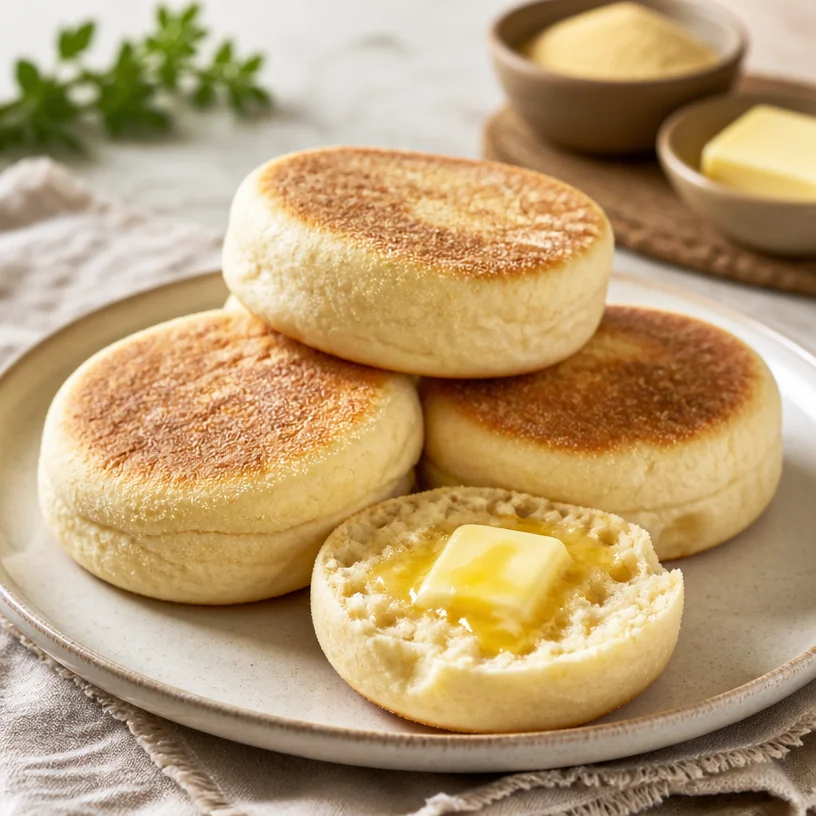
English Muffins
Welcome to Homemade English Muffins: A Culinary Adventure
Nothing quite matches the satisfaction of biting into a warm, toasty English muffin. The satisfying crunch on the outside gives way to a soft, pillowy interior with those signature nooks and crannies just waiting to be filled with butter, jam, or your favorite spread. Welcome back to Clean Plate Cravings, everyone! Today, we’re diving into a recipe that’s close to my heart—homemade English muffins. You may have seen them in the bakery aisle, but believe me when I say that making them from scratch is a rewarding experience that’s both fun and delicious.
Now, before you shrug off making English muffins as something only a fancy baker can do, let me assure you: this recipe is as approachable as it gets! With a handful of simple ingredients and a little love, you can whip up fluffy, mouthwatering muffins that will make your breakfast game soar! As we embark on this culinary journey together, I can’t wait to share a personal story, detailed instructions, and helpful tips to ensure your muffin adventure is a resounding success. Grab your apron and let’s get started!
A Slice of Nostalgia
Growing up, Saturday mornings in my house always came with a delicious aroma wafting through the air. My mother didn’t just reserve the weekend for pancakes or waffles; she took pride in crafting her own English muffins. I remember waking up to the sound of sizzling butter in a pan, the joy of watching her flip those golden rounds, and the magic that happened as she split them open, revealing the fluffy insides that were just perfect for slathering with creamy butter and homemade strawberry jam.
It wasn’t just about the muffins; those mornings were a ritual we shared—the kind where laughter, scents, and good food intertwined, creating a family bond stronger than any recipe. Now, as I stand in my kitchen, proudly carrying on this tradition, I wish to pass on that love and those memories to you. Making these English muffins isn’t just about the food; it’s about creating moments that you can savor and share with your loved ones!
Ingredients
Here’s what you’ll need for these delightful English muffins:
-
4 cups all-purpose flour
The backbone of our muffins, all-purpose flour provides the right texture and structure. You can substitute it with whole wheat flour, but keep in mind the texture may be denser and nuttier. -
2 tsp active dry yeast
This little powerhouse ferments and makes your muffins rise! If you have instant yeast, you can use that, but there’s no need to activate it in warm water; just mix it into the flour. -
1 cup whole milk (warm, 105-115 degrees)
Warm milk contributes moisture and flavor to our muffins. If you’re dairy-free, feel free to use almond or oat milk, just ensure it’s warm! -
1/2 cup water (warm, 105-115 degrees)
This will help keep the dough well-hydrated. Alternatively, you can replace some of the water with more milk to amp up the creaminess! -
2 tbsp shortening (melted)
This helps keep the muffins soft. If you prefer a more natural fat source, use oil or melted coconut oil instead. -
2 tbsp butter (melted)
Who doesn’t love butter? It adds flavor and richness to the muffins. For a dairy-free version, stick with the coconut oil swap. -
1 tsp salt
Elevating all the flavors! Kosher salt works fine if that’s what you have. -
1 tbsp sugar
Just a touch of sweetness to help balance the flavors and feed the yeast. You can also use honey or maple syrup for a different twist. -
2 tbsp cornmeal
This is for sprinkling on the baking sheet to prevent sticking, but it also adds a delightful texture. If you don’t have cornmeal, semolina flour works wonderfully, too.
Step-by-Step Instructions
Let’s roll up those sleeves and get cooking! Here’s how to make perfectly fluffy English muffins:
-
Activate the yeast: In a small bowl, dissolve the active dry yeast and sugar in warm water. Let it sit for about 5 to 10 minutes until it becomes frothy. This step ensures your yeast is alive and ready to work its magic.
-
Mix the wet ingredients: In a large mixing bowl, combine the warm milk, melted shortening, and melted butter. Add the frothy yeast mixture. Give it a gentle stir to mingle all those delicious flavors.
-
Combine the dry ingredients: In another bowl, whisk together the flour and salt. This will ensure the salt doesn’t directly touch the yeast before they interact positively.
-
Create the dough: Gradually add the dry ingredients to the wet mixture. Use a wooden spoon or spatula to bring it together until a shaggy dough forms. It’s perfectly okay if it looks a little rough at this point; it will come together beautifully!
-
Knead the dough: Transfer the dough to a floured surface and knead for about 8 to 10 minutes until it’s smooth and elastic. Don’t be afraid to put some muscle into it! (Chef hack: If the dough sticks to your hands, a little sprinkle of flour can help!)
-
First rise: Place your kneaded dough in a greased bowl, cover it with a clean kitchen towel, and let it rise in a warm place for about an hour, or until it has doubled in size. This is where the magic happens, so let that yeast work!
-
Shape the muffins: Once your dough has risen, punch it down gently and turn it out onto a floured surface. Roll it out to about 1-inch thickness and use a 3-inch round cutter to cut out your muffins. If you don’t have a cutter, a glass works perfectly!
-
Second rise: Place the rounds on a cornmeal-dusted baking sheet. Cover them lightly with the kitchen towel and let them rise again for about 30 minutes until puffed up.
-
Cook the muffins: Preheat a griddle or heavy skillet over medium heat. Place the muffins on the griddle and cook for about 7 minutes on each side until they’re a beautiful golden brown. Pro tip: Keep the heat low enough so the muffins cook through without burning the outside.
-
Cool and enjoy: Once they’re done cooking, transfer the muffins to a wire rack to cool. You can slice them in half, toast them, and enjoy the nooks and crannies filled with your favorite toppings!
Serving Suggestions
These homemade English muffins aren’t just breakfast; they can be the star of any meal! Serve them warm beside scrambled eggs and crispy bacon for a delicious breakfast plate, or toast them up and top with your favorite jam or avocado for a quick snack. And don’t forget about the classic eggs Benedict—these muffins are practically begging to be used for rich hollandaise sauce and poached eggs!
Recipe Variations
Now that you’re a pro at making classic English muffins, let’s shake things up a bit with some fun variations:
-
Herb & Cheese Muffins: Mix in about ½ cup of shredded cheese and your favorite herbs (like rosemary or oregano) into the dough for a savory spin.
-
Cinnamon Raisin Muffins: Add 2 teaspoons of cinnamon and about 1 cup of raisins to the dough for a sweet breakfast treat. And let’s not forget a touch of maple syrup for extra sweetness!
-
Gluten-Free Muffins: If you’re going gluten-free, substitute the all-purpose flour with a 1:1 gluten-free flour blend. Just be sure to adjust the liquid if necessary, as some blends absorb more moisture.
-
Pumpkin Spice Muffins: Mix in ½ cup of pure pumpkin puree and a teaspoon of pumpkin pie spice for a seasonal twist that screams autumn!
-
Chocolate Chip Muffins: Because who doesn’t love a little chocolate? Fold in a cup of chocolate chips for a decadently sweet treat that’s perfect for breakfast or dessert.
Chef’s Notes
I’ll be honest—these homemade English muffins marked a turning point in my journey as a home cook. My first attempt was a hot mess (literally; the dough stuck to everything!). It wasn’t until I learned to keep a light hand with the flour and not rush the rising process that they finally turned out beautifully. Don’t be discouraged by any hiccups along the way, as every time I make these muffins, I learn a little more about my craft. Enjoy the process, and most importantly, have fun in the kitchen!
FAQs and Troubleshooting
1. My muffins didn’t rise. What went wrong?
Sometimes, the yeast may not be active, possibly due to expired yeast or water that’s either too hot or too cold. Always check the expiration date, and remember to keep your water within the 105-115 degree range—too hot can kill the yeast!
2. Why do my muffins have a hard surface?
This usually occurs if the heat is too high while cooking. A low, steady heat allows the muffins to cook evenly and maintain their soft texture.
3. Can I freeze the muffins?
Absolutely! Cool the muffins completely, then place them in a freezer-safe bag and freeze for up to three months. To enjoy, simply toast them right from the freezer or let them thaw overnight.
4. How do I know when my muffins are done?
They should be golden brown on the outside, and when you tap the bottom, it should sound hollow. If you have a thermometer, aim for around 200 degrees Fahrenheit.
Nutritional Info
(For 1 muffin, not including toppings)
- Calories: 180
- Total Fat: 6g
- Saturated Fat: 3.5g
- Cholesterol: 15mg
- Sodium: 180mg
- Total Carbohydrates: 29g
- Dietary Fiber: 1g
- Sugars: 1g
- Protein: 5g
There you have it, my friends! Now you’re ready to storm the kitchen and make these delightful homemade English muffins. Whether it’s a leisurely weekend breakfast or a treat to share, the warmth, love, and flavor baked into each muffin will surely make them a top choice for any meal of the day. Enjoy, and let your cooking journey continue!
PrintHomemade English Muffins

Experience the joy of making warm, fluffy English muffins from scratch that are perfect for breakfast or any meal.
- Prep Time: 15 minutes
- Cook Time: 30 minutes
- Total Time: 45 minutes
- Yield: 12 servings 1x
- Category: Breakfast
- Method: Griddling
- Cuisine: British
- Diet: Vegetarian
Ingredients
- 4 cups all-purpose flour
- 2 tsp active dry yeast
- 1 cup whole milk (warm, 105–115 degrees)
- 1/2 cup water (warm, 105–115 degrees)
- 2 tbsp shortening (melted)
- 2 tbsp butter (melted)
- 1 tsp salt
- 1 tbsp sugar
- 2 tbsp cornmeal
Instructions
- Activate the yeast: In a small bowl, dissolve the active dry yeast and sugar in warm water. Let it sit for about 5 to 10 minutes until it becomes frothy.
- Mix the wet ingredients: In a large mixing bowl, combine the warm milk, melted shortening, and melted butter. Add the frothy yeast mixture and stir gently.
- Combine the dry ingredients: In another bowl, whisk together the flour and salt.
- Create the dough: Gradually add the dry ingredients to the wet mixture, stirring until a shaggy dough forms.
- Knead the dough: Transfer the dough to a floured surface and knead for about 8 to 10 minutes until smooth and elastic.
- First rise: Place the kneaded dough in a greased bowl, cover with a towel, and let it rise for about an hour until doubled in size.
- Shape the muffins: Roll out the dough to about 1-inch thickness and use a cutter to cut out muffins.
- Second rise: Place the rounds on a cornmeal-dusted baking sheet, cover lightly, and let them rise again for about 30 minutes.
- Cook the muffins: Preheat a griddle over medium heat and cook the muffins for about 7 minutes on each side until golden brown.
- Cool and enjoy: Transfer the muffins to a wire rack to cool before slicing and serving.
Notes
These muffins can be frozen and toasted later. Keep the heat low when cooking to ensure they cook through properly without burning.
Nutrition
- Serving Size: 1 muffin
- Calories: 180
- Sugar: 1g
- Sodium: 180mg
- Fat: 6g
- Saturated Fat: 3.5g
- Unsaturated Fat: 2.5g
- Trans Fat: 0g
- Carbohydrates: 29g
- Fiber: 1g
- Protein: 5g
- Cholesterol: 15mg
Keywords: English muffins, homemade muffins, breakfast recipe
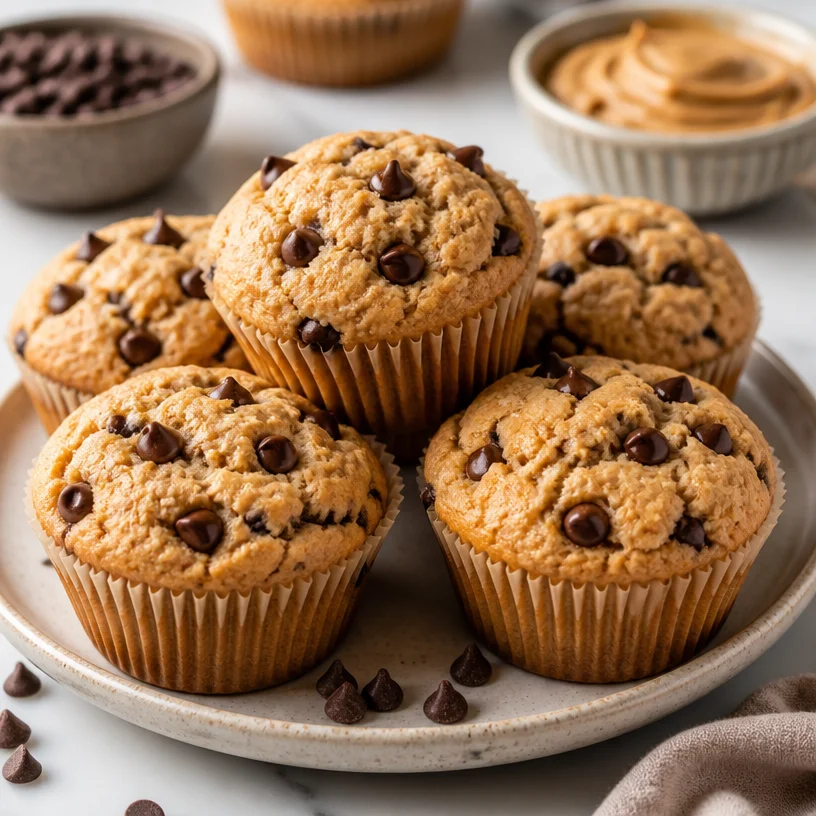
Ingredient Easy Peanut Butter Muffins for Busy Mornings
Peanut Butter Muffins: A Deliciously Nutty Treat to Savor
Welcome, fellow food lovers! If you’ve ever found yourself staring at a crowded pantry, wondering what culinary magic you can create with a few simple ingredients, you’re in for a real treat today. Let’s talk about one of my all-time favorite snacks: peanut butter muffins. These fluffy, nutty delights are bursting with flavor, and I can assure you they’ll quickly become a staple in your kitchen repertoire.
I first stumbled upon a recipe for peanut butter muffins when I was a weekend baker, eager to impress my family with something beyond the usual cookies and brownies. I remember whipping up the batter, not entirely sure how they’d turn out. The sweet, nutty aroma filled the kitchen, wrapping around me like a warm hug. When I pulled those golden-brown muffins out of the oven, I knew I had struck gold. The rich, velvety taste of peanut butter blended perfectly with chocolate chips, and each bite was like a warm embrace, reminding me of cozy afternoons spent with loved ones.
In this blog post, I’m excited to guide you through my peanut butter muffin recipe. You’ll find that it’s as simple as it is delicious. So, grab your apron, and let’s embark on this scrumptious adventure together!
A Trip Down Memory Lane
As a child, my afternoons were often filled with the delightful aroma of cookies baking in the oven, thanks to my lovely mom. She had a knack for transforming everyday ingredients into incredible treats that brought the family together. One memorable day, while searching through the cupboards for the usual chocolate chip cookies, I came across a forgotten jar of peanut butter. Inspired by the idea of something new, I decided to mix things up.
With my mom’s guiding hand, we began experimenting with peanut butter, flour, and a few other pantry staples. The muffins that emerged from that endeavor were an instant hit! They were softer and more indulgent than any cookie I had previously tasted. Each muffin was like a mini celebration of childhood, infused with memories of laughter, shared stories, and, of course, delicious flavors. That day, I learned that sometimes the best recipes come from a mix of spontaneity and love. It’s a lesson I carry with me every time I step into the kitchen, especially when making these irresistible peanut butter muffins.
Ingredients: What You’ll Need
Let’s dive into the ingredients you’ll need to create these delectable peanut butter muffins. Each ingredient plays a crucial role in crafting the perfect texture and flavor. Here’s what we’re using:
-
1 cup peanut butter: The star of the show! Go with creamy for a smooth texture or crunchy for added dimension. If you’re feeling adventurous, almond butter works as a tasty swap!
-
1 cup sugar: This sweetens the muffins. You can use granulated sugar, but feel free to experiment with brown sugar for a deeper flavor or coconut sugar for a healthier alternative.
-
2 eggs: These bind everything together and help the muffins rise. For a vegan version, try flax eggs (1 tablespoon ground flaxseed mixed with 2.5 tablespoons water equals 1 egg).
-
1 teaspoon vanilla extract: This adds a lovely depth of flavor. Use pure vanilla extract for the best taste, but imitation works in a pinch.
-
1 teaspoon baking soda: This is our leavening agent, giving the muffins their beautiful dome shape. Make sure it’s fresh—old baking soda can result in dense muffins.
-
1/2 teaspoon salt: A pinch of salt accentuates the sweetness and rounds out the flavors. If you’re watching sodium intake, you can reduce it but not eliminate it entirely.
-
1 cup flour: All-purpose flour works best for a nice rise, but substitute it with whole wheat flour for a heartier muffin or gluten-free flour if needed.
-
1 cup chocolate chips: Because chocolate makes everything better! Semi-sweet, dark, or even white chocolate chips can all be used, depending on your preference.
Step-by-Step Instructions: Let’s Bake!
Now that you have your ingredients ready, it’s time to transform them into something magical. Here’s how to make these incredible peanut butter muffins:
Step 1: Preheat Your Oven
Start by preheating your oven to 350°F (175°C). This will ensure that your muffins bake evenly and get that lovely golden-brown color. Pro tip: Place your oven rack in the center to achieve consistent heat.
Step 2: Prepare Your Muffin Tin
Line a muffin tin with paper liners or spray it lightly with non-stick cooking spray. No one likes a stuck muffin! If you have silicone muffin molds, those work wonders too! They’re easy to clean and often don’t need any grease.
Step 3: Mix the Peanut Butter and Sugar
In a large mixing bowl, combine the peanut butter and sugar. You can use a hand mixer or a wooden spoon—just make sure it’s well blended, creamy, and smooth. This will create the perfect base for your muffins.
Step 4: Add the Eggs and Vanilla
Crack in the two eggs and pour in the vanilla extract. Beat them well into the peanut butter-sugar mixture until it’s light and fluffy. You want to see a little bit of air incorporated here, as that will help with the muffins’ texture.
Step 5: Combine Dry Ingredients
In a separate bowl, whisk together the flour, baking soda, and salt. This step ensures that your leavening agent is evenly distributed throughout the flour, leading to uniform muffins.
Step 6: Bring It All Together
Gradually add the dry mixture to the wet peanut butter mixture, stirring gently until just combined. Be careful not to overmix! Muffins thrive on a light touch. A few lumps are perfectly fine.
Step 7: Fold in the Chocolate Chips
Now for the fun part! Gently fold in the chocolate chips. This is where those little bursts of chocolate decadence will shine through. If you can’t get enough chocolate goodness, feel free to add a bit more!
Step 8: Scoop It In
Using a spoon or a cookie scoop, evenly distribute the batter among the muffin cups. Fill each cup about 2/3 full to allow for rising without overflowing.
Step 9: Bake ’Em Up
Pop your muffin tin into the preheated oven and let the magic happen. Bake for about 15-18 minutes or until a toothpick inserted in the center comes out clean or with just a few moist crumbs. The smell filling your kitchen at this point will be nothing short of heavenly!
Step 10: Cool and Enjoy!
Once they’re out of the oven, let the muffins cool in the tin for about 5 minutes before transferring them to a wire rack. This helps them maintain that perfect texture. Enjoy them warm or at room temperature, and don’t forget to share with family and friends for some extra love!
Serving Suggestions: How to Present Your Muffins
These peanut butter muffins are fantastic on their own, but a little creativity can elevate your serving experience! Try placing the muffins on a pretty plate or serving them in a rustic basket lined with a cloth. A drizzle of honey or maple syrup on top before serving can bring an extra touch of sweetness, and a side of fresh fruit or yogurt adds freshness. Perfect for brunch or an afternoon snack!
Recipe Variations: Get Creative!
Now let’s mix things up a bit! Here are some creative twists and variations you can try with your peanut butter muffins:
-
Banana Peanut Butter Muffins: Mash a ripe banana and fold it into the batter for a moist, fruity surprise.
-
Oatmeal Peanut Butter Muffins: Add 1/2 cup of rolled oats for added texture and nutrition.
-
Nutty Surprise: Incorporate chopped nuts like walnuts or almonds for extra crunch and flavor.
-
Spiced Delight: Add a teaspoon of cinnamon or even a hint of nutmeg for a spiced muffin that feels festive and cozy.
-
Peanut Butter Cup Variation: Instead of chocolate chips, place a mini peanut butter cup in the center of each muffin before baking for a melty surprise!
Chef’s Notes: A Personal Touch
Cooking, to me, is more than just following a recipe; it’s about sharing and creating memories. These peanut butter muffins have been a beloved staple in my family since my childhood. There was a time when I had a little mishap—I accidentally swapped baking powder for baking soda, leading to a batch of dense, flat muffins. But instead of tossing them, we transformed them into a trifle by layering them with yogurt and berries, and guess what? They became an instant hit as a make-do dessert!
Life in the kitchen is all about embracing little mistakes and making them your own. And each time I whip up these muffins, it’s a reminder that food, along with laughter and good company, nourishes both the body and soul.
FAQs and Troubleshooting: Common Questions Answered
1. Why did my muffins come out too dense?
This can happen if you overmix the batter. Mixing too much develops gluten in the flour, leading to denser muffins. Mixing gently just until ingredients combine is key to keeping them light and fluffy.
2. Can I use natural peanut butter?
Absolutely! Just keep in mind that natural peanut butter tends to be a little runnier. You may need to adjust the flour slightly to get the right batter consistency.
3. How can I store leftover muffins?
Store any leftovers in an airtight container at room temperature for up to 3 days or in the fridge for about a week. You can freeze them as well—just pop them in a zip-top bag after they’ve cooled, and they’ll be good for a couple of months!
4. Can I make these muffins ahead of time?
Definitely! You can make the batter the night before and store it in the fridge, then bake them fresh in the morning. They can also be baked ahead, cooled, and reheated in the microwave for a quick snack or breakfast!
Nutritional Info (if applicable)
While I haven’t included specific nutritional information in this write-up, these peanut butter muffins are packed with protein and healthy fats from the peanut butter, making them a satisfying option. Just keep an eye on the added sugar if you’re monitoring your intake.
There you have it, friends! A delightful journey into the world of peanut butter muffins. I hope these cozy, flavorful treats bring as much joy to your kitchen as they have in mine. Happy baking, and remember: life is too short for boring food!
PrintPeanut Butter Muffins

Deliciously nutty peanut butter muffins that are light, fluffy, and perfect for any time of day.
- Prep Time: 10 minutes
- Cook Time: 18 minutes
- Total Time: 28 minutes
- Yield: 12 muffins 1x
- Category: Snack
- Method: Baking
- Cuisine: American
- Diet: Vegetarian
Ingredients
- 1 cup peanut butter
- 1 cup sugar
- 2 eggs
- 1 teaspoon vanilla extract
- 1 teaspoon baking soda
- 1/2 teaspoon salt
- 1 cup flour
- 1 cup chocolate chips
Instructions
- Preheat your oven to 350°F (175°C).
- Prepare your muffin tin with paper liners or non-stick spray.
- Mix the peanut butter and sugar in a large bowl until creamy and smooth.
- Add the eggs and vanilla, beating until light and fluffy.
- Combine the flour, baking soda, and salt in a separate bowl.
- Bring the dry mixture into the wet batter gradually, stirring gently.
- Fold in the chocolate chips.
- Scoop the batter into the muffin cups, filling about 2/3 full.
- Bake for 15-18 minutes or until a toothpick comes out clean.
- Cool for 5 minutes before transferring to a wire rack.
Notes
For variations, try adding bananas, oats, or nuts. Store in an airtight container for up to 3 days.
Nutrition
- Serving Size: 1 muffin
- Calories: 250
- Sugar: 10g
- Sodium: 200mg
- Fat: 10g
- Saturated Fat: 2g
- Unsaturated Fat: 7g
- Trans Fat: 0g
- Carbohydrates: 30g
- Fiber: 2g
- Protein: 6g
- Cholesterol: 35mg
Keywords: peanut butter, muffins, snacks, baking, easy recipe
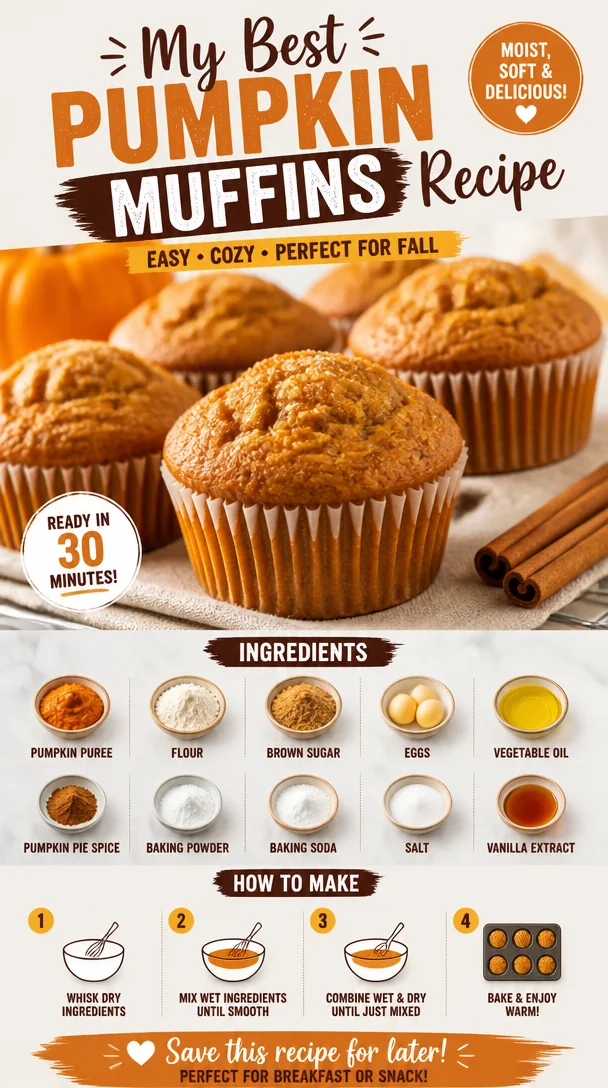
My Best Pumpkin Muffins Recipe
The Ultimate Pumpkin Muffins Recipe: A Fall Favorite
Welcome, fellow food lovers! Today, we’re diving into the cozy, delightful world of pumpkin muffins. Whether you’re in the mood for a warm breakfast treat, an afternoon snack, or a sweet addition to a fall gathering, these muffins are sure to become a staple in your kitchen.
Pumpkin is more than just a seasonal flavor; it’s a delight that brings warmth and happiness to your table. The best pumpkin muffins are moist, fluffy, and bursting with depth of flavor—think cinnamon, nutmeg, and a touch of sweetness. Instead of feeling like a chore, baking these muffins should feel like a soothing ritual that fills your home with fantastic aromas.
So, grab your mixing bowls and preheat that oven! The cozy vibes are about to unfold. And as we go through this recipe together, allow me to share some of my cherished kitchen moments and little tips to ensure your muffin journey is as delightful as the final product. Let’s cook!
A Fond Memory: Pumpkin Muffins and Family
Ah, the smell of pumpkin spice muffins baking in the oven—it’s a scent that instantly takes me back to my childhood kitchen, bustling with activity and warmth. When autumn rolled around, my mom would whip up batches of these delightful muffins, filling our home with an irresistible aroma that hinted at the coming holidays.
I remember gathering with my siblings on cold Saturday mornings, already anticipating the sweet, spicy muffins just out of the oven. With a pat of butter melting into each muffin, we savored every delicious bite, our laughter mingling with the scents of cinnamon and nutmeg.
As I grew older, the tradition continued. Now, I find myself making these muffins with my own family, sharing stories, and passing down the joy of cooking. Baking is cyclical; it connects us across generations. Each muffin batch is a reminder of those warm mornings, filled with love and togetherness. So let’s recreate that magic today!
Ingredients
Here’s what you’ll need to bring your pumpkin muffins to life. Each ingredient plays a pivotal role in building that scrumptious flavor and texture:
-
1 cup pumpkin puree: The star of the show! Look for pure pumpkin puree (not pumpkin pie filling) in the can. You can also make your own by roasting and blending fresh pumpkin. It adds moisture and that signature autumn flavor.
-
½ cup granulated sugar: This sweetener adds essential sweetness. You can swap half for brown sugar for a richer flavor, or use coconut sugar for a healthier alternative.
-
½ cup brown sugar: Brown sugar brings in depth and moisture. If you’re out, you can substitute white sugar mixed with a little molasses.
-
1/3 cup vegetable oil: This keeps the muffins moist. You could use melted coconut oil or unsweetened applesauce for a lighter twist.
-
2 large eggs: Eggs help bind the ingredients together and give structure to our muffins. You can use flax eggs (1 tablespoon ground flaxseed mixed with 2.5 tablespoons water per egg) for a vegan option.
-
1 teaspoon vanilla extract: Adds a lovely aromatic note. Feel free to use fresh vanilla bean for an extra kick.
-
1 ½ cups all-purpose flour: The foundation of the muffins. Whole wheat flour can be used for a heartier texture or a gluten-free blend if needed.
-
1 teaspoon baking soda: This is your rising agent. Always make sure it’s fresh for best results!
-
½ teaspoon baking powder: Another leavening agent, that helps with fluffiness.
-
½ teaspoon salt: Balances out the sweetness.
-
1 teaspoon ground cinnamon: The quintessential autumn spice! You could also add nutmeg, ginger, and cloves for a warm spice blend.
-
½ cup chopped nuts or chocolate chips (optional): For those who love a little crunch or sweetness, add walnuts, pecans, or dark chocolate chips.
Step-by-Step Instructions
Now that we’ve gathered our ingredients, let’s bake those muffins!
-
Preheat your oven to 350°F (175°C): This is crucial for baking. A well-preheated oven ensures the muffins rise beautifully.
-
Prepare your muffin tin: Grease your muffin tin with non-stick spray or line it with paper liners. This makes for easy cleanup, and who doesn’t love that?
-
Mix the wet ingredients: In a large bowl, whisk together the pumpkin puree, granulated sugar, brown sugar, oil, eggs, and vanilla extract until smooth. This is where the magic happens, and you can already start to smell those amazing flavors coming together.
-
Combine the dry ingredients: In another bowl, whisk together the flour, baking soda, baking powder, salt, and ground cinnamon. Mixing these dry ingredients separately ensures they’re evenly distributed throughout the batter—no one wants a mouthful of baking soda!
-
Combine wet and dry ingredients: Gradually add the dry mixture to the wet mixture. Stir gently until just combined—don’t over-mix. It’s okay if there are a few lumps; over-mixing leads to dense muffins, and we want light and fluffy!
-
Fold in nuts or chocolate (optional): If you’re adding nuts or chocolate, gently fold them into the batter now. This is where you can customize your muffins to suit your taste.
-
Fill the muffin tin: Use a cookie scoop or spoon to fill each muffin cup about ¾ full. This allows room for rising.
-
Bake: Pop the muffin tin in the preheated oven and bake for 18-22 minutes, or until a toothpick inserted into the center comes out clean. Keep an eye on them; every oven is a little different!
-
Cool: Once baked, remove the muffins from the oven and allow them to cool in the tin for about 5 minutes before transferring them to a wire rack. This cooling process prevents soggy bottoms and helps retain that perfect texture.
-
Enjoy: Once they’ve cooled (although I’m sure you won’t be able to resist a warm muffin), enjoy them plain or with a spread of your choice.
Serving Suggestions
These pumpkin muffins are perfect for any occasion, but I love serving them warm with a smidge of butter or a smear of cream cheese. If you’re feeling adventurous, drizzle a little honey or maple syrup over the top. For an extra treat, serve with a side of spiced chai or a hot cup of coffee. They also make fantastic gifts—get creative with some pretty packaging and share the love!
Recipe Variations
Want to switch things up? Here are some delicious variations to try:
-
Pumpkin Chocolate Chip Muffins: Stir in ½ cup of mini chocolate chips for a sweet treat that chocolate lovers will adore!
-
Nutty Pumpkin Muffins: Add ½ cup of finely chopped walnuts or pecans for extra crunch and flavor.
-
Spiced Pumpkin Muffins: Mix in ½ teaspoon of ginger, nutmeg, or all-spice for a deeper flavor profile that warms your soul.
-
Vegan Pumpkin Muffins: Substitute eggs with flax eggs and use unsweetened applesauce instead of oil.
-
Gluten-Free Version: Swap all-purpose flour with a gluten-free flour blend—voila, gluten-free pumpkin muffins!
Chef’s Notes
I can’t stress enough how versatile this pumpkin muffin recipe is! It’s a basic template that you can riff on depending on your mood or what’s in your pantry. Some days, I may toss in dried cranberries or even a hint of espresso powder for a little zing.
And speaking of kitchen stories, I once had a baking mishap that still makes me chuckle. I was so eager to eat those muffins that I accidentally dropped the whole mixing bowl onto the floor! After a few expletives (and a bit of cleaning), I regrouped and made a fresh batch. The lesson? Always double-check your grip—and enjoy the baking journey, even if it doesn’t go perfectly!
FAQs and Troubleshooting
-
Why are my muffins dense?
- Over-mixing the batter can lead to density. Mix until just combined for light, fluffy muffins.
-
How do I store leftover muffins?
- Store them in an airtight container at room temperature for up to 2 days, or toss them in the freezer for up to 3 months. Just thaw before eating.
-
Can I use fresh pumpkin instead of canned?
- Absolutely! Roast and puree the pumpkin until smooth. Just make sure there’s not too much water content.
-
Can I freeze the batter for later?
- Yes, you can freeze the muffin batter! Just fill the muffin tray and freeze until solid, then transfer to a freezer bag. When you’re ready to bake, pop the frozen batter into a preheated oven.
Nutritional Info
While each batch of muffins can vary based on ingredient choices, here’s a general idea of the nutrition per muffin (assuming 12 muffins):
- Calories: 180
- Protein: 3g
- Fat: 7g
- Carbohydrates: 29g
- Fiber: 1g
- Sugar: 10g
Keep in mind, these estimates can change based on ingredient substitutions and portion sizes.
Now that you have all the tools to make the perfect pumpkin muffins, I can’t wait to hear about your baking experiences! Enjoy the process, embrace the flavors, and let the warmth of autumn fill your home. Happy baking!
PrintThe Ultimate Pumpkin Muffins

Delightful pumpkin muffins bursting with autumn flavors, perfect for breakfast or as a sweet treat.
- Prep Time: 15 minutes
- Cook Time: 20 minutes
- Total Time: 35 minutes
- Yield: 12 muffins 1x
- Category: Dessert
- Method: Baking
- Cuisine: American
- Diet: Vegetarian
Ingredients
- 1 cup pumpkin puree
- ½ cup granulated sugar
- ½ cup brown sugar
- 1/3 cup vegetable oil
- 2 large eggs
- 1 teaspoon vanilla extract
- 1 ½ cups all-purpose flour
- 1 teaspoon baking soda
- ½ teaspoon baking powder
- ½ teaspoon salt
- 1 teaspoon ground cinnamon
- ½ cup chopped nuts or chocolate chips (optional)
Instructions
- Preheat your oven to 350°F (175°C).
- Prepare your muffin tin by greasing it with non-stick spray or lining it with paper liners.
- Mix the wet ingredients: In a large bowl, whisk together the pumpkin puree, granulated sugar, brown sugar, oil, eggs, and vanilla extract until smooth.
- Combine the dry ingredients: In another bowl, whisk together the flour, baking soda, baking powder, salt, and cinnamon.
- Combine wet and dry ingredients by gradually adding the dry mixture to the wet mixture. Stir gently until just combined.
- Fold in nuts or chocolate if using.
- Fill the muffin tin about ¾ full with the batter.
- Bake for 18-22 minutes, or until a toothpick inserted comes out clean.
- Cool the muffins in the tin for 5 minutes before transferring to a wire rack.
- Enjoy them warm or at room temperature.
Notes
Feel free to customize with different spices, nuts, or chocolate chips according to your preference.
Nutrition
- Serving Size: 1 muffin
- Calories: 180
- Sugar: 10g
- Sodium: 300mg
- Fat: 7g
- Saturated Fat: 1g
- Unsaturated Fat: 5g
- Trans Fat: 0g
- Carbohydrates: 29g
- Fiber: 1g
- Protein: 3g
- Cholesterol: 30mg
Keywords: pumpkin muffins, fall baking, autumn recipes, dessert
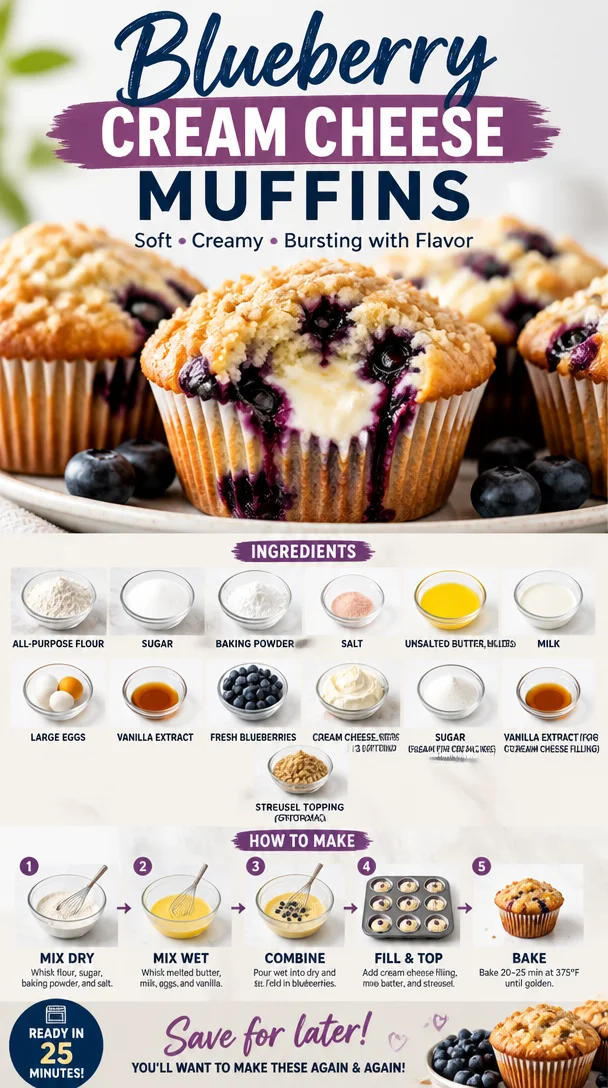
Blueberry Cream Cheese Muffins
Blueberry Cream Cheese Muffins: A Sweet Journey
Welcome, fellow food lovers! Today, I’m thrilled to share a delightful recipe that combines the sweetness of fresh blueberries with the creamy goodness of cream cheese—Blueberry Cream Cheese Muffins! If you’re looking for a dish that’s both comforting and indulgent, yet so easy to whip up, you’re in for a treat. Picture cozy mornings spent savoring warm muffins fresh out of the oven, the aroma wrapping around you like a hug. It’s not just food; it’s a slice of joy!
Blueberry muffins are essentially a breakfast classic, but when you throw cream cheese into the mix, you take things to a whole new level. It’s like the best of both worlds—the soft, airy muffin paired with a rich, tangy filling! Whether you’re gearing up for a busy week ahead or planning a lazy weekend brunch, these muffins are perfect for any occasion.
So, let me take you on a journey back to my childhood where muffins meant love and laughter. Growing up, every Sunday felt like a special holiday in our cozy kitchen. My mom was a self-proclaimed muffin aficionado. With flour dust dancing in the air and the sweet smell of berries filling our home, she’d whip up a batch of muffins like a magician casting a delicious spell. Her signature blueberry muffins were what drew my siblings and me to the kitchen with wide, hungry eyes. But the twist? She always had a little surprise hidden inside: a creamy dollop of cream cheese waiting to be discovered.
There’s something undeniably special about cozy moments in the kitchen, don’t you think? Those memories inspired me to create this recipe, blending a classic blueberry muffin with that nostalgic cream cheese filling. So grab your apron, and let’s embark on this baking adventure together!
Ingredients
Here’s what you’ll need to bring these scrumptious muffins to life:
-
2 cups all-purpose flour
A staple in any muffin-making kitchen! Feel free to swap it for whole wheat flour for a heartier texture or gluten-free flour if you’re avoiding gluten. -
1 cup sugar
Sweetness is key! You can substitute this with coconut sugar or even a sugar alternative like Stevia for a lighter option. -
1 tablespoon baking powder
This magical ingredient helps your muffins rise beautifully. Make sure it’s fresh for the best results! -
1/2 teaspoon salt
Just a pinch to enhance all those lovely flavors. -
1/2 cup unsalted butter, melted
Adds richness and moisture. You can use coconut oil for a dairy-free option or applesauce for a lower-fat version. -
1 cup milk
Whether you go with whole, almond, or oat milk, it’ll help create that tender crumb. Play around with your favorite! -
2 large eggs
Acts as a binding agent—without them, your muffins might crumble. If you’re vegan, try using flax eggs (1 tablespoon ground flaxseed mixed with 2.5 tablespoons water). -
1 teaspoon vanilla extract
A must for that warm, aromatic flavor! Feel free to experiment with almond extract if you’re feeling adventurous. -
1 cup fresh blueberries
These beauties add a burst of flavor and color. Frozen blueberries work too, but toss them in flour before adding to prevent sinking. -
8 ounces cream cheese, softened
The creamy star of the show! For a lighter alternative, consider using ricotta cheese. -
1/4 cup sugar (for cream cheese filling)
Sweetens up that rich cream cheese blend. -
1 teaspoon vanilla extract (for cream cheese filling)
Just a touch to bring the filling to life. -
1/2 cup streusel topping (optional)
For those crunchy muffin tops! Combine flour, sugar, butter, and a pinch of cinnamon for a delightful crumble.
Step-by-Step Instructions
Ready to bake? Let’s get those muffins in the oven!
-
Preheat the Oven
Start by preheating your oven to 350°F (175°C). This ensures an inviting, warm environment for those muffins to rise and crust up perfectly. -
Mix the Dry Ingredients
In a large mixing bowl, whisk together the flour, sugar, baking powder, and salt. Whisking won’t just combine them; it adds air, which contributes to that fluffy texture we crave. Pro tip: sift your flour for the fluffiest results! -
Combine Wet Ingredients
In another bowl, mix the melted butter, milk, eggs, and vanilla extract. Whisk until well combined. The melted butter should cool slightly before adding to avoid scrambling the eggs! -
Incorporate the Blueberries
Gently fold the blueberries into the wet mixture, being careful not to crush them too much. This keeps those beautiful juicy bursts intact! -
Combine Wet and Dry
Create a well in the center of your dry ingredients and pour in the wet mixture. Using a spatula, fold gently until just combined. A few lumps are okay; overmixing can lead to dense muffins! Here’s a fun chef hack: use a rubber spatula to "cut" through the batter, folding as you go for an even mix. -
Prepare Cream Cheese Filling
While your batter rests, mix the softened cream cheese, sugar, and vanilla extract in a separate bowl. Beat until smooth and creamy. If it’s too thick, add a splash of milk until it’s spreadable. -
Fill the Muffin Tins
Grease your muffin tins or use liners. Fill each muffin cup about one-third of the way with batter. Add a dollop of that delicious cream cheese mixture, followed by more batter to fill the cups about two-thirds full. Leave a little room for rising! -
Add Streusel (Optional)
If you’re using the optional streusel topping, sprinkle it generously on top. This adds a fantastic crunch and makes your muffins look bakery-fresh! -
Bake
Pop these beauties in the oven for 18-20 minutes. Keep a close eye; they’re ready when the tops are golden brown and a toothpick inserted in the center comes out clean. -
Cool and Enjoy
Once baked, remove from the oven and let them cool in the pan for about 5 minutes, then transfer to a wire rack. The aroma wafting through your kitchen will be enough to make anyone’s mouth water. Dig in while they’re warm for that perfect gooey cream cheese moment!
Serving Suggestions
These muffins shine best when served fresh! Plate them up on a pretty platter, dust with powdered sugar for an extra touch, and place a few fresh blueberries on top for that inviting, homey vibe. Pair them with a steaming cup of coffee or a refreshing glass of cold milk for the ultimate treat.
Recipe Variations
Feeling adventurous? Here are a few twists to try with these muffins:
- Lemon Zest: Add a teaspoon of fresh lemon zest to the batter for a bright citrusy flavor!
- Mixed Berries: Swap out the blueberries for raspberries, blackberries, or a mix of berries for a fruity explosion.
- Chocolate Chips: For all the chocoholics out there, toss in 1/2 cup of dark or white chocolate chips for a decadent twist.
- Nutty Addition: Add chopped walnuts or pecans to the batter for a delightful crunch.
- Spice It Up: A dash of cinnamon or nutmeg can add warmth and coziness to your muffins!
Chef’s Notes
These muffins have come a long way from that beloved family recipe. Over the years, I’ve played with the sweetness, swapped in different fruits, and even experimented with gluten-free options. Each batch tells a story of kitchen adventures, laughter, and the joy of sharing good food with friends and family. I can’t help but smile thinking of my little ones’ faces after their first bite—pure bliss!
FAQs and Troubleshooting
-
Why are my muffins dense?
Overmixing can be the culprit! When combining wet and dry ingredients, mix just until incorporated. A few lumps are fine! -
My cream cheese filling wasn’t smooth. What did I do wrong?
Make sure your cream cheese is at room temperature. If it’s too cold, it won’t mix well. Consider beating it a bit longer to achieve that creamy texture. -
How do I store leftovers?
Keep them in an airtight container at room temperature for up to 2 days or refrigerate for up to a week. You can also freeze them for up to three months—just thaw and warm before serving! -
Can I use frozen blueberries?
Absolutely! Use them directly from the freezer, but sprinkle them with a tablespoon of flour to help prevent sinking.
Nutritional Info
While these muffins are a delightful treat, they are meant to be enjoyed in moderation. Each muffin contains approximately:
- Calories: 265
- Total Fat: 12g
- Saturated Fat: 6g
- Cholesterol: 45mg
- Sodium: 190mg
- Total Carbohydrates: 36g
- Dietary Fiber: 1g
- Sugars: 14g
- Protein: 4g
Remember that nutritional values can vary based on ingredient substitutions!
In closing, I hope these Blueberry Cream Cheese Muffins become a beloved part of your kitchen adventures! They embrace everything we love about cooking: sharing, creating, and most importantly, enjoying delicious food. So gather your loved ones, bake a batch (or two), and let the good times roll! Happy baking!
PrintBlueberry Cream Cheese Muffins

Delightful blueberry muffins filled with creamy cream cheese for a comforting breakfast treat.
- Prep Time: 15 minutes
- Cook Time: 20 minutes
- Total Time: 35 minutes
- Yield: 12 servings 1x
- Category: Breakfast
- Method: Baking
- Cuisine: American
- Diet: Vegetarian
Ingredients
- 2 cups all-purpose flour
- 1 cup sugar
- 1 tablespoon baking powder
- 1/2 teaspoon salt
- 1/2 cup unsalted butter, melted
- 1 cup milk
- 2 large eggs
- 1 teaspoon vanilla extract
- 1 cup fresh blueberries
- 8 ounces cream cheese, softened
- 1/4 cup sugar (for cream cheese filling)
- 1 teaspoon vanilla extract (for cream cheese filling)
- 1/2 cup streusel topping (optional)
Instructions
- Preheat the oven to 350°F (175°C).
- Mix the dry ingredients: whisk together flour, sugar, baking powder, and salt.
- Combine the wet ingredients: mix the melted butter, milk, eggs, and vanilla extract.
- Incorporate the blueberries into the wet mixture carefully.
- Combine the wet and dry mixtures, folding gently.
- Prepare the cream cheese filling by mixing cream cheese, sugar, and vanilla.
- Fill muffin tins with batter, add cream cheese filling, and top with more batter.
- Add streusel topping if desired.
- Bake for 18-20 minutes until golden brown.
- Cool for 5 minutes before transferring to a wire rack.
Notes
For a lighter alternative, consider using ricotta cheese. Store in an airtight container.
Nutrition
- Serving Size: 1 muffin
- Calories: 265
- Sugar: 14g
- Sodium: 190mg
- Fat: 12g
- Saturated Fat: 6g
- Unsaturated Fat: 6g
- Trans Fat: 0g
- Carbohydrates: 36g
- Fiber: 1g
- Protein: 4g
- Cholesterol: 45mg
Keywords: blueberry, muffins, cream cheese, breakfast, baking
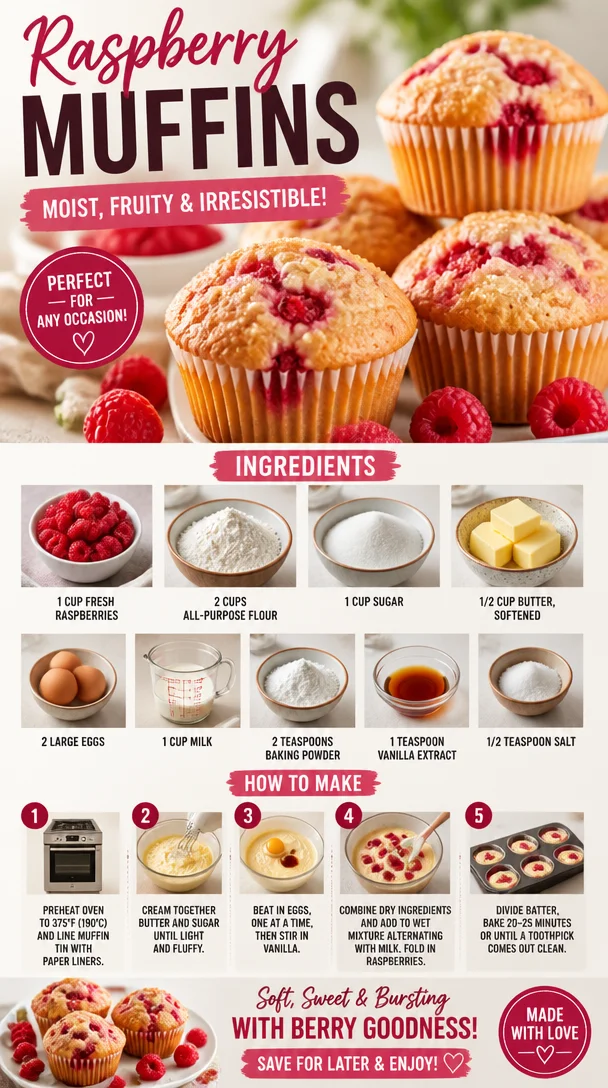
Raspberry Muffins
Whip Up Some Joy: The Ultimate Raspberry Muffins Recipe
Welcome, fellow foodies! I’m Ava Carter, and today, we’re diving into one of my absolute favorite treats—the mouthwatering, tantalizing Raspberry Muffins. If you’re searching for a recipe that’s packed with flavor, isn’t overly complicated, and brings a little sunshine into your kitchen, you’ve just hit the jackpot!
Picture this: a basket of golden-brown muffins, just out of the oven, bursting with bright, juicy raspberries that are begging to be devoured. The first bite reveals a perfectly moist crumb, a balance of sweetness from the sugar, and a slight tang from the raspberries. Pair these beauties with a steaming cup of coffee or tea, and you’ve got the ultimate breakfast or snack. Trust me; these muffins are not just food—they’re a hug in a muffin cup!
Let me take you on a little journey while we explore the magic of Raspberry Muffins. For me, baking has always been about connections—sharing laughter, stories, and those unforgettable moments. This particular recipe harks back to my childhood. I remember standing in my grandma’s cozy kitchen, surrounded by the warmth of freshly baked goods, with the sweet, slightly tart aroma of raspberries wafting through the air. We would pick ripe raspberries in her garden, their vibrant color and luscious taste inspiring us to create all sorts of yummy treats.
Those raspberry muffins were a staple in her house, and every bite brought with it a flood of memories. I still channel those same feelings every time I whip up a batch. Whether it’s for breakfast on a lazy Sunday or to impress a group of friends, these muffins never fail to bring a smile to my face.
Ingredients: Fresh and Fabulous
Here’s what you’ll need to create these delightful Raspberry Muffins:
-
1 cup fresh raspberries
This is the star of the show! Fresh raspberries provide a burst of flavor and color. If fresh ones are unavailable, you can substitute with frozen raspberries—just make sure to thaw and drain them first to avoid excess moisture. -
2 cups all-purpose flour
The backbone of your muffins, all-purpose flour gives them structure. For a healthier twist, you can experiment with whole wheat flour or gluten-free flour blends. -
1 cup sugar
Sweetness is key! You can adjust this to your taste, or use coconut sugar for a more wholesome option. -
1/2 cup butter, softened
Butter keeps your muffins moist and adds richness. You can also use coconut oil or a plant-based butter for a dairy-free alternative. -
2 large eggs
Eggs provide moisture and help bind the ingredients together. For a vegan option, try flax eggs (1 tablespoon ground flaxseed + 2.5 tablespoons water per egg, mixed and let sit for a few minutes). -
1 cup milk
Milk adds a tender crumb. You can use almond milk, oat milk, or any other plant-based milk if you prefer a dairy-free option. -
2 teaspoons baking powder
This little powerhouse is essential for making your muffins rise and develop that lovely texture. -
1 teaspoon vanilla extract
Vanilla adds a touch of warmth and enhances the overall flavor. If you’re feeling adventurous, you can experiment with other extracts like almond or lemon. -
1/2 teaspoon salt
A pinch of salt balances the sweetness and rounds out the flavors.
Let’s make magic happen!
Step-by-Step Instructions: Your Guide to Muffin Mastery
Now that we have our ingredients ready, let’s get baking! Follow these steps, and I promise you’ll have a kitchen full of beautiful Raspberry Muffins in no time.
Step 1: Preheat the Oven
Preheat your oven to 375°F (190°C). This step is crucial for achieving that perfect, fluffy texture. While the oven is heating up, you can prepare your muffin tins.
Step 2: Prepare Your Muffin Tins
Grease a 12-cup muffin tin with cooking spray or line it with muffin liners. This little step helps your muffins release easily and makes cleanup a breeze!
Step 3: Mix the Dry Ingredients
In a large bowl, whisk together the flour, sugar, baking powder, and salt until well combined. This helps aerate the flour, ensuring your muffins will be light and fluffy.
Step 4: Cream the Butter and Sugar
In another bowl, you’ll want to cream together the softened butter and the remaining sugar until the mixture is light and fluffy. This usually takes about 3-5 minutes. Creaming helps to incorporate air, making your muffins lighter.
Step 5: Add the Eggs and Vanilla
Beat in the eggs, one at a time, along with the vanilla extract. Make sure everything is mixed well, so the batter comes together beautifully. Don’t skip the vanilla—it elevates the flavor!
Step 6: Combine Wet and Dry
Now, slowly add the dry mixture to your wet ingredients, alternating with the milk. You want to start and end with the dry ingredients (dry-wet-dry). Doing this helps create a smooth, cohesive batter without over-mixing, which can lead to tough muffins. Gently fold in those gorgeous raspberries, being careful not to break them too much.
Step 7: Fill the Muffin Tins
Spoon the batter into the prepared muffin tins, filling each cup about two-thirds full. This leaves room for the muffins to rise without overflowing.
Step 8: Bake, Bake, Bake!
Pop those muffin tins into the oven and bake for 18-20 minutes, or until the tops are a beautiful golden brown and a toothpick inserted into the center comes out clean.
Step 9: Cool and Enjoy
Once baked, remove the muffins from the oven and let them cool in the tin for about 5 minutes before transferring them to a wire rack to cool completely. The waiting is the hardest part, I know—your kitchen will smell divine!
Serving Suggestions: Muffin Masterpieces
To serve these Raspberry Muffins, feel free to drizzle a touch of honey or maple syrup on top for extra sweetness. A dollop of yogurt alongside makes a perfect pairing. If you want, grab a plate, stack a few muffins, and sprinkle some extra raspberries around. It adds a lovely touch of color and makes for an enticing presentation!
Recipe Variations: Get Creative!
These muffins are incredibly versatile—here are some fun ideas to switch things up:
-
Lemon Zest: Incorporate the zest of one lemon into the batter for a fresh citrus twist that pairs beautifully with the raspberries.
-
Almonds: Add chopped almonds to the mix for crunch and a lovely nutty flavor.
-
Chocolate Chips: Toss in some dark chocolate chips for a decadent treat that’s hard to resist.
-
Oat Topping: Sprinkle some oats with a drizzle of honey on top before baking for an extra chewy layer.
-
Veggies: Feel free to toss in grated carrots or zucchini for added moisture and flavor—who knew muffins could be healthy and breakfast-y?
Chef’s Notes: A Dash of Nostalgia
As I mentioned earlier, this recipe comes from my cherished childhood memories. Each batch takes me back to my grandma’s kitchen, a haven of laughter, love, and, of course, delicious food. Over the years, I’ve tweaked this recipe a bit—experimenting with different fruits and flavors, but the classic Raspberry Muffins always remain a favorite in my household.
I once made these muffins for a brunch gathering, and they disappeared in no time! The best compliment I received was from a friend who said they tasted just like nostalgia with a hint of summer—a mix of warmth and the tantalizing sweetness of fresh raspberries.
FAQs and Troubleshooting
Q: My muffins came out dense. What happened?
A: It’s likely that the batter was over-mixed. When combining the wet and dry ingredients, mix just until combined!
Q: Can I use frozen raspberries?
A: Absolutely! Just be sure to thaw and drain them first to avoid excess moisture in your batter. You can also fold them in gently to avoid a blueberry effect!
Q: How can I store these muffins?
A: Store in an airtight container at room temperature for up to 3 days, or in the fridge for up to a week. You can also freeze them for a longer shelf life—just make sure they’re sealed tightly!
Q: What if I don’t have milk?
A: You can substitute with yogurt, sour cream, or a plant-based milk for a dairy-free version!
Nutritional Info (Optional)
This recipe yields about 12 muffins, and here’s an estimated calorie breakdown for one muffin:
- Calories: 200
- Total Fat: 8g
- Saturated Fat: 5g
- Carbohydrates: 28g
- Sugar: 12g
- Protein: 3g
Keep in mind that these values can vary based on specific ingredients and portion sizes.
The thing about these Raspberry Muffins is that they are more than just a recipe. They’re a way to share love, a little slice of nostalgia, and a delicious treat to brighten up any day. I hope you make a batch, enjoy every crumb, and maybe even create your own fond memories in the kitchen! Happy baking!
PrintRaspberry Muffins

Deliciously moist Raspberry Muffins bursting with fresh raspberries, perfect for breakfast or a snack.
- Prep Time: 15 minutes
- Cook Time: 20 minutes
- Total Time: 35 minutes
- Yield: 12 muffins 1x
- Category: Breakfast
- Method: Baking
- Cuisine: American
- Diet: Vegetarian
Ingredients
- 1 cup fresh raspberries
- 2 cups all-purpose flour
- 1 cup sugar
- 1/2 cup butter, softened
- 2 large eggs
- 1 cup milk
- 2 teaspoons baking powder
- 1 teaspoon vanilla extract
- 1/2 teaspoon salt
Instructions
- Preheat your oven to 375°F (190°C).
- Prepare a 12-cup muffin tin by greasing it or lining it with liners.
- Mix the flour, sugar, baking powder, and salt in a large bowl.
- Cream together the softened butter and sugar until light and fluffy.
- Add the eggs one at a time, along with the vanilla extract, mixing well.
- Combine the dry mixture with the wet ingredients, alternating with the milk.
- Fold in the raspberries gently.
- Fill the muffin tins about two-thirds full with the batter.
- Bake for 18-20 minutes or until golden brown and a toothpick comes out clean.
- Cool in the tin for 5 minutes, then transfer to a wire rack to cool completely.
Notes
Feel free to add lemon zest, almonds, or chocolate chips for variations. These muffins are best enjoyed fresh but can be stored in an airtight container.
Nutrition
- Serving Size: 1 muffin
- Calories: 200
- Sugar: 12g
- Sodium: 200mg
- Fat: 8g
- Saturated Fat: 5g
- Unsaturated Fat: 2g
- Trans Fat: 0g
- Carbohydrates: 28g
- Fiber: 1g
- Protein: 3g
- Cholesterol: 30mg
Keywords: Raspberry, Muffins, Breakfast, Baking, Snack
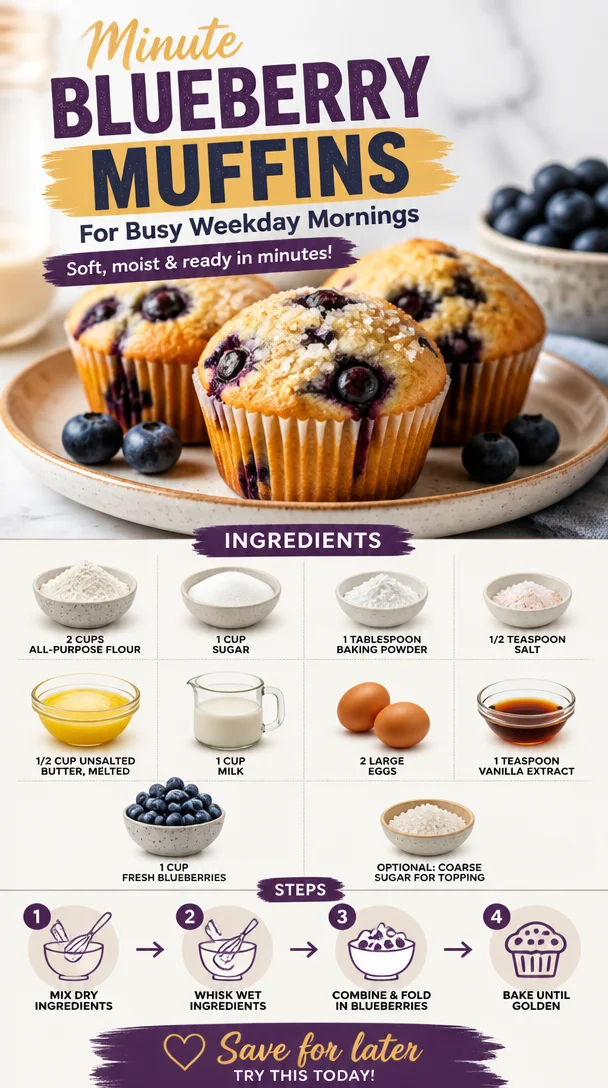
Minute Blueberry Muffins for Busy Weekday Mornings
The Best Blueberry Muffins: A Sweet Journey
Welcome to my cozy kitchen, where the air is always fragrant with the wonderful scent of baked goodies. If there’s one thing that brings joy and comfort like nothing else, it’s the irresistible aroma of freshly baked blueberry muffins wafting through the house. These muffins are not just a breakfast staple; they are a warm hug in the form of baked goods. Throughout the years, they’ve become a beloved treat for family gatherings, lazy Sunday mornings, and even surprise brunches. Today, I’m thrilled to share my foolproof recipe for the best blueberry muffins that are guaranteed to make your taste buds sing!
You might be wondering, what makes these blueberry muffins so special? Well, not only are they fluffy, moist, and bursting with juicy berries, but they also come together quickly and easily—perfect for those busy mornings or impromptu baking sessions. Oh, and did I mention they’re endlessly customizable? You could keep the classic vibe with just blueberries or mix it up with spices and zests. Whatever you choose, you’re in for a treat!
Now, let’s dive into this delicious journey and whip up a batch of blueberry bliss. But before we start mixing, allow me to share a little personal story about my love for these muffins.
A Trip Down Memory Lane
Growing up, my weekends were often filled with the comforting ritual of baking with my grandmother, a true kitchen queen. One of my fondest memories was the day we decided to whip up blueberry muffins from scratch because we had just come back from a berry-picking adventure. We had buckets overflowing with fresh, succulent blueberries, and she thought, “Why not turn these into something delicious?”
With flour dusting the countertops and berry juice streaked across our aprons, we mixed, poured, and baked—but not without her many anecdotes about the “secret ingredient” in her famous muffins: love. I remember that day vividly; the muffins rose beautifully in the oven, and when they finally cooled enough to taste, we couldn’t wait. As we sunk our teeth into the warm, fluffy treasures, the blend of sweetness and tartness exploded in my mouth—it was pure heaven.
Ever since that day, blueberry muffins have held a special place in my heart. They remind me of family, creativity, and the simple joy of baking together. Today, I’m excited to share that joy with you because I believe everyone should experience the magic of these delightful muffins!
Ingredients
Let’s gather our ingredients, shall we? Here’s what you’ll need to bake these scrumptious blueberry muffins:
-
2 cups all-purpose flour: The foundation of our muffins. For a lighter muffin, you could swap in half of the all-purpose flour for whole wheat flour, or even a gluten-free blend if you’re accommodating dietary restrictions.
-
1 cup sugar: This adds sweetness but can easily be adjusted to your taste. Feel free to cut it down to ¾ cup for a less sweet muffin or use coconut sugar for a more wholesome option.
-
1 tablespoon baking powder: Our trusty leavening agent. Be sure it’s fresh for maximum rise; an easy way to check is to drop a bit in warm water and see if it bubbles.
-
½ teaspoon salt: Balances the sweetness and enhances flavor. If you’re watching your sodium intake, you can reduce it to ¼ teaspoon without losing too much flavor.
-
½ cup unsalted butter, melted: Adds richness and moisture. You can substitute with coconut oil for a dairy-free version, or applesauce for a lighter option!
-
1 cup milk: Provides moisture. You can easily switch to almond milk, oat milk, or any other non-dairy milk if you’re vegan or lactose intolerant.
-
2 large eggs: Helps bind everything together. If you’re looking for a vegan option, you can replace each egg with ¼ cup of unsweetened applesauce or 1 tablespoon of ground flaxseed mixed with 2.5 tablespoons of water (let it sit for a few minutes to thicken).
-
1 teaspoon vanilla extract: For an aromatic twist. Feel free to experiment with almond extract or even a bit of citrus zest for an added pop of flavor!
-
1 cup fresh blueberries: The stars of the show! While fresh is best, you can use frozen blueberries if that’s what you have on hand. Just make sure to toss them in a little flour to prevent them from sinking.
-
Optional: coarse sugar for topping: For that bakery-style finish. If you’re feeling extra fancy, a sprinkle of cinnamon alongside the coarse sugar can be delightful!
By keeping these ingredients handy, you’re well on your way to muffin heaven!
Step-by-Step Instructions
Alright, let’s get to the fun part: baking! Follow these step-by-step instructions, and you’ll have a batch of warm blueberry muffins ready in no time.
-
Preheat your oven: First things first, preheat your oven to 375°F (190°C). This ensures a perfect bake from the start. Don’t forget to line your muffin tin with paper liners or grease them if you prefer a more rustic, crumbly muffin.
-
Mix the dry ingredients: In a large mixing bowl, whisk together the flour, sugar, baking powder, and salt. Make sure there are no lumps in the flour. This is crucial for the proper rise and fluffy texture of your muffins.
-
Combine the wet ingredients: In another bowl, whisk the melted butter, milk, eggs, and vanilla extract until everything is blended nicely. Just as my grandma used to say, the secret to moist muffins is combining wet and dry ingredients well but not overmixing.
-
Combine wet and dry: Pour the wet ingredients into the dry ingredients. With a rubber spatula, gently fold them together until just combined. It’s okay if there are a few lumps! Overmixing can lead to dense muffins, and we want fluffy goodness.
-
Add the blueberries: Carefully fold in the blueberries until evenly distributed. Pro tip: You can toss them lightly in flour before this step. It helps them stay suspended in the batter rather than sinking to the bottom!
-
Fill the muffin tins: Scoop the batter into the prepared muffin tins, filling each cup about two-thirds full. This allows room for rising without overflowing. For that bakery-touch, sprinkle a bit of coarse sugar on top of each muffin.
-
Bake: Place your muffin tin in the preheated oven and bake for 18-22 minutes or until a toothpick inserted in the center comes out clean. You might experience the heavenly aroma wafting through your house during this time—it’s absolutely worth the wait!
-
Cool and enjoy: Once baked, remove the muffins from the oven and allow them to cool in the tin for a few minutes. Transfer them to a wire rack to cool completely or dive in while they’re still warm, like I usually do!
Serving Suggestions
Now that your muffins are beautifully golden and fragrant, how do you serve them? They’re delightful on their own, fresh out of the oven, or spread with a touch of butter or cream cheese for some extra indulgence. These muffins shine at breakfast but can also be enjoyed as a delicious snack or dessert. Pair them with a hot cup of coffee or a glass of cold milk, and you’ve got an exquisite treat that works any time of the day!
Recipe Variations
The beauty of blueberry muffins lies in their adaptability! Here are a few creative twists you can consider:
-
Lemon Blueberry Muffins: Add the zest of one lemon and a tablespoon of lemon juice to the batter for a refreshing zing.
-
Nutty Muffins: Mix in chopped walnuts or pecans for added crunch and nutrition. They pair wonderfully with the blueberries!
-
Double Berry Swirl: Combine blueberries with raspberries or strawberries for a mixed berry surprise. Just adjust the amount to balance the flavors.
-
Chocolate Chip Blueberry Muffins: Because chocolate makes everything better! Fold in a half cup of chocolate chips along with the blueberries for a decadent touch.
-
Vegan Blueberry Muffins: Simply substitute the eggs and milk with plant-based options, and you’ve got a delightful vegan version that everyone will love!
Chef’s Notes
These blueberry muffins have traveled with me through various stages of life—from that cherished kitchen with my grandmother to my cozy apartment filled with the sound of excited friends and family as they devour them. Over time, I’ve tweaked the recipe a bit, sometimes experimenting with different fillings or spices. What remains constant is the joyous reaction they evoke in everyone who tastes them.
You may even find me making these muffins with my little ones, creating new memories just as my grandmother did with me. And it never fails—there’s always flour on their cheeks and grins on their faces!
FAQs and Troubleshooting
Q: Why are my muffins dense?
A: Dense muffins usually result from overmixing your batter or not adding enough leavening agent. Ensure you mix until just combined and check that your baking powder is fresh!
Q: How do I prevent my blueberries from sinking to the bottom?
A: Tossing the berries in a little flour before adding them to the batter helps. This creates a barrier that keeps them suspended in the muffin while baking.
Q: Can I make these muffins ahead of time?
A: Absolutely! These muffins store well in an airtight container at room temperature for up to three days. You can also freeze them for up to three months. Simply reheat in the oven or microwave when you’re ready to enjoy!
Q: How can I ensure my muffins are perfectly baked?
A: Stick a toothpick in the center of a muffin; if it comes out clean or with just a few crumbs, they’re done! Avoid opening the oven door too often, as that can cause temperature fluctuations.
Nutritional Info
While exact nutritional values can vary based on your ingredient choices and portion sizes, here’s a rough estimate per muffin (assuming 12 muffins):
- Calories: 200
- Protein: 3g
- Carbohydrates: 28g
- Fat: 9g
Note: Adjust ingredients for a healthier option, like substituting less sugar or butter, to lighten up your muffins without sacrificing flavor!
Now it’s time for you to grab those ingredients and start baking! I can’t wait to hear how your blueberry muffins turn out. Happy baking!
PrintThe Best Blueberry Muffins

Fluffy, moist blueberry muffins bursting with juicy berries, perfect for breakfast or a snack.
- Prep Time: 15 minutes
- Cook Time: 22 minutes
- Total Time: 37 minutes
- Yield: 12 servings 1x
- Category: Breakfast
- Method: Baking
- Cuisine: American
- Diet: Vegetarian
Ingredients
- 2 cups all-purpose flour
- 1 cup sugar
- 1 tablespoon baking powder
- ½ teaspoon salt
- ½ cup unsalted butter, melted
- 1 cup milk
- 2 large eggs
- 1 teaspoon vanilla extract
- 1 cup fresh blueberries
- Optional: coarse sugar for topping
Instructions
- Preheat your oven to 375°F (190°C) and line muffin tin with paper liners.
- Mix the dry ingredients: In a bowl, whisk together flour, sugar, baking powder, and salt.
- Combine the wet ingredients: In another bowl, whisk melted butter, milk, eggs, and vanilla extract.
- Combine the wet and dry ingredients until just combined.
- Add the blueberries and fold them in gently.
- Fill the muffin tins about two-thirds full and sprinkle with coarse sugar if desired.
- Bake for 18-22 minutes or until a toothpick comes out clean.
- Cool the muffins for a few minutes before transferring to a wire rack.
Notes
These muffins can be customized with spices, zests, or other berries.
Nutrition
- Serving Size: 1 muffin
- Calories: 200
- Sugar: 10g
- Sodium: 180mg
- Fat: 9g
- Saturated Fat: 5g
- Unsaturated Fat: 4g
- Trans Fat: 0g
- Carbohydrates: 28g
- Fiber: 1g
- Protein: 3g
- Cholesterol: 40mg
Keywords: blueberry muffins, breakfast, baked goods