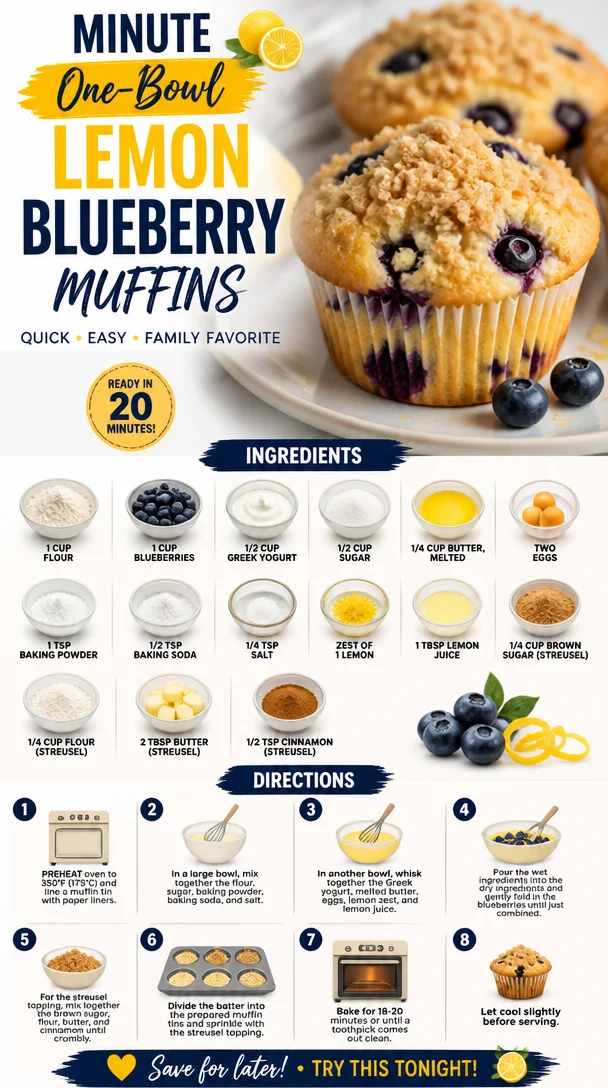
Minute One-Bowl Lemon Blueberry Muffins
Delightful Lemon Blueberry Muffins: A Perfect Morning Pick-Me-Up
Hey there, fellow food lovers! Today, I’m excited to share a special recipe that is sure to brighten your mornings and tantalize your taste buds—Lemon Blueberry Muffins. These aren’t just any muffins; they are a burst of sunshine with each bite, combining the zesty brightness of lemons and the sweet juiciness of blueberries. Trust me; these little guys have a way of making even the rainiest mornings feel like a sunny day.
Now, I know what you’re thinking. Muffins can be boring, right? Well, not these! They are fluffy, moist, and packed with flavors that make them anything but typical. Whether you are busy rushing off to work or simply enjoying a slow weekend breakfast, these muffins are both quick to make and delightful to eat.
A Wholesome Muffin Memory
Let me take you back to when I was a kid. My Grandma Rose had the most enchanting little cottage garden nestled behind her house. Every summer, she would invite me over for afternoon tea, and those dates have become some of my sweetest childhood memories. The best part? We’d whip up a batch of her famous lemon blueberry muffins together.
I remember standing on a stool, my tiny hands covered in flour as we measured ingredients into a big mixing bowl. The house would fill up with that heavenly aroma of lemon and blueberries, making my mouth water in anticipation. We’d sit on the porch, munching on those warm muffins, and sipping herbal tea while watching the butterflies dance around the garden.
Those afternoons taught me more than just how to bake; they instilled in me a love for merging simple ingredients to create cheerful moments. This legacy carries on with each batch I make today.
Ingredients You’ll Need
Here’s what you need to gather to bring these lemon blueberry muffins to life!
-
1 cup all-purpose flour
This is the backbone of your muffins, providing structure. For a gluten-free option, try using almond or oat flour! -
1 cup fresh blueberries
These little jewels add a sweet pop of flavor. If fresh blueberries aren’t available, frozen ones work just as well—no need to thaw! -
1/2 cup Greek yogurt
This ingredient keeps the muffins moist while adding protein. You can swap it out for sour cream or a dairy-free yogurt if you prefer. -
1/2 cup sugar
A good balance of sweetness is essential. You could use coconut sugar or a sugar substitute like stevia for a healthier option. -
1/4 cup butter, melted
Butter adds richness and flavor to the muffins. If you’re looking for a lighter option, coconut oil is a great substitute. -
2 large eggs
Eggs contribute to the texture and moisture. You can use flaxseed meal mixed with water for an egg-free version. -
1 teaspoon baking powder
This helps the muffins rise, yielding a light and fluffy texture. Be sure it’s fresh for the best results! -
1/2 teaspoon baking soda
It complements the baking powder for even better leavening. If you’re out of baking soda, using just a bit more baking powder works too. -
1/4 teaspoon salt
A pinch of salt enhances the flavors and balances the sweetness. -
Zest of 1 lemon
This zest brings a bright, aromatic quality to your muffins. For an extra zing, try adding more zest! -
1 tablespoon lemon juice
Freshly squeezed adds a delightful tang. Lemon juice is highly adjustable if you want a more intense flavor. -
For the streusel topping:
- 1/4 cup brown sugar
Adds a touch of molasses flavor. You can use granulated sugar if that’s all you have. - 1/4 cup all-purpose flour
This provides structure to your crumbly topping. - 2 tablespoons butter
Cold butter will give you that delicious crumble. Substitute with coconut oil for a different twist. - 1/2 teaspoon cinnamon
This adds a warm, cozy flavor to your muffins. Feel free to skip if cinnamon isn’t your thing.
- 1/4 cup brown sugar
Step-by-Step Instructions
Ready to bake? Let’s dive into the process!
-
Preheat your oven:
Preheat your oven to 375°F (190°C). This ensures that your muffins bake evenly and perfectly. -
Prepare your muffin tin:
Grease a muffin tin or use cupcake liners. Greasing and lining helps prevent those delicious beauties from sticking! -
Mix the dry ingredients:
In a medium bowl, whisk together the flour, baking powder, baking soda, salt, and cinnamon for the streusel. This step ensures there are no lumps, promoting even rising. -
Combine the wet ingredients:
In another bowl, mix the melted butter with the sugar until creamy. Then, whisk in the Greek yogurt, eggs, lemon juice, and lemon zest until smooth. A little workout for those mixing muscles! -
Add blueberries:
Gently fold in the blueberries, taking care not to crush them. This preserves the juicy bursts we love in our muffins! -
Combine wet and dry:
Carefully add the dry ingredients into the wet mixture. Stir until just combined; a few lumps are perfectly okay! Over-mixing can lead to dense muffins—yuck! -
Make the streusel topping:
In a small bowl, mix brown sugar, flour, butter, and cinnamon with a fork until crumbly. This will add a delightful crunch to your muffins. -
Fill the muffin cups:
Spoon the batter into the prepared muffin tin, filling each cup about 2/3 full. Sprinkle the streusel topping generously over each muffin—let’s make it extra tasty! -
Bake your muffins:
Place the muffin tin in the preheated oven and bake for around 18-20 minutes or until a toothpick inserted into the center comes out clean. The kitchen should smell heavenly by now! -
Cool it down:
Once they’re out, let the muffins rest in the tin for about 5 minutes before transferring them to a wire rack. This cooling helps them firm up and makes them easier to handle.
Serving Suggestions
Serve these lemon blueberry muffins warm, right out of the oven, with a pat of butter melting on top or a dollop of whipped cream cheese. Pair them with a cup of hot tea or coffee, and you’ve got a perfect breakfast or afternoon snack. You can also top them with a light glaze made from lemon juice and powdered sugar for an extra sweet touch!
Recipe Variations
-
Lemon Poppy Seed Muffins:
Replace some of the flour with poppy seeds for a delicious twist! They add a crunchy texture that pairs beautifully with lemon. -
Gluten-Free Option:
Use a 1:1 gluten-free flour mix instead of all-purpose flour for gluten-free friends joining the table! -
Add Nuts:
Toss in some chopped walnuts or almonds for a delightful crunch and extra nutrition. -
Lemon Blueberry Bread:
Transform this muffin recipe into a loaf by simply pouring the batter into a greased loaf pan and baking for about 50-60 minutes. -
Dairy-Free Delight:
Swap Greek yogurt with dairy-free yogurt and use coconut oil to make these muffins dairy-free, while still delicious!
Chef’s Notes
These muffins have become a staple in my home over the years. Originally inspired by my Grandma Rose’s recipe, I’ve tweaked it plenty of times as seasonal ingredients change. When I have some fresh strawberries or bananas lying around, I toss them in too, and it never disappoints! And let’s be real—they never last more than a day or two; they’re simply too good to resist!
FAQs and Troubleshooting
Q: Why are my muffins dry?
A: Over-mixing or using too much flour can lead to drier muffins. Always measure flour correctly (spoon it into the measuring cup and level it off).
Q: My muffins sank in the middle. What happened?
A: This could happen if your batter was overmixed or if there wasn’t enough leavening. Make sure your baking powder and baking soda are fresh for best results.
Q: Can I freeze these muffins?
A: Absolutely! Allow them to cool completely, then place them in an airtight container or freezer bag. They will keep for up to three months.
Q: Can I make these muffins vegan?
A: You can replace the eggs with flax eggs (1 tablespoon of flaxseed meal + 2.5 tablespoons water per egg) and use non-dairy yogurt and milk.
Nutritional Info (per muffin, approx.)
- Calories: 150
- Protein: 3g
- Fat: 5g
- Carbohydrates: 22g
- Sugar: 7g
Conclusion
So there you have it—Lemon Blueberry Muffins that are not only simple to whip up but also brimming with flavor and nostalgia. Whether it’s for breakfast, a brunch gathering, or just because you crave something sweet, these muffins will always hit the spot. I hope you give them a try, feel inspired, and perhaps create some sweet memories of your own in the kitchen!
Now, grab your apron, channel your inner baker, and let’s get muffin-making. Happy baking!
PrintLemon Blueberry Muffins
Delightful lemon blueberry muffins that are fluffy, moist, and perfect for breakfast or a snack.
- Prep Time: 15 minutes
- Cook Time: 20 minutes
- Total Time: 35 minutes
- Yield: 12 muffins 1x
- Category: Breakfast
- Method: Baking
- Cuisine: American
- Diet: Vegetarian
Ingredients
- 1 cup all-purpose flour
- 1 cup fresh blueberries
- 1/2 cup Greek yogurt
- 1/2 cup sugar
- 1/4 cup butter, melted
- 2 large eggs
- 1 teaspoon baking powder
- 1/2 teaspoon baking soda
- 1/4 teaspoon salt
- Zest of 1 lemon
- 1 tablespoon lemon juice
- Streusel topping:
- 1/4 cup brown sugar
- 1/4 cup all-purpose flour
- 2 tablespoons butter
- 1/2 teaspoon cinnamon
Instructions
- Preheat your oven to 375°F (190°C).
- Prepare a muffin tin by greasing it or using cupcake liners.
- Mix the dry ingredients in a medium bowl: flour, baking powder, baking soda, salt, and cinnamon.
- Combine the wet ingredients in another bowl: melted butter and sugar, whisked in Greek yogurt, eggs, lemon juice, and lemon zest.
- Add the blueberries gently into the wet mixture.
- Combine the dry ingredients with the wet mixture until just combined.
- Make the streusel topping by mixing brown sugar, flour, butter, and cinnamon until crumbly.
- Fill the muffin cups with batter and sprinkle the streusel topping on each.
- Bake in the oven for 18-20 minutes or until a toothpick comes out clean.
- Cool the muffins in the tin for 5 minutes before transferring to a wire rack.
Notes
Serve warm with butter or cream cheese, and enjoy with tea or coffee. These muffins can also be frozen for up to three months.
Nutrition
- Serving Size: 1 muffin
- Calories: 150
- Sugar: 7g
- Sodium: 200mg
- Fat: 5g
- Saturated Fat: 2g
- Unsaturated Fat: 3g
- Trans Fat: 0g
- Carbohydrates: 22g
- Fiber: 1g
- Protein: 3g
- Cholesterol: 30mg
Keywords: muffins, lemon blueberry, breakfast, baking, easy recipes

One-Bowl Pumpkin-Spiced Waffles: Quick Autumn Breakfast
Pumpkin-Spiced Waffles: A Cozy Fall Delight
Welcome back, foodies! As the leaves change and the air gets a bit crisp, there’s something magical about cozying up with a delicious breakfast that not only warms your stomach but also the soul. Today, we’re diving into the world of Pumpkin-Spiced Waffles, a seasonal favorite that’s perfect for leisurely weekend brunches or even weekday wake-up calls (if you prepare them the night before!). Trust me, these waffles have a way of inviting autumn right into your kitchen and your heart.
Imagine the aroma of warm spices filling your kitchen as these beauties cook, and then, when you finally dive in, each bite transports you to your favorite cozy café or a family gathering during the holidays. That’s the essence of what I aim to create here at Clean Plate Cravings—a blend of flavor, nostalgia, and congratulatory vibes for cooking something awesome. So grab your apron, and let’s get started!
Personal Story: A Whiff of Nostalgia
Let me take you back to my childhood—thinking about those early autumn mornings when my family would gather around the kitchen table, the air filled with laughter, chatter, and the irresistible scent of freshly made waffles. My mother had this old waffle iron—an heirloom passed down through generations—its surfaces perfectly seasoned. One of my fondest memories is the first time she introduced pumpkin-spiced waffles into our weekend routine.
Fall was the transition from summer fruit to harvest vegetables, and pumpkins were always a staple in our home. Crushing cinnamon sticks and grating nutmeg became part of our Sunday ritual. My siblings and I would jockey for positioning at the table, plates piled high, our eyes alight with the joy of seasonal treats. Every bite was not just delicious but a cherished moment wrapped in time. Today, as I whip up a batch of these Pumpkin-Spiced Waffles, I can’t help but smile, remembering those beautifully chaotic mornings filled with love—and laughter.
Ingredients
Before we get cooking, let’s check out the simple ingredients we’ll be using. Each plays a lovely role in bringing flavor and warmth to our waffles.
-
1 cup all-purpose flour: The base for our waffles that provides the perfect fluffy texture. Need a gluten-free option? Try almond or coconut flour instead, keeping in mind they may require additional moisture.
-
2 tablespoons sugar: Just the right amount for a hint of sweetness. If you prefer less sugar, you can use a natural sweetener like maple syrup; just adjust the liquid accordingly.
-
1 tablespoon baking powder: This helps our waffles rise and get that delightful fluffiness. Store your baking powder in a cool, dry place for maximum potency.
-
1/2 teaspoon salt: Enhances the flavors of all the other ingredients. It’s a vital part of any recipe.
-
1 teaspoon cinnamon: The quintessential spice of fall that brings warmth and a cozy aroma. If you’d like a twist, try cardamom for a unique flavor boost!
-
1/2 teaspoon nutmeg: Adds a fragrant, nutty depth to our waffles. Freshly grated nutmeg is ideal if you want that extra punch of flavor.
-
1/2 cup pumpkin puree: The star of our dish! Packed with vitamins and gives the waffles that iconic autumn color. Be sure to use pure pumpkin puree—not pumpkin pie filling, which comes with added sugars and spices.
-
1 cup milk: This helps create a light, fluffy batter. For a dairy-free option, you can use almond, oat, or coconut milk.
-
1 large egg: Provides structure and moisture. You can replace it with a flax egg (1 tablespoon ground flaxseed mixed with 2.5 tablespoons water) if you’re looking for an egg-free alternative.
-
2 tablespoons vegetable oil: This keeps the waffles moist and delicious. Melted coconut oil or melted butter works beautifully too!
Step-by-Step Instructions
Alright, the moment we’ve all been waiting for—time to whip up these scrumptious Pumpkin-Spiced Waffles! Follow my lead, and I promise you’ll be flipping the most delightful waffles in no time.
-
Preheat your waffle iron: This is key! Ensuring your waffle iron is hot before you add the batter will give you that golden, crispy exterior. If it’s not ready, the waffles can turn out a bit soggy.
-
Combine the dry ingredients: In a large mixing bowl, whisk together the all-purpose flour, sugar, baking powder, salt, cinnamon, and nutmeg. The goal here is to make sure there are no lumps and everything is evenly distributed. A well-mixed dry mixture ensures consistent flavor in every waffle!
-
Mix the wet ingredients: In another bowl, combine the pumpkin puree, milk, egg, vegetable oil, and vanilla extract. Whisk until smooth. It’s sort of like combining your warm memories and cozy moments—get it all mixed up!
-
Combine the mixtures: Pour the wet ingredients into the dry ingredients. Gently fold them together with a spatula or a wooden spoon until just combined. Be careful not to over-mix; a few lumps are perfectly okay. Overmixing can lead to dense waffles, and we want light and fluffy!
-
Cook the waffles: Lightly grease your waffle iron if necessary (check your manufacturer’s instructions), then pour an appropriate amount of batter onto the iron (usually about 1/3 cup, depending on the iron). Close the lid and cook according to your waffle iron’s instructions. Usually, this takes around 5 minutes but keep an eye on it. The sweet smell will guide you!
-
Serve immediately: Carefully remove the waffle from the iron (caution: they can be hot!). Stack them on a plate, and assure the other waffles keep warm in a low oven (about 200°F) while you finish cooking the rest.
-
Add toppings: This is where it gets fun! Top your waffles with pure maple syrup, a dollop of whipped cream, or a sprinkle of pecans for that added crunch. Maybe even a sprinkle of powdered sugar if you’re feeling fancy!
Serving Suggestions
Plating these Pumpkin-Spiced Waffles is all about showcasing that beautiful golden color. Stack them high on a vibrant plate, allowing them to slightly overlap. Drizzle with warm maple syrup, and finish with a sprinkle of cinnamon and a handful of toasted nuts if you fancy. For an extra touch, artfully place slices of bananas or cranberries for a delightful pop of color! Serve them with a side of warm apple cider or a steaming cup of your favorite spiced tea for the ultimate cozy breakfast experience.
Recipe Variations
Here are a few fun twists to make these waffles even more exciting:
-
Chocolate Chip Pumpkin Waffles: Add a half cup of semi-sweet chocolate chips to the batter for a wonderful contrast of flavors.
-
Vegan Pumpkin Waffles: Substitute the egg with a flax egg and use almond milk instead of dairy; swap vegetable oil with melted coconut oil.
-
Spicy Pumpkin Waffles: Add a pinch of cayenne pepper or chili powder for a spicy kick—trust me, it’s surprisingly amazing!
-
Pumpkin Nut Waffles: Stir in chopped walnuts or pecans for a delightful crunch.
-
Sweet Potato Waffles: Use mashed sweet potato instead of pumpkin for a different, yet equally delicious, flavor profile.
Chef’s Notes
Cooking, for me, isn’t just about the food; it’s about the experiences shared. I remember the time my niece insisted on helping me in the kitchen. She took on the challenge of whisking the batter—a task which, of course, led to a mini flour explosion (may it grace my kitchen with its presence forever). But that little mess turned into a laugh-filled adventure, and those waffles ended up being the best I ever made. Cooking is a journey filled with learning, laughter, and a sprinkle of chaos—embrace it wholeheartedly!
FAQs and Troubleshooting
-
Why are my waffles coming out soggy?
If your waffles aren’t crisping up as they should, it could be due to undercooking or too much liquid in the batter. Ensure your waffle iron is hot enough and try cooking them a little longer. -
Can I make the batter ahead of time?
Absolutely! You can prepare the batter the night before and store it in the fridge. Just give it a good stir before using, as it may thicken a bit. -
Can I freeze the waffles?
Yes! These waffles are phenomenal for freezing. Let them cool completely and then store them in an airtight container or freezer bag. Reheat them in the toaster or oven when you’re ready to indulge! -
What’s the best way to store leftover waffles?
Store any leftovers in an airtight container in the fridge for up to three days or freeze them as mentioned above. Just pop them in the toaster when you’re ready to enjoy!
Nutritional Info
(Approximate values per serving, without toppings)
- Calories: 220
- Protein: 5g
- Carbohydrates: 30g
- Dietary Fiber: 2g
- Sugars: 5g
- Fat: 9g
And there you have it—delicious Pumpkin-Spiced Waffles to fill your home with warmth and joy! I hope you enjoy creating these as much as I do. Remember, food is more than just sustenance; it’s about creating memories and sharing love. So, gather your loved ones, whip up a batch of these cozy waffles, and relish each delightful moment together. Happy cooking! 🧇❤️
PrintPumpkin-Spiced Waffles
Warm, fluffy Pumpkin-Spiced Waffles that bring the essence of autumn into your kitchen. Perfect for leisurely brunches or quick weekday breakfasts.
- Prep Time: 10 minutes
- Cook Time: 20 minutes
- Total Time: 30 minutes
- Yield: 4 servings 1x
- Category: Breakfast
- Method: Waffle Cooking
- Cuisine: American
- Diet: Vegetarian
Ingredients
- 1 cup all-purpose flour
- 2 tablespoons sugar
- 1 tablespoon baking powder
- 1/2 teaspoon salt
- 1 teaspoon cinnamon
- 1/2 teaspoon nutmeg
- 1/2 cup pumpkin puree
- 1 cup milk
- 1 large egg
- 2 tablespoons vegetable oil
Instructions
- Preheat your waffle iron.
- Combine the dry ingredients in a large mixing bowl.
- Mix the wet ingredients in another bowl.
- Combine the mixtures; gently fold them together.
- Cook the waffles in the preheated waffle iron.
- Serve immediately with toppings of your choice.
Notes
For a gluten-free version, substitute all-purpose flour with almond or coconut flour. Enjoy with maple syrup or whipped cream!
Nutrition
- Serving Size: 1 waffle
- Calories: 220
- Sugar: 5g
- Sodium: 200mg
- Fat: 9g
- Saturated Fat: 1g
- Unsaturated Fat: 8g
- Trans Fat: 0g
- Carbohydrates: 30g
- Fiber: 2g
- Protein: 5g
- Cholesterol: 60mg
Keywords: pumpkin waffles, fall recipes, breakfast, brunch, cozy, autumn
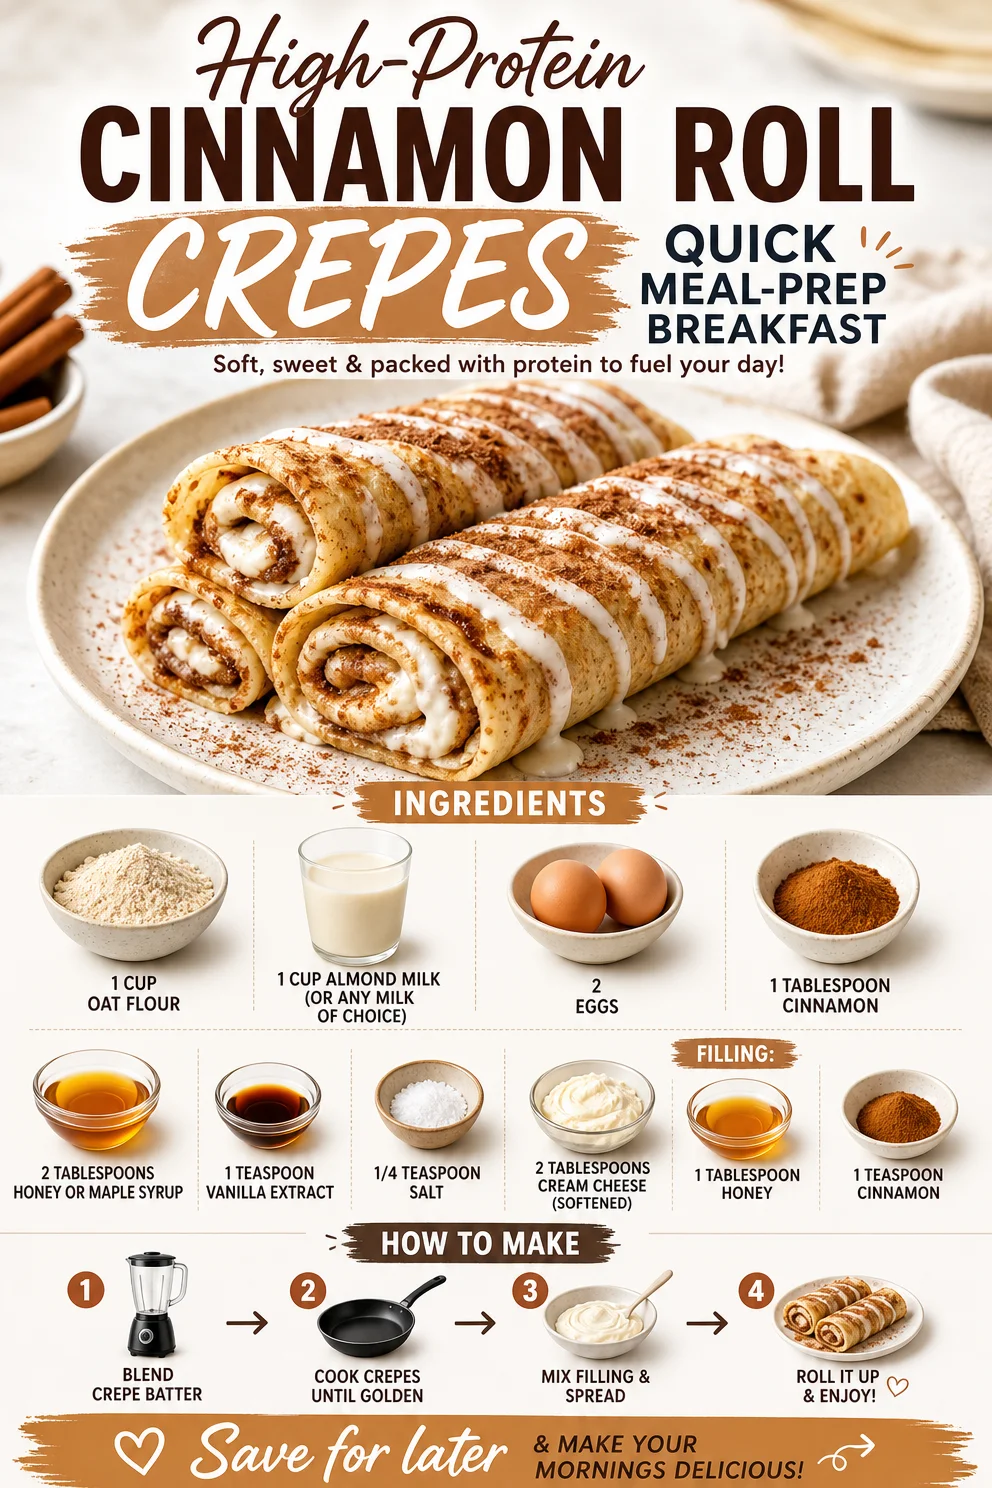
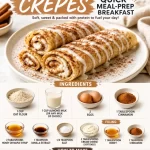
High-Protein Cinnamon Roll Crepes: Quick Meal-Prep Breakfast
Indulge in Deliciousness: Cinnamon Roll Protein Crepes
Welcome back, food lovers! Today, I’m thrilled to bring you a recipe that embodies the perfect intersection of indulgence and nourishment—the delightful Cinnamon Roll Protein Crepes. Imagine fluffy, light crepes wrapped around a sweet, creamy filling, giving you all those cozy cinnamon roll vibes but in a healthier, more versatile form. These crepes are not just a breakfast treat; they are also great for an afternoon snack or a light dessert!
In my kitchen, we often celebrate food that doesn’t compromise on flavor but brings a sense of joy and satisfaction. With the right approach, we can enjoy wholesome meals that make us feel energized and happy. That’s what Clean Plate Cravings is all about! So, let’s roll up our sleeves and dive into this delectable experience together!
A Sweet Slice of Nostalgia
Let me take you back a few years to my childhood, where my love affair with cinnamon rolls began. Every Sunday, my family would gather in the cozy warmth of our kitchen, filling the air with the heavenly aroma of cinnamon, sugar, and butter as my grandma baked her famous rolls. I remember helping her knead the dough, my small hands pining to mimic her practiced movements. She was a magical cook, and the true beauty of those mornings wasn’t just in the warm, gooey rolls that came out of the oven—it was in the stories, laughter, and love that were shared around the table.
Fast forward to my own kitchen days, where I strived to capture that same feeling but with a healthy twist. Enter the Cinnamon Roll Protein Crepes! These delights keep the spirit of my grandma’s rolls while packing in extra protein to fuel your day. With open arms (and a spatula in hand), let’s create something truly special!
Ingredients
Let’s gather our ingredients for these scrumptious crepes:
- 1 cup oat flour: A fantastic gluten-free option that’s high in fiber. You can make your own by blending rolled oats in a food processor!
- 1 cup almond milk (or any milk of choice): I love almond milk for its nutty flavor, but feel free to use cow’s milk, soy, or oat milk if that’s more your style.
- 2 eggs: They provide structure and a protein boost. If you’re going eggless, you can substitute with chia eggs (1 tablespoon chia seeds mixed with 2.5 tablespoons water per egg).
- 1 tablespoon cinnamon: The star spice that adds warmth and sweetness, reminiscent of those cozy cinnamon rolls.
- 2 tablespoons honey or maple syrup: A natural sweetener that balances the richness—choose your favorite!
- 1 teaspoon vanilla extract: For that extra layer of flavor. Homemade vanilla extract is a treasure in the kitchen!
- 1/4 teaspoon salt: A little salt enhances all the flavors and rounds out the sweetness.
- For the filling:
- 2 tablespoons cream cheese (softened): This creamy goodness acts as a base for our filling. You can swap it for Greek yogurt for a lighter option!
- 1 tablespoon honey: Sweetens the filling perfectly—maple syrup works here too!
- 1 teaspoon cinnamon: Adding more of that irresistible spice!
Step-by-Step Instructions
Now that we have our ingredients ready, let’s dive into making these fabulous crepes.
-
Make the Batter: In a large mixing bowl, combine 1 cup of oat flour, 1 cup of almond milk, 2 eggs, 1 tablespoon of cinnamon, 2 tablespoons of honey, 1 teaspoon of vanilla extract, and 1/4 teaspoon of salt. Whisk together until your mixture is smooth and homogenous. Pro tip: Let the batter sit for about 10 minutes. This allows it to thicken slightly, making your crepes fluffier!
-
Prepare Your Pan: Heat a non-stick skillet over medium heat. To check if it’s ready, sprinkle a drop of water on it—if it sizzles and evaporates, you’re good to go! Lightly grease the pan with a little coconut oil or butter for easy flipping.
-
Cook the Crepes: Using a ladle or measuring cup, pour about 1/4 cup of the batter into the center of the skillet. Quickly swirl the pan to spread the batter evenly into a circle. Cook for about 2-3 minutes until the edges start to lift and the bottom is golden brown.
-
Flip with Finesse: Here’s where the fun begins! Use a thin spatula to carefully lift the crepe and flip it over to cook for an additional 1-2 minutes on the other side. Don’t stress if your first one doesn’t look perfect—crepes are forgiving! Practice makes (almost) perfect.
-
Repeat and Stack: Continue the process with the remaining batter, making sure to grease the pan lightly as needed. Place your cooked crepes on a plate and keep them warm by covering them lightly with a kitchen towel.
Fill Them Up!
Now, let’s prepare the delectable filling! In a small bowl, mix 2 tablespoons of softened cream cheese, 1 tablespoon of honey, and 1 teaspoon of cinnamon until smooth and creamy.
- Assemble the Crepes: Take one crepe, spread a layer of that delicious filling down the center, and then fold it over or roll it up. Repeat until all the crepes are filled!
Serving Suggestions
Now that your Cinnamon Roll Protein Crepes are ready, it’s time to serve them up! Place a couple of crepes on a beautiful plate, dust them with powdered sugar if you’re feeling fancy, and perhaps drizzle some extra honey or maple syrup on top. Fresh berries or banana slices wouldn’t hurt either, adding a pop of color and a refreshing taste!
Recipe Variations
Feel free to get creative with these crepes! Here are a few variations to mix things up:
- Chocolate Chip Delight: Fold some dairy-free chocolate chips into the filling for an indulgent twist!
- Fruit-Filled Crepes: Add sliced strawberries or blueberries into the filling for a fruity explosion.
- Nutty Option: Stir in chopped nuts (like pecans or walnuts) into the filling for an added crunch.
- Pumpkin Spice: Switch in some pumpkin puree instead of cream cheese, and add a dash of nutmeg for a seasonal flavor.
Chef’s Notes
As I’ve refined this recipe over time, I’ve found little hacks that make all the difference! The oat flour is a game changer—not only is it gluten-free, but it also adds a heartiness to the crepes. And don’t be afraid to mix and match your milk choices; the key is finding what works best for your taste buds! My grandma would always remind me, "Cooking is about improvisation and joy." So keep experimenting—your versions may become the new family favorites!
FAQs and Troubleshooting
Here are some common questions to help you avoid any potential hiccups:
-
Why are my crepes tearing when I flip them?
- This can happen if the batter is too thick or if there isn’t enough heat. Make sure the pan is hot enough and let the batter rest for the right amount of time for proper consistency!
-
Can I make the batter ahead of time?
- Absolutely! The batter can be prepared the night before and stored in the fridge. Just give it a good whisk before cooking.
-
How do I store leftover crepes?
- Place them in an airtight container or wrap them tightly in plastic wrap. Reheat in a pan over low heat or in the microwave when you’re ready to enjoy them again.
-
Can I freeze these crepes?
- Yes! Just allow them to cool completely first and then stack them with parchment paper in between. Freeze for up to three months. Thaw overnight in the fridge before reheating.
Nutritional Info
These Cinnamon Roll Protein Crepes pack a nutritious punch while satisfying your sweet tooth! Each serving boasts a generous amount of protein, thanks to the oats and eggs, along with healthy fats from the almond milk and cream cheese. Plus, using natural sweeteners keeps the sugar content in check—perfect for a balanced breakfast or snack.
There you have it! The perfect recipe to bring a smile to your face and fuel your body. I hope you enjoy whipping up these Cinnamon Roll Protein Crepes as much as I do. Remember, cooking is a journey, so embrace every moment, make it personal, and always keep it delicious! Happy cooking!
PrintCinnamon Roll Protein Crepes
Delightful Cinnamon Roll Protein Crepes that combine the indulgence of cinnamon rolls with a healthier twist.
- Prep Time: 15 minutes
- Cook Time: 15 minutes
- Total Time: 30 minutes
- Yield: 4 servings 1x
- Category: Breakfast
- Method: Cooking
- Cuisine: American
- Diet: Vegetarian
Ingredients
- 1 cup oat flour
- 1 cup almond milk
- 2 eggs
- 1 tablespoon cinnamon
- 2 tablespoons honey or maple syrup
- 1 teaspoon vanilla extract
- 1/4 teaspoon salt
- 2 tablespoons cream cheese (softened)
- 1 tablespoon honey
- 1 teaspoon cinnamon
Instructions
- Make the batter: In a large mixing bowl, combine 1 cup of oat flour, 1 cup of almond milk, 2 eggs, 1 tablespoon of cinnamon, 2 tablespoons of honey, 1 teaspoon of vanilla extract, and 1/4 teaspoon of salt. Whisk together until smooth. Let sit for 10 minutes.
- Prepare your pan: Heat a non-stick skillet over medium heat. Lightly grease with coconut oil or butter.
- Cook the crepes: Pour 1/4 cup of batter into the skillet. Swirl to spread evenly. Cook for 2-3 minutes until edges lift and bottom is golden.
- Flip with finesse: Carefully lift and flip the crepe, cooking for another 1-2 minutes.
- Repeat and stack: Continue with the remaining batter, greasing the pan as needed.
- Fill them up: In a small bowl, mix 2 tablespoons of cream cheese, 1 tablespoon of honey, and 1 teaspoon of cinnamon until smooth. Spread filling on each crepe and roll or fold.
Notes
Top with powdered sugar and fresh berries for extra flavor. Feel free to experiment with fillings and toppings!
Nutrition
- Serving Size: 1 crepe
- Calories: 250
- Sugar: 8g
- Sodium: 220mg
- Fat: 10g
- Saturated Fat: 4g
- Unsaturated Fat: 6g
- Trans Fat: 0g
- Carbohydrates: 32g
- Fiber: 4g
- Protein: 8g
- Cholesterol: 70mg
Keywords: crepes, protein, cinnamon rolls, healthy breakfast, vegetarian, oat flour

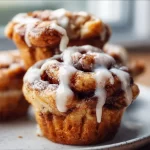
High-Protein Cinnamon Roll Muffins for Busy Mornings
Protein-Packed Cinnamon Roll Muffins
Welcome back, food lovers! I’m thrilled you’re here with me today in the kitchen, where we’re on a mission to enjoy delicious and wholesome food that fuels us right. Let’s talk about a guilty pleasure that we’re turning into a wholesome treat: cinnamon rolls. Picture this—warm, gooey, and loaded with that irresistible cinnamon flavor. Now, let’s kick it up a notch with a protein-packed twist that makes these treats a perfect breakfast or snack option. Yes, I’m talking about Protein-Packed Cinnamon Roll Muffins!
These muffins are not only tasty, but they also pack a nutritious punch that will keep you feeling satisfied and energized throughout your day. Whether you’re heading to work, gearing up for a workout, or just need a little something sweet to make your morning shine, these muffins will check all your boxes. Plus, they’re super easy to whip up!
In this post, we’ll combine wholesome ingredients to create delicious muffins without compromising flavor. I can’t wait to share my memories, tips, and even a few sneaky kitchen secrets to help you craft the perfect batch of these delightful goodies. So grab your aprons, and let’s get baking!
A Sweet Memory
Whenever I think of cinnamon rolls, I can’t help but be transported back to my childhood kitchen, where the smell of freshly baked goods wafted through the house on cozy Sunday mornings. My mom had a unique ability to turn our kitchen into an aroma-filled wonderland of spices and sweetness. One of my fondest memories involves her recipe for cinnamon rolls, which required an absurd amount of butter and sugar—but boy, were they delicious!
I remember eagerly waiting by the oven, my mouth watering as I counted down the seconds until we could devour those fluffy rolls, slathered in a rich cream cheese frosting. As I grew older, though, I started to realize that maybe I should swap out some of that sugar and butter for healthier options—while still retaining that amazing flavor I loved so much. That’s when the inspiration for these Protein-Packed Cinnamon Roll Muffins hit me. They combine nostalgia with health in a way that feels just as good to make as it does to eat.
Now, let’s jump into the ingredients that will help us bring these muffins to life!
Ingredients
-
1 cup whole wheat flour
A fantastic source of fiber and nutrients, whole wheat flour is the backbone of this recipe. It provides that hearty base while keeping the muffins light and fluffy. If you’re in a pinch, you can substitute with all-purpose flour, but you’ll lose some of the nutritional benefits. -
1 cup rolled oats
These little gems contribute a delightful chewiness and even more fiber. They also work great as a natural thickener. If you don’t have rolled oats, quick oats can work too, though they may yield a slightly different texture. -
1/2 cup protein powder
This is where we get our protein boost! You can use your favorite protein powder—whey, plant-based, or any other kind will work. Just be mindful that flavored protein powders may alter the taste, so go for unflavored if you want to keep the cinnamon flavor front and center! -
1/4 cup coconut sugar
Coconut sugar is a natural sweetener that has a lower glycemic index than regular sugar. It’s a wonderful alternative that adds a subtle caramel note to your muffins. If you don’t have coconut sugar, you can swap it for brown sugar—just keep the sweetness in check to your liking. -
2 teaspoons baking powder
This leavening agent gives our muffins that perfect rise, making them fluffy and light. Ensure it’s fresh for the best results! -
1 teaspoon cinnamon
Because what’s a cinnamon roll without cinnamon? This spice adds warmth and sweetness. You can also experiment with adding nutmeg or cardamom for a twist! -
1/2 teaspoon salt
Trust me, this tiny ingredient is key! It enhances the flavors and balances the sweetness of the muffins. -
1 cup unsweetened almond milk
A dairy-free option that keeps these muffins moist and adds a lovely creamy texture. You can replace it with your favorite milk (dairy or non-dairy) if needed. -
1/4 cup unsweetened applesauce
Applesauce helps to keep our muffins moist and fluffy while adding a touch of natural sweetness. It’s a great egg substitute too; if you’re vegan, you can ditch the egg and use a bit more applesauce! -
1 large egg
This helps bind all our ingredients together. If you’re going for a vegan option, just replace it with an extra 1/4 cup of applesauce or a flax egg. -
1 teaspoon vanilla extract
Vanilla extract enhances the overall flavor profile and adds a cozy warmth to our muffins. Always go for pure vanilla extract if you can! -
Optional: Cream cheese frosting
For those of you who want to indulge a little more! A simple mix of cream cheese, powdered sugar, and vanilla extract makes for a dreamy topping. Substitute with Greek yogurt and honey for a lighter version, if desired.
Step-by-Step Instructions
Step 1: Preheat the Oven
Let’s kick things off by preheating your oven to 350°F (175°C). This is crucial for getting those muffins perfectly fluffy. Grab your muffin tin and line it with paper liners or spray it with a bit of non-stick cooking spray. This way, our delicious muffins won’t cling to the pan!
Step 2: Mix the Dry Ingredients
In a large mixing bowl, combine whole wheat flour, rolled oats, protein powder, baking powder, cinnamon, and salt. Whisk them together until well mixed. I always say, the key to fluffy muffins starts with blending those dry ingredients! Plus, the aromatic scent of cinnamon will fill your kitchen, and trust me, that’s a win!
Step 3: Combine the Wet Ingredients
In another bowl, mix almond milk, applesauce, egg, and vanilla extract. Whisk until well combined, and it should have a lovely creamy consistency. Here’s a little chef hack: When mixing wet ingredients, crack your egg directly into the liquid. This way, you can avoid any shell pieces making it into the bowl!
Step 4: Bring it All Together
Now, pour the wet ingredients into the bowl with the dry ingredients, and gently fold them together. Be careful not to overmix—just until everything is combined. A few lumps are totally okay! Overmixing can lead to tough muffins, and we want them to be fluffy and tender.
Step 5: Fill the Muffin Tin
Using a spoon or ice cream scoop, evenly distribute the batter into the prepared muffin tin. This should make about 12 muffins. A little tip: If you want that bakery-style dome on top, fill the cups just above the rim!
Step 6: Bake to Perfection
Pop those beauties into your preheated oven and bake for about 18-20 minutes, or until a toothpick comes out clean. Keep an eye on them towards the end—every oven is a little different! As they bake, the aroma will swirl through your home and may just lure the family into the kitchen!
Step 7: Cool and Frost
Once baked, remove the muffins from the oven and allow them to cool in the tin for about 5-10 minutes before transferring them to a wire rack. If you’re opting for that delicious cream cheese frosting, now is the time to whip it up! Just mix together the cream cheese, powdered sugar, and vanilla until smooth, and then drizzle a little on top of each muffin.
Serving Suggestions
These Protein-Packed Cinnamon Roll Muffins are delightful served warm, fresh from the oven. Pair them with a sprinkle of nuts, a dollop of yogurt, or even a fresh cup of coffee for your perfect breakfast combo. You could also prepare them in advance and simply warm them up when you’re ready to enjoy. Store them in an airtight container for up to a week, or freeze them for a quick grab-and-go snack!
Recipe Variations
-
Chocolate Chip Delight: Mix in some dark chocolate chips for a sweet twist. Who says you can’t have dessert for breakfast?
-
Nutty Banana Swirl: Fold in some mashed bananas for a banana bread twist! It adds moisture and natural sweetness.
-
Apple Cinnamon: Dice up some fresh apples and toss them into the batter for added texture and flavor.
-
Pumpkin Spice: For a seasonal treat, swap in some pumpkin puree and a pinch of nutmeg for a fall-inspired muffin.
-
Gluten-Free Option: Substitute whole wheat flour with a gluten-free all-purpose blend. Just make sure it contains xanthan gum for the right consistency!
Chef’s Notes
Cooking is all about experimenting, and this recipe is no exception! Over the years, I’ve played around with different ingredients, from various types of sweeteners to dairy alternatives. I found that sticking to wholesome, real ingredients not only made my muffins healthier but also incredibly fulfilling.
One fun story involves a baking mishap where I accidentally used baking soda instead of baking powder. Let’s just say my muffins were more like hockey pucks that day! But hey, that’s the beauty of cooking—you learn through every experience.
FAQs and Troubleshooting
Q: Why are my muffins dense?
A: Dense muffins can result from overmixing or too much flour. Make sure to fold gently and measure your ingredients accurately!
Q: Can I make these muffins ahead of time?
A: Absolutely! These muffins store well in an airtight container for up to a week. You can also freeze them for a quick treat whenever you need.
Q: How do I know when my muffins are done baking?
A: Insert a toothpick in the center—if it comes out clean or with a few crumbs, they are ready! If it comes out wet, give them a few more minutes in the oven.
Q: Can I substitute the protein powder with something else?
A: If you’re not a fan of protein powder, consider adding extra oats or flour, though it may change the texture slightly.
Nutritional Info
These muffins are a wholesome option packed with protein, fiber, and essential nutrients. Just one muffin offers a balance of macronutrients that will keep you fueled and satisfied throughout your mornings.
So, are you ready to indulge in some cinnamon goodness without the guilt? Make these Protein-Packed Cinnamon Roll Muffins today, and let them inspire your kitchen adventures! Remember, cooking is all about joy, creativity, and flavor—so have fun, and enjoy every bite! Happy baking, my friends!
PrintProtein-Packed Cinnamon Roll Muffins
Delicious, wholesome muffins packed with protein and irresistible cinnamon flavor, perfect for breakfast or a snack.
- Prep Time: 15 minutes
- Cook Time: 20 minutes
- Total Time: 35 minutes
- Yield: 12 muffins 1x
- Category: Breakfast
- Method: Baking
- Cuisine: American
- Diet: Vegetarian
Ingredients
- 1 cup whole wheat flour
- 1 cup rolled oats
- 1/2 cup protein powder
- 1/4 cup coconut sugar
- 2 teaspoons baking powder
- 1 teaspoon cinnamon
- 1/2 teaspoon salt
- 1 cup unsweetened almond milk
- 1/4 cup unsweetened applesauce
- 1 large egg
- 1 teaspoon vanilla extract
- Optional: Cream cheese frosting
Instructions
- Preheat the oven to 350°F (175°C).
- Mix the dry ingredients in a bowl: whole wheat flour, rolled oats, protein powder, baking powder, cinnamon, and salt.
- Combine the wet ingredients in another bowl: almond milk, applesauce, egg, and vanilla extract.
- Bring the wet ingredients into the dry ingredients, folding gently until just combined.
- Fill a lined muffin tin with batter.
- Bake for 18-20 minutes or until a toothpick comes out clean.
- Cool the muffins for 5-10 minutes before transferring to a wire rack and optionally frost with cream cheese frosting.
Notes
Store muffins in an airtight container for up to a week or freeze for later.
Nutrition
- Serving Size: 1 muffin
- Calories: 180
- Sugar: 6g
- Sodium: 200mg
- Fat: 4g
- Saturated Fat: 1g
- Unsaturated Fat: 3g
- Trans Fat: 0g
- Carbohydrates: 30g
- Fiber: 5g
- Protein: 7g
- Cholesterol: 30mg
Keywords: cinnamon rolls, muffins, breakfast, healthy, protein-packed, baking