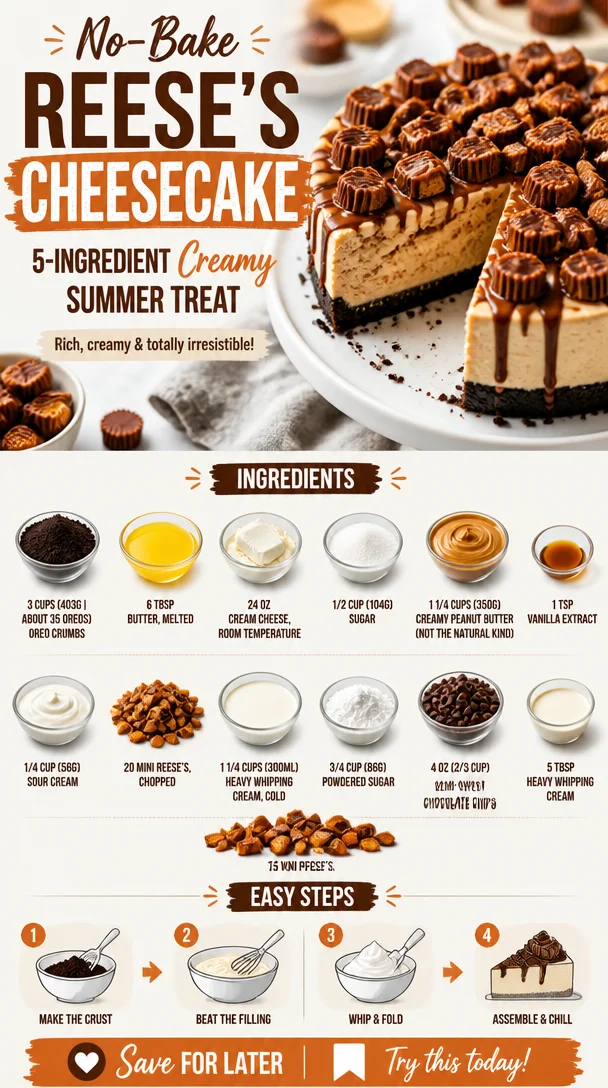
No-Bake Reese’s Cheesecake: 5-Ingredient Creamy Summer Treat
No-Bake Reese’s Peanut Butter Cheesecake: An Irresistible Treat
Welcome to the sweet side of cooking, friends! Today, we’re diving headfirst into a scrumptious creation that combines two of the best things known to humankind: cheesecake and Reese’s Peanut Butter Cups. Yes, you heard it right—this is a No-Bake Reese’s Peanut Butter Cheesecake, and it’s so simple, creamy, and utterly delicious that you’ll find it hard to resist. Whether you’re planning a birthday bash or just need a sweet pick-me-up after a long week, this cheesecake is the answer to all your dessert dreams.
Picture this: creamy cheesecake goodness resting atop a crumbly Oreo crust, all drizzled with luscious chocolate and studded with mini Reese’s. It’s like a party on your plate, and the best part? You can whip it up without ever turning on your oven! So, grab your mixing bowls and let’s get started on making this delightful dessert that’s perfect for all peanut butter and chocolate lovers out there.
A Sweet Memory
Before we jump into the recipe, I want to share a little story about my love for cheesecake. Growing up, my mom would always make a chocolate cheesecake for special occasions—birthdays, anniversaries, you name it. I remember the rich aroma wafting through our kitchen, and how each slice was a reason to celebrate. But let’s be real; it was the creamy, dreamy texture of that cheesecake that always had me begging for seconds.
Years later, I discovered the delightful combination of peanut butter and chocolate, thanks to my obsession with those mini Reese’s cups. So, I thought, "Why not create a cheesecake recipe that pays homage to both my childhood favorite and my peanut buttery obsession?" That’s how the No-Bake Reese’s Peanut Butter Cheesecake was born! It’s easy, it fulfills my sweet tooth, and every bite transports me back to those family gatherings. Let’s make some sweet memories together, shall we?
Ingredients
To create this dessert masterpiece, you’ll need the following ingredients. Each ingredient plays a crucial role in delivering that perfect flavor and texture, so let’s break them down:
-
Oreo crumbs (3 cups | about 35 Oreos): These will be the base of our cheesecake. If you’re feeling adventurous, you can substitute with graham cracker crumbs for a different flavor profile, but let’s be honest—Oreo crust is where it’s at!
-
Butter (6 tbsp, melted): This binds the Oreo crumbs together. For a dairy-free version, coconut oil works well as a substitute.
-
Cream cheese (24 oz, room temperature): The star ingredient that gives the cheesecake its creamy texture. You can opt for reduced-fat cream cheese if you want to lighten it up a bit.
-
Sugar (1/2 cup | 104g): A balance of sweetness in your cheesecake. Feel free to use coconut sugar or a sugar substitute to suit your dietary preferences.
-
Creamy peanut butter (1 1/4 cups | 350g): This is where the magic happens! Make sure to use creamy, not natural, peanut butter for the best consistency.
-
Vanilla extract (1 tsp): A must-have for flavor enhancement. Homemade vanilla extract brings an extra touch of warmth!
-
Sour cream (1/4 cup | 58g): This adds a hint of tanginess and creaminess, elevating the overall taste of the cheesecake. Greek yogurt is a decent substitute if you’re out of sour cream.
-
Mini Reese’s (20, chopped): Because who doesn’t want chunks of chocolatey goodness in their cheesecake? You can use regular Reese’s or even other varieties if you wish!
-
Heavy whipping cream (1 1/4 cups | 300ml, cold): Essential for whipping into fluffy clouds of deliciousness. For a lighter option, opt for whipped coconut cream.
-
Powdered sugar (3/4 cup | 86g): This sweetens the whipped cream and stabilizes it, ensuring we get that perfect dollop on top. You can reduce the quantity if you prefer less sweetness.
-
Semi-sweet chocolate chips (4 oz | 2/3 cup): These will be melted to create that dreamy chocolate drizzle. Any chocolate you love will work—dark chocolate is a great option too!
-
Heavy whipping cream (5 tbsp): Used to melt down the chocolate for that rich drizzle!
-
Mini Reese’s (15, chopped): Trust me; you’ll want even more of this goodness on top!
Step-by-Step Instructions
Making this No-Bake Reese’s Peanut Butter Cheesecake is a breeze. Follow these steps, and you’ll have a dessert fit for a celebration in no time!
-
Prepare the Oreo crust:
- In a mixing bowl, combine the Oreo crumbs and melted butter. Mix until the crumbs are evenly coated—think wet sand.
- Press the mixture firmly into the bottom of a 9-inch springform pan. Use the back of a measuring cup for even pressure; this will help it hold its shape once set. Put it in the freezer while you prepare the filling.
-
Make the cheesecake filling:
- In a large mixing bowl, beat the room temperature cream cheese with an electric mixer until it’s smooth and creamy—about 2 minutes. This is where you’ll want to make sure there are no lumps!
- Add the sugar, creamy peanut butter, vanilla extract, and sour cream. Beat again until everything is well combined. The mixture should be fluffy and full of that inviting peanut buttery goodness.
-
Fold in the chopped Reese’s:
- Gently fold in the chopped mini Reese’s using a spatula. This step is all about preserving the chunks in your cheesecake. Trust me; each bite will be worth it!
-
Whip the cream:
- In a separate bowl, pour in the cold heavy whipping cream. Beat on high speed until soft peaks form—this should take around 3-4 minutes.
- Gradually add the powdered sugar, continuing to whip until stiff peaks form. Aim for a cloud-like, fluffy consistency.
-
Combine the whipped cream with the cream cheese mixture:
- Gently fold the whipped cream into the cheesecake mixture until it’s well combined but still light and airy. Remember, you want that airy texture—the fluffier, the better!
-
Pour the filling into the crust:
- Carefully spoon the cheesecake filling over the prepared crust, smoothing out the top as you go. Use a spatula to create a gentle swirl if you’re feeling fancy!
-
Chill the cheesecake:
- Cover the springform pan with plastic wrap and place it in the refrigerator. Allow it to chill for at least 4 hours, or overnight if you can resist the temptation!
-
Make the chocolate drizzle:
- In a microwave-safe bowl, combine the semi-sweet chocolate chips and 5 tablespoons of heavy whipping cream. Microwave in 30-second intervals, stirring in between, until melted and smooth. Set aside to cool slightly.
-
Serve it up:
- Once the cheesecake is set, remove it from the springform pan. Drizzle the melted chocolate over the top and finish with the remaining chopped mini Reese’s scattered across the surface. It’s like a fancy dessert just waiting to wow your friends and family!
Serving Suggestions
Slice your No-Bake Reese’s Peanut Butter Cheesecake into generous portions and place them on dessert plates. I love adding a dollop of whipped cream on the side for that extra touch of joy! Consider serving it with a forkful of chocolate sauce for added indulgence. Pair it with a scoop of vanilla ice cream or a sprinkle of crushed nuts for a fabulous crunch. This dessert is about making it your own, so feel free to get creative!
Recipe Variations
Looking to mix things up? Here are some fun variations to try:
-
Cookie Base Swap: Try using graham crackers, digestive biscuits, or even crushed pretzels for a salty-sweet crust!
-
Flavor Infusion: Add a tablespoon of your favorite liqueur, like Kahlúa or Bailey’s, to the cheesecake filling for an adult twist.
-
Healthier Version: Substitute half of the cream cheese with Greek yogurt for a lighter option, and use a natural peanut butter without added sugar.
-
Peanut Butter Swirl: For a pretty presentation, drizzle some extra peanut butter into the filling before pouring it into the crust and use a knife to create swirls.
-
Nutty Surprise: Add crushed nuts, like peanuts or almonds, into the cheesecake mixture for extra crunch and flavor—yum!
Chef’s Notes
This No-Bake Reese’s Peanut Butter Cheesecake is one of those recipes that’s evolved over time. I remember my first attempts, where I may have overwhipped the cream (leading to a bit of a grainy texture—oops!) or slightly underfilled my crust. It took a few tries to get the balance just right, but that was all part of the fun! Now, I love sharing it with friends and family, and it never fails to impress.
So, don’t stress if things get a little messy in the kitchen. After all, the joy of cooking comes not just from the end result but from the laughter and love shared along the way!
FAQs and Troubleshooting
-
Can I use natural peanut butter instead of creamy?
- While you can technically use natural peanut butter, it can affect the texture of your cheesecake. Avoid the oily, drippy kind as it may make your cheesecake too runny.
-
What if my cheesecake doesn’t set?
- It could be due to not chilling it long enough or not using sufficient stabilizing ingredients like cream cheese. Ensure both are well mixed and cold to help it firm up properly.
-
How do I store leftovers?
- Store any leftover cheesecake in an airtight container in the fridge for up to 5 days. Just remember to cover the top with plastic wrap to keep it fresh!
-
Can I freeze this cheesecake?
- Absolutely! Once set, wrap it tightly in plastic wrap and aluminum foil, and it will last in the freezer for about 2 months. Let it defrost in the refrigerator overnight before serving.
I hope this No-Bake Reese’s Peanut Butter Cheesecake brings as much joy to your home as it has to mine. It’s simple, delicious, and an absolute crowd-pleaser—a dessert worth celebrating! So go on, grab the ingredients, and let’s make some sweet memories together. Happy baking (or should I say making?)!
PrintNo-Bake Reese’s Peanut Butter Cheesecake
A creamy and delicious no-bake cheesecake that combines the rich flavors of peanut butter and chocolate, perfect for dessert lovers.
- Prep Time: 15 minutes
- Cook Time: 240 minutes
- Total Time: 255 minutes
- Yield: 12 servings 1x
- Category: Dessert
- Method: No-Bake
- Cuisine: American
- Diet: Vegetarian
Ingredients
- 3 cups Oreo crumbs (about 35 Oreos)
- 6 tbsp butter, melted
- 24 oz cream cheese, room temperature
- 1/2 cup sugar (104g)
- 1 1/4 cups creamy peanut butter (350g)
- 1 tsp vanilla extract
- 1/4 cup sour cream (58g)
- 20 mini Reese’s, chopped
- 1 1/4 cups heavy whipping cream (300ml, cold)
- 3/4 cup powdered sugar (86g)
- 4 oz semi-sweet chocolate chips (2/3 cup)
- 5 tbsp heavy whipping cream
- 15 mini Reese’s, chopped
Instructions
- Prepare the Oreo crust: In a mixing bowl, combine the Oreo crumbs and melted butter. Mix until the crumbs are evenly coated. Press the mixture firmly into the bottom of a 9-inch springform pan. Freeze while preparing the filling.
- Make the cheesecake filling: Beat the cream cheese until smooth and creamy. Add the sugar, peanut butter, vanilla extract, and sour cream. Beat until well combined.
- Fold in the chopped Reese’s, preserving the chunks.
- Whip the cream: In a separate bowl, beat the cold heavy whipping cream until soft peaks form. Gradually add powdered sugar until stiff peaks form.
- Combine the whipped cream with the cheesecake mixture, folding gently until well combined.
- Pour the filling into the crust and smooth out the top.
- Chill the cheesecake for at least 4 hours or overnight.
- Make the chocolate drizzle by melting chocolate chips and cream in the microwave in intervals. Set aside to cool.
- Serve the chilled cheesecake topped with chocolate drizzle and remaining chopped Reese’s.
Notes
For a healthier version, substitute half the cream cheese with Greek yogurt and use natural peanut butter. Store leftovers in an airtight container in the fridge for up to 5 days.
Nutrition
- Serving Size: 1 serving
- Calories: 400
- Sugar: 27g
- Sodium: 250mg
- Fat: 25g
- Saturated Fat: 10g
- Unsaturated Fat: 10g
- Trans Fat: 0g
- Carbohydrates: 35g
- Fiber: 2g
- Protein: 6g
- Cholesterol: 40mg
Keywords: cheesecake, no-bake, peanut butter, dessert, chocolate
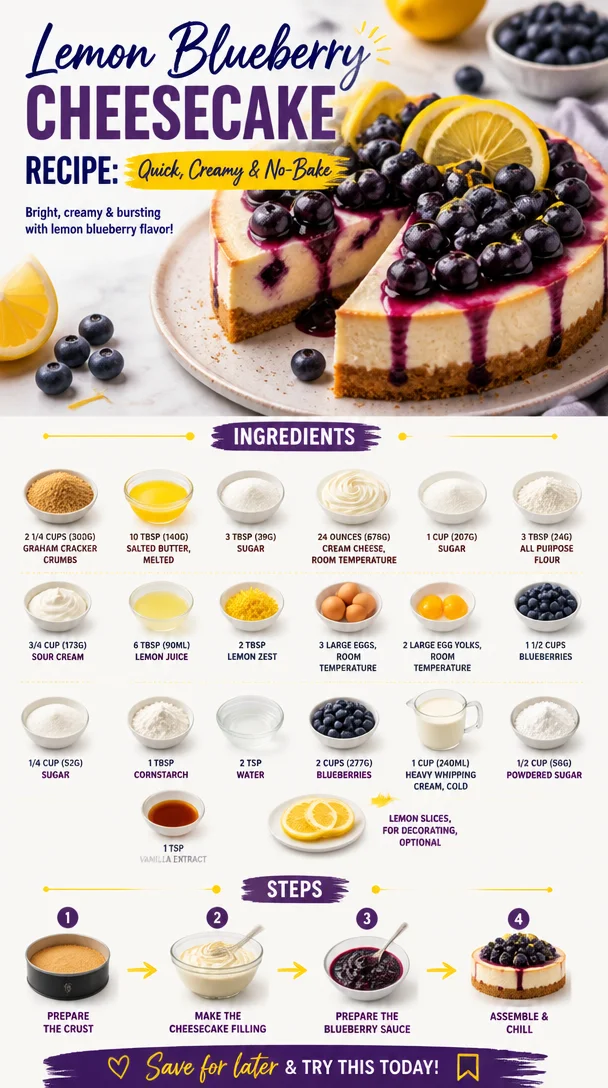
Lemon Blueberry Cheesecake Recipe: Quick, Creamy & No-Bake
The Ultimate Lemon Blueberry Cheesecake: A Sweet Taste of Summer
Welcome to Clean Plate Cravings, my friends! Today, we’re diving into a dessert that brings a whirlwind of memories that are as vibrant as its flavors: Lemon Blueberry Cheesecake. This delightful dish combines the creamy richness of cheesecake with a refreshing citrus zing and the burst of blueberries, making it a perfect sweet treat for any occasion.
As I stir together the ingredients, I can almost hear the laughter of family gatherings and the soft breeze of summer evenings. Cheesecake has a special place in my heart—it’s not just a dessert; it’s a celebration of life, joy, and the delicious moments that we share around the table.
A Slice of Nostalgia
Growing up, my family had an annual tradition of hosting summer barbecues in our backyard. The air was always alive with laughter and the enchanting scent of grilled goodies wafting from the grill. At the end of each meal, there was always a dessert—there had to be! One of the highlights was my mom’s Lemon Blueberry Cheesecake. I can still picture her, apron-clad, delicately folding fresh blueberries into the creamy mixture while the afternoon sun made the kitchen glow.
I would stand on a stool beside her, eagerly watching, occasionally sneaking a taste of the tangy lemon filling before it made its way to the crust. The anticipation was palpable as we waited for it to chill, and the moment we finally sliced into that cheesecake—oh, pure bliss!
Those summer days became a cherished memory for me, and every time I make this cheesecake, I’m reminded of all the love and laughter that filled our home. It’s a reminder that food is more than just sustenance; it’s a way to create connections with the people we cherish most.
Ingredients: What You’ll Need
Now, let’s get down to the nitty-gritty! Here’s what you’ll need to whip up this drool-worthy dessert:
- Graham Cracker Crumbs (2 1/4 cups / 302g): A classic base for cheesecakes; you can substitute with crushed digestive biscuits or gluten-free graham crackers for a twist.
- Salted Butter (10 tbsp / 140g, melted): This adds richness to the crust. Unsalted butter works too, just add a pinch of salt if you go that route!
- Sugar (3 tbsp / 39g for crust + 1 cup / 207g for filling): Balances the tartness; use coconut sugar or maple syrup if you want a more natural sweetener.
- Cream Cheese (24 ounces / 678g, room temperature): The star of the show! Ensure it’s soft to achieve a smooth, creamy texture. You can use vegan cream cheese for a lighter option.
- All-Purpose Flour (3 tbsp / 24g): Helps stabilize the cheesecake. You can swap in almond flour for a gluten-free option.
- Sour Cream (3/4 cup / 173g): Adds tanginess and creaminess; Greek yogurt makes a great substitute for a slightly lighter version.
- Lemon Juice (6 tbsp / 90ml): Freshly squeezed is best for that zesty flavor! Bottled lemon juice works in a pinch, but it’s not quite the same.
- Lemon Zest (2 tbsp): The magic ingredient that amps up the lemon flavor. Make sure to zest it before juicing!
- Large Eggs (3) and Large Egg Yolks (2), both at room temperature: These add richness and structure. You can use flax eggs for a vegan alternative.
- Blueberries (1 1/2 cups / 277g for the cheesecake + 2 cups / 240ml for the topping): Fresh is best, but you can use frozen blueberries if that’s what you have on hand. Just make sure to thaw and drain excess moisture!
- Sugar (1/4 cup / 52g for topping): This will balance the tartness of the blueberries. For a healthier version, try using honey or agave syrup.
- Cornstarch (1 tbsp): This thickens the blueberry topping and gives it a beautiful glossy finish.
- Water (2 tsp): Just a little to help dissolve the cornstarch.
- Heavy Whipping Cream (1 cup / 240ml, cold): This is for the whipped cream topping. You can use coconut cream for a non-dairy option.
- Powdered Sugar (1/2 cup / 58g): It sweetens the whipped cream; feel free to adjust according to your taste.
- Vanilla Extract (1 tsp): Enhances flavor; homemade vanilla extract takes it to the next level!
- Lemon Slices (for decorating, optional): Add a pop of color and a touch of freshness.
Step-by-Step Instructions: Time to Bake!
Alright, let’s get our hands dirty! Follow these steps to create your Lemon Blueberry Cheesecake masterpiece:
-
Preheat your oven: Preheat your oven to 325°F (160°C). This ensures a gentle bake, giving the cheesecake that creamy texture we all love.
-
Prepare the crust: In a medium bowl, mix the graham cracker crumbs, melted butter, and 3 tablespoons of sugar. Stir until well combined. It should resemble wet sand! If it feels too dry, just add a touch more melted butter.
-
Press the crust: Firmly press the crumb mixture into the bottom of a springform pan. Use the bottom of a measuring cup or a flat surface to create an even layer. Bake for about 10 minutes or until lightly golden. Let it cool while you prepare the filling.
-
Make the cheesecake filling: In a large mixing bowl, beat the room temperature cream cheese until smooth and creamy. This is the time to let your electric mixer do the work!
-
Add sugar and flour: Gradually add in the 1 cup of sugar and flour, mixing on low speed until blended. Don’t overmix; we want a smooth texture without too much air incorporated.
-
Incorporate the wet ingredients: Add the sour cream, lemon juice, lemon zest, eggs, and egg yolks (making sure they’re at room temperature). Mix gently until everything is well combined—remember, low and slow keeps the cheesecake from cracking.
-
Fold in the blueberries: Gently fold in 1 1/2 cups of fresh blueberries. This adds explosions of flavor as you bite into the cheesecake!
-
Pour into the crust: Pour the creamy cheesecake mixture over the cooled crust, spreading it out evenly. Tap the pan gently on the counter to release any air bubbles.
-
Bake the cheesecake: Place in the preheated oven and bake for 55-60 minutes, or until the edges are set, but the center still has a slight jiggle. This will help ensure it’s creamy and not overbaked.
-
Cool: Once baked, turn off the oven, crack the door open, and let the cheesecake cool inside for about an hour. This gradual cooling helps to prevent cracks.
-
Chill in the fridge: Once it’s cooled to room temp, cover it with plastic wrap and refrigerate for at least 4 hours (or overnight for the best flavor!).
-
Prepare the blueberry topping: In a small saucepan, combine the 2 cups of blueberries, 1/4 cup of sugar, and 1 tablespoon of cornstarch mixed with 2 teaspoons of water. Cook on medium heat, stirring frequently, until the blueberries start to burst and the mixture thickens (about 5-7 minutes). Set aside to cool.
-
Whip the cream: In a chilled bowl, whip the cold heavy cream with 1/2 cup of powdered sugar and 1 teaspoon of vanilla extract until medium peaks form. This is the moment you want to achieve that luscious, fluffy texture!
-
Assemble the cheesecake: Once the cheesecake has chilled, remove it from the springform pan and place it on a serving platter. Gently spoon the blueberry mixture over the top, allowing it to cascade over the sides for a beautiful presentation.
-
Serve with whipped cream: Top each slice with a dollop of whipped cream, and if you want to be extra fancy, decorate with lemon slices.
Serving Suggestions
Slice into this dreamy Lemon Blueberry Cheesecake and serve it chilled. Pair each slice with a dollop of whipped cream and a few fresh blueberries on top for a stunning presentation. Don’t forget a cup of coffee or a refreshing glass of iced tea—it’ll complement those bright flavors beautifully!
Recipe Variations
Feeling adventurous? Here are a few ways to mix up this classic dessert:
- Lemon Thyme: Add finely chopped fresh thyme to the cheesecake filling for a subtle herbaceous twist that pairs beautifully with the lemon.
- Berry Medley: Swap out some blueberries for raspberries or strawberries for a colorful berry blend.
- Chocolate Drizzle: Drizzle melted dark chocolate over the blueberry topping for a decadent finish that contrasts with the tartness.
- Mini Cheesecakes: Use a muffin tin to make mini cheesecakes, which are perfect for parties and easier to serve!
- Vegan Version: Replace cream cheese with vegan cream cheese, eggs with flax eggs, and add a bit of silken tofu for creaminess!
Chef’s Notes
This Lemon Blueberry Cheesecake has evolved over the years, a blend of my childhood memories and my passion for baking. I once made it for a potluck, and believe me, it didn’t last long! People were coming back for seconds (and thirds). My secret? Always use fresh ingredients! They make an astounding difference in flavor. And really, who doesn’t love the combination of creamy cheesecake, zesty lemon, and sweet blueberries?
In my many attempts, I’ve learned to embrace the bumps in the road—like the time I forgot to bake the crust completely and had to salvage it with a quick oven fix. That little hiccup taught me that baking isn’t just about following a recipe—it’s about joy and discovery!
FAQs and Troubleshooting
-
Why is my cheesecake cracking?
- Cracks are often caused by overmixing or baking at too high a temperature. Make sure to gently mix the filling and bake it at a lower temperature to prevent cracking.
-
How do I store leftovers?
- Keep the cheesecake in an airtight container in the refrigerator for up to 5-7 days. It also freezes well; just wrap it tightly in plastic wrap and foil.
-
Can I use frozen blueberries?
- Yes! Just be sure to thaw them and drain any excess moisture before adding them to the cheesecake filling.
-
My whipped cream isn’t whipping! What happened?
- Make sure the bowl and the heavy cream are both very cold—this is crucial for achieving those fluffy peaks. If it still doesn’t whip, try using a different brand of cream.
Nutritional Info
This Lemon Blueberry Cheesecake is a special treat, so enjoy it in moderation! While precise nutritional info can vary, one slice typically contains around 350-400 calories, 25g of fat, and 30g of carbohydrates.
And there you have it—your go-to guide for creating a luscious Lemon Blueberry Cheesecake! I hope this sweet treat becomes a cherished part of your kitchen adventures as much as it has in mine. Whether you’re serving it at a gathering or savoring it solo on a quiet afternoon, this cheesecake is sure to delight the taste buds and spark some cherished memories. Happy baking, my friends!
PrintThe Ultimate Lemon Blueberry Cheesecake
A delightful dessert combining creamy cheesecake, refreshing lemon zest, and bursts of blueberries, perfect for any occasion.
- Prep Time: 30 minutes
- Cook Time: 70 minutes
- Total Time: 100 minutes
- Yield: 12 servings
- Category: Dessert
- Method: Baking
- Cuisine: American
- Diet: Vegetarian
Ingredients
- Graham Cracker Crumbs (2 1/4 cups / 302g)
- Salted Butter (10 tbsp / 140g, melted)
- Sugar (3 tbsp / 39g for crust + 1 cup / 207g for filling)
- Cream Cheese (24 ounces / 678g, room temperature)
- All-Purpose Flour (3 tbsp / 24g)
- Sour Cream (3/4 cup / 173g)
- Lemon Juice (6 tbsp / 90ml)
- Lemon Zest (2 tbsp)
- Large Eggs (3, room temperature)
- Large Egg Yolks (2, room temperature)
- Blueberries (1 1/2 cups / 277g for the cheesecake + 2 cups / 240ml for the topping)
- Sugar (1/4 cup / 52g for topping)
- Cornstarch (1 tbsp)
- Water (2 tsp)
- Heavy Whipping Cream (1 cup / 240ml, cold)
- Powdered Sugar (1/2 cup / 58g)
- Vanilla Extract (1 tsp)
- Lemon Slices (for decorating, optional)
Instructions
- Preheat your oven to 325°F (160°C).
- In a medium bowl, mix the graham cracker crumbs, melted butter, and 3 tablespoons of sugar.
- Press the crust mixture into the bottom of a springform pan.
- Bake for about 10 minutes or until lightly golden and let it cool.
- In a large mixing bowl, beat the cream cheese until smooth.
- Add in the 1 cup of sugar and flour, mixing on low speed until blended.
- Add the sour cream, lemon juice, lemon zest, eggs, and egg yolks, and mix gently.
- Fold in 1 1/2 cups of blueberries.
- Pour the cheesecake mixture over the cooled crust.
- Bake for 55-60 minutes until the edges are set with a slight jiggle in the center.
- Once baked, turn off the oven and let the cheesecake cool inside for about an hour.
- Cover with plastic wrap and refrigerate for at least 4 hours (or overnight).
- In a small saucepan, combine the blueberries, 1/4 cup of sugar, and cornstarch mixed with water, and cook until thickened.
- Whip the heavy cream with powdered sugar and vanilla until medium peaks form.
- Assemble the cheesecake and spoon the blueberry topping over it.
- Serve with whipped cream and lemon slices.
Notes
Use fresh ingredients for the best flavor. This cheesecake can be made vegan by using plant-based substitutes.
Nutrition
- Serving Size: 1 slice
- Calories: 375
- Sugar: 27g
- Sodium: 320mg
- Fat: 26g
- Saturated Fat: 15g
- Unsaturated Fat: 5g
- Trans Fat: 0g
- Carbohydrates: 36g
- Fiber: 1g
- Protein: 5g
- Cholesterol: 80mg
Keywords: cheesecake, lemon, blueberry, dessert, summer, sweet treat
Min No-Bake Key Lime Cheesecake Jars for Meal Prep
No-Bake Key Lime Cheesecake Jars: A Slice of Sunshine in Every Bite!
Hey there, fellow foodies! I’m so excited to share one of my absolute favorite desserts with you today: No-Bake Key Lime Cheesecake Jars! Picture this: a creamy, tart filling layered with sweet, buttery graham cracker crumbs, all served in adorable little jars. It’s like capturing the essence of summer in a deliciously dreamy dessert. Whether it’s a summer gathering, a relaxing weekend with friends, or just a little self-care after a long week, these jars of joy will make every moment feel special.
Imagine walking into your kitchen, the sun shining through the windows, and that warm breeze beckoning you to create something refreshing. This no-bake treat is super easy to whip up, allowing you to spend more time enjoying your creation rather than slaving over the stove. Perfect for those hot summer days when you want something scrumptious but don’t want to turn on the oven!
So grab your whisk and your favorite jars, and let’s dive into how to make this delightful dessert that will have everyone asking for seconds. Trust me, once you make this, you’ll find all the excuses to whip it out of your fridge!
A Sweet Memory to Cherish
Ah, key lime cheesecake – this dessert brings back so many lovely memories of summer beach trips with my family. I remember how we would drive down to the Florida coast with the windows down, the salty air blowing through the car, and a playlist of our favorite tunes blasting from the speakers. Our first stop would always be at this charming little cafe right by the shore, known for its homemade key lime pie.
I vividly remember the first time I took a bite of their cheesecake version. The tangy lime flavor hit my palate like the ocean waves crashing against the shore, and I was hooked! There was something so nostalgic about that creamy filling combined with the crunch of the graham cracker crust. Fast forward to today, and I’ve transformed that love for key lime cheesecake into these fun little jars. They embody that same luscious flavor, and they stir up wonderful memories with every bite.
Ingredients
Let’s gather our ingredients, shall we? This is a super simple list:
-
8 oz cream cheese, softened: This is the star of your cheesecake! Make sure to let it soften at room temperature, so it’s easy to mix and results in a smooth texture. If you’re in a pinch, you can use mascarpone cheese for a different flavor profile.
-
1/2 cup sugar: This will sweeten your filling perfectly! You can substitute it with honey or maple syrup for a more natural sweetness. Just keep in mind that the texture may vary a bit.
-
1 cup heavy cream: For that dreamy whipped topping on your cheesecake! You can swap it with coconut cream for a dairy-free option.
-
1/2 cup key lime juice: This gives the recipe its zesty kick! Freshly squeezed key limes are ideal, but if you can’t find them, bottled key lime juice works well too. Just check the ingredients for all-natural options.
-
1 tsp vanilla extract: A hint of vanilla enhances the flavor and makes everything more delightful.
-
Graham cracker crumbs: These create the crust! You can crush your own graham crackers or use store-bought crumbs. For a gluten-free version, try using almond flour or gluten-free graham crackers.
-
Lime zest for garnish: This is the cherry on top! Not only does it make your dessert pretty, but it also adds an extra layer of lime flavor.
Step-by-Step Instructions
Now that we have everything ready, let’s get cooking!
-
Mixing the Base: In a large bowl, combine the softened cream cheese and sugar. Use an electric mixer on medium speed to beat it together until it is smooth and creamy. This usually takes about 2-3 minutes. Chef’s tip: Make sure your cream cheese is at room temperature; cold cream cheese can leave lumps in your filling.
-
Whipping the Cream: In a separate bowl, whip the heavy cream until it forms stiff peaks. This might take about 3-5 minutes. You’ll know it’s ready when it holds its shape and doesn’t slosh around. A simple whisk will do if you’re feeling adventurous! This step adds lightness to your cheesecake.
-
Adding the Zesty Kick: Gently fold the whipped cream into the cream cheese mixture. Use a spatula and fold it in slowly to maintain the fluffiness of the whipped cream. Once combined, pour in the key lime juice and vanilla extract, and fold again until everything is well mixed. Your filling should be creamy and light!
-
Layering Time: Now for the fun part! In a jar or a glass, add a spoonful of graham cracker crumbs at the bottom. Then, layer on a generous scoop of your cream cheese mixture. You can use a piping bag for a fancy touch, but a regular spoon does just fine too! Repeat the layers until you reach the top of the jar, ending with a final layer of the cheesecake filling.
-
Chill and Set: Once your jars are assembled, pop them in the fridge for at least 2 hours (or overnight if you can wait!). This will help the cheesecake firm up and allow all those flavors to meld beautifully.
-
Garnish and Serve: Right before serving, sprinkle some extra graham cracker crumbs on top for garnish and finish it off with a sprinkle of lime zest. Serve chilled and watch your friends and family rave about how delicious it is!
Serving Suggestions
When it comes to serving these jars, presentation is key! I love to layer them up in clear glass jars, showcasing all those beautiful layers of creaminess and crunch. You can also use pretty dessert cups or small mason jars for a rustic touch. Pair them with fresh fruit like blueberries or strawberries on the side, or even a sprig of mint for a pop of color. These jars are not just a treat for the taste buds, but for the eyes too!
Recipe Variations
Now, let’s spice things up a bit! Here are a few creative spins on this recipe:
-
Chocolate Key Lime Cheesecake Jars: Add some melted chocolate to the cream cheese mixture, or use chocolate graham crackers to create a delicious chocolate crust for a rich twist.
-
Berry Swirl: Fold in some berry puree (like raspberry or strawberry) into the cream cheese mixture for a fruity surprise!
-
Tequila Key Lime Cheesecake: For the adults, add a splash of tequila to the cream cheese mixture to turn this dessert into a fun, boozy treat.
-
Coconut Cream Variation: Incorporate shredded coconut into the crust and the filling for a tropical coconut key lime experience.
-
Non-Dairy Version: Substitute cream cheese with cashew cream or silken tofu blended until smooth, and the heavy cream with coconut cream for a vegan-friendly option.
Chef’s Notes
I absolutely adore how this recipe has evolved over the years! My very first attempt was a full cheesecake, but it took forever to bake, cool, and slice perfectly. I decided to ditch the oven and embrace the joy of no-bake desserts, which is definitely more my style (and allows for more creativity!). Plus, no one can resist grabbing their own little jar of happiness! Feel free to be experimental with the layers—sometimes, I throw in some crushed candies or rotate the flavors. Get creative; the kitchen is your playground!
FAQs and Troubleshooting
-
What if my cream cheese is lumpy?
- If your cream cheese isn’t soft enough, you might end up with a few lumps. Just keep mixing until it’s smooth, or put it in the microwave for 10-15 seconds to soften it a bit more before mixing.
-
How can I make them less sweet?
- You can reduce the sugar in the filling to taste. Keep in mind that the tartness from the key lime juice will balance it out, so adjust according to your preference!
-
Can I use regular limes instead of key limes?
- Absolutely! Regular limes will work just fine. The flavor may not be as unique, but it’ll still taste great!
-
How long do they last in the fridge?
- These jars can be stored in the fridge for about 3-4 days. Just make sure they’re covered!
Nutritional Info
This no-bake key lime cheesecake jar is not only delicious but also carries a delightful nutritional profile that fits into a balanced lifestyle. Just remember to treat it as an indulgent dessert!
So there you have it, my friends! A fun, refreshing, and super easy recipe that you can whip up any time the mood strikes. I hope you enjoy making (and devouring) these No-Bake Key Lime Cheesecake Jars as much as I do. Here’s to blissful bites and sweet memories in the kitchen! Let’s keep it fresh, simple, and seriously delicious! Happy cooking!
PrintNo-Bake Key Lime Cheesecake Jars
A creamy, tart filling layered with sweet, buttery graham cracker crumbs served in adorable jars, perfect for summer gatherings.
- Prep Time: 15 minutes
- Cook Time: 0 minutes
- Total Time: 120 minutes
- Yield: 4 servings 1x
- Category: Dessert
- Method: No-Bake
- Cuisine: American
- Diet: Vegetarian
Ingredients
- 8 oz cream cheese, softened
- 1/2 cup sugar
- 1 cup heavy cream
- 1/2 cup key lime juice
- 1 tsp vanilla extract
- Graham cracker crumbs
- Lime zest for garnish
Instructions
- Mix the softened cream cheese and sugar in a large bowl until smooth and creamy using an electric mixer.
- Whip the heavy cream in a separate bowl until it forms stiff peaks.
- Fold the whipped cream gently into the cream cheese mixture, then add the key lime juice and vanilla extract.
- Layer graham cracker crumbs and cream cheese mixture in jars until full.
- Chill in the refrigerator for at least 2 hours.
- Garnish with extra graham cracker crumbs and lime zest before serving.
Notes
Serve in clear glass jars for a beautiful presentation. You can alter the layers and add fruits for decoration.
Nutrition
- Serving Size: 1 jar
- Calories: 320
- Sugar: 18g
- Sodium: 180mg
- Fat: 25g
- Saturated Fat: 14g
- Unsaturated Fat: 8g
- Trans Fat: 0g
- Carbohydrates: 32g
- Fiber: 1g
- Protein: 4g
- Cholesterol: 80mg
Keywords: no-bake cheesecake, key lime dessert, summer dessert