Freezer Blueberry Jam: 3-Ingredient Recipe for Meal Prep
Embrace the Sweetness: A Guide to Freezer Blueberry Jam
Welcome to Clean Plate Cravings! Today, we’re diving into a delightful kitchen adventure that will make your taste buds sing: making your very own freezer blueberry jam. If you’ve ever marveled at the perfect jar of jam on a bakery shelf or wished you could bottle up the summer sweetness of fresh blueberries, then this recipe is for you. Not only is this homemade jam simple to make, but it also bursts with flavor, nostalgia, and a touch of creativity.
Jam-making might seem intimidating, but I promise you it doesn’t have to be! In fact, my freezer blueberry jam recipe is so uncomplicated and foolproof that you’ll feel like a pro in no time. Whether you spread it on your morning toast, dollop it onto a scoop of vanilla ice cream, or incorporate it into your baking, this jam will transform everyday meals into something extraordinary.
So grab your freshest blueberries, roll up those sleeves, and let’s get started—because there’s no better feeling than sharing homemade goodness with friends and family!
A Sweet Memory to Cherish
Growing up, my summers were filled with lazy afternoons spent at my grandparents’ farmhouse. The sprawling yard promised adventure, but my favorite spot? It was always the blueberry patch. With sun-kissed cheeks and fingers stained purple from picking, I’d race my cousins to see who could fill their bucket first. We would pluck the juiciest berries, laughing and competing while our grandparents churned out the most divine blueberry pies and jams in the kitchen.
One particular summer, my grandma decided it would be a great time to teach us how to make jam. We stood by the stove, my little hands struggling to stir the bubbling mixture as she chattered about the art of preserving. The smell of warm blueberries dancing with sugar still lingers in my memory. I can still hear her gentle voice guiding me, "Jam is like a little time capsule for those sweet moments. You just need the right ingredients!"
That day ignited my passion for cooking and preserving, and I’ve often thought back on it. Making my own freezer blueberry jam has allowed me to recreate those sunny memories every time I pop open a jar. Each spoonful is a reminder of home, laughter, and the delicious joy of summer. Now, in every scrumptious bite, I invite you to relish those fresh blueberry moments too!
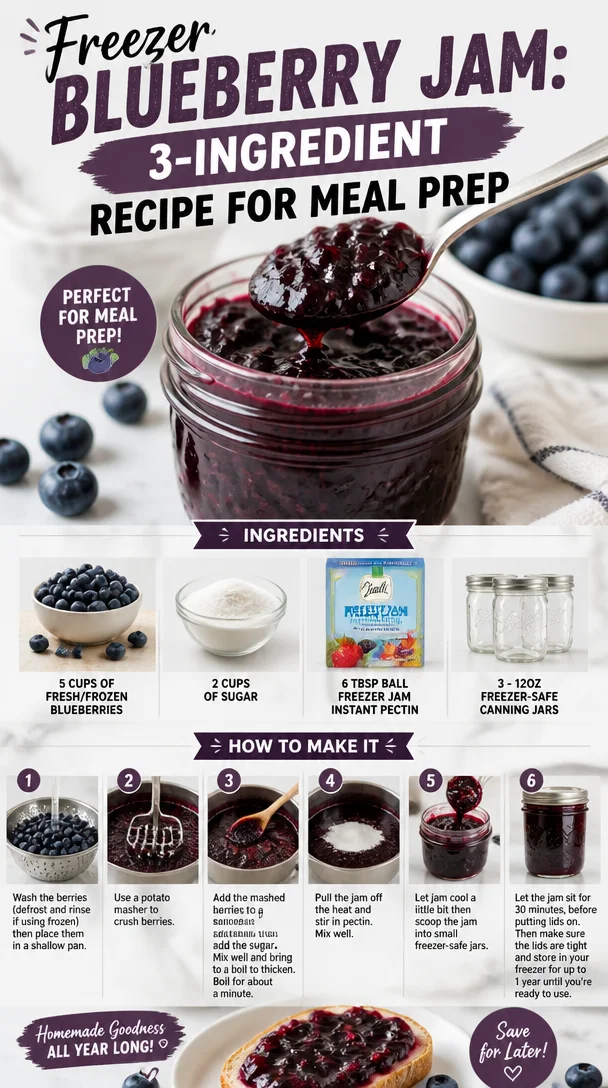
Ingredients for Freezer Blueberry Jam
To whip up a batch of this amazing freezer blueberry jam, you’ll need just a handful of ingredients. Here’s what you’ll need:
-
5 Cups of Fresh or Frozen Blueberries
Juicy blueberries are the star here! Fresh is great during their peak season, but frozen berries work wonderfully too. Just make sure they’re unsweetened and without any added ingredients. -
2 Cups of Sugar
Sugar isn’t just for sweetness; it also acts as a preservative! If you’re looking for a less sugary alternative, consider using less sugar or a natural sugar substitute. Just remember, this may alter both the texture and flavor. -
6 TBSP Ball Freezer Jam Instant Pectin
This magical ingredient helps your jam set without the long cooking process traditional jams require. If you can’t find it, other low-sugar pectins work well too—just follow the packet instructions! -
3 – 12 Oz Freezer-Safe Canning Jars
Make sure to have your jars ready! Glass jars are perfect, but plastic containers also do the trick. Just remember that the jars need to be freezer-safe to avoid any breaks as they expand.
Step-by-Step Instructions
Are you ready to create your own jam? Let’s walk through the steps together!
-
Prep Your Ingredients
Start by washing your blueberries gently under cold water. If you’re using frozen ones, there’s no need to thaw them—you can toss them in straight from the freezer! -
Mash Those Berries
Place your washed blueberries into a large mixing bowl. Using a potato masher (or a fork, get creative!), gently mash them to your preferred consistency. I love leaving a few whole berries for texture, but if you prefer a smooth jam, go wild with the mashing! -
Mix in the Sugar and Pectin
Once the blueberries are mashed, add the sugar and the instant pectin. Give that a good stir! Let it sit for about 10 minutes to allow the sugar to draw out the juice. This also helps dissolve the pectin. -
Time for Stirring!
After the initial resting period, stir the mixture vigorously for about 3–4 minutes. You’re looking for a thickened consistency, and it should look glossy. This is where the magic happens! -
Transfer to Jars
Grab your canning jars and ladle the jam into them, leaving about 1/2 inch of space at the top. (Trust me—this is crucial; the jam will expand in the freezer!) Wipe the rims of the jars to remove any sticky bits and seal them with the lids. -
Set and Chill
Let your filled jars sit at room temperature for about 24 hours to set. After that, pop them in the freezer. Your jam will be good in the freezer for up to a year (if it lasts that long!), and you could also store jars in the fridge for up to three weeks. -
Enjoy the Goodness
After 24 hours, your freezer blueberry jam will be perfectly set and ready to spread on toast, stir into yogurt, or spoon over pancakes. It’s deliciously versatile!
Serving Suggestions
When it comes to serving your homemade blueberry jam, the possibilities are endless. Spread it lavishly over warm biscuits, slather it on whole-grain toast for breakfast, or pair it with creamy brie cheese for an elegant appetizer. Want a special treat? Swirl it into your morning oatmeal or use it as a delightful topping for desserts like cheesecake or ice cream. You could even experiment by mixing it into your favorite salad dressings for a sweet tang!
Recipe Variations
Feeling adventurous? Here are a few delightful twists to elevate your blueberry jam experience:
-
Lemon Zest Surprise: Add the zest of one lemon to the mixture before jarring for a zesty, citrusy punch.
-
Spicy Kick: Mix in a pinch of cayenne or a dash of ginger for a surprising spicy note that pairs beautifully with cheese.
-
Herbal Infusion: Experiment by adding a sprig of fresh mint or thyme while simmering for a fresh, aromatic finish.
-
Berry Medley: Switch out half the blueberries for mashed strawberries or raspberries for a mixed berry jam.
Chef’s Notes
This blueberry jam is more than just a recipe; it’s a journey that’s evolved over the years. I still remember the first batch I made that didn’t set. I laughed when I opened a jar to find a blueberry soup instead! Since then, I’ve learned to be patient and follow the steps, savor the process, and remember that every kitchen endeavor is an opportunity to learn—even if that means a soupy jam every now and then.
Feel free to share your own kitchen mishaps! After all, those make for the best stories and delicious lessons.
FAQs and Troubleshooting
1. Why isn’t my jam setting?
Don’t panic! A few things could be going on. Ensure you used the right amount of pectin, properly mixed in the sugar, and allowed it to sit long enough. If it’s still runny after a day, try using it as a syrup instead!
2. Can I use frozen blueberries?
Absolutely! In fact, frozen blueberries can work just as well as fresh when it comes to making jam. This makes it a year-round treat!
3. How long will my jam last?
In the freezer, it should last up to a year. In the fridge, enjoy it within three weeks for the best flavor.
4. Can I adjust the sugar content?
Certainly! Reducing sugar alters the taste and consistency, so if you prefer less sugar, consider using low-sugar pectin, and remember—the jam will be less sweet!
Nutritional Info
While the nutritional specifics can vary based on ingredient choices and portion sizes, here’s a quick overview for a typical serving of this freezer blueberry jam:
- Calories: Approximately 50 calories per tablespoon
- Total Carbohydrates: 13g
- Total Sugars: 11g
- Fiber: 0.5g
- Protein: 0.1g
And there you have it—your guide to making scrumptious freezer blueberry jam! I hope this recipe inspires you to create, share, and savor every moment in the kitchen. Because nothing beats the joy of spreading a little love (and jam!) in your life. Happy cooking!
PrintFreezer Blueberry Jam
A simple and delicious recipe for homemade freezer blueberry jam that captures the sweetness of summer.
- Prep Time: 15 minutes
- Cook Time: 10 minutes
- Total Time: 25 minutes
- Yield: 4 servings 1x
- Category: Condiment
- Method: No Cook
- Cuisine: American
- Diet: Vegetarian
Ingredients
- 5 cups Fresh or Frozen Blueberries
- 2 cups Sugar
- 6 tbsp Ball Freezer Jam Instant Pectin
- 3 – 12 oz Freezer-Safe Canning Jars
Instructions
- Prep your ingredients by washing blueberries gently under cold water.
- Mash those berries in a large mixing bowl until you reach your preferred consistency.
- Mix in the sugar and instant pectin, and let it sit for about 10 minutes.
- Stir the mixture vigorously for about 3-4 minutes until thickened.
- Transfer the jam into jars, leaving about 1/2 inch of space at the top.
- Set jars at room temperature for 24 hours before freezing.
- Enjoy your blueberry jam on toast or desserts once set!
Notes
This jam can last up to a year in the freezer and up to three weeks in the fridge. Consider adding lemon zest or mixing in other berries for variations.
Nutrition
- Serving Size: 1 tablespoon
- Calories: 50
- Sugar: 11g
- Sodium: 0mg
- Fat: 0g
- Saturated Fat: 0g
- Unsaturated Fat: 0g
- Trans Fat: 0g
- Carbohydrates: 13g
- Fiber: 0.5g
- Protein: 0.1g
- Cholesterol: 0mg
Keywords: blueberry jam, homemade jam, freezer jam, summer recipes, fruit preserves
Min No-Bake Key Lime Cheesecake Jars for Meal Prep
No-Bake Key Lime Cheesecake Jars: A Slice of Sunshine in Every Bite!
Hey there, fellow foodies! I’m so excited to share one of my absolute favorite desserts with you today: No-Bake Key Lime Cheesecake Jars! Picture this: a creamy, tart filling layered with sweet, buttery graham cracker crumbs, all served in adorable little jars. It’s like capturing the essence of summer in a deliciously dreamy dessert. Whether it’s a summer gathering, a relaxing weekend with friends, or just a little self-care after a long week, these jars of joy will make every moment feel special.
Imagine walking into your kitchen, the sun shining through the windows, and that warm breeze beckoning you to create something refreshing. This no-bake treat is super easy to whip up, allowing you to spend more time enjoying your creation rather than slaving over the stove. Perfect for those hot summer days when you want something scrumptious but don’t want to turn on the oven!
So grab your whisk and your favorite jars, and let’s dive into how to make this delightful dessert that will have everyone asking for seconds. Trust me, once you make this, you’ll find all the excuses to whip it out of your fridge!
A Sweet Memory to Cherish
Ah, key lime cheesecake – this dessert brings back so many lovely memories of summer beach trips with my family. I remember how we would drive down to the Florida coast with the windows down, the salty air blowing through the car, and a playlist of our favorite tunes blasting from the speakers. Our first stop would always be at this charming little cafe right by the shore, known for its homemade key lime pie.
I vividly remember the first time I took a bite of their cheesecake version. The tangy lime flavor hit my palate like the ocean waves crashing against the shore, and I was hooked! There was something so nostalgic about that creamy filling combined with the crunch of the graham cracker crust. Fast forward to today, and I’ve transformed that love for key lime cheesecake into these fun little jars. They embody that same luscious flavor, and they stir up wonderful memories with every bite.
Ingredients
Let’s gather our ingredients, shall we? This is a super simple list:
-
8 oz cream cheese, softened: This is the star of your cheesecake! Make sure to let it soften at room temperature, so it’s easy to mix and results in a smooth texture. If you’re in a pinch, you can use mascarpone cheese for a different flavor profile.
-
1/2 cup sugar: This will sweeten your filling perfectly! You can substitute it with honey or maple syrup for a more natural sweetness. Just keep in mind that the texture may vary a bit.
-
1 cup heavy cream: For that dreamy whipped topping on your cheesecake! You can swap it with coconut cream for a dairy-free option.
-
1/2 cup key lime juice: This gives the recipe its zesty kick! Freshly squeezed key limes are ideal, but if you can’t find them, bottled key lime juice works well too. Just check the ingredients for all-natural options.
-
1 tsp vanilla extract: A hint of vanilla enhances the flavor and makes everything more delightful.
-
Graham cracker crumbs: These create the crust! You can crush your own graham crackers or use store-bought crumbs. For a gluten-free version, try using almond flour or gluten-free graham crackers.
-
Lime zest for garnish: This is the cherry on top! Not only does it make your dessert pretty, but it also adds an extra layer of lime flavor.
Step-by-Step Instructions
Now that we have everything ready, let’s get cooking!
-
Mixing the Base: In a large bowl, combine the softened cream cheese and sugar. Use an electric mixer on medium speed to beat it together until it is smooth and creamy. This usually takes about 2-3 minutes. Chef’s tip: Make sure your cream cheese is at room temperature; cold cream cheese can leave lumps in your filling.
-
Whipping the Cream: In a separate bowl, whip the heavy cream until it forms stiff peaks. This might take about 3-5 minutes. You’ll know it’s ready when it holds its shape and doesn’t slosh around. A simple whisk will do if you’re feeling adventurous! This step adds lightness to your cheesecake.
-
Adding the Zesty Kick: Gently fold the whipped cream into the cream cheese mixture. Use a spatula and fold it in slowly to maintain the fluffiness of the whipped cream. Once combined, pour in the key lime juice and vanilla extract, and fold again until everything is well mixed. Your filling should be creamy and light!
-
Layering Time: Now for the fun part! In a jar or a glass, add a spoonful of graham cracker crumbs at the bottom. Then, layer on a generous scoop of your cream cheese mixture. You can use a piping bag for a fancy touch, but a regular spoon does just fine too! Repeat the layers until you reach the top of the jar, ending with a final layer of the cheesecake filling.
-
Chill and Set: Once your jars are assembled, pop them in the fridge for at least 2 hours (or overnight if you can wait!). This will help the cheesecake firm up and allow all those flavors to meld beautifully.
-
Garnish and Serve: Right before serving, sprinkle some extra graham cracker crumbs on top for garnish and finish it off with a sprinkle of lime zest. Serve chilled and watch your friends and family rave about how delicious it is!
Serving Suggestions
When it comes to serving these jars, presentation is key! I love to layer them up in clear glass jars, showcasing all those beautiful layers of creaminess and crunch. You can also use pretty dessert cups or small mason jars for a rustic touch. Pair them with fresh fruit like blueberries or strawberries on the side, or even a sprig of mint for a pop of color. These jars are not just a treat for the taste buds, but for the eyes too!
Recipe Variations
Now, let’s spice things up a bit! Here are a few creative spins on this recipe:
-
Chocolate Key Lime Cheesecake Jars: Add some melted chocolate to the cream cheese mixture, or use chocolate graham crackers to create a delicious chocolate crust for a rich twist.
-
Berry Swirl: Fold in some berry puree (like raspberry or strawberry) into the cream cheese mixture for a fruity surprise!
-
Tequila Key Lime Cheesecake: For the adults, add a splash of tequila to the cream cheese mixture to turn this dessert into a fun, boozy treat.
-
Coconut Cream Variation: Incorporate shredded coconut into the crust and the filling for a tropical coconut key lime experience.
-
Non-Dairy Version: Substitute cream cheese with cashew cream or silken tofu blended until smooth, and the heavy cream with coconut cream for a vegan-friendly option.
Chef’s Notes
I absolutely adore how this recipe has evolved over the years! My very first attempt was a full cheesecake, but it took forever to bake, cool, and slice perfectly. I decided to ditch the oven and embrace the joy of no-bake desserts, which is definitely more my style (and allows for more creativity!). Plus, no one can resist grabbing their own little jar of happiness! Feel free to be experimental with the layers—sometimes, I throw in some crushed candies or rotate the flavors. Get creative; the kitchen is your playground!
FAQs and Troubleshooting
-
What if my cream cheese is lumpy?
- If your cream cheese isn’t soft enough, you might end up with a few lumps. Just keep mixing until it’s smooth, or put it in the microwave for 10-15 seconds to soften it a bit more before mixing.
-
How can I make them less sweet?
- You can reduce the sugar in the filling to taste. Keep in mind that the tartness from the key lime juice will balance it out, so adjust according to your preference!
-
Can I use regular limes instead of key limes?
- Absolutely! Regular limes will work just fine. The flavor may not be as unique, but it’ll still taste great!
-
How long do they last in the fridge?
- These jars can be stored in the fridge for about 3-4 days. Just make sure they’re covered!
Nutritional Info
This no-bake key lime cheesecake jar is not only delicious but also carries a delightful nutritional profile that fits into a balanced lifestyle. Just remember to treat it as an indulgent dessert!
So there you have it, my friends! A fun, refreshing, and super easy recipe that you can whip up any time the mood strikes. I hope you enjoy making (and devouring) these No-Bake Key Lime Cheesecake Jars as much as I do. Here’s to blissful bites and sweet memories in the kitchen! Let’s keep it fresh, simple, and seriously delicious! Happy cooking!
PrintNo-Bake Key Lime Cheesecake Jars
A creamy, tart filling layered with sweet, buttery graham cracker crumbs served in adorable jars, perfect for summer gatherings.
- Prep Time: 15 minutes
- Cook Time: 0 minutes
- Total Time: 120 minutes
- Yield: 4 servings 1x
- Category: Dessert
- Method: No-Bake
- Cuisine: American
- Diet: Vegetarian
Ingredients
- 8 oz cream cheese, softened
- 1/2 cup sugar
- 1 cup heavy cream
- 1/2 cup key lime juice
- 1 tsp vanilla extract
- Graham cracker crumbs
- Lime zest for garnish
Instructions
- Mix the softened cream cheese and sugar in a large bowl until smooth and creamy using an electric mixer.
- Whip the heavy cream in a separate bowl until it forms stiff peaks.
- Fold the whipped cream gently into the cream cheese mixture, then add the key lime juice and vanilla extract.
- Layer graham cracker crumbs and cream cheese mixture in jars until full.
- Chill in the refrigerator for at least 2 hours.
- Garnish with extra graham cracker crumbs and lime zest before serving.
Notes
Serve in clear glass jars for a beautiful presentation. You can alter the layers and add fruits for decoration.
Nutrition
- Serving Size: 1 jar
- Calories: 320
- Sugar: 18g
- Sodium: 180mg
- Fat: 25g
- Saturated Fat: 14g
- Unsaturated Fat: 8g
- Trans Fat: 0g
- Carbohydrates: 32g
- Fiber: 1g
- Protein: 4g
- Cholesterol: 80mg
Keywords: no-bake cheesecake, key lime dessert, summer dessert
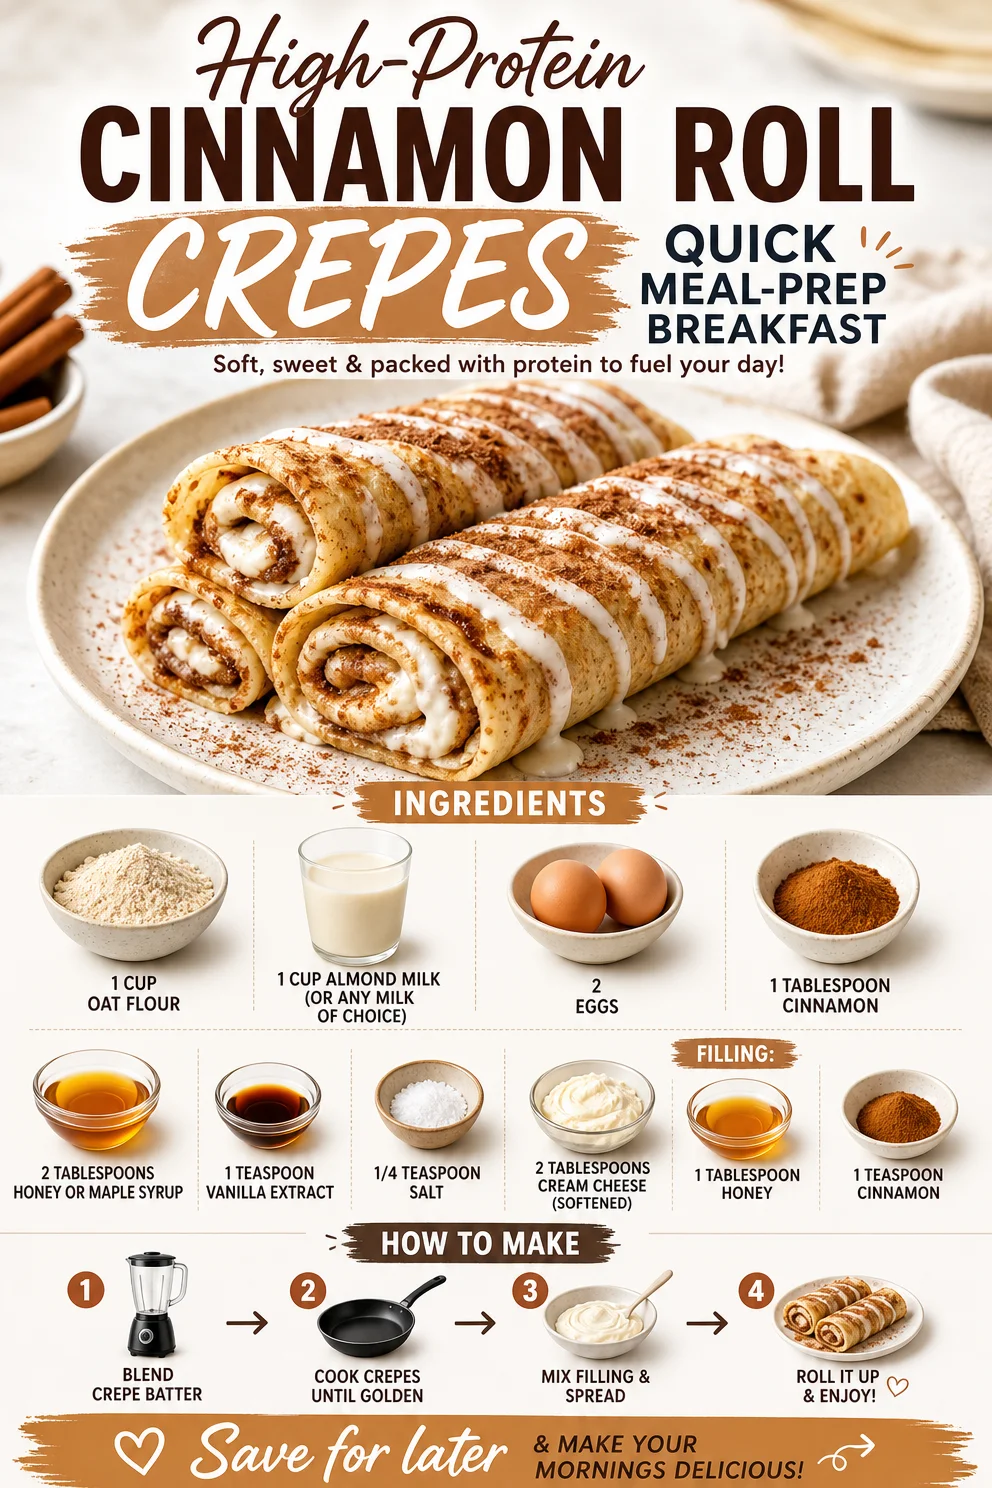
High-Protein Cinnamon Roll Crepes: Quick Meal-Prep Breakfast
Indulge in Deliciousness: Cinnamon Roll Protein Crepes
Welcome back, food lovers! Today, I’m thrilled to bring you a recipe that embodies the perfect intersection of indulgence and nourishment—the delightful Cinnamon Roll Protein Crepes. Imagine fluffy, light crepes wrapped around a sweet, creamy filling, giving you all those cozy cinnamon roll vibes but in a healthier, more versatile form. These crepes are not just a breakfast treat; they are also great for an afternoon snack or a light dessert!
In my kitchen, we often celebrate food that doesn’t compromise on flavor but brings a sense of joy and satisfaction. With the right approach, we can enjoy wholesome meals that make us feel energized and happy. That’s what Clean Plate Cravings is all about! So, let’s roll up our sleeves and dive into this delectable experience together!
A Sweet Slice of Nostalgia
Let me take you back a few years to my childhood, where my love affair with cinnamon rolls began. Every Sunday, my family would gather in the cozy warmth of our kitchen, filling the air with the heavenly aroma of cinnamon, sugar, and butter as my grandma baked her famous rolls. I remember helping her knead the dough, my small hands pining to mimic her practiced movements. She was a magical cook, and the true beauty of those mornings wasn’t just in the warm, gooey rolls that came out of the oven—it was in the stories, laughter, and love that were shared around the table.
Fast forward to my own kitchen days, where I strived to capture that same feeling but with a healthy twist. Enter the Cinnamon Roll Protein Crepes! These delights keep the spirit of my grandma’s rolls while packing in extra protein to fuel your day. With open arms (and a spatula in hand), let’s create something truly special!
Ingredients
Let’s gather our ingredients for these scrumptious crepes:
- 1 cup oat flour: A fantastic gluten-free option that’s high in fiber. You can make your own by blending rolled oats in a food processor!
- 1 cup almond milk (or any milk of choice): I love almond milk for its nutty flavor, but feel free to use cow’s milk, soy, or oat milk if that’s more your style.
- 2 eggs: They provide structure and a protein boost. If you’re going eggless, you can substitute with chia eggs (1 tablespoon chia seeds mixed with 2.5 tablespoons water per egg).
- 1 tablespoon cinnamon: The star spice that adds warmth and sweetness, reminiscent of those cozy cinnamon rolls.
- 2 tablespoons honey or maple syrup: A natural sweetener that balances the richness—choose your favorite!
- 1 teaspoon vanilla extract: For that extra layer of flavor. Homemade vanilla extract is a treasure in the kitchen!
- 1/4 teaspoon salt: A little salt enhances all the flavors and rounds out the sweetness.
- For the filling:
- 2 tablespoons cream cheese (softened): This creamy goodness acts as a base for our filling. You can swap it for Greek yogurt for a lighter option!
- 1 tablespoon honey: Sweetens the filling perfectly—maple syrup works here too!
- 1 teaspoon cinnamon: Adding more of that irresistible spice!
Step-by-Step Instructions
Now that we have our ingredients ready, let’s dive into making these fabulous crepes.
-
Make the Batter: In a large mixing bowl, combine 1 cup of oat flour, 1 cup of almond milk, 2 eggs, 1 tablespoon of cinnamon, 2 tablespoons of honey, 1 teaspoon of vanilla extract, and 1/4 teaspoon of salt. Whisk together until your mixture is smooth and homogenous. Pro tip: Let the batter sit for about 10 minutes. This allows it to thicken slightly, making your crepes fluffier!
-
Prepare Your Pan: Heat a non-stick skillet over medium heat. To check if it’s ready, sprinkle a drop of water on it—if it sizzles and evaporates, you’re good to go! Lightly grease the pan with a little coconut oil or butter for easy flipping.
-
Cook the Crepes: Using a ladle or measuring cup, pour about 1/4 cup of the batter into the center of the skillet. Quickly swirl the pan to spread the batter evenly into a circle. Cook for about 2-3 minutes until the edges start to lift and the bottom is golden brown.
-
Flip with Finesse: Here’s where the fun begins! Use a thin spatula to carefully lift the crepe and flip it over to cook for an additional 1-2 minutes on the other side. Don’t stress if your first one doesn’t look perfect—crepes are forgiving! Practice makes (almost) perfect.
-
Repeat and Stack: Continue the process with the remaining batter, making sure to grease the pan lightly as needed. Place your cooked crepes on a plate and keep them warm by covering them lightly with a kitchen towel.
Fill Them Up!
Now, let’s prepare the delectable filling! In a small bowl, mix 2 tablespoons of softened cream cheese, 1 tablespoon of honey, and 1 teaspoon of cinnamon until smooth and creamy.
- Assemble the Crepes: Take one crepe, spread a layer of that delicious filling down the center, and then fold it over or roll it up. Repeat until all the crepes are filled!
Serving Suggestions
Now that your Cinnamon Roll Protein Crepes are ready, it’s time to serve them up! Place a couple of crepes on a beautiful plate, dust them with powdered sugar if you’re feeling fancy, and perhaps drizzle some extra honey or maple syrup on top. Fresh berries or banana slices wouldn’t hurt either, adding a pop of color and a refreshing taste!
Recipe Variations
Feel free to get creative with these crepes! Here are a few variations to mix things up:
- Chocolate Chip Delight: Fold some dairy-free chocolate chips into the filling for an indulgent twist!
- Fruit-Filled Crepes: Add sliced strawberries or blueberries into the filling for a fruity explosion.
- Nutty Option: Stir in chopped nuts (like pecans or walnuts) into the filling for an added crunch.
- Pumpkin Spice: Switch in some pumpkin puree instead of cream cheese, and add a dash of nutmeg for a seasonal flavor.
Chef’s Notes
As I’ve refined this recipe over time, I’ve found little hacks that make all the difference! The oat flour is a game changer—not only is it gluten-free, but it also adds a heartiness to the crepes. And don’t be afraid to mix and match your milk choices; the key is finding what works best for your taste buds! My grandma would always remind me, "Cooking is about improvisation and joy." So keep experimenting—your versions may become the new family favorites!
FAQs and Troubleshooting
Here are some common questions to help you avoid any potential hiccups:
-
Why are my crepes tearing when I flip them?
- This can happen if the batter is too thick or if there isn’t enough heat. Make sure the pan is hot enough and let the batter rest for the right amount of time for proper consistency!
-
Can I make the batter ahead of time?
- Absolutely! The batter can be prepared the night before and stored in the fridge. Just give it a good whisk before cooking.
-
How do I store leftover crepes?
- Place them in an airtight container or wrap them tightly in plastic wrap. Reheat in a pan over low heat or in the microwave when you’re ready to enjoy them again.
-
Can I freeze these crepes?
- Yes! Just allow them to cool completely first and then stack them with parchment paper in between. Freeze for up to three months. Thaw overnight in the fridge before reheating.
Nutritional Info
These Cinnamon Roll Protein Crepes pack a nutritious punch while satisfying your sweet tooth! Each serving boasts a generous amount of protein, thanks to the oats and eggs, along with healthy fats from the almond milk and cream cheese. Plus, using natural sweeteners keeps the sugar content in check—perfect for a balanced breakfast or snack.
There you have it! The perfect recipe to bring a smile to your face and fuel your body. I hope you enjoy whipping up these Cinnamon Roll Protein Crepes as much as I do. Remember, cooking is a journey, so embrace every moment, make it personal, and always keep it delicious! Happy cooking!
PrintCinnamon Roll Protein Crepes
Delightful Cinnamon Roll Protein Crepes that combine the indulgence of cinnamon rolls with a healthier twist.
- Prep Time: 15 minutes
- Cook Time: 15 minutes
- Total Time: 30 minutes
- Yield: 4 servings 1x
- Category: Breakfast
- Method: Cooking
- Cuisine: American
- Diet: Vegetarian
Ingredients
- 1 cup oat flour
- 1 cup almond milk
- 2 eggs
- 1 tablespoon cinnamon
- 2 tablespoons honey or maple syrup
- 1 teaspoon vanilla extract
- 1/4 teaspoon salt
- 2 tablespoons cream cheese (softened)
- 1 tablespoon honey
- 1 teaspoon cinnamon
Instructions
- Make the batter: In a large mixing bowl, combine 1 cup of oat flour, 1 cup of almond milk, 2 eggs, 1 tablespoon of cinnamon, 2 tablespoons of honey, 1 teaspoon of vanilla extract, and 1/4 teaspoon of salt. Whisk together until smooth. Let sit for 10 minutes.
- Prepare your pan: Heat a non-stick skillet over medium heat. Lightly grease with coconut oil or butter.
- Cook the crepes: Pour 1/4 cup of batter into the skillet. Swirl to spread evenly. Cook for 2-3 minutes until edges lift and bottom is golden.
- Flip with finesse: Carefully lift and flip the crepe, cooking for another 1-2 minutes.
- Repeat and stack: Continue with the remaining batter, greasing the pan as needed.
- Fill them up: In a small bowl, mix 2 tablespoons of cream cheese, 1 tablespoon of honey, and 1 teaspoon of cinnamon until smooth. Spread filling on each crepe and roll or fold.
Notes
Top with powdered sugar and fresh berries for extra flavor. Feel free to experiment with fillings and toppings!
Nutrition
- Serving Size: 1 crepe
- Calories: 250
- Sugar: 8g
- Sodium: 220mg
- Fat: 10g
- Saturated Fat: 4g
- Unsaturated Fat: 6g
- Trans Fat: 0g
- Carbohydrates: 32g
- Fiber: 4g
- Protein: 8g
- Cholesterol: 70mg
Keywords: crepes, protein, cinnamon rolls, healthy breakfast, vegetarian, oat flour