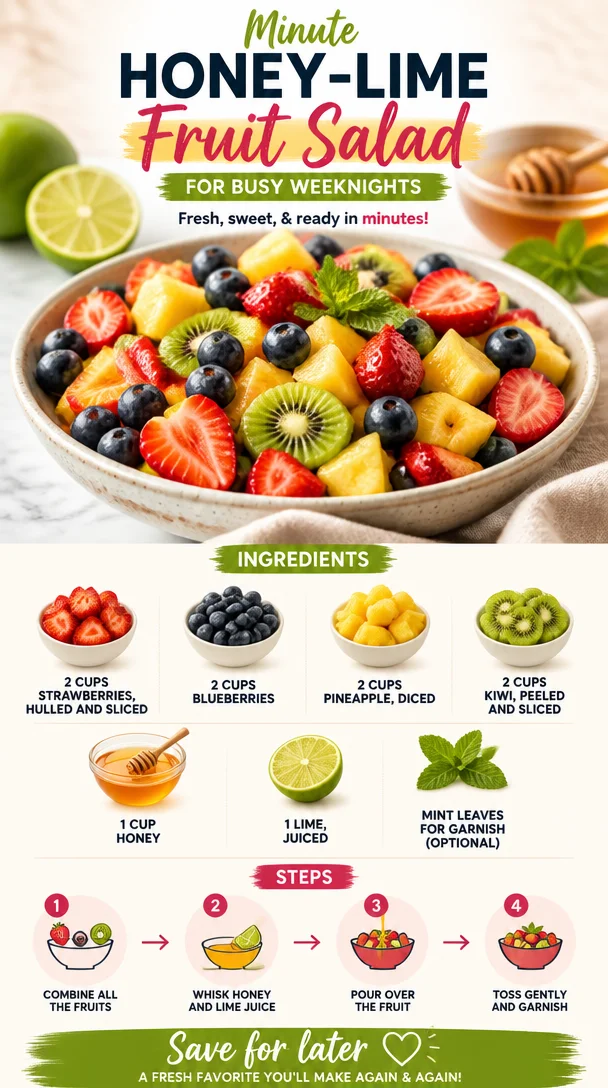
Minute Honey-Lime Fruit Salad for Busy Weeknights
Easy Fruit Salad with Honey Lime Dressing
Introduction
Hey there, fellow food lovers! If you’re like me, there’s just something about fruit that shouts "summer!" It’s vibrant, refreshing, and oh-so-delicious, especially when paired with a little zing from citrus and sweetness from honey. Today, I’m thrilled to share with you my go-to recipe for an Easy Fruit Salad with Honey Lime Dressing.
This dish is seriously perfect for any occasion—you can whip it up for brunch, serve it at a barbecue, or even enjoy a bowl for a light snack during the hot summer days. Believe me, this fruit salad is not your average bowl of chopped fruit. With the honey lime dressing, it transforms from a simple side dish into a flavor explosion that dances on your taste buds!
Growing up, my family had a tradition of making fruit salads during summer picnics. We’d gather around the picnic table, outdoors beneath the shade of giant oaks, laughing and reminiscing as we enjoyed our feast. My mom always encouraged us to get creative with the fruits we used, adding in whatever was fresh and seasonal. I think that’s the best part of this recipe: it’s flexible! You can mix and match or get a little adventurous with whatever’s in your fridge.
The honey lime dressing is the star here! It’s quick to make, and every drizzle brings a burst of brightness to the juicy fruits. Best of all, it’s an amazing way to get in those juicy vitamins and savor the season’s offerings. Ready to dive into the world of color and flavor? Let’s get started!
Personal Story
One of my fondest memories in the kitchen involves a bountiful summer day when my family decided to host a picnic at the local park. My siblings and I were tasked with creating the ultimate fruit salad. We raided our backyard and the local farmers’ market, gathering strawberries, blueberries, and a few things we thought looked "pretty." We threw in all the fruits we could find, of course, and I remember uncovering a hidden stash of ripe kiwis beneath the leaves in our fridge. Each of us had our signature touches—the kids were spread out in a joyous whirlwind of activity.
My job was to make the dressing, which really became the finishing touch! I squeezed fresh lime juice, drizzled honey, and—like a true little chef—tasted it after each addition, trying to find that perfect balance between sweet and tangy. We tossed everything together in a huge bowl, and as we carried it to our picnic spot, the bright colors and tantalizing aromas of our creation turned heads and brought smiles from other park-goers.
That day, we sat sprawled on checkered blankets, laughing and sharing stories, indulging in our creation. The sweet fruit, combined with that zingy dressing, was the highlight of the feast. To this day, I love making this fruit salad not just to relive that sweet nostalgia, but to create new memories with friends and family. Now, it’s your turn to make some fun memories with this delightful dish!
Ingredients
-
2 cups strawberries, hulled and sliced
- These juicy beauties are packed with vitamin C and are the sweetest way to start. If strawberries aren’t in season, feel free to substitute with raspberries or diced apples for a tart twist.
-
2 cups blueberries
- These little gems are like nature’s candy! They add a pop of color and are rich in antioxidants. No blueberries? No worries; think about adding blackberries or even diced peaches!
-
2 cups pineapple, diced
- Pineapple brings a tropical vibe and a sweet-tart flavor. If you don’t have fresh pineapple, drained canned pineapple works too, but fresh is always ideal for the best texture.
-
2 cups kiwi, peeled and sliced
- With its vibrant green color and unique taste, kiwi adds a refreshing twist. Don’t want to deal with peeling? Go ahead and swap it out for other fruits like mango or papaya for a tropical flair!
-
1 cup honey
- Honey is a natural sweetener that elevates the entire dish. If you’re vegan, feel free to swap honey for agave syrup or maple syrup for that same sweetness.
-
1 lime, juiced
- The star of the dressing! Lime juice brings in that necessary acidity to balance the sweetness. If limes aren’t handy, use lemons or even a splash of orange juice as a substitute.
-
Mint leaves for garnish (optional)
- These delicate leaves not only add a fresh aroma but also a lovely finish. If mint isn’t your thing, chopped basil could work just as nicely!
Step-by-Step Instructions
-
Gather Your Ingredients
- Start by gathering all your ingredients and equipment. This is the perfect time to channel your inner chef! You’ll need a large mixing bowl, a cutting board, a knife, and a small bowl if you want to mix the dressing separately.
-
Prep the Fruits
- Begin with the strawberries. Hull them by removing the green tops, then slice them into quarters or halves, depending on their size. Place the sliced strawberries into your mixing bowl. (Tip: If you allow the strawberries to sit a few minutes after slicing them, they’ll release their juices and create their own mini dressing!)
-
Add Blueberries
- Rinse the blueberries in cold water and drain them. No slicing needed—just toss them directly into the bowl with the strawberries. (Chefs Hack: If you’re using frozen blueberries, let them thaw for a bit first—this avoids mushiness!)
-
Cut the Pineapple
- If you’re using a fresh pineapple, carefully cut the top off, remove the skin, and dice the flesh into bite-sized pieces. Add the fresh pineapple to the mix. (Tip: To make this easier, cut the pineapple into rings and then dice through those rings!)
-
Slice the Kiwi
- Peel the kiwi and slice it into rounds or quarters, according to your preference. Toss them into the bowl with the other fruits, throwing in those beautiful green slices! (Pro Tip: Use a spoon to scoop out the kiwi flesh cleanly!)
-
Make the Honey Lime Dressing
- In a small bowl, combine the honey and lime juice. Give it a good stir with a whisk or a fork until fully blended. Want a little zing? You can add a bit more lime juice to suit your taste! (Tip: If it’s a hot day, you can lightly warm the honey for easier mixing!)
-
Combine Everything
- Drizzle the honey lime dressing over your colorful fruit medley. Using a large spoon or spatula, gently toss everything until the fruits are fully coated with that luscious dressing. (Caution: Be gentle! You don’t want to mush the fruits!)
-
Let it Marinate
- For an enhanced flavor experience, let the salad sit in the fridge for about 30 minutes. This allows the fruits to soak up some of that honey lime goodness and meld together beautifully.
Serving Suggestions
Once your fruit salad is nicely chilled and ready to go, grab a pretty bowl and spoon it in! You can serve it directly in individual bowls for guests or pile it high in one large dish for a family-style setting. Finishing touches? Add a few sprigs of fresh mint on top for a gorgeous pop of color and fragrance. This fruit salad also makes a delightful addition to brunch tables or summer feasts, bringing a burst of cheer and freshness to any spread!
Recipe Variations
Feeling adventurous? Here are some fun twists and variations to play around with:
- Tropical Twist: Switch out the kiwi for mango, add some shredded coconut, and maybe throw in a few macadamia nuts for crunch.
- Berry Blast: Use raspberries, blackberries, and sliced strawberries with a splash of orange juice instead of lime for a different citrus profile.
- Nutty Delight: Add a handful of chopped nuts like almonds or walnuts for a bit of crunch, or sprinkle with chia seeds for extra nutrition.
- Creamy Addition: Drizzle with a bit of yogurt on top for a creamy layer that complements the fruits beautifully!
Chef’s Notes
As I look back at those summers spent making fruit salads, I realize that my approach to this dish has changed over time. I’ve played with countless ingredients and combinations! Each evolution brought new friends and flavors, and now, I’m all about keeping it simple yet flexible. I adore taking whatever fruit is in season and transforming it into this delicious medley. And don’t let me forget: the key is all about the dressing! I’ve tried adding spices like cinnamon or ginger when feeling funky, and boy, have those been successful experiments!
FAQs and Troubleshooting
-
Can I use frozen fruits?
- Absolutely! Just be cautious because some fruits might change texture after thawing, especially bananas or and strawberries. Use frozen berries for best results.
-
How long does the fruit salad last?
- This salad is best enjoyed fresh, but you can store it in an airtight container in the fridge for up to 3 days. Just be mindful that it may get watery as it sits!
-
What if I don’t have honey?
- No problem! Agave syrup, maple syrup, or even amber syrup can easily take honey’s place. Just keep adjusting the sweetness to your liking!
-
Is there a way to make this salad ahead of time?
- Sure thing! You can pre-cut the fruits and mix the dressing, but keep them separate. Combine everything right before serving to maintain freshness and color.
Nutritional Info
(Optional, can be personalized based on specific dietary needs or preferences!)
This fruit salad is not just delicious but also nutritious! Each serving is low in calories yet high in vitamins and antioxidants, benefiting your overall health. Enjoy these nutritious powerhouse fruits without guilt, and feel free to get creative to make it even more nourishing!
So there you have it, friends—an Easy Fruit Salad with Honey Lime Dressing that not only tantalizes the taste buds but also brings back warm memories of summer sweetness! Whether for a gathering or a personal treat, this salad is sure to brighten anyone’s day. Happy cooking, and here’s to keeping things fresh, simple, and delicious!
PrintEasy Fruit Salad with Honey Lime Dressing
A vibrant, refreshing fruit salad with a zesty honey lime dressing, perfect for summer picnics and gatherings.
- Prep Time: 15 minutes
- Cook Time: 0 minutes
- Total Time: 15 minutes
- Yield: 6 servings 1x
- Category: Dessert
- Method: Mixing
- Cuisine: American
- Diet: Vegetarian
Ingredients
- 2 cups strawberries, hulled and sliced
- 2 cups blueberries
- 2 cups pineapple, diced
- 2 cups kiwi, peeled and sliced
- 1 cup honey
- 1 lime, juiced
- Mint leaves for garnish (optional)
Instructions
- Gather your ingredients.
- Prep the strawberries by hulling and slicing them, then place in mixing bowl.
- Add the rinsed blueberries directly into the bowl.
- Cut the fresh pineapple and add to the mix.
- Slice the kiwi and toss it into the bowl.
- Make the honey lime dressing by combining honey and lime juice in a small bowl.
- Combine everything by drizzling the dressing over the fruits and gently tossing to coat.
- Let it marinate in the fridge for about 30 minutes.
Notes
Serve chilled; can be garnished with fresh mint. Enjoy fresh for best results.
Nutrition
- Serving Size: 1 serving
- Calories: 100
- Sugar: 20g
- Sodium: 5mg
- Fat: 0g
- Saturated Fat: 0g
- Unsaturated Fat: 0g
- Trans Fat: 0g
- Carbohydrates: 25g
- Fiber: 3g
- Protein: 1g
- Cholesterol: 0mg
Keywords: fruit salad, summer salad, healthy dessert, honey lime dressing
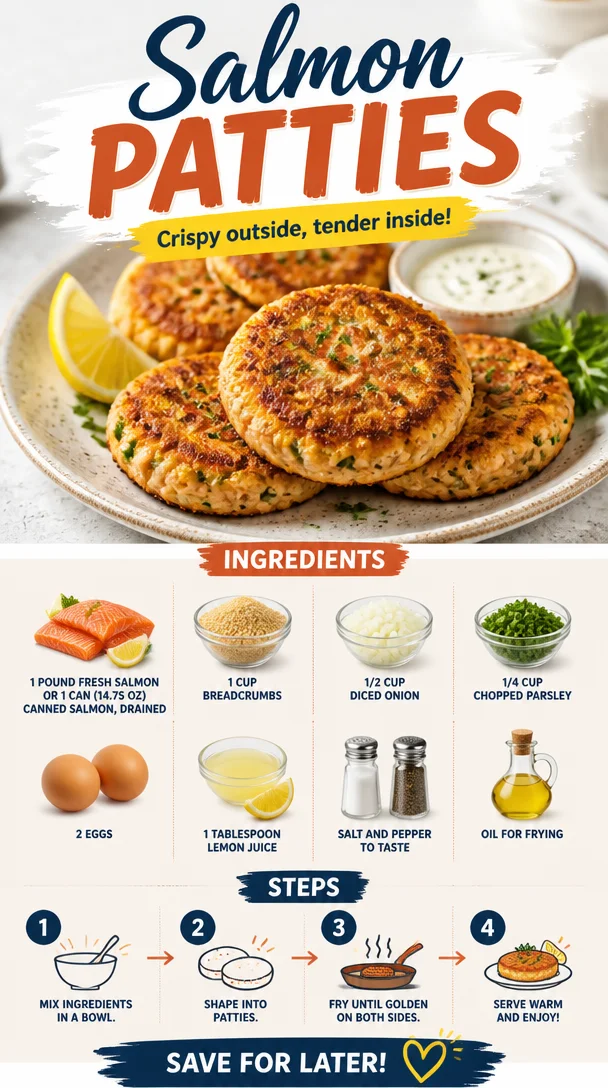
Salmon Patties
Salmon Patties: A Flavorful Delight That’s Good for You
Welcome, food lovers, to another delicious adventure here at Clean Plate Cravings! Today, we’re diving into a dish that is not only packed with flavor but also brings back some sweet nostalgic memories for me—Salmon Patties. These little golden bites are a perfect blend of fresh salmon, crunchy breadcrumbs, and zesty lemon, making them an irresistible option for lunch, dinner, or even as an appetizer. So, grab your apron, and let’s embark on this culinary journey together!
A Trip Down Memory Lane: My First Salmon Patties
Let me take you back to my childhood, where the aroma of salmon patties sizzling in the pan filled our cozy kitchen. My mom was the queen of the kitchen, often whipping up delicious meals with whatever we had on hand. One of my favorites was her salmon patties. On Friday evenings, after a long week, we would gather around the table, buzzing with laughter. Those little patties always brought everyone together, and the best part? They were easy enough for my brothers and me to help mix and form them.
I can still remember the excitement of adding the breadcrumbs, sneaking bites of the crispy edges just as they came off the skillet, and the all-important squeeze of lemon right before taking that crucial first bite. It felt like pure magic. Now, as I share this recipe with you, I hope to evoke those warm memories while inspiring you to create new ones in your kitchen.
Ingredients That Make It Happen
Here’s what you’ll need to whip up these delectable salmon patties:
-
1 pound fresh salmon or 1 can (14.75 oz) canned salmon, drained
- Fresh salmon provides an exceptional flavor and texture; if using canned, look for wild-caught options for a healthier choice.
-
1 cup breadcrumbs
- These give the patties a delightful crunch. You can use store-bought or make your own from stale bread.
-
1/2 cup diced onion
- Onions add sweetness and depth. For a milder taste, use green onions or shallots.
-
1/4 cup chopped parsley
- This brings freshness. Feel free to substitute with dill for an herbaceous twist.
-
2 eggs
- Eggs act as a binder here. If you’re vegan, you can substitute with a flaxseed mixture (1 tablespoon ground flaxseed + 2.5 tablespoons water).
-
1 tablespoon lemon juice
- A splash of bright acidity rounds out the flavors. Use fresh lemon juice for the best zest!
-
Salt and pepper to taste
- Seasoning is key. Don’t shy away from adding a pinch more if you love flavor.
-
Oil for frying
- I prefer olive oil for its health benefits and flavor, but canola or avocado oil works just fine.
Step-by-Step Instructions
Now that we have our ingredients prepped, let’s dive into the cooking process!
-
Prepare the Salmon
- If using fresh salmon, start by poaching it. Place the salmon in a saucepan and cover it with water. Bring it to a gentle simmer and let it cook for about 10-12 minutes or until it flakes easily with a fork. Remove it from the water and let it cool before flaking it into a mixing bowl. If using canned salmon, simply drain it and add it straight to the bowl. Pro Tip: If you have leftover salmon from a previous meal, this is the perfect way to repurpose it!
-
Mix the Ingredients
- In your mixing bowl with the flaked salmon, add the breadcrumbs, diced onion, chopped parsley, eggs, lemon juice, salt, and pepper. Now, here’s where the magic happens—mix everything together until it’s well combined. I like to get in there with my hands; it’s the best way to ensure even distribution. Chef Hack: Wet your hands slightly to prevent the mixture from sticking when you form the patties.
-
Form the Patties
- Grab about 1/4 cup of the mixture and shape it into a patty. You want it to be about 1/2 inch thick. Don’t worry if they aren’t perfect; character is what makes them special! Repeat until all the mixture is used. Bonus Tip: Place them on a plate and refrigerate for about 30 minutes to help them firm up before frying.
-
Heat the Oil
- In a large skillet, heat about 1/4 inch of oil over medium heat. You’ll know it’s ready when a small drop of the mixture sizzles upon contact. Safety Tip: Perfect frying temperature is crucial here; if it’s too hot, the patties will burn!
-
Cook the Patties
- Carefully place a few patties in the skillet, making sure not to overcrowd. Fry for about 4-5 minutes on each side or until they are golden brown. Repeat with remaining patties, adding more oil as necessary. Taste Test: I love to take a tiny piece from the edge while cooking—it helps me gauge if more seasoning is needed!
-
Drain and Serve
- Once fried, transfer the patties to a plate lined with paper towels to drain excess oil. This keeps them crispy!
Serving Suggestions
When serving these salmon patties, I recommend plating them on a beautiful dish, perhaps alongside a fresh green salad or some roasted veggies. You can also dollop some homemade tartar sauce or a zesty cucumber yogurt sauce on the side for that extra zing. Add wedges of lemon and sprigs of parsley for a pop of color—after all, we eat with our eyes first!
Recipe Variations
Feeling adventurous? Here are a few creative twists you can try out:
- Mediterranean Flair: Add feta cheese and chopped olives for a Mediterranean-inspired patty.
- Spicy Kick: Mix in diced jalapeños or a dash of hot sauce to add some heat to your patties.
- Southern Style: Incorporate some creole seasoning and serve with remoulade for a Southern twist.
- Asian Infusion: Add soy sauce and green onions, and serve with a sesame dipping sauce for an Asian flair.
- Vegetarian Option: Swap out the salmon for cooked quinoa or chickpeas to create a satisfying veggie patty!
Chef’s Notes
Every recipe I share has a story, and my salmon patties are no exception. Over the years, I’ve tweaked this recipe to fit different dietary needs and personal tastes—sometimes adding in smoked salmon for a slightly different flavor profile or even throwing in some shredded zucchini for an extra nutritious boost. The essence of my original memory remains, but it’s a comforting reminder that recipes evolve just like we do. I hope these patties bring you as much joy as they have for me throughout the years!
FAQs and Troubleshooting
1. Can I use frozen salmon?
Absolutely! Just make sure to thaw it completely and pat it dry before using. This prevents excess moisture, ensuring a crispy exterior.
2. Why did my patties fall apart?
This can happen if the mixture is too wet or if there aren’t enough binding ingredients. Make sure to use the right amount of breadcrumbs and eggs. Refrigerating the formed patties before frying also helps to hold them together.
3. Can I bake these instead of frying?
Yes! Preheat your oven to 375°F (190°C), place the formed patties on a baking sheet lined with parchment paper, and brush with a little oil. Bake for 20-25 minutes, flipping halfway through, until golden brown.
4. Do they freeze well?
Certainly! You can freeze the uncooked patties by placing them in a single layer on a baking sheet until firm, then transferring them to an airtight container. They’ll keep well for up to three months. Just thaw and fry when you’re ready to enjoy!
Conclusion: Let’s Keep It Fresh and Delicious!
Making salmon patties is not just a meal; it’s a bonding experience, a delightful way to enjoy fresh ingredients, and a venture into nostalgia. I hope you experience the same joy making these at home that I do in my kitchen!
Remember to keep it flexible, have fun, and don’t forget that a dash of love is the secret ingredient to any meal. Now, it’s your turn to make these salmon patties! Get cooking, and let me know how they turn out—I can’t wait to see you thrive in your kitchen journey. Until next time, happy cooking!
PrintSalmon Patties

These flavorful salmon patties are a delightful blend of fresh salmon, crunchy breadcrumbs, and zesty lemon, perfect for lunch, dinner, or as an appetizer.
- Prep Time: 15 minutes
- Cook Time: 20 minutes
- Total Time: 35 minutes
- Yield: 4 servings 1x
- Category: Main Course
- Method: Frying
- Cuisine: American
- Diet: Gluten-Free
Ingredients
- 1 pound fresh salmon or 1 can (14.75 oz) canned salmon, drained
- 1 cup breadcrumbs
- 1/2 cup diced onion
- 1/4 cup chopped parsley
- 2 eggs
- 1 tablespoon lemon juice
- Salt and pepper to taste
- Oil for frying
Instructions
- Prepare the salmon by poaching it or using canned salmon. Flake it into a mixing bowl.
- Mix the breadcrumbs, diced onion, chopped parsley, eggs, lemon juice, salt, and pepper with the flaked salmon.
- Form patties using about 1/4 cup of the mixture, making them about 1/2 inch thick.
- Heat oil in a skillet over medium heat.
- Cook the patties in the skillet for 4-5 minutes on each side until golden brown.
- Drain the patties on paper towels before serving.
Notes
Refrigerating the formed patties for 30 minutes helps them firm up before frying. You can serve with homemade tartar sauce or yogurt sauce.
Nutrition
- Serving Size: 1 patty
- Calories: 300
- Sugar: 1g
- Sodium: 300mg
- Fat: 15g
- Saturated Fat: 2g
- Unsaturated Fat: 12g
- Trans Fat: 0g
- Carbohydrates: 20g
- Fiber: 2g
- Protein: 20g
- Cholesterol: 120mg
Keywords: salmon patties, seafood, appetizers, healthy recipes, quick dinner
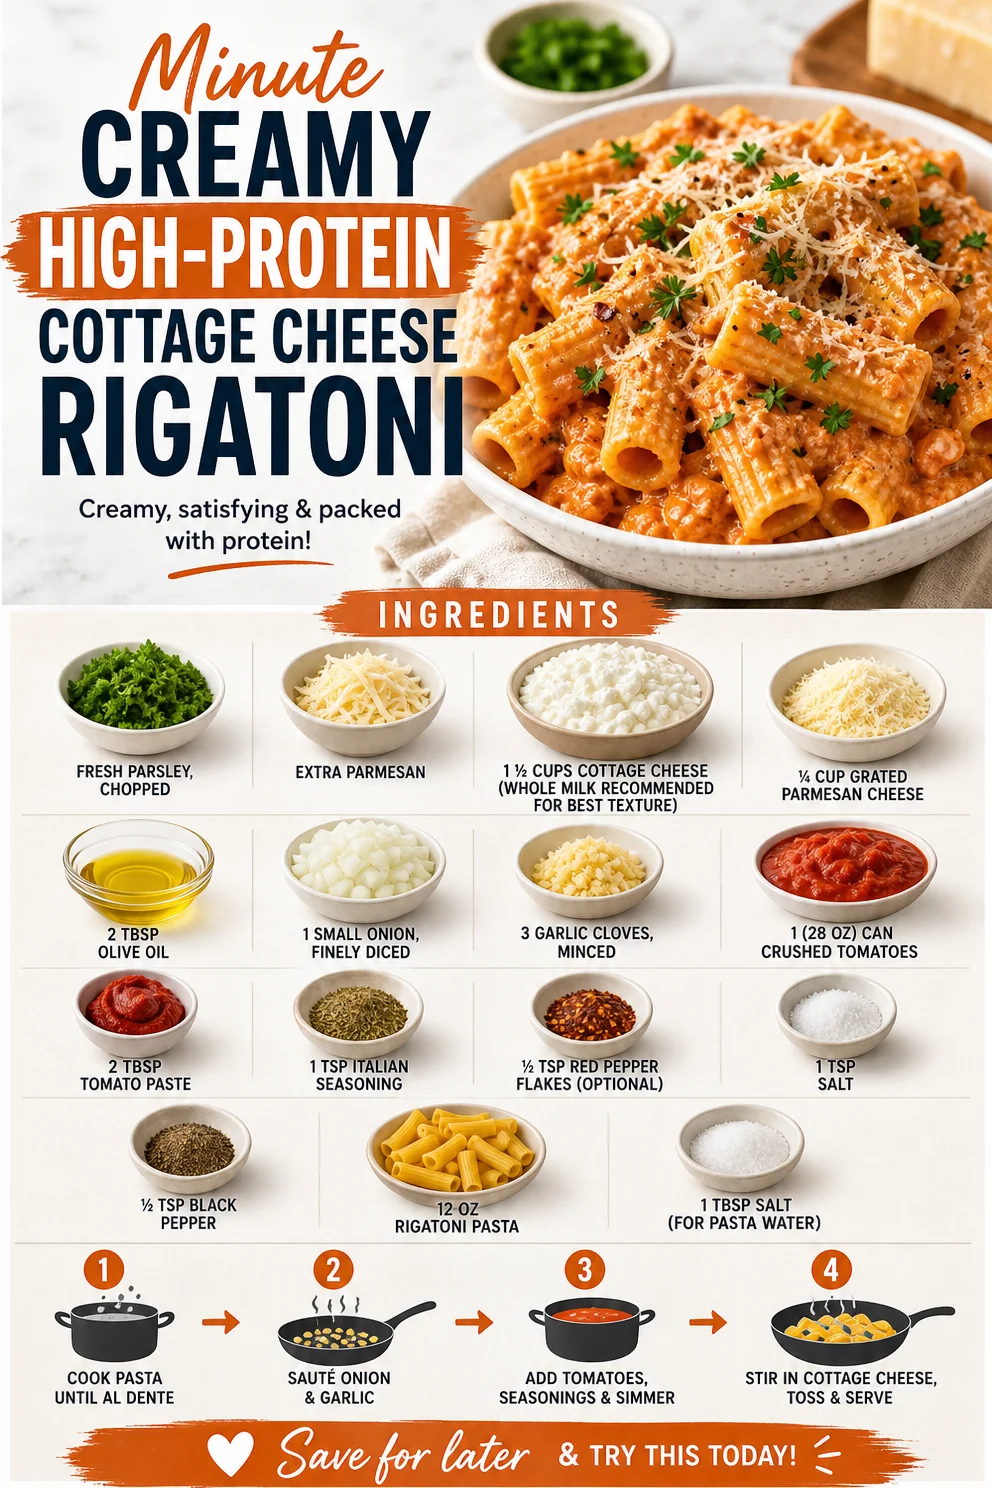
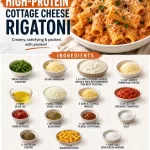
Minute Creamy High-Protein Cottage Cheese Rigatoni
Creamy Cottage Cheese Rigatoni: A High-Protein Delight for Foodies
Hello, my foodie friends! Welcome back to Clean Plate Cravings, where we believe that every meal can be a vibrant celebration of flavor—even when we’re aiming for healthy eating! Today, I’m thrilled to share one of my latest obsessions: Creamy Cottage Cheese Rigatoni. If you’re looking for a high-protein pasta dish that’s rich, satisfying, and packed with flavor, you’ve landed in the right place!
This recipe is the epitome of comfort food, but with a twist. Imagine creamy pasta that’s not only delicious but also nutritious—sounds dreamy, doesn’t it? You’ll be amazed at how simple it is to whip up a dish that feels indulgent yet wholesome. With the perfect balance of savory tomatoes, aromatic garlic, and that luscious cottage cheese, this rigatoni dish is about to become your new weeknight favorite.
A Taste of Nostalgia: The Cottage Cheese Connection
Let me take you back to my childhood kitchen where cottage cheese was a staple of many meals. My mom used to layer it into her lasagna for that extra creaminess and protein boost. I’ll never forget the times spent bustling around the kitchen, the smell of simmering tomatoes wafting through the air, and the laughter that echoed as we enjoyed dinner together.
One day, while wandering through the grocery store, I spotted a bright, colorful block of fresh parsley. It all came rushing back to me—the aroma of the herb mingling with the rich flavors of tomato sauce. That day, I decided to get creative and recreate my mom’s classic recipe with a modern twist. I replaced the ricotta with cottage cheese and added rigatoni for a delightful twist! The result? A pasta dish that not only brings back cherished memories but also serves up goodness on a plate.
Now, let’s dive into making this dish and capture that same warmth of my childhood.
Ingredients You’ll Need
Here’s what you’ll need for this creamy creation:
- Fresh parsley, chopped: A fragrant herb that adds bright color and freshness to the dish. Feel free to substitute with basil or oregano if you prefer.
- Extra Parmesan: Because who doesn’t love more cheese? This is your finishing touch to intensify flavors. Grated Pecorino Romano can be a great substitute.
- 1 ½ cups cottage cheese (whole milk recommended for best texture): The star of the show! Whole milk cottage cheese gives a creamy texture, but low-fat varieties work as well if you’re watching calories.
- ¼ cup grated Parmesan cheese: Adds depth to our sauce. You can use a vegan alternative if you’re going dairy-free.
- 2 tbsp olive oil: For sautéing! Feel free to replace it with avocado oil for a milder flavor.
- 1 small onion, finely diced: Sautéing onion brings out its natural sweetness. Shallots can be a great alternative if you want a milder taste.
- 3 garlic cloves, minced: Garlic makes everything better! If you’re a garlic lover, don’t shy away from adding an extra clove!
- 1 (28 oz) can crushed tomatoes: This forms the base of our sauce. You can substitute with diced tomatoes if you prefer a chunkier sauce.
- 2 tbsp tomato paste: Concentrated tomato goodness to boost flavor. If you’re out, a handful of fresh tomatoes blended works too.
- 1 tsp Italian seasoning: A blend of dried herbs that’s a pantry staple! Don’t have it? Try a mix of dried basil, oregano, and thyme.
- ½ tsp red pepper flakes (optional): For a little kick! Adjust to your preference based on your spice tolerance.
- 1 tsp salt: Enhances flavors. Adjust based on dietary needs.
- ½ tsp black pepper: A cornerstone of seasoning! Freshly ground always packs more flavor.
- 12 oz rigatoni pasta: The perfect vessel for sauce! If you’re gluten-free, you can use chickpea or lentil pasta.
- 1 tbsp salt (for pasta water): Salting the water ensures your pasta is properly seasoned. Don’t skip it!
Step-by-Step Instructions
Are you ready to get cooking? Let’s bring together all these beautiful ingredients and create a dish that will have people begging for seconds!
-
Cook the pasta:
Start by bringing a large pot of salted water to a boil. Remember—this is your chance to add flavor to the pasta itself! Add 12 oz of rigatoni and cook until al dente according to package instructions. Mix it up a bit with a spoon during cooking. Trust me, that extra love keeps everything from sticking together! -
Sauté the aromatics:
While your pasta cooks, heat 2 tablespoons of olive oil in a large skillet over medium heat. Toss in the finely diced onion and sauté until it’s softened and translucent, about 4-5 minutes. As the onion cooks, let its fragrance fill the kitchen and set the mood for deliciousness. Then, add your minced garlic and red pepper flakes. Sauté for an additional minute until the garlic is fragrant but not browned—nobody likes burnt garlic! -
Create the sauce:
Pour in the 28 oz can of crushed tomatoes and mix in the 2 tablespoons of tomato paste along with the Italian seasoning, salt, and black pepper. Allow this mixture to simmer for about 10-15 minutes, stirring occasionally. This is where the magic happens! You’ll notice the sauce thickening and deepening in flavor. Feel free to taste and adjust the seasonings as needed; it’s all about your personal preference! -
Bring in the cottage cheese:
Once your sauce has simmered to perfection, reduce the heat to low and stir in the 1 ½ cups of cottage cheese. Mix it well to create that creamy texture we’re after. Don’t forget to add the ¼ cup of grated Parmesan cheese into the mix! It’s what makes the sauce sing harmony with the rigatoni. Note: There’s something so therapeutic about this step; don’t rush it! -
Combine pasta and sauce:
Drain your rigatoni, reserving a little pasta water (about ½ cup) if it looks too thick. Combine the pasta directly into the skillet with the sauce and toss to coat evenly. If it looks a bit dry, drizzle in some of that reserved pasta water to create a silkier texture. Your home is about to smell like a little Italian bistro! -
Finish and garnish:
Once everything is well incorporated, serve it hot! Plate your creamy cottage cheese rigatoni and sprinkle with fresh chopped parsley and extra Parmesan. Not only does this add a vibrant touch, but it also elevates the flavors beautifully.
Serving Suggestions
To serve, grab a large pasta bowl and heap spoonfuls of that luscious rigatoni in the center. Sprinkle a little extra fresh parsley and some crushed red pepper flakes for those who enjoy a bit of heat. Serve it family-style or plate individual servings, and don’t forget a side of crusty bread to mop up any remaining sauce—it’s an absolute must!
Recipe Variations
Here are a few creative twists to make this dish your own:
- Vegetable Boost: Add sautéed spinach, zucchini, or mushrooms into the sauce for added nutrients and flavor.
- Protein-packed: Stir in cooked ground turkey or chicken for an added protein boost. For a plant-based option, add chickpeas or lentils.
- Flavorful Swaps: Experiment with different types of cheese—ricotta, mascarpone, or even goat cheese can create a beautiful taste profile.
- Tailored Spice Levels: If you like more kick, consider adding more red pepper flakes, or why not try a splash of hot sauce right before you serve?
- Dairy-Free Delight: Use a plant-based alternative for cottage cheese and a vegan Parmesan to create a totally dairy-free version of this dish.
Chef’s Notes
I love that this recipe honors the beauty of comfort food while packing a nutritious punch. The creamy cottage cheese gives me those nostalgic vibes while allowing me to enjoy a lighter meal that keeps me satisfied. Over the years, I’ve played with different herbs and spices in this recipe, but I always come back to my initial inspiration—simple, honest ingredients that truly shine.
Oh, and don’t get me started on the dishes this recipe can conjure up! One evening, a friend dropped by unexpectedly, and I whipped this up in no time. The surprise win? My friend was a die-hard pasta snob! They swooned over the creaminess and couldn’t believe how healthy it was. There’s something special about sharing a meal that makes everyone feel at home—what you serve truly matters.
FAQs and Troubleshooting
Here are some common questions and tips that might help you out:
-
Can I use a different kind of pasta?
Absolutely! While rigatoni is fantastic for holding onto that creamy sauce, you can use any pasta you adore, like penne, farfalle, or even gluten-free options! -
What if the sauce is too thick?
No worries! Just add a splash of pasta water to loosen things up. You can always adjust the creaminess to your liking. -
Can I meal prep this dish?
Yes, indeed! This rigatoni holds up well in the fridge for about 3 days. Just reheat gently, and if it’s a bit dry, add a splash of water or stock while heating to bring back the creamy goodness. -
Is this recipe easily doubled?
You bet! Just remember to adjust the cooking time for the pasta and ensure your skillet is big enough to hold all that deliciousness!
Nutritional Info (Optional)
While I know many of you have varying dietary preferences, here’s a rough estimate for one serving (including rigatoni and sauce):
- Calories: 450
- Protein: 25g
- Fat: 15g
- Carbohydrates: 55g
- Fiber: 4g
(Note: Nutritional values may vary based on specific ingredients used or portion sizes.)
And there you have it, my friends—Creamy Cottage Cheese Rigatoni that will make your taste buds dance! I hope you love making this dish as much as I do. Remember, cooking should be fun, and every bite can be an adventure waiting to happen. Let’s keep it fresh, simple, and seriously delicious! Happy cooking!
PrintCreamy Cottage Cheese Rigatoni
A high-protein pasta dish that combines creamy cottage cheese with savory tomatoes and aromatic garlic for a delightful twist on comfort food.
- Prep Time: 15 minutes
- Cook Time: 30 minutes
- Total Time: 45 minutes
- Yield: 4 servings 1x
- Category: Main Course
- Method: Baking
- Cuisine: Italian
- Diet: Vegetarian
Ingredients
- 12 oz rigatoni pasta
- 1 ½ cups cottage cheese (whole milk recommended)
- ¼ cup grated Parmesan cheese
- 2 tbsp olive oil
- 1 small onion, finely diced
- 3 garlic cloves, minced
- 1 (28 oz) can crushed tomatoes
- 2 tbsp tomato paste
- 1 tsp Italian seasoning
- ½ tsp red pepper flakes (optional)
- 1 tsp salt
- ½ tsp black pepper
- 1 tbsp salt (for pasta water)
- Fresh parsley, chopped (for garnish)
- Extra Parmesan (for garnish)
Instructions
- Cook the pasta: Bring a large pot of salted water to a boil. Add rigatoni and cook until al dente according to package instructions.
- Sauté the aromatics: Heat olive oil in a large skillet over medium heat. Add diced onion and sauté until softened. Add minced garlic and red pepper flakes; sauté for an additional minute.
- Create the sauce: Pour in crushed tomatoes and mix in tomato paste, Italian seasoning, salt, and black pepper. Simmer for about 10-15 minutes.
- Bring in the cottage cheese: Reduce heat and stir in cottage cheese and grated Parmesan. Mix well to create a creamy texture.
- Combine pasta and sauce: Drain rigatoni, reserving some pasta water. Combine pasta with the sauce and toss to coat evenly.
- Finish and garnish: Serve hot and sprinkle with chopped parsley and extra Parmesan.
Notes
This dish can be easily customized with added vegetables or proteins. Perfect for meal prep!
Nutrition
- Serving Size: 1 serving
- Calories: 450
- Sugar: 8g
- Sodium: 800mg
- Fat: 15g
- Saturated Fat: 5g
- Unsaturated Fat: 8g
- Trans Fat: 0g
- Carbohydrates: 55g
- Fiber: 4g
- Protein: 25g
- Cholesterol: 40mg
Keywords: rigatoni, cottage cheese, high protein, quick dinner, comfort food

Sheet Pan Chicken Pitas with Herby Ranch Recipe
Sheet Pan Chicken Pitas with Herby Ranch: A Deliciously Easy Weeknight Meal
Welcome back to Clean Plate Cravings! Today, I’m thrilled to take you on a delightful culinary journey with my Sheet Pan Chicken Pitas with Herby Ranch. If you’ve been searching for a mouthwatering meal that’s as easy to prepare as it is to enjoy, you’ve hit the jackpot! This recipe is packed with juicy chicken, vibrant veggies, and a creamy herby ranch sauce that will take your taste buds to a whole new level.
I have a secret to share: cooking doesn’t have to be a time-consuming chore. With a sheet pan and a few fresh ingredients, dinner can be on the table in no time, leaving you free to unwind and enjoy your evening. As I guide you through this recipe, you’ll discover just how enjoyable healthy cooking can be.
Personal Story
Let me take you back to a warm summer evening at my parents’ backyard. The grill was fired up, and the smell of marinated chicken filled the air while vibrant bell peppers were tossed in oil and spices, caramelizing into summer perfection. My siblings and I were in charge of the music, and we danced around the kitchen, already dreaming of sneaking bites of that flavorful chicken. We’d always end our night gathered around the patio table, sharing stories, laughter, and, of course, serving each other bell pepper and chicken pitas just like these.
Fast forward a few years, and I wanted to recreate that nostalgic joy in my own kitchen—this time with an easy, modern twist. These Sheet Pan Chicken Pitas are inspired by those warm memories but streamlined for everyday life. Each bite brings me back to those summer nights filled with love, laughter, and plenty of food. Now, let’s bring that joy to your kitchen!
Ingredients
Here’s what you’ll need to whip up these scrumptious chicken pitas:
For the Chicken + Veggies:
- 1.5 lbs boneless, skinless chicken breasts or thighs: Chicken thighs are juicier, while breasts are leaner—pick what you prefer! You can also swap in turkey if you’re looking for a lean alternative.
- 1 red bell pepper, sliced: Sweet and colorful, red peppers add a touch of sweetness. Green or yellow can work, but I find red to be extra vibrant!
- 1 yellow bell pepper, sliced: Adds a wonderful sweetness; feel free to mix and match with other colors for a rainbow effect.
- 1 red onion, sliced: The sharpness of red onion adds depth. If you prefer a milder taste, try a sweet onion or shallots.
- 2 tbsp olive oil: A staple for cooking that provides healthy fats. Avocado oil is a great substitute if you’re looking for a higher smoke point.
- 2 tsp garlic powder: Grab it for ease; fresh minced garlic works too—1 clove should do!
- 2 tsp paprika: It adds a beautiful color and depth of flavor—smoked paprika will give a more complex taste.
- 1 tsp dried oregano: A classic herb to heighten flavor; thyme or Italian seasoning can also be a fabulous substitute.
- ½ tsp cumin: This adds warmth and a subtle earthiness; for a different vibe, try coriander instead.
- ½ tsp chili flakes (optional): For a hint of heat! Omit if you prefer it milder.
- Salt and pepper, to taste: Essentials for bringing all the flavors together!
For the Herby Ranch:
- ½ cup mayonnaise: This creamy base is perfect for tanking the ranch flavor—Greek yogurt is a lighter option that works beautifully too.
- ½ cup sour cream or Greek yogurt: Either option pairs well; if you want to lighten it, opt for non-fat Greek yogurt.
- 2 tbsp milk (to thin): Use your choice of milk—dairy or plant-based will do the trick!
- 2 tbsp fresh parsley, finely chopped: Fresh herbs brighten the dish! Basil or cilantro can provide a unique twist.
- 1 tbsp fresh dill, chopped (or 1 tsp dried): Dill adds a refreshing taste; you can swap in thyme if that’s what you have on hand.
- 1 tbsp fresh chives, chopped (or green onion): Chives add a mild onion flavor; shallots are great too if chives are unavailable.
- 1 tsp garlic powder: For that extra kick, and to keep things simple. Fresh minced garlic is an option too.
- 1 tsp onion powder: This is a must-have for flavor; you can also use chopped shallots in a pinch.
- 1 tbsp lemon juice or vinegar: A splash of acidity brightens everything up; apple cider vinegar can be an excellent choice too!
- Salt and pepper, to taste: Always add seasoning to bring out the flavors!
For Assembly:
- 4 pitas (pocket or flatbread style): Use a whole-wheat or gluten-free option to suit your dietary needs.
- 1 cup shredded lettuce or greens: Adds a fresh crunch; swap in kale or arugula if you’re feeling fancy.
- 1 tomato, sliced: You can use heirloom tomatoes for a pop of color or cherry tomatoes for sweetness.
- Optional toppings:
- Feta cheese: A crumbly brine adds tang; if you’re avoiding dairy, try a plant-based feta.
- Pickled onions: For that sweet and sour crunch, easily make your own by soaking onions in vinegar!
- Cucumber: Sliced or diced, it adds a refreshing crunch.
- Hot sauce: Spice things up if you dare!
Step-by-Step Instructions
Now that we have our ingredients ready, let’s get cooking! Here are your detailed steps for this tasty dish:
-
Preheat Your Oven: Preheat your oven to 425°F (220°C). This high heat will ensure that your chicken and veggies get beautifully caramelized and flavorful.
-
Prep the Chicken and Veggies: In a large bowl, combine your bite-sized pieces of chicken, sliced red and yellow bell peppers, and red onion. This is where the magic begins! Drizzle the olive oil over the chicken and veggies, and sprinkle in the garlic powder, paprika, oregano, cumin, chili flakes (if using), salt, and pepper.
Chef Tip: Use your hands to toss everything together! It’s messy, but it’s also the best way to ensure that all the pieces are evenly coated.
-
Arrange on the Sheet Pan: Spread the chicken and veggie mixture in a single layer on a large baking sheet.
Chef Hack: Line your baking sheet with parchment paper or foil for easy clean-up!
-
Roast in the Oven: Place the sheet pan in your preheated oven and roast for about 20-25 minutes, or until the chicken is cooked through and the veggies are tender and slightly caramelized. Give them a shake halfway through cooking for even browning.
-
Prepare the Herby Ranch: While the chicken and veggies are roasting, whisk together the mayonnaise, sour cream (or Greek yogurt), milk, parsley, dill, chives, garlic powder, onion powder, and lemon juice in a small bowl.
Chef Insight: Taste your herby ranch as you mix. If you love it extra herby, add more parsley or chives. Adjust salt and pepper as needed!
-
Prepare the Pitas: Lightly warm your pitas in a skillet or wrap them in foil and place them in the oven for the last 5 minutes of the chicken’s cooking time.
Tip: Warming pitas makes them more pliable and enhances their flavor, so don’t skip this step!
-
Assemble the Pitas: Once the chicken and veggies are cooked, take them out of the oven. Start with your warmed pita, add a generous amount of shredded lettuce, a scoop of your chicken and veggie mix, and finish it off with slices of tomato and your delicious herby ranch.
Presentation Tip: For a pop of color and taste, add those optional toppings—feta cheese, pickled onions, and a drizzle of hot sauce!
-
Serve: Enjoy your assembled pitas warm; each bite should be bursting with flavor.
Serving Suggestions
These Sheet Pan Chicken Pitas are perfect for a casual dinner or lunch. Serve them alongside a fresh side salad or some sweet potato fries for a complete meal. You can also dish up the chicken and veggies on a beautiful platter and let everyone assemble their pitas for a fun, interactive dining experience.
Recipe Variations
- Spicy Sheet Pan Chicken: Add sliced jalapeños or sprinkle cayenne pepper for an extra kick!
- Mediterranean Twist: Swap the herby ranch for tzatziki sauce and add sliced olives and cucumber for a Mediterranean flair.
- BBQ Chicken Pitas: Toss the chicken in your favorite barbecue sauce before roasting and serve with coleslaw.
- Veggie-Heavy Pitas: Add zucchini, asparagus, or mushrooms to the sheet pan for extra veggies and flavor.
- Low-Carb Option: Skip the pitas entirely and serve the chicken and veggies in a bed of leafy greens, drizzled with ranch!
Chef’s Notes
Cooking is all about experimentation and personal touches. Over the years, this recipe has evolved for me, using whatever fresh ingredients I have on hand or embracing seasonal veggies. Sometimes, I switch up the spices or add a pinch of something unexpected. On one particularly chaotic weeknight, I accidentally used lemon juice instead of vinegar in the ranch, and guess what? It wasn’t just good; it was a revelation. So, don’t be afraid to make it your own!
FAQs and Troubleshooting
Q: What if I don’t have a sheet pan?
A: No worries! You can use any baking dish or casserole dish you have; just ensure it’s large enough to avoid crowding the chicken and veggies.
Q: My chicken is dry; what did I do wrong?
A: Overcooking is the most common culprit for dry chicken. Use an instant-read thermometer to ensure the chicken reaches 165°F (75°C) for perfect juiciness.
Q: Can I prep this meal in advance?
A: Absolutely! You can marinate the chicken and veggies the night before, or even fully assemble your pitas, wrap them, and keep them in the fridge for the next day. Just warm them up when you’re ready to eat.
Q: Can I use frozen chicken?
A: While it’s best to thaw your chicken before cooking, in a pinch, you can cook frozen chicken pieces, just adjust cooking time accordingly (they may need an extra 10-15 minutes).
Nutritional Info (Optional)
This meal is not only delicious but also balanced! Each serving provides protein, healthy fats, and plenty of vitamins from the veggies. Adjust portions for a more precise nutritional profile based on your specific dietary needs.
And there you have it: a flavorful, hearty meal that’s perfect for busy weeknights and fun gatherings alike. I hope you enjoy making and devouring these Sheet Pan Chicken Pitas with Herby Ranch as much as I do! Happy cooking and remember—keep it fresh, simple, and seriously delicious!
PrintSheet Pan Chicken Pitas with Herby Ranch

A mouthwatering meal packed with juicy chicken, vibrant veggies, and a creamy herby ranch sauce, perfect for a quick weeknight dinner.
- Prep Time: 15 minutes
- Cook Time: 25 minutes
- Total Time: 40 minutes
- Yield: 4 servings 1x
- Category: Main Course
- Method: Roasting
- Cuisine: Mediterranean
- Diet: Balanced
Ingredients
- 1.5 lbs boneless, skinless chicken breasts or thighs
- 1 red bell pepper, sliced
- 1 yellow bell pepper, sliced
- 1 red onion, sliced
- 2 tbsp olive oil
- 2 tsp garlic powder
- 2 tsp paprika
- 1 tsp dried oregano
- ½ tsp cumin
- ½ tsp chili flakes (optional)
- Salt and pepper, to taste
- ½ cup mayonnaise
- ½ cup sour cream or Greek yogurt
- 2 tbsp milk (to thin)
- 2 tbsp fresh parsley, finely chopped
- 1 tbsp fresh dill, chopped (or 1 tsp dried)
- 1 tbsp fresh chives, chopped (or green onion)
- 1 tsp garlic powder
- 1 tsp onion powder
- 1 tbsp lemon juice or vinegar
- 4 pitas (pocket or flatbread style)
- 1 cup shredded lettuce or greens
- 1 tomato, sliced
- Optional toppings: feta cheese, pickled onions, cucumber, hot sauce
Instructions
- Preheat your oven to 425°F (220°C).
- Prep the chicken and veggies by combining chicken, red and yellow bell peppers, and red onion in a large bowl. Drizzle olive oil and sprinkle garlic powder, paprika, oregano, cumin, chili flakes, salt, and pepper.
- Arrange the chicken and veggie mixture in a single layer on a large baking sheet.
- Roast in the oven for about 20-25 minutes, or until cooked through and tender.
- Prepare the herby ranch by whisking together mayonnaise, sour cream, milk, parsley, dill, chives, garlic powder, onion powder, and lemon juice in a small bowl.
- Prepare the pitas by warming them in a skillet or in the oven for the last 5 minutes of the chicken’s cooking time.
- Assemble the pitas with warmed pita, shredded lettuce, chicken and veggies, and herby ranch.
- Serve warm, enjoy each flavorful bite!
Notes
Feel free to customize the herbs and spices based on your preferences. This dish pairs well with sweet potato fries or a fresh side salad.
Nutrition
- Serving Size: 1 serving
- Calories: 400
- Sugar: 5g
- Sodium: 500mg
- Fat: 15g
- Saturated Fat: 3g
- Unsaturated Fat: 8g
- Trans Fat: 0g
- Carbohydrates: 42g
- Fiber: 4g
- Protein: 25g
- Cholesterol: 70mg
Keywords: chicken pitas, herby ranch, sheet pan meal, quick dinner, weeknight meal