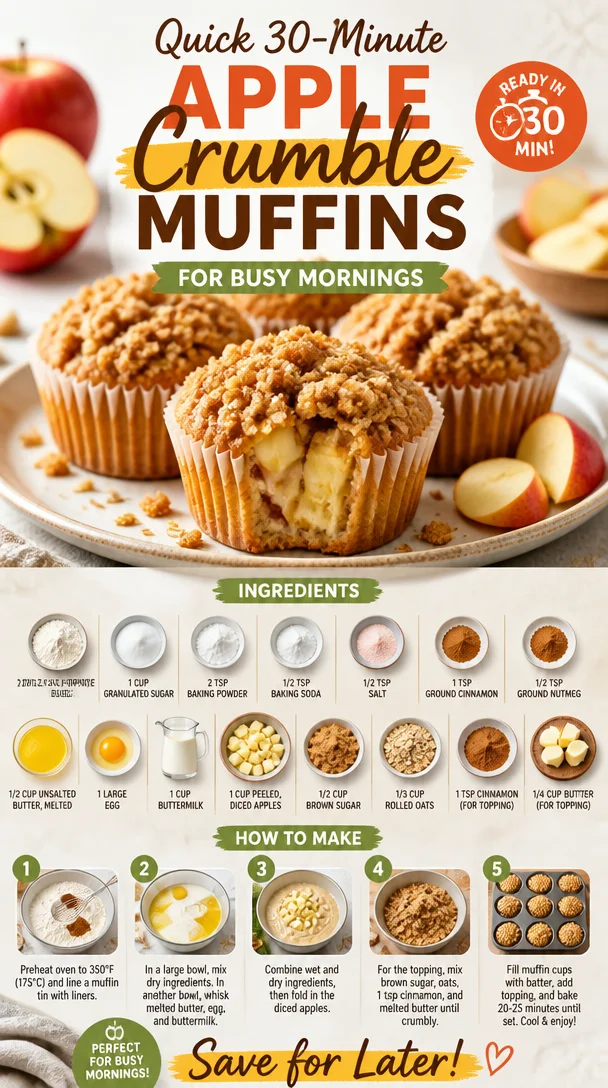
Quick 30-Minute Apple Crumble Muffins for Busy Mornings
Wholesome and Delicious: Apple Crumble Muffins Recipe
Welcome, dear food lover! Today, we’re diving into a delightful and heartwarming recipe that will illuminate your kitchen with cozy aromas: Apple Crumble Muffins. Imagine biting into a warm, golden muffin filled with juicy bits of apples and topped with a sweet, crumbly crust—all while sipping a cup of your favorite coffee or tea. Sounds dreamy, right?
These muffins are not just delicious; they’re also a nostalgia trip back to those crisp autumn days when harvests are bountiful, and sweet treats are aplenty. Baking is a form of love, and these Apple Crumble Muffins convey that message better than any fancy dessert ever could. So, grab your apron, and let’s channel our inner bakers and create something truly special together!
Whether you’re looking for a quick breakfast option, a sweet afternoon snack, or a marvelous treat for gathering friends, these muffins check all the boxes! They’re warm, inviting, and bursting with flavor. Plus, they’re easy to whip up, making them perfect for any cook out there—regardless of skill level. Let’s get started!
A Sweet Nostalgic Memory
I still remember the first time I made apple crumble—a recipe that my grandmother shared with me when I was just a kid. She had this quaint kitchen filled with the best aromas wafting from her oven. I was tasked with peeling apples, and though I had no idea what a great culinary adventure awaited, I loved every moment spent cooking with her.
The crunch of the apples being sliced, the warm hug of the cinnamon, and the joy of sprinkling the crumble topping made me feel like I was part of something magical. We’d devour the crumble fresh from the oven, and I’d always ask if we could have a scoop of vanilla ice cream on top. The combination was pure heaven!
As I grew older and ventured into my own kitchen, I found myself craving that same comforting taste but wanted to create something a bit more portable. Enter: Apple Crumble Muffins! They’re the perfect blend of that timeless recipe, bursting with flavor, but easy to share and enjoy any time of the day. I can’t wait to share them with you!
Ingredients
Let’s gather our ingredients. Here’s what you’ll need for these delightful Apple Crumble Muffins:
-
2 cups all-purpose flour
This is the base for our muffins. If you prefer a gluten-free option, you can substitute with a 1:1 gluten-free flour blend! -
1 cup granulated sugar
A classic choice for sweetness. You can reduce the amount if you prefer it less sweet, or use coconut sugar for a more caramel-like flavor! -
2 teaspoons baking powder
This is our leavening agent, giving the muffins that light, fluffy texture. -
1/2 teaspoon baking soda
Another leavening agent necessary for proper rise! Make sure it’s fresh for best results. -
1/2 teaspoon salt
Balancing flavors is key! Salt enhances the sweetness of the muffins. -
1 teaspoon ground cinnamon
The spice that brings warmth and nostalgia—feel free to add more if you’re a cinnamon lover! -
1/2 teaspoon ground nutmeg
A little goes a long way! This aromatic spice adds depth to our muffins. -
1/2 cup unsalted butter, melted
For moisture and richness. You can use coconut oil for a dairy-free option! -
1 large egg
This acts as a binding agent. If vegan, you can use a flax egg instead! -
1 cup buttermilk
The acidity in buttermilk keeps our muffins moist—no buttermilk? Just add a tablespoon of vinegar to regular milk and let it sit for 5 minutes! -
1 cup peeled, diced apples
I love using Granny Smith for their tartness, but feel free to use your favorite apples! -
1/2 cup brown sugar
This will create a lovely crumble topping. You can also substitute with coconut sugar. -
1/3 cup rolled oats
These add a delightful texture to the topping. You can use quick oats or even crushed nuts for a different twist! -
1 teaspoon cinnamon (for topping)
Cinnamon on the crumble—what could be better?! -
1/4 cup butter (for topping)
A bit more butter brings everything together in the crumble. You can try using vegan butter for a dairy-free version!
Step-by-Step Instructions
Now let’s dive into making these delightful muffins! Follow these steps for a scrumptious result:
-
Preheat Your Oven:
Preheat your oven to 350°F (175°C) and line a muffin tin with paper liners or grease it lightly. This step ensures your muffins bake evenly! -
Mix the Dry Ingredients:
In a large bowl, whisk together the flour, granulated sugar, baking powder, baking soda, salt, ground cinnamon, and nutmeg until well combined. This ensures our leavening agents are evenly distributed! -
Combine the Wet Ingredients:
In a separate bowl, mix the melted butter, egg, buttermilk, and diced apples. Be sure the butter isn’t too hot, or it could cook the egg! -
Bring It All Together:
Pour the wet ingredients into the dry ingredients, stirring gently until combined. Avoid over-mixing; a few lumps are totally okay! This keeps our muffins tender. -
Prepare the Crumble Topping:
In a small bowl, mix together the brown sugar, rolled oats, cinnamon, and cold butter. Use your fingers to crumble it together until it resembles coarse crumbs. (Pro tip: Cold butter works best here for that perfect crumble texture!) -
Fill the Muffin Tin:
Spoon the muffin batter into the prepared muffin tin, filling each about two-thirds full. Remember, they’ll rise! -
Top with Crumble:
Generously sprinkle the crumble topping over each muffin. You can also slightly tap it in—this helps adhere it better post-baking. -
Bake:
Place your muffin tin in the oven and bake for about 18-20 minutes, or until a toothpick inserted in the center comes out clean. The tops will be a beautiful golden brown! -
Cool and Serve:
Once baked, let them sit in the pan for a few minutes before transferring to a wire rack to cool completely. The aroma wafting through your kitchen will be absolutely glorious!
Serving Suggestions
These Apple Crumble Muffins are delightful warm, dusted with a bit of powdered sugar or served with a slather of butter. They also pair beautifully with a scoop of vanilla ice cream or a dollop of whipped cream for that extra indulgence.
For the ultimate breakfast experience, serve with a side of Greek yogurt and fresh fruit. You can even slice them in half and toast them for a crispy outside—yummy!
Recipe Variations
Feel like switching things up? Here are a few creative variations to try:
- Nutty Addition: Add 1/2 cup of chopped walnuts or pecans to the batter for added crunch and flavor.
- Dried Fruits: Swap in dried cranberries or raisins for a surprise sweetness!
- Spice it Up: Add a pinch of ginger or cloves to the spice mix for a different flavor profile.
- Fruit Fusion: Mix in other fruits, like chopped pears or berries, for a unique twist—berry apple crumble muffins, anyone?
- Gluten-Free: Substitute the all-purpose flour with a gluten-free flour blend, and you’re all set for gluten-free goodness!
Chef’s Notes
Oh, how these muffins have become a staple in my kitchen! There are countless versions that I’ve tinkered with and adjusted throughout the years, much to the delight of my family and friends. They’ve become a go-to recipe for gatherings, brunches, or even just when I need a little pick-me-up during the week.
Sometimes I like to add a dash of vanilla extract to the batter, elevating it to another level of deliciousness. And I’ve learned that, like any good dish, they’re best enjoyed with great company—so don’t forget to share!
FAQs and Troubleshooting
-
Why are my muffins dense?
If your muffins are dense, it often means the batter was over-mixed. Make sure to stir until just combined for a light and fluffy texture! -
Can I freeze these muffins?
Absolutely! Just let them cool completely, then place them in an airtight container or a freezer bag. They’ll keep their deliciousness for up to three months. Simply thaw at room temperature or pop them in the microwave to warm them up! -
What if I don’t have buttermilk?
Simple! Just add 1 tablespoon of vinegar or lemon juice to a cup of milk (any kind will do). Let it sit for five minutes, and you’ve got your own buttermilk substitute. -
Can I adjust the sugar content?
Yes, you can! Feel free to reduce the amount of sugar or substitute some sugar with unsweetened applesauce for a lower-sugar version.
Nutritional Info
This recipe yields about 12 muffins. A typical serving (one muffin) contains approximately:
- Calories: 220
- Total Fat: 9g
- Saturated Fat: 5g
- Cholesterol: 30mg
- Sodium: 150mg
- Total Carbohydrates: 33g
- Dietary Fiber: 1g
- Sugars: 14g
- Protein: 3g
Remember, these are estimates based on the ingredients listed and can vary based on substitutions or modifications made.
So there you have it, my friends—Apple Crumble Muffins made with love, nostalgia, and just the right amount of spice! I hope you enjoy baking (and eating!) these delightful treats as much as I do. Be sure to share your creations with me—I can’t wait to hear all about your baking adventures! Happy baking!
PrintApple Crumble Muffins

Delicious and heartwarming muffins filled with juicy apples and topped with a sweet crumble.
- Prep Time: 15 minutes
- Cook Time: 20 minutes
- Total Time: 35 minutes
- Yield: 12 muffins 1x
- Category: Breakfast
- Method: Baking
- Cuisine: American
- Diet: Vegetarian
Ingredients
- 2 cups all-purpose flour
- 1 cup granulated sugar
- 2 teaspoons baking powder
- 1/2 teaspoon baking soda
- 1/2 teaspoon salt
- 1 teaspoon ground cinnamon
- 1/2 teaspoon ground nutmeg
- 1/2 cup unsalted butter, melted
- 1 large egg
- 1 cup buttermilk
- 1 cup peeled, diced apples
- 1/2 cup brown sugar
- 1/3 cup rolled oats
- 1 teaspoon cinnamon (for topping)
- 1/4 cup butter (for topping)
Instructions
- Preheat your oven to 350°F (175°C) and line a muffin tin with paper liners or grease it lightly.
- Mix the dry ingredients in a large bowl: flour, granulated sugar, baking powder, baking soda, salt, ground cinnamon, and nutmeg.
- Combine the wet ingredients: melted butter, egg, buttermilk, and diced apples, in a separate bowl.
- Bring it all together by pouring the wet ingredients into the dry ingredients, stirring gently until combined.
- Prepare the crumble topping by mixing the brown sugar, rolled oats, cinnamon, and cold butter until it resembles coarse crumbs.
- Fill the muffin tin, spooning the batter in about two-thirds of the way full.
- Top each muffin with the crumble mixture.
- Bake for about 18-20 minutes or until a toothpick inserted comes out clean.
- Cool for a few minutes in the pan before transferring to a wire rack to cool completely.
Notes
These muffins are great warm with powdered sugar, butter, or even ice cream!
Nutrition
- Serving Size: 1 muffin
- Calories: 220
- Sugar: 14g
- Sodium: 150mg
- Fat: 9g
- Saturated Fat: 5g
- Unsaturated Fat: 3g
- Trans Fat: 0g
- Carbohydrates: 33g
- Fiber: 1g
- Protein: 3g
- Cholesterol: 30mg
Keywords: apple muffins, crumble muffins, baking, fall recipes, breakfast
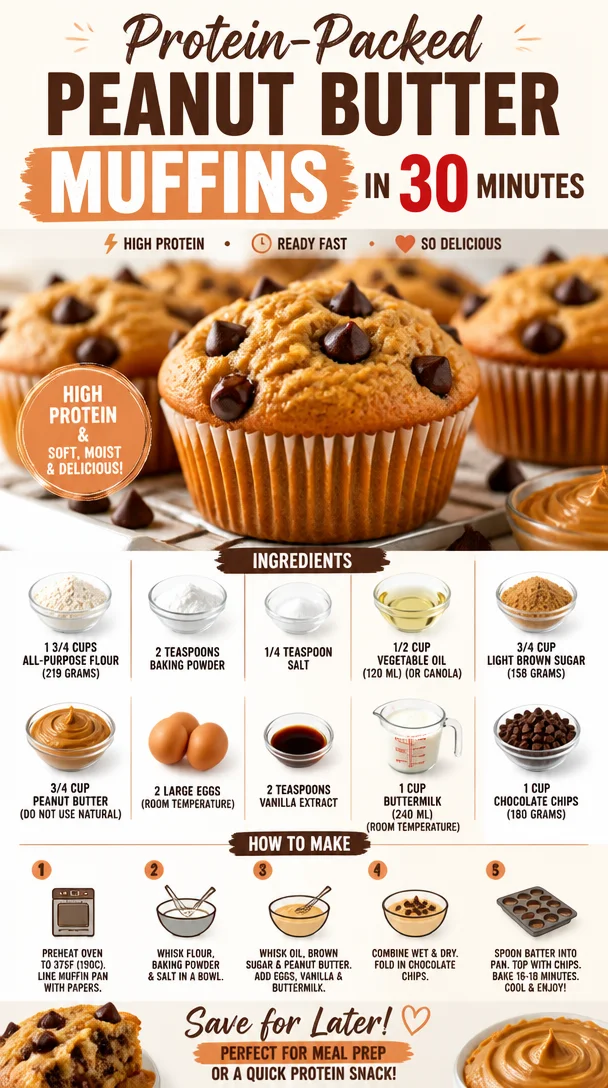
Protein-Packed Peanut Butter Muffins in 30 Minutes
Irresistible Peanut Butter Muffins: A Love Letter to Comfort and Flavor
Welcome to Clean Plate Cravings, where flavor and health go hand in hand. I’m Ava Carter, your friendly guide to a world of nourishing delights! Today, we’re diving into a recipe that is bound to make your mornings brighter and your taste buds dance—Peanut Butter Muffins. These little bites of joy are perfect for breakfast, snack time, or whenever that sweet (and slightly nutty) craving strikes.
You see, these muffins are more than just a treat; they’re a celebration of comfort, nostalgia, and the delightful simplicity of homemade food. I can’t wait to share my love for peanut butter baking and the irresistible aroma that fills the kitchen when these muffins are in the oven. Whether you’re a busy parent looking for easy breakfast ideas or a foodie like me who loves to whip up something delicious, you’re in the right spot!
A Whiff of Nostalgia
Growing up, my mornings revolved around the rich smell of peanut butter wafting through the house. My mom had a knack for transforming simple ingredients into incredible concoctions, and the star of the show was often her peanut butter cookies. While I adored those crispy treats, I soon discovered the joy of muffins—especially when they come infused with that creamy nutty goodness.
One particular Saturday, I recall standing by the kitchen counter, eagerly waiting to sneak a bite straight from the mixing bowl while my mom whipped up a batch of her famous peanut butter muffins. The excitement was palpable! We would sprinkle chocolate chips into the batter and giggle as we imagined the muffins being alive with warm, gooey pockets of chocolate. They never lasted long in our home, and I can still hear the muffled crunch as I bit into the soft, fluffy muffins, topped with a smear of peanut butter for good measure.
Fast forward to today, and I’ve crafted my own version of those beloved muffins, drawing inspiration from my childhood while adding my unique twist. Let’s embark on this delicious journey together!
Ingredients You’ll Need
Here’s what you’ll need to create these mouthwatering Peanut Butter Muffins:
-
1 3/4 cups all-purpose flour (219 grams): This is the foundation of your muffins. For a healthier alternative, consider using whole wheat flour, which will give your muffins a heartier texture and more fiber.
-
2 teaspoons baking powder: This is your trusty leavening agent, ensuring your muffins rise beautifully. Make sure it’s fresh for the best results!
-
1/4 teaspoon salt: Just a pinch enhances all the flavors in your muffins. If you’re watching your sodium intake, feel free to use a low-sodium option.
-
1/2 cup vegetable oil (120 ml) (or canola): This keeps your muffins moist and delicious. If you prefer a lighter touch, you can substitute with applesauce.
-
3/4 cup light brown sugar (158 grams): This adds sweetness and a hint of caramel flavor. If you’re looking for a lower-sugar option, coconut sugar is a great substitute.
-
3/4 cup peanut butter (do not use natural): Creamy and indulgent, this is the star of the show! Opt for classic, creamy peanut butter for the best texture.
-
2 large eggs (room temperature): Eggs provide structure and moisture; for an egg-free version, try using flaxseed meal mixed with water as a binder.
-
2 teaspoons vanilla extract: This is the magic ingredient that elevates the flavors. You can also try almond extract for a different taste profile.
-
1 cup buttermilk (240 ml) (room temperature): Buttermilk gives your muffins a tender crumb. If you don’t have any, you can create a quick version by adding a tablespoon of vinegar to regular milk and letting it sit for a few minutes.
-
1 cup chocolate chips (180 grams): Because who says we can’t indulge? Choose dark chocolate for a richer flavor or try butterscotch chips for a fun twist.
Step-by-Step Instructions
Now that we have our ingredients ready, let’s get cooking! Follow these simple steps to whip up your Peanut Butter Muffins:
-
Preheat the Oven: First things first, let’s get that oven preheating to 350°F (175°C). The even heat will help our muffins rise perfectly!
-
Prepare the Muffin Tin: While the oven warms up, generously grease a muffin tin with cooking spray or use paper liners for easy removal later. This makes cleanup a breeze!
-
Mix Dry Ingredients: In a large mixing bowl, whisk together the flour, baking powder, and salt. This step ensures even distribution of the baking powder, which is crucial for achieving that fluffy muffin texture.
-
Combine Wet Ingredients: In a separate bowl, mix the vegetable oil, brown sugar, and peanut butter until smooth. The combination might feel thick, but that’s totally normal! Add in the eggs one at a time, ensuring they are fully incorporated after each addition. Stir in the vanilla extract and buttermilk until everything is well combined.
-
Combine Wet and Dry Mixtures: Pour the wet mixture into the bowl with the dry ingredients. Gently fold them together until just combined—overmixing can lead to dense muffins, and we want fluffy, light treats!
-
Add the Chocolate Chips: Gently fold in the chocolate chips (or butterscotch chips if you’re feeling adventurous!). Reserve a handful to sprinkle on top before baking for that extra touch.
-
Fill the Muffin Tin: Using a cookie scoop or spoon, divide the batter evenly among the prepared muffin cups. Fill each cup about two-thirds full to allow room for the muffins to rise.
-
Bake: Pop your muffins into the preheated oven and bake for 18-20 minutes, or until a toothpick inserted into the center comes out clean. Inhale deeply—your kitchen will smell divine!
-
Cool and Enjoy: Once they’re baked, remove the muffins from the oven and allow them to cool in the tin for about 5 minutes. Transfer them to a wire rack to cool completely (if you can resist the temptation of warm muffins).
Serving Suggestions
When it comes to serving up these delightful Peanut Butter Muffins, the possibilities are endless! Enjoy them warm with a drizzle of honey or a sprinkle of sea salt for an extra pop of flavor. Pair your muffins with a fresh fruit salad or yogurt for a well-rounded breakfast or snack. You can even pack them in lunchboxes for a delightful treat that everyone will love!
Recipe Variations
Feeling creative? Here are a few fun variations to mix things up:
-
Nutty Banana Muffins: Mash a ripe banana into the batter for a fruity twist and a dose of natural sweetness.
-
Cocoa-Crazy Muffins: Add 1/4 cup of cocoa powder for a chocolate peanut butter experience that’s sure to satisfy your sweet tooth.
-
Crunchy Granola Muffins: Stir in some granola or chopped nuts for added texture and crunch.
-
Spiced Pumpkin Muffins: Swap out peanut butter for pumpkin puree and add warm spices like cinnamon, nutmeg, and cloves for a cozy fall treat.
-
Dairy-Free Option: Use almond milk instead of buttermilk and a vegan butter spread in place of regular butter for a dairy-free delight.
Chef’s Notes
These Peanut Butter Muffins are a recipe I’ve worked on and perfected over the years, and they hold a special place in my heart. I love tweaking the ingredients based on what I have on hand or experimenting with different mix-ins like dried fruit. The best part? They always turn out delicious!
Each time I make them, I’m reminded of those cherished mornings spent in the kitchen with my family. There’s nothing like the feeling of sharing something homemade with loved ones—so don’t be shy about topping these muffins with your favorite nut butter or even a dollop of jelly!
FAQs and Troubleshooting
Q1: Why did my muffins turn out dense?
A1: Densely packed muffins are often a result of overmixing the batter. Remember to gently fold the wet and dry ingredients together until just combined for a fluffy texture.
Q2: Can I use natural peanut butter instead?
A2: I recommend using creamy non-natural peanut butter for the best texture. Natural peanut butter can make the muffins too crumbly, as it has a different fat content.
Q3: How do I store these muffins?
A3: Store your muffins in an airtight container at room temperature for up to three days, or freeze them for up to three months. Just pop them in the microwave for a few seconds when you’re ready to enjoy!
Q4: What should I do if my muffins overflowed?
A4: No worries—muffins can be a bit unpredictable sometimes! Ensure you fill the muffin cups no more than two-thirds full next time. If they do overflow, simply trim the excess once they’re cooled—no one will know!
Nutritional Info (Optional)
Each muffin contains approximately:
- Calories: 250
- Protein: 6g
- Carbohydrates: 30g
- Fat: 12g
- Fiber: 2g
- Sugar: 12g
*Nutrition may vary based on ingredients used and portion sizes.
And there you have it—comforting, delicious Peanut Butter Muffins that are as fun to make as they are to eat! I can’t wait for you to try this recipe, breathe in those heavenly aromas, and share joyous moments around your table. Let’s keep it fresh, simple, and seriously delicious. Happy baking, friends!
PrintIrresistible Peanut Butter Muffins

Delicious Peanut Butter Muffins perfect for breakfast or snacks, infused with the comforting aroma of peanut butter and chocolate.
- Prep Time: 15 minutes
- Cook Time: 20 minutes
- Total Time: 35 minutes
- Yield: 12 servings 1x
- Category: Breakfast
- Method: Baking
- Cuisine: American
- Diet: Vegetarian
Ingredients
- 1 3/4 cups all-purpose flour (219 grams)
- 2 teaspoons baking powder
- 1/4 teaspoon salt
- 1/2 cup vegetable oil (120 ml)
- 3/4 cup light brown sugar (158 grams)
- 3/4 cup peanut butter (not natural)
- 2 large eggs (room temperature)
- 2 teaspoons vanilla extract
- 1 cup buttermilk (240 ml, room temperature)
- 1 cup chocolate chips (180 grams)
Instructions
- Preheat the oven to 350°F (175°C).
- Prepare the muffin tin with cooking spray or paper liners.
- Mix the flour, baking powder, and salt in a large bowl.
- Combine the vegetable oil, brown sugar, and peanut butter until smooth; add eggs, then vanilla and buttermilk.
- Combine the wet and dry mixtures until just blended.
- Add the chocolate chips, reserving some to sprinkle on top.
- Fill each muffin cup about two-thirds full with batter.
- Bake for 18-20 minutes, or until a toothpick comes out clean.
- Cool in the tin for 5 minutes then transfer to a wire rack.
Notes
Store muffins in an airtight container for up to 3 days or freeze for 3 months. Serve warm with honey or sea salt.
Nutrition
- Serving Size: 1 muffin
- Calories: 250
- Sugar: 12g
- Sodium: 200mg
- Fat: 12g
- Saturated Fat: 2g
- Unsaturated Fat: 8g
- Trans Fat: 0g
- Carbohydrates: 30g
- Fiber: 2g
- Protein: 6g
- Cholesterol: 30mg
Keywords: peanut butter muffins, breakfast muffins, easy muffins, chocolate chip muffins
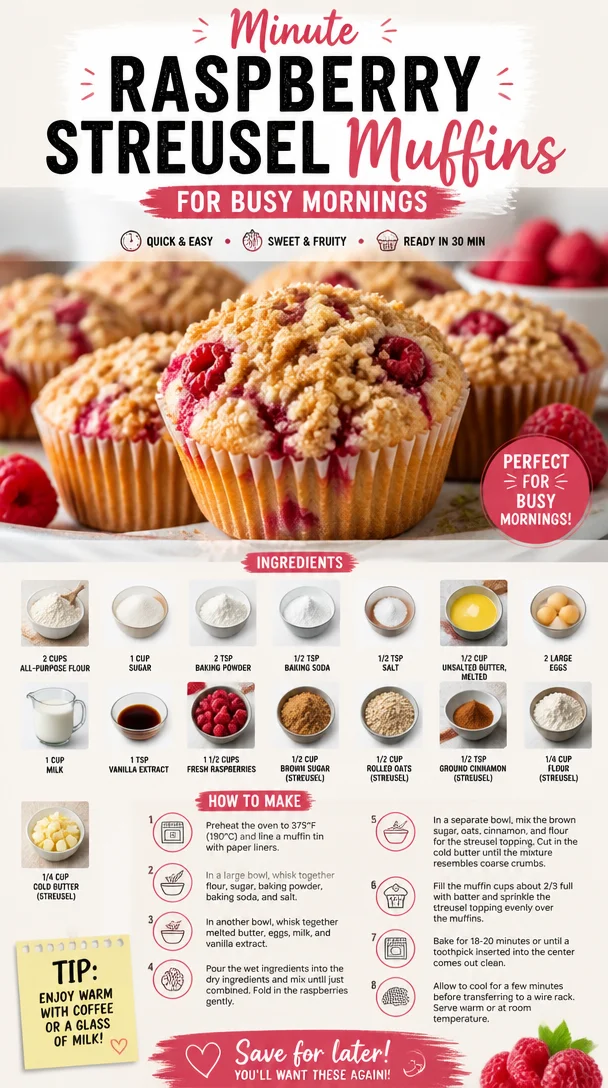
Minute Raspberry Streusel Muffins for Busy Mornings
Raspberry Streusel Muffins: A Berry Delicious Journey
Welcome to a sweet little corner of the kitchen where fresh berries and buttery goodness come together in the form of fluffy raspberry streusel muffins! If your mornings call for a delightfully sweet pick-me-up that doesn’t compromise on flavor or that scrumptious homemade charm, you’ve landed in just the right spot. As we dive into this recipe, let me take you on a journey filled with nostalgia, a sprinkle of culinary wisdom, and the joy of baking—because who doesn’t love starting their day with a berry-licious treat?
A Sweet Memory
Growing up, the scent of freshly baked goods wafting through the house was a signal that something magical was happening in the kitchen. My mom was the queen of muffins, and Saturday mornings were our little tradition. She’d pull out her trusty mixing bowl, and soon the kitchen would fill with laughter and the comforting aroma of baked delights. One of my personal favorites? You guessed it—raspberry muffins! I remember sitting at the kitchen table, my finger poised for the very first taste, while she lovingly sprinkled the streusel topping, her secret weapon for that perfect crumbly finish.
Fast forward to today, and every time I whip up a batch of these raspberry streusel muffins, I’m transported back to those carefree weekends filled with love and laughter. This recipe is not just about creating something delicious; it’s about evoking those cherished memories and sharing that warmth with all of you. So, grab your apron, and let’s make some magic in the kitchen!
Ingredients
-
2 cups all-purpose flour: This forms the base of our muffins. Feel free to substitute with whole wheat flour for a heartier texture or a gluten-free blend if you’re avoiding gluten.
-
1 cup sugar: Sweetness is key for our muffins! You can use coconut sugar or a sugar substitute if you’re looking to cut back on refined sugars.
-
2 teaspoons baking powder: This is our rising agent; it gives muffins their fluffy texture. Just make sure it’s fresh for the best results!
-
1/2 teaspoon baking soda: Works alongside the baking powder to help the muffins rise nicely.
-
1/2 teaspoon salt: A crucial balance to enhance the sweetness without being overpowering.
-
1/2 cup unsalted butter, melted: This provides richness and moisture. If you prefer a dairy-free option, melted coconut oil works wonderfully.
-
2 large eggs: Essential for binding the ingredients together and enriching the flavor. Chia eggs are an easy vegan substitute for a similar effect.
-
1 cup milk: Whole milk adds creaminess, but almond milk or oat milk are fantastic alternatives for a lighter twist.
-
1 teaspoon vanilla extract: The secret ingredient that brings warmth and enhances the flavor of the muffins.
-
1 1/2 cups fresh raspberries: The star of the show! Fresh is best for that burst of berry flavor, though frozen raspberries can also work in a pinch—just allow them to defrost first.
-
For the Streusel Topping:
- 1/2 cup brown sugar: This creates that deliciously sweet, caramel-like finish.
- 1/2 cup rolled oats: Provides texture and a wholesome feel to the crumb topping. Quick oats can be used, too.
- 1/2 teaspoon ground cinnamon: Adds a lovely warmth; feel free to adjust this based on how spicy you like it!
- 1/4 cup flour: Helps bind the streusel together without turning it into pudding.
- 1/4 cup cold butter: Cold butter is key here for that crumbly streusel texture; you can use a vegan butter substitute if desired.
Step-by-Step Instructions
-
Preheat Your Oven to 375°F (190°C): That’s right! This is your essential first step. Preheating ensures an evenly baked muffin from the moment you place them in the oven.
-
Prep Your Muffin Tin: Line a standard muffin tin with paper liners or give it a generous spritz of non-stick spray. Don’t skip this step; nobody wants to be scraping muffins out of the tin on a Sunday morning!
-
Mix Dry Ingredients: In a large mixing bowl, whisk together the flour, sugar, baking powder, baking soda, and salt until combined. This step ensures every muffin is evenly flavored—no lumps allowed!
-
Combine Wet Ingredients: In another bowl, mix the melted butter, eggs, milk, and vanilla extract. Whisk until smooth and creamy. You want a unified mixture that sings with sweet vanilla notes.
-
Combine the Mixtures: Pour the wet ingredients into the dry ingredients, gently folding them together. This is where the magic happens! Mix until just combined—over-mixing can lead to dense muffins, and we want fluffy delights!
-
Add the Raspberries: Gently fold in the fresh raspberries. Take care not to crush them; we want those gorgeous berry bursts intact!
-
Prepare the Streusel Topping: In a small bowl, combine the brown sugar, rolled oats, ground cinnamon, flour, and cold butter. Use your fingers or a pastry cutter to mix until crumbly. This topping is where your muffins will get their divine texture.
-
Fill the Muffin Tin: Spoon the batter evenly into the prepared muffin tin, filling each cup about two-thirds full. Then, sprinkle a generous amount of streusel topping over each muffin.
-
Bake: Pop the muffin tin into your preheated oven and bake for 18-20 minutes, or until golden brown and a toothpick inserted into the center comes out clean. Keep an eye on them; every oven is different!
-
Cool & Serve: Allow the muffins to cool in the tin for about 5 minutes before transferring them to a wire rack. Don’t rush this; the cooling really helps the muffins set!
Serving Suggestions
Serve these raspberry streusel muffins warm with a drizzle of honey or a spread of your favorite jam for an extra treat on the side. They pair wonderfully with a freshly brewed cup of coffee or a refreshing iced tea. You can even plate them on a lovely cake stand as a centerpiece for brunch—it’s almost too pretty to eat… almost!
Recipe Variations
-
Berry Medley: Swap out the raspberries for any combination of your favorite berries—blueberries, blackberries, or strawberries all work great!
-
Zesty Twist: Add the zest of one lemon or orange to the batter for a refreshing citrus kick that complements the berries beautifully.
-
Nutty Crumble: Toss in some chopped nuts, like walnuts or pecans, for an extra crunch in both the muffins and the streusel topping.
-
Chocolate Lover’s Delight: Mix in some dark chocolate chips for those days when you want an indulgent treat.
-
Vegan Version: Substitute the eggs with flax eggs (1 tbsp ground flaxseed + 2.5 tbsp water = 1 egg) and use your favorite plant-based milk and butter.
Chef’s Notes
These muffins have evolved over time in my kitchen—what started as a simple raspberry muffin recipe has transformed into an award-winning brunch item in my home! I remember one morning I had a few extra berries on hand, and in a moment of inspiration, I decided to throw them in. That’s when I realized that cooking is all about embracing the moment and going with your gut. Every iteration of this recipe has been a joy, each bringing a new twist that adds to the family lore. And trust me, nothing feels better than watching loved ones enjoying every delicious bite of something you’ve made with care.
FAQs and Troubleshooting
1. Why are my muffins dense?
Dense muffins may be due to overmixing the batter. Mix until just combined to maintain that fluffy texture!
2. Can I use frozen raspberries?
Absolutely! Just make sure to let them thaw and drain excess moisture to prevent the batter from getting too wet.
3. How can I tell when my muffins are done baking?
A toothpick inserted into the center should come out clean or with a few moist crumbs—not wet batter. Keep an eye on the tops; they should be golden brown!
4. Can I store these muffins? How long do they last?
Yes! Store cooled muffins in an airtight container at room temperature for up to 3 days or in the fridge for about a week. They freeze beautifully too—just pop them in a freezer bag for up to 3 months!
Nutritional Info (optional)
While I focus on flavor and enjoyment, it’s nice to keep the nutritional balance in mind. Each muffin (without added toppings) generally contains:
- Calories: 250
- Protein: 5g
- Carbs: 36g
- Fiber: 2g
- Sugar: 12g
- Fat: 10g
Enjoy these delightful raspberry streusel muffins guilt-free, knowing they are a tasty treat to fuel your day!
So there you have it, friends! A recipe that’s more than just a set of instructions—it’s about creating memories, nourishing your body, and most importantly, indulging your taste buds in a delightful berry adventure. Whether you’re sharing these with family, friends, or just treating yourself, every bite is sure to bring joy. Happy baking! 🌟
PrintRaspberry Streusel Muffins

Delightful raspberry streusel muffins that evoke sweet memories and fill your mornings with flavor.
- Prep Time: 15 minutes
- Cook Time: 20 minutes
- Total Time: 35 minutes
- Yield: 12 muffins 1x
- Category: Breakfast
- Method: Baking
- Cuisine: American
- Diet: Vegetarian
Ingredients
- 2 cups all-purpose flour
- 1 cup sugar
- 2 teaspoons baking powder
- 1/2 teaspoon baking soda
- 1/2 teaspoon salt
- 1/2 cup unsalted butter, melted
- 2 large eggs
- 1 cup milk
- 1 teaspoon vanilla extract
- 1 1/2 cups fresh raspberries
- 1/2 cup brown sugar (for streusel topping)
- 1/2 cup rolled oats (for streusel topping)
- 1/2 teaspoon ground cinnamon (for streusel topping)
- 1/4 cup flour (for streusel topping)
- 1/4 cup cold butter (for streusel topping)
Instructions
- Preheat your oven to 375°F (190°C).
- Prep your muffin tin by lining it with paper liners or spraying with non-stick spray.
- Mix dry ingredients: In a large bowl, whisk together the flour, sugar, baking powder, baking soda, and salt.
- Combine wet ingredients: In another bowl, mix the melted butter, eggs, milk, and vanilla extract until smooth.
- Combine the mixtures: Pour wet ingredients into dry ingredients and gently fold until just combined.
- Add the raspberries, folding gently to keep them intact.
- Prepare the streusel topping in a small bowl by mixing brown sugar, oats, ground cinnamon, flour, and cold butter until crumbly.
- Fill the muffin tin with batter and top with streusel.
- Bake for 18-20 minutes until golden and a toothpick comes out clean.
- Cool for 5 minutes in the tin before transferring to a wire rack.
Notes
For extra flavors, add lemonade zest or swap out the raspberries for other berries!
Nutrition
- Serving Size: 1 muffin
- Calories: 250
- Sugar: 12g
- Sodium: 150mg
- Fat: 10g
- Saturated Fat: 6g
- Unsaturated Fat: 3g
- Trans Fat: 0g
- Carbohydrates: 36g
- Fiber: 2g
- Protein: 5g
- Cholesterol: 70mg
Keywords: muffins, raspberry muffins, breakfast recipes, baking, sweet treats
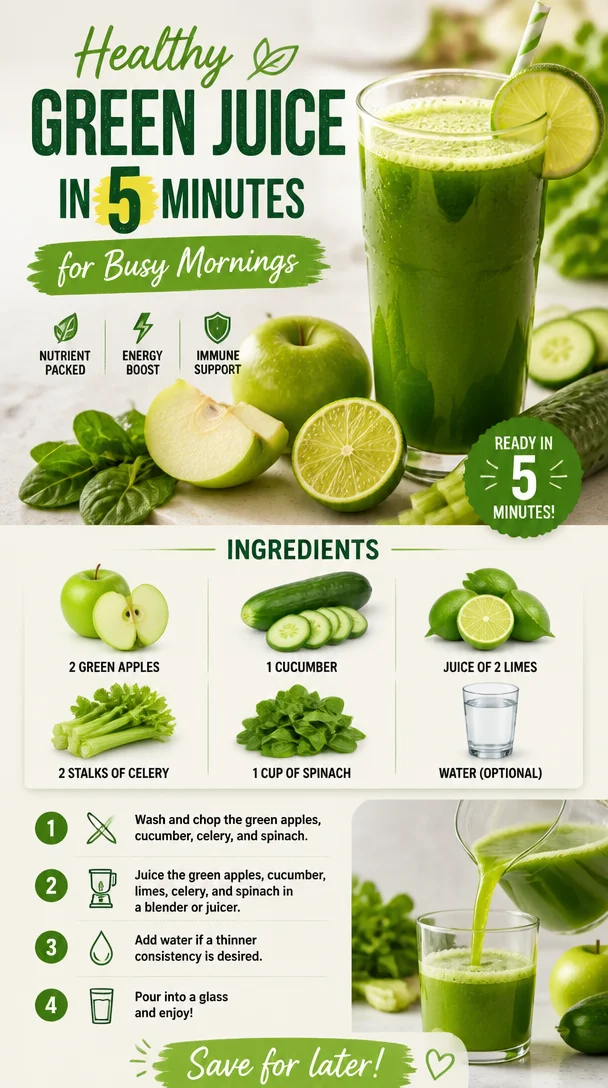
Healthy Green Juice in 5 Minutes for Busy Mornings
Refreshing Green Juice: Your Go-To Guide for a Vibrant Start
Welcome to Clean Plate Cravings, where we’re all about fresh, feel-good food that makes life a tad brighter! Today, I’m going to take you on a juicy journey as we whip up a Refreshing Green Juice. This isn’t just any juice; it’s a delightful blend of crisp green apples, hydrating cucumber, zesty lime, and nutrient-packed greens that not only tastes incredible but also gives you a vibrant boost to kickstart your day!
There’s something about a glass of green juice that feels like a fresh breath of air. Whether you’re easing into a warm summer morning or looking to perk up on that sluggish afternoon, this juice is your perfect companion. It’s like a mini-vacation in a glass, and I’m thrilled to share my recipe with you.
Juicing has become a beloved ritual in my kitchen, rooted in a love for wholesome ingredients and vibrant flavor. I remember the first time I tried fresh green juice at a local café; I was immediately hooked! The refreshing mix of flavors just danced on my taste buds, and I couldn’t wait to replicate it at home. With my trusty juicer by my side, I began experimenting with different fruits and veggies, landing on this winning combination that we’re diving into today.
So, grab your juicer, and let’s get started! Trust me, you’ll fall in love with how easy and satisfying it is to create this beautiful concoction right in your own kitchen.
A Little Backstory on the Green Juice Love Affair
Growing up, my mornings were filled with the exhilarating smell of freshly brewed coffee and the sweet aroma of fruits from our garden. My mom had a knack for blending flavors, and she often handed me a glass of her famous green juice to kickstart my day. The memory of her standing by the juicer, with her hair pulled back and a big smile on her face, always brings a wave of nostalgia. I’d watch the vibrant green liquid flow into the glass, and I’d eagerly take my first sip, feeling the burst of freshness wash over me.
Years later, in my own kitchen, I still embrace those sunny mornings, but I’ve added my own twist. This Refreshing Green Juice has evolved from my childhood memories into a go-to recipe that my friends and family adore. It’s not just a drink; it’s a celebration of the simple pleasures in life — a reminder to nourish ourselves while enjoying every last drop!
Ingredients: What You’ll Need
Let’s talk about the star players in this refreshing concoction! Here’s what you’ll need:
-
2 Green Apples
These juicy gems provide natural sweetness and a hint of tartness, balancing out the savory flavors in our juice. If you prefer less sweetness, Granny Smith apples work beautifully as a substitute. -
1 Cucumber
Hydrating and refreshing, cucumbers are an essential ingredient to keep this juice light and crisp. You can swap this out for zucchini if you’re in a pinch! -
Juice of 2 Limes
Fresh lime juice adds a pop of acidity that elevates flavors. If limes are out of season, you can use lemons for a similar tang. -
2 Stalks of Celery
Celery is not only packed with vitamins but also brings a subtle saltiness that rounds out our juice perfectly. Feel free to replace this with fennel for a different flavor profile! -
1 Cup of Spinach
Leafy greens are a powerhouse of nutrition, and spinach provides a mild, pleasant taste. You can switch things up with kale for a bolder flavor or if you’re looking for extra nutrients. -
Water (Optional)
Add a touch of water if you prefer a thinner consistency. Use coconut water for a tropical twist or add ice for a chilled refreshment!
Step-by-Step Instructions: Let’s Get Juicing!
Step 1: Prepare Your Ingredients
First things first, let’s prep those delightful ingredients! Rinse the apples and cucumber thoroughly to remove any pesticides or dirt. Core the apples, but you can leave the skin on—it adds extra nutrients and color. For the cucumber, slice it in half lengthwise and chop it into manageable pieces. Don’t forget to wash the spinach, too; we want everything nice and clean!
Step 2: Juicing Time
Next, it’s time to unveil your juicer’s magic! Start by feeding the apples into the juicer; if your juicer has different settings, use the slower one for a better yield of juice. Watch that gorgeous apple juice flow!
Step 3: Add the Veggies
Now, toss in the cucumber and celery. I like to alternate fruits and vegetables while juicing; it really helps to blend those flavors. You may want to use a tamping tool if your juicer comes with one to push down the tougher celery stalks.
Step 4: Infuse Citrus Goodness
Once you’ve juiced the apples, cucumber, and celery, it’s time to squeeze in the fresh lime juice. You can use a citrus juicer to get every last drop. Don’t skip this step! The zesty lime elevates your juice to a whole new level.
Step 5: Add Spinach
Finally, gently feed in the spinach leaves. I recommend doing this last because it blends beautifully. If you’re struggling with your juicer’s output, try massaging the spinach leaves a bit to release those essential juices.
Step 6: Blend It All Together
Now, if you like a finer consistency, you can pour your juice through a fine-mesh sieve or cheesecloth. But if you enjoy the fiber, feel free to skip that step! You can adjust the thickness of your juice by adding a bit of water if desired.
Step 7: Taste and Adjust
Give your green juice a taste! Are you feeling adventurous? Add more lime juice for tartness or a touch of honey if you want it sweeter. Remember, this is all about your personal taste!
Step 8: Serve and Enjoy!
Pour your vibrant juice into a glass, garnish it with a slice of lime or a sprig of mint, and take a moment to admire that gorgeous green shade. You’ve earned it! Sip slowly and embrace that refreshing flavor.
Serving Suggestions
To really make this green juice shine, serve it in a tall, chilled glass. You can add some ice cubes for an extra refreshing kick, or even garnish with a slice of cucumber on the rim or a sprig of fresh mint. Not only does it look fantastic, but it also makes your drink a refreshing oasis, inviting for anyone looking for a pick-me-up!
Recipe Variations: Get Creative!
-
Add a Twist of Fruit: Experiment with adding a small piece of ginger or a dash of fresh pineapple for a tropical flair.
-
Herb It Up: Try tossing in a few fresh mint or basil leaves for an aromatic touch! They’ll provide a refreshing surprise with each sip.
-
Superfood Boost: Add a tablespoon of chia seeds or flaxseeds for an extra nutritional punch and heartiness.
-
Mix the Greens: Substitute spinach with kale or swiss chard for a bolder flavor and added health benefits.
-
Make It a Smoothie: Blend in half a ripe banana or a scoop of Greek yogurt for a more filling, smoothie-style drink!
Chef’s Notes
Ah, the journey of discovering the perfect green juice concoction! It’s been a delightful adventure over the years, often accompanied by trial and error. I remember once I went a bit overboard with ginger—it had me buzzing like I just downed a shot of espresso! But those moments make the kitchen such a joyous environment, filled with laughter and learning.
This recipe has evolved over time to fit the tastes of my family and friends. Each person seems to want their own spin on it, which is precisely why I love sharing it! Feel free to play around and make this your own—even switch up the greens based on what’s in season.
FAQs and Troubleshooting
Q: How can I store leftover green juice?
A: Green juice is best enjoyed fresh, but if you have leftovers, store it in an airtight glass container in the fridge and consume it within 24 hours for optimal freshness.
Q: Can I use a blender instead of a juicer?
A: Absolutely! Just blend all the ingredients with a cup of water until smooth. Then, strain the mixture through a fine-mesh sieve or cheesecloth to remove the pulp if desired.
Q: What can I do if my juice is too thick?
A: Simply add a little more water until you reach your desired consistency!
Q: Is it safe to juice fruit and vegetables together?
A: Yes, juicing fruit and vegetables together is perfectly safe and enhances the flavor profile of your juice. Just make sure all ingredients are washed thoroughly!
Nutritional Information
While I’ve not broken down the precise nutritional info here, you can expect this Refreshing Green Juice to be rich in vitamins A, C, and K. It’s low in calories but high in hydration; a perfect way to revitalize your body with fresh nutrients!
And there you have it—the ultimate guide to crafting a Refreshing Green Juice that’s as delightful to the taste buds as it is to the eyes! I hope you enjoy this vibrant drink as much as I do. Remember, cooking and juicing is all about having fun, experimenting, and finding joy in every sip. Cheers to your health and happy juicing, my friends!
PrintRefreshing Green Juice
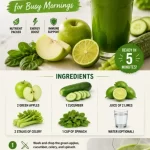
A vibrant blend of green apples, cucumber, lime, and spinach for a refreshing start to your day.
- Prep Time: 10 minutes
- Cook Time: 0 minutes
- Total Time: 10 minutes
- Yield: 2 servings 1x
- Category: Beverage
- Method: Juicing
- Cuisine: American
- Diet: Vegetarian
Ingredients
- 2 Green Apples
- 1 Cucumber
- Juice of 2 Limes
- 2 Stalks of Celery
- 1 Cup of Spinach
- Water (Optional)
Instructions
- Prepare Your Ingredients
- Juicing Time
- Add the Veggies
- Infuse Citrus Goodness
- Add Spinach
- Blend It All Together
- Taste and Adjust
- Serve and Enjoy!
Notes
Serve chilled with ice or garnished with a sprig of mint or cucumber slice for a refreshing touch.
Nutrition
- Serving Size: 1 serving
- Calories: 150
- Sugar: 20g
- Sodium: 100mg
- Fat: 0g
- Saturated Fat: 0g
- Unsaturated Fat: 0g
- Trans Fat: 0g
- Carbohydrates: 37g
- Fiber: 3g
- Protein: 2g
- Cholesterol: 0mg
Keywords: green juice, refreshing drink, healthy beverage, juice recipe