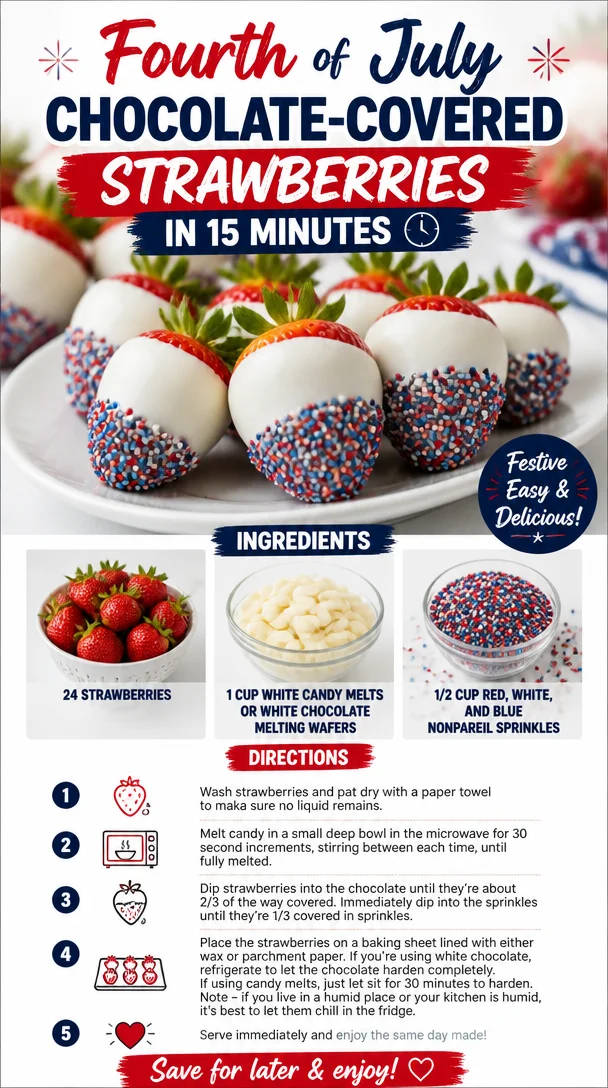
Fourth of July Chocolate-Covered Strawberries in 15 Minutes
4th of July Chocolate Covered Strawberries: A Festive Treat!
The 4th of July is that magical time of year when we gather with friends and family, deck the halls with red, white, and blue, and fire up the grill for some good old-fashioned outdoor fun! And what better way to celebrate than with a sweet treat that not only looks stunning but tastes divine? Today, we’re diving into the world of Chocolate Covered Strawberries, spruced up with festive sprinkles to match the holiday vibe. These beauties are not just a feast for the taste buds; they’re a treat for the eyes too!
Now, before we jump into the recipe, let me share a little personal story with you. Strawberry season is a cherished time for me. As a kid, my family would spend weekends visiting local farms, picking fresh strawberries right off the vine. Those sweet, juicy gems were the highlight of our summer. We’d often bring them home and dip them in chocolate or just enjoy them fresh, straight from the basket. The memory of sharing those strawberries over giggles and laughter while the summer sun warmed our cheeks is a reminder of how simple ingredients can create unforgettable moments.
This year, as we gear up to celebrate Independence Day, I wanted to capture that nostalgia in a festive way with Chocolate Covered Strawberries. They’re easy to make, incredibly delicious, and a perfect crowd-pleaser, giving everyone that sweet taste of summer while fitting right into our patriotic theme. Let’s get started, shall we?
Ingredients
-
24 Strawberries: The star of our show! Look for firm, ripe strawberries with bright green leaves. Freshness is key! If strawberries aren’t in season, you can use other berries like raspberries or blackberries for a delicious twist.
-
1 Cup White Candy Melts or White Chocolate Melting Wafers: These are so easy to work with! You’ll have rich, creamy melted chocolate once they’re heated. If you prefer dark chocolate or milk chocolate instead, feel free to swap!
-
1/2 Cup Red, White, and Blue Nonpareil Sprinkles: These add that festive flair! You can find them at most bakeries or online retailers. If you can’t locate the trio, choose any mix of colorful sprinkles to brighten up your dessert.
Step-by-Step Instructions
-
Prep Your Strawberries: Start by washing the strawberries under cold water. Pat them dry thoroughly with paper towels—this step is crucial because water can prevent the chocolate from adhering properly. Avoid letting them soak; we want them dry and ready for dipping!
Chef Tip: Look for strawberries that are larger and more plump for a fuller bite, plus they will look gorgeous once dipped!
-
Melt the Candy Melts: In a microwave-safe bowl, add the white candy melts. Heat them in the microwave in 30-second intervals, stirring in between, until completely melted and smooth. This usually takes about 2 minutes total.
Chef Hack: Make sure to stop heating as soon as the melts are mostly melted. Stirring helps to melt the remaining pieces without scorching.
-
Dip the Strawberries: Hold the strawberry by the green leaves, and dip it into the melted chocolate, swirling it 360 degrees to coat evenly. Let the excess chocolate drip back into the bowl.
Quick Tip: For a more even coat, dip twice! Just let the first coat set for a minute in the fridge before re-dipping.
-
Add the Sprinkles: While the chocolate is still wet, gently roll the chocolate-covered strawberry in the sprinkles, or spoon the sprinkles over the chocolate-covered part. This will ensure a festive finish!
Insider Note: Don’t hesitate to get creative here! Mix sprinkles for a whole new look or even use crushed nuts for a different texture.
-
Set the Strawberries: Place each dipped strawberry on a baking sheet lined with parchment paper or a decorative tray. Once you’ve dipped all the strawberries, pop them in the fridge for about 30 minutes to set.
Chef Secret: If you want an extra shine on your chocolate, let the dipped strawberries sit at room temperature for a few minutes before popping them into the fridge!
Serving Suggestions
Once your strawberries have set, arrange them on a beautiful platter with decorations that match your 4th of July theme—a few sparklers or even mini American flags will underscore the festive spirit. For an elegant touch, you can even drizzle melted dark chocolate over the sprinkles for that wow factor.
Recipe Variations
-
Chocolate Combo: Try using a combination of white chocolate and dark or milk chocolate. Swirl them together for a marbled effect!
-
Flavor Infusion: Add a few drops of peppermint extract to your melted chocolate for a refreshing twist.
-
Nutty Crunch: Instead of sprinkles, chop up nuts or use finely crushed graham crackers for a deliciously different texture.
-
Fruit Fusion: Experiment with other fruits like banana slices or pineapples for a tropical twist!
-
Sugar-Free Option: If you’re watching your sugar intake, opt for sugar-free candy melts.
Chef’s Notes
These Chocolate Covered Strawberries have come to mean a lot to me over the years. They’ve become a staple at every summer gathering! Whether it’s a 4th of July barbecue or a simple backyard picnic, they never fail to bring smiles. Originally, I started out making them just with chocolate, but as I started experimenting with sprinkles and toppings, they evolved into the fun, colorful treats we know today.
Funny enough, I once tried to make them with jelly-filled strawberries—let’s just say that was a total disaster! The jelly leaked everywhere and I needed a lot more chocolate to hide my mistakes. But as all great recipes do, that led me to devise the perfect method, ensuring every bite is as sweet as summer memories.
FAQs and Troubleshooting
1. Why isn’t the chocolate sticking to my strawberries?
Make sure the strawberries are completely dry before dipping! Any moisture can cause the chocolate to slide right off.
2. Can I make these ahead of time?
Absolutely! You can make these covered strawberries the night before your event. Just keep them refrigerated until you’re ready to serve.
3. What if the chocolate hardens and becomes clumpy?
If your chocolate starts to harden while you’re working, gently reheat it in short increments in the microwave, stirring frequently to regain the smooth texture.
4. My chocolate is too thick to dip. What should I do?
If your melted chocolate gets too thick, you can add a little bit of coconut oil or shortening to thin it out. Be sure to stir well until fully incorporated.
Nutritional Info (Optional)
Serving Size: 1 chocolate-covered strawberry
Calories: Approximately 50
Fat: 2g (Depends on choice of chocolate)
Carbohydrates: 8g
Sugar: 6g
Protein: 0.5g
There you have it, my fellow food enthusiasts! With just a few ingredients and easy steps, you can whip up these delightful Chocolate Covered Strawberries that everyone will adore. They’re perfect for getting into the holiday spirit while showcasing your culinary skills. Happy 4th of July, and here’s to many sweet memories ahead! Enjoy every bite, and don’t forget to share your creations! 🍓❤️💙
Print4th of July Chocolate Covered Strawberries
Delicious and festive chocolate covered strawberries, perfect for the 4th of July celebration!
- Prep Time: 15 minutes
- Cook Time: 5 minutes
- Total Time: 20 minutes
- Yield: 24 servings 1x
- Category: Dessert
- Method: No Cooking Required
- Cuisine: American
- Diet: Vegetarian
Ingredients
- 24 Strawberries
- 1 Cup White Candy Melts or White Chocolate Melting Wafers
- 1/2 Cup Red, White, and Blue Nonpareil Sprinkles
Instructions
- Prep your strawberries by washing and thoroughly drying them.
- Melt the candy melts in a microwave-safe bowl in 30-second intervals until smooth.
- Dip the strawberries into the melted chocolate, swirling to coat evenly.
- Add the sprinkles while the chocolate is still wet.
- Set the dipped strawberries on a baking sheet lined with parchment to cool in the fridge for 30 minutes.
Notes
For extra shine, let the dipped strawberries sit at room temperature for a few minutes before refrigerating.
Nutrition
- Serving Size: 1 chocolate-covered strawberry
- Calories: 50
- Sugar: 6g
- Sodium: 10mg
- Fat: 2g
- Saturated Fat: 1g
- Unsaturated Fat: 1g
- Trans Fat: 0g
- Carbohydrates: 8g
- Fiber: 0g
- Protein: 0.5g
- Cholesterol: 0mg
Keywords: chocolate strawberries, 4th of July dessert, festive treats, summer snacks
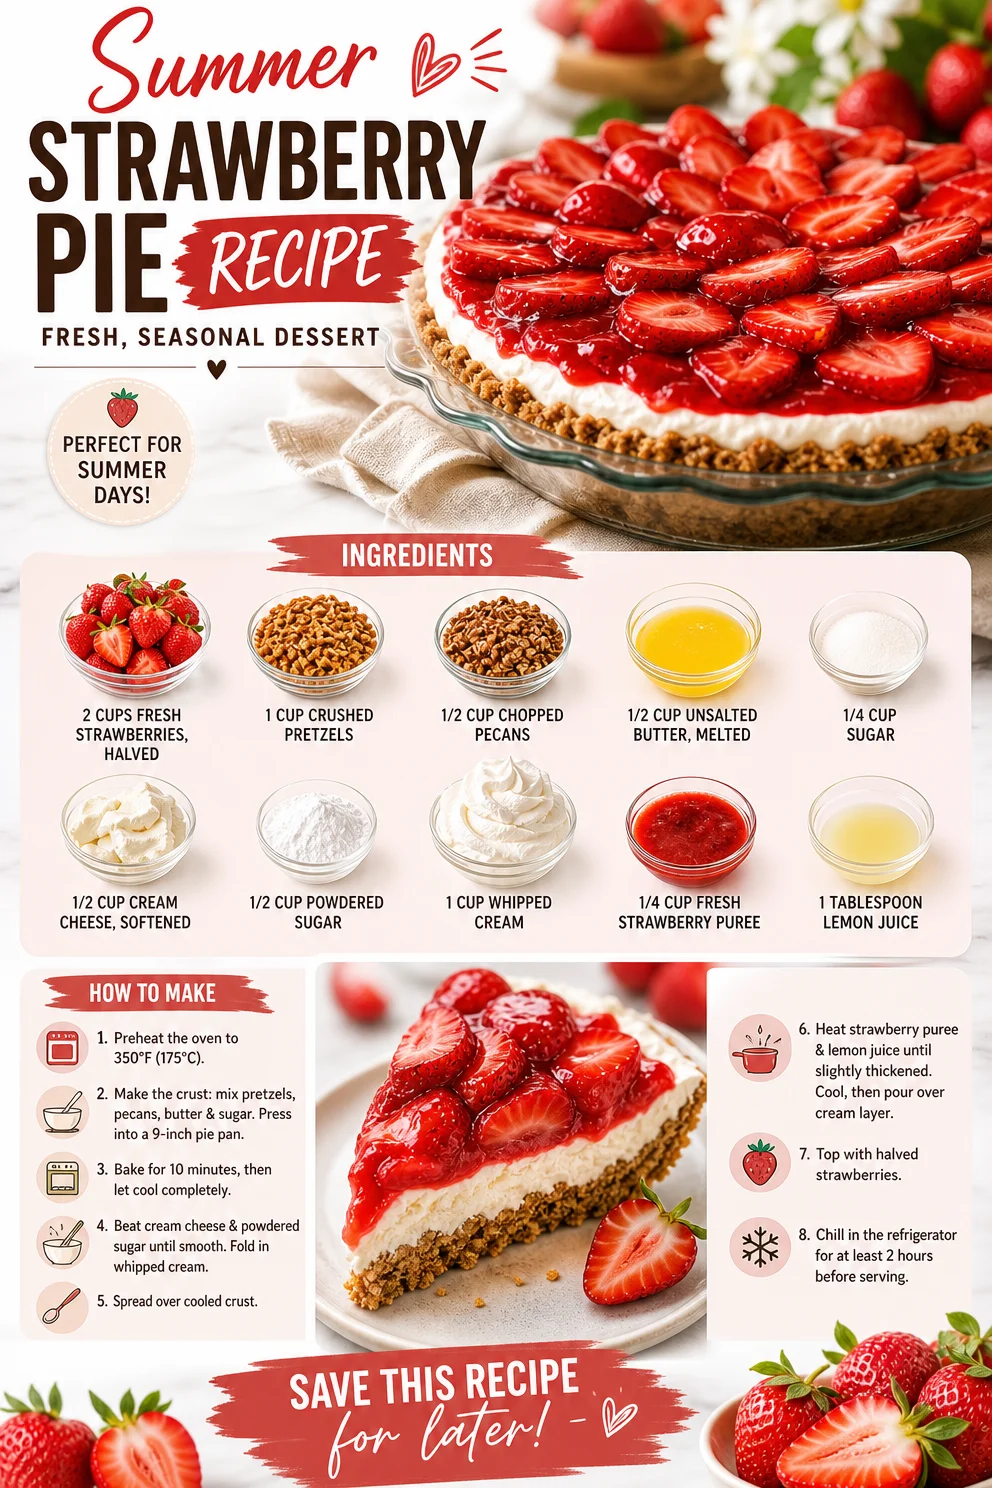
Summer Strawberry Pie Recipe: Fresh, Seasonal Dessert
Fresh Strawberry Pie: A Slice of Summer
Hello, food lovers! Welcome back to Clean Plate Cravings, where we create scrumptious, colorful meals that make you feel as good as they taste. Today, I have a delightful treat that will whisk you straight to summer—the Fresh Strawberry Pie! This pie is a fusion of captivating flavors and textures, with the freshness of strawberries and the crunch of a buttery pretzel crust that will make your taste buds sing. Let’s dive right in!
A Sweet Childhood Memory
Growing up, summer was all about adventures outdoors and enjoying the bountiful harvest from the local farms. I can vividly remember one sunny afternoon spent at my Grandma’s house. She had a small garden where strawberries thrived under the warm sun. I can still hear her laughter as she handed me a bowl and sent me out to pick the ripest strawberries. The thrill of finding those bright red gems and the satisfaction of feasting on them just moments after plucking them is a memory I cherish.
That day, Grandma decided to whip up a fresh strawberry pie. The kitchen filled with the sweet, fruity aroma as she gently sliced the strawberries and prepared the crust. I was her eager little helper, blown away by how straightforward yet magical the process was. Watching her transform those simple ingredients into something so delicious sparked my love for cooking and baking. And that, my friends, is how this Fresh Strawberry Pie became a staple in my kitchen. Now, I’m excited to share it with you—get ready for a burst of summer on your plate!
Ingredients
For this Fresh Strawberry Pie, you’ll need the following ingredients:
-
2 cups fresh strawberries, halved – Look for strawberries that are bright red and plump. If fresh strawberries aren’t available, try frozen, thawing them beforehand for a juicy pie.
-
1 cup crushed pretzels – This will create a salty, crunchy crust! If you don’t have pretzels, graham crackers or even crushed nuts can work in a pinch.
-
1/2 cup chopped pecans – Pecans add a lovely nuttiness. Feel free to substitute with walnuts or almonds if preferred.
-
1/2 cup unsalted butter, melted – This will help bind the crust ingredients together. If you’re looking for a dairy-free option, coconut oil can be a great substitute.
-
1/4 cup sugar – This is for sweetening the crust. If you’re watching sugar intake, try using a sugar substitute like stevia.
-
1/2 cup cream cheese, softened – Cream cheese adds creaminess to the filling. For a lighter alternative, use Greek yogurt or cottage cheese!
-
1/2 cup powdered sugar – This sweetens the cream cheese. If you want a healthier option, make your own powdered sugar with a blender and a sugar substitute.
-
1 cup whipped cream – Freshly whipped cream is a must for that light, airy feel! You can use store-bought, but homemade tastes best.
-
1/4 cup fresh strawberry puree – This adds a beautiful color and enhances the strawberry flavor. You can puree extra strawberries if needed.
-
1 tablespoon lemon juice – A touch of lemon juice balances the sweetness wonderfully! You could also use lime juice for a zesty twist.
Step-by-Step Instructions
Now, let’s get to the fun part—making the pie! Follow these steps to create your masterpiece.
Step 1: Preheat Your Oven
Preheat your oven to 350°F (175°C). This ensures your crust gets that perfect golden brown finish.
Step 2: Prepare the Crust
In a medium bowl, combine the crushed pretzels, chopped pecans, melted butter, and sugar. Mix until everything is well coated; the mixture should stick together when pressed. Chef Tip: Use a fork to really break down any large bits of pretzel for a smoother crust!
Step 3: Form the Crust
Press the pretzel mixture into the bottom and up the sides of a 9-inch pie pan. Make sure it’s evenly distributed! Bake for 10-12 minutes until the crust is lightly golden. This step adds that lovely crunch you won’t be able to resist!
Step 4: Cool the Crust
Let the crust cool completely before adding the filling. Patience is key here! While it cools, you can whip up the creamy filling.
Step 5: Make the Filling
In a large mixing bowl, combine softened cream cheese and powdered sugar until smooth and creamy. Gradually fold in the whipped cream and fresh strawberry puree. The mixture should be light and fluffy—oh, that gorgeous color!
Step 6: Assemble the Pie
Once the crust has cooled, spread the cream cheese filling evenly over the crust. Little Chef Hack: Use an offset spatula for a smooth finish!
Step 7: Top with Strawberries
Arrange the halved strawberries on top of the filling, cut side up, for a stunning presentation. Drizzle with lemon juice for added freshness.
Step 8: Chill
Cover the pie and refrigerate for at least 2 hours, or until set. This step lets the flavors meld together beautifully. Also makes it a wonderful make-ahead dessert!
Serving Suggestions
When you’re ready to serve, slice the pie into wedges and plate it up. For a touch of elegance, add a dollop of whipped cream on each slice and a few sprigs of fresh mint for color. If you’re feeling festive, sprinkle a little extra strawberry puree on the plates for that added wow factor!
Recipe Variations
If you love getting creative in the kitchen, here are some fun twists on this Fresh Strawberry Pie:
-
Balsamic Glaze Drizzle: Add a drizzle of balsamic reduction over the strawberries for a sweet-and-savory contrast.
-
Minty Freshness: Toss some chopped fresh mint into the filling for a refreshing twist.
-
Nut-Free Version: Swap the pecans for more pretzels if you want to keep it nut-free and crunchy.
-
Chocolate Drizzle: Melt some dark chocolate and drizzle it over the finished pie for a decadent touch.
-
Vegan Option: Use vegan cream cheese and coconut whipped cream to make this pie entirely plant-based.
Chef’s Notes
This Fresh Strawberry Pie is not just a recipe; it’s a canvas for creativity and a family tradition rolled into one! Over the years, I’ve tinkered with it, mixing in different fruits and flavors. Once, I added a layer of raspberry puree beneath the strawberry topping—it was a game changer! I love hearing how others put their spin on it too; it’s all about making food that reflects your kitchen and your palate.
FAQs and Troubleshooting
1. My crust crumbled when I tried to slice it. What happened?
Make sure to mix the crust ingredients thoroughly, and press it firmly into the pie pan. A little chill time helps it hold together, too!
2. Can I make this pie in advance?
Absolutely! It keeps beautifully in the fridge for a few days. Just wait to add any toppings until you’re ready to serve for a vibrant finish.
3. What if I can’t find fresh strawberries?
You can use frozen strawberries, but make sure to thaw and drain them well before using, as they can release water.
4. Can I use a store-bought crust?
Of course! A store-bought crust can save time; just skip the baking step and move on to the filling!
Nutritional Info (optional)
While the exact nutrition information may vary based on specific ingredients, a typical slice of this Fresh Strawberry Pie is a refreshing, lighter dessert that pairs well with any meal. Enjoy guilt-free indulgence!
There you have it! A delightful journey through memories, mouthwatering flavors, and a recipe that’s sure to win hearts and taste buds alike. I hope you give this Fresh Strawberry Pie a try, share it with loved ones, and create your own special memories in the kitchen. Happy baking! 🍓
PrintFresh Strawberry Pie
Delightful Fresh Strawberry Pie with a buttery pretzel crust, promising a burst of summer flavors.
- Prep Time: 20 minutes
- Cook Time: 15 minutes
- Total Time: 135 minutes
- Yield: 8 servings 1x
- Category: Dessert
- Method: Chilling, Baking
- Cuisine: American
- Diet: Vegetarian
Ingredients
- 2 cups fresh strawberries, halved
- 1 cup crushed pretzels
- 1/2 cup chopped pecans
- 1/2 cup unsalted butter, melted
- 1/4 cup sugar
- 1/2 cup cream cheese, softened
- 1/2 cup powdered sugar
- 1 cup whipped cream
- 1/4 cup fresh strawberry puree
- 1 tablespoon lemon juice
Instructions
- Preheat the oven to 350°F (175°C).
- Combine the crushed pretzels, chopped pecans, melted butter, and sugar in a medium bowl.
- Press the pretzel mixture into the bottom and up the sides of a 9-inch pie pan.
- Bake for 10-12 minutes until the crust is lightly golden.
- Let the crust cool completely.
- Mix the softened cream cheese and powdered sugar until smooth, then fold in whipped cream and fresh strawberry puree.
- Spread the cream cheese filling evenly over the crust.
- Arrange the halved strawberries on top of the filling and drizzle with lemon juice.
- Cover the pie and refrigerate for at least 2 hours until set.
Notes
This pie is a canvas for creativity! Try adding a layer of raspberry puree or a drizzle of balsamic reduction on top.
Nutrition
- Serving Size: 1 slice
- Calories: 200
- Sugar: 10g
- Sodium: 150mg
- Fat: 10g
- Saturated Fat: 5g
- Unsaturated Fat: 4g
- Trans Fat: 0g
- Carbohydrates: 25g
- Fiber: 1g
- Protein: 3g
- Cholesterol: 15mg
Keywords: strawberry pie, summer dessert, easy pie recipe