Pumpkin Bread
The Ultimate Pumpkin Bread: A Slice of Fall Awesomeness
When the leaves begin to crunch beneath our feet and the air turns crisp with that unmistakable scent of autumn, we all know it’s time for cozy sweaters, pumpkin spice everything, and, of course, the beloved pumpkin bread! This delightful treat captures the essence of the season in every single slice. It’s hearty, moist, and bursting with warm spices that not only fill your home with mouthwatering aromas but also warm your heart. Here at Clean Plate Cravings, we believe that enjoying the flavors of fall doesn’t need to be complicated. So grab your apron, and let’s bake up some magic!
A Journey Back to Grandma’s Kitchen
Growing up, my fondest memories are laced with the smell of spices and pumpkin wafting through my grandmother’s kitchen. Every year, as autumn rolled in, she would set aside time to whip up her famous pumpkin bread. It wasn’t just a recipe; it was a celebration! I remember watching her mix the ingredients together with such care, the way her hands danced through the motions of baking was utterly mesmerizing.
With her signature apron tied snugly around her waist, she would always let me “help” — which really meant standing on a stool next to her, stirring the batter while trying to sneak a taste of the sweet, spiced concoction. The best part? The topping! Sometimes, she’d sprinkle an extra dash of nutmeg, or sneak in some chocolate chips when she thought no one was looking. That was a little secret tradition of ours: the ‘bread with a surprise.’
Now, whenever I make this pumpkin bread, I think of her cheerful spirit, her tender smile, and how she taught me that cooking is all about love and sharing. So let’s carry on that legacy! Here’s how to create your very own pumpkin bread that not only brings comfort but also fills your kitchen with warmth.
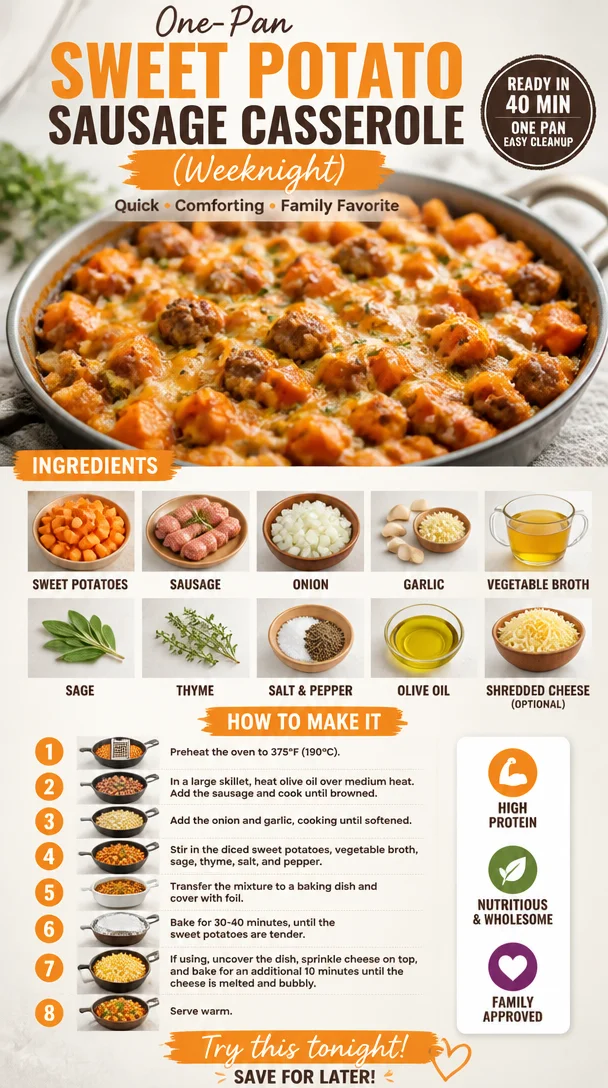
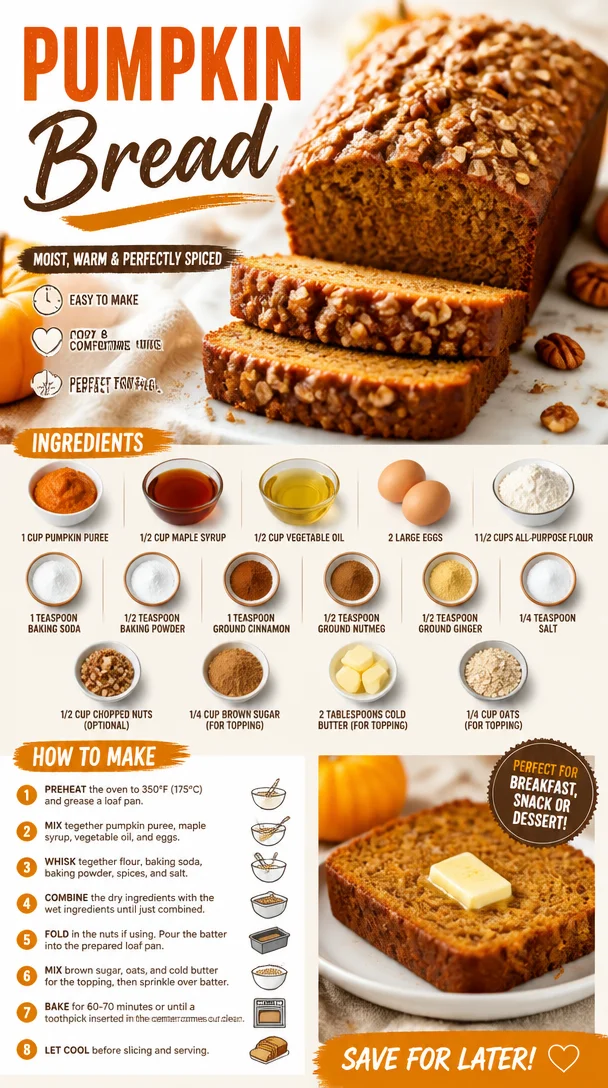
Ingredients
Here’s what you’ll need to make this delightful pumpkin bread:
-
1 cup pumpkin puree
You can use canned pumpkin puree for convenience, or make your own by roasting a fresh pumpkin. The latter enhances flavor and adds a personal touch! -
1/2 cup maple syrup
This natural sweetener adds a unique depth to the flavor. Honey or agave syrup could be a great substitute. -
1/2 cup vegetable oil
For moistness! You can opt for melted coconut oil if you’re aiming for a tropical twist, though it may alter the flavor slightly. -
2 large eggs
Helps bind the ingredients and adds richness. Flax eggs (1 tablespoon ground flaxseed with 3 tablespoons water per egg) are a good vegan substitute. -
1 1/2 cups all-purpose flour
This is the backbone of your bread. Whole wheat flour works too, but it will yield a denser texture. -
1 teaspoon baking soda
This is your leavening agent. Always make sure it’s fresh for the best rise. -
1/2 teaspoon baking powder
A bit more leavening power! -
1 teaspoon ground cinnamon
The quintessential fall spice that gives your bread that warm hug feeling. -
1/2 teaspoon ground nutmeg
A pinch of this spice enhances the pumpkin flavor beautifully. -
1/2 teaspoon ground ginger
Adds a subtle kick that balances the sweetness. -
1/4 teaspoon salt
Essential for flavor enhancement! Salt can uplift the sweetness, allowing all the flavors to shine. -
1/2 cup chopped nuts (optional)
Walnuts or pecans are perfect here! They add a nice crunch and nutty flavor, but feel free to skip if you prefer. -
1/4 cup brown sugar (for topping)
A little sprinkle on top will give your loaf a deliciously sweet crust. -
2 tablespoons cold butter (for topping)
This helps create a lovely crumble when mixed with the brown sugar. -
1/4 cup oats (for topping)
For added texture, these oats will crisp up beautifully in the oven.
Step-by-Step Instructions
Ready to create some pumpkin perfection? Let’s dive into the kitchen!
-
Preheat Your Oven
Preheat your oven to 350°F (175°C). This step is crucial to ensure your pumpkin bread bakes evenly. -
Mix the Wet Ingredients
In a large mixing bowl, combine 1 cup of pumpkin puree, 1/2 cup of maple syrup, and 1/2 cup of vegetable oil. Carefully crack the two large eggs into the bowl, and whisk everything together until you have a gorgeous, smooth mixture. Tip: Use a rubber spatula to scrape the sides to ensure nothing is left behind! -
Combine the Dry Ingredients
In another bowl, whisk together 1 1/2 cups of all-purpose flour, 1 teaspoon of baking soda, 1/2 teaspoon of baking powder, 1 teaspoon of ground cinnamon, 1/2 teaspoon of ground nutmeg, 1/2 teaspoon of ground ginger, and 1/4 teaspoon of salt. Mixing the dry ingredients separately first helps distribute the leavening agents evenly. -
Combine Wet and Dry Mixtures
Gently fold the dry ingredients into the wet mixture. Be careful not to overmix—this can lead to dense bread. Just mix until everything is combined, and a few lumps are okay! Chef Hack: Turn your spoon on its side while mixing; this keeps air in the batter and helps your bread rise! -
Toss in the Nuts
If you’re adding chopped nuts, add them now and give a gentle fold to incorporate. Chef Insight: Toasting the nuts beforehand will intensify their flavor, just be sure to let them cool before adding. -
Prepare the Topping
In a small bowl, combine 1/4 cup of brown sugar, 2 tablespoons of cold butter (cut into small cubes), and 1/4 cup of oats. Use your fingertips to mix until it resembles coarse crumbs. -
Pour the Batter into the Pan
Grease a loaf pan (9×5 inches) or line it with parchment paper for easy removal. Pour the batter in, smoothing the top with a spatula. -
Sprinkle the Topping
Spread the topping mixture evenly over the batter. This will create a delightful crunchy finish! -
Bake
Place the loaf pan into the preheated oven and bake for 50-60 minutes, or until a toothpick inserted in the center comes out clean. Chef Trick: If the top browns too quickly, you can tent it with aluminum foil during the last 15 minutes. -
Cool and Enjoy
Once baked to perfection, remove from the oven and let it cool in the pan for about 10 minutes. Then transfer to a wire rack to cool completely. Slice it up, and you’re ready to enjoy!
Serving Suggestions
Slice your pumpkin bread and serve it warm or at room temperature. It’s fantastic on its own but also works beautifully with a dollop of whipped cream, a smear of butter, or even a drizzle of cream cheese frosting for an extra festive touch. Pair it with a hot cup of coffee or tea for the ultimate cozy experience!
Recipe Variations
- Chocolate Chip Pumpkin Bread: Add 1/2 cup of semi-sweet chocolate chips to the batter for a delicious twist.
- Pumpkin Spice Latte Bread: Mix in 1 tablespoon of instant coffee granules for a caffeinated kick.
- Nut-Free Version: Simply omit the nuts for a smooth, kid-friendly treat.
- Gluten-Free Option: Substitute the all-purpose flour with a 1:1 gluten-free baking blend.
- Add Sweet Dried Fruits: Consider folding in a handful of raisins or dried cranberries for added sweetness and texture.
Chef’s Notes
Baking this pumpkin bread always brings a smile to my face. It’s funny how the simplest recipes work out to be the most soothing and comforting. Over the years, I’ve experimented with different spices and toppings, tailoring it to fit delicious surprises. Now, every time I pull a loaf from the oven, it reminds me of being a kid in my grandma’s kitchen, eagerly waiting for that first taste. Each slice is indeed a memory wrapped in flavor, always encouraging me to make new ones along the way.
FAQs and Troubleshooting
-
My pumpkin bread is dense; what did I do wrong?
This can happen if the batter is overmixed, leading to a tough loaf. Mix until combined, but don’t be afraid of a few lumps! -
Why did my bread sink in the middle?
This can occur if the eggs weren’t properly beaten or the oven temperature was too low. Make sure both are up to par! -
How should I store leftover pumpkin bread?
Wrap it tightly in plastic wrap or store it in an airtight container at room temperature for up to 5 days. It also freezes beautifully for up to 3 months! -
Can I use fresh pumpkin?
Absolutely! Just make sure to roast it and puree it until smooth before adding it to the batter.
Nutritional Info
Although pumpkin bread is a treat, it packs some nutritional punch! Each slice provides fiber, vitamins, and that sweet comfort we all crave during the chilly months. Enjoy it mindfully, savoring every bite!
Pumpkin bread is more than food; it’s a seasonal tradition that invites us to embrace autumn’s warmth and generosity. So whip out that mixing bowl, channel your inner baker, and bake up a loaf that will create your own seasonal memories—one delicious slice at a time!
PrintThe Ultimate Pumpkin Bread

A delightful pumpkin bread that captures the essence of fall with warm spices and a cozy aroma.
- Prep Time: 15 minutes
- Cook Time: 60 minutes
- Total Time: 75 minutes
- Yield: 12 servings 1x
- Category: Dessert
- Method: Baking
- Cuisine: American
- Diet: Vegetarian
Ingredients
- 1 cup pumpkin puree
- 1/2 cup maple syrup
- 1/2 cup vegetable oil
- 2 large eggs
- 1 1/2 cups all-purpose flour
- 1 teaspoon baking soda
- 1/2 teaspoon baking powder
- 1 teaspoon ground cinnamon
- 1/2 teaspoon ground nutmeg
- 1/2 teaspoon ground ginger
- 1/4 teaspoon salt
- 1/2 cup chopped nuts (optional)
- 1/4 cup brown sugar (for topping)
- 2 tablespoons cold butter (for topping)
- 1/4 cup oats (for topping)
Instructions
- Preheat your oven to 350°F (175°C).
- Mix the wet ingredients: combine pumpkin puree, maple syrup, vegetable oil, and eggs in a bowl.
- Combine the dry ingredients in another bowl: flour, baking soda, baking powder, cinnamon, nutmeg, ginger, and salt.
- Combine the wet and dry mixtures, mixing gently until just combined.
- Toss in the chopped nuts if using and fold gently.
- Prepare the topping by mixing brown sugar, cold butter, and oats until crumbly.
- Pour the batter into a greased loaf pan.
- Sprinkle the topping evenly over the batter.
- Bake for 50-60 minutes or until a toothpick comes out clean.
- Cool for 10 minutes in the pan, then transfer to a wire rack.
- Enjoy with butter or whipped cream if desired.
Notes
For variations, consider adding chocolate chips, instant coffee, or dried fruits. For gluten-free, replace flour with a gluten-free blend.
Nutrition
- Serving Size: 1 slice
- Calories: 200
- Sugar: 12g
- Sodium: 150mg
- Fat: 8g
- Saturated Fat: 1g
- Unsaturated Fat: 6g
- Trans Fat: 0g
- Carbohydrates: 30g
- Fiber: 2g
- Protein: 3g
- Cholesterol: 40mg
Keywords: pumpkin bread, fall recipes, baking, cozy dessert