Mango Salad with Lime Dressing: An Incredible Ultimate Recipe
Mango Salad with Lime Dressing: An Incredible Ultimate Recipe
Welcome to Clean Plate Cravings, where today we’re diving headfirst into the vibrant world of a Mango Salad with Lime Dressing! Picture this: the sun is shining, the breeze is light, and you’re enjoying a dish that’s as refreshing as a summer day. Filled with bright, tropical flavors that will make your taste buds dance, this salad is perfect for any occasion. Whether it’s a family barbecue, a picnic in the park, or a simple weeknight dinner, this salad packs a punch of flavor with every bite.
There’s something so magical about a good mango salad, don’t you think? The combination of sweet mango, crunchy bell peppers, and zesty lime dressing creates a fiesta in your mouth, making you forget about the world’s troubles, at least for a little while. It’s not just a side dish; it’s a star player meant to brighten up your day!
Let me tell you, I have a soft spot for mango salads. During my childhood summers, my family would unite at my grandma’s house for big gatherings. And without fail, there’d be a huge bowl of mango salad that dictated the mood of the day. Kids would run around chasing each other, while the adults gathered around the table, laughing and reminiscing. It was bliss. And the best part? The sweet aroma of ripe mangoes mixed with the lime and cilantro was nothing short of sublime.
As I grew older and started dabbling in the kitchen, I was determined to recreate that feeling. I’d start experimenting with different flavors and ingredients, all while trying to bottle up the essence of those carefree summer afternoons. Over the years, this mango salad has become a staple, evolving with my culinary journey, and I’m thrilled to share my ultimate version with you today!
So grab your apron, unleash your inner culinary wizard, and let’s whip up this simple, yet incredible mango salad that will leave you and your guests craving more!
Ingredients
-
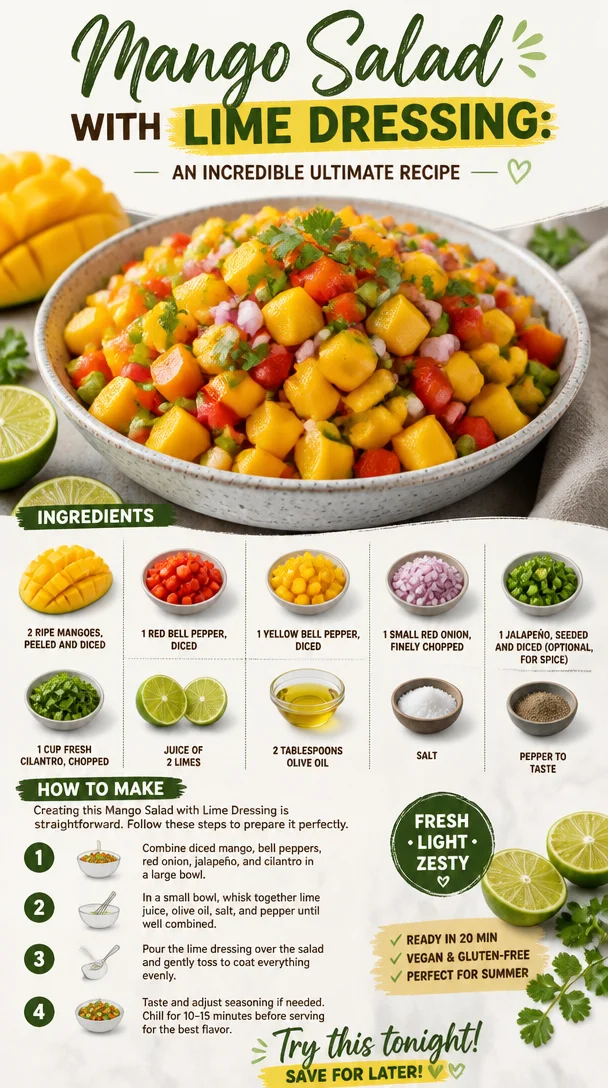
2 ripe mangoes, peeled and diced
The star of our show! Choose mangoes that are slightly soft to the touch for optimal sweetness and flavor. If mangoes aren’t in season, you could use diced pineapple as a substitute for a similar tropical vibe. -
1 red bell pepper, diced
This adds a lovely crunch and sweetness to the salad. If you’re in the mood for a bit more heat, you can swap it with a spicier variety, like a poblano pepper. -
1 yellow bell pepper, diced
The yellow pepper is not just for aesthetics; it brings an additional layer of sweetness. Feel free to use whatever color bell pepper you prefer—green, orange, or even a mix! -
1 small red onion, finely chopped
This adds a wonderful zing. For a milder flavor, soak the chopped onion in cold water for a few minutes before adding it to the salad to tone down its sharpness. -
1 jalapeño, seeded and diced (optional, for spice)
A little kick! If you’re not a fan of spice, feel free to leave this out, or substitute with a pinch of cayenne pepper for a gentler warmth. -
1 cup fresh cilantro, chopped
Fresh cilantro brightens the whole dish; its herbs lend a refreshing note. If you’re not a fan of cilantro, you can use fresh parsley or basil as a substitute. -
Juice of 2 limes
The acidic punch from the lime balances out the sweetness of the mangoes beautifully. If limes aren’t available, freshly squeezed lemon juice works just fine too! -
2 tablespoons olive oil
The oil helps to bring everything together, providing richness to the dressing. For a twist, swap it for avocado oil or sesame oil. -
Salt and pepper to taste
Basic, but essential! The right seasonings enhance the vibrant flavors of the salad.
Step-by-Step Instructions
-
Prepare your ingredients.
Start by washing all your fresh produce under cold water. Peel the mangoes and chop them into bite-sized cubes. Use a sharp knife for clean cuts, and make sure to cut around the pit, as it can be tricky to navigate. When you’re chomping down, you want all your ingredients to be effortless to eat. -
Dice those bell peppers.
Grab your red and yellow bell peppers. Slice them in half, remove the seeds, and then chop them into similar-sized pieces as your mangoes. This way, every bite will be harmonious! -
Chop the red onion.
Take your small red onion and finely chop it. It’s best if the pieces are as small as possible so they don’t overwhelm the other flavors. And remember, if the scent of raw onion sends you running, soaking it in cold water for a few minutes can help reduce its intensity. Drain before adding to the salad. -
Handle the heat. (Optional)
If you’re including jalapeño for a kick, carefully slice it in half and remove the seeds (unless you want to unleash the heat!). Dice it finely. If you prefer a milder option, just stick with bell peppers. -
Toss in the herbs.
Next, chop up a cup of fresh cilantro. You’ll want to include both the leaves and the tender stems, as they’re packed with flavor. -
Make the dressing.
In a small bowl, whisk together the lime juice, olive oil, salt, and pepper. You want to achieve a well-balanced dressing that’s tangy but not overpowering. Adjust according to your taste; if you like it a bit sweeter, add a teaspoon of honey or agave syrup. -
Combine everything.
In a large mixing bowl, combine the diced mangoes, bell peppers, red onion, jalapeño, and cilantro. Now, pour over your lime dressing. Using a spatula or large spoon, gently toss everything together, making sure every piece is coated. Taste and adjust seasoning if necessary! -
Chill for a bit.
Let the salad sit for about 15 to 30 minutes. This allows the flavors to meld beautifully, giving it that ideal zesty flavor. Trust me: it’s worth the wait!
Serving Suggestions
When you’re ready to serve, dish out generous portions into colorful bowls. For an added touch, you can sprinkle more cilantro on top or even throw in some extra lime wedges for that visual flair. Not only does this make for a beautiful presentation, but it also invites guests to customize their own dish with a bit more zesty lime if they wish. Enjoy!
Recipe Variations
- Tropical Twist: Add diced avocado for a creamy texture that complements the sweetness of the mango.
- Protein-Packed: Toss in grilled chicken or shrimp for a heartier main dish.
- Nutty Crunch: A handful of roasted peanuts or cashews can add a delightful crunch and depth of flavor.
- Sweet & Spicy: Mix in a tablespoon or two of diced jalapeños with mango chutney for a sweet and spicy version.
- Quinoa Base: Serve the salad over a bed of fluffy quinoa for a nutritious and filling option.
Chef’s Notes
Every time I make this mango salad, I’m transported back to those sun-soaked summer days with my family. It’s funny—what started as just a summer dish has become my go-to for every season and occasion. The beauty of this salad is how it adapts. One day, I might toss in some black beans and corn for a Mexican twist, and the next, I’m serving it alongside grilled fish or tacos.
So here’s a little chef hack: If you want to take your mango salad to the next level, grill the mangoes for a few minutes. The smoky flavor adds a fantastic depth that’s absolutely insane.
FAQs and Troubleshooting
Q: My mangoes are too hard. Can I still use them?
A: Definitely! Just dice them and let them sit in a bit of lime juice for 10 minutes. This will soften them a tad.
Q: How do I keep my avocado from browning?
A: If adding avocado, squeeze a little extra lime juice on it right before serving to keep it fresh and green!
Q: Can I make this salad ahead of time?
A: While you can prep all the ingredients and store them separately for a few days, I recommend combining them just an hour or so before serving to keep everything fresh and crunchy.
Q: What can I do if my salad is too salty?
A: If it turned out too salty, add a little more diced mango or bell pepper to balance it out.
Nutritional Info
While I usually encourage you to focus more on flavor than numbers, if you’re curious, here’s a quick rundown per serving (based on a 4-serving yield):
- Calories: 150
- Protein: 2g
- Carbohydrates: 20g
- Fiber: 4g
- Fats: 7g
There you have it! A refreshing Mango Salad with Lime Dressing that’s bursting with flavor, nostalgia, and pure joy. Remember, it’s about keeping things simple yet satisfying. Enjoy making this salad as much as I enjoyed sharing my story and recipe with you! Happy cooking, my foodie friend! 🍽️
PrintMango Salad with Lime Dressing

A refreshing mango salad with zesty lime dressing, perfect for any occasion.
- Prep Time: 15 minutes
- Cook Time: 0 minutes
- Total Time: 15 minutes
- Yield: 4 servings 1x
- Category: Salad
- Method: No Cooking
- Cuisine: Tropical
- Diet: Vegan
Ingredients
- 2 ripe mangoes, peeled and diced
- 1 red bell pepper, diced
- 1 yellow bell pepper, diced
- 1 small red onion, finely chopped
- 1 jalapeño, seeded and diced (optional)
- 1 cup fresh cilantro, chopped
- Juice of 2 limes
- 2 tablespoons olive oil
- Salt and pepper to taste
Instructions
- Prepare your ingredients.
- Dice those bell peppers.
- Chop the red onion.
- Handle the heat. (Optional)
- Toss in the herbs.
- Make the dressing.
- Combine everything.
- Chill for a bit.
Notes
Enjoy the salad with additional lime wedges and cilantro for a vibrant presentation.
Nutrition
- Serving Size: 1 serving
- Calories: 150
- Sugar: 14g
- Sodium: 150mg
- Fat: 7g
- Saturated Fat: 1g
- Unsaturated Fat: 6g
- Trans Fat: 0g
- Carbohydrates: 20g
- Fiber: 4g
- Protein: 2g
- Cholesterol: 0mg
Keywords: mango salad, lime dressing, refreshing salad, tropical flavors, summer dish