Ingredient Strawberry Pineapple Sorbet: Quick Summer Treat
Delicious Strawberry Pineapple Sorbet Recipe for Refreshing Bliss
Introduction
Hey there, fellow food lovers! If you’re anything like me, there’s nothing quite as satisfying on a warm day as a scoop of sweet, refreshing sorbet. Today, I’m thrilled to share with you my Delicious Strawberry Pineapple Sorbet Recipe—a little slice of heaven that’s not only easy to make but also bursts with tropical flavor! There’s something magical about the combination of strawberries and pineapple; it’s like a fruity hug in every bite.
Picture this: It’s a sunny afternoon, the kids are playing in the yard, and my friends and I are lounging on the patio, sipping lemonade. The air is filled with laughter and the sweet scent of summer blooms. To top off the day, I bring out a bowl of this vibrant, homemade sorbet, and suddenly, it feels like a mini vacation! That’s the kind of bliss we all need in our lives, right?
The best part about making sorbet at home? You control the sweetness and flavors. This recipe is a great starting point, and you can even get creative with the ingredients. Are you ready to create some icy, fruity magic in your kitchen? Let’s dive in!
Personal Story
Growing up in a small town, summer was always synonymous with fresh fruit. We would often visit the local farmer’s market where the air was heavy with the aroma of ripe strawberries and pineapples. I remember one particular summer when my grandma decided to host a backyard barbecue. Amidst the burgers and hotdogs sizzling on the grill, she pulled out her old ice cream maker and announced that we were making sorbet. I still have that image in my mind—my cousins and I were on juice patrol, squeezing lemons and tasting the concoction at every stage while Grandma spun the machine like a pro.
That day, we made the most fantastic strawberry pineapple sorbet. The sweet, tangy flavor was the highlight of the meal, and it instantly cooled us down after hours of playing in the sun. It didn’t just stay as a treat; it became a family tradition, enjoyed at every gathering and barbecue. Now, as I share this recipe with you, I can’t help but smile, knowing that I’m passing down a little piece of my childhood.
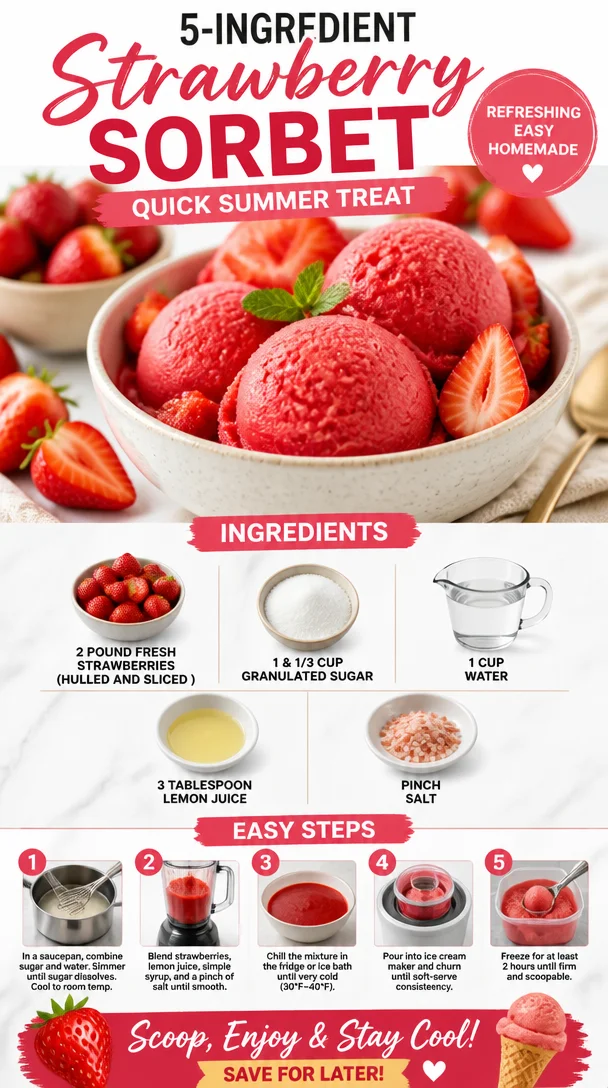
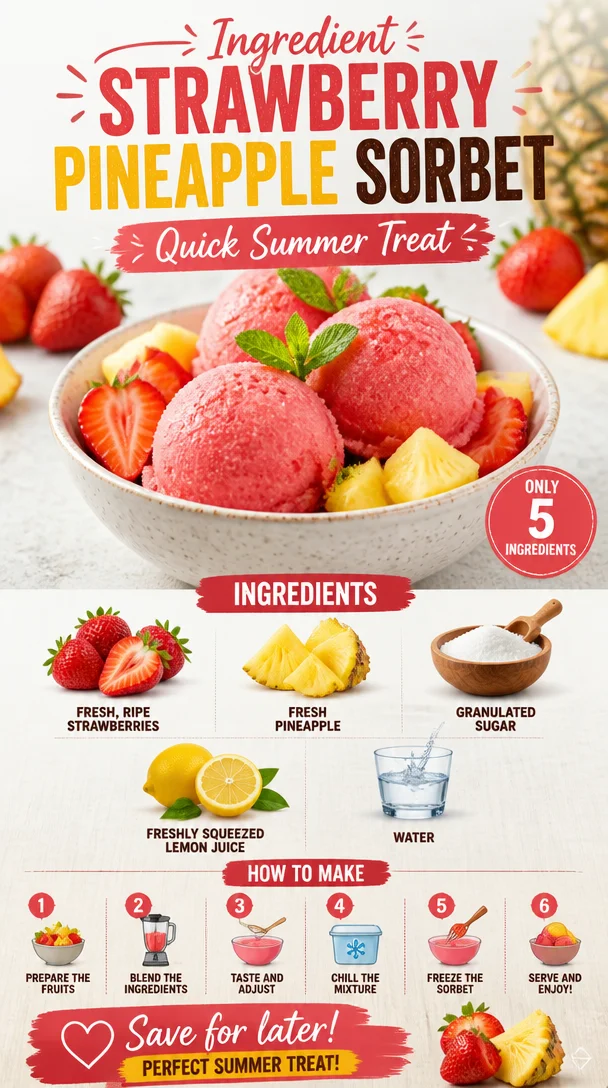
Ingredients
Let’s gather our ingredients! For this Delicious Strawberry Pineapple Sorbet, you’ll need:
-
Fresh, Ripe Strawberries: The star of our sorbet! Choose bright red, fragrant strawberries. Look for ones that are firm and shiny. You can substitute with frozen strawberries in a pinch, but fresh ones bring that unbeatable flavor.
-
Fresh Pineapple: Sweet, juicy, and tropical, fresh pineapple enhances the flavor profile of this sorbet. Prioritize ripe pineapples; they should smell fragrant at the base and feel slightly soft when pressed. Canned pineapple can work, but drain the syrup for best results.
-
Granulated Sugar: This sweetens the sorbet and helps achieve that creamy texture. You can substitute with honey or agave to make it a bit healthier, but keep in mind that it may alter the flavor slightly.
-
Freshly Squeezed Lemon Juice: This brightens the overall flavor of your sorbet and balances the sweetness. Fresh is key—bottled lemon juice just doesn’t compare in taste.
-
Water: Used for blending and creating the desired consistency. If you’d like to swap out plain water, using coconut water can elevate the tropical taste!
Step-by-Step Instructions
Now let’s roll up our sleeves and get down to business. Here’s how you’ll make the Delicious Strawberry Pineapple Sorbet!
-
Prepare the Fruit: Start by washing 2 cups of fresh strawberries. Remove the stems and cut them in half. Dice 2 cups of fresh pineapple, making sure to remove the skin and core. Place the fruit bits in separate bowls.
Chef’s Tip: Use overripe fruit for extra sweetness. If your strawberries are a little past their prime, they’ll still shine in this sorbet!
-
Blend the Strawberries: In a blender or food processor, combine the halved strawberries along with 1/2 cup of sugar and 2 tablespoons of freshly squeezed lemon juice. Blend until smooth and creamy.
Chef Hack: Give the mixture a quick taste. If your berries are sweet enough, you may not need the entire amount of sugar!
-
Blend the Pineapple: Next, combine the diced pineapple with another 1/2 cup of sugar and 2 tablespoons of freshly squeezed lemon juice. Blend until you achieve a smooth mixture.
Insider Tip: You can also add a pinch of salt to enhance the flavor of the fruit. Salt works wonders in sweets!
-
Mix it Together: Now comes the fun part! In a large bowl, fold together the strawberry and pineapple mixtures.
Chef’s Note: For a little extra zing, a splash of coconut rum can be added here—this is optional, of course, but oh-so-delicious!
-
Icy Magic Time: Transfer the mixture to a shallow container (like a baking dish) for faster freezing. Cover it with plastic wrap or a lid, and pop it in the freezer for about 4-6 hours until it’s firm.
Freezing Tip: If you’ve got a little ice cream maker, feel free to use it! Follow the manufacturer’s instructions for churning this mixture for an ultra-smooth texture.
-
Scoop and Enjoy: Once your sorbet is frozen, let it sit at room temperature for a few minutes before scooping. This helps to soften it slightly for easier serving.
Serving Note: For an elegant touch, serve your sorbet in a chilled glass and garnish with a sprig of mint or a slice of fresh fruit!
Serving Suggestions
This Delicious Strawberry Pineapple Sorbet is perfect for sunny days, barbecues, or simply as a sweet treat after dinner. Serve it in charming little bowls, topped with fresh mint or a drizzle of coconut milk for an extra tropical vibe. You can even scoop it into a waffle cone for a delightful twist!
Recipe Variations
Let’s get creative! Here are some fun variations you can try:
-
Berry Blast Sorbet: Add a cup of blueberries or raspberries to the mix for an even fruitier flavor.
-
Mango Magic: Substitute fresh mango for the pineapple for a creamy tropical delight.
-
Coconut Swirl: Mix in a little coconut cream for a richer, creamier texture and beachy flavor.
-
Herb Infusion: Experiment by muddling fresh basil or mint before blending for a refreshing herbal note.
-
Citrus Zing: Add a tablespoon of orange zest to your mixture for an extra citrus kick!
Chef’s Notes
Making this sorbet has become a summer ritual in my house, just like it was with my grandma so many years ago. I love to throw my friends into the mix for a fun afternoon of chatting and creating. Over the years, I’ve added various fruits and flavors that have marked special occasions—like turning it into a "happy birthday" treat with rainbow sprinkles or enjoying it as the perfect refreshing snack after a heat wave.
Remember, the key to a great sorbet is using ripe, fresh fruits, so always choose the best you can find. Don’t hesitate to make this recipe your own!
FAQs and Troubleshooting
Here are some common questions I often hear about making sorbet:
-
My sorbet turned out icy! What did I do wrong?
- If your sorbet has icy crystals, it may have been stored in the freezer for too long or not blended thoroughly enough. To fix it, let it soften slightly, then blend it again until smooth.
-
Can I make this sorbet without an ice cream maker?
- Absolutely! This recipe is designed to work without one. Just freeze it in a shallow dish and stir it every hour for the first three hours to break up any ice crystals.
-
How long does this sorbet last in the freezer?
- If stored properly in an airtight container, your sorbet can last up to two weeks in the freezer.
-
Can I use frozen fruit instead?
- Yes! Frozen fruit can work well, but it’s best to thaw it a bit beforehand to ensure a smooth blend.
Nutritional Info
While this recipe is a treat, it’s also light and refreshing! Each serving is naturally low in calories and packed with vitamin C from the fruit. Enjoy in moderation as part of a balanced diet—after all, life is about indulging every now and then!
And there you have it—a refreshing, delicious Strawberry Pineapple Sorbet recipe that’s brimming with flavor and summertime nostalgia. I hope you enjoy making this treat as much as I do! Cheers to sweet and sunny days ahead!
PrintDelicious Strawberry Pineapple Sorbet

A refreshing and fruity Strawberry Pineapple Sorbet, perfect for warm days and summer gatherings.
- Prep Time: 15 minutes
- Cook Time: 360 minutes
- Total Time: 375 minutes
- Yield: 4 servings 1x
- Category: Dessert
- Method: Freezing
- Cuisine: American
- Diet: Vegan
Ingredients
- 2 cups fresh, ripe strawberries
- 2 cups fresh pineapple, diced
- 1/2 cup granulated sugar
- 1/2 cup granulated sugar (for pineapple)
- 4 tablespoons freshly squeezed lemon juice
- Water (for blending)
Instructions
- Prepare the fruit: Wash strawberries, remove stems, and cut in half. Dice fresh pineapple, removing skin and core. Place in separate bowls.
- Blend the strawberries: In a blender, combine strawberries with 1/2 cup sugar and 2 tablespoons lemon juice. Blend until smooth.
- Blend the pineapple: Combine diced pineapple with 1/2 cup sugar and 2 tablespoons lemon juice. Blend until smooth.
- Mix it together: Fold strawberry and pineapple mixtures in a large bowl.
- Icy magic time: Transfer the mixture to a shallow container and freeze for about 4-6 hours until firm.
- Scoop and enjoy: Let sit at room temperature for a few minutes before scooping.
Notes
For added flavor, try mixing in a splash of coconut rum or serving with fresh mint.
Nutrition
- Serving Size: 1 serving
- Calories: 120
- Sugar: 25g
- Sodium: 5mg
- Fat: 0g
- Saturated Fat: 0g
- Unsaturated Fat: 0g
- Trans Fat: 0g
- Carbohydrates: 31g
- Fiber: 1g
- Protein: 1g
- Cholesterol: 0mg
Keywords: sorbet, strawberry, pineapple, dessert, summer treat