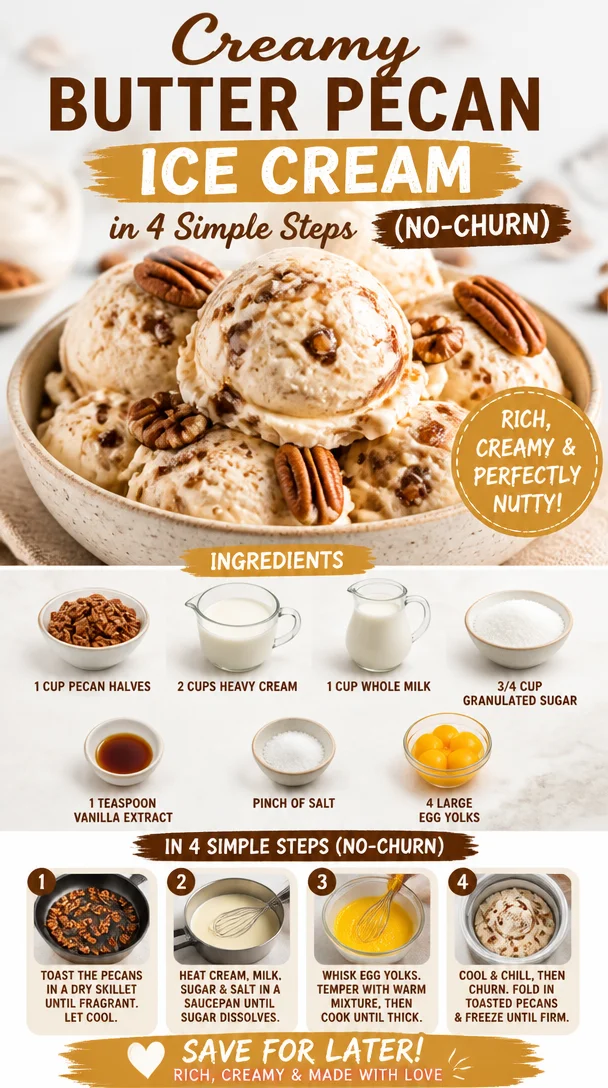
Creamy Butter Pecan Ice Cream in 4 Simple Steps (No-Churn)
Indulge in Homemade Butter Pecan Ice Cream: A Sweet Escape
Ah, ice cream. Is there anything more comforting than a scoop of this frozen delight on a hot summer day or maybe even a cozy winter night? Today, we’re diving into one of my all-time favorite flavors: Butter Pecan Ice Cream. It’s rich, creamy, and has just the right amount of crunch from the toasty pecans. But more than that, it holds a special place in my heart—and I can’t wait to share that with you!
Picture this: a sunny afternoon, the kind where the air is warm, and laughter resonates from the backyard. My mom would whisk me and my siblings away to the tiny local ice cream shop that housed every flavor imaginable. But there was one treat that stood out every single time—Butter Pecan. It was this magical combo of sweet cream and those slightly salty, toasted nuts that had me coming back for more. Those bites always felt like a little hug, comforting and familiar. It became a tradition, one that I carried into adulthood, and I found the joy of replicating that sweet treat at home.
Fast forward to today, and every scoop I make brings back those cherished memories. Making ice cream at home is more than just a kitchen project—it’s an experience. You get to control the quality of ingredients, the sweetness, and, most importantly, you can add a dash of love! Are you ready to transform your kitchen into a mini ice cream parlor? Let’s jump in!
Ingredients
Gather these ingredients for your homemade Butter Pecan Ice Cream, and feel free to get creative with substitutions:
-
1 cup pecan halves: The star of the show! These nuts provide a rich flavor and satisfying crunch. If you can’t find pecans, walnuts or almonds can be a good alternative, but they’ll change the flavor profile slightly.
-
2 cups heavy cream: For that luxurious creaminess we all adore in ice cream. You can substitute half-and-half if you’re looking for something lighter, but the texture won’t be quite as rich.
-
1 cup whole milk: This adds a nice body to the ice cream. Skim milk will work if you want to cut calories, but the ice cream will be less creamy.
-
3/4 cup granulated sugar: Essential for sweetness! If you’re watching your sugar intake, you can opt for coconut sugar or even a sugar substitute like erythritol or Stevia (but follow the substituting guidelines as they can be much sweeter).
-
1 teaspoon vanilla extract: Pure vanilla extract elevates the flavor. If you’re in a pinch, vanilla bean paste or even imitation vanilla in small quantities will do.
-
Pinch of salt: Salt is great for balancing out the sweetness and enhancing flavors.
-
4 large egg yolks: These are crucial for creating a custard base that leads to a creamy texture. If you’re looking for an egg-free version, you can explore avocado-based or coconut-based ice creams, but the texture will be different.
Now that we have our ingredients ready, let’s embark on this delicious journey!
Step-by-Step Instructions
-
Toasted Pecans: Start by toasting your pecan halves. In a dry skillet over medium heat, add the pecans and stir often until they’re golden brown and fragrant, about 5-7 minutes. Keep an eye on them—nuts can go from perfectly toasted to burnt in the blink of an eye. This step really brings out their lovely flavor!
-
Making the Cream Base: In a medium saucepan, combine the heavy cream and whole milk. Heat the mixture over medium heat until it begins to steam, but don’t let it boil. This is where the magic begins! Heating helps to mix the flavors beautifully.
-
Mixing the Sugar and Egg Yolks: In a bowl, whisk together the granulated sugar, egg yolks, and a pinch of salt until it’s pale and thick. This step is crucial; it forms the custard base.
-
Tempering the Eggs: Once your cream and milk are hot, you’ll want to temper the egg mixture. Gradually add about half of the hot cream mixture to the egg yolks, whisking constantly. This prevents the eggs from scrambling. Then slowly whisk this back into the saucepan with the cream mixture.
-
Thickening the Base: Continue to cook this new mixture over medium heat, stirring often, until it thickens enough to coat the back of a spoon (this will take about 8-10 minutes). You’re looking for a custard-like consistency. If you’re ever unsure, use a thermometer—around 170°F is your magic number!
-
Cooling the Base: Once thickened, remove the saucepan from the heat and stir in the vanilla extract. Let it cool at room temperature for about 15-20 minutes and then refrigerate it until completely chilled, ideally 4 hours or overnight.
-
Churning Time: Pour the cooled mixture into your ice cream maker and churn according to the manufacturer’s instructions. This typically takes 20-25 minutes. If you don’t have an ice cream maker, you can put the mixture in a shallow dish, freeze it, and stir every 30 minutes to break up ice crystals!
-
Add the Pecans: In the last few minutes of churning, add in your toasted pecans, mixing them in so they’re evenly distributed throughout the ice cream.
-
Freezing: Transfer your ice cream to an airtight container and freeze for at least 4 hours, or until it’s firm.
And voila! You’ve just made rich and creamy Butter Pecan Ice Cream from scratch!
Serving Suggestions
When it comes to serving your homemade ice cream, the options are endless! Scoop generous servings into beautiful bowls or cone holders, and if you want to treat yourself or impress guests, drizzle some warm caramel sauce over the top. You can also sprinkle additional toasted pecans for that extra crunch. Not only does this look stunning, but it adds wonderful texture!
Recipe Variations
-
Maple Butter Pecan: Swap out the sugar for maple syrup for a delightful twist that adds depth and a hint of autumn flavor.
-
Chocolate Swirl: Add swirls of chocolate ganache as the ice cream is churning for a decadent take on this classic.
-
Spiced Version: Spice things up a bit! Incorporate a dash of cinnamon or nutmeg into the cream base for a warm, cozy flavor.
-
Nut-Free Alternative: Try adding cookie crumbles (like gluten-free Oreos) instead of nuts for a completely different texture and flavor.
Chef’s Notes
Butter Pecan Ice Cream has always been a work in progress for me. My first attempts were more of a frozen pudding—delicious, but not quite right. With time (and perhaps a few too many failed batches), I learned the importance of balancing flavors and achieving that perfect creamy texture. And the beauty of making ice cream at home: you can always customize it to your taste!
One of my fondest memories making this ice cream was when I decided to host a cooking party with friends. We all took turns churning and taste-testing different flavors. It turned into a fun competition, and I’ll never forget the look on my friend’s face when he tried my Butter Pecan—and promptly declared it the best he’d ever tasted!
FAQs and Troubleshooting
-
Why did my ice cream come out icy?
- This can happen if there’s too much water in your mixture or it was not churned long enough. Be sure to cook your base adequately and follow churn times.
-
Can I skip the egg yolks?
- Yes! While the egg yolks create that rich custard base, you can make a simple version using just cream, milk, sugar, and vanilla. It’ll still taste great!
-
What if my ice cream is too soft?
- It might need more time in the freezer. If it’s too soft when you transfer it, let it harden for a few hours, and it should set up nicely.
-
Can I make this dairy-free?
- Absolutely! Substitute coconut cream for the heavy cream and almond milk for the whole milk. You may need to tweak the sweetness, but it can work beautifully!
Nutritional Info
While I believe that ice cream is meant to be enjoyed in moderation and made with love, here’s a quick note on the nutritional aspect (per serving):
- Calories: Around 250-300 (depending on serving size)
- Fat: Approximately 20g (mostly from cream and eggs)
- Sugar: About 20g
- Protein: 4g
Each playful spoonful of this Butter Pecan Ice Cream promises deliciousness, warm memories, and the kind of satisfaction to make your taste buds dance! So gather your ingredients, roll up your sleeves, and let’s whip up this delightful treat together. You won’t just be making ice cream; you’ll be crafting sweet memories one scoop at a time! 🍦
PrintHomemade Butter Pecan Ice Cream
Indulge in rich and creamy Butter Pecan Ice Cream with a satisfying crunch from toasted pecans, a delightful treat for any occasion.
- Prep Time: 20 minutes
- Cook Time: 20 minutes
- Total Time: 240 minutes
- Yield: 8 servings 1x
- Category: Dessert
- Method: Freezing
- Cuisine: American
- Diet: Vegetarian
Ingredients
- 1 cup pecan halves
- 2 cups heavy cream
- 1 cup whole milk
- 3/4 cup granulated sugar
- 1 teaspoon vanilla extract
- Pinch of salt
- 4 large egg yolks
Instructions
- Toast the pecans in a dry skillet over medium heat for 5-7 minutes.
- Combine heavy cream and whole milk in a saucepan and heat until steaming.
- Whisk together granulated sugar, egg yolks, and salt until pale and thick.
- Temper the egg mixture by gradually adding hot cream while whisking.
- Cook the mixture over medium heat until thickened, about 8-10 minutes.
- Remove from heat and stir in vanilla extract. Cool for 15-20 minutes.
- Churn the cooled mixture in an ice cream maker for 20-25 minutes.
- Add toasted pecans in the last few minutes of churning.
- Freeze in an airtight container for at least 4 hours before serving.
Notes
For variations, try swapping sugar for maple syrup or adding chocolate ganache swirls.
Nutrition
- Serving Size: 1 serving
- Calories: 300
- Sugar: 20g
- Sodium: 75mg
- Fat: 20g
- Saturated Fat: 12g
- Unsaturated Fat: 6g
- Trans Fat: 0g
- Carbohydrates: 24g
- Fiber: 1g
- Protein: 4g
- Cholesterol: 100mg
Keywords: ice cream, dessert, butter pecan, homemade ice cream, summer treat
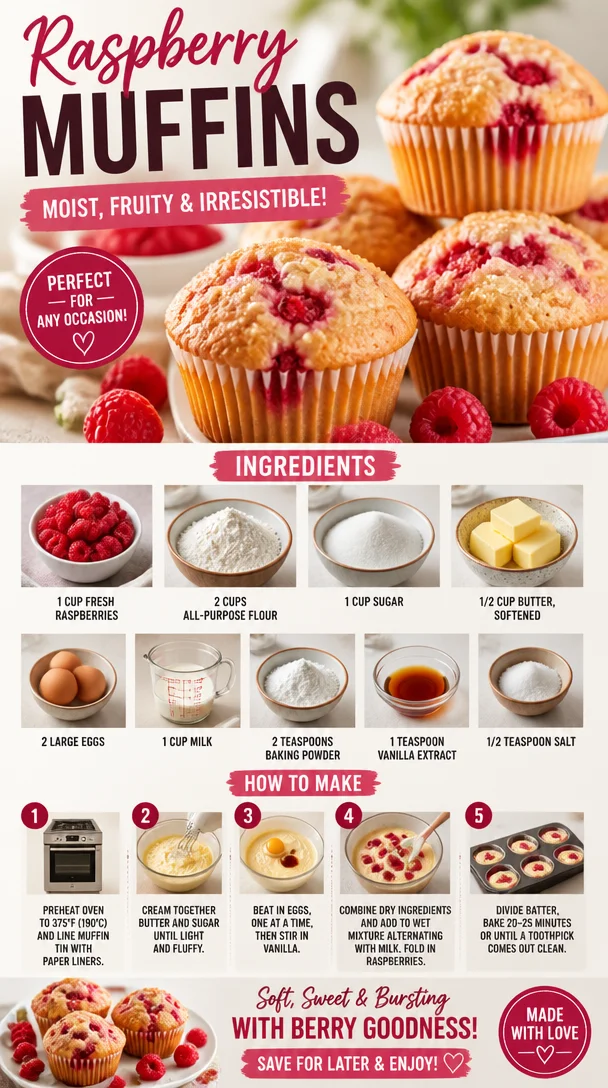
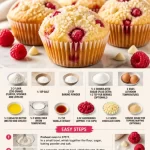
Raspberry Muffins
Whip Up Some Joy: The Ultimate Raspberry Muffins Recipe
Welcome, fellow foodies! I’m Ava Carter, and today, we’re diving into one of my absolute favorite treats—the mouthwatering, tantalizing Raspberry Muffins. If you’re searching for a recipe that’s packed with flavor, isn’t overly complicated, and brings a little sunshine into your kitchen, you’ve just hit the jackpot!
Picture this: a basket of golden-brown muffins, just out of the oven, bursting with bright, juicy raspberries that are begging to be devoured. The first bite reveals a perfectly moist crumb, a balance of sweetness from the sugar, and a slight tang from the raspberries. Pair these beauties with a steaming cup of coffee or tea, and you’ve got the ultimate breakfast or snack. Trust me; these muffins are not just food—they’re a hug in a muffin cup!
Let me take you on a little journey while we explore the magic of Raspberry Muffins. For me, baking has always been about connections—sharing laughter, stories, and those unforgettable moments. This particular recipe harks back to my childhood. I remember standing in my grandma’s cozy kitchen, surrounded by the warmth of freshly baked goods, with the sweet, slightly tart aroma of raspberries wafting through the air. We would pick ripe raspberries in her garden, their vibrant color and luscious taste inspiring us to create all sorts of yummy treats.
Those raspberry muffins were a staple in her house, and every bite brought with it a flood of memories. I still channel those same feelings every time I whip up a batch. Whether it’s for breakfast on a lazy Sunday or to impress a group of friends, these muffins never fail to bring a smile to my face.
Ingredients: Fresh and Fabulous
Here’s what you’ll need to create these delightful Raspberry Muffins:
-
1 cup fresh raspberries
This is the star of the show! Fresh raspberries provide a burst of flavor and color. If fresh ones are unavailable, you can substitute with frozen raspberries—just make sure to thaw and drain them first to avoid excess moisture. -
2 cups all-purpose flour
The backbone of your muffins, all-purpose flour gives them structure. For a healthier twist, you can experiment with whole wheat flour or gluten-free flour blends. -
1 cup sugar
Sweetness is key! You can adjust this to your taste, or use coconut sugar for a more wholesome option. -
1/2 cup butter, softened
Butter keeps your muffins moist and adds richness. You can also use coconut oil or a plant-based butter for a dairy-free alternative. -
2 large eggs
Eggs provide moisture and help bind the ingredients together. For a vegan option, try flax eggs (1 tablespoon ground flaxseed + 2.5 tablespoons water per egg, mixed and let sit for a few minutes). -
1 cup milk
Milk adds a tender crumb. You can use almond milk, oat milk, or any other plant-based milk if you prefer a dairy-free option. -
2 teaspoons baking powder
This little powerhouse is essential for making your muffins rise and develop that lovely texture. -
1 teaspoon vanilla extract
Vanilla adds a touch of warmth and enhances the overall flavor. If you’re feeling adventurous, you can experiment with other extracts like almond or lemon. -
1/2 teaspoon salt
A pinch of salt balances the sweetness and rounds out the flavors.
Let’s make magic happen!
Step-by-Step Instructions: Your Guide to Muffin Mastery
Now that we have our ingredients ready, let’s get baking! Follow these steps, and I promise you’ll have a kitchen full of beautiful Raspberry Muffins in no time.
Step 1: Preheat the Oven
Preheat your oven to 375°F (190°C). This step is crucial for achieving that perfect, fluffy texture. While the oven is heating up, you can prepare your muffin tins.
Step 2: Prepare Your Muffin Tins
Grease a 12-cup muffin tin with cooking spray or line it with muffin liners. This little step helps your muffins release easily and makes cleanup a breeze!
Step 3: Mix the Dry Ingredients
In a large bowl, whisk together the flour, sugar, baking powder, and salt until well combined. This helps aerate the flour, ensuring your muffins will be light and fluffy.
Step 4: Cream the Butter and Sugar
In another bowl, you’ll want to cream together the softened butter and the remaining sugar until the mixture is light and fluffy. This usually takes about 3-5 minutes. Creaming helps to incorporate air, making your muffins lighter.
Step 5: Add the Eggs and Vanilla
Beat in the eggs, one at a time, along with the vanilla extract. Make sure everything is mixed well, so the batter comes together beautifully. Don’t skip the vanilla—it elevates the flavor!
Step 6: Combine Wet and Dry
Now, slowly add the dry mixture to your wet ingredients, alternating with the milk. You want to start and end with the dry ingredients (dry-wet-dry). Doing this helps create a smooth, cohesive batter without over-mixing, which can lead to tough muffins. Gently fold in those gorgeous raspberries, being careful not to break them too much.
Step 7: Fill the Muffin Tins
Spoon the batter into the prepared muffin tins, filling each cup about two-thirds full. This leaves room for the muffins to rise without overflowing.
Step 8: Bake, Bake, Bake!
Pop those muffin tins into the oven and bake for 18-20 minutes, or until the tops are a beautiful golden brown and a toothpick inserted into the center comes out clean.
Step 9: Cool and Enjoy
Once baked, remove the muffins from the oven and let them cool in the tin for about 5 minutes before transferring them to a wire rack to cool completely. The waiting is the hardest part, I know—your kitchen will smell divine!
Serving Suggestions: Muffin Masterpieces
To serve these Raspberry Muffins, feel free to drizzle a touch of honey or maple syrup on top for extra sweetness. A dollop of yogurt alongside makes a perfect pairing. If you want, grab a plate, stack a few muffins, and sprinkle some extra raspberries around. It adds a lovely touch of color and makes for an enticing presentation!
Recipe Variations: Get Creative!
These muffins are incredibly versatile—here are some fun ideas to switch things up:
-
Lemon Zest: Incorporate the zest of one lemon into the batter for a fresh citrus twist that pairs beautifully with the raspberries.
-
Almonds: Add chopped almonds to the mix for crunch and a lovely nutty flavor.
-
Chocolate Chips: Toss in some dark chocolate chips for a decadent treat that’s hard to resist.
-
Oat Topping: Sprinkle some oats with a drizzle of honey on top before baking for an extra chewy layer.
-
Veggies: Feel free to toss in grated carrots or zucchini for added moisture and flavor—who knew muffins could be healthy and breakfast-y?
Chef’s Notes: A Dash of Nostalgia
As I mentioned earlier, this recipe comes from my cherished childhood memories. Each batch takes me back to my grandma’s kitchen, a haven of laughter, love, and, of course, delicious food. Over the years, I’ve tweaked this recipe a bit—experimenting with different fruits and flavors, but the classic Raspberry Muffins always remain a favorite in my household.
I once made these muffins for a brunch gathering, and they disappeared in no time! The best compliment I received was from a friend who said they tasted just like nostalgia with a hint of summer—a mix of warmth and the tantalizing sweetness of fresh raspberries.
FAQs and Troubleshooting
Q: My muffins came out dense. What happened?
A: It’s likely that the batter was over-mixed. When combining the wet and dry ingredients, mix just until combined!
Q: Can I use frozen raspberries?
A: Absolutely! Just be sure to thaw and drain them first to avoid excess moisture in your batter. You can also fold them in gently to avoid a blueberry effect!
Q: How can I store these muffins?
A: Store in an airtight container at room temperature for up to 3 days, or in the fridge for up to a week. You can also freeze them for a longer shelf life—just make sure they’re sealed tightly!
Q: What if I don’t have milk?
A: You can substitute with yogurt, sour cream, or a plant-based milk for a dairy-free version!
Nutritional Info (Optional)
This recipe yields about 12 muffins, and here’s an estimated calorie breakdown for one muffin:
- Calories: 200
- Total Fat: 8g
- Saturated Fat: 5g
- Carbohydrates: 28g
- Sugar: 12g
- Protein: 3g
Keep in mind that these values can vary based on specific ingredients and portion sizes.
The thing about these Raspberry Muffins is that they are more than just a recipe. They’re a way to share love, a little slice of nostalgia, and a delicious treat to brighten up any day. I hope you make a batch, enjoy every crumb, and maybe even create your own fond memories in the kitchen! Happy baking!
PrintRaspberry Muffins
Deliciously moist Raspberry Muffins bursting with fresh raspberries, perfect for breakfast or a snack.
- Prep Time: 15 minutes
- Cook Time: 20 minutes
- Total Time: 35 minutes
- Yield: 12 muffins 1x
- Category: Breakfast
- Method: Baking
- Cuisine: American
- Diet: Vegetarian
Ingredients
- 1 cup fresh raspberries
- 2 cups all-purpose flour
- 1 cup sugar
- 1/2 cup butter, softened
- 2 large eggs
- 1 cup milk
- 2 teaspoons baking powder
- 1 teaspoon vanilla extract
- 1/2 teaspoon salt
Instructions
- Preheat your oven to 375°F (190°C).
- Prepare a 12-cup muffin tin by greasing it or lining it with liners.
- Mix the flour, sugar, baking powder, and salt in a large bowl.
- Cream together the softened butter and sugar until light and fluffy.
- Add the eggs one at a time, along with the vanilla extract, mixing well.
- Combine the dry mixture with the wet ingredients, alternating with the milk.
- Fold in the raspberries gently.
- Fill the muffin tins about two-thirds full with the batter.
- Bake for 18-20 minutes or until golden brown and a toothpick comes out clean.
- Cool in the tin for 5 minutes, then transfer to a wire rack to cool completely.
Notes
Feel free to add lemon zest, almonds, or chocolate chips for variations. These muffins are best enjoyed fresh but can be stored in an airtight container.
Nutrition
- Serving Size: 1 muffin
- Calories: 200
- Sugar: 12g
- Sodium: 200mg
- Fat: 8g
- Saturated Fat: 5g
- Unsaturated Fat: 2g
- Trans Fat: 0g
- Carbohydrates: 28g
- Fiber: 1g
- Protein: 3g
- Cholesterol: 30mg
Keywords: Raspberry, Muffins, Breakfast, Baking, Snack
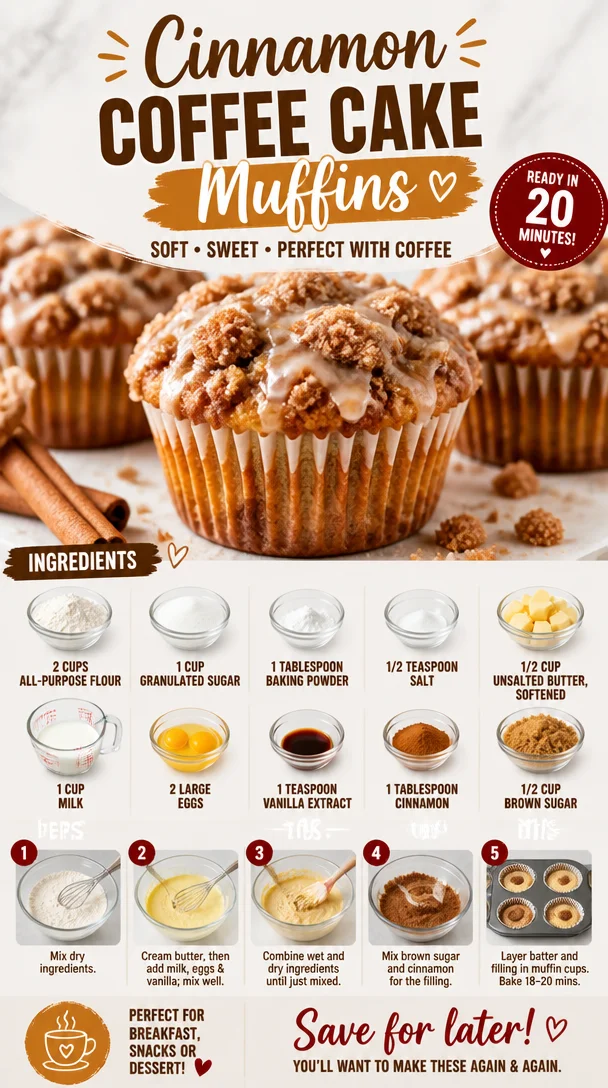
Cinnamon Coffee Cake Muffins
Cinnamon Coffee Cake Muffins: A Warm Hug in Every Bite
Ah, cinnamon coffee cake muffins! Just the name brings back sweet memories of lazy Sunday mornings spent in my grandmother’s cozy kitchen, the warm aroma of cinnamon wafting through the air. There was something truly magical about those mornings—the bustling of the coffee pot brewing, the anticipation of fresh muffins rising in the oven, and of course, the delightful chatter that filled the room. This recipe is all about those cherished moments, where simplicity meets flavor, and comfort food takes center stage.
Whether you’re looking for a breakfast treat to pair with your coffee or a sweet snack to share with friends, these cinnamon coffee cake muffins deliver both nostalgia and scrumptiousness. They’re fluffy, moist, and topped with a heavenly crumbly cinnamon-sugar streusel that adds the perfect crunch. Trust me, once you pop these muffins in your mouth, you’ll feel like a kid again! So, let’s roll up our sleeves, preheat that oven, and dive into the delightful world of cinnamon coffee cake muffins.
A Personal Story with a Pinch of Cinnamon
Growing up, weekends were family time, and nothing brought us together like a batch of freshly baked muffins. My grandmother had a way of turning ordinary ingredients into something extraordinary, and her cinnamon coffee cake muffins were no exception. I can still remember standing on a wobbly stool, watching her expertly mix the batter while sneaking spoonfuls of sugar (okay, maybe a little too much!) when she wasn’t looking.
What made her muffins even more special was the love she put into them. Each time we baked together, she would share little stories about her own childhood—stories filled with laughter, and sometimes a few kitchen mishaps that made us crack up. You know those heartwarming moments that wrap around you like a warm blanket? That’s what these muffins conjure for me. So, as we gather our ingredients and get started on this delightful journey, remember: it’s not just about baking—it’s about creating memories, one muffin at a time.
Ingredients
-
2 cups all-purpose flour
A classic choice for muffins, providing the perfect structure while keeping them light. If you want to make them a bit healthier, try using whole wheat flour or a gluten-free blend! -
1 cup granulated sugar
This sweetener helps the muffins rise and caramelize beautifully, giving that golden crust. For a lower-calorie option, coconut sugar works wonders without compromising flavor. -
1 tablespoon baking powder
The secret that helps our muffins rise to fluffy perfection! Always check the expiry date; old baking powder can leave your muffins flat. -
1/2 teaspoon salt
A tiny but mighty ingredient that brings out the sweetness in our muffins. Don’t skip it—balance is key! -
1/2 cup unsalted butter, softened
This rich ingredient provides moisture and flavor. If you’re in a dairy-free mood, melted coconut oil is a fantastic alternative. -
1 cup milk
I love whole milk for creamy richness, but feel free to swap with almond milk or oat milk to fit any dietary needs! -
2 large eggs
Eggs are the binding force! For a vegan option, consider using flaxseed eggs or applesauce. -
1 teaspoon vanilla extract
This adds a lovely depth of flavor. Make sure to use pure vanilla extract for the best results! -
1 tablespoon cinnamon
The star of our muffins! The warm aroma is simply irresistible. Try adding a little nutmeg for extra warmth if you’re feeling adventurous! -
1/2 cup brown sugar
Mixed with cinnamon, this creates a delicious streusel topping. You can easily use white sugar if you don’t have brown sugar available.
Step-by-Step Instructions
-
Preheat Your Oven
Start by preheating your oven to 350°F (175°C). It’s essential for ensuring your muffins rise perfectly. -
Prepare Your Muffin Tin
While the oven heats, line a muffin tin with paper liners or grease it lightly with butter. This will help keep your muffins from sticking and make for an easy cleanup. -
Mix Dry Ingredients
In a large mixing bowl, whisk together the all-purpose flour, granulated sugar, baking powder, salt, and cinnamon. This step is vital for distributing the leavening agent evenly, which leads to splendidly fluffy muffins. -
Cream Butter and Sugar
In a separate bowl, beat the softened unsalted butter until creamy, then gradually add the brown sugar. This step gets air into the butter, creating a fluffy texture. You can mix by hand, but I recommend using a handheld mixer for the best results! -
Combine Eggs and Vanilla
Add the eggs and vanilla extract to the butter-sugar mixture and beat until it’s fully combined. The batter should be smooth and creamy. Don’t worry if it looks different from cake batter; it will come together nicely when you add the flour mixture! -
Blend Wet and Dry Ingredients
Gradually add the dry ingredients to the wet mixture, alternating with milk. Start and end with the dry ingredients, mixing gently until just combined. Overmixing is a common mistake that leads to tougher muffins; we want tender beauties here! -
Fill the Muffin Tin
Using a spoon or ice cream scoop, fill each muffin cup about 3/4 full with batter. This allows room for rising without overflowing. -
Create the Streusel Topping
In a small bowl, combine cinnamon, brown sugar, and a bit of flour. Sprinkle this crumbly mix generously over your muffin batter. The more, the merrier! -
Bake
Pop the muffin tin into the preheated oven and bake for 18-20 minutes or until a toothpick comes out clean from the center. Keep an eye on them the last few minutes for perfectly golden tops! -
Cool and Enjoy
Once baked, let the muffins cool in the tin for a few minutes before transferring them to a wire rack. Now, you can either enjoy them warm (my favorite!) or let them cool completely for later.
Serving Suggestions
Serve these glorious cinnamon coffee cake muffins warm, dusted with powdered sugar or drizzled with a simple glaze of icing sugar and milk. Pair them with a hot cup of coffee, or even a steaming chai latte for a delightful breakfast or afternoon treat. They also make fantastic grab-and-go snacks, perfect for busy mornings!
Recipe Variations
-
Apple Cinnamon Muffins: Fold in diced apples for a fruity twist!
-
Nutty Cinnamon Muffins: Add chopped walnuts or pecans to the batter for extra crunch and flavor.
-
Pumpkin Spice Muffins: Substitute 1/2 cup of milk with pumpkin puree and adjust the spices for a fall-inspired treat!
-
Chocolate Chip Cinnamon Muffins: Toss in a handful of chocolate chips to satisfy those sweet cravings.
-
Lemon Zest Twist: Add the zest of a lemon to brighten up the flavor profile—cinnamon and citrus are a delightful combination!
Chef’s Notes
These muffins have a special place in my heart, evolving over the years as I’ve fine-tuned my recipe. I once had a baking disaster when my toddler decided to "help" by adding a cup of salt instead of sugar. We laughed so hard (and made a mess), but it taught me the importance of enjoying the process. Baking is just as much about the journey and the joy shared as it is about the final product.
FAQs and Troubleshooting
Q: My muffins turned out dense. What went wrong?
A: Overmixing the batter can lead to a dense texture. Mix until just combined for perfect fluffiness.
Q: Can I freeze these muffins?
A: Absolutely! Let them cool completely, then place them in an airtight container or freezer bag. They’ll stay fresh in the freezer for up to 3 months.
Q: How can I store the leftover muffins?
A: Store your muffins in an airtight container at room temperature for up to 3 days. For longer storage, refrigerate them!
Q: What if I don’t have baking powder?
A: You can substitute baking powder with a mix of cream of tartar and baking soda (1/2 teaspoon baking soda + 1 teaspoon cream of tartar = 1 teaspoon baking powder).
Nutritional Info (Optional)
While I believe in enjoying every bite without counting calories, here’s a rough estimate for the nutritional information per muffin:
- Calories: 220
- Protein: 3g
- Fat: 8g
- Carbohydrates: 35g
- Fiber: 1g
- Sugar: 10g
Conclusion
Whipping up these cinnamon coffee cake muffins is about much more than just satisfying your taste buds; it’s about creating memories that last a lifetime. Each bite is a reminder of warmth and love and a chance to share those moments with friends and family. So, gather your loved ones, start baking, and let the magic unfold in your own kitchen. Remember, whether you’re a novice or a seasoned pro, there’s always room for a bit of joy, a sprinkle of laughter, and a dash of cinnamon in every kitchen adventure. Happy baking!
PrintCinnamon Coffee Cake Muffins
Fluffy and moist cinnamon coffee cake muffins topped with a delightful crumbly cinnamon-sugar streusel, bringing warmth and nostalgia to your mornings.
- Prep Time: 15 minutes
- Cook Time: 20 minutes
- Total Time: 35 minutes
- Yield: 12 servings 1x
- Category: Breakfast
- Method: Baking
- Cuisine: American
- Diet: Vegetarian
Ingredients
- 2 cups all-purpose flour
- 1 cup granulated sugar
- 1 tablespoon baking powder
- 1/2 teaspoon salt
- 1/2 cup unsalted butter, softened
- 1 cup milk
- 2 large eggs
- 1 teaspoon vanilla extract
- 1 tablespoon cinnamon
- 1/2 cup brown sugar
Instructions
- Preheat your oven to 350°F (175°C).
- Prepare a muffin tin with paper liners or grease it with butter.
- Mix dry ingredients: whisk together flour, sugar, baking powder, salt, and cinnamon.
- Cream butter until creamy, then gradually add brown sugar.
- Combine eggs and vanilla with the butter-sugar mixture until smooth.
- Blend dry ingredients into the wet mixture, alternating with milk.
- Fill each muffin cup about 3/4 full with batter.
- Create the streusel topping by combining cinnamon, brown sugar, and flour, then sprinkle over the batter.
- Bake for 18-20 minutes or until a toothpick comes out clean.
- Cool the muffins in the tin for a few minutes before transferring to a wire rack.
Notes
Serve warm or let cool completely for later. Muffins can be frozen for up to 3 months.
Nutrition
- Serving Size: 1 muffin
- Calories: 220
- Sugar: 10g
- Sodium: 200mg
- Fat: 8g
- Saturated Fat: 5g
- Unsaturated Fat: 3g
- Trans Fat: 0g
- Carbohydrates: 35g
- Fiber: 1g
- Protein: 3g
- Cholesterol: 30mg
Keywords: cinnamon muffins, coffee cake muffins, breakfast muffins

Quick 1-Pan Cherry Amaretto Upside-Down Cake for Weeknights
Flavorful Cherry Amaretto Upside-Down Cake: Your New Go-To Dessert
Hello, my dear food lovers! Today, we’re diving into a delightful dessert that will surely make your tastebuds dance with joy: Cherry Amaretto Upside-Down Cake. This cake is not just a dessert; it’s a celebration of flavor, nostalgia, and pure joy. Trust me, once you sink your fork into this beauty, you’ll be craving it again and again.
There’s something inherently magical about the combination of cherries and amaretto. Each bite is like a sweet hug that warms your heart! Whether you’re whipping this up for a casual weeknight treat or impressing guests at your next gathering, this cake promises to bring smiles all around. So, put on your favorite apron, and let’s make some kitchen magic!
A Slice of Nostalgia
This recipe brings back wonderful memories for me, and I’m excited to share them with you! Growing up, my grandmother had a special way of celebrating life’s little moments, and her Cherry Amaretto Upside-Down Cake was a recurring star at family get-togethers. I can vividly remember the aroma wafting through her cozy kitchen as it baked.
It always felt like a festive occasion, and we would gather around the table, excitedly waiting for her to flip the cake over. The joy on her face as she unveiled the golden crust dotted with glistening cherries and a luscious caramelized topping was priceless. It was a cake that spoke of love, family, and the simple pleasure of sharing a treat with one another.
Now, as I recreate this dish in my own kitchen, I’m not just baking; I’m weaving a tapestry of cherished memories and flavors. And the best part? I get to share this deliciousness with all of you! Get ready to experience that same joy in your own home!
Ingredients
Here’s the star-studded cast of ingredients that will join forces to create this delicious Cherry Amaretto Upside-Down Cake.
-
2 cups maraschino cherries, drained: These juicy cherries are the highlight of our cake! They’ll bring sweetness and a pop of color. If you want a more natural flavor, you can substitute with fresh or frozen cherries (just pit them first!).
-
1/4 cup unsalted butter (for browning and richness): Butter adds a creamy, rich flavor that balances the sweetness. Feel free to use vegan butter if you’re looking for a dairy-free option.
-
1/2 cup brown sugar, packed: Brown sugar brings moisture and a touch of caramel flavor, which complements the cherries beautifully. If you’re out of brown sugar, you can make your own by mixing white sugar with a bit of molasses!
-
2 tbsp amaretto liqueur: The secret ingredient that adds a lovely almond flavor to your cake! If you prefer not to use alcohol, you can substitute with a bit of almond extract (1 tsp) and increase the sugar by a tablespoon or two.
-
1/2 cup unsalted butter (for cake batter): Just like before, this butter gives our cake a tender crumb. Use ghee or coconut oil for a dairy-free twist!
-
1 cup granulated sugar: This is our main sweetener. You can use coconut sugar for a lower glycemic alternative.
-
2 large eggs, room temperature: Eggs are crucial in binding the ingredients and providing structure to the cake. For a vegan option, you can use flax eggs (1 tbsp flaxseed meal + 3 tbsp water = 1 egg).
-
1 1/2 cups all-purpose flour: The foundation of our cake! For those with gluten sensitivities, a 1:1 gluten-free blend will work wonderfully.
-
1 1/2 tsp baking powder: This is what makes our cake rise and gives it that fluffy texture. Ensure your baking powder is fresh!
-
1/4 tsp salt: A little pinch of salt enhances all the flavors, making the cake even more delicious!
-
1/2 cup whole milk (or dairy-free milk like oat milk): This add moisture to our cake. Almond milk or soy milk are excellent dairy-free alternatives that will work well.
-
1 tsp pure vanilla extract: Vanilla adds warmth and depth. For a more robust flavor, you can use vanilla beans!
-
1 tbsp amaretto liqueur (optional): This adds an additional layer of amaretto goodness to your cake batter. Your choice, but trust me, you won’t regret adding it!
Each ingredient plays a special role in the symphony of flavors that make this cake unforgettable. Now that we’ve gathered our ingredients, let’s start baking!
Step-by-Step Instructions
-
Preheat Your Oven: Preheat your oven to 350°F (175°C). This ensures that your cake bakes evenly once we pop it in. While your oven warms up, grease a 9-inch round cake pan so the cake can slide right out once it’s done!
-
Prepare the Cherry Layer: In a medium saucepan, melt 1/4 cup of butter over medium heat. Once melted, stir in 1/2 cup of brown sugar until it’s completely dissolved and slightly bubbly. Add your cherries and the 2 tablespoons of amaretto liqueur, stirring gently to coat them in that heavenly caramel. Allow the mixture to simmer for just a couple of minutes. This step enhances the flavor and makes those cherries ultra luscious! Pour this mix into your prepared cake pan, spreading it evenly.
-
Make the Cake Batter: In a large mixing bowl, cream together 1/2 cup of softened butter and 1 cup of granulated sugar until it’s light and fluffy. This step brings air into the mixture, leading to a tender cake. Next, add in the eggs, one at a time, mixing well after each addition. Then, pour in the milk, 1 tablespoon of amaretto (if using), and 1 teaspoon of vanilla extract. Mix until smooth!
-
Combine Dry Ingredients: In a separate bowl, whisk together your all-purpose flour, baking powder, and salt. Gradually add the dry ingredients to the wet mixture, folding gently with a spatula until just combined. Be careful not to overmix; a little lumps will keep your cake fluffy and light!
-
Pour Batter Over Cherries: Carefully pour the batter over the cherry topping in your cake pan. Use the spatula to ensure it’s evenly spread. At this point, your kitchen should be smelling divine!
-
Bake: Slide your cake into the preheated oven and bake for about 35-40 minutes, or until a toothpick inserted into the center comes out clean. Keep an eye on it towards the end—overbaking can lead to a dry cake!
-
Cool and Flip: Once baked, remove the cake from the oven and allow it to cool in the pan for about 10 minutes. This step is crucial—if you flip it too soon, the cherries might stick! Carefully place a plate over the pan and flip it over. The cherry topping will now be on top, glistening and gorgeous.
-
Serve and Enjoy: Let the cake cool slightly before slicing. You can serve it warm or at room temperature, and it pairs beautifully with a scoop of vanilla ice cream or a dollop of whipped cream!
Serving Suggestions
When it comes to serving this Cherry Amaretto Upside-Down Cake, presentation is key! You want your cake to be as stunning as it is delicious. Serve slices on elegant plates, and don’t forget to drizzle a bit of the caramel from the pan over each piece for an extra touch of decadence. For added flair, garnish with a light dusting of powdered sugar or a sprinkle of chopped almonds—it adds a delightful crunch!
Recipe Variations
Ready to put your own spin on this classic? Here are some fun variations to try:
-
Berry Medley: Swap out the cherries for a mix of berries like raspberries, blueberries, and strawberries for a vibrant summer twist!
-
Chocolate Cherry: Add cocoa powder (1/4 cup) to the batter for a chocolatey flair. Who doesn’t love chocolate and cherry together?
-
Nutty Crunch: Mix chopped pecans or walnuts into the cake batter for a delightful crunch and added flavor.
-
Citrus Zing: Add some grated lemon or orange zest to the batter for a refreshing citrus twist that brightens the flavor profile.
-
Vegan Delight: Substitute cherries with a mix of bananas and nuts, use flax eggs, and dairy-free milk for a fantastic vegan version that won’t disappoint!
Chef’s Notes
This recipe is one that has evolved over time, much like any good relationship in the kitchen! I still remember the first attempt—I may have used twice the sugar, and let’s just say the result was a sugar bomb! However, through practice and a lot of delicious taste testing, I’ve perfected this version. Each time I make it, it brings a wave of nostalgia and sweetness, reminding me of those cherished family moments.
One of my funniest kitchen stories involves the time I forgot to add the baking powder completely. Picture me frantically watching it bake, only to realize that I’d essentially made a dense cherry pancake! But hey, while that cake was a flop, the memories it created were worth every lesson learned.
FAQs and Troubleshooting
1. My cake stuck to the pan! What went wrong?
Make sure you thoroughly grease your cake pan. You can also use parchment paper to line the bottom, which will make it super easy to lift the cake out once it cools.
2. Why did my cake turn out dense?
Dense cakes are often a result of overmixing or not adding enough leavening agent. Remember to mix until just combined and check your baking powder for freshness.
3. Can I make this ahead of time?
Absolutely! This cake actually tastes better the next day as the flavors meld together. Just store it in an airtight container at room temperature.
4. Can I freeze this cake?
Yes, you can freeze the cake! Just make sure to wrap it well in plastic wrap and store it in an airtight container. Thaw in the fridge overnight before serving.
Nutritional Info
If you’re keeping an eye on nutrition, here’s a rough breakdown (per slice based on 12 servings):
- Calories: 250
- Protein: 3g
- Fat: 10g
- Carbohydrates: 38g
- Fiber: 1g
Keep in mind that nutritional values may vary based on ingredient substitutions!
And there you have it, my friend! A delicious Cherry Amaretto Upside-Down Cake full of flavor and rich in memories. Make this dessert your own, and don’t be afraid to experiment in the kitchen. After all, cooking is about joy and creativity. Happy baking, and I can’t wait to hear about your culinary adventures!
PrintCherry Amaretto Upside-Down Cake
A delightful dessert that combines juicy cherries and amaretto for a nostalgic and flavorful experience.
- Prep Time: 20 minutes
- Cook Time: 40 minutes
- Total Time: 60 minutes
- Yield: 12 servings 1x
- Category: Dessert
- Method: Baking
- Cuisine: American
- Diet: Vegetarian
Ingredients
- 2 cups maraschino cherries, drained
- 1/4 cup unsalted butter (for browning)
- 1/2 cup brown sugar, packed
- 2 tbsp amaretto liqueur
- 1/2 cup unsalted butter (for cake batter)
- 1 cup granulated sugar
- 2 large eggs, room temperature
- 1 1/2 cups all-purpose flour
- 1 1/2 tsp baking powder
- 1/4 tsp salt
- 1/2 cup whole milk (or dairy-free alternative)
- 1 tsp pure vanilla extract
- 1 tbsp amaretto liqueur (optional)
Instructions
- Preheat your oven to 350°F (175°C) and grease a 9-inch round cake pan.
- Prepare the cherry layer by melting 1/4 cup of butter, then stirring in 1/2 cup of brown sugar. Add cherries and amaretto, simmer, and pour into the cake pan.
- Make the cake batter by creaming together 1/2 cup softened butter and 1 cup sugar, then adding eggs, milk, amaretto, and vanilla extract.
- Combine the dry ingredients in a separate bowl and gradually fold them into the wet mixture.
- Pour the cake batter over the cherry topping in the pan.
- Bake for 35-40 minutes or until a toothpick comes out clean.
- Cool the cake in the pan for 10 minutes, then flip it onto a plate.
- Serve warm or at room temperature, optionally with ice cream or whipped cream.
Notes
Store leftovers in an airtight container at room temperature or freeze for later enjoyment.
Nutrition
- Serving Size: 1 slice
- Calories: 250
- Sugar: 20g
- Sodium: 150mg
- Fat: 10g
- Saturated Fat: 6g
- Unsaturated Fat: 4g
- Trans Fat: 0g
- Carbohydrates: 38g
- Fiber: 1g
- Protein: 3g
- Cholesterol: 30mg
Keywords: cake, dessert, cherry, amaretto, upside-down cake
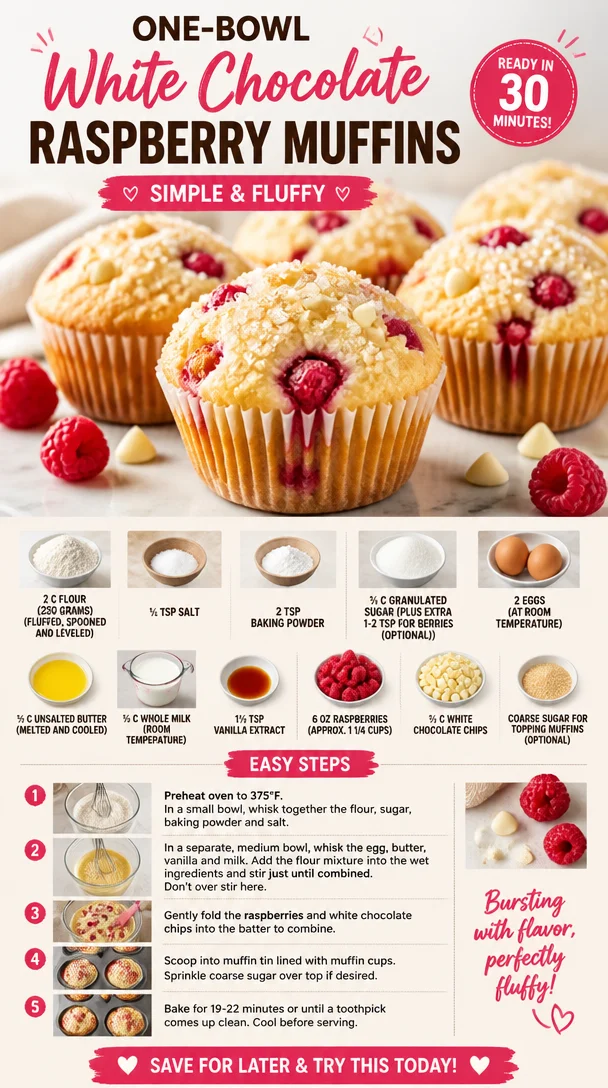
One-Bowl White Chocolate Raspberry Muffins: Simple & Fluffy
White Chocolate Raspberry Muffins: A Sweet Symphony of Flavor
Welcome back to Clean Plate Cravings, where we whip up delicious dishes that brighten your days! Today, let’s dive into a delightful recipe that’s sure to tickle your taste buds: White Chocolate Raspberry Muffins. These muffins are like a hug in a wrapper, combining the rich sweetness of white chocolate with the tartness of fresh raspberries. Trust me; your morning routine (or snack time) will thank you!
The Perfect Morning Treat
Imagine waking up to the smell of freshly baked muffins wafting through your kitchen—there’s something magical about that scent, isn’t there? These White Chocolate Raspberry Muffins are not just breakfast; they’re an experience that transforms ordinary mornings into something deliciously extraordinary. Whether it’s a lazy Sunday brunch or a quick grab-and-go snack, these muffins bring a splash of joy and tenderness to your day.
I first stumbled upon this combo during a lazy summer afternoon at my grandmother’s house. She would whip up her signature muffins, and I’d help her hunt down the ripe raspberries hidden among the garden vines. After a morning spent picking juicy berries, we would return to the kitchen, where the magic of baking would unfold. The anticipation of blending sweet white chocolate with the more tangy berry made it feel like we were creating a symphony of flavors and memories. I’ve cherished that moment ever since, and I want to share that love and joy through this recipe.
Ingredients
Before we dive into the cooking, let’s get acquainted with our key players—the ingredients that make these muffins sing!
-
2 cups all-purpose flour (250 grams): Flour is the backbone of our muffins! Make sure to fluff it up, spoon it into your measuring cup, and level it off for accuracy. If you’re feeling adventurous, consider swapping half of it for almond flour for a nutty twist.
-
½ teaspoon salt: Just a pinch! This tiny ingredient enhances the flavors and balances the sweetness. Don’t skip it!
-
2 teaspoons baking powder: This little powerhouse ensures your muffins rise beautifully. Make sure it’s fresh to keep your muffins nice and fluffy!
-
¾ cup granulated sugar: Sweetness is key here. Feel free to reduce it slightly if you prefer a less sweet muffin. You can also try using coconut sugar for a more caramel-like flavor.
-
2 large eggs (at room temperature): Eggs act as a binder and provide moisture. Room temperature eggs mix more easily into the batter, so take them out of the fridge ahead of time.
-
½ cup unsalted butter (melted and cooled): Butter adds richness and flavor. It’s essential to let it cool down; otherwise, it can scramble the eggs!
-
½ cup whole milk (room temperature): Milk contributes to a tender crumb. For a healthier version, swap it out for almond or oat milk!
-
1½ teaspoons vanilla extract: This is where the magic happens! Vanilla elevates the entire muffin’s flavor profile. Try using pure vanilla extract for the best taste.
-
6 oz raspberries (approximately 1 1/4 cups): Fresh or frozen raspberries work beautifully. If you’re using frozen, just toss them directly into the batter without thawing, and they’ll delightfully burst as they bake!
-
⅔ cup white chocolate chips: The star of the show! These sweet morsels melt into pockets of creamy goodness. If you’re feeling daring, you could use dark chocolate chips for a flavor contrast.
-
Coarse sugar for topping (optional): A sprinkle of coarse sugar adds a delightful crunch and sweetness on top. It’s all about that first bite!
Step-by-Step Instructions
Now that we have our ingredients ready, let’s get our hands dirty!
-
Preheat your oven: This is a crucial step! Set your oven to preheat at 375°F (190°C) and prepare your muffin tin by lining it with paper liners or gently greasing each cup. It’s time to make your kitchen smell amazing!
-
Mix the dry ingredients: In a medium bowl, whisk together the flour, salt, and baking powder. Whisking aerates the flour, ensuring your muffins will be light and fluffy.
-
Combine the wet ingredients: In a large bowl, combine the granulated sugar and melted butter. Use a whisk to blend them until smooth—this creates a lovely base! Now add the eggs, milk, and vanilla extract, mixing until everything is well incorporated.
Chef’s Hack: If you want to reduce dishes, you can also melt the butter in the same bowl used for the sugar. Just allow it to cool before adding the other wet ingredients!
-
Incorporate the dry ingredients: Gradually fold in the dry mixture into the wet ingredients using a spatula. Be gentle! Overmixing can lead to chewy muffins—yikes!
-
Add the raspberries and white chocolate chips: Gently fold in your beautiful raspberries and white chocolate chips. If you’re using fresh raspberries, toss them with a little flour beforehand to prevent them from sinking to the bottom. It’s all about those tasty bursts in every muffin!
-
Scoop and bake: Using an ice cream scoop or a generous spoon, divide the batter evenly among the muffin cups. Fill each cup about ¾ full for perfect rising. If you like, sprinkle the tops with coarse sugar for that extra sparkle. Slide them in the oven and bake for 18-22 minutes, or until they’re golden brown and a toothpick comes out clean from the center.
-
Cool and enjoy: Once baked, remove the muffins from the oven and allow them to cool in the tin for about 5 minutes before transferring them to a wire rack. Don’t rush this part; the aroma is worth taking a moment to savor!
Serving Suggestions
To serve these muffins, I suggest arranging them on a beautiful platter—maybe dusted with a sprinkle of powdered sugar for an elegant touch. Pair them with a steaming cup of coffee or tea for a cozy breakfast or snack experience. You can also slather a bit of butter or cream cheese on top for an extra indulgence.
Recipe Variations
Ready to jazz things up? Here are a few creative twists:
- Lemon Zest: Add a tablespoon of lemon zest to the batter for a citrusy pop to complement the raspberries.
- Oatmeal Crumble: Top your muffins with an oat crumble before baking for a tasty crunchy texture.
- Nutty Delight: Incorporate ½ cup of chopped nuts (like walnuts or pecans) for extra crunch.
- Peanut Butter Swirl: Create a delightful swirl by adding a spoonful of peanut butter into the batter before baking.
- Coconut Flakes: Toss in some unsweetened shredded coconut for a tropical vibe that pairs wonderfully with the raspberry!
Chef’s Notes
These muffins have evolved over the years in my kitchen! Initially, they were just a simple recipe I picked up from a friend. However, as my baking adventure continued, I started adding my personal touches—like fresh raspberries from my garden and fancy white chocolate chips. Each time I make them, I think of that sunny afternoon in my grandma’s kitchen. They’ve become a cherished recipe in my family and now a staple in yours!
FAQs and Troubleshooting
-
Why are my muffins dense?
- Dense muffins can often result from overmixing or using too much flour. Always spoon flour into your measuring cup and level it off!
-
How do I store my muffins?
- Store in an airtight container at room temperature for up to 3 days. For longer storage, freeze them in a ziplock bag for up to 3 months.
-
Can I use other berries?
- Absolutely! Blueberries, strawberries, or even blackberries work beautifully in this recipe. Just adjust the sweetness if needed!
-
What do I do if my muffins overflow?
- If this happens, it’s likely that your batter was overfilled. In the future, fill each cup about ¾ full to leave room for rising.
Nutritional Info (Optional)
While the nutritional info may vary based on your ingredient choices, each muffin is likely to contain roughly:
- Calories: 200
- Protein: 3g
- Carbohydrates: 28g
- Fat: 9g
- Sugar: 10g
Now that you have the recipe for these drool-worthy White Chocolate Raspberry Muffins, it’s time to gather those ingredients and get baking! I can’t wait for you to experience the joy and nostalgia they bring. Share your muffin-making adventures with me—I love hearing from fellow foodies! Happy baking!
PrintWhite Chocolate Raspberry Muffins
Delightful muffins that combine the rich sweetness of white chocolate with the tartness of fresh raspberries, perfect for breakfast or snack time.
- Prep Time: 15 minutes
- Cook Time: 22 minutes
- Total Time: 37 minutes
- Yield: 12 servings 1x
- Category: Dessert
- Method: Baking
- Cuisine: American
- Diet: Vegetarian
Ingredients
- 2 cups all-purpose flour (250 grams)
- ½ teaspoon salt
- 2 teaspoons baking powder
- ¾ cup granulated sugar
- 2 large eggs (at room temperature)
- ½ cup unsalted butter (melted and cooled)
- ½ cup whole milk (room temperature)
- 1½ teaspoons vanilla extract
- 6 oz raspberries (approximately 1 1/4 cups)
- ⅔ cup white chocolate chips
- Coarse sugar for topping (optional)
Instructions
- Preheat your oven to 375°F (190°C) and prepare your muffin tin by lining it with paper liners or greasing each cup.
- Mix the dry ingredients: In a medium bowl, whisk together the flour, salt, and baking powder.
- Combine the wet ingredients: In a large bowl, whisk the granulated sugar and melted butter until smooth, then add eggs, milk, and vanilla, mixing until incorporated.
- Incorporate the dry ingredients: Gradually fold the dry mixture into the wet ingredients using a spatula, being careful not to overmix.
- Add the raspberries and white chocolate chips, folding them in gently to avoid breaking the berries.
- Scoop the batter into muffin cups, filling each about ¾ full. If desired, sprinkle with coarse sugar.
- Bake for 18-22 minutes or until a toothpick comes out clean from the center.
- Cool in the tin for 5 minutes, then transfer to a wire rack to cool completely.
Notes
These muffins are best enjoyed fresh but can be stored in an airtight container for up to 3 days or frozen for up to 3 months.
Nutrition
- Serving Size: 1 muffin
- Calories: 200
- Sugar: 10g
- Sodium: 200mg
- Fat: 9g
- Saturated Fat: 5g
- Unsaturated Fat: 3g
- Trans Fat: 0g
- Carbohydrates: 28g
- Fiber: 1g
- Protein: 3g
- Cholesterol: 30mg
Keywords: muffins, dessert, raspberries, white chocolate, baking