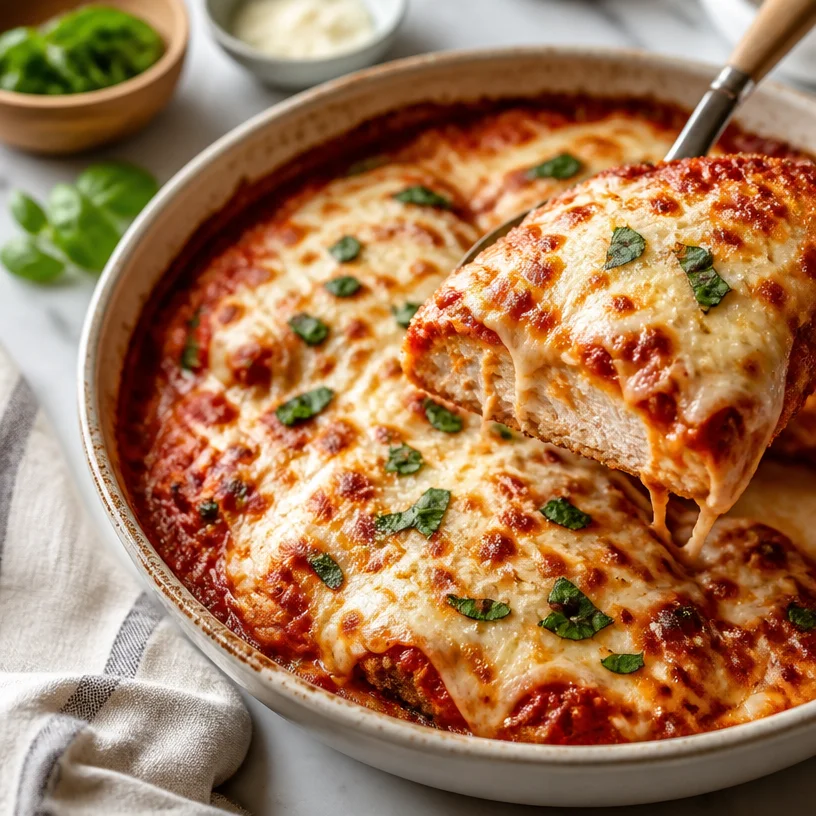
Crispy One-Pan Chicken Parmesan Bake for Busy Weeknights
Chicken Parmesan Bake: A Cozy Culinary Hug
Welcome to a delightful culinary escape with my Chicken Parmesan Bake recipe! If there’s one dish that can bring everyone together at the dinner table, it’s a warm, cheesy bake that captures the essence of comfort food while keeping it light and vibrant. Picture this: golden, crispy chicken coated in marinara sauce, topped with gooey mozzarella and sprinkled with rich Parmesan. It’s a recipe that not only satisfyingly fills your belly but also warms your heart and makes your kitchen smell heavenly!
Now, maybe you’re thinking that Chicken Parmesan is usually a daunting meal reserved for special occasions or dining out. I’m here to change that notion. This recipe embraces simplicity and flavor, making it easy for anyone, even the busiest foodies, to whip up this classic dish any day of the week. Plus, the ingredients are straightforward and won’t require you to trek to specialty stores! So, roll up those sleeves and let’s cook!
A Nostalgic Adventure in the Kitchen
As a young chef-in-training, one of my fondest memories revolves around my family’s kitchen during Sunday dinners. The aroma of basil, garlic, and something irresistibly savory wafted through the air as my mom effortlessly mixed her homemade marinara sauce. I remember standing on a stool at the counter, eagerly stirring the bubbling sauce while she layered crispy chicken in the other pan.
She’d always say, “Cooking is like creating a hug on a plate,” and as we piled cheesy goodness onto our toasted garlic bread, I realized that she was right. Those plates of Chicken Parmesan brought warmth not just from the food, but from the love that filled our home. Every bite was infused with laughter, stories, and the pure joy of being together. Now, I strive to replicate that magic in my own kitchen with this Chicken Parmesan Bake. It’s more than just a dish; it’s a celebration of love, community, and delicious food that brings people together.
Ingredients
Let’s gather our ingredients; this recipe is not only simple but packed with flavor:
Chicken
- Why it’s important: Boneless, skinless chicken breasts are the star of this dish. They’re lean, easy to cook, and perfect for soaking up marinara flavor.
- Substitution tip: You can also use chicken thighs for a juicier texture or even substitute with turkey if you prefer!
Marinara Sauce
- Why it’s essential: A good marinara sauce adds depth and flavor. You can use store-bought, but trust me, homemade is worth the extra love!
- Quick chef insight: Look for sauces that use good-quality tomatoes and have no added sugars.
Mozzarella Cheese
- Flavor profile: Melty and gooey, mozzarella provides that dream cheese pull we all crave!
- Substitution tip: If you’re feeling adventurous, try provolone or even a sprinkle of burrata for added richness.
Parmesan Cheese
- Why it’s necessary: Parmesan adds a nutty, sharp flavor that beautifully complements the other ingredients.
- Substitution tip: Grana Padano or Pecorino Romano can be great alternatives if you want a slightly different flavor profile.
Step-by-Step Instructions
Ready to get this baking adventure started? Follow these steps closely, and I promise you’ll end up with a mouthwatering Chicken Parmesan Bake that will make your taste buds dance!
Step 1: Preheat the Oven
Preheat your oven to 375°F (190°C). This is simple but crucial; we want our bake to be perfectly cooked and bubbly at the end.
Step 2: Prepare the Chicken
While the oven warms, let’s prep our chicken. Take your boneless, skinless chicken breasts and place them between two sheets of parchment paper. Grab your trusty meat mallet or rolling pin and pound the chicken to an even thickness, about ¾ inch thick. This helps them cook evenly and stay juicy!
Step 3: Season
Season both sides of the chicken breasts with salt, pepper, and a touch of Italian seasoning for that authentic flavor profile. Just a sprinkle will do, as we’ll have more flavors coming from the sauce and cheeses.
Step 4: Sauté the Chicken
In a skillet over medium-high heat, drizzle a tablespoon of olive oil. Once the oil is hot and shimmering, gently place your chicken breasts in the pan. Cook for about 4-5 minutes per side until they’re golden brown but not completely cooked through. A little bit of extra texture and color makes a huge difference!
Step 5: Assemble
All right, now for the fun part! In a baking dish, spread a thin layer of marinara sauce on the bottom to prevent the chicken from sticking. Layer the browned chicken breasts on top of the sauce. Spoon more marinara sauce over each piece, covering them generously. Go for that gorgeous, saucy goodness!
Step 6: Cheese Galore
Now, let’s add some love! Sprinkle the shredded mozzarella evenly over the chicken. Don’t be shy! Next, add a generous grating of Parmesan on top. This is where it gets real cheesy and delicious.
Step 7: Baking Magic
Cover your baking dish with aluminum foil (to keep that moisture in), and bake it in the preheated oven for about 25 minutes. After that, remove the foil and let it bake for an additional 10-15 minutes until the cheese is bubbly and golden brown. That cheese pull is worth the wait!
Step 8: Rest and Serve
Once out of the oven, allow the bake to rest for about 5-10 minutes before slicing. This gives the layers a chance to settle and makes it easier to serve.
Serving Suggestions
Now that your Chicken Parmesan Bake is ready to shine, let’s talk presentation! Serve it right from the baking dish to keep it cozy and rustic. Pair it with a fresh green salad for a light and refreshing contrast. A sprinkle of fresh basil or parsley on top adds a radiant splash of color and freshness. You could even offer some garlic bread on the side for that perfect dipping duo!
Creative Variations
Feeling adventurous? Here are a few variations to customize your Chicken Parmesan Bake:
-
Pasta Layer: Add cooked pasta, like penne or rotini, between the chicken and marinara for a heartier, family-style meal.
-
Veggie Delight: Layer sautéed spinach, zucchini, or mushrooms into the dish for added nutrients and color!
-
Spicy Kick: Stir in a pinch of crushed red pepper flakes into the marinara sauce if you like a bit of heat.
-
Herb Infusion: Try using fresh herbs like basil and oregano in the marinara sauce for an extra burst of flavor.
-
Gluten-Free Twist: Swap the traditional breadcrumbs for gluten-free breadcrumbs or almond flour for a gluten-free version that’s just as tasty!
Chef’s Notes
Ah, a little personal touch! This Chicken Parmesan Bake recipe has evolved significantly over the years. I’ve swapped ingredients based on what I have at home, experimented with different cheeses, and even tried adding unexpected touches like pesto for an Italian fusion twist. Each iteration has reminded me of the beauty of cooking: it’s about experimenting, discovering what works, and, above all, enjoying the process!
And, speaking of processes, one time I tried to rush things and ended up baking it without the foil. Let’s just say that I nearly set off the smoke alarm! So, a friendly reminder—don’t skip that foil; it keeps everything deliciously moist and helps achieve that golden crust we all admire.
FAQs and Troubleshooting
1. My chicken is dry! What went wrong?
Dry chicken usually means it was overcooked. Keep an eye on your chicken as oven temperatures can vary. Using a meat thermometer can help! Chicken is safe to eat at 165°F (74°C).
2. Can I prep this dish ahead of time?
Absolutely! You can assemble everything, cover tightly, and store it in the refrigerator for up to 24 hours. Just add an extra 10-15 minutes to the baking time if it’s cold from the fridge.
3. What if I don’t have mozzarella?
Feel free to substitute with any cheese that melts well, like Gouda or Monterey Jack. Just keep in mind the flavor profile will change slightly.
4. How do I store leftovers?
Store any leftovers in an airtight container in the refrigerator for up to 3 days. Reheat in the oven for the best results or in the microwave if you’re in a hurry!
Nutritional Info
While I’m all about enjoying food without restrictions, here’s some general nutritional info to keep in mind:
- Calories: Approximately 400-500 calories per serving, depending on portion sizes and ingredients used.
- Protein: Rich in protein thanks to chicken and cheese.
- Fat: Includes healthy fats from olive oil and cheese, which can be adjusted based on preferences.
So there you have it—my Chicken Parmesan Bake recipe that’s not just a dish; it’s a story of love, nostalgia, and vibrant flavors all wrapped up in one easy-to-make meal. I hope you enjoy cooking it as much as I enjoyed sharing this little slice of my kitchen life with you! Happy cooking, food lovers, and let’s keep keepin’ it fresh, simple, and quite delicious!
PrintChicken Parmesan Bake

A warm and cheesy Chicken Parmesan Bake that brings comfort to any dinner table, featuring crispy chicken, marinara, and gooey cheeses.
- Prep Time: 15 minutes
- Cook Time: 35 minutes
- Total Time: 50 minutes
- Yield: 4 servings 1x
- Category: Main Course
- Method: Baking
- Cuisine: Italian
- Diet: Gluten-Free
Ingredients
- 4 boneless, skinless chicken breasts
- 2 cups marinara sauce
- 2 cups shredded mozzarella cheese
- ½ cup grated Parmesan cheese
- 1 tablespoon olive oil
- Salt and pepper to taste
- 1 teaspoon Italian seasoning
Instructions
- Preheat your oven to 375°F (190°C).
- Prepare the chicken by placing it between two sheets of parchment paper and pounding it to an even thickness of about ¾ inch.
- Season both sides of the chicken with salt, pepper, and Italian seasoning.
- Sauté the chicken in a skillet over medium-high heat with olive oil for about 4-5 minutes per side until golden brown.
- Assemble the dish by spreading marinara sauce in a baking dish and layering the chicken on top.
- Spoon more marinara sauce over each chicken piece.
- Add mozzarella and Parmesan cheese over the chicken.
- Bake covered with foil for 25 minutes, then uncover and bake for another 10-15 minutes until bubbly and golden.
- Rest for 5-10 minutes before slicing and serving.
Notes
For a heartier meal, consider adding cooked pasta between the chicken and marinara. Don’t forget to cover with foil to maintain moisture while baking!
Nutrition
- Serving Size: 1 serving
- Calories: 450
- Sugar: 6g
- Sodium: 700mg
- Fat: 18g
- Saturated Fat: 8g
- Unsaturated Fat: 8g
- Trans Fat: 0g
- Carbohydrates: 30g
- Fiber: 2g
- Protein: 35g
- Cholesterol: 80mg
Keywords: Chicken Parmesan, Bake, Comfort Food, Italian Dish, Dinner
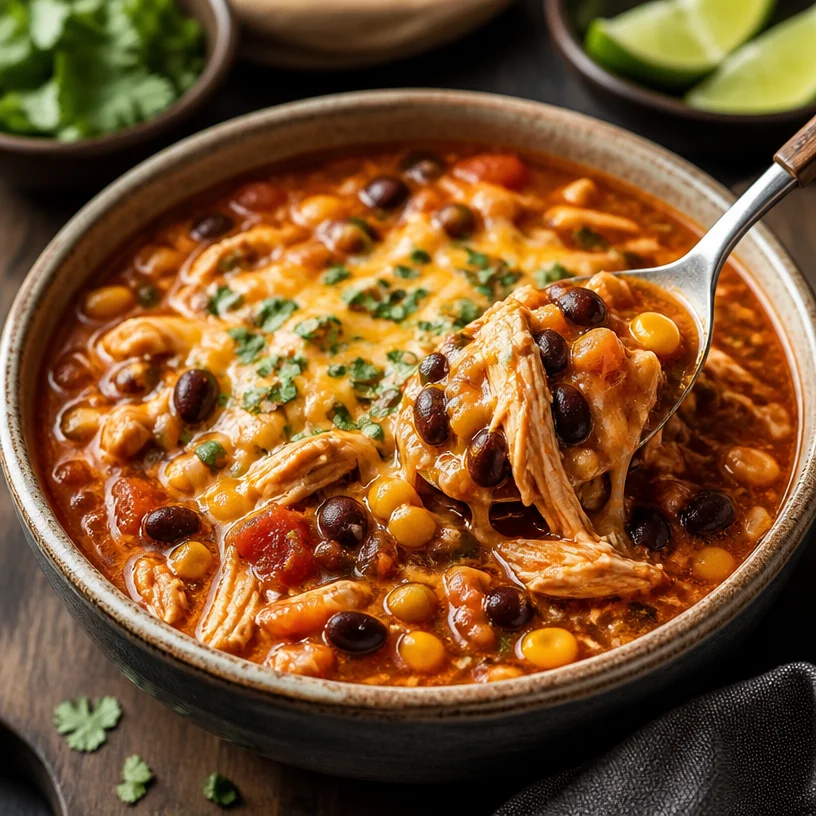
One-Pot Chicken Enchilada Soup: 30-Minute Weeknight Comfort
Cozy Up with This Flavorful Chicken Enchilada Soup
Hey there, fellow food lovers! Today, I’m super excited to share a recipe that has become a cozy essential in my kitchen — Chicken Enchilada Soup. This delicious dish perfectly captures the vibrant flavors of Mexican cuisine while also being loaded with wholesome ingredients. It’s warm, comforting, and oh-so-easy to whip up.
Imagine coming home after a long day; the aroma of spicy, savory soups wafts through your kitchen, and suddenly, life feels just a little bit sweeter. That’s exactly how this Chicken Enchilada Soup makes me feel. If you’re anything like me, food isn’t just about nourishment; it’s about experiences, comfort, and connection. That’s why I think you’re going to love this recipe even more when I share a little backstory with you.
A Soupy Memory Lane
Let me take you on a little stroll down memory lane. I have vivid memories of my grandmother bustling around the kitchen during family gatherings, her energy infectious as she cooked up a storm. One of the highlights was when she pulled out her famous enchiladas, wrapping them up snugly and baking away—sometimes, we had to wait, but the anticipation only made the food taste better.
One chilly evening, she decided to switch things up and make a soup instead. It was such a hit, combining the comfort of those warm enchiladas with a thick, hearty broth. Everyone raved about it, and that evening turned into a yearly tradition for our family. Fast forward a few years, and I’ve created my own rendition that brings all those nostalgic vibes right back. It’s a warm hug in a bowl that’s also incredibly easy to throw together on a weeknight.
Ingredients
Now, let’s dive into the lineup of ingredients that come together to make this hearty Chicken Enchilada Soup. I promise you, the flavor is downright addictive!
-
Chicken: I typically use boneless, skinless chicken breasts or thighs. If you want more flavor, feel free to use rotisserie chicken—just shred it up, and you’re good to go!
-
Enchilada Sauce: Homemade or store-bought—your choice! If you want to amp up the heat, try a spicy enchilada sauce or a green variety for a twist.
-
Beans: I love using black beans for their flavor and protein, but pinto beans work beautifully as well. Drain and rinse to get rid of excess sodium!
-
Corn: Fresh, frozen, or canned corn adds a sweet crunch. If you’re feeling adventurous, try adding roasted corn for some smoky goodness!
-
Onion and Garlic: Essential aromatics! They add depth and flavor to your soup. For a milder taste, sauté shallots instead.
-
Veggies: Bell peppers, jalapeños, or even zucchini can add more flavor and nutrition. Just chop them up and toss them in!
-
Chicken Broth: Use low-sodium chicken broth to control the salt levels. Vegetable broth is a great alternative if you want to keep it plant-based.
-
Cilantro: A fresh garnish that brings brightness. Not a fan? Try green onions or avocado as alternate toppings!
Step-by-Step Instructions
Alright, let’s roll up our sleeves and get cooking. Here’s your step-by-step guide to making this mouthwatering Chicken Enchilada Soup:
-
Prep Your Ingredients: Gather all your ingredients. Chop the onion, garlic, and any additional veggies you’re using. Shred the chicken if you’re using a rotisserie. This makes cooking smoother and quicker—not to mention more fun!
-
Sauté the Aromatics: In a large pot, heat a little olive oil over medium heat. Add the chopped onion and sauté for about 3-4 minutes, until it turns translucent. Toss in minced garlic and sauté for another minute. The smell is heavenly, isn’t it?
-
Cook the Chicken: If you’re using raw chicken, add it to the pot and cook for 5-7 minutes, stirring occasionally, until it’s no longer pink. You can also season it with a pinch of salt and pepper at this stage for more flavor.
-
Mix in the Veggies: Add any additional chopped veg at this point, like bell peppers or jalapeños. Sauté for another 2-3 minutes to start softening them up.
-
Add Sauces and Broth: Pour in the enchilada sauce and then the chicken broth. Stir to combine everything. Allow this to simmer for about 15 minutes. You can add a bay leaf for extra flavor—just remember to remove it before serving!
-
Beans and Corn: Stir in the black beans and corn, and let the soup simmer for another 10 minutes. The combination of flavors at this stage is simply divine!
-
Shred the Chicken: If you used whole chicken, now’s the time to shred it right in the pot with two forks. If you’re feeling fancy, use an immersion blender for a creamier texture, but that’s totally optional!
-
Final Touches: Taste your soup and adjust seasonings as needed. Maybe a pinch of cumin or some more salt and pepper to really pull together the flavors.
-
Garnish It Up: Ladle the soup into bowls and get ready to serve! A sprinkle of fresh cilantro, avocado slices, or a dollop of sour cream makes this dish pop visually and flavor-wise.
Serving Suggestions
Serve this Chicken Enchilada Soup hot, straight from the pot to a hearty bowl. It pairs wonderfully with crispy tortilla chips for crunch or a side of cornbread that can soak up the flavors. You can also offer a little lime wedge for folks to squeeze a hint of brightness on top—it complements the rich flavors beautifully!
Recipe Variations
Feeling adventurous? Here are some fun twists to take your Chicken Enchilada Soup to a whole new level:
-
Vegetarian Version: Swap chicken with chickpeas or extra veggies for a plant-based delight. Just make sure your enchilada sauce is vegetarian-friendly!
-
Spicy Kick: Add diced jalapeños or a splash of hot sauce if you like a little heat!
-
Creamy Style: Stir in a bit of cream cheese or heavy cream at the end to make it ultra-creamy—that’s total comfort food!
-
Taco Inspired: Add taco seasoning for a different flavor profile or top with cheese and bake until bubbling for a cheesy enfolding.
-
Coconut Twist: For a unique flavor, add a can of coconut milk for richness and a hint of sweetness.
Chef’s Notes
As a chef, I love to experiment, and this recipe has seen plenty of twists over the years! Sometimes I toss in leftover veggies from the fridge, and other times, I make it a bit spicy for my friends who love heat. No matter how I make it, the best part is sharing it with others—friends, family, or even a cozy night in. This soup reminds me that food is not just about nourishment; it’s about creating connections, memories, and, of course, good vibes!
FAQs and Troubleshooting
I don’t have enchilada sauce. Can I use something else?
Absolutely! You can use salsa or even taco sauce in a pinch. Just keep an eye on the spice levels!
My soup is too thick. What can I do?
Add more broth or water, little by little, until you reach your desired consistency. Soup should be fluid and delightful, after all!
How long can I store this in the fridge?
The soup keeps well in the fridge for about 3-4 days. Just reheat before enjoying, but I bet it won’t last that long in your house!
Can I freeze Chicken Enchilada Soup?
Yes, indeed! Just cool it completely, then transfer it to freezer-safe bags or containers. It can last up to 2-3 months, but make sure to leave some space for expansion!
So, are you ready to embrace the warmth and comfort of this Chicken Enchilada Soup? Grab your ingredients, follow this simple guide, and let the aroma of deliciousness fill your kitchen. I can’t wait for you to dig in, savor each bite, and create a few memories of your own along the way. Happy cooking!
PrintChicken Enchilada Soup

A warm and comforting Chicken Enchilada Soup that captures the vibrant flavors of Mexican cuisine.
- Prep Time: 15 minutes
- Cook Time: 30 minutes
- Total Time: 45 minutes
- Yield: 4 servings 1x
- Category: Soup
- Method: Stovetop
- Cuisine: Mexican
- Diet: Non-Vegetarian
Ingredients
- 2 cups boneless, skinless chicken breasts or thighs
- 2 cups enchilada sauce
- 1 can black beans, drained and rinsed
- 1 cup corn (fresh, frozen, or canned)
- 1 onion, chopped
- 3 cloves garlic, minced
- 1 bell pepper, chopped
- 1 jalapeño, chopped (optional)
- 4 cups low-sodium chicken broth
- 1/4 cup fresh cilantro, for garnish
Instructions
- Prep your ingredients: Gather all your ingredients. Chop the onion, garlic, and any additional veggies you’re using.
- Sauté the aromatics: In a large pot, heat a little olive oil over medium heat. Add the chopped onion and sauté for 3-4 minutes.
- Cook the chicken: If you’re using raw chicken, add it to the pot and cook for 5-7 minutes, stirring occasionally.
- Mix in the veggies: Add any additional chopped veg at this point. Sauté for another 2-3 minutes.
- Add sauces and broth: Pour in the enchilada sauce and the chicken broth. Stir to combine and let simmer for about 15 minutes.
- Stir in the beans and corn: Let the soup simmer for another 10 minutes.
- Shred the chicken: Shred the chicken right in the pot with two forks.
- Garnish it up: Serve the soup hot with fresh cilantro and optional toppings.
Notes
Add a squeeze of lime for brightness and serve with tortilla chips for crunch.
Nutrition
- Serving Size: 1 bowl
- Calories: 350
- Sugar: 5g
- Sodium: 800mg
- Fat: 12g
- Saturated Fat: 3g
- Unsaturated Fat: 6g
- Trans Fat: 0g
- Carbohydrates: 40g
- Fiber: 8g
- Protein: 25g
- Cholesterol: 70mg
Keywords: Chicken, Enchilada, Soup, Mexican Cuisine, Comfort Food
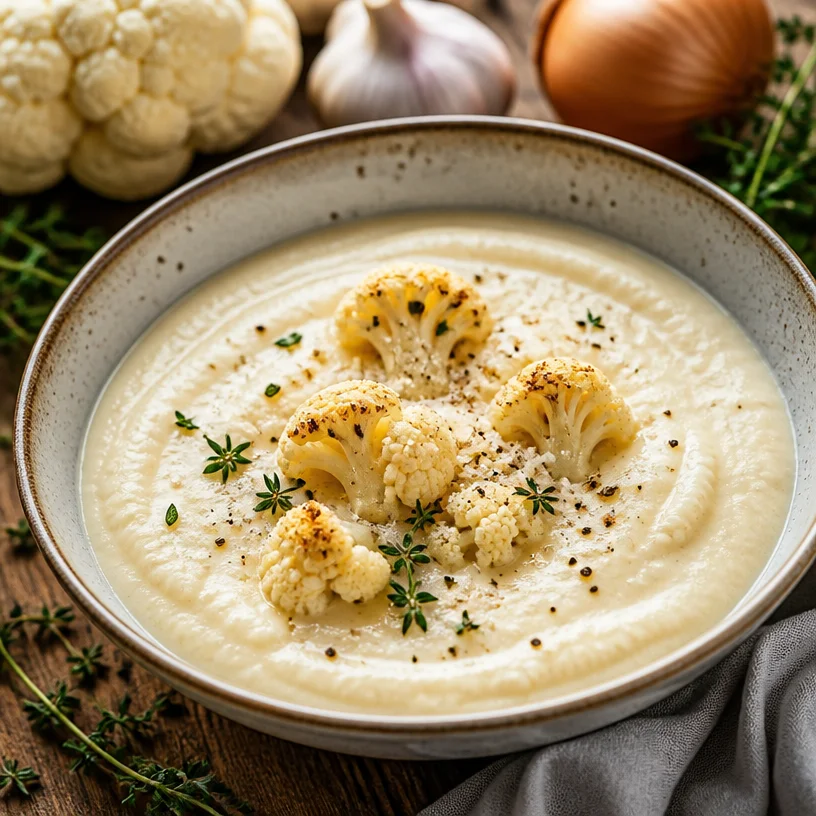
Weeknight 30-Minute Creamy Cauliflower Soup (One-Pot)
Creamy Cauliflower Soup: A Cozy Delight
Welcome, soup lovers! Today, we’re diving into a dish that’s perfect for cozy nights, quick lunches, or whenever you need a little comfort in a bowl. I’m thrilled to share my recipe for Creamy Cauliflower Soup—a dreamy fusion of flavors that’s as nourishing as it is satisfying.
Let’s start with a truth: if you’ve ever thought that healthy eating means skimping on flavor, I’m here to change your mind! This soup proves that you can enjoy indulgent, creamy textures without feeling like you’re overdoing it. So grab your apron, and let’s get cooking!
A Memory to Warm Your Heart
As I think back on the first time I made creamy cauliflower soup, I can’t help but smile at the memory. It was a chilly Saturday afternoon—I was lazily wandering through the local farmer’s market, and the scent of roasted vegetables filled the air. I spotted a towering pile of fresh, splendid cauliflowers that beckoned me.
Fueled by inspiration, I bought one and hurried home. As the soup simmered on the stove, the aroma wafted through my tiny kitchen, instantly transforming the space into a cozy haven of warm flavors. I tossed in sautéed onions and garlic, and before I knew it, my friends had arrived, drawn in by the tantalizing scent.
What started as a simple recipe evolved into a lively kitchen gathering filled with laughter, stories, and plenty of bread for dipping. It was a reminder that food not only nourishes our bodies but also brings people together. That first pot of creamy cauliflower soup became our go-to comfort dish, and I bet it will become yours too!
Ingredients You’ll Need
Here’s what you’ll need to whip up this delightful creamy cauliflower soup:
-
1 medium head of cauliflower
Cauliflower forms the base of this soup and provides a lovely, creamy texture when blended. Choose a fresh one with firm florets for the best flavor. If you’re feeling adventurous, you can substitute with broccoli or even a mix of both! -
1 medium onion, chopped
Onions add depth and sweetness to the soup. A yellow onion works perfectly, but a shallot or even a red onion can add a nice twist. -
3 cloves of garlic, minced
Garlic is essential for flavor! Freshly minced garlic offers the best taste, but you can use pre-minced or garlic powder in a pinch. -
2 cups vegetable or chicken broth
This adds moisture and enhances the soup’s flavor. Either homemade or store-bought works; just aim for low-sodium versions if you’re watching your salt intake. -
1 cup heavy cream
Cream gives the soup that luxurious quality. If you’re looking for a lighter option, you can swap it for coconut milk or even cashew cream for a vegan alternative. -
Salt and pepper to taste
These seasonings are essential! They help elevate the flavors in the soup. Remember, you can always add more, but you can’t take it away.
Cooking Up a Storm: Step-by-Step Instructions
Ready to create some magic in the kitchen? Let’s walk through the steps!
-
Prep Your Ingredients
Start by chopping your onion and mincing the garlic. Cut the cauliflower into bite-sized florets, ensuring they’re roughly the same size for even cooking. Lay everything out in an organized fashion—trust me, it makes the process smoother! -
Sauté the Aromatics
In a large pot over medium heat, drizzle a touch of olive oil. Once it’s shimmering, toss in the onions. Sauté for about 5 minutes until they’re translucent and gently softened. Stir in the minced garlic and sauté for an additional minute until fragrant. Pro tip: Don’t let the garlic burn; it turns bitter! -
Blanch the Cauliflower
Add your cauliflower florets to the pot and give them a mix with the onions and garlic for about 2-3 minutes, allowing them to soak up that delicious flavor. -
Add Broth and Simmer
Pour in the vegetable or chicken broth, ensuring that the cauliflower is mostly submerged. Bring everything to a gentle boil, then reduce to a simmer. Cover the pot and let it cook for about 15 minutes or until the cauliflower is tender when pierced with a fork. -
Blend It Up!
After 15 minutes of simmering, it’s time to blend. If you have an immersion blender, use that for ease. Otherwise, carefully transfer the soup in batches to a blender (be cautious of the hot liquid!). Blend until super smooth and creamy. This step is where the magic happens! -
Create the Creamy Texture
Return the soup to the pot. Stir in the heavy cream (or your chosen substitute) and season generously with salt and pepper. Heat the soup gently over low heat, allowing it to meld together for a few minutes—don’t let it boil! -
Taste and Adjust
Take a moment to taste your soup. This is where you can really make it your own—add additional seasoning, squeeze in some lemon juice for brightness, or even stir in some freshly chopped herbs for a flavor kick!
Serving Suggestions
Serve your creamy cauliflower soup in warm bowls, garnished with a drizzle of olive oil, a sprinkle of freshly cracked pepper, or some chopped fresh herbs. It pairs wonderfully with crusty bread or a vibrant green salad for a complete meal. The goal is to make it inviting and delicious, just like you would find in a cozy café!
Recipe Variations
Feel free to get creative with these variations:
-
Spicy Cauliflower Soup: Add a pinch of red pepper flakes or some diced jalapeños for a spicy kick.
-
Herbed Cauliflower Soup: Sprinkle in fresh herbs like thyme, rosemary, or parsley during the cooking process to infuse the flavors further.
-
Cheesy Version: Stir in some freshly grated Parmesan cheese at the end for a rich, cheesy flavor.
-
Curried Cauliflower Soup: Add a tablespoon of curry powder when you sauté the onions for an aromatic twist.
-
Vegan Delight: Swap heavy cream with coconut milk and use vegetable broth for a fully plant-based version.
Chef’s Notes
Over the years, this creamy cauliflower soup has morphed into my kitchen’s unsung hero! I’ve served it at dinner parties, cozy gatherings, and even enjoyed it as a quick lunch straight from the pot while wearing my comfiest pajamas. It’s the kind of recipe that evolves with each batch; sometimes, I add different spices or even a little bit of smoked paprika for a deeper flavor. The beauty of this soup is that it welcomes creativity!
Funny enough, I’ve even had moments where I forgot to buy heavy cream and ended up blending in silken tofu for a creaminess that turned out to be a happy accident.
FAQs and Troubleshooting
-
Why is my soup grainy?
If your soup comes out grainy, it might be because the cauliflower was not blended thoroughly. Ensure you blend until it’s incredibly smooth. Also, using an immersion blender can help create the perfect texture! -
Can I freeze the soup?
Absolutely! This soup freezes beautifully. Just cool it completely, and then transfer it to an airtight container. When you’re ready to eat, thaw it in the fridge overnight and reheat on the stove. -
What if I don’t have enough cauliflower?
No problem! You can bulk it up with other vegetables like potatoes, carrots, or parsnips. Just remember that the cooking times may vary, so adjust accordingly! -
How can I make it thicker?
If you prefer a thicker soup, you can either add more cauliflower or blend in a potato. Alternatively, let it simmer without the lid to reduce liquid more rapidly.
Nutritional Info
This creamy cauliflower soup is not only comforting but also packed with nutrients. Cauliflower is low in calories while high in fiber and vitamins C and K. When enjoyed with a side of fresh bread or a healthy salad, you’ll find it’s the perfect meal to support overall well-being.
So there you have it! A creamy cauliflower soup that’s as uplifting as a warm hug on a cool day. I hope you enjoy creating your own version of this comforting classic. Happy cooking!
PrintCreamy Cauliflower Soup
A creamy and comforting cauliflower soup that’s perfect for cozy nights and quick lunches.
- Prep Time: 10 minutes
- Cook Time: 20 minutes
- Total Time: 30 minutes
- Yield: 4 servings 1x
- Category: Soup
- Method: Blending
- Cuisine: American
- Diet: Vegetarian
Ingredients
- 1 medium head of cauliflower
- 1 medium onion, chopped
- 3 cloves of garlic, minced
- 2 cups vegetable or chicken broth
- 1 cup heavy cream
- Salt and pepper to taste
Instructions
- Prep your ingredients: chop the onion, mince the garlic, and cut the cauliflower into florets.
- Sauté the aromatics: in a pot, heat olive oil, then add onions and sauté until translucent. Stir in garlic and sauté for an additional minute.
- Blanch the cauliflower: add cauliflower florets to the pot and mix for 2-3 minutes.
- Add broth and simmer: pour in broth, bring to a boil, then reduce heat; cover and cook for 15 minutes.
- Blend it up: use an immersion blender or transfer soup to a blender and purée until smooth.
- Create the creamy texture: return blended soup to pot, stir in heavy cream, and season with salt and pepper.
- Taste and adjust seasoning as desired.
Notes
Serve garnished with olive oil, pepper, or herbs, and enjoy with crusty bread.
Nutrition
- Serving Size: 1 bowl
- Calories: 250
- Sugar: 4g
- Sodium: 600mg
- Fat: 20g
- Saturated Fat: 10g
- Unsaturated Fat: 8g
- Trans Fat: 0g
- Carbohydrates: 18g
- Fiber: 5g
- Protein: 6g
- Cholesterol: 40mg
Keywords: cauliflower soup, creamy soup, vegetarian soup
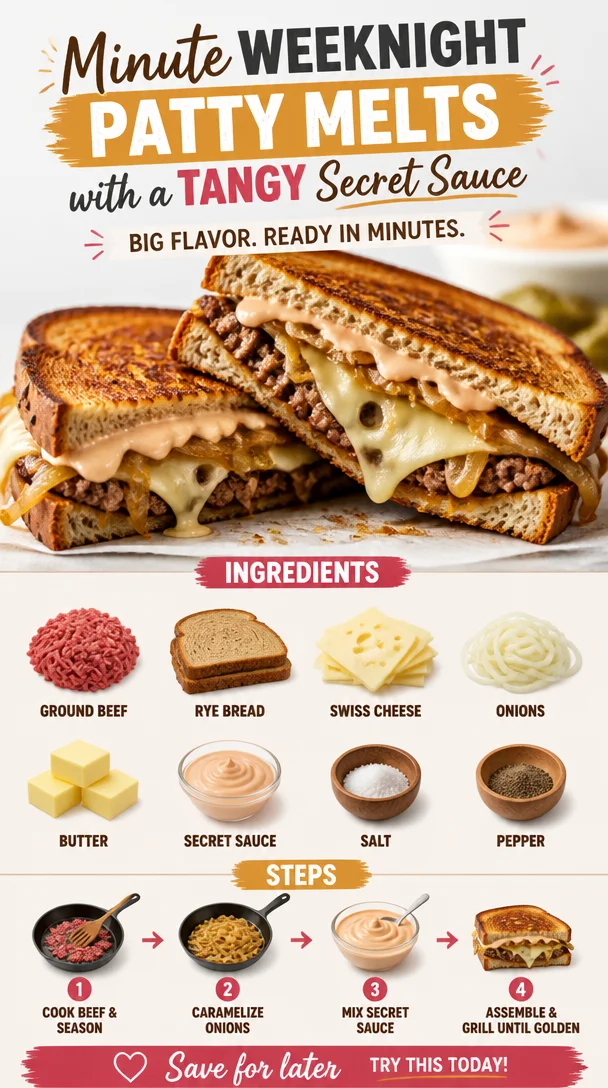
Minute Weeknight Patty Melts with a Tangy Secret Sauce
Patty Melts with Secret Sauce: A Nostalgic Twist on a Classic
Welcome to Clean Plate Cravings! Today, I’ve got a dish in store that’ll warm your heart and tickle your taste buds: Patty Melts with Secret Sauce. If you’ve never tried one of these savory delights, get ready to embark on a delicious journey that blends juicy beef, melty cheese, and a special sauce that’ll have you licking your plate clean.
As a cook, food is more than just nourishment; it’s about gathering around the table, sharing stories, and connecting with loved ones. I think of patty melts as the ultimate comfort food, a classic diner dish that reminds us of simpler times. Imagine sinking your teeth into the crisp, golden rye bread, followed by the rich flavors of perfectly seasoned beef and gooey Swiss cheese—all brought together with a secret sauce that hits the spot every time.
In this blog post, not only will we dive into how to whip up these mouthwatering patty melts, but I’ll also share a personal memory that makes this recipe even more special to me. So grab your apron and let’s get cooking!
A Personal Story
Let me take you back to my childhood. Growing up, weekends in my family were synonymous with cozy kitchen gatherings and comfort food. My dad had this knack for creating simple yet satisfying meals, often involving whatever was in the fridge, and one of our family favorites was his version of the patty melt. I still remember him standing at the stovetop, tendrils of steam wafting up as he grilled the patties to juicy perfection, the sizzle of the onions filling the air with an aroma that had us all eagerly hovering around the kitchen.
He’d make this secret sauce that was a mix of ketchup, mayonnaise, and mustard—a combination that, funny enough, still makes my mouth water just thinking about it! We’d pile everything between thick slices of buttery rye bread, and just like that, the world was right. It was those simple moments—sharing hearty food, laughter, and stories—that ignited my passion for cooking. Fast forward to today, and I’ve adapted that classic recipe to include my own twists, but the soul of those family dinners remains embedded in each melt I create.
Ingredients
To make these delicious patty melts, you’ll need the following ingredients:
-
Ground Beef: The star of our show! Choose a good quality ground beef (80/20 is ideal for flavor and juiciness). If you want a leaner option, turkey or chicken can be used as substitutes, but they might require some adjustments to keep them moist.
-
Rye Bread: Its distinctive flavor pairs so well with the beef and cheese. Feel free to swap it for sourdough or whole wheat, depending on your preference.
-
Swiss Cheese: We’re going for that creamy, melty goodness! If Swiss isn’t your thing, try provolone or cheddar for a different flavor profile.
-
Onions: Sweet, caramelized onions are a must for depth of flavor. You can swap them out for shallots or omit them altogether, but honestly—don’t skip this step!
-
Butter: We’ll use butter to toast the bread to a golden crisp. For a dairy-free option, you can utilize olive oil or vegan butter.
-
Secret Sauce: Mix mayonnaise, ketchup, and mustard to create this flavor-packed sauce. Feel free to tweak the ratios to match your taste, or even add a pinch of garlic powder for an extra kick.
-
Salt and Pepper: Essential for seasoning our beef. Remember, seasoning can be adjusted as per your preference.
Here’s the quick pro tip: prep all your ingredients before you start assembling. This makes everything a breeze and ensures you won’t have to scramble around the kitchen!
Step-by-Step Instructions
Now that we’ve got our ingredients lined up, let’s dive into how to make these patty melts:
-
Prepare the Secret Sauce:
- In a small bowl, mix ¼ cup mayonnaise, 2 tablespoons ketchup, and 1 tablespoon mustard. Adjust the ratios as needed to suit your taste. This sauce will add a delicious creaminess and tanginess to the final dish.
-
Caramelize the Onions:
- Heat a tablespoon of butter in a skillet over medium heat. Add thinly sliced onions (about 1 large onion will do) and a pinch of salt.
- Cook them slowly for about 15-20 minutes, stirring occasionally until they become golden brown and soft. This is where the magic happens; your kitchen will smell divine!
-
Shape the Patties:
- While the onions are caramelizing, take 1 pound of ground beef and divide it into four equal portions. Shape them into patties—slightly larger than your bread since they’ll shrink while cooking. Season each patty with salt and pepper.
-
Cook the Patties:
- In the same skillet (if there’s enough room, otherwise grab another), heat it over medium-high heat. Add a bit more butter if needed.
- Cook your patties for about 4 minutes on one side. Flip them over, add a slice of Swiss cheese on top, and cook for another 3-4 minutes until they reach your desired doneness (medium is ideal for flavor).
-
Toast the Bread:
- While the patties are cooking, in a separate skillet, butter one side of each rye bread slice (2 slices per sandwich). Toast them face down until golden brown—about 3 minutes.
-
Assemble the Patty Melt:
- On the unbuttered side of one slice of toasted rye, spread a generous layer of the secret sauce. Place your cheesy patty on top, followed by a spoonful of those luscious caramelized onions. Add another slice of cheese if you’re feeling indulgent!
- Top it with a second slice of bread, buttered side up.
-
Grill the Patty Melt:
- Place the sandwich back in the skillet and grill it on medium heat until the bread is golden brown and crispy, about 3-4 minutes per side. Press down lightly with a spatula to ensure it grills evenly and the cheese melts perfectly.
-
Slice & Serve:
- Once your patty melt is ready, remove it from the skillet and allow it to rest for a minute—if you can resist! Slice it in half diagonally and see that glorious cheese stretch!
Serving Suggestions
To serve your patty melts, plate them up with some crispy, seasoned fries or a fresh green salad. Garnish with pickle spears for that extra crunch and zing. You could also drizzle a little extra secret sauce on the side for dipping, because who doesn’t love a good dip?
Recipe Variations
Feeling adventurous? Here are some creative twists on the classic patty melt:
-
Veggie Patty Melt: Swap out the beef for black bean or lentil patties for a plant-based delight.
-
Spicy Kick: Add jalapeños or sriracha to your secret sauce for a fiery version that’ll wake up your taste buds.
-
Mushroom & Swiss: Sauté some mushrooms along with the onions for an earthy flavor that complements the Swiss cheese beautifully.
-
Different Cheeses: Experiment with gouda, blue cheese, or a spicy pepper jack for a unique cheesy experience.
-
French Onion Patty Melt: Top with a bit more of that caramelized onion and a sprinkle of beef broth when cooking for a French onion flair.
Chef’s Notes
As I reflect on how this recipe has evolved over time, I realize that what I love most about cooking is the freedom to change things up based on inspiration, seasonality, and, let’s face it, pantry odds and ends. I’ll admit, there have been kitchen mishaps—like the time I accidentally grabbed paprika instead of garlic powder for the sauce (yikes!). But those moments are what make us better cooks.
As you embark on your own culinary journey, embrace the joys and mishaps alike. Whether you make this recipe just as I’ve shared or give it your own twist, what truly matters is the love you put into it and the smiles it brings around your table.
FAQs and Troubleshooting
1. My patties fell apart while cooking. What went wrong?
- This can happen if there isn’t enough fat in the meat or if they aren’t packed tightly enough. Ensure you’re using ground beef with enough fat content (like 80/20) or try chilling the patties for 15 minutes before cooking to help them hold their shape.
2. How can I tell when the beef is cooked through?
- The best way to check for doneness is to use a meat thermometer. Ground beef should reach an internal temperature of 160°F. If you don’t have one, a good indication is when the juices run clear, and the patty is brown in the center.
3. Can I make these in advance?
- Absolutely! You can prep the patties and onions ahead of time and store them in the fridge. Just give them a quick grill on a busy weeknight for an easy dinner.
4. What if I don’t have rye bread?
- No problem! Substitute with whatever bread you have on hand. Sourdough or whole grain will work just fine.
Nutritional Info
Each patty melt can vary based on ingredients, but on average, one serving (one melted sandwich) contains roughly:
- Calories: 600-700
- Protein: 30-35g
- Fat: 40-45g
- Carbohydrates: 40-50g
(If you want a more precise breakdown, consider using a nutrition calculator based on the exact ingredients you use!)
Embrace the creativity that comes with cooking, and don’t shy away from making this patty melt your own. Whether it’s for a cozy night in or a backyard gathering with friends, these patty melts with secret sauce are sure to impress. Happy cooking, and here’s to many delicious memories in the kitchen!
PrintPatty Melts with Secret Sauce

A nostalgic twist on the classic patty melt, featuring juicy beef, melty cheese, and a delicious secret sauce.
- Prep Time: 15 minutes
- Cook Time: 30 minutes
- Total Time: 45 minutes
- Yield: 4 servings 1x
- Category: Main Course
- Method: Grilling
- Cuisine: American
- Diet: Non-Vegetarian
Ingredients
- 1 pound ground beef (80/20)
- 4 slices rye bread
- 4 slices Swiss cheese
- 1 large onion, thinly sliced
- 2 tablespoons butter
- ¼ cup mayonnaise
- 2 tablespoons ketchup
- 1 tablespoon mustard
- Salt and pepper to taste
Instructions
- Prepare the Secret Sauce: In a small bowl, mix ¼ cup mayonnaise, 2 tablespoons ketchup, and 1 tablespoon mustard. Adjust the ratios as needed to suit your taste.
- Caramelize the Onions: Heat a tablespoon of butter in a skillet over medium heat. Add sliced onions and a pinch of salt. Cook slowly for about 15-20 minutes, stirring occasionally until golden brown.
- Shape the Patties: Divide the ground beef into four equal portions and shape them into patties slightly larger than the bread.
- Cook the Patties: In the skillet, cook the patties for 4 minutes on one side, flip, and add Swiss cheese. Cook for another 3-4 minutes until desired doneness.
- Toast the Bread: Butter one side of each rye bread slice and toast them face down in a separate skillet until golden brown, about 3 minutes.
- Assemble the Patty Melt: On the unbuttered side of one slice, spread secret sauce. Place the cheese-covered patty on top, add caramelized onions, and another slice of cheese. Top with a second slice of bread, buttered side up.
- Grill the Patty Melt: Grill the sandwich in the skillet until it’s golden brown and crispy, about 3-4 minutes per side.
- Slice & Serve: Remove from skillet, let rest, slice in half, and serve!
Notes
For a dairy-free option, use olive oil or vegan butter. You can use different breads like sourdough or whole wheat if preferred.
Nutrition
- Serving Size: 1 sandwich
- Calories: 650
- Sugar: 5g
- Sodium: 800mg
- Fat: 45g
- Saturated Fat: 18g
- Unsaturated Fat: 20g
- Trans Fat: 0g
- Carbohydrates: 40g
- Fiber: 2g
- Protein: 32g
- Cholesterol: 75mg
Keywords: patty melt, comfort food, secret sauce, classic recipe, nostalgic food
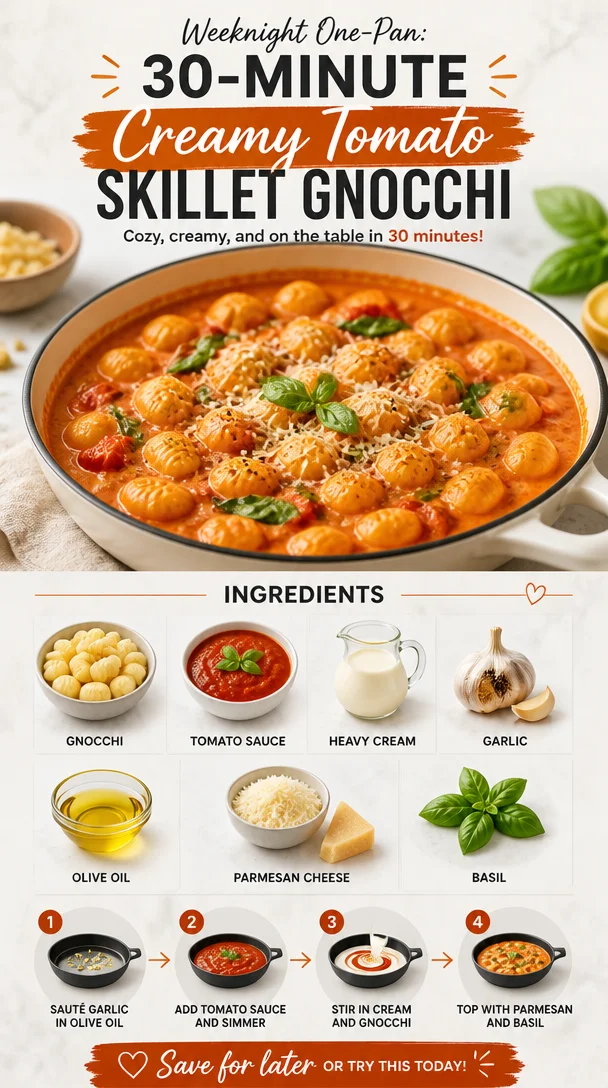
Weeknight One-Pan: 30-Minute Creamy Tomato Skillet Gnocchi
30-Minute Creamy Tomato Gnocchi: A Wholesome Comfort in Every Bite
Welcome, food lovers! If you’re looking for a quick, comforting meal that packs a ton of flavor and feels downright indulgent, you’ve landed in the right spot. Today, we’re diving into the world of creamy tomato gnocchi, a dish that not only satisfies your cravings but also warms your heart. With velvety textures and vibrant colors, this dish is your ticket to a cozy night in or a delightful dinner party.
But let’s be real; this creamy wonder can be on your table in just 30 minutes! Yes, you heard that right—30 minutes from prep to plate. In our busy lives, it’s so easy to feel like home-cooked meals are just too much of a hassle. Well, let’s change that narrative, shall we? You can whip up a dish that feels like a warm hug, all while juggling work, family, and the never-ending to-do list.
What’s even better is that this recipe brings together some of my favorite ingredients. Picture yourself savoring pillowy gnocchi coated in a luscious tomato sauce enriched with heavy cream, garlic, and just a sprinkle of parmesan cheese. Add a twirl of fresh basil, and you have a beautiful dish that invites everyone to sit down and enjoy.
Speaking of beauty, there’s something so nostalgic about gnocchi. It reminds me of lazy Sunday afternoons spent in the kitchen, where the biggest decision was whether to go with marinara or Alfredo sauce, and all sides involved were happy with whatever choice was made. So let’s roll up our sleeves, grab those ingredients, and find out how to make this delightful dish!
A Nostalgic Spin
Let me take you back for a moment. My first experience with gnocchi was in my grandmother’s cozy kitchen, where the air was always filled with the smell of fresh garlic and simmering tomatoes. She had a knack for making everything from scratch. I remember standing on my little stool beside her as we rolled out the dough, her seasoned hands guiding me through the art of creating those adorable little dumplings.
My favorite part? The impromptu taste tests! She would always sneak a forkful of the simmering sauce right under my nose, and I would giggle as the warm flavors spread across my palate. Those moments etched themselves into my heart, turning gnocchi from a mere dish into a symbol of togetherness and love.
Fast forward to today, I find myself recreating those memories in my own kitchen, sharing that same warmth and comfort with friends and loved ones. This 30-minute creamy tomato gnocchi not only connects me to my roots but also makes it accessible for anyone craving the same joy. And hey, you don’t even need to roll out any dough!
Ingredients
Here’s what you’ll need to bring this dish to life:
-
Gnocchi: The star of the show! You can find gnocchi in the pasta aisle of your grocery store, usually made from potatoes. If you’re feeling adventurous, you can even make your own, but store-bought creates a wonderful base that cooks up in a flash.
-
Tomato Sauce: A classic marinara or a roasted tomato sauce works beautifully. If you want to elevate the flavor, look for a brand with high-quality ingredients or even make your own!
-
Heavy Cream: This is what gives our dish that irresistible creaminess. You can swap it for half-and-half for a lower-fat option, or even coconut cream if you want a dairy-free alternative.
-
Garlic: Fresh garlic is a must! It brings a fragrant punch that elevates every bite. Alternatively, you could use garlic powder if you’re in a pinch, but fresh is always best.
-
Olive Oil: Don’t skip on the good stuff; high-quality olive oil enhances flavors and brings a lush texture. Feel free to substitute with avocado oil if you’re looking for a different profile.
-
Parmesan Cheese: Grated Parmesan adds a salty element that perfectly complements the creamy sauce. For a vegan alternative, nutritional yeast can provide that cheesy oomph without the dairy!
-
Basil: Fresh basil is a game-changer! Its fragrant aroma and taste take the dish to new heights. You can substitute with dried basil; just remember, fresh herbs have a brighter flavor!
Step-by-Step Instructions
Now that we have our ingredients, let’s talk about how to bring it all together.
-
Cook the Gnocchi:
Start by bringing a large pot of salted water to a boil. It’s essential to season your water well—this is where your gnocchi will start to absorb flavor. Once boiling, toss in your gnocchi. You’ll know they’re done when they float to the top, typically about 2-3 minutes. Give them a minute more to cook through, and then drain them in a colander. -
Sauté Garlic:
In a large skillet over medium heat, add 1 tablespoon of olive oil. Once it shimmers, toss in minced garlic. Sauté for about 30 seconds until it’s fragrant, but be careful not to let it turn brown. Burnt garlic can turn bitter and ruin that beautiful sauce! -
Add Tomato Sauce:
Pour in your tomato sauce and bring it to a gentle simmer. This is where the magic happens! The garlic will infuse the sauce, making it even more flavorful. Keep it bubbling away for about 3-4 minutes, allowing those flavors to meld together. -
Introduce the Cream:
Once your sauce is simmering, slowly mix in the heavy cream (or your choice of alternative). Stir it well to combine, and watch as it transforms into a dreamy, creamy concoction. Season with salt and pepper to taste—don’t be shy! Taste as you go so you get just the right balance. -
Toss in Gnocchi:
After your sauce has reached creamy perfection, add the drained gnocchi into the skillet. Gently toss to coat every piece in that luscious sauce. You want each gnocchi to bask in the creaminess! -
Finish with Cheese and Basil:
Sprinkle in the grated Parmesan cheese and fresh basil, stirring to incorporate them into the dish. Let it warm through for another minute so the cheese melts into the sauce beautifully. -
Plating:
Grab your plates and serve this masterpiece while it’s hot. A quick drizzle of olive oil or a sprinkle of more cheese on top adds a lovely finishing touch.
Serving Suggestions
To plate this creamy tomato gnocchi, I love using wide, shallow bowls that allow the dish to shine. A light drizzle of extra virgin olive oil and a few torn basil leaves on top gives a fresh pop. You may want to serve it with a side salad or some freshly baked bread to soak up all that glorious sauce. Trust me, your guests will be asking for seconds!
Recipe Variations
Looking to mix things up? Here are a few creative twists you can try with this recipe:
- Add Veggies: Toss in some sautéed spinach, mushrooms, or zucchini for an extra nutrition boost.
- Protein Packed: Add grilled chicken or Italian sausage for an added protein punch.
- Spice It Up: Feel free to add red pepper flakes to the sauce for a touch of heat if you like some spice.
- Herb Swap: Swap basil for fresh parsley or even arugula for a peppery twist.
- Make it Vegan: Replace the heavy cream with cashew cream and the cheese with a nut-based alternative.
Chef’s Notes
This recipe is a staple in my household and has morphed over the years based on what I have on hand or the season. I’ve hosted countless dinner parties where this dish has stolen the spotlight! One time, I forgot to buy cream, and I creatively substituted it with Greek yogurt. It turned out surprisingly delicious and added a tangy edge to the sauce that was a big hit! Don’t hesitate to make this your own—swap, experiment, and enjoy!
FAQs and Troubleshooting
-
What if my gnocchi is mushy?
This can happen if they’re overcooked. Always keep an eye on them; they cook quickly. When you see them float, that’s your cue! -
Can I make this ahead of time?
Absolutely! You can prepare the sauce a day ahead, but I suggest adding the gnocchi fresh when you’re ready to serve. -
What if my sauce is too thick?
Just add a splash of pasta water or more cream to thin it out to your desired consistency. -
How do I store leftovers?
Store in an airtight container in the fridge for up to 3 days. You can reheat on the stovetop or microwave, adding a splash of water or cream to loosen it up.
Nutritional Info
While I won’t bore you with exact numbers, this dish is rich in flavors while offering balanced nutrients. It’s a great source of carbohydrates from gnocchi, healthy fats from olive oil and cream, and protein from Parmesan. And that’s not to mention the fresh basil, which is loaded with antioxidants!
In conclusion, this 30-minute creamy tomato gnocchi is not just a recipe—it’s a love letter to those cozy dinners and cherished kitchen memories. So grab your ingredients, gather your loved ones, and make some delicious memories of your own. Happy cooking!
Print30-Minute Creamy Tomato Gnocchi
A quick, comforting dish featuring pillowy gnocchi coated in a luscious creamy tomato sauce, perfect for a cozy night in or a dinner party.
- Prep Time: 10 minutes
- Cook Time: 20 minutes
- Total Time: 30 minutes
- Yield: 4 servings 1x
- Category: Main Course
- Method: Stovetop
- Cuisine: Italian
- Diet: Vegetarian
Ingredients
- 1 package of gnocchi
- 1 cup tomato sauce
- 1/2 cup heavy cream
- 2 cloves garlic, minced
- 1 tablespoon olive oil
- 1/4 cup grated Parmesan cheese
- Fresh basil, for garnish
Instructions
- Cook the gnocchi by bringing a large pot of salted water to a boil. Add the gnocchi and cook until they float, about 2-3 minutes. Drain.
- Sauté garlic in olive oil in a skillet over medium heat for about 30 seconds.
- Add tomato sauce and let it simmer for 3-4 minutes.
- Introduce heavy cream, stirring to combine. Season with salt and pepper.
- Toss in the drained gnocchi and coat well with the sauce.
- Finish with grated Parmesan and fresh basil, warming through for another minute.
- Plate and serve hot with a drizzle of olive oil on top.
Notes
Feel free to add veggies, proteins, or swap ingredients based on your preferences. This dish can be made ahead but add gnocchi fresh when ready to serve.
Nutrition
- Serving Size: 1 serving
- Calories: 350
- Sugar: 5g
- Sodium: 400mg
- Fat: 12g
- Saturated Fat: 4g
- Unsaturated Fat: 6g
- Trans Fat: 0g
- Carbohydrates: 45g
- Fiber: 3g
- Protein: 15g
- Cholesterol: 30mg
Keywords: gnocchi, creamy tomato sauce, Italian comfort food, quick dinner
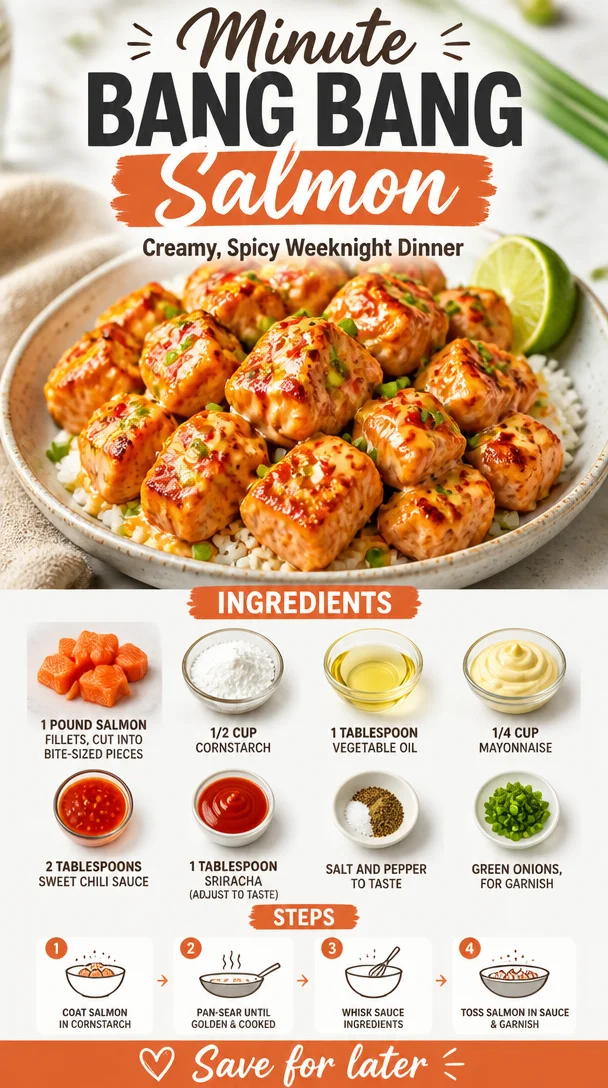
Minute Bang Bang Salmon: Creamy, Spicy Weeknight Dinner
Bang Bang Salmon: A Flavor Explosion on Your Plate
Welcome, food lovers! Today, we’re diving into the delicious, mouthwatering world of Bang Bang Salmon—a dish that not only excites the taste buds but also fills your kitchen with a delightful aroma that will make your stomach rumble in anticipation! If you’re a fan of seafood paired with just the right amount of crunch and a sweet-and-spicy kick, you’re in for a treat. So grab your apron, and let’s get cooking!
A Little Nostalgia: My Culinary Journey with Bang Bang Salmon
I still remember the first time I tasted Bang Bang Shrimp at a trendy little restaurant where I spent my early 20s. I was enthralled by how something so simple could burst with so much flavor! There was something magical about that sweet, spicy sauce enveloping the crispy bites of shrimp, making each morsel utterly addictive. It sparked my imagination and ignited a fire in my culinary heart. Fast forward to today, and the thought struck me: why not recreate this fantastic dish using salmon?
Salmon is a beautifully rich fish that can stand up to bold flavors like no other. It got me thinking about making my own version—Bang Bang Salmon! Not only is salmon packed with health benefits, but it’s also a canvas for incredible flavors. I often find myself in my kitchen reminiscing about that first taste, tweaking the recipe to fit my style while keeping it true to its roots. Now, I’m excited to share this vibrant dish with you!
Ingredients for Bang Bang Salmon
Here’s what you’ll need to whip up this sensational dish:
-
1 pound salmon fillets, cut into bite-sized pieces
Salmon is rich in omega-3 fatty acids, making it a super healthy protein choice. If you’re looking for a substitution, try using shrimp or chicken! -
1/2 cup cornstarch
This will give your salmon that satisfying crunch. If you’re looking for a gluten-free option, cornstarch is perfect. You can also use rice flour for a similar effect. -
1 tablespoon vegetable oil
Use this to get a nice sear on your salmon. Don’t have vegetable oil? Olive oil or avocado oil will work well too! -
1/4 cup mayonnaise
This adds creaminess to your sauce. For a lighter option, you can swap it out for Greek yogurt. -
2 tablespoons sweet chili sauce
Sweet chili sauce is where the magic happens—sweet with a hint of heat! Hot sauce lovers can zest it up by using spicy chili sauce instead. -
1 tablespoon sriracha
This provides that welcomed kick! Adjust the amount based on your spice tolerance—less for mild, more for a fiery punch. -
Salt and pepper to taste
Essential seasonings to enhance all those vibrant flavors! -
Green onions, for garnish
An excellent finishing touch that adds crunch and freshness to the dish.
Step-by-Step Instructions to Create Bang Bang Salmon
Ready to bring your kitchen to life? Let’s get started with these easy-to-follow steps!
-
Prepare the Salmon
Start by cutting your salmon fillets into bite-sized pieces. This makes them easy to cook and perfect for sharing—if you’re feeling generous! Ensure they’re uniform to ensure even frying. -
Coat with Cornstarch
In a mixing bowl, toss the salmon pieces with cornstarch until evenly coated. This might seem simple, but trust me, this coating is key to achieving that delightful crunch. And don’t be shy—make sure every little piece is covered! -
Heat the Oil
In a large skillet, heat the vegetable oil over medium-high heat. You want it hot enough to create a lovely sear on the salmon, but not so hot that it smokes! A drop of water should sizzle if it’s ready. -
Fry the Salmon
Carefully add the coated salmon pieces to the skillet in a single layer. Fry for about 3-4 minutes per side, flipping gently until golden brown and crispy. If you have to do this in batches, that’s okay—take your time; good things come to those who wait! -
Make the Sauce
While your salmon is cooking, let’s whip up that Bang Bang sauce! In a small bowl, combine mayonnaise, sweet chili sauce, and sriracha. Give it a good mix until smooth. You can adjust the sriracha based on how spicy you want it! -
Toss the Salmon
Once your salmon is perfectly crispy and cooked through, remove it from the heat and place it in a clean bowl. Drizzle your Bang Bang sauce over the salmon and gently toss until every piece is coated in that luscious goodness. -
Garnish and Serve
Sprinkle chopped green onions on top for a fresh touch that brightens up the dish. You want that pop of color—it’s all about making your dish look as good as it tastes!
Serving Suggestions
Now that your Bang Bang Salmon is ready, let’s talk presentation! For a feast that looks as amazing as it tastes, serve it over a bed of fluffy jasmine rice or quinoa. A side of lightly steamed veggies or a fresh salad can complement the dish nicely, adding color and freshness. Don’t forget to drizzle a little extra sauce over the top for that eye-catching finish!
Recipe Variations to Try
Get creative! Here are some fun twists on the classic Bang Bang Salmon:
-
Spicy Mango Bang Bang: Add diced ripe mango to the sauce for a tropical flair with a hint of sweetness.
-
Bang Bang Salmon Tacos: Serve the salmon in warm tortillas topped with fresh cabbage slaw for a taco night twist.
-
Pineapple Bliss: Mix in some crushed pineapple into the sauce for a tangy-sweet delight that brightens up your plate.
-
Herb-Infused: Add a sprinkle of chopped fresh herbs like cilantro or parsley for an earthy note.
Chef’s Notes
Oh man, where do I start? This Bang Bang Salmon recipe has definitely evolved over the years. I remember the first time I tried making it—it was a glorious, messy experience, and I may have accidentally spilled sriracha everywhere! But that chaos led to a glorious flavor discovery. Now, I find joy in experimenting with textures and tastes, and this dish is my canvas. Every time I make it, I think of those fun nights dining out with friends, and now all those flavors come together right in my kitchen. It’s about creating memories and sharing laughter around the dinner table—food brings us all together!
FAQs and Troubleshooting
1. My salmon is sticking to the pan! What can I do?
Make sure your pan is hot enough before adding the salmon. If it’s sticking, it might not have developed that crispy coating properly. A well-preheated pan is essential!
2. Can I use frozen salmon for this recipe?
Absolutely! Just make sure to thaw it completely and pat it dry before coating it with cornstarch to ensure a perfect texture.
3. What can I serve with Bang Bang Salmon?
This dish is incredibly versatile! Pair it with rice, stir-fried vegetables, or a refreshing salad to balance those rich flavors.
4. How do I store leftovers?
Leftover salmon can be stored in an airtight container in the fridge for up to 2 days. Just reheating it in the oven for that crispy texture is a great idea!
Nutritional Info
While I don’t have precise numbers for each component here, one serving of this Bang Bang Salmon is packed with protein from the salmon, healthy fats from the mayonnaise, and a hint of carbohydrates from the cornstarch. Feel free to reach out for specific dietary needs or adjustments!
There you have it! Bang Bang Salmon is not just a dish; it’s an experience filled with flavor, fun, and a touch of nostalgia. So, gather your ingredients, get into the kitchen, and enjoy every moment of creating and savoring this delightful meal. Happy cooking!
PrintBang Bang Salmon

A mouthwatering salmon dish with a sweet and spicy bang bang sauce, perfect for seafood lovers.
- Prep Time: 10 minutes
- Cook Time: 10 minutes
- Total Time: 20 minutes
- Yield: 4 servings 1x
- Category: Main Course
- Method: Frying
- Cuisine: Asian
- Diet: Pescatarian
Ingredients
- 1 pound salmon fillets, cut into bite-sized pieces
- 1/2 cup cornstarch
- 1 tablespoon vegetable oil
- 1/4 cup mayonnaise
- 2 tablespoons sweet chili sauce
- 1 tablespoon sriracha
- Salt and pepper to taste
- Green onions, for garnish
Instructions
- Prepare the salmon by cutting it into bite-sized pieces.
- Coat the salmon pieces with cornstarch in a mixing bowl.
- Heat the vegetable oil in a large skillet over medium-high heat.
- Fry the salmon pieces for about 3-4 minutes per side until golden brown and crispy.
- Make the Bang Bang sauce by combining mayonnaise, sweet chili sauce, and sriracha in a small bowl.
- Toss the cooked salmon with the Bang Bang sauce until evenly coated.
- Garnish with chopped green onions before serving.
Notes
For a gluten-free option, use rice flour instead of cornstarch. Adjust sriracha according to your spice preference.
Nutrition
- Serving Size: 1 serving
- Calories: 400
- Sugar: 8g
- Sodium: 500mg
- Fat: 18g
- Saturated Fat: 3g
- Unsaturated Fat: 12g
- Trans Fat: 0g
- Carbohydrates: 30g
- Fiber: 0g
- Protein: 28g
- Cholesterol: 60mg
Keywords: bang bang salmon, seafood recipe, easy salmon dish, Asian cuisine
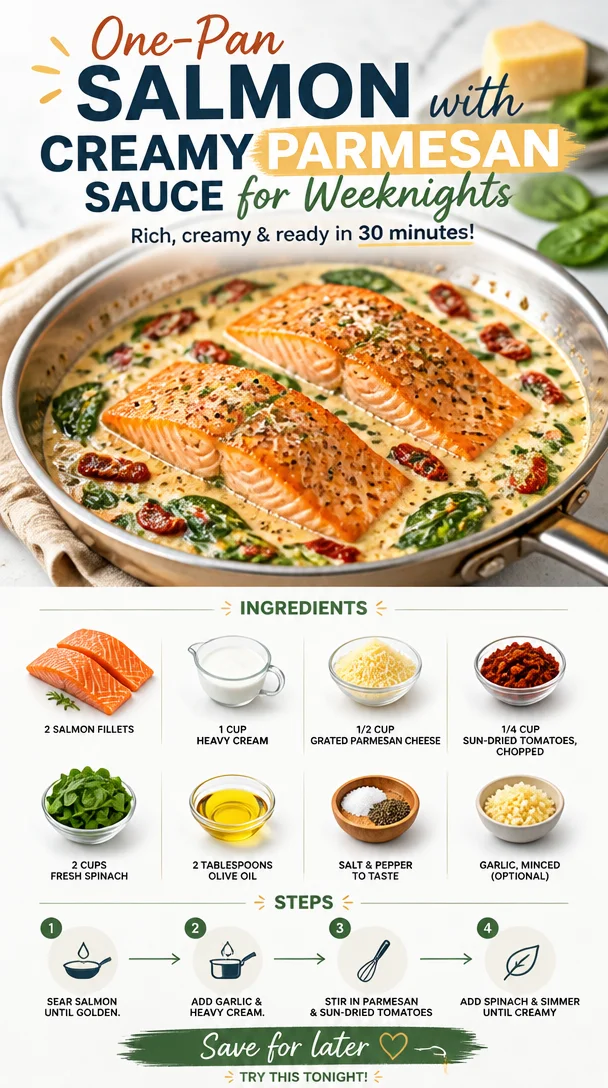
One-Pan Salmon with Creamy Parmesan Sauce for Weeknights
Pan Seared Salmon in Parmesan Cream Sauce: A Delicious Journey
Nothing says comfort food like a beautifully seared salmon fillet nestled in a luscious cream sauce. Welcome to the world of Clean Plate Cravings, where we believe that you don’t have to compromise on flavor or satisfaction when pursuing a healthier lifestyle. Let’s dive into a dish that’s as vibrant as it is indulgent: Pan Seared Salmon in Parmesan Cream Sauce.
This dish is perfect for busy weeknights or a weekend dinner party; it brings that restaurant-quality flair right to your kitchen. Trust me, your family and friends will be raving! And the best part? It’s simple and made with accessible ingredients that you can whip up in no time.
A Fresh Perspective on an Old Favorite
Growing up, my family made a habit of gathering around the dinner table, sharing stories and laughter, with a “healthy” dose of delicious food. One of my fondest memories is of my grandmother—who had a knack for transforming ordinary, everyday meals into extraordinary experiences. I can still picture her in the kitchen, spinning tales about each dish she prepared.
But there was one dish that always stood out: her take on salmon. She would pan-sear it to perfection, and the way the flavors danced together on the plate was pure magic. Fast forward to today, and here I am, creating my rendition of that timeless meal—lighter, fresher, but still bursting with nostalgia.
Ingredients for the Perfect Dish
Here’s what you’ll need to make this mouthwatering Pan Seared Salmon in Parmesan Cream Sauce:
- 2 salmon fillets: I recommend skin-on for maximum flavor and texture. If you’re not a fan of salmon, trout or halibut make great substitutes.
- 1 cup heavy cream: This creates that luxurious, creamy base. For a lighter option, consider coconut cream or unsweetened almond milk, though the texture may differ slightly.
- 1/2 cup grated Parmesan cheese: Freshly grated will give a better flavor and texture, but pre-grated works in a pinch. Nutritional yeast can be a great dairy-free alternative!
- 1/4 cup sun-dried tomatoes, chopped: These add a rich, tangy punch. If you have fresh tomatoes on hand, you can roast them quickly or even add a splash of balsamic vinegar instead.
- 2 cups fresh spinach: Perfect for wilted greens, synonymous with freshness. For a twist, you can use kale or arugula.
- 2 tablespoons olive oil: This will give your salmon a lovely sear. Feel free to swap it for avocado oil for a different flavor profile.
- Salt and pepper to taste: Essential for seasoning! Don’t be shy—seasoning enhances all the flavors.
- Garlic, minced (optional): Adds depth and flavor. If you’re not a garlic fan, feel free to omit it or even use garlic powder.
Step-by-Step Directions
Now, let’s bring this beautiful dish to life! Follow these simple steps and let’s make some magic happen:
-
Get the Pan Heating: Heat 2 tablespoons of olive oil in a skillet over medium-high heat. You want it hot enough to create a lovely sear on the salmon, but watch for smoking!
Pro Tip: To test if your oil is ready, drop a small piece of the salmon into the pan. If it sizzles, you’re good to go!
-
Sear the Salmon: Season both sides of the salmon fillets with salt and pepper. Place them skin-side down into the hot skillet. Cook for about 4-5 minutes without moving them. This gives that crispy skin we all love.
Little Chef Hack: Gently press down on the salmon with a spatula to ensure an even sear.
-
Flip and Cook: After 4-5 minutes, carefully flip the fillets and cook for another 3-4 minutes on the flesh side. The salmon is done when it flakes easily with a fork.
Chef Insight: Cooking time can vary based on the thickness of fillets; aim for an internal temperature of 145°F (63°C).
-
Remove and Set Aside: Once cooked, carefully transfer the salmon to a plate and cover it with foil to keep warm while you prepare the sauce.
-
Create the Cream Sauce: In the same skillet, lower the heat to medium and add minced garlic (if using). Sauté for about 30 seconds until fragrant.
Tip: Make sure you scrape any tasty bits left in the pan—this is where a lot of the flavor hides!
-
Pour in the Cream: Add your cup of heavy cream and bring it to a gentle simmer. Stir continuously, allowing it to thicken slightly.
-
Add Cheese and Tomatoes: Stir in the grated Parmesan and chopped sun-dried tomatoes. Mix until the cheese has melted and the sauce is creamy and luscious.
-
Throw in the Spinach: Add in the fresh spinach and let it wilt down, stirring it into the sauce for that vibrant green color.
Mom’s Tip: If you want a bit of zing, a splash of lemon juice goes a long way here!
-
Combine and Serve: Return the salmon to the pan, spooning some of the Parmesan cream sauce over the top. Let it warm through for about a minute.
Serving Suggestions
For plating, consider a vibrant dish for a beautiful presentation. Place the salmon fillet on a warm plate, generously drizzle with the creamy Parmesan sauce, and finish with a sprinkle of freshly cracked pepper and a few sun-dried tomatoes on top. Serve alongside a simple side salad or roasted veggies for a complete meal that looks as amazing as it tastes!
Recipe Variations
Who doesn’t love a little creativity in the kitchen? Here are a few twists to keep this dish fresh and exciting:
- Herb-Infused Cream: Add fresh herbs like basil or dill to the sauce for an aromatic twist.
- Spicy Kick: Toss in some red pepper flakes with the garlic to spice it up a notch.
- Zesty Citrus: Replace some of the cream with lemon juice or a splash of white wine for a zesty touch.
- Nutty Flavor: Stir in a tablespoon of toasted pine nuts or walnut pieces for crunch.
- Dairy-Free Delight: Swap the cream and cheese for coconut cream and nutritional yeast for a dairy-free alternative.
Chef’s Notes
This recipe has evolved over time, shaped by my love for bold flavors and health-conscious choices. I initially started with a more traditional approach, but as I focused on lighter ingredients without skimping on taste, this version emerged. I’ve had many evenings where the kitchen filled with laughter as we enjoyed this dish, and each time, the joy feeds my passion for creating delicious meals that are nourishing, too.
And remember, kitchen mishaps are part of the process! Just the other day, I mistook cayenne for paprika while making this dish for friends. What was intended to be mildly flavored salmon turned into a spicy adventure that everyone loved. Sometimes the best recipes come from happy accidents!
FAQs and Troubleshooting
1. My salmon is sticking to the pan. What did I do wrong?
That’s often a sign that the pan wasn’t hot enough at the start or that there wasn’t enough oil. Always ensure your oil is shimmering before adding the salmon and use skin-on fillets for an easier release.
2. The sauce turned out too thin, how can I thicken it?
If your sauce is too thin, simply let it simmer a little longer—this will reduce and thicken it. If you want a quick fix, try mixing in a teaspoon of cornstarch slurry (cornstarch mixed with a little cold water) to help it along.
3. What if I don’t like sun-dried tomatoes?
No problem! You can swap them for roasted red peppers, olives, or even fresh cherry tomatoes, depending on what you have on hand or your personal preference.
4. Can I prep this meal ahead of time?
Definitely! You can marinate the salmon with seasonings in advance and prepare the sauce beforehand (just add the spinach before serving). Simply reheat the sauce gently and add the cooked salmon just before serving.
Nutritional Info
While I generally steer clear of strict nutritional breakdowns, enjoying salmon provides a lovely dose of omega-3 fatty acids, while the cream and Parmesan offer calcium and healthy fats. So go ahead, indulge in a splash of goodness that also loves your body!
So there you have it! A delightful journey through Pan Seared Salmon in Parmesan Cream Sauce—flavorful, satisfying, and crafted with love. I hope this dish adds a pinch of joy to your dining table, and I can’t wait to hear about your kitchen adventures. Happy cooking!
PrintPan Seared Salmon in Parmesan Cream Sauce
A comforting dish featuring beautifully seared salmon fillets in a luscious Parmesan cream sauce, perfect for busy weeknights or special occasions.
- Prep Time: 15 minutes
- Cook Time: 15 minutes
- Total Time: 30 minutes
- Yield: 2 servings 1x
- Category: Main Course
- Method: Pan-Searing
- Cuisine: Mediterranean
- Diet: Pescatarian
Ingredients
- 2 salmon fillets, skin-on
- 1 cup heavy cream
- 1/2 cup grated Parmesan cheese
- 1/4 cup sun-dried tomatoes, chopped
- 2 cups fresh spinach
- 2 tablespoons olive oil
- Salt and pepper to taste
- Garlic, minced (optional)
Instructions
- Heat 2 tablespoons of olive oil in a skillet over medium-high heat.
- Season both sides of the salmon fillets with salt and pepper.
- Place them skin-side down into the hot skillet.
- Cook for about 4-5 minutes without moving them.
- Gently press down on the salmon with a spatula.
- Flip the fillets and cook for another 3-4 minutes on the flesh side.
- Remove the salmon to a plate and cover with foil.
- Add minced garlic (if using) to the skillet and sauté for 30 seconds.
- Pour in the heavy cream and bring to a gentle simmer.
- Add in the grated Parmesan and chopped sun-dried tomatoes.
- Stir in the fresh spinach and let it wilt down.
- Return the salmon to the pan and spoon the sauce over the top.
Notes
For a zesty touch, consider adding lemon juice to the sauce. This dish pairs wonderfully with a side salad or roasted vegetables.
Nutrition
- Serving Size: 1 fillet
- Calories: 450
- Sugar: 5g
- Sodium: 500mg
- Fat: 28g
- Saturated Fat: 12g
- Unsaturated Fat: 12g
- Trans Fat: 0g
- Carbohydrates: 5g
- Fiber: 1g
- Protein: 36g
- Cholesterol: 80mg
Keywords: salmon, cream sauce, easy dinner, seafood recipe, healthy comfort food
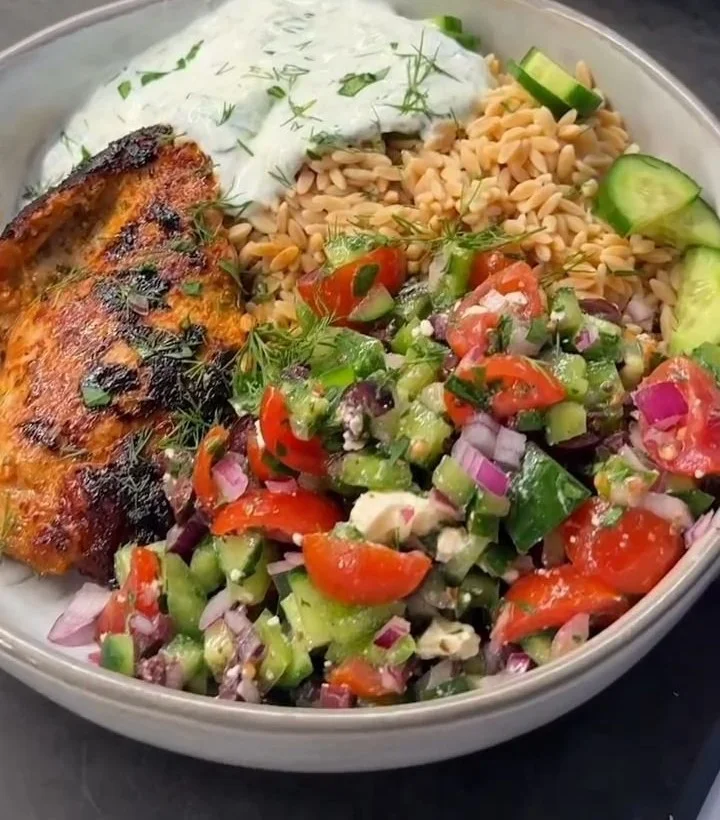
Minute One-Pan Greek Chicken & Rice Bowl for Weeknights
Greek Chicken & Rice Bowl: A Fresh Taste of the Mediterranean
Hello, fellow food lovers! Today, we’re diving into a dish that packs a punch of flavor—meet the Greek Chicken & Rice Bowl! 🥗 It’s vibrant, it’s fresh, and let me tell you, it’s one of those meals that will have you dreaming of sunny Mediterranean beaches. Imagine juicy chicken, creamy Greek yogurt, crunchy veggies, and aromatic herbs all nestled together in a bowl. Trust me, this isn’t just food; it’s an experience.
Personal Story: The Summer of Greek Flavors
I remember my first adventure to Greece like it was yesterday. Picture this: the sun setting over the Aegean Sea, the air filled with the aroma of grilled meats and fresh herbs, and vibrant markets bursting with colors. I was whisked away by the flavors! One evening, while exploring a quaint little tavern, I stumbled across a Greek chicken and rice dish that changed everything for me. The chicken was marinated to perfection, and fresh veggies danced with bright, zesty flavors. That meal brought back memories of my own kitchen, where I learned to mix bold ingredients with love and excitement.
As soon as I returned home, I couldn’t wait to recreate that bowl of joy! This version is a bit lighter with low-carb, high-protein rice and a hefty dollop of Greek yogurt for creaminess. It’s a nod to that unforgettable summer, and I’m excited to share it with you!
Ingredients
-
1 pound chicken breast, diced
Juicy and protein-packed, chicken breasts are a fantastic base for this dish. If you prefer, try swapping for turkey or tofu for a vegetarian option. -
1 cup low carb high protein rice
This rice is not just a nutritional win but also provides a lovely texture. Don’t have it? Quinoa or cauliflower rice works great too! -
1 cup Greek yogurt
Creamy and tangy, Greek yogurt adds a scrumptious layer of flavor. You can use plant-based yogurt as a dairy-free alternative if needed. -
1 cucumber, diced
Crisp and refreshing, cucumbers are the perfect counterbalance to the savory chicken. Try a zucchini if you want something different. -
1 cup cherry tomatoes, halved
Sweet and juicy, cherry tomatoes burst in your mouth! Any fresh tomatoes will do if you can’t find cherries—just chop them up a bit. -
1/4 red onion, finely chopped
Onions add depth and zing. For a milder flavor, you can use shallots or spring onions. -
1 teaspoon olive oil
Rich in healthy fats, this will help in browning the chicken and adding flavor. Avocado oil is a great substitute if you’re out of olive oil. -
1 teaspoon oregano
Classic Mediterranean flavor! You can add other herbs like dill or parsley for a different twist. -
Salt and pepper to taste
Don’t underestimate the magic of seasoning! Adjust it based on your personal preference.
Step-by-Step Instructions
-
Prepare Your Ingredients
Start by gathering all your ingredients. Chop your chicken breast into bite-sized pieces and dice your cucumber. Halve your cherry tomatoes and chop the red onion. This way, everything’s ready to go when you start cooking—no frantic cutting mid-sautéing! -
Marinate the Chicken
In a bowl, combine the diced chicken with olive oil, oregano, salt, and pepper. Let it sit for about 15 minutes while you prep the rest of the ingredients. This step is crucial; it allows the flavors to meld and enhances the chicken’s taste! -
Cook the Rice
Follow the package directions for your low-carb high-protein rice—easy peasy! I’m a big fan of preparing it in vegetable broth for that extra oomph. Once done, fluff it with a fork and set aside. -
Sauté the Chicken
Heat a large pan over medium-high heat. Once hot, add the marinated chicken. Sauté for about 7-10 minutes until the chicken is thoroughly cooked and golden brown. The sizzle is music to your ears—enjoy it! -
Mix the Salad
In a large bowl, combine the diced cucumber, halved cherry tomatoes, and finely chopped red onion. Drizzle with a bit of olive oil, and sprinkle with salt and pepper. This vibrant mix adds freshness and crunch to your bowl—don’t skip it! -
Assemble the Bowls
It’s time for the fun part! Start with a base of fluffy rice, add a hefty portion of sautéed chicken, and then layer on your veggie salad. Top it all off with that creamy Greek yogurt—it’s like the cherry on top of your Mediterranean masterpiece!
Serving Suggestions
Serve your Greek Chicken & Rice Bowl in large, colorful bowls that allow the beautiful ingredients to shine. Don’t be shy with the yogurt—give it a generous dollop right in the center. For a final touch, you can sprinkle extra oregano or some crumbled feta cheese (if you’re feeling indulgent) on top for added flavor.
Recipe Variations
-
Mediterranean Spice Twist
Add a pinch of cumin and coriander to the chicken marinade for a warm, aromatic flavor. -
Swap the Protein
Try shrimp or chickpeas for a different protein option. Both will change the dish in deliciously unexpected ways! -
Warm Grain Base
If you’re not into rice, try a warm quinoa base or even a bed of roasted sweet potatoes for a sweet and savory combo. -
Herby Yogurt Sauce
Mix a tablespoon of chopped dill or mint into the Greek yogurt for a fresh and herby sauce that pairs fabulously with this bowl. -
Veggie Boost
Add spinach or arugula to your salad mix for a nutrient-packed punch. This extra greenery boosts the color and health factor!
Chef’s Notes
Oh, the kitchen mishaps I’ve had over the years! I once tried to impress some friends with this bowl and accidentally grabbed the cinnamon instead of oregano. Let’s just say, we had a very “unique” dinner that night! But it reminded me that cooking is about trial and error—and those imperfections often create the best stories. With every iteration, I refined this recipe, and I’m sure you’ll make it your own, too. Cooking is magic, and more than anything, I love sharing this experience with you.
FAQs and Troubleshooting
1. Can I use chicken thighs instead of breasts?
Absolutely! Chicken thighs will add more richness due to their higher fat content. Just make sure to cook them thoroughly.
2. My chicken is sticking to the pan! What did I do wrong?
Ensure that your pan is sufficiently heated before adding the chicken. If the oil isn’t hot, the chicken will stick. A non-stick pan can be a lifesaver.
3. How do I store leftovers?
Store leftover bowls in airtight containers in the fridge. They’ll stay fresh for about 3-4 days. Just remember to keep the yogurt separate until you’re ready to serve.
4. Can I freeze this dish?
Yes! You can freeze the chicken and rice separately for up to three months. Just make sure to let it cool before freezing. Thaw in the fridge overnight before reheating.
Nutritional Info
(Note: Nutritional information will vary based on specific ingredients used and portion sizes. Here’s a basic breakdown for one serving):
- Calories: Approximately 450
- Protein: 35g
- Carbohydrates: 30g
- Fat: 15g
Now that you’ve got the inside scoop on how to create this delightful Greek Chicken & Rice Bowl, get ready to indulge in a meal that not only nourishes your body but also brings joy to your taste buds. So gather your ingredients, channel your inner chef, and let’s make some magic in the kitchen! Happy cooking! 🍽️✨
PrintGreek Chicken & Rice Bowl

A vibrant and fresh Mediterranean dish featuring juicy chicken, creamy Greek yogurt, and crunchy vegetables.
- Prep Time: 15 minutes
- Cook Time: 20 minutes
- Total Time: 35 minutes
- Yield: 4 servings 1x
- Category: Main Course
- Method: Sautéing
- Cuisine: Mediterranean
- Diet: High Protein
Ingredients
- 1 pound chicken breast, diced
- 1 cup low carb high protein rice
- 1 cup Greek yogurt
- 1 cucumber, diced
- 1 cup cherry tomatoes, halved
- 1/4 red onion, finely chopped
- 1 teaspoon olive oil
- 1 teaspoon oregano
- Salt and pepper to taste
Instructions
- Prepare Your Ingredients: Gather all your ingredients. Chop your chicken breast and dice your cucumber.
- Marinate the Chicken: Combine chicken with olive oil, oregano, salt, and pepper. Let sit for about 15 minutes.
- Cook the Rice: Follow package directions for the rice. Fluff it once done.
- Sauté the Chicken: Heat a pan over medium-high heat and cook the marinated chicken for 7-10 minutes.
- Mix the Salad: Combine cucumber, cherry tomatoes, and red onion in a bowl with olive oil, salt, and pepper.
- Assemble the Bowls: Layer rice, sautéed chicken, and salad in bowls. Top with Greek yogurt.
Notes
Feel free to add extra oregano or crumbled feta cheese on top for added flavor.
Nutrition
- Serving Size: 1 serving
- Calories: 450
- Sugar: 5g
- Sodium: 400mg
- Fat: 15g
- Saturated Fat: 5g
- Unsaturated Fat: 8g
- Trans Fat: 0g
- Carbohydrates: 30g
- Fiber: 3g
- Protein: 35g
- Cholesterol: 85mg
Keywords: Greek, Mediterranean, chicken, rice bowl, healthy eating, quick meals