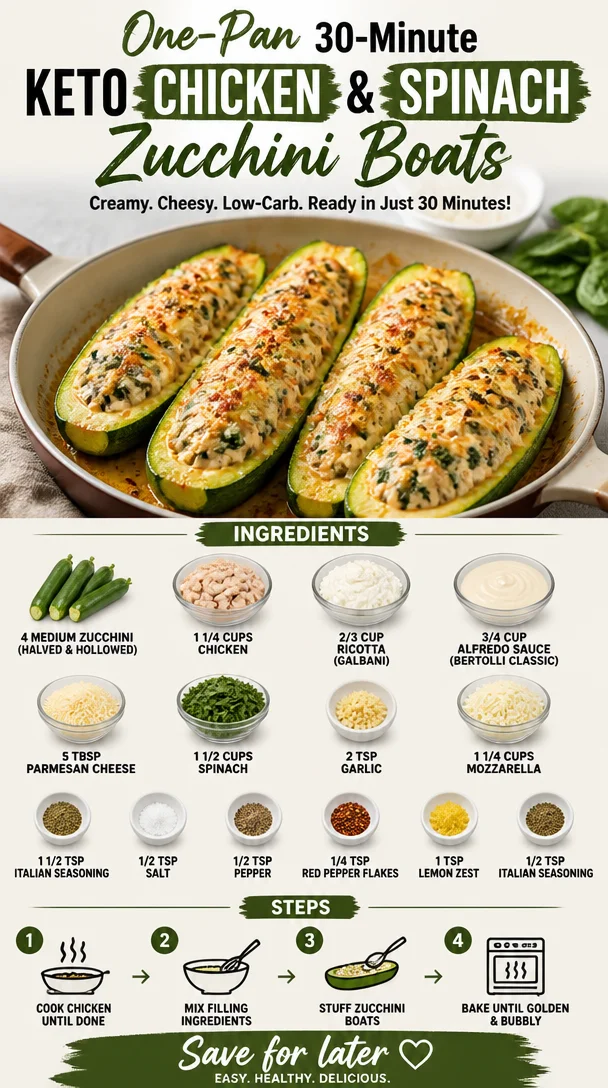
One-Pan 30-Minute Keto Chicken & Spinach Zucchini Boats
Keto Chicken and Spinach Stuffed Zucchini Boats: A Modern Classic
Welcome to Clean Plate Cravings! Today, I’m thrilled to share a recipe that’s not only delicious but also a culinary adventure back to my kitchen roots. If you’re looking for a tasty and guilt-free meal that you can whip up in a jiffy, you’re in the right place. Today, we’re diving into the world of Keto Chicken and Spinach Stuffed Zucchini Boats. These vibrant, flavor-packed boats are not just eye-candy; they’re also a fantastic way to incorporate more vegetables into your diet while keeping things low-carb.
Introduction: The Love Affair with Zucchini
Ah, zucchini! This humble summer squash holds a special place in my heart (and kitchen). It’s versatile, healthy, and practically begs to be stuffed. Growing up, my grandmother would have us assist her in the garden, and every summer, we’d harvest a seemingly endless supply of zucchini. I remember our family’s weekly summertime tradition—zucchini cooking contests. Who could create the most delicious dish? The stakes were high, and creativity soared!
The zucchini boats we enjoyed at those contests inspired this recipe. Combining fresh, wholesome ingredients like chicken, spinach, and cheese, these stuffed zucchini are like warm hugs on a plate—satisfying, without the carbs! Whether you’re hosting friends, pulling together a healthy weeknight dinner, or simply craving something comforting, these keto-friendly boats tick all the boxes. Plus, what’s more fun than digging into a delicious meal that comes in its own natural vessel? So let’s roll up our sleeves and get started—we’ve got some exciting culinary magic to create!
Personal Story: A Family Tradition
One of my fondest memories is from a summer picnic, where my family gathered in our backyard under a canopy of twinkling fairy lights. My aunt was in charge of the food, and to everyone’s delight, she brought her famous stuffed zucchini. I remember taking my first bite and savoring the creamy cheese and savory chicken bursting with flavor. It felt like summer on a plate! That night, laughter filled the air as we swapped stories and reminisced over our filling meal.
From that moment, I knew that zucchini would always be a part of my life. Fast forward to today, and I’m still head-over-heels for this adaptable veggie. Making these Keto Chicken and Spinach Stuffed Zucchini Boats is my way of keeping that tradition alive. They may not be the exact recipe my aunt made, but they carry the same heartfelt joy and camaraderie—and of course, they are super delicious!
Ingredients
Here’s what you’ll need to bring these scrumptious zucchini boats to life:
-
4 medium zucchini: Halved lengthwise and hollowed (1/4-inch shells). Look for firm, shiny zucchinis! They’ll hold up better in the oven.
-
1 1/4 cups chicken: Shredded or cut into 1/2-inch cubes. Rotisserie chicken is an excellent shortcut here if you’re short on time or want to keep it super easy.
-
2/3 cup ricotta cheese: I recommend Galbani for its creamy texture. Ricotta adds a delightful richness. If you’re dairy-free, try using cashew cream as a substitute.
-
3/4 cup Alfredo sauce: Bertolli classic is my go-to for convenience, but you can make your own to control the ingredients.
-
5 tbsp parmesan cheese: This adds a nutty, salty kick. Freshly grated is always superior, but in a pinch, pre-grated works too.
-
1 1/2 cups spinach: Roughly chopped into 1/2-inch ribbons. Fresh is best for a vibrant flavor, but in the off-season, you can use thawed frozen spinach—just make sure to drain excess moisture!
-
2 tsp garlic: Minced. Garlic is a superstar flavor enhancer! If you love garlic, feel free to add more!
-
1 1/2 tsp Italian seasoning: This mix of herbs elevates the dish. You can make your own blend with dried basil, oregano, and thyme if you prefer.
-
1/2 tsp salt: To taste. This balances the flavors—you can always adjust if needed.
-
1/2 tsp pepper: Freshly cracked is best for depth of flavor.
-
1/4 tsp red pepper flakes: For a kick! Adjust this based on your spice tolerance.
-
1 tsp lemon zest: Adds brightness that works wonders with the dish’s creamy elements!
-
1 1/4 cups mozzarella: Shredded from a block for melting perfection. Avoid pre-shredded cheese, as it doesn’t melt as smoothly.
-
1/2 tsp Italian seasoning: Just a sprinkle for that second layer of flavor on top.
Step-by-Step Instructions
Alright, ready to dive in? Follow these straightforward steps, and you’ll be savoring your delicious creation in no time!
-
Preheat Your Oven: Begin by preheating your oven to 375°F (190°C). This ensures an even cook and perfect caramelization.
-
Prepare the Zucchini: Slice each zucchini in half lengthwise and scoop out the insides using a spoon to create “boats.” Aim for about 1/4-inch shell thickness for stability. Save those scooped-out bits! You can chop them finely and add them to the stuffing or use them in another dish.
-
Cook Your Chicken: If you’re using raw chicken, sauté it in a pan over medium heat until fully cooked (about 6-8 minutes). Season with salt and pepper. If using rotisserie chicken, skip this step!
-
Sauté the Spinach: In the same skillet, add a splash of olive oil. Once hot, throw in the minced garlic and sauté for about 30 seconds until fragrant (careful not to burn!). Add the chopped spinach and cook just until wilted. Remove from heat and let it cool slightly.
-
Mix the Filling: In a large bowl, combine the shredded chicken, wilted spinach, ricotta cheese, Alfredo sauce, 5 tbsp parmesan cheese, lemon zest, 1 1/2 tsp Italian seasoning, salt, pepper, and red pepper flakes. Stir until everything is well blended. Don’t be afraid to get your hands in there!
-
Stuff the Zucchini Boats: Generously fill each zucchini half with the mixture. Don’t skimp on this step; the more stuffing, the better!
-
Add More Cheese: Top each boat with shredded mozzarella and a sprinkle of Italian seasoning. You can really pile it on here—who doesn’t love cheesy goodness?
-
Bake: Place the stuffed zucchini boats in a baking dish, cover with foil, and bake in the preheated oven for 25-30 minutes. This will steam them and help cook through the filling. Remove the foil and bake for an additional 10 minutes, or until the cheese is bubbling and golden.
-
Garnish: Once they’re out of the oven, let them rest for a few minutes. You can garnish with fresh basil or a sprinkle of extra parmesan if you like.
Serving Suggestions
When it comes time to serve, I recommend placing your stuffed zucchini boats on a big, vibrant plate. Adding a sprinkle of fresh herbs on top can enhance the visual appeal. Pair them with a light green salad dressed with lemon vinaigrette to round out your meal. The zesty salad complements the creamy boats perfectly!
Recipe Variations
Feel like switching it up? Here are a few fun variations to keep things exciting:
-
Spicy Mexican Twist: Add taco seasoning to the filling and top with jalapeños.
-
Mediterranean Flair: Mix in some sun-dried tomatoes and olives for a zesty Mediterranean vibe.
-
Meatless Version: Swap the chicken for mushrooms or lentils to keep it plant-based!
-
Add Herbs: Mix in fresh basil, parsley, or dill for a fresh flavor boost.
-
Cauliflower Rice: Try adding riced cauliflower for bulk and even more nutrient density.
Chef’s Notes
I cherish how this recipe has come to life. Initially, I was skeptical about stuffing veggies, but once I tried it, I realized that this method is just an avenue to bring flavors together in the most delightful way! This dish has become a staple in my kitchen, thanks to its adaptability. Sometimes I even find myself experimenting with leftover ingredients hanging out in my fridge. It’s funny how cooking evolves, isn’t it? You start with a classic dish, and before you know it, it’s a creative canvas for your culinary whims!
FAQs and Troubleshooting
1. Why do my zucchini boats get mushy?
Zucchini can release moisture while cooking. Make sure to hollow them out well and consider roasting them for a few minutes before stuffing to release some water.
2. Can I make this ahead of time?
Absolutely! Prep the zucchini and filling in advance, then assemble and bake when you’re ready. Just extend the bake time for chilled zucchini.
3. What can I use instead of Alfredo sauce?
You can replace it with a homemade cheese sauce, tomato sauce, or even a light pesto for a fresh twist.
4. How do I store leftovers?
Store any leftovers in an airtight container in the fridge for 3-4 days. They reheat beautifully in the oven or microwave.
Nutritional Info
While the nutritional content may vary, here’s a quick glance at what you might expect per serving (assuming 8 servings):
- Calories: 250
- Protein: 20g
- Carbs: 7g
- Fats: 15g
Get ready to enjoy these colorful Keto Chicken and Spinach Stuffed Zucchini Boats! They’re not just a feast for the stomach but also for the eyes, and I promise they’ll become a staple in your home, just like they have in mine. Here’s to fresh, feel-good meals that bring us together! Happy cooking, foodies!
PrintKeto Chicken and Spinach Stuffed Zucchini Boats

A delicious and keto-friendly meal featuring zucchini stuffed with chicken, spinach, and cheese.
- Prep Time: 15 minutes
- Cook Time: 40 minutes
- Total Time: 55 minutes
- Yield: 4 servings 1x
- Category: Main Course
- Method: Baking
- Cuisine: American
- Diet: Keto
Ingredients
- 4 medium zucchini, halved lengthwise and hollowed
- 1 1/4 cups chicken, shredded or cubed
- 2/3 cup ricotta cheese
- 3/4 cup Alfredo sauce
- 5 tbsp parmesan cheese
- 1 1/2 cups spinach, roughly chopped
- 2 tsp garlic, minced
- 1 1/2 tsp Italian seasoning
- 1/2 tsp salt
- 1/2 tsp pepper
- 1/4 tsp red pepper flakes
- 1 tsp lemon zest
- 1 1/4 cups mozzarella, shredded
- 1/2 tsp Italian seasoning, for topping
Instructions
- Preheat your oven to 375°F (190°C).
- Prepare the zucchini by slicing in half lengthwise and scooping out the insides to create boats.
- Cook the chicken if using raw, sautéing in a pan until fully cooked (about 6-8 minutes).
- Sauté the spinach in a skillet with olive oil and minced garlic until wilted.
- Mix the filling ingredients in a large bowl until well combined.
- Stuff each zucchini half with the chicken and spinach mixture.
- Add shredded mozzarella and Italian seasoning on top.
- Bake in a covered dish for 25-30 minutes, then uncover and bake for an additional 10 minutes.
- Garnish with fresh basil or parmesan if desired and let cool slightly before serving.
Notes
Feel free to vary the filling with different spices or add vegetables to suit your taste!
Nutrition
- Serving Size: 1 serving
- Calories: 250
- Sugar: 4g
- Sodium: 600mg
- Fat: 15g
- Saturated Fat: 8g
- Unsaturated Fat: 5g
- Trans Fat: 0g
- Carbohydrates: 7g
- Fiber: 2g
- Protein: 20g
- Cholesterol: 70mg
Keywords: Keto, Zucchini Boats, Chicken, Spinach, Low Carb

Minute Keto Coconut Slaw: Weeknight-Ready Crunch
Irresistible Coconut Slaw: A Fresh Twist on a Classic
Hey there, food fam! Today, we’re diving into a dish that perfectly combines crunch, sweetness, and a tropical vibe that will transport you right to the sandy beaches—yes, I’m talking about Irresistible Coconut Slaw. This slaw isn’t just any side dish; it’s a vibrant explosion of color and flavor, destined to become your new favorite accompaniment to summer barbecues, picnics, or even just a weeknight dinner.
Now, I know slaw often gets a bad rap as a soggy, tedious side, but trust me: this Coconut Slaw is anything but boring. It’s refreshing, satisfying, and oh-so-easy to whip up. Plus, it’s a fantastic way to get your veggies in without feeling like you’re sacrificing any taste. Let’s chat a bit about what makes this slaw so special.
A Trip Down Memory Lane
One of my favorite kitchen memories comes from a summer spent at my grandmother’s beach house. Every Sunday, we would have a family gathering at her place—uncles flipping burgers on the grill, aunts setting up blankets on the sand, and kids running wild. One of my grandma’s signature dishes was her creamy coleslaw, and my cousin and I would always sneak into the kitchen, waiting for that first taste of the tangy goodness.
As the years went by, my palate evolved, and I began playing around with flavors and ingredients. That nostalgia for my grandma’s coleslaw, mixed with my love for tropical flavors, inspired me to create this Coconut Slaw. It’s got that same crunchy texture I loved but with an exciting twist that’s perfect for any occasion.
Ingredients
Here’s what you’ll need to make this Coconut Slaw:
-
1 small head of red cabbage, shredded
Red cabbage not only adds a beautiful color but also packs a punch in nutrition. Rich in antioxidants and vitamin C, it helps keep everything balanced and healthy! If you don’t have red cabbage on hand, green cabbage works just as well. -
1 cup shredded carrots
Carrots bring both sweetness and crunch. They’re loaded with beta-carotene and are a fantastic way to sneak some extra veggies in. You can use pre-shredded carrots for convenience or grate your own for a fresh touch. -
1 cup shredded coconut (sweetened or unsweetened)
Coconut adds a delightful tropical flair! If you’re looking for a less sweet option, go for unsweetened coconut flakes. For a decadent twist, try using toasted coconut! -
1/2 cup mayonnaise
A creamy base that binds everything together. You can use traditional mayonnaise or make it lighter by swapping in Greek yogurt or a vegan mayo for a plant-based option. -
2 tablespoons apple cider vinegar
This ingredient brings a pleasant tang that balances the sweetness of the coconut. For a slightly different flavor, substitute with white wine vinegar or lemon juice. -
2 tablespoons honey or maple syrup
Whether you choose honey or maple syrup, this adds a natural sweetness that enhances all the flavors. If you prefer to keep things vegan, definitely opt for maple syrup. -
Salt and pepper to taste
Always use seasoning to elevate your dish! Just a pinch of salt and a dash of pepper can make a world of difference.
Step-by-Step Instructions
Now that we have our ingredients sorted, let’s get cooking! Follow these simple steps to whip up your Coconut Slaw:
-
Prepare Your Ingredients:
First things first, let’s get everything prepped. Shred the red cabbage and carrots if you haven’t bought pre-shredded versions. Think of it as your mid-week workout—getting those veggies ready is half the fun! -
Combine the Veggies:
In a large mixing bowl, toss together the shredded cabbage and carrots. This is where the color magic happens! Feel free to add in some bell peppers or scallions for an even more colorful slaw! -
Make the Dressing:
In a separate bowl, combine the mayonnaise, apple cider vinegar, and honey (or maple syrup). Whisk until smooth—show that dressing some love! If you want a thinner dressing, add a teaspoon of warm water at a time until you reach the desired consistency. -
Add the Coconut:
Once your dressing is ready, pour it over the cabbage and carrot mixture. Sprinkle in the shredded coconut and mix everything well. Get in there with your hands for the best results! The warmth from your hands helps combine everything beautifully—almost like a hug for your slaw. -
Season to Taste:
Now, it’s time for salt and pepper! Season to your liking—this is where you can let your personality shine through. Remember, seasoning is key, so don’t skip this step! -
Chill:
Cover your slaw and let it chill in the fridge for about 30 minutes. This helps the flavors meld together. Plus, it’s great to serve cold on a hot day! -
Taste Test:
Before serving, give your slaw a little taste. If you feel like it needs a bit more zing, go ahead and add more vinegar or a touch more sweetener. Always adjust to make it just right for you!
Serving Suggestions
When it comes to serving your Coconut Slaw, think about presentation. Transfer it to a beautiful serving bowl for that wow factor. You can add some extra toasted coconut on top for garnish—a little sprinkle goes a long way! Serve it alongside grilled chicken, fish tacos, or even as a vibrant topping on pulled pork sandwiches. Trust me, this slaw pairs well with anything!
Recipe Variations
Get creative! Here are a few variations you can try with this Coconut Slaw:
- Tropical Twist: Add diced pineapple for added sweetness and juiciness.
- Spicy Kick: Toss in some finely chopped jalapeños for those who love a bit of heat.
- Nutty Crunch: Throw in some slivered almonds or sunflower seeds for an extra crunch.
- Herbaceous Flair: Add in fresh mint or cilantro for a refreshing twist.
- Fruit Facelift: Swap out the coconut for diced apples or pears for a different flavor profile!
Chef’s Notes
This Coconut Slaw has evolved over the years thanks to my travels and culinary explorations. I once had a similar dish at a beachside café while visiting Hawaii, and it forever changed my view on slaw! Since then, I’ve taken inspiration from that experience. Each time I make it, I add a little twist or further tweak the dressing until it’s just right. Plus, it reminds me of those joyful summers at my grandmother’s beach house.
FAQs and Troubleshooting
Q: How long can I store leftover Coconut Slaw in the fridge?
A: It typically lasts for about 3-5 days in an airtight container. Just keep an eye on the texture—sometimes the cabbage might wilt after a few days.
Q: Can I make this slaw ahead of time?
A: Absolutely! Just make sure to store it in the refrigerator. If you want to keep the cabbage crunchy, mix the dressing in right before serving.
Q: My slaw was too watery; what happened?
A: This can happen when the cabbage releases too much moisture. To catch this, you can sprinkle the cabbage with salt beforehand and let it sit for 10 minutes. This draws out some moisture and helps keep the slaw from getting soggy!
Q: Can I make this recipe vegan?
A: Definitely! Use a plant-based mayonnaise and substitute maple syrup for honey. Easy peasy!
Nutritional Info
- Calories: Approximately 150 per serving
- Protein: 2g
- Carbohydrates: 12g
- Total Fat: 10g
- Fiber: 3g
- Sugar: 5g
So there you have it, my delightful foodies! This Irresistible Coconut Slaw is as easy to make as it is delicious. Whether you’re looking for a side dish, a topping, or even a light meal by itself, this slaw will not disappoint. Now, get cooking, and let me know how yours turns out! Happy eating!
PrintIrresistible Coconut Slaw
A vibrant and refreshing Coconut Slaw that combines crunch, sweetness, and a tropical flair, perfect for summer barbecues and picnics.
- Prep Time: 15 minutes
- Cook Time: 0 minutes
- Total Time: 30 minutes
- Yield: 4 servings 1x
- Category: Side Dish
- Method: Mixing
- Cuisine: Tropical
- Diet: Vegetarian
Ingredients
- 1 small head of red cabbage, shredded
- 1 cup shredded carrots
- 1 cup shredded coconut (sweetened or unsweetened)
- 1/2 cup mayonnaise
- 2 tablespoons apple cider vinegar
- 2 tablespoons honey or maple syrup
- Salt and pepper to taste
Instructions
- Prepare your ingredients: Shred the red cabbage and carrots if you haven’t bought pre-shredded versions.
- Combine the veggies: In a large mixing bowl, toss together the shredded cabbage and carrots.
- Make the dressing: In a separate bowl, combine the mayonnaise, apple cider vinegar, and honey (or maple syrup). Whisk until smooth.
- Add the coconut: Pour the dressing over the cabbage and carrot mixture. Mix everything well.
- Season to taste: Add salt and pepper to your liking.
- Chill: Cover your slaw and let it chill in the fridge for about 30 minutes.
- Taste test: Adjust the seasoning or acidity to your preference before serving.
Notes
This slaw pairs well with grilled chicken, fish tacos, or as a topping for pulled pork sandwiches. Consider adding toasted coconut on top for garnish.
Nutrition
- Serving Size: 1 serving
- Calories: 150
- Sugar: 5g
- Sodium: 200mg
- Fat: 10g
- Saturated Fat: 5g
- Unsaturated Fat: 5g
- Trans Fat: 0g
- Carbohydrates: 12g
- Fiber: 3g
- Protein: 2g
- Cholesterol: 15mg
Keywords: coconut slaw, tropical salad, summer side dish, refreshing coleslaw

Keto Lasagna Soup
Keto Lasagna Soup: A Comforting Classic Reimagined
Welcome, food lovers! Today, we’re diving into a delicious twist on an Italian classic that’ll make your taste buds sing and your body rejoice. If you’re a fan of lasagna but looking for a lighter, low-carb option, let me introduce you to my Keto Lasagna Soup! It’s all the hearty goodness of lasagna but in a warm, comforting soup form. Perfect for cozy dinners or meal prep for the week ahead, this dish is flexible, flavorful, and oh-so-satisfying.
Whenever I think of lasagna, I’m brought back to my childhood in the kitchen with my grandma. She was the queen of comfort food, and her kitchen always smelled like a tiny slice of heaven. On Sundays, she’d whip up her famous lasagna. We’d gather around the table, each of us waiting in anticipation, forks at the ready as she pulled that bubbly, cheese-topped masterpiece from the oven. I remember the laughter, the stories, and, of course, the love that went into every layer. Now, while I cherish those memories, I know we all deserve to enjoy our favorite foods without guilt, which is where this Keto Lasagna Soup comes into play!
So, grab your apron, and let’s set the stage for a cooking adventure that’ll keep you coming back for seconds—just like Grandma would want!
Ingredients
Let’s break down the ingredients for your Keto Lasagna Soup. The beauty of this dish is that it’s made with real, wholesome ingredients that pack a punch of flavor. Here’s what you’ll need:
-
1 tablespoon avocado or vegetable oil: Avocado oil is my go-to for cooking because of its high smoke point and healthy fats. Olive oil works too if you’re in the Mediterranean mood!
-
1 pound Italian sausage (ground): This adds a spicy, savory kick. If you’re looking for a lighter option, turkey sausage is a fantastic substitution without losing flavor.
-
½ pound ground beef: Classic ground beef adds heartiness. Feel free to swap with ground turkey or chicken for a leaner profile.
-
1 onion (diced): A base for flavor. If you’re not a fan of onion, try shallots or leeks for a sweeter spin.
-
6 cloves garlic (minced): Because garlic makes everything better, right? Use fresh for the most punch, or pre-minced for a time-saver.
-
1 (14 oz can) crushed tomatoes: These provide a rich, flavorful base. Fire-roasted varieties add a smoky depth that’s simply divine.
-
1 (6 oz can) tomato paste: For that concentrated flavor and thickness in your soup, tomato paste is key—I can’t improvise without it!
-
1 (14 oz can) tomato sauce: Adds the necessary moisture and depth. You could replace it with a homemade sauce if you’re feeling adventurous!
-
2 ½ cups chicken broth (low sodium): A warm broth ties everything together beautifully. Vegetable broth can be an excellent swap for our veggie friends.
-
1 teaspoon fennel seeds: These seeds impart an earthy, slightly sweet flavor profile reminiscent of traditional Italian sausage. Not a fan? Omit and use more Italian seasoning.
-
2 teaspoons Italian seasoning: This versatile combo of herbs will elevate your soup. Feel free to add dried basil, oregano, or thyme for extra flair.
-
1 ½ teaspoons kosher salt: Salt enhances all flavors. Adjust based on your taste preference, especially if you’re using salted broth.
-
½ teaspoon black pepper: Basic but essential! You could use crushed red pepper flakes for some heat.
-
8 oz mozzarella (shredded): Essential for that gooey, melty goodness! If you need a dairy-free option, look for vegan cheeses that melt well.
-
½ cup Parmesan cheese (grated): The finishing touch! Nutritional yeast is a great, cheesy alternative for those on a dairy-free journey.
-
½ cup fresh parsley (chopped): A burst of color and freshness to finalize your bowl of love!
With these ingredients gathered, you’re one step closer to a hug in a bowl. Let’s cook!
Step-by-Step Instructions
Now that we’ve got our ingredients, let’s get cooking! Follow along with these simple steps to whip up your Keto Lasagna Soup.
-
Heat the Oil: In a large pot over medium-high heat, add 1 tablespoon of avocado oil. Let it heat until shimmering. This is the perfect time to take a deep breath and enjoy the anticipation!
-
Sauté the Meat: Add 1 pound of ground Italian sausage and ½ pound of ground beef to the pot. Use a wooden spoon to break up the meat into smaller pieces. Sauté until browned, about 5–7 minutes. Essential chef hack: Don’t rush this step! Browning the meat adds depth and flavor to your soup.
-
Add Onion and Garlic: Toss in 1 diced onion and 6 minced cloves of garlic. Stir frequently until the onion turns translucent (about 3–4 minutes). This is where your kitchen will start smelling amazing!
-
Stir in Tomato Products: Next, add the can of crushed tomatoes, the tomato paste, and the tomato sauce. Stir well to combine. If you like your soup extra thick, feel free to add a little more tomato paste or crushed tomatoes.
-
Pour in Chicken Broth: Gradually add the 2 ½ cups of low-sodium chicken broth. Bring the mixture to a gentle boil, then reduce the heat to low and let it simmer. This allows all those glorious flavors to meld together beautifully.
-
Season It Up: Add 1 teaspoon of fennel seeds, 2 teaspoons of Italian seasoning, 1 ½ teaspoons of kosher salt, and ½ teaspoon of black pepper. Taste and adjust seasoning to your liking! This is your moment to shine—taste as you go!
-
Add Cheese: After about 30 minutes of simmering, stir in the 8 oz of shredded mozzarella and ½ cup of grated Parmesan. You want that melty goodness! If you’re feeling indulgent, add even more. Yum!
-
Finish with Fresh Herbs: Right before serving, stir in ½ cup of chopped fresh parsley for that vibrant pop of color and freshness. This elevates the entire dish!
And there you have it, a beautiful bubbling pot of Keto Lasagna Soup! But wait, we’re not done yet—let’s talk about serving suggestions.
Serving Suggestions
To serve your Keto Lasagna Soup, ladle it generously into bowls, making sure everyone gets a hearty portion of that gooey cheese. You could sprinkle some extra Parmesan on top for added richness and garnish with a sprinkle of parsley for a touch of elegance.
Pair it with a crisp side salad or some low-carb garlic bread for a complete meal. Trust me, this soup is perfect for those chilly nights when you need something comforting and nutritious!
Recipe Variations
If you’re like me and enjoy experimenting in the kitchen, here are a few delicious variations of this recipe:
-
Vegetable Twist: Add chopped zucchini or spinach for extra veggies. Toss them in just before serving for a pop of color and nutrients!
-
Spicy Kick: Toss in a pinch of red pepper flakes or a chopped jalapeño for some heat. It’ll give your soup a nice spicy edge.
-
Creamy Version: For a creamier soup, add a splash of heavy cream or cream cheese right before serving. It’s rich and oh-so-satisfying!
-
Mushroom Lovers: Sauté some mushrooms with the onions for an earthy flavor richness.
-
Swap the Meats: Use chicken sausage or ground turkey for a leaner alternative, or make it vegetarian by adding lentils or chickpeas instead!
Chef’s Notes
I started making this Keto Lasagna Soup after I was looking for something quick to whip up that still gave me that cozy pasta feeling without the carbs. It’s great for meal prep since it tastes even better the next day! I’ve often played with the ingredients, depending on what I have on hand, making it a fun dish to get creative with.
One of my funniest kitchen mishaps was when I accidentally added too much fennel one evening—let’s just say that was a soup no one wanted seconds of! But those kitchen blunders have only made me a more confident cook, teaching me the importance of balance and tasting as I go.
FAQs and Troubleshooting
-
Can I make this soup ahead of time?
Absolutely! This soup stores well in an airtight container in the fridge for up to 4 days. Just reheat on the stove or in the microwave when you’re ready to enjoy. -
What if my soup is too thick?
If you find your soup is thicker than you’d like, simply stir in some more chicken broth until it reaches your desired consistency. -
Can I freeze this soup?
Yes! Allow it to cool completely before transferring it to freezer-safe containers. It should last for up to 3 months. Just thaw in the fridge overnight before reheating. -
How can I make this soup vegetarian?
Swap the meats for 1 cup of cooked lentils or chickpeas. You can also add extra vegetables like bell peppers, zucchini, or spinach for a hearty meal!
Nutritional Info
While I like to focus on the joy of cooking over strict nutritional guidelines, here’s a rough nutritional breakdown per serving:
- Calories: 435
- Protein: 26g
- Fat: 30g
- Carbohydrates: 10g
- Fiber: 3g
Remember, nutrition varies based on the specific ingredients and brands used, so adjust to fit your dietary needs!
And there you have it! A Keto Lasagna Soup that’s not only delicious but full of heart and memories. I hope it brings you as much joy in the kitchen as it has brought me. Happy cooking, and remember to keep it fresh, simple, and seriously delicious!
PrintKeto Lasagna Soup

A delicious twist on traditional lasagna, this Keto Lasagna Soup combines hearty ingredients in a comforting broth, perfect for cozy dinners or meal prep.
- Prep Time: 15 minutes
- Cook Time: 30 minutes
- Total Time: 45 minutes
- Yield: 6 servings 1x
- Category: Soup
- Method: Stovetop
- Cuisine: Italian
- Diet: Keto
Ingredients
- 1 tablespoon avocado or vegetable oil
- 1 pound Italian sausage (ground)
- ½ pound ground beef
- 1 onion (diced)
- 6 cloves garlic (minced)
- 1 (14 oz can) crushed tomatoes
- 1 (6 oz can) tomato paste
- 1 (14 oz can) tomato sauce
- 2 ½ cups chicken broth (low sodium)
- 1 teaspoon fennel seeds
- 2 teaspoons Italian seasoning
- 1 ½ teaspoons kosher salt
- ½ teaspoon black pepper
- 8 oz mozzarella (shredded)
- ½ cup Parmesan cheese (grated)
- ½ cup fresh parsley (chopped)
Instructions
- Heat the oil: In a large pot over medium-high heat, add 1 tablespoon of avocado oil. Let it heat until shimmering.
- Sauté the meat: Add 1 pound of ground Italian sausage and ½ pound of ground beef to the pot. Sauté until browned, about 5–7 minutes.
- Add onion and garlic: Toss in 1 diced onion and 6 minced cloves of garlic. Stir frequently until the onion turns translucent, about 3–4 minutes.
- Stir in tomato products: Add the can of crushed tomatoes, the tomato paste, and the tomato sauce. Stir well to combine.
- Pour in chicken broth: Gradually add 2 ½ cups of low-sodium chicken broth. Bring to a gentle boil, then reduce the heat to low and let it simmer.
- Season it up: Add spices and adjust seasonings to taste.
- Add cheese: After about 30 minutes of simmering, stir in 8 oz of shredded mozzarella and ½ cup of grated Parmesan.
- Finish with fresh herbs: Before serving, stir in ½ cup of chopped fresh parsley.
Notes
This soup stores well in the fridge for up to 4 days and can be frozen for up to 3 months. Adjust the thickness by adding more chicken broth if necessary.
Nutrition
- Serving Size: 1 serving
- Calories: 435
- Sugar: 5g
- Sodium: 800mg
- Fat: 30g
- Saturated Fat: 12g
- Unsaturated Fat: 18g
- Trans Fat: 0g
- Carbohydrates: 10g
- Fiber: 3g
- Protein: 26g
- Cholesterol: 90mg
Keywords: Keto, Soup, Italian, Low-Carb, Comfort Food
Keto stuffed pepper soup
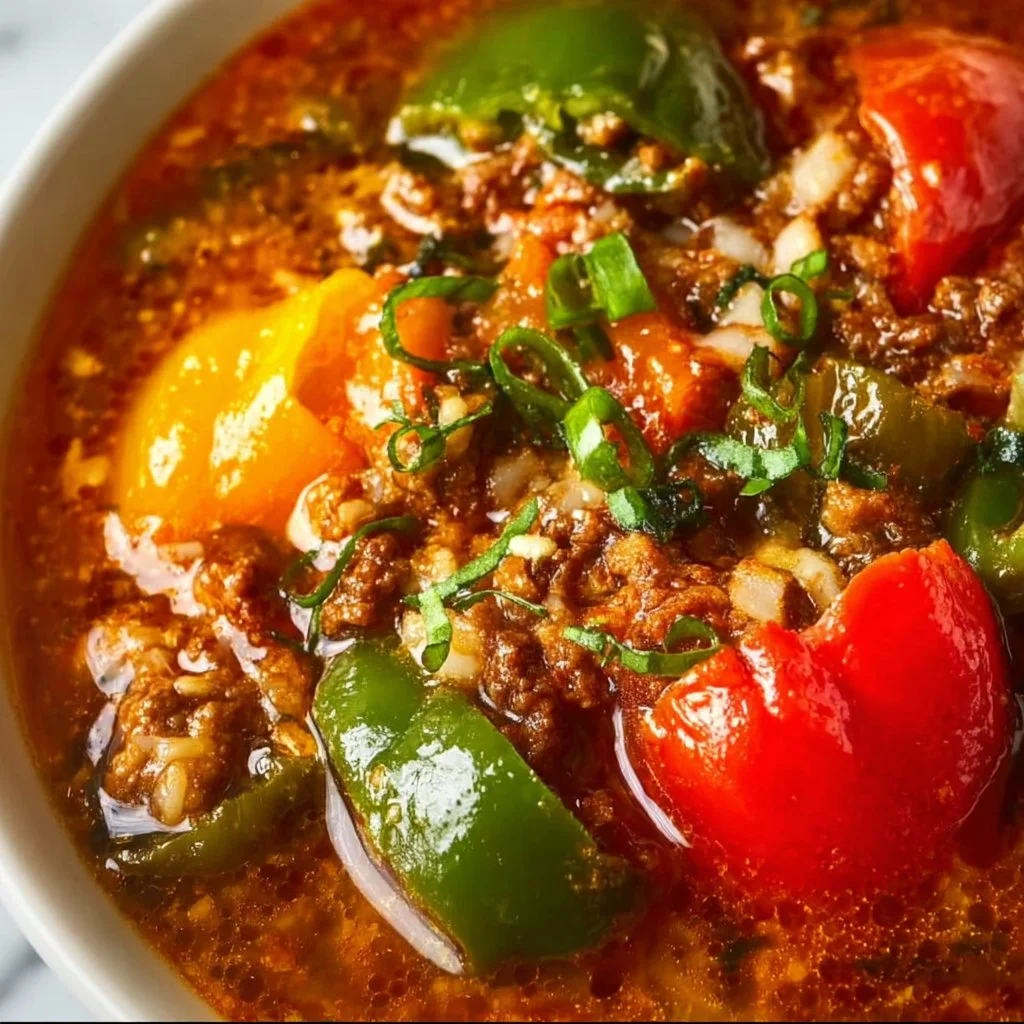
Dive into Decadence: Keto Stuffed Pepper Soup
Welcome, my fellow food enthusiasts! Today, we’re diving into a dish that is not only packed with flavor but also fits seamlessly into the keto lifestyle—Keto Stuffed Pepper Soup. You know those days when the weather is a bit drizzly, and all you want is something warm and comforting? That’s where this delicious soup comes into play. It’s hearty, it’s nutritious, and it’s downright satisfying!
Imagine curling up on the couch with a steaming bowl of vibrant red and green goodness, just waiting to fill your belly with warmth. This Keto Stuffed Pepper Soup is like getting all the goodness of stuffed peppers without the hassle—no need to hollow out any peppers here! Just chop, sauté, and simmer for a delightful one-pot meal that’ll have everyone asking for seconds.
But beyond its comforting qualities, this soup is all about fresh ingredients and bold flavors. We’re talking richly seasoned ground beef, fresh bell peppers, and aromatic herbs bringing vitality to your bowl. Plus, it’s a great way to meet those veggie goals while enjoying every spoonful. So grab your apron, and let’s get started on this delicious journey!
A Fond Memory to Spice Up Your Kitchen
Ah, the memories that come flooding back when I think of stuffed peppers! One of my favorite childhood memories is being in the kitchen with my grandma, watching her work her magic. The kitchen was always filled with such excitement and warmth when she’d throw together her famous stuffed peppers. The moment the smell of sautéed onions and garlic wafted through the air, I knew dinner would be something special.
Grandma’s technique was a bit more traditional; she would carefully stuff each pepper and bake them to perfection. I loved the anticipation as they bubbled away in the oven. But as time went on and life got busier, I realized I needed a quicker version without sacrificing all that nostalgic flavor. That’s how this Keto Stuffed Pepper Soup came to life! With all the comforting elements of grandma’s classic but served in a way that fits our fast-paced lives today.
Ingredients Breakdown
Let’s gather all the fresh, wholesome ingredients for our Keto Stuffed Pepper Soup. Remember, the beauty of cooking lies in flexibility—don’t hesitate to mix things up based on what you have on hand!
-
Olive Oil (1 tablespoon)
A heart-healthy fat that adds richness. Feel free to substitute with avocado oil for a different flavor profile. -
Chopped Onion (70 g / 2.5 oz)
Provides a sweet base for your soup. If you’re looking for a milder taste, shallots would work well too. -
Ground Beef (450 g / 1 lb / 16 oz)
This is the protein powerhouse of your soup. For a leaner option, ground turkey or chicken can be fantastic alternatives. -
Chopped Green or Yellow Pepper (80 g / 2.8 oz)
Adds that classic stuffed pepper flavor! You can mix and match with other colors like orange for more sweetness. -
Chopped Red Pepper (145 g / 5.12 oz)
Not only does it brighten the soup, but it also brings a wee bit of sweetness. If you’re looking to reduce carbs, you can skip this altogether. -
Minced Garlic (3 cloves)
The aromatic punch we all love! If fresh isn’t available, 1 teaspoon of garlic powder can work as a substitute. -
Canned Crushed Tomatoes (1 cup / 200 ml)
Introduces acidity and depth. If you prefer fresh, go for about 4-5 ripe tomatoes, chopped. -
Beef Broth (1.5 cups / 300 ml)
Adds a robust flavor base. Vegetable broth can be used for a vegetarian twist! -
Water (2 cups / 400 ml)
Helps to reach the desired consistency; you can adjust based on how chunky or brothy you like it. -
Salt (1/2 teaspoon or more to taste)
Don’t skip seasoning! Use sea salt or kosher salt for better flavor. -
Pepper (to taste)
Freshly cracked black pepper enhances all the flavors. -
Ground Paprika (1 teaspoon)
Adds warmth and subtle smokiness. Smoked paprika is a great substitution for added depth. -
Turmeric (1 teaspoon)
Not only does it boost color, but it’s also full of anti-inflammatory properties. -
Dried Basil (1 teaspoon)
A classic herb that complements the peppers beautifully. You can easily swap it out for dried thyme or oregano. -
Dried Oregano (1 teaspoon)
A necessity for that Italian flair. Fresh could be used if you have it on hand. -
Freshly Chopped Parsley (1 tablespoon)
Brightens the finished dish. Substitute with cilantro if you’re a fan of its unique flavor!
For Serving:
-
Sour Cream
Adds a creamy, tangy touch—Greek yogurt is a great substitute! -
Freshly Chopped Parsley
For that color pop on top! -
Chopped Spring Onion
A milder onion flavor that’s perfect for garnish. -
Shredded Cheddar Cheese
Because who doesn’t love cheese? Feel free to use your favorite cheese blend!
Step-by-Step Cooking Instructions
Alright, let’s get to the fun part—cooking this delectable Keto Stuffed Pepper Soup! Here’s a step-by-step breakdown to guide you through.
-
Sauté the Aromatics
In a large pot, heat the olive oil over medium heat. Add the chopped onions and let them sweat for about 3-4 minutes until they’re translucent and aromatic. This step builds the foundation of flavor for your soup! -
Add the Garlic
Next, toss in the minced garlic and sauté for an additional 1-2 minutes until fragrant. Be careful not to burn it! Burnt garlic brings bitterness, and trust me, we don’t want that in our delicious soup. -
Brown the Ground Beef
Crank up the heat a smidge and add the ground beef. Using a wooden spoon, break it apart and cook until browned, about 6-8 minutes. Drain excess grease if desired. This step enriches the soup with meaty goodness. -
Incorporate the Peppers
Add the chopped green and red peppers to the pot. Stir everything together and let it cook for about 5 minutes, allowing the peppers to soften slightly. The vibrant colors are truly a feast for the eyes! -
Mix in the Tomatoes and Broth
Now it’s time to pour in the crushed tomatoes and beef broth. Stir to combine, and then add the water. Bring everything to a gentle simmer. -
Season Your Soup
Sprinkle in the salt, pepper, paprika, turmeric, basil, and oregano. This is your chance to infuse the flavors! Let the soup simmer for about 20-25 minutes, uncovered. The longer it simmers, the more those flavors meld together. -
Final Touches
After simmering, taste your soup and adjust the seasoning as necessary. If you like, feel free to add more spices or herbs! The magic happens when we taste and tweak until it’s just right. -
Prepare for Serving
Once satisfied, ladle your Keto Stuffed Pepper Soup into bowls. Top with a dollop of sour cream, a sprinkle of chopped parsley, chopped spring onions, and a generous handful of shredded cheddar cheese.
Serving Suggestions
Plating is an art! To serve your flavorful Keto Stuffed Pepper Soup, simply ladle it into a rustic bowl or a deep plate. The vibrant colors of the peppers and herbs will look stunning against the white bowl. Garnish generously to create a beautiful contrast, and don’t forget a side of crusty bread for those who aren’t counting carbs—just for dipping, of course!
Recipe Variations
Now, for the creative souls out there, here are some fun twists you might want to try with this recipe:
-
Spicy Kick: Add in some diced jalapeños or a sprinkle of red pepper flakes for an extra layer of heat.
-
Vegetarian Delight: Substitute ground beef with lentils or robust mushrooms for a hearty vegetarian option.
-
Cheesy Goodness: Stir in cream cheese towards the end of cooking for an extra creamy texture and rich flavor.
-
Herb Infusion: Try fresh herbs like thyme and rosemary instead of dried for a bright, aromatic addition.
-
Curry Twist: Incorporate curry powder in place of the paprika and turmeric for a fun, exotic take on the flavors.
Chef’s Notes
This Keto Stuffed Pepper Soup has been a hit in my kitchen, evolving with each batch. It started as a quick weeknight meal and turned into something I love to serve at gatherings—everyone loves it! One memory that stands out is the time I accidentally added double the garlic… you know what? It turned out pretty fantastic! The beauty of cooking is that while there’s a recipe, there’s always room for creativity and accidental breakthroughs. Embrace the kitchen chaos; some of the best flavors come from unexpected discoveries!
FAQs and Troubleshooting
1. My soup is too thick—what can I do?
If your soup has thickened more than you’d like, simply add a bit more broth or water until you reach your desired consistency.
2. Can I make this soup in advance?
Absolutely! This soup actually gets better over time as the flavors meld. Store it in the fridge for up to 4 days, and reheat on the stove when you’re ready to enjoy.
3. What’s the best way to freeze leftovers?
Let the soup cool completely, then transfer it to an airtight container. It can be frozen for up to 3 months. Just thaw in the fridge overnight before reheating.
4. Why does my soup taste a bit bland?
Every ingredient brings its own level of flavor! If yours falls flat, it could be due to insufficient seasoning. Taste as you go and don’t be afraid to add more salt, spices, or herbs.
Nutritional Info (Optional)
For those keeping track, here’s a rough breakdown per serving:
- Calories: 340
- Protein: 24g
- Fat: 22g
- Carbohydrates: 9g (Net carbs after fiber)
- Fiber: 3g
And there you have it—the delightful journey that is Keto Stuffed Pepper Soup! I hope it brings as much joy to your kitchen as it does to mine. Remember, cooking is about exploring flavors, enjoying the moment, and making delicious memories. So, let’s eat well, feel good, and keep those cravings in check. Happy cooking, friends!
PrintKeto Stuffed Pepper Soup

A delicious, comforting soup packed with the flavors of stuffed peppers, perfect for a keto lifestyle.
- Prep Time: 10 minutes
- Cook Time: 30 minutes
- Total Time: 40 minutes
- Yield: 6 servings 1x
- Category: Soup
- Method: Stovetop
- Cuisine: American
- Diet: Keto
Ingredients
- 1 tablespoon Olive Oil
- 70 g Chopped Onion
- 450 g Ground Beef
- 80 g Chopped Green or Yellow Pepper
- 145 g Chopped Red Pepper
- 3 cloves Minced Garlic
- 1 cup (200 ml) Canned Crushed Tomatoes
- 1.5 cups (300 ml) Beef Broth
- 2 cups (400 ml) Water
- 1/2 teaspoon Salt (or more to taste)
- Pepper (to taste)
- 1 teaspoon Ground Paprika
- 1 teaspoon Turmeric
- 1 teaspoon Dried Basil
- 1 teaspoon Dried Oregano
- 1 tablespoon Freshly Chopped Parsley
- Sour Cream (for serving)
- Freshly Chopped Parsley (for garnish)
- Chopped Spring Onion (for garnish)
- Shredded Cheddar Cheese (for topping)
Instructions
- Sauté the olive oil in a large pot over medium heat. Add the chopped onions and let them sweat for about 3-4 minutes until translucent.
- Add the minced garlic and sauté for an additional 1-2 minutes until fragrant.
- Brown the ground beef, breaking it apart as it cooks, for about 6-8 minutes until browned.
- Incorporate the chopped green and red peppers and cook for about 5 minutes, allowing them to soften.
- Mix in the crushed tomatoes and beef broth, then add the water. Bring to a gentle simmer.
- Season the soup with salt, pepper, paprika, turmeric, basil, and oregano. Let it simmer uncovered for 20-25 minutes.
- Taste and adjust seasoning as necessary before serving.
- Prepare the soup in bowls and top with sour cream, parsley, chopped spring onions, and shredded cheddar cheese.
Notes
This soup can be made in advance and tastes even better the next day. Feel free to customize with additional spices or herbs.
Nutrition
- Serving Size: 1 serving
- Calories: 340
- Sugar: 4g
- Sodium: 800mg
- Fat: 22g
- Saturated Fat: 10g
- Unsaturated Fat: 8g
- Trans Fat: 0g
- Carbohydrates: 9g
- Fiber: 3g
- Protein: 24g
- Cholesterol: 80mg
Keywords: keto, soup, stuffed peppers, healthy recipe, low carb
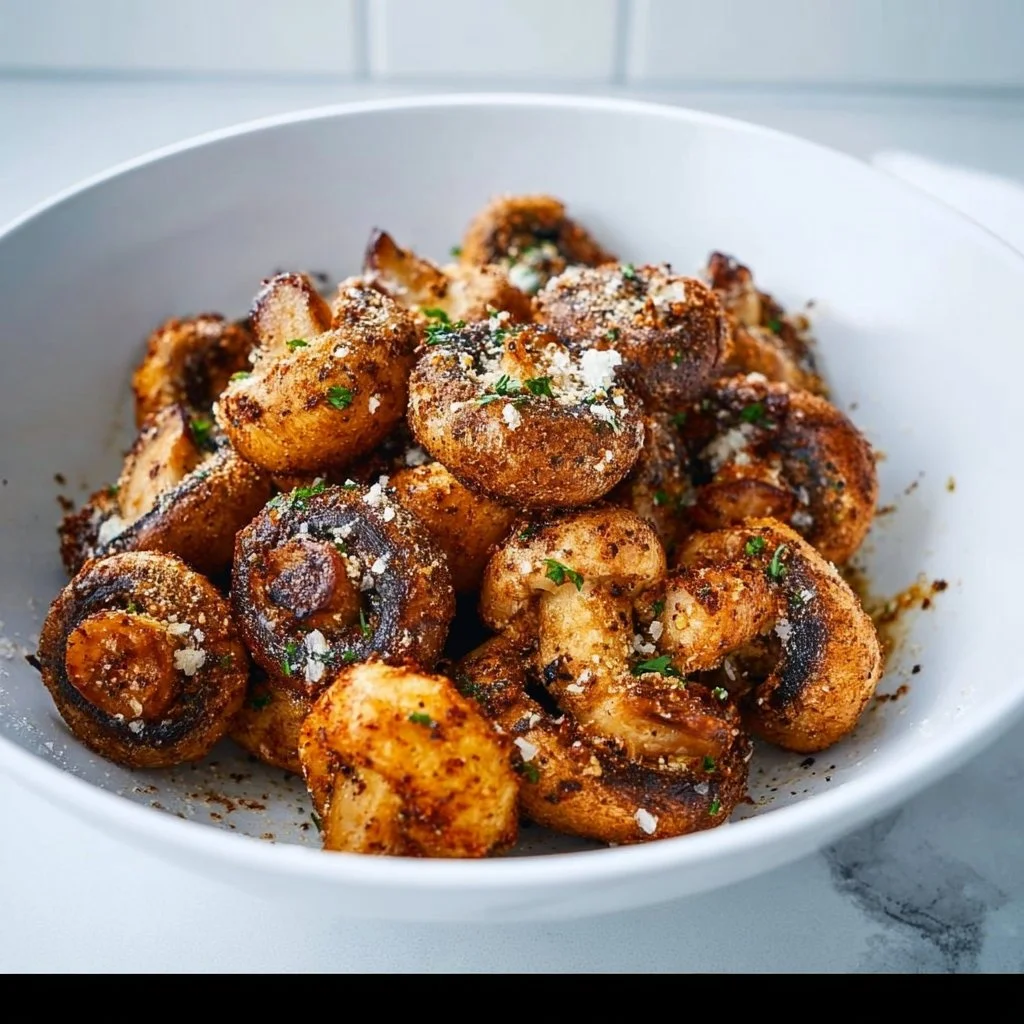
Keto Fried Mushrooms
Keto Fried Mushrooms: A Crispy Delight That Wins Hearts
Welcome to my kitchen, food lovers! Today, I’m excited to take you on a culinary adventure that’s all about crispy, crunchy flavors that tickle your taste buds without the carbs. Yes, you guessed it! We’re diving into the delicious world of Keto Fried Mushrooms.
Now, whether you’re on a keto journey, looking to add more veggies into your meals, or just craving something delightful to snack on, these mushrooms are your ticket to happiness. Why? Because they’re fluffy on the inside with a golden, crispy coating that adds a satisfying crunch to every bite. Plus, they make a perfect snack, side dish, or even a party appetizer that will leave your friends and family wanting more!
Before we jump into the cooking process, let’s take a moment to appreciate the wondrous and versatile mushroom. Not only are they low in carbs, but they’re also packed with flavor and nutrients, proving that healthy eating can be absolutely fabulous! Alright, grab your apron, and let’s get cooking!
A Little Kitchen Story
Growing up, my family had a cozy little restaurant where good food brought everyone together. One dish that never failed to disappear from the menu was our crispy fried mushrooms. My mom used to whip them up for our family gatherings, and they quickly became the star of every meal.
I’ll never forget those weekends when friends would come to our place, seeking not just a meal but an experience. I’d watch eagerly as my mom tossed mushrooms in a zesty batter, her laughter mixing with the sizzling sounds of them frying in the pan. The aroma filled the air, creating an atmosphere of excitement and anticipation that was hard to resist.
Those moments instilled in me a love for food that is both comforting and delightful. They also taught me that cooking is more than just following recipes—it’s about sharing joy, creating connection, and savoring life’s little pleasures. So, as I share this keto-friendly fried mushroom recipe, I want you to feel the same love and joy that was present in my childhood kitchen.
Ingredients
Now, let’s talk about what you’ll need for these delectable Keto Fried Mushrooms:
-
2 cups mushrooms, sliced: Choose your favorite type, such as button, cremini, or shiitake. Mushrooms are low in carbs, high in fiber, and an excellent source of antioxidants. Substitution Tip: If you want a different texture or flavor, try using zucchini slices or eggplant.
-
1/4 cup almond flour: This is our crispy coating that keeps the mushrooms light while giving them a delicate crunch. Chef’s Insight: Almond flour is keto-friendly and gluten-free, making it perfect for those looking for healthier options. If you’re nut-free, you can swap it with finely crushed pork rinds for a unique twist.
-
1/2 teaspoon garlic powder: Garlic is a flavor powerhouse in any dish. It also brings a satisfying aroma that makes your kitchen smell amazing. Substitute: If you love fresh flavors, go for fresh minced garlic!
-
1/2 teaspoon onion powder: Helps to enhance the overall flavor profile of the dish, adding a touch of sweetness. Fun Fact: You can use chives or green onions for a fresh kick.
-
Salt and pepper to taste: Essential seasoning that amplifies flavor. Don’t be shy; taste as you go!
-
Oil for frying: I recommend avocado oil for its high smoke point and health benefits, but you can also use olive oil or coconut oil. Pro Tip: Avoid using vegetable oil as it’s not ideal for high-heat cooking.
Step-by-Step Instructions
Now, it’s time to roll up your sleeves and dive into the cooking! Let’s make these Keto Fried Mushrooms together, shall we?
Step 1: Prepare the Mushrooms
Start by cleaning your mushrooms under running cold water. Gently scrub with a cloth to remove any dirt. Once you’ve cleaned them, slice the mushrooms evenly, about 1/4 inch thick, so they cook evenly and get that nice crispy crust.
Step 2: Create Your Coating
In a medium bowl, combine the almond flour, garlic powder, onion powder, salt, and pepper. Stir them together until they’re well mixed. This flour blend is not only keto-friendly but also gluten-free! You can adjust seasoning according to your preference—feel free to add a splash of your favorite spice!
Step 3: Heat the Oil
In a large skillet, heat about 1/2 inch of your chosen oil over medium-high heat. To check if the oil is hot enough, you can drop a small piece of mushroom in; if it sizzles right away, you’re ready to go!
Step 4: Coat the Mushrooms
Take each sliced mushroom and dip it into the almond flour mixture, making sure to coat it evenly. Shake off any excess flour. This step is crucial because it ensures that each bite delivers that crispy texture we’re after.
Step 5: Fry the Mushrooms
Carefully place the coated mushrooms into the hot oil, a few at a time—don’t overcrowd the skillet! Fry them until they turn golden brown, typically about 2-3 minutes on each side. Use a slotted spoon to turn them for an even fry. You’ll know they’re done when they are beautifully crispy and golden.
Step 6: Drain and Serve
Once fried, use the slotted spoon to transfer the mushrooms to a plate lined with paper towels, which will absorb the excess oil. Repeat with the remaining mushrooms.
Chef’s Tip:
Get creative here—while the mushrooms fry, play some upbeat music or enjoy a fun chat with friends. Cooking is meant to be enjoyable, after all!
Serving Suggestions
These crispy Keto Fried Mushrooms are perfect as they are, but I love to serve them with a vibrant, zesty dipping sauce. A creamy garlic aioli or spicy ranch complements the flavors beautifully! For presentation, simply arrange the mushrooms on a colorful platter, garnished with fresh herbs like parsley or chives. Don’t shy away from getting a little fancy with the plating—this is your moment, food artist!
Recipe Variations
Want to mix things up a bit? Here are a few delicious variations to try:
- Cheesy Delight: Add 1/4 cup of grated Parmesan cheese to your almond flour mix for an extra layer of flavor.
- Spicy Kick: Incorporate some cayenne pepper or chili powder into the coating for a spicier version.
- Herb Infusion: Mix in fresh herbs like thyme or oregano along with the coat for a fragrant twist.
- Sweet & Savory: Try adding a splash of balsamic vinegar to the frying oil for a hint of sweetness.
- Paleo-Friendly: Instead of almond flour, use coconut flour for a different flavor profile (note: you may need to adjust the amount).
Chef’s Notes
As a chef who believes in the transformative power of food, I’ve played around with variations of fried mushrooms over the years. I’d say my favorite discovery was the cheese infusion; it adds a lovely savoriness that’s hard to resist.
One time, I accidentally added way too much cayenne pepper while experimenting, and let’s just say, it was a bit of a spicy surprise! Lesson learned: always adjust seasonings gradually. Cooking is all about experimenting, and sometimes the best dishes come from unexpected places.
FAQs and Troubleshooting
1. Why are my mushrooms soggy?
- This usually happens because of excess moisture or overcrowding in the frying pan. Make sure to dry the mushrooms thoroughly before coating and frying them in batches.
2. Can I bake these instead of frying?
- Absolutely! Lay them out on a baking sheet lined with parchment paper, spray with cooking oil, and bake at 400°F (200°C) for about 15-20 minutes, flipping halfway through.
3. What should I serve with my fried mushrooms?
- These mushrooms pair wonderfully with a fresh salad, grilled protein, or even on top of a keto pizza for some added crunch!
4. How do I store leftovers?
- Store any leftovers in an airtight container in the fridge for up to 3 days. To reheat, place them in a hot skillet for a couple of minutes to regain their crispy texture.
Nutritional Info
While this keto-friendly dish is best enjoyed fresh, if you happen to have leftovers, you won’t have to feel guilty! Each serving contains approximately:
- Calories: 150
- Net Carbs: 5g
- Protein: 5g
- Fat: 12g
And there you have it—my delightful recipe for Keto Fried Mushrooms! I hope you enjoy making these as much as I did sharing them with you. Remember, cooking is about love, creativity, and, most importantly, having fun! Happy cooking!
PrintKeto Fried Mushrooms

Crispy, crunchy keto-friendly mushrooms that make a perfect snack or appetizer.
- Prep Time: 10 minutes
- Cook Time: 15 minutes
- Total Time: 25 minutes
- Yield: 4 servings 1x
- Category: Appetizer
- Method: Frying
- Cuisine: Keto
- Diet: Keto
Ingredients
- 2 cups mushrooms, sliced
- 1/4 cup almond flour
- 1/2 teaspoon garlic powder
- 1/2 teaspoon onion powder
- Salt and pepper to taste
- Oil for frying
Instructions
- Prepare the mushrooms by cleaning them under running cold water and slicing them evenly, about 1/4 inch thick.
- Create the coating by mixing almond flour, garlic powder, onion powder, salt, and pepper in a medium bowl.
- Heat about 1/2 inch of oil in a large skillet over medium-high heat.
- Coat each mushroom slice in the almond flour mixture, shaking off any excess flour.
- Fry the coated mushrooms in the hot oil until they turn golden brown, about 2-3 minutes on each side.
- Drain on paper towels and serve with a dipping sauce of your choice.
Notes
For a fancy touch, serve with a zesty dipping sauce like garlic aioli or spicy ranch.
Nutrition
- Serving Size: 1 serving
- Calories: 150
- Sugar: 1g
- Sodium: 200mg
- Fat: 12g
- Saturated Fat: 1g
- Unsaturated Fat: 11g
- Trans Fat: 0g
- Carbohydrates: 5g
- Fiber: 2g
- Protein: 5g
- Cholesterol: 0mg
Keywords: keto, fried mushrooms, low carb appetizer, crispy snack, healthy eating