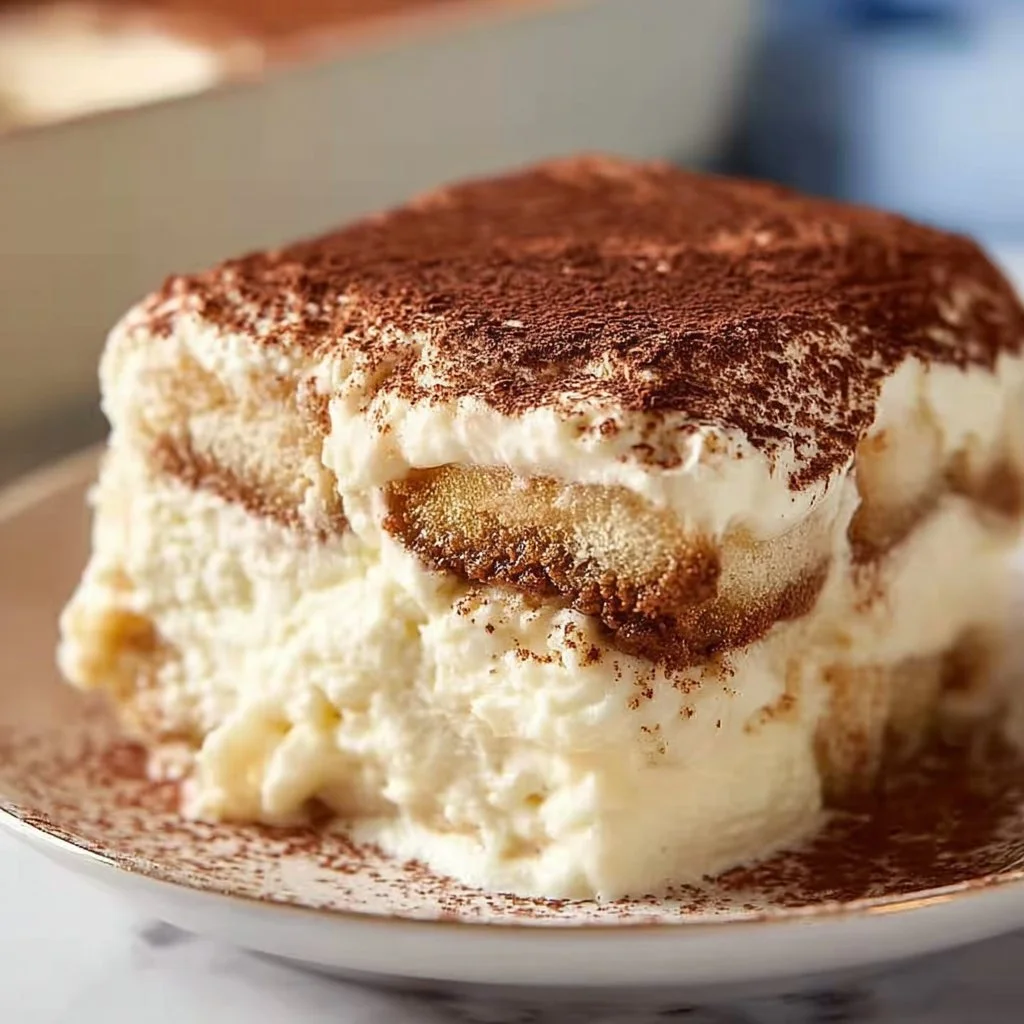
Keto Tiramisu
Indulge Without Guilt: Keto Tiramisu
Welcome back to Clean Plate Cravings! Today, we’re diving into a dessert that’s synonymous with indulgence yet adheres to that oh-so-coveted keto lifestyle! Yes, I’m talking about Keto Tiramisu. This classic Italian dessert has been revamped into a low-carb delight that still captures the essence, flavors, and sheer joy of sweet moments—without the sugar crash. Not only is it rich and creamy, but it also sparkles with the warmth of nostalgia and hints of espresso that dance on your palate.
Now, let’s face it: if you’ve ever had a full-on sugar high (or crash), it’s time to embrace a healthier way to enjoy desserts. Picture this: It’s a relaxed Sunday afternoon, and you’ve whipped together a delectable Keto Tiramisu that fills your kitchen with fragrant notes of coffee and cocoa. Your friends gather excitedly around the kitchen island, each slice dripping with creamy goodness, and laughter fills the air. That’s what I’m talking about—perfect moments where food brings us together and nourishes both body and spirit!
A Sweet Memory
Let me whisk you back to a bright summer afternoon when my Italian grandmother, Nonna Rosa, took me under her wing in her cozy kitchen. The sun filtered through the window, illuminating the dust motes dancing in the air as nonna graciously prepped for our family gathering. There was always a sense of excitement when dessert was involved. "Ava," she called, her voice lilting with warmth. “You must help me make tiramisu today.”
I watched as she expertly layered espresso-soaked ladyfingers and rich mascarpone while sharing stories of each ingredient and the love that went into making them. The best part? Laughter, lots of laughter. I remember her saying, “Life is sweet; it should taste sweet!” Fast forward years later, and I find myself crafting a keto version that captures those cherishable moments, allowing everyone to indulge in the flavor without the guilt.
Ingredients
When making this delightful Keto Tiramisu, you’ll need a medley of simple yet powerful ingredients. Here’s what you’ll need:
-
1 cup almond flour
- This nutty flour is not only low in carbs but also gives a beautiful base for our layers. If you want to experiment, you can swap it with coconut flour, but it will require adjustments in quantities since coconut flour is more absorbent.
-
1/2 cup erythritol
- This natural sweetener is my go-to for keto recipes, as it provides a sweet taste without the added sugars. If you prefer a different sweetener, monk fruit or stevia can also work, but adjust to taste since they can be sweeter.
-
4 large eggs
- Eggs bring richness and act as a binding agent here. Always use fresh eggs for the best flavor—organic if possible! And remember, the egg’s temperature matters; room temperature eggs blend better.
-
1 cup mascarpone cheese
- Mascarpone is the luscious heart of tiramisu, giving it that creamy texture. If you can’t find mascarpone, a mixture of cream cheese and heavy cream can be a good substitute.
-
1 cup heavy cream
- This ingredient adds a dreamy texture that elevates our dessert. You can replace it with coconut cream for a dairy-free option—just make sure it’s well-chilled!
-
1 teaspoon vanilla extract
- Vanilla is like the fairy dust of baking. It enhances everything! Use pure vanilla extract if you can; imitation vanilla just doesn’t hold a candle to the real deal.
-
1 cup brewed coffee
- Strong, robust coffee is essential for that genuine tiramisu flavor. Feel free to use decaf if you prefer! Instant coffee can work, but brew up your favorite cup.
-
Cocoa powder for dusting
- A dusting of cocoa on top adds not only the signature look but also a hint of bitterness that perfectly balances the sweetness of the dessert. Dutch-processed cocoa adds richness if you want to go that route!
Step-by-Step Instructions
Now that we have our ingredients lined up, let’s bring this Keto Tiramisu together, step by step!
1. Prepare the Coffee:
Start by brewing a strong cup of coffee and let it cool to room temperature. You want to ensure that the coffee isn’t too hot when we dip our ladyfingers (or almond flour substitute!). For a fun spin, consider adding a splash of your favorite liqueur like Kahlúa or Amaretto, but make sure to measure to keep it keto-friendly!
2. Make the Almond Flour Mixture:
In a medium-sized bowl, mix together 1 cup of almond flour and 1/2 cup of erythritol. This blend will help form the base. Stir until well combined, then set it aside.
3. Whip the Eggs:
In a large mixing bowl, crack 4 large eggs and whip them with an electric mixer for about 5-7 minutes until you see that beautiful pale and fluffy texture. This step is important to incorporate air into the batter, giving your tiramisu an airy quality!
4. Fold in the Mascarpone:
Gently fold in 1 cup of mascarpone cheese into your whipped eggs using a spatula. Be patient here! You want that creamy cheese to blend beautifully without losing the fluffiness.
5. Fold in the Heavy Cream:
Whip 1 cup of heavy cream in another bowl until it forms stiff peaks. Carefully fold this whipped cream into the egg and mascarpone mixture. This step is crucial as it gives us that light, cloud-like consistency we crave in tiramisu!
6. Assemble Your Layers:
In a shallow dish, pour your cooled coffee. Quickly dip each cookie or almond flour layer in the coffee, ensuring they get a good soaking but don’t turn mushy. Layer them in the bottom of a serving dish, then add half of your mascarpone mixture on top. Repeat the process for the second layer.
7. Chill and Dust:
Now, it’s time for the hardest part—patience! Cover your tiramisu with plastic wrap and chill it in the refrigerator for at least 4 hours, or ideally, overnight. Once ready to serve, dust a generous layer of cocoa powder on top, and voilà!
Serving Suggestions
When it comes to serving your Keto Tiramisu, simple is key. Scoop generous portions onto dessert plates, and consider adding a fresh mint leaf or a sprinkle of extra cocoa for that gourmet touch. For a fun presentation, you can even serve in small individual cups or glasses, allowing each guest to have their own little tiramisu!
Recipe Variations
- Mocha Twist: Add 2 tablespoons of cocoa powder directly to the mascarpone mixture for a rich, mocha flavor.
- Nutty Delight: Incorporate toasted chopped hazelnuts or walnuts between layers for an added crunch.
- Fruit Infusion: Layer on some fresh berries or a fruit purée between the layers for a fruity surprise.
- Chocolate Lover’s Dream: Drizzle some melted sugar-free dark chocolate on top right before serving—decadent and delicious!
- Dairy-Free Option: Use a blend of vegan cream cheese and coconut cream as an alternative to mascarpone and heavy cream.
Chef’s Notes
Keto Tiramisu has become a staple in my kitchen, and it never fails to impress. I’ve experimented a lot with this recipe, and I can confidently say that the key is to find balance in all elements—sweetness, creaminess, and coffee flavor must sing together. Remember that it also improves in flavor after a night in the fridge. On those busy weekdays when I need a quick pick-me-up, sometimes, I even make it for breakfast—shhh! Your secret’s safe with me!
FAQs and Troubleshooting
1. My tiramisu turned out too runny! What did I do wrong?
If your tiramisu is too runny, it could be due to over-whipping the cream or not letting it chill long enough. Ensure you whip the cream to stiff peaks and allow proper chilling for the ganache to set.
2. Can I use decaf coffee in this recipe?
Absolutely! Decaf coffee works beautifully if you’re looking to keep your tiramisu on the lighter side without the caffeine giggle.
3. How do I store leftovers?
Leftover Keto Tiramisu can last in the fridge for up to 4 days, covered with plastic wrap. However, I doubt there will be any leftovers, given how delicious this dessert is!
4. Why is my mascarpone mixture grainy?
This could be due to overmixing the mascarpone. When folding it into the egg mixture, do so gently to maintain a smooth consistency.
Nutritional Info
While I always recommend consulting with a nutritionist for personalized dietary info, here’s a quick breakdown for one serving (1/8 of the recipe):
- Calories: Approximately 220
- Carbs: 5g
- Protein: 6g
- Fat: 20g
And that’s a wrap on my Keto Tiramisu! You’ll love the balance of flavors and the joy it brings. Remember, cooking is about enjoying the moment, so gather your loved ones, whip out those ingredients, and create your delicious masterpiece! Until next time, keep it fresh, simple, and satisfyingly delicious. Happy cooking!
PrintKeto Tiramisu

A delightful low-carb version of the classic Italian dessert that lets you indulge without the guilt.
- Prep Time: 20 minutes
- Cook Time: 15 minutes
- Total Time: 4 hours 35 minutes
- Yield: 8 servings 1x
- Category: Dessert
- Method: Chilling
- Cuisine: Italian
- Diet: Keto
Ingredients
- 1 cup almond flour
- 1/2 cup erythritol
- 4 large eggs
- 1 cup mascarpone cheese
- 1 cup heavy cream
- 1 teaspoon vanilla extract
- 1 cup brewed coffee
- Cocoa powder for dusting
Instructions
- Prepare the Coffee: Brew a strong cup of coffee and let it cool to room temperature.
- Make the Almond Flour Mixture: In a bowl, mix together almond flour and erythritol until combined.
- Whip the Eggs: In a large mixing bowl, whip eggs until pale and fluffy, about 5-7 minutes.
- Fold in the Mascarpone: Gently fold mascarpone into the whipped eggs using a spatula.
- Fold in the Heavy Cream: Whip heavy cream until stiff peaks form, then carefully fold into the egg and mascarpone mixture.
- Assemble Your Layers: Dip ladyfingers or almond flour layer in cooled coffee, layer in a dish, add half of the mascarpone mixture, and repeat.
- Chill and Dust: Cover with plastic wrap and chill for at least 4 hours, dust with cocoa before serving.
Notes
This dessert can be made a day ahead to enhance the flavors. Serve with a fresh mint leaf for garnish.
Nutrition
- Serving Size: 1 serving
- Calories: 220
- Sugar: 1g
- Sodium: 150mg
- Fat: 20g
- Saturated Fat: 10g
- Unsaturated Fat: 6g
- Trans Fat: 0g
- Carbohydrates: 5g
- Fiber: 3g
- Protein: 6g
- Cholesterol: 160mg
Keywords: Keto Tiramisu, Low-Carb Dessert, Italian Dessert, Keto Desserts, Sugar-Free Tiramisu
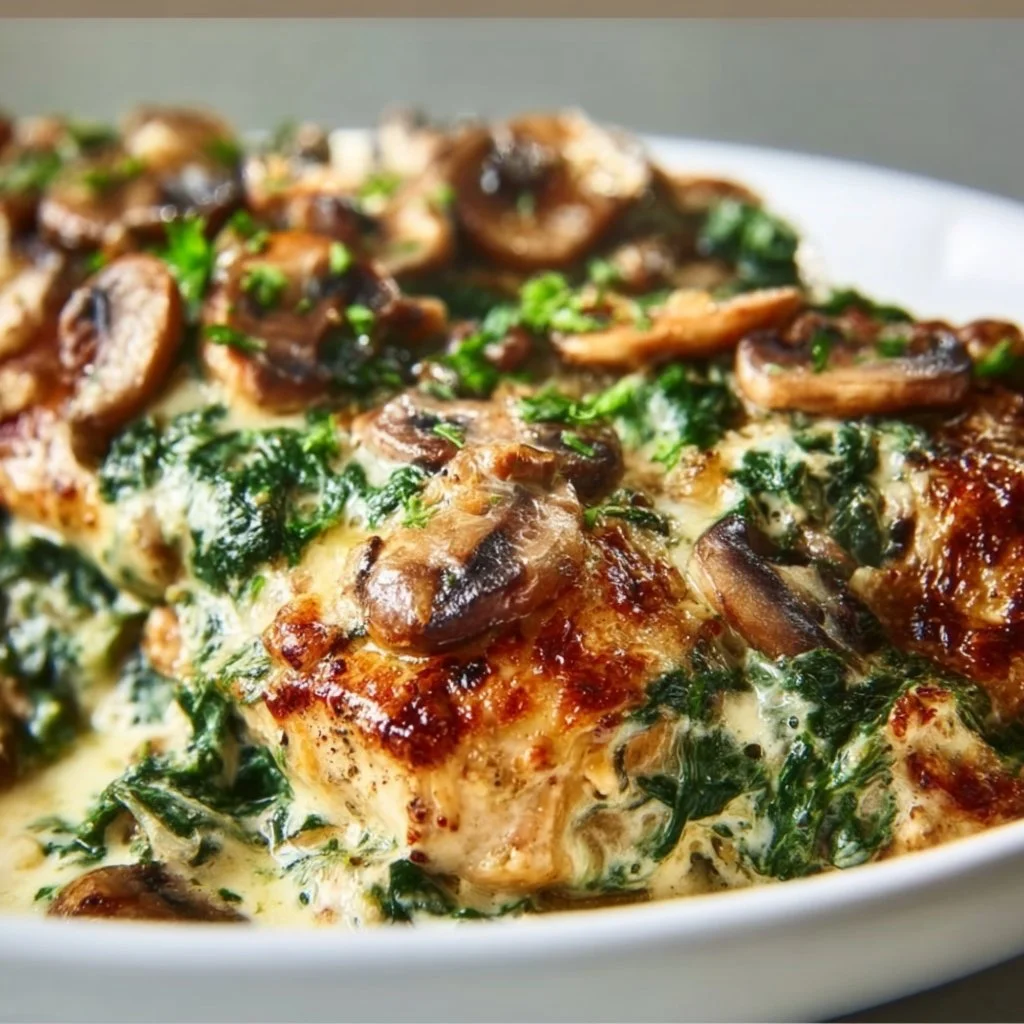
Easy Low-Carb Chicken Spinach Mushroom Bake
Easy Low-Carb Chicken Spinach Mushroom Bake
Introduction
Hey there, food lovers! Welcome back to my cozy kitchen here at Clean Plate Cravings! Today, I’m excited to share a dish that’s not only bursting with flavor but is also low-carb and a breeze to whip up—my Easy Low-Carb Chicken Spinach Mushroom Bake. This comforting recipe is perfect for a busy weeknight but fancy enough to impress those special guests on the weekends!
Picture this: It’s a chilly evening, and after a long day filled with meetings and errands, you crave something warm and satisfying. But here’s the kicker—you also want to keep it healthy and light. That’s where this one-dish wonder comes into play! With tender shredded chicken, vibrant spinach, earthy mushrooms, and a creamy Parmesan sauce, this bake hits all the right notes without weighing you down.
And let me tell you, this dish comes with a little nostalgia. It reminds me of weekends spent cooking with my grandma in her bustling kitchen, where everything was homemade, and flavors mingled like old friends. She would often throw together a casserole filled with whatever vegetables we had on hand, and we’d savor every last bite. That’s the spirit I channel when I craft recipes today—good food, good vibes, and a lot of love.
So, roll up your sleeves, and let’s dive into this easy low-carb bake that’s sure to become a staple in your kitchen! You’ll find that it’s not only delicious but incredibly versatile, too. Let’s get cooking!
Personal Story
Growing up, my family kitchen was always filled with the aromas of delicious home-cooked meals. My grandma was a master of casseroles. She never shied away from throwing whatever was left in the fridge into a baking dish, and her motto was always, "You won’t know until you try!" One chilly autumn evening, I watched her create a creamy chicken and spinach bake that would later become one of our family favorites.
I still remember how she’d let me stir the pot, teaching me her secrets with the warmest smile. "Always taste as you go, dear," she’d say, her eyes twinkling. That day, our kitchen was alive with laughter and the tantalizing smell of garlic sautéing—an irresistible combination I’ve never forgotten.
This Easy Low-Carb Chicken Spinach Mushroom Bake is inspired by those cherished moments in my Grandma’s kitchen. It captures the essence of comfort food while keeping it light and fresh. It’s a reminder that food is not just nourishment; it’s also connection, warmth, and love shared around the table.
Ingredients
Here’s what you’ll need to create this delightful dish:
-
2 cups cooked chicken, shredded
The star of our show! Feel free to use leftover rotisserie chicken, grilled chicken, or even poach chicken breast specifically for this dish. -
2 cups fresh spinach
Spinach adds a beautiful pop of color and a ton of nutrients. Fresh is best, but you can easily substitute with frozen spinach—just make sure to thaw and squeeze out excess moisture. -
1 cup mushrooms, sliced
I love using cremini or button mushrooms for their rich umami flavor. If you’re feeling adventurous, try shiitake for an earthy twist! -
1 cup heavy cream
This creamy base is what ties everything together. For a lighter option, you can substitute with coconut cream or half-and-half, although the flavor will differ slightly. -
1 cup Parmesan cheese, grated
Parmesan brings a salty, nutty flavor to the dish. If you’re not a fan of Parmesan, any cheese that melts well, like mozzarella or goat cheese, can work in a pinch. -
2 cloves garlic, minced
Garlic is a must for adding depth and aroma. For a milder flavor, try roasted garlic. -
Salt and pepper to taste
Simple seasonings that elevate every dish. Don’t be shy—taste as you season! -
Olive oil for cooking
A splash of olive oil helps sauté the veggies and brings a lovely richness. Avocado oil is a great alternative, with a higher smoke point.
Step-by-Step Instructions
Now that we have our ingredients, let’s get to the fun part—cooking this delightful bake!
-
Preheat Your Oven
Preheat your oven to 375°F (190°C). This step is crucial for achieving that beautifully baked, golden top. -
Sauté the Aromatics
In a large skillet, heat about 2 tablespoons of olive oil over medium heat. Add the minced garlic and sauté until fragrant, about 1 minute. This sizzles up the kitchen and sends greetings to all your taste buds! -
Add the Mushrooms
Toss in your sliced mushrooms and sauté for about 3-4 minutes until they’re tender and have released their moisture. Chef’s Tip: Don’t overcrowd the pan; otherwise, the mushrooms will steam instead of sauté! -
Incorporate the Spinach
Add the fresh spinach to the skillet and cook until wilted, about 2-3 minutes. It feels like magic watching it shrink down! Season with salt and pepper to enhance the flavors. -
Combine the Chicken and Cream
Stir in the shredded chicken and pour in the heavy cream, mixing everything together. Allow it to simmer for another 2-3 minutes until everything is well coated. If you want to add a bit of zest, squeeze a little lemon juice into the mix—trust me, it elevates the flavor! -
Cheesy Goodness
Gradually fold in the Parmesan cheese until melted and creamy. Chef Hack: Save a bit of cheese for topping—this will give you a delicious, crispy layer! -
Transfer to Baking Dish
Pour the mixture into a greased 9×13 inch baking dish, spreading it evenly. Top with the remaining Parmesan cheese for a golden crust. -
Bake
Pop it into your preheated oven and bake for 25-30 minutes or until the top is bubbly and golden brown. The delightful aroma will fill your kitchen, making it hard to resist! -
Cool and Serve
Once ready, let it cool for about 5 minutes to set. Serve warm, and enjoy every bite!
Serving Suggestions
This Chicken Spinach Mushroom Bake is perfect all on its own, but if you’re looking to dress it up a bit for serving, here are a couple of ideas! Plate it in individual baking ramekins for a rustic touch. Add a sprinkle of fresh herbs, like parsley or basil, for that pop of freshness. It pairs beautifully with a simple garden salad dressed in balsamic vinaigrette.
Recipe Variations
Now, let’s get creative! Here are a few fun variations to keep this dish exciting:
-
Spicy Kick: Add a pinch of red pepper flakes to the sautéed mushrooms for a spicy version.
-
Herb Infusion: Experiment with different herbs like thyme or rosemary for a gourmet touch.
-
Cauliflower Upgrade: Add roasted cauliflower florets to the bake for an extra veggie boost and delicious texture.
-
Zucchini Noodles: Swap out half of the chicken for spiraled zucchini for a fun twist on the classic!
-
Dairy-Free Delight: Use coconut cream and nutritional yeast instead of Parmesan for a creamy, dairy-free option.
Chef’s Notes
This recipe has evolved from my grandmother’s original version, which was a bit heavier and less health-conscious. I love how we can take traditional comfort foods and make them into healthier options while preserving those beloved flavors. And honestly, I can’t help but giggle sometimes in the kitchen when I try creative combinations—some of which go wonderfully wrong but lead me to even better discoveries. Kitchen experimentation is truly where the magic happens!
FAQs and Troubleshooting
Q: Can I use leftover shredded chicken?
A: Absolutely! This dish is perfect for using up leftover chicken. Just make sure it’s seasoned to your tasting!
Q: Can I make this dish ahead of time?
A: Yes! You can prepare everything a day in advance and store it in the fridge. Just bake it right before serving.
Q: What if my bake is too dry?
A: If your bake comes out a bit dry, it might be because it was cooked for too long. Try not to overbake it, and if needed, add a splash more cream before baking.
Q: How do I store leftovers?
A: Store it in an airtight container in the fridge for up to 3 days. Reheat gently in the oven or microwave!
Nutritional Info
While I always encourage enjoying food without guilt, here’s a rough estimate of the nutritional info per serving (assuming 6 servings):
- Calories: 380
- Protein: 30g
- Fat: 27g
- Carbohydrates: 6g
- Fiber: 2g
Remember, these values can vary based on ingredient substitutions and portion sizes!
And there you have it—a cozy, easy Low-Carb Chicken Spinach Mushroom Bake that’s filled with flavor, nostalgia, and love. Grab your apron and give this recipe a try—you won’t be disappointed! Happy cooking!
PrintEasy Low-Carb Chicken Spinach Mushroom Bake

A delightful low-carb bake featuring tender shredded chicken, vibrant spinach, earthy mushrooms, and a creamy Parmesan sauce, perfect for busy weeknights or impressing guests.
- Prep Time: 15 minutes
- Cook Time: 30 minutes
- Total Time: 45 minutes
- Yield: 6 servings 1x
- Category: Main Course
- Method: Baking
- Cuisine: American
- Diet: Low-Carb, Gluten-Free
Ingredients
- 2 cups cooked chicken, shredded
- 2 cups fresh spinach
- 1 cup mushrooms, sliced
- 1 cup heavy cream
- 1 cup Parmesan cheese, grated
- 2 cloves garlic, minced
- Salt and pepper to taste
- Olive oil for cooking
Instructions
- Preheat your oven to 375°F (190°C).
- Sauté the minced garlic in olive oil over medium heat until fragrant, about 1 minute.
- Add the sliced mushrooms and sauté for about 3-4 minutes until tender.
- Incorporate the fresh spinach and cook until wilted, about 2-3 minutes; season with salt and pepper.
- Combine the shredded chicken and heavy cream, mixing well.
- Cheesy goodness: fold in the Parmesan cheese until melted and creamy.
- Transfer the mixture to a greased 9×13 inch baking dish, top with remaining Parmesan cheese.
- Bake for 25-30 minutes until bubbly and golden brown.
- Cool for 5 minutes and serve warm.
Notes
This dish is versatile; you can add red pepper flakes for spice or substitute with vegetables like cauliflower or zucchini noodles.
Nutrition
- Serving Size: 1 serving
- Calories: 380
- Sugar: 2g
- Sodium: 600mg
- Fat: 27g
- Saturated Fat: 13g
- Unsaturated Fat: 12g
- Trans Fat: 0g
- Carbohydrates: 6g
- Fiber: 2g
- Protein: 30g
- Cholesterol: 90mg
Keywords: low-carb, chicken, bake, easy recipe, comfort food, healthy

Low Carb Green Beans
Low Carb Green Beans: Fresh, Flavorful, and Full of Life
Welcome back, food enthusiasts! Today, we’re diving into a simple yet vibrant dish that will make your taste buds dance: Low Carb Green Beans! Whether you’re on a health kick, trying to keep your carb intake in check, or simply looking to add some green goodness to your plate, these green beans are here to save the day.
Let’s talk about those humble green beans. They’re not just a side dish; they’re a canvas for flavor, a burst of color on your plate, and a nod to the best of nature’s bounty. Tossed with garlic, shimmering olive oil, and a zesty squeeze of lemon juice, these green beans are anything but boring.
One of my favorite things about cooking with fresh produce is that it connects us to the seasons and to memories of family gatherings, picnics in the park, or just cozy weeknight dinners. So grab your apron, and let’s get cooking!
A Trip Down Memory Lane
Let me take you back to my grandma’s kitchen—a bustling hub of activity. Every summer, we’d visit her in the countryside, and her garden was a treasure trove of fresh veggies. Among them, the green beans stood out, their bright green hue promising a mouthful of crisp, refreshing goodness.
I remember the day she taught me to sauté those green beans perfectly. It was less of a formal lesson and more of just a fun, flour-dusted afternoon spent laughing about life while we cooked. She’d throw in some garlic and a splash of lemon juice, and every time, I’d be surprised at how such simple ingredients could create something so delightful. It’s these kinds of memories that fill my soul and inspire me to keep sharing recipes that bring people together. Think of this dish as a little homage to my grandma’s garden and all the love that went into those meals.
Ingredients
Let’s gather our ingredients! Here’s what you’ll need for these fabulous Low Carb Green Beans:
-
Fresh Green Beans: The star of our show! Look for bright, firm beans with a vibrant green color. You can substitute them with other veggies like asparagus or broccoli if you’re feeling experimental.
-
Olive Oil: A must-have for that luscious flavor. Extra virgin olive oil is highly recommended for its rich taste, but feel free to swap it with avocado oil for a kick of healthy fats!
-
Garlic: Because what’s a good dish without garlic? Fresh garlic cloves bring a punch of flavor. If you’re in a hurry, garlic powder can be a handy substitute, though fresh is always best!
-
Salt: Essential for bringing out the flavors of our ingredients. Sea salt or kosher salt works beautifully.
-
Pepper: A dash of fresh black pepper adds depth. You can play with different types, like lemon pepper or smoked paprika, for an extra twist.
-
Lemon Juice: The zesty finish. Freshly squeezed is ideal, but bottled lemon juice will do in a pinch.
Step-by-Step Instructions
Ready to cook? Let’s get started with these delightful green beans!
-
Prep your beans: Begin by rinsing your fresh green beans under cool running water. Snap off the stem ends, discarding them as you go. If you’re feeling fancy, you can also cut them into bite-sized pieces.
-
Heat the pan: Grab a large skillet and place it over medium heat. Add about 2 tablespoons of olive oil, allowing it to warm up until it’s glistening but not smoking. This will help our beans sauté beautifully.
-
Add garlic: Toss in 2-3 minced garlic cloves. Here’s a chef hack: make sure to stir the garlic frequently to prevent it from burning. We want fragrant and golden—not charred!
-
Introduce the beans: Once your garlic is aromatic, it’s time to add the green beans to the pan. Stir them well to coat them in that garlicky bliss.
-
Season it up: Sprinkle in a good pinch of salt and a few cracks of black pepper. This is where you can make it your own; if you like heat, consider some red pepper flakes here too!
-
Sauté to perfection: Continue cooking for about 5-7 minutes, stirring occasionally. You want your green beans tender but still with a bit of crunch—just perfectly al dente.
-
Finish with lemon: Add a splash of fresh lemon juice near the end of cooking. This boosts the flavor and adds a bright, fresh note that’s simply addicting.
-
Taste test: Give your green beans a taste. Need more seasoning? Don’t hesitate to tweak it to your liking. This is your masterpiece!
-
Serve and enjoy: Transfer your vibrant green beans to a serving dish, and watch everyone’s eyes light up at the sight of that fresh, colorful dish!
Serving Suggestions
For an elegant touch, try garnishing your Low Carb Green Beans with some slivered almonds or crispy shallots. They add a delightful crunch and aesthetic appeal to the dish. Serve them hot next to grilled chicken or fish for a wholesome meal, or toss the beans with some cherry tomatoes for an even more colorful presentation. And if you’re up for it, a sprinkle of feta cheese takes it to a whole new level!
Recipe Variations
Feel free to shake things up with these twists on the classic low carb green beans:
-
Asian-Inspired: Swap the olive oil for sesame oil and add a splash of soy sauce and sesame seeds for an Asian flair.
-
Italian Style: Mix in a few chopped sun-dried tomatoes and sprinkle with Parmesan cheese before serving.
-
Mediterranean Wonders: Toss in olives and artichoke hearts for a burst of flavor.
-
Herby Spin: Add fresh herbs like thyme or basil right before serving, for an extra splash of freshness that’s just delightful.
Chef’s Notes
These green beans are one of my go-to sides because they’re not only easy to whip up but also leave room for creativity. The recipe has evolved over the years, starting simply with just salt and pepper, but it’s all the little extras—a dash of lemon here, a swirl of oil there—that make it endlessly interesting. Plus, they pair beautifully with nearly any main dish, which is a huge win in my book!
Fun fact: I once attempted to impress a date by creating a full five-course meal, and the moment the green beans hit the table? That was it. They stole the show with their brightness and flavor—and yes, the date went splendidly too!
FAQs and Troubleshooting
-
What if my green beans are tough?
- If your green beans are tough, they may be overcooked. To ensure a tender yet crunchy texture, stand by during cooking and taste-test along the way!
-
How can I make this dish more filling?
- You can add cooked quinoa, chickpeas, or even toss in some protein like grilled shrimp or chicken, making it a one-pan wonder!
-
Can I prepare these ahead of time?
- Absolutely! You can blanch the beans and sauté them when ready to serve. Just keep in the fridge until you’re set to finish cooking.
-
What’s the best way to store leftovers?
- Place any leftovers in an airtight container in the fridge for up to 3 days. You can reheat them in the skillet with a splash of olive oil to refresh their flavor.
Nutritional Info
These Low Carb Green Beans are not only a fantastic side but also a healthy choice! One serving (about 1 cup) has approximately:
- Calories: 70
- Fat: 6g
- Carbs: 6g
- Fiber: 2g
- Protein: 2g
Now, feel free to celebrate those fresh flavors packed into every bite. I hope this recipe brings you joyful kitchen moments and delicious meals shared with loved ones. Remember, cooking should always be fun, approachable, and fueling—not just for your body, but for your soul! Happy cooking!
PrintLow Carb Green Beans

A vibrant and healthy dish featuring fresh green beans tossed with garlic and lemon for a burst of flavor.
- Prep Time: 10 minutes
- Cook Time: 10 minutes
- Total Time: 20 minutes
- Yield: 4 servings 1x
- Category: Side Dish
- Method: Sautéing
- Cuisine: American
- Diet: Low Carb, Vegetarian
Ingredients
- 1 pound Fresh Green Beans, trimmed
- 2 tablespoons Olive Oil
- 2–3 cloves Garlic, minced
- Salt, to taste
- Pepper, to taste
- Juice of 1 Lemon
Instructions
- Prep your beans: Rinse the green beans under cool water and snap off the stem ends.
- Heat the pan: Place a large skillet over medium heat and add olive oil until warm.
- Add garlic: Toss in minced garlic and stir frequently to prevent burning.
- Introduce the beans: Add the green beans to the pan and stir to coat.
- Season it up: Sprinkle with salt and pepper, adding red pepper flakes if desired.
- Sauté to perfection: Cook for 5-7 minutes until beans are tender but crunchy.
- Finish with lemon: Add lemon juice near the end of cooking.
- Taste test: Adjust seasoning as needed.
- Serve and enjoy: Transfer to a serving dish and serve hot.
Notes
For added crunch, garnish with slivered almonds or crispy shallots. These beans pair well with grilled chicken or fish.
Nutrition
- Serving Size: 1 serving
- Calories: 70
- Sugar: 2g
- Sodium: 250mg
- Fat: 6g
- Saturated Fat: 1g
- Unsaturated Fat: 5g
- Trans Fat: 0g
- Carbohydrates: 6g
- Fiber: 2g
- Protein: 2g
- Cholesterol: 0mg
Keywords: green beans, low carb, healthy side dish, vegetarian, easy recipe