Beginner-Friendly Tropical Pineapple Coconut Dream Cake
Pineapple Coconut Dream Cake: A Slice of Paradise
Welcome to another delicious adventure in the kitchen, foodies! Today, I’m excited to share a recipe that fits right into our mantra at Clean Plate Cravings: vibrant, flavorful, and super approachable. So grab your apron, and let’s dive into making a Pineapple Coconut Dream Cake! This sweet treat is like a tropical holiday you can enjoy every day, perfectly light and oh-so-satisfying.
Imagine sinking your fork into a soft cake bursting with the bright flavors of pineapple and the rich texture of coconut—it’s like summer on a plate! Whether you’re hosting a gathering, indulging on a lazy Sunday, or just in need of some dessert therapy, this cake is here to elevate your day. Trust me, it’s that good!
Let’s get started on this dreamy dessert that will satisfy your sweet tooth while leaving you feeling nourished and energized. Ready? Let’s bake!
A Slice of Nostalgia
Growing up, my grandma had this magical ability to turn the simplest of ingredients into something extraordinary. One of her specialties was a coconut pineapple cake, which she lovingly called “the tropical delight.” I can still recall the intoxicating aroma wafting through her cozy kitchen, tempting all of us grandkids to hang around for a slice—or two!
Every year during family gatherings, that cake would steal the show. We’d eagerly await the moment she’d cut into it, the sound of the knife slicing through the moist cake echoing like sweet music. As kids, we’d rush to grab our plates, hoping for the biggest piece topped with a dollop of whipped cream. Those sunny days spent enjoying that cake became cherished memories, reminding me that food is about so much more than just ingredients—it’s about love, connection, and joy.
With this Pineapple Coconut Dream Cake, I hope to recreate that blissful experience and bring a little piece of my grandma’s kitchen to your home. Let’s stir up some sweet memories together!
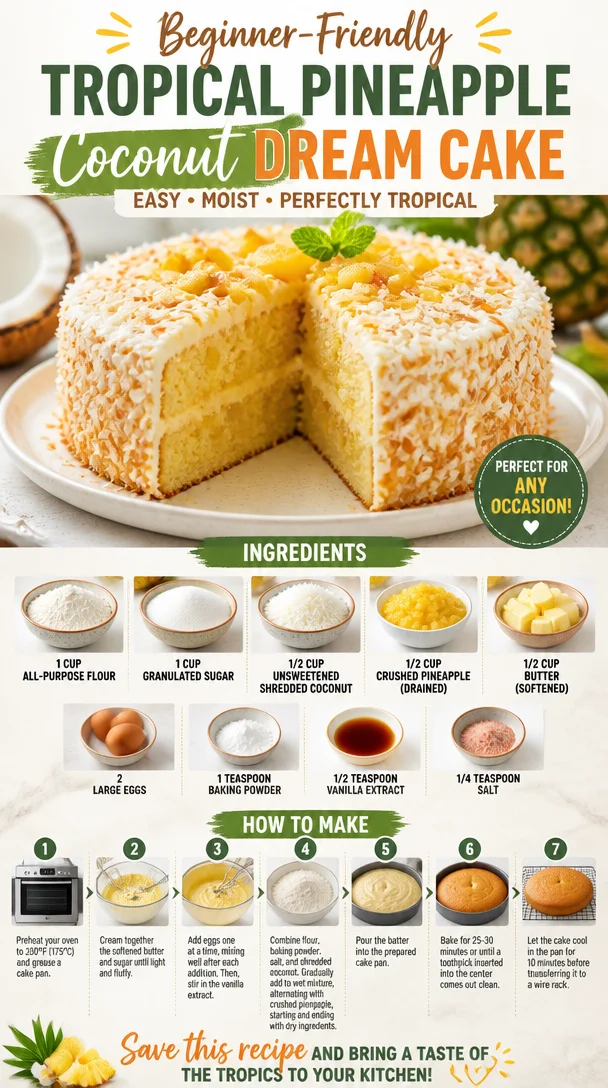
Ingredients
To create this delightful cake, you’ll need a few simple ingredients. Here’s what you’ll need:
-
1 cup all-purpose flour
- This is the backbone of your cake. Feel free to swap it for gluten-free flour or whole wheat flour—just keep in mind it might slightly change the cake’s texture.
-
1 cup granulated sugar
- Sweetening up our cake! You could also use coconut sugar or a sugar substitute if you’re looking for a healthier option, but keep in mind the flavor and texture may change.
-
1/2 cup unsweetened shredded coconut
- A little texture and a lot of flavor! If you’re feeling adventurous, swap it for toasted coconut to add a nutty crunch.
-
1/2 cup crushed pineapple (drained)
- This adds moisture and a burst of tropical flavor! Fresh pineapple, finely chopped, can also work; just make sure to drain it well!
-
1/2 cup butter (softened)
- For that rich, buttery flavor. Feel free to use coconut oil or a dairy-free spread for a vegan twist.
-
2 large eggs
- These help to bind everything together! If you prefer an egg-free option, consider using flax eggs (1 tablespoon of flaxseed meal + 2.5 tablespoons of water) per egg.
-
1 teaspoon baking powder
- This is your leavening agent. It helps the cake rise. Make sure it’s fresh for the best results!
-
1/2 teaspoon vanilla extract
- Adds a warm, sweet aroma to our cake. Use pure vanilla extract for the best flavor—instead of imitation vanilla, if you can.
-
1/4 teaspoon salt
- A little salt enhances all the flavors! You can skip this if you’re watching your sodium intake.
Now that we have our ingredients ready, let’s make some cake magic happen!
Step-by-Step Instructions
-
Preheat Your Oven:
- First things first, set your oven to preheat at 350°F (175°C). This simple step is essential for baking! A hot oven helps your cake rise beautifully.
-
Prepare Your Cake Pan:
- Grease and flour a 9-inch round cake pan (you can also line it with parchment paper for easy removal). This can save you the headache of cake sticking, and trust me, you want that soft, fluffy goodness to come out without any fuss!
-
Cream the Butter and Sugar:
- In a large mixing bowl, add your softened butter and granulated sugar. Beat them together with an electric mixer or a sturdy wooden spoon for about 4-5 minutes until the mixture is light and fluffy. This aerates the batter and gives you that super moist cake texture. A little tip: Don’t skip this step!
-
Add the Eggs and Vanilla:
- Crack in the eggs, one at a time, mixing well after each addition. Pour in the vanilla extract and mix until evenly blended. The batter should look creamy and smooth at this point, with a lovely aroma wafting through the air!
-
Mix the Dry Ingredients:
- In a separate bowl, whisk together the flour, baking powder, shredded coconut, and salt. This step helps to combine the leavening agent with the flour and prevents clumps.
-
Combine the Dry and Wet Mixtures:
- Gradually add your dry mixture to the wet mixture, mixing until just combined. Avoid overmixing—this could lead to a dense cake instead of the fluffy delight we’re aiming for!
-
Fold in the Pineapple:
- Gently fold in the crushed pineapple using a spatula. This is where the dreamy flavor comes in! The pineapple adds such incredible moisture and sweetness.
-
Pour the Batter into the Pan:
- Carefully pour the batter into your prepared cake pan. Use a spatula to smooth the top, making sure it’s even so that it bakes uniformly.
-
Bake Away!
- Place your cake in the preheated oven and bake for 30-35 minutes, or until a toothpick inserted into the center comes out clean. Keep an eye on it—baking times can vary based on your oven.
-
Cool and Enjoy:
- Once baked, take the cake out of the oven and let it cool in the pan for about 10 minutes. Then, transfer it to a wire rack to cool completely before frosting or serving. Trust me, it’s going to be hard to wait, but cooling helps the flavors settle and the cake firm up.
Now that your cake is baked to perfection, you’re almost ready to enjoy a slice of paradise!
Serving Suggestions
When it comes to serving this Pineapple Coconut Dream Cake, less is often more! You can simply dust the top with powdered sugar for a classic look or top it with whipped cream to add extra delight. For a tropical touch, consider garnishing with fresh pineapple slices or a sprinkle of toasted coconut flakes. If you’re feeling fancy, a light drizzle of coconut cream or a passion fruit glaze can really take this cake to the next level!
Recipe Variations
Feeling adventurous? Here are some delightful variations to spice things up a bit:
- Lemon Coconut Twist: Add the zest of one lemon into your batter for a zingy flavor that pairs wonderfully with the sweetness.
- Chocolate Lover’s Delight: Incorporate dark chocolate chips into the batter for a delicious contrast that will please chocolate lovers!
- Tropical Fusion: Add in some chopped macadamia nuts or walnuts for a delightful crunch and extra flavor.
- Coconut Whipped Cream: Top your cake with coconut-flavored whipped cream for an added layer of coconut bliss.
Don’t be shy; mix and match to find your own favorite twist!
Chef’s Notes
This Pineapple Coconut Dream Cake has come a long way from my grandma’s original recipe—it has evolved with me over the years. I’ve tinkered and swapped ingredients; experimenting has always been a treat! One time, I added a splash of rum for a beachy vibe and ended up with a cake that felt like a slice of summer vacation.
Every time I make it, I think of those sun-kissed family gatherings and laughter-filled afternoons. My hope is that this cake brings you and your loved ones just as much joy—and maybe even inspires new fond memories in your kitchen!
FAQs and Troubleshooting
-
Why is my cake dense?
- Overmixing the batter can lead to a dense cake. Make sure to mix just until combined!
-
What if my cake sticks to the pan?
- Ensure your pan is well-greased and floured. Lining with parchment paper is also a great backup plan.
-
Can I use fresh pineapple instead of canned?
- Absolutely! Just make sure to finely chop and thoroughly drain the fresh pineapple before adding it to the batter for the right texture.
-
How do I store leftovers?
- Store your cake in an airtight container at room temperature for up to 3 days or in the fridge for up to a week. You can also freeze it for later enjoyment—just make sure to wrap it tightly!
Nutritional Info
(Per slice, approximate values may vary)
- Calories: 220
- Protein: 2g
- Fat: 9g
- Carbohydrates: 36g
- Fiber: 1g
- Sugar: 16g
And there you have it—the recipe for Pineapple Coconut Dream Cake! I hope you love making it as much as I love sharing it with you. Here’s to bringing a bit of sunshine into your kitchen, one slice at a time. Enjoy!
PrintPineapple Coconut Dream Cake
A vibrant, flavorful cake bursting with the tropical flavors of pineapple and coconut.
- Prep Time: 15 minutes
- Cook Time: 35 minutes
- Total Time: 50 minutes
- Yield: 8 servings 1x
- Category: Dessert
- Method: Baking
- Cuisine: Tropical
- Diet: Vegetarian
Ingredients
- 1 cup all-purpose flour
- 1 cup granulated sugar
- 1/2 cup unsweetened shredded coconut
- 1/2 cup crushed pineapple (drained)
- 1/2 cup butter (softened)
- 2 large eggs
- 1 teaspoon baking powder
- 1/2 teaspoon vanilla extract
- 1/4 teaspoon salt
Instructions
- Preheat your oven to 350°F (175°C).
- Prepare a 9-inch round cake pan by greasing and flouring it.
- Cream the softened butter and granulated sugar together until light and fluffy.
- Add the eggs one at a time, mixing well after each addition. Then add the vanilla extract.
- Mix the flour, baking powder, shredded coconut, and salt in a separate bowl.
- Combine the dry mixture with the wet mixture, mixing until just combined.
- Fold in the crushed pineapple gently using a spatula.
- Pour the batter into the prepared cake pan.
- Bake for 30-35 minutes or until a toothpick inserted comes out clean.
- Cool in the pan for 10 minutes, then transfer to a wire rack to cool completely.
Notes
Serve simply with powdered sugar or top with whipped cream for extra delight.
Nutrition
- Serving Size: 1 slice
- Calories: 220
- Sugar: 16g
- Sodium: 200mg
- Fat: 9g
- Saturated Fat: 5g
- Unsaturated Fat: 4g
- Trans Fat: 0g
- Carbohydrates: 36g
- Fiber: 1g
- Protein: 2g
- Cholesterol: 30mg
Keywords: cake, dessert, tropical, pineapple, coconut
Beginner French Macarons with Raspberry Lemon Buttercream
French Macarons with Raspberry Lemon Buttercream: A Sweet Adventure Awaits!
Welcome to a magical corner of the kitchen where delicate French pastries meet vibrant flavors—yes, I’m talking about macarons! If you’ve ever stood in awe of these colorful, airy delights, you’re not alone. My discovery of macarons was like unearthing a treasure chest filled with flavors, textures, and a sprinkle of culinary challenge. Today, I’m excited to share my favorite recipe for French macarons filled with a luscious raspberry lemon buttercream. Trust me, once you bite into these little beauties, you’ll feel like you’ve taken a trip to a quaint patisserie in Paris!
As you embark on this baking adventure, let’s talk about why making macarons is not just about following a recipe; it’s about creating memories. These little meringue-based sandwiches have a reputation for being finicky, but that’s part of their charm! If you’ve ever found yourself worrying about whether your macarons will have “feet” or if the weather might impact your egg whites, grab a whisk and join me. I promise you’ll gain confidence and fill your kitchen with delightful aromas and colors as we create something truly special!
A Sweet Memory
Let’s take a little trip down memory lane. I vividly remember the first time I tried my hand at making macarons. It was a rainy Sunday afternoon, the kind that calls for hot tea and sweet treats. With a handful of almond flour and some vibrant food coloring, I was ready to embark on my macaron journey! I was nervous, but the moment I piped those little rounds onto the silicone mat, my heart fluttered with excitement.
The first batch, I remember so clearly, had a few “oops” moments—some were slightly cracked, while others were perfect and round. But the taste! Oh, it was pure bliss. I filled them with a simple buttercream, tasting each one with glee and a sense of accomplishment. Those macarons sparked not only a love of baking but a quest to explore flavors and learn more. That rainy day turned into countless afternoons of experimentation, laughter, and tasty treats shared with friends. I can still picture the joy on my friends’ faces as they bit into those sweet surprises, and that feeling of creating happiness with food has fueled my passion ever since.
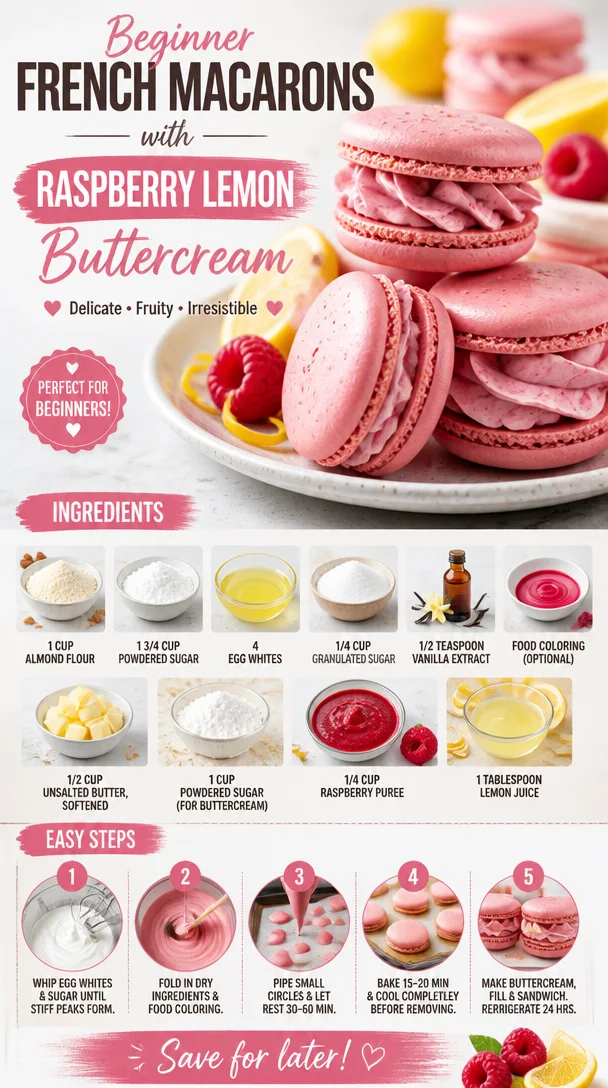
Ingredients List
Let’s gather our ingredients to make these dreamy macarons with raspberry lemon buttercream. Here’s what you need:
-
1 cup almond flour: The cornerstone of the macaron, almond flour gives these treats their signature texture. If you’re nut-free, you could try sunflower seed flour as a substitute, although the color may be slightly greenish.
-
1 3/4 cups powdered sugar: Sweetens and balances the almond flour. You can use store-bought or make your own by blending granulated sugar in a blender until fine.
-
4 large egg whites: The stars of the show! Aged egg whites (left uncovered in the fridge for a day) work best, as they create a better meringue. You can save the yolks for a custard or rich hollandaise sauce.
-
1/4 cup granulated sugar: This is added to stabilize the egg whites and create a shine. If you’re looking to reduce sugar, you could try using a natural sweetener like monk fruit, but it may impact texture.
-
1/2 teaspoon vanilla extract: A splash of flavor! While vanilla is classic, feel free to experiment with almond extract for a twist.
-
Food coloring (optional): Because who doesn’t love a pop of color in their treats? Gel food coloring works best, as liquid can alter the texture of your batter.
-
1/2 cup unsalted butter, softened: The base for our buttercream. Make sure it’s soft, not melted—room temperature is key for achieving a smooth texture.
-
1 cup powdered sugar (for buttercream): Sweetness again! This will ensure our buttercream is luscious and sweet enough to balance the tartness of the raspberry.
-
1/4 cup raspberry puree: Fresh or frozen raspberries blended to a smooth consistency. This adds a lovely fruitiness. If you don’t have raspberries, feel free to substitute with strawberry or passion fruit puree.
-
1 tablespoon lemon juice: For that zing! Freshly squeezed is best for maximum brightness, so go ahead and squeeze away.
Step-by-Step Instructions
Ready to make some macarons? Let’s dive into the process!
-
Prep your workspace: Start by preheating your oven to 300°F (150°C). Line two baking sheets with parchment paper or a silicone mat. Having everything organized will make the whole process smoother, so I recommend measuring out all your ingredients beforehand!
-
Sift your dry ingredients: In a mixing bowl, sift together the almond flour and powdered sugar. This eliminates clumps and creates a fine mixture, which is crucial for a smooth macaron shell. If you notice any large bits of almond flour, just discard them. Remember, the finer the better!
-
Whip your egg whites: In a clean, dry mixing bowl, start to beat the egg whites on medium speed until they become frothy. Gradually add the granulated sugar while continuing to whip them until soft peaks form. This usually takes around 3-4 minutes. If you’re feeling fancy, you can add in your food coloring at this point for a beautiful pastel hue.
-
Achieve stiff peaks: Increase the speed to high and whip until the egg whites reach stiff peaks—meaning that they stand straight up without drooping. Don’t overbeat, or your meringue can become dry.
-
Macaronage time: Gently fold the sifted almond flour and powdered sugar mixture into the whipped egg whites. Use a silicone spatula and fold carefully to maintain the airiness of the mixture. The batter should flow slowly, like lava, and create a smooth surface when piped. This step is crucial—overmix and your macarons will flatten; undermix and they won’t spread evenly.
-
Pipe those circles: Transfer your batter into a piping bag fitted with a round tip. Pipe small rounds onto your prepared baking sheets, leaving space between each—for macarons like personal space! Give the baking sheet a good tap on the counter to release any trapped air bubbles.
-
Let them rest: This is one of the most important parts of making macarons. Let the piped macarons rest for 30-60 minutes until they form a skin and are no longer sticky to touch. You can poke your finger gently to test; if it doesn’t stick to your finger, they’re ready for the oven!
-
Bake: Pop your trays into the preheated oven and bake for 15-20 minutes. Rotate the trays halfway through for even baking. You’ll know they’re done when they don’t wobble and have a lovely foot—a sign of a successful macaron!
-
Cool down: Once baked, let them cool completely on the trays before removing them. Trying to remove them too soon can lead to heartbreak and broken shells.
-
Whip up the buttercream: While cooling, let’s whip up that raspberry lemon buttercream! In a mixing bowl, beat the softened butter until creamy. Gradually add in the powdered sugar and beat until well combined. Then, add in the raspberry puree and lemon juice, mixing until everything is silky smooth. Taste it—if you want more zing, add a bit more lemon juice!
-
Assemble: Pair your macaron shells that are similar in size. Spoon or pipe a dollop of buttercream onto one shell and sandwich it with another. Press gently and voilà—you’ve got a beautifully filled macaron!
Serving Suggestions
When serving these delicious macarons, I like to display them on a rustic wooden platter or a cute cake stand. You can also pile them into a glass jar tied with twine for an adorable touch. Consider pairing them with a cup of tea or coffee, or even a refreshing glass of lemonade to complement the raspberry and lemon flavors. Don’t forget to snap a few pictures before devouring them—these treats are not only tasty but also stunning!
Recipe Variations
What’s that? You want to play with flavors? You got it! Here are a few creative twists to keep the macaron love alive:
-
Chocolate Hazelnut Buttercream: Swap the raspberry and lemon for a rich chocolate hazelnut spread—hello, Nutella!
-
Matcha Green Tea: Add matcha powder to your macaron batter and fill it with a smooth vanilla buttercream for a beautiful green treat!
-
Salted Caramel: Use homemade or store-bought salted caramel as a filling for a decadent touch.
-
Lavender Honey: Infuse your buttercream with lavender (use culinary-grade lavender) and honey for a floral twist.
-
Pistachio Coconut: Substitute some of the almond flour with pistachio flour, and use coconut extract in your buttercream for a tropical flavor.
Chef’s Notes
As with any recipe, macarons can evolve over time. I remember my early days of macaron-making when every batch was a surprise. I learned that the key is precision and patience. Each successful batch is a little victory, and even mistakes taught me invaluable lessons. And hey, with a bit of humor! Once, I accidentally baked a batch on a ridiculously humid day, and let’s just say they came out as lovely little puddles. I took it with a smile and turned that into a lesson on kitchen conditions!
Also, remember, practice makes perfect! After a few tries, you’ll not only gain skill but also discover flavors that become your personal favorites.
FAQs and Troubleshooting
-
Why didn’t my macarons have feet?
This could be due to overmixing the batter, underbaking, or not allowing them to rest before baking. Make sure you’re gentle when folding and tap the trays to release air. -
Why did my macarons crack?
Cracked shells often indicate that the oven temperature was too high or the macarons did not rest long enough before baking. Try reducing your oven temperature slightly and extending the resting time. -
Can I store macarons?
Absolutely! Store them in an airtight container in the fridge for up to a week, or freeze them for longer storage. Allow them to come to room temperature before serving. -
Can I use liquid food coloring?
While you can, it’s better to use gel food coloring to avoid altering the moisture content. If using liquid food coloring, adjust the dry ingredients slightly.
Nutritional Info
While I focus on enjoyment rather than strict nutritional values with treats like macarons, each one typically contains around 100 calories, depending on the filling and size. Remember, moderation is key—enjoy these delightful treats as part of a balanced lifestyle!
Making French macarons with raspberry lemon buttercream is a joyful experience filled with challenges, laughter, and most importantly, flavor. So, roll up your sleeves, invite a friend, and let’s create something beautiful in the kitchen that will fill your hearts and bellies. Happy baking, foodies!
PrintFrench Macarons with Raspberry Lemon Buttercream
Delicate French macarons filled with a luscious raspberry lemon buttercream, perfect for a sweet adventure.
- Prep Time: 30 minutes
- Cook Time: 20 minutes
- Total Time: 50 minutes
- Yield: 20 macarons 1x
- Category: Dessert
- Method: Baking
- Cuisine: French
- Diet: Vegetarian
Ingredients
- 1 cup almond flour
- 1 3/4 cups powdered sugar
- 4 large egg whites
- 1/4 cup granulated sugar
- 1/2 teaspoon vanilla extract
- Food coloring (optional)
- 1/2 cup unsalted butter, softened
- 1 cup powdered sugar (for buttercream)
- 1/4 cup raspberry puree
- 1 tablespoon lemon juice
Instructions
- Prep your workspace: Preheat your oven to 300°F (150°C) and line baking sheets with parchment paper.
- Sift your dry ingredients: Sift together the almond flour and powdered sugar.
- Whip your egg whites: Beat egg whites on medium speed, gradually adding granulated sugar until soft peaks form.
- Achieve stiff peaks: Increase speed to high and whip until stiff peaks form.
- Macaronage time: Gently fold the dry mixture into the egg whites.
- Pipe those circles: Transfer batter to a piping bag and pipe rounds onto baking sheets.
- Let them rest: Allow piped macarons to rest for 30-60 minutes.
- Bake: Bake for 15-20 minutes, rotating trays halfway through.
- Cool down: Let macarons cool completely before removing them from the sheets.
- Whip up the buttercream: Beat softened butter, then add powdered sugar, raspberry puree, and lemon juice.
- Assemble: Pair shells, fill with buttercream, and sandwich them together.
Notes
Practice makes perfect! Don’t be discouraged by initial challenges.
Nutrition
- Serving Size: 1 macaron
- Calories: 100
- Sugar: 12g
- Sodium: 50mg
- Fat: 4g
- Saturated Fat: 2g
- Unsaturated Fat: 2g
- Trans Fat: 0g
- Carbohydrates: 14g
- Fiber: 0g
- Protein: 2g
- Cholesterol: 10mg
Keywords: French macarons, raspberry lemon buttercream, dessert, baking, treats
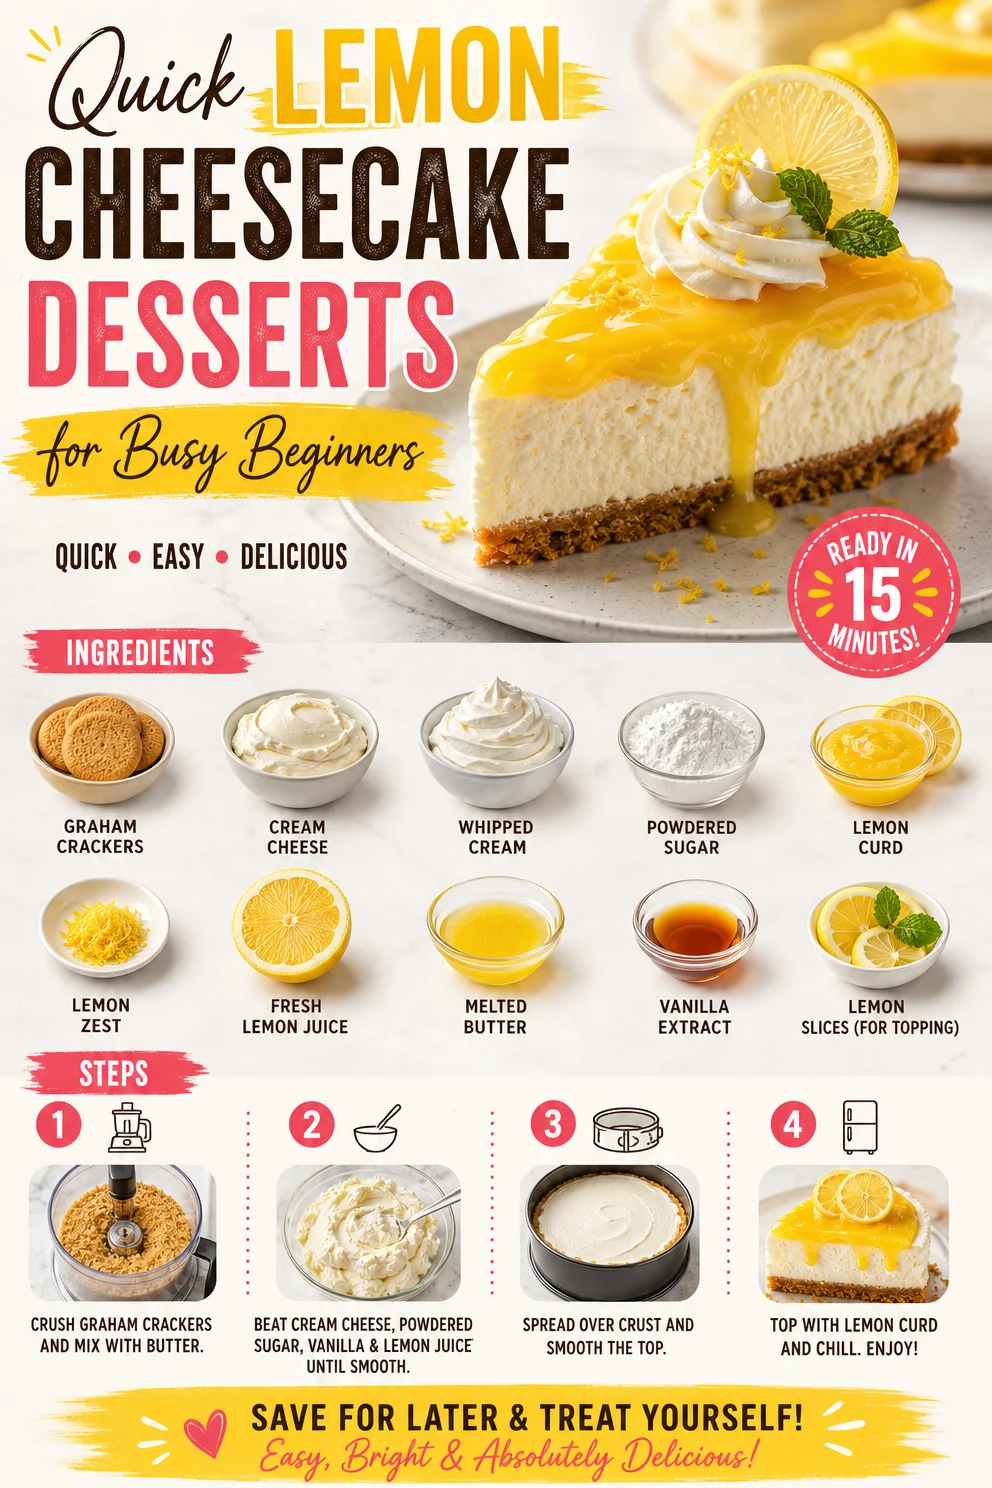
Quick Lemon Cheesecake Desserts for Busy Beginners
Creamy Lemon Cheesecake: Brighten Your Day with a Slice of Happiness
Welcome, fellow food lovers! Today, we’re diving into a delightful dessert that promises to brighten up your day: Creamy Lemon Cheesecake. Whether it’s a sunny afternoon, a special occasion, or just a little pick-me-up after a long day, this cheesecake is here to bring a splash of zest and a whole lot of happiness to your table.
Now, let’s talk about why cheesecake is one of those desserts that resonates with so many of us. It combines the smooth, rich texture of cream cheese with a graham cracker crust that gives a nod to nostalgia. But add fresh, zesty lemon into the mix, and you’ve created something that dances on your palate—a perfect balance of creamy and refreshing.
A Journey Down Memory Lane
Let me share a quick story with you.Growing up, there was no special occasion my family celebrated without my mom whipping up her famous lemon cheesecake. We gathered around the table, the air filled with the sweet and tangy aroma of citrus. I can still picture our tiny kitchen, laughter bouncing off the walls as my siblings and I eagerly awaited the cooling cheesecake. My mom would always say, "A little zest makes life zestier!" And boy, was she right!
One summer afternoon, after a long day of helping mom in the garden, we decided to surprise her. We harvested fresh lemons to make her signature cheesecake, but we were so excited that we accidentally put an extra dose of zest in the mix! When she tried it, she laughed and said, “This is the kind of happy accident I can get behind!” And to this day, that lemon cheesecake brings back a flurry of warm memories, reminding me that cooking is all about joy and love.
Ingredients You’ll Need
Let’s get to the heart of the matter—what you need to bring this creamy lemon cheesecake to life. Here’s the scoop:
-
For the Crust:
- Graham Crackers (1 ½ cups, crushed): The classic choice for a cheesecake crust. For a gluten-free option, swap in gluten-free graham crackers or ground nuts.
- Granulated Sugar (¼ cup): Adds sweetness and helps bind the crust. Coconut sugar can be a great substitute for a hint of caramel flavor.
- Unsalted Butter (½ cup, melted): This buttery goodness brings the crust together. If you’re vegan, you can use coconut oil or a vegan butter alternative.
-
For the Filling:
- Cream Cheese (16 oz, softened): The star of the show! Use full-fat for richness; Neufchâtel can lighten it up without sacrificing too much flavor.
- Granulated Sugar (¾ cup): Standard sweetness; brown sugar can add depth if you’re feeling adventurous.
- Eggs (3 large, at room temperature): Essential for setting the cheesecake. For a vegan version, try aquafaba or a flax egg (1 tbsp flaxseed meal + 2.5 tbsp water).
- Sour Cream (1 cup): For that luscious creaminess. Substitute with Greek yogurt for a healthier twist if you’d like.
- Fresh Lemon Juice (½ cup): This zesty liquid is the soul of the cheesecake! Freshly squeezed is best; bottled lemon juice doesn’t quite cut it.
- Lemon Zest (2 tablespoons): For an extra punch of flavor. Feel free to adjust based on your lemon-loving preferences.
Step-by-Step Instructions
Let’s get cooking! Follow these steps to whip up your own creamy lemon cheesecake. Grab your apron, and let’s do this!
Step 1: Preheat Your Oven
Preheat the oven to 325°F (163°C). This step is crucial for ensuring your cheesecake bakes evenly, giving it that perfectly creamy texture we all crave.
Step 2: Prepare the Crust
In a mixing bowl, combine the crushed graham crackers, granulated sugar, and melted butter. Mix until the crumbs are evenly moistened. Here’s a little tip: if you want a more complex flavor, consider adding a pinch of cinnamon or nutmeg for a warm spice undertone!
Step 3: Press the Crust
Press this mixture into the bottom of a 9-inch springform pan, ensuring it’s packed tightly and evenly. You can use the bottom of a measuring cup for a seamless look and to avoid gaps.
Step 4: Bake the Crust
Bake in the preheated oven for about 10 minutes, or until lightly golden. Then, remove from the oven and allow it to cool while you prep the filling. This will help the crust stay crispy and give that lovely crunch against the creamy filling.
Step 5: Make the Filling
In a large bowl, beat the softened cream cheese with an electric mixer until smooth and creamy (about 2-3 minutes). Gradually add the sugar and mix until blended. Don’t skimp on this step! Incorporating air into the cream cheese will give your cheesecake a dreamy texture.
Step 6: Add the Eggs
Add the eggs one at a time, mixing on low speed after each addition until just incorporated. It’s important not to overbeat the eggs. Too much air can lead to cracks in your finished cheesecake, and we want a smooth, crack-free surface!
Step 7: Stir in the Sour Cream, Lemon Juice, and Zest
Lower the mixer speed and gently fold in the sour cream, lemon juice, and lemon zest until well combined. Tasting is essential here. Feel free to add a bit more lemon juice or zest if you want an extra zing!
Step 8: Pour the Filling into the Crust
Carefully pour the cheesecake filling over the cooled crust. Smooth the top with a spatula for an even finish.
Step 9: Bake the Cheesecake
Bake the cheesecake in your preheated oven for about 55-60 minutes. You’ll know it’s done when the edges are set, and the center still has a slight jiggle. No need to fret—this jiggle will firm up as it cools!
Step 10: Cool and Set
Once baked, turn off the oven and leave the cheesecake inside to cool for about 1 hour, which helps prevent cracks. After an hour, remove it from the oven and let it cool to room temperature. Then, transfer it to the fridge and chill for at least 4 hours (or overnight for best results). Patience is key, folks!
Serving Suggestions
When it comes to serving this masterpiece, simple is best! Slice your cheesecake into wedges and place them on individual plates. For a touch of elegance, top each slice with a handful of fresh berries, a dollop of whipped cream, or a drizzle of lemon curd. You could also sprinkle some toasted coconut on top for that extra flair.
Recipe Variations
While this lemon cheesecake is nothing short of fabulous, here are some fun twists to keep your taste buds guessing:
- Berry Bliss: Swirl in a raspberry or blueberry compote before baking for a fruity infusion.
- Chocolate Lover: Add melted chocolate to the filling or make a chocolate crust using Oreo cookies (just crush them up instead of graham crackers).
- Herbaceous Touch: Infuse the cheesecake with finely chopped basil or mint for an unexpected herbal zing.
- Savory Option: Try a hint of savory by adding a pinch of salt or swapping some sugar for a bit of honey in the crust.
- No-Bake Version: Replace the eggs and bake step with gelatin to create a chilled no-bake cheesecake—perfect for summer days!
Chef’s Notes
Every recipe tells a story, and this creamy lemon cheesecake has evolved over the years. Originally, my mom’s version was simple as can be, but I love to experiment, playing around with flavors and twists to make it my own. Each time I bake it, the scent reminds me of those joyful summer afternoons, connecting me back to my roots. Don’t be afraid to make it your story—every sprinkle of zest is a chance to add your own flair.
FAQs and Troubleshooting
Q: Why did my cheesecake crack?
A: Cracking typically occurs when the cheesecake is overmixed or baked at too high a temperature. To avoid this, mix just until combined and bake at a low temp with the oven door slightly ajar during the cooling phase.
Q: How can I tell when my cheesecake is done?
A: It should be set around the edges but still have a slight jiggle in the center when you gently shake the pan.
Q: Can I make this cheesecake ahead of time?
A: Absolutely! It’s the perfect make-ahead dessert. Just be sure to store it in the fridge and cover it to keep it fresh.
Q: How should I store leftovers?
A: Keep any leftover cheesecake tightly wrapped in plastic wrap or an airtight container in the fridge. It typically lasts for 3-5 days—if it lasts that long!
Nutritional Info
Of course! Each slice of this cheesecake packs a bit of indulgence, but it’s all about balance, right? A slice (about 1/12 of the cheesecake) generally contains approximately:
- Calories: 320
- Total Fat: 22g
- Saturated Fat: 12g
- Cholesterol: 90mg
- Carbohydrates: 28g
- Fiber: 1g
- Sugars: 20g
- Protein: 6g
Now that you’ve got the recipe, a sprinkle of patience, and the zest for making memories in the kitchen, you’re all set to create a delicious creamy lemon cheesecake! I hope this journey inspires you to whip up your version and share it with loved ones.
Here’s to amazing flavors, joyful memories, and, of course, a slice (or two) of creamy lemon goodness! Happy baking!
PrintCreamy Lemon Cheesecake

A delightful dessert that combines smooth cream cheese with a refreshing lemon flavor, perfect for any occasion.
- Prep Time: 20 minutes
- Cook Time: 70 minutes
- Total Time: 90 minutes
- Yield: 12 servings 1x
- Category: Dessert
- Method: Baking
- Cuisine: American
- Diet: Vegetarian
Ingredients
- 1 ½ cups Graham Crackers, crushed
- ¼ cup Granulated Sugar
- ½ cup Unsalted Butter, melted
- 16 oz Cream Cheese, softened
- ¾ cup Granulated Sugar
- 3 large Eggs, at room temperature
- 1 cup Sour Cream
- ½ cup Fresh Lemon Juice
- 2 tablespoons Lemon Zest
Instructions
- Preheat the oven to 325°F (163°C).
- Combine the crushed graham crackers, granulated sugar, and melted butter in a mixing bowl.
- Press the mixture into the bottom of a 9-inch springform pan.
- Bake in the preheated oven for about 10 minutes.
- Beat the softened cream cheese with an electric mixer until smooth and creamy.
- Add the sugar gradually and mix until blended.
- Add the eggs one at a time, mixing on low speed after each addition.
- Stir in the sour cream, lemon juice, and zest until well combined.
- Pour the filling over the cooled crust.
- Bake the cheesecake for about 55-60 minutes.
- Cool the cheesecake in the oven for about 1 hour.
- Chill in the fridge for at least 4 hours or overnight.
Notes
Serve with fresh berries, whipped cream, or lemon curd for added flavor.
Nutrition
- Serving Size: 1 slice
- Calories: 320
- Sugar: 20g
- Sodium: 300mg
- Fat: 22g
- Saturated Fat: 12g
- Unsaturated Fat: 8g
- Trans Fat: 0g
- Carbohydrates: 28g
- Fiber: 1g
- Protein: 6g
- Cholesterol: 90mg
Keywords: cheesecake, lemon dessert, creamy dessert, American dessert
Beginner-Friendly Cinnamon Roll Cookies: Easy, Gooey Treats
The Sweetest Twist: Cinnamon Roll Cookies Recipe
There’s something undeniably cozy about the scent of cinnamon wafting through your kitchen, isn’t there? It’s like wrapping yourself in a warm blanket and settling into a comfy chair with a good book. That’s the feeling I want to evoke in you today with my take on a classic favorite: Cinnamon Roll Cookies. Yes, you heard that right—cookies that capture all the flavors of a delicious cinnamon roll, but come together in a delightful, chewy cookie form!
These cookies are not just a dessert; they are a celebration of texture and flavor that can elevate any day, whether gloomy or sunny. A hint of vanilla, the warmth of cinnamon, and the decadent frosting hugged around every bite make these cookies the ultimate treat. They are perfect for sharing with friends, family gatherings, or, let’s be honest, hiding away for yourself (we won’t tell!).
In this blog post, I’ll take you through every step of crafting these delectable cookies. Whether you’re a seasoned baker or new to the kitchen, this recipe is approachable, so you can whip it up without feeling overwhelmed. Plus, I’ll share some fun stories, culinary tips, and a few delightful variations to keep things fresh every time you bake. So grab your apron, and let’s dive into this delightful cookie adventure together!
A Little Background on My Love for Cinnamon Rolls
Growing up, Sundays were sacred in our household. They began with the cozy ritual of Sunday brunch, where the aroma of freshly baked cinnamon rolls filled the air—the cinnamon, brown sugar, and butter swirled together with tender dough crafted by my mom’s magical hands. Each bite was a warm hug that melted my heart and fueled my day.
One Sunday, however, things took a delicious twist. My mom decided to experiment with a cookie version of our beloved cinnamon rolls. She gathered us around the kitchen, and even though our expectations were high, the moment we took a bite, we were all in agreement—these were divine! The light, chewy texture combined with the rich flavor of cinnamon was an instant hit. The best part? We could eat more than one without feeling guilty!
That memory sticks with me, and it’s why I’m so excited to share this Cinnamon Roll Cookies recipe with you. Not only are these cookies reminiscent of those cherished Sunday mornings, but they bring a modern twist to a classic favorite. Let’s keep those sweet memories alive—one cookie at a time!
Ingredients
Let’s gather our ingredients before diving into the baking process. Here’s what you’ll need:
-
2 cups All-Purpose Flour
This forms the base of your cookie—use a scoop and level method for perfect measurements! If you’re gluten-free, opt for a 1:1 gluten-free flour blend, and it should work just as beautifully. -
1 cup Butter, softened
The butter provides richness and moisture to our cookies. I recommend unsalted butter for better flavor control. In a pinch, you can swap in coconut oil for a dairy-free version—just ensure it’s softened. -
1 cup Sugar
Regular granulated sugar gives these cookies their sweetness and helps create a nice, chewy texture. Feel free to substitute with coconut sugar for a healthier twist, but cookies may be darker in color. -
1 teaspoon Vanilla Extract
Pure vanilla extract enhances the flavor profile wonderfully. If you find yourself out of vanilla, a touch of almond extract can add a unique spin. -
1 teaspoon Baking Powder
This is essential for fluffiness; it gives the cookies a lovely lift. Don’t confuse it with baking soda, as they serve different purposes! -
1/2 teaspoon Salt
Salt balances the sweetness and enhances all the flavors in the cookies. Sea salt is a great option here if you have it! -
1/2 cup Brown Sugar
Brown sugar adds that irresistible caramel flavor, and the moisture it contains helps keep the cookies soft. For a lighter flavor, use light brown sugar instead. -
2 teaspoons Cinnamon
The star of the show! Fresh ground cinnamon works best for the richest flavor; if you have a spice grinder, using whole sticks is the way to go! -
1 Egg
The egg binds everything together while also contributing to the richness. For a vegan replacement, you can use a flaxseed egg (1 tablespoon flaxseed meal mixed with 2.5 tablespoons water). -
1/2 cup Powdered Sugar (for icing)
The icing drizzled on top is the crowning glory for these cookies. If you’re avoiding refined sugars, powdered coconut sugar is a perfect alternative!
Step-by-Step Instructions
Alright, let’s channel our inner baker and get these cookies in the oven! Follow these steps for a stress-free baking experience:
-
Preheat Your Oven
Start by preheating your oven to 350°F (175°C). This ensures that your cookies bake evenly from the moment they hit the tray—no one likes doughy centers! -
Prepare Your Baking Sheet
Line a baking sheet with parchment paper. This prevents sticking and ensures even baking. Alternatively, you can grease the baking sheet but trust me, parchment is a lifesaver! -
Mix the Dry Ingredients
In a medium bowl, whisk together the all-purpose flour, baking powder, salt, and cinnamon. This step is crucial as it helps the baking powder distribute evenly throughout the flour. A well-mixed dry ingredient blend means perfectly risen cookies! -
Cream the Butter and Sugars
In a large mixing bowl, use an electric mixer to cream together the softened butter, granulated sugar, and brown sugar until it’s light and fluffy—about 2-3 minutes. This incorporates air into the batter for a lighter cookie. Pro tip: Your butter should be soft but not melting! -
Add the Egg and Vanilla
Beat in the egg and vanilla extract until well combined. Here’s where that delicious aroma starts to fill your kitchen! -
Combine Wet and Dry Ingredients
Gradually add the dry ingredient mixture to the wet mixture, stirring with a spatula until just combined. Avoid over-mixing, as this can make the cookies tough! -
Scoop & Shape
Using a cookie scoop (or a tablespoon), drop mounds of dough onto the prepared baking sheet, leaving enough space in between for spreading. You can roll them into balls for a more polished look. Want to jazz it up? Gently press down on the tops to create a little flat area for the icing to pool later. -
Bake the Cookies
Pop them in the oven and bake for 10-12 minutes, or until the edges are lightly golden and the centers are just set. Resist the urge to over-bake, as they will continue to cook on the tray after you take them out. My secret? Set a timer for 10 minutes, and start checking—every oven is a bit different! -
Cool Down
Once baked, allow the cookies to cool on the baking sheet for about 5 minutes before transferring them to a wire rack. This helps them firm up a bit without losing that soft center. -
Make the Icing
Whisk the powdered sugar with a splash of milk (about 1-2 tablespoons) until smooth. Drizzle this sweet icing over the warm cookies using a fork for that charming rustic look. If you’d like a thicker icing, simply reduce the amount of milk! -
Enjoy
Wait until the icing sets (or don’t!) and dig in! Nothing beats a warm cinnamon roll cookie fresh out of the oven.
Serving Suggestions
These Cinnamon Roll Cookies are delightful as is! However, I always encourage a little creativity. Consider serving them on a fun platter with a side of whipped cream or custard for dipping. If it’s a celebration, stack them up like a birthday cake and shower them with colorful sprinkles for a festive touch!
Recipe Variations
Your culinary journey doesn’t have to end here! Mix it up with these creative twists:
-
Nutty Boost
Add 1/2 cup of chopped pecans or walnuts for a delightful crunch that complements the soft cookies. -
Chocolate Drizzle
After icing the cookies, drizzle them with melted chocolate for an indulgent twist. You can also use dark chocolate chips instead of half the granulated sugar for a chocolaty experience. -
Apple Cinnamon Roll
Fold in 1 cup of finely chopped apples to bring a fruity note to the cookies—think fresh apple pie meets cinnamon roll! -
Spiced Up
Amp up the cinnamon to 3 teaspoons for a spicier flavor, or add a dash of nutmeg or cardamom for a unique twist! -
Vegan Delight
Replace the butter with vegan buttery sticks and use a flaxseed egg to make these delightful cookies plant-based!
Chef’s Notes
Ah, the journey of perfecting this recipe has been a delightful ride! Initially, my cinnamon roll cookies were a bit too cakey (oops!). After many experiments, I stumbled upon the right balance of ingredients that created the chewy texture you see here. I also remember the time I forgot to add sugar and ended up with a batch of bizarre flour cookies—definitely not my finest moment! But every "oops" in the kitchen leads you to those precious "aha!" moments, doesn’t it?
So don’t be shy—have fun with this recipe and put your own spin on things!
FAQs and Troubleshooting
1. Why are my cookies spreading too much?
This could be due to using melted butter instead of softened or not chilling the dough slightly before baking. If your kitchen is particularly warm, consider chilling the dough for 30 minutes before baking.
2. My cookies feel dry. How can I avoid that?
Overbaking is usually the culprit! Keep an eye on them towards the end of the bake time. They should look a little underbaked when you take them out, as they will continue to set while cooling.
3. Can I freeze the cookies?
Absolutely! You can freeze the cookie dough in advance. Just shape it into balls, chill them, and then store them in an airtight container. They’ll last about 3 months. When you’re ready to bake, just pop them into the oven straight from the freezer (add a minute or two to the baking time).
4. How can I make these gluten-free?
Swap out the all-purpose flour for a 1:1 gluten-free flour blend. Add in a teaspoon of xanthan gum if your blend doesn’t already include it—this helps bind the ingredients together for the perfect texture.
Nutritional Info (optional)
Each cookie contains approximately 180 calories, with 8g of fat, 24g of carbohydrates, 1g of protein, and 9g of sugar. For a healthier alternative, consider using natural sweeteners and almond flour; the nutritional profile will vary.
And there you have it, friends! Your journey into the delightful world of Cinnamon Roll Cookies is just a step away. Each bite is a little piece of heaven, and I can’t wait for you to experience the joy these cookies bring! Happy baking!
PrintCinnamon Roll Cookies
Delightful cookies that capture all the flavors of a delicious cinnamon roll in a chewy form.
- Prep Time: 15 minutes
- Cook Time: 12 minutes
- Total Time: 27 minutes
- Yield: 24 cookies 1x
- Category: Dessert
- Method: Baking
- Cuisine: American
- Diet: Vegetarian
Ingredients
- 2 cups All-Purpose Flour
- 1 cup Butter, softened
- 1 cup Sugar
- 1 teaspoon Vanilla Extract
- 1 teaspoon Baking Powder
- 1/2 teaspoon Salt
- 1/2 cup Brown Sugar
- 2 teaspoons Cinnamon
- 1 Egg
- 1/2 cup Powdered Sugar (for icing)
Instructions
- Preheat your oven to 350°F (175°C).
- Prepare a baking sheet lined with parchment paper.
- Mix the dry ingredients in a bowl: flour, baking powder, salt, and cinnamon.
- Cream the butter, granulated sugar, and brown sugar in a large mixing bowl until light and fluffy.
- Add the egg and vanilla extract, mixing until combined.
- Combine the wet and dry ingredients, stirring until just mixed.
- Scoop mounds of dough onto the baking sheet, leaving space between them.
- Bake for 10-12 minutes until edges are lightly golden.
- Cool on the baking sheet for 5 minutes, then transfer to a wire rack.
- Make the icing by whisking powdered sugar with a splash of milk.
- Drizzle icing over the warm cookies and enjoy!
Notes
For vegan cookies, replace butter with vegan buttery sticks and use a flaxseed egg.
Nutrition
- Serving Size: 1 cookie
- Calories: 180
- Sugar: 9g
- Sodium: 180mg
- Fat: 8g
- Saturated Fat: 5g
- Unsaturated Fat: 3g
- Trans Fat: 0g
- Carbohydrates: 24g
- Fiber: 0g
- Protein: 1g
- Cholesterol: 30mg
Keywords: cinnamon roll, cookies, dessert, baking, sweet treats