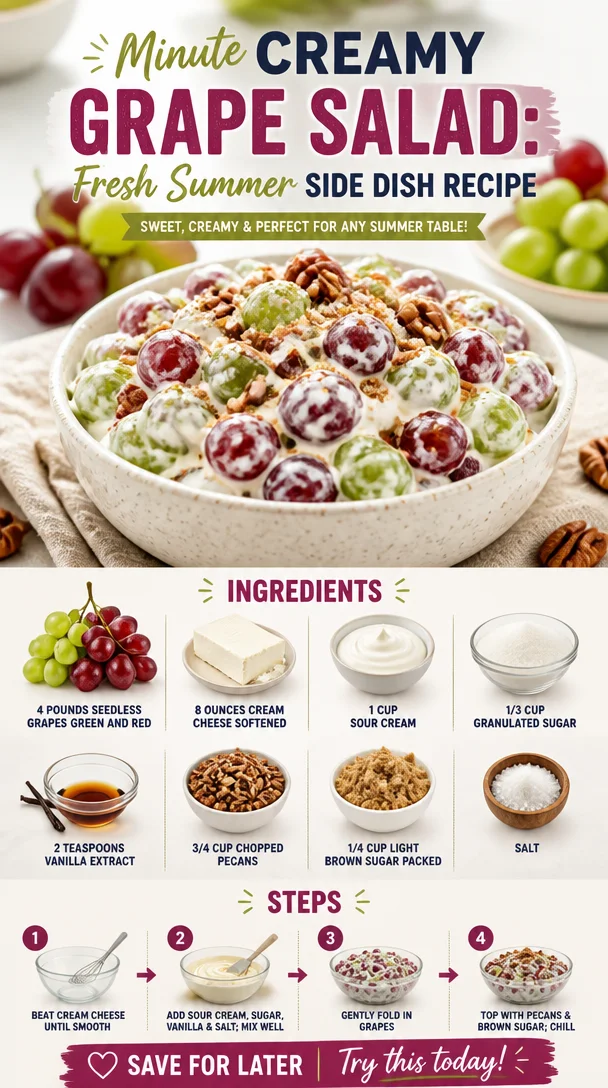
Minute Creamy Grape Salad: Fresh Summer Side Dish Recipe
Cool and Creamy Grape Salad: A Fruity Delight to Brighten Your Day
Welcome to Clean Plate Cravings! Today, we’re diving into a dish that perfectly encapsulates the essence of fresh, vibrant flavors and the joy of gathering around the table with loved ones. Picture this: a sunny afternoon, laughter in the air, and a salad that’s as delightful to look at as it is to eat. Enter the Cool and Creamy Grape Salad. Whether you’re serving it at a picnic, family gathering, or just for a sweet treat to enjoy at home, this dish is sure to be a hit.
You might be wondering, “Why a salad of grapes? Isn’t that just fruit?” Trust me—this is not your average fruit bowl! This creamy concoction combines succulent grapes with a luscious dressing that transforms it into a delightful side or dessert. Think of it as a sweet symphony played by fresh produce, a medley of flavors that dances on your palate and leaves you wanting more.
Growing up, grape salad was a staple at every family picnic and potluck. I remember being a child, eagerly awaiting the moment the bowl appeared on the table, the sun gleaming off the glossy grapes. My aunt would whip up her version, and the secret had always been in the creamy dressing, just enough to bind everything together without overwhelming the freshness of the fruit. The crunch of pecans added the perfect contrast, making each bite a delightful experience.
So roll up your sleeves, and let’s get started on crafting this fresh and fabulous Cool and Creamy Grape Salad that I know will become one of your go-to recipes!
Personal Story
One of my fondest memories tied to grape salad is from last summer’s family reunion. The sun was shining, and the patio was filled with laughter and chatter. My cousin Sarah whipped out her phone and asked if anyone remembered the infamous grape salad incident from the last gathering—a story that still lives in our family lore.
Years ago, Sarah, eager to impress, decided to add a twist to the classic recipe by tossing in some unexpected ingredients—coconut flakes, marshmallows, and even a splash of citrus! While her creativity was commendable, the resulting dish left everyone scratching their heads. We laughed about it all afternoon, but the memory sparked a new tradition: each year, we’d take turns making our own versions of grape salad. It became a friendly competition, each of us trying to capture the balance of flavors and textures while nodding to those quirky culinary “experiments.”
So while my final recipe is rooted in the basics, I encourage you to make it your own—who knows? You just might start a family tradition of your own!
Ingredients
Before we dive into creating this masterpiece, let’s gather our ingredients! Here’s what you’ll need:
-
4 pounds seedless grapes (green and red)
A mix of grapes adds color and flavor! Green grapes are sweet and refreshing, while red grapes offer a delightful burst of juicy sweetness. If you can’t find seedless grapes, you can remove the seeds from regular grapes, but be prepared for a little more work! -
8 ounces cream cheese (softened)
Cream cheese adds a smooth, creamy texture that acts as the base of our dressing. Make sure it’s at room temperature for easy blending. If you want a lighter version, you can substitute with Greek yogurt. -
1 cup sour cream
Sour cream brings a tanginess that complements the sweetness of the grapes. You can substitute it with plain yogurt for a similar texture with less tang. -
1/3 cup granulated sugar
This will sweeten our dressing. If you prefer a lower-sugar option, maple syrup or honey can work beautifully as a substitute! -
2 teaspoons vanilla extract
A splash of vanilla adds warmth and depth to the dressing. If you want to switch things up, consider using almond extract for a nutty twist. -
3/4 cup chopped pecans
Pecans provide a crunchy texture that’s irresistible! If you have nut allergies, sunflower seeds or pumpkin seeds are great alternatives. -
1/4 cup light brown sugar (packed)
Brown sugar adds a slight molasses flavor and will help create a lovely topping. You can use coconut sugar for a different flavor profile! -
Salt
Just a pinch! It brings out all the flavors and balances the sweetness.
Now that we have everything prepped and ready, let’s dive into the cooking process!
Step-by-Step Instructions
-
Prepare the Grapes
Start by rinsing the grapes under cool water to remove any dirt or residue. Drain them well and make sure they are completely dry before proceeding. You can pat them gently with a kitchen towel. Cutting some grapes in half can also enhance their flavor and texture, but keep some whole for visual appeal! -
Make the Creamy Dressing
In a mixing bowl, combine the softened cream cheese and sour cream. Using an electric mixer or a whisk, beat them together until smooth and creamy. This might take about 2-3 minutes. Be patient—making sure there are no lumps is key to achieving that silky texture we all love! -
Add Sweetness and Flavor
Gradually add the granulated sugar and vanilla extract to the cream cheese mixture. Continue mixing until everything is well combined. Taste as you go! If you like it sweeter, feel free to add another tablespoon of sugar. -
Mix in the Grapes
In a large mixing bowl, combine the grapes with the creamy dressing. Gently fold the dressing over the grapes with a spatula, ensuring that every grape is coated but without squishing them. This is where the magic happens! You’ll see the bright colors of the grapes shining through the creamy coating, and it’s hard not to sneak in a taste! -
Prepare the Topping
In a separate bowl, mix the chopped pecans with the packed light brown sugar. This gives it that crunchy, sweet irresistible topping! You can toast the pecans in a dry skillet over medium heat for a couple of minutes until fragrant, but this is optional. -
Combine and Chill
Pour the coated grapes into a serving dish and spread them out. Top generously with the pecan mixture. For the best flavor, cover the dish with plastic wrap and refrigerate for at least an hour. This allows the dressing to meld with the grapes, enhancing the overall taste. -
Serve and Enjoy!
After chilling, give it a gentle stir before serving. It’s ready to delight your family and friends!
Serving Suggestions
To plate your Cool and Creamy Grape Salad, consider using a beautiful glass bowl or a fun, colorful serving dish. Not only does it make for a stunning presentation, but it allows the vibrant colors of the grapes and crunchy topping to shine. A sprinkle of extra chopped pecans on top adds a lovely finishing touch, and don’t shy away from garnishing with a few mint leaves for a pop of freshness. Serve it chilled on a warm day for the ultimate refreshing treat!
Recipe Variations
Now that you have the classic recipe down, here are a few creative twists to keep things interesting:
-
Citrus Burst Grape Salad: Add a pop of freshness with some finely chopped mint and a zest of lemon or orange to the dressing!
-
Tropical Grape Salad: Toss in some diced pineapple or mango for a taste of the tropics!
-
Chocolate Drizzle Grape Salad: For extra indulgence, drizzle some melted dark chocolate over the top just before serving. Yum!
-
Vegan Version: Substitute the cream cheese and sour cream with a plant-based cream cheese and coconut yogurt for a creamy, vegan alternative.
Chef’s Notes
As I initially developed this recipe, I found my thoughts drifting to various gatherings where a simple dish sparked conversation and connection. It truly is incredible how food can transport us back to cherished moments in time. Each time I whip up this grape salad, I’m reminded of the joy it brings to my friends and family. You’ll soon see that this dish not only serves as nourishment but as a vehicle for connection.
As with all recipes, don’t be afraid to put your spin on it—whether it’s through the choice of nuts, tweaking the sweetness, or adding your special secret touch. Food is all about enjoyment, and it evolves through our personal experiences in the kitchen.
FAQs and Troubleshooting
-
Can I use frozen grapes?
While frozen grapes can be delicious as a snack, using them in this recipe may change the texture and consistency. Fresh grapes are recommended for that delightful crunch! -
The dressing is too thick; how can I fix that?
If you find your dressing is thicker than expected, feel free to add a little more sour cream or a splash of milk until you reach your desired consistency. -
How long will the grape salad last in the fridge?
The salad can last up to 3 days in the fridge. However, it’s best enjoyed fresh, as the grapes may release their juices over time. -
Can I make this salad ahead of time?
Absolutely! You can prepare the salad up to a day in advance. Just keep it tightly covered in the fridge to maintain freshness.
Nutritional Info
While it’s always good to be mindful of our food choices, the Cool and Creamy Grape Salad can be enjoyed in moderation. This dish is rich in vitamins from the grapes, healthy fats from the pecans, and brings a delightful sweetness without relying heavily on refined sugars. One serving offers satisfying flavors while being lighter than traditional desserts.
Conclusion
So there you have it—your guide to creating the most delightful Cool and Creamy Grape Salad! It’s a dish that embodies joy and flavor, and one that I know will be a favorite at your next gathering. Remember to experiment, have fun, and most importantly, share your creations with those you love. Let’s keep it fresh, simple, and seriously delicious—one grape salad at a time! Happy cooking!
PrintCool and Creamy Grape Salad
A vibrant and refreshing grape salad with a creamy dressing that’s perfect for picnics or family gatherings.
- Prep Time: 15 minutes
- Cook Time: 0 minutes
- Total Time: 15 minutes
- Yield: 8 servings 1x
- Category: Salad
- Method: No Cook
- Cuisine: American
- Diet: Vegetarian
Ingredients
- 4 pounds seedless grapes (green and red)
- 8 ounces cream cheese (softened)
- 1 cup sour cream
- 1/3 cup granulated sugar
- 2 teaspoons vanilla extract
- 3/4 cup chopped pecans
- 1/4 cup light brown sugar (packed)
- Salt (a pinch)
Instructions
- Prepare the grapes by rinsing them under cool water and draining well.
- Make the creamy dressing by combining the cream cheese and sour cream, then beating until smooth.
- Add granulated sugar and vanilla extract to the creamy mixture, mixing well.
- Mix in the grapes, folding them gently with the dressing.
- Prepare the topping by mixing chopped pecans with light brown sugar.
- Combine everything in a serving dish and refrigerate for at least one hour.
- Serve and enjoy your refreshing salad!
Notes
Feel free to customize with additional ingredients like diced pineapple or chocolate drizzles for a twist.
Nutrition
- Serving Size: 1 cup
- Calories: 220
- Sugar: 18g
- Sodium: 150mg
- Fat: 10g
- Saturated Fat: 4g
- Unsaturated Fat: 4g
- Trans Fat: 0g
- Carbohydrates: 30g
- Fiber: 2g
- Protein: 3g
- Cholesterol: 15mg
Keywords: grape salad, summer salad, creamy dressing, dessert salad
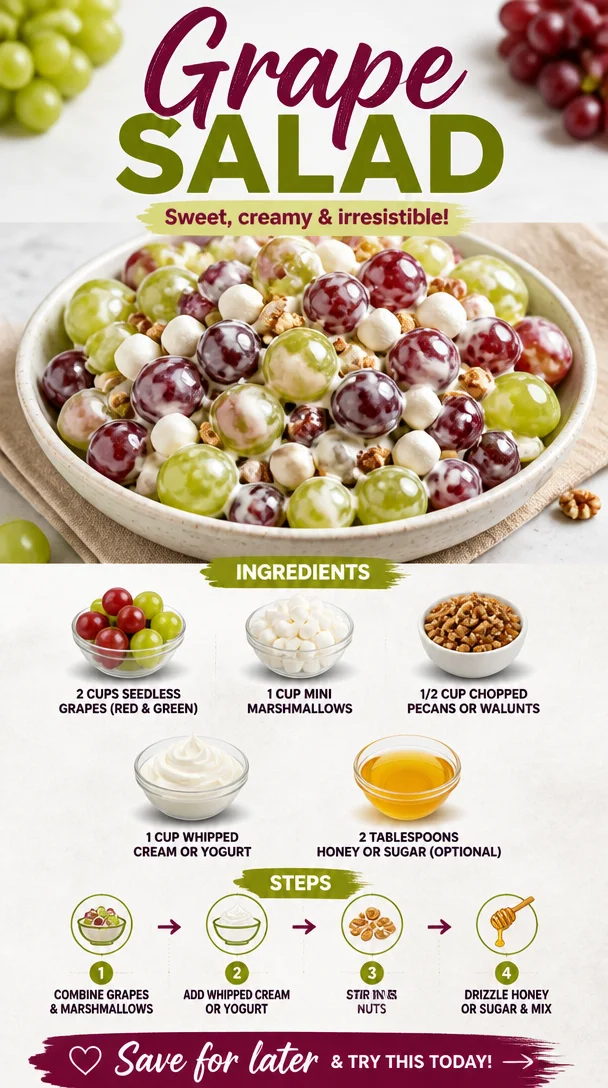
Grape Salad
Sweet and Crunchy Grape Salad: A Delightful Twist on a Classic
Welcome back to Clean Plate Cravings, my friends! Today, I’m bringing you a refreshing and irresistible dish that’s perfect for summer picnics, barbecues, or simply a light dessert after dinner: Grape Salad! This salad has been a staple in my family for years, and I can’t wait to share it with you all. So grab your apron and let’s dive into the delicious world of vibrant flavors and textures that grape salad offers!
This dish holds a special place in my heart, as it reminds me of warm summer afternoons spent at my grandmother’s house. Picture this: sunlight streaming through the windows, the smell of freshly cut grass wafting in from the backyard, and laughter echoing through the house. Grandma would prepare a big bowl of grape salad for our family gatherings, and I can still hear the delighted giggles of my cousins as we eagerly lined up for our first helping. With its sweet, juicy grapes and creamy dressing, grape salad was always a hit—not just with us kids but with adults, too!
What I love most about grape salad is its simplicity. With just a handful of ingredients, you can whip up something absolutely delightful in no time. It’s a versatile dish that can easily adapt to your taste preferences, making it a perfect fit for any occasion.
Let’s get cooking, shall we?
Ingredients
This grape salad recipe is straightforward and requires minimal prep. Here’s what you need:
-
2 cups seedless grapes (red and green)
These juicy bites of goodness are the stars of the show. Use a mix of red and green grapes for a colorful presentation! If you happen to have a grape allergy, feel free to replace them with diced apples or sliced strawberries for that same juicy crunch. -
1 cup mini marshmallows
These add a fun, chewy texture that kids (and adults!) love. For a healthier twist, you can substitute them with chopped apples or pears for some added crunch. -
1/2 cup chopped pecans or walnuts
Nuts bring in a delightful crunch and nutty flavor, which beautifully balances the sweetness. Not a nut fan? Toasted coconut makes a great alternative for that tropical flair! -
1 cup whipped cream or yogurt
This is the creamy element that ties everything together. For a lighter option, opt for Greek yogurt for a dose of probiotics. You can also use non-dairy whipped toppings for a vegan version. -
2 tablespoons honey or sugar (optional)
Depending on the sweetness of your grapes, you might want to adjust the sweetness. Feel free to skip this, especially if you’re using whipped cream.
With just these simple ingredients, you can create a dish that not only looks great but tastes amazing!
Step-by-Step Instructions
Now that we’ve got our ingredients, let’s get into the nitty-gritty of preparing this delightful grape salad. Grab your mixing bowl—let’s get started!
-
Wash the Grapes
Start by rinsing your seedless grapes under cool running water. Make sure to gently swish them around to remove any dirt or residue. After washing, pat them dry with a clean kitchen towel. This step is essential because excess moisture can make your salad watery later on! -
Prep the Grapes
Once they’re dry, slice the grapes in half. This not only makes them easier to mix but also ensures every bite has that juicy explosion we love. Plus, it creates little pockets for the creamy dressing to cling to! -
Mix the Base
In a large mixing bowl, combine the halved grapes, mini marshmallows, and chopped nuts. The visual of this lively mixture is already a feast for the eyes! Stir gently to ensure everything is evenly distributed, but be careful not to mash the grapes. -
Incorporate the Cream
Now, it’s time to add the whipped cream or yogurt! If you decided to use yogurt for a health boost, make it a little sweeter by adding in your honey or sugar at this stage. Gently fold the cream into the grape mixture. You want to maintain that fluffy texture while ensuring everything is coated beautifully. -
Taste and Adjust
Here’s where the real fun begins! Taste your grape salad and see if it needs any adjustments. Perhaps a bit more sweetness? Maybe some zest with a squeeze of lemon or lime? This is your dish, so make it uniquely yours! -
Chill and Serve
Finally, cover your grape salad and let it chill in the refrigerator for at least 30 minutes before serving. This allows all the flavors to meld together and makes for a refreshing treat. Trust me, patience is key here!
Serving Suggestions
When it’s time to serve, grab a beautiful bowl or a vibrant platter. You can garnish with a sprinkle of additional chopped nuts or a few whole grapes on top to impress your guests. This grape salad is not only perfect as a side dish but also shines as a light dessert. It’s a beautiful addition to summer picnics, potlucks, or even as a snack in your daily routine.
Recipe Variations
Looking to change things up a bit? Here are some fun twists to keep your grape salad exciting!
-
Add Citrus
Incorporate some chopped oranges or a sprinkle of lemon zest to brighten the flavors. The citrus will cut the sweetness and add a refreshing zing! -
Berry Blast
Mix in some fresh strawberries or blueberries for an extra burst of color and antioxidants. It’s a perfect summer spin! -
Spiced Up
Add a pinch of cinnamon or nutmeg to the cream dressing for a warm, aromatic flavor. This is especially delightful in the fall! -
Tropical Twist
Replace pecans with shredded coconut and add a few pineapple tidbits. It’s like a vacation on a plate! -
Savory Style
For a more savory approach, consider adding some crumbled feta or a sprinkle of sea salt. The sweet-and-salty combination is truly addictive!
Chef’s Notes
As with all my recipes, this grape salad has evolved over time. I initially started with a heavier cream base but slowly adjusted to include lighter elements, like yogurt, that still keep it creamy but add a nutritional boost. I remember one time at a family gathering when my cousin accidentally added too much sugar, making it more of a dessert! We laughed it off and ended up calling it "sugar bomb grape salad." It just goes to show that cooking is all about experimenting and having fun in the kitchen.
FAQs and Troubleshooting
1. My grape salad is too watery—how do I fix this?
If your salad ends up watery, it could be due to overripe grapes or too much moisture during washing. Next time, make sure to dry the grapes well and use firmer grapes. If it’s too late, try draining excess liquid before serving.
2. How long can I store grape salad?
Grape salad is best enjoyed fresh but can be stored in an airtight container in the refrigerator for up to 2 days. The longer it sits, the more the flavors blend, but keep in mind that the texture might change as the grapes release some moisture.
3. Can I make grape salad ahead of time?
Absolutely! You can prepare the grape mixture and cream separately and combine them just before serving. This will help maintain the freshness and texture!
4. What can I use instead of yogurt?
In place of yogurt, feel free to use sour cream, cottage cheese, or a non-dairy alternative, like coconut whipped cream. Each option will give the salad a unique flavor and texture!
Nutritional Info
While I don’t focus heavily on nutritional info in my recipes, this grape salad is relatively low in calories, especially with yogurt. It’s rich in vitamins, fiber, and antioxidants, making it a great addition to a balanced diet.
And there you have it—a delightful Grape Salad that brings back memories while creating new ones! I hope you try this recipe and share it with your loved ones. Remember, the kitchen is about joy, creativity, and connection, so don’t hesitate to make this dish your own. Happy cooking, friends!
PrintSweet and Crunchy Grape Salad
A refreshing and irresistible grape salad perfect for summer picnics, barbecues, or as a light dessert.
- Prep Time: 10 minutes
- Cook Time: 0 minutes
- Total Time: 40 minutes
- Yield: 4 servings 1x
- Category: Salad
- Method: Mixing
- Cuisine: American
- Diet: Vegetarian
Ingredients
- 2 cups seedless grapes (red and green)
- 1 cup mini marshmallows
- 1/2 cup chopped pecans or walnuts
- 1 cup whipped cream or yogurt
- 2 tablespoons honey or sugar (optional)
Instructions
- Wash the grapes under cool running water and pat them dry.
- Prep the grapes by slicing them in half.
- Mix the halved grapes, mini marshmallows, and chopped nuts in a large mixing bowl.
- Incorporate the whipped cream or yogurt, folding gently to mix.
- Taste and adjust for sweetness if needed.
- Chill in the refrigerator for at least 30 minutes before serving.
Notes
For a lighter option, use Greek yogurt. You can also substitute nuts with shredded coconut or use diced apples if you have a grape allergy.
Nutrition
- Serving Size: 1 serving
- Calories: 200
- Sugar: 10g
- Sodium: 50mg
- Fat: 9g
- Saturated Fat: 3g
- Unsaturated Fat: 6g
- Trans Fat: 0g
- Carbohydrates: 30g
- Fiber: 2g
- Protein: 3g
- Cholesterol: 10mg
Keywords: grape salad, refreshing salad, summer recipe, dessert salad
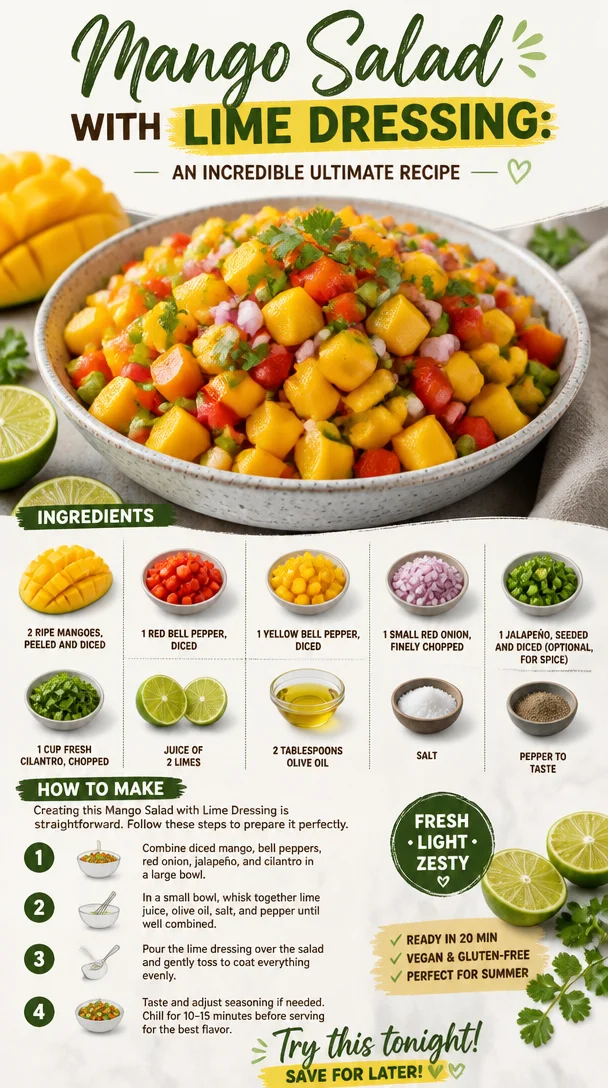
Mango Salad with Lime Dressing: An Incredible Ultimate Recipe
Mango Salad with Lime Dressing: An Incredible Ultimate Recipe
Welcome to Clean Plate Cravings, where today we’re diving headfirst into the vibrant world of a Mango Salad with Lime Dressing! Picture this: the sun is shining, the breeze is light, and you’re enjoying a dish that’s as refreshing as a summer day. Filled with bright, tropical flavors that will make your taste buds dance, this salad is perfect for any occasion. Whether it’s a family barbecue, a picnic in the park, or a simple weeknight dinner, this salad packs a punch of flavor with every bite.
There’s something so magical about a good mango salad, don’t you think? The combination of sweet mango, crunchy bell peppers, and zesty lime dressing creates a fiesta in your mouth, making you forget about the world’s troubles, at least for a little while. It’s not just a side dish; it’s a star player meant to brighten up your day!
Let me tell you, I have a soft spot for mango salads. During my childhood summers, my family would unite at my grandma’s house for big gatherings. And without fail, there’d be a huge bowl of mango salad that dictated the mood of the day. Kids would run around chasing each other, while the adults gathered around the table, laughing and reminiscing. It was bliss. And the best part? The sweet aroma of ripe mangoes mixed with the lime and cilantro was nothing short of sublime.
As I grew older and started dabbling in the kitchen, I was determined to recreate that feeling. I’d start experimenting with different flavors and ingredients, all while trying to bottle up the essence of those carefree summer afternoons. Over the years, this mango salad has become a staple, evolving with my culinary journey, and I’m thrilled to share my ultimate version with you today!
So grab your apron, unleash your inner culinary wizard, and let’s whip up this simple, yet incredible mango salad that will leave you and your guests craving more!
Ingredients
-
2 ripe mangoes, peeled and diced
The star of our show! Choose mangoes that are slightly soft to the touch for optimal sweetness and flavor. If mangoes aren’t in season, you could use diced pineapple as a substitute for a similar tropical vibe. -
1 red bell pepper, diced
This adds a lovely crunch and sweetness to the salad. If you’re in the mood for a bit more heat, you can swap it with a spicier variety, like a poblano pepper. -
1 yellow bell pepper, diced
The yellow pepper is not just for aesthetics; it brings an additional layer of sweetness. Feel free to use whatever color bell pepper you prefer—green, orange, or even a mix! -
1 small red onion, finely chopped
This adds a wonderful zing. For a milder flavor, soak the chopped onion in cold water for a few minutes before adding it to the salad to tone down its sharpness. -
1 jalapeño, seeded and diced (optional, for spice)
A little kick! If you’re not a fan of spice, feel free to leave this out, or substitute with a pinch of cayenne pepper for a gentler warmth. -
1 cup fresh cilantro, chopped
Fresh cilantro brightens the whole dish; its herbs lend a refreshing note. If you’re not a fan of cilantro, you can use fresh parsley or basil as a substitute. -
Juice of 2 limes
The acidic punch from the lime balances out the sweetness of the mangoes beautifully. If limes aren’t available, freshly squeezed lemon juice works just fine too! -
2 tablespoons olive oil
The oil helps to bring everything together, providing richness to the dressing. For a twist, swap it for avocado oil or sesame oil. -
Salt and pepper to taste
Basic, but essential! The right seasonings enhance the vibrant flavors of the salad.
Step-by-Step Instructions
-
Prepare your ingredients.
Start by washing all your fresh produce under cold water. Peel the mangoes and chop them into bite-sized cubes. Use a sharp knife for clean cuts, and make sure to cut around the pit, as it can be tricky to navigate. When you’re chomping down, you want all your ingredients to be effortless to eat. -
Dice those bell peppers.
Grab your red and yellow bell peppers. Slice them in half, remove the seeds, and then chop them into similar-sized pieces as your mangoes. This way, every bite will be harmonious! -
Chop the red onion.
Take your small red onion and finely chop it. It’s best if the pieces are as small as possible so they don’t overwhelm the other flavors. And remember, if the scent of raw onion sends you running, soaking it in cold water for a few minutes can help reduce its intensity. Drain before adding to the salad. -
Handle the heat. (Optional)
If you’re including jalapeño for a kick, carefully slice it in half and remove the seeds (unless you want to unleash the heat!). Dice it finely. If you prefer a milder option, just stick with bell peppers. -
Toss in the herbs.
Next, chop up a cup of fresh cilantro. You’ll want to include both the leaves and the tender stems, as they’re packed with flavor. -
Make the dressing.
In a small bowl, whisk together the lime juice, olive oil, salt, and pepper. You want to achieve a well-balanced dressing that’s tangy but not overpowering. Adjust according to your taste; if you like it a bit sweeter, add a teaspoon of honey or agave syrup. -
Combine everything.
In a large mixing bowl, combine the diced mangoes, bell peppers, red onion, jalapeño, and cilantro. Now, pour over your lime dressing. Using a spatula or large spoon, gently toss everything together, making sure every piece is coated. Taste and adjust seasoning if necessary! -
Chill for a bit.
Let the salad sit for about 15 to 30 minutes. This allows the flavors to meld beautifully, giving it that ideal zesty flavor. Trust me: it’s worth the wait!
Serving Suggestions
When you’re ready to serve, dish out generous portions into colorful bowls. For an added touch, you can sprinkle more cilantro on top or even throw in some extra lime wedges for that visual flair. Not only does this make for a beautiful presentation, but it also invites guests to customize their own dish with a bit more zesty lime if they wish. Enjoy!
Recipe Variations
- Tropical Twist: Add diced avocado for a creamy texture that complements the sweetness of the mango.
- Protein-Packed: Toss in grilled chicken or shrimp for a heartier main dish.
- Nutty Crunch: A handful of roasted peanuts or cashews can add a delightful crunch and depth of flavor.
- Sweet & Spicy: Mix in a tablespoon or two of diced jalapeños with mango chutney for a sweet and spicy version.
- Quinoa Base: Serve the salad over a bed of fluffy quinoa for a nutritious and filling option.
Chef’s Notes
Every time I make this mango salad, I’m transported back to those sun-soaked summer days with my family. It’s funny—what started as just a summer dish has become my go-to for every season and occasion. The beauty of this salad is how it adapts. One day, I might toss in some black beans and corn for a Mexican twist, and the next, I’m serving it alongside grilled fish or tacos.
So here’s a little chef hack: If you want to take your mango salad to the next level, grill the mangoes for a few minutes. The smoky flavor adds a fantastic depth that’s absolutely insane.
FAQs and Troubleshooting
Q: My mangoes are too hard. Can I still use them?
A: Definitely! Just dice them and let them sit in a bit of lime juice for 10 minutes. This will soften them a tad.
Q: How do I keep my avocado from browning?
A: If adding avocado, squeeze a little extra lime juice on it right before serving to keep it fresh and green!
Q: Can I make this salad ahead of time?
A: While you can prep all the ingredients and store them separately for a few days, I recommend combining them just an hour or so before serving to keep everything fresh and crunchy.
Q: What can I do if my salad is too salty?
A: If it turned out too salty, add a little more diced mango or bell pepper to balance it out.
Nutritional Info
While I usually encourage you to focus more on flavor than numbers, if you’re curious, here’s a quick rundown per serving (based on a 4-serving yield):
- Calories: 150
- Protein: 2g
- Carbohydrates: 20g
- Fiber: 4g
- Fats: 7g
There you have it! A refreshing Mango Salad with Lime Dressing that’s bursting with flavor, nostalgia, and pure joy. Remember, it’s about keeping things simple yet satisfying. Enjoy making this salad as much as I enjoyed sharing my story and recipe with you! Happy cooking, my foodie friend! 🍽️
PrintMango Salad with Lime Dressing
A refreshing mango salad with zesty lime dressing, perfect for any occasion.
- Prep Time: 15 minutes
- Cook Time: 0 minutes
- Total Time: 15 minutes
- Yield: 4 servings 1x
- Category: Salad
- Method: No Cooking
- Cuisine: Tropical
- Diet: Vegan
Ingredients
- 2 ripe mangoes, peeled and diced
- 1 red bell pepper, diced
- 1 yellow bell pepper, diced
- 1 small red onion, finely chopped
- 1 jalapeño, seeded and diced (optional)
- 1 cup fresh cilantro, chopped
- Juice of 2 limes
- 2 tablespoons olive oil
- Salt and pepper to taste
Instructions
- Prepare your ingredients.
- Dice those bell peppers.
- Chop the red onion.
- Handle the heat. (Optional)
- Toss in the herbs.
- Make the dressing.
- Combine everything.
- Chill for a bit.
Notes
Enjoy the salad with additional lime wedges and cilantro for a vibrant presentation.
Nutrition
- Serving Size: 1 serving
- Calories: 150
- Sugar: 14g
- Sodium: 150mg
- Fat: 7g
- Saturated Fat: 1g
- Unsaturated Fat: 6g
- Trans Fat: 0g
- Carbohydrates: 20g
- Fiber: 4g
- Protein: 2g
- Cholesterol: 0mg
Keywords: mango salad, lime dressing, refreshing salad, tropical flavors, summer dish
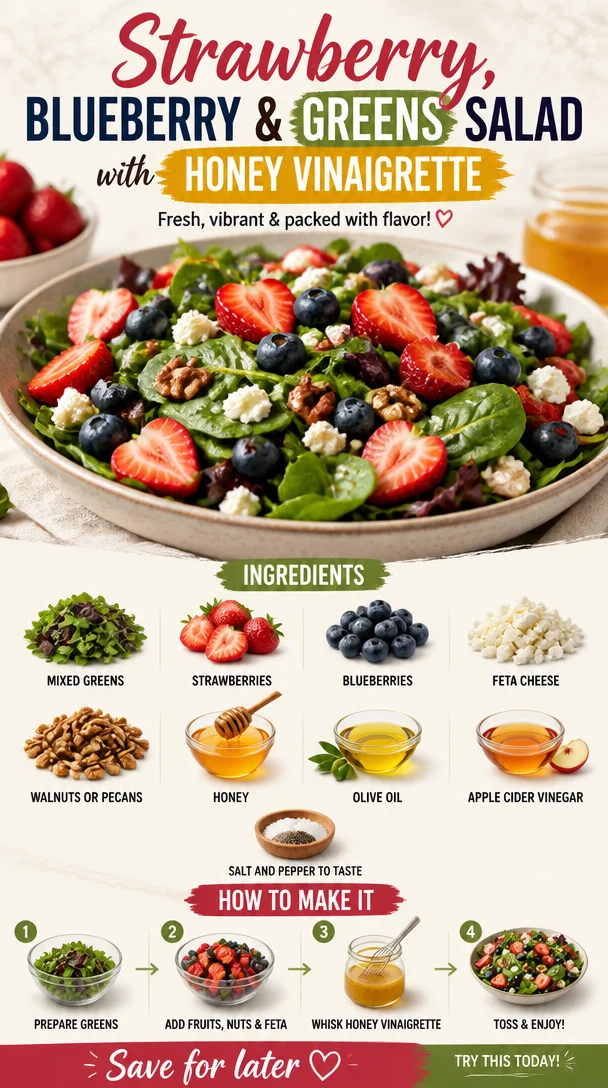
Strawberry, Blueberry & Greens Salad with Honey Vinaigrette
A Fresh Take on Salad: Strawberry, Blueberry & Greens Salad with Honey Vinaigrette
Welcome to Clean Plate Cravings, food lovers! Today, we’re diving into the delightful world of salads with my vibrant and oh-so-satisfying Strawberry, Blueberry & Greens Salad with Honey Vinaigrette. If you’re thinking salads can be boring, think again! This dazzling dish is not only packed with flavor; it’s a celebration of summer’s best bounty. Picture this: a sun-drenched day, a picnic blanket sprawled on the grass, and a bowl full of juicy strawberries and blueberries that burst with flavor. That’s the essence of this salad!
Salads are often seen as a quick meal or a side dish, but trust me when I say they can be show-stoppers in their own right. With the fresh, enticing colors and textures of mixed greens, vibrant fruits, creamy feta, and crunchy nuts, this salad is a feast for the senses. It’s the perfect accompaniment for grilled meats, a light lunch on its own, or even as a stunning side for your next dinner party. Are you ready to embrace fresh, feel-good flavors? Let’s get started!
A Flashback to Family Picnics
Salads have always been a part of my life, but there’s one memory that stands out: family picnics at the park. My grandmother was a true kitchen wizard. She had an endless supply of recipes passed down through the generations, but the one dish she made that we always looked forward to was her fruit salad. It was a colorful mix of seasonal fruits—juicy strawberries, sweet blueberries, and whatever else was ripe and ready from her garden.
I remember her tossing everything together in a big bowl, and as the flavors melded, the entire kitchen lit up with a warm sweetness. Everyone gathered around, the sound of laughter and the smell of fresh fruit mingling in the air. That memory stayed with me, and as I grew older, I realized how much I cherished those flavors. I wanted to create something that evoked that same joy, and thus, this Strawberry, Blueberry & Greens Salad was born—a nod to the past while celebrating fresh ingredients that make our bodies feel good and our taste buds dance!
Ingredients You’ll Need
Let’s gather our ingredients! Here’s what you’ll need to create this fresh and flavorful salad:
-
Mixed greens (spinach, arugula, or your choice): The base of your salad, these greens offer a delightful crunch and a pop of color. Feel free to mix and match various leafy greens for different textures. Want a peppery kick? Arugula is your friend!
-
Fresh strawberries, sliced: Sweet, juicy strawberries bring a vibrant flavor to the dish. Choose ripe, organic strawberries when possible to ensure the best taste.
-
Fresh blueberries: These little nuggets of goodness are packed with antioxidants and add a subtle sweetness. If you can’t find fresh blueberries, frozen ones work in a pinch—just make sure to thaw them first.
-
Feta cheese, crumbled: This tangy cheese adds a creamy texture that balances out the sweetness of the fruits. If you’re looking for a dairy-free option, try a plant-based feta or skip it altogether.
-
Walnuts or pecans, toasted: Adding a lovely crunch, nuts are also a great source of healthy fats. Feel free to roast your nuts on the stove or in the oven for a few minutes for enhanced flavor.
-
Honey: This natural sweetener enhances the dressing and brings everything together. If you prefer a vegan option, agave syrup or maple syrup makes an excellent substitute.
-
Olive oil: A staple in many kitchens, good-quality extra virgin olive oil provides a rich, fruity taste and healthy fats. Choose an oil you enjoy—the better the oil, the tastier the vinaigrette.
-
Apple cider vinegar: This vinegar gives our dressing a tangy kick. If you prefer a milder flavor, try using white wine vinegar as an alternative.
-
Salt and pepper to taste: These basic seasonings enhance all the flavors in your salad. Remember, seasoning is important; it can make or break a dish!
Step-by-Step Instructions
Ready to whip up this delicious salad? Let’s get into the cooking (or assembling, in this case) steps!
-
Prepare the Greens:
Start by washing your mixed greens thoroughly. There’s nothing worse than biting into a salad and finding gritty dirt! I usually rinse them under cold water and then pat them dry with a paper towel or use a salad spinner. The crisp, fresh greens will be the base of our lovely salad, so make sure they’re as clean as can be! -
Slice the Strawberries:
Next, grab your strawberries and slice them! I like to cut them into quarters for a more substantial bite. Lay them out on your cutting board, and let the colors inspire you—it’s all about that vibrant tassel of summer, isn’t it? -
Combine the Fruits:
In a large mixing bowl, add the sliced strawberries and fresh blueberries. Giving these little beauties a gentle toss will create a harmonious blend of sweetness. It’s like creating a fruity canvas for our salad masterpiece! -
Toast the Nuts:
If you’re using walnuts or pecans, now’s the time to toast them. In a skillet over medium-low heat, add the nuts and toast them for about 5-7 minutes, stirring occasionally until they become fragrant and lightly golden. Be careful—once they start to brown, they can burn quickly! The nuttiness will enhance the overall flavor of your salad. -
Make the Vinaigrette:
In a small bowl or jar, add 2 tablespoons of honey, 3 tablespoons of olive oil, and 1 tablespoon of apple cider vinegar. Whisk or shake until everything is combined. Taste it—the sweet and tangy notes should mingle perfectly! Adjust the sweetness or acidity to your liking. -
Assemble the Salad:
Start assembling your salad! Layer the greens at the bottom of a large salad bowl, then add the beautiful fruit mixture on top. Sprinkle with crumbled feta cheese and your toasted nuts. Last but not least, drizzle your honey vinaigrette over the top, making sure to cover all the goodness. -
Toss and Serve:
Using tongs or serving utensils, gently toss your salad until every component is coated in the dressing. Serve it immediately for the freshest bite, although it can sit for a few minutes if you’re not quite ready. Just know that the longer it sits, the softer your greens will become!
Serving Suggestions
This Strawberry, Blueberry & Greens Salad has flexibility written all over it! For a beautiful presentation, consider serving it in individual bowls or on large, rustic platters. A sprinkle of freshly cracked black pepper on top adds an inviting touch and brings out the flavors even more. Pair it with grilled chicken or fish for a hearty meal, or serve it alongside some crusty bread for a delightful lunch.
Recipe Variations
Let’s get creative! Here are some tasty twists you can try for this salad:
-
Add Protein: Toss in grilled chicken, shrimp, or even quinoa for a protein-packed version.
-
Make it Vegan: Swap out feta cheese with a vegan cheese alternative or simply leave it out. You won’t miss it!
-
Herbs Galore: Fresh mint or basil added to the mix gives your salad an aromatic lift. This is especially refreshing in summer.
-
Different Nuts: Swap walnuts for sliced almonds or pistachios for a different crunch.
-
Spicy Kick: If you love spice, throw in some sliced jalapeños or cayenne pepper in your dressing for a fun kick!
Chef’s Notes
Cooking is not just about creating a dish but about cherishing the moments that surround it. There was a time when I couldn’t make a vinaigrette to save my life. I would mix the ingredients and hope for the best! But as I learned from experience, the key is to trust your palate. Taste as you go. Remember, cooking doesn’t have to be perfect; it just needs to be made with love and a dash of creativity! Over the years, this salad has evolved as I’ve played with the ingredients. Sometimes I’ll throw in herbs, or adjust the vinaigrette ratios—cooking is an art, and I’m proud to keep discovering new strokes.
FAQs and Troubleshooting
1. Can I meal prep this salad?
Absolutely! Just keep the dressing separate until you’re ready to eat. The greens and fruits can get soggy if dressed too early.
2. How do I store leftovers?
Any leftovers should be stored in an airtight container in the fridge for up to 24 hours. The fresher, the better!
3. What if I don’t like feta cheese?
No worries! You can replace it with goat cheese, a dairy-free option, or simply leave it out for a lighter take.
4. How can I prevent the fruits from browning?
Keep the fruits in the fridge until you’re ready to serve. If they’re cut, a splash of lemon juice can help prevent browning.
Nutritional Info
While the nutritional values can vary, this Strawberry, Blueberry & Greens Salad is generally low in calories and packed with antioxidants, vitamins, and healthy fats. The addition of nuts adds protein and omega-3s, while fruits bring in fiber and hydration, making this salad a powerhouse of nutrition.
In conclusion, if you’re looking for a vibrant, delicious, and easy-to-make salad that will light up your meals, look no further than this Strawberry, Blueberry & Greens Salad with Honey Vinaigrette. Embrace the freshness, savor the flavors, and above all—enjoy each bite! Happy cooking, friends!
PrintStrawberry, Blueberry & Greens Salad with Honey Vinaigrette
A vibrant salad featuring fresh strawberries, blueberries, mixed greens, and a homemade honey vinaigrette, perfect for summer picnics and light meals.
- Prep Time: 15 minutes
- Cook Time: 10 minutes
- Total Time: 25 minutes
- Yield: 4 servings
- Category: Salad
- Method: Mixing
- Cuisine: American
- Diet: Vegetarian
Ingredients
- Mixed greens (spinach, arugula, or your choice)
- Fresh strawberries, sliced
- Fresh blueberries
- Feta cheese, crumbled
- Walnuts or pecans, toasted
- Honey
- Olive oil
- Apple cider vinegar
- Salt and pepper to taste
Instructions
- Prepare the greens by washing them thoroughly and drying completely.
- Slice the strawberries into quarters.
- Combine the sliced strawberries and fresh blueberries in a large mixing bowl.
- Toast the walnuts or pecans in a skillet over medium-low heat for about 5-7 minutes.
- Make the vinaigrette by whisking together honey, olive oil, and apple cider vinegar in a small bowl.
- Assemble the salad by layering greens and the fruit mixture, then topping with feta and nuts.
- Toss gently with dressing and serve immediately.
Notes
Consider serving in individual bowls or on platters. Pair with grilled chicken or fish for a heartier meal.
Nutrition
- Serving Size: 1 serving
- Calories: 250
- Sugar: 15g
- Sodium: 200mg
- Fat: 8g
- Saturated Fat: 2g
- Unsaturated Fat: 6g
- Trans Fat: 0g
- Carbohydrates: 35g
- Fiber: 5g
- Protein: 7g
- Cholesterol: 10mg
Keywords: salad, summer salad, strawberry salad, blueberry salad, healthy recipe, picnic salad
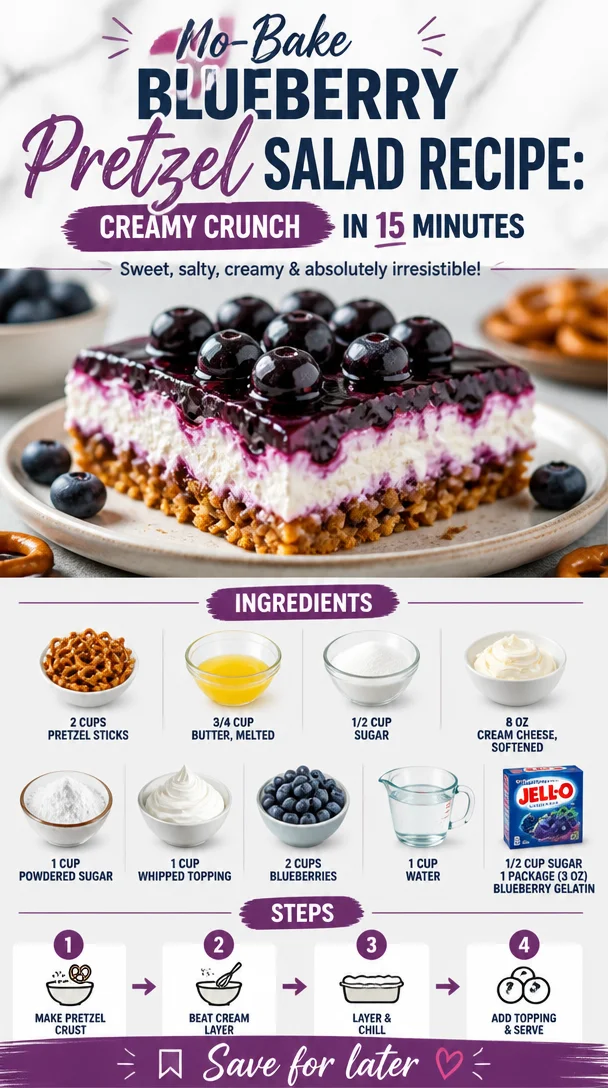
No-Bake Blueberry Pretzel Salad Recipe: Creamy Crunch in 15 Minutes
Blueberry Pretzel Salad: A Cool Summer Treat!
Welcome to my kitchen, where we’re diving into a classic dessert that plays a sweet symphony on your taste buds while bringing a wave of nostalgia: Blueberry Pretzel Salad! Now, this isn’t your ordinary salad filled with leafy greens—oh no! This is a delightful blend of sweet, salty, and creamy goodness that feels like a celebration in a bowl. Whether you serve it at a summer picnic, a holiday gathering, or simply as a refreshing treat at home, this dessert salad is bound to leave everyone smiling and craving more.
Picture this: It’s a warm summer day, and the sun is shining. The air is filled with the laughter of friends and family, and you’re seated at a long table adorned with a colorful spread of delicious food. In the center, there’s a bowl of that beautiful blueberry pretzel salad—the eye-catching layers of salty pretzels, creamy filling, and vibrant blueberries beckoning everyone to dig in. This dish isn’t just about flavor; it’s encapsulated with memories, love, and moments shared around the table.
This delightful dessert is so easy to make, you’ll wonder why you didn’t whip it up sooner! Not only does it tantalize your taste buds, but it also brings a sense of joy and nostalgia that keeps you coming back for more. Are you ready to create your own Blueberry Pretzel Salad that will be the star of your next gathering? Let’s roll up our sleeves and get into the kitchen—trust me, it’s going to be a delicious journey!
A Taste of Nostalgia
Growing up, summer gatherings with my family were always a treat, but the highlight was undoubtedly my grandma’s famous Blueberry Pretzel Salad. Every time she’d make it, the aroma of melted butter combined with the crunch of salty pretzels filled the room, setting the stage for something truly special. I remember standing on tiptoes, peeking into the fridge, eagerly waiting for our after-meal dessert.
With each bite of that sweet and creamy salad, I was transported to a world where everything felt light and joyful. The crunch of the pretzels perfectly balanced the velvety cream cheese mixture, and the blueberries provided a burst of flavor that was always refreshing. It wasn’t just a dessert; it was a family tradition that united us, sparking laughter and stories as we savored every last bite.
To this day, I love recreating that same dish, evoking those cherished memories while adding my own twist. It’s amazing how food has this magical ability to transport us back in time, don’t you think? So grab your apron and let’s make some new memories around this timeless dessert!
Ingredients
Here’s what you’ll need to whip up your very own Blueberry Pretzel Salad. Each component brings something special to this dish!
-
2 cups pretzel sticks
These provide that delicious salty crunch! You can substitute with gluten-free pretzels if you need a gluten-free option. -
3/4 cup butter, melted
This forms the base for our pretzel crust and adds richness. If you’re looking for a healthier option, you can try coconut oil for a tropical twist. -
1/2 cup sugar
Sugar balances the saltiness of the pretzels and enhances the flavors of our cream cheese filling. You can swap it with maple syrup or agave nectar for a more natural sweetener. -
8 oz cream cheese, softened
This creamy base is what makes our salad luscious and decadent. Neufchâtel cheese is a great lower-fat substitute! -
1 cup powdered sugar
For that smooth sweetness! If you want a grain-free alternative, powdered erythritol will work too. -
1 cup whipped topping
This adds a light and airy texture. If you prefer a homemade touch, use freshly whipped cream instead! -
2 cups blueberries
Fresh or frozen—both work wonderfully. Swap with raspberries or strawberries for a unique flavor twist. -
1 cup water
This will be used to dissolve our gelatin. -
1/2 cup sugar
Another layer of sweetness for the blueberry layer! Same sweetener options apply here. -
1 package (3 oz) blueberry gelatin
This packs a punch of blueberry flavor, giving our salad its beautiful color and sweetness. If you’d like to avoid artificial sweeteners, look for natural gelatin options.
Step-by-Step Instructions
Ready to create this beautiful Blueberry Pretzel Salad? Here’s how to bring it all together!
-
Preheat your oven to 350°F (175°C).
Preheating is essential for an even bake, so don’t skip this step! -
Crush the pretzel sticks.
Place the pretzel sticks in a large zip-top bag and crush them gently with a rolling pin or meat mallet. You want a mixture of large and small pieces for texture. Trust me, the crunch will be amazing! -
Combine pretzels and butter.
In a bowl, mix the crushed pretzels, melted butter, and 1/2 cup sugar until fully combined. This will create that irresistible salty crust. The melted butter helps hold everything together! -
Spread mixture in a baking dish.
Press the pretzel mixture evenly into the bottom of a 9×13-inch baking dish. It’s important to pack it down well, as this will serve as the crust for our salad. -
Bake the pretzel crust.
Pop the baking dish into your preheated oven and bake for about 10 minutes until golden brown. Keep an eye on it—over-baking can lead to a hard crust! -
Let it cool.
Remove the dish from the oven and let it cool completely while you prepare the filling. This is the perfect time to snag a sip of your favorite drink! -
Make the cream cheese filling.
In a large bowl, beat the softened cream cheese and powdered sugar together until smooth and creamy. You want a smooth texture—this is the heart of our salad! A handheld mixer works wonderfully here. -
Fold in the whipped topping.
Gently fold in the whipped topping until fully incorporated. This will add lightness to our mixture! Take care not to deflate the fluffiness of the whipped topping. -
Spread the cream cheese mixture.
Once your pretzel crust has cooled, spread the cream cheese mixture evenly over the crust. Use a spatula to get it nice and smooth. -
Prepare the blueberry layer.
In a separate bowl, dissolve the blueberry gelatin in hot water, stirring until completely dissolved. Then, add 1/2 cup of sugar and mix well. This step is essential, as it brings that vibrant blueberry flavor to life! -
Add the blueberries.
Stir in the blueberries gently, ensuring they’re evenly distributed throughout the mixture. -
Pour the blueberry mixture over the cream cheese layer.
Gently pour the gelatin mixture over the cream cheese layer in your baking dish, spreading it out evenly. You want it to set beautifully atop the creamy filling. -
Chill and set.
Cover with plastic wrap and place in the refrigerator for at least 4 hours, or overnight if possible. This allows all the flavors to meld beautifully! -
Serve and Enjoy!
Slice into squares or scoop into bowls, and serve chilled. This dessert is ready to impress with its layered beauty!
Serving Suggestions
Plating your Blueberry Pretzel Salad is easy and fun! You can serve it directly from the baking dish or scoop individual servings into glass dessert cups for an elegant touch. Add a sprig of mint or a sprinkle of fresh blueberries on top for a pop of color and freshness. Enjoy every delightful layer, and watch the smiles grow with each delicious bite!
Recipe Variations
Feeling adventurous? Here are a few creative twists you can try with your Blueberry Pretzel Salad:
- Mixed Berry Medley: Swap out blueberries for a mix of your favorite berries like strawberries, raspberries, or blackberries for a colorful twist.
- Nutty Crunch: Add some chopped nuts like pecans or walnuts into the pretzel crust for an additional crunch and flavor.
- Infused Cream Cheese: Try adding lemon zest or a splash of almond extract to the cream cheese mixture for an elevated flavor profile.
- Chocolate Drizzle: For a decadent treat, drizzle melted chocolate over the top before chilling.
- Vegan Version: Use dairy-free cream cheese and whipped topping for a fabulous vegan-friendly option!
Chef’s Notes
This Blueberry Pretzel Salad has been a staple in my family for as long as I can remember, and I love how every batch seems to come out a little differently. Sometimes I’ll add a bit of lemon zest to brighten the flavor, while other times, I keep it classic. One memorable occasion was when I accidentally used sea salt instead of regular sugar on the crust—they say trial and error is the best teacher! The sweet and salty combination turned out to be deliciously surprising, and I’m still sticking with it for a little extra flair! Every time I make it, I’m reminded of those lovely summer gatherings and the joy of sharing food with loved ones.
FAQs and Troubleshooting
-
Can I use fresh blueberries instead of frozen?
Absolutely! Fresh blueberries are perfect for this recipe—just make sure to rinse and dry them lightly before adding them to your gelatin mixture. -
How can I store leftovers?
Store any leftovers in an airtight container in the refrigerator. Enjoy them within 3-4 days for the best freshness. -
What should I do if my gelatin doesn’t set?
If your gelatin isn’t setting, make sure you’re using the correct amount of water. If the layers don’t firm up, you can place it back in the refrigerator for additional time. -
Can I make this ahead of time?
Yes! This salad is perfect for make-ahead; preparing it the day before lets all the flavors meld beautifully.
Nutritional Info (Optional)
(Nutritional information may vary based on specific ingredients and serving sizes but here’s a rough estimate per serving, based on 12 servings)
- Calories: 215
- Total Fat: 11g
- Saturated Fat: 6g
- Cholesterol: 30mg
- Sodium: 150mg
- Total Carbohydrates: 29g
- Dietary Fiber: 1g
- Sugars: 15g
With this Blueberry Pretzel Salad, you’re not just creating a dessert; you’re crafting an experience filled with laughter and warmth. So grab your ingredients, gather your loved ones, and let’s make some delicious memories together! Happy cooking!
PrintBlueberry Pretzel Salad
A delightful blend of sweet, salty, and creamy goodness, this Blueberry Pretzel Salad is the perfect cool summer treat that everyone will love.
- Prep Time: 20 minutes
- Cook Time: 10 minutes
- Total Time: 240 minutes
- Yield: 12 servings 1x
- Category: Dessert
- Method: Baking
- Cuisine: American
- Diet: Vegetarian
Ingredients
- 2 cups pretzel sticks
- 3/4 cup butter, melted
- 1/2 cup sugar
- 8 oz cream cheese, softened
- 1 cup powdered sugar
- 1 cup whipped topping
- 2 cups blueberries
- 1 cup water
- 1/2 cup sugar
- 1 package (3 oz) blueberry gelatin
Instructions
- Preheat your oven to 350°F (175°C).
- Crush the pretzel sticks.
- Combine pretzels and butter.
- Spread mixture in a baking dish.
- Bake the pretzel crust for about 10 minutes until golden brown.
- Let it cool.
- Make the cream cheese filling.
- Fold in the whipped topping.
- Spread the cream cheese mixture.
- Prepare the blueberry layer.
- Add the blueberries.
- Pour the blueberry mixture over the cream cheese layer.
- Chill and set for at least 4 hours.
- Serve and Enjoy!
Notes
This dessert can be made ahead of time and stored in the refrigerator. For an extra twist, try mixing in different berries or adding nuts.
Nutrition
- Serving Size: 1 serving
- Calories: 215
- Sugar: 15g
- Sodium: 150mg
- Fat: 11g
- Saturated Fat: 6g
- Unsaturated Fat: 5g
- Trans Fat: 0g
- Carbohydrates: 29g
- Fiber: 1g
- Protein: 3g
- Cholesterol: 30mg
Keywords: blueberry, pretzel, salad, dessert, summer treat