Minute One-Pan Garlic Herb Chicken Dinner
Garlic Herb Chicken: A Wholesome Delight for Every Home Cook
Welcome back to Clean Plate Cravings, food lovers! Today, I am excited to share one of my absolute favorite dishes—Garlic Herb Chicken. This dish is a beautiful celebration of fresh flavors, zesty garlic, and tender chicken that pairs beautifully with a multitude of sides. Picture this: juicy chicken breasts sizzling in a pan, infused with fragrant herbs and rich garlic, all while you’re whisking together some luscious creamy potatoes on the side. Are you drooling yet?
Let’s dive right into this culinary journey that not only tantalizes your taste buds but also fills your home with the warm aroma of a home-cooked meal. Throughout this post, I’ll take you step-by-step through easy-to-follow instructions, sprinkling in some personal anecdotes and chef hacks to elevate your cooking experience. Whether you’re looking to impress dinner guests or just craving a comforting meal after a long day, Garlic Herb Chicken is the way to go!
Personal Story
Ah, Garlic Herb Chicken brings back fond memories of cozy family dinners gathered around the dining table. I can still picture it vividly—my mom whipping up her signature dish while the aroma of garlic wafted through the house. We’d all sit at the table, waiting with growing anticipation as the sizzle from the stovetop made our mouths water. It was more than just a meal; it was a time for connection, laughter, and storytelling. I remember my siblings and I racing to see who could finish their plates first, a not-so-subtle competition that always ended with my mom reminding us to savor our food.
Seeing everyone enjoy a dish that was drenched in love and flavor made cooking feel magical. Inspired by those moments, I started experimenting with recipes in my own kitchen, aiming to recreate that same warmth and joy. Today, I find happiness in sharing this Garlic Herb Chicken recipe with you all, hoping it brings as much joy to your table as it did to mine.
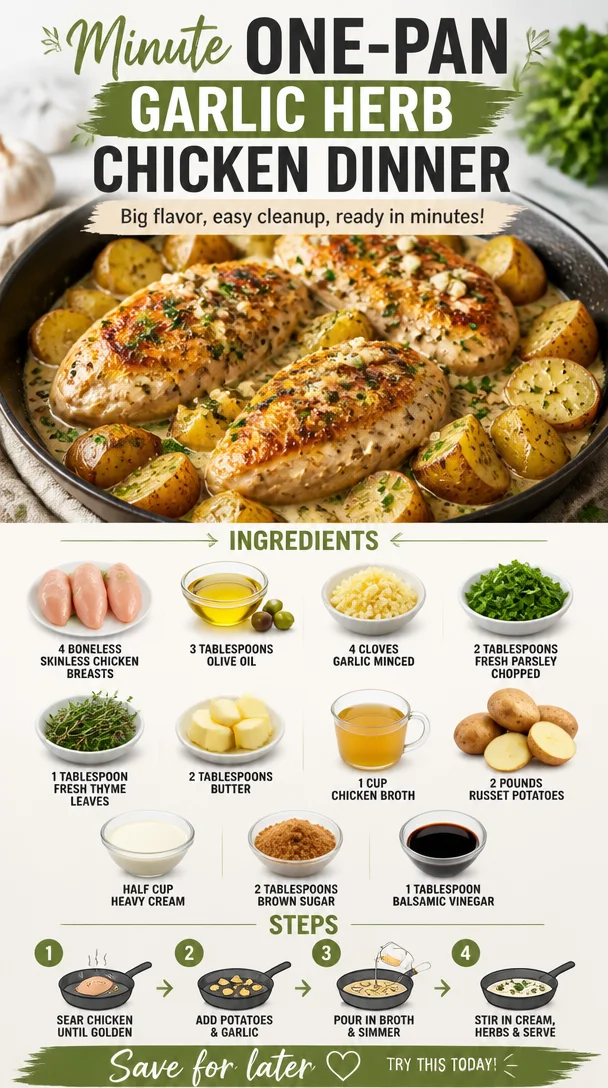
Ingredients
Before we jump into cooking, let’s talk about the vibrant ingredients that make this dish so special. Here’s what you’ll need:
-
4 boneless skinless chicken breasts
The star of the show! Opt for organic or free-range chicken for the best flavor. If you prefer dark meat, substitute with chicken thighs. -
3 tablespoons olive oil
A healthier fat that enhances the dish’s flavor. For a twist, swap it with avocado oil, which has a higher smoke point! -
4 cloves garlic, minced
Garlic adds a punch of flavor. Feel free to use roasted garlic for a sweeter, mellow taste! -
2 tablespoons fresh parsley, chopped
Adds a burst of freshness. If you don’t have fresh parsley, dried parsley can work—use about a teaspoon. -
1 tablespoon fresh thyme leaves
Thyme pairs beautifully with chicken. Substitute with rosemary or oregano for a different twist. -
2 tablespoons butter
Because butter makes everything better! For a dairy-free option, use ghee or a plant-based butter. -
1 cup chicken broth
This is foundational for flavor. You can use vegetable broth if you want to make it vegetarian or choose a low-sodium option for a healthier take. -
2 pounds russet potatoes
Creamy russets are perfect here. Swap them for sweet potatoes for a different flavor profile! -
½ cup heavy cream
Rich, luscious, and creamy. Use coconut cream for a dairy-free alternative. -
2 tablespoons brown sugar
Just a hint of sweetness to balance flavors. Feel free to substitute with honey or maple syrup. -
1 tablespoon balsamic vinegar
This adds depth and brightness. Try red wine vinegar if you need a substitute.
Step-by-Step Instructions
Now that we’ve gathered our ingredients, let’s move on to the fun part—cooking! Follow these step-by-step instructions for a foolproof Garlic Herb Chicken that will delight your senses.
-
Prep the Chicken
Begin by patting the chicken breasts dry with paper towels. This helps get that lovely golden-brown sear on the outside. Season both sides generously with salt and pepper. This is your chance to infuse flavor right at the start! -
Heat the Oil
In a large pan or skillet, heat 3 tablespoons of olive oil over medium-high heat. Watch closely and let it shimmer. You want the oil hot enough to sear without burning! If you’ve got a cast-iron skillet, now’s the time to whip that baby out! -
Sear the Chicken
Carefully place the chicken breasts in the hot oil, leaving space between them. Avoid overcrowding the pan; this ensures a nice sear. Cook for 5-7 minutes on each side—this will create that beautiful browning! Don’t rush—let the chicken do its work. -
Add Aromatics
Once the chicken is nicely browned, add in the minced garlic, fresh parsley, and thyme. Stir it all around until fragrant—about 30 seconds. Keep a close watch because garlic can burn quickly! -
Create the Sauce
Add 2 tablespoons of butter to the pan, letting it melt and mix with the garlic and herbs. Then pour in 1 cup of chicken broth, scraping any delicious bits stuck to the skillet. This is the moment the magic happens—those flavors meld together in perfect harmony. -
Simmer the Chicken
Reduce the heat to low and cover the skillet. Simmer the chicken for 10-15 minutes until it’s cooked through. Use a meat thermometer for precision; the internal temp should reach 165°F (75°C). Juicy chicken awaits! -
Finish with Cream
In the final few minutes of cooking, stir in the heavy cream, brown sugar, and balsamic vinegar. This creamy sauce will give your chicken an incredible richness. Let it simmer uncovered for 2-3 minutes until it thickens slightly. -
Serve It Up
Remove the chicken from the skillet and spoon that luscious sauce over the top. Garnish with extra herbs if you’re feeling fancy!
Serving Suggestions
To plate your Garlic Herb Chicken, serve with a side of roasted or creamy mashed potatoes, drizzling the sauce over both. You can also pair it with your favorite seasonal vegetables like steamed green beans or a light salad for a refreshing touch. Want to make it a feast? Add some warm crusty bread to soak up all that delicious sauce.
Recipe Variations
- Lemon Garlic Chicken: Swap some of the balsamic vinegar with fresh lemon juice for a bright, zesty flavor that dances on your palate.
- Spicy Garlic Chicken: Add red pepper flakes or a minced jalapeño to introduce some heat into your sauce.
- Herb Crusted Chicken: Before searing, coat the chicken in a mixture of breadcrumbs, parmesan, and herbs for a crunchy texture.
- Creamy Sun-Dried Tomato Variation: Toss in some chopped sun-dried tomatoes into the sauce for an Italian flair.
- Low-Carb Option: Serve the chicken on a bed of zoodles (zucchini noodles) instead of potatoes for a lower-carb alternative!
Chef’s Notes
Throughout my cooking journey, Garlic Herb Chicken has evolved into a dish that’s not just about satisfying hunger, but also one that connects hearts. I’ve experimented with different herbs, sauces, and even cooking methods. There was a day I accidentally used smoked paprika instead of brown sugar, and while it turned out surprisingly good, it was a reminder that cooking allows for creativity and spontaneity. Don’t be afraid to tweak this recipe; make it your own!
FAQs and Troubleshooting
Q: My chicken turned out dry. What happened?
A: Overcooking can lead to dry chicken. Be sure to use a meat thermometer and check for an internal temp of 165°F (75°C) to ensure juicy results.
Q: Can I use frozen chicken breasts?
A: Yes, you can! Just be sure to thaw them completely before cooking. You may need to adjust the cooking time slightly.
Q: What if I don’t have chicken broth?
A: No worries! You can use water or a low-sodium vegetable broth. The flavor may be slightly milder, but it will still be delicious!
Q: How can I make this dish dairy-free?
A: Swap the butter with coconut oil and the heavy cream with coconut cream or a dairy-free alternative.
Nutritional Info
(Nutritional info can be provided based on your specific calculations or requirements based on the ingredients you use. Consider providing calories, protein, fats, and carbs per serving if desired.)
In conclusion, I hope you enjoy making this Garlic Herb Chicken as much as I do! It’s all about gathering those around you, sharing good food, and creating lush memories. I’m excited to see how you make this recipe your own. Until next time, keep those cravings clean and delicious!
PrintGarlic Herb Chicken
A delicious and wholesome Garlic Herb Chicken recipe that combines juicy chicken breasts with fragrant herbs and rich garlic, served with creamy potatoes.
- Prep Time: 15 minutes
- Cook Time: 30 minutes
- Total Time: 45 minutes
- Yield: 4 servings 1x
- Category: Main Course
- Method: Searing
- Cuisine: American
- Diet: Gluten-Free
Ingredients
- 4 boneless skinless chicken breasts
- 3 tablespoons olive oil
- 4 cloves garlic, minced
- 2 tablespoons fresh parsley, chopped
- 1 tablespoon fresh thyme leaves
- 2 tablespoons butter
- 1 cup chicken broth
- 2 pounds russet potatoes
- ½ cup heavy cream
- 2 tablespoons brown sugar
- 1 tablespoon balsamic vinegar
Instructions
- Begin by patting the chicken breasts dry with paper towels. Season both sides generously with salt and pepper.
- Heat 3 tablespoons of olive oil in a large pan over medium-high heat until it shimmers.
- Carefully place the chicken breasts in the hot oil, ensuring space between them. Sear for 5-7 minutes on each side.
- Once browned, add minced garlic, parsley, and thyme. Stir until fragrant, about 30 seconds.
- Add 2 tablespoons of butter, allowing it to melt and mix with the herbs.
- Pour in 1 cup of chicken broth, scraping the skillet for flavor bits.
- Reduce heat to low, cover, and simmer for 10-15 minutes until the chicken reaches 165°F (75°C).
- Stir in heavy cream, brown sugar, and balsamic vinegar. Simmer uncovered for 2-3 minutes until slightly thickened.
- Remove the chicken from the skillet and spoon the sauce over the top. Garnish with extra herbs if desired.
Notes
For a dairy-free option, swap butter with coconut oil and heavy cream with coconut cream. Use low-sodium broth for a healthier twist.
Nutrition
- Serving Size: 1 serving
- Calories: 400
- Sugar: 6g
- Sodium: 500mg
- Fat: 20g
- Saturated Fat: 8g
- Unsaturated Fat: 10g
- Trans Fat: 0g
- Carbohydrates: 35g
- Fiber: 4g
- Protein: 30g
- Cholesterol: 75mg
Keywords: chicken, garlic, herbs, easy recipe, dinner

Minute Apple Cobbler: Quick, Cozy Weeknight Dessert
Easy Apple Cobbler: A Cozy Deliciousness
Welcome to the delightful world of Easy Apple Cobbler! If you think about comfort food, the image of warm, fragrant apples enveloped in a buttery, flaky topping often comes to mind. The ability to whip this up in no time is just one of the reasons I find apple cobbler to be pure magic! Whether it’s for a dinner party, family gathering, or just a cozy night on the couch, this dish checks all the boxes. With a handful of simple ingredients, you can create a sweet, satisfying dessert that’ll have everyone begging for seconds.
I can remember the first time I had apple cobbler — it was a chilly autumn afternoon, and the scent wafting from the kitchen was nothing short of enchanting. I was visiting my grandma, who had a talent for turning simple ingredients into something extraordinary. We spent the day picking fresh apples from her backyard—a mix of Granny Smith and Honeycrisp—her favorites. As we peeled and sliced, she shared stories of her childhood and how apple cobbler was a staple in her home. It wasn’t just a recipe; it was a connection, a celebration of all things cozy and heartwarming. That day, we laughed, we reminisced, and most importantly, we baked. When it finally emerged from the oven, crust bubbling and golden-brown, I knew we had created something special. Now, I carry that cherished memory with me every time I make this apple cobbler.
Let’s dive into this easy recipe that’ll soon become a beloved staple in your kitchen!
Ingredients
-
1 can of sweet rolls: These doughy nuggets provide the perfect base for the cobbler topping. You can substitute them with homemade biscuit dough or crescent rolls if you’re feeling adventurous!
-
2 cups of sliced apples: Fresh apples are the star of the show! I love using a mix of tart and sweet apples for a layer of complexity. Feel free to swap out with pears or peaches for a fruity twist.
-
1 teaspoon of cinnamon: This fragrant spice adds warmth and earthy notes to your cobbler. If you want a bolder flavor, consider using apple pie spice or even a dash of nutmeg.
-
Frosting for drizzling (optional): A simple drizzle can elevate your cobbler to a whole new level of indulgence. Store-bought chocolate or vanilla frosting works perfectly, but you can also whip up a quick glaze with powdered sugar, milk, and a splash of vanilla if you’re feeling crafty.
Step-by-Step Instructions
-
Preheat the oven: Start by preheating your oven to 350°F (175°C). A well-preheated oven will help your cobbler bake evenly and achieve that golden crust.
-
Prepare the apples: While the oven is warming, wash, peel, and slice your apples. Aim for thin slices so they cook evenly. If you’re using a mix of apple varieties, slice them all at once and toss with a sprinkle of lemon juice to avoid browning.
-
Toss with cinnamon: In a large bowl, add your sliced apples and the cinnamon. Give it a good toss! You want each apple slice to be coated in that fragrant spice. If you’re feeling extra adventurous, add a tablespoon of brown sugar for some extra caramelization.
-
Open the sweet rolls: Carefully pop open the can of sweet rolls. The dough is usually sectioned, which gives you that rustic cobbler topping. Set it aside for a moment as we prepare the apples.
-
Assemble the cobbler: Grease a baking dish (an 8×8 or 9×9 inch works great). Pour the seasoned apples evenly into the dish, then take the sweet roll dough and tear each piece into smaller pieces or leave them whole if you prefer. Layer them over the apples, covering as much surface area as possible.
-
Bake: Pop the baking dish in the oven and let it work its magic for about 25-30 minutes. You’re looking for a nice, golden brown color on the dough and bubbly apples underneath.
-
Drizzle the frosting: While the cobbler is baking, prepare your frosting if you’re using it! You can either melt the store-bought frosting in the microwave for about 15 seconds for a drizzly consistency or mix up your homemade glaze. Once the cobbler is out and slightly cooled, drizzle it generously over the top for a sweet finishing touch.
-
Serve and enjoy: Let it cool for a few minutes, then scoop it into bowls. It’s delicious on its own or with a scoop of vanilla ice cream. Trust me, it’s heavenly!
Serving Suggestions
To make your apple cobbler a visual treat, consider serving it in wide, shallow bowls or ramekins. A scoop of vanilla ice cream melting on top of the warm cobbler is not only delicious but also creates a lovely contrast in temperature. Garnish with a sprinkle of cinnamon or a few fresh mint leaves for added color.
Recipe Variations
-
Mix it up with nuts: Add a handful of chopped walnuts or pecans to your apple filling for an added crunch and nutty flavor.
-
Cranberry apple cobbler: Toss in some fresh or dried cranberries for a tangy contrast to the sweet apples.
-
Spiced-up version: Add a teaspoon of allspice or cardamom to your apple mixture for an aromatic twist.
-
Caramel apple cobbler: Drizzle some caramel sauce over the apples before adding the sweet rolls for an indulgent dessert.
-
Gluten-free option: Use gluten-free biscuit dough in place of sweet rolls for a fabulous gluten-free treat.
Chef’s Notes
Every time I make this Easy Apple Cobbler, I can’t help but chuckle at how many essay drafts I’ve written in pursuit of the perfect recipe. Some versions missed the mark, but this one—the sweet rolls—always brings the nostalgic feel of cooking with my grandma. I can still hear her laughter and see her smiling face as we shared our love for good food, and I think that’s what makes this dish special. It’s filled with love, joy, and some seriously flavorful apples!
FAQs and Troubleshooting
1. My dough didn’t cook through! What happened?
Don’t worry; this happens sometimes! Make sure your oven is fully preheated, and if your sweet rolls look too brown on top but are undercooked inside, you can cover them loosely with foil and let them bake for a few more minutes.
2. Can I use frozen apples?
Absolutely! Just remember to thaw them fully and drain excess moisture before mixing with your cinnamon.
3. What’s the best way to store leftovers?
Allow your cobbler to cool completely, then store it in an airtight container in the fridge for up to three days. Reheat slices in the microwave, and they’ll be just as delightful!
4. Can I make this ahead of time?
Certainly! You can prepare the apple filling the day before and assemble it right before baking. Just remember that the baking time may need slight adjustments if your ingredients are cold from the fridge.
Nutritional Info
While exact nutritional content can vary based on ingredients and portions, this Easy Apple Cobbler can generally provide:
- Calories: Approximately 270 per serving (based on 8 servings)
- Protein: 3g
- Carbohydrates: 35g
- Fat: 12g
- Fiber: 2g
I hope you enjoy making this Easy Apple Cobbler as much as I do! Remember, the kitchen is all about exploration, laughter, and sharing with loved ones. So what are you waiting for? Grab those apples and let’s get cooking! Your own cozy kitchen story awaits!
PrintEasy Apple Cobbler
A cozy apple cobbler featuring warm, fragrant apples enveloped in a buttery, flaky topping. Perfect for any occasion!
- Prep Time: 15 minutes
- Cook Time: 30 minutes
- Total Time: 45 minutes
- Yield: 8 servings 1x
- Category: Dessert
- Method: Baking
- Cuisine: American
- Diet: Vegetarian
Ingredients
- 1 can of sweet rolls
- 2 cups of sliced apples
- 1 teaspoon of cinnamon
- Frosting for drizzling (optional)
Instructions
- Preheat the oven to 350°F (175°C).
- Prepare the apples by washing, peeling, and slicing them thinly.
- Toss the sliced apples with cinnamon in a large bowl.
- Open the can of sweet rolls and set it aside.
- Assemble the cobbler by greasing a baking dish, pouring in the seasoned apples, and layering the sweet roll dough on top.
- Bake for 25-30 minutes until golden brown and bubbly.
- Drizzle the frosting over the cobbler once baked and slightly cooled.
- Serve warm in bowls, optionally with vanilla ice cream.
Notes
Feel free to mix in nuts or swap apples for pears or peaches. Serve with a scoop of ice cream for an indulgent treat!
Nutrition
- Serving Size: 1 serving
- Calories: 270
- Sugar: 15g
- Sodium: 500mg
- Fat: 12g
- Saturated Fat: 4g
- Unsaturated Fat: 6g
- Trans Fat: 0g
- Carbohydrates: 35g
- Fiber: 2g
- Protein: 3g
- Cholesterol: 30mg
Keywords: apple cobbler, dessert, quick dessert, baking, easy recipe, cozy recipe