Minute Pink Lemonade Sorbet: Quick Summer Treat
Refreshing Pink Lemonade Sorbet: A Delightful Summer Treat
Ah, summer! The season when the sun shines a little brighter, the days stretch out longer, and outdoor gatherings come alive. Nothing screams summer quite like a refreshing, icy treat, and if there’s one dessert that captures the essence of sunshine and joy, it’s Pink Lemonade Sorbet. This vibrant, zesty dessert combines the tartness of fresh lemons with just a touch of sweetness, giving you that perfect balance of flavors that leaves you feeling both refreshed and satisfied.
I have fond memories of running around my childhood backyard during sweltering summer afternoons, playing games with friends, and, of course, indulging in that glorious, pink-hued lemonade my mom used to whip up. The first sip was always the best—cold and sweet with a zing of tartness that brought a little twinkle to my eye. As I got older, I wanted to recreate that magic, but with a fun twist. Enter Pink Lemonade Sorbet! This delightful frozen treat takes all the joys of summer lemonade and turns it into a dessert that’s simple to make, and sure to impress.
Not only is this sorbet delicious, but it’s also a breeze to whip up. With just a handful of ingredients and a few steps, you’ll find yourself savoring a bowl of this icy goodness in no time. Whether you’re hosting a summer barbecue, lounging by the pool, or just looking for a sweet treat to brighten your day, this pink lemonade sorbet is a delightful way to indulge.
Personal Story
One of my favorite summers ever was spent at my grandparents’ lake house. Every evening, my grandmother would take a break from her amazing meals and surprise us with homemade lemonade. We’d sit out on the porch, the warm breeze brushing against our skin, laughing and sharing stories as we enjoyed the refreshing drink. One hot afternoon, she decided to get adventurous and added a splash of pink lemonade flavoring. It was like a party in my mouth! That’s the moment I realized how flavors can transport you back to special times and places.
Fast forward a few years, and I found myself combining that memory with my newfound passion for making frozen desserts. Thus, the Pink Lemonade Sorbet was born! Every time I make this treat, I’m reminded of those carefree summers, fun-filled laughter, and my grandmother’s loving spirit. Now, let’s dive into the recipe. You’ll want to get started as soon as you hear how easy and delightful this is!
Ingredients
-
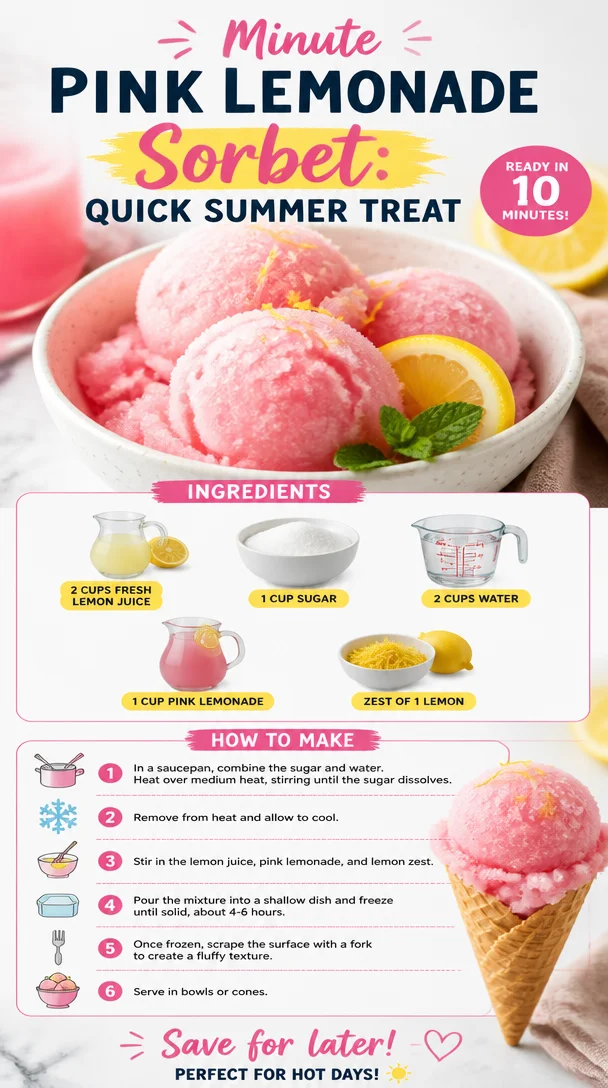
2 cups fresh lemon juice: Fresh lemons are key! You’ll get that bright tartness that’s essential for achieving that refreshing flavor. If you don’t have fresh lemons, you can use bottled lemon juice, but make sure it’s 100% juice for the best results.
-
1 cup sugar: Sugar will balance the tartness of the lemons and create a smooth texture. If you’re looking for alternatives, consider using honey or agave syrup. Just reduce the quantity a little since they are sweeter.
-
2 cups water: Water helps to dilute the strength of the lemon juice. You can substitute sparkling water if you want to add a fun fizz to your sorbet!
-
1 cup pink lemonade: This gives the sorbet its gorgeous color and enhances the flavor. If you prefer a more natural option, you can make your own pink lemonade by mixing lemon juice with a little cranberry juice or raspberry puree.
-
Zest of 1 lemon: Lemon zest is packed with essential oils, which means it adds a deeper lemon flavor. Don’t skip this step, or your sorbet might be lacking that zing! If you’re in a pinch, try using lime zest for a fun twist.
Step-by-Step Instructions
-
Prep Your Lemons: Start by zesting your lemon. This might seem like a small step, but trust me, it packs a punch! Use a microplane or fine grater to avoid any bitter white pith. Set the zest aside. Now, juice those lemons! One way to get the most juice out of your lemons is to roll them on the counter before cutting them open.
-
Make the Syrup: In a medium saucepan, combine the sugar and water over medium heat. Stir until the sugar is completely dissolved. This is your simple syrup base! It should take just a few minutes. Once dissolved, remove from heat and let it cool.
-
Mix It All Together: In a mixing bowl, combine the fresh lemon juice, cooled simple syrup, pink lemonade, and the lemon zest. Whisk it all together until well combined. The mixture should smell fantastic!
-
Chill the Mixture: For best results, chill the mixture in the refrigerator for about 30 minutes. This helps the flavors meld together beautifully and makes the blending process easier.
-
Blend and Freeze: Once chilled, pour the mixture into an ice cream maker (if you have one) and churn according to the manufacturer’s instructions until it reaches a soft-serve consistency. If you don’t have an ice cream maker, you can pour the mixture into a freezer-safe dish, and every 30 minutes, use a fork to scrape and stir the sorbet until it’s frozen (usually about 2-4 hours).
-
Final Freeze: Once it’s churned and fluffy, transfer the sorbet to an airtight container and freeze it for another 2-4 hours until set.
-
Serve and Enjoy: Scoop out your pink lemonade sorbet and serve it in chilled bowls. You can garnish it with a twist of lemon zest or a sprig of mint for a lovely touch!
Serving Suggestions
To serve your Pink Lemonade Sorbet, scoop it into chilled bowls or elegant glasses. Consider topping it with fresh mint leaves for a pop of color, or add a sprinkle of edible flowers to impress your guests. To take it over the top, serve it alongside a slice of lemon cake or a handful of fresh berries. Your taste buds will thank you!
Recipe Variations
If you’re feeling a bit adventurous, why not try these fun twists?
-
Berry Twist: Blend in some pureed strawberries or raspberries with the lemon mixture for a berry lemon sorbet.
-
Herbal Infusion: Infuse the simple syrup with fresh basil or mint leaves for a refreshing herbal note. Just strain the herbs out before mixing!
-
Coconut Cream: For a creamy variation, add 1 cup of coconut cream to the lemon mixture. This will transform your sorbet into a creamy delight that still retains that zesty flavor.
-
Wine Sorbet: For an adult twist, add a splash of your favorite white wine into the mixture before freezing. It will create a wonderfully refreshing sorbet perfect for summer gatherings.
Chef’s Notes
I must admit, my first attempts at making sorbet were hilarious! I had a few boozy misadventures when I thought, "Why not add a little rum to the mix?" While that didn’t quite fit the classic profile, the experiment inspired me! I also learned that a little patience goes a long way. The key is to let the sorbet freeze completely before diving in. I’ve tasted the pre-freeze version more times than I care to count! So my advice? Wait for that full freezing period for the absolute best experience.
FAQs and Troubleshooting
Q: Why is my sorbet icy instead of smooth?
A: An icy sorbet usually means the mixture was frozen too quickly. Make sure to stir it regularly when you’re using the manual freezing method. And if you have an ice cream maker, this will help achieve a smoother texture.
Q: Can I use artificial sweeteners?
A: Absolutely! If you’d like to cut down on sugar, feel free to swap it with your preferred sweetener. Just check the conversion rates as they can vary in sweetness.
Q: How long does the sorbet last?
A: Pink Lemonade Sorbet can be stored in an airtight container in the freezer for up to a month. However, for optimal flavor, I recommend enjoying it within the first couple of weeks.
Q: Can I make this without an ice cream maker?
A: Definitely! Just follow the scraping and stirring method mentioned earlier. It requires a bit more attention but is totally doable!
Nutritional Info
(Approximate values per serving of sorbet, based on 8 servings)
- Calories: 130
- Total Fat: 0g
- Saturated Fat: 0g
- Cholesterol: 0mg
- Sodium: 5mg
- Total Carbohydrates: 33g
- Dietary Fiber: 0g
- Sugars: 30g
- Protein: 0g
There you have it, my fabulous foodie friends! Dive into this refreshing world of Pink Lemonade Sorbet that conjures up beautiful memories while delivering a satisfying treat. So grab those lemons, get creative, and let’s make every day a little sweeter with this delightful dessert. Cheers!
PrintRefreshing Pink Lemonade Sorbet

A vibrant, zesty dessert combining the tartness of fresh lemons with a touch of sweetness, perfect for summer.
- Prep Time: 15 minutes
- Cook Time: 10 minutes
- Total Time: 45 minutes
- Yield: 8 servings 1x
- Category: Dessert
- Method: Freezing
- Cuisine: American
- Diet: Vegan
Ingredients
- 2 cups fresh lemon juice
- 1 cup sugar
- 2 cups water
- 1 cup pink lemonade
- Zest of 1 lemon
Instructions
- Prep your lemons by zesting and juicing them.
- Make the syrup by combining sugar and water in a saucepan over medium heat until dissolved.
- Mix the fresh lemon juice, cooled syrup, pink lemonade, and lemon zest in a bowl.
- Chill the mixture in the refrigerator for about 30 minutes.
- Blend and freeze the mixture in an ice cream maker or use a manual scraping method every 30 minutes until frozen.
- Serve the sorbet in chilled bowls, optionally garnished with lemon zest or mint.
Notes
For a smooth texture, regularly stir if using the manual freezing method. Enjoy within a few weeks for optimal flavor.
Nutrition
- Serving Size: 1 serving
- Calories: 130
- Sugar: 30g
- Sodium: 5mg
- Fat: 0g
- Saturated Fat: 0g
- Unsaturated Fat: 0g
- Trans Fat: 0g
- Carbohydrates: 33g
- Fiber: 0g
- Protein: 0g
- Cholesterol: 0mg
Keywords: sorbet, lemonade, summer dessert, refreshing treat, frozen dessert
Ingredient Strawberry Sorbet: Ready in 10 Minutes
Easy 3-Ingredient Strawberry Sorbet: A Refreshing Delight
Spring has finally sprung, and with it comes a burst of fresh fruit goodness! If you’re like me and can’t resist the allure of vibrant strawberries in the market, then get ready to fall head over heels for this easy 3-Ingredient Strawberry Sorbet. This delightful treat is not only a fantastic way to cool off on a hot day, but it’s also a memories-in-the-making dessert that you can whip up in just a few simple steps.
Can we talk about how versatile strawberries are? Sweet, juicy, and bursting with flavor, they remind me of my childhood summers spent picking fresh fruit from the local farm. Each berry plucked was sweeter than the last, and I would often get covered in juice, my hands red from the delicious mess. I remember coming home with buckets overflowing with strawberries, the anticipation of what we could create next hanging in the air. And guess what our go-to creation always was? Sorbet!
That’s right—who could resist a spoonful of that icy, fruity goodness? As a kid, I would hover around the kitchen, eager to help with the process. Whether it was dumping strawberries into the blender or sneaking a taste of the final product, those moments were all about joy and creativity in the kitchen. Fast forward to today, and I still delight in making this airy concoction that is all about simple ingredients and pure, unadulterated flavor. It’s a nostalgic reminder of my childhood while also being the ultimate refreshing dessert for any occasion.
So, let’s not waste another moment! Grab your blender and let’s dive into this fabulous world of vibrant strawberry bliss. Trust me, you’ll love how easy and rewarding this recipe is to make!
Ingredients
-
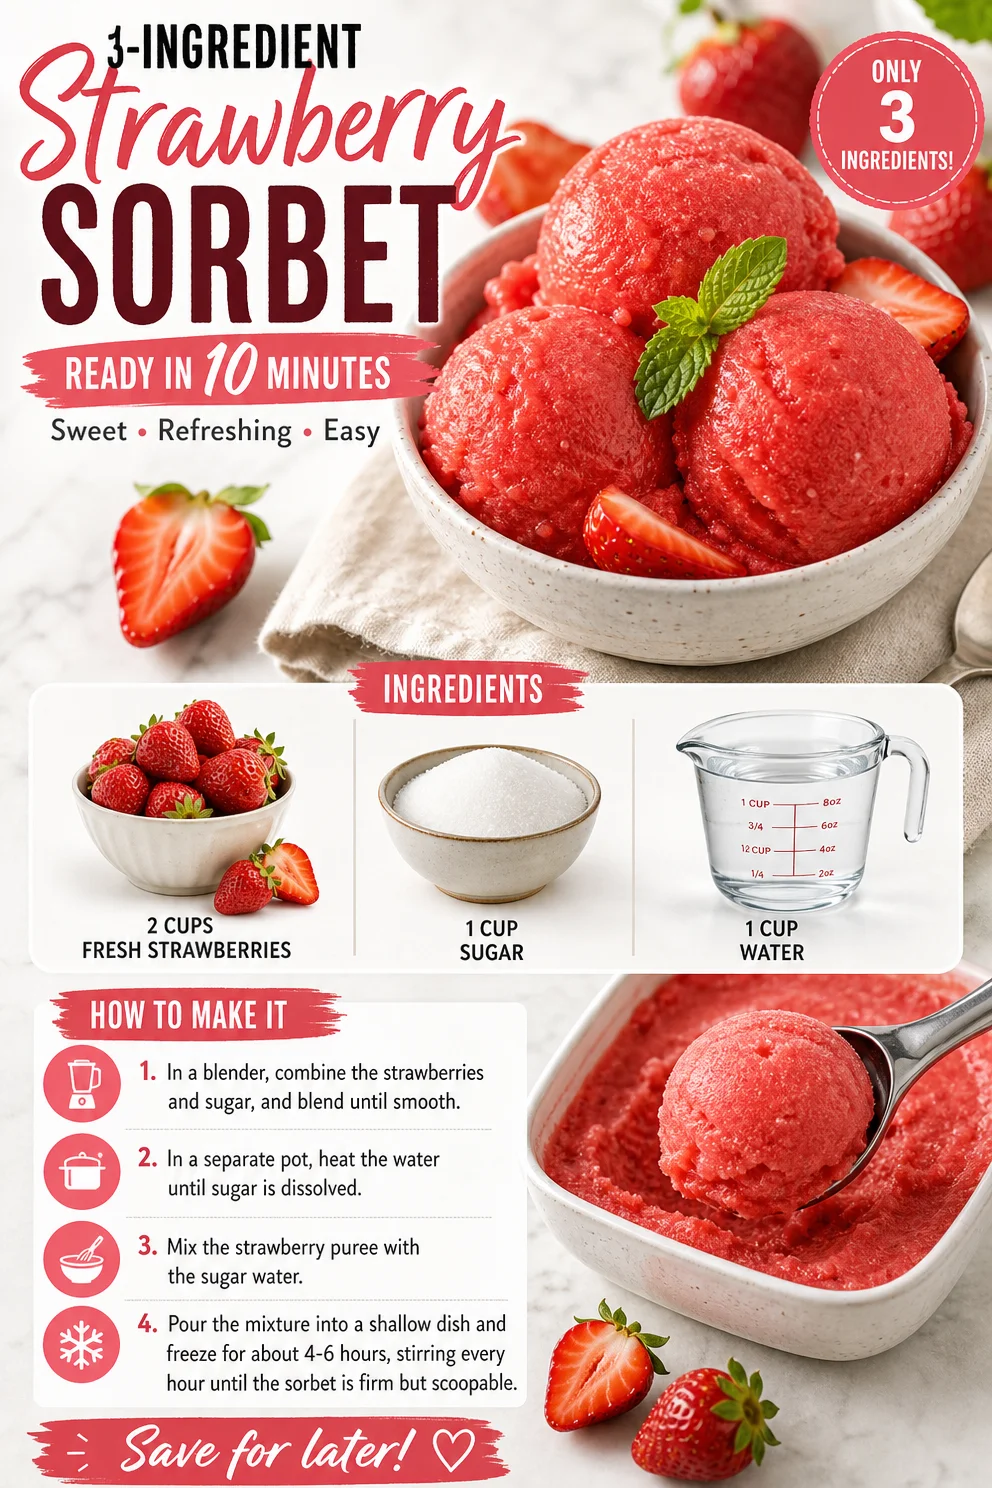
2 cups fresh strawberries
The star of our show! Look for ripe, sweet strawberries for the best flavor. If you can’t find fresh ones, feel free to use frozen strawberries—just let them thaw a bit before blending. -
1 cup sugar
This sweetener balances the tartness of the berries and helps achieve that smooth sorbet consistency. If you’re watching your sugar intake, you can swap in a natural sweetener like agave or honey—just adjust the amounts to taste. -
1 cup water
Water is essential for blending everything smoothly. If you want to enhance the flavor even more, you could use coconut water or fruit juice; they’ll add an extra layer of deliciousness to your sorbet.
Step-by-Step Instructions
-
Prep the Strawberries
Start by washing your strawberries under cold water. Remove the green tops and any bruised spots. If they’re particularly large, consider halving them for easier blending. Remember, the fresher your strawberries, the brighter your sorbet will be! -
Make the Simple Syrup
In a medium saucepan, combine 1 cup of sugar and 1 cup of water. Bring it to a gentle simmer over medium heat, stirring occasionally until the sugar completely dissolves. This should only take a few minutes. Once done, remove it from the heat and let it cool. Pro tip: If you want to infuse some extra flavor, toss in a sprig of mint while the syrup simmers. -
Blend It All Together
Once your simple syrup has cooled, it’s time to blend. Add the strawberries and simple syrup to your blender. Blend until smooth—around 30 seconds should do it! If you prefer a chunkier texture, pulse it a few times instead of blending continuously. Remember to taste as you go; after all, you’re the chef! -
Freeze the Mixture
After blending, pour the strawberry mixture into a shallow dish or ice cream maker. If you’re using a shallow dish, spread it out evenly to help it freeze more quickly. Cover it with plastic wrap and place it in the freezer for about 4-6 hours, or until it’s firm. Don’t forget to stir it every hour! This aeration will create that luscious, fluffy texture. -
Serve and Enjoy
Once your sorbet is frozen solid, you can either scoop it out or blend it for a smoother consistency before serving. If it’s too hard, let it sit at room temperature for a few minutes to soften. And voilà! You’ve just created a frozen treat that’s perfect for all ages.
Serving Suggestions
When it comes to serving your strawberry sorbet, presentation is key! Use a chilled bowl or a fancy glass to scoop the sorbet into. Garnish with a sprig of fresh mint or a few whole berries for that pop of color. I love serving it with a splash of balsamic reduction drizzled over the top—it adds a sophisticated touch that’s sure to impress your guests!
Recipe Variations
-
Berry Medley Sorbet: Mix in other berries like blueberries or raspberries for a mixed berry sorbet. Just keep the total quantity at 2 cups!
-
Citrus Zest Sorbet: Add the zest of a lime or lemon to the strawberries for a refreshing citrus kick.
-
Creamy Strawberry Sorbet: For a creamier texture, blend in ½ cup of coconut milk or Greek yogurt with the strawberries. This gives it a rich, decadent feel!
-
Herb-Infused Sorbet: Add a few basil or mint leaves while blending for a refreshing herbal note that’s simply divine.
-
Substitute Sweeteners: As mentioned, try using honey or maple syrup instead of sugar for a natural variation.
Chef’s Notes
This recipe has been a cherished part of my kitchen since those carefree childhood days. While the basics have remained the same, I’ve enjoyed experimenting with different fruits and flavors along the way. It’s amazing how just three simple ingredients can transport you back to sun-soaked afternoons and laughter-filled family gatherings. Remember, kitchen experiments can sometimes go hilariously wrong—like the time I tried to add too much lemon juice and ended up with a sorbet that tasted more like lemonade. But those moments are part of the fun! Always remember: if a recipe doesn’t go as planned, adapt! Embrace the chaos, and most importantly, enjoy the process.
FAQs and Troubleshooting
-
What if my sorbet is too hard?
If your sorbet is rock solid, let it sit out for a few minutes before scooping. You can also blend it again if you want a softer texture. -
Can I use frozen strawberries?
Absolutely! Just let them thaw a bit before blending. Using frozen strawberries can actually yield a frosty texture that’s perfect for sorbet. -
How long does the sorbet last?
Homemade sorbet can be stored in the freezer for up to a month. Just be sure to cover it tightly to avoid freezer burn! -
Can I make this sorbet without sugar?
Yes, try a natural sweetener like agave or honey. The sweetness will vary, so start with a smaller amount, taste, and adjust as needed.
Nutritional Info
While I love whipping up delicious treats, I also keep things balanced! This sorbet is naturally low in fat and can be made without any added preservatives. Each serving serves as a refreshing dessert that can fit into a wholesome eating plan.
And there you have it! A delicious Easy 3-Ingredient Strawberry Sorbet that’s not only refreshing but also wraps up all those childhood memories in a sweet, cold treat. So, whether you’re treating yourself after a long day or impressing friends at your next gathering, this simple recipe is guaranteed to make everyone smile. Enjoy!
PrintEasy 3-Ingredient Strawberry Sorbet
A refreshing and easy strawberry sorbet made with only three ingredients. Perfect for hot days and nostalgic moments in the kitchen.
- Prep Time: 15 minutes
- Cook Time: 10 minutes
- Total Time: 360 minutes
- Yield: 4 servings 1x
- Category: Dessert
- Method: Blending and Freezing
- Cuisine: American
- Diet: Vegan
Ingredients
- 2 cups fresh strawberries
- 1 cup sugar
- 1 cup water
Instructions
- Prep the strawberries by washing, removing the tops, and halving if large.
- Make the simple syrup by combining sugar and water in a saucepan, simmering until sugar dissolves.
- Blend the cooled simple syrup with strawberries until smooth.
- Freeze the mixture in a shallow dish, stirring every hour for about 4-6 hours until firm.
- Serve the sorbet in a chilled bowl, garnished with mint or berries.
Notes
For a creamier texture, add coconut milk or Greek yogurt. This sorbet can also be made with frozen strawberries, just thaw before blending.
Nutrition
- Serving Size: 1 serving
- Calories: 120
- Sugar: 20g
- Sodium: 5mg
- Fat: 0g
- Saturated Fat: 0g
- Unsaturated Fat: 0g
- Trans Fat: 0g
- Carbohydrates: 30g
- Fiber: 2g
- Protein: 0g
- Cholesterol: 0mg
Keywords: strawberry sorbet, frozen dessert, easy sorbet, summer treat, vegan dessert

Minute Apple Cobbler: Quick, Cozy Weeknight Dessert
Easy Apple Cobbler: A Cozy Deliciousness
Welcome to the delightful world of Easy Apple Cobbler! If you think about comfort food, the image of warm, fragrant apples enveloped in a buttery, flaky topping often comes to mind. The ability to whip this up in no time is just one of the reasons I find apple cobbler to be pure magic! Whether it’s for a dinner party, family gathering, or just a cozy night on the couch, this dish checks all the boxes. With a handful of simple ingredients, you can create a sweet, satisfying dessert that’ll have everyone begging for seconds.
I can remember the first time I had apple cobbler — it was a chilly autumn afternoon, and the scent wafting from the kitchen was nothing short of enchanting. I was visiting my grandma, who had a talent for turning simple ingredients into something extraordinary. We spent the day picking fresh apples from her backyard—a mix of Granny Smith and Honeycrisp—her favorites. As we peeled and sliced, she shared stories of her childhood and how apple cobbler was a staple in her home. It wasn’t just a recipe; it was a connection, a celebration of all things cozy and heartwarming. That day, we laughed, we reminisced, and most importantly, we baked. When it finally emerged from the oven, crust bubbling and golden-brown, I knew we had created something special. Now, I carry that cherished memory with me every time I make this apple cobbler.
Let’s dive into this easy recipe that’ll soon become a beloved staple in your kitchen!
Ingredients
-
1 can of sweet rolls: These doughy nuggets provide the perfect base for the cobbler topping. You can substitute them with homemade biscuit dough or crescent rolls if you’re feeling adventurous!
-
2 cups of sliced apples: Fresh apples are the star of the show! I love using a mix of tart and sweet apples for a layer of complexity. Feel free to swap out with pears or peaches for a fruity twist.
-
1 teaspoon of cinnamon: This fragrant spice adds warmth and earthy notes to your cobbler. If you want a bolder flavor, consider using apple pie spice or even a dash of nutmeg.
-
Frosting for drizzling (optional): A simple drizzle can elevate your cobbler to a whole new level of indulgence. Store-bought chocolate or vanilla frosting works perfectly, but you can also whip up a quick glaze with powdered sugar, milk, and a splash of vanilla if you’re feeling crafty.
Step-by-Step Instructions
-
Preheat the oven: Start by preheating your oven to 350°F (175°C). A well-preheated oven will help your cobbler bake evenly and achieve that golden crust.
-
Prepare the apples: While the oven is warming, wash, peel, and slice your apples. Aim for thin slices so they cook evenly. If you’re using a mix of apple varieties, slice them all at once and toss with a sprinkle of lemon juice to avoid browning.
-
Toss with cinnamon: In a large bowl, add your sliced apples and the cinnamon. Give it a good toss! You want each apple slice to be coated in that fragrant spice. If you’re feeling extra adventurous, add a tablespoon of brown sugar for some extra caramelization.
-
Open the sweet rolls: Carefully pop open the can of sweet rolls. The dough is usually sectioned, which gives you that rustic cobbler topping. Set it aside for a moment as we prepare the apples.
-
Assemble the cobbler: Grease a baking dish (an 8×8 or 9×9 inch works great). Pour the seasoned apples evenly into the dish, then take the sweet roll dough and tear each piece into smaller pieces or leave them whole if you prefer. Layer them over the apples, covering as much surface area as possible.
-
Bake: Pop the baking dish in the oven and let it work its magic for about 25-30 minutes. You’re looking for a nice, golden brown color on the dough and bubbly apples underneath.
-
Drizzle the frosting: While the cobbler is baking, prepare your frosting if you’re using it! You can either melt the store-bought frosting in the microwave for about 15 seconds for a drizzly consistency or mix up your homemade glaze. Once the cobbler is out and slightly cooled, drizzle it generously over the top for a sweet finishing touch.
-
Serve and enjoy: Let it cool for a few minutes, then scoop it into bowls. It’s delicious on its own or with a scoop of vanilla ice cream. Trust me, it’s heavenly!
Serving Suggestions
To make your apple cobbler a visual treat, consider serving it in wide, shallow bowls or ramekins. A scoop of vanilla ice cream melting on top of the warm cobbler is not only delicious but also creates a lovely contrast in temperature. Garnish with a sprinkle of cinnamon or a few fresh mint leaves for added color.
Recipe Variations
-
Mix it up with nuts: Add a handful of chopped walnuts or pecans to your apple filling for an added crunch and nutty flavor.
-
Cranberry apple cobbler: Toss in some fresh or dried cranberries for a tangy contrast to the sweet apples.
-
Spiced-up version: Add a teaspoon of allspice or cardamom to your apple mixture for an aromatic twist.
-
Caramel apple cobbler: Drizzle some caramel sauce over the apples before adding the sweet rolls for an indulgent dessert.
-
Gluten-free option: Use gluten-free biscuit dough in place of sweet rolls for a fabulous gluten-free treat.
Chef’s Notes
Every time I make this Easy Apple Cobbler, I can’t help but chuckle at how many essay drafts I’ve written in pursuit of the perfect recipe. Some versions missed the mark, but this one—the sweet rolls—always brings the nostalgic feel of cooking with my grandma. I can still hear her laughter and see her smiling face as we shared our love for good food, and I think that’s what makes this dish special. It’s filled with love, joy, and some seriously flavorful apples!
FAQs and Troubleshooting
1. My dough didn’t cook through! What happened?
Don’t worry; this happens sometimes! Make sure your oven is fully preheated, and if your sweet rolls look too brown on top but are undercooked inside, you can cover them loosely with foil and let them bake for a few more minutes.
2. Can I use frozen apples?
Absolutely! Just remember to thaw them fully and drain excess moisture before mixing with your cinnamon.
3. What’s the best way to store leftovers?
Allow your cobbler to cool completely, then store it in an airtight container in the fridge for up to three days. Reheat slices in the microwave, and they’ll be just as delightful!
4. Can I make this ahead of time?
Certainly! You can prepare the apple filling the day before and assemble it right before baking. Just remember that the baking time may need slight adjustments if your ingredients are cold from the fridge.
Nutritional Info
While exact nutritional content can vary based on ingredients and portions, this Easy Apple Cobbler can generally provide:
- Calories: Approximately 270 per serving (based on 8 servings)
- Protein: 3g
- Carbohydrates: 35g
- Fat: 12g
- Fiber: 2g
I hope you enjoy making this Easy Apple Cobbler as much as I do! Remember, the kitchen is all about exploration, laughter, and sharing with loved ones. So what are you waiting for? Grab those apples and let’s get cooking! Your own cozy kitchen story awaits!
PrintEasy Apple Cobbler

A cozy apple cobbler featuring warm, fragrant apples enveloped in a buttery, flaky topping. Perfect for any occasion!
- Prep Time: 15 minutes
- Cook Time: 30 minutes
- Total Time: 45 minutes
- Yield: 8 servings 1x
- Category: Dessert
- Method: Baking
- Cuisine: American
- Diet: Vegetarian
Ingredients
- 1 can of sweet rolls
- 2 cups of sliced apples
- 1 teaspoon of cinnamon
- Frosting for drizzling (optional)
Instructions
- Preheat the oven to 350°F (175°C).
- Prepare the apples by washing, peeling, and slicing them thinly.
- Toss the sliced apples with cinnamon in a large bowl.
- Open the can of sweet rolls and set it aside.
- Assemble the cobbler by greasing a baking dish, pouring in the seasoned apples, and layering the sweet roll dough on top.
- Bake for 25-30 minutes until golden brown and bubbly.
- Drizzle the frosting over the cobbler once baked and slightly cooled.
- Serve warm in bowls, optionally with vanilla ice cream.
Notes
Feel free to mix in nuts or swap apples for pears or peaches. Serve with a scoop of ice cream for an indulgent treat!
Nutrition
- Serving Size: 1 serving
- Calories: 270
- Sugar: 15g
- Sodium: 500mg
- Fat: 12g
- Saturated Fat: 4g
- Unsaturated Fat: 6g
- Trans Fat: 0g
- Carbohydrates: 35g
- Fiber: 2g
- Protein: 3g
- Cholesterol: 30mg
Keywords: apple cobbler, dessert, quick dessert, baking, easy recipe, cozy recipe
Ingredient Strawberry Mousse: Quick 10-Min No-Bake Dessert
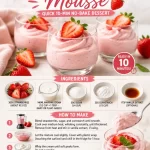
4-Ingredient Strawberry Mousse – So Light, So Dreamy!
Welcome, food lovers! 🌟 Today, we’re diving into a dessert that’s as light and airy as a cloud, yet rich with flavor—Strawberry Mousse! If you’ve ever craved something romantic and delicious without the fuss, you’re in the right place. Picture this: a velvety, smooth mousse that’s perfect for impressing guests, celebrating special occasions, or simply treating yourself after a long day. You might be wondering, "Is that even possible with just four ingredients?" Yes, yes it is! And trust me, you’ll be licking the bowl clean.
I’m Ava Carter, and I firmly believe that cooking should be a joyful and liberating experience, not something that adds stress to your day. This Strawberry Mousse recipe is not just easy; it offers a delicious way to connect with wholesome ingredients without any complicated techniques or hidden nasties. So, let’s roll up our sleeves, gather these fantastic ingredients, and whip up some magic in the kitchen!
A Sweet Memory in Every Bite
Let me take you back in time. I remember sitting at my grandmother’s kitchen table during those lazy summer weekends. The air was rich with the scent of fresh strawberries, and the garden was bursting with ripe fruits, evoking memories of a blissful childhood. Each time my grandmother made her famous Strawberry Mousse, it became an occasion. We would gather around the table, sharing stories and laughter as she dolloped fluffy clouds of mousse into ice-cold bowls.
The mesmerizing pink color, the delicate tang of strawberries, and the lightness of the mousse were always met with squeals of delight. Those moments created more than just sweet treats; they crafted lasting bonds and treasured memories. Today, I want to share that nostalgia with all of you. Let’s create your very own Strawberry Mousse memory! 🌸💕
Ingredients
Here’s how simple this dessert is:
-
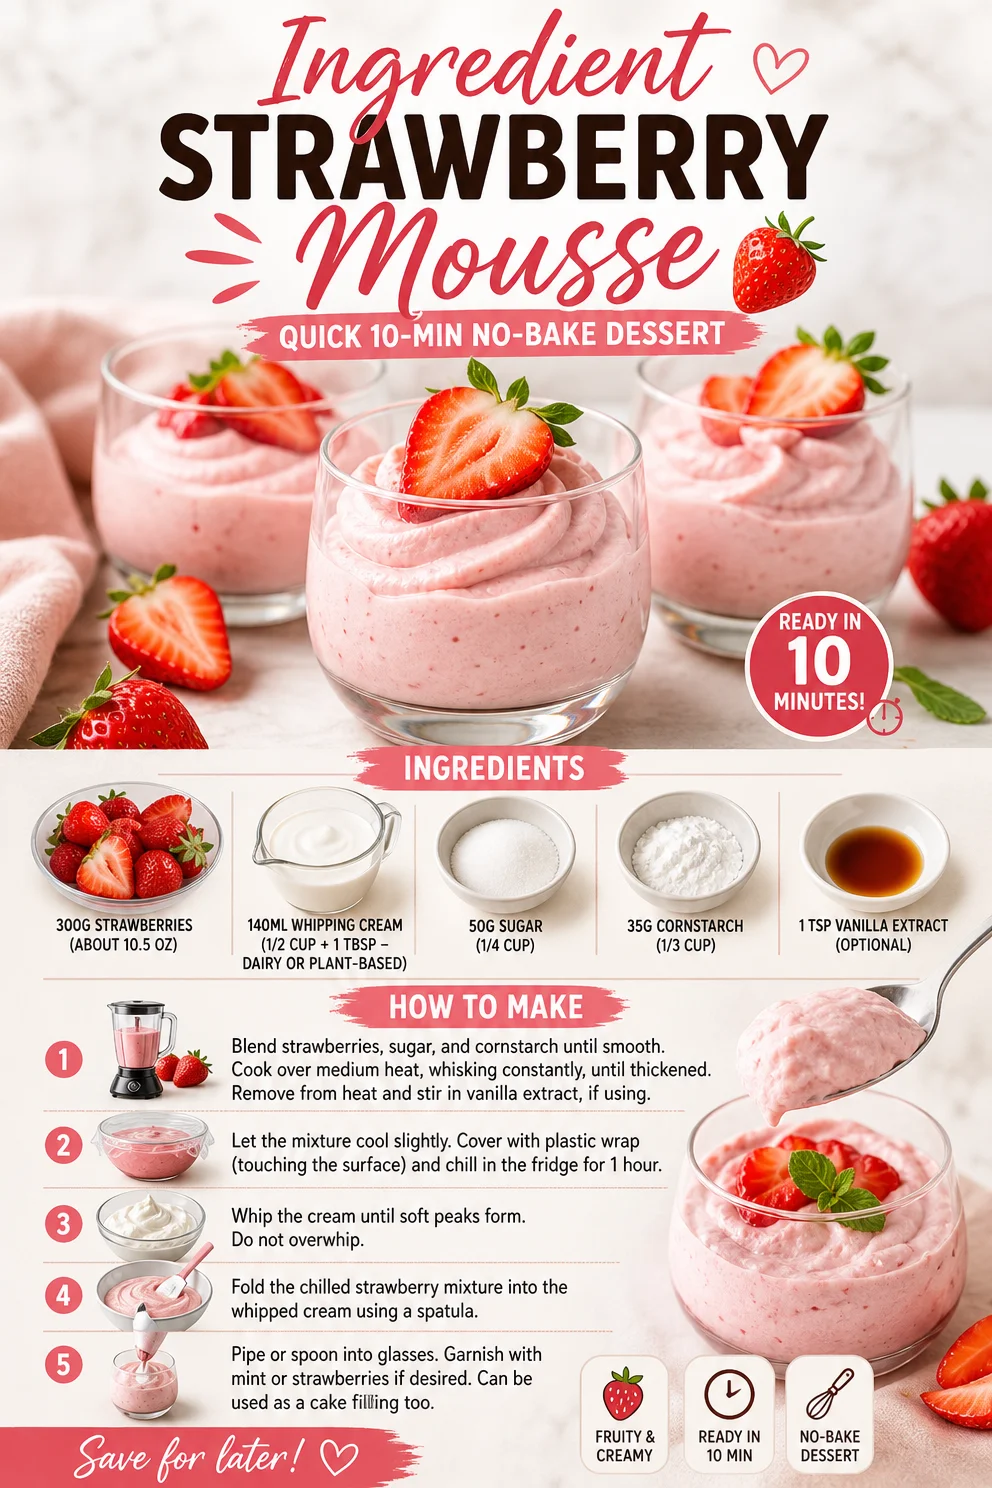
300g Strawberries (about 10.5 oz)
Juicy, sweet strawberries are the star of our show. Choose fresh, ripe berries for the best flavor. If strawberries are out of season, you could substitute with raspberries or even mango for a different twist! -
140ml Whipping Cream (1/2 cup + 1 tbsp)
This creamy base gives the mousse its indulgent texture. Feel free to swap for a dairy-free version with coconut cream or almond whipped cream. Just ensure it’s thick enough to whip! -
50g Sugar (1/4 cup)
We’ll sweeten the deal! You can adjust this based on the natural sweetness of your strawberries; if they’re super sweet, you may want less sugar. Alternatively, honey or maple syrup works too. -
35g Cornstarch (1/3 cup)
This acts as our stabilizer, giving the mousse structure without weighing it down. If you’re looking for a gluten-free option, cornstarch is perfect. You could also use arrowroot starch. -
1 tsp Vanilla Extract (optional)
This is where you can add a warm, aromatic twist. Most recipes benefit from this classic addition, but feel free to omit if you’re keeping it pure and simple.
Step-by-Step Instructions
Now that we’ve gathered our star players, let’s get to the fun part—the actual making! 🎉
-
Prep Your Strawberries
Start by washing your strawberries thoroughly under cool water. Remove the green tops and slice them in half for quicker blending. The more surface area, the easier they will blend into a luscious puree! -
Blend the Strawberries
In a blender or food processor, add the sliced strawberries. Blend until smooth—about 30 seconds should do the trick! If you prefer a chunky mousse, pulse a few times to leave some strawberry bits. Yum! -
Strain if Desired
For an extra silky mousse, you can strain the strawberry puree through a fine mesh sieve. This step is optional, but it guarantees a smooth texture. Use a spatula to push through as much liquid as possible. -
Whip Your Cream
In a mixing bowl, pour in the whipping cream. With an electric mixer, whip until it forms soft peaks. Watch closely! Once it holds its shape but is still silky, stop! Overwhipped cream can become grainy. -
Combine with Strawberries
Gently fold the strawberry puree into the whipped cream. Use a spatula and mix carefully to keep that airy texture—grace, my friend! Add in your sugar and optional vanilla extract during this step for sweetness. -
Thicken with Cornstarch
In a small bowl, mix the cornstarch with a tablespoon of cold water to create a slurry. Heat it in a microwave or stovetop for about 30 seconds until it thickens slightly. This step is key to helping your mousse hold its shape. Once thickened, fold it into the strawberry mixture. -
Chill
Transfer your mousse into dessert cups or a large bowl. Chill in the refrigerator for at least two hours, or until set. This is the hardest part—waiting! -
Serve & Enjoy!
Once chilled and set, it’s time for a taste test! Grab your favorite spoons, heap on some more chopped strawberries or mint for garnish, and dig in!
Serving Suggestions
When you’re ready to serve, think about presentation! Layer your mousse in elegant glass jars or bowls for that wow factor. Garnish with a sprinkle of fresh strawberries on top, maybe even a sprig of mint for that classic touch. Not only does it look beautiful, but it also adds a fresh, aromatic pop that makes every bite more delightful.
Recipe Variations
Feeling adventurous? Here are a few creative twists to give your mousse a personal touch:
- Chocolate Strawberry Mousse: Add 2 tablespoons of melted dark chocolate into the strawberry mixture for a decadent twist.
- Citrus Burst: Add a teaspoon of lemon or lime juice to the strawberries for a zesty spin!
- Nutty Delight: Fold in crushed nuts like almonds or hazelnuts for texture and flavor.
- Berry Medley: Instead of just strawberries, mix in blueberries or blackberries for a tangy blend.
- Coconut Cream: Substitute the whipping cream with coconut cream for a tropical flair!
Chef’s Notes
This recipe has traveled with me through many kitchens, evolving each time I make it. I find it fascinating how the simplest recipes can bring comfort and joy. One time, I made it for a friend’s birthday, and it vanished almost instantly! Not only was it a hit, but it also sparked a cooking session where we experimented together. This certainly reminded me that cooking connects us, and each dish holds a story.
FAQs and Troubleshooting
1. Why is my mousse not setting?
If your mousse isn’t thickening, ensure that your cornstarch slurry was cooked until it thickened before folding it in. If you skipped that step, the mousse might remain runny.
2. Can I use frozen strawberries?
Absolutely! You just need to thaw them first and make sure to drain excess liquid. This might slightly alter the texture but will still be delicious.
3. My cream didn’t whip properly; what did I do wrong?
Ensure your bowl and whisk are clean and dry. Any fat residue can prevent the cream from whipping. Also, using cold cream right out of the fridge is essential.
4. Can I make this recipe ahead of time?
Yes! You can prepare it a day in advance and just store it in the fridge until you’re ready to serve. This can actually enhance the flavors!
Nutritional Information
(Assuming serving size 1/2 cup)
- Calories: 150
- Protein: 2g
- Carbs: 24g
- Sugars: 16g
- Fat: 7g
- Fiber: 2g
And there you have it! A dreamy, fluffy, and delectable 4-Ingredient Strawberry Mousse ready to be enjoyed! Cooking should be about simplicity and joy, so I hope this recipe sparks memories or creates new ones for you.
Remember, the kitchen is a place to nurture creativity and make a little magic happen—so get in there and start whisking. Happy cooking! 🍓✨
Print4-Ingredient Strawberry Mousse
A light and airy strawberry mousse made with just four simple ingredients, perfect for any occasion.
- Prep Time: 15 minutes
- Cook Time: 0 minutes
- Total Time: 120 minutes
- Yield: 4 servings 1x
- Category: Dessert
- Method: Chilling
- Cuisine: French
- Diet: Vegetarian
Ingredients
- 300g Strawberries (about 10.5 oz)
- 140ml Whipping Cream (1/2 cup + 1 tbsp)
- 50g Sugar (1/4 cup)
- 35g Cornstarch (1/3 cup)
- 1 tsp Vanilla Extract (optional)
Instructions
- Prep your strawberries by washing them and slicing in half.
- Blend the strawberries until smooth, about 30 seconds.
- Strain the puree for a silky texture, if desired.
- Whip the cream until soft peaks form, being careful not to overwhip.
- Combine the strawberry puree with the whipped cream, folding gently.
- Thicken the mixture by adding the cornstarch slurry after heating it slightly.
- Chill the mousse in the refrigerator for at least two hours, until set.
- Serve with additional strawberries or mint for garnish.
Notes
Try adding chocolate or citrus for a different twist on flavor. This mousse can be prepared a day in advance for enhanced flavor.
Nutrition
- Serving Size: 1 serving
- Calories: 150
- Sugar: 16g
- Sodium: 5mg
- Fat: 7g
- Saturated Fat: 4g
- Unsaturated Fat: 2g
- Trans Fat: 0g
- Carbohydrates: 24g
- Fiber: 2g
- Protein: 2g
- Cholesterol: 30mg
Keywords: strawberry mousse, dessert, easy dessert, summer dessert