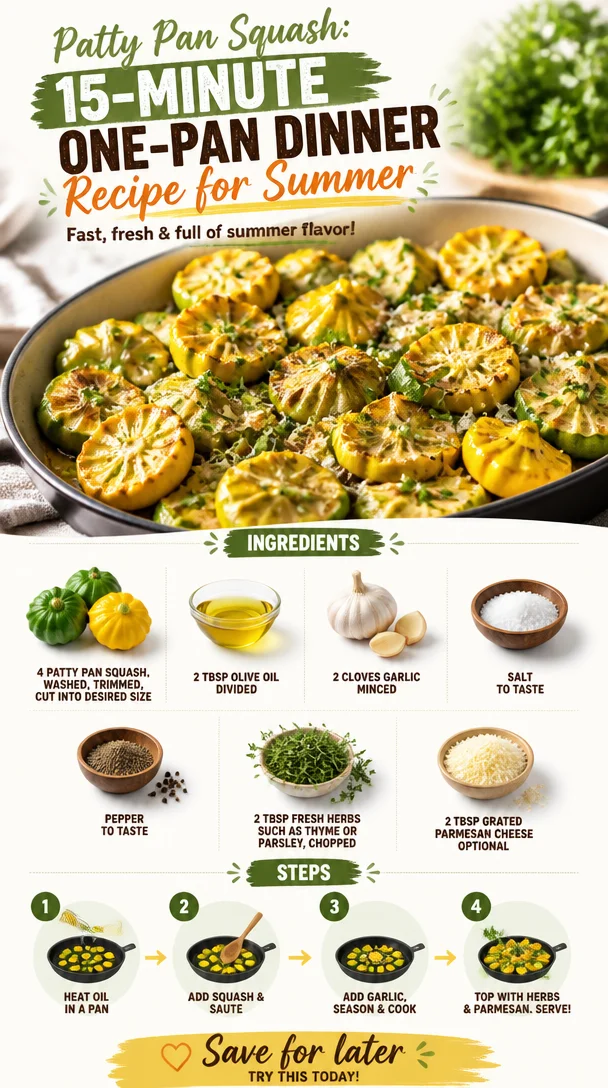
Patty Pan Squash: 15-Minute One-Pan Dinner Recipe for Summer
The Sprightly Squash: A Celebration of Patty Pan Delights
Welcome, fellow food aficionados! Today, we’re diving into the wonderfully whimsical world of patty pan squash. If you’re new to this delightful little veggie, you’re in for a treat. These cheerful, scalloped squashes are not only a feast for the eyes but also a canvas for delicious flavors. Let’s discover together how easy—and fun—it is to whip up a meal that will have you dazzling your dinner guests (or treating yourself!).
A Personal Journey with Patty Pan Squash
My love affair with patty pan squash goes way back to summer afternoons in my grandmother’s garden. Her garden was like a treasure trove of fresh produce, and I can still remember the delight on her face as she picked those quirky, sun-kissed squashes. She would hand me a freshly picked patty pan squash, all gleaming and green, and invite me into the kitchen to transform it into something spectacular.
One of my favorite memories is when we turned them into a vibrant roasted dish that filled the house with an irresistible aroma. The way the squash caramelized in the oven was pure magic! Watching her artfully chop fresh herbs and sprinkle them over the shimmering patty pans was both a lesson in cooking and a cherished bonding experience. Those afternoons shaped my journey as a chef and instilled in me the belief that cooking is about joy, sharing, and celebration.
So, gear up as we recreate these beautiful memories and enjoy patty pan squash in the most flavorful way possible!
Ingredients
Here’s what you’ll need for this vibrant dish:
- 4 patty pan squash: These unique, scalloped squash can vary in color from yellow to green. They have a mild taste that can take on various flavors wonderfully. If unavailable, zucchini can be a good substitute, though the shape won’t be the same.
- 2 tbsp olive oil, divided: A staple in many kitchens, olive oil not only enhances flavor but also helps achieve that lovely roasted finish. Feel free to swap it out for avocado oil if you prefer something with a higher smoke point.
- 2 cloves garlic, minced: Fresh garlic is a game changer! It adds depth and flavor to your dish. If you’re in a pinch, garlic powder can serve as a substitute, but nothing beats freshly minced garlic for that aromatic punch.
- Salt and Pepper to taste: These basics are vital in elevating the overall flavor of your dish. Use sea salt for a pop of flavor, and don’t be shy with the pepper!
- 2 tbsp fresh herbs: I love using thyme or parsley for brightness. You can also mix it up with basil for a sweeter note or oregano for a more earthy flavor.
- 2 tbsp grated Parmesan cheese (optional): This optional ingredient adds a nutty, salty touch that can really elevate your dish. For a dairy-free alternative, nutritional yeast works beautifully here.
Step-by-Step Instructions
Now that we’ve gathered our ingredients, let’s jump into making our delicious roasted patty pan squash!
-
Preheat Your Oven: Set your oven to 400°F (200°C). This heat will help the squash roast perfectly, developing that lovely caramelized exterior while staying tender inside.
-
Prep the Squash: Start by washing your patty pan squash under cool water to remove any dirt. Trim the tops and bottoms, then cut them into bite-sized pieces. The whimsical shape of these squashes makes for a beautiful presentation, so don’t stress too much about uniformity—let their natural shapes shine.
-
Toss with Olive Oil and Garlic: In a large bowl, combine the cut squash with 1 tablespoon of olive oil and the minced garlic. Now, here’s a chef hack: Instead of just adding the garlic raw, you can sauté it for a minute in the olive oil before tossing it with the squash. This step brings out that sweet, rich garlic flavor!
-
Season Generously: Sprinkle in salt and pepper to taste, and mix well. This is your moment to infuse flavor into the squash, so don’t be shy! Remember, salt helps draw out moisture and flavors, while pepper adds the perfect zing.
-
Add Fresh Herbs: Fold in the fresh herbs, ensuring every piece of squash gets a touch of that herby goodness. The aroma alone will make you feel like you’re walking through a sunlit herb garden.
-
Roast to Perfection: Spread the squash mixture evenly on a baking sheet lined with parchment paper. This ensures easy cleanup and avoids any sticking. Roast in the preheated oven for about 20-25 minutes. You’ll know they are ready when they’re tender and golden brown, stirring halfway through to ensure even cooking.
-
Finish with Parmesan: Once they’re beautifully roasted, take them out of the oven and sprinkle with Parmesan cheese, if using. Pop them back in for an additional 2-3 minutes until the cheese is melted and bubbly.
-
Serve and Enjoy: Once you pull that tray out of the oven, watch out! You’ll instantly be drawn in by the melty cheese and fragrant herbs. Taste a piece, and you might just be transported to those summer afternoons in the garden!
Serving Suggestions
These roasted patty pan squash are best served warm. I love plating them alongside a light salad or some grilled chicken for a complete meal. You can garnish with a few extra fresh herbs for a pop of color and freshness. For a lovely presentation, consider stacking them on a vibrant plate or serving them in a rustic bowl, drizzled with a touch of balsamic reduction. Enjoy every colorful bite!
Recipe Variations
- Spicy Kick: Add a pinch of red pepper flakes along with your other seasonings for a touch of heat!
- Mediterranean Vibes: Toss in some chopped olives and sun-dried tomatoes before roasting for a burst of Mediterranean flavor.
- Sweet Glaze: Drizzle with honey or maple syrup in the last few minutes of roasting for a delightful sweet contrast.
- Vegan Version: Skip the cheese or substitute with a nut-based cheese for a deliciously creamy result without dairy.
- Stuffed Patty Pan: For a more filling option, you can scoop out the squash and fill them with quinoa and veggies before roasting!
Chef’s Notes
Oh, the stories I have about patty pan squash! Once during a cook-out, I mischievously offered a friend some “exotic” vegetable that they had never tried before. Little did they know it was just good ol’ patty pan squash! Their surprised expression when they found out made my day! These quirky squashes are often overlooked, but they deserve the spotlight—embrace their unique shapes and flavors, and let your creativity flow in the kitchen.
Over the years, my recipe has evolved as I’ve experimented with different herbs and spices. Don’t be afraid to make it your own—add that touch of “you” into every dish!
FAQs and Troubleshooting
-
Why are my squash mushy?
- If your squash turned out mushy, it may have been overcooked. Each oven is different, so keep an eye on them, especially in the last few minutes of roasting!
-
Can I prep these squash in advance?
- Absolutely! You can chop and season the squash a few hours ahead of time and store it in the refrigerator until you’re ready to roast them.
-
What can I serve with patty pan squash?
- These roasted delights pair beautifully with grilled fish, steak, or a simple green salad. They can also be served as a vibrant side dish to any meal.
-
How do I store leftover patty pan squash?
- Store unused roasted squash in an airtight container in the fridge for up to 3 days. Reheat gently in the oven or microwave!
Nutritional Info
While specific nutritional data varies based on portion sizes, patty pan squash is low in calories, making it a fantastic option for those looking for lighter meal options. It’s high in vitamins A and C and rich in antioxidant properties, which are great for your skin and immune health!
So there you have it! A fun, flavorful journey into the delightful world of patty pan squash, complete with nostalgia and culinary creativity. I hope this recipe inspires you to bring these charming veggies into your kitchen and creates new food memories of your own! Let’s keep it fresh, simple, and delicious! Happy cooking, food friends!
PrintRoasted Patty Pan Squash

A vibrant and flavorful dish featuring roasted patty pan squash, enhanced with garlic and fresh herbs.
- Prep Time: 15 minutes
- Cook Time: 25 minutes
- Total Time: 40 minutes
- Yield: 4 servings 1x
- Category: Side Dish
- Method: Roasting
- Cuisine: Vegetarian
- Diet: Vegetarian
Ingredients
- 4 patty pan squash, cut into bite-sized pieces
- 2 tbsp olive oil, divided
- 2 cloves garlic, minced
- Salt and Pepper to taste
- 2 tbsp fresh herbs (thyme, parsley, or basil)
- 2 tbsp grated Parmesan cheese (optional)
Instructions
- Preheat your oven to 400°F (200°C).
- Wash the patty pan squash under cool water, trim the tops and bottoms, and cut into bite-sized pieces.
- Toss the cut squash with 1 tablespoon of olive oil and minced garlic.
- Season with salt and pepper to taste.
- Fold in the fresh herbs.
- Spread the mixture evenly on a baking sheet lined with parchment paper and roast for about 20-25 minutes, stirring halfway through.
- Sprinkle with Parmesan, if using, and return to the oven for an additional 2-3 minutes.
- Serve warm and enjoy!
Notes
For a vegan version, skip the cheese or substitute with a nut-based cheese.
Nutrition
- Serving Size: 1 serving
- Calories: 150
- Sugar: 2g
- Sodium: 300mg
- Fat: 10g
- Saturated Fat: 2g
- Unsaturated Fat: 8g
- Trans Fat: 0g
- Carbohydrates: 12g
- Fiber: 3g
- Protein: 3g
- Cholesterol: 5mg
Keywords: patty pan squash, roasted vegetables, vegetarian recipes
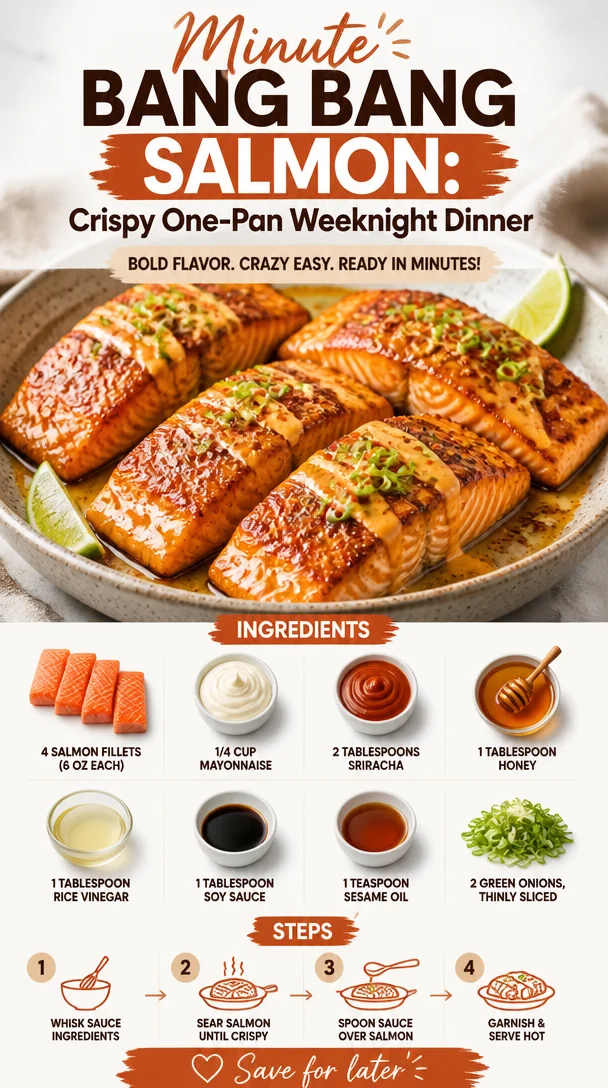
Minute Bang Bang Salmon: Crispy One-Pan Weeknight Dinner
Bang Bang Salmon: A Flavor-Packed Delight
Welcome to my kitchen! Today, I’m incredibly excited to share with you one of my all-time favorite recipes: Bang Bang Salmon. This dish is not only bursting with flavor but is also remarkably easy to prepare, making it perfect for those busy weeknights or for impressing your friends at a weekend gathering.
When I think of Bang Bang Salmon, I can’t help but smile at the memories it conjures up. Picture this: it’s a sunny Saturday afternoon, and I’m hosting a few close friends for a get-together. As I prep the ingredients, the kitchen fills with laughter and the warm aroma of the spices I’m blending. The sound of sizzling salmon in the pan harmonizes with our chatter, an orchestra of good times and delectable flavors. I remember the way my friends dove into the salmon, their eyes lighting up with every bite. The heat from the sriracha combined with the creaminess of the mayo creates a deliciously addictive sauce that complements the salmon perfectly. It’s moments like these—filled with joy and mouth-watering dishes—that remind me why I love cooking so much.
In this blog post, I’ll walk you through everything you need to know to create a show-stopping Bang Bang Salmon dish at home. From the mouthwatering recipe to serving suggestions and a few fun variations, you’re in for a treat! Let’s get cooking!
Ingredients
Here’s what you’ll need to create this delicious Bang Bang Salmon:
-
4 salmon fillets (6 oz each): The star of the show! Choose wild-caught salmon for a richer flavor and better omega-3 fatty acids. Feel free to substitute with other fish like cod or tilapia if needed.
-
1/4 cup mayonnaise: This gives the sauce its creamy base. You can use regular or light mayo, or even Greek yogurt if you prefer a healthier twist.
-
2 tablespoons sriracha: For that signature kick! Not a fan of spicy? You can adjust the amount or swap it for a milder sauce like sweet chili sauce.
-
1 tablespoon honey: Balances the heat with sweetness. Maple syrup can be a great alternative for a vegan option.
-
1 tablespoon rice vinegar: Adds a tangy note to the sauce. You can substitute with apple cider vinegar if that’s what you have on hand.
-
1 tablespoon soy sauce: For a touch of umami! Tamari is an excellent gluten-free alternative.
-
1 teaspoon sesame oil: This adds a lovely toasty flavor to the sauce. Groundnut oil can be used if you don’t have sesame oil.
-
2 green onions, thinly sliced: A fresh garnish that adds both crunch and color to your dish.
Ready to dive into making this delectable dish? Let’s go step by step!
Step-by-Step Instructions
Step 1: Prepping Your Salmon
Start by preheating your oven to 400°F (200°C). While it’s heating up, pat your salmon fillets dry with a paper towel. This step is crucial because it ensures a crispy skin while the salmon bakes. Sprinkle some salt and pepper on both sides—seasoning is key!
Step 2: Whipping Up the Bang Bang Sauce
In a medium-sized bowl, combine the mayonnaise, sriracha, honey, rice vinegar, soy sauce, and sesame oil. Give it a good whisk until it’s completely smooth and well blended. A little chef tip: taste the sauce as you go! If you want more heat, add a splash of sriracha. If you like it sweeter, drizzle in a bit more honey.
Step 3: Baking the Salmon
Line a baking dish with parchment paper for easy cleanup. Place the salmon fillets skin-side down in the dish. Brush a generous 2 tablespoons of the Bang Bang sauce over the top of the salmon fillets. The more sauce, the better, in my opinion! Bake in your preheated oven for about 15-20 minutes, or until the salmon flakes easily with a fork.
Step 4: The Finishing Touch
While the salmon is baking, let’s prepare the garnish. Thinly slice your green onions—this adds that pop of freshness! Once the salmon is done, take it out of the oven and drizzle a little extra sauce over the top if you’re feeling it. Sprinkle with those vibrant green onion slices, and let the colors pop.
Step 5: Serve and Enjoy
Plate the Bang Bang Salmon on a bed of steamed rice or a salad for a lighter option. The glossy sauce should glisten atop the salmon, making it look as fabulous as it tastes. Don’t forget to snap a pic for Instagram before you dig in!
Serving Suggestions
When it comes to serving your Bang Bang Salmon, simplicity is key. I always recommend pairing it with a side of rice, whether it’s jasmine, brown, or cauliflower rice for a low-carb spin. A fresh side salad—think crunchy greens, cherry tomatoes, and a light vinaigrette—complements the richness of the salmon beautifully. Want to step it up? Add a sprinkle of sesame seeds for that extra touch!
Recipe Variations
-
Spicy Garlic Bang Bang: Add a minced clove of garlic to the sauce for a delicious garlicky kick.
-
Honey-Lime Bang Bang: Swap honey for lime juice for a citrusy twist.
-
Coconut Bang Bang: Mix in some canned coconut cream with the mayonnaise for a tropical flavor.
-
Asian-Inspired Veggies: Serve the salmon with Asian veggies like bok choy and snap peas for a delightful contrast!
-
Low-Carb Delight: Use zucchini noodles instead of rice to keep it light and fresh.
Chef’s Notes
As a food lover, I’ve always thrived on exploring bold flavors, and this recipe is no exception. Looking back, the first time I made Bang Bang Salmon was a delightful experiment that turned into a staple in my cooking repertoire! And let me tell you, there have been a few kitchen mishaps along the way. One time, I accidentally grabbed an entire bottle of sriracha instead of the tablespoon measure! Let’s just say that dish had some serious heat! But it all turned out fine in the end—after a bit of improvisation and a few cheers from my friends.
FAQs and Troubleshooting
1. What should I do if my salmon is overcooked?
If your salmon ends up a little dry, don’t fret! Drizzle more Bang Bang sauce over it when serving; it’ll add moisture and flavor back in!
2. Can I grill this salmon instead of baking?
Absolutely! Preheat your grill, oil the grates, and cook the salmon skin-side down for about 5-7 minutes, then flip and cook for another 5-7 minutes, brushing with sauce as you go.
3. How do I store leftovers?
Store leftovers in an airtight container in the fridge for up to 3 days. Reheat gently in the microwave or on a skillet to avoid drying it out.
4. What if I don’t have green onions?
No worries! You can substitute with finely chopped chives, or skip the garnish altogether—your bang bang salmon will still be amazing!
Nutritional Info (Optional)
- Calories: Approximately 380 per serving (based on salmon and sauce only)
- Protein: 36g
- Carbohydrates: 6g
- Fat: 24g
And there you have it—my Bang Bang Salmon recipe, packed with flavor and perfect for any occasion! Whether you’re cooking for yourself or for loved ones, this dish is sure to become a crowd-pleaser. So roll up your sleeves, gather your ingredients, and let’s make some kitchen magic happen! Happy cooking!
PrintBang Bang Salmon
A flavor-packed and easy-to-prepare Bang Bang Salmon dish, perfect for busy weeknights or impressing friends.
- Prep Time: 15 minutes
- Cook Time: 20 minutes
- Total Time: 35 minutes
- Yield: 4 servings 1x
- Category: Main Course
- Method: Baking
- Cuisine: Asian
- Diet: Pescatarian
Ingredients
- 4 salmon fillets (6 oz each)
- 1/4 cup mayonnaise
- 2 tablespoons sriracha
- 1 tablespoon honey
- 1 tablespoon rice vinegar
- 1 tablespoon soy sauce
- 1 teaspoon sesame oil
- 2 green onions, thinly sliced
Instructions
- Preheat your oven to 400°F (200°C) and pat the salmon fillets dry. Season them with salt and pepper.
- Combine the mayonnaise, sriracha, honey, rice vinegar, soy sauce, and sesame oil in a bowl. Whisk until smooth.
- Line a baking dish with parchment paper and place the salmon skin-side down. Brush with 2 tablespoons of the sauce and bake for 15-20 minutes.
- Slice the green onions while the salmon bakes. Optionally drizzle more sauce over the salmon before serving and sprinkle with green onions.
- Serve on a bed of rice or a salad and enjoy!
Notes
Store leftovers in an airtight container for up to 3 days. Reheat gently to avoid drying out.
Nutrition
- Serving Size: 1 serving
- Calories: 380
- Sugar: 4g
- Sodium: 650mg
- Fat: 24g
- Saturated Fat: 4g
- Unsaturated Fat: 16g
- Trans Fat: 0g
- Carbohydrates: 6g
- Fiber: 0g
- Protein: 36g
- Cholesterol: 85mg
Keywords: Bang Bang Salmon, easy salmon recipe, Asian cuisine
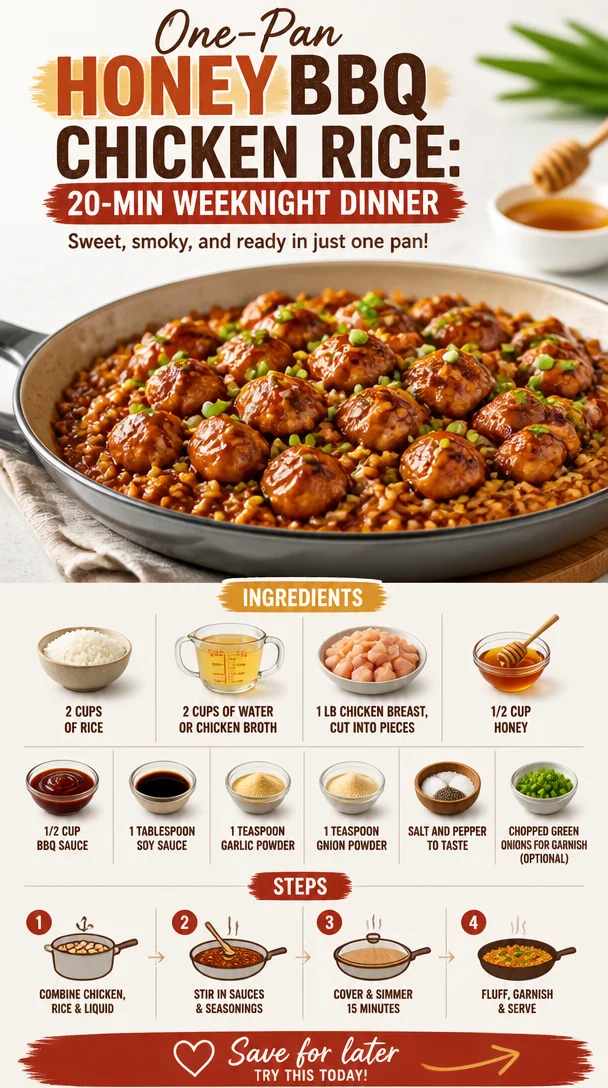
One-Pan Honey BBQ Chicken Rice: 20-Min Weeknight Dinner
One-Pan Honey BBQ Chicken Rice: A Deliciously Easy Comfort Meal
Welcome back to Clean Plate Cravings, friends! Today, we’re diving into a dish that truly embodies the joy of simple, satisfying cooking: One-Pan Honey BBQ Chicken Rice. This recipe is not only packed with flavor but also perfect for those busy nights when you want to whip up something delicious without spending hours in the kitchen. If you’re a fellow food lover who craves mouthwatering meals that don’t come with a laundry list of complicated steps, you’re in the right place!
Let’s be real—life can get hectic. Between juggling work, family commitments, and maybe even squeezing in a workout (if we’re lucky!), cooking can sometimes feel like an uphill battle. But who says healthy eating has to be all about takeout or bland microwave meals? My mission here is to show you that wholesome, enticing food can fit right into your daily routine.
So, grab that apron, and let me take you on a flavorful journey with this One-Pan Honey BBQ Chicken Rice. Trust me, this dish will leave your taste buds dancing and your kitchen smelling heavenly. Plus, it’s all made in one pan—how easy is that? Let’s get cooking!
A Nostalgic Twist on a Family Favorite
When I think of the one-pan meals my mom used to whip up on busy weeknights, my heart swells with nostalgia. I can still picture her in our cozy, bustling kitchen, effortlessly tossing together whatever was in the fridge. One of her go-to’s was a variation of BBQ chicken, often paired with rice. The aroma of tangy barbecue sauce mingling with a hint of sweetness from honey was enough to bring the whole family together around the dinner table.
One evening, I remember her calling us in with that irresistible smell wafting through the house, and I couldn’t wait to dig into that sticky, savory goodness. It wasn’t just food; it was love served on a plate. Now, as I recreate that dish in my own kitchen, I like to think I’m passing down the same warmth and joy to my family.
But let me tell you, this One-Pan Honey BBQ Chicken Rice takes those memories and elevates them to a whole new level! It’s all about simplicity, flavor, and bringing everyone together at the table—all while being an absolute breeze to prepare!
Ingredients You’ll Need
Before we jump into the cooking fun, let’s gather our ingredients. Here’s what you’ll need:
- 2 cups of rice: I recommend long-grain rice for a fluffy texture, but feel free to use basmati or jasmine rice if that’s your jam.
- 2 cups of water or chicken broth: Chicken broth adds extra flavor! If you want a vegetarian option, use vegetable broth instead.
- 1 lb chicken breast, cut into pieces: Boneless, skinless chicken breasts work wonderfully. You can also use thighs for a richer flavor or even tofu for a plant-based twist!
- 1/2 cup honey: This sweet element balances the tanginess of the BBQ sauce. If you’re vegan, agave syrup or maple syrup works perfectly.
- 1/2 cup BBQ sauce: Go for your favorite brand! If you’re feeling adventurous, try making your own—smoky, sweet, and oh-so-good.
- 1 tablespoon soy sauce: This adds a savory depth. For a gluten-free option, use tamari.
- 1 teaspoon garlic powder: A staple in my pantry; it gives an instant flavor boost.
- 1 teaspoon onion powder: This rounds out the flavors. If you prefer fresh, dice a small onion to stir in at the beginning.
- Salt and pepper to taste: Always important for that finishing touch!
- Chopped green onions for garnish (optional): These add a fresh crunch and a pop of color.
Chef’s Insights
Don’t hesitate to switch things up! If you’re not a fan of certain flavors, you can leave ingredients out or replace them. Cooking is all about experimentation, so feel free to adjust to your taste preferences!
Step-by-Step Cooking Instructions
Let’s get into the nitty-gritty of making our delicious One-Pan Honey BBQ Chicken Rice. Trust me, your kitchen is about to smell divine!
-
Prep the Ingredients:
Start by prepping all your ingredients. This will make the cooking process smoother. Cut your chicken breast into bite-sized pieces and chop the green onions if you’re using them for garnish. -
Sauté the Chicken:
In a large, deep skillet or a pan with a lid, heat a drizzle of olive oil over medium heat. Once hot, add the chicken pieces and season with a pinch of salt and pepper. Cook them for about 5-7 minutes, stirring occasionally, until they’re golden brown and no longer pink in the center.Chef’s Tip: Don’t crowd the pan; if needed, cook the chicken in batches. This helps achieve that beautiful caramelization!
-
Mix in the Flavors:
Once the chicken is cooked, reduce the heat to low and pour in the soy sauce, garlic powder, onion powder, honey, and BBQ sauce. Stir everything together evenly, ensuring the chicken is well-coated with that tasty sauce.Chef Hack: If you want a personal touch, feel free to add a splash of your favorite hot sauce for a kick!
-
Add the Rice:
Now, it’s time to incorporate the rice. Sprinkle the rice evenly over the chicken in the pan. Then, pour in the water or chicken broth. Don’t stir it yet! -
Bring to a Simmer:
Increase the heat to medium-high and bring the mixture to a gentle simmer. Let it come together, then reduce the heat to low. Cover the pan with a lid and let it cook for about 20 minutes. This allows the rice to absorb all those amazing flavors while becoming fluffy.Pro Tip: Do not lift the lid! Steam is key for cooking rice perfectly, and you don’t want to let it escape.
-
Final Touches:
After 20 minutes, remove the lid and give everything a gentle stir. You’ll see the rice has soaked up the sauce beautifully! Taste and adjust seasoning, adding a little more salt or pepper if needed. -
Serve it Up:
Scoop generous portions onto plates or into bowls. Garnish with the chopped green onions for that fresh crunch.Serving Suggestion: Consider serving this dish with a side of steamed veggies or a crisp green salad to round out your meal!
Recipe Variations
Looking to mix things up? Here are a few variations to try:
- Spicy BBQ Chicken: Add a tablespoon of sriracha or your favorite hot sauce to the BBQ sauce mixture for a spicy kick.
- Vegetable Boost: Toss in some diced bell peppers, broccoli, or snap peas while the chicken is cooking to add some color and nutrition.
- Pineapple Twist: For a tropical flair, add diced pineapple to the pan when mixing in the honey and BBQ sauce.
- Whole Grains: Substitute white rice with brown rice or quinoa for added fiber and a nuttier flavor.
- Herbed Rice: Add fresh herbs like chopped cilantro or parsley after cooking for a pop of freshness.
Chef’s Notes
As someone who has always loved creating in the kitchen, this One-Pan Honey BBQ Chicken Rice recipe is one I’ve tweaked over the years. What started as a simple family dinner has transformed into a weeknight go-to that my family requests time and again.
I love how it brings someone’s modern-day spin to the nostalgic meals of my childhood. It’s also my secret weapon when I want to impress friends without spending hours prepping—who doesn’t love a one-pan meal?
Remember, cooking is all about exploration and having fun. Do not be afraid to make this dish your own, just as I did!
FAQs and Troubleshooting
1. My rice is too sticky. What did I do wrong?
Usually, overly sticky rice indicates that it’s been overcooked or that it was too wet when cooking. Ensure you measure your liquid accurately and don’t lift the lid during cooking!
2. Can I use frozen chicken?
Absolutely! Just make sure to adjust the cooking time accordingly. Frozen chicken may need a few extra minutes to ensure it cooks through.
3. What if I’m out of honey?
You can substitute with maple syrup or agave syrup. Both will give you that sweet flavor without compromising the dish!
4. How can I reheat leftovers?
Leftovers are best reheated on the stove over medium heat with a splash of water or broth to keep the rice from drying out. Stir often until heated through.
Nutritional Information
While I’ve left the nutritional details out for simplicity, this One-Pan Honey BBQ Chicken Rice is a balanced meal that provides protein from the chicken, carbs from the rice, and a splash of flavor-packed goodness!
And there you have it! A simple, delicious, and nourishing One-Pan Honey BBQ Chicken Rice recipe that embodies everything Clean Plate Cravings stands for. Filling, flexible, and utterly satisfying, this dish is perfect for busy weeknights and relaxing weekends alike. So next time you’re in the mood for something homemade yet effortless, remember this recipe! Happy cooking!
PrintOne-Pan Honey BBQ Chicken Rice
A deliciously easy comfort meal perfect for busy nights, featuring tender chicken, sweet honey, and savory BBQ sauce all cooked in one pan with fluffy rice.
- Prep Time: 10 minutes
- Cook Time: 30 minutes
- Total Time: 40 minutes
- Yield: 4 servings 1x
- Category: Main Course
- Method: Baking
- Cuisine: American
- Diet: None
Ingredients
- 2 cups long-grain rice (or basmati/jasmine)
- 2 cups water or chicken broth
- 1 lb boneless, skinless chicken breast, cut into pieces
- 1/2 cup honey
- 1/2 cup BBQ sauce
- 1 tablespoon soy sauce
- 1 teaspoon garlic powder
- 1 teaspoon onion powder
- Salt and pepper to taste
- Chopped green onions for garnish (optional)
Instructions
- Prep the ingredients by cutting chicken into bite-sized pieces and chopping green onions.
- Sauté the chicken in a skillet with olive oil, seasoning with salt and pepper, until golden brown.
- Mix in soy sauce, garlic powder, onion powder, honey, and BBQ sauce, stirring to coat the chicken.
- Add the rice evenly over the chicken, then pour in water or broth without stirring.
- Bring to a simmer, then cover and reduce heat, cooking for about 20 minutes.
- Remove the lid, stir gently, and adjust seasoning if necessary.
- Serve portions onto plates or bowls, garnished with green onions.
Notes
Feel free to switch up ingredients and add vegetables or spices to suit your taste!
Nutrition
- Serving Size: 1 serving
- Calories: 450
- Sugar: 12g
- Sodium: 700mg
- Fat: 10g
- Saturated Fat: 2g
- Unsaturated Fat: 6g
- Trans Fat: 0g
- Carbohydrates: 54g
- Fiber: 2g
- Protein: 25g
- Cholesterol: 70mg
Keywords: chicken, rice, one-pan meal, BBQ, comfort food
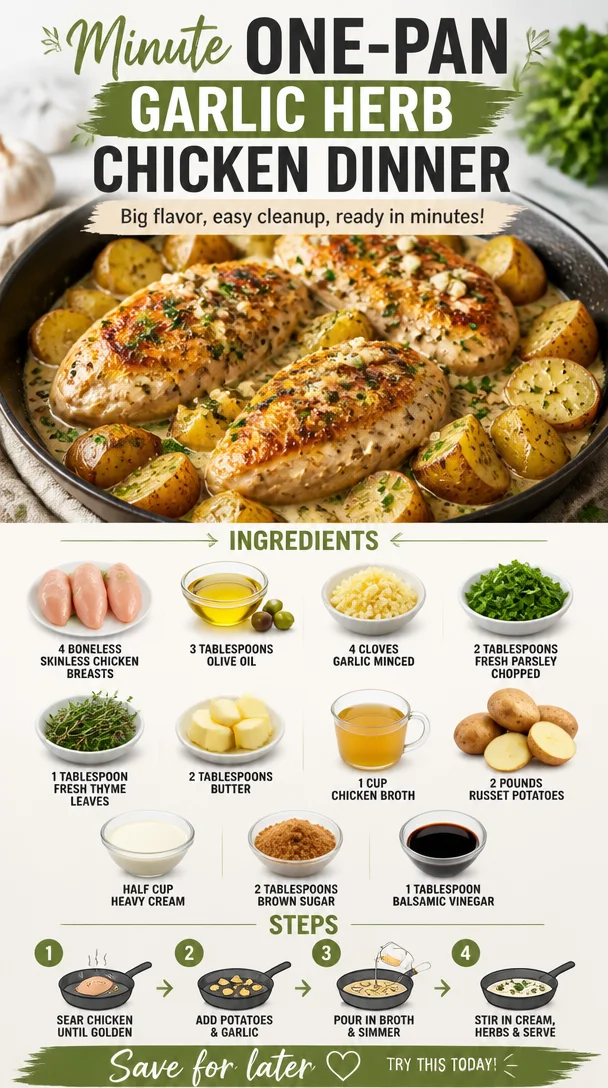
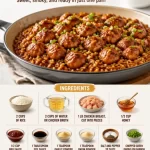
Minute One-Pan Garlic Herb Chicken Dinner
Garlic Herb Chicken: A Wholesome Delight for Every Home Cook
Welcome back to Clean Plate Cravings, food lovers! Today, I am excited to share one of my absolute favorite dishes—Garlic Herb Chicken. This dish is a beautiful celebration of fresh flavors, zesty garlic, and tender chicken that pairs beautifully with a multitude of sides. Picture this: juicy chicken breasts sizzling in a pan, infused with fragrant herbs and rich garlic, all while you’re whisking together some luscious creamy potatoes on the side. Are you drooling yet?
Let’s dive right into this culinary journey that not only tantalizes your taste buds but also fills your home with the warm aroma of a home-cooked meal. Throughout this post, I’ll take you step-by-step through easy-to-follow instructions, sprinkling in some personal anecdotes and chef hacks to elevate your cooking experience. Whether you’re looking to impress dinner guests or just craving a comforting meal after a long day, Garlic Herb Chicken is the way to go!
Personal Story
Ah, Garlic Herb Chicken brings back fond memories of cozy family dinners gathered around the dining table. I can still picture it vividly—my mom whipping up her signature dish while the aroma of garlic wafted through the house. We’d all sit at the table, waiting with growing anticipation as the sizzle from the stovetop made our mouths water. It was more than just a meal; it was a time for connection, laughter, and storytelling. I remember my siblings and I racing to see who could finish their plates first, a not-so-subtle competition that always ended with my mom reminding us to savor our food.
Seeing everyone enjoy a dish that was drenched in love and flavor made cooking feel magical. Inspired by those moments, I started experimenting with recipes in my own kitchen, aiming to recreate that same warmth and joy. Today, I find happiness in sharing this Garlic Herb Chicken recipe with you all, hoping it brings as much joy to your table as it did to mine.
Ingredients
Before we jump into cooking, let’s talk about the vibrant ingredients that make this dish so special. Here’s what you’ll need:
-
4 boneless skinless chicken breasts
The star of the show! Opt for organic or free-range chicken for the best flavor. If you prefer dark meat, substitute with chicken thighs. -
3 tablespoons olive oil
A healthier fat that enhances the dish’s flavor. For a twist, swap it with avocado oil, which has a higher smoke point! -
4 cloves garlic, minced
Garlic adds a punch of flavor. Feel free to use roasted garlic for a sweeter, mellow taste! -
2 tablespoons fresh parsley, chopped
Adds a burst of freshness. If you don’t have fresh parsley, dried parsley can work—use about a teaspoon. -
1 tablespoon fresh thyme leaves
Thyme pairs beautifully with chicken. Substitute with rosemary or oregano for a different twist. -
2 tablespoons butter
Because butter makes everything better! For a dairy-free option, use ghee or a plant-based butter. -
1 cup chicken broth
This is foundational for flavor. You can use vegetable broth if you want to make it vegetarian or choose a low-sodium option for a healthier take. -
2 pounds russet potatoes
Creamy russets are perfect here. Swap them for sweet potatoes for a different flavor profile! -
½ cup heavy cream
Rich, luscious, and creamy. Use coconut cream for a dairy-free alternative. -
2 tablespoons brown sugar
Just a hint of sweetness to balance flavors. Feel free to substitute with honey or maple syrup. -
1 tablespoon balsamic vinegar
This adds depth and brightness. Try red wine vinegar if you need a substitute.
Step-by-Step Instructions
Now that we’ve gathered our ingredients, let’s move on to the fun part—cooking! Follow these step-by-step instructions for a foolproof Garlic Herb Chicken that will delight your senses.
-
Prep the Chicken
Begin by patting the chicken breasts dry with paper towels. This helps get that lovely golden-brown sear on the outside. Season both sides generously with salt and pepper. This is your chance to infuse flavor right at the start! -
Heat the Oil
In a large pan or skillet, heat 3 tablespoons of olive oil over medium-high heat. Watch closely and let it shimmer. You want the oil hot enough to sear without burning! If you’ve got a cast-iron skillet, now’s the time to whip that baby out! -
Sear the Chicken
Carefully place the chicken breasts in the hot oil, leaving space between them. Avoid overcrowding the pan; this ensures a nice sear. Cook for 5-7 minutes on each side—this will create that beautiful browning! Don’t rush—let the chicken do its work. -
Add Aromatics
Once the chicken is nicely browned, add in the minced garlic, fresh parsley, and thyme. Stir it all around until fragrant—about 30 seconds. Keep a close watch because garlic can burn quickly! -
Create the Sauce
Add 2 tablespoons of butter to the pan, letting it melt and mix with the garlic and herbs. Then pour in 1 cup of chicken broth, scraping any delicious bits stuck to the skillet. This is the moment the magic happens—those flavors meld together in perfect harmony. -
Simmer the Chicken
Reduce the heat to low and cover the skillet. Simmer the chicken for 10-15 minutes until it’s cooked through. Use a meat thermometer for precision; the internal temp should reach 165°F (75°C). Juicy chicken awaits! -
Finish with Cream
In the final few minutes of cooking, stir in the heavy cream, brown sugar, and balsamic vinegar. This creamy sauce will give your chicken an incredible richness. Let it simmer uncovered for 2-3 minutes until it thickens slightly. -
Serve It Up
Remove the chicken from the skillet and spoon that luscious sauce over the top. Garnish with extra herbs if you’re feeling fancy!
Serving Suggestions
To plate your Garlic Herb Chicken, serve with a side of roasted or creamy mashed potatoes, drizzling the sauce over both. You can also pair it with your favorite seasonal vegetables like steamed green beans or a light salad for a refreshing touch. Want to make it a feast? Add some warm crusty bread to soak up all that delicious sauce.
Recipe Variations
- Lemon Garlic Chicken: Swap some of the balsamic vinegar with fresh lemon juice for a bright, zesty flavor that dances on your palate.
- Spicy Garlic Chicken: Add red pepper flakes or a minced jalapeño to introduce some heat into your sauce.
- Herb Crusted Chicken: Before searing, coat the chicken in a mixture of breadcrumbs, parmesan, and herbs for a crunchy texture.
- Creamy Sun-Dried Tomato Variation: Toss in some chopped sun-dried tomatoes into the sauce for an Italian flair.
- Low-Carb Option: Serve the chicken on a bed of zoodles (zucchini noodles) instead of potatoes for a lower-carb alternative!
Chef’s Notes
Throughout my cooking journey, Garlic Herb Chicken has evolved into a dish that’s not just about satisfying hunger, but also one that connects hearts. I’ve experimented with different herbs, sauces, and even cooking methods. There was a day I accidentally used smoked paprika instead of brown sugar, and while it turned out surprisingly good, it was a reminder that cooking allows for creativity and spontaneity. Don’t be afraid to tweak this recipe; make it your own!
FAQs and Troubleshooting
Q: My chicken turned out dry. What happened?
A: Overcooking can lead to dry chicken. Be sure to use a meat thermometer and check for an internal temp of 165°F (75°C) to ensure juicy results.
Q: Can I use frozen chicken breasts?
A: Yes, you can! Just be sure to thaw them completely before cooking. You may need to adjust the cooking time slightly.
Q: What if I don’t have chicken broth?
A: No worries! You can use water or a low-sodium vegetable broth. The flavor may be slightly milder, but it will still be delicious!
Q: How can I make this dish dairy-free?
A: Swap the butter with coconut oil and the heavy cream with coconut cream or a dairy-free alternative.
Nutritional Info
(Nutritional info can be provided based on your specific calculations or requirements based on the ingredients you use. Consider providing calories, protein, fats, and carbs per serving if desired.)
In conclusion, I hope you enjoy making this Garlic Herb Chicken as much as I do! It’s all about gathering those around you, sharing good food, and creating lush memories. I’m excited to see how you make this recipe your own. Until next time, keep those cravings clean and delicious!
PrintGarlic Herb Chicken
A delicious and wholesome Garlic Herb Chicken recipe that combines juicy chicken breasts with fragrant herbs and rich garlic, served with creamy potatoes.
- Prep Time: 15 minutes
- Cook Time: 30 minutes
- Total Time: 45 minutes
- Yield: 4 servings 1x
- Category: Main Course
- Method: Searing
- Cuisine: American
- Diet: Gluten-Free
Ingredients
- 4 boneless skinless chicken breasts
- 3 tablespoons olive oil
- 4 cloves garlic, minced
- 2 tablespoons fresh parsley, chopped
- 1 tablespoon fresh thyme leaves
- 2 tablespoons butter
- 1 cup chicken broth
- 2 pounds russet potatoes
- ½ cup heavy cream
- 2 tablespoons brown sugar
- 1 tablespoon balsamic vinegar
Instructions
- Begin by patting the chicken breasts dry with paper towels. Season both sides generously with salt and pepper.
- Heat 3 tablespoons of olive oil in a large pan over medium-high heat until it shimmers.
- Carefully place the chicken breasts in the hot oil, ensuring space between them. Sear for 5-7 minutes on each side.
- Once browned, add minced garlic, parsley, and thyme. Stir until fragrant, about 30 seconds.
- Add 2 tablespoons of butter, allowing it to melt and mix with the herbs.
- Pour in 1 cup of chicken broth, scraping the skillet for flavor bits.
- Reduce heat to low, cover, and simmer for 10-15 minutes until the chicken reaches 165°F (75°C).
- Stir in heavy cream, brown sugar, and balsamic vinegar. Simmer uncovered for 2-3 minutes until slightly thickened.
- Remove the chicken from the skillet and spoon the sauce over the top. Garnish with extra herbs if desired.
Notes
For a dairy-free option, swap butter with coconut oil and heavy cream with coconut cream. Use low-sodium broth for a healthier twist.
Nutrition
- Serving Size: 1 serving
- Calories: 400
- Sugar: 6g
- Sodium: 500mg
- Fat: 20g
- Saturated Fat: 8g
- Unsaturated Fat: 10g
- Trans Fat: 0g
- Carbohydrates: 35g
- Fiber: 4g
- Protein: 30g
- Cholesterol: 75mg
Keywords: chicken, garlic, herbs, easy recipe, dinner