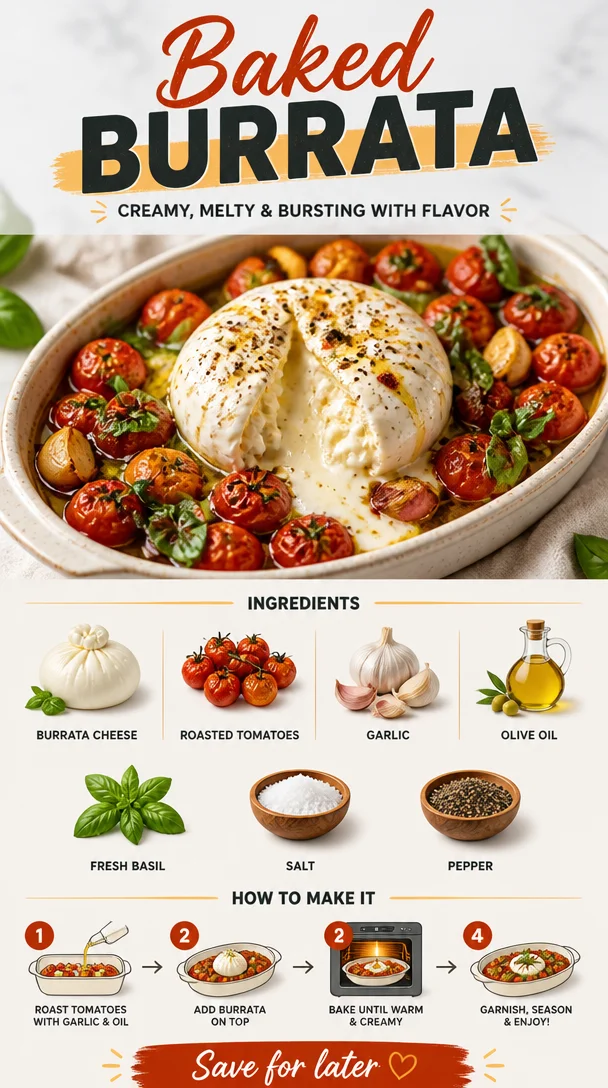
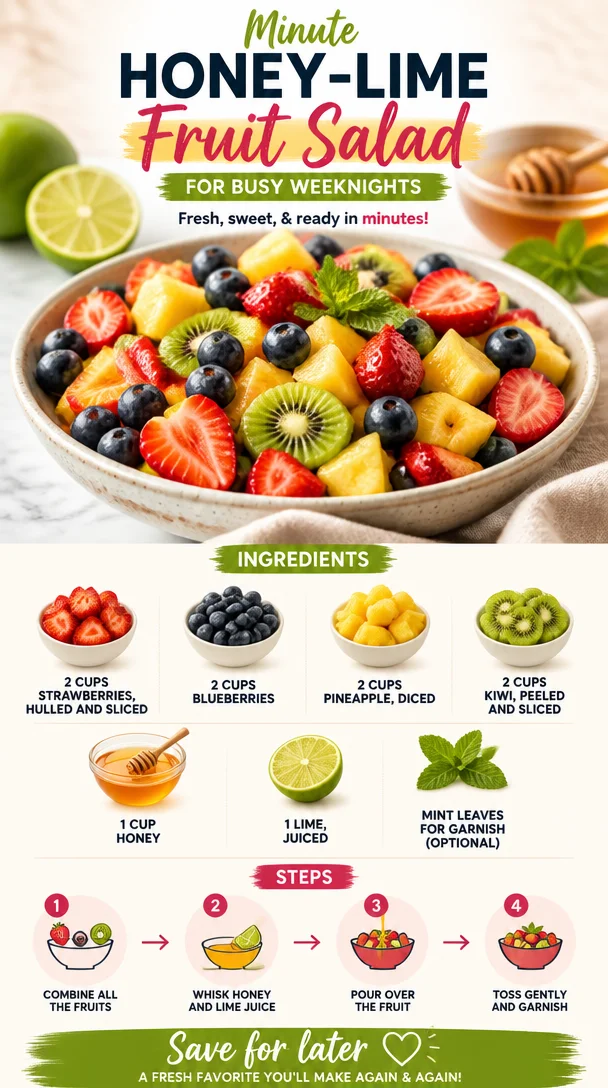
4th of July Red, White & Blue Pasta Salad in 15 Minutes
Red, White, and Blue Pasta Salad: A Celebration of Flavor and Fun
Hello, fellow foodies! Ava here, and I am beyond excited to share with you a dish that not only brings a pop of color to your table but also celebrates the freshness of summer in every bite. Get ready for my glorious Red, White, and Blue Pasta Salad that’s perfect for picnics, barbecues, or just because you deserve something delicious today!
This vibrant pasta salad captures the spirit of summer, combining the playful colors of fresh ingredients with a tangy dressing that will have everyone asking for seconds. The best part? It’s quick, easy, and absolutely instagrammable—your friends will be raving about it long after the last bite. So let’s dive in!
A Nostalgic Culinary Adventure
Whenever I think of the Red, White, and Blue Pasta Salad, I’m instantly transported to my childhood summers spent at family barbecues. Picture this: the sun shining, the smell of chargrilled burgers in the air, and a table overflowing with colorful dishes. I remember my aunt preparing her famous pasta salad, a family favorite that always seemed to disappear as quickly as she could make it.
While her version was a little more traditional, I’ve jazzed it up with a twist that makes it perfect for any occasion. I wanted to create something that reflects not just my love for cooking but also that sense of connection and joy that comes from sharing a meal. This pasta salad does just that—it’s full of vibrant flavors, nostalgic feelings, and a sprinkle of creativity. Plus, it’s super easy to whip up, so you can enjoy those sunny days without being stuck in the kitchen!
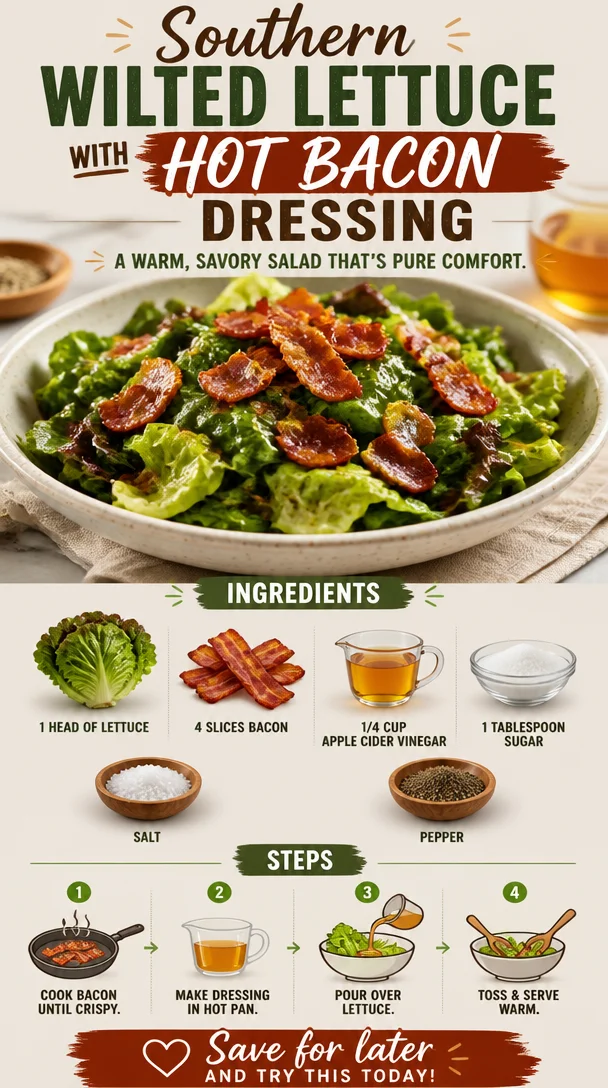
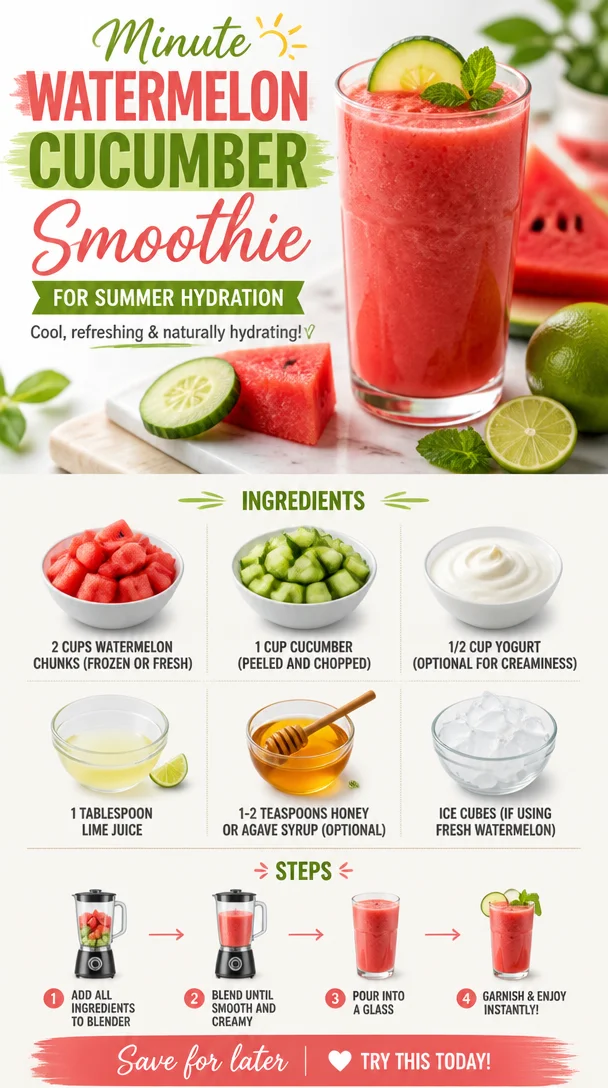
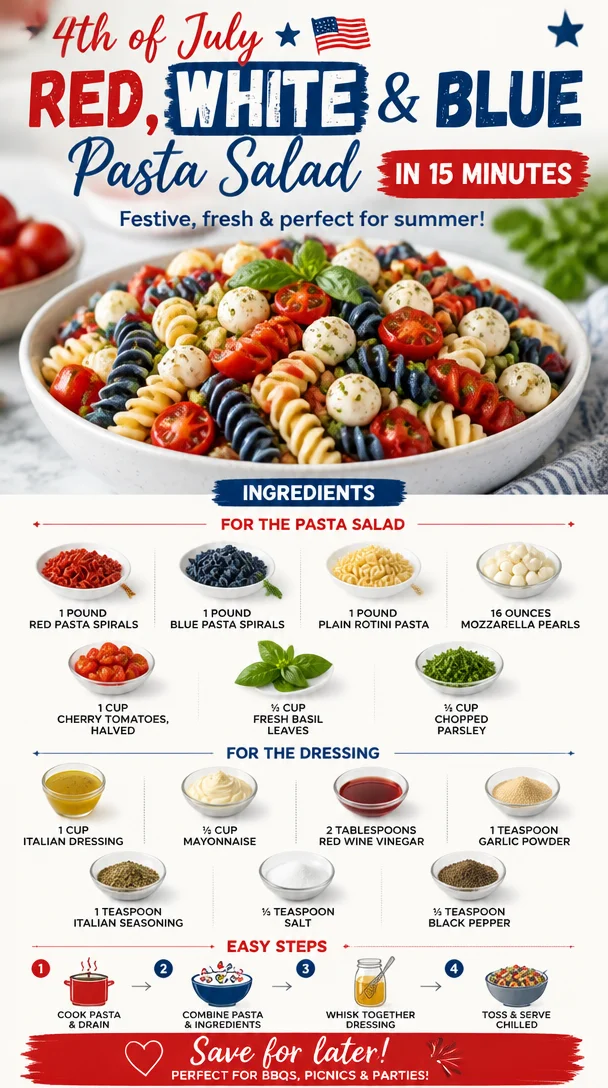
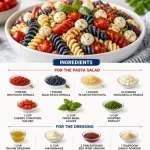
Ingredients You’ll Need
To make the magic happen, here’s what you’ll need for the Red, White, and Blue Pasta Salad:
For the Pasta Salad:
-
1 pound red pasta spirals
Perfect for adding that festive color and a slightly sweet flavor. If you can’t find red pasta, feel free to use regular rotini or a mix of other fun shapes. -
1 pound blue pasta spirals
These will add a pop of blue and uniqueness to your salad. They can be a little harder to find, but don’t fret! If you can’t source blue pasta, use regular pasta and throw in some blue cheese crumbles for a fun touch. -
1 pound plain rotini pasta
The base of your salad! Rotini holds onto the dressing beautifully, making every bite flavorful. -
16 ounces mozzarella pearls
Creamy and delightful, mozzarella pearls bring a mild flavor that balances out the tangy dressing. If you’re looking for a dairy-free option, try cashew cheese or omit entirely! -
1 cup cherry tomatoes, halved
Sweet and juicy, these little gems add a burst of flavor. Any fresh tomato variety will do—just keep that vibrant red color! -
½ cup fresh basil leaves
Basil adds a fragrant, herbaceous note. You can substitute with fresh parsley or even arugula if that’s what you have on hand! -
¼ cup chopped parsley
This not only adds flavor but also a nice contrast to the other ingredients. Don’t have fresh? Dried parsley will work in a pinch.
For the Dressing:
-
1 cup Italian dressing
A zesty base that pairs perfectly with the pasta. Feel free to make your own if you’re feeling adventurous! -
½ cup mayonnaise
For creaminess and richness; you can use Greek yogurt for a lighter, healthier twist without sacrificing taste. -
2 tablespoons red wine vinegar
This adds a tangy kick! Lemon juice is a great alternative if you want something a bit fresher. -
1 teaspoon garlic powder
A must for that extra flavor punch—fresh minced garlic works beautifully, too, if you want something more robust. -
1 teaspoon Italian seasoning
This blends all the flavors together. You can swap it out for any dried herbs you prefer, such as oregano or thyme. -
½ teaspoon salt
To enjoy the full flavor of your ingredients—always taste as you go! -
½ teaspoon black pepper
A basic seasoning that makes all the difference. Spice it up with red pepper flakes if you like a bit of heat!
Cooking Up a Storm: Step-by-Step Instructions
Step 1: Boil Your Pasta
Start by bringing a large pot of salted water to a boil. Add in your red, blue, and rotini pasta. Cook according to package instructions until al dente, usually around 8-10 minutes. Remember to stir occasionally to prevent sticking! A little tip: rinse the pasta in cold water after draining to stop the cooking process and cool it down for the salad.
Step 2: Prepare the Dressing
While the pasta is cooking, whisk together the Italian dressing, mayonnaise, red wine vinegar, garlic powder, Italian seasoning, salt, and black pepper in a large bowl. (Trust me, this dressing is where the magic happens!) Make sure to taste and adjust any flavors according to your preference. If you like it tangier, add more vinegar; for creaminess, throw in more mayo.
Step 3: Chop the Veggies
While waiting for the pasta, go ahead and halve the cherry tomatoes, chop the fresh basil, and parsley. Aim for sizes they’ll mix well with the pasta but not too small that they lose their identity—nobody wants mush in their salad!
Step 4: Combine Ingredients
Once the pasta is cooked and cooled, add it to the bowl with your dressing. Toss gently to coat. Then, add in the mozzarella pearls, cherry tomatoes, basil, and parsley. Mix everything nicely until everything is just combined.
Step 5: Chill and Serve
For the best flavor, cover the salad and let it chill in the fridge for at least 30 minutes before serving. This allows the flavors to meld beautifully, making every bite incredibly tasty! When ready to serve, give it a quick stir and adjust seasoning if needed.
Serving Suggestions
When it’s time to dig in, presentation is key! You can serve the pasta salad in a big, colorful bowl, garnished with extra basil leaves for that pop of green. Pair it with some grilled chicken or shrimp for a protein boost and a light drizzle of olive oil. For a fun twist, serve it in mason jars for individual portions—great for picnics!
Recipe Variations
Want to switch things up? Here are a few fun variations to experiment with:
- Add Protein: Toss in some cooked chicken, shrimp, or chickpeas for a more filling meal.
- Switch the Cheese: Try feta or goat cheese instead of mozzarella for a tangy flavor.
- Spice It Up: Add chopped jalapeños or a dash of hot sauce to give it a kick!
- Go Green: Mix in some spinach or arugula for added nutrients and color.
- Noodle-Free Option: Use zucchini noodles for a gluten-free, veggie-packed version.
Chef’s Notes
This pasta salad has really evolved over the years for me. What started as a simple family recipe quickly turned into an adventurous canvas! I’ve played with flavorings, tried various veggies, and even switched up the dressings. But the heart of this dish—color, freshness, and joy—remains the same. And I love how interactive it is; grab a friend or family member, and let’s whip this up together! Cooking is about the journey as much as it is the destination.
FAQs and Troubleshooting
1. Can I make this salad ahead of time?
Absolutely! This salad tastes even better the next day as it really allows the flavors to meld together. Just keep it covered in the fridge, and it should last 3-5 days.
2. What if the dressing is too thick?
If your dressing ends up too thick, simply whisk in a tablespoon or two of water or extra olive oil until you reach your desired consistency.
3. How can I keep my pasta from sticking together?
Make sure to rinse your pasta in cold water after cooking! This not only stops the cooking process but also reduces stickiness, giving you lovely, separate pasta spirals.
4. Can I use different types of pasta?
Absolutely! Feel free to mix and match your favorite pasta shapes—just make sure they cook evenly so everything blends beautifully!
Nutritional Info (Optional)
- Calories: Approximately 410 per serving (for a serving size of 1 cup)
- Protein: 12g
- Fat: 22g
- Carbohydrates: 40g
- Fiber: 2g
And there you have it—a colorful, delicious Red, White, and Blue Pasta Salad that is sure to impress your family and friends! Remember, the kitchen is a playground—have fun with your food and don’t be afraid to get creative. If you try this recipe, I’d love to hear how it turned out for you. Happy cooking, and enjoy every bite!
PrintRed, White, and Blue Pasta Salad
A vibrant pasta salad celebrating summer with colorful ingredients and a tangy dressing, perfect for picnics and barbecues.
- Prep Time: 15 minutes
- Cook Time: 10 minutes
- Total Time: 45 minutes
- Yield: 8 servings 1x
- Category: Salad
- Method: Mixing
- Cuisine: American
- Diet: Vegetarian
Ingredients
- 1 pound red pasta spirals
- 1 pound blue pasta spirals
- 1 pound plain rotini pasta
- 16 ounces mozzarella pearls
- 1 cup cherry tomatoes, halved
- ½ cup fresh basil leaves
- ¼ cup chopped parsley
- 1 cup Italian dressing
- ½ cup mayonnaise
- 2 tablespoons red wine vinegar
- 1 teaspoon garlic powder
- 1 teaspoon Italian seasoning
- ½ teaspoon salt
- ½ teaspoon black pepper
Instructions
- Boil your pasta by bringing a large pot of salted water to a boil. Add the red, blue, and rotini pasta. Cook until al dente, about 8-10 minutes. Rinse in cold water after draining.
- Prepare the dressing by whisking together the Italian dressing, mayonnaise, red wine vinegar, garlic powder, Italian seasoning, salt, and black pepper in a large bowl.
- Chop the cherry tomatoes, basil, and parsley while the pasta is cooking.
- Combine the cooked pasta with the dressing and toss gently to coat. Add mozzarella, cherry tomatoes, basil, and parsley, mixing until combined.
- Chill the salad in the fridge for at least 30 minutes before serving.
Notes
This salad improves in flavor the next day. Keep it covered in the fridge, and it should last 3-5 days.
Nutrition
- Serving Size: 1 serving
- Calories: 410
- Sugar: 3g
- Sodium: 600mg
- Fat: 22g
- Saturated Fat: 4g
- Unsaturated Fat: 14g
- Trans Fat: 0g
- Carbohydrates: 40g
- Fiber: 2g
- Protein: 12g
- Cholesterol: 15mg
Keywords: pasta salad, summer recipes, picnic food, vibrant colors, easy recipes