Cleanplate Cravings

Cleanplate Cravings

May 31, 2026 |

Blueberry Cream Cheese Bread

Delicious slice of blueberry cream cheese bread with fresh blueberries on top

Blueberry Cream Cheese Bread: A Slice of Heaven

Welcome back to Clean Plate Cravings, friends! Today, I’m excited to share with you a recipe that’s as delightful as a lazy Sunday morning and as comforting as a warm hug from grandma: Blueberry Cream Cheese Bread. This recipe is not just any ordinary bread; it’s a luscious treat that’s bursting with juicy blueberries and creamy goodness that you just won’t be able to resist.

When I first encountered blueberry bread, I was at a quaint little café nestled on the edge of town, where the scent of freshly baked goods danced around me and drew me in like a moth to a flame. There was something about the contrast between the sweet, slightly tangy blueberries and the rich cream cheese that intrigued me. I took a bite, and let me tell you, it was an explosion of flavor that made my taste buds do the happy dance!

Blueberry Cream Cheese Bread is the perfect fusion of wholesome ingredients and indulgent flavors. Whether you enjoy it for breakfast with a hot cup of coffee, as an afternoon snack with tea, or simply as a sweet treat any time of day, this bread stands out in all the right ways. And the best part? It’s so easy to whip up that you may just find yourself making it every week!

Are you ready to dive in? Let’s bake something fun together!

A Slice of Nostalgia

Before we get into the nitty-gritty of the recipe, let me take you back down memory lane. Growing up, Saturdays were sacred in my household. My mom had this delightful ritual of baking while the rest of us would still be nestled under our warm blankets. The sweet and comforting aroma of baked goods would waft through the air, drawing us into the kitchen for what felt like magic in the making.

One particular morning, my mom decided to try her hand at blueberry cream cheese bread. I remember the excitement as the bright blue gems popped against the creamy batter, and my brothers and I were on “blueberry watch,” ensuring every single berry made it into the bowl. As the bread baked, we could hardly contain our anticipation; the delightful smell was too much to bear!

When the timer finally rang, we couldn’t wait to dig into the warm, golden loaf. Each slice was thick and luscious, with that gorgeous cream cheese blended throughout, and the tart blueberries balanced out the sweetness perfectly. We spread butter on top—because why not? It was pure bliss. From that day onward, blueberry cream cheese bread became a staple in our home, one I still cherish deeply.

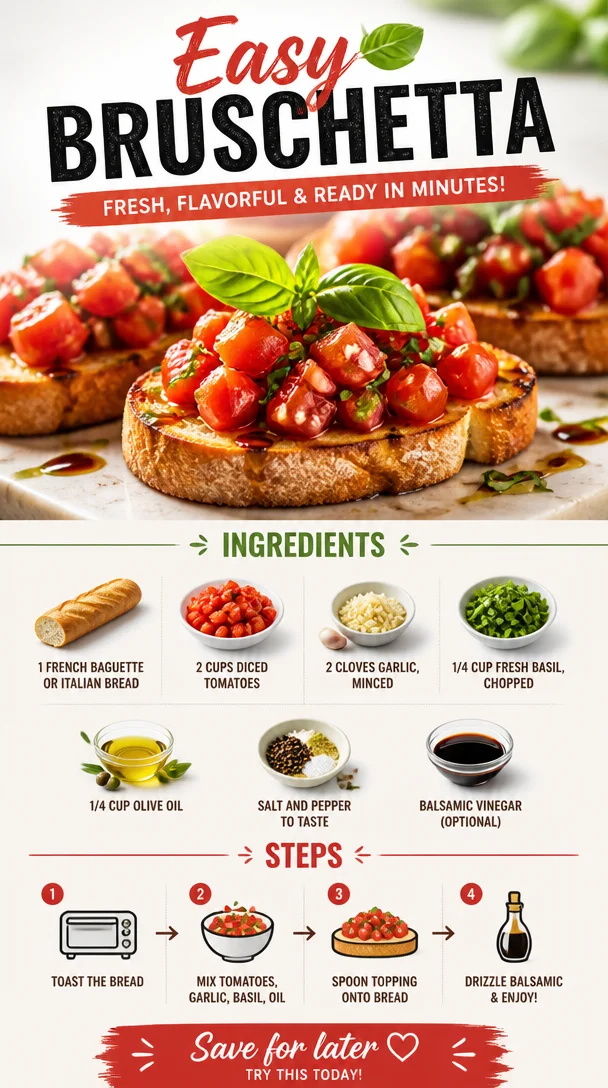
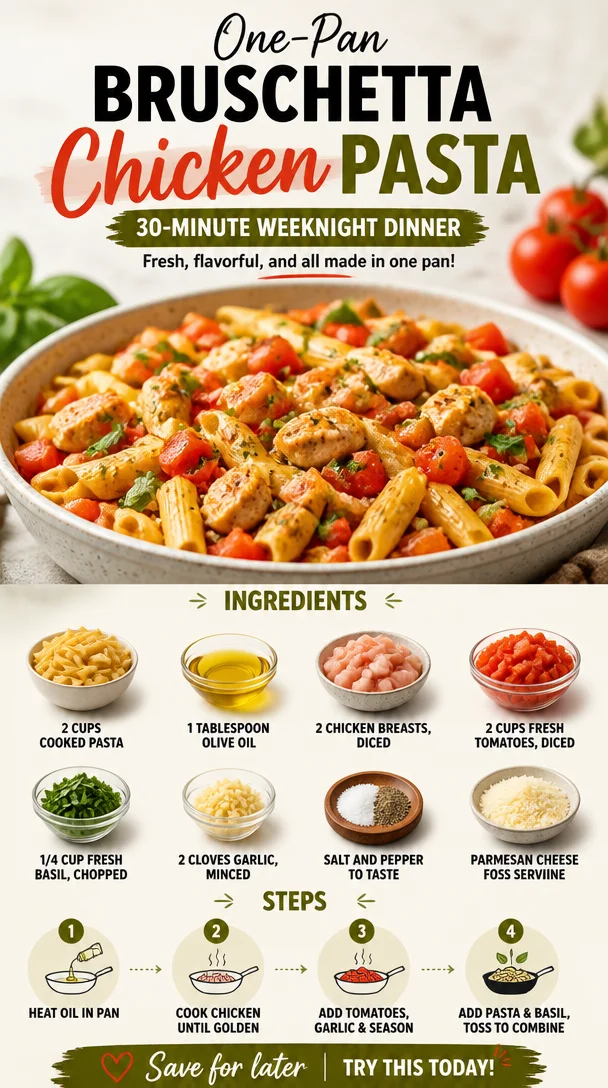
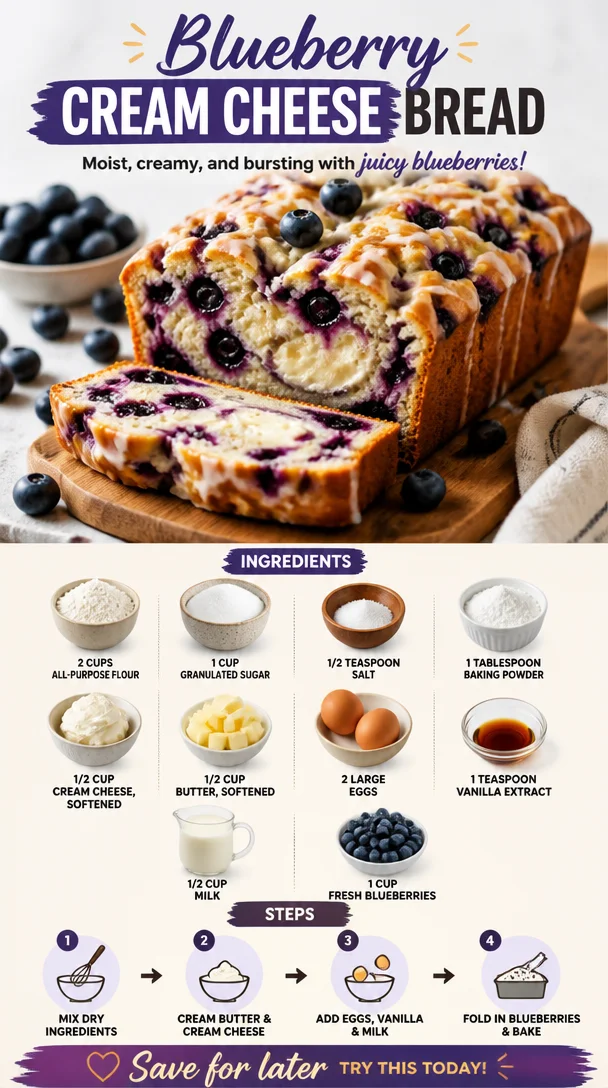
Ingredients You’ll Need

Let’s gather everything you need to whip up this delicious Blueberry Cream Cheese Bread. Here’s what we’re working with:

  • 2 cups all-purpose flour
    A classic choice for baking, all-purpose flour gives the bread its structure. For a healthier twist, try using whole wheat flour—just be sure to adjust the liquid slightly as it can absorb more.

  • 1 cup granulated sugar
    This sugar adds sweetness but can also be swapped for coconut sugar for a more caramel undertone, or you might use a sugar substitute if you’re aiming for lower calories.

  • 1/2 teaspoon salt
    A pinch of salt enhances all flavors, balancing out the sweetness of the blueberries and sugar.

  • 1 tablespoon baking powder
    The star here, baking powder ensures our bread rises to fluffy perfection. If you’re out, you can substitute with 1/2 teaspoon of baking soda combined with 1 teaspoon of lemon juice.

  • 1/2 cup cream cheese, softened
    This ingredient brings a creamy tang to the bread. If you’re looking for a dairy-free option, you could try vegan cream cheese.

  • 1/2 cup butter, softened
    A must for flavor and moisture! If you prefer, melted coconut oil or applesauce can work—a fun way to change the taste!

  • 2 large eggs
    The binding agents here provide structure and moisture. For a vegan alternative, consider using flax eggs (1 tablespoon flaxseed meal with 3 tablespoons water for each egg).

  • 1 teaspoon vanilla extract
    Always use pure vanilla for the best flavor; it’s a game changer! In a pinch, you can use almond extract for a different twist.

  • 1/2 cup milk
    The milk adds moistness; non-dairy milk (like almond or oat) are fantastic swaps if you’re avoiding dairy.

  • 1 cup fresh blueberries
    The star of the show! Fresh blueberries bring sweetness and a burst of flavor. If out of season, feel free to use frozen ones; just don’t thaw them beforehand to keep your batter from getting too colorful.

Step-by-Step Instructions

Now, let’s get down to the fun part—actually making this delicious bread! Follow these step-by-step instructions for a baking experience filled with love and flavor:

  1. Preheat Your Oven:
    Preheat your oven to 350°F (175°C). This initial step is crucial because a properly heated oven leads to perfect baking. Meanwhile, prepare your loaf pan by greasing it well or lining it with parchment paper.

  2. Mix Dry Ingredients:
    In a large mixing bowl, whisk together the all-purpose flour, baking powder, and salt. Make sure they’re well combined—this ensures even baking. Pro-tip: sift the flour for a lighter texture if you want to be super fancy!

  3. Cream the Butter and Sugar:
    In another bowl, combine the softened butter and granulated sugar. Using a hand mixer or a stand mixer, beat them together until the mixture is light and fluffy (about 2-3 minutes). This process incorporates air and makes for a soft bread.

  4. Add the Cream Cheese:
    Next, add the softened cream cheese to the sugar mixture and blend until smooth. Don’t skip this step—cream cheese is what makes this bread decadent!

  5. Incorporate Eggs and Vanilla:
    Crack in those eggs one at a time, mixing well after each addition. Pour in the vanilla extract and mix until everything is combined. This batter should be creamy and luscious!

  6. Add Dry Ingredients & Milk:
    Gradually add the dry ingredients to the creamy mixture, alternating with the milk. Start and end with the flour mixture to keep the batter fluffy. Mix until just combined; be careful not to over-mix!

  7. Gently Fold in Blueberries:
    Using a spatula, gently fold in the fresh blueberries. You want to distribute them evenly without crushing them. Remember, we want those vibrant blue bursts throughout!

  8. Transfer to Loaf Pan:
    Pour the batter into your prepared loaf pan and smooth the top with the spatula. Give it a gentle shake to settle it in.

  9. Bake:
    Bake in the preheated oven for 50-60 minutes or until a toothpick inserted in the center comes out clean. Your kitchen will smell simply amazing during this time. Keep an eye on it; ovens can vary!

  10. Cool and Enjoy!
    Once baked, let it sit in the pan for about 10 minutes before transferring it to a wire rack to cool completely. Slicing it while warm is tempting, but allowing it to cool makes for cleaner slices and better flavor development.

Serving Suggestions

Slice your Blueberry Cream Cheese Bread and serve it warm or at room temperature. It’s incredible on its own, but feel free to dress it up! A light dusting of powdered sugar or a smear of butter adds a touch of luxury. Pair it with a hot cup of coffee or a refreshing herbal tea for a delightful breakfast or snack that you’re going to crave again and again!

Recipe Variations

Here are a few fun twists on the classic Blueberry Cream Cheese Bread that I think you’ll love:

  • Lemon Blueberry Bread: Add the zest of one lemon to the batter for a bright, fresh flavor that complements the blueberries beautifully!

  • Nutty Banana Bread: Incorporate 1 ripe mashed banana into the batter for added moisture and natural sweetness, along with some chopped walnuts for crunch.

  • Spiced Bread: Add 1 teaspoon of cinnamon or nutmeg, or even a pinch of cardamom for a warm, spiced note that makes every bite feel like a cozy hug.

  • Coconut Cream Cheese Bread: Substitute shredded coconut in the batter and on top before baking for wonderful texture and flavor.

Chef’s Notes

I can’t tell you how many times I’ve experimented with this recipe! Each batch brings its own surprises, from slightly overbaked corners to those glorious moments when every slice is perfect. It’s all about experimentation and finding what you love best. One time, I forgot to add the eggs and ended up with a dense, pudding-like treat that’s now my secret guilty pleasure! It was so different but still pined for, and it led to a new family recipe that we now call “Blueberry Pudding Bread”! Remember, kitchen “mistakes” are sometimes the best ways to create something exciting.

FAQs and Troubleshooting

Q1: My bread didn’t rise! What happened?

Answer: This could be due to expired baking powder. Always check the freshness of your leavening agents before baking. A good tip is to add a little vinegar to it; if it bubbles, it’s still good!

Q2: Why is my bread too dense?

Answer: Overmixing your batter can lead to dense bread. Ensure you’re mixing just until combined, and that your ingredients are at room temperature for the best results.

Q3: Can I freeze this bread?

Answer: Absolutely! Once fully cooled, wrap it tightly in plastic wrap and then in foil, or store it in a freezer-safe bag. It should keep well for up to 3 months. Just defrost overnight in the fridge before enjoying!

Q4: Can I use frozen blueberries?

Answer: Yes! Just remember not to thaw them beforehand; adding them frozen will help prevent them from bleeding into the batter and turning it blue.

Nutritional Info

For those curious about the health aspects, here’s a rough estimation per slice (based on a standard loaf cut into 12 slices):

  • Calories: 190
  • Protein: 3g
  • Fat: 8g
  • Carbohydrates: 28g
  • Fiber: 1g
  • Sugar: 9g

Of course, these numbers can vary based on your ingredient choices, but it gives you a general idea of what you’re working with!


Thank you for joining me on this blueberry-filled adventure! I hope you give this Blueberry Cream Cheese Bread a try and experience the nostalgia and deliciousness I hold dear to my heart. Share your creations, stories, and any variations you come up with—let’s keep this vibrant community growing. Until next time, happy baking! 🍞💙

Print

Blueberry Cream Cheese Bread

A delightful bread bursting with juicy blueberries and creamy goodness, perfect for breakfast or as a sweet treat.

  • Prep Time: 15 minutes
  • Cook Time: 60 minutes
  • Total Time: 75 minutes
  • Yield: 12 slices 1x
  • Category: Bread
  • Method: Baking
  • Cuisine: American
  • Diet: Vegetarian

Ingredients

Scale
  • 2 cups all-purpose flour
  • 1 cup granulated sugar
  • 1/2 teaspoon salt
  • 1 tablespoon baking powder
  • 1/2 cup cream cheese, softened
  • 1/2 cup butter, softened
  • 2 large eggs
  • 1 teaspoon vanilla extract
  • 1/2 cup milk
  • 1 cup fresh blueberries

Instructions

  1. Preheat your oven to 350°F (175°C) and prepare your loaf pan.
  2. Mix the all-purpose flour, baking powder, and salt in a large mixing bowl.
  3. Cream the softened butter and granulated sugar until light and fluffy.
  4. Add the softened cream cheese to the sugar mixture and blend until smooth.
  5. Incorporate the eggs one at a time, mixing well after each addition, and then add the vanilla extract.
  6. Add the dry ingredients gradually to the creamy mixture, alternating with the milk.
  7. Gently fold in the fresh blueberries.
  8. Transfer the batter to your prepared loaf pan and smooth the top.
  9. Bake for 50-60 minutes or until a toothpick inserted in the center comes out clean.
  10. Cool the bread in the pan for about 10 minutes, then transfer to a wire rack to cool completely.

Notes

Try variations like adding lemon zest or nuts for a twist on the classic recipe.

Nutrition

  • Serving Size: 1 slice
  • Calories: 190
  • Sugar: 9g
  • Sodium: 200mg
  • Fat: 8g
  • Saturated Fat: 5g
  • Unsaturated Fat: 2g
  • Trans Fat: 0g
  • Carbohydrates: 28g
  • Fiber: 1g
  • Protein: 3g
  • Cholesterol: 35mg

Keywords: blueberry bread, cream cheese bread, breakfast recipe

Did you make this recipe?

Share a photo and tag us — we can't wait to see what you've made!

May 31, 2026 |

Minute Blueberry Muffins for Busy Weekday Mornings

Freshly baked minute blueberry muffins for quick weekday breakfasts

The Best Blueberry Muffins: A Sweet Journey

Welcome to my cozy kitchen, where the air is always fragrant with the wonderful scent of baked goodies. If there’s one thing that brings joy and comfort like nothing else, it’s the irresistible aroma of freshly baked blueberry muffins wafting through the house. These muffins are not just a breakfast staple; they are a warm hug in the form of baked goods. Throughout the years, they’ve become a beloved treat for family gatherings, lazy Sunday mornings, and even surprise brunches. Today, I’m thrilled to share my foolproof recipe for the best blueberry muffins that are guaranteed to make your taste buds sing!

You might be wondering, what makes these blueberry muffins so special? Well, not only are they fluffy, moist, and bursting with juicy berries, but they also come together quickly and easily—perfect for those busy mornings or impromptu baking sessions. Oh, and did I mention they’re endlessly customizable? You could keep the classic vibe with just blueberries or mix it up with spices and zests. Whatever you choose, you’re in for a treat!

Now, let’s dive into this delicious journey and whip up a batch of blueberry bliss. But before we start mixing, allow me to share a little personal story about my love for these muffins.

A Trip Down Memory Lane

Growing up, my weekends were often filled with the comforting ritual of baking with my grandmother, a true kitchen queen. One of my fondest memories was the day we decided to whip up blueberry muffins from scratch because we had just come back from a berry-picking adventure. We had buckets overflowing with fresh, succulent blueberries, and she thought, “Why not turn these into something delicious?”

With flour dusting the countertops and berry juice streaked across our aprons, we mixed, poured, and baked—but not without her many anecdotes about the “secret ingredient” in her famous muffins: love. I remember that day vividly; the muffins rose beautifully in the oven, and when they finally cooled enough to taste, we couldn’t wait. As we sunk our teeth into the warm, fluffy treasures, the blend of sweetness and tartness exploded in my mouth—it was pure heaven.

Ever since that day, blueberry muffins have held a special place in my heart. They remind me of family, creativity, and the simple joy of baking together. Today, I’m excited to share that joy with you because I believe everyone should experience the magic of these delightful muffins!

Ingredients

Let’s gather our ingredients, shall we? Here’s what you’ll need to bake these scrumptious blueberry muffins:

  • 2 cups all-purpose flour: The foundation of our muffins. For a lighter muffin, you could swap in half of the all-purpose flour for whole wheat flour, or even a gluten-free blend if you’re accommodating dietary restrictions.

  • 1 cup sugar: This adds sweetness but can easily be adjusted to your taste. Feel free to cut it down to ¾ cup for a less sweet muffin or use coconut sugar for a more wholesome option.

  • 1 tablespoon baking powder: Our trusty leavening agent. Be sure it’s fresh for maximum rise; an easy way to check is to drop a bit in warm water and see if it bubbles.

  • ½ teaspoon salt: Balances the sweetness and enhances flavor. If you’re watching your sodium intake, you can reduce it to ¼ teaspoon without losing too much flavor.

  • ½ cup unsalted butter, melted: Adds richness and moisture. You can substitute with coconut oil for a dairy-free version, or applesauce for a lighter option!

  • 1 cup milk: Provides moisture. You can easily switch to almond milk, oat milk, or any other non-dairy milk if you’re vegan or lactose intolerant.

  • 2 large eggs: Helps bind everything together. If you’re looking for a vegan option, you can replace each egg with ¼ cup of unsweetened applesauce or 1 tablespoon of ground flaxseed mixed with 2.5 tablespoons of water (let it sit for a few minutes to thicken).

  • 1 teaspoon vanilla extract: For an aromatic twist. Feel free to experiment with almond extract or even a bit of citrus zest for an added pop of flavor!

  • 1 cup fresh blueberries: The stars of the show! While fresh is best, you can use frozen blueberries if that’s what you have on hand. Just make sure to toss them in a little flour to prevent them from sinking.

  • Optional: coarse sugar for topping: For that bakery-style finish. If you’re feeling extra fancy, a sprinkle of cinnamon alongside the coarse sugar can be delightful!

By keeping these ingredients handy, you’re well on your way to muffin heaven!

Step-by-Step Instructions

Alright, let’s get to the fun part: baking! Follow these step-by-step instructions, and you’ll have a batch of warm blueberry muffins ready in no time.

  1. Preheat your oven: First things first, preheat your oven to 375°F (190°C). This ensures a perfect bake from the start. Don’t forget to line your muffin tin with paper liners or grease them if you prefer a more rustic, crumbly muffin.

  2. Mix the dry ingredients: In a large mixing bowl, whisk together the flour, sugar, baking powder, and salt. Make sure there are no lumps in the flour. This is crucial for the proper rise and fluffy texture of your muffins.

  3. Combine the wet ingredients: In another bowl, whisk the melted butter, milk, eggs, and vanilla extract until everything is blended nicely. Just as my grandma used to say, the secret to moist muffins is combining wet and dry ingredients well but not overmixing.

  4. Combine wet and dry: Pour the wet ingredients into the dry ingredients. With a rubber spatula, gently fold them together until just combined. It’s okay if there are a few lumps! Overmixing can lead to dense muffins, and we want fluffy goodness.

  5. Add the blueberries: Carefully fold in the blueberries until evenly distributed. Pro tip: You can toss them lightly in flour before this step. It helps them stay suspended in the batter rather than sinking to the bottom!

  6. Fill the muffin tins: Scoop the batter into the prepared muffin tins, filling each cup about two-thirds full. This allows room for rising without overflowing. For that bakery-touch, sprinkle a bit of coarse sugar on top of each muffin.

  7. Bake: Place your muffin tin in the preheated oven and bake for 18-22 minutes or until a toothpick inserted in the center comes out clean. You might experience the heavenly aroma wafting through your house during this time—it’s absolutely worth the wait!

  8. Cool and enjoy: Once baked, remove the muffins from the oven and allow them to cool in the tin for a few minutes. Transfer them to a wire rack to cool completely or dive in while they’re still warm, like I usually do!

Serving Suggestions

Now that your muffins are beautifully golden and fragrant, how do you serve them? They’re delightful on their own, fresh out of the oven, or spread with a touch of butter or cream cheese for some extra indulgence. These muffins shine at breakfast but can also be enjoyed as a delicious snack or dessert. Pair them with a hot cup of coffee or a glass of cold milk, and you’ve got an exquisite treat that works any time of the day!

Recipe Variations

The beauty of blueberry muffins lies in their adaptability! Here are a few creative twists you can consider:

  • Lemon Blueberry Muffins: Add the zest of one lemon and a tablespoon of lemon juice to the batter for a refreshing zing.

  • Nutty Muffins: Mix in chopped walnuts or pecans for added crunch and nutrition. They pair wonderfully with the blueberries!

  • Double Berry Swirl: Combine blueberries with raspberries or strawberries for a mixed berry surprise. Just adjust the amount to balance the flavors.

  • Chocolate Chip Blueberry Muffins: Because chocolate makes everything better! Fold in a half cup of chocolate chips along with the blueberries for a decadent touch.

  • Vegan Blueberry Muffins: Simply substitute the eggs and milk with plant-based options, and you’ve got a delightful vegan version that everyone will love!

Chef’s Notes

These blueberry muffins have traveled with me through various stages of life—from that cherished kitchen with my grandmother to my cozy apartment filled with the sound of excited friends and family as they devour them. Over time, I’ve tweaked the recipe a bit, sometimes experimenting with different fillings or spices. What remains constant is the joyous reaction they evoke in everyone who tastes them.

You may even find me making these muffins with my little ones, creating new memories just as my grandmother did with me. And it never fails—there’s always flour on their cheeks and grins on their faces!

FAQs and Troubleshooting

Q: Why are my muffins dense?
A: Dense muffins usually result from overmixing your batter or not adding enough leavening agent. Ensure you mix until just combined and check that your baking powder is fresh!

Q: How do I prevent my blueberries from sinking to the bottom?
A: Tossing the berries in a little flour before adding them to the batter helps. This creates a barrier that keeps them suspended in the muffin while baking.

Q: Can I make these muffins ahead of time?
A: Absolutely! These muffins store well in an airtight container at room temperature for up to three days. You can also freeze them for up to three months. Simply reheat in the oven or microwave when you’re ready to enjoy!

Q: How can I ensure my muffins are perfectly baked?
A: Stick a toothpick in the center of a muffin; if it comes out clean or with just a few crumbs, they’re done! Avoid opening the oven door too often, as that can cause temperature fluctuations.

Nutritional Info

While exact nutritional values can vary based on your ingredient choices and portion sizes, here’s a rough estimate per muffin (assuming 12 muffins):

  • Calories: 200
  • Protein: 3g
  • Carbohydrates: 28g
  • Fat: 9g

Note: Adjust ingredients for a healthier option, like substituting less sugar or butter, to lighten up your muffins without sacrificing flavor!

Now it’s time for you to grab those ingredients and start baking! I can’t wait to hear how your blueberry muffins turn out. Happy baking!

Print

The Best Blueberry Muffins

Fluffy, moist blueberry muffins bursting with juicy berries, perfect for breakfast or a snack.

  • Prep Time: 15 minutes
  • Cook Time: 22 minutes
  • Total Time: 37 minutes
  • Yield: 12 servings 1x
  • Category: Breakfast
  • Method: Baking
  • Cuisine: American
  • Diet: Vegetarian

Ingredients

Scale
  • 2 cups all-purpose flour
  • 1 cup sugar
  • 1 tablespoon baking powder
  • ½ teaspoon salt
  • ½ cup unsalted butter, melted
  • 1 cup milk
  • 2 large eggs
  • 1 teaspoon vanilla extract
  • 1 cup fresh blueberries
  • Optional: coarse sugar for topping

Instructions

  1. Preheat your oven to 375°F (190°C) and line muffin tin with paper liners.
  2. Mix the dry ingredients: In a bowl, whisk together flour, sugar, baking powder, and salt.
  3. Combine the wet ingredients: In another bowl, whisk melted butter, milk, eggs, and vanilla extract.
  4. Combine the wet and dry ingredients until just combined.
  5. Add the blueberries and fold them in gently.
  6. Fill the muffin tins about two-thirds full and sprinkle with coarse sugar if desired.
  7. Bake for 18-22 minutes or until a toothpick comes out clean.
  8. Cool the muffins for a few minutes before transferring to a wire rack.

Notes

These muffins can be customized with spices, zests, or other berries.

Nutrition

  • Serving Size: 1 muffin
  • Calories: 200
  • Sugar: 10g
  • Sodium: 180mg
  • Fat: 9g
  • Saturated Fat: 5g
  • Unsaturated Fat: 4g
  • Trans Fat: 0g
  • Carbohydrates: 28g
  • Fiber: 1g
  • Protein: 3g
  • Cholesterol: 40mg

Keywords: blueberry muffins, breakfast, baked goods

Did you make this recipe?

Share a photo and tag us — we can't wait to see what you've made!

May 31, 2026 |

Minute Honey Lime Chicken with Mango Salsa Recipe

Delicious plate of Honey Lime Chicken served with fresh Mango Salsa

Honey Lime Chicken with Mango Salsa: A Flavorful Escape to the Tropics

Welcome back, my foodie friends! Today, we’re diving into the vibrant and tangy world of Honey Lime Chicken with a refreshing Mango Salsa. Imagine the sun shining, the sound of waves crashing in the distance, and the sweet scent of tropical fruits woven together with the savory notes of perfectly grilled chicken. Whether you’re cooking for family, friends, or just treating yourself to a scrumptious meal, this dish is bound to be a hit.

Eating is not just about fueling our bodies—it’s also about creating memories, sharing experiences, and enjoying the moment. In this post, we’ll guide you through a journey of flavors, nostalgia, and a few chef secrets that will make you feel like a kitchen rockstar. So grab your apron, and let’s get cooking!

A Memory to Savor

Growing up, summer evenings meant gathering around the grill with family and friends. My parents would fire up the barbecue, and the aroma of marinated meats would fill the air. One dish that stood out was a simple honey lime chicken, marinated to perfection and served with a side of vibrant salsa. I remember sneaking bites of juicy mango while my mom prepared the salsa, giggling as my little brother tried to steal the last piece of grilled chicken from my plate.

It was more than just a meal; it was about laughter, warmth, and connection. As each bite filled my senses with flavor, I realized that food has a beautiful way of bringing people together. This Honey Lime Chicken with Mango Salsa echoes those cherished moments, inviting you to create your own delicious memories around the dinner table.

Ingredients

Here’s what you’ll need to create this culinary masterpiece:

  • 2 large boneless, skinless chicken breasts (or 4 small): Choose free-range or organic chicken for the best flavor. If you’re vegan, try using tofu or portobello mushrooms as a hearty substitute.

  • 2 tablespoons honey: This natural sweetener adds a wonderful caramelization when grilled. You can swap it for agave syrup if you’re looking for a vegan alternative.

  • Juice and zest of 2 limes: A must for that zesty punch! Zest adds vibrant flavor—don’t skip it!

  • 2 tablespoons olive oil: This healthy fat helps with cooking and enhances overall flavor. If you’re sensitive to olive oil, feel free to use avocado oil instead.

  • 2 cloves garlic, minced: Fresh garlic brings a touch of warmth to the dish. If you’re in a pinch, garlic powder works too. Use ½ teaspoon instead.

  • 1 teaspoon ground cumin: Adds a lovely earthy flavor. For a different twist, try smoked cumin to enhance the smokiness.

  • ½ teaspoon smoked paprika: This ingredient gives the chicken a subtle smokey flavor along with its beautiful color.

  • ½ teaspoon salt: It elevates all the flavors but adjust according to personal preference.

  • ¼ teaspoon black pepper: Freshly ground adds better flavor. It can be omitted for a milder taste.

  • 1 large ripe mango, diced: This fruit offers a sweet, juicy counterpoint to the savory chicken. Substitute with pineapple for a different tropical flair.

  • ¼ cup red onion, finely chopped: Adds a nice crunch and tang. If you prefer a milder taste, soak the onion in cold water for about 10 minutes before using.

  • 1 small jalapeño, seeded and minced (optional for heat): Add just a little spice if you’re a heat lover! Skip it entirely if you prefer a milder salsa.

  • 2 tablespoons fresh cilantro, chopped: For a refreshing touch. If cilantro isn’t your thing, try fresh parsley or mint.

  • Juice of 1 lime: Enhances flavor in the salsa—always fresh for the best result.

  • Salt and pepper, to taste: Don’t forget to adjust these for the final season.

  • Cooked rice, quinoa, salad greens, or tortillas: These serve as great accompaniments for serving.

  • Lime wedges: Perfect for a zesty squeeze right before enjoying!

Step-by-Step Instructions

  1. Marinate the Chicken: In a mixing bowl, combine the honey, lime juice, lime zest, olive oil, minced garlic, cumin, smoked paprika, salt, and black pepper. Whisk until smooth. Add the chicken and make sure it’s well-coated in the marinade. Cover and let it marinate for at least 30 minutes (or up to 4 hours!) in the refrigerator. Chef Hack: The longer you marinate, the more flavor your chicken will have, but if you’re short on time, even 30 minutes will make a difference!

  2. Prepare the Salsa: While the chicken marinates, let’s whip up that vibrant mango salsa! In a separate bowl, mix the diced mango, red onion, minced jalapeño (if using), chopped cilantro, lime juice, salt, and pepper. Gently fold to combine—be careful not to mash the mango! Tip: Letting the salsa sit for about 10-15 minutes allows the flavors to meld beautifully—don’t rush this step!

  3. Preheat the Grill: Get your grill or grill pan ready by preheating it to medium-high heat. Lightly grease the grill grates to prevent the chicken from sticking.

  4. Cook the Chicken: Remove the chicken from the marinade, letting the excess drip off. Place the chicken on the grill and cook for about 5-7 minutes on each side, or until the internal temperature reaches 165°F and the juices run clear. Fun Tip: Don’t flip the chicken too early! Give it some time to get those beautiful grill marks!

  5. Rest the Chicken: Once cooked, transfer the chicken to a cutting board and let it rest for about 5 minutes before slicing. This resting period keeps the juices sealed inside, ensuring tender, juicy meat!

  6. Plate the Dish: Slice the chicken against the grain into strips. Presentation matter—and who doesn’t love a beautifully plated dish?

Serving Suggestions

For the perfect meal, create a bed of fluffy rice, quinoa, or fresh salad greens. Lay the sliced Honey Lime Chicken on top and generously spoon some mango salsa over it. Garnish with lime wedges for that extra zesty finish! This dish pairs beautifully with some grilled veggies or warm tortillas on the side.

Recipe Variations

  • Tropical Twist: Swap the mango for diced pineapple or papaya for a new tropical flavor.

  • Spicy Sour: Add a bit of diced red chili for an extra kick in the salsa.

  • Vegan Delight: Substitute chicken with marinated tofu or chickpeas for a delightful plant-based version.

  • Herbaceous Infusion: Swap cilantro for fresh basil or mint in the salsa for a twist on freshness!

  • Citrus Burst: Mix other citrus juices like orange or grapefruit into the marinade for a unique flavor profile.

Chef’s Notes

I’ve experimented with this recipe for years, tweaking the ingredients and cooking techniques along the way. One time, I used too much cumin, and while my family was understanding, they joked that it tasted more like spice than food! Since then, I’ve learned that balance is key. Remember, cooking is a bit like life—you’ll have your ups and downs, but those little lessons make the journey worthwhile.

I love how this dish embodies the lively, sunny days of summer and brings a taste of the tropics right to your kitchen.

FAQs and Troubleshooting

What can I pair with this chicken?

You can pair it with rice, quinoa, greens, or even tortilla wraps for a fun twist.

My chicken is too dry. What went wrong?

Overcooking can lead to dry chicken. Make sure you keep an eye on it, and always let it rest before slicing!

Can I make the mango salsa ahead of time?

Absolutely! The salsa tastes even better 24 hours after making it—just give it a good stir before serving.

What if I don’t have a grill?

You can easily bake the chicken in the oven at 400°F for about 20-25 minutes or until cooked through. A skillet on the stove works just as well, giving you those lovely sear marks!

Nutritional Info

While this recipe is packed with flavor, it’s equally good for you! Each serving of Honey Lime Chicken with Mango Salsa contains roughly:

  • Calories: 350
  • Protein: 30g
  • Carbohydrates: 25g
  • Fats: 15g

This equates to a satisfying meal that won’t weigh you down!


Now that you’ve got the scoop on Honey Lime Chicken with Mango Salsa, why not plan a tropical dinner adventure? Whether it’s a casual weeknight meal or a fun gathering with friends, this dish is sure to impress. Remember, cooking is an art. Let your taste buds lead the way, and don’t be afraid to make it your own. Happy cooking, and may your kitchen be filled with laughter and flavor!

Print

Honey Lime Chicken with Mango Salsa

A vibrant and tangy chicken dish marinated in honey and lime, paired with a refreshing mango salsa.

  • Prep Time: 30 minutes
  • Cook Time: 15 minutes
  • Total Time: 45 minutes
  • Yield: 4 servings 1x
  • Category: Main Course
  • Method: Grilling
  • Cuisine: Tropical
  • Diet: Gluten Free, Dairy Free

Ingredients

Scale
  • 2 large boneless, skinless chicken breasts
  • 2 tablespoons honey
  • Juice and zest of 2 limes
  • 2 tablespoons olive oil
  • 2 cloves garlic, minced
  • 1 teaspoon ground cumin
  • ½ teaspoon smoked paprika
  • ½ teaspoon salt
  • ¼ teaspoon black pepper
  • 1 large ripe mango, diced
  • ¼ cup red onion, finely chopped
  • 1 small jalapeño, seeded and minced (optional)
  • 2 tablespoons fresh cilantro, chopped
  • Juice of 1 lime
  • Salt and pepper, to taste
  • Cooked rice, quinoa, salad greens, or tortillas (for serving)
  • Lime wedges (for garnish)

Instructions

  1. Marinate the chicken: In a mixing bowl, combine the honey, lime juice, lime zest, olive oil, minced garlic, cumin, smoked paprika, salt, and black pepper. Whisk until smooth. Add the chicken and make sure it’s well-coated in the marinade. Cover and let it marinate for at least 30 minutes (or up to 4 hours!) in the refrigerator.
  2. Prepare the salsa: In a separate bowl, mix the diced mango, red onion, minced jalapeño (if using), chopped cilantro, lime juice, salt, and pepper. Gently fold to combine.
  3. Preheat the grill: Preheat your grill or grill pan to medium-high heat. Lightly grease the grill grates.
  4. Cook the chicken: Remove the chicken from the marinade and place it on the grill. Cook for about 5-7 minutes on each side or until the internal temperature reaches 165°F.
  5. Rest the chicken: Transfer the chicken to a cutting board and let it rest for about 5 minutes before slicing.
  6. Plate the dish: Slice the chicken against the grain into strips and serve with the mango salsa and garnished with lime wedges.

Notes

For a vegan option, substitute chicken with tofu or portobello mushrooms.

Nutrition

  • Serving Size: 1 serving
  • Calories: 350
  • Sugar: 15g
  • Sodium: 400mg
  • Fat: 12g
  • Saturated Fat: 2g
  • Unsaturated Fat: 9g
  • Trans Fat: 0g
  • Carbohydrates: 25g
  • Fiber: 3g
  • Protein: 30g
  • Cholesterol: 70mg

Keywords: chicken, mango salsa, grilled chicken, tropical recipes, summer recipes

Did you make this recipe?

Share a photo and tag us — we can't wait to see what you've made!

May 31, 2026 |

Mango Tiramisu

Delicious Mango Tiramisu layered dessert with tropical flavors.

Delectable Delight: Discovering Mango Tiramisu

Welcome back to the cozy corner of Clean Plate Cravings, foodies! Today, we’re diving into a delightful twist on a classic dessert: Mango Tiramisu. Yes, you read that right! This vibrant, tropical take on the beloved Italian favorite combines creamy layers of mascarpone with luscious mango pulp, all wrapped together with airy ladyfingers. Let’s be real; who could resist that?

Picture this: the sun is shining, fragrant mangoes are in season, and the idea of a heavy dessert just doesn’t feel right on a sunny day. That’s where Mango Tiramisu comes in—a refreshing and flavorful alternative that’s beautiful enough to impress your dinner guests yet simple enough to whip up on a whim during the week.

The magic of this dessert lies not only in its delicious flavor but also in the nostalgia it evokes. As I prepare this dish, I can’t help but think of summer picnics with friends, where the world seems just a little bit brighter. This dessert is a reminder that food can transport us, evoke emotions, and create memories. So, roll up your sleeves, and let’s make some Mango Tiramisu that’s sure to leave everyone smiling!

A Whiff of Nostalgia

Before we get into the nitty-gritty of the recipe, let me share a little story. Growing up, mango season was like a carnival for my taste buds. Every summer, my grandpa would bring home crates full of ripe mangoes, their sweet perfume filling the air. He’d slice them into perfect wedges, and we would devour them while lounging in the backyard, sticky hands and all.

One day, he suggested we try something different with our beloved mangoes—something a bit more decadent. That’s when we stumbled upon the idea of a layered dessert. We merged our love for traditional tiramisu with those sweet, juicy mangoes, and voila! Our family gatherings turned into mango tiramisu parties, where the laughter and the flavors were equally intoxicating. That culinary adventure sparked my love for fusion desserts, and here I am today, sharing a version with you.

Ingredients

Here’s what you’ll need to create this delightful Mango Tiramisu:

  • 2 cups mango pulp:
    The star of the show! Use fresh, ripe mangoes for the best flavor, or opt for frozen mango puree if they’re out of season. Aim for the sweetest variety you can find—Haden, Kent, or Ataulfo are all great picks!

  • 1 cup mascarpone cheese:
    This creamy Italian cheese provides the luxurious texture we crave in tiramisu. If you’re looking for a lighter option, try ricotta cheese blended with a splash of cream for a similar creaminess without the richness.

  • 1 cup heavy cream:
    It gives our dessert its light and airy lift. If you need to lighten it up, consider using a thick coconut cream instead for a deliciously tropical twist.

  • 1/2 cup sugar:
    A key ingredient to sweeten the mascarpone and lighten the flavors of the mango. You can adjust this depending on the sweetness of your mango puree.

  • 1 teaspoon vanilla extract:
    A splash of vanilla enhances the creaminess and adds a warm depth. Feel free to substitute with almond extract for a unique flavor profile.

  • Ladyfinger cookies:
    These sponge-like cookies are perfect for soaking in our mango mixture. If gluten is a concern, look for gluten-free ladyfingers or try soft sponges cut into fingers.

  • 1/2 cup coconut milk or regular milk:
    This will be used to moisten the ladyfingers before layering. If you want to highlight the coconut flavor, stick with coconut milk; otherwise, regular milk will do just fine!

Step-by-Step Instructions

Now, let’s get into the fun part—the cooking! Follow these steps for a stunning Mango Tiramisu:

  1. Prepare the Mango Puree:
    If you’re using fresh mangoes, peel and chop them, then blend them into a smooth puree. If you’re using frozen mango, let them thaw completely before blending! Taste the puree; you want it sweet with a hint of tartness. Add a drizzle of honey or a squeeze of lime if it’s not quite right!

  2. Whip the Cream:
    In a medium bowl, beat the heavy cream until stiff peaks form. This will add the fluffy element to your tiramisu. Keep an eye on it; over-whipping can lead to butter!

  3. Mix Mascarpone and Sugar:
    In another bowl, beat the mascarpone cheese with the sugar and vanilla extract until smooth and creamy. You want it to be light and airy—don’t overmix here, or it will lose its lovely texture.

  4. Fold in the Whipped Cream:
    Gently fold one-third of the whipped cream into the mascarpone mixture to lighten it up, then fold in the remaining whipped cream until just combined. This is your luxurious filling!

  5. Prepare the Soaking Liquid:
    In a shallow dish, mix the coconut milk (or regular milk) with a couple of tablespoons of the mango puree for added flavor. Dip the ladyfingers quickly into this mixture; you want them moist but not soggy!

  6. Layer the Tiramisu:
    In a rectangular dish, place a layer of soaked ladyfingers at the bottom. Then, spread half of the mascarpone mixture over the ladyfingers, followed by a layer of mango puree. Repeat the layers until you reach the top, finishing with a layer of mascarpone.

  7. Chill the Tiramisu:
    Cover the dish with plastic wrap and let it chill in the refrigerator for at least 4 hours, preferably overnight. This allows the flavors to meld beautifully and the dessert to set properly.

  8. Serve with Style:
    Before serving, add some additional mango puree on top and garnish with fresh mango slices or mint leaves for a pop of color!

Serving Suggestions

When it comes to serving this Mango Tiramisu, less is more. Spoon generous servings onto plates and drizzle some extra mango puree around the edges for a decorative touch. You can even add a dollop of whipped cream or a sprinkle of toasted coconut to elevate the tropical vibe. Pair it with a chilled glass of white wine or tropical soda for a refreshing end to your meal!

Recipe Variations

Want to mix things up a bit? Here are some creative twists and variations to try:

  • Tropical Fruit Tiramisu: Swap out the mango for other tropical fruits like passion fruit or pineapple for a different flavor.
  • Coconut Flavored: Mix a tablespoon of shredded coconut into your mascarpone mixture for an extra coconut kick.
  • Chocolate Mango: Add some cocoa powder or melted dark chocolate between the layers for a chocolatey contrast.
  • Dairy-Free Version: Replace the mascarpone and heavy cream with cashew cream and coconut yogurt for a completely dairy-free dessert.
  • Spiced Up: Add a pinch of cinnamon or nutmeg to the mascarpone mixture for a warm, spicy flavor that complements the sweetness of the mango.

Chef’s Notes

This Mango Tiramisu has been a crowd-pleaser in my household for years. I’ll never forget the first time I served it at a summer barbecue. The reactions were priceless—a mix of surprise and delight as guests dug into this unexpected twist on traditional tiramisu! Over the years, I’ve played around with different flavor profiles, and it never fails to impress.

Don’t be intimidated by the layers; they may seem extra, but they’re what make this dish sing. Plus, it’s a great way to get creative with what you have in your pantry. Who knows? You might just invent your version of this dazzling dessert!

FAQs and Troubleshooting

Q: Can I make the tiramisu a day in advance?
A: Absolutely! In fact, this dessert tastes even better the next day as the flavors meld together, making it a perfect make-ahead option!

Q: What if my ladyfingers are too hard?
A: Ladyfingers should be soft but not soggy. If yours are hard, try dipping them briefly in the soaking liquid for just a second longer, but be careful not to oversoak!

Q: Can I substitute the mascarpone cheese?
A: Yes! If mascarpone is hard to find, you can use cream cheese mixed with some whipped cream for a similar texture and taste.

Q: How can I make it gluten-free?
A: Look for gluten-free ladyfingers, or use soft sponge cakes cut into fingers! They’ll still give you that light texture without the gluten.

And there you have it—a colorful twist on a beloved classic! This Mango Tiramisu is the ultimate summer treat that proves desserts can be light and refreshing without sacrificing flavor. Dive in, make a mess, and love every bite! Happy cooking!

Print

Mango Tiramisu

A refreshing and flavorful twist on the classic Italian dessert, combining creamy layers of mascarpone with luscious mango pulp and airy ladyfingers.

  • Prep Time: 15 minutes
  • Cook Time: 0 minutes
  • Total Time: 240 minutes
  • Yield: 8 servings 1x
  • Category: Dessert
  • Method: No-Bake
  • Cuisine: Italian
  • Diet: Vegetarian

Ingredients

Scale
  • 2 cups mango pulp
  • 1 cup mascarpone cheese
  • 1 cup heavy cream
  • 1/2 cup sugar
  • 1 teaspoon vanilla extract
  • Ladyfinger cookies
  • 1/2 cup coconut milk or regular milk

Instructions

  1. Prepare the Mango Puree: If you’re using fresh mangoes, peel and chop them, then blend them into a smooth puree. If you’re using frozen mango, let them thaw completely before blending! Taste the puree; you want it sweet with a hint of tartness. Add a drizzle of honey or a squeeze of lime if it’s not quite right!
  2. Whip the Cream: In a medium bowl, beat the heavy cream until stiff peaks form. Keep an eye on it; over-whipping can lead to butter!
  3. Mix Mascarpone and Sugar: In another bowl, beat the mascarpone cheese with the sugar and vanilla extract until smooth and creamy. Don’t overmix here, or it will lose its lovely texture.
  4. Fold in the Whipped Cream: Gently fold one-third of the whipped cream into the mascarpone mixture to lighten it up, then fold in the remaining whipped cream until just combined.
  5. Prepare the Soaking Liquid: In a shallow dish, mix the coconut milk (or regular milk) with a couple of tablespoons of the mango puree for added flavor. Dip the ladyfingers quickly into this mixture; you want them moist but not soggy!
  6. Layer the Tiramisu: In a rectangular dish, place a layer of soaked ladyfingers at the bottom. Then, spread half of the mascarpone mixture over the ladyfingers, followed by a layer of mango puree. Repeat the layers until you reach the top, finishing with a layer of mascarpone.
  7. Chill the Tiramisu: Cover the dish with plastic wrap and let it chill in the refrigerator for at least 240 minutes, preferably overnight.
  8. Serve with Style: Before serving, add some additional mango puree on top and garnish with fresh mango slices or mint leaves for a pop of color!

Notes

This dessert tastes even better the next day as the flavors meld together, making it a perfect make-ahead option!

Nutrition

  • Serving Size: 1 serving
  • Calories: 320
  • Sugar: 20g
  • Sodium: 100mg
  • Fat: 22g
  • Saturated Fat: 12g
  • Unsaturated Fat: 8g
  • Trans Fat: 0g
  • Carbohydrates: 30g
  • Fiber: 1g
  • Protein: 4g
  • Cholesterol: 80mg

Keywords: Mango Tiramisu, Tropical Dessert, No-Bake Dessert

Did you make this recipe?

Share a photo and tag us — we can't wait to see what you've made!

May 31, 2026 |

Min Mango Muffins: Fluffy, Easy Recipe for Beginners

Freshly baked mango muffins on a wooden table, perfect for breakfast

The Best Ever Mango Muffin Recipe: A Tropical Delight

Welcome to another exciting culinary adventure here at Clean Plate Cravings! Today, I’m thrilled to share with you my Best Ever Mango Muffin recipe. If you’re anything like me, the scent and taste of ripe tropical mango can instantly transport you to paradise—even if it’s just your kitchen! These muffins are not only bursting with juicy mango goodness but also so easy to whip up. Trust me; they will become a staple in your breakfast routine and an instant hit at brunch gatherings!

A Burst of Sunshine in Every Bite

Picture this: it’s a warm Sunday morning, and you’re seated at the kitchen table, sunlight streaming through the window, casting a golden hue over everything it touches. You take a bite of one of these delightful mango muffins, and suddenly, you’re on a mini-vacation. That’s exactly the magic I want to create with this recipe.

Growing up, my grandmother had a luscious mango tree in her backyard. Some of my fondest memories are of plucking those ripe mangoes, the sweet fragrance filling the air as we dashed back inside, hands sticky with juice, ready to bake together. She had this exceptional way of transforming simple ingredients into the most heavenly treats. The best part? Her recipes, much like mine today, were all about keeping it simple and approachable.

In her honor, I’ve refined this mango muffin recipe to echo those warm, sun-soaked mornings. Light and fluffy with the perfect crumb, these muffins will make your kitchen feel like a tropical haven. Enough reminiscing—let’s dive into making these beauties!

Ingredients

Here’s what you’ll need to bake these delightful mango muffins that scream sunshine:

  • 2 ripe mangoes: Fresh, juicy mangoes at peak ripeness are key for maximum flavor. If you can’t find fresh ones, you can use frozen mango chunks (thaw them first).
  • 1 ½ cups all-purpose flour: The base for our muffins. For a healthier spin, whole wheat flour can be used, just make sure to adjust the moisture as needed.
  • ½ cup granulated sugar: Sweetens our muffins perfectly. You can replace half of it with brown sugar for a caramel undertone, or try coconut sugar for a more natural option.
  • 1 teaspoon baking soda: This is our leavening agent that makes the muffins rise and stay fluffy. Ensure it’s fresh for the best results!
  • ½ teaspoon baking powder: Adds extra lift to the muffins. It’s crucial not to confuse these two!
  • ½ teaspoon salt: Enhances the flavors—don’t skip it!
  • 1 large egg: Binds everything together. You can use a flax egg (1 tablespoon ground flaxseeds mixed with 2.5 tablespoons water) for a vegan option.
  • ½ cup vegetable oil: Keeps the muffins moist and tender. You can also substitute it with melted coconut oil for a tropical twist!
  • ½ cup milk: Use any milk you prefer—almond, soy, or coconut milk works just as well.
  • 1 teaspoon vanilla extract: Adds depth to our muffins—a non-negotiable ingredient!
  • Zest of 1 lime: This brightens the muffin, giving them a zing that pairs wonderfully with the mango. You can also use lemon zest if you prefer.

These ingredients come together seamlessly to create a muffin that not only tastes amazing but is also simple to make.

Step-by-Step Instructions

Alright, foodies! Let’s get our hands a little messy and make these mango muffins step-by-step. It’s going to be super fun, I promise!

  1. Preheat Your Oven: Begin by preheating your oven to 350°F (175°C). This ensures that your muffins bake evenly. While it’s warming up, you can gather the rest of the ingredients.

  2. Prepare Your Muffin Tin: Line a 12-cup muffin tin with paper liners or lightly grease it with cooking spray. This step is essential to prevent those adorable muffins from getting stuck.

  3. Mix Dry Ingredients: In a large bowl, whisk together the flour, sugar, baking soda, baking powder, and salt until everything is well combined. This is a great time to inhale that sweet aroma—baking is all about the senses!

  4. Prep the Mangoes: While your dry ingredients are hanging out together, peel and dice your ripe mangoes. Make sure to reserve a few small chunks for topping the muffins later on.

  5. Combine Wet Ingredients: In another bowl, whisk together the egg, vegetable oil, milk, vanilla extract, and lime zest until smooth. You can feel free to dance a little while mixing—nothing lifts the spirit like a good groove in the kitchen!

  6. Combine Wet and Dry: Pour the wet mixture into the dry ingredients and mix gently until just combined. Be careful not to overmix; we want those muffins light and fluffy!

  7. Fold in Mango: Delicately fold in the diced mango, ensuring they are evenly distributed throughout the batter. And I mean gently here—think of yourself as a graceful ballerina, not a bulldozer!

  8. Fill Muffin Cups: Scoop the batter into the prepared muffin tin, filling each cup about ¾ full. And remember those reserved mango chunks? Place a few on top of each muffin for a burst of color and texture!

  9. Bake: Pop the muffin tin into your preheated oven and bake for 20-25 minutes or until a toothpick inserted in the center comes out clean. While they bake, your kitchen will start to smell incredible!

  10. Cool and Enjoy: Once baked, let the muffins cool in the pan for about 5 minutes before transferring them to a wire rack to cool completely. Try to resist the temptation of diving in right away (I know it’s hard)!

Serving Suggestions

These mango muffins are delicious as-is, but if you want to elevate them even further, try serving them warm with a dollop of whipped cream or a smear of coconut butter. Pair them with a fruit smoothie for a refreshing breakfast or serve them alongside a cup of coffee for the ultimate brunch treat. They also make for a fantastic afternoon snack!

Recipe Variations

To keep your mango muffin game fresh, here are a few variations you can try:

  • Coconut Mango Muffins: Add shredded coconut to the batter for added texture and tropical flavor.
  • Mango Macadamia Nut Muffins: Fold in chopped macadamia nuts for a nutty crunch.
  • Spicy Mango Muffins: Add a pinch of cayenne pepper or ginger for a surprising kick!
  • Chocolate Chip Mango Muffins: Stir in some semi-sweet chocolate chips for those chocoholics out there.
  • Mango Oat Muffins: Replace half of the flour with oats for a heartier muffin.

Chef’s Notes

This mango muffin recipe has evolved over the years from my grandmother’s original version, which was packed with butter and sugar. I’ve swapped in healthier alternatives to make them lighter without sacrificing taste. One time, I experimented by tossing in some leftover quinoa, and while they turned out alright, I think I’ll stick to the classic mango goodness for now!

Each bite of these muffins carries a little piece of my childhood, reminding me of hot summer days and baking alongside my grandma. I’m thrilled to pass this joy on to you!

FAQs and Troubleshooting

  1. My muffins turned out dense. What did I do wrong?

    • Overmixing is a common culprit! Make sure you only mix until the ingredients are combined. A few lumps are completely fine.
  2. Can I use other fruits instead of mango?

    • Absolutely! These muffins are versatile. Try adding blueberries, peaches, or even mashed bananas!
  3. How do I store leftovers?

    • Once cooled, store any uneaten muffins in an airtight container at room temperature for up to 3 days or in the refrigerator for up to a week. You can also freeze them for longer-lasting treats.
  4. What if I don’t have a muffin tin?

    • No muffin tin? No problem! You can use a cupcake tin or even bake the batter in a loaf pan, adjusting the baking time accordingly.

Nutritional Info

(Optional but helpful; consider adding approximate values for serving size, calories, fats, carbohydrates, and protein.)


So there you have it, my Best Ever Mango Muffin recipe! I hope this delectable treat will inspire you to bring a little sunshine into your kitchen. Remember, cooking should be fun, relaxing, and filled with love. Stay adventurous, keep experimenting, and share your delicious results with family and friends. Happy baking!

Print

Best Ever Mango Muffin

Light and fluffy mango muffins that bring a burst of tropical flavor to your breakfast or brunch gatherings.

  • Prep Time: 15 minutes
  • Cook Time: 25 minutes
  • Total Time: 40 minutes
  • Yield: 12 muffins 1x
  • Category: Breakfast
  • Method: Baking
  • Cuisine: Tropical
  • Diet: Vegetarian

Ingredients

Scale
  • 2 ripe mangoes
  • 1 ½ cups all-purpose flour
  • ½ cup granulated sugar
  • 1 teaspoon baking soda
  • ½ teaspoon baking powder
  • ½ teaspoon salt
  • 1 large egg
  • ½ cup vegetable oil
  • ½ cup milk
  • 1 teaspoon vanilla extract
  • Zest of 1 lime

Instructions

  1. Preheat your oven to 350°F (175°C).
  2. Prepare your muffin tin with liners or grease it to prevent sticking.
  3. Mix dry ingredients in a large bowl until combined.
  4. Prep the mangoes by peeling and dicing them, reserving some for topping.
  5. Combine wet ingredients in another bowl and whisk until smooth.
  6. Pour the wet mixture into the dry ingredients and mix gently.
  7. Fold in the diced mango, being careful not to overmix.
  8. Fill each muffin cup about ¾ full and top with reserved mango pieces.
  9. Bake for 20-25 minutes or until a toothpick comes out clean.
  10. Cool in the pan for 5 minutes before transferring to a wire rack.

Notes

These muffins can be served warm with whipped cream or coconut butter.

Nutrition

  • Serving Size: 1 muffin
  • Calories: 180
  • Sugar: 9g
  • Sodium: 250mg
  • Fat: 7g
  • Saturated Fat: 1g
  • Unsaturated Fat: 6g
  • Trans Fat: 0g
  • Carbohydrates: 28g
  • Fiber: 1g
  • Protein: 3g
  • Cholesterol: 30mg

Keywords: mango muffin, tropical muffins, breakfast recipe, easy muffin recipe, summer baking

Did you make this recipe?

Share a photo and tag us — we can't wait to see what you've made!

May 31, 2026 |

Mango Curd Tart

Deliciously prepared Mango Curd Tart with creamy filling on a crust

Indulge in Sunny Goodness: Mango Curd Tart

Hello, food lovers! Welcome back to Clean Plate Cravings, your haven for fresh, feel-good food that’s anything but boring. I’m Ava Carter, and today I’m thrilled to share a dish that brings sunshine right into your kitchen: the delightful Mango Curd Tart. If you’ve ever taken a bite of something that just radiates happiness, you know the experience I’m talking about—and this tart embodies that joy!

Now, why mango, you might ask? Well, growing up in a tropical climate, mangoes were a staple in my household. I have vivid memories of my family gathering around the kitchen during summer, slicing into ripe, juicy mangoes, the sweet fragrance wafting through the air. We’d make simple desserts and smoothies, but the idea of turning mangoes into a velvety curd? Oh, now that’s a story waiting to be told!

Imagine a buttery crust cradling a luscious mango curd, with just a hint of zesty lime to cut through the sweetness. Each slice is a perfect balance of creamy and tangy, making it the go-to dessert for any occasion—be it a family gathering, a casual picnic, or simply a sweet treat on a rainy day. This Mango Curd Tart is sure to please your taste buds and warm your heart.

So grab your apron, let’s dive into this recipe that marries nostalgia with vibrant flavors. Trust me, you’ll want to make this one again and again—not just because it’s delicious, but because it’s a celebration of life itself!

Personal Story

One of my fondest memories revolves around mangoes and this very tart recipe. I was spending a summer with my grandmother, who was known for her pranks as much as she was for her desserts. One day, I watched her whip up this tropical delight while playfully teasing me about my “serious” chef skills. As she mixed the mango puree with sugar and eggs, she reminded me, “Life, dear, is like this tart—sweet with a little bit of tang!” It struck a chord with me, and that summer, I learned that cooking could be as much about savoring the moment as it is about the final dish.

When I finally attempted to recreate her mango curd tart years later, the flavors brought back floods of memories—laughter, sunshine, and her playful spirit. It wasn’t just about the curd; it was about sharing the experience with those I love. To me, this tart is not just dessert; it’s a little piece of my heart that I’m excited to share with you!

Ingredients

Here’s what you’ll need to create this Mango Curd Tart. Each ingredient plays a crucial role in building flavor and texture, so let’s break it down:

  • 1 1/2 cups all-purpose flour: The backbone of your tart shell. If you’re looking for a gluten-free option, try using a gluten-free all-purpose blend!

  • 1/2 cup unsalted butter, cold and cubed: Cold butter creates a flaky texture. If dairy-free, feel free to use coconut oil or a vegan butter substitute.

  • 1/4 cup sugar: This adds just the right sweetness to your tart crust. If you want a more natural option, you can opt for coconut sugar or honey (though it will alter the crust consistency).

  • 1/4 teaspoon salt: Balances out the sweetness and enhances the overall flavor. Don’t skip this!

  • 1 egg yolk: This adds richness and binds the crust together. You can substitute with flax egg (1 tablespoon flaxseed meal + 2.5 tablespoons water) for a vegan option.

  • 3 tablespoons ice water: Helps bring the dough together without warming the butter. Keep your water icy to maintain that flaky texture!

  • 2 ripe mangoes, pureed: The star of the show! Choose mangoes that are slightly soft to the touch for maximum sweetness. If mangoes aren’t in season, you can use store-bought mango puree.

  • 1/2 cup sugar: Used in the filling, this sweetens the curd perfectly. Adjust to taste if you prefer it less sweet.

  • 3 eggs: Provides structure and creaminess to the curd. If you’re vegan, substitute with silken tofu blended until smooth (about 1/4 cup).

  • 1/4 cup fresh lime juice: Adds a vibrant zing. If you don’t have fresh limes, bottled lime juice works, but I recommend fresh for the best flavor.

  • 1/4 cup butter, melted: This brings richness to the curd. For a lighter option, consider using coconut milk instead!

  • 1 cup whipped cream (for topping): Light and airy, it complements the tart’s richness. You can use coconut whipped cream for a dairy-free alternative.

  • Fresh fruit (for topping, optional): Fruit is a beautiful way to brighten the presentation! Consider berries, kiwi, or even more mango slices for a colorful touch.

Step-by-Step Instructions

Alright, let’s get these ingredients singing together! Here’s how to whip up this Mango Curd Tart—trust me, you’ll feel like a pro in your kitchen.

  1. Prepare the Tart Crust: Start by preheating your oven to 350°F (175°C). In a large mixing bowl, combine the all-purpose flour, sugar, and salt. Add the cold, cubed butter. Using a pastry cutter or your fingertips, blend the ingredients until the mixture resembles coarse crumbs. (Chef Tip: Keep your hands cold—warm hands melt the butter, and you want those little butter bits intact for flakiness!)

  2. Bring it Together: Make a small well in the center of the mixture and add the egg yolk and ice water. Mix gently until the dough holds together. If it feels too crumbly, add a bit more ice water, one tablespoon at a time. (Little hack: You can chill the dough for about 30 minutes for an even flakier crust before rolling it out!)

  3. Roll the Dough: Turn the dough out onto a lightly floured surface and roll it into a 12-inch circle. Carefully transfer it to a 9-inch tart pan, pressing it into the edges. Trim any excess dough, and prick the bottom with a fork to avoid bubbling.

  4. Blind Bake: Line the crust with parchment paper and fill it with pie weights or dried beans. Bake in the preheated oven for 15 minutes. Remove the weights and parchment, then bake for an additional 10 minutes until lightly golden. Set aside to cool. (Chef Secret: This “blind baking” prevents a soggy crust!)

  5. Make the Mango Curd: In a medium saucepan, combine the mango puree, sugar, eggs, and lime juice over medium heat. Whisk constantly until the mixture thickens, about 10-12 minutes. (Tip: Patience is key! It’s ready when it coats the back of a spoon.)

  6. Add the Melted Butter: Remove from heat and stir in the melted butter until fully incorporated. (Pro Tip: Let the curd cool for a few minutes before pouring it into your tart shell!)

  7. Assemble the Tart: Pour the mango curd into the cooled tart shell, spreading it evenly. Refrigerate for at least 2 hours to set. (Bonus Tip: This curd can be made ahead of time—just keep it in the fridge and assemble when ready to serve!)

  8. Serve and Garnish: When you’re ready to dig in, top the tart with whipped cream and your choice of fresh fruit. (Chef’s choice: a sprinkle of lime zest gives it a lovely pop of color!)

Serving Suggestions

Slice your Mango Curd Tart into wedges and serve chilled. It pairs beautifully with a cup of herbal tea or a refreshing glass of iced lemonade—perfect for those warm afternoons! For parties, consider placing the tart on a beautiful cake stand, garnished with fresh mint leaves for a fresh touch. Elegance with ease!

Recipe Variations

Looking to switch things up? Here are a few creative twists for your Mango Curd Tart:

  1. Tropical Twist: Add a layer of coconut cream under the mango curd for a delightful tropical flavor bomb!

  2. Spiced Mango: Infuse your mango curd with a hint of cardamom or cinnamon for a warm, aromatic flavor profile.

  3. Berry Bliss: Layer the tart with mixed berries before serving to add a tangy contrast against the sweet mango.

  4. Nutty Crust: Swap out 1/2 cup of all-purpose flour for almond flour in the crust for a nutty flavor that beautifully complements the mango.

  5. Mango-Ginger Curd: Add a little grated fresh ginger to the mango filling for an extra zing!

Chef’s Notes

This Mango Curd Tart has been a labor of love over the years. I experimented with several fruit combinations, but the combination of mango and lime remains unparalleled. I chuckle when I think of my initial attempts at making curd—it’s a finicky process! Learning to whisk continuously while dodging curious pets who thought my spatula was a toy makes for some excellent comedic kitchen moments. Each tart made becomes not just a dessert, but a treasured story—reminding me of the joy of creation, laughter, and a hint of chaos in the kitchen.

FAQs and Troubleshooting

  1. What if my mango curd doesn’t thicken?

    • No worries! If it hasn’t thickened as expected, just keep it on medium heat and whisk frequently—most curds take a little time. If you find yourself in a pinch, a cornstarch slurry can help thicken it.
  2. Can I use frozen mangoes?

    • Absolutely! If using frozen, be sure to thaw them completely and drain any excess liquid before pureeing. This will keep your curd from becoming too watery.
  3. How long will the tart last?

    • The tart will stay fresh for up to 4 days in the refrigerator. If there’s leftover curd (unlikely, since it’s so delicious!), it can be stored in an airtight container for about a week.
  4. Can I freeze the tart?

    • Yes, but the texture might change upon thawing. For the best results, store the assembled tart in the fridge if you plan to eat it within the week. If you must freeze, do so before adding the whipped cream topping.

Nutritional Info

While I focus on flavor and enjoyment rather than strict nutritional guidelines, here’s a rough estimate per slice when cutting an 8-slice tart:

  • Calories: 320
  • Fat: 20g
  • Carbohydrates: 30g
  • Protein: 3g

Remember, this is a dessert meant to be savored, so enjoy it guilt-free!


And there you have it, friends! A slice of sunshine in your kitchen with this Mango Curd Tart. I hope you enjoy making it as much as I do. Happy baking!

Print

Mango Curd Tart

Indulge in a delightful Mango Curd Tart with a buttery crust and a luscious mango filling, brightened with zesty lime.

  • Prep Time: 30 minutes
  • Cook Time: 25 minutes
  • Total Time: 55 minutes
  • Yield: 8 servings 1x
  • Category: Dessert
  • Method: Baking
  • Cuisine: Tropical
  • Diet: Vegetarian

Ingredients

Scale
  • 1 1/2 cups all-purpose flour
  • 1/2 cup unsalted butter, cold and cubed
  • 1/4 cup sugar
  • 1/4 teaspoon salt
  • 1 egg yolk
  • 3 tablespoons ice water
  • 2 ripe mangoes, pureed
  • 1/2 cup sugar (for filling)
  • 3 eggs
  • 1/4 cup fresh lime juice
  • 1/4 cup butter, melted
  • 1 cup whipped cream (for topping)
  • Fresh fruit (for topping, optional)

Instructions

  1. Prepare the Tart Crust: Preheat your oven to 350°F (175°C). In a large mixing bowl, combine the flour, sugar, and salt. Add the cold butter and blend until coarse crumbs form.
  2. Bring it Together: Add the egg yolk and ice water, mixing gently until the dough holds. Chill for flakiness if desired.
  3. Roll the Dough: Roll it into a 12-inch circle and press it into a 9-inch tart pan. Trim excess dough and prick the bottom.
  4. Blind Bake: Line with parchment, fill with pie weights, and bake for 15 minutes. Remove weights and bake for another 10 minutes until golden. Cool.
  5. Make the Mango Curd: In a saucepan, combine mango puree, sugar, eggs, and lime juice on medium heat, whisking until thickened, about 10-12 minutes.
  6. Add the Melted Butter: Stir in the melted butter until incorporated and allow to cool slightly.
  7. Assemble the Tart: Pour the cooled mango curd into the tart shell and refrigerate for at least 2 hours to set.
  8. Serve and Garnish: Top with whipped cream and fresh fruit before serving.

Notes

For a vegan option, use coconut oil, flax egg, and silken tofu. Enjoy guilt-free and serve chilled for the best experience.

Nutrition

  • Serving Size: 1 slice
  • Calories: 320
  • Sugar: 21g
  • Sodium: 150mg
  • Fat: 20g
  • Saturated Fat: 10g
  • Unsaturated Fat: 8g
  • Trans Fat: 0g
  • Carbohydrates: 30g
  • Fiber: 1g
  • Protein: 3g
  • Cholesterol: 95mg

Keywords: Mango Tart, Dessert, Tropical Dessert, Curd Tart, Summer Dessert

Did you make this recipe?

Share a photo and tag us — we can't wait to see what you've made!

May 31, 2026 |

The Best Mango Salsa

A vibrant bowl of fresh mango salsa with diced mango, peppers, and herbs.

The Best Mango Salsa: A Flavorful Journey

Welcome, my fellow food lovers, to another delicious adventure in the kitchen! Today, we’re diving into a bright and vibrant dish that embodies the essence of summer—Mango Salsa! This sweet and zesty salsa is not just a delight for your taste buds; it’s also a colorful addition to any meal.

Now, let’s talk about why mango salsa is a must-have in your repertoire. Imagine a sunny day, the warmth of the sun on your skin, and the tantalizing aroma of fresh ingredients all coming together. This salsa will transport you to that happy place, regardless of where you’re dining. It’s perfect for those cookouts, taco nights, or even as a refreshing snack on its own with the best crispy tortilla chips.

When you make this mango salsa, you’ll notice it gives a kick of flavor to everything it touches. Paired with grilled chicken, fish, or shrimp, it transforms a simple meal into a flavor explosion. Not to mention, it’s packed with nutrients, making it both health-conscious and utterly delicious. So grab your cutting board and let’s whip up this tropical treat!

A Taste of Nostalgia

Growing up, my family had a tradition of spending our summers at my aunt’s beach house. The salty air, sandy toes, and the wonderful aroma of her kitchen were everything a kid could dream of. One of my favorite memories is when my aunt would host these lively barbecues. Her mango salsa always made an appearance, and it was a showstopper!

I remember running into the kitchen, laughing and sneaking spoonfuls of that juicy salsa directly from the bowl—much to my aunt’s amusement. She would chuckle and say that the best recipes were meant to be enjoyed early and often! The combination of sweet mangoes, zesty lime, and fresh herbs danced on my palate like summer fireworks. Every bite was a burst of happiness, accompanied by the sound of waves crashing in the background.

To this day, any time I whip up this mango salsa, I’m transported back to those summer days, surrounded by family, laughter, and love. It’s more than just a recipe; it’s a celebration of life, food, and memories!

Ingredients

Gathering the freshest ingredients can elevate your mango salsa from good to out-of-this-world delicious. Here’s what you’ll need:

  • Juicy Mangoes: The star of the show! Choose ripe mangoes that give slightly when you squeeze them. If mangoes aren’t in season, try using diced peaches for a similar sweetness.
  • Lime Juice: This brings a zesty brightness that cuts through the sweetness of the mango. Freshly squeezed lime juice is key; bottled juice can’t match that zing!
  • Onions: Red onions work beautifully in salsa, adding a mild bite and a splash of color. You can substitute with yellow or green onions if that’s what you have on hand—just adjust the quantity to your taste.
  • Jalapeño Peppers: For a little kick, finely dice these beauties. If you prefer a milder flavor, remove the seeds or swap them for a bell pepper for that crunchy texture without the heat.
  • Cilantro: This herb gives the salsa an earthy taste that compliments the mangoes. If you’re not a fan of cilantro (you know who you are!), fresh parsley works as a great alternative.

Step-by-Step Instructions

Now that you have your ingredients prepped, let’s dive into making this delicious mango salsa!

  1. Prep Your Workspace: Before you begin, make sure your kitchen is tidy and all your tools are within reach. You’ll need a sharp knife, a cutting board, and a mixing bowl. A tidy space makes cooking a breeze!

  2. Mango Magic: Start by peeling and dicing your mangoes. To peel, you can use a vegetable peeler or cut off the skin with a knife. Place the mango flat on the cutting board and slice down the sides of the seed. Then, chop it into small cubes. It’s a sticky process, but oh-so-worth it!

  3. Chop the Veggies: Next, go ahead and finely chop the red onion and jalapeño. Don’t forget to wash your hands thoroughly after handling the jalapeño—you never want that spice to land in your eyes! For added flavor, try letting the chopped onions sit in lime juice for a few minutes before mixing it all together.

  4. Flavor Burst with Lime: In a separate bowl, combine the diced mango, onion, and jalapeño. Drizzle freshly squeezed lime juice over the mixture, and don’t be shy; the more, the merrier!

  5. Cilantro Celebration: Finely chop a handful of fresh cilantro and add it to the bowl. Stir it together gently, ensuring every piece gets covered in that zesty goodness.

  6. Taste Test Time: Before you serve, take a moment to taste your salsa. Feel free to add more lime juice or even a pinch of salt to balance the flavors. This is your creation, so tweak it until it’s perfect for you!

  7. Chill and Serve: If you have the time, let the salsa chill in the fridge for at least 30 minutes before serving. This allows the flavors to mingle and creates a delightful taste experience.

Serving Suggestions

Mango salsa can be served in various fun and inviting ways! You can plate it in a rustic bowl alongside crispy tortilla chips for a colorful appetizer that will wow your guests. If you’re serving it as a topping, scoop a generous portion onto grilled chicken, fish, or tacos. The vibrant colors and fresh flavors will undoubtedly make your dish pop!

You might also want to get creative with how you present it. Consider topping a beautiful platter of nachos with a generous amount of salsa or using it as a vibrant garnish for your meals. Your mango salsa deserves to shine!

Recipe Variations

While the classic version is simply unbeatable, here are a few tasty twists you can try!

  1. Tropical Twist: Add diced pineapple or kiwi for an even more fruity punch!
  2. Spicy Upgrade: For the heat lovers, toss in some diced habanero or serrano peppers. Just remember to start small!
  3. Avocado Addition: Creamy avocado can take your salsa to new heights. Just chop it into cubes and gently mix it in.
  4. Sweet & Savory: Drizzle a touch of honey or agave syrup for those days when you crave extra sweetness.
  5. Smoky Flavor: A dash of smoked paprika can add an intriguing depth to the salsa, perfect for grilled meals.

Chef’s Notes

As with many recipes, mango salsa has evolved throughout the years in my kitchen. I’ve tried countless variations, from incorporating exotic fruits to experimenting with different herbs. Every time I revisit this classic, it reminds me of my sun-soaked childhood and those joyous family gatherings.

One particularly funny memory that stands out is the time I thought I had bought ripe mangoes, only to discover they were rock solid. In a moment of desperation, I let them sit on the windowsill, hoping the sun would work its magic. Spoiler alert: it didn’t! Lesson learned—always check your fruit ripeness before you bail on last-minute ingredients.

FAQs and Troubleshooting

Q: What can I use if I can’t find fresh mangoes?
A: If fresh mangoes are out of season, try using frozen mango chunks. Just thaw, drain excess water, and chop!

Q: My salsa is too spicy; how do I tone it down?
A: Acidity can lessen heat! Add extra diced mango or a sprinkle of sugar to balance the spiciness.

Q: How long will this salsa last?
A: In an airtight container in the fridge, it can last up to 3 days, but it’s best enjoyed fresh for optimal taste and texture!

Q: Can I make this salsa ahead of time?
A: Yes! Just remember that the flavors will meld and taste even better after a day, so it’s a great make-ahead option. Just keep it chilled!

Nutritional Info

While I typically focus on the taste, it’s worth noting that mango salsa is a nutritious addition to your meals. Each serving is rich in vitamin C and fiber, adding a wholesome touch to your diet.


So there you have it, friends! You’re now equipped with all the tools to create the most delicious mango salsa. Whether you serve it at your next gathering or enjoy it solo with chips, I promise it’ll bring a smile to your face and sunshine to your palate. Happy cooking!

Print

The Best Mango Salsa

Bright and vibrant mango salsa that embodies the essence of summer with its sweet and zesty flavor.

  • Prep Time: 10 minutes
  • Cook Time: 0 minutes
  • Total Time: 40 minutes
  • Yield: 4 servings
  • Category: Appetizer
  • Method: No-Cook
  • Cuisine: Mexican
  • Diet: Vegetarian

Ingredients

  • Juicy Mangoes
  • Lime Juice
  • Red Onions
  • Jalapeño Peppers
  • Cilantro

Instructions

  1. Prep Your Workspace: Make sure your kitchen is tidy and all your tools are within reach.
  2. Start by peeling and dicing your mangoes.
  3. Chop the red onion and jalapeño finely.
  4. Combine the diced mango, onion, and jalapeño in a bowl.
  5. Drizzle freshly squeezed lime juice over the mixture.
  6. Chop a handful of fresh cilantro and add it to the bowl.
  7. Taste your salsa and adjust flavors as needed.
  8. Chill in the fridge for at least 30 minutes before serving.

Notes

For a twist, consider adding diced pineapple or avocado for extra flavor.

Nutrition

  • Serving Size: 1 serving
  • Calories: 150
  • Sugar: 12g
  • Sodium: 5mg
  • Fat: 1g
  • Saturated Fat: 0g
  • Unsaturated Fat: 1g
  • Trans Fat: 0g
  • Carbohydrates: 35g
  • Fiber: 4g
  • Protein: 2g
  • Cholesterol: 0mg

Keywords: mango salsa, summer salsa, fresh salsa, healthy dip, easy appetizer

Did you make this recipe?

Share a photo and tag us — we can't wait to see what you've made!

May 31, 2026 |

Minute Mango Yogurt with a Crispy Chocolate Shell

Delicious Minute Mango Yogurt with a Crispy Chocolate Shell

Indulge Your Sweet Tooth: Mango Yogurt with Chocolate Shell

Welcome to my kitchen! Today, I am thrilled to share a delightful recipe that hails from the heart of summer—a heavenly Mango Yogurt with a luscious Chocolate Shell. This dessert perfectly embodies everything I stand for at Clean Plate Cravings: vibrant flavors, simple ingredients, and a fun twist that will make your taste buds sing! If you’re looking for a refreshing treat that feels indulgent without the guilt, you’ve come to the right place.

Imagine walking through a vibrant market on a warm summer day, where the scent of ripe mangoes fills the air. Mango is truly the star of this dish—it’s sunny, sweet, and packed with flavor. Combine that with creamy yogurt and a rich, crunchy chocolate shell, and you have a dessert that’s not only easy to make but also irresistibly delicious!

But why stop there? This simple combination is about more than just flavor; it’s about the memories we create around food. I remember my mom making a similar treat on hot summer afternoons. We’d gather in the kitchen, laughter spilling over as she melted chocolate and cut fresh mango. It became a tradition: every mango season meant a chocolate-y mango treat. Now, I get to pass on that joy, sharing this dish with all of you.

Let’s dive into making your very own Mango Yogurt with Chocolate Shell! Get ready for a dessert that’s quick, satisfying, and will leave you craving more.

A Sweet Memory: The Mango Magic

As a kid, summer meant more than just long, lazy days; it meant mangoes! Living in a place where the sun shined brightly and mango trees were plentiful, these juicy fruits were the highlight of my childhood. I’ll never forget my mom’s ritual of making mango yogurt cups as a special treat for my friends and me after a long day of playing outside.

We’d gather around the kitchen island, the smell of sun-ripened mangoes filling the air. Mom would slice the mango and mix it with creamy yogurt, drizzling honey for a touch of sweetness. But the real magic happened when she’d drizzle melted chocolate over the top, watching it transform into a shiny, crunchy shell. Our eyes would light up as we dug in, the combination of flavors and textures becoming one of our favorite summer memories.

Now, as I recreate this dish for you, I can’t help but smile at those warm memories. Food is often about nourishment, but it’s also about connections and moments that stay with us forever. Let’s create a new memory together with this simple yet oh-so-delicious recipe!

Ingredients: Gather Your Goods

Here’s what you’ll need to whip up this delightful dessert, along with some tips and tricks for each ingredient:

  • 1 ripe mango: Look for one that’s slightly soft to the touch; that means it’s perfectly ripe! If mangoes aren’t in season, you can use frozen mango chunks—just thaw them beforehand for this recipe.

  • ¼ cup plain yogurt: Greek yogurt adds a nice creaminess and a bit of tang, but feel free to use any yogurt you love! For a dairy-free option, coconut yogurt works wonders.

  • 1 tbsp milk: This helps achieve a smoother consistency. You can use any milk you prefer—almond, soy, or oat milk all work beautifully.

  • 1 tbsp honey: This natural sweetener perfectly complements the tartness of yogurt. If you’re looking for a vegan option, agave syrup or maple syrup are fantastic substitutes.

  • 1 cup white chocolate: The star of our chocolate shell! If you’re not a fan of white chocolate, dark chocolate could make for an equally decadent topping.

  • 1 tsp sunflower oil: Added to the chocolate for a glossy finish and to help it drizzle beautifully. You can use coconut oil for a tropical twist if you prefer!

With these simple ingredients, we’ll turn ordinary elements into something extraordinary. Ready for the next step? Let’s get cooking!

Step-by-Step Instructions: Let’s Get Cooking

  1. Prep the Mango:

    • Start by peeling the mango and slicing it into bite-sized pieces. Mango is slippery, so use a sharp knife and exercise caution. It’s best to slice around the pit, which is large and flat. I recommend placing the mango on a non-slip cutting board to keep everything steady.
    • Set the mango pieces aside—let that tropical aroma sweep you away!
  2. Make the Yogurt Base:

    • Grab a mixing bowl and combine the plain yogurt, milk, and honey. Whisk it together until smooth and creamy.
    • Taste as you go! If you like it sweeter, feel free to add a touch more honey. This part is all about personal preference, so make it your own!
  3. Assemble the Cups:

    • In small serving bowls or cups, layer the yogurt mix and then top with the mango pieces. This is the fun part—get creative with the layers! Consider adding some yogurt first, a layer of mango, and then repeating until your cup is full.
    • Don’t be afraid to make it colorful! The visual appeal of layers can make this dessert pop and look even more delightful!
  4. Melt the Chocolate:

    • Using a microwave-safe bowl, combine the white chocolate and sunflower oil. Microwave in short bursts, stirring every 15-20 seconds, until smooth and melted. Be careful not to overheat it—the chocolate can seize.
    • When melted, it should have a lovely, glossy consistency that can easily drizzle.
  5. Drizzle and Chill:

    • Now for the magic touch! Drizzle the melted chocolate over the assembled mango yogurt cups. You can let a little chocolate cascade down the sides for that tantalizing effect.
    • Once you’ve drizzled, pop the cups into the fridge for about 15 to 20 minutes to let the chocolate set. This is also a good time to clean up the kitchen—you’ll want to take a moment to admire your handiwork!
  6. Serve and Enjoy:

    • Once the chocolate has set, it’s time to indulge. Grab a spoon and dig in! The contrast of the cool, creamy yogurt, sweet mango, and the crunchy chocolate shell is simply irresistible.

Serving Suggestions: Plate it Up!

When it comes to serving, you can keep it casual by enjoying the yogurt cups straight from the bowl or take it up a notch by plating it with garnishes. Consider adding a sprinkle of shredded coconut, a mint leaf for a pop of color, or even a few fresh berries on the side. The presentation can elevate this simple dessert to something truly special, perfect for entertaining guests or refreshing yourself after a long day.

Recipe Variations: Get Creative!

This recipe is wonderfully flexible! Here are a few creative twists:

  1. Tropical Tango: Add shredded coconut or chopped pineapple to the yogurt for a more tropical feel.

  2. Berry Blast: Layer in some fresh berries like strawberries or blueberries for an additional burst of flavor and color.

  3. Nutty Delights: Sprinkle some crushed nuts, like almonds or pistachios, on top for added crunch and nutritional value.

  4. Chocolate Overload: Instead of white chocolate, go for dark or milk chocolate for a rich twist.

  5. Herbal Infusion: Add a hint of fresh mint or basil to the yogurt for an aromatic touch that contrasts beautifully with the sweet mango.

Feel free to mix and match according to your taste and what you have on hand!

Chef’s Notes: Memories and Evolution

Whenever I whip up this Mango Yogurt with a crunchy chocolate shell, I can’t help but reminisce about those sun-drenched summers from childhood. This recipe reminds me that food is not just something we eat—it’s something that brings us together, sparking joy and connection in every bite.

Over the years, I’ve experimented with different toppings and flavors, often reminiscing about my mom’s original recipe. What started as a simple summer treat in our family home has evolved into a beloved dish that I can share with all of you. It’s proof that recipes can change and adapt, celebrating our unique tastes and moments.

FAQs and Troubleshooting

1. My chocolate shell didn’t set properly. What went wrong?
If the chocolate didn’t harden, it could be due to too much moisture or if it was improperly melted. Ensure you’re using a dry bowl and that the chocolate is fully cooled after drizzling.

2. How can I make this dairy-free?
You can absolutely swap out the yogurt for a dairy-free alternative like coconut yogurt, and use almond milk or any plant-based milk instead.

3. Can I make this in advance?
Yes! Prepare the components ahead of time, but assemble them shortly before serving to keep that delightful chocolate shell crisp.

4. What can I do with leftover mango?
If you have leftover mango, toss it into smoothies, salads, or even salsas! It’s a versatile fruit that shines in many dishes.

Nutritional Info (Optional)

This Mango Yogurt with Chocolate Shell is more than just a treat; it offers a tasty source of vitamins A and C, probiotics from the yogurt, and antioxidants from the chocolate! Feel free to enjoy it as a wholesome dessert, snack, or even breakfast option!


So there you have it, an energizing and refreshing Mango Yogurt with Chocolate Shell that’s quick to make and oh-so-delicious to enjoy! I hope you feel inspired to create your own memories in the kitchen, just like I did with my family. Happy cooking, and don’t forget to share your creations with me—I’d love to see how you enjoy this delightful dish!

Print

Mango Yogurt with Chocolate Shell

A refreshing summer dessert featuring creamy mango yogurt topped with a crunchy chocolate shell.

  • Prep Time: 10 minutes
  • Cook Time: 5 minutes
  • Total Time: 15 minutes
  • Yield: 4 servings 1x
  • Category: Dessert
  • Method: Chilling
  • Cuisine: American
  • Diet: Vegetarian

Ingredients

Scale
  • 1 ripe mango
  • ¼ cup plain yogurt
  • 1 tbsp milk
  • 1 tbsp honey
  • 1 cup white chocolate
  • 1 tsp sunflower oil

Instructions

  1. Prep the mango by peeling and slicing it into bite-sized pieces.
  2. Make the yogurt base by mixing the yogurt, milk, and honey until smooth.
  3. Assemble the cups by layering the yogurt mix and mango pieces in small bowls.
  4. Melt the chocolate and sunflower oil in a microwave-safe bowl until smooth.
  5. Drizzle the melted chocolate over the assembled cups and chill for 15-20 minutes.
  6. Serve and enjoy the delicious contrast of flavors and textures.

Notes

Feel free to customize with your favorite fruits, nuts, or different types of chocolate.

Nutrition

  • Serving Size: 1 serving
  • Calories: 250
  • Sugar: 18g
  • Sodium: 50mg
  • Fat: 10g
  • Saturated Fat: 6g
  • Unsaturated Fat: 4g
  • Trans Fat: 0g
  • Carbohydrates: 32g
  • Fiber: 2g
  • Protein: 4g
  • Cholesterol: 5mg

Keywords: mango dessert, yogurt, chocolate shell, summer treat, easy dessert

Did you make this recipe?

Share a photo and tag us — we can't wait to see what you've made!

May 31, 2026 |

Easy Bruschetta

Delicious easy bruschetta topped with fresh tomatoes and basil

Easy Bruschetta: A Taste of Italy Right at Home

Welcome, food lovers! Today, we’re diving into a classic appetizer that speaks the language of love, simplicity, and flavor—bruschetta. This easy-peasy dish is the life of the party, the charming starter that has everyone reaching for more. Whether you’re hosting a cozy gathering, hanging out with friends for a casual dinner, or even just indulging in a delightful snack for yourself, bruschetta ticks all the boxes.

Let’s set the scene. Picture a sun-drenched Italian villa, a charming terrace overflowing with vibrant tomatoes, fragrant basil, and golden olive oil. Now, you don’t need to hop on a plane to experience that culinary joy! With just a few fresh, wholesome ingredients and some love, you can create a plate of bruschetta that transports you straight to the heart of Italy. Perfectly toasted bread topped with juicy tomatoes, aromatic garlic, and the lushness of basil—what’s not to love? Plus, this dish is all about balance: it’s light yet satisfying, fresh yet fulfilling.

What I adore most about bruschetta is its versatility. You can whip it up in under 20 minutes, it’s easy to adapt based on what you have on hand, and it’s a guaranteed crowd-pleaser. Whether you’re a seasoned home chef or just starting out, this recipe is accessible for everyone. Plus, it allows you to flex your culinary creativity. It’s truly an opportunity to let your personality shine through your cooking! So grab your apron, and let’s get started on something delicious.

A Nostalgic Kitchen Memory

Every time I make bruschetta, I’m transported back to my childhood summers spent at my grandmother’s house. Outside, the sun was hot, and the air buzzed with laughter as our family gathered around the patio for meals. My grandmother was a true Italian cook, always using the freshest ingredients from her garden. Every evening, she would prepare a spread of antipasti, and the bruschetta was the star of the show.

I remember standing on a stool, grating parmesan cheese while she sliced ripe tomatoes and chopped fresh basil from her garden. The way she casually drizzled olive oil and cracked fresh pepper into the mix was pure artistry. It wasn’t just about the flavors; it was the love and togetherness wrapped into every bite. After all, good food connects us, and every piece of bruschetta we enjoyed that summer tasted of sun, laughter, and nostalgia. It ignited a passion in me that has never faded, and I’m thrilled to share a slice of that tradition with you today.

Ingredients

Let’s gather our ingredients! Here’s what you’ll need to make this delectable bruschetta:

  • 1 French baguette or Italian bread
    The bedrock of any bruschetta! A fresh loaf adds that satisfying crunch. For a twist, use sourdough for a tangy flavor or whole-grain bread for added nutrition.

  • 2 cups diced tomatoes
    Ripe, juicy tomatoes are crucial here. You can mix it up with heirloom varieties for color and flavor or swap in cherry or grape tomatoes for a sweeter option.

  • 2 cloves garlic, minced
    Garlic brings that aromatic zing! If you prefer a milder taste, roast the garlic first or use garlic powder as a substitute.

  • 1/4 cup fresh basil, chopped
    Fresh basil is the fragrant highlight of bruschetta. If you can’t find fresh basil, feel free to use a couple of teaspoons of dried basil, but fresh truly shines in this dish.

  • 1/4 cup olive oil
    Quality olive oil elevates the dish. Extra virgin is best, but if you’re looking for an intense flavor, try to find infused oils, like garlic or herb-infused.

  • Salt and pepper to taste
    Essential seasonings that enhance all the flavors. Taste as you go to get that savory balance!

  • Balsamic vinegar (optional)
    A drizzle of balsamic can add a beautiful tangy-sweet note. You can also use a balsamic glaze for a richer flavor.

Step-by-Step Instructions

Alright, now onto the fun part—let’s make some bruschetta! Follow these steps, and you’ll be savoring flavorful bites in no time.

Step 1: Preheat and Prepare the Bread

Start by preheating your oven to 400°F (200°C). While it’s warming up, slice your baguette or Italian bread into 1/2-inch thick slices. Arrange them on a baking sheet.

Chef Tip: Brush a little olive oil on both sides of each slice before toasting to enhance flavor and crunch. It makes all the difference!

Step 2: Toast the Bread

Pop the bread slices into the preheated oven and toast for about 5-7 minutes, or until they’re golden brown on the edges and slightly crisp. Keep an eye on them—nothing worse than burnt bread to ruin the party!

Chef Tip: For an extra layer of flavor, rub each toasted slice with a cut garlic clove right after they come out of the oven. This gives that lovely garlic aroma without overpowering it.

Step 3: Combine Your Tomato Mixture

While the bread is toasting, let’s prepare that vibrant tomato topping! In a medium bowl, combine your diced tomatoes, minced garlic, and fresh basil.

Tip: Make sure to use ripe tomatoes for the best flavor. You can also sprinkle in a pinch of salt and pepper to enhance the natural sweetness!

Step 4: Add the Olive Oil

Drizzle in the olive oil and give everything a gentle toss. You want to coat the tomatoes just enough so they glisten.

Chef Insight: Allow this mixture to sit for a few minutes! This lets the flavors meld together and creates a lovely marinated effect.

Step 5: Assemble the Bruschetta

Once the bread is toasted to perfection, it’s time to assemble! Spoon a generous portion of the tomato mixture onto each slice.

Chef Tip: Mound the topping a bit for presentation, and let some of that juicy goodness spill over the sides!

Step 6: A Finishing Touch

If you’re opting for the balsamic vinegar, now’s the time to drizzle a little over the loaded bruschetta. It adds a delightful sweet-tangy finish that complements the freshness beautifully.

Chef Hack: For extra flair, finish with a sprinkle of coarse sea salt or even some freshly grated Parmesan cheese. Yum!

Serving Suggestions

Bruschetta is visually enticing, so presentation matters! Serve on a wooden platter or a white ceramic dish to make those bright colors pop. Add a few sprigs of fresh basil on the side for garnish and a drizzle of extra virgin olive oil for a gourmet touch. Trust me, your guests will be swooning!

You can also pair bruschetta with a refreshing sparkling drink or a robust red wine. It’s perfect for sharing, so grab a plate, gather around, and savor each bite together.

Recipe Variations

Want to get a little creative? Here are some fun twists on the classic bruschetta that you can explore:

  • Caprese Bruschetta: Add fresh mozzarella slices or balls and a drizzle of pesto for a herby twist.

  • Mediterranean Style: Toss in some finely chopped olives and feta cheese for a salty kick.

  • Spicy Kick: Add minced jalapeños or drizzle sriracha to the tomato mixture for some heat.

  • Avocado Addition: Top your bruschetta with ripe avocado slices or mash for creaminess and health benefits.

  • Fruit Twist: Swap tomatoes for diced peaches or strawberries while incorporating a hint of mint for a fresh summer flavor.

Chef’s Notes

Bruschetta is one of those recipes that has gracefully evolved with my culinary journey. Initially, I relied strictly on my grandma’s method, but as I began exploring various cuisines and flavor profiles, I realized this dish is a canvas waiting to be painted.

Now, I love experimenting with seasonal ingredients and trying out new flavor combinations. Each time I make bruschetta, I create not only a dish but also a story around it—one that’s filled with laughter, smiles, and the deliciousness of togetherness. If you step into my kitchen, you’ll find personal touches all over, and I hope you will do the same!

FAQs and Troubleshooting

  1. What if my tomatoes are too watery?
    If your tomatoes are particularly juicy, you can remove some of the seeds and pulp before dicing. This helps keep the topping from becoming soggy!

  2. How can I store leftovers?
    Bruschetta is best enjoyed fresh, but if you have leftovers, store the topping separately from the bread. Toast again just before serving for optimal crunch.

  3. Can I make this dish ahead of time?
    You can prepare the tomato topping in advance and let the flavors mingle in the fridge. Just assemble it on the toasted bread right before serving for the freshest taste.

  4. What can I pair bruschetta with?
    It pairs beautifully with salads, pastas, or even as part of a charcuterie board. Your options are endless!

Nutritional Info

While exact nutrition can vary based on the bread and olive oil used, a serving of bruschetta (3-4 pieces) generally contains around:

  • Calories: 250–300
  • Protein: 6g
  • Fat: 15g
  • Carbohydrates: 30g
  • Fiber: 3g

Bruschetta is a fantastic way to satisfy your cravings while keeping things light and nutritious!

So there you have it, folks! This easy bruschetta is not just a recipe; it’s an experience, a story, and a way to connect with others through the joy of food. Go ahead and whip up a batch, feel the Italian vibes, and enjoy every delicious bite! Happy cooking!

Print

Easy Bruschetta

A classic Italian appetizer featuring toasted bread topped with juicy tomatoes, aromatic garlic, and fresh basil.

  • Prep Time: 10 minutes
  • Cook Time: 7 minutes
  • Total Time: 17 minutes
  • Yield: 4 servings 1x
  • Category: Appetizer
  • Method: Baking
  • Cuisine: Italian
  • Diet: Vegetarian

Ingredients

Scale
  • 1 French baguette or Italian bread
  • 2 cups diced tomatoes
  • 2 cloves garlic, minced
  • 1/4 cup fresh basil, chopped
  • 1/4 cup olive oil
  • Salt and pepper to taste
  • Balsamic vinegar (optional)

Instructions

  1. Preheat your oven to 400°F (200°C). Slice your baguette into 1/2-inch thick slices and arrange them on a baking sheet.
  2. Toast the bread slices in the preheated oven for about 5-7 minutes, until golden brown.
  3. Combine your diced tomatoes, minced garlic, and fresh basil in a medium bowl.
  4. Add the olive oil and gently toss to coat the tomatoes.
  5. Assemble the bruschetta by spooning the tomato mixture onto each toasted bread slice.
  6. Finish with a drizzle of balsamic vinegar if desired, and enjoy!

Notes

Bruschetta is versatile; feel free to experiment with toppings like mozzarella, olives, or even fruit for a twist.

Nutrition

  • Serving Size: 3-4 pieces
  • Calories: 300
  • Sugar: 4g
  • Sodium: 200mg
  • Fat: 15g
  • Saturated Fat: 2g
  • Unsaturated Fat: 10g
  • Trans Fat: 0g
  • Carbohydrates: 30g
  • Fiber: 3g
  • Protein: 6g
  • Cholesterol: 0mg

Keywords: bruschetta, appetizer, Italian recipe, easy bruschetta

Did you make this recipe?

Share a photo and tag us — we can't wait to see what you've made!

May 31, 2026 |

One-Pan Bruschetta Chicken Pasta: 30-Minute Weeknight Dinner

One-Pan Bruschetta Chicken Pasta meal with fresh ingredients and vibrant flavors

Bruschetta Chicken Pasta: A Delicious Twist on a Classic Dish

Welcome to Clean Plate Cravings! Today, we’re diving into the world of flavors with a dish that perfectly marries the freshness of Italian bruschetta with the wholesome comfort of pasta. Think juicy chicken, vibrant tomatoes, and fragrant basil all tossed together to create one scrumptious meal. Grab your apron, and let’s get cooking!

There are few things in life that can lift your spirits quite like a plate of pasta. It’s comforting, it’s satisfying, and when you load it up with fresh, wholesome ingredients, it transforms into something truly special. That’s precisely what we’re doing today with my Bruschetta Chicken Pasta—a recipe that’s not just delicious, but it also packs a healthy punch.

What I love about this dish is its versatility. You’ll find yourself returning to it time and again, whether it’s for a cozy weeknight dinner, a potluck, or when you want to impress your friends with your mad culinary skills! Plus, it’s super easy to make, meaning anyone, from the novice cook to the seasoned chef, can whip it up in no time.

The best part? It captures the essence of summer with fresh tomatoes and basil, making it a perfect symbol for those sun-soaked days spent with good friends and great food. So, let’s lace up our cooking shoes and get ready to create a dish that is not only mouthwateringly delicious but also all about fresh flavors. Well, my friend, I guarantee you’ll be craving this again and again!

Personal Story

Ah, the nostalgia of food! Whenever I make Bruschetta Chicken Pasta, I can’t help but think back to the unforgettable summer I spent in a quaint little village in Italy. You can almost picture it: sun-drenched streets, warm smiles, and the luscious scent of herbs wafting from every kitchen. Each evening, we’d gather at local trattorias, where rustic dishes were paired with hearty laughter and clinking glasses.

One night, we were treated to an extraordinary meal that inspired this very recipe. Plump chicken, ripe tomatoes, and fresh basil mingled together in a pasta dish that made my heart sing. I could barely put my fork down, enamored by the explosion of flavors and the simplicity that made it so special. Fast-forward a few years, and here I am, sharing my own twist on that magical dish with you!

Ingredients

Let’s gather our vibrant ingredients to make this delicious dish shine. Here’s what you’ll need:

  • 2 cups cooked pasta: Any pasta shape works here! From penne to spaghetti, just make sure it’s al dente. If you’re gluten-free, opt for your favorite gluten-free pasta, or even use zucchini noodles for a lighter option.

  • 1 tablespoon olive oil: This adds a depth of flavor and helps in sautéing. For a twist, consider infused olive oils like garlic or chili for an added kick!

  • 2 chicken breasts, diced: The lean protein in this dish. If you’re vegetarian, substitute with chickpeas or your favorite plant-based protein!

  • 2 cups fresh tomatoes, diced: Juicy, ripe tomatoes are the stars here. Heirloom, Roma, or vine-ripened all make fantastic choices. If you’re in a pinch, canned tomatoes work too—just drain them well!

  • 1/4 cup fresh basil, chopped: Fresh basil embodies that summery goodness. If you can’t find fresh basil, try using a teaspoon of dried basil, though the flavor won’t be as vibrant.

  • 2 cloves garlic, minced: Garlic adds a wonderful aroma and taste. You can substitute with shallots or garlic powder if needed, but fresh is always best!

  • Salt and pepper to taste: Essential for bringing all the flavors together.

  • Parmesan cheese for serving: Shredded or grated, this savory cheese perfectly complements the dish. For a dairy-free option, try nutritional yeast for a cheesy flavor without the dairy.

Step-by-Step Instructions

Now that we’ve got our ingredients sorted, let’s dive into the cooking process. Trust me, this is easier than it looks!

Step 1: Prepare the Chicken

  • In a large skillet, heat that tablespoon of olive oil over medium heat.
  • Add the diced chicken breasts to the skillet, seasoning them with a pinch of salt and pepper.
  • Chef’s hack: Allow the chicken to sear without moving it around too much. This helps develop a lovely golden crust, adding flavor to your dish.

Step 2: Cook the Chicken Through

  • Stir occasionally to ensure the chicken cooks evenly. It should take about 5-7 minutes to fully cook.
  • Once cooked through (internal temperature of 165°F), transfer the chicken to a plate and cover it loosely with foil to keep it warm.

Step 3: Sauté the Garlic and Tomatoes

  • In the same skillet (no need to clean it!), add the minced garlic and cook for about 30 seconds until fragrant. Gorgeous smell alert!
  • Toss in the diced tomatoes and cook for about 2 minutes until they start to soften. The tomatoes will release their juices, creating a delightful sauce.

Step 4: Combine the Pasta and Chicken

  • Add the cooked pasta and the sautéed chicken back into the skillet. Combine everything gently, making sure the pasta is well coated with the tomato-garlic mixture.
  • Toss in the freshly chopped basil, giving it a good stir to incorporate all those beautiful flavors.

Step 5: Add the Finishing Touch

  • Let everything cook together for about 1-2 minutes, allowing it to warm through and the flavors to meld.
  • Taste and adjust your seasoning if needed—don’t be shy, add more salt or pepper to elevate those flavors.

Step 6: Serve and Enjoy

  • Divide the pasta into bowls and top with a sprinkle of grated Parmesan cheese.
  • Quick tip: Add an extra drizzle of olive oil for a restaurant-worthy finish!

Serving Suggestions

When serving this Bruschetta Chicken Pasta, consider plating it in shallow bowls for a modern touch. Garnish with an additional sprinkle of fresh basil and some freshly cracked pepper for a pop of color and flavor. Pair it with a simple side salad or crusty bread to soak up any remaining sauce. This dish is perfect for family gatherings, casual get-togethers, or a romantic dinner for two!

Recipe Variations

Want to mix things up a little? Here are some fun variations you can try:

  1. Pesto Twist: Stir in a couple of tablespoons of your favorite pesto for a burst of flavor.

  2. Veggie Delight: Add sautéed spinach, zucchini, or bell peppers to amp up the veggie intake.

  3. Spicy Kick: Sprinkle in some red pepper flakes while cooking for a little heat.

  4. Creamy Finish: Stir in a tablespoon or two of cream cheese or goat cheese for a rich, creamy texture.

  5. Lemon Zing: A splash of freshly squeezed lemon juice brightens up the flavors beautifully!

Chef’s Notes

This Bruschetta Chicken Pasta has evolved over the years as I experimented with different herbs and ingredients. Originally, I made it with just tomatoes and basil, but as my love for cooking grew, I started adding chicken to make it heartier. I remember a night when I forgot to buy chicken and replaced it with garbanzo beans—talk about a culinary happy accident! That served as a delicious reminder that cooking is all about creativity and making it work with what you have.

FAQs and Troubleshooting

Here are some common questions I get about this recipe:

Q1: Can I use frozen chicken for this dish?

A1: Absolutely! Just make sure to thaw it completely before cooking. If you’re short on time, you can also use pre-cooked rotisserie chicken—just add it in during the last few minutes to warm through.

Q2: What if I can’t find fresh tomatoes?

A2: Canned tomatoes will work in a pinch! Just ensure to drain them and add them at the same stage you would fresh ones. Their concentrated flavor will still shine!

Q3: The pasta is too sticky, what went wrong?

A3: If your pasta is sticky, it might have been overcooked or not tossed with enough oil right after draining. To prevent this in the future, rinse cooked pasta with cold water to stop the cooking process.

Q4: Can I make this dish ahead of time?

A4: Yes! Cooked pasta can be stored in the fridge, and the chicken and sauce can be prepared a few hours in advance. Just combine everything right before serving and reheat gently.

Nutritional Info

This recipe is not only tasty; it’s packed with nutrients! Each serving boasts protein from the chicken, healthy fats from olive oil, and a good dose of vitamins from those fresh tomatoes and basil. Here’s a rough estimate for one serving (one-fourth of the recipe):

  • Calories: 450
  • Protein: 30g
  • Carbohydrates: 55g
  • Fat: 15g
  • Fiber: 5g

And there you have it, a delicious and delightful Bruschetta Chicken Pasta that brings a taste of Italy to your kitchen. I hope you’re inspired to whip this up for your next meal—it’s a dish that celebrates both flavor and freshness, proving that healthy eating can truly be satisfying. Happy cooking, foodies!

Print

Bruschetta Chicken Pasta

A delicious twist on a classic dish that combines juicy chicken, vibrant tomatoes, and fragrant basil with pasta for a wholesome meal.

  • Prep Time: 15 minutes
  • Cook Time: 15 minutes
  • Total Time: 30 minutes
  • Yield: 4 servings 1x
  • Category: Main Course
  • Method: Sautéing
  • Cuisine: Italian
  • Diet: Gluten-Free option available

Ingredients

Scale
  • 2 cups cooked pasta
  • 1 tablespoon olive oil
  • 2 chicken breasts, diced
  • 2 cups fresh tomatoes, diced
  • 1/4 cup fresh basil, chopped
  • 2 cloves garlic, minced
  • Salt and pepper to taste
  • Parmesan cheese for serving

Instructions

  1. Prepare the Chicken: In a large skillet, heat that tablespoon of olive oil over medium heat. Add the diced chicken breasts to the skillet, seasoning them with a pinch of salt and pepper. Allow the chicken to sear without moving it around too much.
  2. Cook the Chicken Through: Stir occasionally to ensure the chicken cooks evenly. It should take about 5-7 minutes to fully cook. Transfer the chicken to a plate and cover it loosely with foil to keep it warm.
  3. Sauté the Garlic and Tomatoes: In the same skillet, add the minced garlic and cook for about 30 seconds until fragrant. Toss in the diced tomatoes and cook for about 2 minutes until they start to soften.
  4. Combine the Pasta and Chicken: Add the cooked pasta and the sautéed chicken back into the skillet. Combine everything gently and toss in the freshly chopped basil.
  5. Add the Finishing Touch: Let everything cook together for about 1-2 minutes. Taste and adjust your seasoning if needed.
  6. Serve and Enjoy: Divide the pasta into bowls and top with a sprinkle of grated Parmesan cheese.

Notes

Feel free to customize this dish with your favorite vegetables or add a splash of lemon juice for extra brightness.

Nutrition

  • Serving Size: 1 serving
  • Calories: 450
  • Sugar: 6g
  • Sodium: 350mg
  • Fat: 15g
  • Saturated Fat: 3g
  • Unsaturated Fat: 10g
  • Trans Fat: 0g
  • Carbohydrates: 55g
  • Fiber: 5g
  • Protein: 30g
  • Cholesterol: 70mg

Keywords: pasta, chicken, bruschetta, Italian, healthy, easy dinner

Did you make this recipe?

Share a photo and tag us — we can't wait to see what you've made!