Cleanplate Cravings

Cleanplate Cravings

May 31, 2026 |

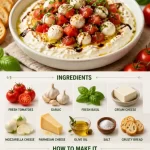
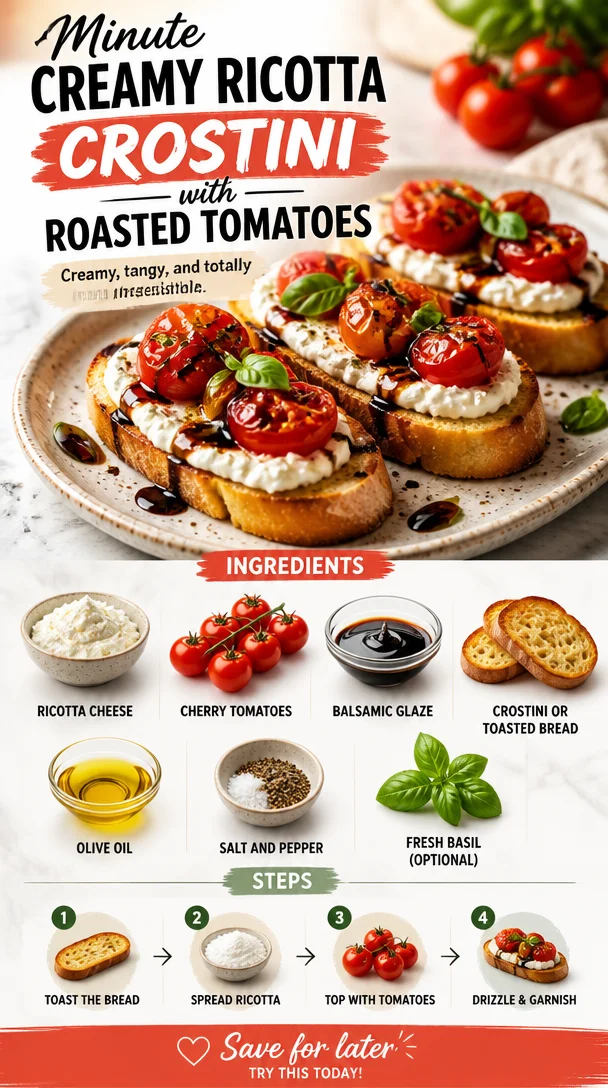
Minute Creamy Ricotta Crostini with Roasted Tomatoes

Creamy ricotta crostini with roasted tomatoes on a wooden serving board

Ricotta Crostini with Roasted Tomatoes: A Delicious Adventure

Welcome, fellow food lovers! Today, we’re diving into the world of Italian-inspired delights with a simple yet sensational dish: Ricotta Crostini with Roasted Tomatoes. Now, I know what you might be thinking: “Crostini? That sounds fancy!” But trust me, this recipe is as approachable as your favorite Friday night pizza.

These golden, crispy crostini piled high with creamy ricotta and bursting with sweet, roasted tomatoes are not just a treat for the taste buds—they’re a celebration of fresh ingredients and good company. Picture this: a warm summer evening, friends gathered around, laughter echoing, and the aroma of herbs and toasty bread wafting through the air. Sounds delightful, right? That’s just how I want to kick off this culinary journey with you.

Personal Story

Let me take you back to the first time I made ricotta crostini. It was at my cousin Mia’s summer barbecue. The sun was setting, casting a golden hue over everything, and I was tasked with bringing an appetizer. Each year, the pressure was on to impress, yet I found myself rifling through my fridge for inspiration.

I stumbled upon a tub of fresh ricotta and some cherry tomatoes that were just begging to be roasted. With a sprinkle of salt and olive oil, they went into the oven, and the transformation was magical. As they caramelized, I sliced up some crusty bread and crisped it up in a pan. When I assembled my creation, I was met with a chorus of ooohs and aaahs that echoed against the evening sky.

That moment, surrounded by my family, taste-testing these little bites of joy, made me realize the power of anchoring simple ingredients into something extraordinary. It’s this spirit that fuels Clean Plate Cravings, and I’m excited for you to experience this delight too!

Ingredients

Now let’s get down to the nitty-gritty of ingredients. Here’s what you’ll need to create these utterly delectable ricotta crostini:

  • Ricotta Cheese: The star of the show! Creamy, light, and a little bit sweet, ricotta adds a velvety texture to each bite. Pro tip: For a richer flavor, try using whole milk ricotta instead of skim.

  • Cherry Tomatoes: Sweetness meets acidity with these gems! Roasting them brings out their natural sugars and makes them burst with flavor. If you can’t find cherry tomatoes, grape tomatoes can be a great substitute.

  • Balsamic Glaze: This thick, syrupy condiment adds a punch of sweetness and tang. If you don’t have balsamic glaze, you can simmer balsamic vinegar until it reduces to a syrupy consistency.

  • Crostini or Toasted Bread: Use your favorite artisan bread, sliced thinly. You can use French baguette, ciabatta, or sourdough. Just make sure it’s nice and crusty for that perfect crunch!

  • Olive Oil: A drizzle before roasting the tomatoes and another before serving enhances flavors and adds a luscious mouthfeel. Good quality olive oil makes all the difference!

  • Salt and Pepper: Simple, yet crucial! Seasoning your ingredients really helps bring those flavors to life.

  • Fresh Basil (optional): A sprinkle of fresh basil elevates this dish with a burst of herbal goodness. Feel free to swap it with parsley or omit it if you prefer!

Step-by-Step Instructions

Are you ready to roll up your sleeves and bring this beautiful dish to life? Let’s dive right into the cooking:

  1. Preheat the Oven: Start by preheating your oven to 400°F (200°C). This is where the magic begins—the roasting will intensify the flavors of the tomatoes!

  2. Prepare the Tomatoes: Wash the cherry tomatoes and cut them in half. Toss them in a bowl with a generous drizzle of olive oil, a good pinch of salt, and freshly cracked pepper. The oil helps to coat the tomatoes and ensure they roast evenly.

  3. Roast the Tomatoes: Spread the seasoned tomatoes cut-side up on a baking sheet lined with parchment paper. Roast in the preheated oven for about 20-25 minutes. You want them blistered and slightly caramelized. Keep an eye on them; the aroma will be absolutely intoxicating!

  4. Toast the Bread: While your tomatoes are roasting, let’s get that crostini ready! Slice your baguette into 1/2-inch thick pieces. Heat a skillet over medium heat, add a drizzle of olive oil, and toast the bread on both sides until golden brown and crispy. (Chef hack: If you want an even more delicious twist, rub a clove of garlic on the toasted bread for added flavor!)

  5. Assemble the Crostini: Once the tomatoes are out of the oven, allow them to cool for a few minutes. Spread a generous layer of ricotta on each crostini piece. Top with the sweet roasted tomatoes, drizzling them with any juices from the baking sheet.

  6. Finish with Flair: Drizzle balsamic glaze over the top, adding a beautiful finish and an extra layer of flavor. Top it off with fresh basil if you’re using it. Voilà! You’ve got yourself a beautiful platter of ricotta crostini!

Serving Suggestions

These crostini are best served fresh, so gather your friends and family around the table. Arrange the crostini artfully on a large wooden board or platter, drizzling with additional balsamic over the top for presentation. Pair them with a glass of crisp white wine or sparkling water with lemon for a truly delightful experience!

Recipe Variations

Want to mix things up? Here are some fun variations to try:

  • Herbed Ricotta: Mix in fresh herbs like chives or dill into the ricotta for an extra flavor punch.

  • Add a Protein: Top with prosciutto or even smoked salmon for a heartier twist.

  • Spicy Kick: Add a pinch of red pepper flakes to the roasted tomatoes for a kick of heat.

  • Cheesy Goodness: Mix some grated Parmesan with your ricotta for a savory depth.

  • Balsamic Reduction: If you prefer, reduce the balsamic vinegar to a syrupy consistency for an aromatic drizzle.

Chef’s Notes

Cooking is often about the stories we create in the kitchen, and this dish is no exception! I’ve played around with this recipe over the years, adding various toppings and ingredients. My favorite version to date included a hint of lemon zest mixed in with the ricotta—it added a refreshing brightness that complemented the roasted tomatoes beautifully.

And, of course, I’ve had my fair share of kitchen disasters while honing my skills. Once, I completely forgot to season the tomatoes and had a “meh” moment that made everyone chuckle. Which brings me back to the wisdom I keep close: always taste as you go!

FAQs and Troubleshooting

Q: My tomatoes didn’t get caramelized. What went wrong?
A: Make sure you’re using enough olive oil and give them enough space on the baking sheet to roast without steaming. They should be spread out evenly in a single layer.

Q: How can I use leftover ricotta?
A: Leftover ricotta is delicious in pancakes, as a spread on toast with honey, or even stirred into pasta dishes for creaminess!

Q: Can I make this ahead of time?
A: You can roast the tomatoes and toast the bread in advance. Assemble the crostini right before serving for the best texture.

Q: Is there a dairy-free alternative for the ricotta?
A: You can try cashew cheese or store-bought dairy-free ricotta as a substitute!

Nutritional Info

While I’m not one to get bogged down by numbers, a serving of these crostini clocks in at approximately 150 calories per piece (considering traditional ingredients). High in protein from the ricotta and filled with vibrant veggies, they make a great snack or appetizer option!

So there you have it! With a little time and care, you can whip up these stunning Ricotta Crostini with Roasted Tomatoes that are not only a feast for the eyes but a delight to the palate. I hope you enjoyed this journey through flavors, memories, and kitchen stories! Happy cooking, and don’t forget to share your delicious creations with the world!

Print

Ricotta Crostini with Roasted Tomatoes

Delicious ricotta crostini topped with sweet roasted tomatoes, perfect for gatherings and summer evenings.

  • Prep Time: 10 minutes
  • Cook Time: 25 minutes
  • Total Time: 35 minutes
  • Yield: 4 servings 1x
  • Category: Appetizer
  • Method: Roasting
  • Cuisine: Italian
  • Diet: Vegetarian

Ingredients

Scale
  • 1 cup Ricotta Cheese
  • 2 cups Cherry Tomatoes, halved
  • 2 tablespoons Balsamic Glaze
  • 1 French Baguette, sliced
  • 2 tablespoons Olive Oil
  • Salt and Pepper to taste
  • Fresh Basil (optional)

Instructions

  1. Preheat the oven to 400°F (200°C).
  2. Prepare the tomatoes by washing and halving them, then tossing with olive oil, salt, and pepper.
  3. Roast the tomatoes on a baking sheet for about 20-25 minutes until blistered and caramelized.
  4. Toast the bread in a skillet with olive oil until golden brown and crispy.
  5. Assemble the crostini by spreading ricotta on each piece of bread and topping with roasted tomatoes.
  6. Drizzle with balsamic glaze and garnish with basil if desired.

Notes

Serve fresh for the best taste. You can experiment with toppings like herbs or proteins.

Nutrition

  • Serving Size: 2 crostini
  • Calories: 150
  • Sugar: 4g
  • Sodium: 200mg
  • Fat: 8g
  • Saturated Fat: 3g
  • Unsaturated Fat: 5g
  • Trans Fat: 0g
  • Carbohydrates: 18g
  • Fiber: 1g
  • Protein: 6g
  • Cholesterol: 10mg

Keywords: crostini, appetizers, Italian food, summer recipes

Did you make this recipe?

Share a photo and tag us — we can't wait to see what you've made!

May 31, 2026 |

Crispy Fried Pickle Dip (Dairy-Free, 15-Minute Prep)

Bowl of crispy fried pickle dip, dairy-free recipe with pickles and spices

The Ultimate Easy Fried Pickle Dip: A Dairy-Free Delight

Hey there, food lovers! Welcome back to Clean Plate Cravings! Today, we’re diving right into one of my favorite crowd-pleasers that’s perfect for game days, movie nights, or simply when you’re craving something tasty to snack on. Yep, you guessed it – it’s Easy Fried Pickle Dip! This dip is rich, creamy, and bursting with flavor, and the best part? I’ll show you how to whip it up with a dairy-free option, so everyone can join in on the fun!

I remember the first time I stumbled upon a fried pickle dip at a local pub. It was a warm summer evening, and I was hanging out with friends, just enjoying the vibes. We ordered a few appetizers to share, and when that golden, crispy pickle dip came out, my world changed! The crunchy bits on top, alongside that fabulous tangy pickle flavor, created a taste explosion that I just couldn’t resist. I knew I had to recreate it at home! After a few trial and errors in my kitchen, I can confidently say this recipe captures all that nostalgia without the fuss. So, let’s jump straight into it!

Personal Story

Growing up, my family had this tradition of gathering for Sunday dinners. Each week, we would choose a theme, and one time it was all about “dips.” We lined the table with various spreads, each one more delicious than the last. There were guacamoles, hummuses, and legends of a spinach artichoke dip that always disappeared by the time desserts came out. Somewhere in that mix, my aunt introduced us to her take on fried pickles, and we couldn’t get enough!

Fast forward a few years, and the moment I discovered fried pickle dip was like a nostalgic memory come back to life. It reminded me of family gatherings, laughter, and good food. I decided to take my aunt’s love for fried pickles and morph it into a creamy, dreamy dip—making it perfect for a casual get-together or even a cozy night in. I couldn’t wait to share this dish with you all, so let’s get cooking!

Ingredients

Let’s gather our ingredients! Here’s what you’ll need:

  • 16 oz container sour cream (dairy-free option available)

    • Chef Insight: Sour cream gives that creamy texture and tang. If you go dairy-free, try out cashew-based options or coconut cream for a dreamy substitute!
  • 8 oz cream cheese (can substitute with dairy-free cream cheese like Kite Hill)

    • Substitution Tip: The cream cheese adds richness; ensure it’s softened so you can blend it seamlessly into the dip.
  • 1 cup dill pickles (chopped)

    • Fun Fact: The heart of this recipe! Use good-quality dill pickles for that signature tang. You can also try bread and butter pickles if you prefer a sweet twist.
  • 2 tbsp pickle juice

    • Chef Insight: This brings the briny flavor into the dip! Don’t be shy; it adds that zesty kick we love.
  • 1 tbsp Worcestershire sauce (make sure it’s vegan if you’re dairy-free)

    • Note: This adds depth and umami to the flavor; read labels to ensure it aligns with your dietary needs.
  • 2-3 tbsp fresh dill

    • Substitution Tip: Fresh dill brightens everything up! If you only have dried, 1 tablespoon will do, but fresh is always best!
  • 1/2 tsp garlic powder

    • Chef Insight: Adds lovely flavor without the hassle of chopping fresh garlic.
  • 1/2 tsp onion powder

    • Substitution Tip: Like garlic powder, this is a powerhouse and creates a wonderful backdrop for the pickle flavor.
  • 2 tbsp ranch seasoning (I have a homemade version with a dairy-free option!)

    • Fun Fact: This is where the magic happens! Store-bought ranch may work, but homemade gives you control over the ingredients.
  • Salt to taste

    • Note: Always taste your mixture! Pickles can be salty, so adjust as necessary.
  • 3/4 cup Panko breadcrumbs

    • Substitution Tip: For a gluten-free option, swap these out for gluten-free breadcrumbs or crushed nuts.
  • 1 tbsp butter (or dairy-free butter)

    • Chef Insight: Using butter gives the Panko a beautiful golden crunch! Leave it out if you’re cooking without oil or fat.

Step-by-Step Instructions

Alright, let’s get our hands dirty—this dip is super simple to make! Follow along closely:

  1. Prep Your Ingredients: Start by gathering and measuring out all your ingredients. This makes the cooking process smoother. While some people love winging it, trust me, a little prep goes a long way!

  2. Combine the Cream Base: In a large mixing bowl, add your softened cream cheese and sour cream. Blend them together using a spatula or hand mixer until they’re well combined. You want this to be super creamy and smooth.

  3. Add the Good Stuff: Now, slowly fold in the chopped dill pickles, pickle juice, Worcestershire sauce, fresh dill, garlic powder, onion powder, and ranch seasoning. Mix well until everything is incorporated. You should see bites of pickle peeking through that gorgeous, creamy base!

  4. Taste and Adjust: Here’s the fun part—taste your dip! This is your chance to adjust anything to your liking. Need more pickle juice? Want it a bit zestier? Go ahead and make it your own!

  5. Prepare for Baking: Transfer the dip mixture into a baking dish (an 8×8 inch dish is perfect). Even out the top with a spatula.

  6. Panko Topping Time: In a small bowl, melt your butter, then mix in the Panko breadcrumbs until they’re nicely coated. Spread this crunchy mixture evenly over the dip.

  7. Bake to Perfection: Preheat your oven to 350°F (175°C) and pop the dip in for 20-25 minutes, or until the top is golden and bubbly. Your kitchen will smell heavenly, and the anticipation will build!

  8. Chill for a Moment: Once it’s out of the oven (and cooled slightly), dive in with some chips, veggies, or even crackers. But beware, it can be hard to wait!

Serving Suggestions

When it comes to serving this Easy Fried Pickle Dip, you have endless options. Serve it warm right out of the oven for that gooey, melty goodness! Pair it with crispy potato chips or veggie sticks like carrots and celery for that crunchy contrast. A platter filled with colorful snacks will make your dip stand out even more. Just don’t forget to have extra pickle slices on the side for those who can’t get enough!

Recipe Variations

Want to switch it up? Here are a few creative twists you can make to keep things fresh:

  1. Spicy Kick: Add a sprinkle of cayenne pepper or some chopped jalapeños for a fiery twist.

  2. Cheesy Delight: Mix in some dairy-free cheese shreds for an even creamier dip.

  3. Herbal Adventure: Swap out dill for fresh chives or parsley for a different flavor profile.

  4. Bacon Lover’s Dip: Crumple some crispy turkey bacon or coconut bacon on top before baking for a smoky crunch.

  5. Tex-Mex Style: Incorporate a handful of chopped sundried tomatoes or black olives for a Mediterranean flair.

Chef’s Notes

Cooking is always evolving, just like this recipe! The first iteration I made was too heavy on the cream cheese, which overshadowed the pickles. After a couple of tweaks (and some snack breaks!), I found the perfect balance of creaminess and tang. I even introduced a dairy-free version for my friends with dietary restrictions, making it versatile for gatherings. And let me tell you—this dip never lasts long!

FAQs and Troubleshooting

1. My dip isn’t creamy enough; what do I do?
If your dip turns out too thick, mix in a bit more pickle juice or a splash of non-dairy milk to loosen it up and make it silky.

2. Can I make this dip ahead of time?
Absolutely! You can prepare the dip and even sprinkle on the breadcrumbs a day in advance. Just cover and refrigerate until you’re ready to bake.

3. My Panko got soggy, what happened?
If your dip is too watery, the Panko can absorb it and lose that crunch. Make sure to drain excess pickle juice before adding it into your dip.

4. What can I use instead of Panko?
Try using crushed crackers or nuts for a tasty topping! Just remember that the texture will be different.

Nutritional Info

While I don’t always include nutritional info, it’s worth noting that this Easy Fried Pickle Dip is a creamy indulgence and best enjoyed in moderation. With the ability to make it dairy-free, it caters to various dietary preferences, making it a versatile addition to your snacking game!


I hope you feel inspired to bring this Easy Fried Pickle Dip into your kitchen! It’s a recipe that comes with memories, laughs, and, of course, scrumptious bites. Let’s keep the flavor alive! Happy dipping, my friends!

Print

The Ultimate Easy Fried Pickle Dip: A Dairy-Free Delight

A rich and creamy dip bursting with flavor, and a dairy-free option for everyone to enjoy. Perfect for game days and cozy nights.

  • Prep Time: 15 minutes
  • Cook Time: 25 minutes
  • Total Time: 40 minutes
  • Yield: 8 servings 1x
  • Category: Appetizer
  • Method: Baking
  • Cuisine: American
  • Diet: Dairy-Free, Vegetarian

Ingredients

Scale
  • 16 oz container sour cream (dairy-free option available)
  • 8 oz cream cheese (can substitute with dairy-free cream cheese)
  • 1 cup dill pickles (chopped)
  • 2 tbsp pickle juice
  • 1 tbsp Worcestershire sauce (vegan if dairy-free)
  • 23 tbsp fresh dill
  • 1/2 tsp garlic powder
  • 1/2 tsp onion powder
  • 2 tbsp ranch seasoning (dairy-free option available)
  • Salt to taste
  • 3/4 cup Panko breadcrumbs
  • 1 tbsp butter (or dairy-free butter)

Instructions

  1. Prep your ingredients: Start by gathering and measuring out all your ingredients for a smoother cooking process.
  2. Combine the cream base: In a large mixing bowl, add soft cream cheese and sour cream. Blend until creamy and smooth.
  3. Add the good stuff: Fold in chopped dill pickles, pickle juice, Worcestershire sauce, fresh dill, garlic powder, onion powder, and ranch seasoning.
  4. Taste and adjust: Sample your dip and adjust seasoning as needed.
  5. Prepare for baking: Transfer the dip mixture into an 8×8 inch baking dish and even out the top with a spatula.
  6. Panko topping time: Melt butter and mix with Panko breadcrumbs. Spread over the dip.
  7. Bake to perfection: Preheat oven to 350°F (175°C) and bake for 20-25 minutes until golden and bubbly.
  8. Chill for a moment: Let cool slightly before serving with chips, veggies, or crackers.

Notes

You can prepare the dip ahead of time and refrigerate until you’re ready to bake. Adjust ingredients to personal taste.

Nutrition

  • Serving Size: 1 serving
  • Calories: 320
  • Sugar: 3g
  • Sodium: 450mg
  • Fat: 18g
  • Saturated Fat: 6g
  • Unsaturated Fat: 10g
  • Trans Fat: 0g
  • Carbohydrates: 30g
  • Fiber: 1g
  • Protein: 5g
  • Cholesterol: 24mg

Keywords: fried pickle dip, dairy-free dip, appetizer recipes, party food, game day snacks

Did you make this recipe?

Share a photo and tag us — we can't wait to see what you've made!

May 31, 2026 |

Hissy Fit Dip

Creamy Hissy Fit Dip served with fresh vegetables and chips

Hissy Fit Dip: The Creamy Comfort Food You’ll Crave

Welcome back to Clean Plate Cravings, my food-loving friends! Today, I have a treat for you that’s as easy to whip up as it is to devour. Let’s dive into the world of Hissy Fit Dip—a creamy, savory delight that hits all the right notes for your next gathering or cozy night in. Trust me, this dip is about to make your taste buds do a happy dance!

When I think of Hissy Fit Dip, I’m flooded with memories of laughter, friends, and indulgence. This dip has a way of bringing people together, whether it’s game day, a potluck, or just a chill Friday night at home. It’s that comforting dish you can rely on to satisfy your cravings and impress your guests all at once. Plus, it’s so simple to make that even the most kitchen-challenged among us can pull it off. So roll up your sleeves, grab your apron, and let’s get cooking!

A Nostalgic Story

Growing up, our family had a unique tradition that revolved around Friday night game nights. We’d gather around the TV with piles of snacks, cheering for our favorite teams while munching on all sorts of comfort food. One Friday evening, my mom decided to make a new dip she’d heard about—Hissy Fit Dip. Intrigued by the name, my friends and I couldn’t wait to dig in!

The moment that warm, cheesy goodness hit our taste buds, we were transported to a world of flavor. It was creamy, with just the right amount of spice from the sausage and a lovely melty consistency that made it irresistible. Every scoop was a bit of heaven, and soon enough, we were stealing bites directly from the baking dish! There might have been some friendly arguments about who got the last bite, leading to giggles and a few good-natured “hissy fits.”

Fast forward to today, and Hissy Fit Dip has become a staple in my own kitchen, providing me with the same joy and nostalgia as it did back then. Each time I make it, I’m reminded of those carefree evenings filled with laughter, good food, and cherished friendships. Now, I can’t wait for you to create your own memories with this scrumptious dip!

Ingredients

Here’s what you’ll need to bring this delightful dip to life:

  • 8 oz cream cheese, softened
    This is the base of our dip! Cream cheese adds that rich, creamy texture. If you’re looking for a lighter option, you can substitute with Greek yogurt.

  • 1 cup sour cream
    A must for the creaminess! It adds a tangy flavor that balances the richness. You can use non-fat or low-fat sour cream if you want to cut calories, or even a dairy-free version if you prefer.

  • 1 cup cooked sausage, crumbled
    Sausage brings a savory punch to the dip. I recommend using Italian sausage for some spice, but feel free to go with turkey or a plant-based sausage if you’re looking for a healthier or vegetarian option.

  • 1 cup shredded cheddar cheese
    Cheddar contributes that iconic cheesy flavor and gooey stretch. A sharp cheddar will up the flavor profile. You could swap in pepper jack if you want a kick!

  • 1 cup shredded mozzarella cheese
    Mozzarella is all about the melt! It keeps the dip luscious and creamy. Try using a low-moisture mozzarella for the best melting quality.

  • 1 tsp garlic powder
    A little garlic powder boosts flavor without the chopping! You can substitute fresh minced garlic if you prefer a stronger garlic kick.

  • 1 tsp onion powder
    This adds a sweet and savory depth. If you have fresh onions, sautéing them first can brighten the flavor even more.

  • 1 tsp paprika
    Paprika lends color and a subtle smokiness to the dip. If you’re feeling adventurous, try smoked paprika for a deeper flavor.

  • Salt and pepper to taste
    Essential for bringing all the flavors together. Always taste your dip before serving to make necessary adjustments.

  • Chopped green onions for garnish
    A fresh finish! Green onions add a pop of color and a burst of freshness to balance the richness of the dip.

Step-by-Step Instructions

Now that you have your ingredients ready, let’s put this delicious Hissy Fit Dip together!

  1. Preheat your oven to 350°F (175°C).
    Be sure to do this first so your oven is ready when you’re done prepping.

  2. In a large mixing bowl, combine the softened cream cheese and sour cream.
    Use a hand mixer or a spatula to blend them together until smooth. This step is essential for avoiding lumps!

  3. Add in the cooked sausage, cheddar cheese, and mozzarella cheese.
    Mix until everything is well combined—a good stir will help disperse the sausage and cheese evenly throughout the dip.

  4. Sprinkle in the garlic powder, onion powder, and paprika.
    It’s time for seasoning! Stir well to incorporate these spices, ensuring each luscious bite is packed with flavor.

  5. Season with salt and pepper to taste.
    Remember, you can always add more salt later, so start with a little and build up if needed.

  6. Transfer the dip mixture to a baking dish.
    I recommend using an 8×8 inch dish, but any oven-safe dish will do. Spread the mixture evenly across the bottom.

  7. Bake in the preheated oven for 25-30 minutes or until bubbling and golden on top.
    Keep an eye on it during the last few minutes; you want that perfect golden crust without burning!

  8. Once it’s out of the oven, let it cool for a few minutes.
    This is the hardest part—don’t dive in just yet! A slight cool will make it easier to scoop.

  9. Garnish with chopped green onions just before serving.
    This adds a colorful touch and a refreshing crunch that cuts through the richness of the cheese.

Voilà! You’ve created a dip that will become a household favorite (if it isn’t already!).

Serving Suggestions

Hissy Fit Dip is best served warm, right out of the oven. Pair it with an array of sides to accompany your dip:

  • Tortilla chips: Go classic with crunchy chips!
  • Vegetable sticks: Carrots, celery, and bell peppers provide a satisfying crunch.
  • Bread: Serve with slices of crusty bread or toasted baguette for a more substantial dipper.
  • Crackers: Opt for a colorful variety to create an appealing platter.

No matter how you choose to serve it, this dip is bound to be a hit!

Recipe Variations

Feel like mixing things up? Here are a few creative twists to try with your Hissy Fit Dip:

  1. Buffalo Chicken Hissy Fit Dip: Swap out the sausage for shredded cooked chicken and add a dash of hot sauce for some spicy flair.

  2. Spinach and Artichoke Version: Stir in a cup of cooked spinach and a half-cup of chopped artichokes for a classic twist!

  3. Southwestern Style: Add black beans, corn, and diced green chilies for a zesty Southwestern flavor profile.

  4. Cheesy Jalapeño Dip: For heat lovers, include diced jalapeños and use pepper jack cheese instead of cheddar.

  5. Vegetarian Hissy Fit Dip: Skip the sausage, and add finely diced bell peppers and zucchini for a veggie version that’s just as delicious!

Chef’s Notes

Ah, the evolution of Hissy Fit Dip! Over the years, this recipe has traveled through many iterations in my kitchen. Originally, I thought it was just a standard cheesy dip, but the moment I started experimenting with spices and different cheeses, it exploded in flavor. I’ll never forget the first time I tried adding a touch of smoked paprika—it was a game-changer!

Another funny memory? Once, I forgot to add the sausage, and my friends accidentally dubbed it a “healthy version.” Little did they know, I just had a major “oops!” moment! But that dip was just as delicious, proving that Hissy Fit Dip truly is versatile.

FAQs and Troubleshooting

1. Can I make this dip ahead of time?
Absolutely! You can prepare the dip, store it in the fridge for up to 24 hours, and then bake it right before serving. Perfect for planning ahead!

2. My dip is too thick; what can I do?
If it seems too thick, you can mix in a splash of milk or additional sour cream before baking to loosen it up a bit.

3. How do I store leftovers?
Store any leftover dip in an airtight container in the fridge for up to 3 days. Just reheat in the oven or microwave before enjoying!

4. How can I make it spicier?
Add more garlic powder, a pinch of cayenne pepper, or even a splash of hot sauce to kick up the spice levels.

Nutritional Info

This Hissy Fit Dip is definitely a treat, so enjoy it in moderation as part of a balanced diet! (Note: Nutritional values will vary based on specific brands and preparation.)

  • Calories per serving: Approximately 200-250 (based on serving size and ingredients used)
  • Protein: 10g
  • Fat: 18g
  • Carbohydrates: 4g

Remember, good food is all about balance and sharing great moments with friends and family!

Now that you’ve discovered the secrets of Hissy Fit Dip, it’s time to gather those ingredients and get cooking. Enjoy the process, have fun, and create your own wonderful memories around this creamy delight. Happy dipping!

Print

Hissy Fit Dip

A creamy and savory dip that is perfect for gatherings and cozy nights in, guaranteed to satisfy your cravings.

  • Prep Time: 15 minutes
  • Cook Time: 30 minutes
  • Total Time: 45 minutes
  • Yield: 8 servings 1x
  • Category: Appetizer
  • Method: Baking
  • Cuisine: American
  • Diet: Vegetarian

Ingredients

Scale
  • 8 oz cream cheese, softened
  • 1 cup sour cream
  • 1 cup cooked sausage, crumbled
  • 1 cup shredded cheddar cheese
  • 1 cup shredded mozzarella cheese
  • 1 tsp garlic powder
  • 1 tsp onion powder
  • 1 tsp paprika
  • Salt and pepper to taste
  • Chopped green onions for garnish

Instructions

  1. Preheat your oven to 350°F (175°C).
  2. Combine the softened cream cheese and sour cream in a large mixing bowl.
  3. Add in the cooked sausage, cheddar cheese, and mozzarella cheese.
  4. Sprinkle in the garlic powder, onion powder, and paprika.
  5. Season with salt and pepper to taste.
  6. Transfer the dip mixture to a baking dish.
  7. Bake in the preheated oven for 25-30 minutes or until bubbling and golden on top.
  8. Let it cool for a few minutes.
  9. Garnish with chopped green onions just before serving.

Notes

Feel free to prepare the dip ahead of time and store it in the fridge for up to 24 hours before baking.

Nutrition

  • Serving Size: 1 serving
  • Calories: 250
  • Sugar: 2g
  • Sodium: 500mg
  • Fat: 18g
  • Saturated Fat: 9g
  • Unsaturated Fat: 7g
  • Trans Fat: 0g
  • Carbohydrates: 4g
  • Fiber: 0g
  • Protein: 10g
  • Cholesterol: 50mg

Keywords: dip, creamy dip, Hissy Fit Dip, easy appetizer, cheese dip

Did you make this recipe?

Share a photo and tag us — we can't wait to see what you've made!

May 31, 2026 |

Caprese Dip

Delicious Caprese Dip served in a bowl with fresh basil and tomatoes

A Taste of Summer: Caprese Dip to Savor

Hello there, fellow food lovers! Today, I’m thrilled to share one of my go-to recipes that screams summer but is delightful on any occasion: Caprese Dip! This vibrant, creamy, and oh-so-delicious dip combines the classic flavors of a Caprese salad and brings it right to your snack table. It’s perfect for parties, casual get-togethers, or even a cozy night in with friends—because who doesn’t love some good foot-stomping, finger-licking goodness?

Let’s chat for a moment about the fresh ingredients that come together to create this dip. Imagine plump, ripe tomatoes bursting with flavor, aromatic garlic dancing around in the mix, and the sweet, herbal notes of fresh basil wafting through the air. And don’t even get me started on the creamy goodness of cream cheese combined with gooey mozzarella and salty Parmesan—pure bliss!

Back in the day, during those endless summer afternoons at my grandparents’ house, my family would gather around a big platter of fresh Caprese salad, with all the colors of summer exploding on the table. It was a simple dish but packed with memories, laughter, and a hint of competition to see who could snag the last piece of mozzarella. This dip is my homage to those sunny days, a way to bring that nostalgia and love into a comforting, shareable form.

Now, let’s jump into how to whip up this fabulous Caprese Dip that your taste buds (and your friends) will thank you for!

Ingredients

Gather these fresh goodies to create your Caprese Dip masterpiece:

  • Fresh Tomatoes: The star of the show! I recommend using heirloom or vine-ripened tomatoes for their intense flavor. If you’re in a pinch, feel free to substitute with cherry tomatoes or even sun-dried tomatoes for a different flavor profile.

  • Garlic: A couple of cloves will do the trick, bringing a lovely depth of flavor. If you’re not a fan of raw garlic, try roasting it first for a sweeter, milder taste.

  • Fresh Basil: Nothing beats the fragrant aroma of fresh basil! If you can’t find any, dried basil can be used in a pinch, but fresh is always best for that vibrant punch.

  • Cream Cheese: This adds a luscious creaminess to the dip. Low-fat cream cheese can be a lighter alternative, but you can also swap it for Greek yogurt for a tangy twist!

  • Mozzarella Cheese: Go for the fresh mozzarella balls (bocconcini) for the best texture and flavor, but shredded mozzarella works if that’s all you have on hand.

  • Parmesan Cheese: Grated Parmesan gives that savory kick! For a vegan option, try nutritional yeast for a cheesy flavor without the dairy.

  • Olive Oil: A drizzle of high-quality extra virgin olive oil will elevate your dip’s flavors. You can swap this out with avocado oil for a buttery taste.

  • Salt: Just a pinch to enhance all the flavors. Always taste and adjust; everyone has different salt preferences!

  • Crusty Bread: To serve, you’ll need something to scoop up this deliciousness. A fresh baguette, ciabatta, or even pita chips will work beautifully.

Step-by-Step Instructions

  1. Prep the Ingredients:

    • Start by dicing your tomatoes. Aim for bite-sized pieces since this dip will be an easy grab-and-dip situation. Don’t forget to remove any excess seeds to prevent it from getting watery. A chef hack? Gently squeeze the tomatoes to release some juice before chopping.
    • Mince the garlic finely; this will infuse every bite with flavor. Don’t be shy; garlic lovers rejoice!
  2. Mix the Creamy Base:

    • In a large mixing bowl, beat the cream cheese until it’s smooth. You can use a hand mixer, or just your trusty spatula—whatever floats your boat! If your cream cheese is still cold, it might take a moment to soften up, so patience is key!
    • Add in the minced garlic and finely chopped fresh basil. Mix well, letting those flavors meld—it’s a fragrant delight!
  3. Incorporate the Cheeses:

    • Fold in the mozzarella and Parmesan cheese gently so you don’t break apart the mozzarella balls. Imagine you’re cradling a small, lovely baby; we want the cheese chunks intact for those gooey bites!
  4. Combine with Tomatoes:

    • Now, gently fold in the diced tomatoes and a pinch of salt. This is where color and flavor collide! The vivid reds and greens will make your heart sing.
  5. Final Touches:

    • Drizzle in a generous swirl of olive oil and give it one last mix. Taste it—does it need a bit more salt? Maybe another drizzle of olive oil? Adjust as needed to suit your taste.
  6. Serve It Up:

    • Transfer the Caprese Dip to a rustic serving bowl. Optional step: Garnish with a few basil leaves and an extra drizzle of olive oil on top to make it Instagram-ready.

Serving Suggestions

This dip is best enjoyed fresh, served alongside warm, crusty bread or crispy pita chips. Arrange your serving platter beautifully, with toast slices around the dip, maybe even a few fresh basil leaves for that extra touch. It’s all about presentation, so get creative! Win the hearts of your guests with an attractive spread that invites everyone to dig in.

Recipe Variations

  • Pesto Caprese Dip: Mix in a few tablespoons of pesto when combining with the cheeses for a herby twist that’ll make it pop.

  • Spicy Caprese Dip: Add a dash of red pepper flakes or some finely chopped jalapeños for a kick.

  • Veggie-packed Dip: Fold in finely diced bell peppers or roasted red peppers for extra flavor and a dosage of color.

  • Olive Tapenade Addition: Try mixing in a bit of olive tapenade for a briny depth that complements the fresh flavors.

Chef’s Notes

I first experimented with this dip one lazy Friday evening, yearning for something fresh but cozy. It began as a little creativity while clearing out my fridge. The fact that it magically transforms simple ingredients into a crowd-pleaser is beyond me, but that’s how cooking goes sometimes, isn’t it?

Over the years, I’ve had friends tell me they’ve made this for their summer barbecues and even holiday parties—successes that have put a smile on my face. It evolves with the seasons, much like my cooking journey—from trying new ingredients to adapting for dietary needs. I love that cooking can be fluid and adaptable; it’s part of the fun!

FAQs and Troubleshooting

1. My dip turned out too watery. What happened?

This often happens if the tomatoes are too juicy! Be sure to remove excess seeds before chopping, or you can strain the chopped tomatoes if needed.

2. Can I use dried basil instead of fresh?

While I always recommend fresh for best flavor, you can substitute dried basil in a pinch! Just use about a third of the amount—dried herbs are more concentrated.

3. My cream cheese isn’t blending smoothly. What can I do?

If your cream cheese is too cold, try microwaving it for just about 10-15 seconds or let it sit out at room temperature for about 30 minutes before mixing to make it easier to blend.

4. How can I store leftovers?

If you have any dip left (which is rare), store it in an airtight container in the fridge. It should last for 3–5 days. Just give it a good stir before serving again!

Nutritional Info

Though I’ll always advocate for enjoying food without fear, here’s a little peek at the nutritional value: approximately 150 calories per serving (about 2 tablespoons), with a healthy dose of protein and wonderful flavor without any guilt!

So, there you have it! Dive into your very own Caprese Dip, and recreate those sunny days filled with flavor and laughter. Whether you’re sharing it with friends or keeping it all to yourself (no judgment here!), I hope this vibrant dip brings a bit of joy to your table. Happy cooking, my friends! 🍅🍃🥖

Print

Caprese Dip

A vibrant and creamy dip that combines classic Caprese salad flavors, perfect for summer gatherings or cozy nights in.

  • Prep Time: 15 minutes
  • Cook Time: 0 minutes
  • Total Time: 15 minutes
  • Yield: 8 servings 1x
  • Category: Appetizer
  • Method: No Cooking
  • Cuisine: Italian
  • Diet: Vegetarian

Ingredients

Scale
  • 4 Fresh Heirloom Tomatoes, diced
  • 2 cloves Garlic, minced
  • 1/4 cup Fresh Basil, chopped
  • 8 oz Cream Cheese, softened
  • 1 cup Fresh Mozzarella balls (bocconcini)
  • 1/2 cup Grated Parmesan cheese
  • 2 tbsp Olive Oil
  • Salt, to taste
  • Crusty Bread, for serving

Instructions

  1. Prep the Ingredients: Dice the tomatoes into bite-sized pieces, remove excess seeds, and mince the garlic finely.
  2. Mix the Creamy Base: Beat the cream cheese until smooth, then mix in minced garlic and chopped basil.
  3. Incorporate the Cheeses: Gently fold in mozzarella and Parmesan cheese to maintain the mozzarella’s shape.
  4. Combine with Tomatoes: Fold in the diced tomatoes and a pinch of salt.
  5. Final Touches: Drizzle olive oil and adjust seasoning as needed.
  6. Serve It Up: Transfer to a rustic serving bowl and garnish with basil and olive oil.

Notes

Best served fresh with warm crusty bread or crispy pita chips. Can be customized with pesto, spicy peppers, or vegetables.

Nutrition

  • Serving Size: 2 tablespoons
  • Calories: 150
  • Sugar: 3g
  • Sodium: 300mg
  • Fat: 10g
  • Saturated Fat: 5g
  • Unsaturated Fat: 3g
  • Trans Fat: 0g
  • Carbohydrates: 5g
  • Fiber: 1g
  • Protein: 4g
  • Cholesterol: 25mg

Keywords: Caprese Dip, Summer Dip, Appetizer, Italian Recipes, Creamy Dip

Did you make this recipe?

Share a photo and tag us — we can't wait to see what you've made!

May 31, 2026 |

Best Mexican White Cheese Dip

Creamy Mexican white cheese dip served in a bowl with tortilla chips

Best Mexican White Cheese Dip: A Flavorful Journey

Welcome to Clean Plate Cravings, friends! Today, we’re diving into a beloved classic that is sure to make your taste buds dance. I can already hear the crunch of tortilla chips and the zing of flavor as we prepare to make the best Mexican white cheese dip. This cheesy delight is not just a party favorite; it’s a comfort food that brings people together, whether you’re throwing a festive gathering or just indulging in a cozy night on the couch.

Now, let’s talk about the magic that happens when smooth, velvety cheese meets zesty ingredients. Trust me, this dip is a crowd-pleaser! There’s something about that warm, gooey texture and rich flavor that makes every bite feel like a warm hug. The best part is that it’s incredibly simple to make—perfect for busy weeknights when you just want something delicious without all the fuss.

A Whirlwind Through Flavorful Memories

Flashback to my childhood summers spent in my abuela’s kitchen. The tantalizing aroma of spice and cheese wafted through the air, mingling perfectly with laughter and chatter. Every family gathering centered around delicious food, and no occasion was too small for her famous white cheese dip. It wasn’t just about the dip; it was the experience of gathering around the table, dipping crunchy tortilla chips in a pot of cheesy goodness, and sharing stories with family and friends.

Each bite transported me back to those sun-soaked afternoons—friends and family, a backyard full of sunshine, and of course, that unforgettable white cheese dip. Now, I’ll share that joy with you through this recipe, so you can create those same wonderful moments. Whether you’re hosting a taco night, watching the big game, or just needing a cozy treat, this dip fits right in!

Ingredients

Here’s what you’ll need to create this heavenly white cheese dip, plus some tips to enhance your experience:

  • 2 cups white American cheese, shredded
    The star of the show! Its creamy texture melts beautifully and creates that desired dip consistency. If you can’t find white American, you can use Monterey Jack or a blend of both for a slightly different flavor.

  • 1/2 cup milk
    This helps to provide the right creaminess. Use whole milk for a richer dip, or substitute with almond milk or oat milk for a lighter option.

  • 1/4 cup diced green chilies
    These little gems bring a lively flavor and a touch of heat. If you prefer a milder taste, opt for canned diced green chilies such as mild or substitute with sweet bell peppers.

  • 1/4 cup diced onions
    For added depth of flavor! You can use white or yellow onions, or even sauté some scallions for a fresher taste.

  • 1/2 teaspoon garlic powder
    Just a pinch as we want it to enhance, not overpower. Feel free to switch to fresh minced garlic for a more intense flavor.

  • Salt to taste
    Always adjust to your personal preference, but remember, the cheese already has some saltiness!

  • Fresh cilantro for garnish (optional)
    A sprinkle brings freshness and a pop of color. If cilantro isn’t your thing, chopped green onions work well too.

Step-by-Step Instructions

Ready to set your cheese dip into motion? Let’s get cooking!

  1. Prepare Your Ingredients
    Start by gathering all your ingredients. Shred the cheese ahead of time for a smoother melt. Having everything ready will make the cooking process seamless!

  2. Heat Up the Pot
    In a medium saucepan, pour in your milk and set it on low to medium heat. Gently heating the milk helps it blend seamlessly with the cheese.

  3. Add the Cheese
    Gradually add in the shredded white American cheese while stirring continuously. I love to use a wooden spoon for this—it feels more rustic and somehow enhances the experience!

  4. Incorporate the Diced Veggies
    Once the cheese starts to melt (and the smell wafts through the kitchen—heaven!), fold in the diced green chilies and onions. Keep stirring, so everything warms evenly. This is also where you want to sprinkle in that garlic powder.

  5. Season and Stir
    Taste your mixture and add salt as needed. Remember, every cheese has a different salt content, so adjust accordingly. Continue stirring until it’s completely smooth and melted. If it feels too thick, splash in a bit more milk until it reaches your desired dip consistency.

  6. Garnish and Serve
    Remove the saucepan from the heat. This is where you can be creative—sprinkle fresh cilantro on top for a pop of color and flavor.

Serving Suggestions

Now that your dip is ready, it’s time to serve! Pour the cheesy goodness into a charming bowl, and place it in the center of your dining table with a generous pile of crunchy tortilla chips around it. You can also serve it with fresh veggie sticks for a lighter alternative. Perfect for sharing… or for indulging solo—no judgment here!

Recipe Variations

Get ready to take this dip to new heights with these fun variations:

  • Spicy Twist: Add a dash of cayenne pepper or diced jalapeños to really kick things up a notch.
  • Meaty Addition: Crumble in some cooked chorizo or ground beef for a heartier version.
  • Veggie Delight: Mix in some sautéed bell peppers and corn for extra flavor and texture.
  • Herbed Up: Stir in some fresh herbs like basil or oregano for a unique twist.
  • Smoky Flavor: Use smoked gouda cheese in place of white American for a deliciously smoky version.

Chef’s Notes

This recipe has been a beloved staple in my kitchen for years, and believe me; I’ve had my fair share of experimental dips. I remember once adding too much garlic, thinking I could intensify the flavor. Let’s just say, it was a lesson learned—sometimes, less is more! Over time, I refined this recipe, incorporating traditional elements while making it approachable.

If you have kids in the kitchen, this is a fantastic recipe to have them help with. Let them sprinkle cheese or choose the garnishes—anything to get them excited about cooking!

FAQs and Troubleshooting

1. My dip turned out too thick—what should I do?
No worries! Gradually add more milk until you reach the desired consistency while stirring continuously.

2. Why is my cheese dip gritty?
This can happen if the cheese is overheated or if it’s not good quality. Ensure you’re melting at low heat, and consider investing in a higher-quality cheese for better results.

3. Can I make this dip in advance?
Yes! Prepare the dip and store it in an airtight container in the fridge for up to three days. When you’re ready to serve, gently reheat it on low heat, adding a splash of milk as needed.

4. What can I use instead of cheese?
For a dairy-free option, try a cashew cheese sauce or a plant-based cheese alternative. Just consider that the flavor and consistency may differ.

Nutritional Info (optional)

While I don’t often dive deep into nutritional information, this dip provides a blend of protein and calcium thanks to the cheese. Just remember to enjoy it in moderation, especially if you’re pairing it with that big bowl of tortilla chips!

In conclusion, this Mexican white cheese dip is more than just a recipe; it’s a celebration of flavor and memories. I hope you bring this joy into your kitchen and make it your own. Get ready to dip, share, and savor every mouthful! Happy cooking!

Print

Best Mexican White Cheese Dip

A creamy and flavorful Mexican cheese dip that brings people together, perfect for parties or cozy nights. Enjoy this beloved comfort food with tortilla chips!

  • Prep Time: 10 minutes
  • Cook Time: 15 minutes
  • Total Time: 25 minutes
  • Yield: 4 servings 1x
  • Category: Appetizer
  • Method: Cooking
  • Cuisine: Mexican
  • Diet: Vegetarian

Ingredients

Scale
  • 2 cups white American cheese, shredded
  • 1/2 cup milk
  • 1/4 cup diced green chilies
  • 1/4 cup diced onions
  • 1/2 teaspoon garlic powder
  • Salt to taste
  • Fresh cilantro for garnish (optional)

Instructions

  1. Prepare your ingredients by gathering everything and shredding the cheese.
  2. Heat up a medium saucepan over low to medium heat and pour in the milk.
  3. Add the shredded cheese gradually while stirring continuously.
  4. Incorporate the diced green chilies and onions once the cheese starts to melt, and then sprinkle in the garlic powder.
  5. Season the mixture with salt to taste and stir until smooth, adding more milk if needed.
  6. Garnish with cilantro before serving.

Notes

For added spice, mix in cayenne pepper or jalapeños. This dip can be made in advance and reheated for convenience.

Nutrition

  • Serving Size: 1 serving
  • Calories: 350
  • Sugar: 2g
  • Sodium: 800mg
  • Fat: 24g
  • Saturated Fat: 14g
  • Unsaturated Fat: 8g
  • Trans Fat: 0g
  • Carbohydrates: 6g
  • Fiber: 1g
  • Protein: 15g
  • Cholesterol: 60mg

Keywords: cheese dip, Mexican dip, appetizer, comfort food, party food

Did you make this recipe?

Share a photo and tag us — we can't wait to see what you've made!

May 31, 2026 |

Minute Bang Bang Salmon: Crispy One-Pan Weeknight Dinner

Crispy Minute Bang Bang Salmon in a one-pan dinner served with vegetables.

Bang Bang Salmon: A Flavor-Packed Delight

Welcome to my kitchen! Today, I’m incredibly excited to share with you one of my all-time favorite recipes: Bang Bang Salmon. This dish is not only bursting with flavor but is also remarkably easy to prepare, making it perfect for those busy weeknights or for impressing your friends at a weekend gathering.

When I think of Bang Bang Salmon, I can’t help but smile at the memories it conjures up. Picture this: it’s a sunny Saturday afternoon, and I’m hosting a few close friends for a get-together. As I prep the ingredients, the kitchen fills with laughter and the warm aroma of the spices I’m blending. The sound of sizzling salmon in the pan harmonizes with our chatter, an orchestra of good times and delectable flavors. I remember the way my friends dove into the salmon, their eyes lighting up with every bite. The heat from the sriracha combined with the creaminess of the mayo creates a deliciously addictive sauce that complements the salmon perfectly. It’s moments like these—filled with joy and mouth-watering dishes—that remind me why I love cooking so much.

In this blog post, I’ll walk you through everything you need to know to create a show-stopping Bang Bang Salmon dish at home. From the mouthwatering recipe to serving suggestions and a few fun variations, you’re in for a treat! Let’s get cooking!

Ingredients

Here’s what you’ll need to create this delicious Bang Bang Salmon:

  • 4 salmon fillets (6 oz each): The star of the show! Choose wild-caught salmon for a richer flavor and better omega-3 fatty acids. Feel free to substitute with other fish like cod or tilapia if needed.

  • 1/4 cup mayonnaise: This gives the sauce its creamy base. You can use regular or light mayo, or even Greek yogurt if you prefer a healthier twist.

  • 2 tablespoons sriracha: For that signature kick! Not a fan of spicy? You can adjust the amount or swap it for a milder sauce like sweet chili sauce.

  • 1 tablespoon honey: Balances the heat with sweetness. Maple syrup can be a great alternative for a vegan option.

  • 1 tablespoon rice vinegar: Adds a tangy note to the sauce. You can substitute with apple cider vinegar if that’s what you have on hand.

  • 1 tablespoon soy sauce: For a touch of umami! Tamari is an excellent gluten-free alternative.

  • 1 teaspoon sesame oil: This adds a lovely toasty flavor to the sauce. Groundnut oil can be used if you don’t have sesame oil.

  • 2 green onions, thinly sliced: A fresh garnish that adds both crunch and color to your dish.

Ready to dive into making this delectable dish? Let’s go step by step!

Step-by-Step Instructions

Step 1: Prepping Your Salmon

Start by preheating your oven to 400°F (200°C). While it’s heating up, pat your salmon fillets dry with a paper towel. This step is crucial because it ensures a crispy skin while the salmon bakes. Sprinkle some salt and pepper on both sides—seasoning is key!

Step 2: Whipping Up the Bang Bang Sauce

In a medium-sized bowl, combine the mayonnaise, sriracha, honey, rice vinegar, soy sauce, and sesame oil. Give it a good whisk until it’s completely smooth and well blended. A little chef tip: taste the sauce as you go! If you want more heat, add a splash of sriracha. If you like it sweeter, drizzle in a bit more honey.

Step 3: Baking the Salmon

Line a baking dish with parchment paper for easy cleanup. Place the salmon fillets skin-side down in the dish. Brush a generous 2 tablespoons of the Bang Bang sauce over the top of the salmon fillets. The more sauce, the better, in my opinion! Bake in your preheated oven for about 15-20 minutes, or until the salmon flakes easily with a fork.

Step 4: The Finishing Touch

While the salmon is baking, let’s prepare the garnish. Thinly slice your green onions—this adds that pop of freshness! Once the salmon is done, take it out of the oven and drizzle a little extra sauce over the top if you’re feeling it. Sprinkle with those vibrant green onion slices, and let the colors pop.

Step 5: Serve and Enjoy

Plate the Bang Bang Salmon on a bed of steamed rice or a salad for a lighter option. The glossy sauce should glisten atop the salmon, making it look as fabulous as it tastes. Don’t forget to snap a pic for Instagram before you dig in!

Serving Suggestions

When it comes to serving your Bang Bang Salmon, simplicity is key. I always recommend pairing it with a side of rice, whether it’s jasmine, brown, or cauliflower rice for a low-carb spin. A fresh side salad—think crunchy greens, cherry tomatoes, and a light vinaigrette—complements the richness of the salmon beautifully. Want to step it up? Add a sprinkle of sesame seeds for that extra touch!

Recipe Variations

  • Spicy Garlic Bang Bang: Add a minced clove of garlic to the sauce for a delicious garlicky kick.

  • Honey-Lime Bang Bang: Swap honey for lime juice for a citrusy twist.

  • Coconut Bang Bang: Mix in some canned coconut cream with the mayonnaise for a tropical flavor.

  • Asian-Inspired Veggies: Serve the salmon with Asian veggies like bok choy and snap peas for a delightful contrast!

  • Low-Carb Delight: Use zucchini noodles instead of rice to keep it light and fresh.

Chef’s Notes

As a food lover, I’ve always thrived on exploring bold flavors, and this recipe is no exception. Looking back, the first time I made Bang Bang Salmon was a delightful experiment that turned into a staple in my cooking repertoire! And let me tell you, there have been a few kitchen mishaps along the way. One time, I accidentally grabbed an entire bottle of sriracha instead of the tablespoon measure! Let’s just say that dish had some serious heat! But it all turned out fine in the end—after a bit of improvisation and a few cheers from my friends.

FAQs and Troubleshooting

1. What should I do if my salmon is overcooked?
If your salmon ends up a little dry, don’t fret! Drizzle more Bang Bang sauce over it when serving; it’ll add moisture and flavor back in!

2. Can I grill this salmon instead of baking?
Absolutely! Preheat your grill, oil the grates, and cook the salmon skin-side down for about 5-7 minutes, then flip and cook for another 5-7 minutes, brushing with sauce as you go.

3. How do I store leftovers?
Store leftovers in an airtight container in the fridge for up to 3 days. Reheat gently in the microwave or on a skillet to avoid drying it out.

4. What if I don’t have green onions?
No worries! You can substitute with finely chopped chives, or skip the garnish altogether—your bang bang salmon will still be amazing!

Nutritional Info (Optional)

  • Calories: Approximately 380 per serving (based on salmon and sauce only)
  • Protein: 36g
  • Carbohydrates: 6g
  • Fat: 24g

And there you have it—my Bang Bang Salmon recipe, packed with flavor and perfect for any occasion! Whether you’re cooking for yourself or for loved ones, this dish is sure to become a crowd-pleaser. So roll up your sleeves, gather your ingredients, and let’s make some kitchen magic happen! Happy cooking!

Print

Bang Bang Salmon

A flavor-packed and easy-to-prepare Bang Bang Salmon dish, perfect for busy weeknights or impressing friends.

  • Prep Time: 15 minutes
  • Cook Time: 20 minutes
  • Total Time: 35 minutes
  • Yield: 4 servings 1x
  • Category: Main Course
  • Method: Baking
  • Cuisine: Asian
  • Diet: Pescatarian

Ingredients

Scale
  • 4 salmon fillets (6 oz each)
  • 1/4 cup mayonnaise
  • 2 tablespoons sriracha
  • 1 tablespoon honey
  • 1 tablespoon rice vinegar
  • 1 tablespoon soy sauce
  • 1 teaspoon sesame oil
  • 2 green onions, thinly sliced

Instructions

  1. Preheat your oven to 400°F (200°C) and pat the salmon fillets dry. Season them with salt and pepper.
  2. Combine the mayonnaise, sriracha, honey, rice vinegar, soy sauce, and sesame oil in a bowl. Whisk until smooth.
  3. Line a baking dish with parchment paper and place the salmon skin-side down. Brush with 2 tablespoons of the sauce and bake for 15-20 minutes.
  4. Slice the green onions while the salmon bakes. Optionally drizzle more sauce over the salmon before serving and sprinkle with green onions.
  5. Serve on a bed of rice or a salad and enjoy!

Notes

Store leftovers in an airtight container for up to 3 days. Reheat gently to avoid drying out.

Nutrition

  • Serving Size: 1 serving
  • Calories: 380
  • Sugar: 4g
  • Sodium: 650mg
  • Fat: 24g
  • Saturated Fat: 4g
  • Unsaturated Fat: 16g
  • Trans Fat: 0g
  • Carbohydrates: 6g
  • Fiber: 0g
  • Protein: 36g
  • Cholesterol: 85mg

Keywords: Bang Bang Salmon, easy salmon recipe, Asian cuisine

Did you make this recipe?

Share a photo and tag us — we can't wait to see what you've made!

May 31, 2026 |

One-Pan Baked Salmon with Lemon-Butter Cream Sauce

One-Pan Baked Salmon with Lemon-Butter Cream Sauce on a plate

Baked Salmon with Lemon Butter Cream Sauce: A Flavorful Journey

Welcome, fellow foodies! Today, we’re embarking on a culinary adventure together—a delicious trek into the world of baked salmon with lemon butter cream sauce. If you’re anything like me, you know that cooking should be fun, creative, and above all, satisfying. And here at Clean Plate Cravings, I’m all about making your kitchen experiences enjoyable and hassle-free. This dish is a fantastic way to impress family and friends or simply treat yourself to something wonderfully tasty and healthy.

Imagine buttery salmon, flaking at the touch of a fork, bathed in a luscious lemony cream sauce. It’s a symphony of flavors—all while being simple enough to whip together on a busy weeknight. What more could you want? So, roll up those sleeves as we dive into the secrets behind this delightful dish, sprinkled with stories and insights that make cooking all the more enjoyable!

A Personal Culinary Memory

Let me take you back a few years to a summer evening that forever changed my relationship with salmon. I was visiting my grandparents’ beach house, where summer sunsets painted the sky with swirling hues of orange and pink. My grandma was in the kitchen, and the scent of zesty lemon and fresh herbs wafted through the air as she prepared her famous salmon fillets.

Her technique was simple but magical; she always said the key was to let the quality of the ingredients shine. Watching her gently whisk together butter, lemon juice, and cream while chatting effortlessly with me about life made the meal even more special. After she popped that salmon into the oven, we carried our plates outside to enjoy dinner on the deck. Each bite was a burst of freshness, a perfect complement to the sound of waves crashing nearby. It wasn’t just a meal; it was a memory, a celebration of family, flavor, and the beauty of simple ingredients coming together.

Fast forward to today, and that experience has inspired me to recreate and share my own version of baked salmon with lemon butter cream sauce. I’ve added my twist, of course, but the essence remains the same: it’s all about enjoying good food surrounded by good company.

Ingredients

Here’s what you’ll need to make this delectable dish:

  • 4 salmon fillets (6 oz each)
    Freshness is key! Look for wild-caught salmon if possible. If you can’t find salmon, try substituting with trout or cod, which will also catch that luscious sauce beautifully.

  • 2 tbsp olive oil
    A good extra virgin olive oil can elevate the dish’s flavor. If you prefer, avocado oil makes a wonderful alternative due to its high smoke point and mild flavor.

  • 3 garlic cloves (minced)
    Garlic is the superstar here! It brings warmth and depth to the sauce. If you’re not a fan of fresh garlic, garlic powder can work in a pinch—just use about a teaspoon.

  • Salt and pepper to taste
    Essential seasonings! Sea salt or kosher salt will bring out all the flavors, while freshly cracked pepper adds a hint of spice.

  • 1/4 cup fresh lemon juice
    Freshly squeezed lemon juice is a game-changer—it brightens the dish and balances the richness of the cream. Bottled lemon juice won’t offer the same depth, but you can use it if you’re in a hurry.

  • Zest of 1 lemon
    Don’t discard that lemon peel! It holds aromatic oils that enhance the lemon flavor. If you’d like a different twist, lime zest or orange zest can be substituted for a unique citrus note.

  • 1/2 cup heavy cream
    For a creamy, luxurious sauce! If you want a lighter version, feel free to swap with half-and-half or coconut cream for a dairy-free option.

  • 1/4 cup unsalted butter
    Butter adds richness that complements the salmon. Ghee is a great dairy-free alternative while maintaining that buttery flavor.

  • 2 tbsp chopped fresh parsley or dill
    Fresh herbs give the dish a delightful finishing touch! Dill works great with salmon, but basil or chives can also lend their unique herby flair.

Step-by-Step Instructions

Ready to make magic happen in the kitchen? Follow these steps to create your orange-hued masterpiece!

  1. Prep Your Ingredients
    Start by preheating your oven to 375°F (190°C). While that’s warming up, gather your gorgeous salmon fillets and pat them dry with a paper towel. This helps to achieve a nice sear later. Sprinkle salt and pepper on both sides—don’t be shy!

  2. Sizzle Those Fillets
    In a large oven-safe skillet, heat the olive oil over medium-high heat. Once it’s shimmering, add the salmon fillets skin-side down. Let them sear for about 4–5 minutes or until they’re beautifully golden. This step creates a lovely crust.

  3. Flip and Finish Searing
    Gently flip the salmon using a spatula. It’s okay if some of the seasoning comes off; you’ll have more flavors coming soon! Cook for another 2 minutes on the other side, then transfer the salmon to a plate.

  4. Make That Sauce!
    In the same pan, lower the heat to medium and toss in the minced garlic. Sauté it for about 30 seconds until fragrant—watch it closely; you don’t want to burn it! Pour in the fresh lemon juice, scraping up any tasty bits stuck to the bottom of the pan.

  5. Cream it Up
    Now for the star of our show—add the heavy cream and butter. Stir continuously until the butter melts and the sauce thickens slightly, usually about 2–3 minutes. Toss in the lemon zest and mix to combine.

  6. Back to the Fillets
    Return the salmon fillets to the skillet, skin-side down, allowing them to bathe in that luscious lemon butter sauce. Spoon the sauce over the top to soak in all that flavor.

  7. Bake to Perfection
    Pop the skillet in the preheated oven and let it bake for about 10–12 minutes or until the salmon flakes easily with a fork. The internal temperature should reach 145°F (63°C).

  8. Garnish and Enjoy!
    Before serving, sprinkle with fresh parsley or dill. Plate it up nice and pretty, maybe with a side of veggies or rice. There you have it—a stunning dish you’ve whipped up in no time!

Serving Suggestions

When it comes to plating your baked salmon, let’s make it as beautiful as it is delicious. I love to serve it on a bed of wilted spinach or alongside some roasted asparagus for that vibrant green contrast. Drizzle some of that lemon butter cream sauce over the top and add a slice of lemon for visual appeal. It’s all about making your dining experience a feast for the eyes, too!

Recipe Variations

The beauty of this dish lies in its versatility. Here are a few creative twists you can try:

  1. Mediterranean Twist: Add kalamata olives and sun-dried tomatoes in the sauce for a Mediterranean flair.
  2. Spicy Kick: Mix in a pinch of red pepper flakes with the garlic for a zesty punch.
  3. Herbaceous Delight: Swap out parsley or dill for fresh tarragon or chervil to change the flavor profile.
  4. Citrus Burst: Mix lemon with lime and orange juice for a citrus medley that brightens the sauce.
  5. Asian Inspiration: Incorporate soy sauce and sesame oil in place of lemon juice for an Asian twist on this classic!

Chef’s Notes

As I reflect on this dish, I can’t help but chuckle at my early cooking attempts when I was a teenager. My first encounter with salmon was disastrous! I overcooked it and smothered it in far too much lemon juice, thinking it would save my culinary travesty. Lesson learned: balance is key! Now, years later, I embrace the beautiful simplicity of baked salmon with lemon butter cream sauce. It has evolved into one of my go-to recipes, and I hope it becomes a staple in your kitchen, too!

FAQs and Troubleshooting

  1. What type of salmon is best for this recipe?
    Wild-caught salmon is preferred for its flavor and texture, but farmed salmon works too. Just be cautious about where it’s sourced!

  2. Can I make this ahead of time?
    You can prep the sauce and marinate the salmon ahead of time. Just bake it fresh when you’re ready to eat—there’s nothing like enjoying a meal made with love!

  3. Why is my sauce too thin?
    If your sauce isn’t thickening, let it simmer on low heat for a bit longer. You can also mix in a small cornstarch slurry (cornstarch mixed with water) to help it along.

  4. Can I use frozen salmon?
    Absolutely! Just make sure to fully thaw it in the fridge before cooking to ensure even cooking throughout.

Nutritional Info

  • Calories: Approximately 400 per serving
  • Protein: 32g
  • Carbohydrates: 5g
  • Fat: 30g (with 15g saturated fat)
  • Fiber: 0g

And there you have it, a complete guide to making baked salmon with lemon butter cream sauce! I hope this recipe becomes a favorite for you and your loved ones just like it is for me. It’s easy, flavor-packed, and most importantly, a wonderful way to connect over good food. Happy cooking, my friends! 🍋✨

Print

Baked Salmon with Lemon Butter Cream Sauce

A delicious baked salmon recipe with a rich lemon butter cream sauce that’s easy to prepare and perfect for impressing guests.

  • Prep Time: 15 minutes
  • Cook Time: 12 minutes
  • Total Time: 27 minutes
  • Yield: 4 servings 1x
  • Category: Main Course
  • Method: Baking
  • Cuisine: American
  • Diet: Pescatarian

Ingredients

Scale
  • 4 salmon fillets (6 oz each)
  • 2 tbsp olive oil
  • 3 garlic cloves (minced)
  • Salt and pepper to taste
  • 1/4 cup fresh lemon juice
  • Zest of 1 lemon
  • 1/2 cup heavy cream
  • 1/4 cup unsalted butter
  • 2 tbsp chopped fresh parsley or dill

Instructions

  1. Prep your ingredients by preheating your oven to 375°F (190°C). Pat the salmon fillets dry and sprinkle salt and pepper on both sides.
  2. Sizzle those fillets by heating the olive oil in a large oven-safe skillet over medium-high heat. Add the salmon fillets skin-side down and sear for about 4–5 minutes.
  3. Flip the salmon gently and cook for another 2 minutes on the other side, then transfer to a plate.
  4. Make the sauce by adding minced garlic to the same pan and sauté for about 30 seconds. Pour in the lemon juice and scrape the bits stuck to the pan.
  5. Cream it up by adding heavy cream and butter to the pan. Stir until the butter melts and the sauce thickens (about 2–3 minutes).
  6. Return the salmon to the skillet, skin-side down, and spoon the sauce over the top.
  7. Bake for about 10–12 minutes or until the salmon flakes easily with a fork, reaching an internal temperature of 145°F (63°C).
  8. Garnish with fresh parsley or dill before serving.

Notes

Serve over wilted spinach or alongside roasted asparagus for a perfect pairing.

Nutrition

  • Serving Size: 1 serving
  • Calories: 400
  • Sugar: 1g
  • Sodium: 400mg
  • Fat: 30g
  • Saturated Fat: 15g
  • Unsaturated Fat: 10g
  • Trans Fat: 0g
  • Carbohydrates: 5g
  • Fiber: 0g
  • Protein: 32g
  • Cholesterol: 80mg

Keywords: salmon, baked salmon, lemon butter sauce, easy dinner, healthy recipe

Did you make this recipe?

Share a photo and tag us — we can't wait to see what you've made!

May 31, 2026 |

Minute Bang Bang Salmon: Creamy, Spicy Weeknight Dinner

Plate of Minute Bang Bang Salmon with creamy sauce and garnishes

Bang Bang Salmon: A Flavor Explosion on Your Plate

Welcome, food lovers! Today, we’re diving into the delicious, mouthwatering world of Bang Bang Salmon—a dish that not only excites the taste buds but also fills your kitchen with a delightful aroma that will make your stomach rumble in anticipation! If you’re a fan of seafood paired with just the right amount of crunch and a sweet-and-spicy kick, you’re in for a treat. So grab your apron, and let’s get cooking!

A Little Nostalgia: My Culinary Journey with Bang Bang Salmon

I still remember the first time I tasted Bang Bang Shrimp at a trendy little restaurant where I spent my early 20s. I was enthralled by how something so simple could burst with so much flavor! There was something magical about that sweet, spicy sauce enveloping the crispy bites of shrimp, making each morsel utterly addictive. It sparked my imagination and ignited a fire in my culinary heart. Fast forward to today, and the thought struck me: why not recreate this fantastic dish using salmon?

Salmon is a beautifully rich fish that can stand up to bold flavors like no other. It got me thinking about making my own version—Bang Bang Salmon! Not only is salmon packed with health benefits, but it’s also a canvas for incredible flavors. I often find myself in my kitchen reminiscing about that first taste, tweaking the recipe to fit my style while keeping it true to its roots. Now, I’m excited to share this vibrant dish with you!

Ingredients for Bang Bang Salmon

Here’s what you’ll need to whip up this sensational dish:

  • 1 pound salmon fillets, cut into bite-sized pieces
    Salmon is rich in omega-3 fatty acids, making it a super healthy protein choice. If you’re looking for a substitution, try using shrimp or chicken!

  • 1/2 cup cornstarch
    This will give your salmon that satisfying crunch. If you’re looking for a gluten-free option, cornstarch is perfect. You can also use rice flour for a similar effect.

  • 1 tablespoon vegetable oil
    Use this to get a nice sear on your salmon. Don’t have vegetable oil? Olive oil or avocado oil will work well too!

  • 1/4 cup mayonnaise
    This adds creaminess to your sauce. For a lighter option, you can swap it out for Greek yogurt.

  • 2 tablespoons sweet chili sauce
    Sweet chili sauce is where the magic happens—sweet with a hint of heat! Hot sauce lovers can zest it up by using spicy chili sauce instead.

  • 1 tablespoon sriracha
    This provides that welcomed kick! Adjust the amount based on your spice tolerance—less for mild, more for a fiery punch.

  • Salt and pepper to taste
    Essential seasonings to enhance all those vibrant flavors!

  • Green onions, for garnish
    An excellent finishing touch that adds crunch and freshness to the dish.

Step-by-Step Instructions to Create Bang Bang Salmon

Ready to bring your kitchen to life? Let’s get started with these easy-to-follow steps!

  1. Prepare the Salmon
    Start by cutting your salmon fillets into bite-sized pieces. This makes them easy to cook and perfect for sharing—if you’re feeling generous! Ensure they’re uniform to ensure even frying.

  2. Coat with Cornstarch
    In a mixing bowl, toss the salmon pieces with cornstarch until evenly coated. This might seem simple, but trust me, this coating is key to achieving that delightful crunch. And don’t be shy—make sure every little piece is covered!

  3. Heat the Oil
    In a large skillet, heat the vegetable oil over medium-high heat. You want it hot enough to create a lovely sear on the salmon, but not so hot that it smokes! A drop of water should sizzle if it’s ready.

  4. Fry the Salmon
    Carefully add the coated salmon pieces to the skillet in a single layer. Fry for about 3-4 minutes per side, flipping gently until golden brown and crispy. If you have to do this in batches, that’s okay—take your time; good things come to those who wait!

  5. Make the Sauce
    While your salmon is cooking, let’s whip up that Bang Bang sauce! In a small bowl, combine mayonnaise, sweet chili sauce, and sriracha. Give it a good mix until smooth. You can adjust the sriracha based on how spicy you want it!

  6. Toss the Salmon
    Once your salmon is perfectly crispy and cooked through, remove it from the heat and place it in a clean bowl. Drizzle your Bang Bang sauce over the salmon and gently toss until every piece is coated in that luscious goodness.

  7. Garnish and Serve
    Sprinkle chopped green onions on top for a fresh touch that brightens up the dish. You want that pop of color—it’s all about making your dish look as good as it tastes!

Serving Suggestions

Now that your Bang Bang Salmon is ready, let’s talk presentation! For a feast that looks as amazing as it tastes, serve it over a bed of fluffy jasmine rice or quinoa. A side of lightly steamed veggies or a fresh salad can complement the dish nicely, adding color and freshness. Don’t forget to drizzle a little extra sauce over the top for that eye-catching finish!

Recipe Variations to Try

Get creative! Here are some fun twists on the classic Bang Bang Salmon:

  • Spicy Mango Bang Bang: Add diced ripe mango to the sauce for a tropical flair with a hint of sweetness.

  • Bang Bang Salmon Tacos: Serve the salmon in warm tortillas topped with fresh cabbage slaw for a taco night twist.

  • Pineapple Bliss: Mix in some crushed pineapple into the sauce for a tangy-sweet delight that brightens up your plate.

  • Herb-Infused: Add a sprinkle of chopped fresh herbs like cilantro or parsley for an earthy note.

Chef’s Notes

Oh man, where do I start? This Bang Bang Salmon recipe has definitely evolved over the years. I remember the first time I tried making it—it was a glorious, messy experience, and I may have accidentally spilled sriracha everywhere! But that chaos led to a glorious flavor discovery. Now, I find joy in experimenting with textures and tastes, and this dish is my canvas. Every time I make it, I think of those fun nights dining out with friends, and now all those flavors come together right in my kitchen. It’s about creating memories and sharing laughter around the dinner table—food brings us all together!

FAQs and Troubleshooting

1. My salmon is sticking to the pan! What can I do?
Make sure your pan is hot enough before adding the salmon. If it’s sticking, it might not have developed that crispy coating properly. A well-preheated pan is essential!

2. Can I use frozen salmon for this recipe?
Absolutely! Just make sure to thaw it completely and pat it dry before coating it with cornstarch to ensure a perfect texture.

3. What can I serve with Bang Bang Salmon?
This dish is incredibly versatile! Pair it with rice, stir-fried vegetables, or a refreshing salad to balance those rich flavors.

4. How do I store leftovers?
Leftover salmon can be stored in an airtight container in the fridge for up to 2 days. Just reheating it in the oven for that crispy texture is a great idea!

Nutritional Info

While I don’t have precise numbers for each component here, one serving of this Bang Bang Salmon is packed with protein from the salmon, healthy fats from the mayonnaise, and a hint of carbohydrates from the cornstarch. Feel free to reach out for specific dietary needs or adjustments!


There you have it! Bang Bang Salmon is not just a dish; it’s an experience filled with flavor, fun, and a touch of nostalgia. So, gather your ingredients, get into the kitchen, and enjoy every moment of creating and savoring this delightful meal. Happy cooking!

Print

Bang Bang Salmon

A mouthwatering salmon dish with a sweet and spicy bang bang sauce, perfect for seafood lovers.

  • Prep Time: 10 minutes
  • Cook Time: 10 minutes
  • Total Time: 20 minutes
  • Yield: 4 servings 1x
  • Category: Main Course
  • Method: Frying
  • Cuisine: Asian
  • Diet: Pescatarian

Ingredients

Scale
  • 1 pound salmon fillets, cut into bite-sized pieces
  • 1/2 cup cornstarch
  • 1 tablespoon vegetable oil
  • 1/4 cup mayonnaise
  • 2 tablespoons sweet chili sauce
  • 1 tablespoon sriracha
  • Salt and pepper to taste
  • Green onions, for garnish

Instructions

  1. Prepare the salmon by cutting it into bite-sized pieces.
  2. Coat the salmon pieces with cornstarch in a mixing bowl.
  3. Heat the vegetable oil in a large skillet over medium-high heat.
  4. Fry the salmon pieces for about 3-4 minutes per side until golden brown and crispy.
  5. Make the Bang Bang sauce by combining mayonnaise, sweet chili sauce, and sriracha in a small bowl.
  6. Toss the cooked salmon with the Bang Bang sauce until evenly coated.
  7. Garnish with chopped green onions before serving.

Notes

For a gluten-free option, use rice flour instead of cornstarch. Adjust sriracha according to your spice preference.

Nutrition

  • Serving Size: 1 serving
  • Calories: 400
  • Sugar: 8g
  • Sodium: 500mg
  • Fat: 18g
  • Saturated Fat: 3g
  • Unsaturated Fat: 12g
  • Trans Fat: 0g
  • Carbohydrates: 30g
  • Fiber: 0g
  • Protein: 28g
  • Cholesterol: 60mg

Keywords: bang bang salmon, seafood recipe, easy salmon dish, Asian cuisine

Did you make this recipe?

Share a photo and tag us — we can't wait to see what you've made!

May 31, 2026 |

Minute Honey Garlic Salmon: One-Pan Skillet Dinner

One-pan honey garlic salmon skillet dinner with fresh ingredients

Honey Garlic Salmon: A Delicious Journey to the Heart of Flavor

Welcome to Clean Plate Cravings, where healthy eating meets delicious flavors! Today, I want to take you on a culinary adventure centered around one of my absolute favorite dishes: Honey Garlic Salmon. This recipe is a perfect harmony of sweet and savory that will have your taste buds dancing in delight. Whether you’re a busy professional, a parent juggling kids’ schedules, or just someone who loves good food, this honey garlic salmon dish is here to rescue your weeknight dinners!

Imagine this: it’s a busy Monday evening after a long day, and the thought of cooking feels overwhelming. But fear not! With just a handful of ingredients and a quick cooking method, this honey garlic salmon can transform your mundane Monday into a vibrant food experience. What more could you ask for? It’s quick, it’s easy, and most importantly, it’s absolutely finger-licking good!

Personal Story

Let me share a little story about how honey garlic salmon became a staple in my kitchen. I remember the first time I made this dish. It was a chilly autumn evening, and I had invited a couple of friends over for dinner. Wanting to impress, I scoured through my recipe box and stumbled upon an old family recipe for honey garlic glazed chicken. It was great, but I had salmon sitting in my fridge, and I thought, "Why not give it a whirl?"

I marinated the salmon fillets in a decadent mixture of honey and garlic, letting those flavors mingle and create something magical. When I pulled the salmon out of the oven, my friends were instantly captivated. The aroma enveloped our dining area, luring everyone to the table. We dug in, and I watched as they enjoyed every bite, the sweet and savory glaze perfectly enveloping the succulent salmon.

That night was filled with laughter, stories, and an overwhelming sense of joy around the table as we savored each and every bite of honey garlic salmon. Since then, it has become my go-to recipe for gatherings, weeknight dinners, and even special occasions. It symbolizes warmth and good company, and I can’t wait for you to create your own unforgettable moments around this dish!

Ingredients

Here’s what you’ll need to bring this honey garlic salmon to life:

  • 4 salmon fillets
    Look for wild-caught salmon if possible; it tends to be fresher and often tastier than farmed. If you’re on a budget, feel free to substitute it with any white fish like cod or tilapia.

  • 1/4 cup honey
    The star ingredient! It adds a natural sweetness that balances beautifully with the savory elements. If you’re looking for a dietary swap, you can use maple syrup or agave nectar for a vegan alternative.

  • 3 cloves garlic, minced
    Garlic not only adds flavor but is also great for heart health. Don’t have fresh garlic? Garlic powder can work in a pinch—about 1 teaspoon will do.

  • 2 tablespoons soy sauce
    It adds depth and umami to the dish. If you’re gluten-free, opt for tamari instead—most brands are a perfect substitute.

  • 1 tablespoon olive oil
    This helps to sear the salmon and ensures a crispy skin while keeping it moist. Avocado oil could be a great alternative as well!

  • Salt and pepper to taste
    Essential seasoning to enhance the flavors—don’t skip this part!

  • Chopped green onions for garnish
    This adds a fresh burst of color and flavor at the end. You can also swap these out for sesame seeds or cilantro for a different twist!

Step-by-Step Instructions

Now let’s get cooking! Follow these simple steps to make your honey garlic salmon shine.

  1. Preheat the Oven
    Set your oven to 400°F (200°C). Preheating your oven is crucial for achieving that perfect cook on your salmon. You want a hot oven to get that lovely caramelization from the honey!

  2. Prepare the Marinade
    In a small bowl, combine honey, minced garlic, and soy sauce. Give it a good stir to mix all those flavors together. Here’s a little tip: taste your marinade! This way, you can adjust sweetness or saltiness to your preference. If it’s too sweet, a splash more soy sauce can balance things out.

  3. Season the Salmon
    Place your salmon fillets on a baking sheet lined with parchment paper (easy cleanup alert!). Drizzle with olive oil, then sprinkle with salt and pepper. If you’re feeling adventurous, a light brush of the marinade on top will give the fish a great start!

  4. Marinate the Salmon
    Pour your honey garlic mixture over the salmon, ensuring each fillet is coated. If you have time, let it marinate for about 15-30 minutes—this truly allows flavors to seep into the fish, but if you’re short on time, you can skip this step.

  5. Bake
    Pop those beauties into your preheated oven and let them bake for about 12-15 minutes, depending on the thickness of your fillets. Check them halfway through, and drizzle some of the marinade on top for extra flavor. You know your salmon is done when it flakes easily with a fork.

  6. Serve with Style
    Once your salmon is perfectly baked, remove it from the oven and let it rest for a couple of minutes. This allows the juices to redistribute, keeping it moist and tasty. Garnish with chopped green onions for a pop of color!

Serving Suggestions

Plating matters, my friends! For a gorgeous presentation, serve your honey garlic salmon on a bed of fluffy rice or quinoa with steamed veggies on the side. Drizzling a little extra marinade over the top can give it that “wow factor!” Add a lemon wedge on the side for that citrusy twist, and watch your guests swoon over this dish.

Recipe Variations

Ready to switch things up? Here are a few fun ways to customize your honey garlic salmon:

  1. Spicy Honey Garlic Salmon
    Add a teaspoon of chili flakes or sriracha to the marinade for a kick!

  2. Asian-Inspired Twist
    Add a splash of rice vinegar and a teaspoon of sesame oil to your marinade for an even deeper flavor profile.

  3. Herb-Infused Salmon
    Mix in some fresh herbs like dill or basil after baking for an additional flavor burst.

  4. Roasted Veggie Side
    Toss some zucchini, bell peppers, or asparagus on the same baking sheet for a one-pan meal.

  5. Citrus Garlic Salmon
    Squeeze in some fresh orange or lime juice for a bright flavor boost!

Chef’s Notes

You know, cooking is all about experimentation to find what works best for you. This honey garlic salmon recipe has evolved over the years, and I’ve tried countless variations, each time discovering new flavors and combinations that I love. One of my favorite memories is when I mixed in some ginger—talk about a flavor explosion! Keep playing in the kitchen until you find your perfect blend. The more you cook, the more confident you’ll become!

FAQs and Troubleshooting

1. My salmon is dry! What did I do wrong?
Overcooking is the culprit! Always check your salmon a few minutes before the suggested cooking time, and remember that it continues to cook a bit after you take it out.

2. Can I use frozen salmon?
Absolutely! Just make sure to thaw it first in the refrigerator overnight before marinating and cooking.

3. What should I serve with honey garlic salmon?
The world is your oyster! Rice, quinoa, or even cauliflower rice all pair wonderfully. Don’t forget some bright, roasted veggies to balance the meal.

4. Can I make this dish ahead of time?
Yes! You can marinate the salmon in advance and keep it in the fridge for up to 24 hours. Just remember to cook it fresh for the best flavor and texture!

Nutritional Info

While I usually keep my focus on flavor, here’s a little nutrition breakdown for those curious:

  • Calories: Approximately 380 per serving (based on one salmon fillet)
  • Protein: 34 grams
  • Fat: 12 grams
  • Carbs: 30 grams (from the honey and soy sauce)

Remember, oh foodie friends, nutrition can vary based on the specific ingredients you choose, so feel free to adapt to your dietary needs!

So there you have it! I hope you’re inspired to make this Honey Garlic Salmon dish—and the best part? It comes together in no time flat! I can’t wait for you to dive into this recipe, and please share your kitchen adventures with me. Happy cooking!

Print

Honey Garlic Salmon

A perfect harmony of sweet and savory, this honey garlic salmon dish transforms mundane weeknight dinners into delightful culinary experiences.

  • Prep Time: 15 minutes
  • Cook Time: 15 minutes
  • Total Time: 30 minutes
  • Yield: 4 servings 1x
  • Category: Main Course
  • Method: Baking
  • Cuisine: American
  • Diet: Gluten-Free

Ingredients

Scale
  • 4 salmon fillets
  • 1/4 cup honey
  • 3 cloves garlic, minced
  • 2 tablespoons soy sauce
  • 1 tablespoon olive oil
  • Salt and pepper to taste
  • Chopped green onions for garnish

Instructions

  1. Preheat the oven to 400°F (200°C).
  2. Combine honey, minced garlic, and soy sauce in a small bowl to make the marinade.
  3. Place salmon fillets on a baking sheet lined with parchment paper, drizzle with olive oil, and season with salt and pepper.
  4. Pour the honey garlic mixture over the salmon to coat.
  5. Let it marinate for 15-30 minutes if time allows.
  6. Bake for 12-15 minutes, until the salmon flakes easily with a fork.
  7. Remove from the oven, let rest, and garnish with chopped green onions before serving.

Notes

Serve with fluffy rice or quinoa and steamed veggies for a complete meal. A lemon wedge adds a nice touch!

Nutrition

  • Serving Size: 1 serving
  • Calories: 380
  • Sugar: 24g
  • Sodium: 800mg
  • Fat: 12g
  • Saturated Fat: 2g
  • Unsaturated Fat: 8g
  • Trans Fat: 0g
  • Carbohydrates: 30g
  • Fiber: 0g
  • Protein: 34g
  • Cholesterol: 70mg

Keywords: honey garlic salmon, easy salmon recipe, healthy dinner

Did you make this recipe?

Share a photo and tag us — we can't wait to see what you've made!

May 31, 2026 |

Min Balsamic-Glazed Salmon: Healthy Weeknight Dinner

Delicious balsamic-glazed salmon served with fresh vegetables for a healthy dinner.

Taste the Magic: Balsamic Glazed Salmon

Welcome, food lovers! Today, we’re diving into a dish that’s not just a meal; it’s an experience—Balsamic Glazed Salmon. From bustling weeknight dinners to fancy date nights, this dish has the power to elevate any occasion while still feeling effortlessly approachable. What’s the secret ingredient, you ask? It’s all in that luscious balsamic glaze that wraps around the salmon, creating a beautiful balance of sweet, tangy, and umami flavors.

I’ve always believed that cooking should be a celebration, not a chore. So, let me take you on a flavorful journey where fresh ingredients shine, and amazing aromas fill your kitchen. Grab your apron, and let’s get cooking!

A Sweet Memory with Salmon

Growing up, family dinners were always something special in my household. My mom had a few go-to dishes, but her salmon creations were legendary. One of my fondest memories was preparing dinner with her on a rainy Saturday afternoon. We laughed, played music, and just marveled at how a simple piece of fish could transform into something spectacular. The dish that became our favorite was a glazed salmon, which she tweaked based on what we had in the pantry, always involving balsamic vinegar and a hint of sweetness.

Years later, my own rendition of Balsamic Glazed Salmon still carries all those warm memories. It reminds me of how food can connect us to our past, evoke feelings of love, and create new traditions. So, I’m excited to share this recipe with you—it’s a dish that’s not only delicious but holds a piece of my heart.

Ingredients You’ll Need

Here’s what you’ll need to whip up this delightful Balsamic Glazed Salmon:

  • 1 lb. salmon fillet: Fresh is best! You can substitute with trout if you desire a different flavor.
  • 1/4 cup brown sugar: This brings the sweetness to our glaze. Feel free to swap with honey or maple syrup for a different twist!
  • 1/4 cup balsamic vinegar: A quality balsamic vinegar can elevate this dish. Try white balsamic for a lighter note.
  • 2 teaspoons Dijon mustard: Adds a lovely tang. Don’t have any? Yellow mustard will work in a pinch, though the flavor will differ slightly.
  • 1 teaspoon garlic, minced: Fresh garlic makes a huge difference. If you’re short on fresh, garlic powder can do the trick—just use about 1/4 teaspoon.
  • 1/4 teaspoon garlic powder: This enhances the garlic flavor without being overwhelming.
  • 1/4 teaspoon red pepper flakes: For a little kick! Modify based on your spice tolerance.
  • 1/2 tablespoon Worcestershire sauce: Adds depth; you can leave it out if you want a gluten-free version.
  • Salt and pepper to taste: Essential for seasoning and balance.

These ingredients may seem simple but trust me, together, they create a symphony of flavors that will dance on your palate!

Cooking Steps to Glaze Your Way to Glory

Alright, let’s get this culinary party started! Follow these steps for your Balsamic Glazed Salmon:

  1. Preheat Your Oven: Start by preheating your oven to 400°F (200°C). This ensures your salmon cooks evenly and gets that lovely crispy texture we all crave.

  2. Make the Glaze: In a small saucepan over low heat, combine the brown sugar, balsamic vinegar, Dijon mustard, minced garlic, garlic powder, red pepper flakes, and Worcestershire sauce. Stir it all together and let it simmer gently for about 5–7 minutes until the mixture slightly thickens. This is your magic potion that will turn the salmon into something extraordinary. Keep an eye on it, and don’t let it boil away—nobody wants burnt sugar!

  3. Prepare the Salmon: While the glaze is simmering, rinse your salmon fillet under cold water, pat it dry with paper towels, and then season generously with salt and freshly cracked pepper on both sides. The seasoning is key to bringing out the natural flavors of the fish.

  4. Bake the Salmon: Line a baking dish with parchment paper (easy cleanup!) and place the salmon skin-side down in the center. Brush half of the balsamic glaze over the salmon, making sure it’s well coated. This glaze will caramelize beautifully as it bakes!

  5. Time to Bake: Place the baking dish in your preheated oven and bake for about 12–15 minutes, depending on the thickness of your salmon fillet. The salmon should be cooked through but remain moist and flaky. If you have a food thermometer, aim for an internal temperature of 145°F (63°C).

  6. Glaze It Again: Once the salmon is done, remove it from the oven and give it one last brush with the remaining glaze—this will make the surface glossy and incredibly appetizing! Let it rest for a couple of minutes; this step allows the juices to redistribute.

  7. Serve and Enjoy: Slice your perfectly cooked salmon into portions and get ready for compliments. It pairs wonderfully with a side of steamed vegetables or a light salad.

Plating Perfection

When it comes to serving your Balsamic Glazed Salmon, presentation is everything! Place your salmon on a fresh bed of arugula or quinoa for a pop of color and flavor. Drizzle a little more of that irresistible glaze over the top, and finish it off with a sprinkle of fresh herbs like parsley or chives for a vibrant touch. If you’re feeling fancy, add some lemon wedges on the side for an extra zing!

Upscale Your Recipe

Here are a few different twists to consider when making your Balsamic Glazed Salmon:

  • Lemon Zest: Add some fresh lemon zest to the glaze for a refreshing citrus hit!
  • Herb Infusion: Mix in fresh chopped herbs like thyme or rosemary for an aromatic twist.
  • Citrus Variation: Use orange juice instead of balsamic vinegar for a sweeter, fruitier glaze.
  • Miso Magic: Add a tablespoon of miso paste to the glaze to give it an umami flair.
  • Spice It Up: Incorporate different spices like cumin or smoked paprika for a totally different flavor profile.

Chef’s Notes

As I reflect on my culinary journey, I can’t help but chuckle at the countless experiments that have taken place in my kitchen. There was that one time I accidentally used apple cider vinegar instead of balsamic in the glaze—let’s just say it taught me the importance of reading labels! Through those little mishaps, I discovered that cooking is about exploration and having fun, not just perfection.

Over the years, this Balsamic Glazed Salmon recipe has evolved into a beloved staple in our house. It’s become a go-to dish for gatherings, family dinners, and even the occasional ‘I just want something delicious’ moment. Each time I make it, I’m reminded of those rainy Saturdays in my childhood kitchen, and I hope to create similar memories for you.

FAQs and Troubleshooting

Q1: My salmon turned out dry. What went wrong?
A: Overcooking is often the culprit. Keep an eye on the time and use a thermometer to check for that sweet spot at 145°F (63°C).

Q2: Can I make the glaze ahead of time?
A: Absolutely! You can make the glaze in advance and store it in the fridge for up to a week. Just reheat it gently before using.

Q3: What’s the best type of salmon to use?
A: Wild-caught salmon is fantastic for flavor and sustainability. However, farmed salmon works well too—just ensure it’s fresh!

Q4: How do I know when the salmon is perfectly cooked?
A: The salmon should be opaque and flake easily with a fork. If it still looks translucent in the middle, give it a few extra minutes in the oven.

Nutritional Info

While I believe in enjoying food without the stress of counting calories, I know that many of you like to keep an eye on the nutritional value. Here’s a rough estimate per serving of Balsamic Glazed Salmon:

  • Calories: ~300
  • Protein: ~30g
  • Fat: ~15g
  • Carbohydrates: ~18g
  • Fiber: ~0g

These numbers can vary based on the exact ingredients and serving sizes, but you’re definitely fueling your body with this tasty dish!


There you have it! A delicious, approachable, and vibrant Balsamic Glazed Salmon recipe that’s perfect for any occasion. I hope you enjoy every bite as much as I do, and remember—cooking is all about joy, creativity, and sharing good food with those you love. Happy cooking!

Print

Balsamic Glazed Salmon

A delicious Balsamic Glazed Salmon recipe that elevates any occasion with a sweet and tangy glaze.

  • Prep Time: 10 minutes
  • Cook Time: 15 minutes
  • Total Time: 25 minutes
  • Yield: 4 servings 1x
  • Category: Main Course
  • Method: Baking
  • Cuisine: American
  • Diet: Pescatarian

Ingredients

Scale
  • 1 lb. salmon fillet
  • 1/4 cup brown sugar
  • 1/4 cup balsamic vinegar
  • 2 teaspoons Dijon mustard
  • 1 teaspoon garlic, minced
  • 1/4 teaspoon garlic powder
  • 1/4 teaspoon red pepper flakes
  • 1/2 tablespoon Worcestershire sauce
  • Salt and pepper to taste

Instructions

  1. Preheat your oven to 400°F (200°C).
  2. Make the glaze by combining brown sugar, balsamic vinegar, Dijon mustard, minced garlic, garlic powder, red pepper flakes, and Worcestershire sauce in a saucepan over low heat, stirring, and simmering for 5–7 minutes.
  3. Prepare the salmon by rinsing it under cold water, patting it dry, and seasoning with salt and pepper.
  4. Bake the salmon in a lined baking dish, brushing half of the glaze over it, and bake for 12–15 minutes.
  5. Glaze again with the remaining sauce after baking.
  6. Serve the salmon on a bed of arugula or quinoa, drizzled with extra glaze and garnished with herbs.

Notes

For variations, consider adding lemon zest, fresh herbs, or using different types of vinegar.

Nutrition

  • Serving Size: 1 serving
  • Calories: 300
  • Sugar: 20g
  • Sodium: 600mg
  • Fat: 15g
  • Saturated Fat: 3g
  • Unsaturated Fat: 10g
  • Trans Fat: 0g
  • Carbohydrates: 18g
  • Fiber: 0g
  • Protein: 30g
  • Cholesterol: 60mg

Keywords: salmon recipe, balsamic glaze, seafood, easy dinner, healthy meal

Did you make this recipe?

Share a photo and tag us — we can't wait to see what you've made!