Cleanplate Cravings

Cleanplate Cravings

June 25, 2026 |

Ingredient Banana Streusel Muffins for Quick Meal Prep
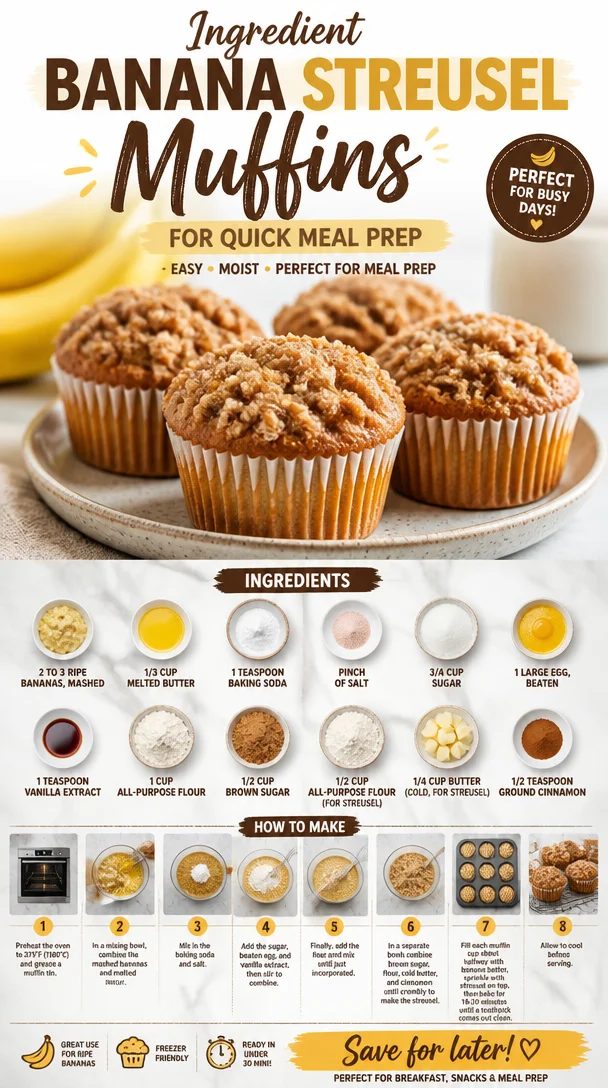
Freshly baked banana streusel muffins with crumbly topping on a wooden table

Banana Streusel Muffins: A Deliciously Comforting Treat

Welcome back to Clean Plate Cravings! Today, I’ve got a recipe that will surely become a star in your kitchen: Banana Streusel Muffins. Picture this: it’s a Saturday morning, the sun is shining, and you’ve got your favorite coffee brewing. What could make that moment even better? Freshly baked muffins that smell divine wafting through your home! Trust me, these muffins are super moist, bursting with banana goodness, and topped with a crunchy streusel that whispers sweet nothings of cinnamon and sugar.

You know, muffins have a special place in my heart. They remind me of cozy mornings spent with my family, where we gathered around the breakfast table, a mix of laughter and sweet aromas in the air. Would you believe that just a whiff of banana can transport me back to my childhood kitchen? It’s true! Every time I bake these Banana Streusel Muffins, I can almost hear my grandma’s laughter as she guided me through the art of baking. She taught me that baking isn’t just about precise measurements; it’s about love, sharing, and building memories. Those moments made me realize that food has an incredible power to unite us.

So, let’s dive into this delightful recipe! Break out your apron, and let’s make some magic happen!

Ingredients

Here’s what you’ll need to whip up these scrumptious Banana Streusel Muffins:

  • 2 to 3 ripe bananas, mashed
    Ripe bananas bring sweetness and moisture to the muffins. They’ll also add that wonderful banana flavor. If you’re in a pinch, you can substitute with unsweetened applesauce—just remember to adjust the sugar slightly!

  • 1/3 cup melted butter
    Butter adds richness and moisture, making your muffins soft and tender. You can swap it with coconut oil for a dairy-free option, but the flavor will change slightly.

  • 1 teaspoon baking soda
    This is the leavening agent that gives your muffins that fluffy texture. Baking powder can be used as a substitute, but adjust the quantity.

  • Pinch of salt
    Just a pinch! It enhances the sweetness and balances the flavors.

  • 3/4 cup sugar
    For sweetness! Coconut sugar or brown sugar can be great alternatives, each imparting a slightly different flavor.

  • 1 large egg, beaten
    Eggs contribute to the structure and moisture. For a vegan option, try using a flaxseed egg (1 tablespoon ground flaxseed mixed with 2.5 tablespoons water).

  • 1 teaspoon vanilla extract
    Vanilla adds depth to the flavor. It’s one of those ingredients that elevates any baked good—from muffins to cookies!

  • 1 cup all-purpose flour
    This forms the base of your muffins. You can experiment with whole wheat flour for added nutrition; just note that the texture will be a bit denser.

  • 1/2 cup brown sugar
    This is for your streusel topping! It brings a caramel flavor and a hint of moisture. You can use coconut sugar here as well if you want a less refined option.

  • 1/2 cup all-purpose flour (for streusel)
    This helps make the streusel crumbly and delicious. Same as the previous point on flour, feel free to use whole wheat or gluten-free flour if needed.

  • 1/4 cup butter (cold, for streusel)
    Cold butter is essential for that perfect crumbly topping. You can use vegan butter for a dairy-free version.

  • 1/2 teaspoon ground cinnamon
    Cinnamon adds warmth and an inviting aroma. You can also experiment with nutmeg or cardamom for a little twist!

Step-by-Step Instructions

Let’s make some incredibly scrumptious Banana Streusel Muffins!

  1. Preheat your oven to 350°F (175°C)
    Preheating is crucial! It ensures that your muffins bake evenly. It’s like giving your kitchen a warm-up before the main event.

  2. Prepare your muffin pan
    Grease a 12-cup muffin pan or line it with baking cups. Using liners makes for easy clean-up and a lovely presentation. If you’re feeling fancy, try dusting the liners with a little flour to prevent sticking!

  3. Mash the bananas
    In a large bowl, mash the ripe bananas using a fork or potato masher. If you like chunkier muffins, leave some banana lumps for texture. I love seeing those banana bits when biting into a warm muffin!

  4. Mix in the wet ingredients
    Add melted butter, sugar, beaten egg, and vanilla extract to the mashed bananas. Stir until combined. The mixture should look glossy and inviting. A good stir here incorporates flavors beautifully!

  5. Combine the dry ingredients
    In another bowl, mix the flour, baking soda, and salt. Whisking these together ensures the baking soda is evenly distributed throughout the flour, preventing any bitter bites from concentrated baking soda.

  6. Combine wet and dry ingredients
    Gradually add the dry mixture to the wet banana mixture, stirring gently. Don’t overmix! A few floury little streaks are perfectly okay. Overmixing results in tough muffins—you want them to be light and fluffy!

  7. Prepare the streusel topping
    In a small bowl, combine 1/2 cup all-purpose flour, brown sugar, ground cinnamon, and cold butter. Use your fingers or a pastry cutter to mix until it resembles coarse crumbs. This is where the magic happens; the smell coming from this mixture will have you swooning!

  8. Fill the muffin cups
    Spoon the muffin batter into your prepared muffin cups, filling each about 2/3 full. You’ll want room for that lovely streusel topping.

  9. Add the streusel on top
    Sprinkle a generous amount of the streusel mixture on top of each muffin. This is what makes them so special! The streusel will create a beautifully crunchy crust.

  10. Bake
    Place your muffin pan in the preheated oven and bake for 18–20 minutes, or until a toothpick inserted into the center of a muffin comes out clean. The tops should be golden brown, and your kitchen will smell absolutely heavenly!

  11. Let it cool
    Allow your muffins to cool in the pan for about 5 minutes, then transfer them to a wire rack. This little cooling time lets the flavors settle and makes them easier to handle.

Serving Suggestions

These Banana Streusel Muffins are perfect for breakfast, brunch, or as a delightful snack any time of the day. Serve them warm with a pat of butter or a drizzle of honey for an added touch. You can also pair them with Greek yogurt for a protein boost or a fresh fruit salad to make a well-rounded meal. They’re great to pack for on-the-go breakfasts or to share with friends!

Recipe Variations

  1. Nutty Banana Muffins: Add half a cup of walnuts or pecans to the batter for a delightful crunch.

  2. Chocolate Chip Twist: Throw in some dark chocolate chips for an indulgent treat. You can never go wrong with chocolate!

  3. Coconut Delight: Mix in sweetened shredded coconut to the batter for a tropical vibe.

  4. Spiced Up: Add a dash of nutmeg or even cardamom for an aromatic twist that complements the bananas beautifully.

  5. Dairy-Free/Dietary Swap: Use almond milk and flaxseed egg if you’re looking for a dairy-free or vegan option!

Chef’s Notes

I learned to bake with my grandma, and she always had a way of making even the simplest recipes feel special. These Banana Streusel Muffins have evolved over the years, influenced by seasonal ingredients and my personal health journey. I love playing around with spices or mixing in different types of flours. One time, I substituted half of the all-purpose flour with almond flour, and they turned out beautifully nutty. There’s magic in experimenting, and I hope you feel encouraged to make this recipe your own!

FAQs and Troubleshooting

1. My muffins sank in the middle—what went wrong?
This can happen if the oven temperature is too low, or if there was too much moisture in the batter. Make sure your ingredients are measured correctly and your oven is properly preheated.

2. Can I freeze these muffins?
Absolutely! After baking, let them cool completely. Then, wrap them in plastic wrap and place them in a freezer-safe bag. They’ll last about 2-3 months. Just pop them in the microwave or oven to warm them up!

3. How do I tell if my muffins are done?
Insert a toothpick into the center of a muffin. If it comes out clean or with a few crumbs (not wet batter!), they’re done. Every oven is different, so keep an eye on them!

4. Can I use frozen bananas?
Yes! Just thaw them out first and drain any excess liquid. It’s a great way to use up overripe bananas you’ve been saving!

Nutritional Info (Optional)

While the exact nutritional content can vary depending on specific brands and measurements, here’s a rough estimate per muffin:

  • Calories: 180
  • Carbohydrates: 26g
  • Protein: 2g
  • Fat: 7g
  • Fiber: 1g
  • Sugar: 10g

And there you have it—my favorite Banana Streusel Muffins! I hope you enjoy making and savoring them just as much as I do. Happy baking, and remember, share those muffins with someone you love! Let’s keep it fresh, simple, and seriously delicious. Happy cooking, my friends!

Print

Banana Streusel Muffins

Deliciously moist Banana Streusel Muffins topped with a crunchy cinnamon streusel.

  • Prep Time: 15 minutes
  • Cook Time: 20 minutes
  • Total Time: 35 minutes
  • Yield: 12 muffins 1x
  • Category: Breakfast
  • Method: Baking
  • Cuisine: American
  • Diet: Vegetarian

Ingredients

Scale
  • 2 to 3 ripe bananas, mashed
  • 1/3 cup melted butter
  • 1 teaspoon baking soda
  • Pinch of salt
  • 3/4 cup sugar
  • 1 large egg, beaten
  • 1 teaspoon vanilla extract
  • 1 cup all-purpose flour
  • 1/2 cup brown sugar (for streusel)
  • 1/2 cup all-purpose flour (for streusel)
  • 1/4 cup butter (cold, for streusel)
  • 1/2 teaspoon ground cinnamon

Instructions

  1. Preheat your oven to 350°F (175°C).
  2. Prepare your muffin pan by greasing or lining it with baking cups.
  3. Mash the bananas in a large bowl.
  4. Mix in the melted butter, sugar, beaten egg, and vanilla extract.
  5. Combine the flour, baking soda, and salt in another bowl.
  6. Combine the wet and dry ingredients gently.
  7. Prepare the streusel topping by mixing flour, brown sugar, ground cinnamon, and cold butter.
  8. Fill the muffin cups about 2/3 full with the batter.
  9. Add the streusel topping on each muffin.
  10. Bake for 18–20 minutes or until golden brown.
  11. Let the muffins cool in the pan for about 5 minutes, then transfer to a wire rack.

Notes

Serve warm with butter or honey. Perfect for breakfast or snacks.

Nutrition

  • Serving Size: 1 muffin
  • Calories: 180
  • Sugar: 10g
  • Sodium: 150mg
  • Fat: 7g
  • Saturated Fat: 4g
  • Unsaturated Fat: 2g
  • Trans Fat: 0g
  • Carbohydrates: 26g
  • Fiber: 1g
  • Protein: 2g
  • Cholesterol: 30mg

Keywords: banana muffins, streusel muffins, breakfast muffins
Did you make this recipe?

Share a photo and tag us — we can't wait to see what you've made!

June 25, 2026 |

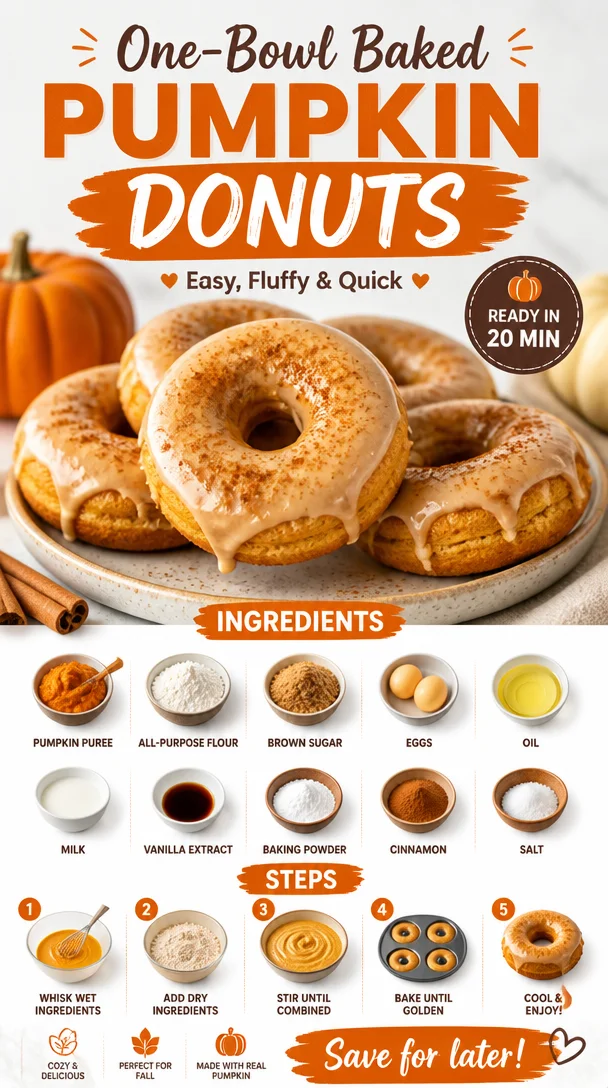
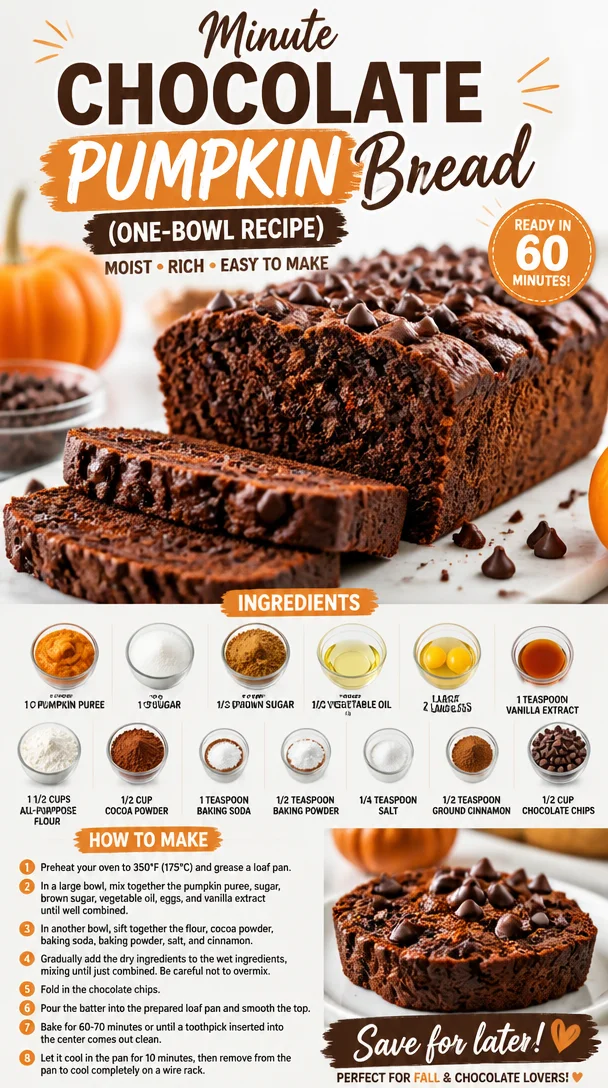
Minute Chocolate Pumpkin Bread (One-Bowl Recipe)

Delicious one-bowl chocolate pumpkin bread fresh from the oven

Indulge in Autumn with Chocolate Pumpkin Bread

Hey there, fellow food lovers! Today, I’m inviting you to dive into a delightful treat that brings together the warm embrace of autumn and the irresistible allure of chocolate. Yes, I’m talking about Chocolate Pumpkin Bread! This scrumptious loaf captures the cozy essence of fall—think crispy leaves, warm sweaters, and that sweet aroma wafting through your kitchen. Are you ready to get started? Let’s turn your kitchen into a bakery, where comfort food meets something a little adventurous!

The Moment That Sparked My Love for Pumpkin Bread

Let me take you down memory lane for a moment. Picture it: a chilly October morning, the sun just peeking through the trees, casting a warm glow over the neighborhood. It was my grandma’s kitchen, where the rich scent of spices was mingling with something sweet—a sure sign that something magical was happening. Grandma was known for her incredible pumpkin bread, an infusion of her love and creativity into every bite.

I remember standing on a stool, my little hands covered in flour, as I watched her mix the pumpkin, sugar, and just the right amount of chocolate. It was a playful kitchen affair, where culinary experiments often resulted in delicious masterpieces. The joyful laughter, the gentle GPS direction of “add a pinch more cinnamon,” and, of course, the failed first loaf that turned into an accidental dessert-for-breakfast. Each moment crafted a memory, and it’s those delightful sparks of joy I aim to recreate in my recipe today.

Now, fast forward to now. I’ve blended that nostalgic tradition with my own creative flair to create this Chocolate Pumpkin Bread recipe that’s moist, chocolatey, and downright delicious. Are you ready to get your hands doughy and create some new memories? Grab your apron, and let’s bake!

Ingredients That Bring Your Bread to Life

Before we get our mixing bowls out, let’s gather our ingredients! Each component plays a vital role in making this bread phenomenal. Here’s what you’ll need:

  • 1 cup pumpkin puree: The star of the show! You can use canned or homemade pumpkin puree. Just ensure it’s pure pumpkin for the best taste. If you don’t have pumpkin, substitute with applesauce for a different vibe!

  • 1 cup sugar: Classic granulated sugar balances the flavors perfectly, but you can experiment with coconut sugar if you’re feeling adventurous.

  • 1/2 cup brown sugar: This brings a lovely depth of flavor with its rich molasses notes. If you’re out, feel free to use more granulated sugar or even maple sugar.

  • 1/2 cup vegetable oil: This keeps your bread moist and tender. Swap it with melted coconut oil for a delightful twist, or use unsweetened applesauce for a lighter option!

  • 2 large eggs: These provide structure and moisture. For a vegan version, try flax eggs—mix 2 tablespoons of ground flaxseed with 6 tablespoons of water, letting it sit for 5 minutes to thicken.

  • 1 teaspoon vanilla extract: The flavor enhancer that brings harmony to the blend. Go for pure vanilla extract if you can; it’s worth it!

  • 1 1/2 cups all-purpose flour: This gives body to your bread. If you’re gluten-free, a 1:1 gluten-free baking blend is a great alternative.

  • 1/2 cup cocoa powder: The chocolate essence! Use unsweetened cocoa for a deep chocolate flavor. For an extra zing, try dark cocoa!

  • 1 teaspoon baking soda: This helps your bread rise, creating a fluffy texture. If you’re out, baking powder can be a substitute—just use about 3 teaspoons for a similar effect.

  • 1/2 teaspoon baking powder: This works alongside the baking soda for the perfect rise. Sometimes a little baking powder helps keep things light.

  • 1/4 teaspoon salt: Don’t skip this! Salt enhances all the flavors, making sure nothing tastes bland.

  • 1/2 teaspoon ground cinnamon: This spicy kick captures that autumn vibe. Feel free to add more if you’re a cinnamon lover or substitute with pumpkin pie spice!

  • 1/2 cup chocolate chips: Because who can resist chocolate? You can use semi-sweet, dark, or even white chocolate for a different twist.

Step-by-Step: Let’s Bake!

Now that we have our ingredients lined up like a well-rehearsed orchestra, let’s get to the good stuff. Follow these steps as we bake our way to chocolatey perfection!

Step 1: Preheat Your Oven

Start by preheating your oven to 350°F (175°C). Preheating is key for ensuring even baking—just like a warm-up before hitting the gym!

Step 2: Combine the Wet Ingredients

In a large mixing bowl, combine pumpkin puree, granulated sugar, brown sugar, vegetable oil, eggs, and vanilla extract. Using a whisk or a mixer (my mixer is my best friend!), mix until everything is well combined and creamy. This is where the magic begins!

Chef Tip: Make sure your eggs are at room temperature; it helps with a smoother batter!

Step 3: Mix the Dry Ingredients

In another bowl, whisk together flour, cocoa powder, baking soda, baking powder, salt, and ground cinnamon. This helps distribute the leavening agents evenly. You don’t want any surprises!

Tip: Sift the cocoa powder if it’s clumpy. No one wants a chocolate surprise in the wrong way!

Step 4: Combine Wet and Dry Mixes

Gently fold the dry mixture into the wet ingredients. Use a spatula to combine until just blended—be careful not to over-mix. We want a tender loaf, not a chewy one!

Pro Tip: If you see a few flour streaks, that’s okay! It’ll mix in as the ingredients meld together. Over-mixing is the enemy!

Step 5: Add the Chocolate Chips

Now, fold in those glorious chocolate chips. Let’s face it; they deserve a grand entrance in this bread!

Chef Hack: Reserve a few chips for topping the bread. It adds a delightful touch and looks so appealing!

Step 6: Prepare Your Pan

Lightly grease a loaf pan (or line it with parchment paper for easy release). Pour your batter into the prepared pan, spreading it out evenly.

Tip: Tap the pan lightly on the counter to release any air bubbles. Also double-check—don’t forget to add those reserved chocolate chips on top!

Step 7: Bake to Perfection

Place your pan in the preheated oven and bake for 50-60 minutes or until a toothpick inserted into the center comes out clean with just a few moist crumbs.

Chef’s Note: Every oven is different, so start checking around the 50-minute mark!

Step 8: Cool Before Slicing

Once it’s out of the oven, let your bread cool in the pan for about 10-15 minutes before transferring it to a wire rack. This cooling time allows the flavors to settle and the bread to firm up.

Tip: Patience is key here—it’ll be tough to resist sneaking a slice too early, but trust me on this one!

Serving Suggestions: Presenting Your Masterpiece

When it comes to serving your Chocolate Pumpkin Bread, it’s all about making it as inviting as it tastes. Slice it into thick, decadent pieces and arrange them on a charming platter. A sprinkle of powdered sugar on top gives an elegant touch that makes it feel like a special occasion. Pair it with a dollop of whipped cream or a scoop of vanilla ice cream for an indulgent dessert.

But wait, it doesn’t end there! Serve it alongside a steaming cup of coffee or hot cocoa to elevate the whole experience. Picture this: you and your loved ones, cozy blankets, and a slice of warm bread in hand. Doesn’t that sound delightful?

Recipe Variations: Make It Your Own!

Now, let’s talk creativity! The beauty of baking is that the possibilities are endless. Here are a few fun variations to experiment with:

  1. Spiced Nut Variation: Add a handful of chopped walnuts or pecans for a delightful crunch and nutty flavor.

  2. Zesty Citrus Twist: Incorporate the zest of an orange or lemon for a fresh, fruity note that adds brightness to the bread.

  3. ** Pumpkin Chocolate Chip Muffins**: Use the same batter but bake in a muffin tin for bite-sized joy! Just reduce the baking time to around 20-25 minutes.

  4. Marble Bread: Create a swirled effect by mixing half a batch of plain batter and half chocolate batter together before baking for a show-stopper appearance!

  5. Dairy-Free Delight: Use almond milk instead of vegetable oil and opt for dairy-free chocolate chips for a vegan twist.

Chef’s Notes: My Baking Journey

As I reflect on my journey with pumpkin bread, I can’t help but smile at all the little kitchen mishaps that have transformed into delicious success stories. There was that one time I mistook baking powder for baking soda—let’s just say my first loaf had a personality of its own, and by personality, I mean a volcano bread explosion—it was chaotic, but the taste was unforgettable!

This recipe has adapted over time, finding a cozy home in countless family gatherings. Each time it graces the table, someone shares a memory tied to the flavors, and it warms my heart knowing I can recreate that joy for others.

FAQs and Troubleshooting

  1. My bread turned out dry! What happened?

    • Overmixing or baking too long can lead to dryness. Make sure to mix until just combined, and check your bread a few minutes before the estimated time.
  2. What’s the best way to store leftover bread?

    • Allow the bread to cool completely, then wrap it tightly in plastic wrap or foil. Store it at room temperature for up to three days or in the fridge for up to a week.
  3. Can I freeze my Chocolate Pumpkin Bread?

    • Absolutely! Wrap the cooled bread tightly in plastic wrap and then in foil. It can stay in the freezer for up to three months. Just thaw it overnight in the fridge before enjoying!
  4. Why did my bread sink in the middle?

    • It could be due to underbaking or not using enough leavening agent. Double-check your measurements and ensure the bread is fully baked before removing it from the oven.

Nutritional Info

While sharing treats is the best part, being mindful of nutrition can help us enjoy them even more. Each slice of Chocolate Pumpkin Bread is roughly:

  • Calories: 220
  • Fat: 9g
  • Carbohydrates: 34g
  • Protein: 3g
  • Fiber: 2g

Remember, these values will vary based on exact ingredients and portion sizes.

So there you have it, my delightful friends! A journey into making the most scrumptiously moist Chocolate Pumpkin Bread, steeped in love and history. Whether you’re baking for yourself or sharing with loved ones, this recipe is perfect for bringing everyone together. Now, roll up those sleeves and let’s get baking—your kitchen stands ready for deliciousness! Happy baking and even happier memories!

Print

Chocolate Pumpkin Bread

A delightful loaf combining the cozy essence of fall with rich chocolate flavors, perfect for sharing with loved ones.

  • Prep Time: 15 minutes
  • Cook Time: 60 minutes
  • Total Time: 75 minutes
  • Yield: 1 loaf 1x
  • Category: Dessert
  • Method: Baking
  • Cuisine: American
  • Diet: Vegetarian

Ingredients

Scale
  • 1 cup pumpkin puree
  • 1 cup granulated sugar
  • 1/2 cup brown sugar
  • 1/2 cup vegetable oil
  • 2 large eggs
  • 1 teaspoon vanilla extract
  • 1 1/2 cups all-purpose flour
  • 1/2 cup cocoa powder
  • 1 teaspoon baking soda
  • 1/2 teaspoon baking powder
  • 1/4 teaspoon salt
  • 1/2 teaspoon ground cinnamon
  • 1/2 cup chocolate chips

Instructions

  1. Preheat your oven to 350°F (175°C).
  2. Combine pumpkin puree, sugar, brown sugar, vegetable oil, eggs, and vanilla extract in a bowl and mix until creamy.
  3. Whisk together flour, cocoa powder, baking soda, baking powder, salt, and cinnamon in another bowl.
  4. Fold the dry mixture into the wet ingredients until just blended.
  5. Add the chocolate chips and fold gently.
  6. Prepare a loaf pan by greasing it or lining it with parchment paper.
  7. Pour the batter into the prepared pan and tap it lightly to release air bubbles.
  8. Bake for 50-60 minutes or until a toothpick comes out clean.
  9. Cool in the pan for 10-15 minutes before transferring to a wire rack.

Notes

Serve with powdered sugar or paired with whipped cream or vanilla ice cream for a delightful dessert experience.

Nutrition

  • Serving Size: 1 slice
  • Calories: 220
  • Sugar: 22g
  • Sodium: 200mg
  • Fat: 9g
  • Saturated Fat: 2g
  • Unsaturated Fat: 7g
  • Trans Fat: 0g
  • Carbohydrates: 34g
  • Fiber: 2g
  • Protein: 3g
  • Cholesterol: 30mg

Keywords: pumpkin bread, chocolate bread, fall recipes, dessert, baking

Did you make this recipe?

Share a photo and tag us — we can't wait to see what you've made!

June 25, 2026 |

One-Pot Garlic Parmesan Crockpot Chicken & Potatoes

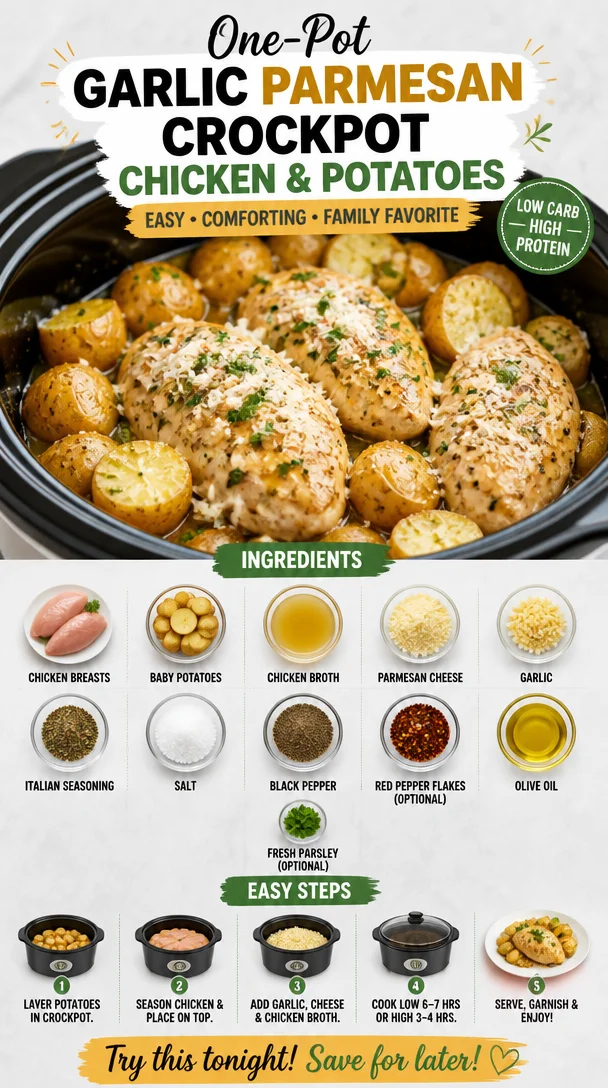
One-Pot Garlic Parmesan Crockpot Chicken with Potatoes in a crockpot

Garlic Parmesan Crockpot Chicken and Potatoes: An Incredible Ultimate Recipe

Welcome to Clean Plate Cravings, where the kitchen is a sanctuary filled with fresh ingredients, comforting aromas, and delightful flavors. Today, I’m super excited to share a dish that’s been a game-changer in my home: Garlic Parmesan Crockpot Chicken and Potatoes. It’s one of those recipes that just makes my heart sing, and with fall creeping in, it’s the perfect cozy dish to prepare on a busy day.

Imagine coming home after a long day, the aroma of garlic and herbs wafting through your home, instantly lifting your spirits. This dish encapsulates that dreamy feeling. Slow-cooked to perfection, the chicken turns out so tender it practically falls apart at a gentle nudge with a fork, while the baby potatoes soak up all those mouthwatering flavors. You won’t believe how simple it is to whip up, making it a favorite not just for me, but for everyone I’ve shared it with.

Growing up, my family would gather for slow-cooked meals on special evenings. My mom had this magical way of simmering flavors that created memories around the dinner table. I remember one specific Sunday when we had roast chicken with garlic and potatoes. I was just a kid then—full of energy and a little too chatty for my own good. I can still picture the clattering of pots, the warmth of the kitchen, and my mom’s laughter as we waited for dinner. That day, I learned two things: the power of good ingredients and the joy of sharing a meal with loved ones.

So, let’s dive into this recipe and create memories of your own!

Ingredients

Here’s what you will need to make this spectacular dish:

  • 4 boneless, skinless chicken breasts
    Tender chicken that soaks up all the delicious flavors. You can substitute with thighs for a juicier option, just remember to adjust the cooking time slightly.

  • 1.5 pounds baby potatoes, halved
    These little nuggets are perfect for slow cooking. They hold their shape well. Don’t have baby potatoes? No worries! Quarter normal-sized potatoes or use sweet potatoes for a twist.

  • 1 cup chicken broth
    This adds moisture and depth. Homemade broth is the best if you have it, but store-bought works just fine. For a vegetarian option, you can use vegetable broth.

  • 1/2 cup grated parmesan cheese
    This wonderful cheese adds rich umami flavors. Feel free to swap in pecorino romano for a sharper taste.

  • 4 cloves garlic, minced
    Garlic brings a beautiful aroma and flavor to any dish, but if you’re in a pinch, garlic powder can work (just use about 1 teaspoon).

  • 1 tablespoon Italian seasoning
    A blend of herbs that instantly makes everything taste gourmet! If you don’t have ready mix, you can use individual herbs like oregano, basil, and thyme.

  • 1 teaspoon salt
    Essential for flavor balance.

  • 1/2 teaspoon black pepper
    Adds a subtle kick. Feel free to adjust according to your taste preference.

  • 1/2 teaspoon red pepper flakes (optional)
    For those who like a little heat, this step is the perfect kick! Leave it out if you want a milder flavor.

  • 2 tablespoons olive oil
    Gives your dish a lovely richness. You can also use avocado oil for a subtle taste.

  • Fresh parsley for garnish (optional)
    Adds a pop of color and freshness. You can substitute with fresh cilantro for an exciting twist!

Step-by-Step Instructions

Now let’s get down to business and make this meal!

  1. Prepare Your Ingredients
    Before we dive into cooking, let’s prep. Rinse your baby potatoes and halve them—this helps them cook evenly. Mince your garlic; nothing beats fresh garlic!

  2. Sear the Chicken (Optional)
    Although this step is optional, I highly recommend it! Heat a tad bit of olive oil in a skillet over medium-high heat, and sear each chicken breast for about 2-3 minutes on each side until golden. This adds a lovely depth of flavor!

  3. Add Ingredients to the Crockpot
    Toss the halved baby potatoes into the bottom of your crockpot. They need to be layered first to prevent them from getting too mushy. Then, lay the seared (or raw, if you skipped that step) chicken breasts on top.

  4. Mix the Sauce
    In a bowl, whisk together the chicken broth, garlic, Italian seasoning, salt, pepper, and red pepper flakes. Finally, pour this mixture over your chicken and potatoes, ensuring every piece is coated with that garlicky goodness.

  5. Cook It Low and Slow
    Cover your crockpot and set it to low for 6-7 hours or high for 3-4 hours. The slower cooking provides tender, juicy chicken! Stir occasionally if you can, but it’s not necessary.

  6. Final Touch
    About 15 minutes before you’re ready to eat, sprinkle the grated parmesan cheese over everything. Cover the crockpot again and let that cheese melt into a gooey masterpiece.

And voilà! Your kitchen will smell heavenly, and everyone will be eagerly awaiting dinner.

Serving Suggestions

To plate, scoop a generous serving of the chicken and potatoes onto a vibrant plate. Drizzle any sauce from the bottom of the crockpot over the top for added flavor. Finish it off with a sprinkle of freshly chopped parsley for a burst of color. This dish pairs beautifully with a simple green salad or steamed vegetables!

Recipe Variations

Here are a few fun ways to switch things up:

  • Herb-Infused: Add fresh herbs like rosemary or thyme for a fragrant twist. Simply toss them in with the garlic!

  • Cheesy Broccoli Addition: Stir in some broccoli florets in the last hour of cooking for extra veggies and flavor.

  • Lemon Zest: A little lemon zest added right before serving can brighten the flavors.

  • Creamy Spin: Add a splash of heavy cream or sour cream toward the end for a creamy sauce.

  • Spicy Kick: Consider tossing in some sliced jalapeños or a dash of hot sauce for those who love heat.

Chef’s Notes

Over the years, this recipe has evolved in my kitchen. What started as a simple “dump and go” meal has become my trusty weeknight staple. I remember one time I attempted to add mushrooms, and let me tell you, they soaked up all the chicken flavor! A happy accident. Also, don’t be surprised if you find yourself making this more than once a week—everyone will be asking for seconds!

FAQs and Troubleshooting

1. Can I use frozen chicken?
Absolutely! If using frozen chicken, the cooking time will need to be extended, especially on the low setting. Ensure it’s cooked to an internal temperature of 165°F.

2. My chicken is dry! What happened?
If your chicken ended up dry, it might have cooked for too long. Always check on it a little sooner if you know your crockpot runs hot.

3. Can I add more vegetables?
You can totally add veggies! Just remember to include ones that cook well in a crockpot, like carrots or bell peppers, and toss them in at the same time as the potatoes.

4. Can I double this recipe?
Yes! Just ensure your crockpot is large enough to handle it, and keep an eye on the cooking time—larger quantities might take a little longer.

Nutritional Info

While the nutritional values can vary based on specific ingredients, a serving of this delightful Garlic Parmesan Crockpot Chicken and Potatoes generally contains around 450 calories, with adequate protein from the chicken and healthy carbs from the potatoes.

So, there you have it—my recipe for Garlic Parmesan Crockpot Chicken and Potatoes! It’s not only simple but also an incredible dish that brings everyone around the table with joy and satisfaction. I hope you enjoy making and sharing this meal just as much as I do. Happy cooking!

Print

Garlic Parmesan Crockpot Chicken and Potatoes

A cozy slow-cooked dish featuring tender chicken and flavorful baby potatoes, perfect for busy days.

  • Prep Time: 15 minutes
  • Cook Time: 360 minutes
  • Total Time: 375 minutes
  • Yield: 4 servings 1x
  • Category: Main Course
  • Method: Slow Cooking
  • Cuisine: American
  • Diet: Gluten-Free

Ingredients

Scale
  • 4 boneless, skinless chicken breasts
  • 1.5 pounds baby potatoes, halved
  • 1 cup chicken broth
  • 1/2 cup grated parmesan cheese
  • 4 cloves garlic, minced
  • 1 tablespoon Italian seasoning
  • 1 teaspoon salt
  • 1/2 teaspoon black pepper
  • 1/2 teaspoon red pepper flakes (optional)
  • 2 tablespoons olive oil
  • Fresh parsley for garnish (optional)

Instructions

  1. Prepare your ingredients by rinsing the baby potatoes and halving them; mince the garlic.
  2. Sear the chicken (optional) in olive oil over medium-high heat for 2-3 minutes on each side until golden.
  3. Add the halved baby potatoes to the bottom of your crockpot.
  4. Mix together chicken broth, garlic, Italian seasoning, salt, pepper, and red pepper flakes in a bowl, then pour over chicken and potatoes.
  5. Cook on low for 6-7 hours or high for 3-4 hours.
  6. Final touch: Sprinkle grated parmesan cheese over everything 15 minutes before serving.

Notes

For a twist, consider adding fresh herbs, broccoli, lemon zest, or a splash of cream. Adjust cooking time if using frozen chicken.

Nutrition

  • Serving Size: 1 serving
  • Calories: 450
  • Sugar: 2g
  • Sodium: 800mg
  • Fat: 18g
  • Saturated Fat: 6g
  • Unsaturated Fat: 10g
  • Trans Fat: 0g
  • Carbohydrates: 40g
  • Fiber: 5g
  • Protein: 35g
  • Cholesterol: 75mg

Keywords: crockpot chicken, garlic chicken, parmesan chicken, slow cooker recipes, cozy meals

Did you make this recipe?

Share a photo and tag us — we can't wait to see what you've made!

June 25, 2026 |

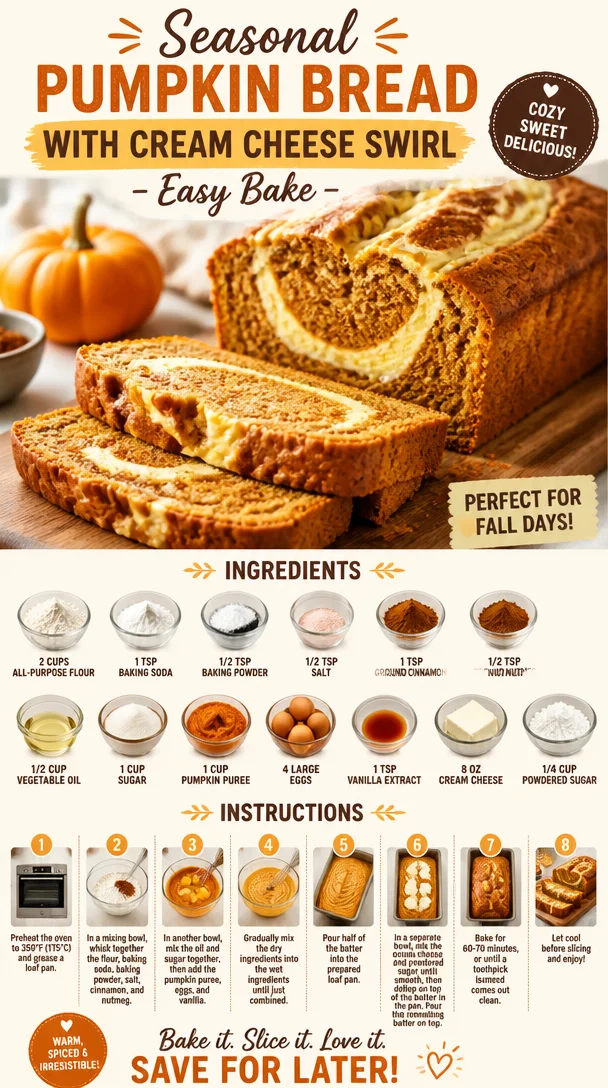
Seasonal Pumpkin Bread with Cream Cheese Swirl – Easy Bake

Seasonal pumpkin bread with cream cheese swirl in a loaf pan

Whip Up Some Happiness: Pumpkin Bread with Cream Cheese

Hello, dear food lovers! Today, let’s dive into something that not only embodies the spirit of comfort baking but also fills your kitchen with the warm, inviting aroma of cozy fall days—yes, I’m talking about homemade Pumpkin Bread with Cream Cheese. This sweet treat perfectly balances the natural sweetness of pumpkin with a luscious cream cheese filling that will have your taste buds doing a dance. Whether you’re celebrating the arrival of autumn or simply seeking a delightful snack, this recipe is your ticket to flavor town!

Now, let’s take a moment to picture a scene we all know well: you’re standing in your kitchen, the sun streaming through the window, and your favorite playlist is gently humming in the background. You’ve gathered all your ingredients, and there’s a hint of excitement in the air. But wait—there’s something even more magical here. There’s a rich tapestry of memories that make this pumpkin bread recipe feel like a warm hug from the past.

A Taste of Nostalgia

Whenever I think about pumpkin bread, I am reminded of my childhood and the warm kitchen of my grandmother. She had a knack for creating delightful treats that filled our bellies and hearts alike. Fall was her favorite season, and for us, it meant pumpkin everything! I remember coming home from school on chilly afternoons, the scent of spices swirling in the air, and her cheerful voice inviting me to help.

Together, we would measure out flour and sugar, her gentle hands guiding mine as I eagerly mixed. But the best part was always the cream cheese filling. We would sneak spoonfuls when she wasn’t looking! As I watched her expertly swirl it into the batter, I learned that a little indulgence can go a long way in making something that’s already delicious even better. Those baking sessions instilled a love for flavors and an understanding of the joy food can bring into our lives.

This pumpkin bread with cream cheese is more than just a recipe; it’s a loving connection to those cherished memories—one that I’m excited to share with you!

Ingredients Breakdown

Let’s gather the ingredients for this delightful pumpkin bread. Below, you’ll find a breakdown of each element that will help us create this cozy masterpiece:

  • 2 cups all-purpose flour
    This is the base for our bread, providing structure. If you’re looking for a gluten-free option, you can substitute it with a 1-to-1 gluten-free flour blend.

  • 1 tsp baking soda
    This will help our bread rise beautifully! Be sure it’s fresh; expired ingredients can dampen your baking dreams.

  • 1/2 tsp baking powder
    A little added insurance for a fluffy texture!

  • 1/2 tsp salt
    Balances the sweetness and enhances the flavors. Don’t skip this—salt is a flavor enhancer!

  • 1 tsp ground cinnamon
    Warm, comforting, and downright essential in any pumpkin recipe! You can also mix in a pinch of allspice for a deeper flavor profile.

  • 1/2 tsp ground nutmeg
    Adds a nutty warmth; it’s like a cozy blanket for your taste buds. Freshly grated nutmeg is a game changer if you have it on hand.

  • 1/2 cup vegetable oil
    This keeps the bread moist and luscious. Feel free to use melted coconut oil or applesauce for a lighter option.

  • 1 cup sugar
    Traditional white sugar works like a charm here, but consider swapping it out for brown sugar for a touch of caramel flavor.

  • 1 cup pumpkin puree
    The star of our show! Make sure you use pure pumpkin puree (not pumpkin pie filling) for the best results. You can also make your own by roasting and pureeing fresh pumpkins if you’re feeling adventurous!

  • 4 large eggs
    These provide moisture and richness. If you need an egg substitute, consider using flax eggs.

  • 1 tsp vanilla extract
    This fragrant addition enhances overall flavor beautifully.

For the Cream Cheese Filling:

  • 8 oz cream cheese
    This creates the rich center that pairs so well with the spices in the bread. Allow it to soften at room temperature for easier mixing!

  • 1/4 cup powdered sugar
    Sweetens the cream cheese filling and provides a lovely texture. If you’re looking for a sugar-free alternative, you can try a powdered erythritol or other sweeteners!

Step-by-Step Instructions

Now that we’ve gathered our ingredients, it’s time to get cooking! Follow these simple steps, and don’t hesitate to let your creativity flow—you can do this!

  1. Preheat Your Oven
    Begin by preheating your oven to 350°F (175°C). This sets the stage for our baking adventure!

  2. Prepare Your Pan
    Grease a 9×5 inch loaf pan with non-stick spray or line it with parchment paper for effortless removal later. A little preparation goes a long way!

  3. Mix Dry Ingredients
    In a medium bowl, whisk together the all-purpose flour, baking soda, baking powder, salt, cinnamon, and nutmeg. This ensures an even distribution of leavening agents and spices throughout the bread.

  4. Blend Wet Ingredients
    In a separate, large bowl, combine the sugar and vegetable oil. Whisk them together until well combined. Next, add in the pumpkin puree, eggs, and vanilla extract, whisking until smooth and creamy.

  5. Combine Wet and Dry
    Gradually add the dry ingredient mixture into the wet ingredients, stirring with a spatula until just combined. Don’t overmix; a few lumps are perfectly fine! This is a key tip to keep your bread light and fluffy.

  6. Make the Cream Cheese Filling
    In another bowl, beat the softened cream cheese with the powdered sugar until smooth and creamy. You can also add a teaspoon of vanilla extract here if you want to elevate the flavor even more!

  7. Layer the Mixtures
    Pour half of the pumpkin batter into your prepared loaf pan, ensuring it’s evenly spread. Then, dollop the cream cheese mixture on top, spreading it gently—aim for a mesmerizing swirl. Finally, pour the remaining pumpkin batter over the cream cheese layer, ensuring it’s covered.

  8. Bake to Perfection
    Bake your pumpkin bread in the preheated oven for about 60-70 minutes. Keep an eye out, as ovens vary! A toothpick inserted into the center should come out clean with just a few moist crumbs attached.

  9. Cool it Down
    Once baked, allow your pumpkin bread to cool in the pan for about 15 minutes, then transfer it to a wire rack to cool completely. This helps it set and enhances the flavors!

Serving Suggestions

Time to serve up that gorgeous pumpkin bread! Slice it into thick, warm pieces and enjoy it as is or with a dollop of whipped cream or a drizzle of maple syrup for an exciting twist. It pairs beautifully with a cup of coffee or tea, making it an excellent choice for a cozy brunch or an afternoon snack.

Recipe Variations

Feeling a little adventurous? Here are a few variations to switch things up:

  1. Nutty Delight: Add 1/2 cup of chopped walnuts or pecans to the batter for a satisfying crunch.

  2. Chocolate Lover’s: Stir in 1/2 cup of chocolate chips to bring a sweet surprise to your bread.

  3. Dairy-Free Option: Replace cream cheese with a dairy-free cream cheese or a banana puree for a lighter filling.

  4. Spicy Kick: Add a 1/4 teaspoon of ground ginger or a pinch of cayenne pepper for an unexpected spicy twist.

  5. Cinnamon Sugar Topping: Mix 1/2 teaspoon of cinnamon with 2 tablespoons of sugar and sprinkle it on top before baking for a crunchy crust!

Chef’s Notes

This recipe has been a staple in my kitchen for years, evolving over time as I’ve experimented with different ingredients and variations. The cream cheese filling is inspired by my grandmother’s recipes; she always encouraged me to add my own twists. The joy of baking comes not just from following directions but from making a recipe your own. So feel free to get creative!

One of my funniest kitchen moments involved my little cousin trying to ‘help’ by adding salt instead of sugar—let’s just say our bread was very… interesting that day! It’s a reminder that cooking is about having fun and sharing joy, even when things don’t go perfectly.

FAQs and Troubleshooting

Q: My pumpkin bread didn’t rise! What went wrong?

A: This could be due to old leavening agents. Always check your baking soda and powder for freshness!

Q: How should I store my pumpkin bread?

A: Store it in an airtight container at room temperature for up to three days. For longer storage, wrap it tightly in plastic wrap and freeze for up to three months.

Q: Can I use fresh pumpkin instead of canned?

A: Absolutely! Roast fresh pumpkin, puree it, and use it in place of canned. Just ensure it’s well-drained to avoid excess moisture.

Q: The cream cheese filling was too runny. What did I do wrong?

A: Make sure your cream cheese is softened but not overly melty; the mixing should create a smooth, thick consistency.

Nutritional Info

(Optional as per your preference)

This pumpkin bread is not only delicious but also packed with nutrients from the pumpkin. Each slice provides a comforting taste of fall in every bite.


And there you have it! A heartfelt recipe for pumpkin bread with cream cheese that infuses kitchen magic into every bite. I hope you enjoy making—and eating—this delightful treat as much as I do! Remember, it’s about savoring each moment, sharing with loved ones, and letting your creativity shine in the kitchen. Happy baking!

Print

Pumpkin Bread with Cream Cheese

Enjoy a delightful homemade Pumpkin Bread with a rich cream cheese filling that captures the essence of cozy fall days.

  • Prep Time: 15 minutes
  • Cook Time: 70 minutes
  • Total Time: 85 minutes
  • Yield: 8 servings 1x
  • Category: Dessert
  • Method: Baking
  • Cuisine: American
  • Diet: Vegetarian

Ingredients

Scale
  • 2 cups all-purpose flour
  • 1 tsp baking soda
  • 1/2 tsp baking powder
  • 1/2 tsp salt
  • 1 tsp ground cinnamon
  • 1/2 tsp ground nutmeg
  • 1/2 cup vegetable oil
  • 1 cup sugar
  • 1 cup pumpkin puree
  • 4 large eggs
  • 1 tsp vanilla extract
  • For the Cream Cheese Filling:
  • 8 oz cream cheese
  • 1/4 cup powdered sugar

Instructions

  1. Preheat your oven to 350°F (175°C).
  2. Grease a 9×5 inch loaf pan with non-stick spray or line with parchment paper.
  3. Mix the dry ingredients in a medium bowl: all-purpose flour, baking soda, baking powder, salt, cinnamon, and nutmeg.
  4. Blend the wet ingredients in a separate bowl: combine sugar and vegetable oil, then whisk in pumpkin puree, eggs, and vanilla extract.
  5. Combine the wet and dry ingredients, stirring until just mixed.
  6. Make the cream cheese filling by beating the softened cream cheese and powdered sugar until smooth.
  7. Layer half of the pumpkin batter into the loaf pan, then add dollops of the cream cheese mixture, topping with the remaining pumpkin batter.
  8. Bake for 60-70 minutes until a toothpick comes out clean with a few moist crumbs.
  9. Cool in the pan for 15 minutes before transferring to a wire rack.

Notes

Serve warm with whipped cream or a drizzle of maple syrup. You can also add nuts or chocolate chips for a twist.

Nutrition

  • Serving Size: 1 slice
  • Calories: 280
  • Sugar: 18g
  • Sodium: 200mg
  • Fat: 10g
  • Saturated Fat: 2g
  • Unsaturated Fat: 8g
  • Trans Fat: 0g
  • Carbohydrates: 36g
  • Fiber: 2g
  • Protein: 4g
  • Cholesterol: 50mg

Keywords: pumpkin bread, fall recipes, cream cheese filling

Did you make this recipe?

Share a photo and tag us — we can't wait to see what you've made!

June 25, 2026 |

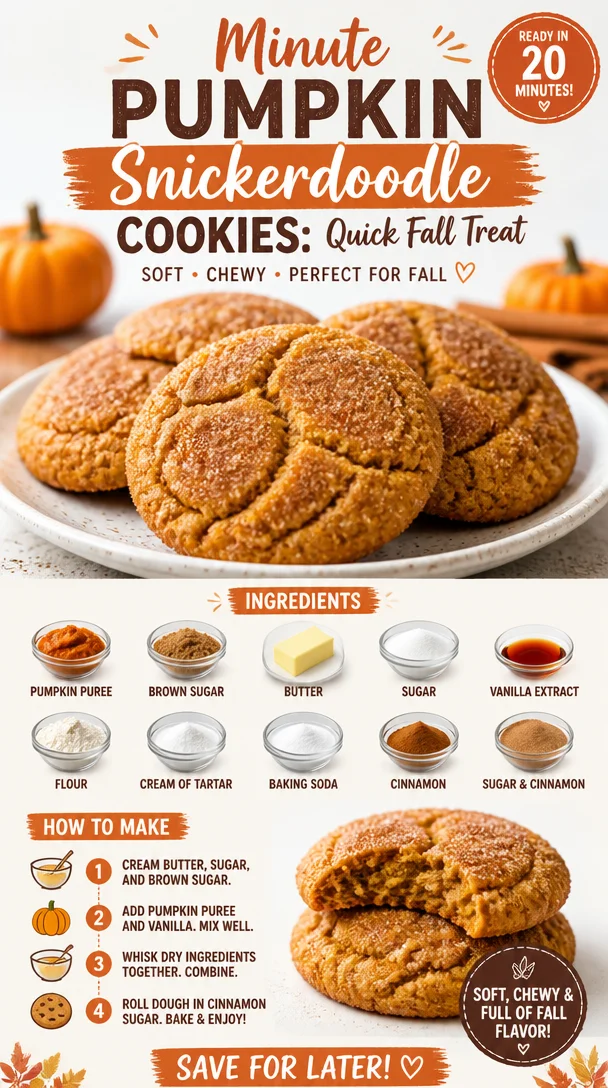
Minute Pumpkin Snickerdoodle Cookies: Quick Fall Treat

Batch of freshly baked Pumpkin Snickerdoodle Cookies on a wooden table

Easy Pumpkin Snickerdoodle Cookies: A Flavorful Fall Treat

As the leaves turn and a cool breeze whispers through the air, the scent of pumpkin spice seems to waft through every corner of our kitchens. It’s that magical time of year again when everything feels more connected to the earth, and cozy flavors become the highlight of our gatherings. That’s right—fall is here, and so is my favorite excuse to bake! Today, I’m thrilled to share with you a delightful twist on a classic favorite: Easy Pumpkin Snickerdoodle Cookies! These cookies are soft, chewy, and bursting with that irresistible pumpkin flavor, making them the perfect treat for any autumn occasion—whether it’s a cozy night in or a festive gathering with friends.

You might be wondering, “What’s a snickerdoodle, and why are we adding pumpkin?” Good question! Traditional snickerdoodles are those warm, cinnamon-sugar-dusted cookies that carry a slightly tangy flavor from cream of tartar. They’re comforting, nostalgic, and oh-so-satisfying. By adding pumpkin, we keep all of that cozy goodness while introducing a new layer of flavor that’s as vibrant as the colors of the season. Plus, pumpkin adds moisture, making these cookies even more tender and delicious.

So grab your mixing bowl, put on your favorite playlist, and let’s whip up a batch of these Pumpkin Snickerdoodles that’ll have you feeling all kinds of fall vibes! Whether you’re enjoying them with a cup of steaming cider or sharing them at a potluck, these pumpkin-infused delights are sure to be a hit!

A Whiff of Nostalgia: My Pumpkin Cookie Memory

Let me take you back to my childhood for a second. I remember every fall, my grandma would invite all the grandkids over for a Saturday of baking. The kitchen was our playground as we flourished our hands in the dough, beat eggs with enthusiastic chatter, and debated if we could sneak a spoonful of the cookie dough (spoiler alert: we always did!).

One year, she decided to switch things up and introduced us to pumpkin cookies. I can still smell the warm, spicy aroma that filled the house as they baked, drawing us in like a sweet siren song. The moment we took that first bite, it felt like an embrace from autumn itself! My grandma’s recipe wasn’t for snickerdoodles, but it sparked something in me that yearned for the seasonal flavors. Mixing in the comforting notes of cinnamon with the smooth richness of pumpkin felt groundbreaking. It ignited my passion for baking goodies that brought joy and connection—just like it did for me as a child.

From that day forward, pumpkin cookies became a staple in our fall festivities. And as I grew older and started experimenting in the kitchen, those cherished moments inspired my own take on those pumpkin cookies, transforming them into these creamy, dreamy Pumpkin Snickerdoodle Cookies!

Ingredients: What You’ll Need

Here’s a rundown of delicious ingredients you’ll need to create these delightful cookies. Each element plays a key role in achieving that amazing flavor and texture:

  • 1 cup unsalted butter, softened
    Butter adds richness and moisture to the cookies. If you’re in a pinch, you can substitute with coconut oil or a vegan butter.

  • 1 cup granulated sugar
    This brings sweetness and helps the cookies lift perfectly. You can swap it with brown sugar for a deeper flavor or even coconut sugar for a healthier alternative.

  • 1 cup packed brown sugar
    This is where the caramel notes come into play! If you don’t have brown sugar, you can mix granulated sugar with a tablespoon of molasses.

  • 1 cup pumpkin puree
    Use canned pumpkin puree for convenience, or make your own by roasting and blending fresh pumpkin. Either way, it’s a moisturizing agent and brings that fall flavor we love!

  • 2 large eggs
    Eggs bind the mixture together, providing a fluffy texture. For an egg-free version, bananas or flax eggs can work in a pinch.

  • 3 cups all-purpose flour
    Flour is the foundation of any great cookie. For gluten-free options, try a 1:1 gluten-free flour blend.

  • 2 teaspoons cream of tartar
    This ingredient gives snickerdoodles that signature tangy flavor. If you don’t have any, you can substitute with baking powder (just skip the baking soda).

  • 1 teaspoon baking soda
    Baking soda is crucial for leavening. Make sure it’s fresh for the best rise!

  • ½ teaspoon salt
    This enhances all the other flavors. Don’t skip it!

  • 2 teaspoons ground cinnamon
    A quintessential autumn spice that gives warmth and depth. Feel free to mix in some nutmeg or ginger for a spice kick!

  • ¼ teaspoon ground nutmeg (optional)
    Nutmeg adds warmth and that cozy fall spice. Use it according to your taste preference.

  • 2 tablespoons of cinnamon-sugar mixture
    A mix of granulated sugar and cinnamon for rolling! It’s the finishing touch that makes these cookies pop.

Step-by-Step Instructions: Let’s Get Baking!

Now that you have all your ingredients prepped and ready, it’s time to turn up the heat and create some kitchen magic! Follow these detailed steps to achieve the perfect Pumpkin Snickerdoodle Cookies.

  1. Preheat the Oven
    Begin by preheating your oven to 350°F (175°C). This is crucial for even baking! While your oven warms up, you can get started on your dough.

  2. Cream the Butter and Sugars
    In a large mixing bowl, add the softened butter, granulated sugar, and brown sugar. Using an electric mixer or a good old-fashioned whisk, beat them together until light and fluffy. This step is essential as it will incorporate air into the mixture, making your cookies tender. Don’t rush it; it should take about 3–5 minutes.

  3. Add in the Pumpkin and Eggs
    Next, add the pumpkin puree and eggs to the mix. Beat together until well-combined. You’ll notice this beautiful, creamy orange swirl come together! Trust me—it will smell heavenly.

  4. Mix the Dry Ingredients
    In a separate bowl, whisk together the flour, cream of tartar, baking soda, salt, cinnamon, and nutmeg. Gradually add the dry ingredients to the wet mixture, mixing just until combined. Be careful not to overmix; you want your cookies to be soft and chewy!

  5. Chill the Dough (Optional but Recommended)
    If you have time, cover the dough and chill it in the refrigerator for at least 30 minutes. Chilling helps the cookies hold their shape and enhances the flavors. But if you’re in a rush, you can skip this step!

  6. Form the Cookies
    Use a cookie scoop or your hands to roll even-sized balls of dough about 1.5 inches in diameter. This will ensure they bake uniformly.

  7. Cinnamon-Sugar Coating
    In a small bowl, mix together the cinnamon-sugar mixture. Roll each dough ball in this mixture until fully coated. It will clump together, creating that crave-worthy crispy crust!

  8. Bake ‘Em Up
    Place the coated cookie balls onto lined baking sheets, spacing them about 2 inches apart. Bake for 10–12 minutes, or until the edges are lightly golden. The centers may look slightly underbaked, but that’s perfect! Remember, cookies continue to cook on the baking sheet after being pulled from the oven.

  9. Cool and Enjoy
    After baking, let your cookies cool on the baking sheet for a few minutes before transferring them to a wire rack to cool completely.

  10. Savor the Moment
    Finally, grab a cup of your favorite coffee, cider, or warm milk, and take a moment to enjoy these delicious cookies. Perhaps share a few with friends and family (if you’re feeling generous)!

Serving Suggestions: Plating Your Treats

These Pumpkin Snickerdoodle Cookies are super versatile. You can serve them as part of a delightful autumn dessert spread alongside caramel dipping sauce or slice them up and create an adorable cookie sandwich with cream cheese frosting in the middle! Simple white plates with a sprinkle of cinnamon or fall-themed dishware can elevate your presentation. A fun tip? Place some cookies in a mason jar with a little twine; they make for a sweet gift or charming table decoration!

Recipe Variations: Get Creative!

If you’re feeling adventurous, here are some fun ways to mix things up with your Pumpkin Snickerdoodle Cookies:

  • Add Chocolate Chips: For a delightful contrast, mix in some semi-sweet or dark chocolate chips. Pumpkin and chocolate are a match made in heaven!

  • Walnuts or Pecans: For some crunch, toss in some chopped nuts. They provide a lovely texture and added flavor!

  • Oatmeal Pumpkin Snickerdoodles: Stir in some oats for a hearty twist. It adds healthy fiber and makes them a great breakfast treat!

  • Spicy Variation: Experiment with additional spices like allspice, cardamom, or even a dash of cayenne for a warming kick!

  • Vegan Option: Swap in vegan butter, replace eggs with flax eggs, and use dairy-free chocolate chips if desired!

Chef’s Notes: A Dash of Love

Every recipe tells a story, and this one has a special place in my heart. I’ve played around with countless cookie recipes over the years, but none bring me back quite like these Pumpkin Snickerdoodles. They are a perfect homage to my grandma’s essence, reminding me that baking is not just about food—it’s about memories, love, and connections. Plus, each time I make these cookies, I can’t help but feel gratitude for all those joyful baking sessions with my family. Who knew that a simple pumpkin could spark such delightful memories?

FAQs and Troubleshooting: Your Baking Concerns Addressed

Q: Why are my cookies flat and not rising?
A: Flat cookies can be caused by a few things: make sure your baking soda is fresh (an expired product won’t work), and double-check that you’re measuring your flour properly—too little can lead to flattening.

Q: Can I use pumpkin pie filling instead of pumpkin puree?
A: Technically, you can. However, pumpkin pie filling contains added sugars and spices, which might alter the final taste and sweetness of your cookies. I recommend using pure pumpkin puree for the best results.

Q: How do I store leftover cookies?
A: Store your cookies in an airtight container at room temperature for up to a week. To keep them even fresher, you can put parchment paper between layers to prevent them from sticking together!

Q: Can I freeze the dough for later use?
A: Absolutely! You can scoop dough balls and freeze them on a baking sheet before transferring them to a freezer-safe bag. When you’re ready to bake, just pop them into the oven straight from the freezer—adjust the baking time by a couple of minutes little if needed!

Nutritional Info (Optional)

While enjoying these treats, consider their benefits! Each Pumpkin Snickerdoodle Cookie contains good amounts of fiber, vitamins A and C from pumpkin, and the comforting essence of whole ingredients. Just remember to savor in moderation!


I hope you give these Pumpkin Snickerdoodle Cookies a try! They’re not just cookies; they’re little bites of nostalgia and warmth that remind us why the kitchen should be the heart of our home. So roll up those sleeves and create some sweet memories—you’ll thank yourself later! Enjoy every bite, and happy baking!

Print

Easy Pumpkin Snickerdoodle Cookies

Delicious and tender Pumpkin Snickerdoodle Cookies, perfect for fall gatherings.

  • Prep Time: 15 minutes
  • Cook Time: 12 minutes
  • Total Time: 27 minutes
  • Yield: 24 servings 1x
  • Category: Dessert
  • Method: Baking
  • Cuisine: American
  • Diet: Vegetarian

Ingredients

Scale
  • 1 cup unsalted butter, softened
  • 1 cup granulated sugar
  • 1 cup packed brown sugar
  • 1 cup pumpkin puree
  • 2 large eggs
  • 3 cups all-purpose flour
  • 2 teaspoons cream of tartar
  • 1 teaspoon baking soda
  • ½ teaspoon salt
  • 2 teaspoons ground cinnamon
  • ¼ teaspoon ground nutmeg (optional)
  • 2 tablespoons of cinnamon-sugar mixture for rolling

Instructions

  1. Preheat the oven to 350°F (175°C).
  2. Cream the butter, granulated sugar, and brown sugar until light and fluffy.
  3. Add the pumpkin puree and eggs, mixing until well-combined.
  4. Mix the dry ingredients in a separate bowl, then gradually add to the wet mixture.
  5. Chill the dough in the refrigerator for at least 30 minutes (optional).
  6. Form cookie balls about 1.5 inches in diameter.
  7. Roll each ball in the cinnamon-sugar mixture.
  8. Bake for 10-12 minutes until edges are lightly golden.
  9. Cool on the baking sheet for a few minutes before transferring to a wire rack.

Notes

Chilling the dough helps enhance flavors and maintain cookie shape.

Nutrition

  • Serving Size: 1 cookie
  • Calories: 150
  • Sugar: 10g
  • Sodium: 150mg
  • Fat: 7g
  • Saturated Fat: 4g
  • Unsaturated Fat: 3g
  • Trans Fat: 0g
  • Carbohydrates: 20g
  • Fiber: 1g
  • Protein: 2g
  • Cholesterol: 30mg

Keywords: pumpkin cookies, snickerdoodle, fall baking, autumn treats, dessert recipes

Did you make this recipe?

Share a photo and tag us — we can't wait to see what you've made!

June 25, 2026 |

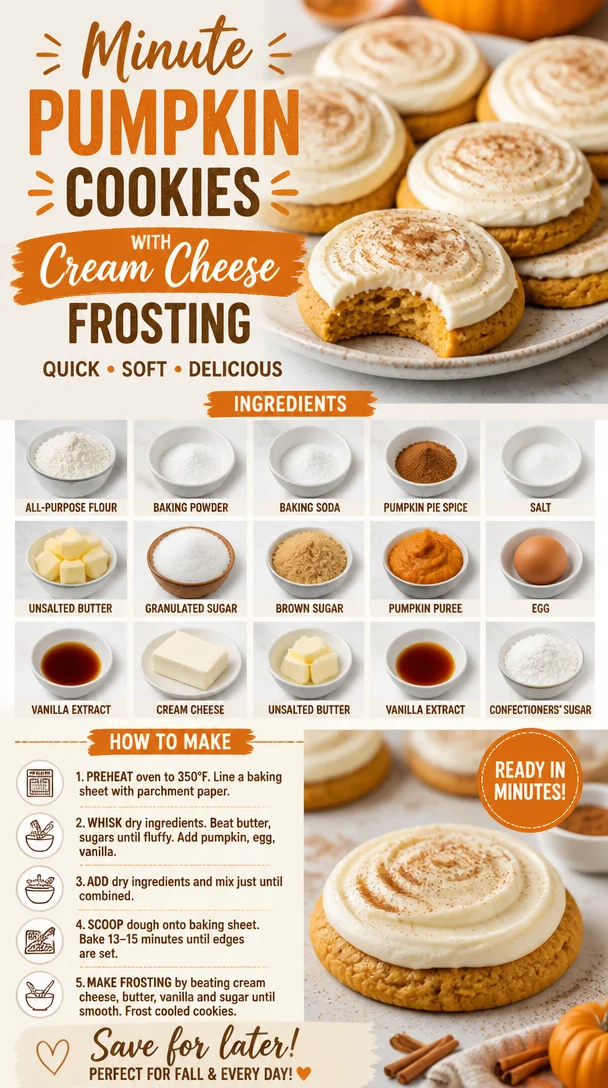
Minute Pumpkin Cookies with Cream Cheese Frosting

Delicious minute pumpkin cookies with cream cheese frosting on a plate

Pumpkin Cookies with Cream Cheese Frosting: A Fall Delight

Ah, pumpkin season—those crisp autumn days when the leaves turn golden and the air carries a hint of spice. Nothing says cozy like the warm aroma of freshly baked pumpkin cookies wafting through your kitchen, right? I can’t help but grin when I think about diving into a batch of these delicious treats, topped with creamy, dreamy frosting. Trust me, once you try these pumpkin cookies with cream cheese frosting, your taste buds will be convinced that fall is their favorite season too!

Baking has always been a special ritual for me, and pumpkin cookies hold a nostalgic place in my heart. I remember huddling in the kitchen with my grandmother on chilly afternoons, eagerly waiting for the timer to ding as we baked a new batch. She taught me the importance of quality ingredients and shared her secret spice blends that filled our home with warmth and love. These cookies remind me of those cherished moments, capturing the essence of simpler times when the joy of cooking was an adventure shared with loved ones.

Let’s get to it! Together, we’ll whip up a batch of these delectable pumpkin cookies that are soft, chewy, and bursting with flavor. And don’t forget the cream cheese frosting—it’s the cherry on top (or should I say, the swirl of cream cheese?). So grab your apron, and let’s embrace the cozy vibes of fall one bite at a time!

Ingredients

Here’s what you’ll need to make these mouthwatering cookies:

  • 2 1/2 cups (312 g) all-purpose flour: The backbone of your cookie. For a gluten-free version, try using a 1:1 gluten-free flour blend. It works like magic!

  • 1 teaspoon baking powder: This will help your cookies rise and become light and fluffy. Make sure it’s fresh; old powder can leave you with sad, flat cookies.

  • 1 teaspoon baking soda: This ingredient is crucial for creating that delightful texture. Don’t skip it, or you might end up with cookies as dense as a brick!

  • 1 tablespoon pumpkin pie spice (plus extra for sprinkling): A perfect blend of cinnamon, nutmeg, and ginger adds a warm flavor that embodies fall. If you’re feeling adventurous, make your own spice mix!

  • 1/2 teaspoon salt: Just a pinch to balance the sweetness. It enhances all the flavors!

  • 3/4 cup (170 g) unsalted butter (room temperature): This is the creaminess factor. Make sure it’s soft, but not melted.

  • 3/4 cup (150 g) granulated sugar: Adds sweetness and crunch. You can use coconut sugar for a healthier twist!

  • 1/2 cup (100 g) packed light brown sugar: For that rich, caramel undertone. Dark brown sugar works too if you like a bolder flavor!

  • 1 1/4 cups (305 g) canned pumpkin puree: The star of the show! Canned pumpkin is super convenient, but if you’re feeling ambitious, you can use freshly roasted pumpkin too. Just be sure it’s well pureed!

  • 1 large egg (room temperature): Provides binding and richness. Did you know letting eggs come to room temperature helps with mixing? It really does!

  • 1 teaspoon pure vanilla extract: This addition brings a delightful aroma to your cookies. Always opt for pure extract over synthetic!

  • 8 ounces (1 brick or 226 g) block-style cream cheese (softened but still cool): The base of our frosting! Similar to butter, we want it soft but not melted for the best consistency.

  • ¼ cup (56 g) unsalted butter (softened but still cool): A companion to the cream cheese that adds richness to the frosting.

  • 1 teaspoon pure vanilla extract: Just like in the cookie, this enhances the flavor of the frosting too.

  • 1 3/4 cups (210 g) confectioners’ sugar (sifted): For sweetness and that silky texture. Sifting helps prevent clumps and creates a creamy finish!

Step-by-Step Instructions

  1. Preheat Your Oven: Start by preheating your oven to 350°F (175°C). This is the perfect temperature to get those cookies just right—golden on the edges, soft in the center.

  2. Combine Dry Ingredients: In a medium bowl, whisk together the flour, baking powder, baking soda, pumpkin pie spice, and salt. This ensures that everything is evenly distributed. Pro tip: whisking also aerates the flour, which can help your cookies rise beautifully!

  3. Cream the Butter and Sugars: In a large mixing bowl, beat together the room-temperature butter, granulated sugar, and brown sugar with an electric mixer on medium speed until fluffy. This step is crucial because it incorporates air into the mix, giving your cookies that delightful texture. Aim for about 2-3 minutes until light and creamy.

  4. Mix in Pumpkin and Egg: Add the pumpkin puree, egg, and vanilla extract to the butter mixture. Continue to mix on medium speed until everything is well combined. The mixture will look a bit messy, but that’s just because of the pumpkin—embrace it!

  5. Gradually Combine Dry & Wet Ingredients: Slowly add the flour mixture to the wet ingredients, mixing on low speed until just combined. Avoid overmixing here; you want the cookies to remain tender.

  6. Scoop the Cookies: Using a cookie scoop or tablespoon, drop rounded balls of dough onto a lined baking sheet, spacing them about 2 inches apart. To make uniform cookies, try chilling the dough for about 30 minutes before baking—this also makes them a bit chewy!

  7. Bake: Pop the cookies in the preheated oven and bake for 12-15 minutes, or until the cookies are lightly golden on the edges. You’ll know they’re done when they look set in the center. Be careful not to overbake, or you’ll miss out on that soft texture!

  8. Cool: Once baked, remove the cookies from the oven and let them cool on the baking sheet for a few minutes before transferring them to a wire rack to cool completely.

  9. Make the Cream Cheese Frosting: While the cookies cool, beat together the softened cream cheese and butter until creamy. Then, gradually add the sifted confectioners’ sugar and vanilla extract, mixing until smooth. You want it to be thick but spreadable.

  10. Frost the Cookies: Once the cookies are cool, generously spread a dollop of cream cheese frosting on top of each one. If you want to get fancy, you can use a piping bag to create a beautiful swirl. Sprinkle a light dusting of extra pumpkin pie spice on top for that extra touch of fall!

Serving Suggestions

Serve these pumpkin cookies on a beautiful platter, perhaps with some cute autumn decorations like mini pumpkins or colorful leaves. They’re perfect for cozy gatherings, holiday parties, or just a simple treat to enjoy with your afternoon coffee or tea. Enjoy them warm or chilled; either way, they’re scrumptious!

Recipe Variations

  • Chocolate Chip Pumpkin Cookies: Add 1 cup of chocolate chips to the dough for a delightful chocolatey twist.

  • Nutty Pumpkin Cookies: Toss in 1 cup of chopped walnuts or pecans for a crunchy texture.

  • Maple Cream Cheese Frosting: Swap out the vanilla extract in the frosting for maple extract for a deliciously different flavor profile.

  • Spiced Cranberry Variation: Add in 1/2 cup of dried cranberries for a tart balance to the sweetness.

  • Vegan Option: Use a flax egg in place of the egg and coconut oil instead of butter for a dairy-free version. Check each ingredient for vegan alternatives, and voilà—pumpkin cookies for everyone!

Chef’s Notes

I can’t help but chuckle whenever I think back to my first attempt at baking these cookies. Let’s just say it didn’t go as planned! I forgot the baking soda and ended up with what my friends lovingly dubbed “pumpkin cakes.” They were delicious, just not what I intended! After lots of practice, I can proudly say I’ve mastered them. My love for these cookies only grows with each batch I bake, and I hope they bring a little joy and nostalgia to your kitchen, just as they have mine over the years.

FAQs and Troubleshooting

1. Why are my cookies flat?
If your cookies spread too much, you might have skipped chilling the dough or used warm butter instead of room temperature. Remember, room temperature means soft but not melted!

2. Can I freeze these cookies?
Absolutely! Bake the cookies and let them cool completely. Freeze them in an airtight container for up to three months. Frosting can also be frozen separately!

3. What can I do if my frosting is too runny?
If your cream cheese frosting turns out too thin, simply add more sifted confectioners’ sugar until you reach your desired consistency.

4. How can I tell when my cookies are done?
Look for the edges to be slightly golden and the center to look set. They’ll continue to firm up as they cool, so don’t worry if they seem soft right out of the oven!

Nutritional Info

(Optional, based on serving size—this section can be filled if needed)

  • Calories: 180 per cookie (depends on size and portions)
  • Total Fat: 8g
  • Saturated Fat: 4g
  • Carbohydrate: 25g
  • Sugar: 12g
  • Protein: 2g

Now it’s your turn to create and share these delightful pumpkin cookies! Whether you follow the recipe to a tee or throw in your special twist, remember to enjoy the process. Baking should be about having fun and connecting with the flavors and nostalgia of fall. So grab those ingredients, crank up some tunes, and let the magic happen. Happy baking, friends!

Print

Pumpkin Cookies with Cream Cheese Frosting

Delicious pumpkin cookies topped with creamy, dreamy cream cheese frosting, perfect for fall.

  • Prep Time: 15 minutes
  • Cook Time: 15 minutes
  • Total Time: 30 minutes
  • Yield: 24 cookies 1x
  • Category: Dessert
  • Method: Baking
  • Cuisine: American
  • Diet: Vegetarian

Ingredients

Scale
  • 2 1/2 cups (312 g) all-purpose flour
  • 1 teaspoon baking powder
  • 1 teaspoon baking soda
  • 1 tablespoon pumpkin pie spice (plus extra for sprinkling)
  • 1/2 teaspoon salt
  • 3/4 cup (170 g) unsalted butter (room temperature)
  • 3/4 cup (150 g) granulated sugar
  • 1/2 cup (100 g) packed light brown sugar
  • 1 1/4 cups (305 g) canned pumpkin puree
  • 1 large egg (room temperature)
  • 1 teaspoon pure vanilla extract
  • 8 ounces (226 g) block-style cream cheese (softened but still cool)
  • 1/4 cup (56 g) unsalted butter (softened but still cool)
  • 1 teaspoon pure vanilla extract
  • 1 3/4 cups (210 g) confectioners’ sugar (sifted)

Instructions

  1. Preheat your oven to 350°F (175°C).
  2. Combine the dry ingredients in a medium bowl.
  3. Cream the butter and sugars together until fluffy.
  4. Mix in the pumpkin, egg, and vanilla.
  5. Gradually add the flour mixture to the wet ingredients.
  6. Scoop the dough onto a lined baking sheet.
  7. Bake for 12-15 minutes or until lightly golden.
  8. Cool the cookies on a wire rack.
  9. Make the cream cheese frosting by mixing all frosting ingredients until smooth.
  10. Frost the cooled cookies generously.

Notes

Chill the dough for 30 minutes for chewier cookies. Can freeze baked cookies for up to 3 months.

Nutrition

  • Serving Size: 1 cookie
  • Calories: 180
  • Sugar: 12g
  • Sodium: 200mg
  • Fat: 8g
  • Saturated Fat: 4g
  • Unsaturated Fat: 3g
  • Trans Fat: 0g
  • Carbohydrates: 25g
  • Fiber: 1g
  • Protein: 2g
  • Cholesterol: 30mg

Keywords: pumpkin cookies, fall desserts, cream cheese frosting, cozy baking

Did you make this recipe?

Share a photo and tag us — we can't wait to see what you've made!

June 25, 2026 |

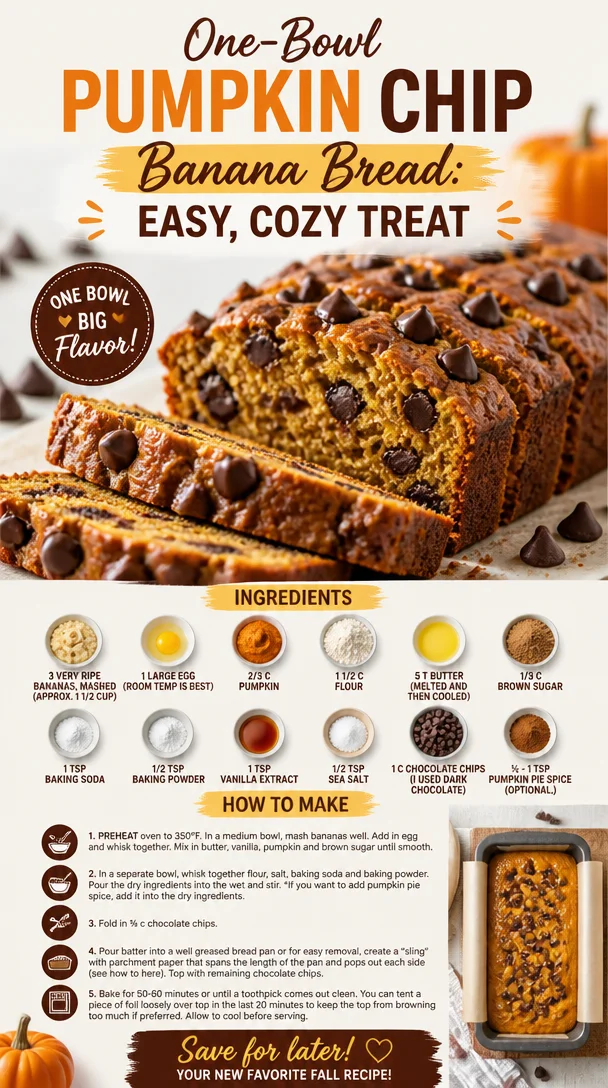
One-Bowl Pumpkin Chip Banana Bread: Easy, Cozy Treat

One-bowl pumpkin banana bread with chocolate chips freshly baked

The Ultimate Pumpkin Chip Banana Bread: A Cozy Delicacy

Ah, the sweet smell of freshly baked banana bread wafting through the kitchen! Nothing warms the heart quite like the aroma of sweet bananas mingling with cozy autumn spices and rich chocolate. Today, I am thrilled to share one of my most beloved recipes—Pumpkin Chip Banana Bread. Picture yourself snuggling up with a warm slice of this delightful bread, coffee in hand, as the crisp autumn leaves fall outside.

When I think about pumpkin chip banana bread, it takes me back to my childhood. Growing up, my family had a tradition of baking together on Sunday afternoons. We would gather in the kitchen, laughter filling the air as we mixed, measured, and created culinary masterpieces. One particular September, my grandma decided it was time to add a seasonal twist to our banana bread, incorporating pumpkin and chocolate chips for a treat that was beyond delicious! That first bite of her warm, soft creation left a lasting impression and soon became a family favorite.

So here we are, blending those sweet memories with simple ingredients to create an incredible treat that’s perfect for any gathering—or just your cozy afternoon snack. Let’s get started!

Ingredients

Here’s what you’ll need to whip up this scrumptious Pumpkin Chip Banana Bread:

  • 3 very ripe bananas, mashed (approx. 1 ½ cup): The riper, the better! Use overripe bananas to add natural sweetness and moisture. If you’re in a pinch, unsweetened applesauce can serve as a replacement—just note it may change the bread’s flavor slightly.

  • 1 large egg (room temp is best): Eggs bind our ingredients together. For a vegan twist, you could try flaxseed meal (1 tablespoon ground flax + 2.5 tablespoons water = 1 egg) or a store-bought egg replacer.

  • 2/3 cup pumpkin puree: Canned pumpkin works wonders here. And if you’re adventurous, use fresh pumpkin for a more authentic taste—just roast and puree it! Make sure not to confuse pumpkin puree with pumpkin pie filling, as the latter contains added spices and sugars.

  • 1 ½ cups all-purpose flour: This recipe is super forgiving! You can swap in whole wheat flour for a nuttier flavor, or even gluten-free flour if you need to—just check the conversion ratios.

  • 5 tablespoons butter (melted and then cooled): Butter brings richness to our loaf. If you prefer dairy-free, coconut oil works like a charm!

  • 1/3 cup brown sugar: This adds a lovely caramelized sweetness. Feel free to use coconut sugar or maple syrup in place of brown sugar for a different nuance.

  • 1 teaspoon baking soda: Our leavening agent that gives the bread a lovely rise!

  • 1/2 teaspoon baking powder: Adds some extra fluffiness—perfect for that tender crumb.

  • 1 teaspoon vanilla extract: A dash of vanilla elevates the flavors beautifully. Don’t skip it!

  • 1/2 teaspoon sea salt: Balances the sweetness. Always use fine sea salt for even distribution; it’s a kitchen must!

  • 1 cup chocolate chips (I used dark chocolate): Because who doesn’t love chocolate? You can use semi-sweet, milk chocolate, or even white chocolate for a fun twist.

  • 1/2-1 teaspoon pumpkin pie spice (optional): This adds warm, cozy flavors reminiscent of fall. If you don’t have it on hand, a combination of cinnamon and nutmeg will work just fine.

Now that we have our ingredients all lined up, let me take you through the fun part—the cooking process!

Step-by-Step Instructions

Step 1: Preheat Your Oven

Preheat your oven to 350°F (175°C). This is crucial! We want your oven nice and toasty for our banana bread to rise perfectly.

Step 2: Prepare Pan

Grab a loaf pan (9×5 inches is perfect), and grease it with butter or line it with parchment paper for easy removal. Nothing’s worse than your gorgeous loaf sticking to the pan!

Step 3: Mash The Bananas

In a large mixing bowl, mash those ripe bananas using a fork or a potato masher until smooth. Leave a few lumps for texture if you like it rustic. This is where the magic starts—smell that banana goodness?

Step 4: Mix The Wet Ingredients

Add the egg, pumpkin puree, lactose-free butter, brown sugar, and vanilla extract to the mashed bananas. Beat until well combined. The mixture should be creamy and inviting. A little secret: at this stage, you can sneak a taste—just a tiny one, promise!

Step 5: Combine Dry Ingredients

In another bowl, whisk together flour, baking soda, baking powder, pumpkin pie spice (if using), and sea salt. This ensures even distribution of those dry ingredients, avoiding any baking surprises.

Step 6: Merge Wet and Dry

Gently fold the dry ingredients into the wet mixture using a spatula or wooden spoon. Mix until just combined—it’s okay to have a few lumps in the batter. Overmixing can lead to dense bread, and we want it fluffy!

Step 7: Chocolate Chips

Now for the fun part: fold in your chocolate chips. Ensure they’re evenly distributed without overmixing. Remember, every bite should be a chocolatey dream!

Step 8: Pour and Bake

Transfer your batter to the prepared loaf pan. Smooth the top with a spatula and pop it in the oven on the middle rack. Bake for 55-65 minutes, or until a toothpick inserted into the center comes out clean or with just a few crumbs.

Step 9: Cool It Down

Once baked, remove your loaf from the oven and let it cool in the pan for about 10 minutes. Then, transfer it to a wire rack to cool completely. This is the hardest part—waiting for that first heavenly slice!

Serving Suggestions

Slice your Pumpkin Chip Banana Bread thick, and serve it warm with a pat of butter or a drizzle of maple syrup for added decadence. For a delightful brunch item, pair it with a side of fruit or a dollop of yogurt. Or, if you’re feeling adventurous, toast slices and top them with cream cheese for a luxurious twist!

Recipe Variations

  1. Nutty Surprise: Add 1/2 cup of chopped walnuts or pecans for an added crunch.

  2. Spiced Up: Blend in some chopped candied ginger or additional spices like nutmeg for a complex flavor profile.

  3. Fruit Fusion: Throw in some dried cranberries or raisins to give it a fruity finish.

  4. Coconut Twist: Replace 1/4 cup of flour with unsweetened shredded coconut for added richness.

  5. Frosted Delight: Once cooled, frost the top with vanilla or cream cheese icing for a sweet treat!

Chef’s Notes

I’ve been making this recipe for years now, and it’s evolved through my personal adventures in the kitchen. Each autumn, I play around with different spices and chocolate varieties, and you know what? Every loaf tells a different story. A family friend once asked me to add a pinch of chili flakes for a surprising kick; I was skeptical, but oh boy, was I amazed at the flavor explosion!

FAQs and Troubleshooting

Q: Why did my pumpkin banana bread sink in the middle?
A: A common culprit is underbaking. Make sure you test it with a toothpick before removing it from the oven. Also, avoid opening the oven door while it’s baking!

Q: Can I freeze this banana bread?
A: Absolutely! Wrap it tightly in plastic wrap then again in foil. It can last up to 3 months in the freezer—perfect for those future cravings.

Q: How do I know when my banana bread is done?
A: Look for a golden top and a toothpick test—insert it in the center, and if it comes out clean or with a few crumbs, you are all set!

Q: What should I do if my bread is too dense?
A: Overmixing the batter can lead to dense bread. Be gentle as you combine your wet and dry ingredients!

Nutritional Info

While every slice of this bread is a delightful indulgence, it has some wholesome elements. Each slice (roughly 1/10 of your loaf) comes in at around 180 calories, with healthy fats, fiber, and potassium from bananas. Adding nuts or using whole grain flour can increase the fiber content!


There you have it! Your journey to creating the perfect Pumpkin Chip Banana Bread is just a few steps away. Whether it’s sharing with loved ones, savoring a slice with coffee, or gifting someone a delicious treat, this recipe is sure to warm hearts and fill bellies. So grab your apron, gather those ingredients, and let’s create some kitchen magic together! Happy baking!

Print

Pumpkin Chip Banana Bread

A delightful blend of ripe bananas, pumpkin, and chocolate chips, baked into a cozy bread, perfect for autumn afternoons.

  • Prep Time: 15 minutes
  • Cook Time: 60 minutes
  • Total Time: 75 minutes
  • Yield: 10 servings 1x
  • Category: Dessert
  • Method: Baking
  • Cuisine: American
  • Diet: Vegetarian

Ingredients

Scale
  • 3 very ripe bananas, mashed (approx. 1 ½ cup)
  • 1 large egg
  • 2/3 cup pumpkin puree
  • 1 ½ cups all-purpose flour
  • 5 tablespoons butter, melted and cooled
  • 1/3 cup brown sugar
  • 1 teaspoon baking soda
  • 1/2 teaspoon baking powder
  • 1 teaspoon vanilla extract
  • 1/2 teaspoon sea salt
  • 1 cup chocolate chips
  • 1/2–1 teaspoon pumpkin pie spice (optional)

Instructions

  1. Preheat your oven to 350°F (175°C).
  2. Prepare a loaf pan (9×5 inches) by greasing it with butter or lining it with parchment paper.
  3. Mash the ripe bananas in a large mixing bowl until smooth.
  4. Add the egg, pumpkin puree, melted butter, brown sugar, and vanilla extract to the mashed bananas and mix until well combined.
  5. Whisk together the flour, baking soda, baking powder, pumpkin pie spice, and sea salt in another bowl.
  6. Fold the dry ingredients into the wet mixture until just combined.
  7. Gently fold in the chocolate chips.
  8. Transfer the batter to the prepared loaf pan and smooth the top.
  9. Bake for 55-65 minutes, or until a toothpick inserted comes out clean.
  10. Cool the bread in the pan for about 10 minutes, then transfer it to a wire rack to cool completely.

Notes

Serve warm with butter or maple syrup. Can be frozen for up to 3 months.

Nutrition

  • Serving Size: 1 slice
  • Calories: 180
  • Sugar: 10g
  • Sodium: 200mg
  • Fat: 8g
  • Saturated Fat: 4g
  • Unsaturated Fat: 4g
  • Trans Fat: 0g
  • Carbohydrates: 25g
  • Fiber: 2g
  • Protein: 3g
  • Cholesterol: 30mg

Keywords: pumpkin bread, banana bread, autumn baking, dessert, cozy treat

Did you make this recipe?

Share a photo and tag us — we can't wait to see what you've made!

June 25, 2026 |

One-Bowl Baked Pumpkin Donuts: Easy, Fluffy & Quick

Fluffy one-bowl baked pumpkin donuts garnished with spices

Delightfully Easy Baked Pumpkin Donuts: A Fall Favorite

Ah, fall! The season where the air turns crisp, leaves start to dance in shades of amber and gold, and pumpkin spice reigns supreme. If you’re like me, the aroma of freshly baked treats wafting through the kitchen is not just an indulgence; it’s a cherished ritual that brings cozy comfort to our busy lives. Today, I’m excited to share a recipe that will have your taste buds singing with joy—Baked Pumpkin Donuts!

These delightful donuts are not only easy to whip up but also a fun way to embrace the flavors of autumn. Forget about deep frying! I promise you, these baked beauties are moist, flavorful, and somehow manage to be both guilt-free and indulgent all at once. And the best part? They are made with wholesome ingredients that will leave you feeling satisfied without the sugar crash.

Whether you are hosting a brunch, looking for a delicious snack, or just want to treat yourself (because you deserve it!), this recipe is here to guide you toward bakery-style donuts right at home. Grab your apron, roll up your sleeves, and let’s make some magic in the kitchen with these deliciously easy baked pumpkin donuts!

A Slice of Nostalgia

I’ll never forget the first time I experienced the joy of pumpkin donuts. It was a crisp October morning, and my family decided to visit our local pumpkin patch. Between picking the perfect pumpkin and drinking apple cider, I found myself at a little stand that promised freshly made pumpkin donuts. One bite, and I was transported to “comfort food heaven.” The sweetness of the pumpkin, the hint of nutmeg, and the glaze that was almost too delicious to believe—it was pure joy wrapped in a donut!

From that day on, pumpkin donuts became a fall staple in my life. I went home determined to recreate that magical experience, and now, after countless experiments and joyful taste tests, I’ve settled upon a recipe that captures all that nostalgia—minus the frying and the guilt. Let me show you how to bring a piece of that pumpkin patch magic right to your own kitchen!

Ingredients

Here’s what you’ll need to whip up these scrumptious baked pumpkin donuts:

  • 1 cup all-purpose flour

    • The base of our donuts! If you’re looking for a gluten-free option, look for a 1:1 gluten-free flour blend that contains xanthan gum.
  • 1 cup pumpkin puree

    • Use canned for convenience, or roast fresh pumpkins for a richer flavor! Just make sure you use plain pumpkin puree, not pumpkin pie filling, for the best results.
  • ½ cup brown sugar

    • This will give our donuts a subtle depth of flavor. You can substitute with coconut sugar for a healthier alternative, though the flavor will differ slightly.
  • ¼ cup granulated sugar

    • A little extra sweetness never hurt anyone! You can reduce the amount for a less sweet donut if you prefer.
  • 1/4 cup vegetable oil or melted coconut oil

    • This helps keep the donuts moist. Feel free to use applesauce or unsweetened Greek yogurt as a light substitute.
  • 2 large eggs

    • They provide structure too! For an egg-free option, a flaxseed meal ‘egg’ works well—mix 1 tablespoon of flaxseed meal with 2.5 tablespoons of water and let it sit for a few minutes to thicken.
  • 1 tsp vanilla extract

    • This enhances the flavor beautifully. Always good to use pure vanilla extract for the best taste!
  • 1 tsp baking powder

    • This will help our donuts rise and become wonderfully fluffy.
  • 1/2 tsp baking soda

    • Together with the baking powder, this creates the perfect leavening. Do double-check their freshness before use!
  • 1 tsp ground cinnamon

    • The spice of fall! Feel free to use a homemade pumpkin spice blend for an extra warm flavor.
  • 1/2 tsp ground nutmeg

    • Adds a nice complexity; always fresher when you grate it yourself!
  • 1/4 tsp salt

    • It may seem small, but salt enhances all the flavors beautifully!
  • Optional: Glaze or cinnamon sugar for topping

    • Use a simple mixture of powdered sugar and a splash of milk for a quick glaze or toss your baked donuts in a mixture of cinnamon and sugar while they’re still warm for a cozy finish!

Step-by-Step Instructions

Creating your own Baked Pumpkin Donuts is easy and fun! Here’s how to bring it all together:

  1. Preheat Your Oven
    Preheat your oven to 350°F (175°C) and grease a donut pan (or use a silicone pan) to ensure those beauties pop right out later!

  2. Combine Dry Ingredients
    In a medium bowl, whisk together the flour, baking powder, baking soda, cinnamon, nutmeg, and salt. This will help distribute the leavening agents evenly through the batter, ensuring that each donut is perfectly risen.

  3. Mix Wet Ingredients
    In another large bowl, mix the brown sugar, granulated sugar, and oil until well combined, then add the pumpkin puree and mix until smooth. The sugars will help incorporate air into the mixture, so you’re looking for a creamy consistency.

  4. Add Eggs and Vanilla
    Crack in the eggs and pour in the vanilla extract, then whisk everything together until the mixture is wonderfully smooth and fluffy.

  5. Combine Dry and Wet Mixtures
    Gradually add the dry ingredients to the wet mixture. Stir gently until just combined! Overmixing can create donuts that are dense instead of fluffy, so be careful here!

  6. Spoon Batter into the Pan
    Using a piping bag or a zip-top bag with a corner cut off, fill the donut cavities about 2/3 full. This prevents overflow while still allowing enough room for rising.

  7. Bake to Perfection
    Pop your pan in the preheated oven and bake for 10-12 minutes or until a toothpick inserted into the center comes out clean. Keep an eye on them; every oven is a little different!

  8. Cool and Decorate
    Allow the donuts to cool in the pan for about 5 minutes, then transfer them to a wire rack to cool completely. Once cool, you can dip them in a delicious glaze or roll them in cinnamon sugar for that extra touch of magic.

Serving Suggestions

These baked pumpkin donuts are perfect for any occasion! Serve them warm with a piping hot cup of coffee or a spiced chai tea. For a festive brunch, stack them neatly on a cake stand, adding some additional decorative elements like autumn leaves or tiny pumpkins around the base. If you’re feeling fancy, drizzle some caramel sauce on top for an extra hit of sweetness!

Recipe Variations

Looking to switch things up? Here are some creative twists to consider:

  • Chocolate Chip Delight: Toss in some mini chocolate chips for a decadent, chocolaty surprise!
  • Nutty Crunch: Add chopped pecans or walnuts to the batter for a delightful crunch.
  • Glazed Maple Wonder: Swap the sugar glaze for a maple glaze by mixing powdered sugar with maple syrup for a rich flavor.
  • Spiced Apple Twist: Fold in finely chopped apples or apple sauce for a fruity take on the classic pumpkin flavor.

Chef’s Notes

Oh, the memories I have while perfecting this recipe! The kitchen is always a playground for experimentation, and I once accidentally mixed up baking soda and baking powder. Talk about a science experiment gone wrong! A mini explosion of failed donut density motivated me to keep testing until I got it right. Now, friends come knocking at my door the moment the leaves start falling, asking me to whip these up!

Remember, these donuts are more than just food; they are little nuggets of happiness that can brighten anyone’s day. Experiment, have fun, and make it your own!

FAQs and Troubleshooting

Q: Why are my donuts dense?
A: This usually happens from overmixing the batter or not using fresh leavening agents (baking powder and baking soda). Be sure to mix just until combined!

Q: Can I make these ahead of time?
A: Absolutely! You can store baked donuts in an airtight container for about 2-3 days. They also freeze well, so make extra batches to pull out on busy mornings!

Q: What can I do if I don’t have a donut pan?
A: No problem! You can use a muffin tin; just adjust the baking time and keep an eye out for doneness. They’ll be more like muffin tops but still delicious!

Q: How do I store leftover donuts?
A: Place your donuts in an airtight container at room temperature for a few days, or refrigerate for a longer shelf life. They can also be frozen for up to three months; just thaw before enjoying!

Nutritional Info

While I am not a nutritionist, I can tell you that these baked pumpkin donuts are made with wholesome ingredients that provide a satisfying treat without the guilt!

Conclusion

Baked pumpkin donuts are more than just a delicious treat—they are a celebration of flavors, memories, and the beauty of fall. So whether you’re treating yourself on a quiet morning or entertaining friends at brunch, this easy recipe is here to make your kitchen smell like the sweetest autumn dream.

Let’s keep that oven warm and those flavors fresh! Happy baking, my friends!

Print

Delightfully Easy Baked Pumpkin Donuts

These delightful baked pumpkin donuts capture the essence of fall with their moist, flavorful texture and guilt-free indulgence.

  • Prep Time: 15 minutes
  • Cook Time: 12 minutes
  • Total Time: 27 minutes
  • Yield: 12 servings 1x
  • Category: Dessert
  • Method: Baking
  • Cuisine: American
  • Diet: Vegetarian

Ingredients

Scale
  • 1 cup all-purpose flour
  • 1 cup pumpkin puree
  • ½ cup brown sugar
  • ¼ cup granulated sugar
  • ¼ cup vegetable oil or melted coconut oil
  • 2 large eggs
  • 1 tsp vanilla extract
  • 1 tsp baking powder
  • ½ tsp baking soda
  • 1 tsp ground cinnamon
  • ½ tsp ground nutmeg
  • ¼ tsp salt
  • Optional: Glaze or cinnamon sugar for topping

Instructions

  1. Preheat your oven to 350°F (175°C) and grease a donut pan.
  2. Combine dry ingredients in a bowl.
  3. Mix brown sugar, granulated sugar, and oil until well combined, then add pumpkin puree and mix until smooth.
  4. Add eggs and vanilla, whisking until smooth and fluffy.
  5. Combine dry and wet mixtures gently to avoid overmixing.
  6. Spoon batter into the donut pan about 2/3 full.
  7. Bake for 10-12 minutes until a toothpick comes out clean.
  8. Cool for 5 minutes in the pan, then transfer to a wire rack to cool completely.

Notes

Experiment with toppings like a maple glaze or cinnamon sugar for added flavor.

Nutrition

  • Serving Size: 1 donut
  • Calories: 200
  • Sugar: 10g
  • Sodium: 150mg
  • Fat: 8g
  • Saturated Fat: 2g
  • Unsaturated Fat: 6g
  • Trans Fat: 0g
  • Carbohydrates: 29g
  • Fiber: 1g
  • Protein: 2g
  • Cholesterol: 30mg

Keywords: pumpkin donuts, baked donuts, fall recipes

Did you make this recipe?

Share a photo and tag us — we can't wait to see what you've made!

June 25, 2026 |

Beginner-Friendly Apple Cobbler: Easy Homemade Comfort

Delicious homemade apple cobbler baking in a dish

Easy Homemade Apple Cobbler: A Cozy Kitchen Delight

Welcome, fellow food lovers! Today, we’re diving into the scrumptious world of apple cobbler—a delightful dessert that marries the sweetness of baked apples with a warm, buttery topping. If you’re anything like me, the aroma of cinnamon and sugar wafting from the oven brings back cherished memories of kitchen escapades. So grab your apron, let’s roll up our sleeves, and whip up a treat that feels like a hug on a plate!

Personal Story: A Trip Down Memory Lane

Growing up, autumn meant a burst of colorful leaves and, more importantly, endless apple picking adventures with my family. We’d head out to the glistening orchards on crisp Sunday mornings, eagerly selecting bags of the juiciest apples. Those days were magical—filled with laughter, sunshine, and the overwhelming sense of getting lost in nature.

Once we returned home with our load, the kitchen transformed into a buzzing hub of activity. My mom’s famous apple cobbler was on the menu, and I could hardly wait! As we sliced through those shiny apples, my little hands would dabble in flour, sugar, and spice—creating a concoction that was as fun to make as it was to eat. The cobbler emerged from the oven golden-brown, nestled under a sweet, crumbly topping that was just begging for a scoop of vanilla ice cream. That first spoonful of warm, gooey goodness made all the hard work worth it, and the smile on my mom’s face said it all: we had created something truly special together.

Ingredients

Now, let’s gather our ingredients for this mouthwatering homemade apple cobbler. Here’s what you’ll need:

  • 6 cups sliced apples
    Choose firm apples like Granny Smith or Honeycrisp for the best texture and flavor. If you’re feeling adventurous, mix a couple of varieties!

  • 1 cup granulated sugar
    Sweetness is key! You can adjust the amount up or down based on your taste preference (and the tartness of your apples).

  • 1 teaspoon cinnamon
    A warm, cozy spice that pairs perfectly with apples. Don’t shy away—this is what gives the cobbler its signature flavor!

  • 1/4 teaspoon nutmeg
    A pinch of nutmeg elevates the flavor. If you don’t have it on hand, you can omit it or use a bit more cinnamon.

  • 1 tablespoon lemon juice
    This helps to balance the sweetness and enhance the apple flavor. Fresh-squeezed is best, but bottled juice works too.

  • 1 1/2 cups all-purpose flour
    The foundation of our topping! For a gluten-free alternative, use a 1:1 gluten-free flour blend.

  • 1/2 cup buttermilk
    This adds moisture and a lovely tang. If you don’t have buttermilk, mix regular milk with a tablespoon of vinegar and let it sit for five minutes.

  • 1/2 cup unsalted butter, melted
    Adds richness. If you’re watching your fat intake, consider using coconut oil or a mild flavored vegetable oil.

  • 1 cup brown sugar
    For that delightful caramel flavor! Light or dark brown sugar will work, but dark gives a deeper taste.

  • 1/2 teaspoon baking powder
    This helps our topping rise and become fluffy.

  • 1/2 teaspoon baking soda
    Combined with buttermilk, it creates a light and airy texture.

  • 1/4 teaspoon salt
    A small but essential ingredient that complements the sweetness!

Step-by-Step Instructions

Now that we have everything we need, let’s jump into the cooking process. Trust me, this is going to fill your kitchen with the most enchanting aroma!

  1. Preheat Your Oven
    Preheat your oven to 350°F (175°C). Get your kitchen ready for some sizzling magic!

  2. Prepare the Apples
    In a large mixing bowl, toss your sliced apples with the granulated sugar, cinnamon, nutmeg, and lemon juice. Let it sit for about 10-15 minutes. This helps the apples release their juices and become extra flavorful.

    Chef’s tip: If you’re using particularly tart apples, try adding a touch more sugar to balance out the flavors.

  3. Make the Topping
    In another bowl, combine the flour, brown sugar, baking powder, baking soda, and salt. Whisk it together to ensure the baking powder is well-distributed.

    Tip: Sifting the dry ingredients together can help prevent clumps, but it’s not essential if you mix well!

  4. Add the Wet Ingredients
    Pour in the melted butter and buttermilk. Stir gently until just combined; it’s okay if it’s a little lumpy—remember, we want it light and fluffy.

    Quick hack: If you whisk the buttermilk before mixing it in, it helps to prevent lumps in your batter.

  5. Combine
    In a greased baking dish (a 9×13 inch or something similar works great), layer the apple mixture evenly first. Then, dollop spoonfuls of the batter over the apples. Don’t worry about covering every inch—some gaps allow the steam to escape and make the edges crispy.

  6. Bake
    Place the baking dish in your preheated oven and bake for about 40-45 minutes, or until the topping is golden brown and the apples are bubbly.

    Chef tip: If you notice the top browning too quickly, cover it loosely with aluminum foil for the last 10 minutes of baking.

  7. Cool and Serve
    Once baked, let your cobbler cool for about 10-15 minutes. This gives it a chance to set up a little and makes serving easier.

Serving Suggestions

To serve, scoop out a generous portion of apple cobbler into a bowl or on a plate. A dollop of whipped cream or a scoop of vanilla ice cream on top just takes things to the next level! If you’re feeling indulgent, a sprinkle of crushed pecans or walnuts adds a lovely crunch and extra flavor.

Recipe Variations

Let’s get creative! Here are some fun twists you can try with this basic apple cobbler recipe:

  1. Berry Blast: Add a cup of fresh or frozen blueberries or raspberries to the apples for a delightful twist.

  2. Spiced Pear Cobbler: Swap out half the apples for pears to give a unique flavor combination.

  3. Maple Twist: Replace half of the granulated sugar with pure maple syrup for a distinctive, rich taste.

  4. Oat Topping: For a heartier version, stir in half a cup of rolled oats to the topping mixture for added texture.

  5. Nutty Addition: Sprinkle some finely chopped nuts like almonds or pecans into the apple mixture for an extra crunch.

Chef’s Notes

Oh, how this recipe has evolved over the years! What started as my mom’s simple concoction has transformed—I’ve added my personal touch through these variations, ever honing in on the perfect balance of flavors. While we can all appreciate the nostalgia that comes with making a classic recipe, I love how every iteration tells a story of its own!

And let me tell you, I can’t count how many times I’ve had to swap out ingredients last minute. Lurking in the back of the pantry? That half-empty jar of honey? You bet your apple cobbler it can get a little creative sometimes!

FAQs and Troubleshooting

Q: Can I make this cobbler ahead of time?
A: Absolutely! You can prep it the day before and store it in the fridge. Just bake it right before serving. It’ll be just as delicious!

Q: Why is my cobbler gooey in the middle?
A: If it’s too gooey, it might need a little more baking time. Ensure you bake until the topping is golden brown, and the fruit is bubbling.

Q: Can I freeze leftover apple cobbler?
A: Definitely! Allow it to cool completely, then wrap it tightly in aluminum foil or plastic wrap and place it in the freezer. When you’re ready to enjoy it again, thaw and reheat gently in the oven.

Q: What’s the best way to store leftovers?
A: Store the cobbler in an airtight container in the fridge for up to five days. Just reheat in the oven to bring back the melty goodness!

Nutritional Info

If you’re keeping track, a standard serving of apple cobbler has approximately:

  • Calories: 310
  • Total Fat: 15g
  • Carbohydrates: 45g
  • Fiber: 3g
  • Sugar: 25g
  • Protein: 3g

Remember, these values can vary based on your specific ingredients, portions, and any tweaks you might make!

So there you have it! An easy homemade apple cobbler that’s sure to delight your taste buds and warm your heart. I can’t wait for you to try this recipe and create your own delicious memories in the kitchen. Happy baking! 🥧✨

Print

Easy Homemade Apple Cobbler

A delightful dessert that marries sweet baked apples with a warm, buttery topping, perfect for cozy gatherings.

  • Prep Time: 15 minutes
  • Cook Time: 45 minutes
  • Total Time: 60 minutes
  • Yield: 8 servings 1x
  • Category: Dessert
  • Method: Baking
  • Cuisine: American
  • Diet: Vegetarian

Ingredients

Scale
  • 6 cups sliced apples (Granny Smith or Honeycrisp)
  • 1 cup granulated sugar
  • 1 teaspoon cinnamon
  • 1/4 teaspoon nutmeg
  • 1 tablespoon lemon juice
  • 1 1/2 cups all-purpose flour
  • 1/2 cup buttermilk
  • 1/2 cup unsalted butter, melted
  • 1 cup brown sugar
  • 1/2 teaspoon baking powder
  • 1/2 teaspoon baking soda
  • 1/4 teaspoon salt

Instructions

  1. Preheat your oven to 350°F (175°C).
  2. In a large mixing bowl, toss your sliced apples with the granulated sugar, cinnamon, nutmeg, and lemon juice. Let it sit for about 10-15 minutes.
  3. In another bowl, combine the flour, brown sugar, baking powder, baking soda, and salt. Whisk it together.
  4. Pour in the melted butter and buttermilk. Stir gently until just combined.
  5. In a greased baking dish, layer the apple mixture evenly first. Then, dollop spoonfuls of the batter over the apples.
  6. Place the baking dish in your preheated oven and bake for about 40-45 minutes, or until the topping is golden brown and the apples are bubbly.
  7. Once baked, let your cobbler cool for about 10-15 minutes.

Notes

Serve with whipped cream or a scoop of vanilla ice cream for a delightful addition.

Nutrition

  • Serving Size: 1 serving
  • Calories: 310
  • Sugar: 25g
  • Sodium: 200mg
  • Fat: 15g
  • Saturated Fat: 9g
  • Unsaturated Fat: 6g
  • Trans Fat: 0g
  • Carbohydrates: 45g
  • Fiber: 3g
  • Protein: 3g
  • Cholesterol: 30mg

Keywords: apple cobbler, dessert, baking, homemade, fall recipes

Did you make this recipe?

Share a photo and tag us — we can't wait to see what you've made!

June 25, 2026 |

Caramel Apple Cheesecake Bars

Delicious caramel apple cheesecake bars topped with caramel drizzle and apple slices

Caramel Apple Cheesecake Bars: A Slice of Nostalgia and Flavor

Welcome to the cozy corner of my kitchen, where we’re about to whip up something truly delicious: Caramel Apple Cheesecake Bars! Imagine a dessert that combines the creamy richness of cheesecake with the nostalgic flavors of apple pie and the sweet, gooey goodness of caramel. Sounds heavenly, right? Well, trust me when I say these bars are not just delicious—they’re a warm hug for your taste buds!

Every bite of these cheesecake bars brings me back to crisp autumn days spent at the local apple orchard with my family. I can still smell the air thick with fresh apples and cinnamon as we picked out our favorites for pies, sauces, and, of course, a little baking project to do together at home. My mom had this way of making everything feel special, whether it was her obvious love for cooking or the way she turned the ordinary into something magical.

Back then, it was all about the iconic apple pie, but as I grew older—and a bit bolder in the kitchen—I found myself wanting to blend traditions and create something that brought all those flavors together in a new way. Enter these Caramel Apple Cheesecake Bars, a dessert that perfectly encapsulates the essence of autumn but is truly loved year-round. They’re super easy to make and guaranteed to impress!

So grab your apron, and let’s dive into this delightful recipe that’s sure to become a cherished favorite in your home!

A Sweet Memory

I still remember my first time making cheesecake from scratch. It was a rainy Saturday afternoon, and I felt a sense of adventure bubbling inside me. I had a hunch that combining my love for apples with this dreamy cheesecake would yield something incredible. I decided to give it a whirl. With the help of my trusty vintage mixer and a few snack breaks (I mean, who can resist a slice of apple while baking?), I mixed, blended, and baked my way through the recipe.

Once it was ready, I pulled that golden-brown cheesecake out of the oven, drizzled caramel all over it, and let it cool. My family gathered around the dining table, and the moment I served those first slices, everyone’s eyes lit up. It was an instant hit! That day struck a chord within me, igniting a passion for baking that continues to this day. There’s something special about sharing food with loved ones—these Caramel Apple Cheesecake Bars are a throwback to that beautiful memory, and I’m thrilled to share it with you!

Ingredients

Here’s what you’ll need to create these luscious Caramel Apple Cheesecake Bars:

  • 1 1/2 cups graham cracker crumbs: The perfect base for our crust. If you’re in a pinch, you can swap these for digestive biscuits or even gluten-free graham crackers for a gluten-free variation.

  • 1/2 cup unsalted butter, melted: This adds richness and binds the crumbs together. You can substitute coconut oil for a dairy-free option if needed.

  • 1 cup sugar, divided: Half will sweeten the filling and half for the caramel drizzle (more on that later). If you prefer it less sweet, use less or try coconut sugar for a deeper flavor.

  • 2 (8-ounce) packages cream cheese, softened: Cream cheese brings that delightful creaminess. Neufchâtel cheese can work in its place if you’re looking for a lighter option.

  • 2 large eggs: These are crucial for setting the cheesecake. Flax eggs or applesauce can be used as a vegan alternative if you want to avoid eggs.

  • 1 teaspoon vanilla extract: Because every delicious dessert needs this heavenly flavor. Pure vanilla extract is best, but you can use vanilla bean paste in a pinch.

  • 3 cups diced apples (such as Granny Smith): Tart apples add a nice tangy flavor and a lovely texture. Feel free to mix in some sweeter varieties like Gala or Honeycrisp if you like!

  • 1 cup caramel sauce: Ready-made caramel sauce makes it easy to whip this up, but you can also make your own if you’re feeling adventurous!

  • 1 teaspoon cinnamon: This is the spice that amplifies those warm autumn flavors. You can use apple pie spice for a more complex flavor if you have it on hand.

  • 1/4 teaspoon nutmeg: A pinch of nutmeg adds depth. If you’re not a fan, feel free to skip it, or replace it with a hint of allspice for a different floral note.

Let’s gather our ingredients, roll up our sleeves, and get started on these irresistible bars!

Step-by-Step Instructions

Here’s how to create these Caramel Apple Cheesecake Bars step by step—let’s get cooking!

  1. Preheat the Oven: Preheat your oven to 325°F (160°C). This step is essential for ensuring that our cheesecake bakes evenly.

  2. Prepare the Crust: In a mixing bowl, combine the graham cracker crumbs and melted butter. Here’s where the magic begins! Mix until the crumbs resemble wet sand. If it’s too dry, add a bit more melted butter.

  3. Press the Mixture into the Pan: Line a 9×9-inch baking pan with parchment paper for easy removal. Pour the crust mixture into the pan and press it firmly into an even layer using your hands or the bottom of a glass. Make sure it’s packed tightly!

  4. Bake the Crust: Pop it in the oven for about 10 minutes, until it’s golden and fragrant. Keep an eye on it—the aroma will be hard to resist!

  5. Make the Cheesecake Filling: While the crust is cooling, mix softened cream cheese and 1/2 cup of sugar in a clean mixing bowl. Beat until smooth. The trick here is to make sure there are no lumps, so aim for a creamy, luscious texture.

  6. Add Eggs and Vanilla: Crack in the eggs one at a time, mixing thoroughly after each addition. Then add the vanilla extract. This is where the filling starts to get that beautiful richness!

  7. Mix in Diced Apples: Gently fold in the diced apples, cinnamon, and nutmeg. The apples will soften and release juices while baking, making each bite of cheesecake delightfully fruity.

  8. Pour the Filling over the Crust: Carefully pour the apple cheesecake mixture onto the crust, spreading it evenly with a spatula.

  9. Bake the Bars: Bake for about 40-45 minutes or until the center is just set (it might have a slight jiggle). If you see cracks, don’t worry—those will be disguised by our caramel topping!

  10. Cool Down: Remove from the oven and let the bars cool at room temperature for about an hour, then transfer them to the fridge for at least 2 hours. Trust me; they’re worth the wait!

  11. Drizzle with Caramel: Once chilled, it’s time for the star of the show! Drizzle the cooled cheesecake with caramel sauce—generous amounts, of course.

  12. Slice and Serve: Carefully lift the bars out of the pan using the parchment paper edges. Slice into squares, serve, and watch everyone fall in love.

Serving Suggestions

These Caramel Apple Cheesecake Bars are perfect for sharing! Serve them at gatherings, potlucks, or just for a cozy night in. To elevate the serving, garnish with a sprinkle of cinnamon or a dollop of freshly whipped cream. And don’t forget a little extra caramel drizzle on top for that wow factor!

Recipe Variations

Want to switch things up? Here are a few fun variations to try:

  1. Nutty Crunch: Add 1/2 cup of chopped pecans or walnuts to the crust for added crunch and nutty flavor.

  2. S’mores Twist: Replace some of the graham cracker crumbs with mini marshmallows, chocolate chips, and a bit of cocoa powder for a delicious s’mores-inspired treat.

  3. Pumpkin Spice: Substitute some of the apples with pumpkin puree and add a tablespoon of pumpkin spice for a seasonal delight.

  4. Chocolate Drizzle: Feeling extra indulgent? Drizzle melted dark chocolate over the caramel drizzle for a rich flavor combination.

  5. Swap the Apples: Try pears or even berries instead of apples for a delightful twist on flavor!

Chef’s Notes

Making these Caramel Apple Cheesecake Bars brings back so many memories of laughter and family bonding in the kitchen. Each time I make them, I find myself tweaking the recipe just a touch—maybe a different blend of spices or a sprinkle of sea salt on top for an added flavor kick.

There was a time when my friends and I attempted to make these cheesecake bars for the first time at a small get-together. A tiny misunderstanding led to an over-the-top amount of caramel sauce, but instead of worrying, we embraced the gooey goodness! We laughed our way through the chaos, and those bars turned out delicious anyway. That’s what cooking is all about, after all—embracing imperfections and having fun!

FAQs and Troubleshooting

1. Why did my cheesecake crack?
Cracks can happen for a few reasons: overmixing the batter, baking at too high a temperature, or cooling too quickly. If you see cracks, don’t fret! They’ll be covered by caramel, and the flavor remains fantastic.

2. Can I freeze these bars?
Absolutely! You can freeze these bars for up to 3 months. Just make sure to wrap them tightly in plastic wrap and place them in an airtight container. Thaw in the fridge before serving.

3. Can I use other types of apples?
Definitely! Granny Smith apples add tartness, but feel free to mix and match with your favorite varieties. Sweeter apples like Fuji or Honeycrisp will create a different but delightful flavor.

4. How do I tell if my cheesecake is done?
The edges should be set, while the center will still have a slight jiggle. Avoid overbaking as this could lead to a dry texture.

Nutritional Info

While this delightful treat is a bit indulgent, it’s meant for sharing and enjoyment, so enjoy it in moderation! These Caramel Apple Cheesecake Bars are packed with good vibes and nostalgia, making every bite feel worth it.


And there you have it—a delicious journey to make Caramel Apple Cheesecake Bars from scratch, weaving together flavors, memories, and a touch of creativity. Bonus points for sharing them with loved ones—these bars are sure to spread joy! Happy baking!

Print

Caramel Apple Cheesecake Bars

A delightful dessert combining the creamy richness of cheesecake, nostalgic flavors of apple pie, and sweet caramel goodness, perfect for autumn or year-round.

  • Prep Time: 15 minutes
  • Cook Time: 50 minutes
  • Total Time: 65 minutes
  • Yield: 16 servings 1x
  • Category: Dessert
  • Method: Baking
  • Cuisine: American
  • Diet: Vegetarian

Ingredients

Scale
  • 1 1/2 cups graham cracker crumbs
  • 1/2 cup unsalted butter, melted
  • 1 cup sugar, divided
  • 2 (8-ounce) packages cream cheese, softened
  • 2 large eggs
  • 1 teaspoon vanilla extract
  • 3 cups diced apples (such as Granny Smith)
  • 1 cup caramel sauce
  • 1 teaspoon cinnamon
  • 1/4 teaspoon nutmeg

Instructions

  1. Preheat the oven to 325°F (160°C).
  2. Combine graham cracker crumbs and melted butter.
  3. Press the mixture into the bottom of a lined 9×9-inch baking pan.
  4. Bake the crust for about 10 minutes.
  5. Mix cream cheese and 1/2 cup of sugar until smooth.
  6. Add eggs one at a time, mixing thoroughly, then add vanilla extract.
  7. Fold in diced apples, cinnamon, and nutmeg.
  8. Pour the filling over the crust.
  9. Bake for 40-45 minutes until the center is just set.
  10. Cool the bars at room temperature for about an hour, then refrigerate for at least 2 hours.
  11. Drizzle with caramel sauce before serving.
  12. Slice into squares and serve.

Notes

These bars can be enjoyed as is or garnished with whipped cream and extra caramel. For variations, try adding nuts, chocolate, or pumpkin.

Nutrition

  • Serving Size: 1 bar
  • Calories: 320
  • Sugar: 20g
  • Sodium: 250mg
  • Fat: 14g
  • Saturated Fat: 8g
  • Unsaturated Fat: 4g
  • Trans Fat: 0g
  • Carbohydrates: 45g
  • Fiber: 2g
  • Protein: 4g
  • Cholesterol: 60mg

Keywords: cheesecake, caramel, apple, dessert, fall recipes, baking

Did you make this recipe?

Share a photo and tag us — we can't wait to see what you've made!