Cleanplate Cravings

Cleanplate Cravings

June 25, 2026 |

Gluten-Free Flourless Pumpkin Brownies: Weeknight Treat
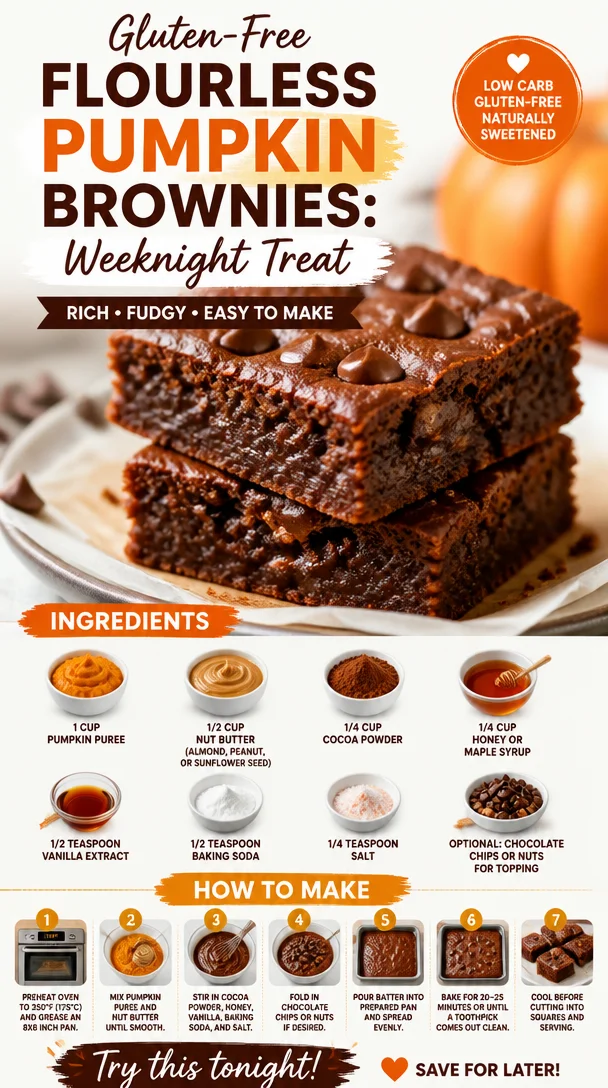
Delicious gluten-free flourless pumpkin brownies topped with chocolate chips.

Indulge Guilt-Free: Flourless Pumpkin Brownies Recipe

Welcome back to Clean Plate Cravings, where fresh, feel-good food meets real life! Today, I’m bringing you a soul-warming treat that’s a perfect blend of seasonal flavor and wholesome goodness: Flourless Pumpkin Brownies. If you’re like me, you love indulging in sweets but don’t want to sacrifice your health or well-being for a decadent dessert. These brownies are the ultimate solution. They are fudgy, rich, and as comforting as that favorite sweater you can’t bear to part with come springtime.

Imagine indulging in a sweet that not only satisfies your cravings but also packs in some nutrients. That’s right, folks—these brownies are made with pumpkin puree, so they’re not just delicious but also come with a hidden dose of vitamins and fiber! Plus, they’re quick to whip up, making them perfect for impromptu get-togethers or cozy nights in. You don’t need fancy ingredients or hours in the kitchen. Just simple, wholesome, and approachable ingredients, which is exactly how I like to roll.

So, grab your mixing bowl and let’s dive into this indulgent yet nutritious recipe together. You won’t believe how easy it is to create these heavenly delights—let’s get started!

A Slice of Nostalgia: My Pumpkin Love Affair

Oh, where do I even begin? My love for pumpkin started in childhood during the crisp autumn months. There was something magical about the transition into fall—the leaves changing color, the air getting just a little bit cooler, and most importantly, the smell of pumpkin baking in the oven. My family had this tradition of making pumpkin bread every Thanksgiving. The whole house would be filled with that warm, spicy aroma, and I remember waiting anxiously for it to come out of the oven, practically salivating as I imagined slathering butter on it.

Fast forward to now, and I wanted to embrace the essence of those autumn days but in a more indulgent form. Enter the flourless pumpkin brownies! These brownies capture that nostalgic feeling in a new, exciting way—satisfying that sweet tooth while still feeling good about what I’m eating. Every bite reminds me of the warmth of family gatherings and cozy evenings spent around the kitchen table, sharing laughter and stories. And now, I can create that magic with these brownies anytime I want!

Ingredients: What You’ll Need

Here’s what you’ll need to whip up these delightful flourless pumpkin brownies:

  • 1 cup pumpkin puree
    A nutrient-packed powerhouse! Opt for fresh pumpkin or canned—just make sure it’s 100% pumpkin purée with no added sugar. If you’re looking for a substitute, sweet potato puree works beautifully too!

  • 1/2 cup nut butter (almond, peanut, or sunflower seed)
    Nut butter adds that fudgy texture and keeps things rich. Almond and peanut butters give a nice flavor, while sunflower seed butter is a great nut-free alternative for allergy-friendly options.

  • 1/4 cup cocoa powder
    The star ingredient for that deep, chocolatey flavor. Unsweetened cocoa or dark cocoa powder delivers the richest taste. If you want a twist, try using cacao powder for a more intense cocoa flavor.

  • 1/4 cup honey or maple syrup
    This natural sweetener balances the flavors. Honey adds a hint of its floral essence, while maple syrup provides an autumnal twist. If you’re vegan, sticking to maple syrup is your best bet!

  • 1/2 teaspoon vanilla extract
    This adds warmth and depth to the brownies. For an even more vibrant flavor, try using vanilla bean paste for that extra touch of sweetness.

  • 1/2 teaspoon baking soda
    This is your leavening agent, ensuring those brownies don’t come out as dense as a brick. If you need a gluten-free alternative, cream of tartar works as a leavening agent too—just mix it with baking soda in equal parts.

  • 1/4 teaspoon salt
    A little salt enhances all the flavors in your brownies. If you’re watching your sodium, you can reduce this to just a pinch, but I recommend keeping it for the heavenly balance it provides.

  • Optional: chocolate chips or nuts for topping
    The choice is yours! Add a sprinkle of chocolate chips for an extra indulgent brownie or some chopped nuts for crunch. Pecans or walnuts bring a delicious nutty flavor that complements the pumpkin beautifully.

Step-by-Step Instructions: Get Cooking!

Ready to make some magic? Follow these simple steps, and I promise you’ll be on your way to brownie bliss!

  1. Preheat your oven to 350°F (175°C). This is key for getting a perfect, fudgy texture. While it heats up, line an 8×8-inch baking pan with parchment paper or grease it lightly.

  2. Mix the wet ingredients. In a large mixing bowl, combine 1 cup of pumpkin puree, 1/2 cup of your chosen nut butter, 1/4 cup of honey or maple syrup, and 1/2 teaspoon of vanilla extract. Grab a whisk and stir until well-blended! You want a creamy, smooth texture—almost like a lovely pumpkin smoothie.

    Chef Tip: If your nut butter is a little stiff, pop it in the microwave for 10-15 seconds to warm it up. It’ll blend beautifully with the other ingredients.

  3. Sift in the dry ingredients. Add the 1/4 cup cocoa powder, 1/2 teaspoon baking soda, and 1/4 teaspoon salt to the wet mixture. Gently fold everything together using a spatula. You don’t want to overmix—just until everything is well incorporated and no dry spots remain.

    Chef Hack: For an even richer brownie, consider adding a tablespoon of espresso powder here! It deepens the chocolate flavor without turning your brownies into coffee-flavored ones.

  4. Pour and spread. Transfer the brownie batter into your prepared baking pan. Use a spatula to spread the mixture evenly—get in there and make sure it’s all the way to the corners!

  5. Add your toppings. If you’re feeling adventurous, sprinkle some chocolate chips or chopped nuts on top. This is where the creativity can really shine.

  6. Bake! Pop the pan into your preheated oven and bake for about 20-25 minutes. Keep an eye on them; they’re ready when a toothpick comes out with just a couple of moist crumbs.

    Pro Chef Insight: Don’t overbake! We want these beauties to stay fudgy, so if you’ve got a few moist crumbs on that toothpick, you’re in the clear.

  7. Cool and slice. Once baked, remove the brownies from the oven and let them cool in the pan for about 10-15 minutes. Transfer them to a wire rack to cool completely before slicing into squares. Trust me; allowing them to cool fully gives you that perfect fudgy texture!

Serving Suggestions

Now that your brownies are baked and cooled, it’s time to serve them up! Cut them into delightful squares and arrange them on a pretty plate. Drizzle some extra melted nut butter or chocolate sauce on top for an indulgent touch. Pair these brownies with a scoop of vanilla ice cream or a dollop of whipped cream for an even more amazing dessert experience!

Recipe Variations

Feeling a little adventurous? Here are a few fun twists you can add to elevate your flourless pumpkin brownies:

  • Spice it up: Add 1 teaspoon of pumpkin pie spice or a dash of cinnamon for that warm, cozy flavor that complements pumpkin beautifully.

  • Nutty chocolate delight: Fold in some chopped walnuts or pecans into the batter for added crunch and earthy flavors.

  • Boost with dried fruit: Toss in a handful of dried cranberries or raisins into the batter for a pop of sweetness and chewiness.

  • Minty fresh: Add a drop of peppermint extract for a refreshing twist on these brownies—perfect for the holidays!

Chef’s Notes

As I reflect on the journey of creating these flourless pumpkin brownies, I’m reminded how recipes evolve over time. The first version I tried was… well, let’s just say it didn’t quite hit the mark. It was a textbook brownie, dense and slightly crumbly. After several tweaking sessions, I realized that the key was the balance of moisture from the pumpkin and the richness from the nut butter.

And while my kids can turn their noses up at veggies sometimes, they absolutely gobble these brownies up! It’s a joy seeing them enjoy a dessert that’s not just about satisfying a sweet tooth but is also filled with wholesome ingredients. These brownies have become a staple in our household, and I love sharing this recipe with friends and family.

FAQs and Troubleshooting

Q1: Why are my brownies too dense?
A1: If you find your brownies turning out too dense, it might be due to overmixing after adding the dry ingredients. Make sure to mix just until incorporated!

Q2: Can I make these brownies ahead of time?
A2: Absolutely! Store them in an airtight container for up to five days at room temperature or refrigerate them for up to a week. They can also be frozen for up to three months—just make sure to thaw them in the fridge when you’re ready to snack!

Q3: How do I know when the brownies are done?
A3: The trick is to check for moist crumbs on a toothpick inserted in the center. If it comes out clean, they might be overbaked! You want that perfectly fudgy consistency.

Q4: Can I substitute pumpkin with something else?
A4: Yes! Sweet potato or mashed bananas work as great substitutes, though the flavor will change slightly. Each option brings its unique taste while keeping the brownies moist.

Nutritional Info

(Per Brownie—makes about 12 servings)

  • Calories: 130
  • Protein: 4g
  • Fat: 8g
  • Carbs: 15g
  • Fiber: 2g
  • Sugar: 4g

So there you have it—the perfect recipe for Flourless Pumpkin Brownies that are not only easy to make but also incredibly delicious. I hope you take as much joy in making these as I do! Enjoy each rich, fudgy bite, and remember, healthy eating should be about comfort, joy, and of course, deliciousness. Happy baking, my fellow foodies!

Print

Flourless Pumpkin Brownies

These fudgy, rich flourless pumpkin brownies are a guilt-free dessert packed with nutrients and perfect for any occasion.

  • Prep Time: 10 minutes
  • Cook Time: 25 minutes
  • Total Time: 35 minutes
  • Yield: 12 servings 1x
  • Category: Dessert
  • Method: Baking
  • Cuisine: American
  • Diet: Vegetarian

Ingredients

Scale
  • 1 cup pumpkin puree
  • 1/2 cup nut butter (almond, peanut, or sunflower seed)
  • 1/4 cup cocoa powder
  • 1/4 cup honey or maple syrup
  • 1/2 teaspoon vanilla extract
  • 1/2 teaspoon baking soda
  • 1/4 teaspoon salt
  • Optional: chocolate chips or nuts for topping

Instructions

  1. Preheat your oven to 350°F (175°C) and line an 8×8-inch baking pan with parchment paper.
  2. Mix the wet ingredients: combine pumpkin puree, nut butter, honey or maple syrup, and vanilla extract in a bowl.
  3. Sift in the cocoa powder, baking soda, and salt, folding gently until incorporated.
  4. Pour the brownie batter into the prepared baking pan, spreading it evenly.
  5. Add any toppings such as chocolate chips or chopped nuts.
  6. Bake for 20-25 minutes or until a toothpick comes out with a couple of moist crumbs.
  7. Cool the brownies in the pan for 10-15 minutes, then transfer to a wire rack to cool completely before slicing.

Notes

These brownies can be stored in an airtight container for up to five days at room temperature or can be refrigerated for up to a week. They also freeze well for up to three months.

Nutrition

  • Serving Size: 1 brownie
  • Calories: 130
  • Sugar: 4g
  • Sodium: 120mg
  • Fat: 8g
  • Saturated Fat: 1g
  • Unsaturated Fat: 7g
  • Trans Fat: 0g
  • Carbohydrates: 15g
  • Fiber: 2g
  • Protein: 4g
  • Cholesterol: 0mg

Keywords: pumpkin brownies, flourless dessert, healthy dessert, chocolate pumpkin, vegetarian brownies
Did you make this recipe?

Share a photo and tag us — we can't wait to see what you've made!

June 25, 2026 |

Minute One-Pan Pumpkin Dump Cake (Simple Holiday Treat)

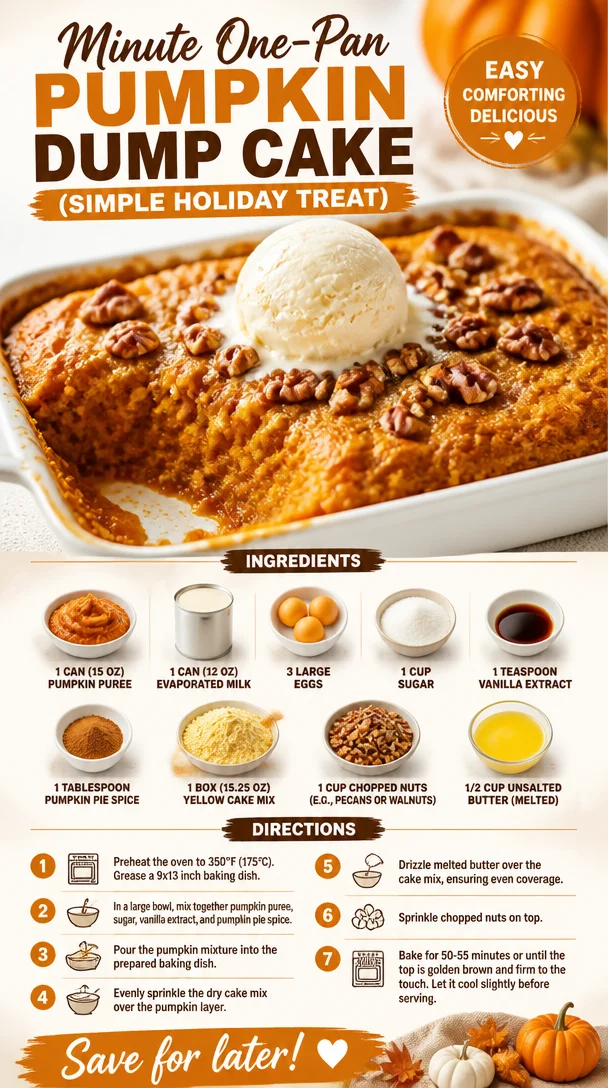
Delicious pumpkin dump cake served in a one-pan for easy holiday dessert.

The Joy of Baking: Pumpkin Dump Cake

Welcome to the cozy embrace of autumn, where leaves crunch underfoot, pumpkin spice reigns supreme, and our kitchens emanate warmth and sweetness. Today, I’m excited to share a recipe that’s not only easy to whip up but also a beloved classic that will have your family flocking to the table every time you make it. Enter the glorious Pumpkin Dump Cake, a dessert that captures the very essence of fall with its rich, spiced flavor and delightful texture.

Now, if you are wondering what exactly a "dump cake" is, let me tell you: it’s a glorious baking hack that involves “dumping” your ingredients into a pan without the fuss of layers or the worry of precision. This effortless method means you can spend more time savoring the season and less time sweating in the kitchen.

But pumpkin dump cake isn’t just any dessert; it holds a special place in my heart. As those cool breezes turn our thoughts to holiday gatherings and warm family moments, I can’t help but dive into the fond memories tied to this sweet treat.

A Slice of Nostalgia

I’ll never forget the first time I made pumpkin dump cake; it was a night that felt oddly magical. My best friend Sarah and I, fresh out of college and eager to impress our families, decided to hold a cozy fall dinner before heading off to our respective jobs. Armed with a few trusty recipes, pumpkin dump cake was our secret weapon.

We whipped it up in Sarah’s tiny apartment kitchen, laughter mingling with the scent of cinnamon and nutmeg wafting through the air. As we gently mixed the pumpkin puree with evaporated milk, sugar, and spice, we reminisced about our childhood—Halloween costumes, visits to pumpkin patches, and those endless nights of baking in her mom’s kitchen.

When our families came over, an enchanting aroma guided them straight to our dessert table. With every rich, creamy bite, we heard sighs of happiness and a chorus of “what is this deliciousness?”. They devoured every crumb, and Sarah and I shared knowing smiles. That night, we solidified our bond not just as friends, but as fellow food lovers. It was a slice of nostalgia I’ll carry with me forever, reminding me how food has the power to bring people together.

Ingredients

Let’s gather our ingredients for this delightful creation:

  • 1 can (15 oz) pumpkin puree: The star of the show! Rich in flavor and nutrients, pumpkin puree provides that comforting taste we crave in autumn. For a twist, you could use butternut squash puree, which brings a slightly different sweetness.

  • 1 can (12 oz) evaporated milk: This creamy ingredient adds richness to the cake. If you’re looking for a lighter option, feel free to swap in coconut milk or any non-dairy alternative.

  • 3 large eggs: Eggs bind everything together and add a lovely fluffiness. If you’re doing a vegan version, substitute with flax eggs (1 tablespoon ground flaxseed mixed with 2.5 tablespoons water = 1 egg).

  • 1 cup sugar: Sweetness is essential, but if you’re trying to reduce sugar, feel free to use coconut sugar or a sugar substitute that’s suitable for baking.

  • 1 teaspoon vanilla extract: A dash of vanilla elevates the flavor. Consider using pure vanilla extract for more depth, or try almond extract for a unique twist!

  • 1 tablespoon pumpkin pie spice: This fantastic mix should scream "fall." If you don’t have it on hand, mix your own with cinnamon, nutmeg, ginger, and cloves in equal parts.

  • 1 box (15.25 oz) yellow cake mix: The foundation for our dump cake. You can swap this for a gluten-free cake mix or a spice cake mix for an extra flavor kick.

  • 1 cup chopped nuts (e.g., pecans or walnuts): These add texture and nuttiness. This is optional; if you are nut-free, feel free to leave them out!

  • 1/2 cup unsalted butter (melted): This step is key, as it creates a crispy, golden topping. For a vegan alternative, opt for melted coconut oil or dairy-free butter.

Step-by-Step Instructions

Let’s get down to the fun part! Here’s how to create your pumpkin dump cake:

  1. Preheat Your Oven: Preheat your oven to 350°F (175°C). This allows for even baking from the get-go, ensuring your cake is moist and delicious.

  2. Prepare the Baking Dish: Grab a 9×13 inch baking dish and lightly grease it with cooking spray or butter. This will make it easy to serve and clean up later.

  3. Mix the Pumpkin Filling: In a large mixing bowl, combine the pumpkin puree, evaporated milk, sugar, eggs, vanilla extract, and pumpkin pie spice. Using a whisk, blend everything until smooth and homogenous. You want the mixture to be creamy and lovely.

  4. Pour the Mixture: Pour this creamy pumpkin filling into the prepared baking dish and spread it evenly with a spatula.

  5. Sprinkle the Cake Mix: Now for the “dump” part! Sprinkle the entire box of yellow cake mix over the pumpkin mixture. Don’t mix it! Just let the powder sit on top; this is what helps create that amazing crumbly topping.

  6. Add the Nuts: If you’re using nuts, sprinkle them generously over the top. This adds a wonderful crunch that contrasts beautifully with the creamy pumpkin.

  7. Drizzle with Butter: Melt your unsalted butter and drizzle it evenly over the cake mix and nuts. This is what makes it golden and delicious without needing to mix in!

  8. Bake: Place the dish in the preheated oven and bake for about 50–60 minutes, or until the top is golden brown and a toothpick inserted comes out clean. The smell will fill your home, and you’ll be counting down the minutes!

  9. Cool: Once baked, allow the cake to cool slightly in the dish. This makes it easier to slice and also helps the flavors meld.

Serving Suggestions

Slice into squares and serve warm, perhaps with a dollop of freshly whipped cream or a scoop of vanilla ice cream on top. For a more festive presentation, sprinkle some extra pumpkin spice or crushed nuts on top for that finishing touch. Trust me, your guests will be asking for seconds!

Recipe Variations

Feeling adventurous? Here are some creative twists to make this dish your own:

  • Add Chocolate: Sprinkle in some chocolate chips before baking for a delightful chocolate-pumpkin combo!

  • Coconut Flavor: Mix in shredded coconut for extra texture and a tropical hint.

  • Maple Glaze: Drizzle a warm maple syrup glaze over the top before serving for a rich finish.

  • Fruit Layer: Add a layer of fresh cranberries or sliced apples on top of the pumpkin filling for a pop of tartness.

  • Nut-Free Version: Swap in quick oats on the top layer rather than nuts for a hearty texture.

Chef’s Notes

Every time I bake this pumpkin dump cake, I’m reminded of all the simple joys of cooking—how it invites laughter and memories into the kitchen. Over the years, I’ve played around with flavors, tried various toppings, and even made it vegan on a few occasions. Each version has its own charm, but the classic remains close to my heart.

The best part? With virtually no cleanup, this recipe is ideal for a last-minute gathering or Thanksgiving dinner when time is of the essence!

FAQs and Troubleshooting

1. Why is my pumpkin dump cake too runny?
This might happen if the pumpkin puree is too watery. Always opt for high-quality pumpkin puree and drain any excess liquid if necessary before mixing.

2. Can I make this in advance?
Absolutely! You can prepare it the night before and bake it just before serving. Letting it sit overnight in the fridge allows those lovely flavors to meld together.

3. How do I store leftovers?
Cover the pan tightly with plastic wrap or transfer leftovers to an airtight container. It’ll last in the fridge for up to 5 days—but trust me, it’s unlikely to last that long!

4. Can I freeze the pumpkin dump cake?
Sure! Once cooled, you can freeze it for up to 3 months. Thaw in the refrigerator overnight before serving.

Nutritional Info

(If applicable; adjust based on actual ingredients used.)

Per serving: Approximately 250 calories, 10g fat, 35g carbohydrates, 3g protein. Keep in mind that this can vary based on ingredients and portion size!


So, whether you’re baking for a gathering, a cozy night in, or just because it’s a Tuesday, this pumpkin dump cake is sure to bring joy, comfort, and a heck of a lot of flavor to your table. Enjoy the process, share it with loved ones, and always keep it fresh, simple, and seriously delicious! Happy baking!

Print

Pumpkin Dump Cake

An easy and delicious pumpkin dump cake that captures the essence of fall with its rich, spiced flavor and delightful texture.

  • Prep Time: 15 minutes
  • Cook Time: 60 minutes
  • Total Time: 75 minutes
  • Yield: 12 servings 1x
  • Category: Dessert
  • Method: Baking
  • Cuisine: American
  • Diet: Vegetarian

Ingredients

Scale
  • 1 can (15 oz) pumpkin puree
  • 1 can (12 oz) evaporated milk
  • 3 large eggs
  • 1 cup sugar
  • 1 teaspoon vanilla extract
  • 1 tablespoon pumpkin pie spice
  • 1 box (15.25 oz) yellow cake mix
  • 1 cup chopped nuts (e.g., pecans or walnuts)
  • 1/2 cup unsalted butter (melted)

Instructions

  1. Preheat your oven to 350°F (175°C).
  2. Prepare a 9×13 inch baking dish by lightly greasing it with cooking spray or butter.
  3. Mix the pumpkin puree, evaporated milk, sugar, eggs, vanilla extract, and pumpkin pie spice in a large mixing bowl until smooth.
  4. Pour the pumpkin filling into the prepared baking dish and spread it evenly.
  5. Sprinkle the yellow cake mix over the pumpkin mixture without mixing.
  6. Add the chopped nuts on top, if using.
  7. Drizzle the melted butter evenly over the cake mix and nuts.
  8. Bake for 50–60 minutes or until golden brown and a toothpick inserted comes out clean.
  9. Cool slightly in the dish before slicing.

Notes

Serve warm with whipped cream or vanilla ice cream. Can be made in advance and frozen for up to 3 months.

Nutrition

  • Serving Size: 1 serving
  • Calories: 250
  • Sugar: 10g
  • Sodium: 300mg
  • Fat: 10g
  • Saturated Fat: 5g
  • Unsaturated Fat: 3g
  • Trans Fat: 0g
  • Carbohydrates: 35g
  • Fiber: 2g
  • Protein: 3g
  • Cholesterol: 50mg

Keywords: pumpkin cake, fall dessert, easy baking, Thanksgiving dessert, pumpkin recipes

Did you make this recipe?

Share a photo and tag us — we can't wait to see what you've made!

June 25, 2026 |

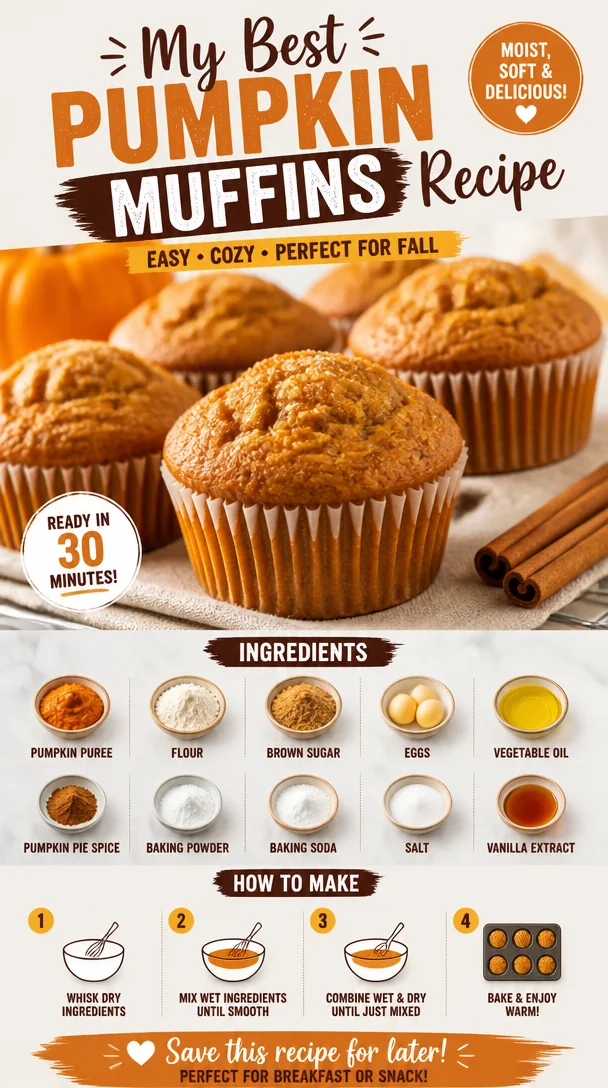
My Best Pumpkin Muffins Recipe

Delicious homemade pumpkin muffins fresh out of the oven

The Ultimate Pumpkin Muffins Recipe: A Fall Favorite

Welcome, fellow food lovers! Today, we’re diving into the cozy, delightful world of pumpkin muffins. Whether you’re in the mood for a warm breakfast treat, an afternoon snack, or a sweet addition to a fall gathering, these muffins are sure to become a staple in your kitchen.

Pumpkin is more than just a seasonal flavor; it’s a delight that brings warmth and happiness to your table. The best pumpkin muffins are moist, fluffy, and bursting with depth of flavor—think cinnamon, nutmeg, and a touch of sweetness. Instead of feeling like a chore, baking these muffins should feel like a soothing ritual that fills your home with fantastic aromas.

So, grab your mixing bowls and preheat that oven! The cozy vibes are about to unfold. And as we go through this recipe together, allow me to share some of my cherished kitchen moments and little tips to ensure your muffin journey is as delightful as the final product. Let’s cook!

A Fond Memory: Pumpkin Muffins and Family

Ah, the smell of pumpkin spice muffins baking in the oven—it’s a scent that instantly takes me back to my childhood kitchen, bustling with activity and warmth. When autumn rolled around, my mom would whip up batches of these delightful muffins, filling our home with an irresistible aroma that hinted at the coming holidays.

I remember gathering with my siblings on cold Saturday mornings, already anticipating the sweet, spicy muffins just out of the oven. With a pat of butter melting into each muffin, we savored every delicious bite, our laughter mingling with the scents of cinnamon and nutmeg.

As I grew older, the tradition continued. Now, I find myself making these muffins with my own family, sharing stories, and passing down the joy of cooking. Baking is cyclical; it connects us across generations. Each muffin batch is a reminder of those warm mornings, filled with love and togetherness. So let’s recreate that magic today!

Ingredients

Here’s what you’ll need to bring your pumpkin muffins to life. Each ingredient plays a pivotal role in building that scrumptious flavor and texture:

  • 1 cup pumpkin puree: The star of the show! Look for pure pumpkin puree (not pumpkin pie filling) in the can. You can also make your own by roasting and blending fresh pumpkin. It adds moisture and that signature autumn flavor.

  • ½ cup granulated sugar: This sweetener adds essential sweetness. You can swap half for brown sugar for a richer flavor, or use coconut sugar for a healthier alternative.

  • ½ cup brown sugar: Brown sugar brings in depth and moisture. If you’re out, you can substitute white sugar mixed with a little molasses.

  • 1/3 cup vegetable oil: This keeps the muffins moist. You could use melted coconut oil or unsweetened applesauce for a lighter twist.

  • 2 large eggs: Eggs help bind the ingredients together and give structure to our muffins. You can use flax eggs (1 tablespoon ground flaxseed mixed with 2.5 tablespoons water per egg) for a vegan option.

  • 1 teaspoon vanilla extract: Adds a lovely aromatic note. Feel free to use fresh vanilla bean for an extra kick.

  • 1 ½ cups all-purpose flour: The foundation of the muffins. Whole wheat flour can be used for a heartier texture or a gluten-free blend if needed.

  • 1 teaspoon baking soda: This is your rising agent. Always make sure it’s fresh for best results!

  • ½ teaspoon baking powder: Another leavening agent, that helps with fluffiness.

  • ½ teaspoon salt: Balances out the sweetness.

  • 1 teaspoon ground cinnamon: The quintessential autumn spice! You could also add nutmeg, ginger, and cloves for a warm spice blend.

  • ½ cup chopped nuts or chocolate chips (optional): For those who love a little crunch or sweetness, add walnuts, pecans, or dark chocolate chips.

Step-by-Step Instructions

Now that we’ve gathered our ingredients, let’s bake those muffins!

  1. Preheat your oven to 350°F (175°C): This is crucial for baking. A well-preheated oven ensures the muffins rise beautifully.

  2. Prepare your muffin tin: Grease your muffin tin with non-stick spray or line it with paper liners. This makes for easy cleanup, and who doesn’t love that?

  3. Mix the wet ingredients: In a large bowl, whisk together the pumpkin puree, granulated sugar, brown sugar, oil, eggs, and vanilla extract until smooth. This is where the magic happens, and you can already start to smell those amazing flavors coming together.

  4. Combine the dry ingredients: In another bowl, whisk together the flour, baking soda, baking powder, salt, and ground cinnamon. Mixing these dry ingredients separately ensures they’re evenly distributed throughout the batter—no one wants a mouthful of baking soda!

  5. Combine wet and dry ingredients: Gradually add the dry mixture to the wet mixture. Stir gently until just combined—don’t over-mix. It’s okay if there are a few lumps; over-mixing leads to dense muffins, and we want light and fluffy!

  6. Fold in nuts or chocolate (optional): If you’re adding nuts or chocolate, gently fold them into the batter now. This is where you can customize your muffins to suit your taste.

  7. Fill the muffin tin: Use a cookie scoop or spoon to fill each muffin cup about ¾ full. This allows room for rising.

  8. Bake: Pop the muffin tin in the preheated oven and bake for 18-22 minutes, or until a toothpick inserted into the center comes out clean. Keep an eye on them; every oven is a little different!

  9. Cool: Once baked, remove the muffins from the oven and allow them to cool in the tin for about 5 minutes before transferring them to a wire rack. This cooling process prevents soggy bottoms and helps retain that perfect texture.

  10. Enjoy: Once they’ve cooled (although I’m sure you won’t be able to resist a warm muffin), enjoy them plain or with a spread of your choice.

Serving Suggestions

These pumpkin muffins are perfect for any occasion, but I love serving them warm with a smidge of butter or a smear of cream cheese. If you’re feeling adventurous, drizzle a little honey or maple syrup over the top. For an extra treat, serve with a side of spiced chai or a hot cup of coffee. They also make fantastic gifts—get creative with some pretty packaging and share the love!

Recipe Variations

Want to switch things up? Here are some delicious variations to try:

  • Pumpkin Chocolate Chip Muffins: Stir in ½ cup of mini chocolate chips for a sweet treat that chocolate lovers will adore!

  • Nutty Pumpkin Muffins: Add ½ cup of finely chopped walnuts or pecans for extra crunch and flavor.

  • Spiced Pumpkin Muffins: Mix in ½ teaspoon of ginger, nutmeg, or all-spice for a deeper flavor profile that warms your soul.

  • Vegan Pumpkin Muffins: Substitute eggs with flax eggs and use unsweetened applesauce instead of oil.

  • Gluten-Free Version: Swap all-purpose flour with a gluten-free flour blend—voila, gluten-free pumpkin muffins!

Chef’s Notes

I can’t stress enough how versatile this pumpkin muffin recipe is! It’s a basic template that you can riff on depending on your mood or what’s in your pantry. Some days, I may toss in dried cranberries or even a hint of espresso powder for a little zing.

And speaking of kitchen stories, I once had a baking mishap that still makes me chuckle. I was so eager to eat those muffins that I accidentally dropped the whole mixing bowl onto the floor! After a few expletives (and a bit of cleaning), I regrouped and made a fresh batch. The lesson? Always double-check your grip—and enjoy the baking journey, even if it doesn’t go perfectly!

FAQs and Troubleshooting

  1. Why are my muffins dense?

    • Over-mixing the batter can lead to density. Mix until just combined for light, fluffy muffins.
  2. How do I store leftover muffins?

    • Store them in an airtight container at room temperature for up to 2 days, or toss them in the freezer for up to 3 months. Just thaw before eating.
  3. Can I use fresh pumpkin instead of canned?

    • Absolutely! Roast and puree the pumpkin until smooth. Just make sure there’s not too much water content.
  4. Can I freeze the batter for later?

    • Yes, you can freeze the muffin batter! Just fill the muffin tray and freeze until solid, then transfer to a freezer bag. When you’re ready to bake, pop the frozen batter into a preheated oven.

Nutritional Info

While each batch of muffins can vary based on ingredient choices, here’s a general idea of the nutrition per muffin (assuming 12 muffins):

  • Calories: 180
  • Protein: 3g
  • Fat: 7g
  • Carbohydrates: 29g
  • Fiber: 1g
  • Sugar: 10g

Keep in mind, these estimates can change based on ingredient substitutions and portion sizes.

Now that you have all the tools to make the perfect pumpkin muffins, I can’t wait to hear about your baking experiences! Enjoy the process, embrace the flavors, and let the warmth of autumn fill your home. Happy baking!

Print

The Ultimate Pumpkin Muffins

Delightful pumpkin muffins bursting with autumn flavors, perfect for breakfast or as a sweet treat.

  • Prep Time: 15 minutes
  • Cook Time: 20 minutes
  • Total Time: 35 minutes
  • Yield: 12 muffins 1x
  • Category: Dessert
  • Method: Baking
  • Cuisine: American
  • Diet: Vegetarian

Ingredients

Scale
  • 1 cup pumpkin puree
  • ½ cup granulated sugar
  • ½ cup brown sugar
  • 1/3 cup vegetable oil
  • 2 large eggs
  • 1 teaspoon vanilla extract
  • 1 ½ cups all-purpose flour
  • 1 teaspoon baking soda
  • ½ teaspoon baking powder
  • ½ teaspoon salt
  • 1 teaspoon ground cinnamon
  • ½ cup chopped nuts or chocolate chips (optional)

Instructions

  1. Preheat your oven to 350°F (175°C).
  2. Prepare your muffin tin by greasing it with non-stick spray or lining it with paper liners.
  3. Mix the wet ingredients: In a large bowl, whisk together the pumpkin puree, granulated sugar, brown sugar, oil, eggs, and vanilla extract until smooth.
  4. Combine the dry ingredients: In another bowl, whisk together the flour, baking soda, baking powder, salt, and cinnamon.
  5. Combine wet and dry ingredients by gradually adding the dry mixture to the wet mixture. Stir gently until just combined.
  6. Fold in nuts or chocolate if using.
  7. Fill the muffin tin about ¾ full with the batter.
  8. Bake for 18-22 minutes, or until a toothpick inserted comes out clean.
  9. Cool the muffins in the tin for 5 minutes before transferring to a wire rack.
  10. Enjoy them warm or at room temperature.

Notes

Feel free to customize with different spices, nuts, or chocolate chips according to your preference.

Nutrition

  • Serving Size: 1 muffin
  • Calories: 180
  • Sugar: 10g
  • Sodium: 300mg
  • Fat: 7g
  • Saturated Fat: 1g
  • Unsaturated Fat: 5g
  • Trans Fat: 0g
  • Carbohydrates: 29g
  • Fiber: 1g
  • Protein: 3g
  • Cholesterol: 30mg

Keywords: pumpkin muffins, fall baking, autumn recipes, dessert

Did you make this recipe?

Share a photo and tag us — we can't wait to see what you've made!

June 25, 2026 |

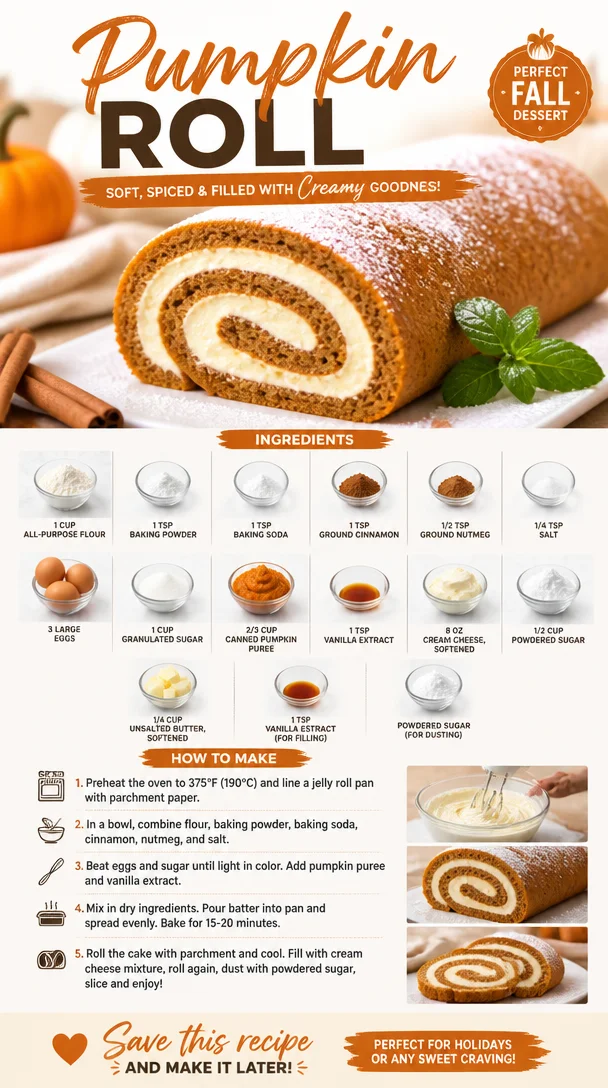
Pumpkin Roll

Homemade pumpkin roll with cream cheese filling and fall spices

The Perfect Fall Treat: A Cozy Pumpkin Roll

Ah, autumn! The season where leaves turn golden, sweaters make their grand appearance, and the air fills with the sweet, spicy aroma of pumpkin everything. As a self-proclaimed pumpkin enthusiast, I can’t help but let my love for this versatile gourd shine through in the form of my favorite fall dessert: the Pumpkin Roll. It’s not just a beautiful centerpiece for any gathering; it’s a nostalgic bite of my childhood wrapped in a delightful spiral of cake and cream cheese filling.

Imagine this: it’s a crisp October afternoon, and my mom is in the kitchen, her apron dusted with flour as she expertly whips up a batch of pumpkin goodness. The warm cinnamon and nutmeg wafting through the house was an invitation for the whole family to gather. Those moments, surrounded by the people I love, with smiles, laughter, and the promise of a delicious dessert to come, are the very reason I cook. I created this recipe so everyone can experience that joy, and I can’t wait to share the journey with you.

So, grab your baking tools and let’s dive into crafting this show-stopping Pumpkin Roll that will not only brighten your autumn festivities but also bring a sense of warmth and comfort.

A Slice of Nostalgia: My Pumpkin Roll Memory

The first time I made a Pumpkin Roll on my own was a rite of passage. I was about 12 years old, and I decided to surprise my family with a homemade dessert inspired by my mom’s cherished recipe. Armed with her handwritten notes, a mixing bowl, and an alarming amount of excitement, I declared that I would whip up the pumpkin cake that united our family season after season.

As I started combining ingredients, the mishaps began. My attempt to add the eggs ended in a slight eggy explosion, which left the counter covered in batter. My little brother, perched on a stool, was my ever-patient sous chef, offering encouraging words between fits of laughter.

But despite the chaos, we finally rolled the cake and filled it with cream cheese frosting, and when we took that first bite together, the sense of pride and joy was palpable. It wasn’t just about the dessert—it was about the memories, the laughter, and the feeling that we were all part of something wonderful. That sticky kitchen adventure sticks with me to this day, and I can promise you this—if you approach this recipe with love, laughter, and a spoonful of enthusiasm, your kitchen will be a magical place, too.

Ingredients You’ll Need

Let’s get started! Here’s the lineup for our pumpkin roll. Gather these ingredients, and you’ll be on your way to baking glory!

  • 1 cup all-purpose flour: This is the base of our cake. You can substitute with whole wheat flour for a heartier version, but the texture will be a bit denser.

  • 1 tsp baking powder: This adds just the right amount of lift. If you’re out, you can use 1/3 tsp of baking soda instead, but make sure to adjust your acid ingredients (like pumpkin) accordingly.

  • 1 tsp baking soda: Essential for helping our cake rise. Again, if you’re out, follow the same substitution advice.

  • 1 tsp ground cinnamon: Ah, the warm, cozy spice that screams “fall” to me. If you want to mix it up, you can try pumpkin pie spice for an extra layer of flavor.

  • 1/2 tsp ground nutmeg: This spice adds warmth and depth. If you don’t have nutmeg, a pinch of cloves can work in a pinch.

  • 1/4 tsp salt: Enhances flavors! Never skip this; it’s essential for balancing sweetness.

  • 3 large eggs: The binding agents! For a vegan option, you can replace each egg with 1/4 cup of unsweetened applesauce.

  • 1 cup granulated sugar: Provides sweetness. If you want to cut back on sugar, you can use coconut sugar or a sugar substitute, but the results may vary in texture.

  • 2/3 cup canned pumpkin puree: Make sure it’s pure pumpkin and not pie filling! This is the star of our roll. You can substitute with sweet potato puree for a twist.

  • 1 tsp vanilla extract: This adds depth. Feel free to use almond extract for a unique flavor.

  • 8 oz cream cheese, softened: The luscious filling of our roll! Double-check that it’s softened to avoid lumps.

  • 1/2 cup powdered sugar: Sweetens our cream cheese filling. You can substitute with a sugar alternative, but it may alter the texture.

  • 1/4 cup unsalted butter, softened: This provides creaminess to our filling. If needed, vegan butter can work as a substitute.

  • 1 tsp vanilla extract (for filling): Because you can never have enough vanilla!

  • Powdered sugar (for dusting): A little touch of sweetness on top adds elegance. Optional but highly recommended for presentation!

Step-by-Step Instructions

Alright, let’s get to the good part—the baking! Here’s your guide to making the perfect Pumpkin Roll, with all the little chef tips along the way.

  1. Preheat Your Oven: Set your oven to 375°F (190°C). While it’s heating, you can prep your baking sheet. Line a 15×10-inch jelly roll pan with parchment paper and spray it lightly with cooking spray to ensure our roll doesn’t stick.

  2. Mix the Dry Ingredients: In a medium bowl, whisk together the flour, baking powder, baking soda, cinnamon, nutmeg, and salt. This is a crucial step! Whisking ensures that the leavening agents and spices are evenly distributed. Set this bowl aside while we work on the wet ingredients.

  3. Beat the Eggs and Sugar: In a large mixing bowl, beat the eggs and granulated sugar on high speed until fluffy and pale in color, about 5 minutes. The air you’re incorporating here is essential; it’s what creates that delightful spongy texture in the cake!

  4. Add in the Good Stuff: Gently fold in the pumpkin puree and vanilla extract. Once incorporated, you can gradually add in the dry ingredients. Use a spatula to fold the mixture just until it’s blended. Avoid overmixing to keep the cake light and tender!

  5. Bake It Up: Pour the batter into the prepared jelly roll pan and spread it evenly. Bake it for about 15-20 minutes, or until a toothpick inserted in the center comes out clean. Your kitchen will start to smell heavenly!

  6. Roll It Up: Once baked, remove it from the oven and let it cool for about 5 minutes. Then, carefully flip the cake onto a clean kitchen towel, gently peel off the parchment paper, and roll the cake tightly in the towel. Allow it to cool completely in the towel—this helps our beautiful shape set!

  7. Make the Filling: In a medium bowl, beat the softened cream cheese and butter until creamy. Then add powdered sugar and the additional vanilla extract, mixing until smooth. Taste it—feel free to adjust the sweetness if you’re feeling jazzy!

  8. Unroll and Fill: Once the cake has completely cooled, carefully unroll it. Spread the cream cheese filling evenly over the surface, leaving about half an inch at the edges. It’s time for that delicious swirl, so roll it back up (without the towel this time!), starting from the shorter end.

  9. Chill Out: Wrap your rolled cake in plastic wrap and refrigerate for at least an hour to let the flavors meld and the cream cheese filling firm up.

  10. Dust and Slice: When you’re ready to serve, dust the rolled cake with powdered sugar for that lovely presentation. Slice it into thick rounds and prepare to impress!

Serving Suggestions

This Pumpkin Roll is not just a dessert; it’s a work of art! Serve slices on a beautiful platter, and consider pairing it with a scoop of vanilla ice cream for added decadence. A dollop of whipped cream and a sprinkle of cinnamon on top elevate the experience even more. If you’re feeling fancy, garnish the platter with sliced apples or candied pecans to bring a little fall flavor to your spread.

Recipe Variations

Looking to switch things up? Here are some creative twists that will keep this recipe fresh:

  1. Caramel Pumpkin Roll: Drizzle caramel sauce over the cream cheese filling for a decadent topping that mixes wonderfully with pumpkin flavors.

  2. Nutty Twist: Add chopped pecans or walnuts into the filling for a delightful crunch.

  3. Chocolate Lovers Unite: Incorporate chocolate chips into the batter for a rich, chocolatey surprise with each bite.

  4. Lemon Zest: For a tangy twist, add lemon zest to the cream cheese filling—this brightens the flavors beautifully and adds a refreshing contrast.

  5. Spiced Up: Don’t be shy—experiment with different spices such as ginger or cardamom to create your unique flavor profile.

Chef’s Notes

Let me remind you, perfection is in the eye of the beholder! This Pumpkin Roll has graced my kitchen table for years, and each time I make it, I am reminded of how we can all put our unique spin on things. I’ve learned that the key to a great pumpkin roll lies in patience—letting it cool, roll gently (no rush!), and savor each slice! I once tried to cut it straight out of the oven! With a sticky mess of filling everywhere, I quickly learned that good things come to those who wait.

FAQs and Troubleshooting

1. My cake cracked while rolling, what did I do wrong?

Cracking can occur if the cake is too dry or overbaked. Make sure to keep an eye on the bake time and let the cake cool a bit before rolling. It should be soft and pliable.

2. How do I prevent my cream cheese filling from being lumpy?

Make sure to fully soften your cream cheese and butter before mixing. Using an electric mixer helps achieve that smooth consistency you’ll love.

3. Can I freeze my pumpkin roll?

Yes! You can wrap it tightly in plastic wrap and store it in the freezer for up to 3 months. Thaw overnight in the refrigerator before serving.

4. What’s the best way to slice the roll?

Use a serrated knife and slice gently—this will prevent squashing the roll and helps maintain that beautiful spiral.

Nutritional Info

While I generally focus on the deliciousness of food rather than the numbers, a slice of this Pumpkin Roll has approximately:

  • Calories: 280
  • Protein: 3g
  • Fat: 12g
  • Carbohydrates: 40g
  • Sugar: 20g

Just remember—this is a treat to enjoy on special occasions!


So there you have it! A cozy journey through the delightful art of making a Pumpkin Roll. I hope this recipe becomes a cherished addition to your fall traditions, just as it has in mine. Dive into this delicious adventure, embrace those kitchen messes, and share this special dessert with the people you love. Happy baking! 🍂🥰

Print

The Perfect Fall Treat: A Cozy Pumpkin Roll

A nostalgic and delightful dessert featuring a spiced pumpkin cake rolled with creamy filling, perfect for autumn gatherings.

  • Prep Time: 20 minutes
  • Cook Time: 20 minutes
  • Total Time: 60 minutes
  • Yield: 12 servings 1x
  • Category: Dessert
  • Method: Baking
  • Cuisine: American
  • Diet: Vegetarian

Ingredients

Scale
  • 1 cup all-purpose flour
  • 1 tsp baking powder
  • 1 tsp baking soda
  • 1 tsp ground cinnamon
  • 1/2 tsp ground nutmeg
  • 1/4 tsp salt
  • 3 large eggs
  • 1 cup granulated sugar
  • 2/3 cup canned pumpkin puree
  • 1 tsp vanilla extract
  • 8 oz cream cheese, softened
  • 1/2 cup powdered sugar
  • 1/4 cup unsalted butter, softened
  • 1 tsp vanilla extract (for filling)
  • Powdered sugar (for dusting)

Instructions

  1. Preheat your oven to 375°F (190°C). Line a 15×10-inch jelly roll pan with parchment paper.
  2. Mix the dry ingredients: whisk flour, baking powder, baking soda, cinnamon, nutmeg, and salt in a medium bowl.
  3. Beat the eggs and sugar in a large mixing bowl on high speed until fluffy and pale, about 5 minutes.
  4. Add the pumpkin puree and vanilla extract, then fold in the dry ingredients until just blended.
  5. Pour the batter into the jelly roll pan and bake for 15-20 minutes, or until a toothpick comes out clean.
  6. Roll the cake in a clean kitchen towel after cooling for 5 minutes.
  7. Make the filling by beating cream cheese and butter, adding powdered sugar and vanilla until smooth.
  8. Unroll the cooled cake and spread the cream cheese filling evenly before rolling it back up.
  9. Chill the rolled cake wrapped in plastic wrap in the refrigerator for at least an hour.
  10. Dust with powdered sugar before slicing and serving.

Notes

Let the cake cool completely before filling for easier rolling and to avoid cracks.

Nutrition

  • Serving Size: 1 slice
  • Calories: 280
  • Sugar: 20g
  • Sodium: 300mg
  • Fat: 12g
  • Saturated Fat: 7g
  • Unsaturated Fat: 3g
  • Trans Fat: 0g
  • Carbohydrates: 40g
  • Fiber: 1g
  • Protein: 3g
  • Cholesterol: 40mg

Keywords: pumpkin roll, fall dessert, autumn recipe, pumpkin cake, cream cheese filling

Did you make this recipe?

Share a photo and tag us — we can't wait to see what you've made!

June 25, 2026 |

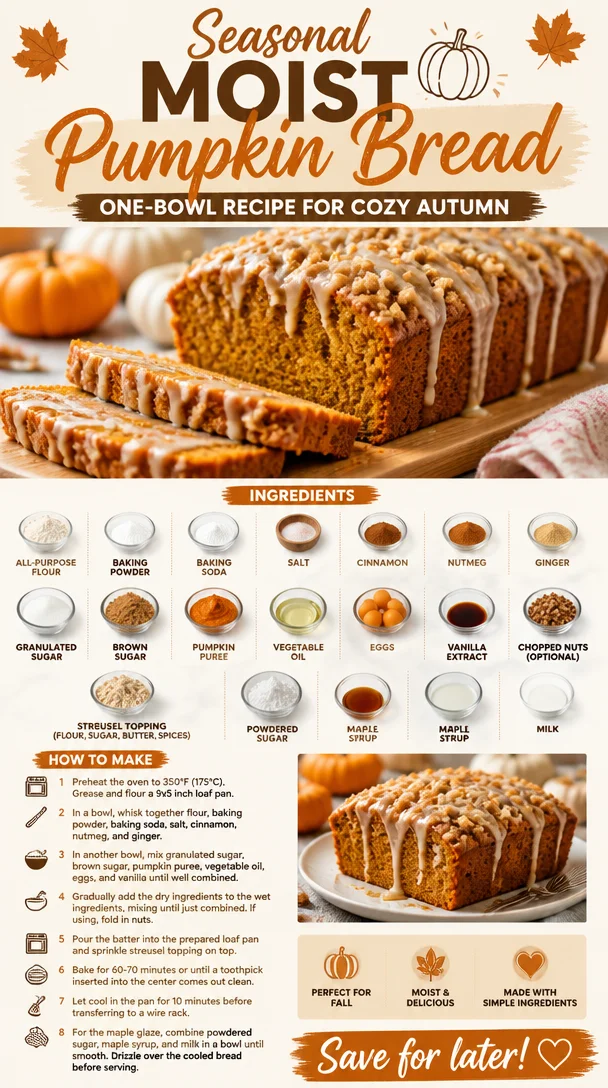
Seasonal Moist Pumpkin Bread: One-Bowl Recipe for Cozy Autumn

Moist pumpkin bread made with a simple one-bowl recipe for fall

The Ultimate Moist Pumpkin Bread Recipe: Fall’s Favorite Treat

Ah, pumpkin bread! It’s that cozy slice of nostalgia that makes you feel all warm and fuzzy inside, as if you’re wrapped in a blanket next to a crackling fire. With the aromatic blend of spices and that oh-so-satisfying moist texture, it’s no wonder this delicious treat has become a beloved staple, especially in the fall. Whether you spread a bit of butter on a fresh slice, savor it with your morning coffee, or whip it up for a last-minute gathering, pumpkin bread is a versatile and delightful addition to any menu.

When I think of pumpkin bread, I’m transported back to my childhood kitchen, where the sweet, earthy scent of spices wafted through the air, inviting us to come and taste what my mom was baking. There was something magical about the sound of the mixer whirring, the sight of vibrant orange pumpkin puree spilling into the mixing bowl, and the excitement of sprinkling in the fragrant cinnamon and nutmeg. Those weekday afternoons, with my siblings and I hovering around the oven, eagerly awaiting the golden-brown loaf to emerge, were some of my favorite moments.

And now, I’m thrilled to share my version of this classic recipe with you! It’s moist, flavorful, and oh-so-satisfying—perfect for sharing, gifting, or simply indulging in all by yourself. So, let’s roll up our sleeves and dive into the wonderful world of baking moist pumpkin bread!

Ingredients You’ll Need

Here’s a complete list of ingredients you’ll need for this scrumptious pumpkin bread. Each one plays a vital role in creating that perfect loaf you’ll crave all fall long.

  • 2 cups all-purpose flour: The foundation of our bread. For a gluten-free option, you can substitute with a gluten-free all-purpose blend or almond flour.

  • 1 teaspoon baking powder: This helps our bread rise and gives it that light, airy texture. Make sure it’s fresh for the best effect!

  • 1 teaspoon baking soda: Another essential leavening agent that works alongside the baking powder for optimal rise.

  • 1 teaspoon salt: Balances the sweetness and enhances the flavors—don’t skimp on this!

  • 1 teaspoon ground cinnamon: The quintessential spice in pumpkin bread, adding warmth and depth to each bite.

  • 1/2 teaspoon ground nutmeg: A warm and slightly sweet spice that complements the pumpkin perfectly.

  • 1/2 teaspoon ground ginger: For a little extra zing! If you want to tone it down, you can replace it with an equal amount of allspice.

  • 1 cup granulated sugar: The primary sweetener for this recipe. You can reduce the amount for a less sweet result or use coconut sugar for a healthier alternative.

  • 1/2 cup brown sugar: Adds moisture and a rich flavor. You can use all granulated sugar if you’re out of brown sugar.

  • 1 cup pumpkin puree: The star ingredient! You can use canned puree or make your own by roasting and pureeing a sugar pumpkin.

  • 1/2 cup vegetable oil: Keeps the bread moist. If you prefer a healthier swap, try using applesauce.

  • 4 large eggs: Helps bind the ingredients together and adds richness.

  • 1 teaspoon vanilla extract: A touch of vanilla brings everything together, enhancing the flavor profile.

  • 1 cup chopped nuts (optional): A delightful crunch! You can use walnuts or pecans; if you want it nut-free, just omit them.

  • 1/2 cup streusel topping: This adds a delightful crunch on top, made from flour, sugar, butter, and spices—totally worth it!

  • Maple glaze: Optional, but highly recommended! Made with powdered sugar, maple syrup, and a splash of milk, it adds a sweet finish.

Step-by-Step Instructions

Ready to bring this fragrant pumpkin bread to life? Let’s get baking!

  1. Preheat your oven: Preheat your oven to 350°F (175°C). This step is crucial, so don’t skip it! A hot oven will help our bread achieve that perfect rise and golden color.

  2. Prepare your loaf pans: Grease two 9×5-inch loaf pans with butter or cooking spray to ensure your bread slides out smoothly when cooked. For an extra layer of protection, you can line the bottoms with parchment paper.

  3. Mix dry ingredients: In a large mixing bowl, whisk together the flour, baking powder, baking soda, salt, cinnamon, nutmeg, and ginger. This ensures that everything is evenly distributed. A little chef hack: Use a sifter if you have one—this will aerate your dry ingredients and give your bread a lighter texture!

  4. Combine wet ingredients: In another bowl, whisk the granulated sugar, brown sugar, pumpkin puree, oil, eggs, and vanilla extract until well combined. The mixture will be thick and creamy, so whip it good!

  5. Combine dry and wet ingredients: Gradually add the dry mixture into the wet mixture. Stir gently with a spatula until just combined. Be careful not to overmix—this could make your bread dense instead of light and fluffy.

  6. Add nuts (if using): Fold in the chopped nuts gently. If you’re not a nut person, feel free to skip this step, and the bread will still be delicious!

  7. Prepare the streusel topping (optional): In a small bowl, mix together flour, sugar, butter, and spices until crumbly. Sprinkle this mixture generously on top of your unbaked batter in the pans.

  8. Bake: Pour the batter evenly into the prepared loaf pans, filling each about 2/3 full. Bake in the preheated oven for 50-60 minutes, or until a toothpick inserted into the center comes out clean. Every oven is different, so keep an eye on it in the last few minutes!

  9. Cool: Once baked, remove from the oven and let the loaves cool in the pans for about 10 minutes. Then, transfer them to a wire rack to cool completely.

  10. Prepare the glaze (optional): While the bread cools, whisk together the powdered sugar, maple syrup, and milk until smooth. Drizzle it over the cooled bread for an added sweet touch!

Serving Suggestions

Now that you’ve baked a gorgeous loaf of pumpkin bread, it’s time to serve! Slice it up as thick or as thin as you like—there’s no wrong way to enjoy this treat. You can serve it warm with a pat of butter for an irresistible melt-in-your-mouth experience. Or, go ahead and top it with a dollop of cream cheese for a delightful combo. It’s also lovely alongside a steaming cup of coffee or chai tea for the perfect midday pick-me-up.

Recipe Variations

Want to shake things up? Here are a few creative twists you might consider:

  1. Chocolate Chip Pumpkin Bread: Add 1 cup of semi-sweet or dark chocolate chips to the batter for a decadent treat.

  2. Pumpkin Spice Swirl: Add a swirl of cream cheese filling by mixing 8 oz. cream cheese with 1/4 cup sugar and a little vanilla before swirling it into the batter.

  3. Dried Fruit Addition: Toss in 1 cup of raisins or dried cranberries for a pop of color and natural sweetness.

  4. Vegan Version: Substitute eggs with flaxseed meal (1 tablespoon ground flaxseed + 3 tablespoons water for each egg) and use an oil like coconut or melt-in-your-mouth vegan butter.

  5. Savory Pumpkin Bread: Reduce sugars and add herbs like rosemary or thyme for a savory bread that’s fantastic with meals.

Chef’s Notes

This pumpkin bread recipe has evolved beautifully over time. I started off with a basic version, and over the years, I’ve played with different spices and added toppings. I’ve learned that the key to a consistently moist loaf is the balance of wet to dry ingredients, and I’m always experimenting with flavor combinations. And let me tell you, I’ve had my fair share of kitchen disasters—like the time I forgot to add sugar. Let’s just say, it was a very…interesting loaf. But that’s all part of the fun and learning that happens in the kitchen!

FAQs and Troubleshooting

1. Why is my pumpkin bread too dense?
Overmixing the batter is usually the culprit. Mix just until combined to keep it light and airy.

2. How do I know when my pumpkin bread is done?
Insert a toothpick into the center; if it comes out clean or with a few moist crumbs (not wet batter), it’s done!

3. Can I freeze pumpkin bread?
Absolutely! Wrap the cooled loaves tightly in plastic wrap and then in aluminum foil. They can last for up to 3 months in the freezer. Just thaw at room temperature when you’re ready to enjoy.

4. What should I do if my bread sinks in the middle?
This can happen if there’s too much leavening agent or if the batter is under-mixed. Make sure to measure accurately and mix until just combined.

Nutritional Info (Optional)

While I always encourage everyone to enjoy their food mindfully, here’s a rough breakdown for a standard slice of moist pumpkin bread (without glaze):

  • Calories: ~180
  • Fat: 7g
  • Carbohydrates: 29g
  • Fiber: 1g
  • Sugar: 14g
  • Protein: 3g

If you’re looking to make it lighter, you can easily reduce the sugar and oil without compromising taste!

So there you have it—the ultimate moist pumpkin bread recipe! I hope you enjoy making (and devouring) it as much as I do. Remember, the kitchen is all about joy and creativity, so have fun experimenting and making it your own. Happy baking!

Print

The Ultimate Moist Pumpkin Bread

A cozy and flavorful pumpkin bread perfect for fall, moist with an aromatic blend of spices.

  • Prep Time: 15 minutes
  • Cook Time: 60 minutes
  • Total Time: 75 minutes
  • Yield: 2 loaves 1x
  • Category: Dessert
  • Method: Baking
  • Cuisine: American
  • Diet: Vegetarian

Ingredients

Scale
  • 2 cups all-purpose flour
  • 1 teaspoon baking powder
  • 1 teaspoon baking soda
  • 1 teaspoon salt
  • 1 teaspoon ground cinnamon
  • 1/2 teaspoon ground nutmeg
  • 1/2 teaspoon ground ginger
  • 1 cup granulated sugar
  • 1/2 cup brown sugar
  • 1 cup pumpkin puree
  • 1/2 cup vegetable oil
  • 4 large eggs
  • 1 teaspoon vanilla extract
  • 1 cup chopped nuts (optional)
  • 1/2 cup streusel topping
  • Maple glaze (optional)

Instructions

  1. Preheat your oven to 350°F (175°C).
  2. Prepare two 9×5-inch loaf pans by greasing them.
  3. Mix the dry ingredients in a bowl.
  4. Combine the wet ingredients in another bowl.
  5. Combine the wet and dry mixtures, stirring gently.
  6. Add chopped nuts if using.
  7. Prepare the streusel topping if desired.
  8. Bake the batter in the prepared pans for 50-60 minutes.
  9. Cool the loaves in the pans for 10 minutes before transferring to a wire rack.
  10. Prepare the glaze if desired and drizzle over the cooled bread.

Notes

Serve warm with butter or cream cheese, or enjoy with coffee or chai tea.

Nutrition

  • Serving Size: 1 slice
  • Calories: 180
  • Sugar: 14g
  • Sodium: 400mg
  • Fat: 7g
  • Saturated Fat: 1g
  • Unsaturated Fat: 6g
  • Trans Fat: 0g
  • Carbohydrates: 29g
  • Fiber: 1g
  • Protein: 3g
  • Cholesterol: 30mg

Keywords: pumpkin bread, fall recipes, moist pumpkin bread, baking, dessert

Did you make this recipe?

Share a photo and tag us — we can't wait to see what you've made!

June 25, 2026 |

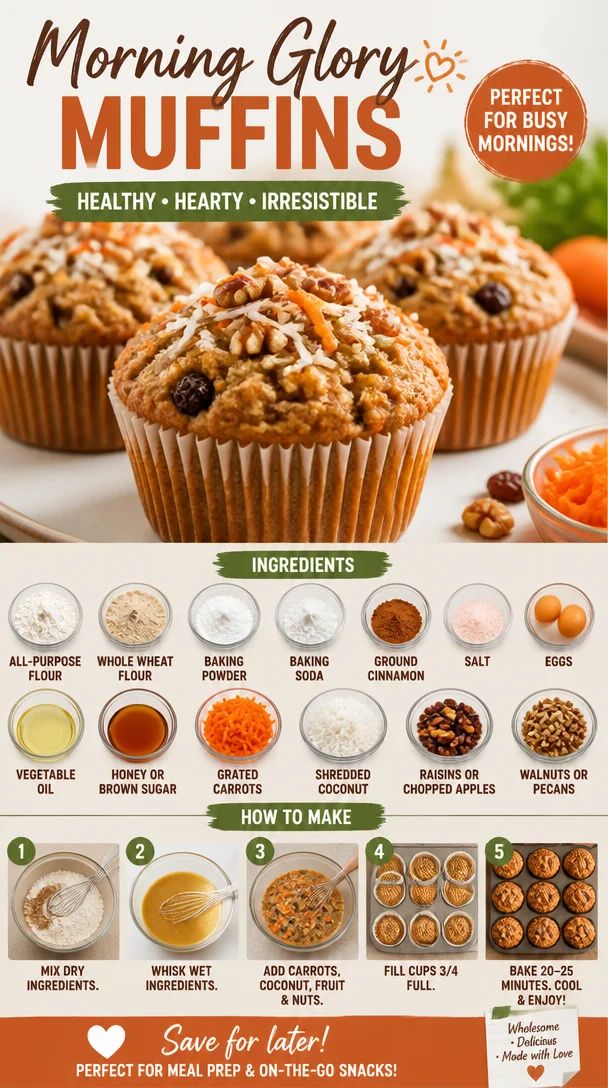
Morning Glory Muffins

Freshly baked Morning Glory Muffins packed with fruits, nuts, and spices.

Morning Glory Muffins: A Delicious Start to Your Day

Welcome to another delightful journey in the kitchen! Today, we’re baking something that might just become your new breakfast favorite: Morning Glory Muffins. These little gems are not only bursting with flavor, but they also pack a nutritional punch, making them perfect for busy mornings or cozy weekend brunches. So, grab your apron, and let’s dive into a recipe that’s as comforting as it is energizing!

A Breakfast Memory to Treasure

I can still remember the first time I tasted morning glory muffins. It was a chilly autumn morning, and my grandmother had a tradition of baking these muffins every Sunday. The warm aroma of cinnamon and carrots wafted through the house, drawing everyone to the kitchen like bees to honey. My siblings and I would gather around the table, eagerly waiting for that first warm muffin to land on our plates. As we dug in, our smiles were as bright as the golden autumn leaves outside.

That first bite was a blend of sweet and spicy, with just the right crunch from the nuts and the delightful chewiness of raisins. It was an experience that went beyond just eating; it was about family, warmth, and the joy of sharing food. Those muffins were a staple of my childhood, and now I love sharing this recipe, keeping that cherished memory alive and welcoming you into the fold of deliciousness!

Ingredients

Let’s talk about what you’ll need to make these super scrumptious morning glory muffins. Here’s the lineup:

  • 1 cup all-purpose flour: This is your base for the muffins, giving them structure. You can substitute with a 1:1 gluten-free flour blend if you want a gluten-free version.

  • 1 cup whole wheat flour: This adds nutrition and a delightful nutty flavor. If you don’t have whole wheat, feel free to use more all-purpose flour.

  • 1 teaspoon baking powder: This is your leavening agent, helping the muffins rise and become fluffy.

  • 1/2 teaspoon baking soda: A little extra lift here—plus, it balances the acidity of the honey or brown sugar.

  • 1 teaspoon ground cinnamon: This warm spice is what gives our muffins that cozy flavor. You can swap it out for nutmeg if you’re feeling adventurous!

  • 1/2 teaspoon salt: A must for enhancing all the other flavors; it’s the secret ingredient!

  • 2 large eggs: These provide moisture and act as a binder. For a vegan option, consider using flaxseed mixed with water as a substitute.

  • 1/2 cup vegetable oil: This keeps the muffins moist. You can also use melted coconut oil for a tropical twist.

  • 1/2 cup honey or brown sugar: Sweetness is key! Honey brings a lovely floral note, while brown sugar adds a caramel-like depth.

  • 2 cups grated carrots: This is where the "morning glory" shines, adding natural sweetness and moisture.

  • 1/2 cup shredded coconut: A tropical flair! Unsweetened coconut works great if you’re looking for a healthier option.

  • 1/2 cup raisins or chopped apples: Both options add sweetness and texture. If you’re not a fan, you can leave them out altogether or use dried cranberries instead.

  • 1/2 cup walnuts or pecans, chopped: They give these muffins a satisfying crunch. Feel free to swap for sunflower seeds if you have nut allergies.

Step-by-Step Instructions

Now that you have your ingredients laid out, let’s get started on making these incredible muffins!

  1. Preheat Your Oven: First things first, preheat your oven to 350°F (175°C). This step ensures that the muffins start to bake immediately when you put them in, giving you those perfect domes!

  2. Prepare Your Muffin Tin: Grease a standard muffin tin or line it with paper liners for easy removal. I always prefer using liners as it makes cleanup a breeze, plus it adds a pop of color!

  3. Mix Dry Ingredients: In a large mixing bowl, combine the all-purpose flour, whole wheat flour, baking powder, baking soda, ground cinnamon, and salt. This is where the magic starts! Whisk them together until well blended—this helps ensure that your leavening agents are evenly distributed.

  4. Whisk Wet Ingredients: In another bowl, beat the eggs, then add in the vegetable oil and honey (or brown sugar). Whisk these together until everything is nicely combined. You’ll want it to be smooth and creamy. It’s my little ritual to smile at this point, knowing deliciousness awaits!

  5. Combine Wet and Dry Ingredients: Pour the wet ingredients into the dry ingredients. Using a spatula (or a wooden spoon), gently fold the mixture. Be careful not to overmix; a few lumps are totally okay! This keeps your muffins nice and fluffy.

  6. Add the Goodness: Now it’s time to add in your grated carrots, coconut, raisins (or apples), and nuts. This is where the colors and textures really come to life—in a rainbow of health!

  7. Scoop Into Muffin Tin: Using an ice cream scoop or two spoons, fill each muffin cup about 2/3 full. This allows room for the muffins to rise beautifully!

  8. Bake Amazonian Muffins: Slide your muffin tin into the preheated oven and bake for about 20-25 minutes. The muffins should be golden brown, and a toothpick inserted into the center should come out clean. But keep an eye on them; ovens can be sneaky!

  9. Cool Down: Once baked, let the muffins cool in the tin for a few minutes, then transfer them to a wire rack to cool completely. This prevents them from getting soggy and lets them set perfectly!

Serving Suggestions

There’s nothing better than warming up a muffin, slathering it with a bit of butter (or coconut oil for dairy-free), and enjoying it with your morning coffee or tea. Serve these muffins slightly warm, perhaps with a side of fresh fruit or yogurt for a wholesome breakfast that feels like a treat. Want a fancy touch? Top them with a dollop of whipped cream cheese for an indulgent twist!

Recipe Variations

Feeling like getting creative? Here are some delicious variations you can try:

  • Tropical Twist: Substitute the raisins with pineapple and add macadamia nuts for a lush island flavor.

  • Chocolate Chip Delight: Fold in dark chocolate chips instead of nuts for a sweet, gooey surprise.

  • Apple Cinnamon: Swap out the grated carrots for grated apples and increase the cinnamon for an irresistible apple-cinnamon combo.

  • Savory Spin: Add some sautéed spinach or zucchini for a savory muffin that’s packed with veggies—perfect for brunch!

  • Vegan Version: Use flax eggs and unsweetened applesauce in place of eggs and half the oil, and you’re all set for a vegan treat!

Chef’s Notes

As I’ve been making these muffins over the years, each batch carries a little story. One time, I decided to make a double batch for a brunch gathering. I was feeling pretty proud until I realized I had accidentally grabbed baking soda instead of baking powder! The result was an incredibly dense muffin that had everyone laughing—at least they were delicious!

They’ve evolved as I’ve experimented with adding various spices and flavors, but the classic version remains my favorite. Baking is all about love and learning, after all, and I can’t wait for you to create your own memories with these delightful muffins.

FAQs and Troubleshooting

1. My muffins came out flat. What happened?

  • This can happen if the leavening agents (baking powder and soda) are old or if the batter is overmixed. Make sure these ingredients are fresh, and fold gently!

2. Can I freeze the muffins?

  • Absolutely! These muffins freeze well. Let them cool completely, wrap them tightly in plastic wrap, and store them in an airtight container. They’ll last up to three months. Just pop them in the microwave or toaster oven when you’re ready to enjoy!

3. How do I keep my muffins moist?

  • Ensure you’re using enough moisture in the recipe. Don’t skip the oil, and consider adding in a bit of applesauce for added moisture. Also, be careful not to overbake!

4. Can I use other sweeteners?

  • Yes! Maple syrup or agave nectar can be great substitutes for honey or brown sugar. Just make sure to adjust the liquid content slightly as needed.

Nutritional Info

Here’s a quick look at the nutritional benefits of our Morning Glory Muffins (per muffin, approx.):

  • Calories: 180
  • Protein: 3g
  • Fat: 7g
  • Carbohydrates: 27g
  • Fiber: 2g
  • Sugar: 7g

So, there you have it! Morning Glory Muffins that are as joyful to make as they are to eat. I hope you’ll bring this recipe into your home, creating memories and delicious moments just like my grandmother did with me. Happy baking, friends! Let’s make every bite full of love and flavor!

Print

Morning Glory Muffins

These delightful muffins are bursting with flavor and packed with nutrition, perfect for busy mornings or cozy weekend brunches.

  • Prep Time: 15 minutes
  • Cook Time: 25 minutes
  • Total Time: 40 minutes
  • Yield: 12 servings 1x
  • Category: Breakfast
  • Method: Baking
  • Cuisine: American
  • Diet: Vegetarian

Ingredients

Scale
  • 1 cup all-purpose flour
  • 1 cup whole wheat flour
  • 1 teaspoon baking powder
  • 1/2 teaspoon baking soda
  • 1 teaspoon ground cinnamon
  • 1/2 teaspoon salt
  • 2 large eggs
  • 1/2 cup vegetable oil
  • 1/2 cup honey or brown sugar
  • 2 cups grated carrots
  • 1/2 cup shredded coconut
  • 1/2 cup raisins or chopped apples
  • 1/2 cup walnuts or pecans, chopped

Instructions

  1. Preheat your oven to 350°F (175°C).
  2. Prepare a standard muffin tin by greasing it or lining it with paper liners.
  3. Mix together the all-purpose flour, whole wheat flour, baking powder, baking soda, ground cinnamon, and salt in a large mixing bowl.
  4. Whisk the eggs, then add the vegetable oil and honey (or brown sugar) in another bowl and mix until well combined.
  5. Combine the wet ingredients with the dry ingredients and gently fold until just combined.
  6. Add in the grated carrots, coconut, raisins (or apples), and nuts.
  7. Scoop the batter into the muffin tin, filling each cup about 2/3 full.
  8. Bake for about 20-25 minutes until golden brown and a toothpick comes out clean.
  9. Cool the muffins in the tin for a few minutes, then transfer to a wire rack to cool completely.

Notes

These muffins are best enjoyed warm with a bit of butter or coconut oil and pair nicely with coffee or tea. Variations include using chocolate chips or apples instead of carrots.

Nutrition

  • Serving Size: 1 muffin
  • Calories: 180
  • Sugar: 7g
  • Sodium: 200mg
  • Fat: 7g
  • Saturated Fat: 1g
  • Unsaturated Fat: 5g
  • Trans Fat: 0g
  • Carbohydrates: 27g
  • Fiber: 2g
  • Protein: 3g
  • Cholesterol: 30mg

Keywords: morning glory muffins, breakfast muffins, healthy muffins

Did you make this recipe?

Share a photo and tag us — we can't wait to see what you've made!

June 25, 2026 |

Pumpkin Bread

Homemade pumpkin bread sliced and served on a wooden table

The Ultimate Pumpkin Bread: A Slice of Fall Awesomeness

When the leaves begin to crunch beneath our feet and the air turns crisp with that unmistakable scent of autumn, we all know it’s time for cozy sweaters, pumpkin spice everything, and, of course, the beloved pumpkin bread! This delightful treat captures the essence of the season in every single slice. It’s hearty, moist, and bursting with warm spices that not only fill your home with mouthwatering aromas but also warm your heart. Here at Clean Plate Cravings, we believe that enjoying the flavors of fall doesn’t need to be complicated. So grab your apron, and let’s bake up some magic!

A Journey Back to Grandma’s Kitchen

Growing up, my fondest memories are laced with the smell of spices and pumpkin wafting through my grandmother’s kitchen. Every year, as autumn rolled in, she would set aside time to whip up her famous pumpkin bread. It wasn’t just a recipe; it was a celebration! I remember watching her mix the ingredients together with such care, the way her hands danced through the motions of baking was utterly mesmerizing.

With her signature apron tied snugly around her waist, she would always let me “help” — which really meant standing on a stool next to her, stirring the batter while trying to sneak a taste of the sweet, spiced concoction. The best part? The topping! Sometimes, she’d sprinkle an extra dash of nutmeg, or sneak in some chocolate chips when she thought no one was looking. That was a little secret tradition of ours: the ‘bread with a surprise.’

Now, whenever I make this pumpkin bread, I think of her cheerful spirit, her tender smile, and how she taught me that cooking is all about love and sharing. So let’s carry on that legacy! Here’s how to create your very own pumpkin bread that not only brings comfort but also fills your kitchen with warmth.

Ingredients

Here’s what you’ll need to make this delightful pumpkin bread:

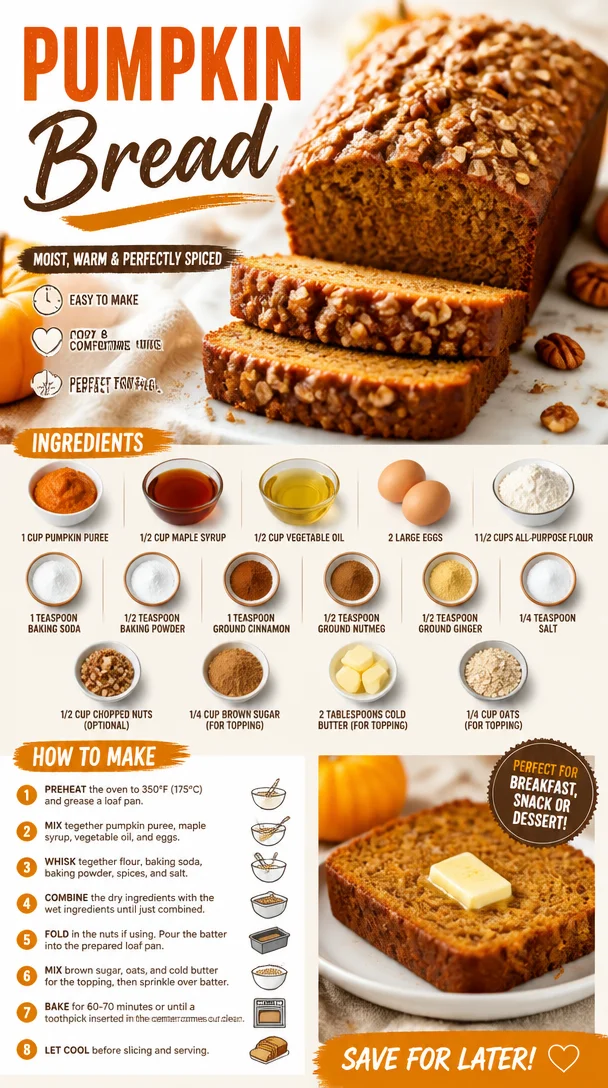
  • 1 cup pumpkin puree
    You can use canned pumpkin puree for convenience, or make your own by roasting a fresh pumpkin. The latter enhances flavor and adds a personal touch!

  • 1/2 cup maple syrup
    This natural sweetener adds a unique depth to the flavor. Honey or agave syrup could be a great substitute.

  • 1/2 cup vegetable oil
    For moistness! You can opt for melted coconut oil if you’re aiming for a tropical twist, though it may alter the flavor slightly.

  • 2 large eggs
    Helps bind the ingredients and adds richness. Flax eggs (1 tablespoon ground flaxseed with 3 tablespoons water per egg) are a good vegan substitute.

  • 1 1/2 cups all-purpose flour
    This is the backbone of your bread. Whole wheat flour works too, but it will yield a denser texture.

  • 1 teaspoon baking soda
    This is your leavening agent. Always make sure it’s fresh for the best rise.

  • 1/2 teaspoon baking powder
    A bit more leavening power!

  • 1 teaspoon ground cinnamon
    The quintessential fall spice that gives your bread that warm hug feeling.

  • 1/2 teaspoon ground nutmeg
    A pinch of this spice enhances the pumpkin flavor beautifully.

  • 1/2 teaspoon ground ginger
    Adds a subtle kick that balances the sweetness.

  • 1/4 teaspoon salt
    Essential for flavor enhancement! Salt can uplift the sweetness, allowing all the flavors to shine.

  • 1/2 cup chopped nuts (optional)
    Walnuts or pecans are perfect here! They add a nice crunch and nutty flavor, but feel free to skip if you prefer.

  • 1/4 cup brown sugar (for topping)
    A little sprinkle on top will give your loaf a deliciously sweet crust.

  • 2 tablespoons cold butter (for topping)
    This helps create a lovely crumble when mixed with the brown sugar.

  • 1/4 cup oats (for topping)
    For added texture, these oats will crisp up beautifully in the oven.

Step-by-Step Instructions

Ready to create some pumpkin perfection? Let’s dive into the kitchen!

  1. Preheat Your Oven
    Preheat your oven to 350°F (175°C). This step is crucial to ensure your pumpkin bread bakes evenly.

  2. Mix the Wet Ingredients
    In a large mixing bowl, combine 1 cup of pumpkin puree, 1/2 cup of maple syrup, and 1/2 cup of vegetable oil. Carefully crack the two large eggs into the bowl, and whisk everything together until you have a gorgeous, smooth mixture. Tip: Use a rubber spatula to scrape the sides to ensure nothing is left behind!

  3. Combine the Dry Ingredients
    In another bowl, whisk together 1 1/2 cups of all-purpose flour, 1 teaspoon of baking soda, 1/2 teaspoon of baking powder, 1 teaspoon of ground cinnamon, 1/2 teaspoon of ground nutmeg, 1/2 teaspoon of ground ginger, and 1/4 teaspoon of salt. Mixing the dry ingredients separately first helps distribute the leavening agents evenly.

  4. Combine Wet and Dry Mixtures
    Gently fold the dry ingredients into the wet mixture. Be careful not to overmix—this can lead to dense bread. Just mix until everything is combined, and a few lumps are okay! Chef Hack: Turn your spoon on its side while mixing; this keeps air in the batter and helps your bread rise!

  5. Toss in the Nuts
    If you’re adding chopped nuts, add them now and give a gentle fold to incorporate. Chef Insight: Toasting the nuts beforehand will intensify their flavor, just be sure to let them cool before adding.

  6. Prepare the Topping
    In a small bowl, combine 1/4 cup of brown sugar, 2 tablespoons of cold butter (cut into small cubes), and 1/4 cup of oats. Use your fingertips to mix until it resembles coarse crumbs.

  7. Pour the Batter into the Pan
    Grease a loaf pan (9×5 inches) or line it with parchment paper for easy removal. Pour the batter in, smoothing the top with a spatula.

  8. Sprinkle the Topping
    Spread the topping mixture evenly over the batter. This will create a delightful crunchy finish!

  9. Bake
    Place the loaf pan into the preheated oven and bake for 50-60 minutes, or until a toothpick inserted in the center comes out clean. Chef Trick: If the top browns too quickly, you can tent it with aluminum foil during the last 15 minutes.

  10. Cool and Enjoy
    Once baked to perfection, remove from the oven and let it cool in the pan for about 10 minutes. Then transfer to a wire rack to cool completely. Slice it up, and you’re ready to enjoy!

Serving Suggestions

Slice your pumpkin bread and serve it warm or at room temperature. It’s fantastic on its own but also works beautifully with a dollop of whipped cream, a smear of butter, or even a drizzle of cream cheese frosting for an extra festive touch. Pair it with a hot cup of coffee or tea for the ultimate cozy experience!

Recipe Variations

  1. Chocolate Chip Pumpkin Bread: Add 1/2 cup of semi-sweet chocolate chips to the batter for a delicious twist.
  2. Pumpkin Spice Latte Bread: Mix in 1 tablespoon of instant coffee granules for a caffeinated kick.
  3. Nut-Free Version: Simply omit the nuts for a smooth, kid-friendly treat.
  4. Gluten-Free Option: Substitute the all-purpose flour with a 1:1 gluten-free baking blend.
  5. Add Sweet Dried Fruits: Consider folding in a handful of raisins or dried cranberries for added sweetness and texture.

Chef’s Notes

Baking this pumpkin bread always brings a smile to my face. It’s funny how the simplest recipes work out to be the most soothing and comforting. Over the years, I’ve experimented with different spices and toppings, tailoring it to fit delicious surprises. Now, every time I pull a loaf from the oven, it reminds me of being a kid in my grandma’s kitchen, eagerly waiting for that first taste. Each slice is indeed a memory wrapped in flavor, always encouraging me to make new ones along the way.

FAQs and Troubleshooting

  1. My pumpkin bread is dense; what did I do wrong?
    This can happen if the batter is overmixed, leading to a tough loaf. Mix until combined, but don’t be afraid of a few lumps!

  2. Why did my bread sink in the middle?
    This can occur if the eggs weren’t properly beaten or the oven temperature was too low. Make sure both are up to par!

  3. How should I store leftover pumpkin bread?
    Wrap it tightly in plastic wrap or store it in an airtight container at room temperature for up to 5 days. It also freezes beautifully for up to 3 months!

  4. Can I use fresh pumpkin?
    Absolutely! Just make sure to roast it and puree it until smooth before adding it to the batter.

Nutritional Info

Although pumpkin bread is a treat, it packs some nutritional punch! Each slice provides fiber, vitamins, and that sweet comfort we all crave during the chilly months. Enjoy it mindfully, savoring every bite!


Pumpkin bread is more than food; it’s a seasonal tradition that invites us to embrace autumn’s warmth and generosity. So whip out that mixing bowl, channel your inner baker, and bake up a loaf that will create your own seasonal memories—one delicious slice at a time!

Print

The Ultimate Pumpkin Bread

A delightful pumpkin bread that captures the essence of fall with warm spices and a cozy aroma.

  • Prep Time: 15 minutes
  • Cook Time: 60 minutes
  • Total Time: 75 minutes
  • Yield: 12 servings 1x
  • Category: Dessert
  • Method: Baking
  • Cuisine: American
  • Diet: Vegetarian

Ingredients

Scale
  • 1 cup pumpkin puree
  • 1/2 cup maple syrup
  • 1/2 cup vegetable oil
  • 2 large eggs
  • 1 1/2 cups all-purpose flour
  • 1 teaspoon baking soda
  • 1/2 teaspoon baking powder
  • 1 teaspoon ground cinnamon
  • 1/2 teaspoon ground nutmeg
  • 1/2 teaspoon ground ginger
  • 1/4 teaspoon salt
  • 1/2 cup chopped nuts (optional)
  • 1/4 cup brown sugar (for topping)
  • 2 tablespoons cold butter (for topping)
  • 1/4 cup oats (for topping)

Instructions

  1. Preheat your oven to 350°F (175°C).
  2. Mix the wet ingredients: combine pumpkin puree, maple syrup, vegetable oil, and eggs in a bowl.
  3. Combine the dry ingredients in another bowl: flour, baking soda, baking powder, cinnamon, nutmeg, ginger, and salt.
  4. Combine the wet and dry mixtures, mixing gently until just combined.
  5. Toss in the chopped nuts if using and fold gently.
  6. Prepare the topping by mixing brown sugar, cold butter, and oats until crumbly.
  7. Pour the batter into a greased loaf pan.
  8. Sprinkle the topping evenly over the batter.
  9. Bake for 50-60 minutes or until a toothpick comes out clean.
  10. Cool for 10 minutes in the pan, then transfer to a wire rack.
  11. Enjoy with butter or whipped cream if desired.

Notes

For variations, consider adding chocolate chips, instant coffee, or dried fruits. For gluten-free, replace flour with a gluten-free blend.

Nutrition

  • Serving Size: 1 slice
  • Calories: 200
  • Sugar: 12g
  • Sodium: 150mg
  • Fat: 8g
  • Saturated Fat: 1g
  • Unsaturated Fat: 6g
  • Trans Fat: 0g
  • Carbohydrates: 30g
  • Fiber: 2g
  • Protein: 3g
  • Cholesterol: 40mg

Keywords: pumpkin bread, fall recipes, baking, cozy dessert

Did you make this recipe?

Share a photo and tag us — we can't wait to see what you've made!

June 25, 2026 |

Fall Apple Cider Cheesecake Cookies: Easy Stuffed Recipe

Delicious fall apple cider cheesecake cookies with a creamy filling

Cheesecake-Stuffed Apple Cider Cookies: A Fall Treat to Remember

Welcome to Clean Plate Cravings! I’m so thrilled to share a recipe with you today that brings a wave of nostalgia and comfort all at once. Picture this: the crisp autumn air, leaves crunching beneath your feet, and the rich aroma of apple cider wafting through the house. These feelings all come rushing back when I think about my Cheesecake-Stuffed Apple Cider Cookies—the ultimate seasonal treat that combines two of my favorite flavors.

Sure, cookies are always a good idea, but add in the flavors of spiced apple cider and creamy cheesecake, and you’ve got a dessert that stands out from the rest. When I bake these cookies, it feels like a hug in cookie form, perfect for sharing (or indulging in all by yourself, no judgment here!).

There’s something wonderfully cozy about this time of year, don’t you think? It makes every bite feel like falling into a soft, warm blanket. Plus, this recipe is easy enough to whip up on a busy fall afternoon, perfect for after school snacks, cozy gatherings, or simply to remind yourself that you deserve something delicious. So grab your apron, and let’s dive into the world of flavors that could make every day feel like autumn!

A Sweet Memory

Every recipe holds a memory, and these Cheesecake-Stuffed Apple Cider Cookies are no exception. Growing up, my grandmother had this tradition of baking right at the start of autumn. The kitchen would be filled with laughter, and the smell of cinnamon and apples danced through the air. I distinctly remember one year when my grandma decided to experiment with a cookie recipe. She had a stash of creamy cheesecake filling left from an earlier dessert and thought, “Why not?” It was an idea that changed our cookie game forever!

As we pulled those cookies out of the oven, the blend of sweet and tart, warm and gooey, was nothing short of magical. I remember sinking my teeth into the soft cookie, surprised by the luscious cheesecake oozing out, and thinking, “This is pure bliss!” Now, I carry that joy forward, recreating and refining that recipe while keeping our family traditions alive. And today, we get to share that same bliss together.

Ingredients

Here’s what you’ll need to whip up these tantalizing cookies:

  • 2 cups all-purpose flour
    This is your cookie base! Look for a good quality flour; it helps maintain the perfect structure while keeping the cookies soft. You can substitute with a 1:1 gluten-free flour blend if you need to go gluten-free.

  • 1/2 cup apple cider
    The star of the show! Apple cider infuses the cookies with a spicy, sweet flavor. If you can’t find apple cider, try using fresh apple juice for a similar taste.

  • 1/2 cup granulated sugar
    Standard sugar adds sweetness and a lovely texture to our cookies. If you’d like, you could swap in coconut sugar for a deeper caramel note.

  • 1/2 cup brown sugar
    Brown sugar adds moisture and enhances the depth of flavor. You can use light or dark brown sugar based on your preference. For the closest substitute, mix white sugar with a little molasses.

  • 1/2 cup unsalted butter, softened
    The fat in the butter creates that rich, melt-in-your-mouth texture. If you’re dairy-free, coconut oil works surprisingly well.

  • 1 large egg
    Eggs help bind the ingredients together and keep our cookies moist. For a vegan option, replace it with a flax egg (1 tbsp flaxseed meal mixed with 2.5 tbsp water).

  • 1 tsp vanilla extract
    Pure vanilla extract adds a lovely flavor. Feel free to switch it up with almond extract if you’re looking for a twist!

  • 1 tsp baking soda
    A leavening agent that helps the cookies rise. Make sure it’s fresh for best results.

  • 1/2 tsp baking powder
    Another boost to help our cookies rise. Like baking soda, check the expiration date!

  • 1/2 tsp salt
    A crucial component that enhances sweetness and balances flavors.

  • 1 tsp ground cinnamon
    This will add warmth and spice that’s perfect for fall. You can also try pumpkin spice or apple pie spice for a delightful variation.

  • 1/2 cup cream cheese, softened
    The creamy filling that takes these cookies over the top! For a lighter alternative, use Neufchâtel cheese or a vegan cream cheese version.

  • 1/4 cup powdered sugar
    This will sweeten the cream cheese filling to perfection. You can omit the sugar for a less sweet filling or use a powdered sugar substitute.

  • 1/2 tsp vanilla extract (for filling)
    Just like above, this brings out the flavor in our cream cheese filling; you really can’t go wrong with more vanilla!

Step-by-Step Instructions

Ready to get started? Let’s make some magic happen in the kitchen!

  1. Preheat your oven: First things first, preheat your oven to 350°F (175°C). This is crucial for getting those cookies nice and fluffy!

  2. Mix the dry ingredients: In a medium bowl, whisk together the all-purpose flour, baking soda, baking powder, salt, and ground cinnamon. The aroma of cinnamon will immediately transport you to a cozy autumn afternoon. Set it aside for now.

  3. Cream the butter and sugars: In a large mixing bowl, cream together the softened butter, granulated sugar, and brown sugar using an electric mixer. Mix on medium speed until the mixture is light and fluffy, about 3-4 minutes. This step is key for aeration, which helps your cookies rise beautifully.

  4. Add the egg and vanilla: Now, add in the large egg and vanilla extract to the creamed butter and sugars. Mix until just incorporated. The batter will start to look creamy and luscious!

  5. Incorporate the dry ingredients: Gradually add the flour mixture to the wet ingredients, mixing just until combined. Overmixing can lead to tough cookies—so remember to keep it gentle. The dough should be soft but manageable.

  6. Stir in the apple cider: Pour in the apple cider and mix until it’s fully incorporated. At this point, your kitchen should smell heavenly.

  7. Prepare the filling: In a separate bowl, combine the softened cream cheese, powdered sugar, and vanilla extract for the filling. Mix until smooth and creamy. You could even give it a quick taste—it’s like cheesecake dip!

  8. Scoop the dough: Line a baking sheet with parchment paper, and using a cookie scoop, drop about 2 tablespoons of dough onto the prepared sheet.

  9. Add the filling: With your fingers, make a small indentation in the center of each dough ball. Place about a teaspoon of the cream cheese filling in the center. Then, scoop another tablespoon of cookie dough on top, sealing the filling inside. This is where the magic happens!

  10. Bake: Bake in your preheated oven for about 12-15 minutes, or until the edges are golden brown. Keep an eye on them—the smell will remind you to check sooner than later!

  11. Cool and devour: Once baked, allow the cookies to cool on the baking sheet for a few minutes before transferring them to a wire rack. Try not to devour them immediately (but I won’t blame you if you do!).

Serving Suggestions

Once your Cheesecake-Stuffed Apple Cider Cookies have cooled, it’s time to present these delightful treats! Arrange them on a beautiful serving platter, perhaps alongside a small bowl of caramel sauce drizzled over the top for that extra touch. Pair it with warm apple cider or even a scoop of vanilla bean ice cream for a delicious dessert that’s sure to impress!

Recipe Variations

Let’s get creative! Here are some fun variations to try:

  • Add nuts: For a bit of crunch, consider incorporating finely chopped walnuts or pecans into the cookie dough.

  • Chocolate chips: Toss in some mini chocolate chips into the mix for an extra touch of decadence, creating a flavor combination you won’t forget.

  • Pumpkin Spice: In place of cinnamon, add pumpkin spice to the cookie dough for a seasonal twist that’s perfect for fall.

  • Gluten-Free: Use a gluten-free flour blend that measures cup-for-cup as a substitute for the all-purpose flour.

  • Dairy-Free: Replace the butter with coconut oil and use a dairy-free cream cheese alternative for a completely dairy-free version.

Chef’s Notes

As with every recipe, this one has evolved in my kitchen over the years. Originally inspired by my grandma’s simple cookies, I’ve tried numerous fillings and spices to find that perfect balance. The balance of sweet cream cheese and the warm spices of autumn is what makes these cookies shine!

For a funny kitchen story: the first time I attempted these cookies, I got so caught up on introducing my own twists that I accidentally put double the amount of baking soda. Let’s just say they turned into fluffy little biscuits rather than cookies! But in that moment, I learned that every mishap is an opportunity to learn and adapt—so embrace the journey!

FAQs and Troubleshooting

  1. Why are my cookies flat?
    If your cookies are spreading out too much, check that your butter wasn’t too warm. It should be softened, not melted. Also, check the freshness of your baking soda and baking powder. If they’re past their expiration dates, they won’t help your cookies rise.

  2. Can I make the dough ahead of time?
    Absolutely! You can prepare the cookie dough ahead of time and keep it chilled in the refrigerator for 1-2 days. Just remember, freshly baked cookies are always the best!

  3. What can I use instead of apple cider?
    If apple cider isn’t available, fresh apple juice works well, but make sure it’s slightly unsweetened to keep the flavor balanced.

  4. How do I store leftover cookies?
    Store your cookies in an airtight container at room temperature for up to a week, or refrigerate them for a longer shelf life. Just remember to let them warm up a bit before indulging!

Nutritional Info

These cookies are a bit indulgent with the cream cheese filling, but remember that everything is best in moderation! While I don’t have exact nutritional values at this moment, one cookie will surely provide a delightful balance of sweetness and flavor that you’ll savor!

Now, armed with all this knowledge and a little love, you’re all set to create your very own Cheesecake-Stuffed Apple Cider Cookies! Enjoy every bite and every moment in the kitchen because that’s what it’s all about—bringing people together over fresh, delicious food. Happy baking, my fellow foodies! 🍏🍪

Print

Cheesecake-Stuffed Apple Cider Cookies

Delightful cookies filled with creamy cheesecake and infused with spiced apple cider, perfect for fall.

  • Prep Time: 15 minutes
  • Cook Time: 15 minutes
  • Total Time: 30 minutes
  • Yield: 24 cookies 1x
  • Category: Dessert
  • Method: Baking
  • Cuisine: American
  • Diet: Vegetarian

Ingredients

Scale
  • 2 cups all-purpose flour
  • 1/2 cup apple cider
  • 1/2 cup granulated sugar
  • 1/2 cup brown sugar
  • 1/2 cup unsalted butter, softened
  • 1 large egg
  • 1 tsp vanilla extract
  • 1 tsp baking soda
  • 1/2 tsp baking powder
  • 1/2 tsp salt
  • 1 tsp ground cinnamon
  • 1/2 cup cream cheese, softened
  • 1/4 cup powdered sugar
  • 1/2 tsp vanilla extract (for filling)

Instructions

  1. Preheat your oven: First things first, preheat your oven to 350°F (175°C).
  2. Mix the dry ingredients: In a medium bowl, whisk together the all-purpose flour, baking soda, baking powder, salt, and ground cinnamon.
  3. Cream the butter and sugars: In a large mixing bowl, cream together the softened butter, granulated sugar, and brown sugar using an electric mixer.
  4. Add the egg and vanilla: Now, add in the large egg and vanilla extract to the creamed butter and sugars.
  5. Incorporate the dry ingredients: Gradually add the flour mixture to the wet ingredients, mixing just until combined.
  6. Stir in the apple cider: Pour in the apple cider and mix until it’s fully incorporated.
  7. Prepare the filling: In a separate bowl, combine the softened cream cheese, powdered sugar, and vanilla extract for the filling.
  8. Scoop the dough: Line a baking sheet with parchment paper, and using a cookie scoop, drop about 2 tablespoons of dough onto the prepared sheet.
  9. Add the filling: With your fingers, make a small indentation in the center of each dough ball, place about a teaspoon of the cream cheese filling in the center.
  10. Bake: Bake in your preheated oven for about 12-15 minutes, or until the edges are golden brown.
  11. Cool and devour: Once baked, allow the cookies to cool on the baking sheet for a few minutes before transferring them to a wire rack.

Notes

These cookies can be stored in an airtight container at room temperature for up to a week.

Nutrition

  • Serving Size: 1 cookie
  • Calories: 180
  • Sugar: 11g
  • Sodium: 150mg
  • Fat: 6g
  • Saturated Fat: 4g
  • Unsaturated Fat: 2g
  • Trans Fat: 0g
  • Carbohydrates: 26g
  • Fiber: 0g
  • Protein: 2g
  • Cholesterol: 30mg

Keywords: cookies, fall dessert, cheesecake, apple cider, baking

Did you make this recipe?

Share a photo and tag us — we can't wait to see what you've made!

June 25, 2026 |

Meyer Lemon Blueberry Muffins: 30-Minute One-Bowl Recipe

Freshly baked Meyer Lemon Blueberry Muffins on a kitchen counter

Meyer Lemon Blueberry Muffins: A Fresh Take on a Classic Treat

When it comes to the perfect breakfast or snack, muffins always hold a special place in my heart—and on my kitchen counter. They’re inviting, portable, and endlessly customizable. Today, I’m excited to share my take on the classic blueberry muffin with a bright, zesty twist: Meyer Lemon Blueberry Muffins! These tender, fluffy delights are packed with juicy blueberries and a punch of citrus flavor that will brighten your morning.

The beauty of these muffins lies in their simplicity. They require just a handful of wholesome ingredients and minimal prep, making them a go-to recipe for busy mornings or lazy brunches. Plus, they smell absolutely divine as they bake, filling your kitchen with a warm, inviting aroma that makes you feel right at home. So, grab your apron, and let’s bake something incredible together!

A Slice of Nostalgia

I’ll never forget the summer of my high school graduation. My best friend and I took a road trip up the coast to visit a charming little seaside town. Early one morning, we stumbled upon a local café known for its baked goods. As we sat down with our coffees, the friendly barista set down a plate of freshly baked blueberry muffins with a sprinkle of lemon zest on top. One bite was all it took—I was hooked! The sweet, tart explosion of flavor left me dreaming of my own kitchen and new muffin recipes I could create.

Years later, with the indulgence of that café experience still fresh in my memory, I decided to develop my own version. By pairing blueberries with the unique sweetness of Meyer lemons, I captured that perfect summer moment in a muffin. Sharing this recipe with you feels like sharing a warm hug from a friend, inviting you to create your own beautiful breakfast memories!

Ingredients

Here’s what you’ll need to whip up these Meyer Lemon Blueberry Muffins, along with some tips and tricks for each ingredient:

  • 1 ½ cups all-purpose flour
    The base of any good muffin. For a healthier twist, consider using whole wheat flour or a gluten-free blend. Just be aware that altering the flour can change the texture slightly.

  • ½ cup granulated sugar
    This will give your muffins a touch of sweetness. For a lower-calorie option, try coconut sugar or a sugar substitute, but keep in mind that the baking time may vary.

  • 2 tsp baking powder
    This ingredient helps your muffins rise and become fluffy. Make sure your baking powder is fresh; old powder means flat muffins!

  • ½ tsp baking soda
    This adds extra lift and reacts with the acidity of the lemon juice. If you don’t have baking soda on hand, you can omit it, but your muffins may not be as fluffy.

  • ½ tsp salt
    Salt enhances the flavor of your muffins and balances the sweetness.

  • 1 large egg
    The binding agent that helps hold everything together. If you’re vegan, replace the egg with a flaxseed egg (1 tbsp flaxseed meal + 2.5 tbsp water) or unsweetened applesauce.

  • ½ cup milk
    This provides moisture but can easily be swapped for almond milk or oat milk if you seek a dairy-free option.

  • ¼ cup unsalted butter, melted
    For richness and flavor. Coconut oil or vegetable oil can be substitutes; just note that coconut oil may impart a slight flavor.

  • Zest of 1 Meyer lemon
    The zesty star of our recipe! Meyer lemons are sweeter and less acidic than regular lemons, but if you can’t find them, you can use regular lemon zest as a substitute. Just be aware that it will have a more tangy flavor.

  • 2 tbsp fresh Meyer lemon juice
    This liquid gold brings brightness to the muffins. Make sure to juice it directly before adding for the freshest taste!

  • 1 cup fresh blueberries
    These little gems are loaded with antioxidants and sweetness! Feel free to use frozen blueberries, but make sure to thaw and drain them first to avoid excess moisture.

Step-by-Step Instructions

Get ready to smear a bit of butter on your creations—let’s jump into the cooking process!

1. Preheat Your Oven

Start by preheating your oven to 375°F (190°C). Preheating is super important because it helps the muffins rise uniformly. While that’s warming up, line a 12-cup muffin tin with paper liners or lightly grease it with cooking spray.

2. Mix the Dry Ingredients

In a large mixing bowl, combine the all-purpose flour, granulated sugar, baking powder, baking soda, and salt. Whisking these together ensures that the baking powder and soda disperse evenly throughout the flour—bye-bye, lumpy muffins! You want a smooth, fluffy consistency for the best results.

3. Combine the Wet Ingredients

In another bowl, whisk together the egg, milk, melted butter, Meyer lemon zest, and lemon juice until everything is well combined. The melted butter can cool a bit during this step, which prevents cooking the egg when they combine.

Chef Tip: You could use a fork for a quick whisk, but a whisk will aerate the mixture even better, giving your muffins that fluffy texture.

4. Combine Wet and Dry Mixtures

Now, gently pour the wet mixture into the dry ingredients. This part is where the magic happens! Use a spatula or wooden spoon to gently fold them together until just combined—don’t overmix! A few lumps are okay. We’ll add the blueberries next, so it’s important not to mix too much here to avoid tough muffins.

5. Fold in Those Blueberries

Next, carefully fold in the blueberries, ensuring they’re evenly distributed throughout the batter. Pro tip: Toss your blueberries in a little flour before adding them to the batter. This will help keep them suspended in the muffins and prevent them from sinking to the bottom.

6. Scoop and Bake

Using an ice cream scoop or a ¼-cup measuring cup, evenly distribute the muffin batter among the prepared muffin cups, filling each about ¾ full. This allows room for them to rise! Bake in your preheated oven for 18-20 minutes or until a toothpick inserted in the center comes out clean.

Chef Hack: Rotate your muffin tin halfway through baking for even cooking, especially if your oven has hot spots.

7. Cool and Serve

Once baked to perfection, remove the muffins from the oven and let them cool in the tin for about 5 minutes. Then transfer them to a wire rack. This cooling process allows the moisture to escape, keeping your muffins tender rather than soggy.

Serving Suggestions

For the ultimate enjoyment, serve your Meyer Lemon Blueberry Muffins warm, optionally with a pat of butter or a drizzle of honey for that extra indulgence. They’re also fabulous with a cup of coffee or your favorite herbal tea.

Recipe Variations

Want to switch things up? Try these fun variations:

  • Add a Crunch: Mix in some chopped nuts like walnuts or pecans for added texture and flavor.
  • Banana Blueberry Twist: Replace some of the butter with mashed banana for a moist and sweet twist.
  • Cinnamon Sugar Crust: Sprinkle a mix of sugar and cinnamon on top before baking for a sweet and crunchy crust.
  • Coconut Flare: Add shredded coconut for a tropical vibe that pairs beautifully with the lemon and berries.
  • Vegan Delight: Substitute all dairy with plant-based alternatives (milk, butter, and egg) for a totally vegan muffin experience!

Chef’s Notes

These Meyer Lemon Blueberry Muffins hold a special spot in my heart—like an old friend you haven’t seen in a while but immediately reconnect with! They evolved from my initial trial-and-error baking sessions into this simple yet delightful recipe that’s great for any occasion. The burst of lemony goodness paired with blueberries adds a spring-like freshness that feels like sunshine in every bite. Remember, baking is all about experimenting—so feel free to play with flavors and find your perfect combination!

FAQs and Troubleshooting

  1. Why Are My Muffins Dense?
    If you overmix the batter, you’ll end up with a tough texture. Remember to mix just until combined!

  2. My Muffins Are Too Sweet; What Did I Do Wrong?
    If you find them too sweet, it could be due to the sugar or the sweetness of the blueberries. You can cut down the sugar by a few tablespoons next time or increase the lemon juice for a better balance.

  3. How Do I Prevent Blueberries from Sinking?
    Toss them in a little flour before folding them into the batter. This will help suspend them throughout the muffin for an even distribution.

  4. Can I Freeze These Muffins?
    Absolutely! Cool completely, then store them in an airtight container or zip-top bag in the freezer. They’ll be good for up to 3 months. Just reheat in the microwave or toaster oven when you’re ready to enjoy!

Now that you’ve got the recipe and the tips, it’s time to take on the kitchen and whip up these delicious Meyer Lemon Blueberry Muffins! Let the inviting aroma fill your home and enjoy each mouthful of bright, lemony goodness. Happy baking, foodies!

Print

Meyer Lemon Blueberry Muffins

Tender, fluffy muffins filled with juicy blueberries and zesty Meyer lemon for a delightful breakfast treat.

  • Prep Time: 15 minutes
  • Cook Time: 20 minutes
  • Total Time: 35 minutes
  • Yield: 12 muffins 1x
  • Category: Breakfast
  • Method: Baking
  • Cuisine: American
  • Diet: Vegetarian

Ingredients

Scale
  • 1 ½ cups all-purpose flour
  • ½ cup granulated sugar
  • 2 tsp baking powder
  • ½ tsp baking soda
  • ½ tsp salt
  • 1 large egg
  • ½ cup milk
  • ¼ cup unsalted butter, melted
  • Zest of 1 Meyer lemon
  • 2 tbsp fresh Meyer lemon juice
  • 1 cup fresh blueberries

Instructions

  1. Preheat your oven to 375°F (190°C) and line a muffin tin with paper liners.
  2. Mix together the all-purpose flour, granulated sugar, baking powder, baking soda, and salt in a large bowl.
  3. Combine the egg, milk, melted butter, Meyer lemon zest, and lemon juice in another bowl.
  4. Pour the wet mixture into the dry ingredients and gently fold together until just combined.
  5. Fold in the blueberries, ensuring they are evenly distributed.
  6. Scoop the batter into the muffin cups, filling each about ¾ full.
  7. Bake for 18-20 minutes or until a toothpick inserted in the center comes out clean.
  8. Cool in the tin for 5 minutes before transferring to a wire rack.

Notes

For added texture, try mixing in some chopped nuts or coconut. These muffins can be frozen for up to 3 months.

Nutrition

  • Serving Size: 1 muffin
  • Calories: 250
  • Sugar: 10g
  • Sodium: 250mg
  • Fat: 9g
  • Saturated Fat: 5g
  • Unsaturated Fat: 4g
  • Trans Fat: 0g
  • Carbohydrates: 36g
  • Fiber: 1g
  • Protein: 4g
  • Cholesterol: 40mg

Keywords: muffins, blueberry, lemon, breakfast, dessert

Did you make this recipe?

Share a photo and tag us — we can't wait to see what you've made!

June 25, 2026 |

Minute Creamy Pumpkin Gnocchi with Sage and Parmesan

Delicious creamy pumpkin gnocchi topped with sage and Parmesan cheese

Easy Pumpkin Gnocchi: A Cozy Journey Through Fall Flavors

Welcome to my kitchen, dear foodie friends! Today, we’re diving into a dish that truly embodies the spirit of fall: Easy Pumpkin Gnocchi. Imagine soft, pillowy bites of goodness, infused with the warmth of pumpkin and sage, served with a drizzle of melted butter that will make your taste buds do a little happy dance. Gnocchi might sound fancy, but believe me, it’s one of those dishes that’s as easy as pie—err, gnocchi!

Before we roll up our sleeves and get to cooking, let me share a little of the magic behind this dish. Growing up, autumn meant two things in my household: the leaves turning vibrant shades of orange and, of course, pumpkin everything! My mom would whisk up a roaring batch of pumpkin soup that would simmer gently on the stove, filling our home with hints of cinnamon and nutmeg. One day, inspired by our love for that creamy soup, I decided to turn those flavors into gnocchi. And let me tell you, the kitchen turned into a delightful battleground of flour, laughter, and, maybe just a little bit of pure pumpkin mayhem!

Fast forward a few years, and here I am sharing this same love for gnocchi with you! Each time I make this dish, it takes me back to those cozy fall afternoons spent in my mom’s kitchen. So grab your apron, and let’s create some delicious memories together!

Ingredients

  • 2 ⅔ cups pumpkin (cubed)
    Pumpkin is rich in vitamins and gives that sweet, earthy flavor. Use fresh pumpkin for a more vibrant taste, or canned pumpkin if you’re in a pinch. Just skip the pumpkin pie filling, as you want pure pumpkin!

  • ⅔ cup starchy potato (cubed)
    Starchy potatoes like Russets or Yukon Golds are key to achieving the perfect texture. They create that fantastic soft feel in each gnocchi. If you’re in need of a substitute, you can use sweet potatoes for an extra twist of sweetness.

  • ½ tsp salt
    Salt is essential for enhancing flavors. If you’re cutting back, feel free to reduce this to suit your dietary needs, but I recommend keeping a pinch for flavor!

  • ¾ cup flour
    All-purpose flour is your go-to for gnocchi. If you’re looking for gluten-free options, try using a gluten-free flour blend, but be aware it may alter the texture slightly.

  • 2 tbsp vegan butter
    This will add richness and a buttery flavor to the dish. You could use any olive oil or other plant-based butter if you prefer.

  • 2 tsp sage (densely packed)
    Sage brings a beautiful aroma and flavor that pairs wonderfully with pumpkin. Fresh is best, but dried sage will work too—just go for about 1 tsp if that’s what you have on hand.

Step-by-Step Instructions

  1. Prepare the Pumpkin and Potato:
    Start by peeling and cubing your pumpkin and potato. If you’re using fresh pumpkin, roast or steam them until tender. Steaming will retain more nutrients. If using canned pumpkin, just measure it out—easy peasy!

  2. Mash The Vegetables:
    Once cooked, mash the pumpkin and potato together in a large bowl until smooth. You want a creamy texture here. A potato masher works perfectly, but you can also use a fork or a food processor for an extra-smooth consistency.

  3. Mix with Flour and Salt:
    Gradually add the flour and salt to your mashed mixture. Use a fork to combine, then knead gently by hand. Go for a soft dough—if it’s too sticky, add a bit more flour, but avoid over-kneading (we want tender gnocchi, not tough!).

  4. Shape the Gnocchi:
    Dust your work surface with flour and divide the dough into four portions. Roll each piece into a long rope about ½-inch thick. Cut into 1-inch pieces; this is your gnocchi! For a fun twist, you can press each piece down lightly with a fork to create ridges.

  5. Cook the Gnocchi:
    Bring a large pot of salted water to a gentle boil. Once boiling, drop the gnocchi in batches. They’re done when they float to the surface, which takes about 2–3 minutes. Scoop them out with a slotted spoon, and let them love in a colander while you finish.

  6. Prepare the Butter Sauce:
    In a skillet, melt the vegan butter over medium heat. Add in your fresh or dried sage, cooking until fragrant. This is where the magic happens! Toss your gnocchi gently in the sauce to coat.

Serving Suggestions

Serve your pumpkin gnocchi hot, garnished with a sprinkle of fresh sage or a dusting of nutritional yeast for a cheesy flavor. A side salad with an apple vinaigrette complements the warmth of the gnocchi beautifully. Don’t forget to pour yourself a warm mug of cider to sip while you dig in!

Recipe Variations

  • Nutty Sage Gnocchi: Add a sprinkle of walnuts or pine nuts over the top for a delightful crunch.

  • Creamy Vegan Alfredo: For a richer sauce, try tossing your gnocchi in a creamy vegan alfredo made from soaked cashews!

  • Spicy Kick: For those who love a bit of heat, sprinkle some red pepper flakes into the butter sauce for a fiery twist.

  • Herb-Infused: Swap sage for fresh thyme or basil for a different flavor profile every time.

  • Cheesy Delight: For a cheesy variation, incorporate vegan cheese into the dough before cooking!

Chef’s Notes

This recipe has evolved over time, initially inspired by my childhood favorites—often with some experimentation along the way. There was a time when I added way too much flour, and the gnocchi ended up as little doughy rocks! Learn from my mistakes, folks: the key is a balance between moisture and flour. Trust your instincts, and don’t stress about perfection! Cooking should be fun and filled with moments that let your personality shine through.

FAQs and Troubleshooting

  • What if my dough is too sticky?
    Don’t panic! Simply dust with a bit more flour while kneading until it becomes manageable.

  • Can I freeze the gnocchi?
    Absolutely! Lay them in a single layer on a baking sheet until frozen, then transfer them to a bag. They can be cooked straight from frozen; just add a few extra minutes in the water.

  • Why did my gnocchi fall apart in the water?
    This can happen if the dough was too wet or if it wasn’t properly formed. Make sure you’re careful with water content and gently handle the gnocchi to keep them intact!

  • How do I know if my gnocchi is done cooking?
    Look for them to float to the top—this is your cue they’re cooked through! A taste test is ideal; they should be light and fluffy.

Nutritional Info

While caloric values can vary, this dish is packed with good nutrients! Pumpkin is rich in vitamins A and C, while potatoes provide healthy carbohydrates. The overall dish is low in fat (especially when using vegan butter) and can be enriched with nutritional yeast!


Thank you for joining me in the kitchen today! I hope this Easy Pumpkin Gnocchi recipe inspires you to embrace the fall flavors that are abundant right now. Remember, cooking is about creating joyful moments—add your own flair and enjoy every delicious bite. Happy cooking, friends!

Print

Easy Pumpkin Gnocchi

A cozy dish that embodies fall flavors with soft pumpkin and sage-infused gnocchi, served with a drizzle of melted vegan butter.

  • Prep Time: 15 minutes
  • Cook Time: 30 minutes
  • Total Time: 45 minutes
  • Yield: 4 servings 1x
  • Category: Main Course
  • Method: Boiling
  • Cuisine: Italian
  • Diet: Vegan

Ingredients

Scale
  • 2 ⅔ cups pumpkin (cubed)
  • ⅔ cup starchy potato (cubed)
  • ½ tsp salt
  • ¾ cup flour
  • 2 tbsp vegan butter
  • 2 tsp sage (densely packed)

Instructions

  1. Prepare the pumpkin and potato by peeling and cubing them. Roast or steam until tender or use canned pumpkin.
  2. Mash the pumpkin and potato together in a large bowl until smooth.
  3. Mix the flour and salt into the mashed mixture, kneading gently by hand to form a soft dough.
  4. Shape the dough into four ropes, cut into 1-inch pieces for gnocchi.
  5. Cook the gnocchi in boiling salted water until they float to the surface.
  6. Prepare the butter sauce by melting vegan butter in a skillet, adding sage and tossing the cooked gnocchi to coat.

Notes

For a richer sauce, try tossing your gnocchi in a creamy vegan alfredo made from soaked cashews. You can also freeze the gnocchi for later use.

Nutrition

  • Serving Size: 1 serving
  • Calories: 350
  • Sugar: 5g
  • Sodium: 400mg
  • Fat: 12g
  • Saturated Fat: 4g
  • Unsaturated Fat: 6g
  • Trans Fat: 0g
  • Carbohydrates: 45g
  • Fiber: 3g
  • Protein: 15g
  • Cholesterol: 0mg

Keywords: pumpkin, gnocchi, vegan, fall flavors, easy recipe

Did you make this recipe?

Share a photo and tag us — we can't wait to see what you've made!