Cleanplate Cravings

Cleanplate Cravings

July 7, 2026 |

One-Pan Crispy Garlic Butter Parmesan Roasted Potatoes
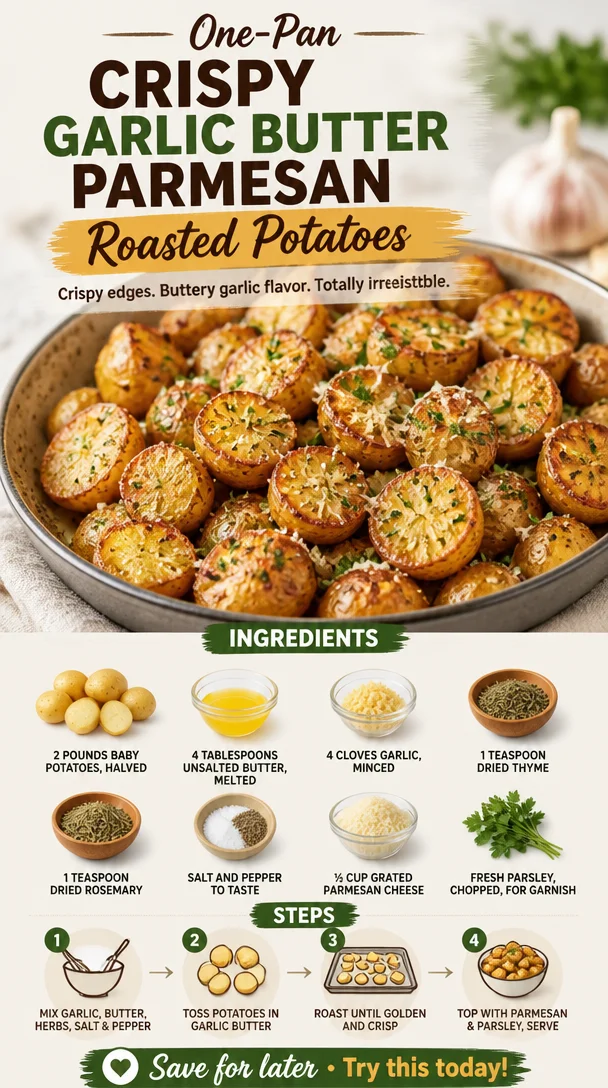
One-Pan Crispy Garlic Butter Parmesan Roasted Potatoes served on a plate

Garlic Butter Parmesan Roasted Potatoes: A Feel-Good Classic

Welcome to my cozy kitchen! Today, we’re diving into a nostalgic recipe that’s pure comfort—Garlic Butter Parmesan Roasted Potatoes. There’s something magical about potatoes, don’t you think? They can be fluffy, crispy, or creamy, and they soak up all that delicious flavor like a champ. This dish is the epitome of satisfying and makes a fantastic side for any meal. Plus, it’s incredibly simple to whip up, which is just the way we like it here at Clean Plate Cravings.

Introduction

I grew up in a household where potatoes were practically a food group. My mom had a repertoire of potato recipes that ranged from buttery mashed potatoes on Sundays to crispy roasted ones on weeknights. Each bite was a little celebration of flavor and comfort, a reminder that meals could be nourishing without sacrificing taste.

And that’s precisely what I want to share with you today: a dish that sings with spices, embraces the zing of garlic, and is generously bathed in rich, creamy butter. These Garlic Butter Parmesan Roasted Potatoes will take you back to the warmth of home-cooked meals while fitting perfectly into the busy lifestyle we all lead today.

Imagine this—your family gathers around the table, and the aroma of roasted garlic wafts through the air. Everyone’s eyes light up as you serve up these golden, crispy potatoes. It’s all about making those little moments special, and with this recipe, you can do exactly that, adding a touch of indulgence to your everyday meals. So roll up your sleeves, grab your apron, and let’s create something beautiful together!

Personal Story

I’ll never forget the first time I attempted to make roasted potatoes on my own. I was in college, living in a tiny apartment with just a hot plate and a questionable oven. My friends decided to host a potluck, and I was determined to impress them. Channeling my mom’s flair for cooking, I concocted a garlic butter potato dish that I thought would wow everyone.

With nowhere near the kitchen supplies I needed, I executed it with a mismatched array of utensils and even a little improvisation along the way. When those potatoes came out of the oven—golden brown, crisp on the edges, and glistening with garlic magic—I felt like a culinary rock star. My friends devoured them, and for that one evening, I was the queen of the kitchen. That memory still warms my heart, and it reminds me how cooking, even in the most humble settings, can create bonds and joy among friends.

Ingredients

Here’s what you’ll need to make these delightful Garlic Butter Parmesan Roasted Potatoes:

  • 2 pounds baby potatoes, halved
    Look for smaller potatoes for the best texture. Red or yellow baby potatoes work beautifully. If you can’t find baby potatoes, just cut regular potatoes into 1-inch chunks.

  • 4 tablespoons unsalted butter, melted
    Butter adds richness! Unsalted is best so you can control the saltiness. If you prefer an alternative, you could swap in olive oil for a lighter option.

  • 4 cloves garlic, minced
    Fresh garlic infuses this dish with a robust flavor. If you’re in a pinch, jarred minced garlic works well, about 1 teaspoon per clove.

  • 1 teaspoon dried thyme
    Thyme provides a lovely earthy note. You can substitute it with dried oregano or Italian seasoning if that’s what you have on hand.

  • 1 teaspoon dried rosemary
    Rosemary adds a delightful aroma. Fresh rosemary can be used if you happen to have it; just double the amount!

  • Salt and pepper to taste
    Essential for bringing all the flavors together. Feel free to adjust according to your taste preferences.

  • ½ cup grated Parmesan cheese
    Cheesy goodness! You can use freshly grated cheese for better flavor. Pecorino Romano can be a great substitute if you’re looking for a sharper flavor.

  • Fresh parsley, chopped, for garnish
    A sprinkle of parsley adds a fresh touch. If you don’t have parsley, chives or basil can also brighten up the dish.

Step-by-Step Instructions

Now that we’ve got our ingredients lined up, let’s dive into the cooking!

  1. Preheat Your Oven
    Start by preheating your oven to 400°F (200°C). This ensures that our potatoes get that perfect crispy texture. While it’s heating, you can prep your ingredients.

  2. Prep the Potatoes
    Rinse your baby potatoes under cold water and give them a good scrub. Halve them for optimal roasting. You want them to be roughly the same size so they cook evenly.

  3. Make the Garlic Butter Mixture
    In a small bowl, combine the melted butter with the minced garlic, thyme, rosemary, salt, and pepper. Stir it together until it’s all blended. The aroma will already start to make your mouth water!

  4. Toss the Potatoes
    Place the halved potatoes in a large mixing bowl and pour the garlic butter mixture over them. Toss them gently with your hands or a large spatula until every potato is well-coated.

  5. Spread on a Baking Sheet
    Line a large baking sheet with parchment paper for easy cleanup. Spread the potatoes in a single layer, cut side down if you want an extra crispy texture. This way, they’ll fry up nicely in the oven.

  6. Roast the Potatoes
    Pop the baking sheet into your preheated oven and roast the potatoes for about 25-30 minutes, or until they are golden brown and crisp. Halfway through, use a spatula to flip them for even roasting. This is a great time to make sure your oven is doing its job—some spots may cook quicker than others!

  7. Add the Parmesan
    In the final 10 minutes of roasting, sprinkle the grated Parmesan cheese evenly over the potatoes. The cheese will melt and create a delightful crust. You can also give them a quick broil at the end if you want an extra crunch!

  8. Garnish and Serve
    Once the potatoes are golden and cheese is melted, remove them from the oven. Let them cool for just a minute before transferring them to your serving platter. Garnish with freshly chopped parsley for a pop of color.

Serving Suggestions

Serve these Garlic Butter Parmesan Roasted Potatoes alongside grilled chicken, steak, or a vibrant salad for a balanced meal. They also make a fantastic side to bring to gatherings or barbecues—trust me, they’ll disappear in no time! You can arrange them in a lovely serving bowl and allow everyone to scoop their share.

Recipe Variations

Here are a few fun ways to mix it up:

  • Herb Variations: Try using fresh herbs like dill or tarragon for a different flavor profile.

  • Spicy Kick: Add a pinch of red pepper flakes to the garlic butter for a spicy twist.

  • Lemon Zest: Grate some lemon zest over the potatoes just after they come out of the oven for a zesty bite.

  • Cheese Options: Mix it up by using feta or goat cheese for a tangy twist.

  • Sweet and Savory: Toss in some diced sweet potatoes or carrots for a colorful and different take.

Chef’s Notes

These Garlic Butter Parmesan Roasted Potatoes have been a staple in my kitchen for years, and I love how they work with just about any main dish. You can easily customize them based on your mood or what you have in the pantry. Once, I even added leftover vegetables—still delicious!

One of my funniest kitchen mishaps happened while making this dish. In my excitement, I knocked over the garlic into the butter, which resulted in a garlicky pool rather than a mixture. But you know what? The more, the merrier, right? The garlic was a hit, proving that sometimes "mistakes" lead to the best discoveries!

FAQs and Troubleshooting

Q: Why didn’t my potatoes get crispy?
A: Make sure you preheat your oven and spread the potatoes in a single layer on the baking sheet. Crowding them can cause steaming instead of roasting.

Q: Can I cook these potatoes in advance?
A: Absolutely! Prepare the potatoes and toss them in the garlic butter mixture ahead of time, then store them in the fridge. When you’re ready, pop them into the oven—just add a few extra minutes to the cooking time!

Q: Can I use larger potatoes?
A: Yes! Just cut them into uniform pieces, about 1-inch in size, for even cooking. You may need to adjust the cooking time slightly.

Q: How can I tell if the potatoes are done?
A: They should be golden brown and fork-tender—meaning a fork can easily pierce through.

Nutritional Info (per serving)*

*Calories: 200 | Protein: 5g | Carbs: 30g | Fat: 8g | Fiber: 3g

Conclusion

That’s it! Now you have a delectable recipe for Garlic Butter Parmesan Roasted Potatoes that will surely impress anyone who gathers at your table. Remember, cooking is all about having fun and making memorable experiences, and I hope this dish brings warmth and cheer to your kitchen. So, roll up your sleeves, invite some friends over, and enjoy every bite together!

Keep it fresh, simple, and seriously delicious—happy cooking!

Print

Garlic Butter Parmesan Roasted Potatoes

A comforting side dish featuring crispy roasted baby potatoes tossed in garlic butter and Parmesan cheese.

  • Prep Time: 15 minutes
  • Cook Time: 30 minutes
  • Total Time: 45 minutes
  • Yield: 4 servings 1x
  • Category: Side Dish
  • Method: Roasting
  • Cuisine: American
  • Diet: Vegetarian

Ingredients

Scale
  • 2 pounds baby potatoes, halved
  • 4 tablespoons unsalted butter, melted
  • 4 cloves garlic, minced
  • 1 teaspoon dried thyme
  • 1 teaspoon dried rosemary
  • Salt and pepper to taste
  • ½ cup grated Parmesan cheese
  • Fresh parsley, chopped, for garnish

Instructions

  1. Preheat your oven to 400°F (200°C).
  2. Rinse your baby potatoes under cold water and halve them.
  3. Combine melted butter with minced garlic, thyme, rosemary, salt, and pepper in a bowl.
  4. Toss the halved potatoes in the garlic butter mixture until well-coated.
  5. Spread the potatoes on a lined baking sheet in a single layer.
  6. Roast for 25-30 minutes, flipping halfway through.
  7. Add Parmesan cheese in the last 10 minutes of roasting.
  8. Garnish with freshly chopped parsley and serve.

Notes

You can customize the recipe with different herbs or cheeses, and they also pair wonderfully with grilled meats or salads.

Nutrition

  • Serving Size: 1 serving
  • Calories: 200
  • Sugar: 1g
  • Sodium: 300mg
  • Fat: 8g
  • Saturated Fat: 4g
  • Unsaturated Fat: 3g
  • Trans Fat: 0g
  • Carbohydrates: 30g
  • Fiber: 3g
  • Protein: 5g
  • Cholesterol: 20mg

Keywords: potatoes, roasted, garlic butter, Parmesan, side dish
Did you make this recipe?

Share a photo and tag us — we can't wait to see what you've made!

July 7, 2026 |

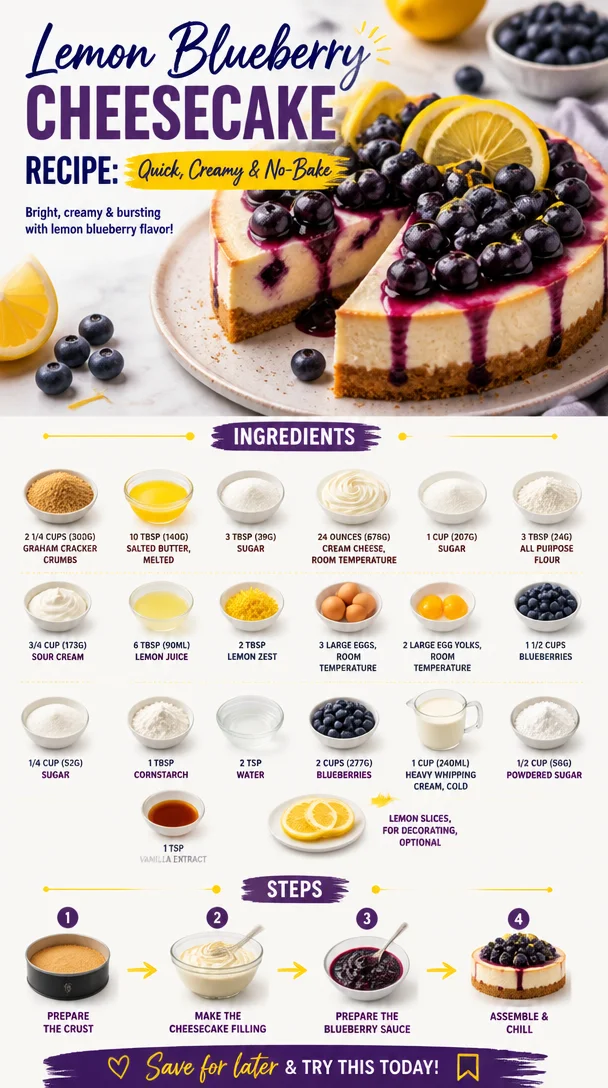
Lemon Blueberry Cheesecake Recipe: Quick, Creamy & No-Bake

Delicious no-bake lemon blueberry cheesecake topped with fresh blueberries.

The Ultimate Lemon Blueberry Cheesecake: A Sweet Taste of Summer

Welcome to Clean Plate Cravings, my friends! Today, we’re diving into a dessert that brings a whirlwind of memories that are as vibrant as its flavors: Lemon Blueberry Cheesecake. This delightful dish combines the creamy richness of cheesecake with a refreshing citrus zing and the burst of blueberries, making it a perfect sweet treat for any occasion.

As I stir together the ingredients, I can almost hear the laughter of family gatherings and the soft breeze of summer evenings. Cheesecake has a special place in my heart—it’s not just a dessert; it’s a celebration of life, joy, and the delicious moments that we share around the table.

A Slice of Nostalgia

Growing up, my family had an annual tradition of hosting summer barbecues in our backyard. The air was always alive with laughter and the enchanting scent of grilled goodies wafting from the grill. At the end of each meal, there was always a dessert—there had to be! One of the highlights was my mom’s Lemon Blueberry Cheesecake. I can still picture her, apron-clad, delicately folding fresh blueberries into the creamy mixture while the afternoon sun made the kitchen glow.

I would stand on a stool beside her, eagerly watching, occasionally sneaking a taste of the tangy lemon filling before it made its way to the crust. The anticipation was palpable as we waited for it to chill, and the moment we finally sliced into that cheesecake—oh, pure bliss!

Those summer days became a cherished memory for me, and every time I make this cheesecake, I’m reminded of all the love and laughter that filled our home. It’s a reminder that food is more than just sustenance; it’s a way to create connections with the people we cherish most.

Ingredients: What You’ll Need

Now, let’s get down to the nitty-gritty! Here’s what you’ll need to whip up this drool-worthy dessert:

  • Graham Cracker Crumbs (2 1/4 cups / 302g): A classic base for cheesecakes; you can substitute with crushed digestive biscuits or gluten-free graham crackers for a twist.
  • Salted Butter (10 tbsp / 140g, melted): This adds richness to the crust. Unsalted butter works too, just add a pinch of salt if you go that route!
  • Sugar (3 tbsp / 39g for crust + 1 cup / 207g for filling): Balances the tartness; use coconut sugar or maple syrup if you want a more natural sweetener.
  • Cream Cheese (24 ounces / 678g, room temperature): The star of the show! Ensure it’s soft to achieve a smooth, creamy texture. You can use vegan cream cheese for a lighter option.
  • All-Purpose Flour (3 tbsp / 24g): Helps stabilize the cheesecake. You can swap in almond flour for a gluten-free option.
  • Sour Cream (3/4 cup / 173g): Adds tanginess and creaminess; Greek yogurt makes a great substitute for a slightly lighter version.
  • Lemon Juice (6 tbsp / 90ml): Freshly squeezed is best for that zesty flavor! Bottled lemon juice works in a pinch, but it’s not quite the same.
  • Lemon Zest (2 tbsp): The magic ingredient that amps up the lemon flavor. Make sure to zest it before juicing!
  • Large Eggs (3) and Large Egg Yolks (2), both at room temperature: These add richness and structure. You can use flax eggs for a vegan alternative.
  • Blueberries (1 1/2 cups / 277g for the cheesecake + 2 cups / 240ml for the topping): Fresh is best, but you can use frozen blueberries if that’s what you have on hand. Just make sure to thaw and drain excess moisture!
  • Sugar (1/4 cup / 52g for topping): This will balance the tartness of the blueberries. For a healthier version, try using honey or agave syrup.
  • Cornstarch (1 tbsp): This thickens the blueberry topping and gives it a beautiful glossy finish.
  • Water (2 tsp): Just a little to help dissolve the cornstarch.
  • Heavy Whipping Cream (1 cup / 240ml, cold): This is for the whipped cream topping. You can use coconut cream for a non-dairy option.
  • Powdered Sugar (1/2 cup / 58g): It sweetens the whipped cream; feel free to adjust according to your taste.
  • Vanilla Extract (1 tsp): Enhances flavor; homemade vanilla extract takes it to the next level!
  • Lemon Slices (for decorating, optional): Add a pop of color and a touch of freshness.

Step-by-Step Instructions: Time to Bake!

Alright, let’s get our hands dirty! Follow these steps to create your Lemon Blueberry Cheesecake masterpiece:

  1. Preheat your oven: Preheat your oven to 325°F (160°C). This ensures a gentle bake, giving the cheesecake that creamy texture we all love.

  2. Prepare the crust: In a medium bowl, mix the graham cracker crumbs, melted butter, and 3 tablespoons of sugar. Stir until well combined. It should resemble wet sand! If it feels too dry, just add a touch more melted butter.

  3. Press the crust: Firmly press the crumb mixture into the bottom of a springform pan. Use the bottom of a measuring cup or a flat surface to create an even layer. Bake for about 10 minutes or until lightly golden. Let it cool while you prepare the filling.

  4. Make the cheesecake filling: In a large mixing bowl, beat the room temperature cream cheese until smooth and creamy. This is the time to let your electric mixer do the work!

  5. Add sugar and flour: Gradually add in the 1 cup of sugar and flour, mixing on low speed until blended. Don’t overmix; we want a smooth texture without too much air incorporated.

  6. Incorporate the wet ingredients: Add the sour cream, lemon juice, lemon zest, eggs, and egg yolks (making sure they’re at room temperature). Mix gently until everything is well combined—remember, low and slow keeps the cheesecake from cracking.

  7. Fold in the blueberries: Gently fold in 1 1/2 cups of fresh blueberries. This adds explosions of flavor as you bite into the cheesecake!

  8. Pour into the crust: Pour the creamy cheesecake mixture over the cooled crust, spreading it out evenly. Tap the pan gently on the counter to release any air bubbles.

  9. Bake the cheesecake: Place in the preheated oven and bake for 55-60 minutes, or until the edges are set, but the center still has a slight jiggle. This will help ensure it’s creamy and not overbaked.

  10. Cool: Once baked, turn off the oven, crack the door open, and let the cheesecake cool inside for about an hour. This gradual cooling helps to prevent cracks.

  11. Chill in the fridge: Once it’s cooled to room temp, cover it with plastic wrap and refrigerate for at least 4 hours (or overnight for the best flavor!).

  12. Prepare the blueberry topping: In a small saucepan, combine the 2 cups of blueberries, 1/4 cup of sugar, and 1 tablespoon of cornstarch mixed with 2 teaspoons of water. Cook on medium heat, stirring frequently, until the blueberries start to burst and the mixture thickens (about 5-7 minutes). Set aside to cool.

  13. Whip the cream: In a chilled bowl, whip the cold heavy cream with 1/2 cup of powdered sugar and 1 teaspoon of vanilla extract until medium peaks form. This is the moment you want to achieve that luscious, fluffy texture!

  14. Assemble the cheesecake: Once the cheesecake has chilled, remove it from the springform pan and place it on a serving platter. Gently spoon the blueberry mixture over the top, allowing it to cascade over the sides for a beautiful presentation.

  15. Serve with whipped cream: Top each slice with a dollop of whipped cream, and if you want to be extra fancy, decorate with lemon slices.

Serving Suggestions

Slice into this dreamy Lemon Blueberry Cheesecake and serve it chilled. Pair each slice with a dollop of whipped cream and a few fresh blueberries on top for a stunning presentation. Don’t forget a cup of coffee or a refreshing glass of iced tea—it’ll complement those bright flavors beautifully!

Recipe Variations

Feeling adventurous? Here are a few ways to mix up this classic dessert:

  • Lemon Thyme: Add finely chopped fresh thyme to the cheesecake filling for a subtle herbaceous twist that pairs beautifully with the lemon.
  • Berry Medley: Swap out some blueberries for raspberries or strawberries for a colorful berry blend.
  • Chocolate Drizzle: Drizzle melted dark chocolate over the blueberry topping for a decadent finish that contrasts with the tartness.
  • Mini Cheesecakes: Use a muffin tin to make mini cheesecakes, which are perfect for parties and easier to serve!
  • Vegan Version: Replace cream cheese with vegan cream cheese, eggs with flax eggs, and add a bit of silken tofu for creaminess!

Chef’s Notes

This Lemon Blueberry Cheesecake has evolved over the years, a blend of my childhood memories and my passion for baking. I once made it for a potluck, and believe me, it didn’t last long! People were coming back for seconds (and thirds). My secret? Always use fresh ingredients! They make an astounding difference in flavor. And really, who doesn’t love the combination of creamy cheesecake, zesty lemon, and sweet blueberries?

In my many attempts, I’ve learned to embrace the bumps in the road—like the time I forgot to bake the crust completely and had to salvage it with a quick oven fix. That little hiccup taught me that baking isn’t just about following a recipe—it’s about joy and discovery!

FAQs and Troubleshooting

  1. Why is my cheesecake cracking?

    • Cracks are often caused by overmixing or baking at too high a temperature. Make sure to gently mix the filling and bake it at a lower temperature to prevent cracking.
  2. How do I store leftovers?

    • Keep the cheesecake in an airtight container in the refrigerator for up to 5-7 days. It also freezes well; just wrap it tightly in plastic wrap and foil.
  3. Can I use frozen blueberries?

    • Yes! Just be sure to thaw them and drain any excess moisture before adding them to the cheesecake filling.
  4. My whipped cream isn’t whipping! What happened?

    • Make sure the bowl and the heavy cream are both very cold—this is crucial for achieving those fluffy peaks. If it still doesn’t whip, try using a different brand of cream.

Nutritional Info

This Lemon Blueberry Cheesecake is a special treat, so enjoy it in moderation! While precise nutritional info can vary, one slice typically contains around 350-400 calories, 25g of fat, and 30g of carbohydrates.


And there you have it—your go-to guide for creating a luscious Lemon Blueberry Cheesecake! I hope this sweet treat becomes a cherished part of your kitchen adventures as much as it has in mine. Whether you’re serving it at a gathering or savoring it solo on a quiet afternoon, this cheesecake is sure to delight the taste buds and spark some cherished memories. Happy baking, my friends!

Print

The Ultimate Lemon Blueberry Cheesecake

A delightful dessert combining creamy cheesecake, refreshing lemon zest, and bursts of blueberries, perfect for any occasion.

  • Prep Time: 30 minutes
  • Cook Time: 70 minutes
  • Total Time: 100 minutes
  • Yield: 12 servings
  • Category: Dessert
  • Method: Baking
  • Cuisine: American
  • Diet: Vegetarian

Ingredients

  • Graham Cracker Crumbs (2 1/4 cups / 302g)
  • Salted Butter (10 tbsp / 140g, melted)
  • Sugar (3 tbsp / 39g for crust + 1 cup / 207g for filling)
  • Cream Cheese (24 ounces / 678g, room temperature)
  • All-Purpose Flour (3 tbsp / 24g)
  • Sour Cream (3/4 cup / 173g)
  • Lemon Juice (6 tbsp / 90ml)
  • Lemon Zest (2 tbsp)
  • Large Eggs (3, room temperature)
  • Large Egg Yolks (2, room temperature)
  • Blueberries (1 1/2 cups / 277g for the cheesecake + 2 cups / 240ml for the topping)
  • Sugar (1/4 cup / 52g for topping)
  • Cornstarch (1 tbsp)
  • Water (2 tsp)
  • Heavy Whipping Cream (1 cup / 240ml, cold)
  • Powdered Sugar (1/2 cup / 58g)
  • Vanilla Extract (1 tsp)
  • Lemon Slices (for decorating, optional)

Instructions

  1. Preheat your oven to 325°F (160°C).
  2. In a medium bowl, mix the graham cracker crumbs, melted butter, and 3 tablespoons of sugar.
  3. Press the crust mixture into the bottom of a springform pan.
  4. Bake for about 10 minutes or until lightly golden and let it cool.
  5. In a large mixing bowl, beat the cream cheese until smooth.
  6. Add in the 1 cup of sugar and flour, mixing on low speed until blended.
  7. Add the sour cream, lemon juice, lemon zest, eggs, and egg yolks, and mix gently.
  8. Fold in 1 1/2 cups of blueberries.
  9. Pour the cheesecake mixture over the cooled crust.
  10. Bake for 55-60 minutes until the edges are set with a slight jiggle in the center.
  11. Once baked, turn off the oven and let the cheesecake cool inside for about an hour.
  12. Cover with plastic wrap and refrigerate for at least 4 hours (or overnight).
  13. In a small saucepan, combine the blueberries, 1/4 cup of sugar, and cornstarch mixed with water, and cook until thickened.
  14. Whip the heavy cream with powdered sugar and vanilla until medium peaks form.
  15. Assemble the cheesecake and spoon the blueberry topping over it.
  16. Serve with whipped cream and lemon slices.

Notes

Use fresh ingredients for the best flavor. This cheesecake can be made vegan by using plant-based substitutes.

Nutrition

  • Serving Size: 1 slice
  • Calories: 375
  • Sugar: 27g
  • Sodium: 320mg
  • Fat: 26g
  • Saturated Fat: 15g
  • Unsaturated Fat: 5g
  • Trans Fat: 0g
  • Carbohydrates: 36g
  • Fiber: 1g
  • Protein: 5g
  • Cholesterol: 80mg

Keywords: cheesecake, lemon, blueberry, dessert, summer, sweet treat

Did you make this recipe?

Share a photo and tag us — we can't wait to see what you've made!

July 7, 2026 |

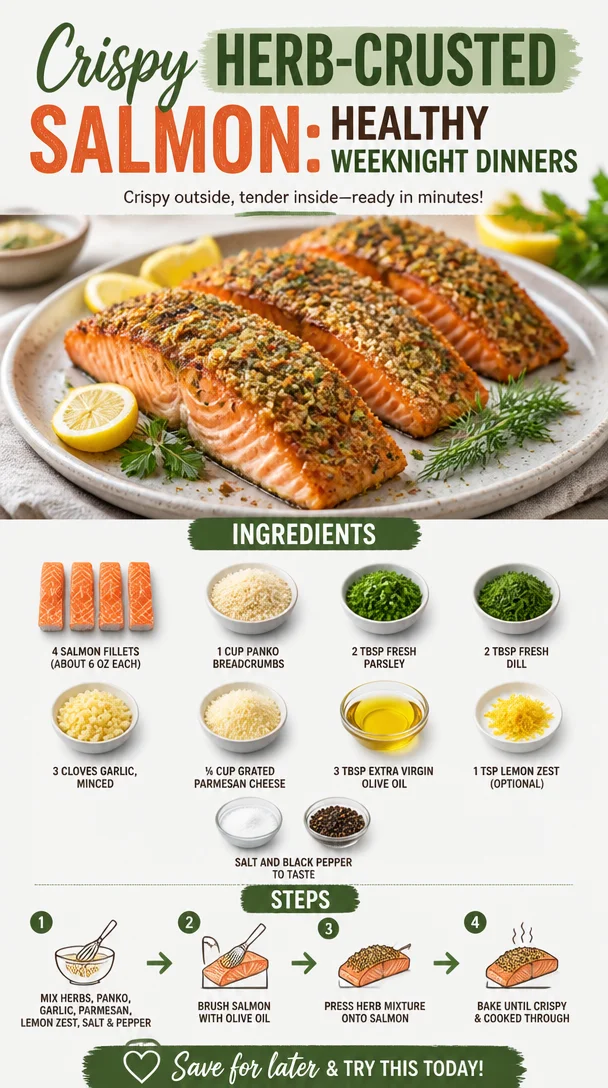
Crispy Herb-Crusted Salmon: Healthy Weeknight Dinners

Crispy herb-crusted salmon fillet on a plate with fresh herbs.

Extra-Crispy Oven-Baked Salmon Recipe with Herb Crust for Healthy Dinners

Introduction

Hey there, fellow food lovers! If you’re anything like me, you know that life can get busy, and sometimes whipping up a delicious dinner feels like an Olympic event. But, what if I told you that you can nail a healthy, gourmet meal without spending hours in the kitchen? You’ve come to the right place!

Today, I’m thrilled to share one of my all-time favorite recipes: Extra-Crispy Oven-Baked Salmon with an Herb Crust. This dish is perfect for those nights when you want to impress yourself (and maybe a few friends or family members) without breaking a sweat. It’s simple, vibrant, and packed with flavor, not to mention incredibly good for you!

Salmon is a true superstar in the world of healthy eating. It’s rich in omega-3 fatty acids, which are essential for heart health. Plus, when you add a crunchy herb crust made with panko breadcrumbs and a medley of fresh herbs, you bring out flavors that are just downright delightful!

Imagine pulling a perfectly golden salmon fillet out of your oven, the aroma wafting through your kitchen, and your taste buds dancing with anticipation. This recipe will have you feeling like a kitchen rockstar in no time. So, roll up your sleeves, grab your apron, and let’s dive into this mouthwatering dish that’s sure to become a staple in your home!

Personal Story

Oh, how I cherish my memories of the first time I made a crispy herb-crusted salmon! I was living in a tiny apartment, juggling a full-time job and my love for cooking. One evening, I had some friends over for dinner, and I wanted to serve something that would wow them without leaving me trapped in the kitchen during the whole gathering.

So, after a few trial and errors, I finally hit the jackpot when I decided to coat my salmon in that delightful crust. As the salmon went into the oven, my friends arrived, and I was greeted by the savory aroma that spread through every corner of my little apartment.

We gathered around the table, and as I served up that beautifully baked salmon, there were gasps of delight as everyone took their first bite. Suddenly, my friends felt like they were dining at a gourmet restaurant instead of my cozy kitchen! That night was not just about good food; it was about connection, laughter, and love shared over a meal. And let me tell you, we’ve made it a tradition to cook this dish together ever since. There’s something genuinely magical about gathering around a well-prepared meal, and I can’t wait for you to experience it too!

Ingredients

Here’s what you’ll need to create this extra-crispy herb-crusted salmon:

  • 4 salmon fillets (about 6 oz each): Fresh or thawed, skin-on or skinless. Salmon is a fantastic source of protein and healthy fats! If you’re looking for a vegan-friendly option, try using marinated tofu for a similar texture.
  • 1 cup panko breadcrumbs: These give a wonderfully crisp texture. If you’re gluten-free, no problem! Gluten-free panko works perfectly here.
  • 2 tablespoons fresh parsley, finely chopped: This adds a bright, fresh flavor. You can substitute it with cilantro or basil for a different twist!
  • 2 tablespoons fresh dill, finely chopped: Dill pairs beautifully with salmon. If you don’t have dill on hand, thyme is a great substitute.
  • 3 cloves garlic, minced: Garlic infuses the dish with warmth and depth. If you’re short on fresh garlic, one teaspoon of garlic powder will do the trick.
  • ¼ cup grated Parmesan cheese: This adds a delicious salty kick. Looking for a dairy-free option? Nutritional yeast is a fantastic substitute that brings a nutty flavor.
  • 3 tablespoons extra virgin olive oil: A drizzle of this adds richness and helps the crust brown beautifully. Avocado oil is an excellent alternative if you prefer a higher smoke point.
  • 1 teaspoon lemon zest (optional): This brightens everything up! Feel free to leave it out if citrus isn’t your jam.
  • Salt and black pepper to taste: Essential for bringing all the flavors together. Don’t be shy; season generously!

Step-by-Step Instructions

Now, let’s get cooking! Here’s how to prepare your Extra-Crispy Oven-Baked Salmon:

  1. Preheat the Oven: Start by preheating your oven to 400°F (200°C). This temperature is perfect for achieving a beautifully crispy outside while keeping the salmon tender and flaky on the inside.

  2. Prepare the Baking Dish: Line a baking sheet with parchment paper or aluminum foil for easy cleanup. You can also lightly grease it with a touch of olive oil to prevent sticking.

  3. Make the Herb Crust: In a large mixing bowl, combine the panko breadcrumbs, chopped parsley, dill, minced garlic, grated Parmesan cheese, and lemon zest if using. Add a generous drizzle of olive oil and season with salt and pepper. Mix everything until well combined and the breadcrumbs are coated with the oil.

  4. Prepare the Salmon Fillets: Pat your salmon fillets dry with paper towels. This step is crucial for getting that crispy crust! Place the fillets skin-side down on the prepared baking sheet. Drizzle the tops with a bit of olive oil and sprinkle with salt and pepper.

  5. Crust the Salmon: Now comes the fun part! Take a handful of your herb crumb mixture and press it onto the top of each salmon fillet, ensuring it sticks nicely. Use your fingers to shape it, making sure to cover the entire surface for maximum crunch.

  6. Bake the Salmon: Once all the fillets are coated, transfer the baking sheet to your preheated oven. Bake for about 12-15 minutes, or until the crust is golden brown and the salmon flakes easily with a fork. Keep an eye on it towards the end—you want it crispy, not burnt!

  7. Serve it Up: Remove the baking sheet from the oven and let the salmon rest for a minute. This allows the juices to redistribute, making every bite tender and juicy. Plate up the salmon alongside your favorite sides, and get ready to dig in!

Serving Suggestions

To make this dish even more delightful, consider plating your crispy salmon with a side of roasted vegetables or a refreshing salad. Nothing beats a vibrant mix of greens and colorful veggies to complement the richness of the salmon! A squeeze of lemon over the top just before serving adds a burst of brightness.

Recipe Variations

Want to mix things up? Here are a few creative variations to keep your salmon exciting!

  1. Spicy Kick: Add crushed red pepper flakes to the herb crust for a hint of heat that’ll tantalize your taste buds.
  2. Asian Flair: Replace the parsley and dill with chopped green onions and sesame seeds, resulting in a delicious twist on the classic.
  3. Mediterranean Sunshine: Incorporate chopped sun-dried tomatoes and olives into the herb crust for a burst of Mediterranean flavors.
  4. Nutty Crunch: Mix chopped almonds or walnuts into your panko for an extra layer of texture and flavor.
  5. Citrusy Herb Fusion: Try using lime zest instead of lemon for a zesty kick, pairing beautifully with a cilantro garnish.

Chef’s Notes

Each time I make this Extra-Crispy Salmon, I’m reminded of the joy it brings both in taste and presentation. I’ve experimented with different herbs and flavors over the years, and it’s fascinating how a simple recipe can evolve! The best part? It never fails to impress. Whether it’s a casual weeknight dinner or a fancy gathering, this salmon dish always fits the bill.

And let me tell you, there have been a few kitchen bloopers along the way! Like that time I accidentally grabbed the cayenne instead of the paprika—oh boy, spicy salmon for dinner! But hey, every cooking adventure is a lesson learned, and they always make for a great story around the dinner table.

FAQs and Troubleshooting

Can I use frozen salmon?
Absolutely! Just make sure it’s fully thawed and patted dry before coating it with the herb crust for best results.

What if I don’t have panko breadcrumbs?
No worries! Regular breadcrumbs will work too, but panko gives you that extra crunch that takes this dish to the next level.

How do I know when the salmon is done?
The salmon is cooked perfectly when it flakes easily with a fork and has reached an internal temperature of 145°F (63°C). If you’re unsure, using a meat thermometer can be a great help.

Can I make the herb crust ahead of time?
Definitely! You can prepare the herb crust mixture a day in advance and keep it in an airtight container in the fridge. Just coat your salmon when you are ready to bake.

Nutritional Info

Though this recipe can vary, here’s a rough nutritional breakdown for one salmon fillet (without additional sides):

  • Calories: 350
  • Protein: 34g
  • Fat: 21g
  • Carbohydrates: 10g
  • Fiber: 1g

There you have it! An easy, flavorful recipe with a crisp herb crust that’s perfect for healthy dinners. I can’t wait to hear how yours turns out, so don’t forget to come back and share your kitchen triumphs! Happy cooking, foodies!

Print

Extra-Crispy Oven-Baked Salmon with Herb Crust

A delicious and healthy oven-baked salmon with a crispy herb crust, perfect for impressing your guests without the fuss.

  • Prep Time: 10 minutes
  • Cook Time: 15 minutes
  • Total Time: 25 minutes
  • Yield: 4 servings 1x
  • Category: Main Course
  • Method: Baking
  • Cuisine: American
  • Diet: Healthy

Ingredients

Scale
  • 4 salmon fillets (about 6 oz each)
  • 1 cup panko breadcrumbs
  • 2 tablespoons fresh parsley, finely chopped
  • 2 tablespoons fresh dill, finely chopped
  • 3 cloves garlic, minced
  • ¼ cup grated Parmesan cheese
  • 3 tablespoons extra virgin olive oil
  • 1 teaspoon lemon zest (optional)
  • Salt and black pepper to taste

Instructions

  1. Preheat the oven to 400°F (200°C).
  2. Prepare a baking sheet with parchment paper or aluminum foil.
  3. Make the herb crust by mixing panko breadcrumbs, parsley, dill, garlic, Parmesan cheese, and lemon zest in a bowl. Drizzle with olive oil and season with salt and pepper.
  4. Pat the salmon fillets dry and place them skin-side down on the baking sheet. Drizzle with olive oil and season with salt and pepper.
  5. Crust the salmon by pressing the herb mixture onto the top of each fillet.
  6. Bake for about 12-15 minutes, until the crust is golden brown and the salmon flakes easily with a fork.
  7. Serve the salmon alongside your favorite sides.

Notes

Consider pairing with roasted vegetables or a refreshing salad for a complete meal.

Nutrition

  • Serving Size: 1 fillet
  • Calories: 350
  • Sugar: 1g
  • Sodium: 350mg
  • Fat: 21g
  • Saturated Fat: 4g
  • Unsaturated Fat: 15g
  • Trans Fat: 0g
  • Carbohydrates: 10g
  • Fiber: 1g
  • Protein: 34g
  • Cholesterol: 70mg

Keywords: salmon, herb crust, healthy dinner, baked salmon, panko breadcrumbs

Did you make this recipe?

Share a photo and tag us — we can't wait to see what you've made!

July 7, 2026 |

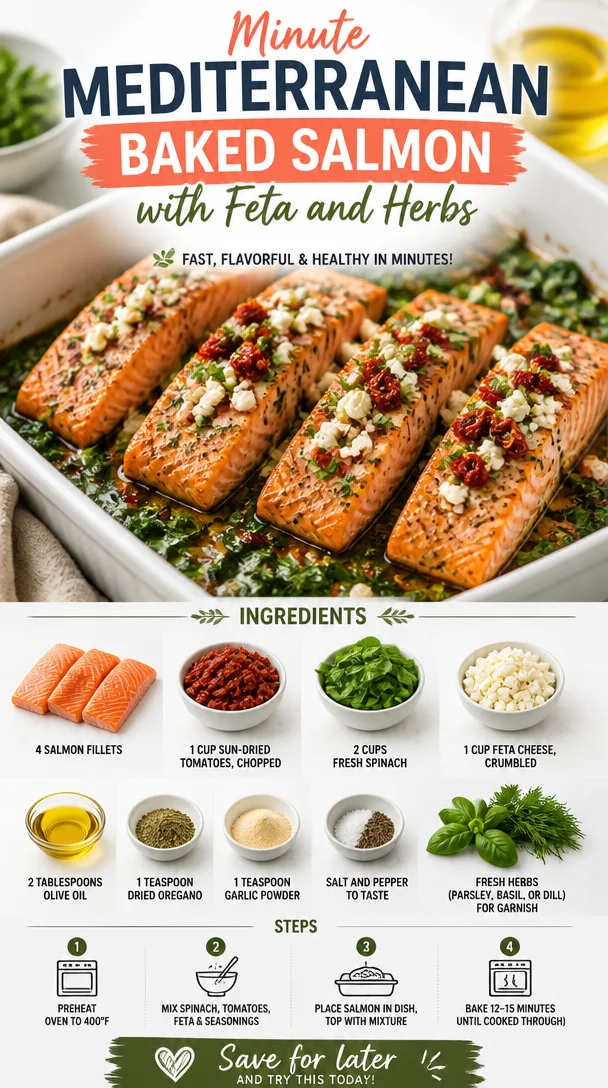
Minute Mediterranean Baked Salmon with Feta and Herbs

Mediterranean Baked Salmon with Feta and Herbs served on a plate

Mediterranean Baked Salmon with Feta: A Tasty Journey to the Mediterranean

Welcome to another delicious adventure on Clean Plate Cravings! Today, we’re diving into a dish that brings the sun-kissed vibes of the Mediterranean right to your kitchen: Mediterranean Baked Salmon with Feta. With this recipe, you’ll enjoy a kaleidoscope of flavors that are as vibrant as they are healthy. This dish is not just a feast for the taste buds; it’s also visually stunning and brimming with wholesome ingredients that make you feel good inside and out.

Now, let’s set the scene. Picture this: a warm, breezy evening, with the smell of fresh herbs filling the air as you toss aside a busy day and step into your kitchen sanctuary. You pull out your trusty baking dish and your favorite ingredients—salmon, sun-dried tomatoes, and feta—and get ready to create something extraordinary. This recipe is simple but elegantly layered, and it’s perfect for impressing family or friends or just treating yourself to a special meal.

I truly believe that cooking should feel joyful and creative. The Mediterranean-inspired flavors in this dish are a reflection of the sunny, laid-back lifestyle of the region, where sharing good food with loved ones is a cherished tradition. So, grab your apron, turn up your favorite tunes, and let’s whip up something that not only tastes fabulous but also nourishes your body.

A Taste of Nostalgia

Before I dive into the ingredient list, let me take you back to one of my favorite culinary memories. As a child, I remember my grandmother bustling around her kitchen, her energy infectious. On warm summer days, she would often make baked fish with fragrant herbs and rich feta cheese. The aroma was always inviting, drawing all of us to the table, where laughter and stories flowed as freely as the olive oil she drizzled over everything.

One dish stood out among all her creations: a hearty Mediterranean-style fish bake featuring salmon. She’d layer the fish with sun-dried tomatoes, fresh herbs, and, of course, crumbled feta. Every bite transported us to vibrant markets in Greece, with azure waters and beautiful landscapes as our backdrop. It was in those moments that I realized how food could evoke feelings of warmth, love, and community.

Now, inspired by those memories, I’ve crafted my own version of this iconic dish—one that retains that nostalgic charm but with my modern healthy twist. It’s easy to prepare, so you can focus on savoring the flavors and sharing stories with your loved ones, just like my grandmother did.

Ingredients You’ll Need

Here’s what you’ll need to bring this Mediterranean delight to life:

  • 4 salmon fillets: Fresh, high-quality salmon is key! Go for wild-caught if you can, as it tends to be more flavorful and nutritious. If you don’t have salmon, you can substitute with another firm fish like cod or halibut.

  • 1 cup sun-dried tomatoes, chopped: These little nuggets of flavor add depth and sweetness to the dish. If you can’t find sun-dried tomatoes, you can use fresh tomatoes, but adjust the cooking time since they have more moisture.

  • 2 cups fresh spinach: Packed with vitamins, spinach adds a beautiful color and nutritious punch. For a twist, use kale or arugula as a substitute.

  • 1 cup feta cheese, crumbled: This tangy cheese adds a creamy texture and salty flavor. If you’re looking for a dairy-free option, crumbled tofu can stand in, but it won’t have quite the same richness.

  • 2 tablespoons olive oil: A staple in Mediterranean cooking, olive oil brings a lovely richness to this dish. Feel free to swap it out for avocado oil if you prefer.

  • 1 teaspoon dried oregano: This herb is classic in Mediterranean cuisine, lending its aromatic warmth. You could also use Italian seasoning for a similar effect.

  • 1 teaspoon garlic powder: For that wow factor! If you prefer fresh garlic, use 2-3 cloves minced for a more robust flavor.

  • Salt and pepper to taste: Essential for elevating all the flavors in this dish. Always use freshly cracked pepper if you can; it makes a big difference!

  • Fresh herbs (parsley, basil, or dill) for garnish: These herbs don’t just make your dish look stunning; they also complement the flavors beautifully! Pick your favorite or combine a few to elevate your presentation.

Step-by-Step Instructions

Let’s get cooking! Follow these simple steps for a stunningly delicious Mediterranean Baked Salmon:

Preheat Your Oven

  1. Start by preheating your oven to 375°F (190°C). A hot oven helps to seal in the moisture, ensuring your salmon is juicy and tender.

Prepare the Baking Dish

  1. Grab a baking dish and drizzle a tablespoon of olive oil on the bottom. This prevents the salmon from sticking and adds a flavor base. I like to spread it around with my hands to make sure every corner is coated.

Layering the Ingredients

  1. Place the salmon fillets in the baking dish, skin-side down. Make sure they have a little space between them so they cook evenly. Now, season each fillet with salt and pepper. Remember, season generously; you want every bite to be flavorful!

  2. Next, scatter the chopped sun-dried tomatoes over the salmon. The sweetness of the tomatoes perfectly balances the richness of the fish. Don’t skimp—layer it on!

  3. Now it’s time for the spinach. Pile it high around the salmon and tomatoes. As it cooks, it will wilt down beautifully, disappearing into the dish and packing it with nutrients.

Adding the Feta

  1. Crumble the feta cheese generously over the top. This is where the magic happens. As it bakes, the feta will become slightly golden and creamy, creating a delicious topping.

Seasoning the Dish

  1. Drizzle the remaining olive oil over everything, and sprinkle the dried oregano and garlic powder evenly. The garlic powder infuses the dish with that irresistible aroma, making your kitchen smell heavenly.

Baking

  1. Cover the dish with aluminum foil to keep the moisture in and bake for 20–25 minutes, or until the salmon flakes easily with a fork. Remove the foil during the last 5 minutes of baking to give the feta a chance to brown slightly.

Finishing Touches

  1. Once out of the oven, let it sit for a couple of minutes to finish cooking through. Then, garnish with fresh herbs like parsley, basil, or dill before serving. Not only does this add a touch of color, but the fresh herbs brighten the dish remarkably.

Serving Suggestions

Serve this Mediterranean Baked Salmon warm, straight from the oven, alongside a fresh green salad or a side of quinoa for that extra healthy touch. It’s fantastic rolled up in whole-grain pita bread or paired with roasted vegetables for a complete meal. Don’t forget to drizzle a little extra olive oil or a squeeze of lemon juice over the top for that refreshing zing!

Recipe Variations

Here are a few fun twists you can add to customize this dish to your liking:

  1. Mediterranean Herb Mix: Try adding a teaspoon of fresh chopped dill or some lemon zest along with the oregano for added brightness.

  2. Spice it Up: Add a pinch of red pepper flakes for a bit of heat—this will give your dish a nice kick!

  3. Creamy Spinach: For a creamier version, mix in some cream cheese or Greek yogurt with the spinach before layering.

  4. Citrus Kick: Squeeze some fresh lemon or orange juice over the top before serving for a refreshing citrus flavor.

  5. Grain Bowl: Serve over a bed of farro or brown rice for a hearty grain bowl option—just add your favorite veggies!

Chef’s Notes

This recipe has evolved over time, and it reflects my journey toward healthier eating while enjoying every bite. Originally, I made it with more cheese and lots of creamy sauces, but I’ve learned that simplicity often shines the brightest. This Mediterranean Baked Salmon is one of those dishes where the flavors blend beautifully, allowing the quality of the ingredients to stand out. Plus, it’s just as satisfying and comforting!

Oh, and here’s a little confession: the first time I made this, I forgot to cover it with foil during the first half of baking. Let’s just say the feta turned into a crusty topping! While it was a happy accident, I recommend wrapping it for optimal results.

FAQs and Troubleshooting

How do I know when the salmon is done?
Look for the salmon to be opaque and flake easily with a fork. An internal temperature of around 145°F (63°C) is ideal.

Can I prep this ahead of time?
Absolutely! You can assemble the dish a few hours ahead, cover it tightly, and pop it in the fridge until you’re ready to bake. Just remember to adjust your cooking time if it’s chilled.

What if I don’t have sun-dried tomatoes?
Don’t worry! You can substitute with fresh diced tomatoes, just be cautious of the extra moisture. If you use fresh, you may want to reduce the cooking time a bit.

Can I freeze leftovers?
Yes! This dish freezes well. Just make sure to store it in an airtight container. When you’re ready to enjoy, thaw it in the fridge overnight and reheat in the oven!

Nutritional Info

While I don’t provide hard numbers here, rest assured this dish is high in protein (thanks to the salmon!), packed with healthy fats from olive oil and omega-3s, and loaded with vitamins from spinach and fresh herbs. It’s a guilt-free meal that leaves you feeling nourished and satisfied!


With that, your Mediterranean Baked Salmon with Feta is ready to take center stage at your dinner table! I hope this recipe inspires you to gather with loved ones, share stories, and enjoy some delicious homemade goodness. Remember, food is about connection—so cook, savor, and enjoy every moment! Happy cooking, foodies!

Print

Mediterranean Baked Salmon with Feta

Experience the vibrant flavors of the Mediterranean with this healthy and visually stunning baked salmon recipe topped with feta and sun-dried tomatoes.

  • Prep Time: 15 minutes
  • Cook Time: 25 minutes
  • Total Time: 40 minutes
  • Yield: 4 servings 1x
  • Category: Main Course
  • Method: Baking
  • Cuisine: Mediterranean
  • Diet: Pescatarian

Ingredients

Scale
  • 4 salmon fillets
  • 1 cup sun-dried tomatoes, chopped
  • 2 cups fresh spinach
  • 1 cup feta cheese, crumbled
  • 2 tablespoons olive oil
  • 1 teaspoon dried oregano
  • 1 teaspoon garlic powder
  • Salt and pepper to taste
  • Fresh herbs (parsley, basil, or dill) for garnish

Instructions

  1. Preheat your oven to 375°F (190°C).
  2. Grab a baking dish and drizzle a tablespoon of olive oil on the bottom.
  3. Place the salmon fillets in the baking dish, skin-side down, and season with salt and pepper.
  4. Scatter the chopped sun-dried tomatoes over the salmon.
  5. Pile the spinach around the salmon and tomatoes.
  6. Crumble the feta cheese over the top.
  7. Drizzle the remaining olive oil over everything, and sprinkle with oregano and garlic powder.
  8. Cover the dish with aluminum foil and bake for 20-25 minutes.
  9. Remove the foil during the last 5 minutes of baking.
  10. Garnish with fresh herbs before serving.

Notes

You can prepare this dish ahead of time and refrigerate it until ready to bake. Adjust cooking time if chilled. The dish also freezes well.

Nutrition

  • Serving Size: 1 serving
  • Calories: 350
  • Sugar: 5g
  • Sodium: 400mg
  • Fat: 20g
  • Saturated Fat: 6g
  • Unsaturated Fat: 10g
  • Trans Fat: 0g
  • Carbohydrates: 10g
  • Fiber: 3g
  • Protein: 30g
  • Cholesterol: 60mg

Keywords: salmon, baked salmon, Mediterranean, seafood, healthy recipes, easy dinner

Did you make this recipe?

Share a photo and tag us — we can't wait to see what you've made!

July 7, 2026 |

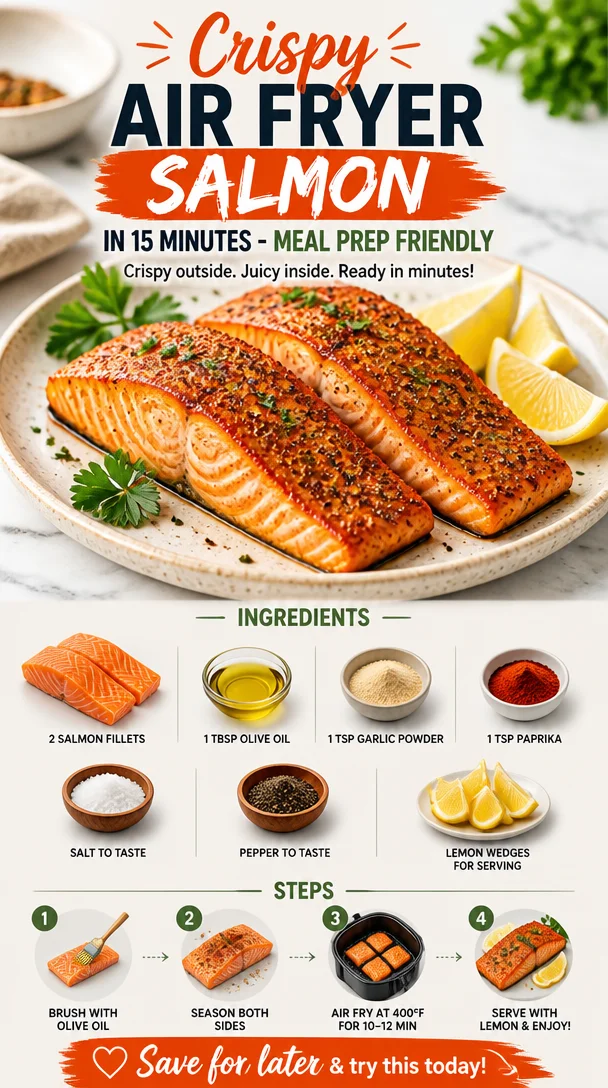
Crispy Air Fryer Salmon in 15 Minutes – Meal Prep Friendly

Crispy air fryer salmon fillet cooked in 15 minutes on a plate

Air Fryer Fresh Salmon: A Delightful Journey to Flavorful Dining

Let’s chat about fresh salmon, shall we? Imagine a dish so delicious that it transports you straight to a cozy seaside café, with the sound of waves gently lapping at the shore. I’m here to tell you that air-fried salmon can give you just that experience—all from the comfort of your kitchen. Cooking with an air fryer is not only fun; it’s a game changer for busy food lovers who crave flavor but might feel intimidated by meal prep. Plus, baking, grilling, or pan-searing can take time and effort, but with an air fryer, you get that perfect flaky texture in a fraction of the time.

Now, you might wonder: how does this work? The magic happens with a powerful fan that circulates hot air around the food, giving you that crispy, golden finish without drowning your salmon in oil. It’s clean, healthy, and just plain genius!

Now, as we embark on this culinary adventure together, I invite you to dive into the incredible world of air-fried salmon. Whether you’re a novice in the kitchen or a seasoned chef, this recipe will add sparkle to your weeknight dinners. So grab your apron, roll up your sleeves, and let’s make a delicious meal that you—and everyone around you—will adore!

A Taste of Nostalgia

Growing up, fish wasn’t exactly my best friend. I remember summer family vacations at the lake, where my parents would catch fish and fry them up in our rustic cabin. As a little girl, I’d shy away from the smoky, fried scent wafting up from the kitchen. But when I tasted grilled salmon for the first time—flaky, buttery, and with a hint of citrus—I was hooked (pun intended!). The thrill of discovering a love for salmon was as transformative as it was delightful.

Fast forward to my culinary journey today, where I’ve embraced every cooking method imaginable. Discovering the air fryer was a revelation! I can now make that magical salmon I adored so much as a child in a healthier and quicker way. Every time I prepare this dish, it brings back sunny memories and fills my kitchen with the scent of nostalgia. Trust me; once you try this recipe, it may just evoke a few cherished memories of your own!

Ingredients

Here’s what you’ll need to bring some air-fryer magic into your home:

  • 2 Salmon Fillets: Look for wild-caught salmon for the best flavor and sustainability. If you can’t find it, Atlantic salmon is a good substitute. Keep the skin on for extra moisture!

  • 1 Tablespoon Olive Oil: This adds a touch of healthy fat and enhances flavor. In a pinch, avocado oil works wonders too!

  • 1 Teaspoon Garlic Powder: Who can resist garlic? It gives the salmon a rich, warm taste. If you prefer fresh garlic, minced cloves will work—just adjust the amount as fresh garlic is stronger.

  • 1 Teaspoon Paprika: This adds a mild smoky flavor and vibrant color. Sweet or smoked paprika can both shine here—choose based on your preference!

  • Salt and Pepper to Taste: Simple yet powerful! Freshly cracked pepper can elevate your dish. If you’re on a low-sodium diet, consider using a salt substitute.

  • Lemon Wedges for Serving: Fresh lemon juice is a game changer! It brightens the entire dish and adds a needed zing. You can also zest the lemon for an extra pop of flavor—talk about fresh!

Step-by-Step Instructions

Now that we’ve rounded up our ingredients, let’s get started on this glorious air-fried salmon!

  1. Preheat Your Air Fryer: Set your air fryer to 400°F (200°C). It’s like warming up your car on a chilly morning—getting it hot first ensures that your salmon cooks evenly and quickly.

  2. Prepare the Salmon: Pat the salmon fillets dry with a paper towel. This step is vital because moisture can hinder that beautiful caramelization we crave. Place the fillets on a cutting board, skin side down. Drizzle the olive oil over each fillet, making sure to coat them generously.

  3. Spice Things Up: Mix the garlic powder, paprika, salt, and pepper in a small bowl. Rub this seasoning mixture all over the salmon. Get your hands in there! Massage those flavors into the fish. The more love you give it, the tastier it will be.

  4. Air Fry: Place the seasoned salmon fillets in the air fryer basket, making sure they’re not cramped. We want good airflow for that crispy finish! Close the lid and let them do their thing for 10-12 minutes, depending on thickness. If you like your salmon medium-rare, keep it on the lower end. Pro tip: you can check for doneness with a fork—if it flakes easily, it’s ready!

  5. Squeeze a Lemon: As the salmon cooks, get those lemon wedges ready. Once the salmon is finished, take it out and let it rest for a minute. Drizzle that freshly squeezed lemon juice over the top, letting it do its magic.

  6. Plate it Up: Transfer the beautiful fillets onto a plate, and garnish with extra lemon slices and maybe a sprig of fresh parsley if you’re feeling fancy.

And voilà! You’ve just created a gloriously juicy air-fried salmon dish that’s ready to be devoured.

Serving Suggestions

To serve this delight, plate the salmon with a side of steamed asparagus and quinoa salad. A sprinkle of sesame or a drizzle of your favorite dressing can take it to the next level. If you’re feeling adventurous, consider turning this dish into an elegant platter for guests, arranging colorful sides around the salmon. Scatter herbs or edible flowers for that extra touch of magic!

Recipe Variations

  1. Herb-Encrusted Salmon: Add fresh herbs like dill or parsley to the seasoning mix for an aromatic twist.

  2. Spicy Cajun: Switch the spices to create a Cajun seasoning blend for heat—perfect for those who love a kick!

  3. Lemon-Basil Infusion: Use crushed fresh basil in place of the garlic powder for a Mediterranean vibe that pops.

  4. Sesame-Ginger Glaze: Add a teaspoon of sesame oil and ginger paste to the olive oil for an Asian-inspired flavor.

  5. Mango Salsa Topper: Serve the salmon with a refreshing mango salsa—just combine diced mango, red onion, cilantro, lime juice, and a pinch of salt for a fruity punch!

Chef’s Notes

Ah, the evolution of this recipe! You wouldn’t believe the countless “experiments” I’ve had trying to perfect air fryer salmon. There was one particularly memorable disaster where I got a bit too ambitious (and a touch too distracted by a TV show). Let’s just say salmon was involved—and a smoke alarm! But out of that culinary chaos emerged this fantastic, fool-proof recipe.

I’ve learned that simplicity often leads to incredible flavor. Each time I make this air-fried salmon dish, I find joy not just in cooking but in connecting with the food and the techniques that make it shine. I genuinely hope it brings some joy to your table, too!

FAQs and Troubleshooting

Q: Can I use frozen salmon fillets?
Absolutely! Just make sure to thaw the salmon completely before seasoning and cooking. You can quickly do this by placing it in the refrigerator overnight or using the cold water method, where you submerge it in water until it’s thawed.

Q: Why is my salmon still raw in the center after cooking?
Cooking times can vary based on the thickness of your fillets. If it looks raw in the center, simply pop it back in the air fryer for an additional few minutes. Always check doneness with a fork—good salmon should flake easily.

Q: How do I clean my air fryer?
Many air fryers have removable parts that are dishwasher-safe, which makes cleanup a breeze! If not, let the basket soak in warm soapy water, then scrub it off. Just make sure to wipe down the main unit with a damp cloth—keeping everything fresh will prolong the life of your air fryer.

Q: Can I over-season my salmon?
Yes! A little goes a long way, especially with strong spices. Adjust the amount of seasoning based on your taste rather than drowning the fillets. Remember, you can always add seasoning in layers; it’s easier to add than to take away!

Hopefully, these tips help you avoid any culinary mishaps, but remember: the kitchen is a place for exploration (and occasional mistakes!). Enjoy the process!

Nutritional Info

While this recipe primarily focuses on flavor, here’s a rough breakdown (per serving of salmon without additional sides):

  • Calories: ~280
  • Protein: 40g
  • Fats: 14g (mostly healthy fats)
  • Carbohydrates: 0g

With nutritious and wholesome ingredients, this dish not only excites your taste buds but also fuels your body well.

So there you have it—your ultimate guide to effortlessly air-frying salmon! Keep it fresh, simple, and seriously delicious, and remember: every time you step into the kitchen, it’s an opportunity to create something unique and wonderful. Happy cooking!

Print

Air Fryer Fresh Salmon

Delicious and healthy air-fried salmon that captures the essence of flavor and simplicity, perfect for any weeknight dinner.

  • Prep Time: 10 minutes
  • Cook Time: 12 minutes
  • Total Time: 22 minutes
  • Yield: 2 servings 1x
  • Category: Main Course
  • Method: Air Frying
  • Cuisine: American
  • Diet: Paleo

Ingredients

Scale
  • 2 Salmon Fillets (wild-caught preferred)
  • 1 Tablespoon Olive Oil
  • 1 Teaspoon Garlic Powder
  • 1 Teaspoon Paprika
  • Salt and Pepper to Taste
  • Lemon Wedges for Serving

Instructions

  1. Preheat your air fryer to 400°F (200°C).
  2. Prepare the salmon by patting it dry with a paper towel and drizzling olive oil over it.
  3. Spice things up by mixing garlic powder, paprika, salt, and pepper, then rub the mixture onto the salmon fillets.
  4. Air fry the salmon for 10-12 minutes, checking for doneness.
  5. Squeeze lemon juice over the cooked salmon.
  6. Plate and serve with additional lemon slices.

Notes

Consider serving with a side of steamed asparagus and quinoa salad for a complete meal.

Nutrition

  • Serving Size: 1 serving
  • Calories: 280
  • Sugar: 0g
  • Sodium: 200mg
  • Fat: 14g
  • Saturated Fat: 2g
  • Unsaturated Fat: 10g
  • Trans Fat: 0g
  • Carbohydrates: 0g
  • Fiber: 0g
  • Protein: 40g
  • Cholesterol: 80mg

Keywords: salmon, air fryer, healthy dinner, seafood, easy recipe

Did you make this recipe?

Share a photo and tag us — we can't wait to see what you've made!

July 7, 2026 |

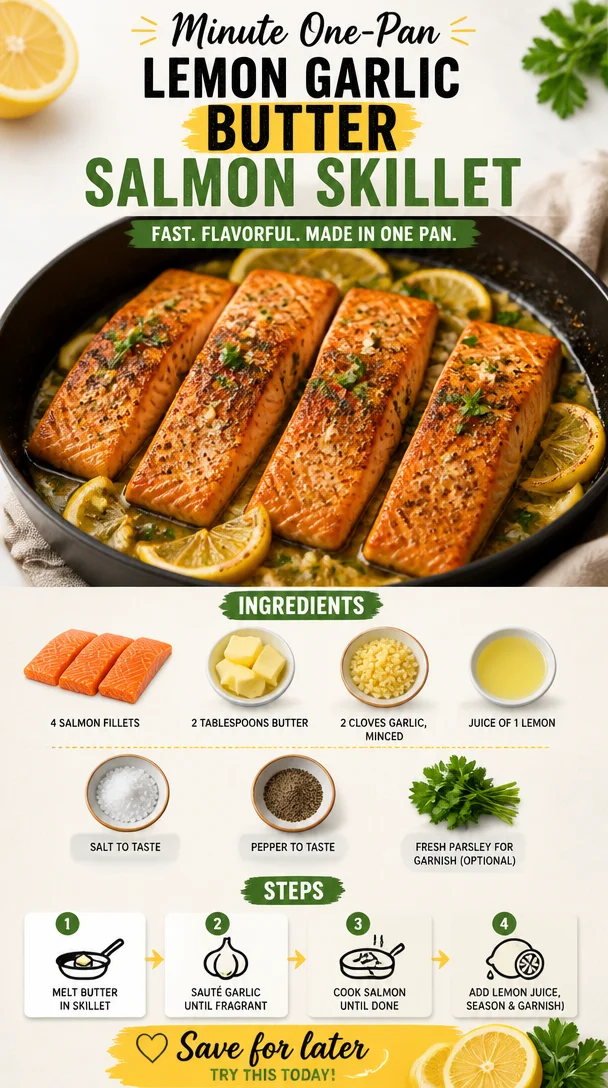
Minute One-Pan Lemon Garlic Butter Salmon Skillet

One-Pan Lemon Garlic Butter Salmon Skillet served with lemon slices and herbs.

Lemon Garlic Butter Salmon: A Deliciously Simple Recipe

Welcome, foodies! Today, I’m thrilled to share one of my absolute favorite recipes: Lemon Garlic Butter Salmon. It’s quick, easy, and bursting with flavor—perfect for those busy weeknights when you just want something delicious without spending hours in the kitchen. So, grab your apron, turn up your favorite playlist, and let’s get cooking!

Introduction

There’s something magical about a perfectly cooked piece of salmon. It’s not just the delicate texture or the rich flavor but the ability to turn an ordinary night into something special. When I make Lemon Garlic Butter Salmon, it feels like I’m treating myself—and anyone I’m sharing the meal with—to a five-star dining experience right at home. This dish embodies everything I love about cooking: simplicity, warmth, and that little spark of joy that comes from fresh, vibrant ingredients.

Growing up, my family often gathered around the dinner table for meals that brought us together. My mom had this way of making even the simplest dishes feel luxurious. One night, she introduced us to salmon. At first, I was hesitant; I was just a kid, and fish wasn’t exactly my jam. But she called it “the good stuff,” and with a delightful sizzle in the pan and the aroma of garlic filling the kitchen, I was hooked! She always said that food should be an experience, and lemon garlic butter salmon became one of our family staples.

Now, every time I whip up this dish, I think about those cherished dinners, where laughter and great conversation filled the air, accompanied by the delightful tang of lemon and the rich aroma of garlic. I hope this recipe brings you and your loved ones together, just like it did for my family.

Ingredients

To create this mouthwatering Lemon Garlic Butter Salmon, you’ll need the following ingredients:

  • 4 salmon fillets
    Salmon is an incredible source of protein and omega-3 fatty acids. Choose fillets that are skin-on for extra flavor and texture. If you’re in a pinch, you can substitute with another fish like trout or cod, but be mindful of cooking times.

  • 2 tablespoons butter
    Butter brings richness to the fish and creates a luscious sauce. For a lighter option, you can use olive oil or coconut oil for a slightly different but equally delicious flavor.

  • 2 cloves garlic, minced
    Fresh garlic gives this dish its essential zing. You could substitute with garlic powder, but fresh delivers the best flavor. Mince finely for a balanced taste and to avoid big garlic chunks.

  • Juice of 1 lemon
    The bright acidity of lemon elevates the dish, balancing the richness of the salmon. If you don’t have fresh lemons, bottled lemon juice can work in a pinch, but fresh is always best!

  • Salt and pepper to taste
    Simple seasoning is key! Freshly cracked black pepper adds a lovely aroma. If you want a bit of heat, consider adding a pinch of cayenne pepper for a kick.

  • Fresh parsley for garnish (optional)
    Parsley adds a pop of color and freshness to the dish. Feel free to use chives or dill for a different herbaceous note!

Step-by-Step Instructions

  1. Preheat Your Oven
    Preheat your oven to 400°F (200°C). This temperature is perfect for achieving a beautifully cooked salmon with a slightly crispy exterior while keeping the inside tender. Preheating is crucial—don’t skip this step!

  2. Prep Your Salmon
    Pat the salmon fillets dry with a paper towel. This helps achieve that lovely sear! Season both sides generously with salt and pepper. You can also sprinkle a bit of paprika if you’d like a smokey undertone.

  3. Make the Garlic Butter Mixture
    In a small bowl, mix the melted butter, minced garlic, and lemon juice together. This step is essential because it ensures that the garlic is evenly distributed and infuses the salmon with flavor throughout the cooking process.

  4. Sear the Salmon
    In an oven-safe skillet (cast iron works wonders!), melt about a tablespoon of the garlic butter mixture over medium-high heat. Once hot, carefully place the salmon, skin side down. Sear for 3-4 minutes, allowing that beautiful golden crust to develop. The key is patience—resist the urge to move it around!

  5. Add the Butter Mixture
    After searing, spoon the remaining garlic butter over the salmon. This will create an irresistible sauce and add flavor depth. You can toss in some lemon slices on top at this stage for extra flavor!

  6. Bake the Salmon
    Once the salmon is coated, transfer the skillet to the preheated oven. Bake for 12-15 minutes until the salmon is cooked through. It should flake easily with a fork but still remain moist. For extra moisture, baste it with the sauce halfway through.

  7. Check for Doneness
    Use a fork to test if it’s done — the salmon should be opaque and flake easily. For those with a food thermometer, aim for an internal temperature of 145°F (63°C).

  8. Garnish and Serve
    When it’s out of the oven, drizzle a bit more of that garlic butter sauce over the top and garnish with fresh parsley.

Serving Suggestions

Plate your lemon garlic butter salmon with a scoop of fluffy quinoa or a light salad for a refreshing contrast. A side of asparagus or roasted vegetables would complement the dish perfectly. I love to serve this with a lemon wedge on the side; it adds a beautiful presentation and allows everyone to add a dash of brightness as they wish!

Recipe Variations

  1. Citrus Twist: Swap the lemon juice for lime or orange juice for a different citrus twist.
  2. Herbed Delight: Add fresh dill or thyme to the garlic butter for an herbaceous flavor profile.
  3. Spicy Kick: Mix in some red pepper flakes to the garlic butter for a spicy variant.
  4. Asian Influence: Drizzle with a little soy sauce and sprinkle sesame seeds for an Asian-inspired twist.
  5. Gluten-Free Option: This recipe is naturally gluten-free; just make sure all ingredients are certified gluten free!

Chef’s Notes

Over the years, this recipe has evolved as my cooking skills grew. Initially, I would use a non-stick skillet, but I’ve found that the caramelization from a cast iron skillet adds a depth of flavor that’s simply unbeatable. Plus, watching the garlic bubble in that luscious butter is a kitchen experience I never get tired of! And hey, if you ever catch yourself with leftover garlic butter (I mean, it happens), slather it on some crusty bread, and trust me, it’ll be gone before you know it!

FAQs and Troubleshooting

Q: My salmon turned out dry. What did I do wrong?
A: Overcooking is the usual culprit when it comes to dry salmon. Always keep an eye on cooking times — check around the 10-minute mark for doneness if you’re using thicker fillets.

Q: Can I use frozen salmon?
A: Absolutely! Just make sure to thaw it completely before cooking. Thaw in the fridge overnight or place it in a sealed bag and submerge it in cold water.

Q: What if I don’t have a cast iron skillet?
A: No problem! Any oven-safe skillet works well. Alternatively, you can sear it in a regular pan and transfer it to a baking dish for the oven.

Q: How can I tell when my salmon is perfectly cooked?
A: Look for a change in color from vivid pink to opaque, and it should flake easily when you press it with a fork. Use a thermometer for precision if you’re unsure!

Nutritional Info

(Per serving, based on 4 servings)

  • Calories: 320
  • Protein: 23g
  • Fat: 22g
  • Carb: 1g
  • Fiber: 0g

And there you have it! Lemon Garlic Butter Salmon is a dish that combines vibrant flavors with simplicity. I hope you enjoy cooking and sharing it with your loved ones as much as I do. Remember, cooking is about having fun and being flexible—so make it your own! Happy cooking!

Print

Lemon Garlic Butter Salmon

A quick and easy recipe for Salmon fillets infused with lemon, garlic, and butter, perfect for busy weeknights.

  • Prep Time: 10 minutes
  • Cook Time: 15 minutes
  • Total Time: 25 minutes
  • Yield: 4 servings 1x
  • Category: Main Course
  • Method: Baking
  • Cuisine: American
  • Diet: Paleo

Ingredients

Scale
  • 4 salmon fillets
  • 2 tablespoons butter
  • 2 cloves garlic, minced
  • Juice of 1 lemon
  • Salt and pepper to taste
  • Fresh parsley for garnish (optional)

Instructions

  1. Preheat your oven to 400°F (200°C).
  2. Pat the salmon fillets dry with a paper towel and season with salt and pepper.
  3. Mix the melted butter, minced garlic, and lemon juice in a small bowl.
  4. Melt about a tablespoon of the garlic butter mixture in an oven-safe skillet over medium-high heat and sear the salmon, skin side down, for 3-4 minutes.
  5. Spoon the remaining garlic butter over the salmon.
  6. Transfer the skillet to the preheated oven and bake for 12-15 minutes until cooked through.
  7. Check for doneness using a fork.
  8. Drizzle with more garlic butter and garnish with parsley before serving.

Notes

Serve with quinoa or a light salad for a refreshing contrast. For a citrus twist, you can substitute lemon juice with lime or orange.

Nutrition

  • Serving Size: 1 fillet
  • Calories: 320
  • Sugar: 1g
  • Sodium: 350mg
  • Fat: 22g
  • Saturated Fat: 8g
  • Unsaturated Fat: 14g
  • Trans Fat: 0g
  • Carbohydrates: 1g
  • Fiber: 0g
  • Protein: 23g
  • Cholesterol: 60mg

Keywords: salmon, lemon, garlic, quick dinner, weeknight meal

Did you make this recipe?

Share a photo and tag us — we can't wait to see what you've made!

June 25, 2026 |

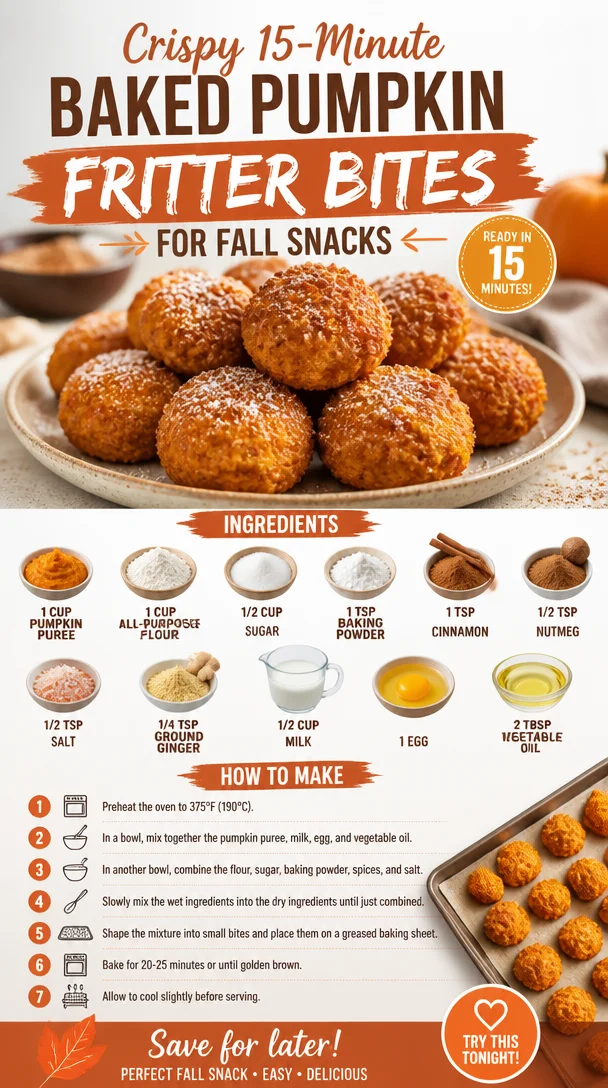
Crispy 15-Minute Baked Pumpkin Fritter Bites for Fall Snacks

Baked pumpkin fritter bites served with a dipping sauce for a fall snack.

Easy Baked Pumpkin Fritter Bites: A Flavorful Fall Twist

Welcome to another delicious adventure in the kitchen! Today, I’m excited to share a recipe that not only warms the heart but also captures the spirit of fall—Easy Baked Pumpkin Fritter Bites. As the leaves turn and the air gets crisper, there’s something truly magical about incorporating pumpkin into our meals. These little bites of joy are fluffy, slightly sweet, and delightful—all without the fuss of frying.

Now, you might be wondering why I’m raving about baked fritters when the traditional route takes the plunge into hot oil. Well, let me tell you, these baked beauties retain that comforting fritter experience while being lighter and healthier. Plus, they come together in a snap, making them perfect for busy mornings, afternoon snacks, or cozy gatherings with friends. Who doesn’t love a treat that’s both good for you and totally satisfying?

Join me as we embark on a culinary journey filled with warmth, nostalgia, and of course, flavor! I’ll share a personal story that’ll tickle your taste buds, walk you through the ingredients, and guide you every step of the way to ensure your fritters turn out deliciously perfect. So grab your apron, and let’s get started!

A Slice of My Culinary Memory

Let me take you back to my childhood, where the scent of pumpkin pie wafted through the air every autumn. My Grandma June had a way of making everything feel special, and during pumpkin season, her kitchen was the heart of our family gatherings. Each year, we’d huddle around the kids’ table, eagerly waiting to help her mix, pour, and taste test. The joy on her face when we “helped” was priceless—though we mostly just enjoyed sneaking spoonfuls of batter!

One of my fondest memories involves Grandma’s famous pumpkin fritters. She usually would whip them up as a post-harvest treat, and we’d devour them with warm maple syrup and a sprinkle of powdered sugar. I can still hear her laughter as we fought over the last bite. Fast forward to today, and I find myself recreating those moments with a healthy twist through these baked pumpkin fritter bites. They might not be as heavy or greasy as Grandma’s version, but they carry the essence of her warmth in every scrumptious bite.

Ingredients

Let’s gather our ingredients for these Easy Baked Pumpkin Fritter Bites. Here’s what you’ll need:

  • 1 cup pumpkin puree: The star of the show! This is what makes your fritters moist and flavorful. You can use canned puree or roast fresh pumpkin—both work beautifully.

  • 1 cup all-purpose flour: The base of your batter. If you want to add a whole grain element, substitute half with whole wheat flour for added fiber.

  • 1/2 cup sugar: This adds sweetness. For a healthier spin, consider using honey or maple syrup (just adjust the liquid content).

  • 1 teaspoon baking powder: This gives your fritters that much-loved rise and fluffy texture.

  • 1 teaspoon cinnamon: A warm spice that enhances the autumn vibe. Feel free to swap with pumpkin spice for an extra flavor punch!

  • 1/2 teaspoon nutmeg: This adds a nuttiness and depth of flavor. It’s warming and pairs beautifully with the pumpkin.

  • 1/2 teaspoon salt: A tiny helper to balance the sweetness and enhance every flavor.

  • 1/4 teaspoon ground ginger: This adds a little zing! Ginger is optional, but it gives a nice, warm kick.

  • 1/2 cup milk: Helps to moisten your batter. You can swap this with a plant-based alternative or even pumpkin spice latte for a fun twist!

  • 1 egg: This helps hold everything together and adds richness. For a vegan option, you can replace it with a flax egg (1 tablespoon ground flaxseed mixed with 2.5 tablespoons water).

  • 2 tablespoons vegetable oil: This keeps your fritters moist; feel free to use melted coconut oil or applesauce for a lighter version.

Step-by-Step Instructions

Now comes the fun part—let’s dive into making our Easy Baked Pumpkin Fritter Bites! Follow these steps, and let’s whip up some delightful treats that will have everyone coming back for seconds.

1. Preheat your oven
Start by preheating your oven to 400°F (200°C). This ensures that your fritters bake evenly and become perfectly golden. While the oven is warming up, line a baking sheet with parchment paper—it helps with easy clean-up and gives the fritters a nice, crisp texture.

2. Combine your dry ingredients
In a medium-sized mixing bowl, whisk together the flour, sugar, baking powder, cinnamon, nutmeg, salt, and ground ginger. Mixing your dry ingredients first helps evenly distribute the leavening agents and spices throughout the batter, ensuring that each bite is full of flavor!

3. Mix the wet ingredients
In a separate bowl, mix your pumpkin puree, milk, egg, and vegetable oil. If you’re using a flax egg for a vegan option, mix the flaxseed with water and let it sit for a few minutes before adding it to the mix. This little trick will give you that necessary binding effect!

4. Combine wet and dry ingredients
Now, pour your wet mixture into the dry ingredients. Gently fold them together with a spatula until just combined. Make sure not to overmix—this keeps your fritters light and fluffy! Trust me, a few lumps here and there are perfectly okay.

5. Scoop your batter onto the baking sheet
Using a cookie scoop or a spoon, drop rounded tablespoons of batter onto your prepared baking sheet, leaving a bit of space between each one. They don’t spread much, so be generous but not too crowded!

6. Bake until golden brown
Pop your sheet in the oven and bake for about 15-20 minutes or until the fritters are puffed up and golden. You can do the toothpick test—just poke one in the center; if it comes out clean, you’re good to go!

7. Cool and serve
Once baked, remove them from the oven and let them cool for a few minutes. Then, transfer to a wire rack to cool completely—if you can resist the temptation, that is!

Serving Suggestions

These Easy Baked Pumpkin Fritter Bites are perfect for sharing, so consider serving them warm. You can dust them with powdered sugar or dip them in maple syrup for an extra treat. For a more gourmet touch, drizzle some honey or a cream cheese glaze over the top and watch everyone swoon with delight!

Recipe Variations

Get creative with your fritters! Here are a few fun twists you can try:

  • Add-ins: Mix in chopped nuts like walnuts or pecans for a delightful crunch.

  • Dried fruits: Toss in some dried cranberries or raisins for sweetness and texture contrast.

  • Spices: Experiment with cardamom or allspice to add a new dimension to your flavors.

  • Cheese twist: Try incorporating mild cheese (like feta or goat cheese) for a savory twist!

  • Gluten-free: Swap out all-purpose flour for a gluten-free blend, and voila! You’ve got a gluten-free version!

Chef’s Notes

Oh, how I love this recipe! It has evolved from Grandma June’s deep-fried fritters to these lightened-up bites that everyone can enjoy. You know, the beauty of cooking lies in its ability to bring people together and create lasting memories. I’m always experimenting in the kitchen—I once tossed in some cranberries, and they were an instant hit! Cooking should be fun and flexible, so don’t hesitate to make this recipe your own.

If you have kids (or just sprinkle some whimsical joy in your life), let them help out! Mixing and scooping are easy tasks for little hands and a chance to create memories together, just like I did with Grandma.

FAQs and Troubleshooting

  1. My fritters didn’t rise. What happened?
    Ensure your baking powder is fresh. An expired baking powder will lead to flat fritters. Also, make sure not to overmix your batter; this can lead to dense fritters.

  2. Can I use fresh pumpkin instead of canned?
    Absolutely! Just roast your pumpkin, scoop, and puree until smooth—it adds a wonderful fresh flavor that’s hard to beat!

  3. Why are my fritters too dry?
    They might have baked too long, so keep an eye on them during the last few minutes. If they’re dry, consider adding a bit more milk next time or reducing the baking time slightly.

  4. Can these be made ahead?
    Yes! You can prepare the batter ahead of time and refrigerate it for up to 24 hours before baking them fresh. They’re best enjoyed warm, straight from the oven!

Nutritional Info

One fritter (approximately 30g) consists of approximately:

  • Calories: 80
  • Protein: 1g
  • Total Fat: 3g
  • Saturated Fat: 0.5g
  • Carbohydrates: 12g
  • Fiber: 1g
  • Sugar: 3g

Keep in mind that these values are just a ballpark, so adjust based on your ingredient swaps and serving size.


And there you have it—a delightful journey through my favorite baked pumpkin fritter bites! Remember, cooking is all about love, experimentation, and feeding your soul. I hope you enjoy making (and devouring) these treats as much as I do. Happy cooking, fellow foodies!

Print

Easy Baked Pumpkin Fritter Bites

These fluffy, slightly sweet pumpkin bites are a healthier twist on traditional fritters, perfect for fall gatherings or cozy snacking.

  • Prep Time: 10 minutes
  • Cook Time: 20 minutes
  • Total Time: 30 minutes
  • Yield: 4 servings 1x
  • Category: Snack
  • Method: Baking
  • Cuisine: American
  • Diet: Vegetarian

Ingredients

Scale
  • 1 cup pumpkin puree
  • 1 cup all-purpose flour
  • 1/2 cup sugar
  • 1 teaspoon baking powder
  • 1 teaspoon cinnamon
  • 1/2 teaspoon nutmeg
  • 1/2 teaspoon salt
  • 1/4 teaspoon ground ginger
  • 1/2 cup milk
  • 1 egg
  • 2 tablespoons vegetable oil

Instructions

  1. Preheat your oven to 400°F (200°C) and line a baking sheet with parchment paper.
  2. Combine your dry ingredients: In a bowl, whisk together flour, sugar, baking powder, cinnamon, nutmeg, salt, and ginger.
  3. Mix your wet ingredients: In another bowl, mix pumpkin puree, milk, egg, and vegetable oil.
  4. Combine wet and dry ingredients until just mixed.
  5. Scoop batter onto the prepared baking sheet.
  6. Bake for 15-20 minutes until golden brown.
  7. Cool on a wire rack before serving.

Notes

Serve warm with powdered sugar or maple syrup. Kids can help with mixing and scooping!

Nutrition

  • Serving Size: 1 fritter
  • Calories: 80
  • Sugar: 3g
  • Sodium: 200mg
  • Fat: 3g
  • Saturated Fat: 0.5g
  • Unsaturated Fat: 2g
  • Trans Fat: 0g
  • Carbohydrates: 12g
  • Fiber: 1g
  • Protein: 1g
  • Cholesterol: 30mg

Keywords: pumpkin fritters, baked fritters, healthy snacks, fall recipes, vegetarian

Did you make this recipe?

Share a photo and tag us — we can't wait to see what you've made!

June 25, 2026 |

Lemon Poppy Seed Muffins Recipe: Quick, Tender Morning Treat

Delicious lemon poppy seed muffins on a plate, perfect for breakfast.

Lemon Poppy Seed Muffins: A Zesty Twist on a Classic Treat

Welcome, fellow food lovers! Today, we are diving into the delightful world of Lemon Poppy Seed Muffins. These little wonders are not just any ordinary muffins; they are fluffy, zesty, and bursting with a light, refreshing flavor that can whisk you away to a sunny afternoon. Each bite is a symphony of sweetness, nuttiness, and a tangy citrus kick that makes your taste buds dance. Whether you’re enjoying them with a cup of coffee for breakfast or as a snack in the afternoon, these muffins are sure to put a smile on your face.

I like to think of muffins as little packages of happiness. They’re versatile enough for any time of day and are easy to whip up on a whim. Plus, who doesn’t love that warm, home-baked aroma that fills the kitchen? It’s like a hug from the oven! And let’s be honest; there’s something utterly satisfying about transforming simple ingredients into a delightful treat.

My journey with lemon poppy seed muffins dates back to childhood. I remember sunny weekends spent with my grandmother, who had a special knack for baking. With her apron tied tightly around her waist, she would have me help her zest lemons and measure out the poppy seeds. It was during those moments that I learned the magic of cooking with love. Every muffin she made was a testament to her warm spirit and culinary skills. Even now, when I whip up these muffins, the tang of lemon and the crunch of poppy seeds take me back to those cherished days spent in her cozy kitchen. It’s amazing how food can connect us to memories, isn’t it?

Ingredients

Here’s what you’ll need to create these lemony delights:

  • 1 1/2 cups all-purpose flour
    This is your base. If you’re looking for a healthier option, try using whole wheat flour or almond flour for a nutty flavor.

  • 1/2 cup sugar
    The sugar adds sweetness and helps the muffins rise. You can substitute coconut sugar or stevia for a healthier alternative, but keep in mind that it may alter the texture slightly.

  • 1 tablespoon poppy seeds
    These little seeds bring a nutty crunch and a dash of visual appeal. If you can’t find them, chia seeds make for a lovely substitute, albeit with a different flavor profile.

  • 1 tablespoon baking powder
    This is your leavening agent that helps the muffins rise beautifully. Make sure it’s fresh; old baking powder may lead to flat muffins.

  • 1/2 teaspoon salt
    A pinch of salt enhances all the flavors. Sea salt or kosher salt works well too!

  • 1/2 cup unsalted butter, melted
    Butter adds richness and moisture; you can swap it out for coconut oil or a plant-based butter if you’re aiming for a vegan version.

  • 1/2 cup milk
    Dairy milk adds moisture; almond or oat milk are excellent alternatives for dairy-free muffins.

  • 2 large eggs
    Eggs are essential for binding. If you need an egg substitute, 1/4 cup of applesauce or 1/4 cup of yogurt can work wonders.

  • 1 tablespoon lemon zest
    This is where the magic happens! Freshly zested lemons will give your muffins that bright, zesty flavor. Avoid the zest from older lemons, as they lack vibrancy.

  • 1/4 cup fresh lemon juice
    Fresh is key! Bottled lemon juice just doesn’t cut it when it comes to flavor – trust me!

Step-by-Step Instructions

Now, let’s get baking! Follow these steps closely for lemon poppy seed muffin perfection.

Step 1: Preheat the Oven

Start by preheating your oven to 350°F (175°C). This is an important step that ensures your muffins bake evenly.

Step 2: Prepare Your Muffin Tin

While the oven heats up, line a 12-cup muffin tin with paper liners or give it a good spray with non-stick cooking spray. If you’re a fan of paper-less baking, consider greasing the tin with a little butter, so they pop right out.

Step 3: Combine Dry Ingredients

In a large mixing bowl, whisk together the flour, sugar, baking powder, poppy seeds, and salt. This ensures that your dry ingredients are evenly distributed, which is key for consistent flavor in each muffin!

Step 4: Mix Wet Ingredients

In another bowl, combine the melted butter, milk, eggs, lemon zest, and lemon juice. Whisk them until they are well combined. Here’s a little tip: gently warm the milk before mixing to help create an even fluffier muffin.

Step 5: Combine the Mixtures

Pour the wet ingredients into the dry ingredients and stir until just combined. Be careful not to overmix; it’s okay if there are a few lumps—they’ll bake out! Overmixing can lead to dense muffins, and nobody wants a brick.

Step 6: Fill the Muffin Cups

Using a large spoon or an ice cream scoop, fill each muffin cup about 3/4 full. This gives them room to rise while keeping them perfectly muffin-shaped.

Step 7: Bake to Perfection

Pop the muffin tin into the preheated oven and bake for about 18-20 minutes, or until the tops are lightly golden and a toothpick inserted into the center comes out clean. Keep an eye on them as oven temperatures can vary!

Step 8: Cool and Enjoy

Once baked, let the muffins cool in the tin for about 5 minutes before transferring them to a wire rack to cool completely. This step is crucial for preventing sogginess!

Serving Suggestions

These lemon poppy seed muffins are best enjoyed warm. Serve them with a pat of butter or a drizzle of honey on top for an extra touch of sweetness. You can also pair them with a delightful cup of tea or coffee for the perfect afternoon pick-me-up. If you’re feeling a bit fancy, sprinkle some powdered sugar on top for a gorgeous finish!

Recipe Variations

Get ready to get creative! Here are a few fun ways to put your spin on these muffins:

  1. Lemon Blueberry Muffins: Add 1 cup of fresh or frozen blueberries for a fruity twist.

  2. Chia Seed Muffins: Replace poppy seeds with chia seeds for added health benefits and a slightly different texture.

  3. Lemon Almond Muffins: Substitute half the flour with almond flour for a nutty flavor profile, and sprinkle slivered almonds on top before baking.

  4. Coconut Lemon Muffins: Add shredded coconut into the batter for a tropical touch.

  5. Glazed Lemon Poppy Seed Muffins: Drizzle a simple lemon glaze made from powdered sugar and lemon juice over the cooled muffins for extra zing.

Chef’s Notes

I have to say, these lemon poppy seed muffins have been a staple in my kitchen for years. They’ve evolved over time; each batch is a little different based on what I have on hand or what I feel like that day. Sometimes, I’ll throw some fresh herbs like rosemary into the mix for a unique flavor twist. It’s all about having fun and making the recipe your own!

I remember one time I was hosting a brunch and completely forgot the muffins in the oven. The kitchen filled with an, let’s say, robust aroma! Thankfully, with a little bit of creativity (and some powdered sugar), I managed to turn those burnt muffins into a “charred citrus concept” dessert. Sometimes, kitchen mishaps can lead to the best stories!

FAQs and Troubleshooting

Q: My muffins turned out dry. What did I do wrong?
A: This usually happens if the flour was over-measured or if they were overbaked. Be sure to fluff your flour and spoon it into your measuring cup rather than scooping directly to avoid packing it down. Always check for doneness a few minutes early!

Q: Can I make these ahead of time?
A: Absolutely! These muffins store well in an airtight container for up to three days. You can also freeze them for longer storage. Just let them cool completely, then wrap them tightly in plastic wrap and place them in a freezer bag.

Q: How can I make these muffins vegan?
A: You can easily make these vegan by substituting the eggs with 1/4 cup applesauce or your favorite egg replacer, using plant-based butter, and opting for non-dairy milk.

Q: My muffins didn’t rise very much. What went wrong?
A: There are a couple of culprits here! Make sure your baking powder is fresh, and double-check that you’re using the correct measurements. Also, don’t skip preheating your oven; putting the batter in a cold oven can significantly impact rising.

Nutritional Info (Optional)

  • Serving Size: 1 muffin
  • Calories: 180
  • Protein: 3g
  • Fat: 8g
  • Total Carbohydrates: 25g
  • Fiber: 1g
  • Sugars: 8g

And there you have it! Your very own batch of scrumptious Lemon Poppy Seed Muffins, ready to share (or not!) with friends and family. I hope this recipe sparks joy and nostalgia in your kitchen, just like it has in mine. Happy baking, and until next time – keep it fresh, simple, and delicious!

Print

Lemon Poppy Seed Muffins

Fluffy, zesty muffins bursting with refreshing lemon flavor and a delightful crunch from poppy seeds.

  • Prep Time: 15 minutes
  • Cook Time: 20 minutes
  • Total Time: 35 minutes
  • Yield: 12 muffins 1x
  • Category: Breakfast
  • Method: Baking
  • Cuisine: American
  • Diet: Vegetarian

Ingredients

Scale
  • 1 1/2 cups all-purpose flour
  • 1/2 cup sugar
  • 1 tablespoon poppy seeds
  • 1 tablespoon baking powder
  • 1/2 teaspoon salt
  • 1/2 cup unsalted butter, melted
  • 1/2 cup milk
  • 2 large eggs
  • 1 tablespoon lemon zest
  • 1/4 cup fresh lemon juice

Instructions

  1. Preheat the oven to 350°F (175°C).
  2. Prepare your muffin tin by lining it with paper liners or spraying with non-stick spray.
  3. Combine the flour, sugar, baking powder, poppy seeds, and salt in a large mixing bowl.
  4. Mix the melted butter, milk, eggs, lemon zest, and lemon juice in another bowl until well combined.
  5. Pour the wet ingredients into the dry ingredients and stir until just combined.
  6. Fill each muffin cup about 3/4 full with the batter.
  7. Bake for 18-20 minutes or until golden brown and a toothpick comes out clean.
  8. Cool in the tin for 5 minutes before transferring to a wire rack to cool completely.

Notes

These muffins are best enjoyed warm, optionally served with butter or honey. They can also be frozen for longer storage.

Nutrition

  • Serving Size: 1 muffin
  • Calories: 180
  • Sugar: 8g
  • Sodium: 200mg
  • Fat: 8g
  • Saturated Fat: 5g
  • Unsaturated Fat: 3g
  • Trans Fat: 0g
  • Carbohydrates: 25g
  • Fiber: 1g
  • Protein: 3g
  • Cholesterol: 50mg

Keywords: muffins, lemon poppy seed, baking, breakfast, snacks

Did you make this recipe?

Share a photo and tag us — we can't wait to see what you've made!

June 25, 2026 |

One-Bowl Pumpkin Cream Cheese Bread: Easy Autumn Loaf

One-bowl pumpkin cream cheese bread loaf for autumn baking

Indulge in Comfort: Pumpkin Cream Cheese Bread

Welcome to my cozy kitchen where fall flavors are crafting magic! My name is Ava Carter, and today, I’m excited to share a quintessential autumn treat that’s bursting with warmth and nostalgia: Pumpkin Cream Cheese Bread. This delightful loaf is the perfect blend of tender pumpkin spice and rich cream cheese swirls, ensuring each bite feels like a warm hug on a crisp fall day.

With the leaves turning golden and the aroma of pumpkin spice wafting through the air, there’s no better time to dive into this easy-to-make bread! Imagine biting into a slice, where the fluffy pumpkin bread meets a luscious cream cheese filling that dances on your taste buds. It’s the kind of treat that’ll make your kitchen feel like the heart of your home, where friends gather, stories are shared, and the world slows down just a little. Let’s embrace these comforting times together.

A Slice of Nostalgia

Let me take you back to a childhood memory that embodies the spirit of this recipe. When I was younger, my mom would always make a special pumpkin bread each fall as soon as those first leaves turned. The entire house would be filled with the warm, spicy aroma, and I would sit eagerly at the kitchen counter, waiting for it to bake. I remember how she would let me help her mix the ingredients, guiding my small hands as we combined the pumpkin, spices, and sugars. It felt like pure alchemy.

Once the bread was out of the oven, it was tradition to have a slice with a pat of butter while sipping hot cocoa. As we gathered around the table, her soft laugh blended with stories about her childhood. It was in those moments that I learned the power of food as a connector, nourishing not just the body but the soul as well. This Pumpkin Cream Cheese Bread reflects those sweet memories, offering the same comforting flavors while adding a little twist with the creamy filling.

Ingredients

Let’s talk about what you’ll need to whip up this lovely bread. Here’s the list of ingredients along with some insightful tidbits to take your baking to the next level:

  • 1 cup pumpkin puree (not pumpkin pie filling)
    Fresh or canned – both work beautifully! Make sure it’s puree, though, for the right texture.

  • 1 large egg
    This helps bind all the ingredients together, ensuring a perfect rise. For a vegan option, you can use a flax egg (1 tablespoon ground flaxseed mixed with 2.5 tablespoons water).

  • 3/4 cup light brown sugar
    It gives the bread a lovely depth of flavor and moisture. If you prefer less sweetness, feel free to cut back or use coconut sugar.

  • 1/4 cup oil
    Use a neutral oil like canola or vegetable. You can sneak in some melted coconut oil for a delightful hint of flavor!

  • 1/4 cup sour cream
    Adds a velvety richness that keeps the bread nice and moist. Greek yogurt is a good substitute if you’ve run out of sour cream.

  • 1 teaspoon vanilla extract
    A kitchen staple that enhances all the other flavors! Choose real vanilla extract for the best taste.

  • 1/2 tablespoon pumpkin pie spice
    A blend of cinnamon, nutmeg, ginger, and allspice. You can make your own mix or substitute with a more straightforward blend of cinnamon and nutmeg if needed.

  • 1 cup all-purpose flour
    Using all-purpose gives the perfect balance of structure and fluffiness. Substitute with a 1:1 gluten-free flour blend if desired.

  • 1/2 teaspoon baking powder
    Helps the bread to rise beautifully.

  • 1/2 teaspoon baking soda
    Works together with the acidic sour cream to create a soft, tender crumb.

  • 1/4 teaspoon salt
    Enhances all the flavors—it’s a magical ingredient!

  • 4 ounces cream cheese (softened)
    The star of the show! Soften it well for easy swirling. Neufchâtel cheese can be used for a lighter version.

  • 1/4 cup granulated sugar
    Balances the tanginess of the cream cheese. You can reduce the sugar if you’re looking for a less sweet filling.

  • 3 tablespoons all-purpose flour
    This helps stabilize the cream cheese filling.

Step-by-Step Instructions

Ready to bake? Let’s make this tantalizing Pumpkin Cream Cheese Bread together! Grab your apron, and let’s get started!

  1. Preheat Your Oven
    Start by preheating your oven to 350°F (175°C). This is a crucial step to ensure even baking. While the oven heats up, prepare your loaf pan by greasing it or lining it with parchment paper for easy removal later.

  2. Mix the Pumpkin Batter
    In a large mixing bowl, combine the pumpkin puree, egg, light brown sugar, oil, sour cream, and vanilla extract. Whisk until everything is smooth and creamy. The colors should be warm and inviting! Chef’s Tip: Use a whisk for a fluffier texture, but a spatula will also work if you prefer. Just make sure everything is well combined!

  3. Incorporate Dry Ingredients
    In a separate bowl, whisk together the flour, pumpkin pie spice, baking powder, baking soda, and salt. Gradually add this dry mixture into the pumpkin mixture, stirring gently until just combined. Take care not to overmix; a few lumps are perfectly fine! Little hacks: Overmixing can lead to a dense loaf—nobody wants that!

  4. Prepare Cream Cheese Filling
    In another bowl, beat the softened cream cheese until smooth. Then add the granulated sugar and 3 tablespoons of flour, mixing until well combined. Tip: If you’re fighting with cold cream cheese, microwave it for about 10 seconds to make blending easier!

  5. Layering
    Pour half of the pumpkin batter into your prepared loaf pan. Next, spoon dollops of cream cheese mixture evenly over the batter. Follow this by pouring the remaining pumpkin batter over the top. Use a butter knife or skewer to swirl the cream cheese into the batter gently! Pro tip: Don’t overdo the swirling! A few gentle swirls are enough to create a beautiful marbled effect.

  6. Bake
    Place your loaf pan in the preheated oven and bake for 50-60 minutes. It’s ready when a toothpick inserted into the center comes out clean (a few crumbs are okay, just no wet batter!). Keep an eye on it! Ovens vary, so make adjustments as needed!

  7. Cool and Serve
    Once baked, let the bread cool in the pan for about 10 minutes before transferring it to a wire rack to cool completely. This will help maintain its shape. Don’t rush this step! Slicing too soon might lead to a crumbly mess. Patience is key!

Serving Suggestions

Now, let’s talk presentation! Slice your Pumpkin Cream Cheese Bread into generous pieces and serve it warm or at room temperature. Dust the top with a sprinkle of powdered sugar for a chic finish, or spread a little extra cream cheese frosting on top for the ultimate indulgence. Pair with a steaming cup of spiced chai or your favorite Fall latte, and let the flavors dance on your palate. Trust me, this is the kind of comforting treat you’ll want to share!

Recipe Variations

  1. Nutty Delight: Add 1/2 cup of chopped walnuts or pecans to the pumpkin batter for an added crunch.

  2. Chocolate Swirl: Mix in some chocolate chips or make a chocolate cream cheese filling instead of plain cream cheese.

  3. Spicy Twist: Increase the pumpkin pie spice to 1 tablespoon for an extra punch of flavor.

  4. Gluten-Free: Substitute regular flour with a 1:1 gluten-free baking blend to make this bread gluten-free without sacrificing taste.

  5. Vegan Version: Use a flax egg, coconut oil, and dairy-free cream cheese for a vegan take on this delicious treat.

Chef’s Notes

This recipe has been a labor of love over the years, evolving as I’ve experimented and adapted it for different tastes and dietary needs. I’ve received feedback from friends insisting that the frosting is a must, while others rave about the nutty version. Every time I bake this bread, it brings back beautiful memories of my childhood, mixed with the joy of sharing it with my own loved ones. I’ve enjoyed adding new twists and have even made mini-loaves as gifts during the fall season!

FAQs and Troubleshooting

1. Why did my bread come out dense?
This can happen if you overmix the batter or if you added too much flour. Try being gentle with the mixing and measuring flour accurately.

2. Can I store this bread?
Yes, once completely cooled, wrap it tightly in plastic wrap, and keep it in an airtight container at room temperature for up to 3 days. For longer storage, refrigerate it or freeze it for up to 3 months!

3. How do I know when my bread is done?
The toothpick test is key! Insert a toothpick into the center – it should come out clean or with a few moist crumbs. If it’s wet batter, give it more time. Remember: a little caution goes a long way!

4. Can I substitute pumpkin with another puree?
Absolutely! While pumpkin is traditional, you can try using butternut squash puree or carrot puree for a different flavor profile. Just ensure the consistency is similar.

Nutritional Info

While I believe in enjoying food fully, if you or your guests have specific dietary concerns, it’s worth noting that Pumpkin Cream Cheese Bread is rich in flavor, thanks to the wholesome ingredients. A slice (approximately 1/12 of the loaf) generally contains around 220 calories, with 7g of fat and 32g of carbohydrates. It’s a delightful treat but remember to savor it in moderation!


And there you have it! Your kitchen is about to be filled with the aroma of autumn. I hope this recipe for Pumpkin Cream Cheese Bread brings as much joy to your table as it has to mine. Whether you’re enjoying a slice on a cool morning or sharing it with friends, remember that cooking is all about love and connection. Happy baking!

Print

Pumpkin Cream Cheese Bread

A quintessential autumn treat featuring tender pumpkin spice and rich cream cheese swirls, perfect for cozy gatherings.

  • Prep Time: 15 minutes
  • Cook Time: 60 minutes
  • Total Time: 75 minutes
  • Yield: 12 servings 1x
  • Category: Bread
  • Method: Baking
  • Cuisine: American
  • Diet: Vegetarian

Ingredients

Scale
  • 1 cup pumpkin puree
  • 1 large egg
  • 3/4 cup light brown sugar
  • 1/4 cup oil
  • 1/4 cup sour cream
  • 1 teaspoon vanilla extract
  • 1/2 tablespoon pumpkin pie spice
  • 1 cup all-purpose flour
  • 1/2 teaspoon baking powder
  • 1/2 teaspoon baking soda
  • 1/4 teaspoon salt
  • 4 ounces cream cheese (softened)
  • 1/4 cup granulated sugar
  • 3 tablespoons all-purpose flour

Instructions

  1. Preheat your oven to 350°F (175°C) and prepare your loaf pan.
  2. Mix the pumpkin puree, egg, light brown sugar, oil, sour cream, and vanilla extract until smooth.
  3. Incorporate the flour, pumpkin pie spice, baking powder, baking soda, and salt into the wet mixture until just combined.
  4. Prepare the cream cheese filling by beating it until smooth, then mix in granulated sugar and flour.
  5. Layer half of the pumpkin batter in the pan, then dollops of cream cheese mixture, followed by the remaining pumpkin batter, swirling gently.
  6. Bake for 50-60 minutes or until a toothpick comes out clean.
  7. Cool in the pan for 10 minutes before transferring to a wire rack.

Notes

Consider adding nuts or chocolate chips for variations. Serve warm or at room temperature with a sprinkle of powdered sugar.

Nutrition

  • Serving Size: 1 slice
  • Calories: 220
  • Sugar: 15g
  • Sodium: 200mg
  • Fat: 7g
  • Saturated Fat: 3g
  • Unsaturated Fat: 4g
  • Trans Fat: 0g
  • Carbohydrates: 32g
  • Fiber: 1g
  • Protein: 3g
  • Cholesterol: 30mg

Keywords: pumpkin bread, cream cheese, autumn recipe, fall flavors, baking

Did you make this recipe?

Share a photo and tag us — we can't wait to see what you've made!

June 25, 2026 |

Apple Cobbler

Delicious homemade apple cobbler with tender apples and crispy topping

Apple Cobbler: A Comforting Classic with a Flavorful Twist

Welcome, food lovers! Today, we’re diving into one of the ultimate comfort desserts—apple cobbler. There’s just something magical about the aroma of baked apples mixed with spices wafting through the kitchen that instantly makes you feel at home. Whether you’re hosting a cozy dinner party or simply want to treat yourself after a long day, this apple cobbler is sure to delight your taste buds and warm your soul.

A Taste of Nostalgia

Let me take you back to my childhood—hot summer afternoons spent at my grandmother’s house, where the kitchen was always bustling. I remember the sound of her antique wooden spoon clinking against the mixing bowl as she prepared her famous apple cobbler. She had a knack for turning simple ingredients into something extraordinary, and that recipe was her crown jewel. Whenever she pulled the cobbler out of the oven, the sweet, cinnamon-scented air would wrap around us like a warm hug.

On those lazy afternoons, we’d gather around the table, plates piled high with that toasty, bubbling dessert. The first scoop would always be the best—smooth, soft apples paired with a crispy topping, often dished out with a scoop of vanilla ice cream melting into it. There’s something about those memories that fills me with joy, and it inspires me to share this classic dish with all of you today. It reminds us that the kitchen can be a gathering place, a source of comfort, and a canvas for creativity.

Ingredients

Here’s what you’ll need to whip up this delightful apple cobbler. Each ingredient plays a key role in creating the perfect balance of flavor and texture.

  • 6 cups sliced apples

    • Apple varieties like Granny Smith, Honeycrisp, or Fuji add the perfect balance of sweetness and tartness. Don’t hesitate to mix and match!
  • 1 cup granulated sugar

    • This is essential for sweetening your apples. If you’re looking to cut back on sugar, you can substitute half with honey or maple syrup for a more natural option!
  • 1 teaspoon cinnamon

    • Cinnamon is the star spice in this recipe, bringing warmth and comfort. For an extra kick, try adding some cardamom or allspice!
  • 1/4 teaspoon nutmeg

    • Just a hint of nutmeg enhances the flavors beautifully. If you’re not a fan of nutmeg, feel free to leave it out.
  • 1 tablespoon lemon juice

    • This balances the sweetness of the apples and keeps them from browning. You can use lime juice in a pinch for a zesty twist!
  • 1 cup all-purpose flour

    • This forms the base of your topping. If you’re looking for a gluten-free option, almond flour or a gluten-free baking blend works wonders!
  • 1 cup rolled oats

    • Oats bring a chewy texture—perfect for that comforting topping. For a nutty flavor, try substituting half with chopped nuts like pecans or walnuts.
  • 1/2 cup brown sugar

    • This adds depth and a slight hint of caramel flavor. You can easily swap it with coconut sugar for a healthier option!
  • 1/2 cup unsalted butter, melted

    • Butter adds richness to the cobbler. If you’d like to lighten it up, you can use coconut oil instead for a dairy-free version.
  • 1/4 teaspoon salt

    • A pinch of salt enhances all the flavors in the dish, making it taste richer. Always a must!
  • Vanilla ice cream (for serving)

    • A scoop of creamy vanilla ice cream is a classic complement. Try caramel or cinnamon ice cream for an extra treat!

Step-by-Step Instructions

Now that we have our ingredients ready, it’s time to get to the fun part—cooking! Follow these steps to create a mouthwatering apple cobbler that’ll have everyone begging for seconds.

  1. Preheat Your Oven:

    • Preheat your oven to 350°F (175°C). This is crucial because you want your cobbler to bake evenly and achieve that golden, crispy topping.
  2. Prepare the Apples:

    • In a large mixing bowl, toss together the sliced apples, granulated sugar, cinnamon, nutmeg, and lemon juice until the apples are well-coated.
    • Tip: If you’re using different apple varieties, combine them for a more layered flavor profile. The key here is to let them mingle with the sugar and spices for at least 10 minutes!
  3. Make the Topping:

    • In another bowl, mix together the flour, oats, brown sugar, salt, and melted butter.
    • Chef’s Hack: Use your hands to crumble the mixture. It might feel messy, but that’s where the magic happens! You want a crumbly texture that will bake up crispy.
  4. Combine Layers:

    • Pour the apple mixture into a greased 9×13-inch baking dish, making sure to spread it evenly. Sprinkle the topping mixture generously over the apples.
    • Tip: Don’t worry about covering every inch. Leaving some gaps allows the heat to penetrate and creates those delightful crispy bits!
  5. Bake to Perfection:

    • Place your baking dish in the oven and bake for about 40-45 minutes or until the apples are bubbling and the topping is golden brown.
    • Pro Tip: Keep an eye on it towards the end of the baking time—you want it bubbly and golden, but not burnt!
  6. Cool and Serve:

    • Allow the cobbler to cool for 10-15 minutes before serving. This sets everything and makes it easier to scoop out.
    • Nothing feels better than serving warm cobbler topped with that creamy ice cream as it slowly melts into the sweet filling!

Serving Suggestions

For the ultimate presentation, serve your warm apple cobbler in individual ramekins or a big scoop in cozy bowls. Top each serving with a generous scoop of vanilla ice cream, and perhaps a sprig of mint for a pop of color. Drizzle with caramel sauce if you’re feeling a little extra! It’s all about creating that inviting, shareable moment around the table.

Recipe Variations

  1. Berry-Apple Delight:

    • Add mixed berries (like blueberries or raspberries) to your apple mixture for a sweet and tangy burst of flavor!
  2. Caramel Swirl:

    • Drizzle some caramel sauce over the apple layer before adding the topping for an indulgent twist.
  3. Nutty Crumble:

    • Include chopped pecans or walnuts in the crumble topping for added crunch and nuttiness.
  4. Spiced Pear Cobbler:

    • Swap out some apples for ripe pears for a different but equally delicious flavor combination.
  5. Oatless Option:

    • For a lighter topping, substitute the oats with crushed graham crackers mixed with a bit of butter for that classic dessert vibe!

Chef’s Notes

This apple cobbler recipe has been a staple in my kitchen for years, and it’s evolved over time—just like us! I started with my grandmother’s version, which was perfectly lovely but lacked a bit of texture. By incorporating oats and tweaking the spices, I created my own spin. One thing remains the same though: it’s still about those cozy memories and the joy of sharing this dessert with family and friends.

Now, imagine pulling this lively cobbler out of the oven and the hearts it brings together—each slice tells a story and adds a note of warmth to any gathering. It’s truly a simple yet profound expression of love!

FAQs and Troubleshooting

1. What if my apples are too tart?

  • If your apples are too tart, consider adding a bit more sugar to balance the flavors. A drizzle of honey or maple syrup can also help enhance the sweetness!

2. My cobbler topping is too dry. What should I do?

  • If your topping feels too dry before baking, try adding a tablespoon or two more melted butter until it reaches a crumbly but moist consistency.

3. Can I make this ahead of time?

  • Absolutely! You can prepare both the apple filling and the topping a day ahead. Just assemble and bake when you’re ready to serve for that freshly-baked goodness!

4. How do I store leftovers?

  • Store any leftovers in an airtight container in the refrigerator for 3-4 days. To reheat, pop it in the oven at 350°F (175°C) until warmed through—or enjoy it cold (though I highly recommend it warm!).

Nutritional Info (Optional)

For those who might be keeping track, a typical serving of apple cobbler (about 1/8 of the pan) contains:

  • Calories: Approximately 250-300
  • Protein: 3g
  • Fat: 12g
  • Carbohydrates: 40g
  • Fiber: 2g
  • Sugar: 20g

Now you know all the ins and outs of making a delightful apple cobbler! The best part? It’s as easy as it is delicious. I can’t wait for you to create your own memories with this dish. So grab your aprons, gather your ingredients, and let the magic begin! Happy baking! 🍏🥧

Print

Apple Cobbler

A comforting and classic apple cobbler with a delicious twist.

  • Prep Time: 15 minutes
  • Cook Time: 45 minutes
  • Total Time: 60 minutes
  • Yield: 8 servings 1x
  • Category: Dessert
  • Method: Baking
  • Cuisine: American
  • Diet: Vegetarian

Ingredients

Scale
  • 6 cups sliced apples
  • 1 cup granulated sugar
  • 1 teaspoon cinnamon
  • 1/4 teaspoon nutmeg
  • 1 tablespoon lemon juice
  • 1 cup all-purpose flour
  • 1 cup rolled oats
  • 1/2 cup brown sugar
  • 1/2 cup unsalted butter, melted
  • 1/4 teaspoon salt
  • Vanilla ice cream (for serving)

Instructions

  1. Preheat your oven to 350°F (175°C).
  2. In a large mixing bowl, toss together the sliced apples, granulated sugar, cinnamon, nutmeg, and lemon juice until the apples are well-coated.
  3. Mix together the flour, oats, brown sugar, salt, and melted butter in another bowl.
  4. Pour the apple mixture into a greased 9×13-inch baking dish.
  5. Sprinkle the topping mixture generously over the apples.
  6. Bake for about 40-45 minutes or until the apples are bubbling and the topping is golden brown.
  7. Allow the cobbler to cool for 10-15 minutes before serving.

Notes

Serve warm topped with vanilla ice cream for the ultimate treat. You can also drizzle with caramel sauce for extra sweetness!

Nutrition

  • Serving Size: 1 serving
  • Calories: 275
  • Sugar: 20g
  • Sodium: 100mg
  • Fat: 12g
  • Saturated Fat: 7g
  • Unsaturated Fat: 4g
  • Trans Fat: 0g
  • Carbohydrates: 40g
  • Fiber: 3g
  • Protein: 3g
  • Cholesterol: 30mg

Keywords: apple cobbler, dessert, comfort food, baking, thanksgiving dessert

Did you make this recipe?

Share a photo and tag us — we can't wait to see what you've made!