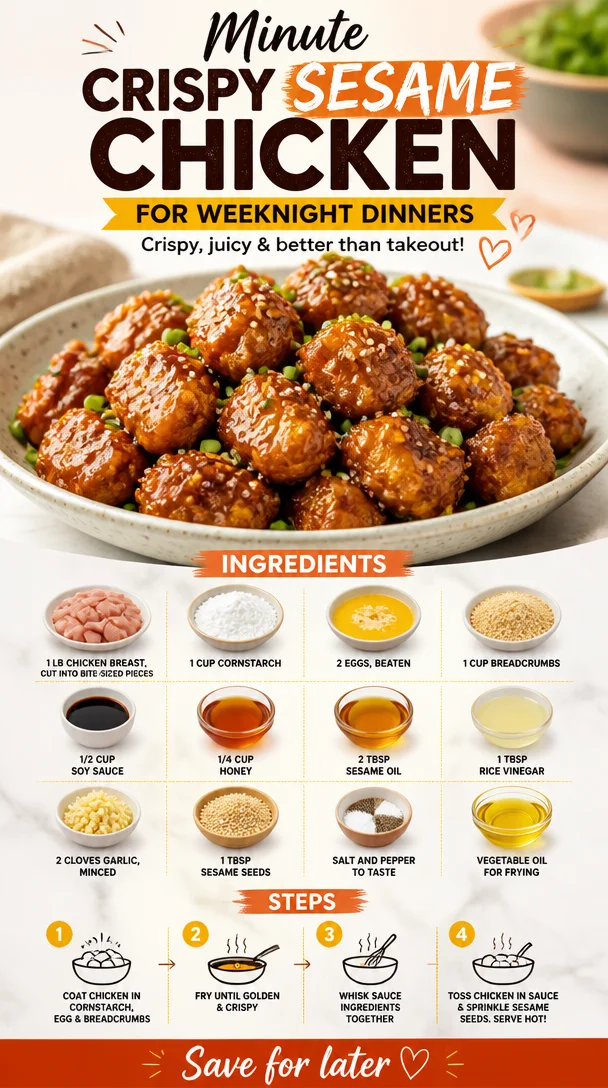
Minute Crispy Sesame Chicken for Weeknight Dinners
Crispy Sesame Chicken: A Flavorful Journey
Welcome to another delightful adventure in the kitchen, where I, Ava Carter, am thrilled to share one of my all-time favorite recipes with you—Crispy Sesame Chicken! 🥢✨ This dish is not only a crowd-pleaser but also a fantastic way to bring the warmth of Asian-inspired cooking right into your home. Whether you’re dining with family or whipping up a feast for friends, this crispy delight is sure to impress.
Introduction
Imagine this: the aroma of fragrant sesame oil and garlic wafts through the air, mingling with the sizzle of chicken in a hot pan. As you take your first bite, the crunchy exterior gives way to tender, juicy chicken, and you can’t help but smile. That’s the magic of Crispy Sesame Chicken!
In my culinary adventures, I believe that every great recipe starts with a story—it’s about flavor, love, and a sprinkle of nostalgia. For me, this dish is reminiscent of cozy evenings spent at local Asian restaurants, where the enticing scent of sesame filled the air, and the ambiance was vibrant with laughter and conversation. Each bite was a celebration, and I wanted to bring that experience into my own home kitchen.
But here’s the best part about this recipe: it’s simple enough for a weeknight dinner yet impressive enough for special occasions. Plus, it’s versatile! You can whip up a dish that’s crispy, savory, and slightly sweet. Are you ready to start cooking? Let’s dive into it!
Personal Story
Growing up, my family had a tradition of going out for Chinese food every Friday night. It was a mini celebration to kick off the weekend, and each restaurant had its own special spin on beloved dishes. One evening, I found myself captivated by a dish of crispy sesame chicken, its glistening sauce and crunchy bits capturing my attention immediately. Dipping my fork into the velvety sauce and indulging in the textures was pure heaven!
That moment always stuck with me. Many years later, during a culinary class, I decided to recreate that magical dish. The first time I perfected it, I couldn’t wait to share it with friends and family. Watching them savor each bite brought back fond memories while creating new ones. This recipe feels like a bridge between my past and present—a celebration of taste and nostalgia in every crispy, sesame-infused bite.
Ingredients
To make your Crispy Sesame Chicken, you’ll need the following ingredients:
-
1 lb chicken breast, cut into bite-sized pieces
A lean protein that cooks quickly and absorbs flavors beautifully. Chicken thighs can also be used for extra juiciness. -
1 cup cornstarch
This is the secret to that irresistible crunch! It creates a light, crispy coating. If you want to keep it gluten-free, use arrowroot powder as a substitute. -
2 eggs, beaten
This adds moisture and helps the cornstarch adhere to the chicken. Flaxseed meal mixed with water can be a great vegan replacement. -
1 cup breadcrumbs
I recommend panko breadcrumbs for an extra crispy texture! You can swap with crushed rice crackers for a gluten-free option or use whole-wheat breadcrumbs for a healthier version. -
1/2 cup soy sauce
A savory backdrop for the dish; it infuses the chicken with deep umami flavor. For a gluten-free version, use tamari. -
1/4 cup honey
This adds a delightful sweetness and balances the saltiness of soy sauce. Maple syrup can be a great plant-based substitute. -
2 tablespoons sesame oil
A key flavor component! It adds a nutty aroma. If you’re sensitive to sesame, consider using a neutral oil like canola instead. -
1 tablespoon rice vinegar
For that tangy kick! Apple cider vinegar can be used if rice vinegar isn’t available. -
2 cloves garlic, minced
Fresh garlic enhances the flavor of the sauce, making it aromatic and robust. You can use garlic powder in a pinch—just adjust the amount to your taste. -
1 tablespoon sesame seeds
These little gems provide a lovely crunch and nutty flavor! Feel free to toast them for an extra depth of flavor. -
Salt and pepper to taste
Simple seasoning that elevates the dish! -
Vegetable oil for frying
A neutral oil is best for frying; canola or peanut oil works wonders!
Step-by-Step Instructions
Let’s get cooking! Follow these steps for making your Crispy Sesame Chicken:
1. Preparing the Chicken
Start by cutting your chicken breasts into bite-sized pieces (approximately 1-inch cubes). This ensures even cooking and makes it easy to eat. Season the chicken lightly with salt and pepper—don’t oversalt, as the soy sauce will add plenty of flavor.
2. Creating the Coating
In one mixing bowl, whisk together the eggs until they’re frothy. In another bowl, put the cornstarch, and in a third bowl, add the breadcrumbs. This three-bowl method may seem like a bit of a hassle, but I promise it’s worth it! This setup prevents clumping and ensures an even coating.
3. Coating the Chicken
Take each piece of chicken and first dip it in the cornstarch, shaking off the excess. Then dip it into the egg mixture, allowing it to coat evenly. Finally, roll it in the breadcrumbs, pressing down slightly to ensure they stick. Repeat until all the chicken pieces are coated.
Pro Tip: If you want an extra layer of crunch, feel free to double-dip in the cornstarch and egg mixture before the breadcrumbs!
4. Heating the Oil
In a large skillet or wok, heat about 1/4 inch of vegetable oil over medium-high heat. You want the oil to be hot enough for frying, but not smoking. A good test is to drop a few breadcrumbs into the oil; they should sizzle immediately.
5. Frying the Chicken
Working in batches to avoid overcrowding the pan (which can lower the oil temperature), carefully add the coated chicken pieces to the hot oil. Fry them for about 4-5 minutes on each side until they are golden brown and crispy. Use tongs to turn them over for even cooking!
Chef Hack: To keep the fried chicken warm while you finish cooking the rest, place the cooked pieces on a wire rack set over a baking sheet. This allows any excess oil to drip off while keeping them crispy!
6. Making the Sauce
Once the chicken is all fried up and golden, it’s time for the best part! In a small bowl, mix together the soy sauce, honey, sesame oil, rice vinegar, and minced garlic. Pour this delightful mixture into a clean skillet over medium heat, bringing it to a simmer.
7. Tossing It All Together
When the sauce is warm, add the crispy chicken pieces into the skillet. Gently toss the chicken in the sauce until entirely coated. Sprinkle the sesame seeds over the top and mix once more to distribute evenly.
8. Final Touches
Remove from heat and let sit for a moment to allow the flavors to meld. It’s now time to serve!
Serving Suggestions
Plate your Crispy Sesame Chicken on a vibrant dish, garnished with additional sesame seeds and a sprinkle of sliced green onions for a pop of color. This dish pairs beautifully with fluffy white rice, steamed broccoli, or a light salad. You could even serve it in lettuce wraps for a fun twist! Don’t forget to drizzle some of that luscious sauce over the top for an extra touch of sweetness.
Recipe Variations
Want to get creative with your Crispy Sesame Chicken? Here are a few delicious twists:
- Spicy Sesame Chicken: Add a touch of sriracha or red pepper flakes to the sauce for a spicy kick!
- Honey Garlic Version: Swap honey for brown sugar in the sauce and add chopped green onions and sesame seeds right before serving for a fresh and zesty flavor.
- Orange Sesame Chicken: Incorporate fresh orange juice and zest into the sauce for a citrusy bright twist.
- Vegetarian Alternative: Use tofu instead of chicken—press it to remove moisture, coat, and fry for a delightful vegetarian dish!
- Crispy Cauliflower: For a vegan option, replace chicken with bite-sized cauliflower florets. Coat and fry in the same way for a beautiful crispy dish!
Chef’s Notes
Cooking this Crispy Sesame Chicken has been a joyous journey! I remember the first time I tried it with my kids; their eyes lit up just like mine once did at that restaurant all those years ago. We dressed up a little for the evening, set the table with chopsticks, and indulged in this crispy wonder. It turned a regular dinner into a celebration!
Over the years, I’ve played with this recipe; sometimes, I add different sauces, and other times, I go lighter on the sugar. Each time, it transforms into something new and exciting, but it always brings back that warm feeling of home and togetherness.
FAQs and Troubleshooting
Q: Why did my chicken turn out soggy?
A: This can happen if the oil isn’t hot enough, or if the chicken pieces are overcrowded in the pan. Make sure your oil is hot, and fry in batches to achieve that perfect crispy texture!
Q: Can I bake this chicken instead of frying?
A: Absolutely! Preheat your oven to 400°F (200°C). Place the breaded chicken on a baking sheet lined with parchment paper. Lightly spray with cooking spray or drizzle with a bit of oil and bake for about 20-25 minutes, turning halfway through.
Q: How can I store leftover chicken?
A: Store leftover Crispy Sesame Chicken in an airtight container in the fridge for up to 3 days. Reheat in the oven or an air fryer to regain its crispy texture!
Q: Can I use other proteins?
A: Yes! Feel free to try shrimp, beef, or even tempeh for a twist. Just adjust cooking times accordingly.
Nutritional Info
While I believe in enjoying good food, here’s a quick overview of the nutritional aspects (per serving, assuming you eat a moderate portion):
- Calories: Approximately 350
- Protein: 24g
- Carbohydrates: 30g
- Fat: 15g
- Fiber: 1g
Crispy Sesame Chicken is not only delicious but also fairly balanced!
Conclusion
I hope you enjoyed this colorful journey through the creation of Crispy Sesame Chicken! Cooking doesn’t have to be intimidating; it should be fun and filled with flavorful experiences. So gather your ingredients, invite some friends over, and enjoy the process of making this delicious recipe as much as savoring each delightful bite!
Here’s to keeping it fresh, simple, and seriously delicious—until next time, happy cooking! 🌟
PrintCrispy Sesame Chicken

A delightful Asian-inspired dish featuring crispy chicken coated in a savory sesame sauce that balances flavors beautifully.
- Prep Time: 15 minutes
- Cook Time: 25 minutes
- Total Time: 40 minutes
- Yield: 4 servings 1x
- Category: Main Course
- Method: Frying
- Cuisine: Asian
- Diet: Paleo
Ingredients
- 1 lb chicken breast, cut into bite-sized pieces
- 1 cup cornstarch
- 2 eggs, beaten
- 1 cup panko breadcrumbs
- 1/2 cup soy sauce
- 1/4 cup honey
- 2 tablespoons sesame oil
- 1 tablespoon rice vinegar
- 2 cloves garlic, minced
- 1 tablespoon sesame seeds
- Salt and pepper to taste
- Vegetable oil for frying
Instructions
- Start by cutting your chicken breasts into bite-sized pieces (approximately 1-inch cubes). Season the chicken lightly with salt and pepper.
- In one mixing bowl, whisk together the eggs until they’re frothy. In another bowl, put the cornstarch, and in a third bowl, add the breadcrumbs.
- Take each piece of chicken and dip it in the cornstarch, then into the egg mixture, and finally roll it in the breadcrumbs.
- Heat about 1/4 inch of vegetable oil over medium-high heat until hot.
- Working in batches, add the coated chicken pieces to the hot oil and fry for about 4-5 minutes each side until golden brown.
- In a small bowl, mix together the soy sauce, honey, sesame oil, rice vinegar, and minced garlic. Pour into a skillet and bring to a simmer.
- Add the crispy chicken pieces into the skillet and toss until coated. Sprinkle sesame seeds over the top.
- Remove from heat and let sit for a moment before serving.
Notes
This dish pairs beautifully with white rice, steamed broccoli, or lettuce wraps. For a twist, try adding sriracha for heat or substituting with tofu for a vegetarian option.
Nutrition
- Serving Size: 1 serving
- Calories: 350
- Sugar: 15g
- Sodium: 800mg
- Fat: 15g
- Saturated Fat: 2g
- Unsaturated Fat: 8g
- Trans Fat: 0g
- Carbohydrates: 30g
- Fiber: 1g
- Protein: 24g
- Cholesterol: 120mg
Keywords: Crispy Chicken, Sesame Chicken, Asian Cuisine, Easy Recipes, Dinner
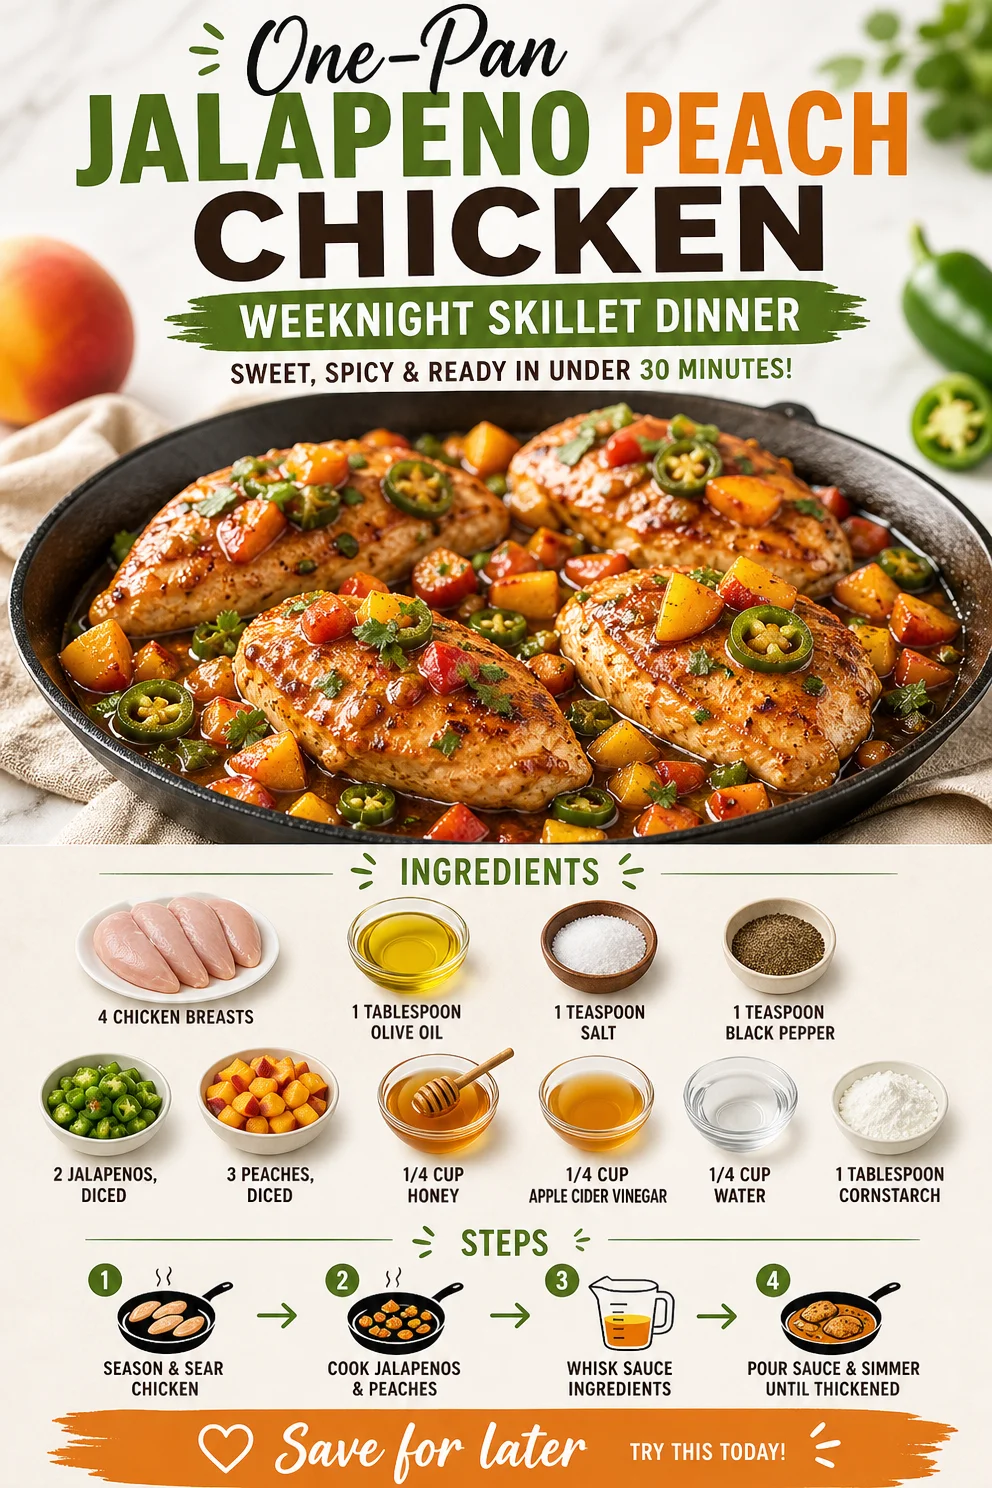
One-Pan Jalapeno Peach Chicken Weeknight Skillet Dinner
Jalapeno Peach Chicken: A Flavor Explosion
Welcome to Clean Plate Cravings, where we believe that food should not only nourish your body but also light up your taste buds! Today, I’m thrilled to share a recipe that beautifully marries sweet and spicy: Jalapeno Peach Chicken. This dish is perfect for those summer nights when you want something refreshing yet satisfying, and believe me, the flavor combination will have you planning dinner parties just to show off your culinary skills!
Imagine slicing into a juicy piece of chicken, perfectly cooked and glazed with a sweet yet spicy sauce that’s bursting with flavor. You can taste the warmth of the jalapenos and the sweetness of fresh peaches harmonizing beautifully, creating a mouthwatering experience that your family and friends will rave about. And the best part? It’s super simple to whip up! Whether you’re entertaining guests or just enjoying a cozy dinner at home, this dish will surely hit the spot.
A Personal Touch: Family Memories
Let me take you back to my childhood for a moment. Growing up in a vibrant, family-oriented home, meals were always a big deal. My mom had this magical ability to create dishes that brought the family together around the dinner table. One of our favorite summer rituals was peach picking at a local farm followed by an impromptu BBQ in the backyard. We’d always come home with bags full of sun-kissed peaches, and my mom would concoct the most delectable recipes to showcase their sweetness.
One summer, she decided to make a spicy chicken dish that combined those juicy peaches with jalapenos she’d grown in our garden. The way the sweetness of the peaches complemented the fiery kick of jalapenos was nothing short of heavenly. The recipe has since evolved, but the essence remains the same: the balance of flavors is key! That childhood memory is what inspired me to create this Jalapeno Peach Chicken dish, and I can’t wait for you to experience it for yourself!
Ingredients
Here’s what you’ll need to whip up this tantalizing dish:
-
4 Chicken Breasts
Juicy and packed with protein, chicken breasts are perfect for this recipe. If you’re looking for alternatives, boneless, skinless thighs will work beautifully, adding a hint of richness. -
1 Tablespoon Olive Oil
A fantastic fat for sautéing, olive oil adds a delicious depth of flavor. You could swap it for avocado oil or even coconut oil for a different twist. -
1 Teaspoon Salt
Essential for bringing out all the flavors. If you’re watching your sodium intake, feel free to use a low-sodium salt alternative. -
1 Teaspoon Black Pepper
This adds that lovely kick! Freshly cracked black pepper is always a good idea for the best flavor. -
2 Jalapenos, Diced
The star of our show! Jalapenos bring both heat and flavor. If you prefer milder heat, you can remove the seeds and membranes. For a bolder experience, add an extra jalapeno! -
3 Peaches, Diced
Fresh peaches bring that sweet contrast to the dish. If peaches are out of season, nectarines or canned peaches (in juice, not syrup!) can work well too. -
1/4 Cup Honey
This natural sweetener enhances the glaze and balances the heat. Maple syrup can be a great vegan alternative. -
1/4 Cup Apple Cider Vinegar
Adds a tangy zest to the dish. White wine vinegar can work in a pinch if you don’t have apple cider vinegar handy. -
1/4 Cup Water
This helps to thin out the glaze, allowing for even distribution among the chicken. -
1 Tablespoon Cornstarch
When mixed with a little water, cornstarch acts as a thickener. If you prefer not to use cornstarch, you can use arrowroot powder, but keep in mind that it’s a more sensitive thickening agent.
Step-by-Step Instructions
-
Prepare the Chicken:
Start by gently patting your chicken breasts dry with a paper towel—this helps to get a nice sear. Season both sides of the chicken generously with salt and black pepper. You’ll be amazed at how much flavor this brings! -
Sauté the Chicken:
Heat the olive oil in a large skillet over medium-high heat. Once the oil is shimmering, carefully add the chicken breasts. Sear them for about 5-6 minutes on each side or until golden brown. This step locks in all the juices! (Tip: Avoid overcrowding the pan; you may need to cook in batches if your skillet isn’t large enough.) -
Add the Jalapenos and Peaches:
Once your chicken is beautifully browned, add the diced jalapenos and peaches right into the skillet. Stir everything around, letting the flavors meld for a couple of minutes. The peaches will soften and start releasing their juices, which is exactly what we want! -
Make the Glaze:
In a small bowl, whisk together the honey, apple cider vinegar, water, and cornstarch until smooth. Pour this mixture over the chicken, jalapenos, and peaches. Stir to coat everything evenly. Allow this to simmer on low heat for about 10-12 minutes, or until the chicken is cooked through (you can use a meat thermometer—165°F is your magic number!). -
Finishing Touches:
As the sauce simmers, it will thicken beautifully. Taste it and adjust the seasoning if needed! If you like more heat, toss in some crushed red pepper flakes for an extra kick! Once ready, remove from heat and let it rest for a few minutes.
Serving Suggestions
Serve your Jalapeno Peach Chicken hot from the skillet! Plate it up with a generous scoop of the peach and jalapeno mix draped over the chicken. Pair it with fluffy rice, creamy mashed potatoes, or a vibrant green salad—whatever fits your vibe! Garnish with fresh herbs like cilantro or parsley for an extra pop of color and flavor.
Recipe Variations
-
Tropical Twist: Add a splash of coconut milk when making the glaze for a creamy, tropical finish—perfect for a summer cookout!
-
Grill It: Want a smoky flavor? Marinate the chicken in the glaze for a few hours, then grill it for an amazing charred taste!
-
Spice Lovers: Add a sprinkle of cayenne pepper or red chili flakes for an extra spicy kick!
-
Tempeh or Tofu Switch: For a vegan option, replace chicken with tempeh or firm tofu. Slice and marinate for at least 30 minutes before cooking.
Chef’s Notes
This recipe is a personal favorite that holds a blend of nostalgia and flavor magic! Over the years, I’ve experimented with different fruits and spices, and while peaches will always have a special place in my heart, don’t hesitate to get creative! You might find a new favorite combination that inspires you as much as my childhood did! And let me tell you, I have had more than my fair share of "oops" moments in the kitchen—like the time I mistook cayenne for paprika. Let’s just say, some of my friends were sweating bullets that night!
FAQs and Troubleshooting
Q: How can I tell when my chicken is done?
A: The best way to check is to use a meat thermometer—you want to hit 165°F. If you don’t have one, cut into the thickest part of the chicken. The juices should run clear, and there shouldn’t be any pink inside.
Q: What if my sauce is too thin?
A: If your sauce doesn’t thicken up as expected, mix a little cornstarch with cold water (about 1 tablespoon of each), then stir it into the simmering sauce until it thickens!
Q: Can I make this ahead of time?
A: Absolutely! You can prep the chicken and sauce separately and keep them in the fridge for up to a day. When ready to serve, just reheat everything in a skillet until warmed through.
Q: What should I serve with Jalapeno Peach Chicken?
A: This dish pairs beautifully with rice, quinoa, or even a light salad. You can also serve it with grilled veggies or garlic bread for a more hearty meal!
Nutritional Info (Optional)
While I usually focus on the joy of cooking, I know many of you are mindful of nutrition as well. This Jalapeno Peach Chicken recipe is a great source of protein while bringing healthy vitamins from the peaches and jalapenos. Each serving is approximately:
- Calories: 450
- Protein: 34g
- Carbohydrates: 45g
- Fat: 15g
I hope you’re as excited to make this Jalapeno Peach Chicken as I am to share it! Let’s keep those kitchen adventures going—share your culinary creations and let me know how you tweak this recipe. Happy cooking!
PrintJalapeno Peach Chicken

A flavorful dish that beautifully marries sweet peaches and spicy jalapenos, perfect for summer nights.
- Prep Time: 15 minutes
- Cook Time: 30 minutes
- Total Time: 45 minutes
- Yield: 4 servings 1x
- Category: Main Course
- Method: Sautéing
- Cuisine: Fusion
- Diet: Gluten-Free
Ingredients
- 4 Chicken Breasts
- 1 Tablespoon Olive Oil
- 1 Teaspoon Salt
- 1 Teaspoon Black Pepper
- 2 Jalapenos, Diced
- 3 Peaches, Diced
- 1/4 Cup Honey
- 1/4 Cup Apple Cider Vinegar
- 1/4 Cup Water
- 1 Tablespoon Cornstarch
Instructions
- Prepare the Chicken: Start by gently patting your chicken breasts dry with a paper towel. Season both sides of the chicken with salt and black pepper.
- Sauté the Chicken: Heat the olive oil in a large skillet over medium-high heat. Add the chicken breasts and sear them for about 5-6 minutes on each side.
- Add the Jalapenos and Peaches: Once the chicken is browned, add the diced jalapenos and peaches to the skillet. Stir to combine.
- Make the Glaze: In a small bowl, whisk together honey, apple cider vinegar, water, and cornstarch. Pour this mixture over the chicken and stir to coat.
- Finishing Touches: Allow the mixture to simmer on low heat for about 10-12 minutes until the chicken is cooked through. Adjust seasoning as needed.
Notes
For a tropical twist, add coconut milk to the glaze. For a smoky flavor, grill the marinated chicken. Substitute chicken with tempeh or tofu for a vegan option.
Nutrition
- Serving Size: 1 serving
- Calories: 450
- Sugar: 35g
- Sodium: 600mg
- Fat: 15g
- Saturated Fat: 2g
- Unsaturated Fat: 10g
- Trans Fat: 0g
- Carbohydrates: 45g
- Fiber: 3g
- Protein: 34g
- Cholesterol: 75mg
Keywords: chicken, peaches, jalapenos, summer dish, easy recipe
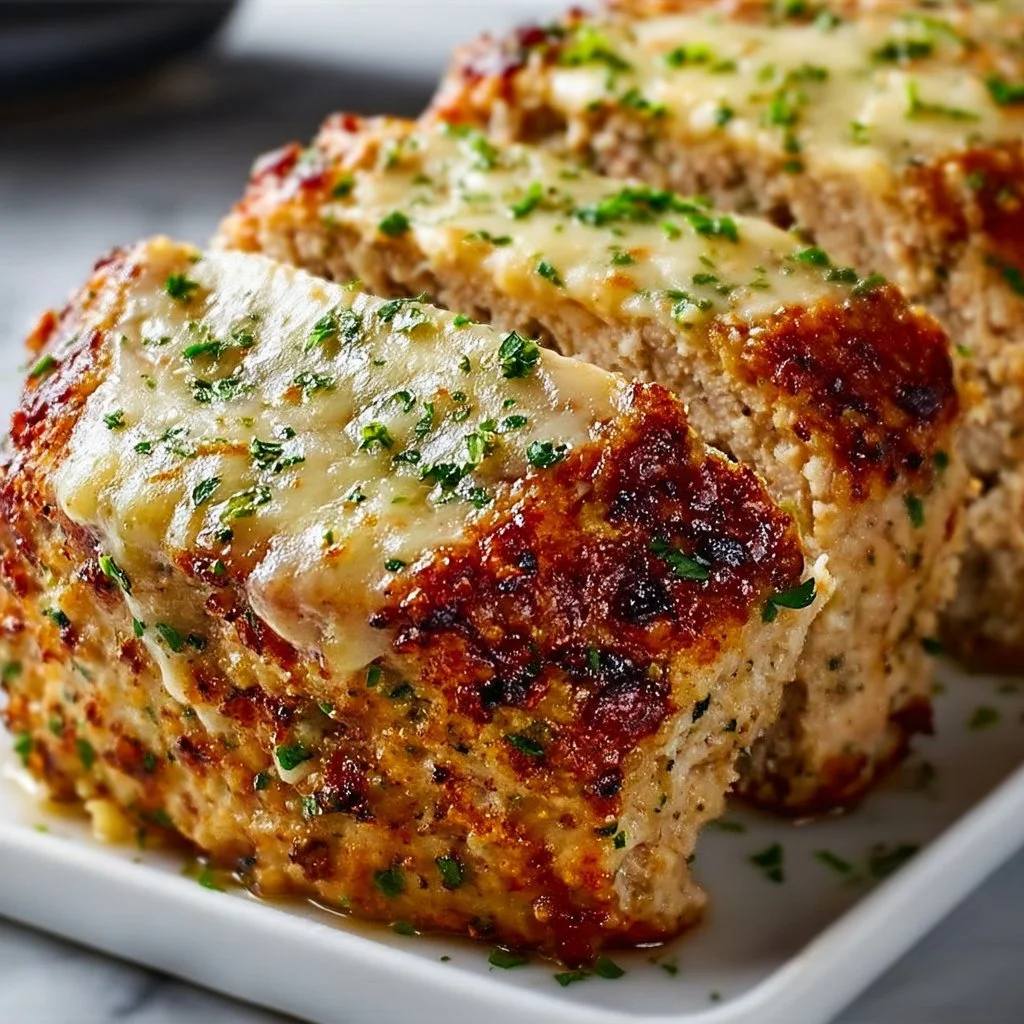
Garlic Parmesan Chicken Meatloaf
Garlic Parmesan Chicken Meatloaf: A Wholesome Twist on a Classic Favorite
Welcome to Clean Plate Cravings! If you’re looking for a dish that captures comfort food in a healthier setting, you’ve landed in just the right spot. Today, we’re diving into the world of deliciousness with a twist on a beloved classic: Garlic Parmesan Chicken Meatloaf. Yes, you heard that right! Think juicy chicken blended with savory garlic and nutty Parmesan, all packed into a hearty loaf that’s just bursting with flavor.
Now, you might be wondering, “Meatloaf with chicken?” The answer is a resounding yes! While traditional meatloaf often calls for beef (and trust me, I love a good beef meatloaf), ground chicken brings a lighter, leaner profile that perfectly absorbs the flavors of garlic and Parmesan. You’ll find this dish not only satisfies that craving for something hearty but also aligns beautifully with a clean and straightforward eating approach.
Imagine slicing into a warm loaf, the aroma of roasted garlic wafting up as you cut each perfectly portioned piece. Pair it with a refreshing side salad or some roasted veggies, and you’ve got yourself a meal that feels both comforting and invigorating. Perfect for busy weeknight dinners or a casual weekend feast, this Garlic Parmesan Chicken Meatloaf is your new go-to recipe! Let’s get started.
A Little Kitchen Story from My Life
Meatloaf has always held a special place in my heart. I remember the first time I made it—my mom’s classic recipe. There she was, apron-clad, guiding me in the kitchen, as we mixed the ingredients together in a big bowl. I had my hands smeared with a mix of ground beef and spices, and I thought it was the most fun I could have while cooking. It was messy, sure, but there’s something magical about getting your hands dirty in the kitchen and creating something delicious.
Years later, I decided to switch things up and experiment with lighter proteins, inspired by my journey towards healthier dining habits. The first time I made chicken meatloaf infused with garlic and Parmesan, it brought back waves of nostalgia, reminding me of those warm evenings spent cooking with my mom. This recipe is more than just food; it’s a celebration of family, flavor, and the joy of eating well. So, let’s channel those good vibes and bring some wholesome, flavorful magic to your kitchen!
Ingredients
Here’s what you’ll need to whip up this tasty Garlic Parmesan Chicken Meatloaf:
-
1 lb ground chicken
The star of the show! Ground chicken is leaner than beef or pork, making it a healthier choice. If you prefer, ground turkey works well as a substitute, just ensure it’s not too lean to keep the meatloaf moist. -
1/2 cup grated Parmesan cheese
This adds a punch of savory goodness! Use fresh grated Parmesan for the best flavor. If you’re looking for a dairy-free option, try nutritional yeast for a similar umami kick. -
2 cloves garlic, minced
Garlic brings a warm, aromatic flavor to the dish. If you’re a garlic lover (like me!), feel free to double this! Alternatively, garlic powder can be used, but fresh garlic offers a more robust taste. -
1/4 cup chopped fresh herbs (like parsley or basil)
Fresh herbs not only enhance the flavor but also add a pop of color. Swap in your favorites—thyme or oregano would work wonderfully, too. -
1/2 cup breadcrumbs
These help bind the meatloaf and ensure it stays moist. Whole wheat bread crumbs add a nice texture, or you can use gluten-free alternatives to accommodate dietary preferences. -
1 large egg
The egg acts as a binder, bringing everything together nicely. If you want an egg-free option, flaxseed meal mixed with water is a great substitution! -
Salt and pepper to taste
Simple yet essential! Don’t be shy with the seasoning; it brings out the flavors of all the other ingredients.
Step-by-Step Instructions
1. Prepare Your Baking Dish
Start by preheating your oven to 375°F (190°C). While it’s heating up, lightly grease a loaf pan with cooking spray or olive oil. This little step ensures your meatloaf won’t stick and makes for an easier cleanup later!
2. Combine the Ingredients
In a large mixing bowl, combine the ground chicken, grated Parmesan cheese, minced garlic, fresh herbs, breadcrumbs, beaten egg, salt, and pepper. Here’s a little chef hack: use your hands to mix everything! Yes, it’s messy, but mixing by hand ensures the meatloaf comes together smoothly without overworking the chicken, which can lead to a rubbery texture.
3. Shape the Meatloaf
Once everything is well combined, transfer the mixture to your prepared loaf pan. Gently press it down to form a loaf shape that’s about 1-1.5 inches high. The height matters! A thicker loaf will take longer to cook, so keep that in mind to ensure it cooks evenly.
4. Bake and Glaze
Pop your meatloaf in the oven and let it bake for about 45 minutes. A few minutes before it’s done, you can add a simple glaze of your choice. My favorite is a mix of ketchup with a splash of balsamic vinegar for some extra zing!
5. Check for Doneness
You’ll know your meatloaf is ready when the internal temperature reaches 165°F (74°C). Use a meat thermometer to check! If you don’t have one handy, simply make a small cut through the center—the juices should run clear.
6. Let It Rest
After pulling it out of the oven, let your meatloaf rest for 10-15 minutes before slicing. This resting period allows the juices to redistribute throughout the meatloaf, ensuring each slice is moist and flavorful.
Serving Suggestions
Slice your Garlic Parmesan Chicken Meatloaf and serve it hot on a plate. Pair it with a fresh salad drizzled with a light vinaigrette, or perhaps some seasoned roasted vegetables for a colorful side. A dollop of homemade pesto on top can also elevate your presentation while adding a vibrant, zesty flavor. It’s all about making it visually appealing, so don’t hesitate to add some herbs for garnish!
Recipe Variations
-
Italian-Style Meatloaf: Add diced sun-dried tomatoes and Italian seasoning for a Mediterranean twist.
-
Spicy Kick: Mix in chopped jalapeños or red pepper flakes for a spicy version.
-
Low-Carb Option: Swap breadcrumbs for finely grated cauliflower for a keto-friendly version.
-
Mushroom Medley: Incorporate finely chopped mushrooms into the mix for an earthy flavor boost.
-
Herb-Infused: Experiment with a variety of fresh herbs like rosemary and thyme for a flavor explosion.
Chef’s Notes
Cooking this Garlic Parmesan Chicken Meatloaf has truly evolved over the years for me! Initially, I started experimenting because I wanted to create a recipe that my kids would love without compromising our family’s health goals. They loved the original beef version, but I knew I could revamp it. This dish has been the perfect solution! Plus, it has become a staple at gatherings with friends and family. I still have to remind them it’s made with chicken because no one can believe something so flavorful can come from poultry!
FAQs and Troubleshooting
Q: Why is my meatloaf too dry?
A: Dry meatloaf typically comes from overcooking or too much breadcrumbs. Ensure you’re monitoring the cooking time and using enough moist ingredients.
Q: Can I freeze meatloaf?
A: Absolutely! This Garlic Parmesan Chicken Meatloaf freezes beautifully. Just wrap it tightly and store it in the freezer for up to three months. Thaw it in the refrigerator overnight before reheating.
Q: What if I don’t have fresh herbs?
A: No worries! You can use dried herbs instead; just remember that dried herbs have a stronger flavor, so use about one-third of the amount.
Q: How can I tell when my meatloaf is done?
A: Use a meat thermometer! The internal temperature should reach 165°F (74°C). If you don’t have a thermometer, cutting into the center should reveal clear juices and no pink.
Nutritional Info
This Garlic Parmesan Chicken Meatloaf offers a great balance of protein and flavor. A typical serving contains approximately:
- Calories: 220
- Protein: 30g
- Carbohydrates: 15g
- Fat: 8g
Feel free to adjust ingredients according to your dietary needs, and don’t forget to enjoy every bite!
Cooking should always be a joyful experience, and I’m thrilled to share this Garlic Parmesan Chicken Meatloaf with you. Whether it becomes a new family favorite or a dish to impress your friends, it’s a great step toward embracing delicious, feel-good food. Let’s keep it fresh and uncomplicated—because you deserve to enjoy meals that nourish and excite you! Happy cooking!
PrintGarlic Parmesan Chicken Meatloaf

A wholesome twist on a classic favorite, this Garlic Parmesan Chicken Meatloaf blends juicy chicken with savory garlic and nutty Parmesan for a flavorful meal.
- Prep Time: 15 minutes
- Cook Time: 45 minutes
- Total Time: 60 minutes
- Yield: 4 servings 1x
- Category: Main Course
- Method: Baking
- Cuisine: American
- Diet: Paleo
Ingredients
- 1 lb ground chicken
- 1/2 cup grated Parmesan cheese
- 2 cloves garlic, minced
- 1/4 cup chopped fresh herbs (like parsley or basil)
- 1/2 cup breadcrumbs
- 1 large egg
- Salt and pepper to taste
Instructions
- Prepare your baking dish by preheating the oven to 375°F (190°C) and greasing a loaf pan.
- Combine the ground chicken, grated Parmesan, minced garlic, fresh herbs, breadcrumbs, beaten egg, salt, and pepper in a large bowl.
- Shape the mixture into a loaf and transfer it to the prepared loaf pan.
- Bake the meatloaf for about 45 minutes, adding a simple glaze a few minutes before it’s done.
- Check for doneness with a meat thermometer; internal temperature should reach 165°F (74°C).
- Let the meatloaf rest for 10-15 minutes before slicing.
Notes
Pair with a fresh salad or roasted vegetables for a complete meal. This meatloaf freezes well, making it perfect for meal prep.
Nutrition
- Serving Size: 1 serving
- Calories: 220
- Sugar: 1g
- Sodium: 300mg
- Fat: 8g
- Saturated Fat: 3g
- Unsaturated Fat: 3g
- Trans Fat: 0g
- Carbohydrates: 15g
- Fiber: 1g
- Protein: 30g
- Cholesterol: 90mg
Keywords: meatloaf, healthy dinner, chicken recipe, garlic, parmesan
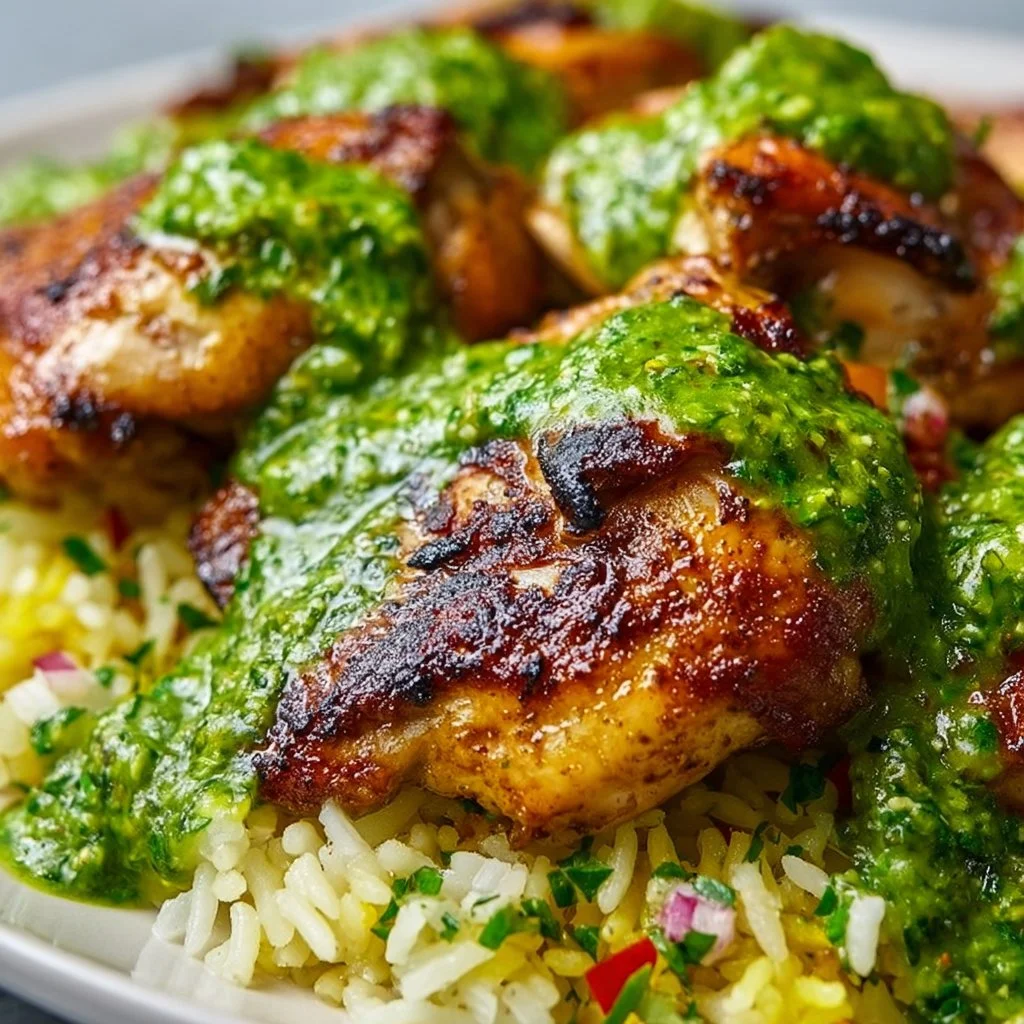
Peruvian Chicken and Rice with Green Sauce
Discovering the Joy of Peruvian Chicken and Rice with Green Sauce
Welcome to another delicious journey at Clean Plate Cravings! Today, we’re diving into the colorful world of Peruvian cuisine with a dish that’s bursting with flavor—Peruvian Chicken and Rice with Green Sauce. Trust me, once you make this dish, it’ll quickly find a permanent spot in your weekly meal plan.
As a self-proclaimed foodie and kitchen enthusiast, I’ve always believed that cooking should be both joyful and accessible. There’s nothing quite like creating a meal that not only fills your stomach but also uplifts your spirit. And that’s where Peruvian chicken and rice come into play! This dish embodies everything I love about eating—simple yet layered with aromatic spices, comforting yet light enough to leave you energized.
Meet the star of the dish: the chicken thighs, crispy on the outside and tender on the inside. The fragrant rice acts like a cozy blanket, while the vibrant green sauce makes everything sing with zest and freshness. Not only does this dish celebrate the flavors of Peru, but it also beautifully represents the way food brings people together. No fancy techniques or hard-to-find ingredients here—just wholesome cooking made for everyone.
A Taste of Home: My Personal Connection
Let me take you back to my childhood for a moment. I remember gathering around the dinner table with my family on warm summer nights, the air filled with laughter and the aroma of delicious food wafting from the kitchen. My culinary adventures began with my grandmother, who was passionate about trying recipes from all over the world, especially from South America. One summer, she introduced us to Peruvian flavors, and I was utterly captivated.
Watching her marinate juicy chicken thighs with spices and preparing this textured, flavorful rice was a defining moment in my cooking journey. But it was the green sauce—so vibrant, so fresh—that stole the show. I remember the first bite vividly; it was tangy, spicy, and refreshing all at once. It was then that I realized how much magic a few fresh ingredients could create.
Today, as I recreate my grandmother’s recipe with my own twist, I can’t help but feel nostalgic. This dish is more than just food; it’s a celebration of family, love, and culture. So, get ready to infuse your kitchen with flavor and memories, because Peruvian Chicken and Rice with Green Sauce is about to impress!
Ingredients
Here’s what you’ll need to make this comforting dish:
For the Chicken and Rice:
-
4-6 chicken thighs, bone-in and skin-on: These juicy cuts are perfect for absorbing flavors while keeping the meat tender. If you prefer, you can use chicken breasts, but they’ll be less juicy.
-
3 tablespoons lime juice (freshly squeezed): A must-have for adding brightness. Bottled lime juice works in a pinch but fresh is best for vibrant flavor.
-
3 garlic cloves, minced: Garlic is the backbone of flavor. If you’re feeling adventurous, try roasting the garlic first for a sweeter taste.
-
1 teaspoon ground cumin: This spice adds a warm and earthy depth. If you don’t have cumin, coriander can be a lovely alternative.
-
1 teaspoon paprika: Sweet paprika brings out the chicken’s color and flavor. Smoked paprika adds an extra layer of complexity if you prefer.
-
1 teaspoon salt: Essential for seasoning. You can adjust it based on your personal preference or dietary needs.
-
½ teaspoon black pepper: Freshly cracked pepper always elevates a dish!
-
2 tablespoons olive oil: Great for sautéing and for drizzling to finish the dish. Use avocado oil for a high smoke point alternative.
-
1 ½ cups jasmine or long-grain rice: Make sure to rinse the rice to remove excess starch. Basmati rice also works beautifully in this recipe!
-
2 ½ cups water or chicken broth: Broth will enhance the flavor of your rice. Meatless broth can keep this dish vegetarian.
For the Green Sauce:
-
1 cup fresh cilantro leaves, packed: This herb packs a punch! If you’re not a cilantro fan, parsley or a mix of herbs could work too.
-
1 garlic clove: More garlic? Absolutely! It adds layers of flavor to the sauce.
-
1 jalapeño or 1 aji amarillo (seeds removed for less heat): Adds warmth and a bit of spice. Use bell pepper for a milder option.
-
2 tablespoons lime juice: Fresh lime juice here is key for that tangy flavor.
-
¼ cup mayonnaise or Greek yogurt: Use Greek yogurt for a healthier, tangier option. Sour cream is another cool alternative.
-
2 tablespoons olive oil: This helps create a luscious, creamy texture in your sauce.
-
Salt and black pepper, to taste: Seasoning is essential—taste-test as you go!
-
Water, as needed for consistency: Depending on how thick or thin you like your sauce, add a bit of water to reach your desired consistency.
Step-by-Step Instructions
Ready to get cookin’? Follow these detailed steps, and you’ll have an impressive meal in no time!
-
Marinating the Chicken:
- In a bowl, mix together the lime juice, minced garlic, cumin, paprika, salt, and black pepper. Add olive oil to create a marinade.
- Add the chicken thighs to the bowl, ensuring they are well-coated. Cover and let it marinate in the fridge for at least 30 minutes, or up to overnight for deeper flavor.
- Chef’s Tip: Marinating the chicken overnight makes it extra flavorful and juicy, but even a short time will do wonders!
-
Cooking the Rice:
- Rinse the rice under cold water until the water runs clear. This step helps to achieve fluffy rice by removing excess starch.
- In a medium pot, bring 2 ½ cups of water (or chicken broth) to a boil. Add a pinch of salt and stir in the rice.
- Lower the heat to a simmer, cover, and cook for about 15 minutes until the rice is tender and water is absorbed. Remove from heat and let it sit covered for 5 minutes.
- Chef’s Hack: Fluff your rice with a fork for that perfect texture and to prevent clumping!
-
Cooking the Chicken:
- While the rice is cooking, heat a large skillet or grill over medium-high heat. Add a splash of olive oil.
- Once hot, add the marinated chicken thighs, skin side down. Cook for about 6-7 minutes until the skin is golden and crispy.
- Flip the chicken and reduce heat to medium. Cook for another 8-10 minutes until fully cooked (internal temperature should reach 165°F).
- Pro Tip: Don’t crowd the pan! If you have more chicken, cook in batches to achieve that crispy skin.
-
Making the Green Sauce:
- In a blender or food processor, combine the cilantro, garlic clove, jalapeño, lime juice, mayonnaise (or Greek yogurt), olive oil, salt, and black pepper.
- Blend until smooth, adding a teaspoon of water at a time until you reach your desired consistency. Taste and adjust seasoning if necessary.
- Chef’s Insight: This sauce is incredibly versatile—try it on tacos, sandwiches, or as a dip for veggies!
-
Bringing It All Together:
- To serve, scoop fluffy rice onto a plate or bowl and arrange the crispy chicken thighs on the side. Drizzle with green sauce generously—don’t hold back!
- Plating Tip: Brighten your plate with lime wedges, cilantro sprigs, or even diced avocado for an extra pop of color.
Serving Suggestions
This Peruvian Chicken and Rice dish is fantastic on its own, but if you’re looking to elevate your dining experience, consider adding a side salad of mixed greens with a light vinaigrette. It balances the richness of the chicken and adds a refreshing touch. You can also serve it family-style on a large platter for a communal dining vibe—a fabulous way to bond over food!
Recipe Variations
Feeling adventurous? Here are a few creative twists you can put on this classic dish:
- Spicy Peruvian Twist: Add a bit more heat with extra jalapeño or by using spicy mayonnaise.
- Vegetarian Option: Substitute chicken for marinated tofu or tempeh for a plant-based delight!
- Grain Swaps: Use quinoa or farro instead of rice for a nutritious twist.
- Herb Mix: Instead of all cilantro, try a mix with mint or basil in the green sauce for a different flavor profile.
- Zesty Add-Ins: Toss in some sautéed bell peppers or peas to the rice for added texture and nutrition.
Chef’s Notes
One of the things I love about this Peruvian Chicken and Rice with Green Sauce is how adaptable it is. Over the years, I’ve experimented with so many flavors and ingredients, often based on what I had on hand. It’s a delicious way to clean out the fridge! Plus, the incredible flavors make it a hit at any gathering. I can still hear friends exclaiming, "What is that amazing sauce?" as they douse their plates with the vibrant green goodness.
Another funny kitchen memory I have is accidentally grabbing cumin instead of cinnamon while making a sweet dish, but that little blunder turned into a fun new savory recipe that I fell in love with. Cooking is all about making mistakes and learning from them, right? So don’t be afraid to play around with flavors!
FAQs and Troubleshooting
1. What can I substitute for chicken thighs?
If you prefer, you can use chicken breasts, but keep in mind that they may dry out faster. Bone-in chicken offers richer flavor and juiciness.
2. My green sauce turned out too thick. What can I do?
No problem! Simply add a small amount of water (or more lime juice) to thin it out until you reach your desired consistency.
3. How can I store the leftovers?
Store any leftovers in an airtight container in the fridge for up to 3-4 days. Reheat gently in the microwave or on the stovetop.
4. How can I make this dish gluten-free?
This recipe is already gluten-free as long as you check labels on any sauces you use.
Nutritional Info
This recipe serves around four people, providing a hearty and wholesome meal filled with protein from the chicken, healthy fats from the olive oil, and carbohydrates from the rice. Each serving provides a balanced plate of essential nutrients, making it a fantastic option for a healthy lifestyle.
So there you have it, my friends—Peruvian Chicken and Rice with Green Sauce! This dish is all about celebrating flavors, family, and fun in the kitchen. I can’t wait for you to try it and make your own stories around the table. If you do make it, be sure to tag me on social media with #CleanPlateCravings. Happy cooking!
PrintPeruvian Chicken and Rice with Green Sauce

A flavorful dish featuring crispy chicken thighs and fragrant rice, complemented by a vibrant green sauce made with fresh cilantro.
- Prep Time: 30 minutes
- Cook Time: 30 minutes
- Total Time: 60 minutes
- Yield: 4 servings 1x
- Category: Main Course
- Method: Grilling
- Cuisine: Peruvian
- Diet: Gluten-Free
Ingredients
- 4–6 chicken thighs, bone-in and skin-on
- 3 tablespoons lime juice (freshly squeezed)
- 3 garlic cloves, minced
- 1 teaspoon ground cumin
- 1 teaspoon paprika
- 1 teaspoon salt
- ½ teaspoon black pepper
- 2 tablespoons olive oil
- 1 ½ cups jasmine or long-grain rice
- 2 ½ cups water or chicken broth
- 1 cup fresh cilantro leaves, packed
- 1 garlic clove
- 1 jalapeño or 1 aji amarillo (seeds removed)
- 2 tablespoons lime juice
- ¼ cup mayonnaise or Greek yogurt
- 2 tablespoons olive oil
- Salt and black pepper, to taste
- Water, as needed for consistency
Instructions
- In a bowl, mix together the lime juice, minced garlic, cumin, paprika, salt, and black pepper. Add olive oil to create a marinade.
- Add the chicken thighs to the bowl, ensuring they are well-coated. Cover and let it marinate in the fridge for at least 30 minutes, or up to overnight for deeper flavor.
- Rinse the rice under cold water until the water runs clear.
- Bring 2 ½ cups of water (or chicken broth) to a boil. Add a pinch of salt and stir in the rice.
- Lower the heat to a simmer, cover, and cook for about 15 minutes until the rice is tender and water is absorbed.
- Remove from heat and let it sit covered for 5 minutes.
- While the rice is cooking, heat a large skillet or grill over medium-high heat. Add a splash of olive oil.
- Add the marinated chicken thighs, skin side down. Cook for about 6-7 minutes until the skin is golden and crispy.
- Flip the chicken and reduce heat to medium. Cook for another 8-10 minutes until fully cooked (internal temperature should reach 165°F).
- In a blender or food processor, combine the cilantro, garlic clove, jalapeño, lime juice, mayonnaise (or Greek yogurt), olive oil, salt, and black pepper.
- Blend until smooth, adding a teaspoon of water at a time until you reach your desired consistency.
- To serve, scoop fluffy rice onto a plate and arrange the crispy chicken thighs on the side. Drizzle with green sauce generously.
Notes
Marinating overnight enhances flavor; rice may be fluffed for light texture.
Nutrition
- Serving Size: 1 serving
- Calories: 450
- Sugar: 2g
- Sodium: 600mg
- Fat: 18g
- Saturated Fat: 3g
- Unsaturated Fat: 10g
- Trans Fat: 0g
- Carbohydrates: 45g
- Fiber: 3g
- Protein: 25g
- Cholesterol: 100mg
Keywords: Peruvian chicken, rice, green sauce, cilantro, comfort food, family meal
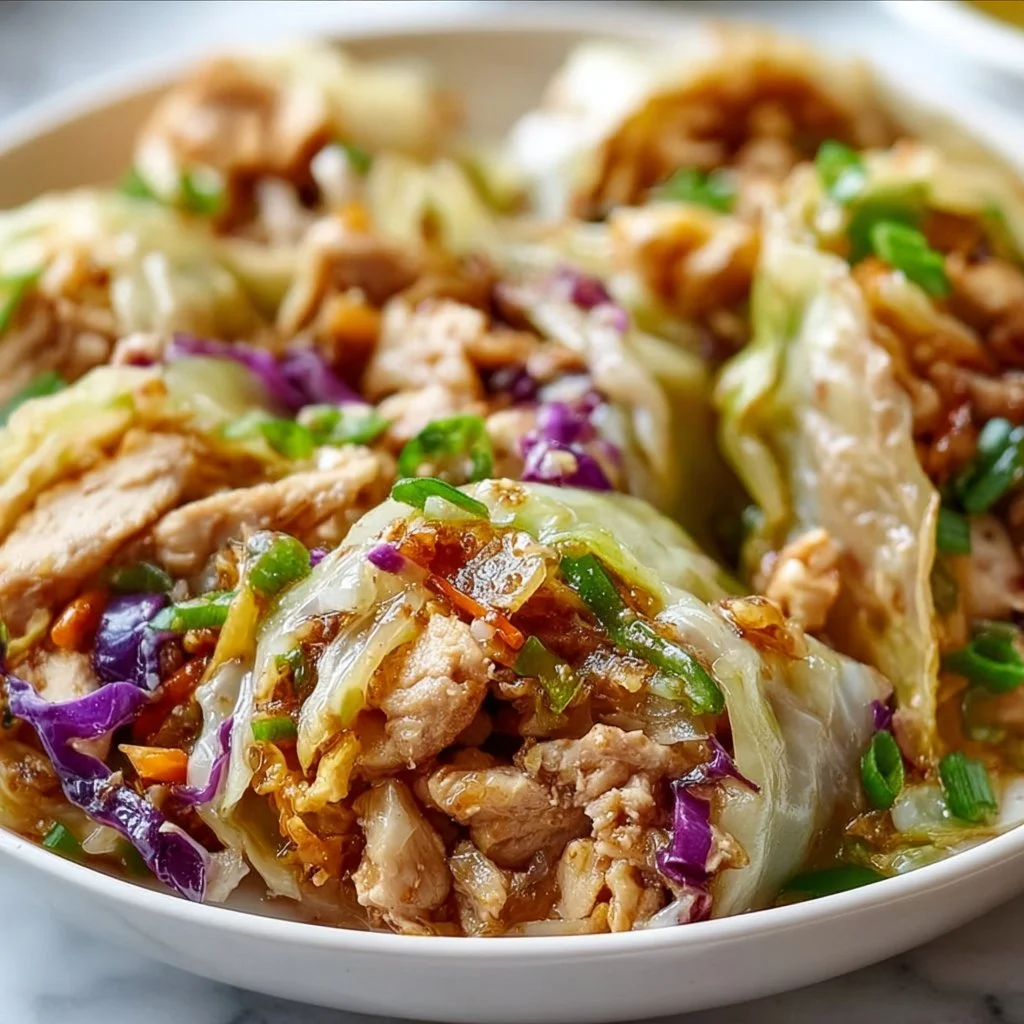
Egg Roll Bowls with Chicken and Cabbage
Egg Roll Bowls with Chicken and Cabbage: A Flavorful Twist on a Classic Favorite
Welcome to another exciting culinary adventure here at Clean Plate Cravings! Today, we’re whipping up something that’s not just delicious but also takes you on a little trip down memory lane. Whether you’re a meal-prepping pro or a novice in the kitchen, this dish is perfect for anyone looking to satisfy their cravings without sacrificing flavor or freshness. Let’s dive into these Egg Roll Bowls with Chicken and Cabbage!
Personal Story
Growing up, my mom had a few signature dishes that made our home feel extra cozy and delicious. One of the standout meals was definitely her homemade egg rolls. Every Sunday, the kitchen would transform into a bustling hub of flavors—crispy wrappers, sizzling filling, and that magical aroma that enveloped the whole house. I loved stealing a crunchy piece straight from the fryer before they even hit the table! Those crispy, savory bites always reminded me of family gatherings and cozy evenings in, where laughter filled the air and the food was a highlight.
As life got busier and our family dynamics shifted, finding time to make those egg rolls became a challenge. That’s when the idea of an egg roll bowl struck me! It maintains all those amazing flavors we love about traditional egg rolls but in a super simple, nourishing bowl that anyone can whip up in no time. Plus, it’s a great way to enjoy that classic taste without any frying, making it a perfect meal for any day of the week!
Ingredients
Let’s gather our colorful cast of ingredients before we get cooking. Each one plays an essential role in crafting these delightful egg roll bowls!
-
1 pound ground chicken
A lean protein that cooks quickly and absorbs flavors beautifully. If you want to switch it up, try ground turkey or even a plant-based ground meat. -
2 cups shredded cabbage
The star of this dish! Crunchy, nutrient-dense, and full of antioxidants. For a twist, use bok choy or stir-fried kale. -
1 cup carrots, shredded
Sweet and crunchy, they add great color and a hint of natural sweetness. You can substitute with sliced bell peppers for a bolder flavor. -
3 green onions, chopped
These add a fresh bite and aromatic flavor. You can replace them with chives or shallots if you prefer something milder. -
2 cloves garlic, minced
A key ingredient that elevates the overall taste. Fresh garlic is best, but garlic powder works in a pinch! -
1 tablespoon ginger, minced
This will add a zesty warmth to the dish; ginger paste is a suitable substitute if you’re short on fresh ginger. -
3 tablespoons soy sauce
The umami punch! For a gluten-free version, try tamari or coconut aminos. -
1 tablespoon sesame oil
Adds a deliciously nutty flavor. For an alternative, try avocado oil, but it won’t have that toasty taste. -
Salt and pepper, to taste
Essential for seasoning and bringing all the flavors together. -
Cooked rice or quinoa, for serving
These form the hearty base of your bowl—feel free to use cauliflower rice for a lighter option! -
Sesame seeds, for garnish
Crunchy and nutty, they add the perfect finishing touch! You can swap this for chopped peanuts for a fun twist.
Step-by-Step Instructions
Are you ready to create something delicious? Let’s get cooking!
-
Heat it Up
Start by heating a large skillet over medium heat. Add in 1 tablespoon of sesame oil. When the oil is hot and shimmering, it’s time to add the ground chicken.
Pro Tip: Use a spatula to break the chicken into smaller pieces as it cooks for even browning. -
Cook the Chicken
Cook the ground chicken for about 5–7 minutes, or until it’s fully cooked and no longer pink. Season with a pinch of salt and pepper.
Chef Hack: If you want a bit more flavor, add a splash of soy sauce during cooking! -
Add Aromatics
Once the chicken is cooked, toss in the minced garlic and ginger. Sauté for about 1–2 minutes until fragrant.
Tip: Make sure to keep stirring so the garlic doesn’t burn! A burnt taste can ruin the flavor. -
Incorporate Veggies
Next, add the shredded cabbage and carrots to the skillet. Stir everything together and let it cook for about 5 minutes, stirring occasionally, until the cabbage is tender but still crunchy.
Fun Fact: You’ll know it’s ready when the kitchen smells amazing! -
Seasoning Magic
Pour in the soy sauce and stir well. Cook for another 2–3 minutes, allowing the flavors to meld together and the cabbage to soak up that deliciousness.
Tip: Taste it! Add more soy sauce or pepper based on your preference! -
Finish Strong
Remove the skillet from heat and toss in the chopped green onions. Give it one last stir to incorporate everything.
Chef’s Insight: The residual heat will perfectly wilt the green onions while keeping their vibrant color!
Serving Suggestions
To serve your Egg Roll Bowls, start by layering a generous scoop of rice or quinoa in a bowl. Spoon over the fragrant chicken and cabbage mixture, ensuring everyone gets a hearty portion. Finish with a sprinkle of sesame seeds for that extra crunch!
And voilà—you’ve got a dinner that’s quick, easy, and oh-so-satisfying!
Recipe Variations
Want to switch things up a bit? Here are a few variations you can try:
-
Spicy Kick: Add some red pepper flakes or sriracha when you’re sautéing the garlic for a spicy twist!
-
Different Protein: Switch out the chicken for ground pork, beef, or tofu to suit your palate.
-
Extra Veggies: Add in some bell peppers, zucchini, or mushrooms for added nutrition and flavor.
-
Rice Alternatives: Try quinoa, cauliflower rice, or even brown rice for a different base.
-
Herb It Up: Experiment with fresh herbs like cilantro or basil for a vibrant freshness!
Chef’s Notes
This recipe has become a kitchen staple for me! I love how adaptable it is, turning into whatever I have on hand. One winter evening, I had a random assortment of veggies in the fridge, so I threw them into the mix, and it turned out spectacularly! It’s moments like these that inspire creativity in cooking—seriously, don’t be afraid to play with your food!
Plus, it’s a hit with friends and family, making it great for casual gatherings. Everyone loves a cozy bowl of goodness, and this dish can easily feed a crowd!
FAQs and Troubleshooting
1. Can I prepare this dish ahead of time?
Absolutely! You can prep the chicken and vegetable mixture ahead and store it in an airtight container in the fridge. Just reheat when you’re ready to serve.
2. What if my egg roll bowl is too salty?
If you’ve added too much soy sauce, try adding another cup of shredded cabbage or carrots to balance the flavor.
3. Can I freeze leftovers?
Definitely! Portion out the leftovers in containers and freeze for a quick meal later. Just make sure to separate the rice from the filling if you want to keep the textures nice.
4. What if I can’t find fresh ginger?
You can use ground ginger in a pinch! Just use ¼ teaspoon for every tablespoon of fresh ginger required.
Nutritional Info
Estimated per serving (based on 4 servings):
- Calories: 350
- Protein: 30g
- Carbs: 30g
- Fat: 15g
- Fiber: 4g
Now you’ve got a go-to recipe for Egg Roll Bowls with Chicken and Cabbage! It’s a simple, fun, and satisfying meal that brings the essence of those nostalgic egg rolls straight to your bowl. So grab your apron, gather your ingredients, and let’s create a meal that’s fresh, vibrant, and absolutely delicious! Happy cooking!
PrintEgg Roll Bowls with Chicken and Cabbage

A flavorful twist on classic egg rolls, this dish combines ground chicken, cabbage, and a savory mix of spices for a quick and satisfying meal.
- Prep Time: 10 minutes
- Cook Time: 15 minutes
- Total Time: 25 minutes
- Yield: 4 servings 1x
- Category: Main Course
- Method: Stovetop
- Cuisine: Asian
- Diet: Paleo
Ingredients
- 1 pound ground chicken
- 2 cups shredded cabbage
- 1 cup carrots, shredded
- 3 green onions, chopped
- 2 cloves garlic, minced
- 1 tablespoon ginger, minced
- 3 tablespoons soy sauce
- 1 tablespoon sesame oil
- Salt and pepper, to taste
- Cooked rice or quinoa, for serving
- Sesame seeds, for garnish
Instructions
- Heat a large skillet over medium heat. Add 1 tablespoon of sesame oil. When hot, add the ground chicken.
- Cook the ground chicken for 5–7 minutes, or until fully cooked. Season with salt and pepper.
- Add minced garlic and ginger. Sauté for 1–2 minutes until fragrant.
- Incorporate shredded cabbage and carrots, cooking for 5 minutes, until cabbage is tender but crunchy.
- Pour in the soy sauce and cook for another 2–3 minutes.
- Finish by tossing in chopped green onions and stir to combine.
Notes
You can meal prep this dish ahead of time and store in the fridge for easy reheating. Feel free to customize the recipe by adding more veggies or changing the protein.
Nutrition
- Serving Size: 1 serving
- Calories: 350
- Sugar: 5g
- Sodium: 600mg
- Fat: 15g
- Saturated Fat: 3g
- Unsaturated Fat: 10g
- Trans Fat: 0g
- Carbohydrates: 30g
- Fiber: 4g
- Protein: 30g
- Cholesterol: 100mg
Keywords: egg roll, chicken, cabbage, healthy, meal prep

One-Pan Chicken with Buttered Noodles
One-Pan Chicken with Buttered Noodles: A Comforting Classic
Welcome to another delicious adventure here at Clean Plate Cravings! Today, we’re diving into a dish that’s not only comforting but also incredibly simple to whip up on busy weeknights: One-Pan Chicken with Buttered Noodles. This dish is the definition of cozy, packing in all those warm flavors that remind you of home-cooked meals shared with loved ones. So grab your apron, and let’s get cooking together!
A Touch of Nostalgia
Growing up, my family had a tradition of Sunday dinners that brought us all together. The kitchen would fill with the sound of laughter, the aromas of simmering garlic and tasty sauces, and the unmistakable rhythm of pots and pans clinking. One of those memorable meals was a chicken and pasta dish that my mom made, and I can still remember the way the egg noodles twirled around my fork, perfectly coated in creamy goodness with those beautifully seared chicken breasts.
There was something magical about cooking together during those Sunday afternoons. As Mom would sauté the chicken, I was usually perched on a stool, eager to help, because that meant I got to add the garlic—the official starter to any flavor explosion, right? Little did I know how much that kitchen experience would later shape my love for cooking and sharing recipes. Today, looking back, it’s not just about the food; it’s about those moments spent with family, and that’s precisely the spirit I want to convey in my own kitchen today. Let’s make a comforting dish that’s flavorful, hearty, and destined to create its own warm memories in your home!
Ingredients
Here’s the lineup of ingredients you’ll need for our One-Pan Chicken with Buttered Noodles:
-
4 boneless, skinless chicken breasts (1.5 lbs)
These are the stars of the show! You can also use thighs if you prefer darker meat. Just remember, cooking times might differ slightly. -
8 oz egg noodles
Egg noodles are perfect because they soak up the chicken broth well. If you’re feeling adventurous, switch them out for whole-grain or gluten-free pasta! -
4 tbsp real butter
Butter adds that lovely richness. If you’d like a lighter option, coconut oil can be a wonderful substitute. -
4 cloves garlic, minced
Garlic is a flavor powerhouse! You can use garlic powder in a pinch, but nothing beats fresh garlic. -
2 cups low-sodium chicken broth
This builds the base of our sauce. Low-sodium keeps things under control salt-wise, but homemade broth is even better if you have it on hand! -
¼ cup fresh parsley, chopped
Fresh parsley adds color and freshness. Don’t have fresh? You can use dried, but half the amount is all you need. -
Salt and pepper to taste
These are your flavor friends—don’t be shy to taste as you go!
Step-by-Step Instructions
Alright, let’s roll up our sleeves and get cooking!
-
Prep the chicken:
Start by seasoning the chicken breasts generously with salt and pepper. This isn’t just a sprinkle; you want a nice coating that will enhance the flavor when we sear them. Take this moment to channel your inner chef—give those breasts a little pat to make sure the seasoning sticks! -
Sear the chicken:
In a large skillet (trust me, you’ll love this one-pan business), melt 2 tablespoons of butter over medium heat. Once it’s bubbly, add your seasoned chicken breasts. Sear them for about 5-6 minutes on each side until they form that golden-brown crust. This is where the flavor explosion begins! If the chicken is sticking, give it a few more moments—patience is key. -
Add the garlic:
When the chicken is beautifully browned, throw in the minced garlic. Stir it around for about 30 seconds until it’s fragrant. Keep an eye on it to avoid burning; this is a common rookie mistake (trust me!). -
Pour in the broth:
Now it’s time to add the chicken broth to the same skillet. Gently scrape the bottom of the pan with a wooden spoon to release those flavorful brown bits (they’re called fond, and they add an incredible taste!). Bring the broth to a simmer, and then nestle the chicken back into the skillet. -
Cook the noodles:
Once the broth is simmering, add in the egg noodles. Cover the skillet and let everything cook for about 10 minutes, stirring occasionally until the noodles are al dente and the chicken is cooked through. This is that moment where magic happens—everything melds into one deliciously cohesive dish. -
Finishing touches:
Once the noodles are tender, remove the skillet from heat. Take out the chicken breasts and let them rest on a plate. This is crucial because resting allows the juices to redistribute, resulting in succulent chicken. Add the remaining butter and chopped parsley to the noodles and give them a good toss. -
Slice and serve:
Slice the chicken breasts into medallions and arrange them over the buttery noodles. Sprinkle with extra parsley for a pop of color.
Serving Suggestions
To plate this delightful dish, use a large serving bowl or individual plates for a more elegant touch. Gather the buttery noodles in the center, artfully lay the sliced chicken on top, and finish with a sprinkle of fresh parsley. Want to impress? Add a drizzle of olive oil or a squeeze of lemon for a fresh zing!
Recipe Variations
-
Herb-Infused Chicken:
Marinate the chicken in a mixture of olive oil and your favorite herbs like thyme or rosemary before searing for deeper flavor. -
Veggie Booster:
Toss in some spinach, peas, or cherry tomatoes along with the noodles to amp up the nutritional value and color! -
Creamy Twist:
For a creamier sauce, stir in a splash of heavy cream towards the end of cooking. It creates a luscious, restaurant-style finish. -
Add Heat:
Sprinkle in some red pepper flakes while cooking for an added kick that brings the dish to life! -
Cheesy Delight:
Top the dish with freshly grated Parmesan or Pecorino cheese before serving for an extra indulgent experience.
Chef’s Notes
This recipe has become one of my go-to comfort meals over the years. I remember my first attempt; I was so excited that I forgot to season the chicken, and it turned out bland! Lesson learned: seasoning is your best friend. Over the years, this recipe has evolved from being just a quick fix for my family into a crowd-pleaser among friends and a staple in my cooking repertoire. It never fails to ignite discussions and nostalgia, just like the heartfelt Sunday dinners of my childhood.
FAQs and Troubleshooting
-
What if my chicken is dry?
If your chicken is overcooked, next time, try using a meat thermometer to check for doneness—it should reach 165°F (75°C). Also, consider letting it rest before slicing. -
Why are my noodles sticky?
Make sure you stir the noodles occasionally while they cook. Additionally, adding enough liquid is essential, so ensure you don’t skimp on the broth! -
Can I make this dish ahead of time?
While it’s best served fresh, you can certainly prep the chicken and garlic in advance. Just put everything together shortly before mealtime for best results. -
My sauce is too thin. How can I thicken it?
If you prefer a thicker sauce, you can mix a teaspoon of cornstarch with cold water and stir it in while simmering. Let it cook for a few more minutes to thicken!
Nutritional Info (Optional)
While specific nutritional content can vary based on ingredient brands and portions, a serving of this One-Pan Chicken with Buttered Noodles is generally around 450 calories, with 30 grams of protein, 20 grams of carbs, and 25 grams of fat.
This One-Pan Chicken with Buttered Noodles is more than just a meal—it’s a celebration of simple ingredients and cherished memories. I hope this recipe brings a smile to your face, fills your kitchen with delightful scents, and more importantly, ignites your passion for cooking. So gather your loved ones and dig into this simple yet satisfying dish. Happy cooking!
PrintOne-Pan Chicken with Buttered Noodles
A comforting dish of juicy chicken and buttery egg noodles, perfect for busy weeknights.
- Prep Time: 10 minutes
- Cook Time: 20 minutes
- Total Time: 30 minutes
- Yield: 4 servings 1x
- Category: Main Course
- Method: Stovetop
- Cuisine: American
- Diet: Gluten-Free, Dairy-Free upon substitution
Ingredients
- 4 boneless, skinless chicken breasts (1.5 lbs)
- 8 oz egg noodles
- 4 tbsp real butter
- 4 cloves garlic, minced
- 2 cups low-sodium chicken broth
- ¼ cup fresh parsley, chopped
- Salt and pepper to taste
Instructions
- Prep the chicken: Season the chicken breasts generously with salt and pepper.
- Sear the chicken: In a large skillet, melt 2 tablespoons of butter over medium heat and sear the chicken for about 5-6 minutes on each side.
- Add the garlic: Throw in the minced garlic and stir it around for about 30 seconds until fragrant.
- Pour in the broth: Add the chicken broth, scraping the bottom of the pan, and bring to a simmer.
- Cook the noodles: Add in the egg noodles, cover, and cook for about 10 minutes until the noodles are al dente and the chicken is cooked through.
- Finishing touches: Remove the skillet from heat, let the chicken rest, and stir the remaining butter and parsley into the noodles.
- Slice and serve: Slice the chicken and arrange over the noodles, garnishing with extra parsley.
Notes
For a creamier sauce, stir in a splash of heavy cream before serving. Adjust seasoning to taste.
Nutrition
- Serving Size: 1 serving
- Calories: 450
- Sugar: 2g
- Sodium: 350mg
- Fat: 25g
- Saturated Fat: 10g
- Unsaturated Fat: 12g
- Trans Fat: 0g
- Carbohydrates: 30g
- Fiber: 2g
- Protein: 30g
- Cholesterol: 80mg
Keywords: chicken, pasta, quick meal, comfort food, one-pan dish
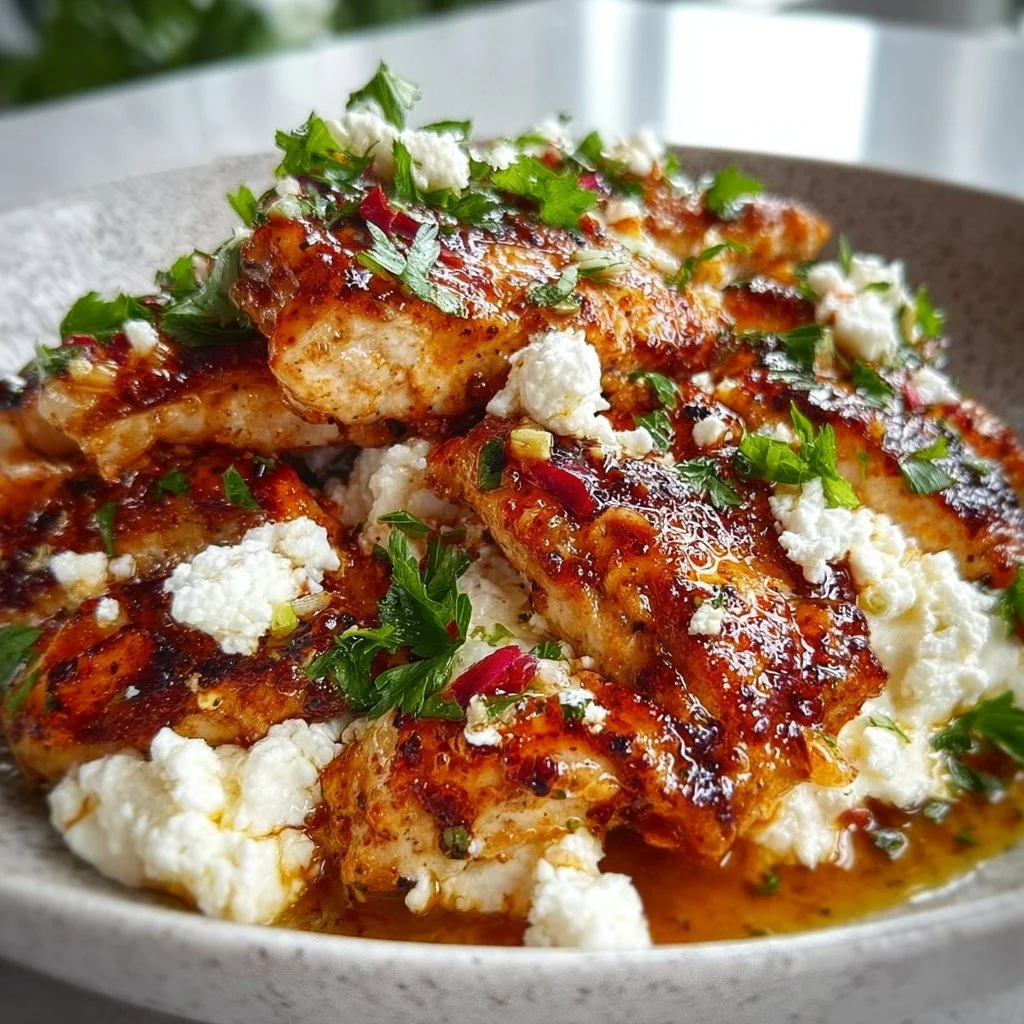
Hot Honey Feta Chicken
Hot Honey Feta Chicken: A Flavor-Packed Dish to Ignite Your Taste Buds
Hey there, food lovers! Today, I’m super excited to share a dish that’s going to spice up your dinner routine: Hot Honey Feta Chicken. If you’re like me, you treasure meals that bring a punch of flavor without keeping you in the kitchen for hours on end. This dish does just that! It’s an effortless way to impress your family or friends, or simply treat yourself to something delicious after a long day.
Introduction
When you think of comfort food, what comes to mind? Is it a warm bowl of pasta, a cheesy slice of pizza, or perhaps a juicy piece of chicken? For me, it’s all about that perfect balance of flavors. The kind of meal that dances on your taste buds and warms your heart. The first time I stumbled upon the combination of sweet honey and spicy heat paired with feta cheese, I knew I was onto something special. My love for adventurous flavors has taken me all over the culinary map, and this dish embodies that spirit perfectly.
Imagine succulent chicken breasts drizzled with a sticky-sweet hot honey sauce, melting into rich, tangy feta cheese. It’s a celebration of sweet and spicy, all while keeping things light and satisfying. If you’re hoping to cook something that’s not only vibrant and delicious but also easy to whip up, you’re in for a real treat today!
Let’s be honest: we all have those busy days where cooking feels more like a chore than a joy. That’s why I’m here—to show you that with just a few basic ingredients and a couple of steps, you can create something fantastic in your very own kitchen. Plus, this recipe is flexible enough to adapt to what you have on hand!
So grab your apron, and let’s dive into some kitchen magic with this Hot Honey Feta Chicken recipe that’s sure to make your taste buds tingle and your heart sing!
Personal Story
Ah, the memories I have of my first bite of hot honey drizzled over anything! I was visiting a charming little bistro downtown with friends, eager for some fun and tasty bites. As we scanned the menu, something caught my eye—a chicken dish topped with a hot honey sauce and feta crumble. At first, I was unsure. Hot honey? On chicken? But curiosity (and my love for feta) won me over, and I ordered it.
When that plate arrived, I knew I was in for an experience. The aroma wafted up to meet me with hints of sweetness and spice. The first bite was pure bliss. The chicken was perfectly cooked, tender and juicy, while the creamy, tangy feta complemented the honey in a way I’d never imagined. I was hooked! I left that bistro with a full belly and a heart full of inspiration, and I couldn’t wait to recreate that dish at home. Now, each time I make Hot Honey Feta Chicken, I’m reminded of that delightful evening and the joy of sharing good food with great friends.
Ingredients
Let’s gather what we need! Here’s a simple list of ingredients for your Hot Honey Feta Chicken with some chef insights and substitution tips:
-
4 Chicken Breasts: The star of the show! Look for organic or free-range chicken if possible. Want a more budget-friendly option? Boneless, skinless thighs work just as well!
-
1 Cup Feta Cheese, Crumbled: Feta brings a salty, tangy flavor that pairs beautifully with the sweetness of honey. If you’re feeling adventurous, you can swap it for goat cheese for a creamier texture.
-
1/4 Cup Honey: This is where your dish gets its glorious sweetness. Local honey not only adds a unique flavor but also carries potential health benefits. If you’re vegan, agave syrup is a great substitute.
-
1-2 Tablespoons Hot Sauce: The magic ingredient! Adjust the amount depending on your spice preference; I usually go with a tablespoon for just the right kick. Sriracha, Frank’s RedHot, or any of your favorite hot sauces will do the trick!
-
Salt and Pepper to Taste: Just a sprinkle to enhance all the beautiful flavors.
-
Olive Oil: A drizzle to keep the chicken juicy as it cooks.
-
Fresh Vegetables or Salad for Serving: This dish pairs wonderfully with a fresh green salad, roasted veggies, or even a grain like quinoa. You could sneak in some extra color with a mix of peppers, zucchini, or whatever is in season!
Step-by-Step Instructions
Let’s get cooking! Follow these step-by-step instructions, and trust me, you’ll end up with an enticing meal that fills your kitchen with mouthwatering aromas!
-
Preheat Your Oven: Start by preheating your oven to 400°F (200°C). This allows your chicken to cook perfectly while you prepare the sauce.
-
Prepare the Chicken: Grab your chicken breasts, pat them dry with paper towels, and place them in a baking dish. This might seem trivial, but removing excess moisture will help achieve that beautiful golden crust.
-
Season the Chicken: Drizzle a little olive oil over the chicken and then sprinkle with salt and pepper. This step is essential to bring out the flavors in the chicken and forms a tasty base for your sauce.
-
Mix Your Hot Honey Sauce: In a small bowl, combine the honey and hot sauce, stirring until mixed well. This sauce is where the magic happens—sweet and spicy melded together.
-
Apply the Sauce: Generously brush the hot honey mixture over the seasoned chicken breasts. Make sure every inch is coated; you want that sweet glaze to caramelize beautifully as it bakes.
-
Add the Feta: Sprinkle the crumbled feta cheese evenly over the chicken. This step not only adds flavor but also gives the dish that creamy texture we love.
-
Bake to Perfection: Place the baking dish in the preheated oven and let it bake for 25-30 minutes, or until the chicken reaches an internal temperature of 165°F (75°C). The feta will melt slightly and create a delicious crust.
-
Finish with a Drizzle: Once the chicken is cooked, pull it out of the oven and give it a final drizzle of any leftover hot honey sauce for that extra oomph. This will leave your taste buds dancing!
-
Resting Time: Let the chicken rest for about 5 minutes before slicing. This ensures the juices redistribute throughout the chicken, making every bite succulent!
Serving Suggestions
Now comes the best part—serving! Plate up your Hot Honey Feta Chicken with a side of fresh veggies or a vibrant salad. You can also skip the plate and enjoy it straight from the baking dish; no judgment here! For an extra touch, garnish the dish with fresh herbs, like parsley or basil, to add a pop of color and a fresh aroma.
Recipe Variations
Feeling adventurous? Here are a few creative twists and substitutions you can try:
-
Herb-Infused Olive Oil: Drizzle the chicken with a flavored olive oil, such as rosemary or lemon-infused, for an added layer of flavor.
-
Citrus Kick: Add a splash of lemon juice or orange zest to your hot honey sauce. The citrus tones will brighten the dish with a refreshing zing.
-
Stuffed Chicken: Create a stuffed version by slicing a pocket into each chicken breast and filling it with sautéed spinach and garlic prior to baking. Yum!
-
Spicy Crunch: For some added texture, toss in some chopped nuts like pistachios or walnuts before serving for a crispy contrast.
Chef’s Notes
Every recipe has its own story, and this one is no different! Every time I prepare Hot Honey Feta Chicken, I think about how I started off following a different recipe and how it has transformed over the years. Initially, I was hesitant about combining sweetness and heat, but it quickly became a staple in my household. The beauty of this dish lies in its versatility; you can swap ingredients to fit your preferences.
Plus, the joy it continues to bring whenever I serve it is priceless. Whether for a cozy night in or gathering with friends, it never fails to evoke smiles and satisfied bellies!
FAQs and Troubleshooting
1. Can I use chicken thighs instead of breasts?
Absolutely! Chicken thighs are a great choice for this recipe. They add an extra layer of juiciness and flavor, plus they’re often more forgiving if you accidentally overcook them a bit.
2. What if I don’t have honey?
If honey isn’t available, agave syrup or maple syrup are great substitutes! You might end up with a slightly different flavor profile, but sweet is sweet, right?
3. What if my feta isn’t crumbly?
If your feta cheese is not crumbly, you can simply crumble it with your hands or use a fork to break it apart. Fresh feta tends to be a bit more moist, but that’s totally fine!
4. How can I store leftovers?
If you have leftovers (they’re rare, but it happens!), store them in an airtight container in the fridge and enjoy within 3–4 days. Just reheat in the oven or microwave before serving.
Nutritional Info
While I know some of us are a little conscious about the numbers, I encourage balance above all. Enjoy your Hot Honey Feta Chicken with a generous serving of fresh veggies, and you’ll have a nutritious meal straight from the heart!
So there you have it—a delightful recipe to warm your heart and satisfy your cravings! Hot Honey Feta Chicken certainly delivers on all fronts, and I hope you enjoy every bite as much as I do. Don’t forget to share your creations and experiences. Happy cooking!
PrintHot Honey Feta Chicken
A flavor-packed dish featuring succulent chicken breasts drizzled with a sweet and spicy hot honey sauce, topped with creamy feta cheese.
- Prep Time: 10 minutes
- Cook Time: 30 minutes
- Total Time: 40 minutes
- Yield: 4 servings 1x
- Category: Main Course
- Method: Baking
- Cuisine: American
- Diet: Paleo
Ingredients
- 4 Chicken Breasts
- 1 Cup Feta Cheese, Crumbled
- 1/4 Cup Honey
- 1–2 Tablespoons Hot Sauce
- Salt and Pepper to Taste
- Olive Oil
- Fresh Vegetables or Salad for Serving
Instructions
- Preheat your oven to 400°F (200°C).
- Prepare the chicken by patting dry and placing in a baking dish.
- Season the chicken with olive oil, salt, and pepper.
- Mix honey and hot sauce in a small bowl.
- Apply the hot honey mixture over the chicken breasts.
- Add crumbled feta evenly over the chicken.
- Bake for 25-30 minutes until the chicken reaches 165°F (75°C).
- Finish with a drizzle of leftover hot honey sauce.
- Rest for 5 minutes before slicing.
Notes
Pairs well with fresh veggies or a salad. For added flavor, consider herb-infused oils or a citrus kick.
Nutrition
- Serving Size: 1 serving
- Calories: 350
- Sugar: 14g
- Sodium: 400mg
- Fat: 12g
- Saturated Fat: 4g
- Unsaturated Fat: 6g
- Trans Fat: 0g
- Carbohydrates: 32g
- Fiber: 0g
- Protein: 30g
- Cholesterol: 85mg
Keywords: chicken, feta, honey, spicy, easy dinner
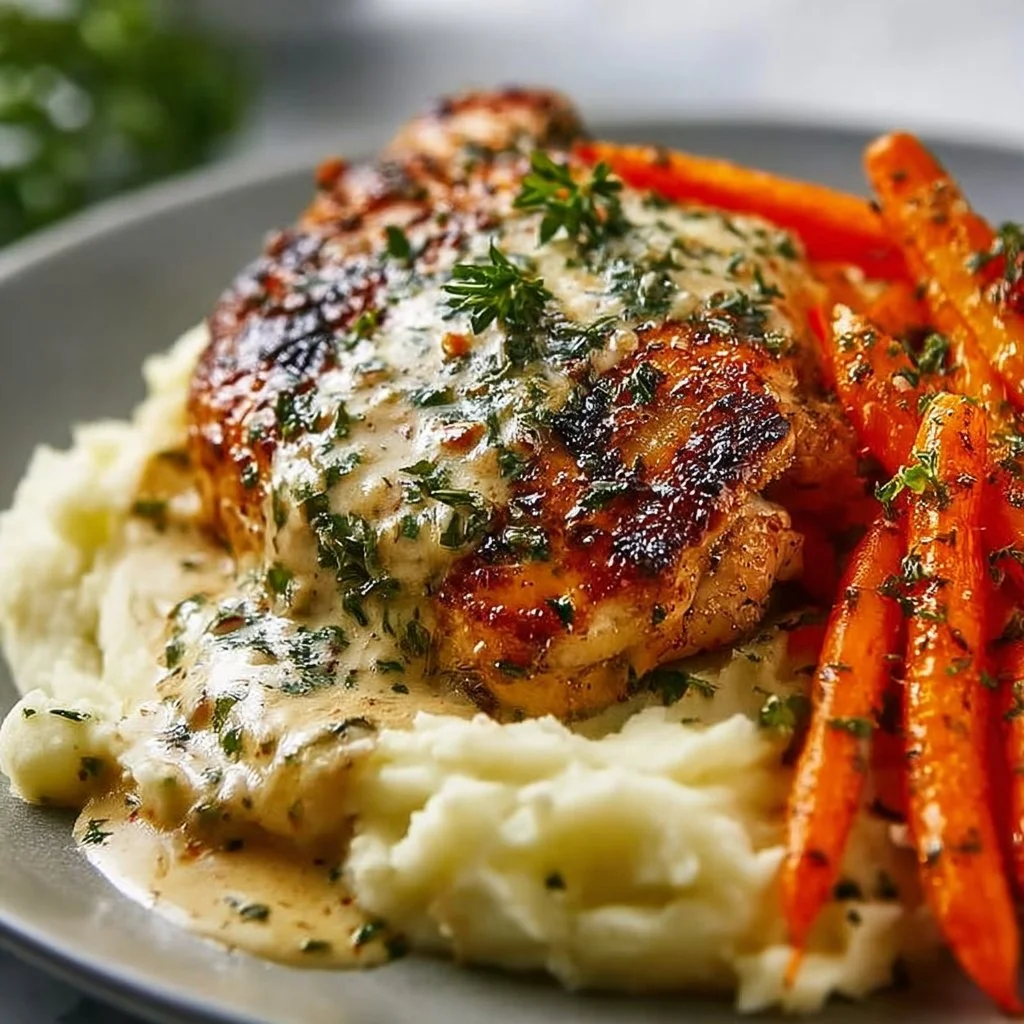
Creamy Herb Chicken with Mashed Potatoes and Honey Glazed Carrots
Creamy Herb Chicken with Mashed Potatoes and Honey Glazed Carrots
Introduction
Hey, food lovers! Welcome back to Clean Plate Cravings. Today, we’re diving into one of my all-time favorite comfort dishes: Creamy Herb Chicken with Mashed Potatoes and Honey Glazed Carrots. I can’t wait to share this recipe with you because it promises to make your kitchen feel like a cozy embrace, and trust me, you’re going to love every creamy, herb-infused bite!
Picture this: A warm evening, the sun setting with a golden glow, and the scent of savory chicken wafting through your home. There’s something magical about cooking that brings back memories, doesn’t it? This dish not only nourishes the body but also warms the soul. With the richness of heavy cream melding with the fragrant mix of herbs, and the perfect pairing of sweet, tender carrots, this meal is sure to evoke familiar feelings of comfort and joy.
This recipe is perfect for busy weeknights when you want something satisfying without spending hours in the kitchen. It’s also ideal for family gatherings or cozy dinners with friends. Plus, it doesn’t hurt that it looks gorgeous on the plate! As we go through the steps, I’ll share some of my favorite tips and tricks that make whipping this dish up an absolute breeze.
So grab your apron, put on your favorite tunes, and let’s cook something delicious together!
Personal Story
I remember the first time I made Creamy Herb Chicken. It was a rainy Saturday afternoon, and I was looking for something to lift my spirits. My sister, who is not particularly keen on cooking, came over to visit. We decided to whip up something hearty, and I thought this chicken dish would be the perfect antidote to the dreary weather outside.
As I sautéed the chicken and the cream began to bubble away with those lovely herbs, my sister and I laughed, chatted, and danced around the kitchen to our favorite tunes. The smell was so divine that it filled the entire house, and I knew we were onto something special.
When we finally sat down to eat, the first bite brought a smile to both our faces. It was incredibly delicious! We spent the rest of the evening reminiscing about family dinners growing up, surrounded by our loved ones and delicious food. That experience cemented this dish as one of my go-to recipes—it’s not just about the flavors but also about creating joy and connection through cooking.
Ingredients
Here’s what you’re going to need to recreate this comfort dish at home:
-
4 chicken thighs
I prefer using thighs for their juicy texture, but you can easily swap them for boneless chicken breasts if you’re looking for something leaner. -
1 cup heavy cream
For that irresistible creaminess! If you’re looking for a lighter option, try using half-and-half or coconut cream for a dairy-free alternative. -
1 tablespoon mixed herbs (thyme, rosemary, parsley)
Fresh herbs bring a burst of flavor to the dish, but dried herbs will work in a pinch. Just use about a third of the amount since dried herbs are more concentrated. -
2 cups mashed potatoes (prepared with butter and milk)
The ultimate comfort food! You can use ready-made mashed potatoes, or for a twist, try garlic mashed potatoes or add cream cheese for extra creaminess. -
4 carrots, sliced
Sweet and vibrant, carrots balance out the savory chicken. You can substitute with baby carrots or even parsnips for a different flavor. -
2 tablespoons honey
Adds a touch of sweetness to the carrots. Maple syrup or agave nectar can work as a sugar substitute if you prefer. -
Salt and pepper to taste
Essential for enhancing the flavors of the dish! -
Olive oil for cooking
A staple in any kitchen—if olive oil isn’t your thing, feel free to use butter or vegetable oil.
Step-by-Step Instructions
Let’s get to the fun part—cooking this delicious dish!
-
Prepare Your Ingredients
Start by gathering all your ingredients. Trust me, it’ll make the cooking process smoother and less chaotic! Chop the carrots and measure out your cream and herbs. You’ll be amazed at how organized you feel. -
Sear the Chicken
In a large skillet, heat about 2 tablespoons of olive oil over medium-high heat. Season your chicken thighs generously with salt and pepper. Once the oil is hot and shimmering, place the chicken thighs skin-side down (if you’re using skin-on). Let them sear for about 7-8 minutes until they get a beautiful golden brown color. Pro tip: Don’t rush this step! The perfect sear seals in the moisture and flavor. -
Flip and Cook Through
After your chicken is beautifully golden, flip them over and let them cook for another 5-7 minutes until the internal temperature reaches 165°F (75°C). If you’re using boneless chicken, the cooking time will be less, around 15 minutes in total. Once cooked, remove them from the skillet and set aside. -
Make the Cream Sauce
In the same skillet (don’t clean it—those brown bits enhance the flavor!), reduce the heat to medium-low and add your heavy cream. Scrape up any flavorful bits from the bottom of the pan with a wooden spoon. Stir in your mixed herbs and let the sauce simmer for about 3-4 minutes, allowing it to thicken slightly. You can adjust the seasoning with more salt and pepper if needed. -
Return Chicken to the Skillet
Once the sauce has thickened, return your chicken thighs back to the skillet, spooning the creamy sauce over them. Let everything simmer together for a couple of minutes to allow the flavors to meld. -
Prepare the Carrots
Meanwhile, bring a pot of water to a boil and add your sliced carrots. Boil for 4-5 minutes until they’re just tender. Drain them, then transfer them back to the pot. Add honey, a pinch of salt, and a splash of olive oil. Stir to coat and let them glaze over medium heat for a couple of minutes. Sweet and simple! -
Whip Up the Mashed Potatoes
If you haven’t prepared the mashed potatoes yet, now is the time! Boil peeled potatoes until fork-tender, drain, then mash with butter, milk, and a pinch of salt. For extra flavor, a little roasted garlic goes a long way!
Serving Suggestions
Now that everything is ready, let’s plate this beauty! Start with a generous scoop of mashed potatoes in the center of your plate. Place a chicken thigh on top, drenching it in that luscious creamy herb sauce. Then, on the side, add a handful of those honey-glazed carrots. For a little extra color, sprinkle some fresh parsley on top, and voila! You’ve got a beautiful meal that’s just waiting to be devoured.
Recipe Variations
Feeling adventurous? Here are a few creative twists to try:
-
Add Spinach or Kale: Toss in a handful of fresh spinach or kale to the cream sauce for a nutritious boost and a pop of color.
-
Spicy Kick: Add a pinch of red pepper flakes to the cream sauce for a spicy finish. It will add a delightful contrast to the creaminess.
-
Mushroom Medley: Sauté sliced mushrooms along with the chicken for an earthy undertone that complements the dish beautifully.
-
Mustard Cream Sauce: Stir in a tablespoon of Dijon mustard to the cream sauce for a tangy and flavorful twist.
-
Cheesy Mashed Potatoes: Mix in shredded cheddar cheese or parmesan into your mashed potatoes for extra richness. Who doesn’t love cheesy potatoes?
Chef’s Notes
As with any recipe, feel free to adjust based on your preferences! I’ve found that this dish is perfect for making ahead of time. The flavors only get better as they sit, making it an excellent option for meal prep or family gatherings. One day, I even experimented and added a splash of white wine to the cream sauce. It was such a hit that it’s now a permanent addition to my version!
In the kitchen, never be afraid to make a little mess! It’s all part of the fun. And if something goes awry, just laugh it off! Cooking is an adventure, and sometimes the best memories come from the unexpected.
FAQs and Troubleshooting
Q: Why is my cream sauce not thickening?
A: If your sauce isn’t thickening as expected, try simmering it a bit longer. If you want a quick fix, whisk in a teaspoon of cornstarch mixed with a bit of water to thicken it up.
Q: Can I use other cuts of chicken?
A: Absolutely! Bone-in chicken breasts or even chicken drumsticks will work fine, but keep an eye on cooking times. Drumsticks may take longer, while breasts may cook a bit faster.
Q: Can the recipe be made dairy-free?
A: Yes! Substitute heavy cream with full-fat coconut cream or a cashew-based cream. Just be mindful of seasoning, as these alternatives may alter the flavor slightly.
Q: How long will leftovers last?
A: Any leftovers can be stored in an airtight container in the refrigerator for up to 3 days. Just reheat gently to avoid overcooking the chicken!
Nutritional Info
While I often focus on deliciousness over dietary specifics, here’s a general estimate for a serving of Creamy Herb Chicken with Mashed Potatoes and Honey Glazed Carrots:
- Calories: 650
- Protein: 35g
- Carbs: 70g
- Fat: 25g
This is a comfort meal that provides a good balance of nutrients to fuel your day, but remember, it’s all about enjoying and finding what works for your body!
So, there you have it! A delightful recipe that’s not just about the food but the joy of cooking and sharing. I hope you enjoy making this dish as much as I do. Remember, it’s all about keeping things fresh, simple, and seriously delicious! Happy cooking!
PrintCreamy Herb Chicken with Mashed Potatoes and Honey Glazed Carrots
A comforting dish featuring juicy chicken thighs in a creamy herb sauce, served with buttery mashed potatoes and sweet, honey-glazed carrots.
- Prep Time: 15 minutes
- Cook Time: 30 minutes
- Total Time: 45 minutes
- Yield: 4 servings 1x
- Category: Main Course
- Method: Sautéing
- Cuisine: American
- Diet: Gluten-Free
Ingredients
- 4 chicken thighs
- 1 cup heavy cream
- 1 tablespoon mixed herbs (thyme, rosemary, parsley)
- 2 cups mashed potatoes (prepared with butter and milk)
- 4 carrots, sliced
- 2 tablespoons honey
- Salt and pepper to taste
- Olive oil for cooking
Instructions
- Prepare Your Ingredients: Gather all your ingredients and chop the carrots.
- Sear the Chicken: Heat olive oil in a skillet, season chicken, and sear for 7-8 minutes.
- Flip and Cook Through: Flip chicken and cook for another 5-7 minutes until fully cooked.
- Make the Cream Sauce: Add heavy cream and herbs to the skillet, scraping up bits, and simmer.
- Return Chicken to the Skillet: Add chicken back to the sauce and let simmer.
- Prepare the Carrots: Boil sliced carrots until tender, then glaze with honey and olive oil.
- Whip Up the Mashed Potatoes: Prepare mashed potatoes with butter and milk.
Notes
Feel free to customize with your favorite herbs or add different vegetables. Leftovers can be stored for up to 3 days.
Nutrition
- Serving Size: 1 serving
- Calories: 650
- Sugar: 10g
- Sodium: 600mg
- Fat: 25g
- Saturated Fat: 12g
- Unsaturated Fat: 10g
- Trans Fat: 0g
- Carbohydrates: 70g
- Fiber: 4g
- Protein: 35g
- Cholesterol: 180mg
Keywords: Creamy Chicken, Comfort Food, Herb Chicken, Mashed Potatoes, Honey Carrots