Minute Berry Caprese Salad for Fresh Summer Dinners
Berry Caprese Salad: A Fresh Take on a Classic
Welcome to another delicious day in my kitchen! Today, we’re whipping up a dish that will bring a smile to your face and a burst of flavor to your palate: Berry Caprese Salad. If you’re a fan of vibrant, playful salads that don’t just look good but taste incredible, then you’ve stumbled upon something special. Picture this: luscious, creamy mozzarella hugging juicy mixed berries, all wrapped up in the aromatic embrace of fresh basil. You’d be right to think that this sounds like a heavenly match, and trust me, it is!
What I love about this salad is that it perfectly straddles the line between indulgent and healthy. Each ingredient shines, and when they come together, it’s magic in a bowl. There’s something about the sweet-tart explosion from the berries paired with the smooth, mild mozzarella that creates a symphony of flavors. Whether you’re planning a fancy picnic, a backyard BBQ, or just looking for a quick and nutritious lunch, Berry Caprese Salad is here to elevate your meal.
Now, before we dive into the details, let me reminisce a bit and share how this delightful dish became a staple in my cuisine.
A Nostalgic Memory: The First Time I Made a Berry Caprese Salad
It was several summers ago when I first encountered the charm of a Berry Caprese Salad. I was hosting a backyard gathering, excited to impress my friends with my culinary creations. The idea of a traditional Caprese Salad was dancing around in my head, but I wanted to kick it up a notch, something fun and unexpected. As I strolled through the local farmer’s market, the ripe strawberries and vibrant blueberries called out to me. It struck me like a bolt of lightning! Why not combine the fresh berries with the classic Caprese elements?
So, with a basket of colorful produce, I headed home, eager to experiment. My friends were skeptical as I set the table—after all, the classic tomato and mozzarella duo is hard to beat! But as soon as I took that first bite of our innovative creation, laughter erupted around the table. It was a hit! The sweet berries playfully danced with the creamy mozzarella, and everyone was hooked. From that moment on, Berry Caprese Salad became my summer showstopper—a dish that ushered in laughter, friendships, and the joy of shared meals. And now, I’m thrilled to share that joy with you!
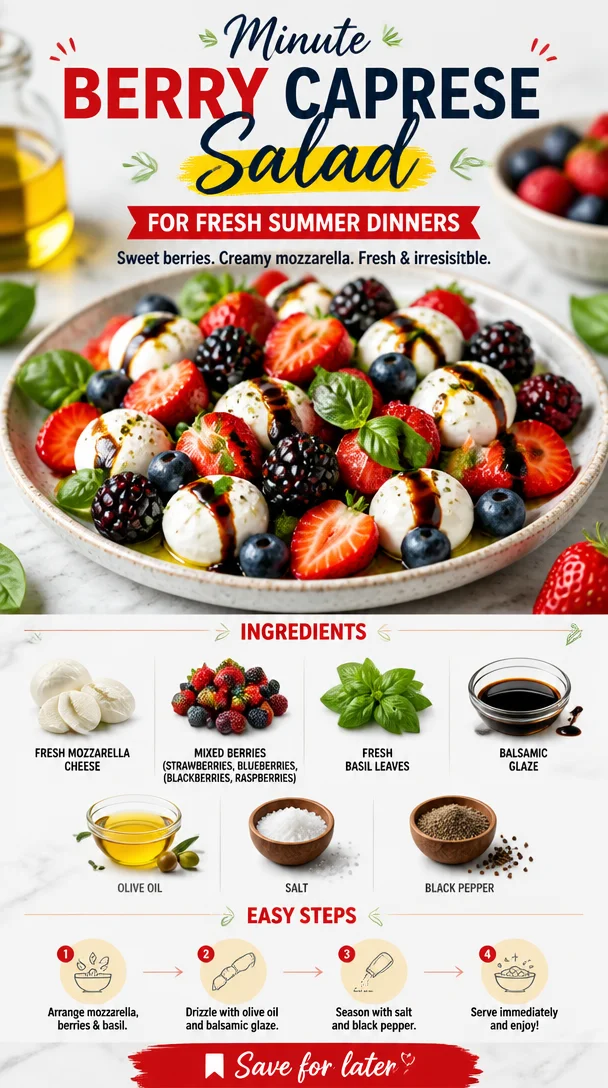
Ingredients: Fresh, Colorful, and Simple
Here’s what you’ll need to create this delightful dish, along with some little chef insights to help you shine in your kitchen:
-
Fresh Mozzarella Cheese: Creamy and mild, fresh mozzarella is a must for that authentic Caprese experience. If you can’t find it, burrata works beautifully too. It adds an extra creaminess that’s simply divine!
-
Mixed Berries (strawberries, blueberries, blackberries, raspberries): The star of the show! Feel free to mix and match based on what you love or what’s in season. You could even try blackcurrants or cherries for a twist!
-
Fresh Basil Leaves: Aromatic and bright, basil adds a fantastic herbal note. Look for vibrant green leaves, and don’t be shy! The more, the merrier. If you’re feeling adventurous, mint could be a refreshing substitute!
-
Balsamic Glaze: This adds that sweet-and-sour punch that ties everything together. If you don’t have balsamic glaze on hand, a drizzle of balsamic vinegar works too—just ensure to use a high-quality one for maximum flavor.
-
Olive Oil: A good drizzle of extra virgin olive oil enhances the richness of the mozzarella and balances the sweetness of the fruit. You can substitute with avocado oil for a different flavor profile.
-
Salt: Just a pinch, please! Salt brings out the flavors of the ingredients and helps them shine. Try flaky sea salt for a gourmet touch.
-
Black Pepper: Freshly cracked black pepper adds a bit of zesty warmth to the salad. For a spicy kick, you can use a bit of crushed red pepper instead.
Step-by-Step Instructions: Let’s Get Cooking!
Alright, my foodie friends, it’s time to roll up your sleeves and jump into the fun of assembling this gorgeous salad. Follow these steps, and you’ll have a masterpiece in no time:
-
Prepare the Ingredients: Start by gathering all your ingredients. Rinse the berries gently under cool water; be careful not to squish them! Pat them dry with a paper towel.
-
Slice the Mozzarella: Carefully slice your fresh mozzarella into bite-sized pieces. Aim for roughly half-inch thick slices—big enough to enjoy but small enough to fit comfortably on your fork. If you’re using burrata, simply break it apart with your fingers; that creamy goodness should be easily accessible!
-
Tear the Basil: Take a handful of fresh basil leaves and tear them into smaller pieces. This helps release their aromatic oils, which enhances the overall flavor of the dish.
-
Assemble the Salad: On a serving platter or in a large bowl, start layering your salad. Begin with a base of sliced mozzarella, then alternate with mixed berries and torn basil leaves. Don’t worry about perfection; this dish is all about showing off cozy, rustic beauty. The colors should shine!
-
Drizzle with Balsamic Glaze and Olive Oil: Now comes the magic touch. Drizzle balsamic glaze over the salad, allowing it to cascade down the mozzarella and berries. Next, add a gentle drizzle of olive oil for that rich mouthfeel. It’s like giving your salad a fashionable coat to wear!
-
Season It Right: Sprinkle a pinch of salt and a few cracks of fresh black pepper over the top. Just enough to elevate those flavors without overpowering the delightful balance.
-
Taste and Adjust: Before serving, give it a little taste test. Adjust seasoning if needed, and maybe add more balsamic or olive oil if you’re feeling fancy. Each bite should excite your taste buds!
-
Serve Immediately: This salad is best enjoyed fresh, so try to serve it right away. If you must make it ahead, keep the dressed salad in the fridge and assemble it just before serving.
As you prepare your Berry Caprese Salad, don’t hesitate to enjoy the process! Chat with someone nearby, sip a tasty drink, and relish the fresh aromas wafting through your kitchen.
Serving Suggestions: Make It a Masterpiece
When it comes to serving this dish, presentation matters just as much as taste! If you’ve assembled it on a platter, simply bring it to the table for a stunning centerpiece. For individual servings, layer each component into clear glasses for a charming effect where guests can see the beautiful colors. This elevates your salad to a culinary art piece!
This salad pairs wonderfully with grilled meats, crusty bread, or can be served as a refreshing side dish at a summer BBQ. Don’t forget about wine! A chilled rosé or Sauvignon Blanc adds to the experience—trust me on this one.
Recipe Variations: Get Creative
This Berry Caprese Salad is a great canvas for your culinary creativity. Here are a few tasty variations to consider:
-
Tropical Twist: Substitute strawberries and blueberries for pineapple and mango for a tropical vibe. The sweetness of the fruit will pair beautifully with the mozzarella.
-
Nuts for Crunch: Toss in some toasted pine nuts or walnuts for an added crunch. They provide a lovely texture while enhancing the flavors.
-
Balsamic Berry Vinaigrette: Whisk together balsamic vinegar, Dijon mustard, and honey for a unique dressing instead of glaze. This lightens up the dish while adding more zing.
-
Spicy Kick: Add thin slices of jalapeño or drizzle some spicy chili oil for those who like it hot! This unexpected twist will surprise and delight your guests.
-
Vegan Delight: Swap out the mozzarella for vegan cheese or marinated tofu. The flavors from the berries and basil will make it a hit for everyone!
Chef’s Notes: A Personal Touch
Every recipe tells a story, and this one is no different! Over the years, I have enjoyed experimenting with flavors and ingredients. One fun memory that stands out was during a cooking class I held in my home. I asked my students to brainstorm exotic berries to include, and we ended up trying out some astonishing combinations like goji berries and raspberries. The twist made it an unforgettable event filled with laughter and new friendships.
It’s important to remember that cooking is a form of self-expression. Each time you make this salad, let your creativity shine! Have fun with it, and never hesitate to try something new.
FAQs and Troubleshooting: Your Burning Questions Answered
-
Can I make this salad ahead of time?
Absolutely! However, I recommend keeping the berries and mozzarella separate from the dressing until you’re ready to serve. If you mix it all, the salad can become soggy, and that’s not what we want! -
What if I can’t find fresh mozzarella?
No worries at all! Feel free to substitute with regular mozzarella cheese or even feta if you’re looking for something a bit tangier. Reminder: the flavor profile will change slightly, but it will still be delicious! -
Is it possible to make this dish low-sugar?
Yes! Simply reduce or eliminate the balsamic glaze in favor of plain balsamic vinegar or a drizzle of olive oil. Focus on letting the natural sweetness of the berries stand out. -
How do I prevent the salad from getting soggy in the fridge?
Store the berries and mozzarella in separate containers from the dressing. When you’re ready to enjoy, toss it together for the freshest taste.
Nutritional Info
While I encourage you to savor each bite without stress, here’s a rough estimate of what you’re indulging in:
- Calories: 230 per serving (This can vary based on quantity and specific ingredients)
- Protein: 10g
- Carbohydrates: 15g
- Fat: 15g
Conclusion
And there you have it! A vibrant, Berry Caprese Salad that not only looks stunning on the plate but also tantalizes your taste buds. I hope you enjoy making it as much as I do! Remember, cooking is all about balance, so feel free to swap and experiment while keeping the essence of this delightful dish alive. Let food be delightful fuel for your life, and share it generously with those you love. Happy cooking!
PrintBerry Caprese Salad

A vibrant and playful salad that combines creamy mozzarella with juicy mixed berries and fresh basil, drizzled with balsamic glaze.
- Prep Time: 15 minutes
- Cook Time: 0 minutes
- Total Time: 15 minutes
- Yield: 4 servings
- Category: Salad
- Method: Assembling
- Cuisine: Italian
- Diet: Vegetarian
Ingredients
- Fresh Mozzarella Cheese
- Mixed Berries (strawberries, blueberries, blackberries, raspberries)
- Fresh Basil Leaves
- Balsamic Glaze
- Olive Oil
- Salt
- Black Pepper
Instructions
- Prepare the Ingredients: Gather all ingredients and rinse berries gently under cool water; pat dry.
- Slice the Mozzarella: Cut fresh mozzarella into bite-sized slices.
- Tear the Basil: Tear basil leaves into smaller pieces to release oils.
- Assemble the Salad: Layer salad starting with mozzarella, followed by mixed berries and basil.
- Drizzle with Balsamic Glaze and Olive Oil: Let glaze cascade over the salad.
- Season It Right: Sprinkle salt and black pepper over the top.
- Taste and Adjust: Adjust seasoning as needed.
- Serve Immediately: Best enjoyed fresh.
Notes
This salad pairs well with grilled meats or crusty bread. For serving, layer ingredients in clear glasses for a charming effect.
Nutrition
- Serving Size: 1 serving
- Calories: 230
- Sugar: 10g
- Sodium: 200mg
- Fat: 15g
- Saturated Fat: 5g
- Unsaturated Fat: 8g
- Trans Fat: 0g
- Carbohydrates: 15g
- Fiber: 3g
- Protein: 10g
- Cholesterol: 30mg
Keywords: salad, berry salad, caprese, fresh ingredients, summer recipe
Minute English Pea Salad for Weeknight Meal Prep
The Bright and Fresh English Pea Salad: A Dish That Celebrates Spring
Welcome back, foodies! Today, I’m beyond excited to share with you one of my favorite springtime dishes: English Pea Salad. This light, vibrant salad is bursting with flavor and energy, making it the perfect addition to any meal or gathering. With every bite, you’ll relish the crunch of fresh produce, the creamy delight of cheese, and just a hint of something tangy that ties it all together. Trust me; your taste buds will be thanking you!
When finding delicious ways to enjoy healthier meals, simplicity is key. This salad features fresh or frozen peas, crunchy celery, and savory red onions, all harmoniously blended with cheddar cheese and a simple dressing made from mayo and apple cider vinegar. Easy to whip up and totally satisfying, this dish is not just a salad—it’s an experience that will transport you right back to those warm, sunlit days of childhood.
So, grab your apron, let’s roll up our sleeves, and dive into the magic of making English Pea Salad!
A Little Taste of Nostalgia
When I was a kid, springtime meant one thing: pea planting with my grandmother. Each year, we’d venture into her garden, where neat rows of pea plants awaited us, sunlit and vibrant. It was such a magical time, filled with shared laughter, dirt-stained hands, and high hopes for the garden’s bounty.
One of my fondest memories is the delightful sound of popping those sweet little peas from their pods. It felt like opening nature’s little presents! After our hard work, we’d whip up a simple English Pea Salad using the freshest peas right from the garden. The joy of sharing that meal with family, surrounded by blooming flowers and buzzing bees, planted in me a love for cooking that has only grown over the years. That’s why I absolutely adore recreating this dish—it’s a personal nod to my grandmother, her garden, and those beautiful, sun-soaked afternoons.
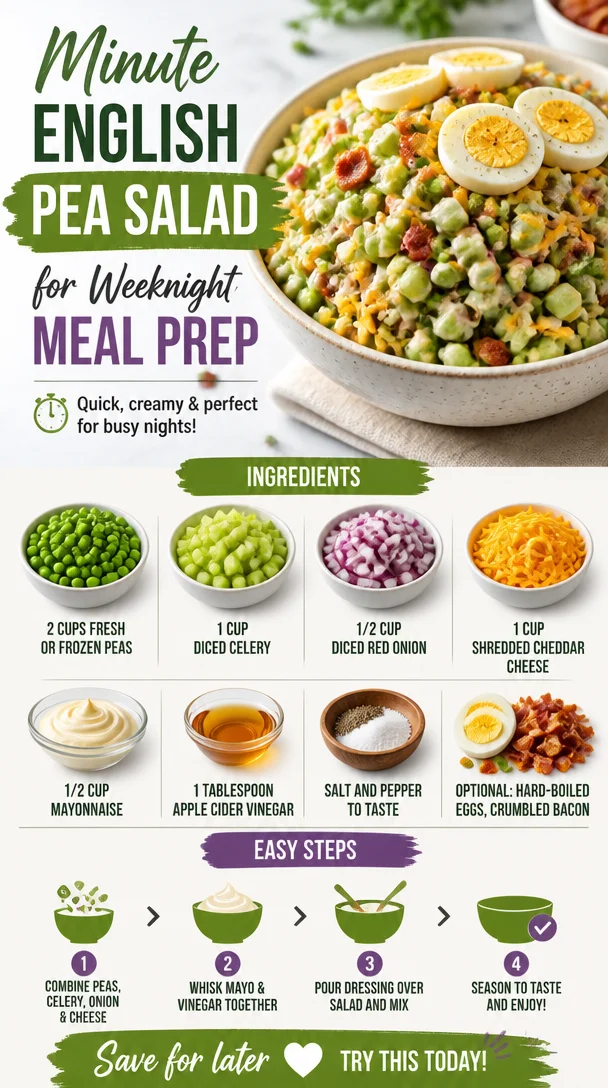
Ingredients
Let’s gather our ingredients and make this delicious salad together!
-
2 cups fresh or frozen peas
Fresh peas offer a sweet, vibrant flavor that shines through in this dish, but frozen peas work just as well if you’re in a pinch. For substitution, you can use diced green beans for a different crunch! -
1 cup diced celery
Celery adds that delightful crunch and refreshing bite. If you’re not a fan of celery, feel free to replace it with diced cucumber for a sweeter flavor. -
1/2 cup diced red onion
These bring a pop of color and a mild onion flavor. For a more subtle taste, try using green onions or scallions instead. -
1 cup shredded cheddar cheese
Cheddar adds a creamy, tangy richness to the salad. If you want a lighter version, try using reduced-fat cheese or even feta for a tangier twist! -
1/2 cup mayonnaise
This creamy base is what binds the salad together. If you prefer a lighter option, swap it out for Greek yogurt—it offers protein and a nice tang! -
1 tablespoon apple cider vinegar
The vinegar adds a delightful tang to balance the richness of the mayonnaise. Lemon juice can be an excellent substitute if you want something citrusy. -
Salt and pepper to taste
These simple seasonings enhance all the flavors and bring everything to life. -
Optional: hard-boiled eggs, crumbled bacon
For an extra layer of flavor and heartiness, throw in some sliced hard-boiled eggs or crispy bacon bits. You can always leave these out for a lighter, vegetarian option!
Step-by-Step Instructions
Now that we’ve gathered our ingredients, let’s dive into the cooking process! Trust me, making this English Pea Salad is a breeze.
-
Prep Your Ingredients
Begin by gathering all your ingredients on the counter. It helps to have a clean workspace! Dice your celery and red onion, and if you’re using fresh peas, shell them while humming your favorite cooking tune. -
Cook the Peas (if using fresh)
If you decided to go with fresh peas, bring a pot of water to a boil. Add the peas and blanch them for about 2-3 minutes until they’re bright green and tender. Don’t forget to drain them and plunge them into cold water to stop the cooking process. This keeps their beautiful color intact! -
Mix the Dressing
In a medium bowl, combine your mayonnaise and apple cider vinegar. Stir until smooth. Taste it—it should be creamy with just a hint of tang. Feel free to adjust the vinegar according to your preference! -
Combine Everything
In a large mixing bowl, combine the cooked (or thawed) peas, diced celery, diced red onion, and cheddar cheese. Pour the dressing over the mixture and gently fold everything together. Be careful not to mash the peas; we want them to stay intact for that satisfying crunch! -
Season
Season your salad with salt and pepper to taste. This is a great time to add optional ingredients like diced hard-boiled eggs or crispy bacon for extra flavor and heartiness. Mix it all once more to ensure an even distribution. -
Chill
For the best flavor, cover your salad with plastic wrap or a lid and let it chill in the fridge for at least 30 minutes. This allows the flavors to meld and marry beautifully—trust me, patience is key here! -
Serve and Enjoy
Once your salad has chilled, give it a gentle stir before serving. Plate it in a beautiful bowl, garnishing with a sprinkle of fresh herbs if you like, and get ready to dig in!
Serving Suggestions
This English Pea Salad is perfect for picnics, BBQs, or as a delightful side at any meal. Serve it cold or at room temperature alongside grilled chicken, fish, or a hearty veggie burger. You can also serve it in lettuce cups for a fun and fresh way to enjoy it!
Recipe Variations
The beauty of this salad is how versatile it is! Here are a few creative twists you can try:
- Herbed Up: Add in some fresh herbs like dill, parsley, or basil to elevate the flavor profile.
- Nutty Addition: Toss in some toasted walnuts or pecans for an extra crunch and healthy fats.
- Spicy Kick: For a bit of heat, try adding diced jalapeños or a splash of hot sauce into the dressing—your taste buds will thank you!
- Fruit Fiesta: Diced apples or berries can introduce a lovely sweetness that contrasts beautifully with the savory elements of the salad.
Chef’s Notes
As with any dish, this English Pea Salad has evolved over time in my kitchen! When I was initially developing the recipe, my grandmother’s influence always loomed large. I experimented with various ingredients until I found this delicious blend that pays homage to those sunny garden days. Funny enough, my brother was convinced that salad couldn’t taste great—until he had his first bite of this creamy, savory wonder. Now he requests it for every family gathering!
One of my favorite moments is when you observe friends and family enjoying it and going back for seconds (and thirds!). It’s those experiences wrapped up in wholesome food that make cooking so rewarding.
FAQs and Troubleshooting
Q: Can I use frozen peas?
Absolutely! Frozen peas work perfectly here and save you lots of prep time. Just thaw them before adding to the salad.
Q: How long will this salad last in the fridge?
This salad is best enjoyed within 2-3 days. The flavors will intensify, but the texture may slightly diminish over time.
Q: Can I make this salad ahead of time?
Yes! You can prepare it the night before, letting the flavors meld overnight. Just give it a good stir before serving the next day.
Q: What if my salad turns out too salty?
If you’ve accidentally added too much salt, try to balance it with a little more creamy dressing or add in extra peas to dilute the saltiness.
Nutritional Info
This salad is a wholesome mix of nutrients! With protein from the cheese and eggs (if included), fiber from the peas and celery, plus healthy fats from the mayonnaise or yogurt, this dish is perfect for a balanced meal.
So there you have it! This English Pea Salad might seem simple, but it’s packed with memories, flavors, and joy. I hope you enjoy making it as much as I do! Remember that cooking is all about experimenting—so don’t hesitate to make it your own! Happy cooking, my fellow food lovers!
PrintEnglish Pea Salad
A light and vibrant salad celebrating spring with fresh peas, crunchy celery, and creamy cheddar cheese, balanced with a tangy dressing.
- Prep Time: 15 minutes
- Cook Time: 5 minutes
- Total Time: 50 minutes
- Yield: 4 servings 1x
- Category: Salad
- Method: Mixing
- Cuisine: American
- Diet: Vegetarian
Ingredients
- 2 cups fresh or frozen peas
- 1 cup diced celery
- 1/2 cup diced red onion
- 1 cup shredded cheddar cheese
- 1/2 cup mayonnaise
- 1 tablespoon apple cider vinegar
- Salt and pepper to taste
- Optional: hard-boiled eggs, crumbled bacon
Instructions
- Prep your ingredients by gathering them on the counter and dicing celery and red onion.
- Cook the peas by boiling them for about 2-3 minutes if using fresh, and then drain and plunge into cold water.
- Mix the dressing by combining mayonnaise and apple cider vinegar until smooth.
- Combine everything in a large mixing bowl, adding the cooked peas, celery, onion, and cheddar cheese.
- Season the salad with salt and pepper, and add optional ingredients if desired.
- Chill the salad in the fridge for at least 30 minutes to allow flavors to meld.
- Serve and enjoy your refreshing English Pea Salad!
Notes
This salad is versatile; feel free to add herbs, nuts, or fruits for a creative twist.
Nutrition
- Serving Size: 1 serving
- Calories: 250
- Sugar: 5g
- Sodium: 300mg
- Fat: 15g
- Saturated Fat: 3g
- Unsaturated Fat: 10g
- Trans Fat: 0g
- Carbohydrates: 25g
- Fiber: 5g
- Protein: 8g
- Cholesterol: 20mg
Keywords: salad, spring, peas, vegetarian, easy recipe
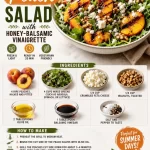
Seasonal Grilled Peach Salad with Honey-Balsamic Vinaigrette
Grilled Peach Salad: A Sweet Spin on a Classic
There’s something truly magical about the sweetness of summer, especially when it comes to peaches. Picture this: the sun is shining, the air is warm, and you’ve just come back from the local farmer’s market, a bag brimming with ripe, juicy peaches. It’s one of those moments that simply calls for a celebration, and what better way to embrace the season than with a vibrant Grilled Peach Salad!
Here at Clean Plate Cravings, I believe that food should be an experience—a joy to prepare and to eat. This Grilled Peach Salad is not just a dish; it’s a burst of summer happiness, beautifully balancing the sweetness of the peaches with the vibrancy of greens and the richness of feta cheese. Plus, it’s super easy to whip up! Let’s take a little trip down memory lane as I share a personal story about how this delightful salad came to be.
A Slice of Nostalgia
I remember the first time I had grilled peaches. It was at a backyard barbecue hosted by my dear friend, Sarah. The sun was starting to set, and the warm glow of the evening added a magical touch to our gathering. Sarah, a culinary whiz, decided to throw some peaches on the grill as a spontaneous appetizer. We all watched in anticipation, and when she pulled those charred, caramelized jewels off the grill, the aroma was simply heavenly.
With just a drizzle of honey and a sprinkle of sea salt, I took my first bite. The contrast of the warm, juicy peach against the tangy feta was a revelation! I could hardly believe how something so simple could taste so divine. It inspired me to create this salad, melding fresh greens with luscious grilled peaches. Every time I make it, it takes me back to that beautiful summer evening, surrounded by friends and laughter.
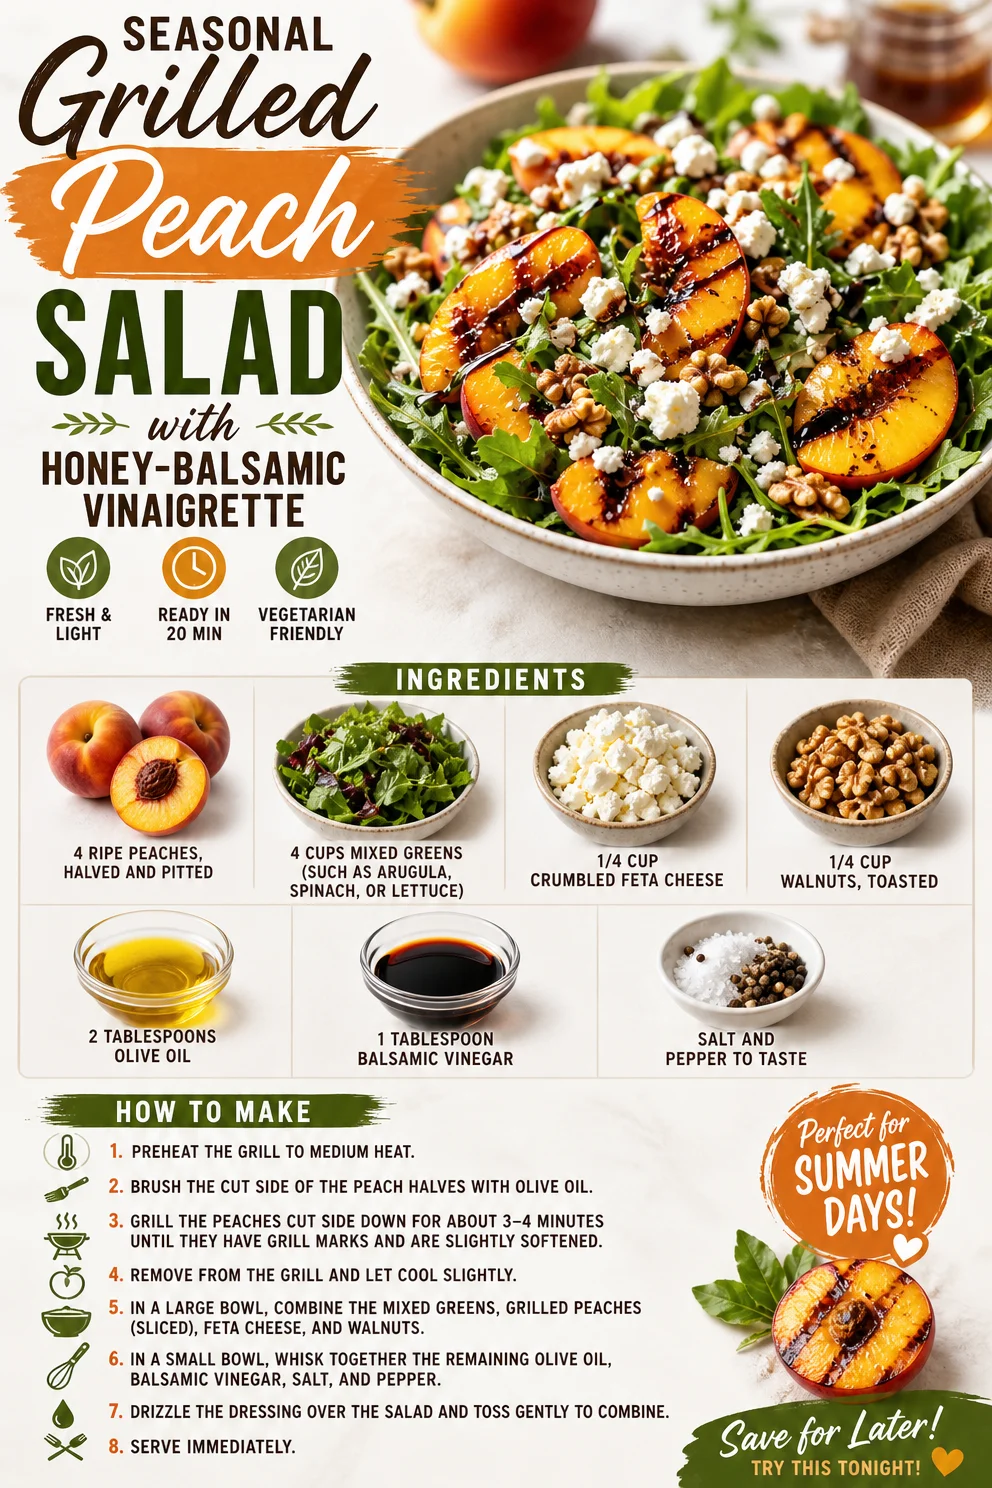
Ingredients
Let’s gather our star players for this Grilled Peach Salad:
-
4 ripe peaches, halved and pitted
Look for peaches that are slightly soft to the touch; they should give a little when pressed. If peaches aren’t in season, you can substitute with nectarines or even plums for a similar flavor. -
4 cups mixed greens (such as arugula, spinach, or lettuce)
Mixed greens add color and texture; arugula brings a peppery flavor, while spinach adds a tenderness. Feel free to use what you have on hand—kale or baby kale work great too! -
1/4 cup crumbled feta cheese
Feta adds a salty, creamy element that pairs perfectly with the sweetness of the peaches. If you want a different flavor profile, try goat cheese or even blue cheese for an extra punch. -
1/4 cup walnuts, toasted
Walnuts not only add crunch but also a lovely nutty flavor. To toast, simply place them in a dry skillet over medium heat until fragrant—something you’ll want to keep an eye on so they don’t burn! -
2 tablespoons olive oil
A good quality extra virgin olive oil enhances the flavor of every ingredient in this dish. If you’re feeling adventurous, try infusing it with herbs like rosemary or basil for an added kick. -
1 tablespoon balsamic vinegar
Balsamic is a classic dressing for salads, bringing a tangy sweetness that binds everything together. You can switch this with apple cider vinegar or lemon juice for a different sour note. -
Salt and pepper to taste
Always remember: seasoning is key to bringing out the flavors in your dish. Freshly cracked pepper adds a little heat, while sea salt elevates every ingredient beautifully.
Step-by-Step Instructions
Now that we have our ingredients ready, let’s dive into the cooking process. Don’t worry; I’ll walk you through it step by step and share some chef hacks along the way!
-
Preheat Your Grill
Make sure your grill is heated to medium-high. This ensures those beautiful grill marks and caramelization on the peaches. No grill? No worries! You can use a grill pan on the stovetop. -
Prep the Peaches
Halve the peaches and remove the pits. If they’re sticking a bit, you can run a knife around the pit and twist gently. Brush each half lightly with olive oil to prevent sticking and to enhance the flavor while grilling. -
Grill the Peaches
Place the peach halves cut-side down on the grill. Grill for about 3-4 minutes until they develop those stunning grill marks and are warm throughout. Keep an eye on them—grilled fruit cooks quickly, and you want that perfect caramelization without turning mushy. -
While the Peaches Grill
Start building your salad base! In a large bowl, combine your mixed greens. Toss them gently, allowing them to fluff up. This step makes the salad look inviting and airy. -
Toast the Walnuts
In a separate dry skillet over medium heat, add the walnuts. Toast them for about 5 minutes, stirring frequently until they are golden brown and fragrant. Stand nearby—these can go from toasted to burnt quickly! -
Dress It Up
In a small bowl, whisk together the remaining olive oil and balsamic vinegar with a pinch of salt and pepper. This will be your salad dressing—it’s fresh and simple! -
Put It All Together
Once the peaches are grilled, chop them into bite-sized pieces. Add the grilled peaches and toasted walnuts to the mixed greens. Crumble the feta cheese on top, and drizzle the dressing. Give it a gentle toss to combine all those delightful flavors. -
Taste Test!
This is the best part! Before serving, taste your salad and adjust the seasoning if necessary. Maybe you’d like a hint more salt or another drizzle of balsamic vinegar? Go for it!
Serving Suggestions
To serve, plate the salad in a large salad bowl or on individual plates. For a beautiful presentation, place generous portions of the mixed greens at the base, scatter the grilled peaches, crumbled feta, and toasted walnuts on top. Finish with a peek of extra balsamic drizzle, maybe a sprinkle of chopped fresh herbs for an added touch. Voilà, your stunning Grilled Peach Salad is ready to impress!
Recipe Variations
Feeling creative? Here are a few fun twists you can try with this Grilled Peach Salad:
- Add Grains: Incorporate cooked quinoa or farro for a heartier salad that packs a nutritional punch.
- Use Different Fruits: Try grilling other fruits like pineapples or apricots for a fun twist.
- Herbed Options: Toss in fresh herbs like basil or mint to elevate the flavor.
- Spicy Kick: Add some sliced jalapeños or red pepper flakes for a kick!
- Nuts Swap: Experiment with different nuts—almonds or pecans are great alternatives to walnuts.
Chef’s Notes
Every recipe has a backstory, and this one holds a special place in my heart. Over the years, I’ve experimented with various ingredients to create unique flavor combinations. I’ve swapped out the greens, replaced feta with goat cheese, and even tried a honey-lime dressing during one summer gathering. The beauty of this salad is its flexibility—feel free to make it your own!
And let me tell you, each version has been a total hit! I often reminisce about that first unforgettable taste of grilled peaches, unlocking a world of fruit-forward salads that leave everyone wanting more.
FAQs and Troubleshooting
1. My peaches are too firm. What should I do?
If your peaches aren’t ripe enough, you can still grill them! Just slice them thinner to help them caramelize better. Alternatively, let them ripen at room temperature for a couple of days.
2. How do I prevent my salad from wilting?
Dress the salad just before serving to keep the greens crisp. If you have leftovers, store the dressing separately for the next day.
3. Can I prepare this salad in advance?
You can grill the peaches and toast the walnuts ahead of time, but I recommend assembling the salad right before serving to maintain freshness.
4. What can I add for protein?
Grilled chicken, shrimp, or chickpeas are all fantastic options to boost protein in this salad. Just add them on top after tossing your other ingredients!
Nutritional Info
If you’re curious about the nutritional profile of this Grilled Peach Salad, here’s a quick breakdown (per serving):
- Calories: 250
- Protein: 6g
- Carbohydrates: 20g
- Fats: 18g
- Fiber: 3g
This salad is not only delicious but also packed with nutrients. It’s as nourishing as it is vibrant.
Whether you’re enjoying this Grilled Peach Salad as a light lunch, a side dish for dinner, or a star at your next barbecue, I hope it brings a refreshing burst of flavor to your table. Remember, cooking is all about creativity and having fun—so go ahead, make it your own, and savor each juicy bite! Enjoy!
PrintGrilled Peach Salad
A vibrant Grilled Peach Salad that beautifully balances the sweetness of peaches with fresh greens and rich feta cheese.
- Prep Time: 15 minutes
- Cook Time: 10 minutes
- Total Time: 25 minutes
- Yield: 4 servings 1x
- Category: Salad
- Method: Grilling
- Cuisine: American
- Diet: Vegetarian
Ingredients
- 4 ripe peaches, halved and pitted
- 4 cups mixed greens (such as arugula, spinach, or lettuce)
- 1/4 cup crumbled feta cheese
- 1/4 cup walnuts, toasted
- 2 tablespoons olive oil
- 1 tablespoon balsamic vinegar
- Salt and pepper to taste
Instructions
- Preheat your grill to medium-high.
- Prep the peaches by halving and removing the pits, brushing each half lightly with olive oil.
- Grill the peach halves cut-side down for about 3-4 minutes until warm throughout.
- While the peaches grill, combine mixed greens in a large bowl.
- Toast walnuts in a dry skillet over medium heat for about 5 minutes until golden brown and fragrant.
- Whisk together remaining olive oil and balsamic vinegar with a pinch of salt and pepper for the dressing.
- Put the grilled peach pieces and toasted walnuts into the mixed greens, add crumbled feta, and drizzle with dressing. Toss gently.
- Taste the salad and adjust seasoning if necessary before serving.
Notes
Feel free to substitute with nectarines or other seasonal fruits. This salad pairs beautifully with grilled chicken or shrimp for added protein.
Nutrition
- Serving Size: 1 serving
- Calories: 250
- Sugar: 10g
- Sodium: 200mg
- Fat: 18g
- Saturated Fat: 3g
- Unsaturated Fat: 15g
- Trans Fat: 0g
- Carbohydrates: 20g
- Fiber: 3g
- Protein: 6g
- Cholesterol: 10mg
Keywords: salad, grilled peaches, summer salad, vegetarian salad, healthy recipe