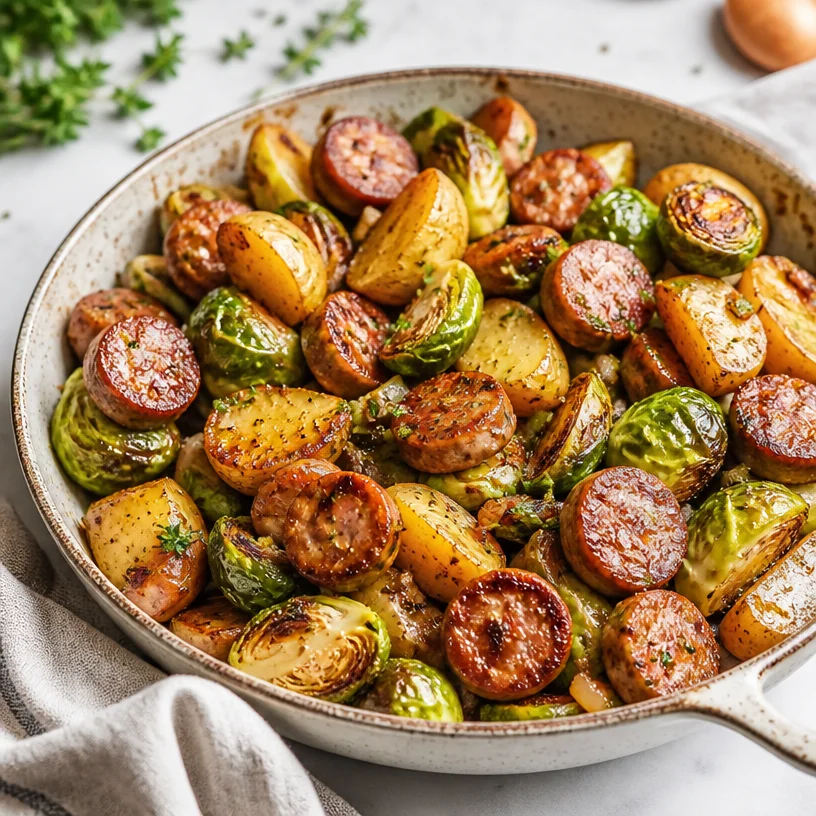
One-Pan Sausage Veggies: 25-Minute Weeknight Skillet
One-Pan Sausage Veggies: A Delicious and Easy Dinner Adventure
Welcome, food enthusiasts! Today, we’re diving into a dish that’s not only bursting with flavor but also a total game-changer for busy weeknights: One-Pan Sausage Veggies. Picture this: it’s been a long day, the last thing you want is a sink full of dishes or a complicated recipe to tackle. You want something that feels like a warm hug on a plate, right? Well, this recipe is just that—simple, delicious, and so satisfying!
Now, let’s talk about why one-pan meals have captured my heart. There’s something incredibly grounding and leisurely about those evenings spent in the kitchen. When I was a kid, my family often gathered around the table for homemade dinners. My mom had this magical ability to create mouthwatering meals with whatever we had left in the fridge. One night, she whipped up a dish that’s forever etched in my memory—sausage and whatever vegetables were on hand. It may have been a simple humble meal, but those delightful flavors dancing together on my plate ignited my love for cooking.
As I grew up and embarked on my culinary journey, I aimed to recreate that magic. This One-Pan Sausage Veggies recipe beautifully mirrors my childhood nostalgia while adding a modern twist. Made with hearty sausages, crisp Brussels sprouts, and creamy potatoes, you’ll find that every forkful is a satisfying bite of comfort. Plus, it’s all cooked in one pan, making clean-up a breeze. Are you ready to make this magic happen in your kitchen? Let’s get cooking!
A Taste of Home: A Personal Story
One of my fondest memories around food revolves around weekends with my family—a cherished time when we’d gather together after a busy week. I remember my mom preparing different meals every Saturday. It was like a fun cooking adventure. The aroma of sausages sizzling and potatoes roasting would waft throughout the house, filling every corner with warmth and excitement. One particular Saturday, she made a delightful one-pan dish with some leftover sausages, seasonings, and whatever vegetables we had lying around. As we sat at the table, sharing stories and laughing over each bite, I realized how food truly brings us together.
Fast forward to today, I’ve taken that very idea and built upon it. My One-Pan Sausage Veggies recipe channels that same cozy spirit, combining what once were fridge leftovers into a wholesome and vibrant dinner. Each time I cook this meal, I’m taken back to those sunlit days, bringing my kids into the kitchen to share that sense of togetherness. It’s a reminder that the best meals are often those made with love and a bit of creativity, all wrapped up in a single pan.
Ingredients
Here’s what you’ll need to get started on this beautiful dish:
-
Sausages (about 4-6, any variety you prefer)
- I recommend using your favorite sausage—whether it’s spicy Italian, chicken, or even plant-based options like soy or lentil. Feel free to customize to your taste!
-
Brussels Sprouts (1 pound, trimmed and halved)
- These little gems add such a beautiful, earthy flavor. If Brussels sprouts aren’t your thing, try substituting with broccoli, green beans, or even asparagus!
-
Potatoes (about 1 pound, diced)
- I like using baby Yukon Golds for their creamy texture, but any type of potato (sweet potatoes add a nice sweetness!) works here. Just make sure to cut them into even pieces for uniform cooking.
-
Olive Oil (3 tablespoons)
- Olive oil not only brings richness but also helps achieve that lovely golden brown crust. If you’re looking for a change, avocado oil is a fantastic alternative.
-
Garlic Powder (1 teaspoon)
- A flavor powerhouse! You can use fresh minced garlic if you prefer, just adjust the quantity according to your taste.
-
Dried Italian herbs (1 teaspoon – a blend of oregano, basil, and thyme works well)
- These herbs bring that Mediterranean vibe to your dish. Use fresh herbs to enhance the flavor even more if they’re available!
-
Salt and Pepper (to taste)
- Essential for bringing out the natural flavors in your veggies and sausage. Don’t be shy with this!
Step-by-Step Instructions
Now that we’ve gathered all our vibrant ingredients, let’s turn up the heat and whip up this delightful dish! Follow along with these simple steps:
-
Preheat your oven: Set your oven to 400°F (200°C) and let it come to that perfect cooking temperature. This step is crucial for achieving beautifully roasted vegetables.
-
Prepare the pan: Grab a large rimmed baking sheet—that surface area helps everything get nice and crispy! Drizzle about two tablespoons of olive oil over the top, making sure to spread it evenly.
-
Cut your sausages: If you prefer even cooking, slice your sausages into pieces—about 2 inches thick works well. If you’re using links, you can keep them whole for a rustic feel.
-
Toss the veggies: In a large bowl, combine the Brussels sprouts and diced potatoes. Drizzle with the remaining olive oil, then sprinkle the garlic powder, dried herbs, salt, and pepper over the top. Give everything a good toss so that each piece gets evenly coated. This is where the magic begins!
-
Add the sausages: Now, it’s time to introduce our stars of the show! Add the sliced sausages to the bowl and mix everything one last time. I’m telling you, this combination is mouthwatering already!
-
Spread it out: Pour the entire mixture onto your prepared baking sheet, spreading it out in a single layer. This allows for optimal roasting, so don’t overcrowd the pan—feel free to use two if needed!
-
Roast away: Pop the baking sheet into the preheated oven and let everything roast for about 25-35 minutes. Halfway through, make sure to stir the ingredients around to ensure even cooking. Keep an eye on those Brussels sprouts; you want them tender and golden-brown, not mushy.
-
Check for doneness: When your sausages are cooked through and the veggies are beautifully caramelized, take your pan out of the oven. Use a meat thermometer for the sausage to make sure they’ve reached an internal temperature of 165°F (74°C).
-
Serve it up: This dish is all about enjoying those simple moments. Grab your favorite plate or serving dish, and dive into the flavorful feast you just created.
Serving Suggestions
Plating this One-Pan Sausage Veggies is simple yet beautiful! Serve it hot, straight from the oven, and enjoy the vibrant colors on your plate. I love sprinkling a little extra chopped fresh parsley over the top for a pop of freshness and color. A side of crusty bread or a light green salad can complement this dish nicely if you’re feeling fancy. But let’s be real—this dish can stand strong on its own, and you’ll find it’s already a complete meal!
Recipe Variations
Feeling adventurous? Here are a few creative twists to keep things exciting:
- Spicy Kick: Add some red pepper flakes before roasting for a touch of heat!
- Herby Delight: Substitute the dried Italian herbs with fresh rosemary or thyme for a fragrant twist.
- Zesty Lemon: Squeeze some fresh lemon juice over the dish just before serving for brightness.
- Creamy Additions: Add dollops of crème fraîche or Greek yogurt on top for a creamy finish.
- Vegetarian Delight: Swap out the sausage for roasted chickpeas or marinated tempeh to make it plant-based.
Chef’s Notes
This One-Pan Sausage Veggies has a special place in my heart, quite like the cherished family meals from my childhood. It’s evolved over the years; I’ve learned that cooking doesn’t have to be tedious or stressful—it’s all about simplicity and flavor. Whenever I whip up this dish, I can’t help but smile as the aromas fill the kitchen, transforming the space into a cozy haven. Plus, my kids love it, which makes me a happy chef!
The flexibility of this recipe is fantastic, allowing for a little improvisation based on what you have at hand. It’s a reminder that every meal can be a little adventure. You just need the right ingredients and a generous sprinkle of creativity!
FAQs and Troubleshooting
1. What can I do if my veggies are cooking too quickly?
If you notice your veggies browning too fast, simply pull the baking sheet out and cover it loosely with aluminum foil to manage the cooking while still allowing them to roast.
2. Can I prep this dish ahead of time?
Absolutely! You can chop your veggies and sausage the night before. Store them in an airtight container in the fridge and toss them together right before roasting.
3. How can I tell when the sausages are fully cooked?
Using a meat thermometer is the best way to check! Sausages should reach an internal temperature of 165°F (74°C) to ensure they’re safe to eat.
4. Is it okay to use frozen veggies?
It’s best to use fresh vegetables for this recipe to achieve that lovely caramelized texture. However, if frozen veggies are all you have on hand, just be sure to adjust the cooking time, as they may require less time in the oven.
Nutritional Info
While I always encourage enjoying food without the pressure of counting calories, if you’re curious, a typical serving of One-Pan Sausage Veggies contains approximately:
- Calories: 450
- Protein: 20g
- Carbohydrates: 35g
- Fat: 25g
Your mileage may vary based on the specific ingredients and portion sizes, but this dish is sure to fill you with wholesome goodness!
That wraps up our culinary adventure into the delightful realm of One-Pan Sausage Veggies! I hope you find as much joy in cooking and sharing this dish as I do. Remember, every meal is an opportunity to create lasting memories—so let’s keep it fresh, simple, and seriously delicious! Happy cooking!
PrintOne-Pan Sausage Veggies

A simple and delicious one-pan meal featuring hearty sausages, Brussels sprouts, and creamy potatoes, perfect for busy weeknights.
- Prep Time: 15 minutes
- Cook Time: 35 minutes
- Total Time: 50 minutes
- Yield: 4 servings
- Category: Main Course
- Method: Baking
- Cuisine: American
- Diet: Omnivore
Ingredients
- Sausages (about 4-6, any variety)
- Brussels Sprouts (1 pound, trimmed and halved)
- Potatoes (about 1 pound, diced)
- Olive Oil (3 tablespoons)
- Garlic Powder (1 teaspoon)
- Dried Italian herbs (1 teaspoon)
- Salt and Pepper (to taste)
Instructions
- Preheat your oven to 400°F (200°C).
- Prepare a large rimmed baking sheet and drizzle two tablespoons of olive oil over it.
- Cut the sausages into pieces or leave them whole if using links.
- Toss the Brussels sprouts and diced potatoes in a bowl with the remaining olive oil, garlic powder, dried herbs, salt, and pepper.
- Add the sliced sausages and mix everything together.
- Spread the mixture on the prepared baking sheet in a single layer.
- Roast for about 25-35 minutes, stirring halfway through.
- Check for doneness with a meat thermometer to ensure sausages reach 165°F (74°C).
- Serve hot and enjoy!
Notes
For added flavor, sprinkle fresh parsley before serving. This dish pairs nicely with crusty bread or a light salad.
Nutrition
- Serving Size: 1 serving
- Calories: 450
- Sugar: 5g
- Sodium: 600mg
- Fat: 25g
- Saturated Fat: 9g
- Unsaturated Fat: 10g
- Trans Fat: 0g
- Carbohydrates: 35g
- Fiber: 5g
- Protein: 20g
- Cholesterol: 80mg
Keywords: one-pan meal, sausage, veggies, easy dinner, healthy recipe
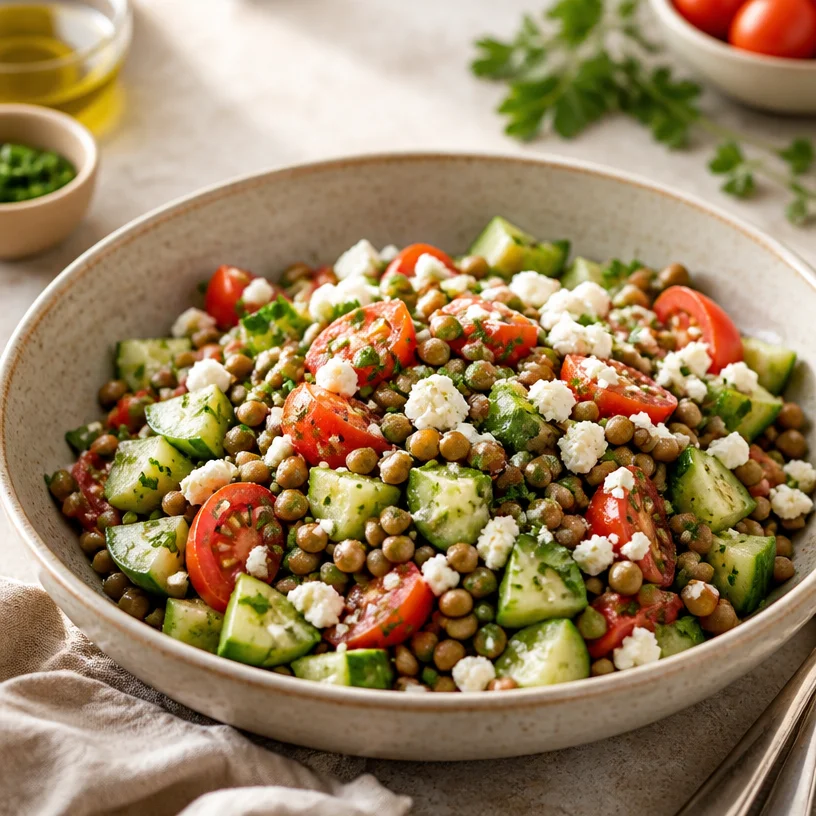
Minute Mediterranean Lentil Bowl for Weeknights
Mediterranean Lentil Bowl: A Wholesome Delight
Welcome back, food lovers! Today, we’re diving into a dish that’s not only a feast for the palate but also a celebration of vibrant, fresh ingredients—welcome to my Mediterranean Lentil Bowl! Whether you’re a seasoned chef or just getting cozy in the kitchen, this recipe will ignite your taste buds and fill your body with the good stuff. Trust me, this is one bowl you’ll be craving again and again.
Why Lentils?
Lentils aren’t just any ordinary legume; they are little nutritional powerhouses! Packed with protein, fiber, and essential nutrients, they give you that solid base to keep you satisfied and energized throughout your day. Plus, they’re incredibly versatile and soak up flavors beautifully, making them the perfect star of our Mediterranean Bowl.
I remember a sunny afternoon in my grandmother’s kitchen, the smell of simmering lentils wafting through the air as we prepared for our Sunday family feast. She always emphasized the love and care that went into cooking, which made every meal taste that much better. Now, as I whip up this Mediterranean Lentil Bowl, I can almost hear her gentle reminders echoing in my kitchen, encouraging me to savor every bite and share the joy of good food with others.
Ingredients
Here’s what you’ll need for this vibrant Mediterranean Lentil Bowl:
-
Lentils: The base of our dish! You can use any variety, but I love green or French lentils for their unique texture. Substitution tip: If lentils aren’t available, you can swap them for cooked quinoa or chickpeas for a different texture.
-
Cucumber: Adds a refreshing crunch! Look for a firm cucumber without soft spots. If you’re not a cucumber fan, swap in bell peppers or zucchini for a similar fresh crunch.
-
Tomatoes: Juicy, vibrant tomatoes bring color and sweetness! Cherry or grape tomatoes work wonderfully; they add a pop of flavor. For a twist, try sun-dried tomatoes for a more concentrated taste.
-
Feta Cheese: This tangy cheese adds a creamy bite. If you’re looking for a dairy-free option, crumbled tofu or avocado can provide a similar textural element.
-
Olive Oil: A staple in Mediterranean cooking, it brings richness and depth. Choose high-quality extra virgin olive oil for the best flavor! In a pinch, avocado oil can be a suitable alternative.
-
Lemon Juice: For that zesty kick! Freshly squeezed lemon juice enhances all the other flavors. If you don’t have lemon, a little vinegar (like balsamic or red wine) can work well too.
-
Salt and Pepper: Essential for bringing out all those delicious flavors! Feel free to experiment with herbs and spices according to your palate.
Step-by-Step Instructions
Now that we have our ingredients prepped and ready, let’s get to the fun part—cooking! Here’s how to create your Mediterranean Lentil Bowl step by step.
-
Cooking the Lentils:
Begin by rinsing your lentils under cold water. This removes any dirt or impurities that may linger. In a pot, combine 1 cup of lentils with 3 cups of water or vegetable broth (for added flavor) and a pinch of salt. Bring to a boil, then reduce the heat to a simmer. Cook for about 20-25 minutes until they are tender but still hold their shape. Chef hack: Add a bay leaf while cooking for an extra aromatic touch! -
Prep the Veggies:
While the lentils are cooking, it’s time to chop our veggies! Dice the cucumber into small cubes and halve your tomatoes. You want them to be bite-sized for that perfect bowl experience. Pro tip: If you let the cucumber sit with a sprinkle of salt for a few minutes, it’ll release some moisture, intensifying its flavor! -
Assemble the Bowl:
Once your lentils are cooked, drain any excess liquid and let them cool slightly. In a large mixing bowl, combine the lentils, tomatoes, and cucumber. Crumble in your feta for that creamy goodness, then drizzle with olive oil and a squeeze of lemon juice. Give it all a gentle toss so everything is evenly coated. Chef insight: For a delightful crunch, consider tossing in some roasted nuts or seeds such as sunflower seeds or almonds. -
Season It Up:
Taste the mixture and add salt and pepper to your liking. This is your opportunity to customize! If you’re feeling spicy, a pinch of red pepper flakes can elevate the dish beautifully. -
Serve:
Spoon your Mediterranean Lentil Bowl onto individual plates or a large serving platter. The vibrant colors are sure to catch anyone’s eye—don’t forget to take a quick pic for your foodgram before diving in!
Serving Suggestions
Serve your Mediterranean Lentil Bowl warm, at room temperature, or even chilled. Pair it with crusty whole-grain bread or pita and a side of hummus for a deliciously satisfying meal. And don’t forget to garnish with a sprinkle of fresh herbs like parsley or basil for that added flair!
Recipe Variations
Feeling adventurous? Here are a few tasty variations to switch things up:
- Mediterranean Lentil Tacos: Use your lentil mixture as a filling for tacos, adding avocado and salsa for a twist.
- Spicy Harissa Lentils: Stir in a spoonful of harissa paste for a spicy kick!
- Grilled Veggie Bowl: Top your lentils with charred veggies like bell peppers and eggplant for a smoky flavor.
- Herbed Quinoa Bowl: Swap lentils for quinoa and mix in fresh herbs like dill or mint for a lighter version.
Chef’s Notes
As I was developing this recipe, I wanted to capture the essence of my grandmother’s cooking—simple yet rich in flavor. The beauty of this bowl is its flexibility; you get to cater it to your tastes! It has evolved over the years, from a simple lentil stew to this delightful medley of textures and bright flavors.
One of my favorite moments was a summer cookout where I served this dish as a main, and guests couldn’t get enough! It’s moments like these that remind me why we cook; it’s about connection, love, and sharing good food.
FAQs and Troubleshooting
Q: Why are my lentils mushy?
A: Overcooking can lead to mushy lentils. Keep an eye on them during cooking—taste them once the water reaches a simmer!
Q: Can I meal prep this dish?
A: Absolutely! This bowl holds well in the fridge for up to 4 days. Just store the components separately to keep the veggies crisp.
Q: What can I use if I don’t have feta cheese?
A: You can skip the cheese altogether or substitute with vegan options like crumbled tofu or even avocado for creaminess.
Q: How can I make this dish more filling?
A: Include a grain like quinoa or brown rice in your bowl for added fiber and nutritional benefits.
Nutritional Info
This Mediterranean Lentil Bowl is not only delicious but also packed with nutrition. A serving offers around:
- Calories: 350
- Protein: 18g
- Fiber: 14g
- Carbs: 45g
- Fats: 10g
It’s a balanced dish that gives you the fuel you need to tackle your day!
So there you have it: a wholesome Mediterranean Lentil Bowl that combines flavor, nostalgia, and healthy eating—all in one. Dive in, enjoy, and remember that good food is best when shared. Happy cooking, foodies!
PrintMediterranean Lentil Bowl
A vibrant and wholesome dish featuring lentils, fresh vegetables, and tangy feta cheese, perfect for any meal!
- Prep Time: 15 minutes
- Cook Time: 25 minutes
- Total Time: 40 minutes
- Yield: 4 servings 1x
- Category: Main Course
- Method: Boiling & Tossing
- Cuisine: Mediterranean
- Diet: Vegetarian
Ingredients
- 1 cup lentils (green or French)
- 3 cups water or vegetable broth
- 1 cucumber, diced
- 1 cup cherry or grape tomatoes, halved
- 1 cup feta cheese, crumbled
- 2 tablespoons olive oil
- 2 tablespoons freshly squeezed lemon juice
- Salt to taste
- Pepper to taste
Instructions
- Rinse your lentils under cold water.
- Combine lentils, water or broth, and a pinch of salt in a pot.
- Bring to a boil, then reduce heat to simmer for 20-25 minutes until tender.
- Dice the cucumber and halve the tomatoes while lentils cook.
- Drain excess liquid from cooked lentils and let cool slightly.
- Mix lentils, tomatoes, and cucumber in a large bowl.
- Add crumbled feta, olive oil, and lemon juice; toss gently.
- Season with salt and pepper to taste.
- Serve the bowl on plates or a platter, garnished with fresh herbs.
Notes
This dish can be served warm, at room temperature, or chilled. Perfect with whole-grain bread or pita.
Nutrition
- Serving Size: 1 serving
- Calories: 350
- Sugar: 5g
- Sodium: 400mg
- Fat: 10g
- Saturated Fat: 3g
- Unsaturated Fat: 7g
- Trans Fat: 0g
- Carbohydrates: 45g
- Fiber: 14g
- Protein: 18g
- Cholesterol: 30mg
Keywords: lentil bowl, Mediterranean recipe, healthy dishes, vegetarian meal, wholesome ingredients

Minute Turkey Cranberry Panini for Busy Weeknights
Turkey Cranberry Panini: A Deliciously Nostalgic Twist
Welcome, fellow food lovers! I’m thrilled to have you here at Clean Plate Cravings, where we believe that fresh food should fit seamlessly into our lives—full of flavor and no fuss. Today, I’m excited to talk about a delightful sandwich that gives a nod to the classic holiday spread: the Turkey Cranberry Panini. This is not just a recipe; it’s a celebration of taste, simplicity, and the cherished moments around our dining tables.
The Turkey Cranberry Panini is the perfect balance of savory and sweet. With tender turkey, tangy cranberry sauce, melty Swiss cheese, and crispy sourdough bread, it’s a dish that really hits the mark, whether you’re reminiscing about family gatherings or just wanting something delicious for lunch. Let’s dive into this culinary adventure together as I share the cozy story behind this delightful meal, the simple ingredients that make it shine, and all the tips you need to whip it up in your kitchen.
A Slice of Nostalgia
Growing up, Thanksgiving was always a big deal at my house. The aroma of roasted turkey filled the air as we gathered around the kitchen, chatting and laughing while my mom worked her magic. Every year, we would pile our plates high with turkey, stuffing, and a generous dollop of homemade cranberry sauce. After the meal, we might have some leftovers, but nothing compared to the joy of enjoying it all fresh off the table.
One year, inspired by my family’s post-Thanksgiving conversations, I took it upon myself to create something new out of those leftover holiday treasures. Armed with some sourdough bread, turkey, Swiss cheese, and cranberry sauce, I decided to make a panini. I still remember the thrill of pressing that sandwich down, waiting for it to crisp and melt in all the right places. Each bite delivered that nostalgic taste of Thanksgiving, but in a warm, comforting sandwich form. From that day on, the Turkey Cranberry Panini became a beloved staple, enjoyed anytime we craved a dash of festive flavor.
Ingredients
Before we embark on our sandwich-making journey, let’s gather our ingredients! Here’s what you’ll need:
-
Turkey: Tender turkey slices are the star of our dish. Feel free to use deli turkey or leftovers from your holiday feast! For a vegetarian twist, swap it out for roasted veggies or savory mushrooms.
-
Cranberry Sauce: Sweet and tangy, this is what brings the festive spirit to our panini. You can use store-bought or homemade; both work beautifully! If you want a twist, try using a spiced cranberry chutney for a flavor boost.
-
Swiss Cheese: Melty, creamy, and slightly nutty, Swiss cheese pulls the panini together beautifully. Need to switch it up? Gruyère works great as a substitute, or for a sharp twist, try sharp cheddar.
-
Sourdough Bread: The foundation of our sandwich! Sourdough has a lovely tangy flavor and sturdy crust that holds everything together. If sourdough isn’t your jam, feel free to use whole grain or even a gluten-free bread option.
Step-by-Step Instructions
Now that we have our ingredients ready, let’s get cooking! Follow these steps to create the most delicious Turkey Cranberry Panini:
-
Preheat Your Panini Press (or skillet): If you’re using a panini press, preheat it according to the manufacturer’s instructions. For skille, heat it over medium heat. This ensures that our bread gets that gorgeous golden crust.
-
Prepare the Bread: Start by laying out two slices of sourdough bread. This is where the magic begins! Use a pastry brush or your fingers to lightly spread a thin layer of butter or olive oil on one side of each slice. This will help us achieve that irresistible crunch!
-
Layer It Up: On the unbuttered side of one slice, layer a generous amount of turkey. Don’t skimp on this—this is the heart of our panini! Follow it with a spoonful of cranberry sauce. You can add more or less to taste, depending on how sweet-tart you like it.
-
Cheese, Please: Now it’s time for the cheese! Add a couple of slices of Swiss cheese on top of the cranberry sauce. This melty goodness will elevate our sandwich from good to unforgettable.
-
Top It Off: Place the second slice of sourdough bread on top, ensuring that the buttered sides are facing out. Press down gently—this will help everything meld together while cooking.
-
Cook It Right: If using a panini press, simply close it and let it cook for about 5–7 minutes, or until golden. If using a skillet, cook for about 3-4 minutes per side, flipping carefully with a spatula. You can place a heavy skillet on top of your panini to help it cook evenly and achieve that crispy texture.
-
Check for Melty Goodness: After cooking, take a peek to ensure the cheese is all melted and the bread is wonderfully golden. If it’s not quite there, give it another minute or two.
-
Slice and Serve: Once perfectly cooked, remove the panini from your press or skillet, and let it sit for a minute. Slice it in half diagonally, revealing the delicious layers within.
Serving Suggestions
Plate your Turkey Cranberry Panini with a side of crunchy chips or a simple side salad to add some freshness! Drizzle a bit of balsamic reduction on the plate for a gourmet touch, or serve it with a dollop of extra cranberry sauce on the side for dipping. It’s the little touches that make your meal feel that much more special!
Recipe Variations
The beauty of the Turkey Cranberry Panini is that it’s incredibly versatile! Here are a few creative twists you can try:
-
Apple Slices: Add thin slices of crisp apple for a touch of sweetness and crunch.
-
Avocado Smash: Spread some creamy avocado on one slice of bread for extra richness.
-
Spice It Up: Incorporate some arugula or spinach for a peppery bite, or add spicy mustard for a tangy kick.
-
Switch the Cheese: Experiment with other cheeses like pepper jack for a little heat or creamy mozzarella for a melty delight.
-
Savory Sauté: Sautéed onions or mushrooms can add deep, rich flavors to your panini.
Chef’s Notes
As with any cherished recipe, the Turkey Cranberry Panini has evolved over time in my kitchen. Originally crafted from holiday leftovers, I’ve come to appreciate experimenting with different flavors and ingredients. Each time I make it, I find that little tweaks make it feel new! I love to invite friends over and have a panini-making night, where we share our favorite ingredients and create our own custom versions. It’s a party and a wonderful way to explore new tastes!
FAQs and Troubleshooting
-
What if my panini is soggy?
- Make sure to use just the right amount of cranberry sauce—not too much! Also, ensure your bread is dry and not too thick, as this can lead to sogginess.
-
Can I use frozen turkey?
- Absolutely! Just make sure it’s fully thawed and well-drained before adding it to your sandwich.
-
Why isn’t the cheese melting?
- If you’re having trouble with cheese melting, try covering the sandwich with a lid during cooking or using a lower heat to allow more time for melting without burning the bread.
-
Can I meal prep this panini?
- Definitely! Assemble your panini, wrap it in foil or parchment paper, and store it in the refrigerator. When you’re ready to enjoy, you can grill it fresh.
Nutritional Info
Here’s a rough nutritional breakdown for one Turkey Cranberry Panini (not including additional sides):
- Calories: Approximately 400
- Protein: 28g
- Carbohydrates: 38g
- Fat: 15g
- Fiber: 3g
- Sugar: 4g
Enjoy the process, and don’t forget to savor each bite! The Turkey Cranberry Panini is not just about filling your stomach; it’s also about filling your heart with the warmth and joy of good company and delicious food. So roll up your sleeves, get your aprons on, and let’s make some tasty memories in the kitchen! Happy cooking!
PrintTurkey Cranberry Panini

A delightful sandwich featuring tender turkey, tangy cranberry sauce, and melty Swiss cheese on crispy sourdough bread.
- Prep Time: 10 minutes
- Cook Time: 7 minutes
- Total Time: 17 minutes
- Yield: 1 serving
- Category: Main Course
- Method: Grilling
- Cuisine: American
- Diet: None
Ingredients
- Tender turkey slices
- Cranberry sauce
- Swiss cheese
- Sourdough bread
- Butter or olive oil
Instructions
- Preheat your panini press (or skillet).
- Prepare the bread by spreading butter or oil on one side of each slice.
- Layer turkey on the unbuttered side of one slice.
- Add a spoonful of cranberry sauce.
- Top with slices of Swiss cheese.
- Place the second slice of bread on top, buttered sides out.
- Cook in the press or skillet until golden, about 5-7 minutes.
- Check for melted cheese and golden bread.
- Slice and serve with sides!
Notes
For extra richness, consider adding avocado or experimenting with different cheeses.
Nutrition
- Serving Size: 1 sandwich
- Calories: 400
- Sugar: 4g
- Sodium: 500mg
- Fat: 15g
- Saturated Fat: 7g
- Unsaturated Fat: 5g
- Trans Fat: 0g
- Carbohydrates: 38g
- Fiber: 3g
- Protein: 28g
- Cholesterol: 60mg
Keywords: panini, turkey sandwich, cranberry sauce, comfort food

Creamy One-Pot Loaded Taco Potato Soup (Weeknight Meal)
Loaded Taco Potato Soup: A Comforting Bowl of Happiness
Welcome back to Clean Plate Cravings! Today, I’m thrilled to share with you a recipe that marries two of my favorite cozy comforts: tacos and soup! Yes, you heard that right! We’re diving into a bowl of Loaded Taco Potato Soup that’s not just mouthwateringly delicious but also packed with wholesome goodness. It’s the ultimate fusion dish of nachos and a hearty chowder—perfect for chilly days, celebratory gatherings, or any time you simply need a comforting bowl of happiness.
As a chef who believes healthy eating should be an exciting adventure, let me assure you that this soup is a celebration of flavor. Picture fluffy potatoes mingling with seasoned ground beef, all bathed in a warm, savory broth. And let’s not forget the toppings—cheddar cheese, sour cream, and fresh cilantro taking center stage as they complete this flavor-packed dish!
What I love most about this Loaded Taco Potato Soup is its flexibility. You can adjust it to fit any dietary need or personal taste, making it a dish that everyone will want seconds of. So roll up your sleeves, grab your spoon, and let’s whip this together!
A Taste of Nostalgia
Whenever I smell a batch of taco seasoning simmering on the stove, I’m transported back to my childhood dinners around the kitchen table. My mom had this way of turning even the simplest meals into cherished family gatherings. I remember those nights vividly—our little kitchen alive with laughter, the sound of spoon clinking against bowls, and the aroma of taco-flavored food wafting through the air.
One of my favorite dishes was her zesty taco soup, and while I loved it, I can’t help but think it could use just a little extra comfort. Fast forward to the present, and I’ve taken that beloved recipe, sprinkled some potato magic, and created this Loaded Taco Potato Soup. It holds all of the nostalgia and warmth, but with an exciting twist that’s sure to have your family gathering around the table just like mine did.
What You’ll Need
Let’s gather our ingredients! Here’s what you’ll need to whip up this deliciousness:
-
Ground Beef: The star of our show! It adds protein and a rich flavor. Try swapping it for ground turkey, chicken, or even lentils for a vegetarian option.
-
Potatoes: I prefer russet potatoes for their fluffiness, but Yukon gold potatoes work too. You could even use sweet potatoes for a slightly sweeter and healthier twist!
-
Taco Seasoning: You can use a store-bought packet or make your own. Spice it up with cayenne or keep it mild—totally up to you!
-
Cheddar Cheese: A generous sprinkling on top elevates this soup! If you want a different flavor, try pepper jack or Monterey Jack cheese.
-
Vegetable Broth: This gives your soup depth. Use low-sodium for more control over salt or chicken broth for a different flavor.
-
Sour Cream or Greek Yogurt: This is perfect for finishing touches; it adds creaminess. You can also go for dairy-free options if that suits your diet!
-
Toppings: Let’s not forget about the fun! Add fresh cilantro, diced tomatoes, avocado, or crushed tortilla chips for a satisfying crunch.
Step-by-Step Instructions
Here comes the fun part—let’s cook!
-
Brown the Beef: In a large pot over medium-high heat, add the ground beef. Use a wooden spoon to break it up as it cooks—this should take about 5-7 minutes or until it’s no longer pink. This is where the magic begins! If you’re using lean beef, you might want to add a splash of olive oil to prevent it from drying out.
-
Add Potatoes: Dice your potatoes into small cubes while the beef is cooking. Once the beef is browned, drain any excess fat, then toss in your potatoes. Stir them around with the beef for 2-3 minutes to blend those flavors.
-
Season it Up: Sprinkle in your taco seasoning and give everything another good stir to coat those potatoes and beef evenly. Your kitchen should start smelling heavenly!
-
Pour in Broth: Add the vegetable broth to the pot, enough to cover the potatoes completely, typically about 4 cups. Bring it to a boil, then reduce heat and let it simmer for about 15-20 minutes. This allows the potatoes to soften and soak up those delicious taco flavors.
-
Cheesy Goodness: When the potatoes are tender, it’s time to stir in a handful of cheddar cheese—or more, if you’re feeling adventurous! Allow it to melt in, creating that creamy texture we’re after. Give it a taste; this is a perfect moment to adjust the seasoning.
-
Finishing Touches: Serve hot, and don’t forget the toppings! A dollop of sour cream and a handful of fresh cilantro will brighten it all up. You might even want to throw on some crushed tortilla chips for that satisfying crunch.
Serving Suggestions
For a picture-perfect presentation, ladle the soup into beautiful, rustic bowls. Sprinkle the remaining cheddar cheese on top, followed by a generous dollop of sour cream, and finish with a flourish of cilantro. A few slices of avocado or a side of warm, crusty bread would elevate the experience even more!
Recipe Variations
Don’t be afraid to get creative with this one! Here are some fun twists you can try:
-
Spicy Kick: Add chopped jalapeños or a dash of hot sauce to the mix for some heat.
-
Beefless Delight: Swap out the ground beef for black beans or chickpeas for a filling vegetarian option.
-
Taco Fiesta: Toss in a cup of corn or black olives for extra flavor, color, and texture.
-
Creamy Vegan Version: Use plant-based ground beef and coconut cream instead of sour cream for a full dairy-free experience.
Chef’s Notes
This recipe has come a long way since my mom’s taco soup days. Originally inspired by those family dinners, I experimented with different ingredients until I stumbled upon the delightful combination of potatoes and taco flavors. It’s become a staple in my home, especially during busy weekdays or when friends drop by unexpectedly.
And let me tell you, the success of this soup has spawned a “potato night” tradition, where we swap out fillings each week! So, don’t hesitate to make this your own!
FAQs and Troubleshooting
1. What if my soup is too thick?
No worries! If it’s thicker than you’d like, gradually add more broth (or water) until it reaches your desired consistency.
2. How can I make this a one-pot meal?
You’re in luck! This recipe is in itself a one-pot wonder, but you can simply use frozen mixed veggies of your choice to add more nutrients without compromising on flavor.
3. My potatoes turned mushy!
Potatoes can get quite soft if overcooked. Make sure to check them at the 15-minute mark. They should be tender but not disintegrating.
4. Can I freeze leftovers?
Absolutely! Allow the soup to cool completely, then store it in airtight containers. It should last up to 3 months in the freezer. Just thaw and reheat when you’re ready!
Nutritional Info
(For a basic serving of Loaded Taco Potato Soup)
- Calories: 350
- Protein: 20g
- Carbohydrates: 40g
- Fat: 15g
- Fiber: 5g
Ready to soup it up? I can’t wait for you to try it and to hear all about your loaded taco potato adventures! So, gather your ingredients, get comfy, and let’s make some magical flavors come to life. Until next time, keep it fresh, simple, and seriously delicious!
PrintLoaded Taco Potato Soup

A cozy fusion of taco flavors and hearty potato soup, perfect for cold days.
- Prep Time: 15 minutes
- Cook Time: 30 minutes
- Total Time: 45 minutes
- Yield: 6 servings 1x
- Category: Soup
- Method: Stovetop
- Cuisine: Mexican
- Diet: Gluten-Free, Nut-Free
Ingredients
- 1 lb Ground Beef
- 3 large Potatoes (russet or Yukon gold)
- 2 tbsp Taco Seasoning
- 4 cups Vegetable Broth
- 1 cup Cheddar Cheese
- ½ cup Sour Cream or Greek Yogurt
- Fresh Cilantro for garnish
- Diced Tomatoes, Avocado, and Crushed Tortilla Chips for toppings
Instructions
- Brown the Beef: In a large pot over medium-high heat, add the ground beef. Cook until no longer pink, about 5-7 minutes.
- Add Potatoes: Dice the potatoes and toss them in after draining excess fat from the beef, stirring for 2-3 minutes.
- Season it Up: Sprinkle in taco seasoning and stir to coat beef and potatoes.
- Pour in Broth: Add vegetable broth to cover potatoes and bring to a boil, then simmer for 15-20 minutes.
- Stir in Cheddar: When potatoes are tender, stir in cheddar cheese until melted.
- Serve: Ladle into bowls and top with sour cream, cilantro, and any additional toppings.
Notes
Feel free to customize with spicy toppings or substitute ingredients for dietary needs.
Nutrition
- Serving Size: 1 bowl
- Calories: 350
- Sugar: 5g
- Sodium: 400mg
- Fat: 15g
- Saturated Fat: 6g
- Unsaturated Fat: 8g
- Trans Fat: 0g
- Carbohydrates: 40g
- Fiber: 5g
- Protein: 20g
- Cholesterol: 70mg
Keywords: taco soup, potato soup, comfort food, Mexican cuisine, healthy soup
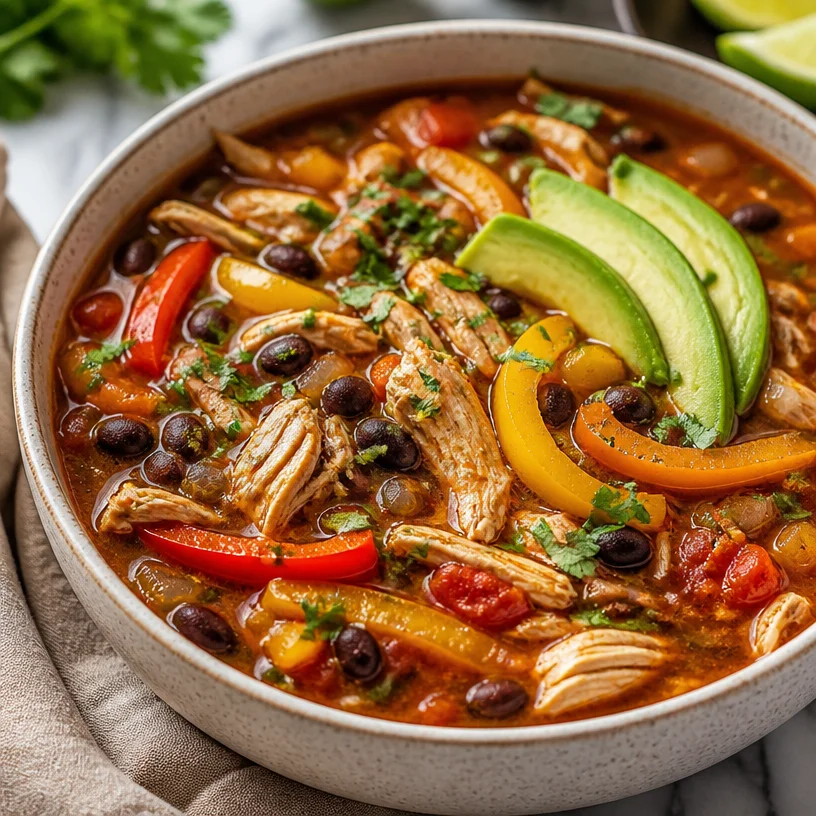
Weeknight One-Pan Chicken Fajita Soup in 30 Minutes
Chicken Fajita Soup: A Flavorful Bowl of Comfort
Welcome to the cozy corner of Clean Plate Cravings! Today, we’re diving into a recipe that will warm both your heart and your tummy—Chicken Fajita Soup! Think of this dish as a big hug in a bowl. It’s packed with vibrant flavors, colorful veggies, and a warm spice blend that will make your taste buds dance. Whether you’re enjoying a laid-back lunch at home, feeding the family, or hosting a casual gathering with friends, this soup is sure to impress.
If you’ve ever bitten into a sizzling chicken fajita, you know that magical combination of smokiness and spice. Now imagine that deliciousness in a soup! This dish brings all those fantastic fajita flavors together in a warming broth that’s easy to prepare and, most importantly, totally comforting. Plus, it’s a great way to sneak in some extra veggies without anyone noticing.
So grab your apron, put on your favorite playlist, and let’s get cooking!
Personal Story
Growing up, my family had this tradition of "Fajita Friday." I remember the smells wafting through the house as my mom marinated chicken in a savory medley of spices. As the grill sizzled and the peppers charred, we all gathered around the kitchen island, filling soft tortillas with beautifully seasoned chicken, onions, and peppers. We’d laugh, share stories about our week, and savor each bite.
One rainy day, however, we found ourselves craving those beloved fajitas—but who wants to grill under an umbrella? So, we decided to get creative and turned our favorite flavors into a soup. The result was a deliciously smoky broth filled with tender chicken and colorful veggies. It was love at first spoonful! Since then, this Chicken Fajita Soup has remained a staple, making it a warm reminder of those family nights filled with love, laughter, and flavorful food.
Ingredients
Here’s what you’ll need to create this mouthwatering Chicken Fajita Soup:
-
Chicken (breast or thighs): Use boneless skinless chicken breasts or thighs, depending on your preference. If you’re in a rush, rotisserie chicken can be a great shortcut.
-
Bell Peppers: A mix of red, yellow, and green bell peppers adds an explosion of color. Feeling adventurous? Any bell pepper will do, or toss in some poblano or jalapeño for extra spice!
-
Fajita Seasoning: You can use store-bought fajita seasoning or whip up your own with chili powder, cumin, garlic powder, and paprika. This is the magic that brings those Tex-Mex vibes to the soup!
-
Beans: Black beans or pinto beans work beautifully in this recipe. They add protein and creaminess. Canned beans are super convenient, but if you prefer dry beans, don’t forget to soak and cook them first!
-
Chicken Broth: This will be your flavorful base. Homemade is always preferred, but store-bought is perfectly fine. Swapping for vegetable broth can easily make this soup vegetarian.
-
Onion: Sweet onions, like Vidalia or yellow onions, lend a lovely sweetness to the dish. White onions are a good alternative if you want a sharper flavor.
-
Garlic: Fresh minced garlic will add a fragrant punch. If you’re short on time, garlic powder works in a pinch—just cut down the amount to about half a teaspoon.
-
Olive Oil: For sautéing, use high-quality extra virgin olive oil to elevate the dish’s flavor. Alternatively, avocado oil or any neutral oil will work.
-
Lime Juice: A splash of fresh lime juice at the end brightens everything up! This is non-negotiable, so make sure to have it!
-
Cilantro (optional): Fresh cilantro adds a refreshing finish. If you’re one of those who find cilantro soapy, leave it out! A sprinkle of green onion will work too!
Step-by-Step Instructions
Now, let’s get down to the cooking! Follow these steps, and you’ll have a steaming bowl of Chicken Fajita Soup ready to satisfy your cravings.
-
Prep Your Ingredients: Before you start cooking, it’s key to chop your onions, bell peppers, and garlic. Having everything ready to go makes the process so much smoother. This is called mise en place, and it’s a chef’s best friend!
-
Sauté the Aromatics: In a large pot, heat 2 tablespoons of olive oil over medium heat. Toss in the chopped onion and sauté for about 3-4 minutes until softened. Then, add the minced garlic and sauté for an additional minute, just until fragrant. If the garlic burns, it can taste bitter, so keep an eye on it!
-
Add the Peppers: Now, it’s time to introduce the beautiful bell peppers into the mix! Cook them for about 5-7 minutes until they soften up and start to play with the heat. They’ll be a lovely rainbow in your pot!
-
Season the Chicken: Cut your chicken into bite-sized pieces and sprinkle a generous amount of fajita seasoning over it. I recommend using about 2 tablespoons, but feel free to adjust based on how spicy you want the soup! If you’re using rotisserie chicken, skip this step and move on to the next one!
-
Brown the Chicken: Add the seasoned chicken pieces to the pot and cook for about 5 minutes until they get a nice golden brown on the edges. This step enhances flavor, so don’t skip it! If you’re using pre-cooked chicken, just stir it in with the broth and beans later.
-
Pour in Chicken Broth: Once the chicken is browned, pour in 4 cups of chicken broth. Bring the mixture to a gentle boil, stirring occasionally. The broth is where all the magic happens, so make sure it bubbles away happily!
-
Add the Beans: Rinse and drain your black beans, then toss them into the pot. They’ll contribute creaminess and heartiness to the soup. If you fancy a bit of kick, this is the moment to add a chopped jalapeño!
-
Simmer Away: Let the soup simmer for 20-25 minutes on low heat. This is a great time to kick back, relax, and let those flavors meld together beautifully. If you’re feeling fancy, you can also add a bay leaf for an extra depth of flavor.
-
Finish with Lime Juice: Before serving, squeeze in the juice of one lime to give it that fresh, zesty uplift—trust me, it’s a game changer!
-
Taste and Adjust: Give the soup a taste and see if it needs any salt or extra spices. Every palate is different, so adjust the seasonings until it’s perfect for you!
Serving Suggestions
This Chicken Fajita Soup is best served hot and fresh! Ladle it into bowls, and if you’re feeling indulgent, top each serving with a dollop of sour cream or Greek yogurt, a sprinkle of shredded cheese, and fresh cilantro. You can also serve it with crispy tortilla chips for added crunch or alongside some warm, crusty bread for soaking up every last drop.
Recipe Variations
Looking to switch things up? Here are a few fun variations to try:
-
Spicy Chicken Fajita Soup: Add chopped jalapeños during the sauté process or toss in a pinch of cayenne pepper to heat things up!
-
Vegetarian Option: Swap chicken for hearty vegetables like zucchini or mushrooms and use vegetable broth. You could also add tofu for extra protein!
-
Creamier Soup: Stir in 1 cup of coconut milk or heavy cream towards the end of cooking for a luxuriously creamy texture.
-
Fajita Tortilla Soup: Serve the soup over crispy tortilla strips and top with avocado slices for a delicious twist on traditional tortilla soup.
-
Southwest Fajita Soup: Toss in corn and diced tomatoes for a sweeter flavor and added texture.
Chef’s Notes
This Chicken Fajita Soup is a bit of a crowd-pleaser in my home! It’s easy to customize, and honestly, it never comes out exactly the same way twice—each batch is a new flavor adventure. I remember one time when I figured I could use up leftover steak instead of chicken. The result was fantastic! I love that this recipe evolves with the seasons and what’s in my pantry. Whether I’m using fresh produce from the farmer’s market or just the last bits of veggies hiding in my fridge, it always transforms into something delicious.
FAQs and Troubleshooting
Q: Can I make this soup ahead of time?
A: Absolutely! This soup stores great in the fridge for up to 3 days. Just reheat it before serving! The flavors actually get better as they sit.
Q: What if I don’t have fajita seasoning?
A: No problem! You can make your own by mixing together chili powder, cumin, garlic powder, paprika, and a pinch of salt.
Q: My soup is too salty! What can I do?
A: Try adding a few slices of potato to the pot and simmer for 10 minutes; the potato will absorb some salt. Just remember to remove them before serving!
Q: How can I thicken my soup?
A: If you want a thicker texture, you can blend a cup of the soup in a blender and return it to the pot. Alternatively, you can mix a tablespoon of cornstarch with cold water to create a slurry and stir it into the soup to thicken!
Nutritional Info
(Approximate per serving)
- Calories: 320
- Protein: 30g
- Carbohydrates: 30g
- Fat: 10g
- Fiber: 7g
So there you have it, my friends—your ultimate guide to Chicken Fajita Soup! I hope you enjoy making and savoring this delightful dish as much as I do. Remember, cooking is all about having fun and experimenting. Let your taste buds lead the way, and don’t hesitate to make this recipe your own. Happy cooking!
PrintChicken Fajita Soup

A flavorful and comforting Chicken Fajita Soup packed with vibrant flavors and colorful veggies.
- Prep Time: 15 minutes
- Cook Time: 30 minutes
- Total Time: 45 minutes
- Yield: 4 servings 1x
- Category: Soup
- Method: Stovetop
- Cuisine: Mexican
- Diet: Gluten-Free
Ingredients
- 2 boneless skinless chicken breasts or thighs
- 1 red bell pepper
- 1 yellow bell pepper
- 1 green bell pepper
- 2 tablespoons fajita seasoning
- 1 can (15 oz) black beans
- 4 cups chicken broth
- 1 sweet onion
- 2 cloves garlic, minced
- 2 tablespoons olive oil
- Juice of 1 lime
- Cilantro (optional)
Instructions
- Prep your ingredients: Chop onions, bell peppers, and garlic.
- Sauté the aromatics: Heat olive oil, add onion, and sauté for 3-4 minutes. Then add garlic and sauté for 1 more minute.
- Add the peppers and cook for 5-7 minutes until softened.
- Season the chicken with fajita seasoning.
- Brown the chicken for about 5 minutes until golden brown.
- Pour in the chicken broth and bring to a gentle boil.
- Add the black beans and optional jalapeños.
- Simmer for 20-25 minutes on low heat.
- Finish with lime juice and adjust seasoning to taste.
Notes
This soup is great served with a dollop of sour cream, shredded cheese, and crispy tortilla chips.
Nutrition
- Serving Size: 1 serving
- Calories: 320
- Sugar: 5g
- Sodium: 800mg
- Fat: 10g
- Saturated Fat: 2g
- Unsaturated Fat: 8g
- Trans Fat: 0g
- Carbohydrates: 30g
- Fiber: 7g
- Protein: 30g
- Cholesterol: 75mg
Keywords: chicken, fajita, soup, comfort food, Mexican

Minute One-Pan Stuffed Pepper Soup for Busy Weeknights
Unleashing the Comfort: My Cheesy Stuffed Pepper Soup Recipe
Welcome back to the cozy kitchen of Clean Plate Cravings! Today, I’m excited to share a dish that radiates comfort and warmth—Stuffed Pepper Soup. This soup is like a warm hug on a chilly day, with vibrant flavors and nourishing ingredients that will fuel your body and satisfy your taste buds.
There’s something incredibly satisfying about a bowl of homemade soup. It’s comforting, heartwarming, and ideal for that moment when you just want to curl up with a blanket and enjoy a bowl of goodness. The idea for this particular soup came from long, cold winter evenings spent with my family. I remember my mom whipping up stuffed peppers during the week while I would hover around the kitchen, waiting to sneak bites of the filling. The smell would waft through the house and capture her efforts, making the prospect of dinner all the more inviting.
But let’s face it, stuffed peppers can be a bit fussy to prepare—hollowing out the peppers, stuffing them, and then baking. So, I thought, why not turn that joyous experience into an easy, hearty soup instead? This recipe captures all the flavors of stuffed peppers while keeping it simple and straightforward. Let’s dive right in!
Personal Story
One of my favorite memories from childhood was when we’d have family dinners. My mom would make stuffed peppers—a dish I never thought I’d crave as a kid! I’d be in the living room watching cartoons, and the aroma would swirl around, pulling me into the kitchen like a moth to a flame.
We’d gather around the dinner table, and that dish always sparked conversations about our day. My younger brother would dive into debates about the best superhero while the peppers simmered on the stove; they were more than just food; they were a family bonding experience. Fast forward to today, I’ve transformed that nostalgic dish into a deliciously comforting Stuffed Pepper Soup that embodies those memories while being quicker to prepare. Every bowl takes me back, reminding me of late-night family talks and those simple moments that mean the most.
Ingredients
Here’s what you’ll need for this delightful Stuffed Pepper Soup:
-
Ground Beef
Rich in protein and flavor, ground beef serves as the hearty base of this soup. You can substitute it with ground turkey, chicken, or even plant-based meat for a lighter or vegetarian twist. -
Bell Peppers
Choose your favorite colors—red, yellow, or green! Sweet bell peppers add a gorgeous vibrancy and flavor to the soup. If you want something spicier, try using jalapeños or poblano peppers. -
White or Brown Rice
Rice gives the soup a comforting, filling texture. If you’re going grain-free, quinoa or cauliflower rice works beautifully as a substitute. -
Diced Tomatoes
Canned diced tomatoes provide acidity and sweetness, which meld perfectly with the spices. Feel free to swap for fresh tomatoes during the summer months or use fire-roasted tomatoes for extra depth. -
Onion and Garlic
These aromatics form the flavor base of the soup. Aromatics like leeks or shallots can also be used if you prefer a milder taste. -
Beef Broth
Broth adds a rich flavor to the soup. If you’re looking for a lighter option, vegetable broth works wonders too. -
Italian Seasoning
The herb blend brings the classic flavors of Italian stuffed peppers to the soup. You can easily create your own mix using dried basil, oregano, and thyme. -
Salt and Pepper
Essential for seasoning—always taste before serving! Feel free to add cayenne pepper for a bit of kick.
Step-by-Step Instructions
Let’s roll up our sleeves and get cooking! Follow these directions, and before you know it, you’ll be enjoying a comforting bowl of Stuffed Pepper Soup.
-
Prepare Your Ingredients
Start by dicing the onion and mincing the garlic. Wash and chop your bell peppers into small pieces, ensuring they’re bite-sized for the soup. Oh, and have a little fun with it—let your chopping be as colorful as those peppers! -
Sauté the Aromatics
In a large pot over medium heat, drizzle in a splash of olive oil. Once hot, add the diced onion, stirring occasionally until it becomes translucent, about 4-5 minutes. Add in the minced garlic and sauté for another minute; trust me, you want that garlic aroma wafting through your kitchen! -
Brown the Beef
Add the ground beef to the pot, breaking it apart with a wooden spoon. Cook it until browned and fully cooked, about 6-8 minutes. Don’t forget to drain any excess fat to keep it light! The browning of the beef adds a layer of flavor—this is where it all begins! -
Add the Peppers and Spice
Toss in your chopped bell peppers and sprinkle in your Italian seasoning, salt, and pepper. Stir everything together for a couple of minutes until the peppers begin to soften—your kitchen should be smelling amazing already! -
Incorporate the Rice and Tomatoes
Now, mix in the uncooked rice and the can of diced tomatoes (do not drain). Pour in the beef broth or vegetable broth and mix thoroughly. Here’s a little chef hack: If you want a creamier soup, throw in a splash of cream or milk at this point—but it’s totally optional! -
Bring to a Simmer
Raise the heat to bring the soup to a gentle boil, then lower it to a simmer. Cover the pot with a lid and let it cook for 20-25 minutes or until the rice is cooked. Take a moment to steal a taste; adjust the seasoning as needed. -
Final Touch
When the rice is tender, give the soup a good stir, and if you love cheese (who doesn’t?), top with mozzarella or cheddar for an extra gooey finish. Let it melt slightly before serving. This is your moment to bask in the aromas and flavors that have come to life in your pot!
Serving Suggestions
To serve, ladle the soup into deep bowls, ensuring everyone gets a hearty portion of those beautiful peppers and rice. For an extra touch of indulgence, sprinkle with shredded cheese or a dollop of sour cream and garnish with fresh parsley or basil. It can also be paired with crusty bread or a simple side salad for a comforting, well-rounded meal.
Recipe Variations
Feel free to get creative with this recipe! Here are a few fun twists you might want to try:
-
Spicy Kick: Add chopped jalapeños or a dash of hot sauce for some extra heat. Spice lovers, rejoice!
-
Cheesy Delight: Stir in cream cheese or cream at the end for a creamier texture. How about a sprinkle of feta for a tangy twist?
-
High Protein: For a plant-based alternative, substitute ground beef with lentils or quinoa and add extra veggies like zucchini or spinach.
-
Herbaceous Upgrade: Use fresh herbs like cilantro or parsley to brighten the dish.
-
Curry Twist: Introduce curry powder for a delightful spin that blends beautifully with the existing flavors—think stuffed peppers with an exotic twist!
Chef’s Notes
This soup recipe has evolved quite a bit over the years. Initially, it started as a hodgepodge of whatever vegetables were on sale. I remember once throwing in some corn, and it surprisingly enhanced the sweetness of the dish! It was a hit, and that serendipitous moment prompted me to embrace improvisation in the kitchen. That’s what cooking is all about—experimentation, laughter, and delicious discoveries. So, don’t hesitate! Use what’s in your pantry; you might surprise yourself with a new favorite!
FAQs and Troubleshooting
Q: Can I make this soup in advance?
Absolutely! This soup actually tastes better the next day as the flavors meld together. Store it in an airtight container in the fridge for up to 3 days, or freeze it for up to 3 months.
Q: My soup is too watery. What do I do?
If your soup turns out a bit too watery, let it simmer uncovered for a few more minutes to reduce. Alternatively, mix a tablespoon of cornstarch with water and add it to the soup to thicken it up.
Q: What if I don’t like tomatoes?
No worries! You can replace diced tomatoes with tomato sauce for a smoother texture, or skip them entirely and increase the broth for a different flavor profile.
Q: Can I make this vegetarian?
Definitely! Simply omit the ground beef and swap the broth with vegetable broth, adding your choice of beans (like black beans or kidney beans) for protein and heartiness.
Nutritional Info (Optional)
While I generally focus on flavor first, I understand the importance of nutritional values too! Here’s a quick rundown per serving (about 1.5 cups):
- Calories: 320
- Protein: 20g
- Carbohydrates: 40g
- Fiber: 3g
- Fat: 10g
This Stuffed Pepper Soup is not only a treat for your taste buds, but it’s also nourishing and satisfying.
So there you have it! A warm, inviting bowl of Stuffed Pepper Soup, infused with love, nostalgia, and a dash of creativity. Grab your ladle and dig in—let the comforting flavors wrap around you like a cozy blanket. Happy cooking!
PrintCheesy Stuffed Pepper Soup

A comforting and hearty soup that captures all the flavors of stuffed peppers without the fuss.
- Prep Time: 15 minutes
- Cook Time: 30 minutes
- Total Time: 45 minutes
- Yield: 4 servings 1x
- Category: Main Course
- Method: Stovetop
- Cuisine: American
- Diet: Paleo
Ingredients
- 1 lb Ground Beef
- 2 Bell Peppers, chopped
- 1 cup White or Brown Rice
- 1 can Diced Tomatoes
- 1 Onion, diced
- 2 cloves Garlic, minced
- 4 cups Beef Broth
- 2 tsp Italian Seasoning
- Salt and Pepper to taste
- Optional: Shredded Cheese for serving
Instructions
- Prepare your ingredients by dicing the onion and mincing the garlic. Chop the bell peppers into small pieces.
- Sauté the onion in a large pot over medium heat with olive oil until translucent, about 4-5 minutes. Add garlic and sauté for another minute.
- Brown the ground beef in the pot, breaking it apart and cooking until fully browned, about 6-8 minutes. Drain excess fat.
- Add the chopped bell peppers, Italian seasoning, salt, and pepper, stirring until the peppers soften, about 2 minutes.
- Incorporate the uncooked rice, diced tomatoes (with juice), and beef broth. Mix thoroughly.
- Bring to a gentle boil, then lower to a simmer. Cover and cook for 20-25 minutes or until rice is cooked.
- Final touches: Stir the soup, add cheese if desired, and let it melt slightly before serving.
Notes
This soup tastes even better the next day! Store in the fridge for up to 3 days, or freeze for up to 3 months.
Nutrition
- Serving Size: 1 serving
- Calories: 320
- Sugar: 5g
- Sodium: 700mg
- Fat: 10g
- Saturated Fat: 4g
- Unsaturated Fat: 6g
- Trans Fat: 0g
- Carbohydrates: 40g
- Fiber: 3g
- Protein: 20g
- Cholesterol: 75mg
Keywords: stuffed pepper soup, comfort food, easy soup recipe
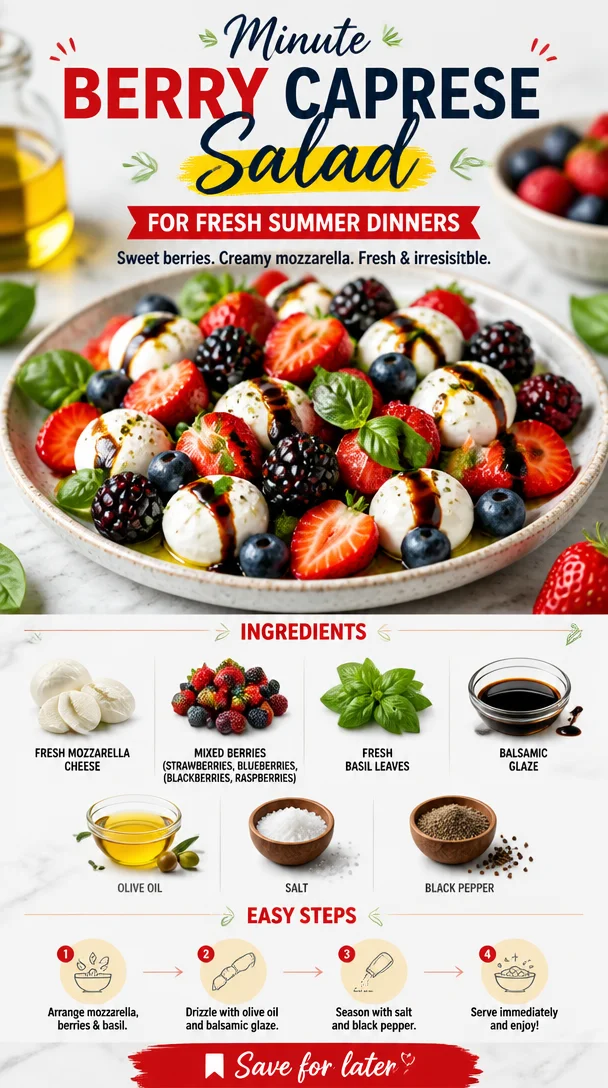
Minute Berry Caprese Salad for Fresh Summer Dinners
Berry Caprese Salad: A Fresh Take on a Classic
Welcome to another delicious day in my kitchen! Today, we’re whipping up a dish that will bring a smile to your face and a burst of flavor to your palate: Berry Caprese Salad. If you’re a fan of vibrant, playful salads that don’t just look good but taste incredible, then you’ve stumbled upon something special. Picture this: luscious, creamy mozzarella hugging juicy mixed berries, all wrapped up in the aromatic embrace of fresh basil. You’d be right to think that this sounds like a heavenly match, and trust me, it is!
What I love about this salad is that it perfectly straddles the line between indulgent and healthy. Each ingredient shines, and when they come together, it’s magic in a bowl. There’s something about the sweet-tart explosion from the berries paired with the smooth, mild mozzarella that creates a symphony of flavors. Whether you’re planning a fancy picnic, a backyard BBQ, or just looking for a quick and nutritious lunch, Berry Caprese Salad is here to elevate your meal.
Now, before we dive into the details, let me reminisce a bit and share how this delightful dish became a staple in my cuisine.
A Nostalgic Memory: The First Time I Made a Berry Caprese Salad
It was several summers ago when I first encountered the charm of a Berry Caprese Salad. I was hosting a backyard gathering, excited to impress my friends with my culinary creations. The idea of a traditional Caprese Salad was dancing around in my head, but I wanted to kick it up a notch, something fun and unexpected. As I strolled through the local farmer’s market, the ripe strawberries and vibrant blueberries called out to me. It struck me like a bolt of lightning! Why not combine the fresh berries with the classic Caprese elements?
So, with a basket of colorful produce, I headed home, eager to experiment. My friends were skeptical as I set the table—after all, the classic tomato and mozzarella duo is hard to beat! But as soon as I took that first bite of our innovative creation, laughter erupted around the table. It was a hit! The sweet berries playfully danced with the creamy mozzarella, and everyone was hooked. From that moment on, Berry Caprese Salad became my summer showstopper—a dish that ushered in laughter, friendships, and the joy of shared meals. And now, I’m thrilled to share that joy with you!
Ingredients: Fresh, Colorful, and Simple
Here’s what you’ll need to create this delightful dish, along with some little chef insights to help you shine in your kitchen:
-
Fresh Mozzarella Cheese: Creamy and mild, fresh mozzarella is a must for that authentic Caprese experience. If you can’t find it, burrata works beautifully too. It adds an extra creaminess that’s simply divine!
-
Mixed Berries (strawberries, blueberries, blackberries, raspberries): The star of the show! Feel free to mix and match based on what you love or what’s in season. You could even try blackcurrants or cherries for a twist!
-
Fresh Basil Leaves: Aromatic and bright, basil adds a fantastic herbal note. Look for vibrant green leaves, and don’t be shy! The more, the merrier. If you’re feeling adventurous, mint could be a refreshing substitute!
-
Balsamic Glaze: This adds that sweet-and-sour punch that ties everything together. If you don’t have balsamic glaze on hand, a drizzle of balsamic vinegar works too—just ensure to use a high-quality one for maximum flavor.
-
Olive Oil: A good drizzle of extra virgin olive oil enhances the richness of the mozzarella and balances the sweetness of the fruit. You can substitute with avocado oil for a different flavor profile.
-
Salt: Just a pinch, please! Salt brings out the flavors of the ingredients and helps them shine. Try flaky sea salt for a gourmet touch.
-
Black Pepper: Freshly cracked black pepper adds a bit of zesty warmth to the salad. For a spicy kick, you can use a bit of crushed red pepper instead.
Step-by-Step Instructions: Let’s Get Cooking!
Alright, my foodie friends, it’s time to roll up your sleeves and jump into the fun of assembling this gorgeous salad. Follow these steps, and you’ll have a masterpiece in no time:
-
Prepare the Ingredients: Start by gathering all your ingredients. Rinse the berries gently under cool water; be careful not to squish them! Pat them dry with a paper towel.
-
Slice the Mozzarella: Carefully slice your fresh mozzarella into bite-sized pieces. Aim for roughly half-inch thick slices—big enough to enjoy but small enough to fit comfortably on your fork. If you’re using burrata, simply break it apart with your fingers; that creamy goodness should be easily accessible!
-
Tear the Basil: Take a handful of fresh basil leaves and tear them into smaller pieces. This helps release their aromatic oils, which enhances the overall flavor of the dish.
-
Assemble the Salad: On a serving platter or in a large bowl, start layering your salad. Begin with a base of sliced mozzarella, then alternate with mixed berries and torn basil leaves. Don’t worry about perfection; this dish is all about showing off cozy, rustic beauty. The colors should shine!
-
Drizzle with Balsamic Glaze and Olive Oil: Now comes the magic touch. Drizzle balsamic glaze over the salad, allowing it to cascade down the mozzarella and berries. Next, add a gentle drizzle of olive oil for that rich mouthfeel. It’s like giving your salad a fashionable coat to wear!
-
Season It Right: Sprinkle a pinch of salt and a few cracks of fresh black pepper over the top. Just enough to elevate those flavors without overpowering the delightful balance.
-
Taste and Adjust: Before serving, give it a little taste test. Adjust seasoning if needed, and maybe add more balsamic or olive oil if you’re feeling fancy. Each bite should excite your taste buds!
-
Serve Immediately: This salad is best enjoyed fresh, so try to serve it right away. If you must make it ahead, keep the dressed salad in the fridge and assemble it just before serving.
As you prepare your Berry Caprese Salad, don’t hesitate to enjoy the process! Chat with someone nearby, sip a tasty drink, and relish the fresh aromas wafting through your kitchen.
Serving Suggestions: Make It a Masterpiece
When it comes to serving this dish, presentation matters just as much as taste! If you’ve assembled it on a platter, simply bring it to the table for a stunning centerpiece. For individual servings, layer each component into clear glasses for a charming effect where guests can see the beautiful colors. This elevates your salad to a culinary art piece!
This salad pairs wonderfully with grilled meats, crusty bread, or can be served as a refreshing side dish at a summer BBQ. Don’t forget about wine! A chilled rosé or Sauvignon Blanc adds to the experience—trust me on this one.
Recipe Variations: Get Creative
This Berry Caprese Salad is a great canvas for your culinary creativity. Here are a few tasty variations to consider:
-
Tropical Twist: Substitute strawberries and blueberries for pineapple and mango for a tropical vibe. The sweetness of the fruit will pair beautifully with the mozzarella.
-
Nuts for Crunch: Toss in some toasted pine nuts or walnuts for an added crunch. They provide a lovely texture while enhancing the flavors.
-
Balsamic Berry Vinaigrette: Whisk together balsamic vinegar, Dijon mustard, and honey for a unique dressing instead of glaze. This lightens up the dish while adding more zing.
-
Spicy Kick: Add thin slices of jalapeño or drizzle some spicy chili oil for those who like it hot! This unexpected twist will surprise and delight your guests.
-
Vegan Delight: Swap out the mozzarella for vegan cheese or marinated tofu. The flavors from the berries and basil will make it a hit for everyone!
Chef’s Notes: A Personal Touch
Every recipe tells a story, and this one is no different! Over the years, I have enjoyed experimenting with flavors and ingredients. One fun memory that stands out was during a cooking class I held in my home. I asked my students to brainstorm exotic berries to include, and we ended up trying out some astonishing combinations like goji berries and raspberries. The twist made it an unforgettable event filled with laughter and new friendships.
It’s important to remember that cooking is a form of self-expression. Each time you make this salad, let your creativity shine! Have fun with it, and never hesitate to try something new.
FAQs and Troubleshooting: Your Burning Questions Answered
-
Can I make this salad ahead of time?
Absolutely! However, I recommend keeping the berries and mozzarella separate from the dressing until you’re ready to serve. If you mix it all, the salad can become soggy, and that’s not what we want! -
What if I can’t find fresh mozzarella?
No worries at all! Feel free to substitute with regular mozzarella cheese or even feta if you’re looking for something a bit tangier. Reminder: the flavor profile will change slightly, but it will still be delicious! -
Is it possible to make this dish low-sugar?
Yes! Simply reduce or eliminate the balsamic glaze in favor of plain balsamic vinegar or a drizzle of olive oil. Focus on letting the natural sweetness of the berries stand out. -
How do I prevent the salad from getting soggy in the fridge?
Store the berries and mozzarella in separate containers from the dressing. When you’re ready to enjoy, toss it together for the freshest taste.
Nutritional Info
While I encourage you to savor each bite without stress, here’s a rough estimate of what you’re indulging in:
- Calories: 230 per serving (This can vary based on quantity and specific ingredients)
- Protein: 10g
- Carbohydrates: 15g
- Fat: 15g
Conclusion
And there you have it! A vibrant, Berry Caprese Salad that not only looks stunning on the plate but also tantalizes your taste buds. I hope you enjoy making it as much as I do! Remember, cooking is all about balance, so feel free to swap and experiment while keeping the essence of this delightful dish alive. Let food be delightful fuel for your life, and share it generously with those you love. Happy cooking!
PrintBerry Caprese Salad

A vibrant and playful salad that combines creamy mozzarella with juicy mixed berries and fresh basil, drizzled with balsamic glaze.
- Prep Time: 15 minutes
- Cook Time: 0 minutes
- Total Time: 15 minutes
- Yield: 4 servings
- Category: Salad
- Method: Assembling
- Cuisine: Italian
- Diet: Vegetarian
Ingredients
- Fresh Mozzarella Cheese
- Mixed Berries (strawberries, blueberries, blackberries, raspberries)
- Fresh Basil Leaves
- Balsamic Glaze
- Olive Oil
- Salt
- Black Pepper
Instructions
- Prepare the Ingredients: Gather all ingredients and rinse berries gently under cool water; pat dry.
- Slice the Mozzarella: Cut fresh mozzarella into bite-sized slices.
- Tear the Basil: Tear basil leaves into smaller pieces to release oils.
- Assemble the Salad: Layer salad starting with mozzarella, followed by mixed berries and basil.
- Drizzle with Balsamic Glaze and Olive Oil: Let glaze cascade over the salad.
- Season It Right: Sprinkle salt and black pepper over the top.
- Taste and Adjust: Adjust seasoning as needed.
- Serve Immediately: Best enjoyed fresh.
Notes
This salad pairs well with grilled meats or crusty bread. For serving, layer ingredients in clear glasses for a charming effect.
Nutrition
- Serving Size: 1 serving
- Calories: 230
- Sugar: 10g
- Sodium: 200mg
- Fat: 15g
- Saturated Fat: 5g
- Unsaturated Fat: 8g
- Trans Fat: 0g
- Carbohydrates: 15g
- Fiber: 3g
- Protein: 10g
- Cholesterol: 30mg
Keywords: salad, berry salad, caprese, fresh ingredients, summer recipe
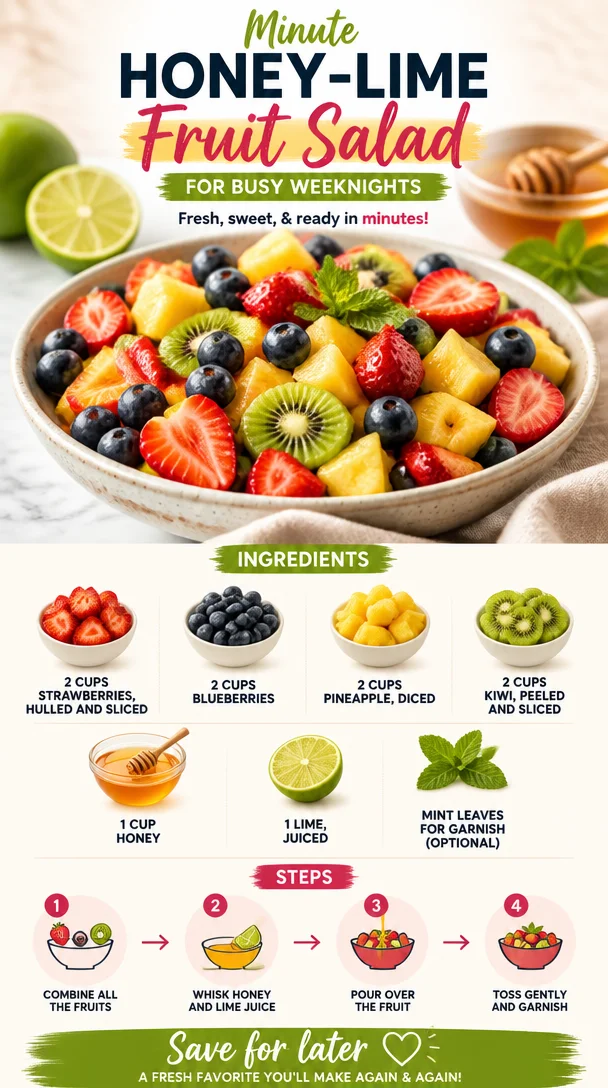
Minute Honey-Lime Fruit Salad for Busy Weeknights
Easy Fruit Salad with Honey Lime Dressing
Introduction
Hey there, fellow food lovers! If you’re like me, there’s just something about fruit that shouts "summer!" It’s vibrant, refreshing, and oh-so-delicious, especially when paired with a little zing from citrus and sweetness from honey. Today, I’m thrilled to share with you my go-to recipe for an Easy Fruit Salad with Honey Lime Dressing.
This dish is seriously perfect for any occasion—you can whip it up for brunch, serve it at a barbecue, or even enjoy a bowl for a light snack during the hot summer days. Believe me, this fruit salad is not your average bowl of chopped fruit. With the honey lime dressing, it transforms from a simple side dish into a flavor explosion that dances on your taste buds!
Growing up, my family had a tradition of making fruit salads during summer picnics. We’d gather around the picnic table, outdoors beneath the shade of giant oaks, laughing and reminiscing as we enjoyed our feast. My mom always encouraged us to get creative with the fruits we used, adding in whatever was fresh and seasonal. I think that’s the best part of this recipe: it’s flexible! You can mix and match or get a little adventurous with whatever’s in your fridge.
The honey lime dressing is the star here! It’s quick to make, and every drizzle brings a burst of brightness to the juicy fruits. Best of all, it’s an amazing way to get in those juicy vitamins and savor the season’s offerings. Ready to dive into the world of color and flavor? Let’s get started!
Personal Story
One of my fondest memories in the kitchen involves a bountiful summer day when my family decided to host a picnic at the local park. My siblings and I were tasked with creating the ultimate fruit salad. We raided our backyard and the local farmers’ market, gathering strawberries, blueberries, and a few things we thought looked "pretty." We threw in all the fruits we could find, of course, and I remember uncovering a hidden stash of ripe kiwis beneath the leaves in our fridge. Each of us had our signature touches—the kids were spread out in a joyous whirlwind of activity.
My job was to make the dressing, which really became the finishing touch! I squeezed fresh lime juice, drizzled honey, and—like a true little chef—tasted it after each addition, trying to find that perfect balance between sweet and tangy. We tossed everything together in a huge bowl, and as we carried it to our picnic spot, the bright colors and tantalizing aromas of our creation turned heads and brought smiles from other park-goers.
That day, we sat sprawled on checkered blankets, laughing and sharing stories, indulging in our creation. The sweet fruit, combined with that zingy dressing, was the highlight of the feast. To this day, I love making this fruit salad not just to relive that sweet nostalgia, but to create new memories with friends and family. Now, it’s your turn to make some fun memories with this delightful dish!
Ingredients
-
2 cups strawberries, hulled and sliced
- These juicy beauties are packed with vitamin C and are the sweetest way to start. If strawberries aren’t in season, feel free to substitute with raspberries or diced apples for a tart twist.
-
2 cups blueberries
- These little gems are like nature’s candy! They add a pop of color and are rich in antioxidants. No blueberries? No worries; think about adding blackberries or even diced peaches!
-
2 cups pineapple, diced
- Pineapple brings a tropical vibe and a sweet-tart flavor. If you don’t have fresh pineapple, drained canned pineapple works too, but fresh is always ideal for the best texture.
-
2 cups kiwi, peeled and sliced
- With its vibrant green color and unique taste, kiwi adds a refreshing twist. Don’t want to deal with peeling? Go ahead and swap it out for other fruits like mango or papaya for a tropical flair!
-
1 cup honey
- Honey is a natural sweetener that elevates the entire dish. If you’re vegan, feel free to swap honey for agave syrup or maple syrup for that same sweetness.
-
1 lime, juiced
- The star of the dressing! Lime juice brings in that necessary acidity to balance the sweetness. If limes aren’t handy, use lemons or even a splash of orange juice as a substitute.
-
Mint leaves for garnish (optional)
- These delicate leaves not only add a fresh aroma but also a lovely finish. If mint isn’t your thing, chopped basil could work just as nicely!
Step-by-Step Instructions
-
Gather Your Ingredients
- Start by gathering all your ingredients and equipment. This is the perfect time to channel your inner chef! You’ll need a large mixing bowl, a cutting board, a knife, and a small bowl if you want to mix the dressing separately.
-
Prep the Fruits
- Begin with the strawberries. Hull them by removing the green tops, then slice them into quarters or halves, depending on their size. Place the sliced strawberries into your mixing bowl. (Tip: If you allow the strawberries to sit a few minutes after slicing them, they’ll release their juices and create their own mini dressing!)
-
Add Blueberries
- Rinse the blueberries in cold water and drain them. No slicing needed—just toss them directly into the bowl with the strawberries. (Chefs Hack: If you’re using frozen blueberries, let them thaw for a bit first—this avoids mushiness!)
-
Cut the Pineapple
- If you’re using a fresh pineapple, carefully cut the top off, remove the skin, and dice the flesh into bite-sized pieces. Add the fresh pineapple to the mix. (Tip: To make this easier, cut the pineapple into rings and then dice through those rings!)
-
Slice the Kiwi
- Peel the kiwi and slice it into rounds or quarters, according to your preference. Toss them into the bowl with the other fruits, throwing in those beautiful green slices! (Pro Tip: Use a spoon to scoop out the kiwi flesh cleanly!)
-
Make the Honey Lime Dressing
- In a small bowl, combine the honey and lime juice. Give it a good stir with a whisk or a fork until fully blended. Want a little zing? You can add a bit more lime juice to suit your taste! (Tip: If it’s a hot day, you can lightly warm the honey for easier mixing!)
-
Combine Everything
- Drizzle the honey lime dressing over your colorful fruit medley. Using a large spoon or spatula, gently toss everything until the fruits are fully coated with that luscious dressing. (Caution: Be gentle! You don’t want to mush the fruits!)
-
Let it Marinate
- For an enhanced flavor experience, let the salad sit in the fridge for about 30 minutes. This allows the fruits to soak up some of that honey lime goodness and meld together beautifully.
Serving Suggestions
Once your fruit salad is nicely chilled and ready to go, grab a pretty bowl and spoon it in! You can serve it directly in individual bowls for guests or pile it high in one large dish for a family-style setting. Finishing touches? Add a few sprigs of fresh mint on top for a gorgeous pop of color and fragrance. This fruit salad also makes a delightful addition to brunch tables or summer feasts, bringing a burst of cheer and freshness to any spread!
Recipe Variations
Feeling adventurous? Here are some fun twists and variations to play around with:
- Tropical Twist: Switch out the kiwi for mango, add some shredded coconut, and maybe throw in a few macadamia nuts for crunch.
- Berry Blast: Use raspberries, blackberries, and sliced strawberries with a splash of orange juice instead of lime for a different citrus profile.
- Nutty Delight: Add a handful of chopped nuts like almonds or walnuts for a bit of crunch, or sprinkle with chia seeds for extra nutrition.
- Creamy Addition: Drizzle with a bit of yogurt on top for a creamy layer that complements the fruits beautifully!
Chef’s Notes
As I look back at those summers spent making fruit salads, I realize that my approach to this dish has changed over time. I’ve played with countless ingredients and combinations! Each evolution brought new friends and flavors, and now, I’m all about keeping it simple yet flexible. I adore taking whatever fruit is in season and transforming it into this delicious medley. And don’t let me forget: the key is all about the dressing! I’ve tried adding spices like cinnamon or ginger when feeling funky, and boy, have those been successful experiments!
FAQs and Troubleshooting
-
Can I use frozen fruits?
- Absolutely! Just be cautious because some fruits might change texture after thawing, especially bananas or and strawberries. Use frozen berries for best results.
-
How long does the fruit salad last?
- This salad is best enjoyed fresh, but you can store it in an airtight container in the fridge for up to 3 days. Just be mindful that it may get watery as it sits!
-
What if I don’t have honey?
- No problem! Agave syrup, maple syrup, or even amber syrup can easily take honey’s place. Just keep adjusting the sweetness to your liking!
-
Is there a way to make this salad ahead of time?
- Sure thing! You can pre-cut the fruits and mix the dressing, but keep them separate. Combine everything right before serving to maintain freshness and color.
Nutritional Info
(Optional, can be personalized based on specific dietary needs or preferences!)
This fruit salad is not just delicious but also nutritious! Each serving is low in calories yet high in vitamins and antioxidants, benefiting your overall health. Enjoy these nutritious powerhouse fruits without guilt, and feel free to get creative to make it even more nourishing!
So there you have it, friends—an Easy Fruit Salad with Honey Lime Dressing that not only tantalizes the taste buds but also brings back warm memories of summer sweetness! Whether for a gathering or a personal treat, this salad is sure to brighten anyone’s day. Happy cooking, and here’s to keeping things fresh, simple, and delicious!
PrintEasy Fruit Salad with Honey Lime Dressing
A vibrant, refreshing fruit salad with a zesty honey lime dressing, perfect for summer picnics and gatherings.
- Prep Time: 15 minutes
- Cook Time: 0 minutes
- Total Time: 15 minutes
- Yield: 6 servings 1x
- Category: Dessert
- Method: Mixing
- Cuisine: American
- Diet: Vegetarian
Ingredients
- 2 cups strawberries, hulled and sliced
- 2 cups blueberries
- 2 cups pineapple, diced
- 2 cups kiwi, peeled and sliced
- 1 cup honey
- 1 lime, juiced
- Mint leaves for garnish (optional)
Instructions
- Gather your ingredients.
- Prep the strawberries by hulling and slicing them, then place in mixing bowl.
- Add the rinsed blueberries directly into the bowl.
- Cut the fresh pineapple and add to the mix.
- Slice the kiwi and toss it into the bowl.
- Make the honey lime dressing by combining honey and lime juice in a small bowl.
- Combine everything by drizzling the dressing over the fruits and gently tossing to coat.
- Let it marinate in the fridge for about 30 minutes.
Notes
Serve chilled; can be garnished with fresh mint. Enjoy fresh for best results.
Nutrition
- Serving Size: 1 serving
- Calories: 100
- Sugar: 20g
- Sodium: 5mg
- Fat: 0g
- Saturated Fat: 0g
- Unsaturated Fat: 0g
- Trans Fat: 0g
- Carbohydrates: 25g
- Fiber: 3g
- Protein: 1g
- Cholesterol: 0mg
Keywords: fruit salad, summer salad, healthy dessert, honey lime dressing
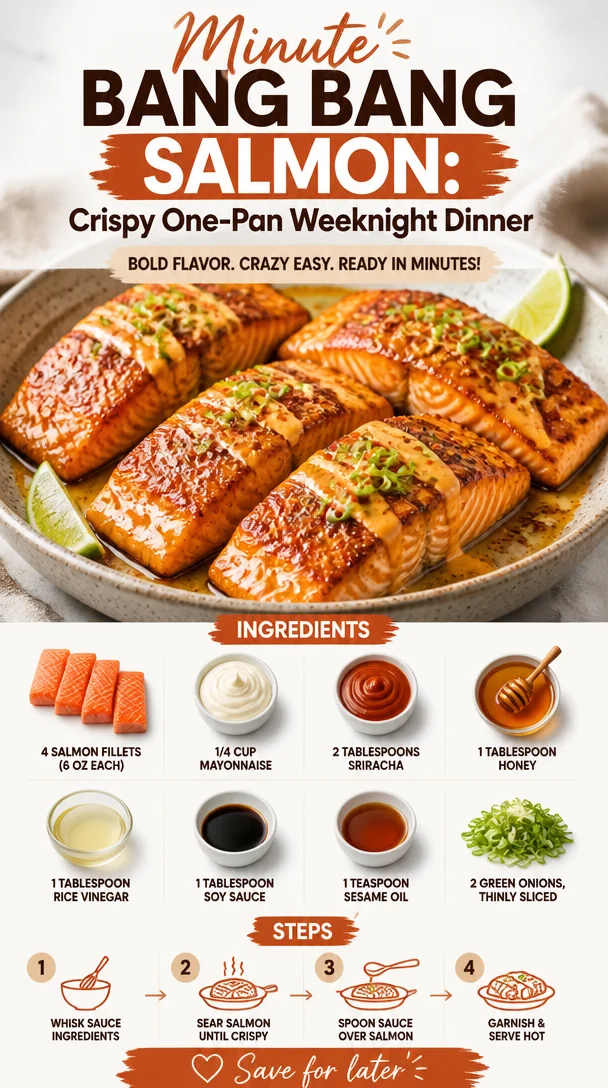
Minute Bang Bang Salmon: Crispy One-Pan Weeknight Dinner
Bang Bang Salmon: A Flavor-Packed Delight
Welcome to my kitchen! Today, I’m incredibly excited to share with you one of my all-time favorite recipes: Bang Bang Salmon. This dish is not only bursting with flavor but is also remarkably easy to prepare, making it perfect for those busy weeknights or for impressing your friends at a weekend gathering.
When I think of Bang Bang Salmon, I can’t help but smile at the memories it conjures up. Picture this: it’s a sunny Saturday afternoon, and I’m hosting a few close friends for a get-together. As I prep the ingredients, the kitchen fills with laughter and the warm aroma of the spices I’m blending. The sound of sizzling salmon in the pan harmonizes with our chatter, an orchestra of good times and delectable flavors. I remember the way my friends dove into the salmon, their eyes lighting up with every bite. The heat from the sriracha combined with the creaminess of the mayo creates a deliciously addictive sauce that complements the salmon perfectly. It’s moments like these—filled with joy and mouth-watering dishes—that remind me why I love cooking so much.
In this blog post, I’ll walk you through everything you need to know to create a show-stopping Bang Bang Salmon dish at home. From the mouthwatering recipe to serving suggestions and a few fun variations, you’re in for a treat! Let’s get cooking!
Ingredients
Here’s what you’ll need to create this delicious Bang Bang Salmon:
-
4 salmon fillets (6 oz each): The star of the show! Choose wild-caught salmon for a richer flavor and better omega-3 fatty acids. Feel free to substitute with other fish like cod or tilapia if needed.
-
1/4 cup mayonnaise: This gives the sauce its creamy base. You can use regular or light mayo, or even Greek yogurt if you prefer a healthier twist.
-
2 tablespoons sriracha: For that signature kick! Not a fan of spicy? You can adjust the amount or swap it for a milder sauce like sweet chili sauce.
-
1 tablespoon honey: Balances the heat with sweetness. Maple syrup can be a great alternative for a vegan option.
-
1 tablespoon rice vinegar: Adds a tangy note to the sauce. You can substitute with apple cider vinegar if that’s what you have on hand.
-
1 tablespoon soy sauce: For a touch of umami! Tamari is an excellent gluten-free alternative.
-
1 teaspoon sesame oil: This adds a lovely toasty flavor to the sauce. Groundnut oil can be used if you don’t have sesame oil.
-
2 green onions, thinly sliced: A fresh garnish that adds both crunch and color to your dish.
Ready to dive into making this delectable dish? Let’s go step by step!
Step-by-Step Instructions
Step 1: Prepping Your Salmon
Start by preheating your oven to 400°F (200°C). While it’s heating up, pat your salmon fillets dry with a paper towel. This step is crucial because it ensures a crispy skin while the salmon bakes. Sprinkle some salt and pepper on both sides—seasoning is key!
Step 2: Whipping Up the Bang Bang Sauce
In a medium-sized bowl, combine the mayonnaise, sriracha, honey, rice vinegar, soy sauce, and sesame oil. Give it a good whisk until it’s completely smooth and well blended. A little chef tip: taste the sauce as you go! If you want more heat, add a splash of sriracha. If you like it sweeter, drizzle in a bit more honey.
Step 3: Baking the Salmon
Line a baking dish with parchment paper for easy cleanup. Place the salmon fillets skin-side down in the dish. Brush a generous 2 tablespoons of the Bang Bang sauce over the top of the salmon fillets. The more sauce, the better, in my opinion! Bake in your preheated oven for about 15-20 minutes, or until the salmon flakes easily with a fork.
Step 4: The Finishing Touch
While the salmon is baking, let’s prepare the garnish. Thinly slice your green onions—this adds that pop of freshness! Once the salmon is done, take it out of the oven and drizzle a little extra sauce over the top if you’re feeling it. Sprinkle with those vibrant green onion slices, and let the colors pop.
Step 5: Serve and Enjoy
Plate the Bang Bang Salmon on a bed of steamed rice or a salad for a lighter option. The glossy sauce should glisten atop the salmon, making it look as fabulous as it tastes. Don’t forget to snap a pic for Instagram before you dig in!
Serving Suggestions
When it comes to serving your Bang Bang Salmon, simplicity is key. I always recommend pairing it with a side of rice, whether it’s jasmine, brown, or cauliflower rice for a low-carb spin. A fresh side salad—think crunchy greens, cherry tomatoes, and a light vinaigrette—complements the richness of the salmon beautifully. Want to step it up? Add a sprinkle of sesame seeds for that extra touch!
Recipe Variations
-
Spicy Garlic Bang Bang: Add a minced clove of garlic to the sauce for a delicious garlicky kick.
-
Honey-Lime Bang Bang: Swap honey for lime juice for a citrusy twist.
-
Coconut Bang Bang: Mix in some canned coconut cream with the mayonnaise for a tropical flavor.
-
Asian-Inspired Veggies: Serve the salmon with Asian veggies like bok choy and snap peas for a delightful contrast!
-
Low-Carb Delight: Use zucchini noodles instead of rice to keep it light and fresh.
Chef’s Notes
As a food lover, I’ve always thrived on exploring bold flavors, and this recipe is no exception. Looking back, the first time I made Bang Bang Salmon was a delightful experiment that turned into a staple in my cooking repertoire! And let me tell you, there have been a few kitchen mishaps along the way. One time, I accidentally grabbed an entire bottle of sriracha instead of the tablespoon measure! Let’s just say that dish had some serious heat! But it all turned out fine in the end—after a bit of improvisation and a few cheers from my friends.
FAQs and Troubleshooting
1. What should I do if my salmon is overcooked?
If your salmon ends up a little dry, don’t fret! Drizzle more Bang Bang sauce over it when serving; it’ll add moisture and flavor back in!
2. Can I grill this salmon instead of baking?
Absolutely! Preheat your grill, oil the grates, and cook the salmon skin-side down for about 5-7 minutes, then flip and cook for another 5-7 minutes, brushing with sauce as you go.
3. How do I store leftovers?
Store leftovers in an airtight container in the fridge for up to 3 days. Reheat gently in the microwave or on a skillet to avoid drying it out.
4. What if I don’t have green onions?
No worries! You can substitute with finely chopped chives, or skip the garnish altogether—your bang bang salmon will still be amazing!
Nutritional Info (Optional)
- Calories: Approximately 380 per serving (based on salmon and sauce only)
- Protein: 36g
- Carbohydrates: 6g
- Fat: 24g
And there you have it—my Bang Bang Salmon recipe, packed with flavor and perfect for any occasion! Whether you’re cooking for yourself or for loved ones, this dish is sure to become a crowd-pleaser. So roll up your sleeves, gather your ingredients, and let’s make some kitchen magic happen! Happy cooking!
PrintBang Bang Salmon

A flavor-packed and easy-to-prepare Bang Bang Salmon dish, perfect for busy weeknights or impressing friends.
- Prep Time: 15 minutes
- Cook Time: 20 minutes
- Total Time: 35 minutes
- Yield: 4 servings 1x
- Category: Main Course
- Method: Baking
- Cuisine: Asian
- Diet: Pescatarian
Ingredients
- 4 salmon fillets (6 oz each)
- 1/4 cup mayonnaise
- 2 tablespoons sriracha
- 1 tablespoon honey
- 1 tablespoon rice vinegar
- 1 tablespoon soy sauce
- 1 teaspoon sesame oil
- 2 green onions, thinly sliced
Instructions
- Preheat your oven to 400°F (200°C) and pat the salmon fillets dry. Season them with salt and pepper.
- Combine the mayonnaise, sriracha, honey, rice vinegar, soy sauce, and sesame oil in a bowl. Whisk until smooth.
- Line a baking dish with parchment paper and place the salmon skin-side down. Brush with 2 tablespoons of the sauce and bake for 15-20 minutes.
- Slice the green onions while the salmon bakes. Optionally drizzle more sauce over the salmon before serving and sprinkle with green onions.
- Serve on a bed of rice or a salad and enjoy!
Notes
Store leftovers in an airtight container for up to 3 days. Reheat gently to avoid drying out.
Nutrition
- Serving Size: 1 serving
- Calories: 380
- Sugar: 4g
- Sodium: 650mg
- Fat: 24g
- Saturated Fat: 4g
- Unsaturated Fat: 16g
- Trans Fat: 0g
- Carbohydrates: 6g
- Fiber: 0g
- Protein: 36g
- Cholesterol: 85mg
Keywords: Bang Bang Salmon, easy salmon recipe, Asian cuisine