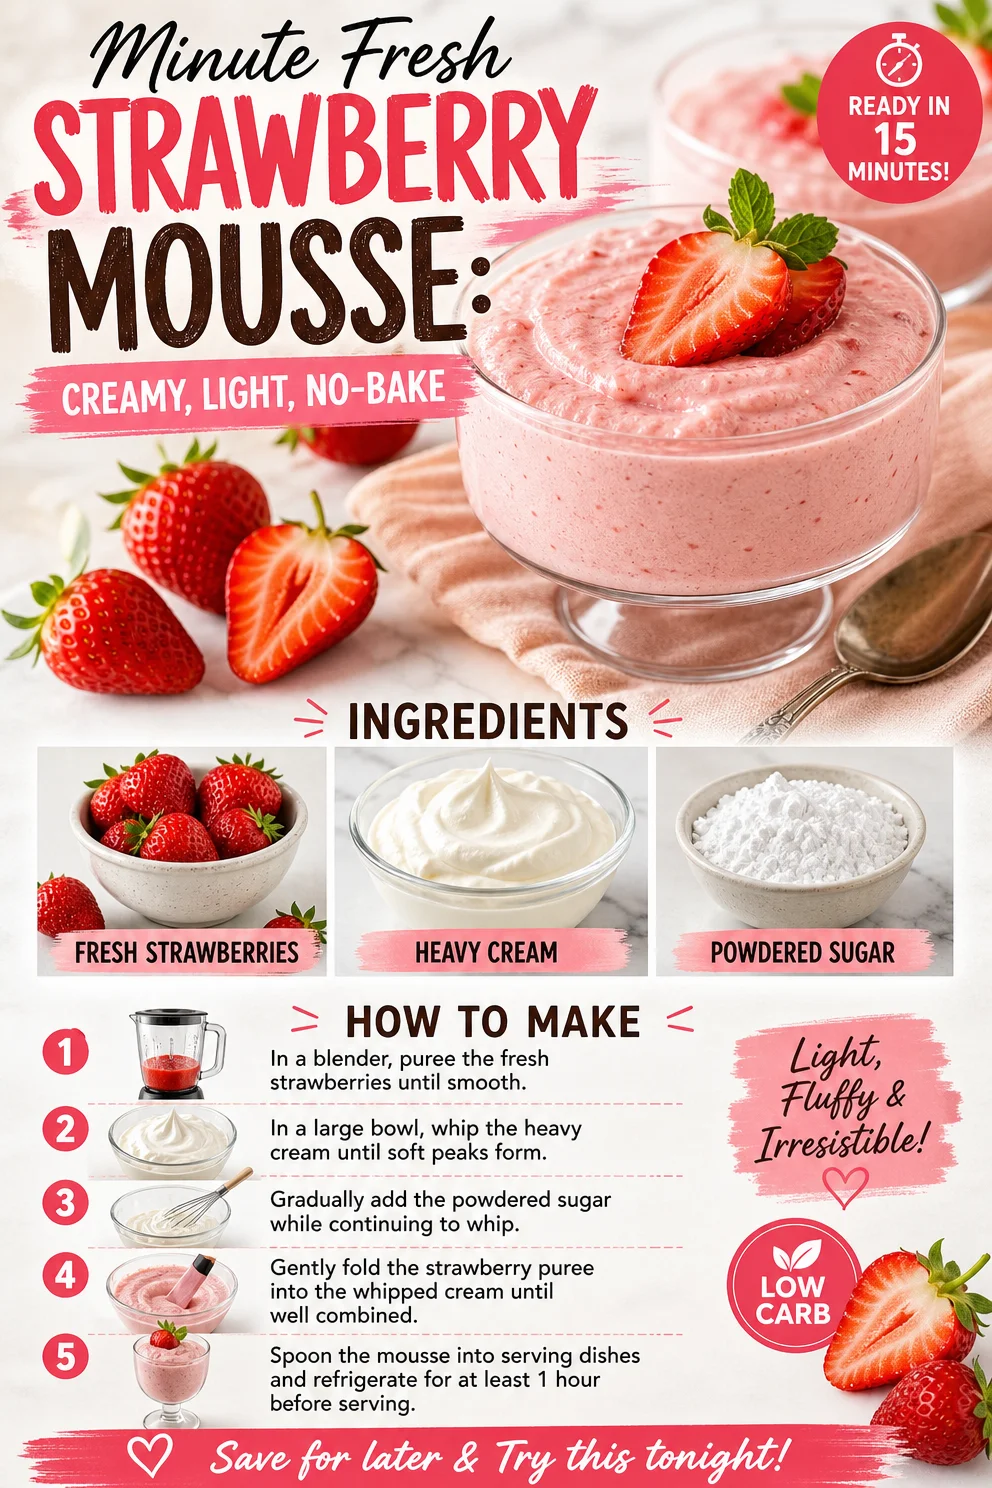
Minute Fresh Strawberry Mousse: Creamy, Light, No-Bake
Easy Fresh Strawberry Mousse: A Whip of Delight
Welcome, fellow food lovers! Today, I’m thrilled to share a delightful dish that’s equal parts nostalgia and decadence: Easy Fresh Strawberry Mousse. Picture a warm summer day, sunlight dancing through the leaves, and a sweet, fluffy dessert just waiting to be savored. With fresh strawberries as the star of this show, this mousse is creamy, airy, and the perfect end to any meal—or even a special snack during the day.
What I love most about this strawberry mousse is how incredibly simple it is to prepare. Seriously, with only three ingredients and some gentle folding action, you’ll create a dessert that’s sure to impress your family and friends. Not only does it taste amazing, but it also looks beautiful when served, making it a fantastic choice for gatherings, picnics, or simply treating yourself after a long day.
Whether you’ve got a lush batch of strawberries from your garden or picked up a fresh basket from the farmer’s market, this recipe is your new go-to. So, grab your mixing bowl and let’s whisk away!
A Sweet Scoop of Nostalgia
Let me share a little story from my childhood that’s forever tied to the joy of strawberry mousse. Growing up, my grandmother had the most stunning garden filled with vibrant strawberries. They were red and juicy, ready to be picked on sunny afternoons. Every summer, my cousins and I would race each other to see who could gather the most strawberries. With our puddle of sweet spoils in hand, we’d gather around Grandma’s kitchen as she whipped up her infamous strawberry desserts.
One of my favorites was her strawberry mousse, which she prepared using fresh berries, cream, and just a touch of sugar to enhance the flavor. I remember the laughter, the aroma of strawberries filling the air, and the way the mousse seemed to float off the spoon as we eagerly devoured it. Nostalgic comfort food at its finest! Now, I’m excited to share that legacy through this simple yet elegant recipe, making new memories for the next generations.
Ingredients You’ll Need
-
Fresh Strawberries:
- The star of the show! Choose ripe, juicy strawberries for a naturally sweet flavor. If fresh isn’t available, you can use frozen strawberries, but make sure to thaw and drain excess moisture.
-
Heavy Cream:
- This is what gives the mousse its luscious, creamy texture. If you need a lighter version, you can substitute it with coconut cream or a low-fat whipped topping, but the flavor will be slightly different.
-
Powdered Sugar:
- This sugar dissolves easily into the cream, giving it just the right amount of sweetness. If you’d like to keep it less sweet, feel free to reduce the amount or use an alternative sweetener like honey or agave. Just remember to adjust the quantities because honey is liquid.
With these three ingredients in hand, you’re halfway to a dessert that will become a star of any table!
Step-by-Step Instructions
Now, let’s get down to business and whip up this strawberry mousse!
-
Prepare Your Strawberries:
- Start by washing your fresh strawberries under cool water. Pat them dry with a paper towel—no one wants a soggy mousse! Remove the green tops and slice them in half. For a more intense strawberry flavor, you can toss them with a tablespoon of powdered sugar and let them sit for about 10 minutes. This will release their natural juices, making for a delightful syrup to fold into your mousse later.
-
Blend the Strawberries:
- Transfer the strawberry halves to a blender or food processor. Blend until smooth, but keep some chunks for texture if you prefer it that way. I like to leave a few small pieces for visual interest and extra bites of flavor! Set this berry goodness aside.
-
Whip the Cream:
- In a large mixing bowl, pour in the heavy cream. Using an electric mixer, beat the cream on medium-high speed until soft peaks form. This generally takes about 3-5 minutes. Be careful not to overwhip; we want to maintain that fluffy texture that makes mousse so airy and delightful. If you’ve never whipped cream before, start slow and gradually increase speed to prevent splatters.
-
Incorporate the Sugar:
- Once your cream has reached those glorious soft peaks, gradually add in the powdered sugar. Beat for an additional minute until the cream is firm and glossy. This will not only sweeten the cream but also help stabilize it.
-
Fold in the Strawberries:
- Now comes the magic part—gently fold the blended strawberries into the whipped cream. Use a rubber spatula and be gentle, as you want to retain all that lovely air you’ve just created. This should result in a beautiful pink mousse! If you want a more pronounced strawberry flavor, feel free to fold in some of the syrup you created earlier.
-
Chill and Set:
- Spoon your luscious mousse into individual serving cups or a larger bowl if you wish to share. Cover lightly with plastic wrap and refrigerate for at least 2 hours. This helps it set and allows those flavors to marry beautifully—though good luck waiting that long!
-
Serve and Savor:
- Once your mousse is chilled, serve it as is or garnish with extra strawberry slices, a sprig of mint, or a dollop of whipped cream for an extra touch. Trust me, it’s as good as it sounds.
Serving Suggestions
When it comes to presentation, strawberry mousse can be served in elegant dessert cups or fun mason jars for a rustic vibe. Maybe even layer it with some crushed shortbread cookies for added texture! Garnish each serving with a mint leaf, a few whole strawberries, or a sprinkle of crushed nuts for a delightful crunch. Not only does it make for an aesthetically pleasing dish, but those small touches also add an extra layer of flavor.
Recipe Variations
Now, let’s mix things up a bit! Here are some creative twists you can try:
-
Chocolate Strawberry Mousse:
- Stir in melted dark chocolate with the strawberry puree for a decadent chocolate-strawberry combination.
-
Citrus Zing:
- Add a splash of lemon or orange juice to the strawberry mixture for a zesty kick! This brightens the tones of the strawberries and adds a refreshing twist.
-
Balsamic Strawberry Mousse:
- Drizzle the strawberries with a touch of balsamic vinegar before blending. It enhances the sweetness and adds a sophisticated edge.
-
Nutty Crunch:
- Fold in some finely chopped almonds or pistachios to the mousse at the end for a delightful crunch.
-
Dairy-Free Version:
- Use coconut cream in place of heavy cream to create a dairy-free mousse that’s just as delicious!
Chef’s Notes
This strawberry mousse has traveled through time with me and has evolved along the way. I remember the first time I tried to make it on my own—let’s just say it didn’t go as planned! I overwhipped the cream and ended up with butter—not exactly the light dessert I was aiming for! But those little missteps are what make us better in the kitchen, right? Now, I’ve got the hang of it, and it brings me so much joy to see others enjoy this simple pleasure. Remember, it’s all about enjoying the process and sharing the sweet results with those you love.
FAQs and Troubleshooting
-
Why did my mousse not set?
- If your mousse doesn’t set, it may be due to not whipping the cream enough to reach the proper consistency. Ensure you achieve soft peaks before folding in the strawberries. Also, chilling the mousse for enough time is crucial!
-
Can I make this ahead of time?
- Absolutely! This mousse can be made a day in advance and stored in the fridge. Just make sure to cover it well so it doesn’t absorb any fridge odors.
-
What if I don’t have powdered sugar?
- You can make your own powdered sugar by blending granulated sugar in a blender until it becomes a fine powder. Use this as a substitute!
-
Can I use other fruits?
- Yes! This technique works wonderfully with raspberries, blueberries, or even peaches. Just adjust the sugar based on the fruit’s natural sweetness.
Nutritional Info
(Optional based on your preferences)
Making this mousse feels great, and guess what? It also has nutritional benefits! Strawberries are packed with vitamin C and antioxidants, while the heavy cream gives you a bit of fat that keeps you satisfied. Just remember to enjoy it in moderation as part of a balanced diet.
And there you have it, my friends! An easy fresh strawberry mousse that’s simple, delightful, and bursting with summer flavors. I hope this recipe brings you as much joy as it does for me. Now, let’s get into the kitchen and start whipping up some sweet memories together! 🍓
PrintEasy Fresh Strawberry Mousse
A simple and delightful strawberry mousse that brings nostalgia and elegance to any occasion with its creamy texture and fresh flavor.
- Prep Time: 15 minutes
- Cook Time: 0 minutes
- Total Time: 120 minutes
- Yield: 4 servings 1x
- Category: Dessert
- Method: No-Bake
- Cuisine: American
- Diet: Vegetarian
Ingredients
- 2 cups Fresh Strawberries, hulled and sliced
- 1 cup Heavy Cream
- 1/4 cup Powdered Sugar
Instructions
- Prepare your strawberries: Wash under cool water, pat dry, remove the green tops, and slice in half. Optionally, toss with a tablespoon of powdered sugar and let sit for 10 minutes.
- Blend the strawberries: Transfer strawberry halves to a blender and blend until smooth, leaving some chunks for texture.
- Whip the cream: In a bowl, beat the heavy cream on medium-high speed until soft peaks form, about 3-5 minutes.
- Incorporate the sugar: Gradually add in powdered sugar and beat for another minute until firm and glossy.
- Fold in the strawberries: Gently fold the blended strawberries into the whipped cream with a rubber spatula.
- Chill and set: Spoon the mousse into cups, cover with plastic wrap, and refrigerate for at least 2 hours.
- Serve and savor: Garnish the chilled mousse with extra strawberry slices or mint before serving.
Notes
Use ripe strawberries for the best flavor. The mousse can be made a day in advance and stored in the fridge.
Nutrition
- Serving Size: 1 serving
- Calories: 200
- Sugar: 15g
- Sodium: 30mg
- Fat: 10g
- Saturated Fat: 6g
- Unsaturated Fat: 4g
- Trans Fat: 0g
- Carbohydrates: 25g
- Fiber: 2g
- Protein: 2g
- Cholesterol: 30mg
Keywords: strawberry mousse, dessert, summer recipe, easy recipe, fresh strawberries
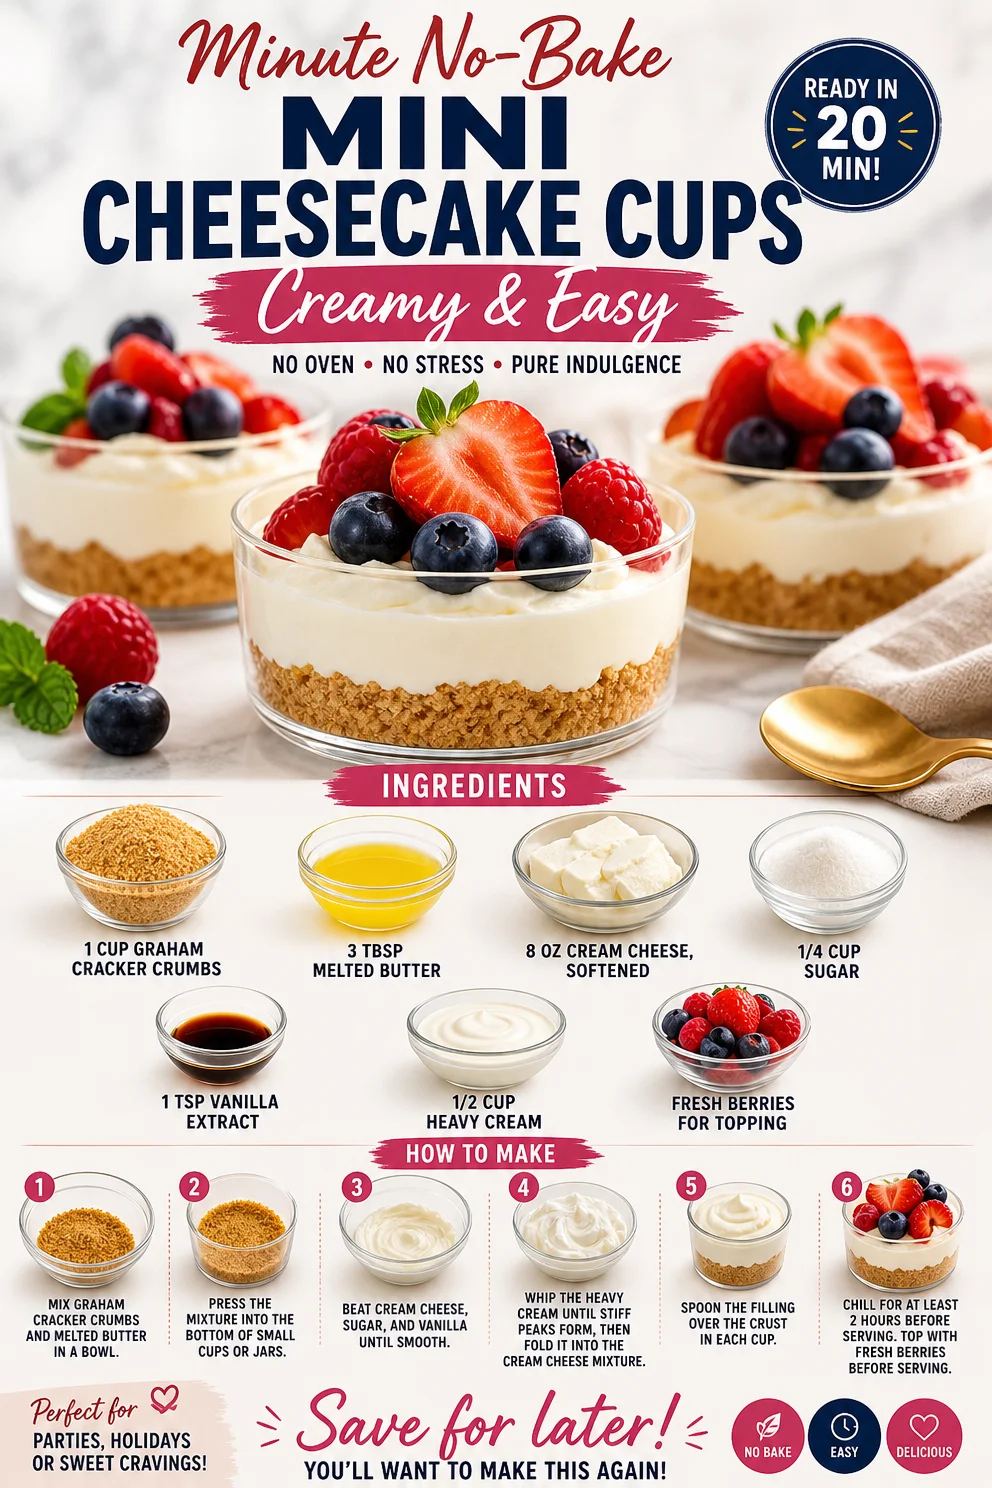
Minute No-Bake Mini Cheesecake Cups (Creamy & Easy)
Irresistible No-Bake Mini Cheesecake Cups in 15 Minutes
Introduction
Hey there, fellow food lovers! If you’re anything like me, you probably have a constant craving for something sweet, creamy, and utterly delicious. Lucky for you, I have just the treat in mind: No-Bake Mini Cheesecake Cups! These little gems are all about enjoying the rich, decadent flavor of cheesecake without the fuss of baking. And the best part? You can whip them up in just 15 minutes!
I’ve always been a huge fan of cheesecakes, but there’s something extra special about the mini version that brings a delightful playfulness to dessert time. Picture this: a buttery graham cracker crust cradling a velvety cream cheese filling, topped with fresh, juicy berries. It’s the kind of dessert that makes your taste buds dance and your heart sing.
Making these No-Bake Mini Cheesecake Cups is not only a treat for yourself but also a fantastic way to impress friends and family. Whether you’re hosting a casual gathering, celebrating a special occasion, or just need a sweet pick-me-up after a long day, these mini cheesecakes are about to become your go-to recipe.
In this post, I’ll share a little backstory that will take you on a trip down memory lane, guide you through the ingredients needed, and offer step-by-step instructions that will make you feel like a pro in the kitchen. So grab your apron, and let’s dive into the delicious world of no-bake cheesecake!
Personal Story
Let me take you back to a particularly memorable summer afternoon from my childhood. My grandmother, a passionate baker with an unbeatable sweet tooth, was preparing her famous cheesecake for our family BBQ. I can still picture the sun shining through the kitchen window, illuminating her apron as she expertly mixed cream cheese with sugar. The rich aroma filled the air, and I was captivated by the creamy filling as it piled up high in her springform pan.
However, in true grandma fashion, she insisted on letting it bake for hours before it was ready to serve, leaving me with a long wait—and an even longer craving! Fast forward to today, while I cherish her traditional recipe, I often find myself reminiscing about those lazy summers spent waiting for that first slice. The idea of a mini cheesecake that doesn’t require an oven was born out of my desire to indulge in that classic dessert quickly!
These No-Bake Mini Cheesecake Cups evoke those tender memories, allowing me to recreate the joy of cheesecake anytime I want without the long wait. Best of all, I can share this delightful treat with friends and family, just like my grandmother did with me. So, let’s create our own cherished moments together—one mini cheesecake cup at a time!
Ingredients
-
1 cup graham cracker crumbs
- This creates the crunchy crust! You can easily make your own by crushing whole graham crackers in a food processor or using store-bought crumbs for convenience.
-
3 tbsp melted butter
- The butter adds richness and helps bind the crust together. If you’re looking for a lighter option, you can swap it with coconut oil or even applesauce for a healthier twist.
-
8 oz cream cheese, softened
- The star of the show! Softening the cream cheese makes it easier to mix and creates that smooth, creamy texture we all crave. For a lighter version, try using low-fat cream cheese or yogurt.
-
1/4 cup sugar
- This adds sweetness to the filling. Feel free to adjust the sweetness based on your preference—honey or maple syrup can be great substitutes!
-
1 tsp vanilla extract
- Vanilla enhances the flavor, infusing it with warmth. If you’re feeling adventurous, consider adding a splash of almond or lemon extract for a unique twist.
-
1/2 cup heavy cream
- This is what gives our cheesecake filling its luscious texture. For a dairy-free alternative, you might opt for coconut cream instead.
-
Fresh berries for topping
- Berries not only enhance the aesthetics but also add a burst of freshness to each bite. Feel free to use strawberries, blueberries, raspberries, or whatever is in season!
Step-by-Step Instructions
-
Prepare the Crust:
Start by mixing the graham cracker crumbs and melted butter in a medium bowl until combined. You want the texture to resemble wet sand. If it feels too dry, drizzle in a bit more melted butter. This will help the crumbs stick together. -
Distribute into Cups:
Using a spoon or your fingers, press the crumb mixture firmly into the bottom of your mini dessert cups or muffin tins. Make sure to pack it tightly so your crust holds its shape. A flat-bottomed glass works wonders for this! -
Mix the Filling:
In another bowl, beat the softened cream cheese until smooth and creamy. I recommend using an electric mixer for this step to avoid any lumps. Gradually add the sugar and vanilla extract, mixing until fully incorporated. -
Whip the Cream:
In a separate bowl, whip the heavy cream until soft peaks form. This is where the magic happens! Gently fold the whipped cream into the cream cheese mixture. Use a spatula in a gentle upward motion to keep the mixture light and airy. -
Combine Fillings:
Once the whipped cream is incorporated, your cheesecake filling is ready! Spoon the mixture into your pre-prepared cups, filling each one generously. You can go as high as you want—these mini cheesecakes are meant to be decadent! -
Chill in the Fridge:
Cover your mini cheesecake cups with plastic wrap and let them chill in the fridge for at least 1 hour. This will help set the filling. If you’re in a rush, even 30 minutes will do the trick. -
Top with Berries:
Just before serving, load up each cheesecake with fresh berries. This not only looks beautiful but adds a refreshing touch to every rich bite.
And voilà! Your No-Bake Mini Cheesecake Cups are ready to dazzle your taste buds and impress your guests!
Serving Suggestions
To serve these adorable cheesecake cups, arrange them on a colorful platter for an eye-catching display. You can also drizzle some homemade berry sauce or a sprinkle of powdered sugar on top for added flair. If you want to create a more interactive experience, set out extra berries and toppings so your guests can customize their mini cheesecakes. Enjoy with a fork, or for the adventurous, dig in directly with a spoon!
Recipe Variations
-
Chocolate Lovers’ Delight:
Swirl in some melted chocolate into your cheesecake filling for a chocolate version! You can even top it with chocolate shavings. -
Citrus Twist:
Add a teaspoon of lemon or orange zest to the filling for a bright, zesty flavor that’ll perk up your palate. -
Nutty Crust:
Mix in crushed nuts, like pecans or almonds, with the graham cracker crumbs for a nutty crunch. You can also use crushed cookies like Oreos for a fun twist! -
Vegan Version:
Replace the cream cheese with a vegan cream cheese alternative, use coconut cream instead of heavy cream, and sweeten with maple syrup for a delicious dairy-free option. -
Mini Layered Cheesecake:
Layer the filling with different flavored yogurt for a fun and colorful presentation! Each layer can have a unique flavor profile that keeps things exciting.
Chef’s Notes
Food has a funny way of transporting us back in time. Whenever I make these Mini Cheesecake Cups, I think about my grandma’s kitchen, that summer day, and the family gatherings filled with laughter. This recipe has evolved over the years—what started as a simple cheesecake has transformed into a crowd-pleasing, no-bake delight that’s perfect for any occasion. Plus, it’s a time-saver that lets you focus on what really matters: savouring those sweet moments with loved ones.
FAQs and Troubleshooting
-
What if my cheesecake filling is lumpy?
Make sure you’re mixing the cream cheese until it’s really smooth before adding the sugar. If you find lumps after combining everything, you can quickly whip it with a blender! -
Can I make these ahead of time?
Absolutely! You can make them a day in advance. Just keep them in the fridge, covered, until you’re ready to serve them. -
What if I don’t have mini cups?
No worries! You can use a muffin tin or even a large dessert dish for a family-style cheesecake. Just adjust the chilling time accordingly. -
How long can I store these?
They’ll stay fresh in an airtight container in the fridge for about 3-4 days. Although, I doubt they’ll last that long—the taste is simply irresistible!
Nutritional Info
While I’m not a dietitian, I can tell you these No-Bake Mini Cheesecake Cups are a delightful treat worth enjoying in moderation! If you’re interested in specific nutritional info (calories, sugar content, etc.), feel free to use an online calculator based on the ingredients you choose.
So there you have it! No-Bake Mini Cheesecake Cups that are quick, easy, and utterly delicious. Now it’s your turn to create some sweet memories in the kitchen. Happy baking (or, should I say, chilling)! Enjoy!
PrintNo-Bake Mini Cheesecake Cups
Quick and easy no-bake mini cheesecake cups topped with fresh berries, perfect for satisfying your sweet cravings in just 15 minutes.
- Prep Time: 15 minutes
- Cook Time: 0 minutes
- Total Time: 75 minutes
- Yield: 4 servings 1x
- Category: Dessert
- Method: No-Bake
- Cuisine: American
- Diet: Vegetarian
Ingredients
- 1 cup graham cracker crumbs
- 3 tbsp melted butter
- 8 oz cream cheese, softened
- 1/4 cup sugar
- 1 tsp vanilla extract
- 1/2 cup heavy cream
- Fresh berries for topping
Instructions
- Prepare the crust: Start by mixing the graham cracker crumbs and melted butter in a medium bowl until combined.
- Distribute into cups: Press the crumb mixture firmly into the bottom of mini dessert cups or muffin tins.
- Mix the filling: Beat the softened cream cheese until smooth, then add the sugar and vanilla extract.
- Whip the cream: In a separate bowl, whip the heavy cream until soft peaks form, then fold into the cream cheese mixture.
- Combine fillings: Spoon the mixture into the prepared cups, filling each one generously.
- Chill in the fridge: Cover with plastic wrap and chill for at least 1 hour.
- Top with berries: Just before serving, add fresh berries on top of each cheesecake.
Notes
These mini cheesecakes can be made a day in advance and are perfect for any occasion.
Nutrition
- Serving Size: 1 cup
- Calories: 220
- Sugar: 10g
- Sodium: 200mg
- Fat: 14g
- Saturated Fat: 8g
- Unsaturated Fat: 6g
- Trans Fat: 0g
- Carbohydrates: 22g
- Fiber: 1g
- Protein: 3g
- Cholesterol: 40mg
Keywords: cheesecake, no-bake dessert, mini cheesecake, easy dessert, quick recipe
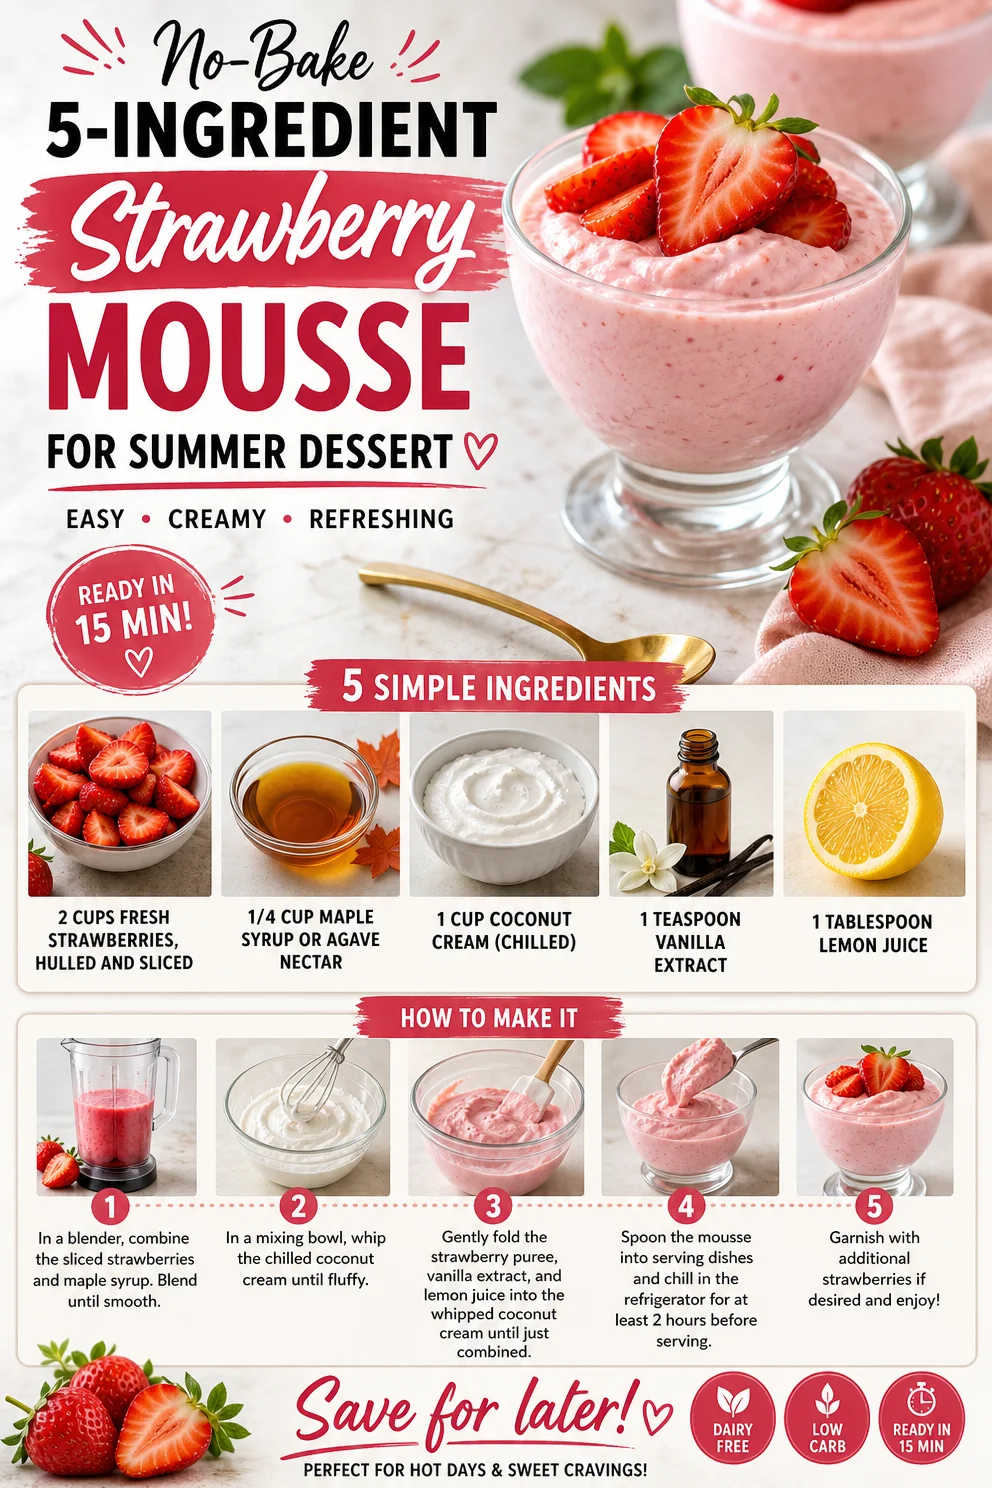
No-Bake 5-Ingredient Strawberry Mousse for Summer Dessert
Indulge in Freshness: A Delightful Strawberry Mousse
Welcome, fellow food lovers! Today, I’m shimmying into your kitchen to share one of my all-time favorite recipes—Strawberry Mousse. This light and fluffy dessert is as vibrant as a summer day and will have your taste buds dancing with delight. I mean, who doesn’t love the combination of creamy, dreamy textures mingling with the sweet-tartness of fresh strawberries? Trust me; this is a dessert that will make you feel like a culinary rockstar, even if you’re just starting out in the kitchen.
The beauty of Strawberry Mousse lies in its simplicity. With just a few wholesome ingredients, we can create a dish that feels indulgent yet remains guilt-free. Plus, it’s versatile enough to suit any occasion—from casual family dinners to fancy gatherings. It’s time to roll up those sleeves, grab your favorite apron, and let’s create a dessert that will be the star of the show.
A Sweet Childhood Memory
Before we dive into the how-to, let me whisk you away to my childhood for a moment. I grew up in a household that absolutely celebrated food. Some of my fondest memories revolve around summer afternoons spent in my grandmother’s sun-kissed garden, where strawberries grew in abundance. We’d pluck those ruby-red jewels right off the vine, their sweetness bursting in our mouths.
One day, my grandmother introduced me to her secret recipe for Strawberry Mousse. As we whipped the creamy mixture together, she shared stories from her childhood, her laughter mixing with the sounds of the mixer whirring. We indulged in cherry-red bowls of mousse on the porch, while the sun set behind us, painting the sky with hues of orange and pink.
Those moments instilled in me a love for cooking and sharing food. This Strawberry Mousse is my way of honoring those sun-drenched days filled with sweetness, laughter, and love. So, grab your strawberries, and let’s whip up some delicious memories of our own!
Ingredients
Here’s what you’ll need to create this delightful Strawberry Mousse:
-
2 cups fresh strawberries, hulled and sliced
The star ingredient! Choose ripe strawberries for the best flavor. If strawberries aren’t in season, feel free to substitute with frozen berries—just ensure they’re thawed and well-drained. -
1/4 cup maple syrup or agave nectar
A natural sweetener that adds richness! If you want to cut down on sweetness, feel free to adjust the amount. Honey can be used here too, just remember that it may change the flavor slightly. -
1 cup coconut cream (chilled)
This gives our mousse its luxurious, creamy texture. Chill your coconut cream overnight for the best results. Want a nut-free option? Try Greek yogurt instead. -
1 teaspoon vanilla extract
A splash of vanilla adds depth! Go for pure vanilla extract if you can; it makes all the difference in flavor. -
1 tablespoon lemon juice
Lemon juice brightens the flavors and balances the sweetness. If you don’t have fresh lemons, bottled lemon juice can work in a pinch.
Step-by-Step Instructions
Now that our ingredients are ready, let’s get into the nitty-gritty of creating this mousse! Follow these steps to ensure success:
-
Prepare Your Strawberries
Start by hulling and slicing your strawberries. A quick tip: use the tip of a paring knife to remove the green tops efficiently. Set aside a few lovely slices for garnishing later! -
Blend the Strawberries
Toss your sliced strawberries into a blender or food processor. Blend until smooth. You want it velvety! If you prefer textured mousse, pulse a few times to leave some tiny chunks. -
Sweeten It Up
Add the maple syrup (or your chosen sweetener) to the strawberry puree. Blend again until combined. Taste at this stage; adjust sweetness as needed! You can even add a tiny pinch of salt to enhance those sweet notes. -
Whip the Coconut Cream
In a separate bowl, beat your chilled coconut cream. Use an electric mixer on medium speed; you want it fluffy and light. It should take about 3-4 minutes. If it’s too stiff, you can add a splash of non-dairy milk to help it along. -
Combine the Mixtures
Gently fold the strawberry puree into the whipped coconut cream until well combined. Be careful not to deflate the cream too much; we want that airy texture to remain! This is where the magic happens. -
Add Vanilla and Lemon Juice
Now, add your teaspoon of vanilla extract and tablespoon of lemon juice. Fold it gently until everything is mixed in. The mousse should look pretty and light, with a beautiful pink color. -
Chill to Perfection
Spoon the mousse into your favorite serving dishes or glasses. Cover them with plastic wrap or a lid and chill in the fridge for at least an hour. This step is crucial to help the flavors meld and ensure it’s cool when served.
Serving Suggestions
Once your mousse has chilled, it’s time to serve! You can ladle it into elegant glasses for a fancy dinner party or into simple bowls for a cozy night-in. Garnish with those reserved strawberry slices, a dollop of coconut cream, or even a sprig of fresh mint for an extra pop of freshness. If you’re feeling adventurous, drizzle a little chocolate sauce over the top—this mousse is all about creative expression, after all!
Recipe Variations
Now, let’s jazz up this recipe with some fun twists, shall we? Here are a few ideas to keep things exciting:
-
Berry Medley Mousse: Blend in a mix of berries—think blueberries, raspberries, or blackberries. The colors and flavors will make your mousse appealing and delicious!
-
Chocolate-Covered Strawberry Mousse: Add 2 tablespoons of cocoa powder to the strawberry mixture for a decadent chocolate flavor that pairs beautifully with strawberries.
-
Citrus Burst: Replace lemon juice with lime or orange juice for a zesty twist on this classic dessert.
-
Herb-Infused: Add fresh mint or basil to the blender with the strawberries for a refreshing herbal note.
-
Nutty Mousse: Incorporate a tablespoon of almond extract along with the vanilla for a subtle nuttiness that complements the strawberries.
Chef’s Notes
This Strawberry Mousse is a canvas for creativity! I often swap ingredients based on what’s in my fridge or pantry—there’s no right or wrong way here. And if you happen to over-whip your coconut cream (guilty!), fear not! Simply add a tad more coconut cream to soften it back up.
I also learned in my kitchen adventures that a bit of patience goes a long way. Letting the mousse chill for a bit helps solidify the lovely fluffy texture. Plus, it allows the flavors to sing in harmony. So don’t rush it; good things take time—especially sweet, creamy things!
FAQs and Troubleshooting
-
Why is my mousse not thickening?
If your mousse isn’t thickening, ensure that your coconut cream is chilled properly before whipping. If you used regular cream, it may require more whipping. -
Can I make this ahead of time?
Absolutely! Strawberry Mousse can be made a day ahead, just keep it stored in the refrigerator. It’s a great make-ahead dessert. -
How long will the mousse last?
Stored in an airtight container in the refrigerator, this mousse will stay fresh for about 2-3 days. -
What if I want to make this recipe vegan?
The recipe is already vegan-friendly, thanks to the coconut cream and maple syrup. Just double-check that all your ingredients align with vegan diets.
Nutritional Info
Each serving of Strawberry Mousse contains approximately:
- Calories: 180
- Fat: 11g
- Carbohydrates: 20g
- Protein: 2g
- Fiber: 2g
And there you have it! A delightful Strawberry Mousse that’s fresh, delicious, and sure to impress. This dessert not only brings back beautiful memories but also creates new ones with every spoonful! Remember, the kitchen is your playground; experiment, enjoy, and most importantly, savor every bite. Happy cooking!
PrintStrawberry Mousse
A light and fluffy strawberry mousse that combines creamy textures with the sweet-tartness of fresh strawberries.
- Prep Time: 15 minutes
- Cook Time: 0 minutes
- Total Time: 60 minutes
- Yield: 4 servings 1x
- Category: Dessert
- Method: No-Cook
- Cuisine: International
- Diet: Vegan
Ingredients
- 2 cups fresh strawberries, hulled and sliced
- 1/4 cup maple syrup or agave nectar
- 1 cup coconut cream (chilled)
- 1 teaspoon vanilla extract
- 1 tablespoon lemon juice
Instructions
- Prepare your strawberries by hulling and slicing them. Set aside a few slices for garnishing later.
- Blend the sliced strawberries in a blender until smooth.
- Sweeten the strawberry puree by adding maple syrup and blending again. Adjust sweetness as needed.
- Whip the chilled coconut cream in a separate bowl until fluffy, about 3-4 minutes.
- Combine the strawberry puree with the whipped coconut cream, folding gently.
- Add the vanilla extract and lemon juice, folding until well mixed.
- Chill the mousse in serving dishes for at least an hour before serving.
Notes
You can garnish with additional strawberry slices or a dollop of coconut cream. This mousse can be made ahead of time and stored in the fridge for 2-3 days.
Nutrition
- Serving Size: 1 serving
- Calories: 180
- Sugar: 14g
- Sodium: 5mg
- Fat: 11g
- Saturated Fat: 10g
- Unsaturated Fat: 1g
- Trans Fat: 0g
- Carbohydrates: 20g
- Fiber: 2g
- Protein: 2g
- Cholesterol: 0mg
Keywords: strawberry mousse, dessert, vegan dessert, easy dessert, summer recipes
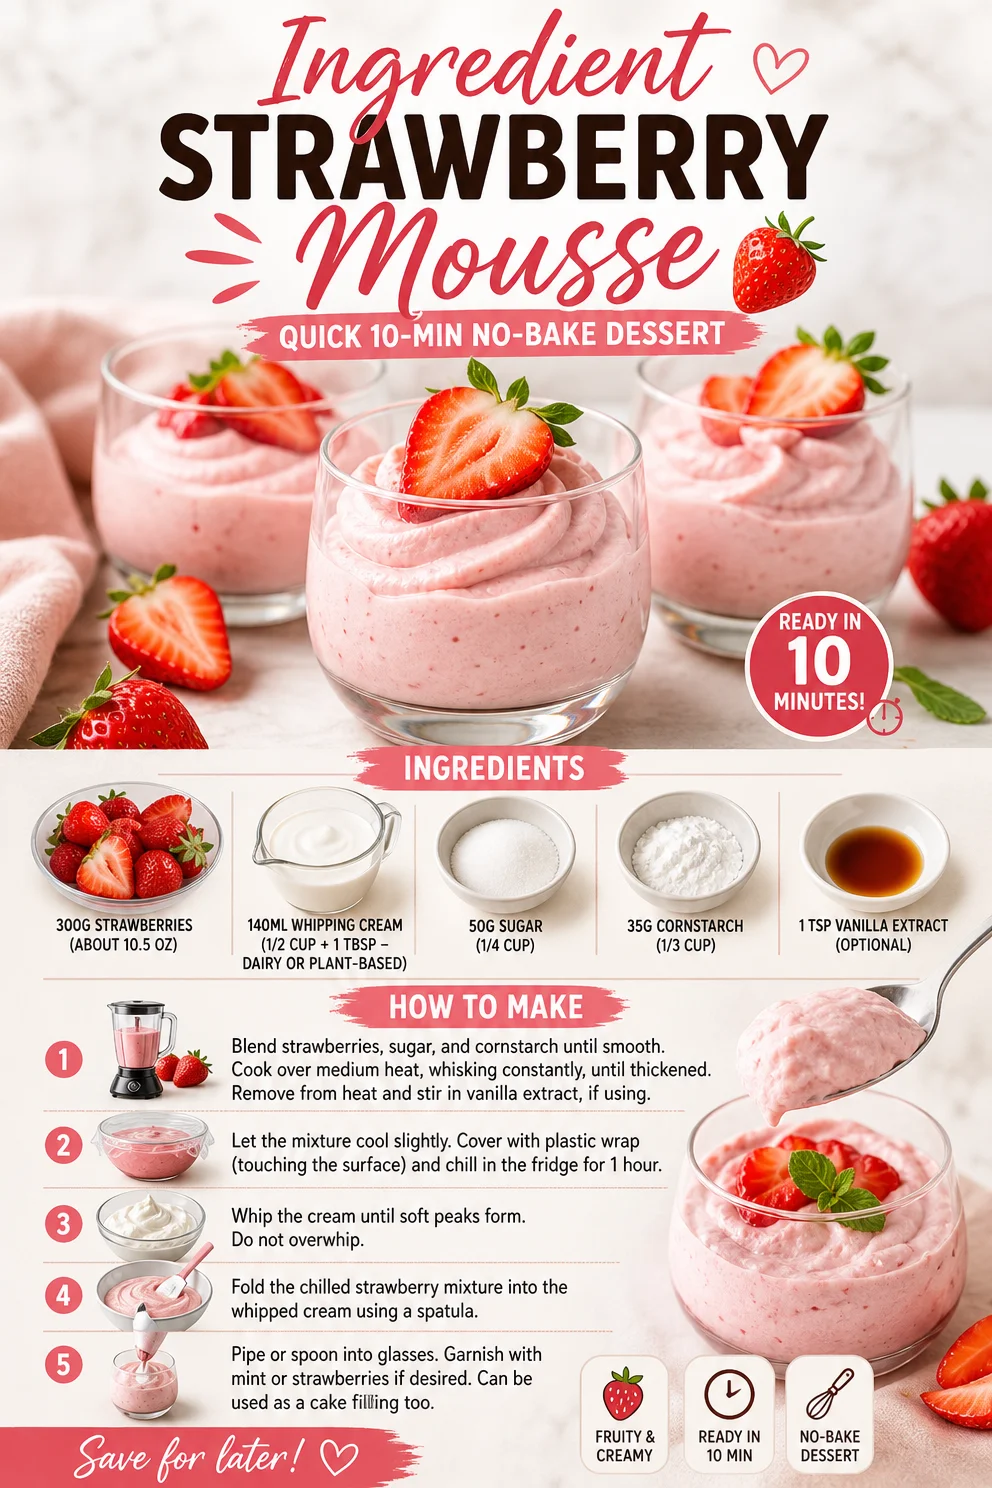
Ingredient Strawberry Mousse: Quick 10-Min No-Bake Dessert
4-Ingredient Strawberry Mousse – So Light, So Dreamy!
Welcome, food lovers! 🌟 Today, we’re diving into a dessert that’s as light and airy as a cloud, yet rich with flavor—Strawberry Mousse! If you’ve ever craved something romantic and delicious without the fuss, you’re in the right place. Picture this: a velvety, smooth mousse that’s perfect for impressing guests, celebrating special occasions, or simply treating yourself after a long day. You might be wondering, "Is that even possible with just four ingredients?" Yes, yes it is! And trust me, you’ll be licking the bowl clean.
I’m Ava Carter, and I firmly believe that cooking should be a joyful and liberating experience, not something that adds stress to your day. This Strawberry Mousse recipe is not just easy; it offers a delicious way to connect with wholesome ingredients without any complicated techniques or hidden nasties. So, let’s roll up our sleeves, gather these fantastic ingredients, and whip up some magic in the kitchen!
A Sweet Memory in Every Bite
Let me take you back in time. I remember sitting at my grandmother’s kitchen table during those lazy summer weekends. The air was rich with the scent of fresh strawberries, and the garden was bursting with ripe fruits, evoking memories of a blissful childhood. Each time my grandmother made her famous Strawberry Mousse, it became an occasion. We would gather around the table, sharing stories and laughter as she dolloped fluffy clouds of mousse into ice-cold bowls.
The mesmerizing pink color, the delicate tang of strawberries, and the lightness of the mousse were always met with squeals of delight. Those moments created more than just sweet treats; they crafted lasting bonds and treasured memories. Today, I want to share that nostalgia with all of you. Let’s create your very own Strawberry Mousse memory! 🌸💕
Ingredients
Here’s how simple this dessert is:
-
300g Strawberries (about 10.5 oz)
Juicy, sweet strawberries are the star of our show. Choose fresh, ripe berries for the best flavor. If strawberries are out of season, you could substitute with raspberries or even mango for a different twist! -
140ml Whipping Cream (1/2 cup + 1 tbsp)
This creamy base gives the mousse its indulgent texture. Feel free to swap for a dairy-free version with coconut cream or almond whipped cream. Just ensure it’s thick enough to whip! -
50g Sugar (1/4 cup)
We’ll sweeten the deal! You can adjust this based on the natural sweetness of your strawberries; if they’re super sweet, you may want less sugar. Alternatively, honey or maple syrup works too. -
35g Cornstarch (1/3 cup)
This acts as our stabilizer, giving the mousse structure without weighing it down. If you’re looking for a gluten-free option, cornstarch is perfect. You could also use arrowroot starch. -
1 tsp Vanilla Extract (optional)
This is where you can add a warm, aromatic twist. Most recipes benefit from this classic addition, but feel free to omit if you’re keeping it pure and simple.
Step-by-Step Instructions
Now that we’ve gathered our star players, let’s get to the fun part—the actual making! 🎉
-
Prep Your Strawberries
Start by washing your strawberries thoroughly under cool water. Remove the green tops and slice them in half for quicker blending. The more surface area, the easier they will blend into a luscious puree! -
Blend the Strawberries
In a blender or food processor, add the sliced strawberries. Blend until smooth—about 30 seconds should do the trick! If you prefer a chunky mousse, pulse a few times to leave some strawberry bits. Yum! -
Strain if Desired
For an extra silky mousse, you can strain the strawberry puree through a fine mesh sieve. This step is optional, but it guarantees a smooth texture. Use a spatula to push through as much liquid as possible. -
Whip Your Cream
In a mixing bowl, pour in the whipping cream. With an electric mixer, whip until it forms soft peaks. Watch closely! Once it holds its shape but is still silky, stop! Overwhipped cream can become grainy. -
Combine with Strawberries
Gently fold the strawberry puree into the whipped cream. Use a spatula and mix carefully to keep that airy texture—grace, my friend! Add in your sugar and optional vanilla extract during this step for sweetness. -
Thicken with Cornstarch
In a small bowl, mix the cornstarch with a tablespoon of cold water to create a slurry. Heat it in a microwave or stovetop for about 30 seconds until it thickens slightly. This step is key to helping your mousse hold its shape. Once thickened, fold it into the strawberry mixture. -
Chill
Transfer your mousse into dessert cups or a large bowl. Chill in the refrigerator for at least two hours, or until set. This is the hardest part—waiting! -
Serve & Enjoy!
Once chilled and set, it’s time for a taste test! Grab your favorite spoons, heap on some more chopped strawberries or mint for garnish, and dig in!
Serving Suggestions
When you’re ready to serve, think about presentation! Layer your mousse in elegant glass jars or bowls for that wow factor. Garnish with a sprinkle of fresh strawberries on top, maybe even a sprig of mint for that classic touch. Not only does it look beautiful, but it also adds a fresh, aromatic pop that makes every bite more delightful.
Recipe Variations
Feeling adventurous? Here are a few creative twists to give your mousse a personal touch:
- Chocolate Strawberry Mousse: Add 2 tablespoons of melted dark chocolate into the strawberry mixture for a decadent twist.
- Citrus Burst: Add a teaspoon of lemon or lime juice to the strawberries for a zesty spin!
- Nutty Delight: Fold in crushed nuts like almonds or hazelnuts for texture and flavor.
- Berry Medley: Instead of just strawberries, mix in blueberries or blackberries for a tangy blend.
- Coconut Cream: Substitute the whipping cream with coconut cream for a tropical flair!
Chef’s Notes
This recipe has traveled with me through many kitchens, evolving each time I make it. I find it fascinating how the simplest recipes can bring comfort and joy. One time, I made it for a friend’s birthday, and it vanished almost instantly! Not only was it a hit, but it also sparked a cooking session where we experimented together. This certainly reminded me that cooking connects us, and each dish holds a story.
FAQs and Troubleshooting
1. Why is my mousse not setting?
If your mousse isn’t thickening, ensure that your cornstarch slurry was cooked until it thickened before folding it in. If you skipped that step, the mousse might remain runny.
2. Can I use frozen strawberries?
Absolutely! You just need to thaw them first and make sure to drain excess liquid. This might slightly alter the texture but will still be delicious.
3. My cream didn’t whip properly; what did I do wrong?
Ensure your bowl and whisk are clean and dry. Any fat residue can prevent the cream from whipping. Also, using cold cream right out of the fridge is essential.
4. Can I make this recipe ahead of time?
Yes! You can prepare it a day in advance and just store it in the fridge until you’re ready to serve. This can actually enhance the flavors!
Nutritional Information
(Assuming serving size 1/2 cup)
- Calories: 150
- Protein: 2g
- Carbs: 24g
- Sugars: 16g
- Fat: 7g
- Fiber: 2g
And there you have it! A dreamy, fluffy, and delectable 4-Ingredient Strawberry Mousse ready to be enjoyed! Cooking should be about simplicity and joy, so I hope this recipe sparks memories or creates new ones for you.
Remember, the kitchen is a place to nurture creativity and make a little magic happen—so get in there and start whisking. Happy cooking! 🍓✨
Print4-Ingredient Strawberry Mousse
A light and airy strawberry mousse made with just four simple ingredients, perfect for any occasion.
- Prep Time: 15 minutes
- Cook Time: 0 minutes
- Total Time: 120 minutes
- Yield: 4 servings 1x
- Category: Dessert
- Method: Chilling
- Cuisine: French
- Diet: Vegetarian
Ingredients
- 300g Strawberries (about 10.5 oz)
- 140ml Whipping Cream (1/2 cup + 1 tbsp)
- 50g Sugar (1/4 cup)
- 35g Cornstarch (1/3 cup)
- 1 tsp Vanilla Extract (optional)
Instructions
- Prep your strawberries by washing them and slicing in half.
- Blend the strawberries until smooth, about 30 seconds.
- Strain the puree for a silky texture, if desired.
- Whip the cream until soft peaks form, being careful not to overwhip.
- Combine the strawberry puree with the whipped cream, folding gently.
- Thicken the mixture by adding the cornstarch slurry after heating it slightly.
- Chill the mousse in the refrigerator for at least two hours, until set.
- Serve with additional strawberries or mint for garnish.
Notes
Try adding chocolate or citrus for a different twist on flavor. This mousse can be prepared a day in advance for enhanced flavor.
Nutrition
- Serving Size: 1 serving
- Calories: 150
- Sugar: 16g
- Sodium: 5mg
- Fat: 7g
- Saturated Fat: 4g
- Unsaturated Fat: 2g
- Trans Fat: 0g
- Carbohydrates: 24g
- Fiber: 2g
- Protein: 2g
- Cholesterol: 30mg
Keywords: strawberry mousse, dessert, easy dessert, summer dessert
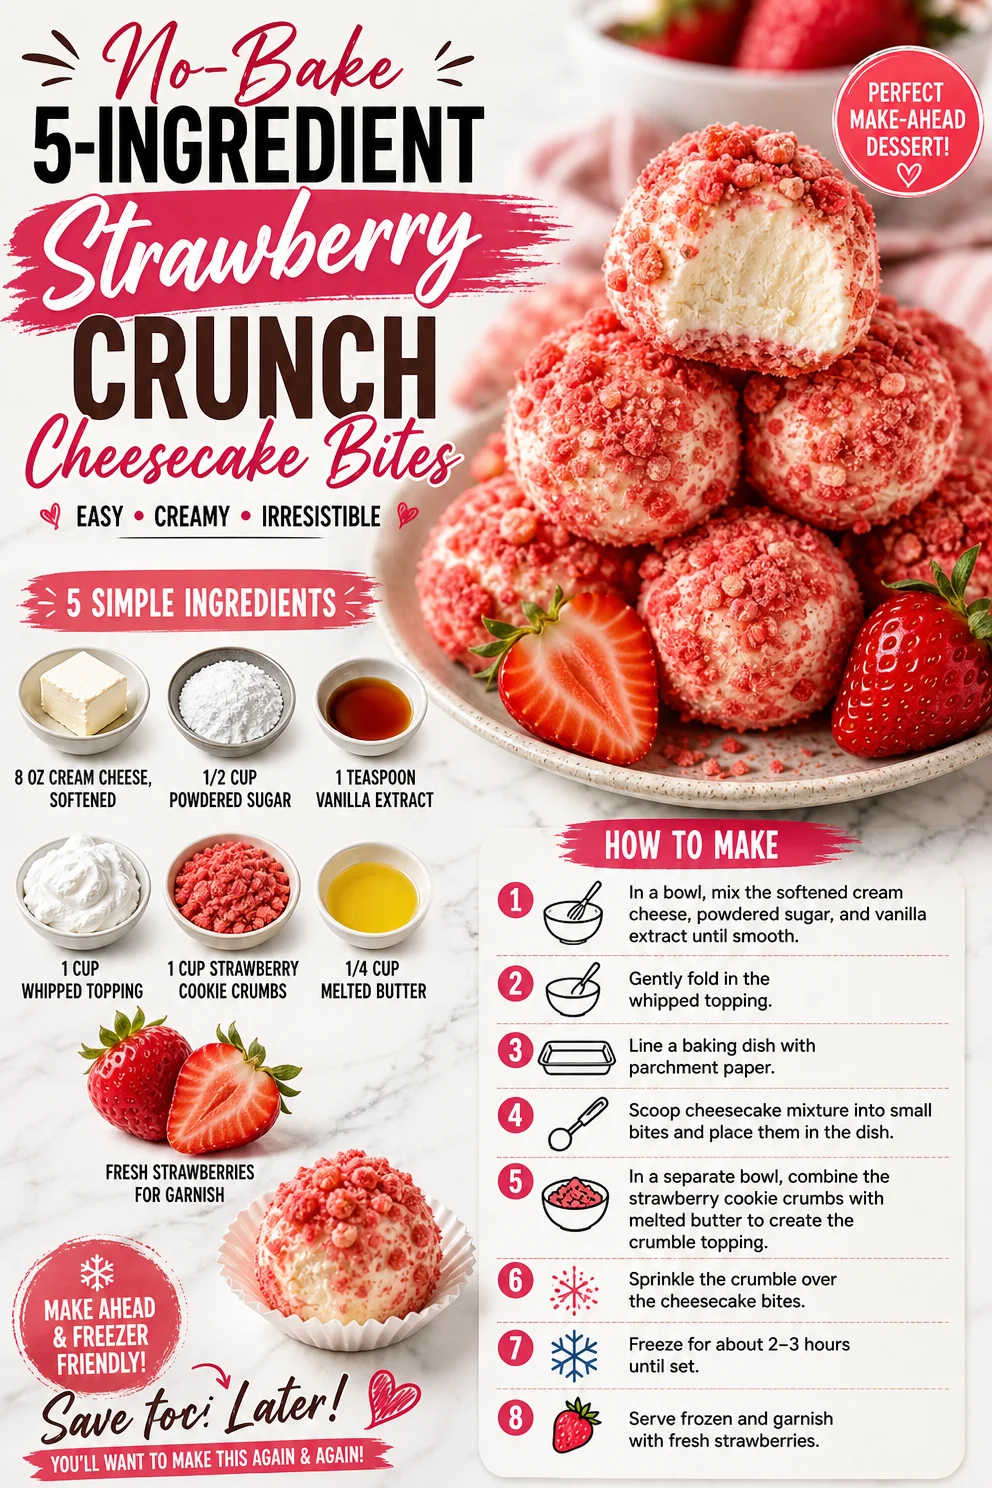
No-Bake 5-Ingredient Strawberry Crunch Cheesecake Bites
Strawberry Crunch Cheesecake Bites: A Sweet, Nostalgic Treat
Hey there, fellow food lovers! It’s your friend Ava here and today we’re diving into a sweet indulgence that combines creamy decadence with a pop of crunch and a burst of strawberry goodness. Yes, you guessed it, we’re making Strawberry Crunch Cheesecake Bites! These little morsels are not just delicious; they hold a special place in my heart, and I can’t wait to share the story behind them.
A Slice of Nostalgia
Growing up, my family had a tradition during summer barbecues—an unspoken competition of who could bring the sweetest, most delightful dessert. My grandmother always impressed us with her strawberry shortcakes, each layer of fresh berries, creamy filling, and buttery biscuit leaving us pleading for just one more slice.
One summer, as I stood precariously on a stool helping her out in the kitchen, we decided to switch things up. Combining her love for cheesecake with my craving for shortcake, we created these Strawberry Crunch Cheesecake Bites. I vividly remember the first time we took a bite; it was as if fireworks lit up our taste buds! The way the creamy cheesecake melted in our mouths while the crunchy cookie layer added a perfect texture was pure magic. Those moments spent giggling in the kitchen, surrounded by flour dust and berry stains, have shaped my cooking style today—simple yet joyful, and bursting with flavor!
I hope these bites bring you the same joy they bring to me because they are perfect for any occasion, or no occasion at all!
Ingredients
Let’s gather our ingredients for these delightful bites:
-
8 oz cream cheese, softened
Cream cheese is the star of this show. It adds that rich, smooth texture we associate with cheesecake. If you’re looking for a lighter option, try using Neufchâtel cheese, which has less fat but still gives you that creamy goodness! -
1/2 cup powdered sugar
Powdered sugar gives the cheesecake a sweet touch without being overly gritty. In a pinch? You can omit the sugar or use a sugar alternative like erythritol for a lower-calorie option. -
1 teaspoon vanilla extract
Nothing warms the heart quite like vanilla. It enhances the sweetness and adds depth to your cheesecake. Use pure vanilla extract for a better flavor, but in a pinch, imitation vanilla will work, too. -
1 cup whipped topping
This fluffy element lightens up our cheesecake mix, giving it that airy texture. You can easily swap this for homemade whipped cream if you’re feeling adventurous—just whip some heavy cream until stiff peaks form. -
1 cup strawberry cookie crumbs (or crushed strawberry shortcake bars)
This is where the magic happens! Use strawberry cookies for that perfect crunch and sweet flavor. If you can’t find them, crushed shortcake bars make a delicious alternative. Feel free to crush up some graham crackers, too! -
1/4 cup melted butter
The melted butter helps bind our cookie crumbs into a beautiful crust. Unsalted butter is best for maintaining flavor balance, but coconut oil is a fun swap if you want a dairy-free twist. -
Fresh strawberries for garnish
Fresh strawberries are the rockstars of this recipe—garnishing with them gives that appealing touch and fresh burst of flavor. This is optional, of course, but why not spring for the fresh stuff when it’s so beautifully vibrant?
Step-by-Step Instructions
Now that we’ve got our ingredients prepped, let’s get cooking!
-
Prepare the Cheesecake Mixture
In a large mixing bowl, combine the softened cream cheese, powdered sugar, and vanilla extract. Using an electric mixer, beat the mixture on medium speed until it’s smooth and creamy—about 2 minutes. A little tip here: make sure your cream cheese is softened enough (leave it at room temperature for about 30 minutes) to avoid lumps. Trust me; nobody wants a lumpy cheesecake! -
Fold in the Whipped Topping
Gently fold in the whipped topping until fully combined. This step adds airiness to the mixture, keeping that luscious cheesecake light and fluffy. Use a spatula and a gentle folding motion, kind of like you’re tucking the whipped topping into a warm blanket! -
Prepare the Crunchy Cookie Base
In another bowl, mix together the strawberry cookie crumbs and melted butter until the crumbs are evenly coated. When your mixture looks like wet sand, it’s ready! Press this mixture firmly into the bottom of your chosen mini dessert cups or a muffin tin lined with cupcake liners. Pro tip: Use the back of a tablespoon to pack it down tightly so they hold together perfectly when you bite into them! -
Fill with Cheesecake Mixture
Spoon the creamy cheesecake mixture on top of the pressed cookie base. Try to smooth out the tops for a lovely presentation—unless, of course, you love that homemade look. Don’t be afraid to use a piping bag if you want a fancier finish! -
Chill Until Set
Cover your dessert cups with plastic wrap or foil, and place them in the fridge for at least 2 hours to let them set. This is the perfect time to whip up a batch of your favorite cocktails or simply relax with a good book while dreaming of your creamy, crunchy treat! -
Garnish and Serve
Before serving, pop a fresh strawberry piece on top of each cheesecake bite. You can even drizzle a bit of chocolate sauce or strawberry puree if you’re feeling extra fancy!
Serving Suggestions
These Strawberry Crunch Cheesecake Bites are perfect for picnics, parties, or just a sweet little treat after dinner. Serve them chilled, and for a fun touch, place them on a colorful platter alongside whole fresh strawberries and mint leaves to brighten up your table. It’s like a little spring party on a plate!
Recipe Variations
Let’s get creative! Here are a few fun twists to try on this classic recipe:
-
Chocolate Lovers’ Delight: Swap the strawberry cookie crumbs for crushed chocolate cookies, and mix some melted chocolate into the cheesecake mixture for a divine chocolate strawberry cheesecake combo.
-
Caribbean Vacation: Add a splash of coconut extract to your cheesecake mixture and substitute crushed pineapple for the strawberry layer for a tropical vibe!
-
Berry Medley: Use a mix of berries—raspberries, blueberries, and strawberries—to make a berry explosion!
-
Vegan Option: Substitute cream cheese with a cashew cream or a vegan cream cheese. Ensure that your whipped topping is also dairy-free for a completely plant-based dessert.
Chef’s Notes
As with many of my recipes, this one has evolved over time. Initially, I stuck strictly to the classic strawberry flavor. However, after hearing from friends and love ones about their flavor preferences, I started experimenting with different combinations, much to my delight! The look of surprise and joy as they took their first bites inspired me to keep trying new variations. So don’t hesitate to make this recipe your own!
Oh, and I can’t forget the time I accidentally left the cheesecake bites out of the fridge for a few hours. Instead of panicking, I decided to embrace it! The bites were slightly warm and extra creamy, with the crust becoming soft but still delicious. Sometimes the magic happens in the unexpected—and that’s what you can find when you embrace your kitchen adventures!
FAQs and Troubleshooting
1. Why are my cheesecake bites not setting?
If your bites haven’t set, they likely need more chilling time. Make sure they’re covered well and give them a few more hours in the fridge.
2. Can I freeze these bites?
You absolutely can! Just be sure to wrap them tightly in plastic wrap or aluminum foil. Thaw them in the refrigerator before serving for the best texture.
3. My crust is too crumbly! What went wrong?
You might not have used enough melted butter to bind the crumbs. If this happens, simply mix in a bit more melted butter until you reach the desired consistency.
4. How can I make these bites lower in sugar?
Substituting the powdered sugar with a sugar alternative like Stevia or monk fruit is a great option! You can also reduce the sugar a bit and see how you like it. Taste as you go—cooking is all about finding what pleases your palate!
Nutritional Info (Optional, if applicable)
While indulgent, each Strawberry Crunch Cheesecake Bite is a perfect balance of flavor and satisfaction! For those counting calories, know there are options to lower sugar and calorie counts, but these little treats are meant to be enjoyed in moderation!
And there you have it! A delightful recipe that combines sweet nostalgia with homemade goodness. You’ll find that these Strawberry Crunch Cheesecake Bites are the perfect treat for anytime you want something easy, delicious, and guaranteed to impress. So get in that kitchen, make a mess, and enjoy every bite—after all, life is too short for boring food! Let’s keep things fresh and flavorful!
PrintStrawberry Crunch Cheesecake Bites
Creamy cheesecake bites with a crunchy strawberry cookie base, perfect for any occasion.
- Prep Time: 20 minutes
- Cook Time: 0 minutes
- Total Time: 120 minutes
- Yield: 12 servings 1x
- Category: Dessert
- Method: Chilling
- Cuisine: American
- Diet: Vegetarian
Ingredients
- 8 oz cream cheese, softened
- 1/2 cup powdered sugar
- 1 teaspoon vanilla extract
- 1 cup whipped topping
- 1 cup strawberry cookie crumbs (or crushed strawberry shortcake bars)
- 1/4 cup melted butter
- Fresh strawberries for garnish
Instructions
- Prepare the cheesecake mixture: In a large mixing bowl, combine the softened cream cheese, powdered sugar, and vanilla extract. Beat until smooth and creamy.
- Fold in the whipped topping until fully combined.
- Prepare the crunchy cookie base: Mix strawberry cookie crumbs and melted butter in another bowl until evenly coated. Press firmly into mini dessert cups.
- Fill with cheesecake mixture: Spoon the creamy cheesecake mixture on top of the pressed cookie base.
- Chill until set: Cover with plastic wrap or foil, and refrigerate for at least 2 hours.
- Garnish and serve: Top each cheesecake bite with a fresh strawberry piece before serving.
Notes
These bites can be frozen; wrap tightly and thaw in the refrigerator before serving. Experiment with flavors for a fun twist.
Nutrition
- Serving Size: 1 bite
- Calories: 150
- Sugar: 8g
- Sodium: 160mg
- Fat: 9g
- Saturated Fat: 4g
- Unsaturated Fat: 4g
- Trans Fat: 0g
- Carbohydrates: 15g
- Fiber: 0g
- Protein: 2g
- Cholesterol: 30mg
Keywords: strawberry cheesecake bites, dessert, summer treats, no bake cheesecake