
Gourmet Brownie Cookies
Gourmet Brownie Cookies: The Ultimate Treat for Chocoholics
Welcome back to Clean Plate Cravings, fellow food lovers! Today, I’m absolutely thrilled to share a recipe that’s guaranteed to make your sweet tooth sing: Gourmet Brownie Cookies. If you’re like me, dessert is a delightful end to the day, and these cookies are the perfect indulgence when you want a rich chocolate hit without the fuss of a traditional brownie.
Imagine biting into a warm, gooey cookie, the chocolate chips melting in your mouth, with that little crunch on the outside and a soft, brownie-like interior. Sounds heavenly, right? Let’s be honest: Brownies and cookies are two beloved treats that we often find ourselves choosing between. But why choose when we can have the best of both worlds?
What I love most about these Gourmet Brownie Cookies is how simple the ingredients are and how versatile the recipe can be. Whether you whip them up for a special occasion or just to satisfy that chocolate craving on a Tuesday evening, they never disappoint! So, grab your aprons, and let’s dive into the delicious world of cookies.
A Sweet Memory: The First Batch
Let me take you back to a sunny afternoon when I was about ten years old. My mom decided it was the perfect day to bake, and naturally, I was right in the kitchen, eager to help. She pulled out her trusty cookbook, and we stumbled upon a brownie recipe. But instead of making traditional brownies, we decided to experiment and create cookies!
As we stirred the ingredients, the warm, comforting smell of melted butter and chocolate filled the air. I distinctly remember sneaking spoonfuls of that rich batter and feeling like the luckiest kid in the world. When those cookies finally came out of the oven, golden brown and oozing chocolatey goodness, my entire family gathered around the kitchen. It was pure joy as we indulged in those warm cookies, giggling and sharing stories.
To this day, those moments serve as a foundation of my love for cooking and baking. Every time I make these Gourmet Brownie Cookies, I’m transported back to that kitchen, surrounded by laughter and a mouthful of chocolate. Now, let me share this indulgent recipe with you!
The Ingredients You’ll Need
Here’s what you’ll need to whip up these dreamy cookies:
-
1 cup unsalted butter, softened
This is your base for flavor and texture. Don’t forget to soften it—nobody wants a lumpy cookie dough! -
1 cup brown sugar, packed
This adds moisture and a slight caramel flavor. If you don’t have brown sugar on hand, you can substitute half with granulated sugar or mix in a tablespoon of molasses per cup to replicate the moisture and flavor. -
1/2 cup granulated sugar
For added sweetness and a touch of crispness. You can use coconut sugar for a less refined option. -
2 large eggs
Eggs bind the ingredients and add richness. If you’re vegan, try using flaxseed meal (1 tablespoon of flaxseed mixed with 2.5 tablespoons of water) as a great egg substitute. -
2 teaspoons vanilla extract
This elevates the flavor profile. If you’re out, almond extract can also lend a beautiful flavor twist, but use it sparingly! -
1 cup all-purpose flour
This is essential for structure. For a gluten-free option, try substituting with almond flour or a gluten-free flour blend. -
1/2 cup cocoa powder
The star of the show! It provides the deep chocolate flavor. Make sure you use unsweetened cocoa powder for the best results. -
1/2 teaspoon baking powder
This little ingredient helps the cookies rise a bit, giving them that perfect brownie-cookie texture. -
1/4 teaspoon salt
Just a pinch to enhance all the flavors. If you’re watching your sodium, you can omit it, but I wouldn’t recommend it! -
1 cup chocolate chips
Go for semi-sweet or dark chocolate for that rich contrast. Feeling adventurous? Try butterscotch or white chocolate chips for a fun twist!
Step-by-Step Instructions to Cookie Heaven
Now that you’ve gathered all your ingredients, it’s time to bake these delicious treats!
-
Preheat Your Oven
Start by preheating your oven to 350°F (175°C). This step is crucial as it ensures even baking, which is key for that perfect texture. While it’s heating up, let’s prepare the dough! -
Cream the Butter and Sugars
In a large mixing bowl, beat together the softened unsalted butter, packed brown sugar, and granulated sugar until smooth and creamy. This usually takes about 3-4 minutes with an electric mixer. The mixture should become lighter in color. This aeration is what helps create a tender cookie! -
Add the Eggs and Vanilla
Next, crack in those two large eggs and pour in the vanilla extract. Beat until well combined. Make sure not to overmix at this stage; you want a nice smooth blend, but a little lumpiness is okay. -
Sift in Dry Ingredients
Now, in a separate bowl, sift together the all-purpose flour, cocoa powder, baking powder, and salt. Sifting helps to break up any clumps and combines the dry ingredients evenly. Slowly add this dry mixture to your wet ingredients, stirring gently until just combined. -
Fold in Chocolate Chips
At this stage, it’s time to incorporate the chocolate chips. Use a spatula for this, folding gently to avoid breaking the chips. You want even distribution throughout the cookie dough! -
Chill the Dough (Optional)
If you have the time, refrigerate your dough for about 30 minutes. Chilling helps the flavors meld and can prevent the cookies from spreading too much during baking. But if you’re in a hurry, dive right in! -
Scoop and Bake
Using a cookie scoop or spoon, drop dough balls onto a parchment-lined baking sheet, spaced a couple of inches apart. This helps them bake evenly. Pop them into your preheated oven and bake for about 10-12 minutes. The edges should look firm, while the center may still appear soft. That’s perfect! -
Cool and Enjoy
Remove the cookies from the oven and allow them to cool on the baking sheet for about 5 minutes before transferring them to a wire rack. This waiting period allows them to set up perfectly—trust me, the temptation is real, but it’s worth the wait!
Serving Suggestions
For the ultimate sweet experience, serve these Gourmet Brownie Cookies slightly warm with a scoop of vanilla ice cream on top or drizzled with chocolate syrup. You can also dust them with powdered sugar or serve with a side of fresh berries to balance those rich flavors. Presentation is key, so don’t forget a beautiful plate or rustic wooden board to elevate your serving game!
Recipe Variations
Why stop at just one version? Here are a few fun variations you might try:
-
Mint Chocolate Brownie Cookies: Add 1 teaspoon of peppermint extract to the dough for a refreshing twist!
-
Spicy Brownie Cookies: Incorporate a pinch of cayenne pepper or cinnamon to the dough for a warm kick.
-
Nutty Brownie Cookies: Fold in some chopped walnuts or pecans to add a nice crunch and depth of flavor.
-
Double Chocolate Delight: Replace half the flour with more cocoa powder for an extra chocolatey treat.
-
Gluten-Free Option: Swap in a 1:1 gluten-free flour blend as mentioned, and voilà—you can enjoy these cookies without compromise!
Chef’s Notes
You know, every time I make these cookies, I like to reminisce about my childhood kitchen adventures. Sometimes, I’ll even invite friends over for a baking night, where we can munch on cookie dough and share our stories, just like I did with my mom. It’s funny how just one batch of cookies can create so much nostalgia and joy. Over the years, this recipe has evolved, influenced by seasonal flavors and whatever ingredients I have on hand. The important thing is to have fun with it!
FAQs and Troubleshooting
-
Why did my cookies spread too much?
If cookies spread too much, they might be too warm before they hit the oven. Try chilling the dough longer next time, or ensure your ingredients, particularly butter, are properly measured and at the right temperature. -
How do I store leftover cookies?
Store your cookies in an airtight container at room temperature for up to a week. If you want to keep them longer, freeze them in a zip-lock bag, and they’ll last for up to three months! -
My cookies came out cakey. What happened?
It may be due to overmixing the dough or too much flour. Make sure to scoop flour rather than packing it into the measuring cup when measuring. -
Can I add different types of chocolate chips?
Absolutely! Feel free to mix it up with milk chocolate, dark chocolate, or even white chocolate for a delightful taste sensation.
Nutritional Info
While I won’t delve into exact nutritional values for our delicious cookies, you can generally expect them to be a delightful treat that can fit into a balanced diet when enjoyed in moderation. After all, feeling good about what you eat is all part of the experience!
And there you have it! Your ticket to baking the most delectable Gourmet Brownie Cookies. Remember, it’s all about enjoying the process and the delicious end result. I’m so excited for you to make these, and I can’t wait to hear how they turn out. Happy baking, and may your kitchen always be filled with love and chocolate!
PrintGourmet Brownie Cookies

Indulge in these rich and gooey Gourmet Brownie Cookies, the perfect treat for chocolate lovers seeking a delightful combination of brownies and cookies.
- Prep Time: 15 minutes
- Cook Time: 12 minutes
- Total Time: 27 minutes
- Yield: 24 cookies 1x
- Category: Dessert
- Method: Baking
- Cuisine: American
- Diet: Vegetarian
Ingredients
- 1 cup unsalted butter, softened
- 1 cup brown sugar, packed
- 1/2 cup granulated sugar
- 2 large eggs
- 2 teaspoons vanilla extract
- 1 cup all-purpose flour
- 1/2 cup cocoa powder
- 1/2 teaspoon baking powder
- 1/4 teaspoon salt
- 1 cup chocolate chips
Instructions
- Preheat the oven to 350°F (175°C).
- Cream the softened unsalted butter, packed brown sugar, and granulated sugar together until smooth and creamy.
- Add the large eggs and vanilla extract and beat until well combined.
- Sift together the flour, cocoa powder, baking powder, and salt in a separate bowl.
- Slowly add the dry mixture to the wet ingredients, stirring gently until just combined.
- Fold in the chocolate chips gently.
- Chill the dough for about 30 minutes if desired.
- Scoop dough balls onto a parchment-lined baking sheet.
- Bake for 10-12 minutes until the edges are firm but the center is soft.
- Cool on the baking sheet for 5 minutes before transferring to a wire rack.
Notes
For an extra touch, serve with vanilla ice cream or drizzle with chocolate syrup. Chilling the dough can enhance flavor and control spreading.
Nutrition
- Serving Size: 1 cookie
- Calories: 180
- Sugar: 16g
- Sodium: 120mg
- Fat: 8g
- Saturated Fat: 5g
- Unsaturated Fat: 3g
- Trans Fat: 0g
- Carbohydrates: 25g
- Fiber: 1g
- Protein: 2g
- Cholesterol: 30mg
Keywords: brownie cookies, chocolate cookies, dessert recipes, baking, gourmet cookies

Chicken Kofta with Creamy Garlic Yogurt Sauce
Chicken Kofta with Creamy Garlic Yogurt Sauce
Welcome to the world of flavor and nourishment, where we’re diving into the delightful realm of Chicken Kofta with Creamy Garlic Yogurt Sauce! If you’ve never tried kofta, get ready—a culinary journey awaits you that’s bursting with taste and a whole lot of love. Cooking, to me, is much more than just a task; it’s a magical experience that ties us to memories, cultures, and, most importantly, to each other.
A Culinary Journey
Picture this: it’s a sun-drenched afternoon, the aroma of spices wafting through the air, and laughter echoing in the background. That’s the scene I often remember when I think of kofta—a dish that transcends borders and brings people together over hearty meals. My love for Middle Eastern cuisine began during my college years in a bustling food market where I first encountered these fragrant, juicy meatballs. There was a little stall run by an elderly gentleman who made the most incredible kofta. His secret? A pinch of nostalgia and a whole lot of soul.
I remember standing there, mesmerized by how he molded ground meat with fresh herbs and spices, chatting with patrons as he cooked. As the meat sizzled on the grill, our eyes widened in hunger. The moment I took my first bite, I was transported to a world where flavors danced in harmony. The crispy exterior juxtaposed with the juicy interior was a revelation! I knew then that this was something I wanted to replicate in my own kitchen—not just to recreate that moment, but to bring that joy to others, too.
And, dear friend, that’s what I’m here to do with you today! Let’s whip up these delicious Chicken Kofta with creamy garlic yogurt sauce together. Trust me; your taste buds will be forever grateful!
Ingredients
To create the magic of Chicken Kofta, you’ll need:
-
1 lb ground chicken: Tender and healthy, chicken serves as a great base for kofta. If you want an alternative, turkey or lean beef works beautifully as well.
-
1 small onion, finely chopped: The aromatic companion that adds sweetness and depth. You can swap it for shallots if you prefer a milder taste.
-
2 cloves garlic, minced: Because everything is better with garlic! Fresh garlic works its charm here, but jarred minced garlic can save time in a pinch.
-
1/4 cup fresh parsley, chopped: This bright herb lifts the dish with freshness. If parsley isn’t your favorite, consider using cilantro or even mint for a different flavor profile.
-
1 tsp ground cumin: This spice delivers a warm, earthy essence. For a twist, try smoked paprika for a smokier flavor.
-
1 tsp ground coriander: Offers a citrusy note that complements the chicken beautifully. If you don’t have it on hand, feel free to skip it or use a dash of lemon pepper.
-
1/2 tsp paprika: Adds a hint of color and warmth. Use smoked paprika for a deeper flavor or sweet paprika for a milder touch.
-
Salt and pepper to taste: Essential for amplifying the flavors. Don’t shy away from seasoning; it’s what makes every bite delightful!
-
3/4 cup Greek yogurt: The base for our creamy sauce, Greek yogurt adds tanginess. If you’re dairy-free, try using coconut yogurt.
-
1 clove garlic, minced (for yogurt sauce): Another level of garlicky goodness! Adjust according to your love for garlic.
-
1 tbsp lemon juice: Brightness in a bottle! It cuts through the creaminess while enhancing flavors.
-
1 tbsp olive oil: Adds richness and helps with cooking moisture. Feel free to substitute with avocado oil or melted coconut oil.
-
Fresh herbs for garnish (optional): A sprinkle of herbs like dill, mint, or more parsley adds a lovely touch to your final dish.
Step-by-Step Instructions
Let’s cook these koftas like pros! Ready? Let’s get that apron on and start cooking:
-
Prep Your Ingredients: Gather all your ingredients and start with the cutting board. Finely chop the onion and garlic and set them aside. It’s crucial to have everything prepped to make the process smooth. Plus, you’ll feel like a kitchen ninja!
-
Mix the Mixture: In a large bowl, combine the ground chicken, chopped onion, minced garlic, parsley, cumin, coriander, paprika, salt, and pepper. The key here is to mix without overworking the meat; just knead gently until everything is incorporated. I often think of it like a recipe for success; we want unity without overload!
-
Shape the Koftas: With moistened hands (trust me, it helps), grab a handful of the mixture and form to your desired shape! You can go traditional with oval shapes or roll them into little meatballs. Aim for about 1.5 inches in size to ensure even cooking.
-
Heat Up the Cooking Surface: In a non-stick skillet or grill pan, heat a tablespoon of olive oil over medium heat. The oil should shimmer, signaling it’s time for the kofta to meet the pan! It’s like a warm hug waiting for those delicious meatballs.
-
Cook: Carefully place the shaped koftas in the skillet, ensuring they’re not overcrowded. Cook for about 4-5 minutes on each side until golden brown and cooked through. You might need to do this in batches if your skillet isn’t massive. The sizzle will be music to your ears!
-
Prepare the Yogurt Sauce: While the koftas grill, let’s whip up the sauce! In a small bowl, combine Greek yogurt, the minced garlic, lemon juice, and a pinch of salt and pepper. Mix it until creamy and luscious. This sauce is so versatile; you’ll want to drizzle it over everything!
-
Garnish and Serve: Once the koftas are cooked, garnish them with fresh herbs of your choice. Place them on a beautiful platter or individual plates, and don’t forget that creamy garlic yogurt sauce—drizzle or dollop generously on top!
Serving Suggestions
These Chicken Kofta are delightful alongside fluffy couscous or warm pita bread. Pair them with a fresh salad of cucumbers, tomatoes, and a sprinkle of feta for a delightful crunch. If you’re feeling adventurous, serve them with grilled vegetables for that lovely char flavor. And don’t forget a deliciously refreshing drink—a cool mint lemonade pairs perfectly with these savory delights!
Recipe Variations
Feeling creative? Here are a few fun twists to customize your kofta experience:
-
Spicy Twist: Add a kick by incorporating chopped fresh jalapeños or red pepper flakes into your mixture for a zesty touch.
-
Mediterranean Style: Add crumbled feta cheese and sun-dried tomatoes to the chicken mixture—yum!
-
Herb-Infused: Experiment with changing herbs; try basil or dill for a fresh and unique flavor profile.
-
Paleo-Friendly: Serve the kofta on a bed of cauliflower rice instead of grain for a low-carb option.
Chef’s Notes
Over the years, this recipe has evolved in my kitchen. I started with traditional beef kofta, but once I ventured into using the leaner ground chicken, I never looked back! I love how chicken absorbs the flavors of spices so well and remains juicy. A funny memory? I once tried to impress friends by making kofta, but I was so distracted by the conversation that I accidentally added double the garlic! Surprisingly, everyone loved it—maybe it turned into a new recipe all its own!
FAQs and Troubleshooting
1. Can I make kofta in advance?
Absolutely! You can shape the kofta and refrigerate them in advance. They’ll hold up well for up to a day; just cook them right before serving for the best results.
2. Can I freeze these?
Yes! Cooked kofta can be frozen for up to 3 months. Just allow them to cool, wrap them tightly, and pop them in the freezer. Thaw and reheat them gently in a skillet.
3. Why did my kofta fall apart?
Make sure to gently mix the ingredients and avoid overworking the meat. Additionally, adding a little breadcrumb or egg might help bind them if you’re using leaner meat.
4. How do I know when they are cooked through?
Use a meat thermometer for accurate results! Chicken should reach an internal temperature of 165°F (75°C) for safety.
Nutritional Info
Though not mandatory, here’s a minimal breakdown to keep you informed:
- Calories: Approximately 200 per serving (depends on the size of your kofta)
- Protein: 23g
- Fat: 9g
- Carbohydrates: 4g
- Fiber: 0g
So there you have it—Chicken Kofta with Creamy Garlic Yogurt Sauce. This recipe captures my love for cooking and sharing delicious meals. I hope it inspires you to hit the kitchen with a dash of joy and a sprinkle of adventure. Let’s keep it fresh, simple, and seriously delicious! Enjoy every bite, and don’t forget to share the love!
PrintChicken Kofta with Creamy Garlic Yogurt Sauce

Delicious and flavorful Chicken Kofta served with a creamy garlic yogurt sauce, perfect for your next meal.
- Prep Time: 15 minutes
- Cook Time: 20 minutes
- Total Time: 35 minutes
- Yield: 4 servings 1x
- Category: Main Course
- Method: Grilling
- Cuisine: Middle Eastern
- Diet: Paleo-friendly option available
Ingredients
- 1 lb ground chicken
- 1 small onion, finely chopped
- 2 cloves garlic, minced
- 1/4 cup fresh parsley, chopped
- 1 tsp ground cumin
- 1 tsp ground coriander
- 1/2 tsp paprika
- Salt and pepper to taste
- 3/4 cup Greek yogurt
- 1 clove garlic, minced (for yogurt sauce)
- 1 tbsp lemon juice
- 1 tbsp olive oil
- Fresh herbs for garnish (optional)
Instructions
- Prep your ingredients: Gather all your ingredients and finely chop the onion and garlic, then set them aside.
- Mix the mixture: In a large bowl, combine ground chicken, chopped onion, minced garlic, parsley, cumin, coriander, paprika, salt, and pepper.
- Shape the koftas: With moistened hands, grab a handful of the mixture and form to your desired shape, about 1.5 inches in size.
- Heat up the cooking surface: In a skillet, heat a tablespoon of olive oil over medium heat.
- Cook: Carefully place the shaped koftas in the skillet, cooking for about 4-5 minutes on each side until golden brown.
- Prepare the yogurt sauce: In a small bowl, combine Greek yogurt, minced garlic, lemon juice, and a pinch of salt and pepper.
- Garnish and serve: Once the koftas are cooked, garnish with fresh herbs and serve with the yogurt sauce.
Notes
You can make the koftas in advance and refrigerate for up to a day. Cook just before serving for the best results.
Nutrition
- Serving Size: 1 serving
- Calories: 250
- Sugar: 5g
- Sodium: 500mg
- Fat: 10g
- Saturated Fat: 2g
- Unsaturated Fat: 7g
- Trans Fat: 0g
- Carbohydrates: 6g
- Fiber: 1g
- Protein: 23g
- Cholesterol: 80mg
Keywords: Chicken Kofta, Middle Eastern, Yogurt Sauce

Chicken Enchilada Crock Pot Meal Recipe for Easy Dinners
Chicken Enchilada Crock Pot Meal Recipe for Easy Dinners
Welcome to Clean Plate Cravings! If you’re like me, you probably have those busy days when cooking feels like a Herculean task. Between juggling work, family, and a social life, who has time to slave away in the kitchen? That’s precisely why I’m all about easy, wholesome meals that require minimal prep but deliver maximum flavor. Today, we’re diving into a dish that embodies just that: the Chicken Enchilada Crock Pot Meal.
Picture this: tender chicken smothered in spicy enchilada sauce with beans, corn, and those vibrant Mexican spices. A warm, comforting meal that practically cooks itself! The best part? You can make it ahead of time and let the crock pot do all the hard work. Trust me, by the end of the day, you’ll be greeted by the mouthwatering aroma of a dish that tastes like it took all day to prepare. Let’s get cooking, shall we?
Personal Story
Back in college, I discovered my love for Mexican food during late-night study sessions and spontaneous taco nights with friends. One of my fondest memories is cooking with my roommate, who had a family enchilada recipe that we would twist and turn every week. We’d throw everything together last minute because, let’s be honest, who has time to cook from scratch when you’re cramming for finals?
One night, we decided to try crafting a chicken enchilada dish in my trusty crock pot after an exhausting day filled with classes and cafeteria food. As we dumped in the chicken, beans, veggies, and spices, the stress of the day melted away. Hours later, the kitchen filled with a heavenly aroma, and we gathered around a bowl of what could only be described as happiness in a tortilla. These are the kind of meals that build connections and warm the soul. Now, I carry that nostalgia with me every time I whip up this Chicken Enchilada Crock Pot Meal, sharing the love with friends and family alike.
Ingredients
Here’s what you’ll need to create this flavorful masterpiece:
-
2 pounds boneless, skinless chicken breasts or thighs
Juicy and tender, chicken thighs will add more flavor, while breasts are leaner and great for a lighter option. If you’re short on time, rotisserie chicken works wonders too! -
1 can (15 oz) black beans, drained and rinsed (or pinto beans)
Beans are a fantastic source of protein and fiber, which will keep you feeling full. Feel free to swap with kidney beans or even lentils for a twist! -
1 can (15 oz) corn kernels, drained
Sweet corn adds a pop of texture and flavor. You can use frozen corn if that’s what you have on hand. -
1 can (10 oz) enchilada sauce (red or green)
The heart of the dish! Red enchilada sauce tends to be more traditional, while green offers a delightful twist. If you’re feeling adventurous, make your homemade sauce! -
1 can (10 oz) diced tomatoes with green chiles
This adds a zesty flavor kick. Don’t have any? Fresh tomatoes with a touch of chili powder work just as well. -
1 medium onion, diced
Onions build the base flavor and sweetness. Sautéing them beforehand can enhance their taste even more! -
1 tablespoon chili powder
Essential for spice and warmth. Adjust this based on your heat preference! -
2 teaspoons ground cumin
Cumin brings that classic Mexican flavor—essential for any good Mexican dish. -
1 teaspoon garlic powder
Because garlic makes everything better! You can use fresh minced garlic for a stronger punch. -
½ teaspoon smoked paprika
This adds a lovely smokiness to the dish. If you don’t have smoked paprika, regular paprika will work in a pinch. -
Salt and pepper to taste
Always taste as you go! -
2 cups shredded Mexican cheese blend
Cheese is the crown jewel of this dish—melted and gooey over everything equals happiness! -
6-8 small corn or flour tortillas (optional)
Choose whichever you love! Corn tortillas tend to be more authentic, while flour tortillas offer a softer texture. -
Fresh cilantro, chopped
Adds a burst of freshness! If you’re not a fan, you can omit it or use green onions. -
Sour cream or Greek yogurt for topping
A cool, creamy finish to balance the spices—use yogurt for a lower-fat option! -
Diced avocado
Trust me; avocado makes everything better! -
Lime wedges
A squeeze of lime ties all the flavors together. -
Sliced jalapeños
For those who crave an extra kick!
Step-by-Step Instructions
Let’s get to the good stuff! Here’s how to make your Chicken Enchilada Crock Pot Meal in a few simple steps:
Step 1: Prep the Ingredients
First, let’s wash and chop: dice up that onion (don’t worry, I won’t judge if you use pre-chopped), and rinse the black beans. If you’re using fresh tomatoes, chop those up too! This is where the fun begins—lay all your ingredients out like you’re in a cooking show.
Step 2: Season Your Chicken
In a bowl, sprinkle the chili powder, cumin, garlic powder, smoked paprika, salt, and pepper over the chicken. Give it a good rub–this helps to infuse the flavors right into the meat. If you’re feeling particularly adventurous, toss in a dash of cayenne for extra heat!
Step 3: Layer in the Crock Pot
Put your seasoned chicken at the bottom of the crock pot. This helps it to cook perfectly and absorb those fantastic flavors. Next, layer your beans, corn, diced tomatoes, and onion on top. Pour the enchilada sauce over everything—don’t forget every last drop!
Step 4: Stir It Up
Using a wooden spoon, gently mix everything in the crock pot until well combined. It should look like a glorious mountain of color! Cover it and set your crock pot for about 6-8 hours on low, or 3-4 hours on high. Pro tip: while it cooks, resist the urge to lift the lid. The steam is your best friend here!
Step 5: Check for Doneness
When the timer goes off, or the aroma is simply irresistible, take a peek! The chicken should shred easily with a fork. If you’re feeling inspired, shred it in the pot for that rustic, homey vibe, but if you want a more even texture, transfer it to a bowl to shred first.
Step 6: Add the Cheese
Once you’ve shredded the chicken, sprinkle that glorious cheese right on top. Give it a few minutes with the lid on so the cheese melts beautifully into the mix.
Step 7: Serve!
Grab your tortillas and spoon the delicious mixture onto each tortilla. You can eat it like a burrito, or if you enjoy a more rustic feel, serve it on a plate! Top each wrap or plate with fresh cilantro, diced avocado, a dollop of sour cream and a squeeze of lime.
Serving Suggestions
To plate your Chicken Enchilada Crock Pot Meal, lay out individual tortillas and fill them generously with the chicken mixture. You can do a beautiful presentation by stacking them or rolling them up burrito-style. Top each portion with fresh cilantro, diced avocado, and a sprinkle of lime juice for that fresh zing. Don’t forget to serve with tortilla chips on the side for that satisfying crunch!
Recipe Variations
Feeling creative? Here are a few fun twists on this recipe:
-
Vegetarian Version: Substitute chicken with jackfruit or a mixture of lentils and mushrooms for a hearty vegetarian option.
-
Spicy Kick: Add in some chopped chipotle peppers in adobo sauce for a smoky, spicy flavor.
-
Creamy Enchiladas: Mix in some cream cheese or Greek yogurt before serving for a creamy version.
-
Southwestern Quinoa: Swap the tortillas for cooked quinoa for a gluten-free bowl-style meal.
-
Slow-Cooker Tacos: Serve the filling in taco shells for a fun party twist!
Chef’s Notes
This Chicken Enchilada Crock Pot Meal is huge in my culinary arsenal! Over time, I’ve played around with flavors, adding everything from black olives to jalapeños, but the beauty lies in its simplicity. Each time I make it, I’m reminded of cozy college nights filled with laughter and great food—those are the moments I cherish most! I’d love to hear how your version turns out!
FAQs and Troubleshooting
Q: Can I use frozen chicken?
Absolutely! Just remember that if you use frozen chicken, it will take longer to cook, so ensure you check for doneness around the 6-8 hour mark or longer.
Q: How do I know if the chicken is done?
The chicken should shred easily with a fork. If it feels tough, give it more time in the slow cooker.
Q: What if my enchiladas turn out too dry?
This can happen if the chicken is overcooked or not enough sauce. Be sure to check on it periodically and add a little more enchilada sauce if needed.
Q: Can I double this recipe?
Of course! Just make sure your crock pot can accommodate the larger volume, and enjoy the leftovers!
Nutritional Info (optional)
Per serving (based on a 6-serving recipe):
- Calories: 350
- Protein: 27g
- Carbohydrates: 40g
- Fat: 12g
- Fiber: 10g
This Chicken Enchilada Crock Pot Meal is not just a time-saver; it’s an experience, a reminder of the joys of home cooking. So the next time you’re in a pinch for dinner, let this recipe transport you back to those bustling nights of camaraderie and laughter. Happy cooking, friends!
PrintChicken Enchilada Crock Pot Meal

A flavorful Chicken Enchilada meal made easy in a crock pot, perfect for busy days.
- Prep Time: 15 minutes
- Cook Time: 360 minutes
- Total Time: 375 minutes
- Yield: 6 servings 1x
- Category: Main Course
- Method: Slow Cooking
- Cuisine: Mexican
- Diet: Gluten Free
Ingredients
- 2 pounds boneless, skinless chicken breasts or thighs
- 1 can (15 oz) black beans, drained and rinsed
- 1 can (15 oz) corn kernels, drained
- 1 can (10 oz) enchilada sauce (red or green)
- 1 can (10 oz) diced tomatoes with green chiles
- 1 medium onion, diced
- 1 tablespoon chili powder
- 2 teaspoons ground cumin
- 1 teaspoon garlic powder
- ½ teaspoon smoked paprika
- Salt and pepper to taste
- 2 cups shredded Mexican cheese blend
- 6–8 small corn or flour tortillas (optional)
- Fresh cilantro, chopped
- Sour cream or Greek yogurt for topping
- Diced avocado
- Lime wedges
- Sliced jalapeños
Instructions
- Prep the Ingredients: Wash and chop the onion, rinse the black beans, and prepare any other fresh ingredients.
- Season Your Chicken: Mix chili powder, cumin, garlic powder, smoked paprika, salt, and pepper, then rub onto the chicken.
- Layer in the Crock Pot: Place chicken at the bottom, then layer beans, corn, diced tomatoes, and onion. Pour enchilada sauce on top.
- Stir It Up: Mix everything gently in the crock pot and cover it.
- Check for Doneness: After 6-8 hours on low or 3-4 hours on high, ensure the chicken shreds easily.
- Add the Cheese: Sprinkle cheese on top and let it melt.
- Serve: Spoon the mixture onto tortillas and top with cilantro, avocado, sour cream, and lime juice.
Notes
Use rotisserie chicken for a quicker option. You can customize the recipe by adding ingredients like black olives or jalapeños.
Nutrition
- Serving Size: 1 serving
- Calories: 350
- Sugar: 3g
- Sodium: 800mg
- Fat: 12g
- Saturated Fat: 6g
- Unsaturated Fat: 4g
- Trans Fat: 0g
- Carbohydrates: 40g
- Fiber: 10g
- Protein: 27g
- Cholesterol: 75mg
Keywords: crock pot, chicken enchiladas, easy dinner, Mexican recipes, slow cooker
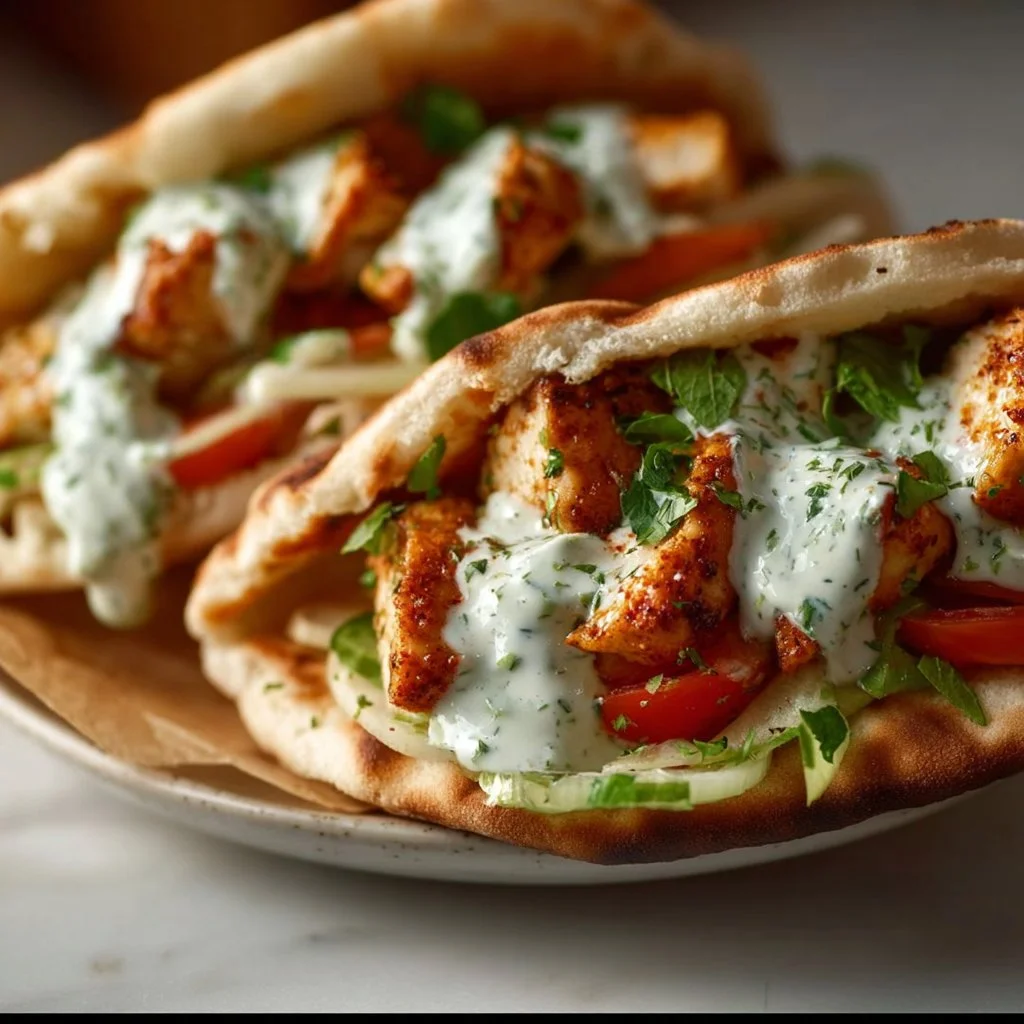
Sheet Pan Chicken Pitas with Herby Ranch
Sheet Pan Chicken Pitas with Herby Ranch: A Flavorful Feast in One Pan
Hey food lovers! If you’re on the lookout for a meal that’s not just quick and easy but also bursting with flavor, you’re in for a real treat. Today, we’re whipping up some delicious Sheet Pan Chicken Pitas with Herby Ranch. This recipe has everything you want: savory chicken, vibrant veggies, and a creamy, herby sauce—all wrapped up in soft pita bread. It’s perfect for a busy weeknight or even a fun weekend gathering. Let’s dive into the beautiful world of chicken pitas and discover why this dish will become a staple in your kitchen!
Introduction: The Allure of Sheet Pan Cooking
There’s something magical about sheet pan meals. Maybe it’s the minimal cleanup that makes the chef in me do a little happy dance, or perhaps it’s the way all those ingredients roast together, creating a symphony of flavors. When I first discovered the joys of sheet pan cooking, it felt like uncovering a secret. Who knew that cooking could be this effortless and enjoyable?
One of my favorite aspects of a sheet pan meal is how customizable it is. The concept of throwing a bunch of fresh ingredients onto a single tray, letting them roast, and then assembling everything into a delightful dish is pure genius. It’s the kind of kitchen craft that allows for creativity while keeping things simple. Plus, the clean-up? A breeze!
For today’s recipe, I decided to go with chicken, colorful bell peppers, and a luscious herby ranch sauce that adds a creamy tang without overwhelming the dish. The combination of spices gives life to the chicken, while the roasted veggies add a vibrant crunch. And let’s not forget about the pillowy pita bread! Together, they create a satisfying meal that fuels your body and inspires your taste buds.
So grab your apron, preheat that oven, and let’s unleash our inner chefs. You’re going to love how easy and delicious this recipe is!
Personal Story: A Slice of Nostalgia
To me, cooking has always been more than just a means to an end; it’s a way to connect with my roots. Growing up, my mom would often prepare pitas stuffed with whatever deliciousness she had on hand. I remember one summer evening, the sun setting behind our garden, as my mom pulled out a tray of marinated chicken, vibrant peppers, and onions, fully seasoned and ready for the roasting pan.
As the aromas filled our kitchen, we’d gather around to assemble our pitas, each one a masterpiece of our own design. I would watch my mom carefully drizzle the homemade ranch sauce, her hands effortlessly creating that perfect mix of herbs and cream. Those evenings became a beloved family tradition, where cooking and togetherness intertwined beautifully.
As I got older and started experimenting in my own kitchen, those flavors and memories stuck with me. I wanted to recreate that joy and familial love in my own simple, convenient way. That’s why I’m so excited to share this Sheet Pan Chicken Pitas with Herby Ranch. It’s not just a meal; it’s a memory on a plate, bringing the warmth of my childhood back in a modern spin. So, let’s get into that recipe and make our own memories!
Ingredients
Here’s what you’ll need to whip up these delicious Sheet Pan Chicken Pitas:
-
1.5 pounds boneless, skinless chicken breasts or thighs
Cut into bite-sized strips: The choice between breasts or thighs is all about preference; thighs are more juicy and flavorful, while breasts lean a bit healthier. -
1 medium red bell pepper
Sliced: Sweet bell peppers add the perfect crunch and color. Feel free to use orange or green peppers for a twist! -
1 medium yellow bell pepper
Sliced: Not only does this add more color, but it also contributes to that beautiful roasted flavor. -
1 medium red onion
Sliced: Red onions caramelize wonderfully in the oven, adding a natural sweetness to the dish. -
2 tablespoons olive oil
To toss with chicken and veggies: This not only helps with roasting but also adds richness. Avocado oil or any neutral oil works too if you’re looking for alternatives. -
2 teaspoons garlic powder
For seasoning: A quick way to infuse that garlicky goodness without the chopping! -
2 teaspoons paprika
For seasoning: Sweet paprika adds warmth to the dish. If you’re looking for a smokier flavor, try using smoked paprika! -
1 teaspoon dried oregano
For seasoning: This herb complements the chicken beautifully. Fresh oregano is a lovely swap if you have it on hand. -
0.5 teaspoon cumin
For seasoning: This earthy spice rounds out the flavor profile, giving it that subtle depth. -
0.5 teaspoon chili flakes
Optional for heat: Perfect for those who like a kick! Adjust it to your preference. -
Salt and pepper to taste
Elevates all the flavors: Never forget to season well! -
0.5 cup mayonnaise
A base for our creamy ranch: If you’re looking for a lighter option, swap this with Greek yogurt. -
0.5 cup sour cream or Greek yogurt
For tang: Both options add that delightful creaminess, with Greek yogurt being a healthier alternative. -
2 tablespoons milk
To thin the ranch: Alter the amount based on your desired consistency; plant-based milk can also be used here! -
2 tablespoons fresh parsley
Finely chopped: This bright herb adds freshness. Sub in cilantro or basil if you prefer! -
1 tablespoon fresh dill
Chopped (or 1 teaspoon dried): Dill’s unique flavor really elevates the ranch dressing. -
1 tablespoon fresh chives or green onion
Chopped: These add a mild onion flavor without overwhelming the ranch. -
1 teaspoon garlic powder
More flavor for the dressing: It’s all about layers of deliciousness! -
1 teaspoon onion powder
For seasoning: Balances the flavors in our ranch. -
1 tablespoon lemon juice or vinegar
For acidity: This brightens the ranch dressing; feel free to use your favorite vinegar. -
Salt and pepper to taste
Don’t skimp on seasoning; it makes all the difference. -
4 pieces pitas
Warm before serving, if desired: These soft pitas are the perfect vessel for all that goodness! -
Shredded lettuce or mixed greens
For stuffing: Fresh greens add so much crunch and nutrition. -
1-2 slices tomato
For stuffing: Juicy tomato slices complete the flavor profile. -
Optional toppings: Crumbled feta, pickled onions, cucumber, hot sauce: Feel free to mix it up!
Step-by-Step Instructions
Now, let’s get cooking! Follow these steps to create a delicious meal that’s sure to please.
-
Preheat the oven: Start by preheating your oven to 425°F (220°C). This is the optimal temperature for roasting chicken and vegetables, creating that delicious golden-brown caramelization.
-
Prepare the chicken: In a large bowl, combine the chicken strips, olive oil, garlic powder, paprika, oregano, cumin, chili flakes, salt, and pepper. (Tip: Mixing the chicken with your hands ensures that every piece is well-coated with the seasoning.)
-
Chop the veggies: While the chicken is marinating in all those spices, slice your bell peppers and red onion. Don’t worry about making them perfect; rustic cuts give them character and charm!
-
Gather the baking sheet: Spread the seasoned chicken on one side of a large parchment-lined baking sheet. Then toss your sliced peppers and onions in a bit of olive oil, salt, and pepper and spread them on the other half. (Make sure there’s plenty of space; we want those veggies to roast, not steam!)
-
Bake it all together: Pop the sheet in the oven and let it roast for about 20-25 minutes or until the chicken is cooked through (internal temperature should reach 165°F/75°C) and the veggies are nicely caramelized. (Tip: Give the pan a little shake halfway through for even roasting!)
-
Whip up the herby ranch: While your chicken and veggies are roasting, it’s time to make that creamy ranch. In a bowl, whisk together the mayonnaise, sour cream (or Greek yogurt), milk, parsley, dill, chives, garlic powder, onion powder, lemon juice, salt, and pepper until smooth. (Pro tip: Make this dressing ahead of time and let it chill in the fridge for an even more robust flavor!)
-
Warm those pitas: Once everything is roasted and your homemade ranch is ready, it’s time to warm those pita breads. You can microwave them for about 30 seconds or heat them on a skillet until soft.
-
Assemble your pitas: To assemble, layer in some shredded lettuce or greens, add a few slices of tomato, and generously top with the roasted chicken and veggies. Finish it off with a drizzle of herby ranch and any extra toppings you love.
-
Dig in and enjoy! Serve with extra ranch on the side for dipping—because you can never have too much!
Serving Suggestions
These delicious pitas can be plated beautifully! Place the filled pitas on a cutting board, with a small bowl of herby ranch for dipping. Surround them with a colorful array of fresh veggies and toppings, making the presentation as vibrant as the flavors. You could also serve them alongside a bright salad to complement the meal!
Recipe Variations
Feel free to get creative! Here are some twists:
-
Spicy Chicken: Add more chili flakes or toss in some hot sauce to the chicken before baking for an extra kick!
-
Veggie-Loaded: Add in any seasonal vegetables like zucchini or cherry tomatoes to the roast for an even more colorful dish.
-
Mediterranean Flavor: Incorporate Mediterranean spices like sumac or add olives and roasted chickpeas for a twist.
-
Cauliflower as a Base: For a lower-carb option, substitute chicken with roasted cauliflower florets.
-
Greek Pita: Swap the ranch for tzatziki and add some olives and feta for a Mediterranean flair!
Chef’s Notes
One of the things I love about this recipe is how forgiving it is. Don’t have all the spices? No problem! Don’t have pitas? Serve the chicken and veggies over rice or quinoa instead. This dish is all about making cooking fun and adaptable.
Also, let’s be real: I’ve had my share of kitchen mishaps. I remember one time I misread "teaspoon" as "tablespoon" and ended up with an over-salted disaster. Lesson learned? Always double-check! But that’s what’s fun about cooking—it’s a journey. So don’t worry if things don’t go perfectly; a little creativity can turn those moments into delicious surprises.
FAQs and Troubleshooting
1. How do I know when my chicken is fully cooked?
Always use a meat thermometer to ensure you’re at 165°F (75°C) internally. If you don’t have one, the chicken should be white throughout with no pink remaining.
2. Can I use frozen chicken?
While fresh chicken is best, you can use frozen chicken. Just extend your cooking time and ensure it cooks thoroughly.
3. What do I do if my veggies are too soft?
You might have overcooked them; next time check the veggies a bit earlier or cut them larger to retain their crunch.
4. How long can I store leftovers?
Store any leftovers in an airtight container in the fridge for up to three days. Reheat gently in the oven or microwave before enjoying!
Nutritional Info (optional)
This dish is not only packed with flavor but also provides a great balance of protein, fiber, and essential nutrients. A typical serving of Chicken Pita (with ranch) would have around 450-500 calories, depending on the toppings and sides you choose.
And there you have it! Your guide to making the Sheet Pan Chicken Pitas with Herby Ranch. Simple, satisfying, and downright delicious, it’s a dish that reminds you that cooking can be fun. Enjoy every bite, and remember to share your own stories and tweaks with me. Happy cooking!
PrintSheet Pan Chicken Pitas with Herby Ranch

A quick and flavorful meal featuring savory chicken, vibrant veggies, and a creamy herby sauce wrapped in soft pita bread.
- Prep Time: 15 minutes
- Cook Time: 25 minutes
- Total Time: 40 minutes
- Yield: 4 servings 1x
- Category: Main Course
- Method: Baking
- Cuisine: Mediterranean
- Diet: None
Ingredients
- 1.5 pounds boneless, skinless chicken breasts or thighs, cut into bite-sized strips
- 1 medium red bell pepper, sliced
- 1 medium yellow bell pepper, sliced
- 1 medium red onion, sliced
- 2 tablespoons olive oil
- 2 teaspoons garlic powder
- 2 teaspoons paprika
- 1 teaspoon dried oregano
- 0.5 teaspoon cumin
- 0.5 teaspoon chili flakes (optional)
- Salt and pepper to taste
- 0.5 cup mayonnaise
- 0.5 cup sour cream or Greek yogurt
- 2 tablespoons milk
- 2 tablespoons fresh parsley, finely chopped
- 1 tablespoon fresh dill, chopped (or 1 teaspoon dried)
- 1 tablespoon fresh chives or green onion, chopped
- 1 teaspoon garlic powder
- 1 teaspoon onion powder
- 1 tablespoon lemon juice or vinegar
- Salt and pepper to taste
- 4 pieces pitas
- Shredded lettuce or mixed greens
- 1–2 slices tomato
- Optional toppings: crumbled feta, pickled onions, cucumber, hot sauce
Instructions
- Preheat the oven to 425°F (220°C).
- Combine the chicken strips, olive oil, garlic powder, paprika, oregano, cumin, chili flakes, salt, and pepper in a large bowl.
- Chop the bell peppers and red onion while the chicken marinates.
- Spread the seasoned chicken on one side of a parchment-lined baking sheet and toss the veggies on the other side.
- Bake for 20-25 minutes until the chicken reaches 165°F (75°C) and the veggies are caramelized.
- Whisk together mayonnaise, sour cream (or yogurt), milk, parsley, dill, chives, garlic powder, onion powder, lemon juice, salt, and pepper for the ranch dressing.
- Warm the pitas in the microwave for about 30 seconds or on a skillet.
- Assemble by layering lettuce, tomato, roasted chicken, and veggies in pitas, finishing with ranch and toppings.
- Enjoy! Serve with extra ranch on the side for dipping.
Notes
Feel free to customize with your favorite veggies or toppings. The ranch can be made ahead of time for added flavor.
Nutrition
- Serving Size: 1 pita
- Calories: 450
- Sugar: 5g
- Sodium: 650mg
- Fat: 20g
- Saturated Fat: 3g
- Unsaturated Fat: 12g
- Trans Fat: 0g
- Carbohydrates: 40g
- Fiber: 3g
- Protein: 28g
- Cholesterol: 85mg
Keywords: chicken, pitas, ranch, quick meal, sheet pan, colorful veggies
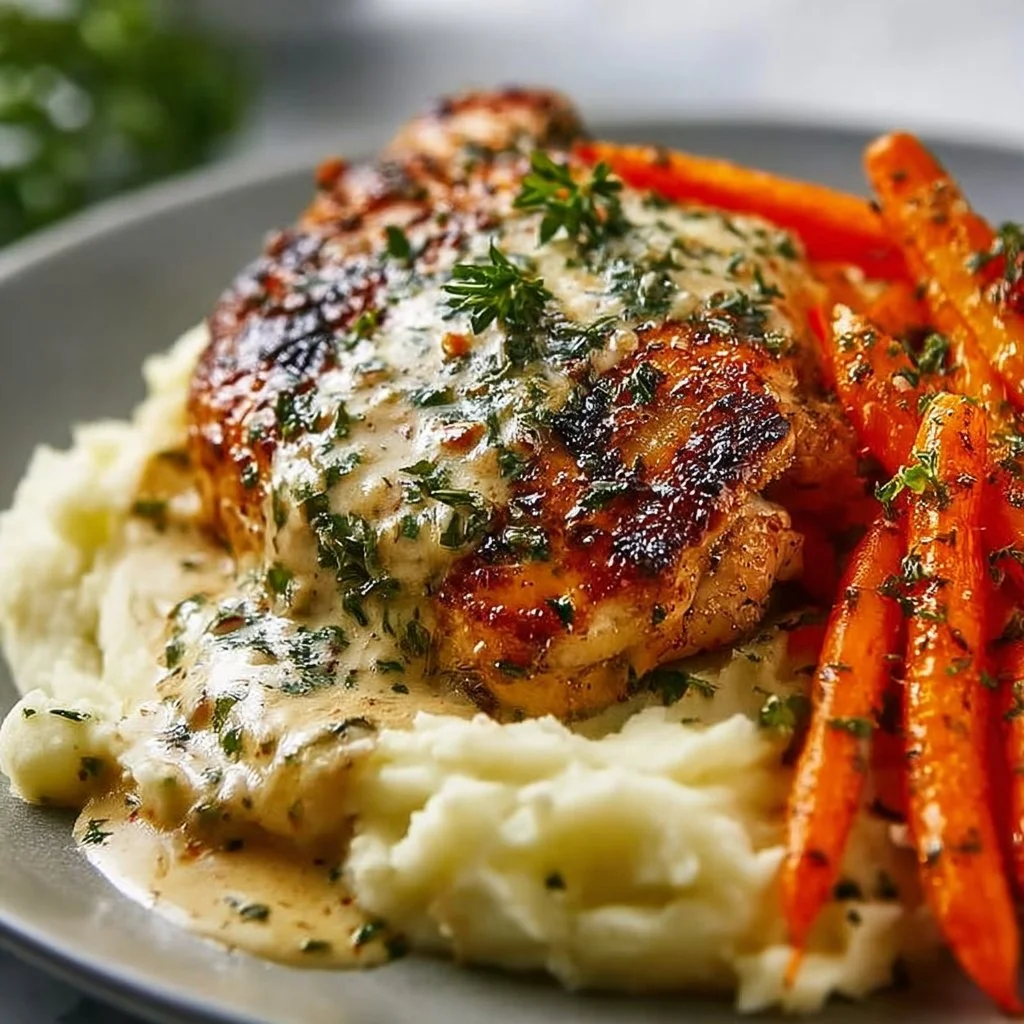
Creamy Herb Chicken with Mashed Potatoes and Honey Glazed Carrots
Creamy Herb Chicken with Mashed Potatoes and Honey Glazed Carrots
Introduction
Hey, food lovers! Welcome back to Clean Plate Cravings. Today, we’re diving into one of my all-time favorite comfort dishes: Creamy Herb Chicken with Mashed Potatoes and Honey Glazed Carrots. I can’t wait to share this recipe with you because it promises to make your kitchen feel like a cozy embrace, and trust me, you’re going to love every creamy, herb-infused bite!
Picture this: A warm evening, the sun setting with a golden glow, and the scent of savory chicken wafting through your home. There’s something magical about cooking that brings back memories, doesn’t it? This dish not only nourishes the body but also warms the soul. With the richness of heavy cream melding with the fragrant mix of herbs, and the perfect pairing of sweet, tender carrots, this meal is sure to evoke familiar feelings of comfort and joy.
This recipe is perfect for busy weeknights when you want something satisfying without spending hours in the kitchen. It’s also ideal for family gatherings or cozy dinners with friends. Plus, it doesn’t hurt that it looks gorgeous on the plate! As we go through the steps, I’ll share some of my favorite tips and tricks that make whipping this dish up an absolute breeze.
So grab your apron, put on your favorite tunes, and let’s cook something delicious together!
Personal Story
I remember the first time I made Creamy Herb Chicken. It was a rainy Saturday afternoon, and I was looking for something to lift my spirits. My sister, who is not particularly keen on cooking, came over to visit. We decided to whip up something hearty, and I thought this chicken dish would be the perfect antidote to the dreary weather outside.
As I sautéed the chicken and the cream began to bubble away with those lovely herbs, my sister and I laughed, chatted, and danced around the kitchen to our favorite tunes. The smell was so divine that it filled the entire house, and I knew we were onto something special.
When we finally sat down to eat, the first bite brought a smile to both our faces. It was incredibly delicious! We spent the rest of the evening reminiscing about family dinners growing up, surrounded by our loved ones and delicious food. That experience cemented this dish as one of my go-to recipes—it’s not just about the flavors but also about creating joy and connection through cooking.
Ingredients
Here’s what you’re going to need to recreate this comfort dish at home:
-
4 chicken thighs
I prefer using thighs for their juicy texture, but you can easily swap them for boneless chicken breasts if you’re looking for something leaner. -
1 cup heavy cream
For that irresistible creaminess! If you’re looking for a lighter option, try using half-and-half or coconut cream for a dairy-free alternative. -
1 tablespoon mixed herbs (thyme, rosemary, parsley)
Fresh herbs bring a burst of flavor to the dish, but dried herbs will work in a pinch. Just use about a third of the amount since dried herbs are more concentrated. -
2 cups mashed potatoes (prepared with butter and milk)
The ultimate comfort food! You can use ready-made mashed potatoes, or for a twist, try garlic mashed potatoes or add cream cheese for extra creaminess. -
4 carrots, sliced
Sweet and vibrant, carrots balance out the savory chicken. You can substitute with baby carrots or even parsnips for a different flavor. -
2 tablespoons honey
Adds a touch of sweetness to the carrots. Maple syrup or agave nectar can work as a sugar substitute if you prefer. -
Salt and pepper to taste
Essential for enhancing the flavors of the dish! -
Olive oil for cooking
A staple in any kitchen—if olive oil isn’t your thing, feel free to use butter or vegetable oil.
Step-by-Step Instructions
Let’s get to the fun part—cooking this delicious dish!
-
Prepare Your Ingredients
Start by gathering all your ingredients. Trust me, it’ll make the cooking process smoother and less chaotic! Chop the carrots and measure out your cream and herbs. You’ll be amazed at how organized you feel. -
Sear the Chicken
In a large skillet, heat about 2 tablespoons of olive oil over medium-high heat. Season your chicken thighs generously with salt and pepper. Once the oil is hot and shimmering, place the chicken thighs skin-side down (if you’re using skin-on). Let them sear for about 7-8 minutes until they get a beautiful golden brown color. Pro tip: Don’t rush this step! The perfect sear seals in the moisture and flavor. -
Flip and Cook Through
After your chicken is beautifully golden, flip them over and let them cook for another 5-7 minutes until the internal temperature reaches 165°F (75°C). If you’re using boneless chicken, the cooking time will be less, around 15 minutes in total. Once cooked, remove them from the skillet and set aside. -
Make the Cream Sauce
In the same skillet (don’t clean it—those brown bits enhance the flavor!), reduce the heat to medium-low and add your heavy cream. Scrape up any flavorful bits from the bottom of the pan with a wooden spoon. Stir in your mixed herbs and let the sauce simmer for about 3-4 minutes, allowing it to thicken slightly. You can adjust the seasoning with more salt and pepper if needed. -
Return Chicken to the Skillet
Once the sauce has thickened, return your chicken thighs back to the skillet, spooning the creamy sauce over them. Let everything simmer together for a couple of minutes to allow the flavors to meld. -
Prepare the Carrots
Meanwhile, bring a pot of water to a boil and add your sliced carrots. Boil for 4-5 minutes until they’re just tender. Drain them, then transfer them back to the pot. Add honey, a pinch of salt, and a splash of olive oil. Stir to coat and let them glaze over medium heat for a couple of minutes. Sweet and simple! -
Whip Up the Mashed Potatoes
If you haven’t prepared the mashed potatoes yet, now is the time! Boil peeled potatoes until fork-tender, drain, then mash with butter, milk, and a pinch of salt. For extra flavor, a little roasted garlic goes a long way!
Serving Suggestions
Now that everything is ready, let’s plate this beauty! Start with a generous scoop of mashed potatoes in the center of your plate. Place a chicken thigh on top, drenching it in that luscious creamy herb sauce. Then, on the side, add a handful of those honey-glazed carrots. For a little extra color, sprinkle some fresh parsley on top, and voila! You’ve got a beautiful meal that’s just waiting to be devoured.
Recipe Variations
Feeling adventurous? Here are a few creative twists to try:
-
Add Spinach or Kale: Toss in a handful of fresh spinach or kale to the cream sauce for a nutritious boost and a pop of color.
-
Spicy Kick: Add a pinch of red pepper flakes to the cream sauce for a spicy finish. It will add a delightful contrast to the creaminess.
-
Mushroom Medley: Sauté sliced mushrooms along with the chicken for an earthy undertone that complements the dish beautifully.
-
Mustard Cream Sauce: Stir in a tablespoon of Dijon mustard to the cream sauce for a tangy and flavorful twist.
-
Cheesy Mashed Potatoes: Mix in shredded cheddar cheese or parmesan into your mashed potatoes for extra richness. Who doesn’t love cheesy potatoes?
Chef’s Notes
As with any recipe, feel free to adjust based on your preferences! I’ve found that this dish is perfect for making ahead of time. The flavors only get better as they sit, making it an excellent option for meal prep or family gatherings. One day, I even experimented and added a splash of white wine to the cream sauce. It was such a hit that it’s now a permanent addition to my version!
In the kitchen, never be afraid to make a little mess! It’s all part of the fun. And if something goes awry, just laugh it off! Cooking is an adventure, and sometimes the best memories come from the unexpected.
FAQs and Troubleshooting
Q: Why is my cream sauce not thickening?
A: If your sauce isn’t thickening as expected, try simmering it a bit longer. If you want a quick fix, whisk in a teaspoon of cornstarch mixed with a bit of water to thicken it up.
Q: Can I use other cuts of chicken?
A: Absolutely! Bone-in chicken breasts or even chicken drumsticks will work fine, but keep an eye on cooking times. Drumsticks may take longer, while breasts may cook a bit faster.
Q: Can the recipe be made dairy-free?
A: Yes! Substitute heavy cream with full-fat coconut cream or a cashew-based cream. Just be mindful of seasoning, as these alternatives may alter the flavor slightly.
Q: How long will leftovers last?
A: Any leftovers can be stored in an airtight container in the refrigerator for up to 3 days. Just reheat gently to avoid overcooking the chicken!
Nutritional Info
While I often focus on deliciousness over dietary specifics, here’s a general estimate for a serving of Creamy Herb Chicken with Mashed Potatoes and Honey Glazed Carrots:
- Calories: 650
- Protein: 35g
- Carbs: 70g
- Fat: 25g
This is a comfort meal that provides a good balance of nutrients to fuel your day, but remember, it’s all about enjoying and finding what works for your body!
So, there you have it! A delightful recipe that’s not just about the food but the joy of cooking and sharing. I hope you enjoy making this dish as much as I do. Remember, it’s all about keeping things fresh, simple, and seriously delicious! Happy cooking!
PrintCreamy Herb Chicken with Mashed Potatoes and Honey Glazed Carrots

A comforting dish featuring juicy chicken thighs in a creamy herb sauce, served with buttery mashed potatoes and sweet, honey-glazed carrots.
- Prep Time: 15 minutes
- Cook Time: 30 minutes
- Total Time: 45 minutes
- Yield: 4 servings 1x
- Category: Main Course
- Method: Sautéing
- Cuisine: American
- Diet: Gluten-Free
Ingredients
- 4 chicken thighs
- 1 cup heavy cream
- 1 tablespoon mixed herbs (thyme, rosemary, parsley)
- 2 cups mashed potatoes (prepared with butter and milk)
- 4 carrots, sliced
- 2 tablespoons honey
- Salt and pepper to taste
- Olive oil for cooking
Instructions
- Prepare Your Ingredients: Gather all your ingredients and chop the carrots.
- Sear the Chicken: Heat olive oil in a skillet, season chicken, and sear for 7-8 minutes.
- Flip and Cook Through: Flip chicken and cook for another 5-7 minutes until fully cooked.
- Make the Cream Sauce: Add heavy cream and herbs to the skillet, scraping up bits, and simmer.
- Return Chicken to the Skillet: Add chicken back to the sauce and let simmer.
- Prepare the Carrots: Boil sliced carrots until tender, then glaze with honey and olive oil.
- Whip Up the Mashed Potatoes: Prepare mashed potatoes with butter and milk.
Notes
Feel free to customize with your favorite herbs or add different vegetables. Leftovers can be stored for up to 3 days.
Nutrition
- Serving Size: 1 serving
- Calories: 650
- Sugar: 10g
- Sodium: 600mg
- Fat: 25g
- Saturated Fat: 12g
- Unsaturated Fat: 10g
- Trans Fat: 0g
- Carbohydrates: 70g
- Fiber: 4g
- Protein: 35g
- Cholesterol: 180mg
Keywords: Creamy Chicken, Comfort Food, Herb Chicken, Mashed Potatoes, Honey Carrots
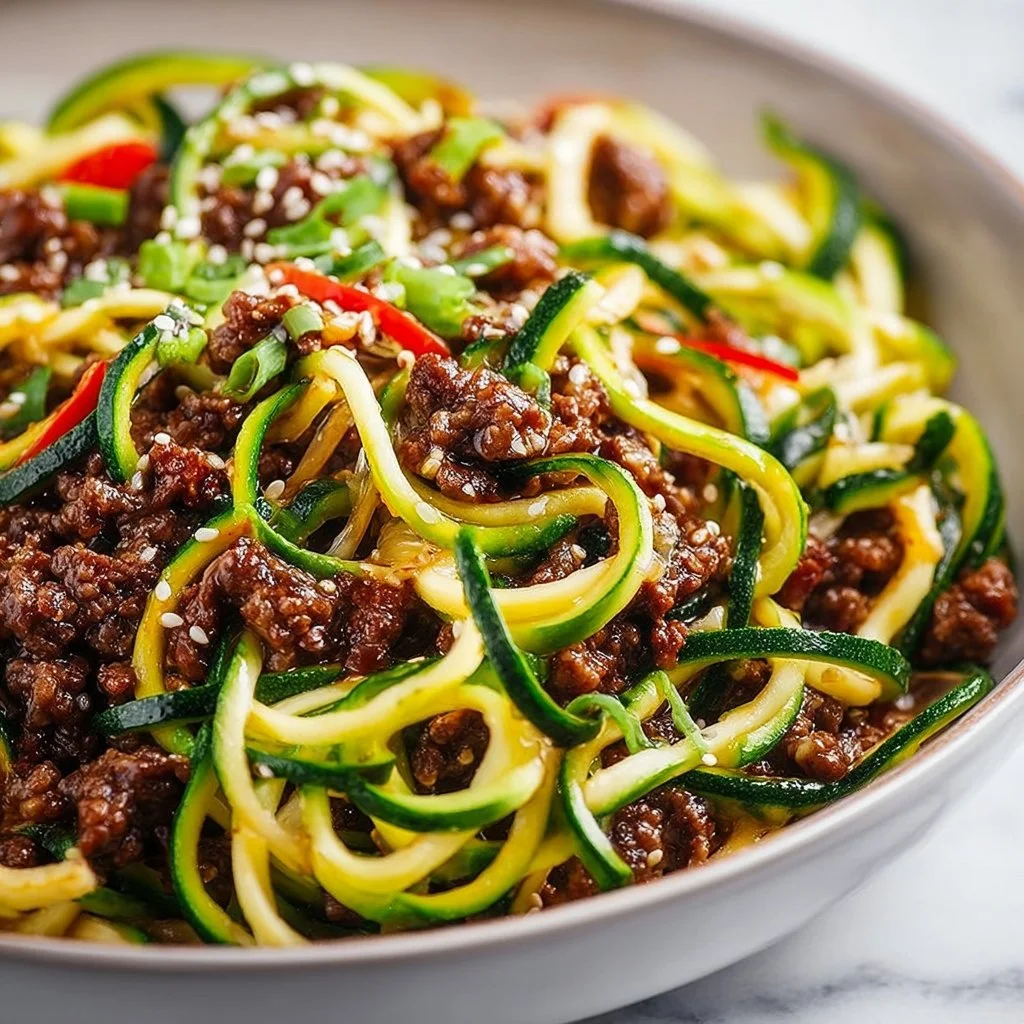
Hearty Korean Beef Zucchini Noodles
Hearty Korean Beef Zucchini Noodles: A Wholesome Twist on a Classic Dish
Welcome back to Clean Plate Cravings, where we’re all about mealtime happiness! Today, I am super excited to share a dish that hits all the right notes—Hearty Korean Beef Zucchini Noodles. If you’ve ever craved a satisfying meal that makes you feel good without compromising on flavor, buckle up because I’ve got something special for you!
Picture this: it’s a busy weekday evening, and the last thing you want to do is spend hours cooking. Yet, you’re starving for something that fuels you and delights your taste buds. That’s where my take on Korean Beef with Zucchini Noodles comes in—quick, easy, and utterly delicious! With the tender, savory beef and fresh zucchinis twirling like little green noodles in rich, bold sauce, you’re going to be hooked. And the best part? It’s all prepared in under 30 minutes!
This dish captures the essence of Korean cuisine—sweet, savory, and just a bit spicy—with the added benefit of being lighter and veggie-packed. Zucchini noodles are not only a fantastic low-carb alternative to traditional noodles, but they also soak up all those incredible flavors beautifully. Let’s dive into this culinary adventure together!
A Nostalgic Memory with Korean Flavors
Now, let me take you on a little trip down memory lane. Growing up, my family was all about gathering around the table for hearty meals. My mom was a queen of making flavors dance—especially when it came to Korean-inspired dishes. I still remember one particular meal where she introduced us to her take on beef bulgogi. The smell of marinated beef sizzling in the pan mingled with garlic and ginger filled the kitchen, turning it into a magical haven.
We’d often grab our chopsticks and dig in, but I distinctly recall the moment I realized that traditional dishes like this could fit into a healthier lifestyle. It was during one of my culinary explorations when I came across spiralizing veggies and thought, “Why not give our beloved classic a fresh twist?” And so, Korean Beef Zucchini Noodles were born—a dish that combines nostalgia with vibrant ingredients to create something truly scrumptious!
Ingredients
Here’s what you’ll need to whip up this delightful dish:
-
1 pound ground beef: Opt for lean ground beef for a healthier rendition. If you’re looking to go meatless, try ground turkey or tempeh for a plant-based twist.
-
2 medium zucchinis, spiralized: Zucchini noodles are light and full of moisture! No spiralizer? No problem—use a vegetable peeler or even buy ready-to-use spiralized zucchini from the store.
-
1 tablespoon sesame oil: This oil adds a nutty depth to the dish. For a different flavor, avocado oil works too!
-
3 cloves garlic, minced: Garlic infuses everything with flavor! If fresh isn’t available, you can use 1 teaspoon of garlic powder as a substitute.
-
1 onion, sliced: Sweet and slightly caramelized onions elevate the overall taste. Red or yellow onions work well; if you want a sharper taste, go for white onions.
-
1 red bell pepper, sliced: Bell peppers add a sweet crunch and color to our dish! Feel free to mix it up with yellow or orange bell peppers for variety.
-
1/4 cup soy sauce: This is the secret to that umami flavor! For a gluten-free option, substitute with tamari or coconut amino.
-
2 tablespoons brown sugar: It balances the savory and salty elements. You can use honey or coconut sugar for a healthier alternative.
-
1 tablespoon rice vinegar: A dash of acidity brightens the dish. Apple cider vinegar or white wine vinegar makes a good substitute.
-
1 teaspoon ginger, grated: Fresh ginger gives an aromatic kick! Ground ginger could work in a pinch if you don’t have fresh.
-
Sesame seeds, for garnish: These little beauties not only look fabulous but add a delightful crunch. You can also use chopped nuts like peanuts or cashews for extra texture.
-
Green onions, for garnish: Bright and vibrant, green onions add a fresh finish to your dish. If you’re not a fan, fresh cilantro works too!
Step-by-Step Instructions
Let’s get cooking! Here’s how to bring this Hearty Korean Beef Zucchini Noodles dish to life.
1. Prepare Your Veggies
Start by spiralizing your zucchinis if you haven’t done so already. I love using fresh veggies, as they provide a lovely crunch! If you’re using store-bought, just make sure to drain any excess water to keep your dish from getting soupy.
2. Heat the Pan
In a large skillet, heat that tablespoon of sesame oil over medium-high heat. Once it’s shimmering (but not smoking), toss in the minced garlic and sliced onion. Sauté for about 2-3 minutes until fragrant—oh, the heavenly aroma!
3. Brown the Beef
Next up, add the ground beef. Use a wooden spoon to break it up as it cooks. This should take about 5-7 minutes until it’s nice and browned. Keep stirring occasionally, ensuring even cooking. If there’s excess fat, feel free to drain it!
4. Add the Veggies
After the beef is ready, introduce the sliced bell pepper and sauté for another 2-3 minutes. You want those peppers to just soften while still holding onto their crunch.
5. Stir in the Saucy Goodness
Now, it’s time to mix in the soy sauce, brown sugar, rice vinegar, and grated ginger. Stir well to ensure everything gets coated; let it simmer for about 2 minutes.
6. Fold in the Zucchini Noodles
Finally, toss in those spiralized zucchinis. Give everything a good toss for 2-3 minutes, just until the zoodles are heated through but still retain a bit of bite. We don’t want them mushy—nobody likes soggy noodles!
7. Garnish and Serve!
Plate your masterpiece, garnishing with sesame seeds and sliced green onions. Trust me, it’ll look like something straight out of a culinary magazine.
Serving Suggestions
Serve your Hearty Korean Beef Zucchini Noodles in large bowls for a cozy presentation. Drizzle a little extra sesame oil over the top for that nutty aroma. Pair this dish with a side of kimchi or a fresh cucumber salad for a full, vibrant meal. And don’t forget to put out some chopsticks—it makes everything more fun!
Recipe Variations
Here are a few creative twists to switch things up:
- Spicy Kick: Add a teaspoon of gochujang (Korean chili paste) for a fiery explosion.
- Add More Veggies: Toss in some sliced mushrooms or snap peas for extra crunch and nutrition.
- Switch the Protein: Go for chicken or shrimp instead of beef, or even a plant-based protein like lentils or tofu.
- Whole Wheat or Gluten-Free Noodles: If you’re not feeling zoodles, opt for whole wheat or gluten-free noodles like rice noodles for a heartier base.
- Herbaceous Twist: Fresh basil or mint can be added at the end for a refreshing finish.
Chef’s Notes
As I experimented with this recipe over the years, I’ve learned that the best kitchen outcomes often come with a bit of trial and error. Initially, I was worried zucchini noodles would taste bland or watery, but I quickly discovered that with the right seasonings, they truly shine! You learn to embrace the unpredictability of cooking, which is the beauty of it—adding your personal twist makes every dish unique.
One of my favorite moments while preparing this dish occurred when I invited a few friends over for dinner. They were skeptical about substituting traditional noodles with zoodles, but by the time they took a bite, I saw their skeptical faces light up with delight. That’s a chef’s dream, my friends!
FAQs and Troubleshooting
Q: Can I make this ahead of time?
Absolutely! You can prepare the beef mixture in advance and store it in the fridge. Just reheat and add the zucchini noodles right before serving.
Q: What if my zucchini noodles are too watery?
Zucchini has a high water content, so it’s best to salt the noodles and let them sit in a colander for 10 minutes before cooking. This will help draw out excess moisture!
Q: Can I use other vegetables?
Definitely! Feel free to toss in whatever veggies you love or have on hand. Carrots, broccoli, or even cauliflower rice would work great too!
Q: How can I make this dish spicier?
Add more ginger, toss in red pepper flakes, or use a spicier soy sauce. Tweak it to your heat preference!
Nutritional Info
This Hearty Korean Beef Zucchini Noodles recipe is not only delicious but also packed with nutrients:
- Calories: Approximately 300 per serving
- Protein: 25g
- Carbohydrates: 15g
- Fat: 15g
- Fiber: 3g
Packed with protein and vitamins from the vegetables, this dish is a stellar choice for lunch or dinner!
And there you have it—a delightful journey into making Hearty Korean Beef Zucchini Noodles! I hope you feel inspired to give this dish a try in your own kitchen. Happy cooking, and don’t forget to share your culinary creations with me! Remember, cooking is all about joy, exploration, and connecting with those you love around the table. Until next time, keep it fresh, simple, and absolutely delicious!
PrintHearty Korean Beef Zucchini Noodles

A quick and delicious twist on Korean beef made with spiralized zucchini noodles, perfect for a healthy meal.
- Prep Time: 10 minutes
- Cook Time: 20 minutes
- Total Time: 30 minutes
- Yield: 4 servings 1x
- Category: Main Course
- Method: Stovetop
- Cuisine: Korean
- Diet: Paleo
Ingredients
- 1 pound ground beef
- 2 medium zucchinis, spiralized
- 1 tablespoon sesame oil
- 3 cloves garlic, minced
- 1 onion, sliced
- 1 red bell pepper, sliced
- 1/4 cup soy sauce
- 2 tablespoons brown sugar
- 1 tablespoon rice vinegar
- 1 teaspoon ginger, grated
- Sesame seeds, for garnish
- Green onions, for garnish
Instructions
- Prepare your veggies by spiralizing zucchinis if you haven’t done so already.
- Heat the pan over medium-high heat and add sesame oil.
- Brown the ground beef for about 5-7 minutes.
- Add the sliced bell pepper and sauté for another 2-3 minutes.
- Stir in soy sauce, brown sugar, rice vinegar, and ginger, and let it simmer.
- Fold in zucchini noodles and cook for an additional 2-3 minutes.
- Garnish with sesame seeds and green onions before serving.
Notes
If zucchini noodles become too watery, salt and let them sit for 10 minutes before cooking.
Nutrition
- Serving Size: 1 serving
- Calories: 300
- Sugar: 6g
- Sodium: 800mg
- Fat: 15g
- Saturated Fat: 6g
- Unsaturated Fat: 8g
- Trans Fat: 0g
- Carbohydrates: 15g
- Fiber: 3g
- Protein: 25g
- Cholesterol: 80mg
Keywords: Korean beef, zucchini noodles, healthy recipe, quick dinner, low-carb meal

Zero Sugar Brownies with Greek Yogurt
Indulge Guilt-Free: Zero Sugar Brownies with Greek Yogurt
Welcome to Clean Plate Cravings! Today, we’re diving into the world of guilt-free indulgence with a delightful recipe that’ll leave your taste buds dancing and your body feeling great. What could be better than brownies that are rich, fudgy, and—wait for it—completely free of added sugar? Yes, you heard that right! These Zero Sugar Brownies with Greek Yogurt are a game-changer.
As much as we love a good dessert, the post-sweet treat slump can sometimes feel unbearable, and that just won’t do! Imagine enjoying a delicious brownie without the nagging guilt or the energy crash after. By swapping traditional ingredients for healthier alternatives, we’re creating a treat that you can truly savor. I’m here to tell you that these brownies do not compromise on flavor or texture. So grab your apron, and let’s get baking!
A Sweet Memory
It was a Sunday afternoon, and I was rummaging through my childhood memories in the kitchen of my parents’ home. I stumbled upon a tattered old recipe book filled with handwritten notes and little smudges—possibly remnants of past baking adventures. My mom had been whipping up her signature brownies for as long as I could remember, and the aroma of chocolate wafting from the oven was something I cherished in those innocent days. That rich cocoa smell would float up the stairs and lead me straight to the kitchen, a siren call that was impossible to resist.
As I flipped through the pages, I realized how sentimental food can be. The act of baking those brownies was more than just mixing ingredients; it was bonding time, sharing laughter, and creating memories with loved ones. Inspired by that nostalgia, I set out on a mission to create a version of those classic brownies—only this time, they’d be healthier. Enter my Zero Sugar Brownies, a heartfelt tribute with a twist that brings the essence of my childhood into today’s kitchen!
Ingredients
Before we dive into the magic of baking, let’s gather our ingredients. Each one is carefully chosen to ensure you get a delicious brownie without the added sugar!
-
1 cup Greek yogurt: This creamy ingredient adds moisture and a protein kick to our brownies. Greek yogurt is a great substitute for oil or butter in baking. You can also use dairy-free yogurt if you prefer.
-
1/2 cup unsweetened cocoa powder: The rich base for our brownies, providing all that deep chocolate flavor without any added sugars. Be sure to look for high-quality cocoa for the best taste!
-
1/2 cup almond flour or oat flour: These flours keep our brownies moist and give them a lovely texture. Almond flour is lower in carbs and packed with healthy fats, while oat flour adds a heartier touch. Use whichever suits your dietary needs!
-
1/2 cup sugar substitute (like erythritol or stevia): A key ingredient that allows us to enjoy sweetness without the added sugar. Erythritol offers a similar texture to sugar, while stevia is much sweeter so you might need less. Always check the conversion guidelines!
-
1/4 cup unsweetened applesauce: Adds natural sweetness and moisture, plus a bit of fiber. Feel free to substitute it with mashed banana if you’re a fan of that flavor!
-
1 teaspoon vanilla extract: A must for any baking recipe, vanilla enhances all the flavors in our brownies. You can also use almond extract for a unique twist.
-
1/2 teaspoon baking powder: Helps our brownies rise just enough to keep them from being too dense.
-
1/4 teaspoon salt: Just a pinch to elevate all the sweet flavors; salt balances the sweetness beautifully!
Step-by-Step Instructions
Now that we’ve got everything prepped, let’s get baking! Here’s how to whip up these delicious brownies in no time:
-
Preheat Your Oven: Preheat your oven to 350°F (175°C). While the oven warms up, it’s the perfect time to gather your equipment: a mixing bowl, spatula, measuring cups, and a 9×9 baking pan. Don’t forget to grease the pan or line it with parchment paper for easy removal! Trust me; you don’t want to risk losing any of that gooey goodness.
-
Mix the Wet Ingredients: In a medium mixing bowl, combine the Greek yogurt, unsweetened applesauce, and vanilla extract. Whisk them together until smooth. Here’s a pro tip: Using room temperature yogurt will help you achieve a smoother mixture and integrate better!
-
Sift the Dry Ingredients: In another bowl, combine the almond or oat flour, cocoa powder, baking powder, sugar substitute, and salt. Sifting them together not only breaks up any lumps but also creates a lighter brownie!
-
Combine Wet and Dry: Gradually add the dry mixture into the wet mixture, stirring gently with a spatula. It’s important not to overmix. If you’re feeling fancy, fold in some chocolate chips or nuts for extra texture and flavor!
-
Pour the Batter: Transfer the brownie batter into your prepared baking pan, smoothing it out evenly with the spatula. It’s okay if the batter is thick; that’s what makes them fudgy!
-
Bake to Perfection: Pop the pan into your preheated oven and bake for 20-25 minutes. Keep an eye on them; you want the edges to be firm and the center to be slightly underbaked for that gooey texture. Insert a toothpick—if it comes out with a few moist crumbs, they’re ready!
-
Cool and Slice: Once baked, remove the brownies from the oven and let them cool in the pan for about 10-15 minutes before transferring them to a wire rack. Allow them to cool completely before slicing. Yes, the waiting is tough, but just imagine to get to enjoy that fudgy goodness!
Serving Suggestions
When it comes to serving these brownies, the sky’s the limit! You can simply cut them into squares and serve them warm alongside a dollop of Greek yogurt or a scoop of your favorite sugar-free ice cream. Want to dress it up a bit? Drizzle a homemade chocolate sauce or a sprinkle of fresh berries for an elegant touch. Trust me, your guests (or family) will be looking for seconds!
Recipe Variations
Feeling adventurous? Here are some fun twists to customize your brownies:
-
Nutty Brownies: Fold in some chopped walnuts or pecans for that extra crunch and a boost of healthy fats.
-
Mint Chocolate Delights: Add some mint extract to the batter for a refreshing mint brownie experience.
-
Coconut Bliss: Toss in shredded unsweetened coconut for a tropical flair.
-
Peanut Butter Swirl: Drop spoonfuls of natural peanut butter into the batter and swirl it around for rich, creamy bites.
-
Fruity Fudge: Stir in a handful of fresh or frozen berries for a fruity twist on the classic brownie.
Chef’s Notes
These brownies have come a long way since that Sunday afternoon memory. Every time I make them, I think about how they transformed from my mom’s decadent, sugar-laden version into a treat I can feel good about eating (and sharing!). When testing recipes, I’ve learned that simple swaps can make a big difference, and healthy eating doesn’t have to mean sacrificing joy in the kitchen.
Oh, and I’ve had my fair share of “kitchen adventures” (read: mishaps) along the way. From flour explosions to chocolate-covered countertops, let’s just say that the journey to create these brownies was as much fun as the finished product. So don’t be afraid to experiment and make your own memories along the way!
FAQs and Troubleshooting
-
Why are my brownies too gooey?
Make sure to bake them long enough. If they’re undercooked, they’ll remain gooey. Always do the toothpick test to check for doneness—they should come out with moist crumbs, not wet batter. -
Can I use another sweetener?
Absolutely! Just keep in mind that different sweeteners have varying degrees of sweetness. If you’re using a liquid sweetener, adjust the other wet ingredients accordingly. -
What if I don’t have Greek yogurt?
No problem! You can substitute it with unsweetened regular yogurt, or even a nut-based yogurt if you’re looking for a dairy-free option. -
How do I store the brownies?
These brownies can be stored in an airtight container in the fridge for up to a week (if they last that long!). They also freeze well, making it easy to meal prep for your future sweet cravings!
Nutritional Info (if applicable)
These brownies are packed with protein from the Greek yogurt, healthy fats from almond flour, and are low in sugar, making them a nutritious yet decadent treat. Depending on your choice of sugar substitute and additional mix-ins, the calorie count can vary, but you’re looking at roughly 100-120 calories per brownie!
So there you have it, friends! Your guide to making scrumptious, guilt-free Zero Sugar Brownies with Greek Yogurt. I can’t wait for you to try this recipe and fall in love—with desserts like this, healthy eating becomes a delicious journey rather than a chore. Happy baking!
PrintZero Sugar Brownies with Greek Yogurt

Indulge guilt-free with these rich and fudgy brownies that are completely free of added sugar, featuring Greek yogurt for added moisture and protein.
- Prep Time: 10 minutes
- Cook Time: 25 minutes
- Total Time: 35 minutes
- Yield: 12 servings 1x
- Category: Dessert
- Method: Baking
- Cuisine: American
- Diet: Vegetarian
Ingredients
- 1 cup Greek yogurt
- 1/2 cup unsweetened cocoa powder
- 1/2 cup almond flour or oat flour
- 1/2 cup sugar substitute (like erythritol or stevia)
- 1/4 cup unsweetened applesauce
- 1 teaspoon vanilla extract
- 1/2 teaspoon baking powder
- 1/4 teaspoon salt
Instructions
- Preheat your oven to 350°F (175°C) and prepare your baking pan.
- Mix the Greek yogurt, applesauce, and vanilla extract until smooth.
- Sift the almond or oat flour, cocoa powder, baking powder, sugar substitute, and salt together.
- Combine the wet and dry mixtures, stirring gently.
- Pour the batter into the prepared baking pan.
- Bake for 20-25 minutes or until the edges are firm and the center is slightly underbaked.
- Cool in the pan, then transfer to a wire rack to cool completely before slicing.
Notes
Optional: Fold in chocolate chips or nuts for added texture. Serve warm with Greek yogurt or sugar-free ice cream.
Nutrition
- Serving Size: 1 brownie
- Calories: 120
- Sugar: 1g
- Sodium: 130mg
- Fat: 6g
- Saturated Fat: 1g
- Unsaturated Fat: 5g
- Trans Fat: 0g
- Carbohydrates: 16g
- Fiber: 2g
- Protein: 5g
- Cholesterol: 5mg
Keywords: zero sugar brownies, healthy dessert, Greek yogurt brownies, guilt-free baking