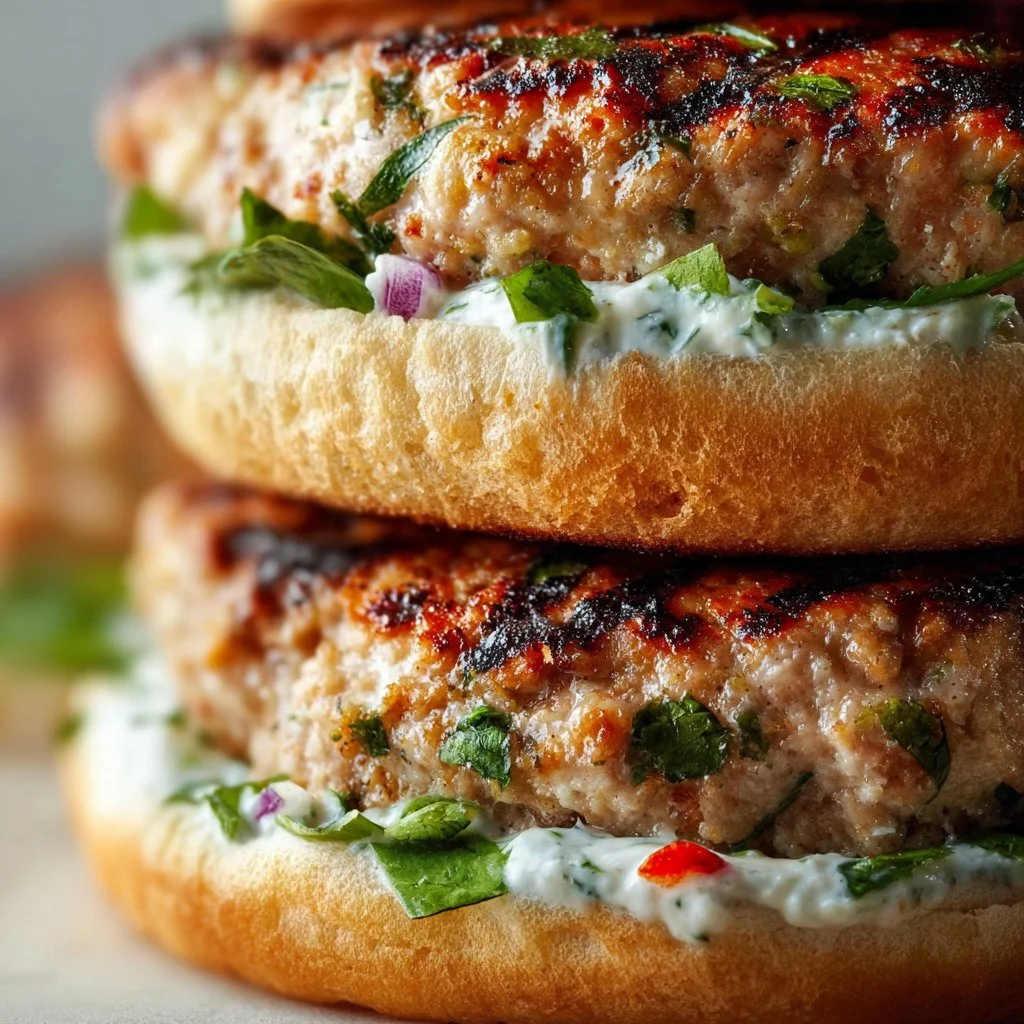
Juicy Greek Chicken Burgers with Tzatziki Bliss
Juicy Greek Chicken Burgers with Tzatziki Bliss
Welcome back, my food-loving friends! Today, we’re diving into something that’s not just delicious but also a total flavor bomb: Juicy Greek Chicken Burgers with Tzatziki Bliss. These aren’t your average chicken burgers; we’re bringing in all the zesty Mediterranean vibes that’ll make your taste buds do a happy dance. Picture grilled chicken patties infused with herbs, spices, and a sprinkle of feta cheese, crowned with creamy tzatziki. Are you ready? Let’s get cooking!
Introduction
As someone who loves exploring different cuisines, Greek food holds a special place in my heart. Ever since I visited a charming little taverna during a summer in Santorini, I’ve been captivated by the culture and flavors that celebrate fresh ingredients. From the juicy souvlakis to the tangy tzatziki, each dish is a burst of delight. So, when I decided to whip up a burger that encapsulates the essence of Greek cuisine, these Juicy Greek Chicken Burgers were born!
Not only are they quick to prepare but they’re also a healthier twist on the classic burger—perfect for weeknight dinners, backyard barbecues, or an easy meal prep option! They are loaded with fragrant herbs and spices, ensuring you won’t miss the beef patties at all. And let’s not forget the addition of tzatziki; it’s like the icing on the cake of this culinary creation. Whether you’re a foodie looking to shake things up, or just someone seeking lighter meal options, these burgers are guaranteed to impress.
So grab your apron as we embark on a culinary adventure that’s fresh, vibrant, and bursting with flavor. Ready to tantalize your taste buds? Let’s jump in!
Personal Story
One of my favorite kitchen memories involves my grandmother, who was a wonderful cook. During the summer, she would often host family gatherings where we would feast on her homemade Greek dishes. I remember one sunny afternoon when she taught me her secrets to making the best tzatziki sauce. It was a mix of yogurt, shredded cucumbers, garlic, and a squeeze of lemon juice—so simple yet absolutely revolutionary! While my cousins and I played in the backyard, she would whip up her classic chicken souvlaki and, of course, her famous tzatziki. The fragrant scent wafting through the air was enough to make our mouths water!
Fueled by childhood memories and a passion for bringing vibrant flavors to my kitchen, I set out to create these Greek chicken burgers. They serve as a nod to my grandmother’s legacy while allowing me to fuse modern cooking techniques with traditional tastes. Every bite transports me back to those warm summer gatherings. I hope you find joy in these burgers as much as I do!
Ingredients
Let’s gather all the goodness needed for these scrumptious Greek Chicken Burgers. Here we go!
-
1 lb Ground Chicken (93% lean): This lean meat keeps the burgers juicy without feeling heavy. You can substitute with ground turkey if that’s your thing!
-
1/2 cup Feta Cheese: The salty tang of feta adds depth to the flavor. If you’re feeling adventurous, any crumbly cheese could work in a pinch—think goat cheese or even omit it altogether for dairy-free options.
-
1 medium Onion (finely chopped): This brings sweetness and texture. Yellow onions are great, but if you’re looking for a milder taste, try the sweeter Vidalia variety!
-
3 cloves Garlic (minced): Essential! Garlic elevates the burgers with its aromatic intensity. Fresh garlic is always best, but you could swap for garlic powder in a pinch.
-
1/4 cup Fresh Parsley (or dill): Fresh herbs brighten up the dish. If parsley isn’t available, dill is a lovely alternative offering its own unique taste.
-
1 tsp Dried Oregano: A staple in Greek cooking, it adds a lovely earthy flavor. If you have fresh oregano on hand, use 1 tablespoon instead!
-
1 tsp Salt: Essential for enhancing flavor in any dish. Adjust to your taste preference, keeping in mind that feta adds saltiness as well.
-
1/2 tsp Black Pepper (freshly ground): Freshly ground pepper gives the burgers an aromatic warmth. Pre-ground works but freshly ground is always superior!
-
1/4 tsp Red Pepper Flakes (optional): For a little kick! Add more if you love heat or leave it out if you prefer mild flavors.
-
1 tbsp Lemon Zest: This brightens up the burger with a citrusy freshness. Be sure to zest only the bright yellow part of the lemon for the best flavor.
-
1 tbsp Lemon Juice: Adds acidity and balances the flavors. Fresh is best, but bottled lemon juice works too in a pinch.
-
1/2 cup Breadcrumbs (or almond flour for gluten-free): This acts as a binder and adds some structure to the burgers. Panko breadcrumbs can create a lighter texture if you prefer!
-
1 large Egg: Essential for binding all the ingredients together. If you need an egg-free option, try a flax egg (1 tbsp ground flaxseed mixed with 2.5 tbsp water).
-
1 cup Tzatziki Sauce: Fresh or store-bought; this creamy cucumber sauce is the perfect cooling counterpart to the spicy chicken. I usually recommend making it fresh for that homemade taste!
-
2 cups Fresh Vegetables (lettuce, sliced tomatoes, cucumbers): These add crunch and freshness. Use your favorite veggies to top your burger!
-
4 pieces Buns or Pita (whole grain or gluten-free): Opt for whole grain for a healthier version, or use gluten-free pita for a delightful twist. This is where you can get creative; serve them on lettuce wraps if you want to skip the bread!
Step-by-Step Instructions
Alright, let’s get down to the cooking! Here’s how to make these Juicy Greek Chicken Burgers step by step. Grab your mixing bowl, and let’s roll!
-
Prepare the Chicken Mixture: In a large mixing bowl, combine the ground chicken, feta cheese, chopped onion, minced garlic, parsley, oregano, salt, black pepper, red pepper flakes (if using), lemon zest, lemon juice, breadcrumbs, and the egg. Use your hands (it’s the best tool for this job!) to gently combine everything until just mixed. Be careful not to overwork the meat; we want those burgers to be tender.
-
Form the Patties: Once everything is well combined, divide the mixture into four equal portions. Shape each portion gently into a burger patty about 3/4 inch thick. A trick I love is to create a small indentation in the middle of each patty—this helps them cook evenly and prevents them from puffing up!
-
Chill in the Fridge: Place the patties on a plate and cover them with plastic wrap. Let them chill in the refrigerator for about 20-30 minutes. This helps the flavors meld together and firms up the patties, making them easier to grill.
-
Preheat the Grill or Pan: While the patties are chilling, preheat your grill or a non-stick skillet over medium heat. Add a light drizzle of olive oil to prevent sticking. We’ve got to get that sizzle going!
-
Cook the Patties: Remove the patties from the fridge and carefully place them on the grill or skillet. Cook for about 5-6 minutes on one side until golden brown. Don’t rush this step; the caramelization adds tons of flavor! Flip them over and cook for another 5-6 minutes until they reach an internal temperature of 165°F (75°C).
-
Warm the Buns: If you’re using buns or pita, toast them on the grill for the last minute or so of cooking. Getting those toasty edges will add fantastic texture!
-
Assemble the Burgers: Now for the fun part—assemble your burgers! Spread a generous dollop of tzatziki sauce on the bottom bun or pita, add a juicy chicken patty, and pile on fresh veggies like lettuce, sliced tomatoes, and cucumbers. Top it off with more tzatziki, if you dare!
Serving Suggestions
To plate or serve these burgers, place each one on a clean plate with a side of crispy baked sweet potato fries or a light Greek salad drizzled with olive oil and vinegar. Garnishing with a sprinkle of extra feta or herbs elevates the look! If you’re feeling extra whimsical, serve them in a little pita with a side of crunchy veggies for a fun, shareable meal.
Recipe Variations
Feel like changing things up? Here are a few creative twists to keep things exciting:
-
Mediterranean Meat Mix: Use half ground chicken and half ground lamb for a richer flavor that pays homage to classic Greek dishes.
-
Spicy Twist: Mix in some chopped jalapeños for a zesty kick or add a dash of your favorite hot sauce into the meat mixture.
-
Vegan Option: For a plant-based meal, try substituting the ground chicken with a mix of chickpeas and quinoa (with necessary binding agents like flax eggs or breadcrumbs).
-
Cheesy Delight: Add different cheese options such as pepper jack for a spicy burger or Swiss cheese for a melty twist!
-
Herb Variations: Experiment with different herbs like mint or cilantro instead of parsley for a fresh change.
Chef’s Notes
These Juicy Greek Chicken Burgers represent a truly personal journey from those cherished childhood moments in my grandmother’s kitchen to a dish I’m now eager to share with you all. Over the years, I’ve tried playing around with the spices, and sometimes I even switch up the meat. I once made a version with ground bison that knocked my socks off!
A funny incident I’ll always remember: I once invited friends over for a cookout and forgot to buy the tzatziki sauce. In a pinch, I threw together a last-minute yogurt-based dip with whatever I had, and it ended up being a big hit! You never know what surprises cooking can bring, so don’t stress about perfection!
FAQs and Troubleshooting
1. Why is my chicken burger falling apart?
If your patties are falling apart, they might need more binding. Try adding a bit more breadcrumbs or an extra egg to the mixture next time. Also, chilling the patties before cooking helps them hold their shape.
2. Can I make these burgers ahead of time?
Absolutely! You can prepare the patties in advance, keep them covered in the fridge, and cook them whenever you’re ready. They freeze well, too, so feel free to double the recipe and save some for later.
3. What if I don’t have a grill?
No worries! You can make these burgers in a skillet, grill pan, or even bake them in the oven at 375°F (190°C). Just keep an eye on the cooking time, as they might take a bit longer!
4. How do I know when the burgers are done?
The best way to tell is with a meat thermometer. When they reach an internal temperature of 165°F (75°C), they’re safe to eat!
Nutritional Info
(If applicable, you could include this section post-FAQ. You’d need to calculate the nutritional data based on your specific ingredients and serving sizes.)
And there you have it! Juicy Greek Chicken Burgers with Tzatziki Bliss that are just as refreshing as they are satisfying. I can’t wait for you to give these a try; they’re sure to become a family favorite. Remember, cooking is all about enjoying the process and sharing love through food. So, get in that kitchen, embrace your inner chef, and let’s create some delicious memories together! Happy cooking!
PrintJuicy Greek Chicken Burgers with Tzatziki Bliss

Delicious chicken burgers infused with Mediterranean flavors and topped with creamy tzatziki.
- Prep Time: 15 minutes
- Cook Time: 30 minutes
- Total Time: 45 minutes
- Yield: 4 servings 1x
- Category: Main Course
- Method: Grilling
- Cuisine: Greek
- Diet: Paleo
Ingredients
- 1 lb Ground Chicken (93% lean)
- 1/2 cup Feta Cheese
- 1 medium Onion (finely chopped)
- 3 cloves Garlic (minced)
- 1/4 cup Fresh Parsley (or dill)
- 1 tsp Dried Oregano
- 1 tsp Salt
- 1/2 tsp Black Pepper (freshly ground)
- 1/4 tsp Red Pepper Flakes (optional)
- 1 tbsp Lemon Zest
- 1 tbsp Lemon Juice
- 1/2 cup Breadcrumbs (or almond flour for gluten-free)
- 1 large Egg
- 1 cup Tzatziki Sauce
- 2 cups Fresh Vegetables (lettuce, sliced tomatoes, cucumbers)
- 4 pieces Buns or Pita (whole grain or gluten-free)
Instructions
- Prepare the Chicken Mixture: In a large mixing bowl, combine the ground chicken, feta cheese, chopped onion, minced garlic, parsley, oregano, salt, black pepper, red pepper flakes (if using), lemon zest, lemon juice, breadcrumbs, and the egg. Use your hands to gently combine everything until just mixed.
- Form the Patties: Divide the mixture into four equal portions. Shape each portion into a burger patty about 3/4 inch thick.
- Chill in the Fridge: Place the patties on a plate and cover them with plastic wrap. Chill in the refrigerator for about 20-30 minutes.
- Preheat the Grill or Pan: Preheat your grill or non-stick skillet over medium heat with a light drizzle of olive oil.
- Cook the Patties: Remove the patties from the fridge and carefully place them on the grill or skillet. Cook for about 5-6 minutes on one side until golden brown, then flip and cook for another 5-6 minutes until they reach an internal temperature of 165°F (75°C).
- Warm the Buns: Toast the buns or pita on the grill for the last minute or so of cooking.
- Assemble the Burgers: Spread tzatziki sauce on the bottom bun or pita, add a chicken patty, pile on fresh veggies, and top with more tzatziki.
Notes
These burgers can be made in advance and stored in the fridge or freezer for later use.
Nutrition
- Serving Size: 1 burger
- Calories: 350
- Sugar: 4g
- Sodium: 600mg
- Fat: 15g
- Saturated Fat: 4g
- Unsaturated Fat: 8g
- Trans Fat: 0g
- Carbohydrates: 30g
- Fiber: 2g
- Protein: 25g
- Cholesterol: 120mg
Keywords: Greek chicken burgers, tzatziki sauce, Mediterranean recipes, healthy burgers, BBQ recipes
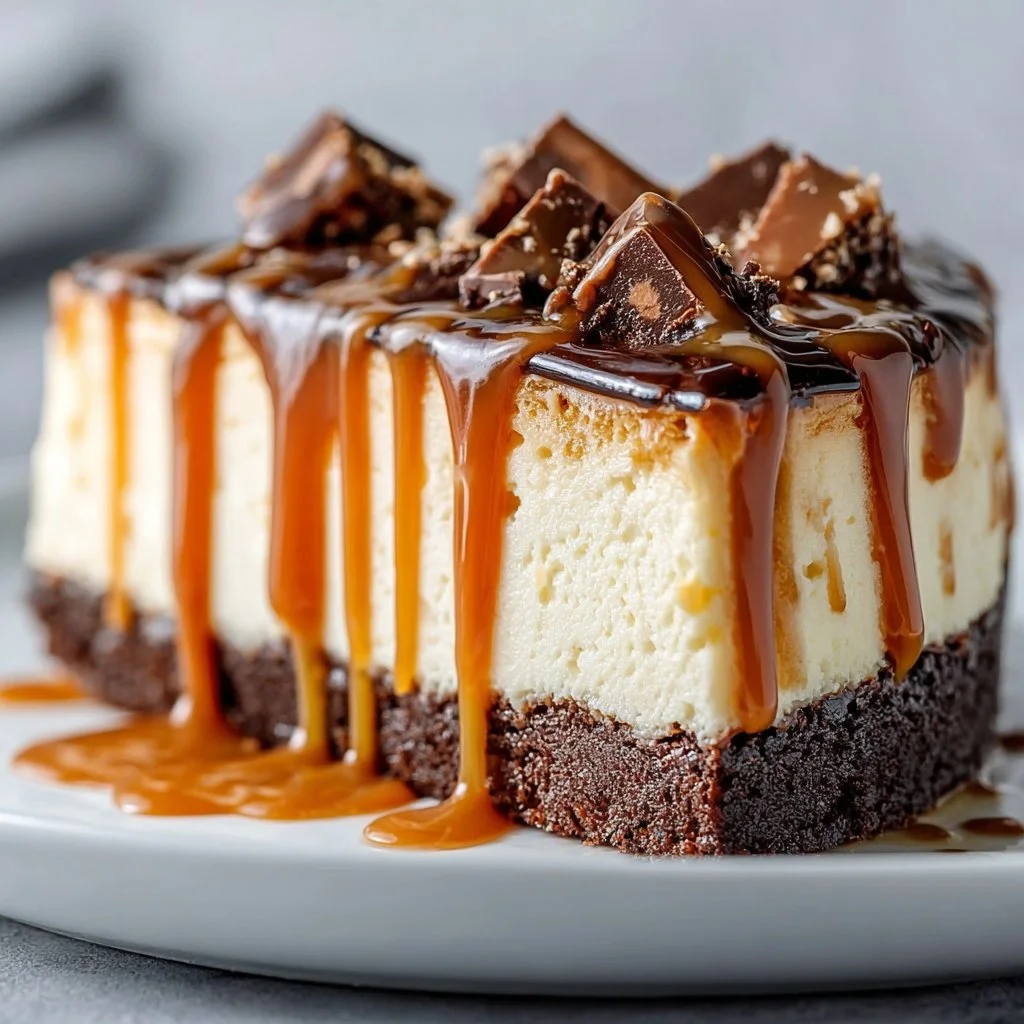
Caramel Brownie Cheesecake: A Dreamy Dessert for Every Occasion
Caramel Brownie Cheesecake: A Dreamy Dessert for Every Occasion
Hey there, fellow food lovers! If you love indulging in desserts that balance decadence with a hint of nostalgia, you’ve landed in the right place! Today, we’re diving into a spectacular recipe that combines the best of two worlds: your beloved brownies and creamy cheesecake! It’s a Caramel Brownie Cheesecake, and let me tell you, it’s a dreamy dessert that will have your taste buds dancing with joy.
I still remember the first time I tried a dessert creation that mixed brownies and cheesecake. It was at a friend’s birthday party, and as soon as I had my first bite, I knew I found my dessert soulmate. The rich and fudgy brownie meets the luscious tang of the cream cheese, all beautifully swirled together and topped with caramel—what’s not to love?
In this chilled wonder, we’ll master a classic that is perfect for every occasion—birthdays, holidays, or even just a Tuesday when you deserve a treat (and let’s be honest, don’t we all?). Plus, it’s surprisingly simple to make; you’ll impress your friends and family without spending all day in the kitchen. So let’s roll up our sleeves and create some magic together!
My Sweet Memory
Ah, before we get our hands dirty, let me share a little memory that makes this dessert even more special. I was a teenager, still learning my way around the kitchen, but always eager to help out during family gatherings. One year, my aunt decided to throw a potluck dinner, and she asked if I’d like to help her whip up something sweet. That was my golden opportunity!
We teamed up to create a variety of treats, but the highlight was her caramel cheesecake, which instantly became a family favorite. As we crafted the layers, I vividly remember creating perfect swirls of caramel and chocolate, getting a bit too excited and sneaking bites in between layers. It was a kitchen adventure filled with laughter and an explosion of flavor in every bite.
Now, every time I make this Caramel Brownie Cheesecake, I’m transported back to that day. The blend of excitement and love in the kitchen reminds me that food is more than just sustenance; it’s about creating memories with the ones we cherish. So, whether you’re creating this dessert for yourself or for someone you love, let’s dive in and sprinkle a little magic together!
Ingredients
Here’s what you’ll need to create this beautiful Caramel Brownie Cheesecake:
-
1 package of brownie mix: Choose your favorite brand! Most mixes require eggs, oil, and water. I usually go for a fudgy brownie mix for that deep, rich texture. If you have a homemade recipe you love, feel free to substitute it.
-
24 ounces (three 8-ounce packages) cream cheese, softened: You want your cream cheese to be soft and at room temperature for a smooth cheesecake batter. If you need a lower-fat option, you can use Neufchâtel cheese, which works well too!
-
1 cup granulated sugar: Sugar will sweeten the cheesecake perfectly and balance out the richness. If you’re looking for a healthier option, you can use coconut sugar as a substitute for a different flavor profile.
-
1 teaspoon vanilla extract: Pure vanilla extract gives your cheesecake a lovely flavor that elevates everything. If you want to experiment, try using almond extract for a nutty twist!
-
3 large eggs: Eggs are crucial for binding everything together and giving your cheesecake the right texture. If you’re in a pinch, you can use flax eggs (1 tablespoon of ground flaxseed mixed with 3 tablespoons of water per egg) as a substitute.
-
1/4 cup sour cream: This ingredient adds creaminess and a slight tang to the cheesecake. You can replace it with Greek yogurt when you need a healthier option.
-
1/4 cup heavy cream: The heavy cream enhances the overall creaminess. If you need a dairy-free option, coconut cream works wonders.
-
1/2 cup caramel sauce (plus extra for drizzling on top): You can make your own caramel or store-bought works just as well! Just be sure it’s thick and rich for that perfect drizzle.
-
Whipped cream: Homemade or store-bought; it’s the finishing touch that elevates this dessert!
-
Chocolate shavings: For garnish, you can use dark chocolate, white chocolate, or caramelized chocolate for an extra layer of richness.
Step-by-Step Instructions
Now, it’s time to bring this beauty to life! Follow these detailed steps and watch as your kitchen transforms into a delicious wonderland!
-
Preheat the Oven: Start by preheating your oven to 350°F (175°C). This step is crucial because you want all the parts of your cheesecake to cook evenly.
-
Prepare the Brownie Base: Prepare your brownie mix as directed on the package. Pour the batter into a greased springform pan, smoothing it out evenly. The brownie layer should be about an inch thick. Bake for about 25–30 minutes until a toothpick comes out with minimal crumbs. Remove from the oven and let it cool completely—it should be fudgy and delightful!
-
Make the Cheesecake Filling: In a large mixing bowl, combine the softened cream cheese and granulated sugar. Use a hand mixer or a stand mixer to beat until it’s smooth and creamy, about 2-3 minutes. Don’t skip this step; a properly beaten mixture ensures your cheesecake will be super smooth!
-
Add Eggs One at a Time: Add in the eggs, one at a time, mixing on low speed after each addition. This method combines them without overmixing and keeps your cheesecake from cracking in the oven—we’re aiming for a velvety texture!
-
Incorporate the Other Ingredients: Add the vanilla extract, sour cream, and heavy cream. Beat until just combined. Stir in the caramel sauce by hand, creating a lovely marbling effect. A little extra caramel never hurts! If you like things extra sweet, feel free to add more!
-
Fill the Springform: Pour the cheesecake mixture over the cooled brownie base, spreading it evenly. Make sure all that chocolatey goodness is well covered!
-
Bake the Cheesecake: Place the springform pan in the preheated oven. Bake for 55-60 minutes or until the edges appear set, but the center still has a slight jiggle. Trust me; that jiggle means it will be creamy as it cools.
-
Cool Down: After baking, turn off the oven and crack the door open, letting the cheesecake cool in the oven for about an hour. This prevents cracking by allowing it to cool gradually.
-
Chill: Once it’s at room temperature, cover it with plastic wrap and refrigerate it for at least 4 hours or, even better, overnight. The flavors will deepen, and the cheesecake will set beautifully.
-
Serve with Style: When ready to serve, remove the sides of the springform pan. Drizzle additional caramel sauce on top and garnish with whipped cream and chocolate shavings. How gorgeous!
Serving Suggestions
When serving your Caramel Brownie Cheesecake, presentation is key! Here are some fun ways to plate it up:
-
For a sophisticated twist, use a cake stand and plate the cheesecake cleanly with a slice already out. Decorate individual slices with extra caramel drizzle and a dollop of whipped cream on the side.
-
If you’re feeling festive, garnish with fresh berries around the base—strawberries or raspberries pop against the caramel and chocolate beautifully!
-
Add a mini sprinkle of sea salt on top—it pairs delightfully with the chocolate and caramel. It’s a game-changer!
Recipe Variations
You’re in for a treat! Here are a few creative ways to switch things up with your Caramel Brownie Cheesecake:
-
Nutty Delight: Swirl in chopped pecans or walnuts into the cheesecake batter before baking for a delightful crunch.
-
Different Flavors: Experiment with different flavored extracts! Try orange or coffee to enhance the flavors of your base.
-
Swirled Chocolate: Incorporate some melted dark chocolate into the cheesecake mixture for an additional layer of chocolate goodness.
-
Minty Fresh: Add a few drops of peppermint extract for a festive twist during the holidays!
-
Dairy-Free Version: Substitute all dairy-based ingredients with dairy-free alternatives (like nut cream cheese, coconut whipped cream, and soy milk), and you’ll have a delicious treat for everyone.
Chef’s Notes
As a chef, I love sharing tips and tales from the kitchen. This recipe has come a long way! The original idea sparked when a friend of mine invited me over just to taste her brownie cheesecake concoction, and I couldn’t help but tweak it over the years. My encounters in the kitchen often lead to joyful accidents—like adding a bit too much caramel and accidentally creating the richest dessert to ever exist! Just remember: cooking is all about having fun and leaning into your creativity.
Don’t be afraid to experiment—if something doesn’t turn out as expected, laugh it off and try again! Some of my best kitchen stories come from attempts that didn’t quite nail it but turned into something extraordinary.
FAQs and Troubleshooting
1. Why did my cheesecake crack?
Cheesecakes can crack for various reasons, often related to temperature. Ensure you cool it down gradually, as mentioned above, and avoid overmixing after adding the eggs.
2. Can I make this dessert ahead of time?
Absolutely! This cheesecake tastes even better a day or two after making it, giving the flavors more time to meld together. Just keep it stored in the fridge tightly covered.
3. How do I know when my cheesecake is done?
The edges should be set while the center remains slightly jiggly. It will continue to firm as it cools, leading to that creamy texture we’re all dreaming of!
4. Can I freeze the cheesecake?
Yes, this cheesecake can be frozen! Just wrap it tightly in plastic wrap and then foil to avoid freezer burn. When ready to enjoy, thaw it in the refrigerator overnight.
Nutritional Info
Please note: Nutritional information can vary based on specific products and brands used. Based on the ingredients above, a single slice (assuming 12 slices) averages around:
- Calories: 350
- Protein: 6g
- Carbohydrates: 40g
- Fat: 20g
- Sugar: 25g
And there you have it—your mouthwatering Caramel Brownie Cheesecake! I’m so excited for you to get into your kitchen and create something delicious. So grab your apron, turn on some tunes, and let’s make some unforgettable food memories together! Happy baking!
PrintCaramel Brownie Cheesecake

A decadent Caramel Brownie Cheesecake that beautifully combines rich brownies and creamy cheesecake with a drizzle of caramel.
- Prep Time: 30 minutes
- Cook Time: 60 minutes
- Total Time: 90 minutes (plus chilling time)
- Yield: 12 servings 1x
- Category: Dessert
- Method: Baking
- Cuisine: American
- Diet: Vegetarian
Ingredients
- 1 package brownie mix
- 24 ounces cream cheese, softened
- 1 cup granulated sugar
- 1 teaspoon vanilla extract
- 3 large eggs
- 1/4 cup sour cream
- 1/4 cup heavy cream
- 1/2 cup caramel sauce (plus extra for drizzling)
- Whipped cream for topping
- Chocolate shavings for garnish
Instructions
- Preheat the oven to 350°F (175°C).
- Prepare your brownie mix as directed and pour into a greased springform pan, smoothing it out evenly.
- Bake for about 25–30 minutes until a toothpick comes out with minimal crumbs. Let it cool completely.
- In a large mixing bowl, combine the softened cream cheese and granulated sugar, beating until smooth, about 2-3 minutes.
- Add the eggs one at a time, mixing on low speed after each addition.
- Incorporate the vanilla extract, sour cream, and heavy cream, beating until just combined.
- Stir in the caramel sauce by hand to create a marbling effect.
- Pour the cheesecake mixture over the cooled brownie base and spread it evenly.
- Bake for 55-60 minutes, or until the edges appear set but the center has a slight jiggle.
- Cool in the oven with the door cracked for about 1 hour, then refrigerate for at least 4 hours or overnight.
- Serve with additional caramel drizzle and garnish with whipped cream and chocolate shavings.
Notes
Try serving with fresh berries or a sprinkle of sea salt for added flavor.
Nutrition
- Serving Size: 1 slice
- Calories: 350
- Sugar: 25g
- Sodium: 300mg
- Fat: 20g
- Saturated Fat: 10g
- Unsaturated Fat: 8g
- Trans Fat: 0g
- Carbohydrates: 40g
- Fiber: 2g
- Protein: 6g
- Cholesterol: 70mg
Keywords: cheesecake, brownie, caramel, dessert, baking
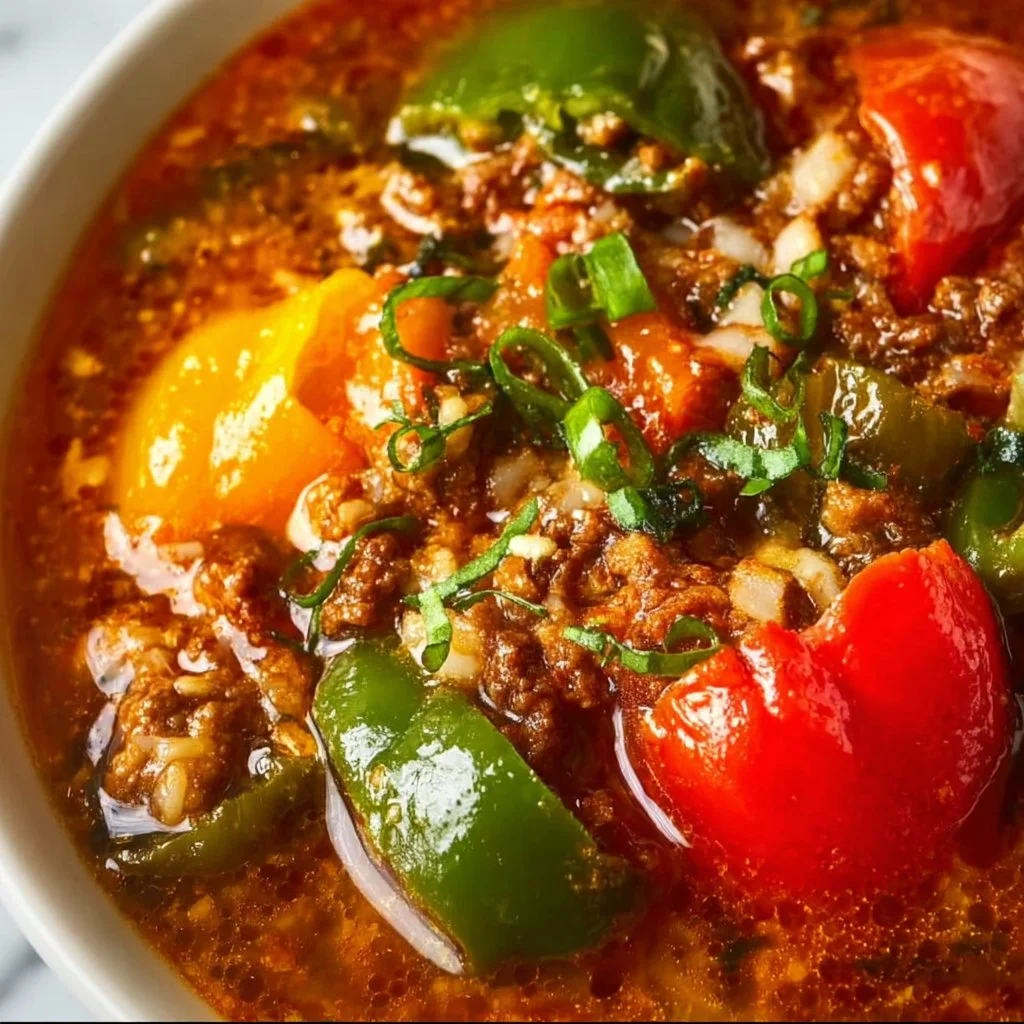
Keto stuffed pepper soup
Dive into Decadence: Keto Stuffed Pepper Soup
Welcome, my fellow food enthusiasts! Today, we’re diving into a dish that is not only packed with flavor but also fits seamlessly into the keto lifestyle—Keto Stuffed Pepper Soup. You know those days when the weather is a bit drizzly, and all you want is something warm and comforting? That’s where this delicious soup comes into play. It’s hearty, it’s nutritious, and it’s downright satisfying!
Imagine curling up on the couch with a steaming bowl of vibrant red and green goodness, just waiting to fill your belly with warmth. This Keto Stuffed Pepper Soup is like getting all the goodness of stuffed peppers without the hassle—no need to hollow out any peppers here! Just chop, sauté, and simmer for a delightful one-pot meal that’ll have everyone asking for seconds.
But beyond its comforting qualities, this soup is all about fresh ingredients and bold flavors. We’re talking richly seasoned ground beef, fresh bell peppers, and aromatic herbs bringing vitality to your bowl. Plus, it’s a great way to meet those veggie goals while enjoying every spoonful. So grab your apron, and let’s get started on this delicious journey!
A Fond Memory to Spice Up Your Kitchen
Ah, the memories that come flooding back when I think of stuffed peppers! One of my favorite childhood memories is being in the kitchen with my grandma, watching her work her magic. The kitchen was always filled with such excitement and warmth when she’d throw together her famous stuffed peppers. The moment the smell of sautéed onions and garlic wafted through the air, I knew dinner would be something special.
Grandma’s technique was a bit more traditional; she would carefully stuff each pepper and bake them to perfection. I loved the anticipation as they bubbled away in the oven. But as time went on and life got busier, I realized I needed a quicker version without sacrificing all that nostalgic flavor. That’s how this Keto Stuffed Pepper Soup came to life! With all the comforting elements of grandma’s classic but served in a way that fits our fast-paced lives today.
Ingredients Breakdown
Let’s gather all the fresh, wholesome ingredients for our Keto Stuffed Pepper Soup. Remember, the beauty of cooking lies in flexibility—don’t hesitate to mix things up based on what you have on hand!
-
Olive Oil (1 tablespoon)
A heart-healthy fat that adds richness. Feel free to substitute with avocado oil for a different flavor profile. -
Chopped Onion (70 g / 2.5 oz)
Provides a sweet base for your soup. If you’re looking for a milder taste, shallots would work well too. -
Ground Beef (450 g / 1 lb / 16 oz)
This is the protein powerhouse of your soup. For a leaner option, ground turkey or chicken can be fantastic alternatives. -
Chopped Green or Yellow Pepper (80 g / 2.8 oz)
Adds that classic stuffed pepper flavor! You can mix and match with other colors like orange for more sweetness. -
Chopped Red Pepper (145 g / 5.12 oz)
Not only does it brighten the soup, but it also brings a wee bit of sweetness. If you’re looking to reduce carbs, you can skip this altogether. -
Minced Garlic (3 cloves)
The aromatic punch we all love! If fresh isn’t available, 1 teaspoon of garlic powder can work as a substitute. -
Canned Crushed Tomatoes (1 cup / 200 ml)
Introduces acidity and depth. If you prefer fresh, go for about 4-5 ripe tomatoes, chopped. -
Beef Broth (1.5 cups / 300 ml)
Adds a robust flavor base. Vegetable broth can be used for a vegetarian twist! -
Water (2 cups / 400 ml)
Helps to reach the desired consistency; you can adjust based on how chunky or brothy you like it. -
Salt (1/2 teaspoon or more to taste)
Don’t skip seasoning! Use sea salt or kosher salt for better flavor. -
Pepper (to taste)
Freshly cracked black pepper enhances all the flavors. -
Ground Paprika (1 teaspoon)
Adds warmth and subtle smokiness. Smoked paprika is a great substitution for added depth. -
Turmeric (1 teaspoon)
Not only does it boost color, but it’s also full of anti-inflammatory properties. -
Dried Basil (1 teaspoon)
A classic herb that complements the peppers beautifully. You can easily swap it out for dried thyme or oregano. -
Dried Oregano (1 teaspoon)
A necessity for that Italian flair. Fresh could be used if you have it on hand. -
Freshly Chopped Parsley (1 tablespoon)
Brightens the finished dish. Substitute with cilantro if you’re a fan of its unique flavor!
For Serving:
-
Sour Cream
Adds a creamy, tangy touch—Greek yogurt is a great substitute! -
Freshly Chopped Parsley
For that color pop on top! -
Chopped Spring Onion
A milder onion flavor that’s perfect for garnish. -
Shredded Cheddar Cheese
Because who doesn’t love cheese? Feel free to use your favorite cheese blend!
Step-by-Step Cooking Instructions
Alright, let’s get to the fun part—cooking this delectable Keto Stuffed Pepper Soup! Here’s a step-by-step breakdown to guide you through.
-
Sauté the Aromatics
In a large pot, heat the olive oil over medium heat. Add the chopped onions and let them sweat for about 3-4 minutes until they’re translucent and aromatic. This step builds the foundation of flavor for your soup! -
Add the Garlic
Next, toss in the minced garlic and sauté for an additional 1-2 minutes until fragrant. Be careful not to burn it! Burnt garlic brings bitterness, and trust me, we don’t want that in our delicious soup. -
Brown the Ground Beef
Crank up the heat a smidge and add the ground beef. Using a wooden spoon, break it apart and cook until browned, about 6-8 minutes. Drain excess grease if desired. This step enriches the soup with meaty goodness. -
Incorporate the Peppers
Add the chopped green and red peppers to the pot. Stir everything together and let it cook for about 5 minutes, allowing the peppers to soften slightly. The vibrant colors are truly a feast for the eyes! -
Mix in the Tomatoes and Broth
Now it’s time to pour in the crushed tomatoes and beef broth. Stir to combine, and then add the water. Bring everything to a gentle simmer. -
Season Your Soup
Sprinkle in the salt, pepper, paprika, turmeric, basil, and oregano. This is your chance to infuse the flavors! Let the soup simmer for about 20-25 minutes, uncovered. The longer it simmers, the more those flavors meld together. -
Final Touches
After simmering, taste your soup and adjust the seasoning as necessary. If you like, feel free to add more spices or herbs! The magic happens when we taste and tweak until it’s just right. -
Prepare for Serving
Once satisfied, ladle your Keto Stuffed Pepper Soup into bowls. Top with a dollop of sour cream, a sprinkle of chopped parsley, chopped spring onions, and a generous handful of shredded cheddar cheese.
Serving Suggestions
Plating is an art! To serve your flavorful Keto Stuffed Pepper Soup, simply ladle it into a rustic bowl or a deep plate. The vibrant colors of the peppers and herbs will look stunning against the white bowl. Garnish generously to create a beautiful contrast, and don’t forget a side of crusty bread for those who aren’t counting carbs—just for dipping, of course!
Recipe Variations
Now, for the creative souls out there, here are some fun twists you might want to try with this recipe:
-
Spicy Kick: Add in some diced jalapeños or a sprinkle of red pepper flakes for an extra layer of heat.
-
Vegetarian Delight: Substitute ground beef with lentils or robust mushrooms for a hearty vegetarian option.
-
Cheesy Goodness: Stir in cream cheese towards the end of cooking for an extra creamy texture and rich flavor.
-
Herb Infusion: Try fresh herbs like thyme and rosemary instead of dried for a bright, aromatic addition.
-
Curry Twist: Incorporate curry powder in place of the paprika and turmeric for a fun, exotic take on the flavors.
Chef’s Notes
This Keto Stuffed Pepper Soup has been a hit in my kitchen, evolving with each batch. It started as a quick weeknight meal and turned into something I love to serve at gatherings—everyone loves it! One memory that stands out is the time I accidentally added double the garlic… you know what? It turned out pretty fantastic! The beauty of cooking is that while there’s a recipe, there’s always room for creativity and accidental breakthroughs. Embrace the kitchen chaos; some of the best flavors come from unexpected discoveries!
FAQs and Troubleshooting
1. My soup is too thick—what can I do?
If your soup has thickened more than you’d like, simply add a bit more broth or water until you reach your desired consistency.
2. Can I make this soup in advance?
Absolutely! This soup actually gets better over time as the flavors meld. Store it in the fridge for up to 4 days, and reheat on the stove when you’re ready to enjoy.
3. What’s the best way to freeze leftovers?
Let the soup cool completely, then transfer it to an airtight container. It can be frozen for up to 3 months. Just thaw in the fridge overnight before reheating.
4. Why does my soup taste a bit bland?
Every ingredient brings its own level of flavor! If yours falls flat, it could be due to insufficient seasoning. Taste as you go and don’t be afraid to add more salt, spices, or herbs.
Nutritional Info (Optional)
For those keeping track, here’s a rough breakdown per serving:
- Calories: 340
- Protein: 24g
- Fat: 22g
- Carbohydrates: 9g (Net carbs after fiber)
- Fiber: 3g
And there you have it—the delightful journey that is Keto Stuffed Pepper Soup! I hope it brings as much joy to your kitchen as it does to mine. Remember, cooking is about exploring flavors, enjoying the moment, and making delicious memories. So, let’s eat well, feel good, and keep those cravings in check. Happy cooking, friends!
PrintKeto Stuffed Pepper Soup

A delicious, comforting soup packed with the flavors of stuffed peppers, perfect for a keto lifestyle.
- Prep Time: 10 minutes
- Cook Time: 30 minutes
- Total Time: 40 minutes
- Yield: 6 servings 1x
- Category: Soup
- Method: Stovetop
- Cuisine: American
- Diet: Keto
Ingredients
- 1 tablespoon Olive Oil
- 70 g Chopped Onion
- 450 g Ground Beef
- 80 g Chopped Green or Yellow Pepper
- 145 g Chopped Red Pepper
- 3 cloves Minced Garlic
- 1 cup (200 ml) Canned Crushed Tomatoes
- 1.5 cups (300 ml) Beef Broth
- 2 cups (400 ml) Water
- 1/2 teaspoon Salt (or more to taste)
- Pepper (to taste)
- 1 teaspoon Ground Paprika
- 1 teaspoon Turmeric
- 1 teaspoon Dried Basil
- 1 teaspoon Dried Oregano
- 1 tablespoon Freshly Chopped Parsley
- Sour Cream (for serving)
- Freshly Chopped Parsley (for garnish)
- Chopped Spring Onion (for garnish)
- Shredded Cheddar Cheese (for topping)
Instructions
- Sauté the olive oil in a large pot over medium heat. Add the chopped onions and let them sweat for about 3-4 minutes until translucent.
- Add the minced garlic and sauté for an additional 1-2 minutes until fragrant.
- Brown the ground beef, breaking it apart as it cooks, for about 6-8 minutes until browned.
- Incorporate the chopped green and red peppers and cook for about 5 minutes, allowing them to soften.
- Mix in the crushed tomatoes and beef broth, then add the water. Bring to a gentle simmer.
- Season the soup with salt, pepper, paprika, turmeric, basil, and oregano. Let it simmer uncovered for 20-25 minutes.
- Taste and adjust seasoning as necessary before serving.
- Prepare the soup in bowls and top with sour cream, parsley, chopped spring onions, and shredded cheddar cheese.
Notes
This soup can be made in advance and tastes even better the next day. Feel free to customize with additional spices or herbs.
Nutrition
- Serving Size: 1 serving
- Calories: 340
- Sugar: 4g
- Sodium: 800mg
- Fat: 22g
- Saturated Fat: 10g
- Unsaturated Fat: 8g
- Trans Fat: 0g
- Carbohydrates: 9g
- Fiber: 3g
- Protein: 24g
- Cholesterol: 80mg
Keywords: keto, soup, stuffed peppers, healthy recipe, low carb
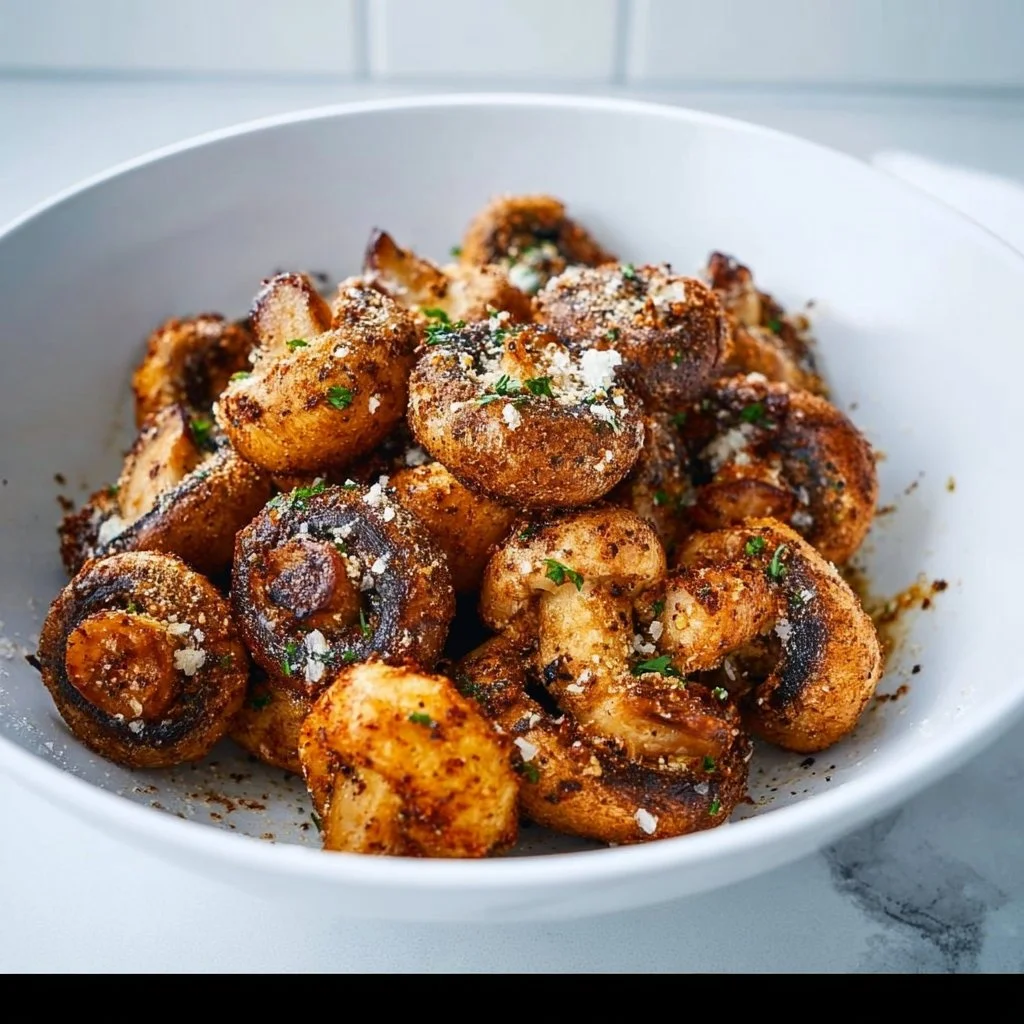
Keto Fried Mushrooms
Keto Fried Mushrooms: A Crispy Delight That Wins Hearts
Welcome to my kitchen, food lovers! Today, I’m excited to take you on a culinary adventure that’s all about crispy, crunchy flavors that tickle your taste buds without the carbs. Yes, you guessed it! We’re diving into the delicious world of Keto Fried Mushrooms.
Now, whether you’re on a keto journey, looking to add more veggies into your meals, or just craving something delightful to snack on, these mushrooms are your ticket to happiness. Why? Because they’re fluffy on the inside with a golden, crispy coating that adds a satisfying crunch to every bite. Plus, they make a perfect snack, side dish, or even a party appetizer that will leave your friends and family wanting more!
Before we jump into the cooking process, let’s take a moment to appreciate the wondrous and versatile mushroom. Not only are they low in carbs, but they’re also packed with flavor and nutrients, proving that healthy eating can be absolutely fabulous! Alright, grab your apron, and let’s get cooking!
A Little Kitchen Story
Growing up, my family had a cozy little restaurant where good food brought everyone together. One dish that never failed to disappear from the menu was our crispy fried mushrooms. My mom used to whip them up for our family gatherings, and they quickly became the star of every meal.
I’ll never forget those weekends when friends would come to our place, seeking not just a meal but an experience. I’d watch eagerly as my mom tossed mushrooms in a zesty batter, her laughter mixing with the sizzling sounds of them frying in the pan. The aroma filled the air, creating an atmosphere of excitement and anticipation that was hard to resist.
Those moments instilled in me a love for food that is both comforting and delightful. They also taught me that cooking is more than just following recipes—it’s about sharing joy, creating connection, and savoring life’s little pleasures. So, as I share this keto-friendly fried mushroom recipe, I want you to feel the same love and joy that was present in my childhood kitchen.
Ingredients
Now, let’s talk about what you’ll need for these delectable Keto Fried Mushrooms:
-
2 cups mushrooms, sliced: Choose your favorite type, such as button, cremini, or shiitake. Mushrooms are low in carbs, high in fiber, and an excellent source of antioxidants. Substitution Tip: If you want a different texture or flavor, try using zucchini slices or eggplant.
-
1/4 cup almond flour: This is our crispy coating that keeps the mushrooms light while giving them a delicate crunch. Chef’s Insight: Almond flour is keto-friendly and gluten-free, making it perfect for those looking for healthier options. If you’re nut-free, you can swap it with finely crushed pork rinds for a unique twist.
-
1/2 teaspoon garlic powder: Garlic is a flavor powerhouse in any dish. It also brings a satisfying aroma that makes your kitchen smell amazing. Substitute: If you love fresh flavors, go for fresh minced garlic!
-
1/2 teaspoon onion powder: Helps to enhance the overall flavor profile of the dish, adding a touch of sweetness. Fun Fact: You can use chives or green onions for a fresh kick.
-
Salt and pepper to taste: Essential seasoning that amplifies flavor. Don’t be shy; taste as you go!
-
Oil for frying: I recommend avocado oil for its high smoke point and health benefits, but you can also use olive oil or coconut oil. Pro Tip: Avoid using vegetable oil as it’s not ideal for high-heat cooking.
Step-by-Step Instructions
Now, it’s time to roll up your sleeves and dive into the cooking! Let’s make these Keto Fried Mushrooms together, shall we?
Step 1: Prepare the Mushrooms
Start by cleaning your mushrooms under running cold water. Gently scrub with a cloth to remove any dirt. Once you’ve cleaned them, slice the mushrooms evenly, about 1/4 inch thick, so they cook evenly and get that nice crispy crust.
Step 2: Create Your Coating
In a medium bowl, combine the almond flour, garlic powder, onion powder, salt, and pepper. Stir them together until they’re well mixed. This flour blend is not only keto-friendly but also gluten-free! You can adjust seasoning according to your preference—feel free to add a splash of your favorite spice!
Step 3: Heat the Oil
In a large skillet, heat about 1/2 inch of your chosen oil over medium-high heat. To check if the oil is hot enough, you can drop a small piece of mushroom in; if it sizzles right away, you’re ready to go!
Step 4: Coat the Mushrooms
Take each sliced mushroom and dip it into the almond flour mixture, making sure to coat it evenly. Shake off any excess flour. This step is crucial because it ensures that each bite delivers that crispy texture we’re after.
Step 5: Fry the Mushrooms
Carefully place the coated mushrooms into the hot oil, a few at a time—don’t overcrowd the skillet! Fry them until they turn golden brown, typically about 2-3 minutes on each side. Use a slotted spoon to turn them for an even fry. You’ll know they’re done when they are beautifully crispy and golden.
Step 6: Drain and Serve
Once fried, use the slotted spoon to transfer the mushrooms to a plate lined with paper towels, which will absorb the excess oil. Repeat with the remaining mushrooms.
Chef’s Tip:
Get creative here—while the mushrooms fry, play some upbeat music or enjoy a fun chat with friends. Cooking is meant to be enjoyable, after all!
Serving Suggestions
These crispy Keto Fried Mushrooms are perfect as they are, but I love to serve them with a vibrant, zesty dipping sauce. A creamy garlic aioli or spicy ranch complements the flavors beautifully! For presentation, simply arrange the mushrooms on a colorful platter, garnished with fresh herbs like parsley or chives. Don’t shy away from getting a little fancy with the plating—this is your moment, food artist!
Recipe Variations
Want to mix things up a bit? Here are a few delicious variations to try:
- Cheesy Delight: Add 1/4 cup of grated Parmesan cheese to your almond flour mix for an extra layer of flavor.
- Spicy Kick: Incorporate some cayenne pepper or chili powder into the coating for a spicier version.
- Herb Infusion: Mix in fresh herbs like thyme or oregano along with the coat for a fragrant twist.
- Sweet & Savory: Try adding a splash of balsamic vinegar to the frying oil for a hint of sweetness.
- Paleo-Friendly: Instead of almond flour, use coconut flour for a different flavor profile (note: you may need to adjust the amount).
Chef’s Notes
As a chef who believes in the transformative power of food, I’ve played around with variations of fried mushrooms over the years. I’d say my favorite discovery was the cheese infusion; it adds a lovely savoriness that’s hard to resist.
One time, I accidentally added way too much cayenne pepper while experimenting, and let’s just say, it was a bit of a spicy surprise! Lesson learned: always adjust seasonings gradually. Cooking is all about experimenting, and sometimes the best dishes come from unexpected places.
FAQs and Troubleshooting
1. Why are my mushrooms soggy?
- This usually happens because of excess moisture or overcrowding in the frying pan. Make sure to dry the mushrooms thoroughly before coating and frying them in batches.
2. Can I bake these instead of frying?
- Absolutely! Lay them out on a baking sheet lined with parchment paper, spray with cooking oil, and bake at 400°F (200°C) for about 15-20 minutes, flipping halfway through.
3. What should I serve with my fried mushrooms?
- These mushrooms pair wonderfully with a fresh salad, grilled protein, or even on top of a keto pizza for some added crunch!
4. How do I store leftovers?
- Store any leftovers in an airtight container in the fridge for up to 3 days. To reheat, place them in a hot skillet for a couple of minutes to regain their crispy texture.
Nutritional Info
While this keto-friendly dish is best enjoyed fresh, if you happen to have leftovers, you won’t have to feel guilty! Each serving contains approximately:
- Calories: 150
- Net Carbs: 5g
- Protein: 5g
- Fat: 12g
And there you have it—my delightful recipe for Keto Fried Mushrooms! I hope you enjoy making these as much as I did sharing them with you. Remember, cooking is about love, creativity, and, most importantly, having fun! Happy cooking!
PrintKeto Fried Mushrooms

Crispy, crunchy keto-friendly mushrooms that make a perfect snack or appetizer.
- Prep Time: 10 minutes
- Cook Time: 15 minutes
- Total Time: 25 minutes
- Yield: 4 servings 1x
- Category: Appetizer
- Method: Frying
- Cuisine: Keto
- Diet: Keto
Ingredients
- 2 cups mushrooms, sliced
- 1/4 cup almond flour
- 1/2 teaspoon garlic powder
- 1/2 teaspoon onion powder
- Salt and pepper to taste
- Oil for frying
Instructions
- Prepare the mushrooms by cleaning them under running cold water and slicing them evenly, about 1/4 inch thick.
- Create the coating by mixing almond flour, garlic powder, onion powder, salt, and pepper in a medium bowl.
- Heat about 1/2 inch of oil in a large skillet over medium-high heat.
- Coat each mushroom slice in the almond flour mixture, shaking off any excess flour.
- Fry the coated mushrooms in the hot oil until they turn golden brown, about 2-3 minutes on each side.
- Drain on paper towels and serve with a dipping sauce of your choice.
Notes
For a fancy touch, serve with a zesty dipping sauce like garlic aioli or spicy ranch.
Nutrition
- Serving Size: 1 serving
- Calories: 150
- Sugar: 1g
- Sodium: 200mg
- Fat: 12g
- Saturated Fat: 1g
- Unsaturated Fat: 11g
- Trans Fat: 0g
- Carbohydrates: 5g
- Fiber: 2g
- Protein: 5g
- Cholesterol: 0mg
Keywords: keto, fried mushrooms, low carb appetizer, crispy snack, healthy eating

Nigerian Chicken Stew Recipe
Nigerian Chicken Stew Recipe
Introduction
Welcome back to Clean Plate Cravings! Today, I’m super excited to share one of my all-time favorite recipes: Nigerian Chicken Stew. This dish is a vibrant, flavor-packed delight that’s perfect for any occasion. It’s cozy, comforting, and downright delicious. Whether you’re new to cooking or a seasoned chef, this stew will whisk you away on a culinary adventure!
Now, if you’ve never had Nigerian chicken stew before, you’re in for quite the treat! The combination of spices and fresh ingredients brings a delightful warmth to your kitchen. As the chicken simmers, the aromas will dance through your home, beckoning everyone to gather around the table—trust me, they won’t be able to resist!
Nigerian chicken stew is a staple in many West African homes and is often served over rice, with some plantains or traditional Nigerian bread. What I love most about this dish is its versatility; it can be enjoyed at a family dinner, a festive gathering, or even a cozy night in while binge-watching your favorite show. The best part? It’s easy to prepare and made with simple ingredients, but it offers that wow factor that will impress anyone who tries it.
So, grab your apron and let’s dive into this amazing recipe! We’ll chat about the origins of the dish, share some kitchen stories, and of course, guide you step by step through the cooking process. Are you ready to savor every bite of this spicy, warm, and satisfying dish? Let’s get cooking!
Personal Story
Growing up, my family held tight to our Nigerian roots, and food was always at the center of our gatherings. I vividly remember Sundays at my grandmother’s house, where the air was filled with the intoxicating scent of spices simmering on the stove. It was a time where laughter intertwined with the sizzling pans, and we all looked forward to the hearty dishes she prepared.
The star of those Sunday meals was always her famous chicken stew. I can still picture her standing over the stove, expertly blending fresh tomatoes and peppers to create that vibrant red sauce we all adored. As a kid, I couldn’t help but sneak bits of chicken when I thought no one was watching (sorry, Grandma!). But finding the perfect spice combination—oh, that was her secret!
Now, every time I whip up this Nigerian chicken stew, I’m transported back to those sunny afternoons filled with laughter and love. It reminds me that food is not just about nutrition; it’s also about memories, connections, and the joy of sharing a table. So, let’s honor those traditions and infuse our kitchens with that same warmth and flavor.
Ingredients
Here’s what you’ll need to create this delicious Nigerian chicken stew:
-
2.5 lbs bone-in chicken (thighs or drumsticks), cleaned
- Bone-in chicken adds depth and flavor to your dish. Thighs and drumsticks are especially juicy!
-
1 teaspoon salt
- A must for enhancing the overall flavor of the stew.
-
1/2 teaspoon black pepper
- Adds a gentle kick without overwhelming the taste.
-
1 teaspoon paprika
- This not only gives color but also a subtle smokiness that complements the dish.
-
1 teaspoon curry powder
- A blend of spices that brings a fragrant warmth to the stew—don’t skip this!
-
1 teaspoon thyme
- Dried thyme is earthy and adds another layer of flavor to the mix.
-
1 onion, chopped
- Essential for building the stew’s base; onions add sweetness when cooked down.
-
1/4 cup vegetable oil
- Used for sautéing; feel free to substitute with olive oil for a healthier option.
-
4 large Roma tomatoes
- Fresh tomatoes offer a vibrant tartness—canned tomatoes can work too in a pinch.
-
1 large red bell pepper
- Sweet and crunchy, the bell pepper balances the heat from the spices.
-
1 small red onion
- Softer and sweeter than yellow onions, it adds a nice contrast.
-
2 scotch bonnet peppers (or 1 for less heat)
- These fiery little guys pack a punch! Adjust depending on your spice tolerance.
-
2 tablespoons tomato paste
- Deepens the flavor with a rich tomato essence.
-
1 teaspoon garlic powder
- Convenience at its best—adds the classic garlic flavor without the chopping.
-
1 teaspoon ginger powder
- Ginger brings warmth and a slight spiciness; you can substitute with fresh ginger if desired.
-
1 bouillon cube
- Enhances the umami flavor—feel free to use a low-sodium version.
-
Salt to taste
- Always taste before serving to adjust seasoning.
Step-by-Step Instructions
Now let’s get cooking! Follow these steps to create your delicious Nigerian chicken stew:
-
Prep the Chicken
Begin by cleaning your chicken pieces under cold water, patting them dry with paper towels. Season the chicken with salt, black pepper, paprika, curry powder, and thyme. Make sure to coat each piece well for maximum flavor. This is where all the magic begins! -
Sauté the Onions
In a large pot, heat the vegetable oil over medium heat. Once hot, add the chopped onion and sauté until they become translucent, about 5-7 minutes. This step builds a flavorful base, so don’t rush it! -
Add the Chicken
Carefully place the seasoned chicken into the pot, and sear each side until golden brown, about 5 minutes per side. The goal here is to lock in those juices and get a good color on the chicken. Just look at that beautiful golden crust! -
Blend the Sauce
While the chicken is browning, blend the Roma tomatoes, red bell pepper, and scotch bonnet peppers in a blender until smooth. If you like it chunky, go for it! Pour this mixture over the browned chicken in the pot. -
Stir in Seasoning
Add the tomato paste, garlic powder, ginger powder, and bouillon cube to the pot. Stir everything together, ensuring the tomato sauce coats the chicken evenly. Here’s where you’ll want to take a deep breath and appreciate those rich aromas filling your kitchen. -
Simmer Away
Bring the stew to a gentle boil, then reduce the heat to low and cover. Let it simmer for about 30-40 minutes. This is the time to get those flavors mingling and the chicken becoming tender and flavorful. Go ahead; check your phone, but don’t wander too far—the smells may just lure you back! -
Taste and Adjust
About 10 minutes before serving, taste the stew and adjust the seasoning if necessary. If you’d like it spicier, toss in an additional scotch bonnet. Just be careful; it’s easy to overdo it! -
Finish Up
Once the chicken is tender and the stew has thickened to your liking, remove it from the heat. A sprinkle of fresh herbs or sliced green onions on top can add a lovely touch before serving.
Serving Suggestions
To serve your Nigerian chicken stew, ladle it over a generous portion of fluffy rice. The hearty stew pairs beautifully with steamed white rice or jollof rice for an added twist. Don’t forget to add some fried plantains on the side for that perfect sweetness. Serve it in wide, shallow bowls to capture all those delicious juices, and watch as smiles emerge around the table!
Recipe Variations
Feel free to get creative with your Nigerian chicken stew! Here are some variations to consider:
- Vegetarian Option: Substitute chicken with chickpeas or firm tofu for a plant-based version.
- Seafood Delight: Add shrimp or fish towards the end of cooking time for a lovely seafood flair.
- Extra Veggies: Toss in diced carrots, green beans, or spinach for added nutrition and colors.
- Coconut Twist: Stir in a splash of coconut milk for a creamier texture and a hint of tropical flavor.
- Jollof Style: Spice it up with additional spices like bay leaves or use jollof rice as a base; the flavors will complement beautifully.
Chef’s Notes
I’ve made this Nigerian chicken stew countless times, and it never gets old! Each batch holds a bit of nostalgia and new discoveries. Over the years, I’ve learned that the key to a great stew lies in the seasoning and allowing it to simmer long enough for those flavors to meld perfectly. One time, I accidentally added too much ginger powder, and you would think it was a disaster, but my friends insisted it was the best version! So, embrace those kitchen accidents; they often turn into culinary gems!
FAQs and Troubleshooting
1. My stew turned out too spicy. What can I do?
If the heat is overwhelming, you can add more tomatoes or coconut milk to balance the spice. A spoonful of sugar can also help tone it down.
2. How can I thicken my stew?
If you prefer a thicker sauce, let it simmer uncovered for a bit longer, or you can stir in a slurry made from cornstarch and water.
3. Is it okay to use frozen chicken?
Absolutely! Just make sure to thaw it properly before seasoning and cooking. It may need a bit more time to cook through.
4. How should I store leftovers?
Store any leftover stew in an airtight container in the fridge for up to 3 days. It also freezes well, so you can save some for later!
Nutritional Info
While I won’t delve into extensive nutritional details, this Nigerian chicken stew is packed with protein from the chicken and plenty of vitamins from the vegetables. Depending on serving sizes and ingredients used, you can enjoy a wholesome, hearty meal with minimal guilt!
And there you have it! A delicious, comforting Nigerian chicken stew recipe that’s sure to become a favorite in your kitchen. Remember, cooking should be enjoyed, not rushed—so take your time, savor each step, and let the love pour into your dish. Happy cooking!
PrintNigerian Chicken Stew

A vibrant, flavor-packed Nigerian chicken stew perfect for any occasion, made with simple ingredients and bold spices.
- Prep Time: 15 minutes
- Cook Time: 40 minutes
- Total Time: 55 minutes
- Yield: 6 servings 1x
- Category: Main Course
- Method: Stovetop
- Cuisine: Nigerian
- Diet: Gluten-Free
Ingredients
- 2.5 lbs bone-in chicken (thighs or drumsticks), cleaned
- 1 teaspoon salt
- 1/2 teaspoon black pepper
- 1 teaspoon paprika
- 1 teaspoon curry powder
- 1 teaspoon thyme
- 1 onion, chopped
- 1/4 cup vegetable oil
- 4 large Roma tomatoes
- 1 large red bell pepper
- 1 small red onion
- 2 scotch bonnet peppers (or 1 for less heat)
- 2 tablespoons tomato paste
- 1 teaspoon garlic powder
- 1 teaspoon ginger powder
- 1 bouillon cube
- Salt to taste
Instructions
- Prep the chicken: Clean the chicken under cold water, pat dry and season with salt, black pepper, paprika, curry powder, and thyme.
- Sauté the onions: Heat vegetable oil in a large pot over medium heat and sauté the chopped onion until translucent, about 5-7 minutes.
- Add the chicken: Place the seasoned chicken in the pot and sear until golden brown, about 5 minutes per side.
- Blend the sauce: Blend Roma tomatoes, red bell pepper, and scotch bonnet peppers until smooth and pour it over the browned chicken.
- Stir in seasoning: Add tomato paste, garlic powder, ginger powder, and bouillon cube, stirring to coat the chicken evenly.
- Simmer away: Bring to a gentle boil, reduce heat, cover, and simmer for about 30-40 minutes.
- Taste and adjust: Taste and adjust seasoning as needed about 10 minutes before serving.
- Finish up: Once chicken is tender and stew thickens, remove from heat and garnish before serving.
Notes
Serve over rice or with fried plantains. Adjust spice levels to your taste by adding or reducing scotch bonnet peppers.
Nutrition
- Serving Size: 1 serving
- Calories: 450
- Sugar: 6g
- Sodium: 600mg
- Fat: 20g
- Saturated Fat: 3g
- Unsaturated Fat: 15g
- Trans Fat: 0g
- Carbohydrates: 25g
- Fiber: 4g
- Protein: 35g
- Cholesterol: 80mg
Keywords: Nigerian stew, chicken stew, west african cuisine, comfort food, hearty meal

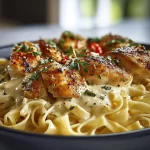
One-Pan Chicken with Buttered Noodles
One-Pan Chicken with Buttered Noodles: A Comforting Classic
Welcome to another delicious adventure here at Clean Plate Cravings! Today, we’re diving into a dish that’s not only comforting but also incredibly simple to whip up on busy weeknights: One-Pan Chicken with Buttered Noodles. This dish is the definition of cozy, packing in all those warm flavors that remind you of home-cooked meals shared with loved ones. So grab your apron, and let’s get cooking together!
A Touch of Nostalgia
Growing up, my family had a tradition of Sunday dinners that brought us all together. The kitchen would fill with the sound of laughter, the aromas of simmering garlic and tasty sauces, and the unmistakable rhythm of pots and pans clinking. One of those memorable meals was a chicken and pasta dish that my mom made, and I can still remember the way the egg noodles twirled around my fork, perfectly coated in creamy goodness with those beautifully seared chicken breasts.
There was something magical about cooking together during those Sunday afternoons. As Mom would sauté the chicken, I was usually perched on a stool, eager to help, because that meant I got to add the garlic—the official starter to any flavor explosion, right? Little did I know how much that kitchen experience would later shape my love for cooking and sharing recipes. Today, looking back, it’s not just about the food; it’s about those moments spent with family, and that’s precisely the spirit I want to convey in my own kitchen today. Let’s make a comforting dish that’s flavorful, hearty, and destined to create its own warm memories in your home!
Ingredients
Here’s the lineup of ingredients you’ll need for our One-Pan Chicken with Buttered Noodles:
-
4 boneless, skinless chicken breasts (1.5 lbs)
These are the stars of the show! You can also use thighs if you prefer darker meat. Just remember, cooking times might differ slightly. -
8 oz egg noodles
Egg noodles are perfect because they soak up the chicken broth well. If you’re feeling adventurous, switch them out for whole-grain or gluten-free pasta! -
4 tbsp real butter
Butter adds that lovely richness. If you’d like a lighter option, coconut oil can be a wonderful substitute. -
4 cloves garlic, minced
Garlic is a flavor powerhouse! You can use garlic powder in a pinch, but nothing beats fresh garlic. -
2 cups low-sodium chicken broth
This builds the base of our sauce. Low-sodium keeps things under control salt-wise, but homemade broth is even better if you have it on hand! -
¼ cup fresh parsley, chopped
Fresh parsley adds color and freshness. Don’t have fresh? You can use dried, but half the amount is all you need. -
Salt and pepper to taste
These are your flavor friends—don’t be shy to taste as you go!
Step-by-Step Instructions
Alright, let’s roll up our sleeves and get cooking!
-
Prep the chicken:
Start by seasoning the chicken breasts generously with salt and pepper. This isn’t just a sprinkle; you want a nice coating that will enhance the flavor when we sear them. Take this moment to channel your inner chef—give those breasts a little pat to make sure the seasoning sticks! -
Sear the chicken:
In a large skillet (trust me, you’ll love this one-pan business), melt 2 tablespoons of butter over medium heat. Once it’s bubbly, add your seasoned chicken breasts. Sear them for about 5-6 minutes on each side until they form that golden-brown crust. This is where the flavor explosion begins! If the chicken is sticking, give it a few more moments—patience is key. -
Add the garlic:
When the chicken is beautifully browned, throw in the minced garlic. Stir it around for about 30 seconds until it’s fragrant. Keep an eye on it to avoid burning; this is a common rookie mistake (trust me!). -
Pour in the broth:
Now it’s time to add the chicken broth to the same skillet. Gently scrape the bottom of the pan with a wooden spoon to release those flavorful brown bits (they’re called fond, and they add an incredible taste!). Bring the broth to a simmer, and then nestle the chicken back into the skillet. -
Cook the noodles:
Once the broth is simmering, add in the egg noodles. Cover the skillet and let everything cook for about 10 minutes, stirring occasionally until the noodles are al dente and the chicken is cooked through. This is that moment where magic happens—everything melds into one deliciously cohesive dish. -
Finishing touches:
Once the noodles are tender, remove the skillet from heat. Take out the chicken breasts and let them rest on a plate. This is crucial because resting allows the juices to redistribute, resulting in succulent chicken. Add the remaining butter and chopped parsley to the noodles and give them a good toss. -
Slice and serve:
Slice the chicken breasts into medallions and arrange them over the buttery noodles. Sprinkle with extra parsley for a pop of color.
Serving Suggestions
To plate this delightful dish, use a large serving bowl or individual plates for a more elegant touch. Gather the buttery noodles in the center, artfully lay the sliced chicken on top, and finish with a sprinkle of fresh parsley. Want to impress? Add a drizzle of olive oil or a squeeze of lemon for a fresh zing!
Recipe Variations
-
Herb-Infused Chicken:
Marinate the chicken in a mixture of olive oil and your favorite herbs like thyme or rosemary before searing for deeper flavor. -
Veggie Booster:
Toss in some spinach, peas, or cherry tomatoes along with the noodles to amp up the nutritional value and color! -
Creamy Twist:
For a creamier sauce, stir in a splash of heavy cream towards the end of cooking. It creates a luscious, restaurant-style finish. -
Add Heat:
Sprinkle in some red pepper flakes while cooking for an added kick that brings the dish to life! -
Cheesy Delight:
Top the dish with freshly grated Parmesan or Pecorino cheese before serving for an extra indulgent experience.
Chef’s Notes
This recipe has become one of my go-to comfort meals over the years. I remember my first attempt; I was so excited that I forgot to season the chicken, and it turned out bland! Lesson learned: seasoning is your best friend. Over the years, this recipe has evolved from being just a quick fix for my family into a crowd-pleaser among friends and a staple in my cooking repertoire. It never fails to ignite discussions and nostalgia, just like the heartfelt Sunday dinners of my childhood.
FAQs and Troubleshooting
-
What if my chicken is dry?
If your chicken is overcooked, next time, try using a meat thermometer to check for doneness—it should reach 165°F (75°C). Also, consider letting it rest before slicing. -
Why are my noodles sticky?
Make sure you stir the noodles occasionally while they cook. Additionally, adding enough liquid is essential, so ensure you don’t skimp on the broth! -
Can I make this dish ahead of time?
While it’s best served fresh, you can certainly prep the chicken and garlic in advance. Just put everything together shortly before mealtime for best results. -
My sauce is too thin. How can I thicken it?
If you prefer a thicker sauce, you can mix a teaspoon of cornstarch with cold water and stir it in while simmering. Let it cook for a few more minutes to thicken!
Nutritional Info (Optional)
While specific nutritional content can vary based on ingredient brands and portions, a serving of this One-Pan Chicken with Buttered Noodles is generally around 450 calories, with 30 grams of protein, 20 grams of carbs, and 25 grams of fat.
This One-Pan Chicken with Buttered Noodles is more than just a meal—it’s a celebration of simple ingredients and cherished memories. I hope this recipe brings a smile to your face, fills your kitchen with delightful scents, and more importantly, ignites your passion for cooking. So gather your loved ones and dig into this simple yet satisfying dish. Happy cooking!
PrintOne-Pan Chicken with Buttered Noodles
A comforting dish of juicy chicken and buttery egg noodles, perfect for busy weeknights.
- Prep Time: 10 minutes
- Cook Time: 20 minutes
- Total Time: 30 minutes
- Yield: 4 servings 1x
- Category: Main Course
- Method: Stovetop
- Cuisine: American
- Diet: Gluten-Free, Dairy-Free upon substitution
Ingredients
- 4 boneless, skinless chicken breasts (1.5 lbs)
- 8 oz egg noodles
- 4 tbsp real butter
- 4 cloves garlic, minced
- 2 cups low-sodium chicken broth
- ¼ cup fresh parsley, chopped
- Salt and pepper to taste
Instructions
- Prep the chicken: Season the chicken breasts generously with salt and pepper.
- Sear the chicken: In a large skillet, melt 2 tablespoons of butter over medium heat and sear the chicken for about 5-6 minutes on each side.
- Add the garlic: Throw in the minced garlic and stir it around for about 30 seconds until fragrant.
- Pour in the broth: Add the chicken broth, scraping the bottom of the pan, and bring to a simmer.
- Cook the noodles: Add in the egg noodles, cover, and cook for about 10 minutes until the noodles are al dente and the chicken is cooked through.
- Finishing touches: Remove the skillet from heat, let the chicken rest, and stir the remaining butter and parsley into the noodles.
- Slice and serve: Slice the chicken and arrange over the noodles, garnishing with extra parsley.
Notes
For a creamier sauce, stir in a splash of heavy cream before serving. Adjust seasoning to taste.
Nutrition
- Serving Size: 1 serving
- Calories: 450
- Sugar: 2g
- Sodium: 350mg
- Fat: 25g
- Saturated Fat: 10g
- Unsaturated Fat: 12g
- Trans Fat: 0g
- Carbohydrates: 30g
- Fiber: 2g
- Protein: 30g
- Cholesterol: 80mg
Keywords: chicken, pasta, quick meal, comfort food, one-pan dish
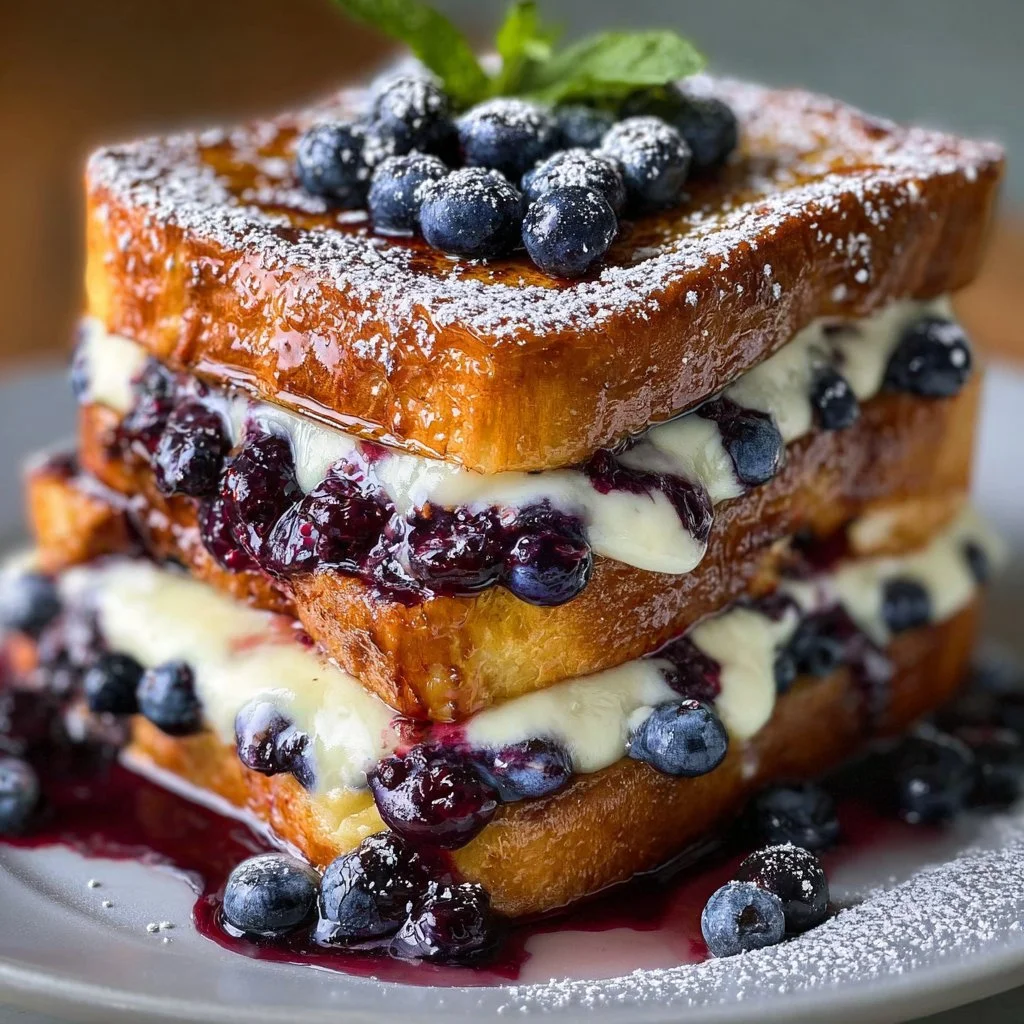
How to Make Blueberry Cheesecake Stuffed French Toast at Home
How to Make Blueberry Cheesecake Stuffed French Toast at Home
Hey there, fellow food lovers! Today, I want to take you on a culinary adventure that blends two soul-soothing breakfast delights into one: Blueberry Cheesecake Stuffed French Toast! If you adore the creamy textures of cheesecake and the warm, fluffy goodness of French toast, buckle up—this recipe is your new best friend.
Introduction
Imagine waking up on a leisurely weekend morning, the sun streaming through your kitchen window, and the tantalizing aroma of something utterly delicious wafting through the air. You roll out of bed, your senses dancing with delight as you make your way to the kitchen. What could be better? Oh, I know—indulging in a plate of Blueberry Cheesecake Stuffed French Toast!
This concept emerged during one of those blissful, lazy brunch days when my mind drifted to my all-time favorite dessert: cheesecake. I remembered devouring slice after slice, completely enchanted by its creamy richness. That very day, as I stared at a loaf of day-old brioche sitting on my counter, inspiration struck! Why not combine these two flavors in a way that’s fun, delicious, and (dare I say) a little indulgent?
Let’s face it—sometimes, life calls for a treat. And what better way to celebrate the good moments than with a dish that’s as striking as it is scrumptious? Whether you’re hosting a brunch for friends or simply treating yourself on a Saturday morning, this recipe is sure to impress!
Ready to dive in? Grab your apron and let’s get cooking!
Personal Story
I remember the first time I had a really memorable French toast. It was during a road trip with friends. We stumbled upon this cozy little diner tucked away in a small town that seemed to have the vibe of a 1950s treasure. Among the plethora of breakfast options on the menu was “Stuffed French Toast.” The waitress described it so passionately, I couldn’t resist ordering it.
The moment my plate arrived, I was in awe! Thick slices of French toast, golden and crispy on the outside, oozing a sweet cream cheese filling, and topped with a neat pile of fresh blueberries. With the first bite, my taste buds were dancing a joyful jig, as if they had just discovered a hidden treasure.
From that day on, the quest for the perfect stuffed French toast became my mission. And now, here I am, sharing my rendition of that delightful dish! What’s even more exciting is that I crafted this version to be a bit healthier while keeping all the indulgent flavors. You’re going to love this! Now, let’s put on our culinary hats and get started!
Ingredients
Here’s what you’ll need to whip up these amazing Blueberry Cheesecake Stuffed French Toast slices:
-
150g (5.3 oz) Cream Cheese, softened
- This creamy staple brings that classic cheesecake flavor to the equation. If you’re looking for a lighter option, try using low-fat cream cheese or Greek yogurt!
-
2 tablespoons Caster Sugar
- Caster sugar dissolves easily, giving a sweet touch to the filling. You can substitute with coconut sugar or even honey for a natural sweetener.
-
1 teaspoon Vanilla Extract
- A splash of vanilla brings warmth and depth to the cheese mixture. Consider using vanilla bean paste for an extra luxurious twist!
-
½ cup Blueberries (fresh or thawed if frozen)
- These little gems not only add a fresh sweetness, but they’ll also burst with flavor in every bite. If blueberries aren’t your jam, feel free to swap in raspberries or strawberries!
-
1 Loaf Day-Old Brioche, sliced thick (8 slices)
- Brioche is wonderfully fluffy and perfect for soaking up the custard. If you can’t find brioche, challah works just as beautifully!
-
1 Egg
- This binds everything together in our custard mixture. For a vegan option, you can use a flax egg (1 tablespoon ground flaxseed mixed with 2.5 tablespoons water).
-
½ cup Milk
- Whole milk gives a rich texture, but almond or oat milk works great if you’re looking for a dairy-free alternative.
-
½ cup Cream
- The cream adds a lusciousness that’s hard to beat! For a lighter version, opt for half-and-half or even a plant-based cream.
-
1 teaspoon Cinnamon
- Cinnamon not only adds warmth but perfectly complements the sweetness of the blueberries. Don’t be shy to sprinkle a bit more on if you love its flavor!
-
Butter, for frying
- Butter creates a beautiful golden crust. You can use coconut oil or ghee if you prefer a dairy-free option.
-
Extra Blueberries, for garnish
- Because we all want our dish to look as fabulous as it tastes!
-
Icing Sugar, for dusting
- A light sprinkle adds a beautiful finish. If you want to skip the sugar hit, you can leave this out.
-
Maple Syrup, for drizzling
- The final touch that ties it all together! While you can use honey or agave syrup, nothing beats good old maple syrup for this dish.
Step-by-Step Instructions
Let’s get our hands dirty and create this delightful breakfast masterpiece!
-
Prepare the Cheesecake Filling
- In a mixing bowl, combine the softened cream cheese, caster sugar, vanilla extract, and half of the blueberries. Use a fork or hand mixer to mix until smooth and creamy. It should be luscious and spreadable—like a dreamy cloud! If you’ll be using frozen blueberries, make sure to thaw and drain them beforehand to avoid excess moisture.
-
Assemble the Brioche Slices
- Take your day-old brioche bread and make a pocket in each slice by cutting a slit on one side. Just be careful not to cut all the way through; you want to keep the base intact. Spoon a generous amount of that beautiful cheesecake filling into each slice, followed by a few more blueberries to amp up the flavor. Get creative and pack it in, but don’t overstuff—leave space for the French toast custard to soak in!
-
Make the Custard Mixture
- In another bowl, whisk together the egg, milk, cream, cinnamon, and a pinch of salt. This is where all the magic comes together. The custard should be well combined, with no lumps. Immerse each stuffed brioche slice into the custard mixture, allowing it to soak up the goodness from both sides for about 5-10 seconds each. Don’t rush this step—soft, custardy toast is a must!
-
Get Cooking!
- Heat a skillet or non-stick pan over medium heat and add a generous knob of butter. Once it’s melted and bubbly, carefully lay your soaked slices into the pan. Cook for about 4-5 minutes per side or until golden brown and crispy. Flip gently to avoid spilling the yummy filling. You want that crunchy exterior cradling a soft, gooey center. The smell? Pure breakfast heaven!
-
Plate It Up
- Once cooked to perfection, remove the stuffed French toast from the pan and let it rest for a couple of minutes. This helps the filling set a little. When you’re ready to serve, place the slices on plates and dust with icing sugar. Top with fresh blueberries and drizzle with maple syrup.
And there you have it! The ultimate brunch dish that will have everyone asking for seconds.
Serving Suggestions
To elevate your presentation, serve your Blueberry Cheesecake Stuffed French Toast on a lovely plate with extra blueberries arranged artfully around the edges. A drizzle of maple syrup or a few mint leaves can really put the finishing touches on your dish. Pair it with crispy bacon or fresh fruit salad to create a well-rounded meal that’s bound to impress.
Recipe Variations
-
Nutty Delight: Add crushed almonds or walnuts to your cheesecake filling for a delightful crunch.
-
Chocolate Twist: Stir in mini chocolate chips with the blueberries for a decadent version.
-
Citrus Zing: Add a touch of lemon or orange zest to the cream cheese for a bright, citrusy lift.
-
Savory Option: Replace the blueberries with sautéed spinach and feta for a savory take!
-
Gluten-Free: Swap the brioche for gluten-free bread to enjoy this delicious treat without grassiness.
Chef’s Notes
This Blueberry Cheesecake Stuffed French Toast recipe has been a work in progress! It started as a simple idea inspired by that unforgettable diner experience. Over the years, I’ve added my own twist and experimented with various fillings and toppings. The best part? It’s so flexible! You really can make it your own.
One time, I was throwing a brunch with friends and wanted to impress them. I decided to try making a chocolate version instead of the classic. It was a hit, and I ended up setting up a little “stuffing station” where everyone could prepare their own. It became a wild and fun brunch, and we still chat about it years later!
FAQs and Troubleshooting
1. What if my French toast isn’t crispy?
- If your French toast doesn’t crisp as you’d like, ensure your pan is hot enough before adding the butter. Lowering the heat can make it cook through before achieving that lovely golden crust.
2. Can I use fresh blueberries instead of frozen?
- Absolutely! Fresh blueberries are perfect for this recipe, bringing that burst of juicy sweetness. Just remember to wash and dry them before use.
3. What if I overstuff the bread?
- If you overstuffed it and it spills out while cooking, don’t worry! Just remove the excess before flipping. The filling is meant to be creamy and delightful, so a little spill won’t ruin the dish!
4. How do I store leftovers?
- If you have any leftovers (though I doubt it!), store them in an airtight container in the fridge for up to 2 days. Just reheat in a skillet or microwave before enjoying again.
Nutritional Info
For those interested in a rough estimate of the nutritional content, here’s what you can expect per serving (based on 1 slice):
- Calories: Approximately 350
- Protein: 8g
- Carbohydrates: 40g
- Fat: 20g
- Sugar: 10g
Note: Nutritional values may vary based on specific ingredients used and portion sizes.
And there you have it! A comforting and indulgent Blueberry Cheesecake Stuffed French Toast recipe that’s destined to become a household favorite. I hope you have fun in the kitchen and enjoy every bite! Bon appétit!
PrintBlueberry Cheesecake Stuffed French Toast

A delightful blend of creamy cheesecake and fluffy French toast, perfect for brunch or a special breakfast treat.
- Prep Time: 15 minutes
- Cook Time: 20 minutes
- Total Time: 35 minutes
- Yield: 4 servings 1x
- Category: Breakfast
- Method: Frying
- Cuisine: American
- Diet: Vegetarian
Ingredients
- 150g (5.3 oz) Cream Cheese, softened
- 2 tablespoons Caster Sugar
- 1 teaspoon Vanilla Extract
- ½ cup Blueberries (fresh or thawed if frozen)
- 1 Loaf Day-Old Brioche, sliced thick (8 slices)
- 1 Egg
- ½ cup Milk
- ½ cup Cream
- 1 teaspoon Cinnamon
- Butter, for frying
- Extra Blueberries, for garnish
- Icing Sugar, for dusting
- Maple Syrup, for drizzling
Instructions
- Prepare the Cheesecake Filling: In a mixing bowl, combine the softened cream cheese, caster sugar, vanilla extract, and half of the blueberries. Mix until smooth and creamy.
- Assemble the Brioche Slices: Cut a pocket in each brioche slice and fill with cheesecake filling and additional blueberries.
- Make the Custard Mixture: Whisk together the egg, milk, cream, cinnamon, and a pinch of salt.
- Get Cooking: Heat a skillet over medium heat and cook the soaked slices in butter until golden brown, about 4-5 minutes per side.
- Plate It Up: Dust finished French toast with icing sugar, top with fresh blueberries, and drizzle with maple syrup.
Notes
Serve with crispy bacon or a fresh fruit salad for a well-rounded meal.
Nutrition
- Serving Size: 1 serving
- Calories: 350
- Sugar: 10g
- Sodium: 300mg
- Fat: 20g
- Saturated Fat: 10g
- Unsaturated Fat: 7g
- Trans Fat: 0g
- Carbohydrates: 40g
- Fiber: 2g
- Protein: 8g
- Cholesterol: 80mg
Keywords: French toast, breakfast, brunch, blueberry, cheesecake
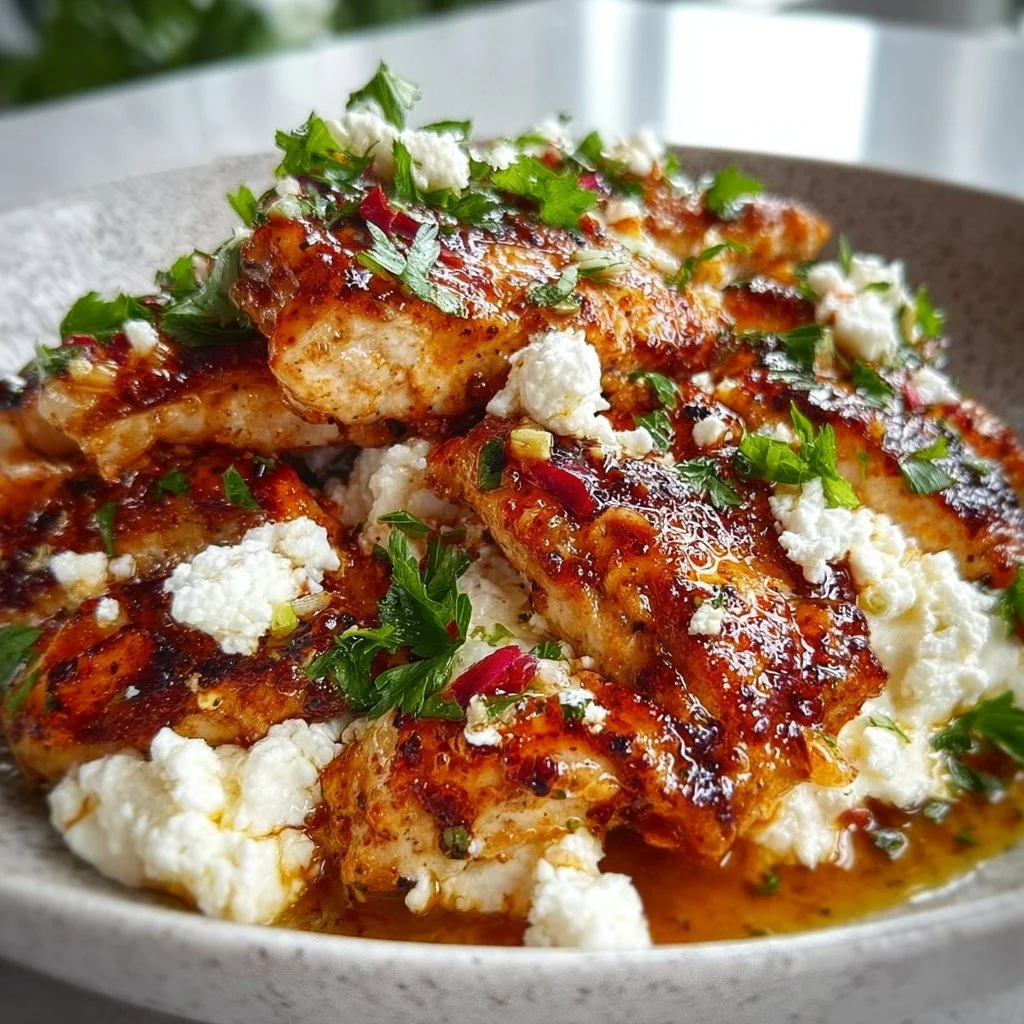
Hot Honey Feta Chicken
Hot Honey Feta Chicken: A Flavor-Packed Dish to Ignite Your Taste Buds
Hey there, food lovers! Today, I’m super excited to share a dish that’s going to spice up your dinner routine: Hot Honey Feta Chicken. If you’re like me, you treasure meals that bring a punch of flavor without keeping you in the kitchen for hours on end. This dish does just that! It’s an effortless way to impress your family or friends, or simply treat yourself to something delicious after a long day.
Introduction
When you think of comfort food, what comes to mind? Is it a warm bowl of pasta, a cheesy slice of pizza, or perhaps a juicy piece of chicken? For me, it’s all about that perfect balance of flavors. The kind of meal that dances on your taste buds and warms your heart. The first time I stumbled upon the combination of sweet honey and spicy heat paired with feta cheese, I knew I was onto something special. My love for adventurous flavors has taken me all over the culinary map, and this dish embodies that spirit perfectly.
Imagine succulent chicken breasts drizzled with a sticky-sweet hot honey sauce, melting into rich, tangy feta cheese. It’s a celebration of sweet and spicy, all while keeping things light and satisfying. If you’re hoping to cook something that’s not only vibrant and delicious but also easy to whip up, you’re in for a real treat today!
Let’s be honest: we all have those busy days where cooking feels more like a chore than a joy. That’s why I’m here—to show you that with just a few basic ingredients and a couple of steps, you can create something fantastic in your very own kitchen. Plus, this recipe is flexible enough to adapt to what you have on hand!
So grab your apron, and let’s dive into some kitchen magic with this Hot Honey Feta Chicken recipe that’s sure to make your taste buds tingle and your heart sing!
Personal Story
Ah, the memories I have of my first bite of hot honey drizzled over anything! I was visiting a charming little bistro downtown with friends, eager for some fun and tasty bites. As we scanned the menu, something caught my eye—a chicken dish topped with a hot honey sauce and feta crumble. At first, I was unsure. Hot honey? On chicken? But curiosity (and my love for feta) won me over, and I ordered it.
When that plate arrived, I knew I was in for an experience. The aroma wafted up to meet me with hints of sweetness and spice. The first bite was pure bliss. The chicken was perfectly cooked, tender and juicy, while the creamy, tangy feta complemented the honey in a way I’d never imagined. I was hooked! I left that bistro with a full belly and a heart full of inspiration, and I couldn’t wait to recreate that dish at home. Now, each time I make Hot Honey Feta Chicken, I’m reminded of that delightful evening and the joy of sharing good food with great friends.
Ingredients
Let’s gather what we need! Here’s a simple list of ingredients for your Hot Honey Feta Chicken with some chef insights and substitution tips:
-
4 Chicken Breasts: The star of the show! Look for organic or free-range chicken if possible. Want a more budget-friendly option? Boneless, skinless thighs work just as well!
-
1 Cup Feta Cheese, Crumbled: Feta brings a salty, tangy flavor that pairs beautifully with the sweetness of honey. If you’re feeling adventurous, you can swap it for goat cheese for a creamier texture.
-
1/4 Cup Honey: This is where your dish gets its glorious sweetness. Local honey not only adds a unique flavor but also carries potential health benefits. If you’re vegan, agave syrup is a great substitute.
-
1-2 Tablespoons Hot Sauce: The magic ingredient! Adjust the amount depending on your spice preference; I usually go with a tablespoon for just the right kick. Sriracha, Frank’s RedHot, or any of your favorite hot sauces will do the trick!
-
Salt and Pepper to Taste: Just a sprinkle to enhance all the beautiful flavors.
-
Olive Oil: A drizzle to keep the chicken juicy as it cooks.
-
Fresh Vegetables or Salad for Serving: This dish pairs wonderfully with a fresh green salad, roasted veggies, or even a grain like quinoa. You could sneak in some extra color with a mix of peppers, zucchini, or whatever is in season!
Step-by-Step Instructions
Let’s get cooking! Follow these step-by-step instructions, and trust me, you’ll end up with an enticing meal that fills your kitchen with mouthwatering aromas!
-
Preheat Your Oven: Start by preheating your oven to 400°F (200°C). This allows your chicken to cook perfectly while you prepare the sauce.
-
Prepare the Chicken: Grab your chicken breasts, pat them dry with paper towels, and place them in a baking dish. This might seem trivial, but removing excess moisture will help achieve that beautiful golden crust.
-
Season the Chicken: Drizzle a little olive oil over the chicken and then sprinkle with salt and pepper. This step is essential to bring out the flavors in the chicken and forms a tasty base for your sauce.
-
Mix Your Hot Honey Sauce: In a small bowl, combine the honey and hot sauce, stirring until mixed well. This sauce is where the magic happens—sweet and spicy melded together.
-
Apply the Sauce: Generously brush the hot honey mixture over the seasoned chicken breasts. Make sure every inch is coated; you want that sweet glaze to caramelize beautifully as it bakes.
-
Add the Feta: Sprinkle the crumbled feta cheese evenly over the chicken. This step not only adds flavor but also gives the dish that creamy texture we love.
-
Bake to Perfection: Place the baking dish in the preheated oven and let it bake for 25-30 minutes, or until the chicken reaches an internal temperature of 165°F (75°C). The feta will melt slightly and create a delicious crust.
-
Finish with a Drizzle: Once the chicken is cooked, pull it out of the oven and give it a final drizzle of any leftover hot honey sauce for that extra oomph. This will leave your taste buds dancing!
-
Resting Time: Let the chicken rest for about 5 minutes before slicing. This ensures the juices redistribute throughout the chicken, making every bite succulent!
Serving Suggestions
Now comes the best part—serving! Plate up your Hot Honey Feta Chicken with a side of fresh veggies or a vibrant salad. You can also skip the plate and enjoy it straight from the baking dish; no judgment here! For an extra touch, garnish the dish with fresh herbs, like parsley or basil, to add a pop of color and a fresh aroma.
Recipe Variations
Feeling adventurous? Here are a few creative twists and substitutions you can try:
-
Herb-Infused Olive Oil: Drizzle the chicken with a flavored olive oil, such as rosemary or lemon-infused, for an added layer of flavor.
-
Citrus Kick: Add a splash of lemon juice or orange zest to your hot honey sauce. The citrus tones will brighten the dish with a refreshing zing.
-
Stuffed Chicken: Create a stuffed version by slicing a pocket into each chicken breast and filling it with sautéed spinach and garlic prior to baking. Yum!
-
Spicy Crunch: For some added texture, toss in some chopped nuts like pistachios or walnuts before serving for a crispy contrast.
Chef’s Notes
Every recipe has its own story, and this one is no different! Every time I prepare Hot Honey Feta Chicken, I think about how I started off following a different recipe and how it has transformed over the years. Initially, I was hesitant about combining sweetness and heat, but it quickly became a staple in my household. The beauty of this dish lies in its versatility; you can swap ingredients to fit your preferences.
Plus, the joy it continues to bring whenever I serve it is priceless. Whether for a cozy night in or gathering with friends, it never fails to evoke smiles and satisfied bellies!
FAQs and Troubleshooting
1. Can I use chicken thighs instead of breasts?
Absolutely! Chicken thighs are a great choice for this recipe. They add an extra layer of juiciness and flavor, plus they’re often more forgiving if you accidentally overcook them a bit.
2. What if I don’t have honey?
If honey isn’t available, agave syrup or maple syrup are great substitutes! You might end up with a slightly different flavor profile, but sweet is sweet, right?
3. What if my feta isn’t crumbly?
If your feta cheese is not crumbly, you can simply crumble it with your hands or use a fork to break it apart. Fresh feta tends to be a bit more moist, but that’s totally fine!
4. How can I store leftovers?
If you have leftovers (they’re rare, but it happens!), store them in an airtight container in the fridge and enjoy within 3–4 days. Just reheat in the oven or microwave before serving.
Nutritional Info
While I know some of us are a little conscious about the numbers, I encourage balance above all. Enjoy your Hot Honey Feta Chicken with a generous serving of fresh veggies, and you’ll have a nutritious meal straight from the heart!
So there you have it—a delightful recipe to warm your heart and satisfy your cravings! Hot Honey Feta Chicken certainly delivers on all fronts, and I hope you enjoy every bite as much as I do. Don’t forget to share your creations and experiences. Happy cooking!
PrintHot Honey Feta Chicken

A flavor-packed dish featuring succulent chicken breasts drizzled with a sweet and spicy hot honey sauce, topped with creamy feta cheese.
- Prep Time: 10 minutes
- Cook Time: 30 minutes
- Total Time: 40 minutes
- Yield: 4 servings 1x
- Category: Main Course
- Method: Baking
- Cuisine: American
- Diet: Paleo
Ingredients
- 4 Chicken Breasts
- 1 Cup Feta Cheese, Crumbled
- 1/4 Cup Honey
- 1–2 Tablespoons Hot Sauce
- Salt and Pepper to Taste
- Olive Oil
- Fresh Vegetables or Salad for Serving
Instructions
- Preheat your oven to 400°F (200°C).
- Prepare the chicken by patting dry and placing in a baking dish.
- Season the chicken with olive oil, salt, and pepper.
- Mix honey and hot sauce in a small bowl.
- Apply the hot honey mixture over the chicken breasts.
- Add crumbled feta evenly over the chicken.
- Bake for 25-30 minutes until the chicken reaches 165°F (75°C).
- Finish with a drizzle of leftover hot honey sauce.
- Rest for 5 minutes before slicing.
Notes
Pairs well with fresh veggies or a salad. For added flavor, consider herb-infused oils or a citrus kick.
Nutrition
- Serving Size: 1 serving
- Calories: 350
- Sugar: 14g
- Sodium: 400mg
- Fat: 12g
- Saturated Fat: 4g
- Unsaturated Fat: 6g
- Trans Fat: 0g
- Carbohydrates: 32g
- Fiber: 0g
- Protein: 30g
- Cholesterol: 85mg
Keywords: chicken, feta, honey, spicy, easy dinner
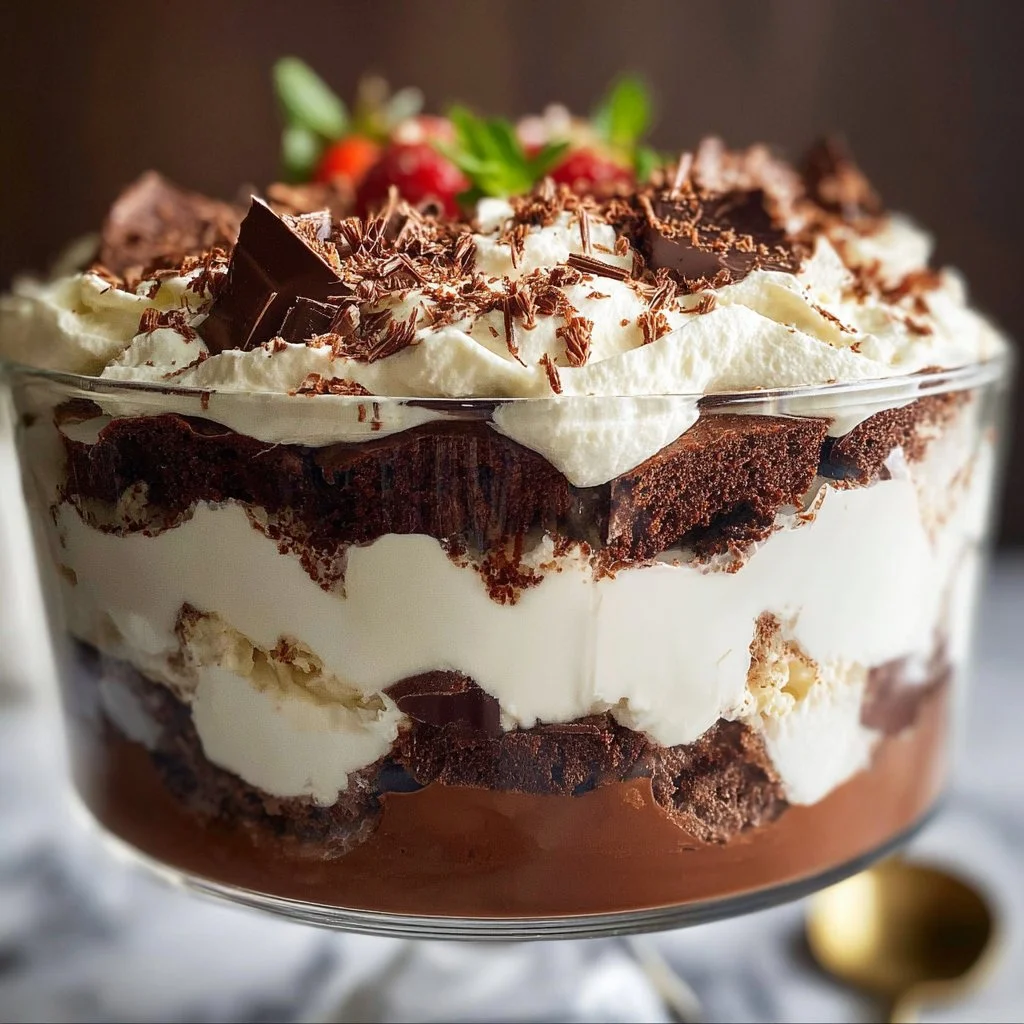
Brownie Trifle
The Ultimate Brownie Trifle: Decadence Meets Simplicity!
Welcome to Clean Plate Cravings, where fresh, feel-good food fuels our passions, and we embrace every delicious bite with enthusiasm! Today, I’m excited to share a dessert that’s as easy to make as it is scrumptious—the Brownie Trifle. This dish ticks all the boxes: rich, chocolatey goodness layered with smooth, creamy textures that will make everyone swoon. Whether you’re hosting a gathering or just want to treat yourself after a long week, this showstopper is here to impress without turning your kitchen into a disaster zone.
Now, if you’re like me, there’s something special about desserts that transport you back to simpler times—a warm kitchen, laughter, and the irresistible aroma of chocolate wafting through the air. As a kid, I always loved baking with my grandmother. We made a big production out of every dessert, and her chocolate brownies were a family secret that always felt like magic. One particular afternoon stands out: we whipped up a double batch of brownies, and I couldn’t wait to sink my teeth into those fudgy pieces of heaven. Inspired by those moments and the simplicity of layering flavors, the Brownie Trifle was born—a modern twist on a classic favorite!
With layers of moist brownies, luscious chocolate pudding, and fluffy whipped cream, this dessert feels indulgent but is made with easy-to-find ingredients. So grab your apron (or your favorite comfy shirt) and let’s dive into creating this irresistible treat!
Ingredients
Here’s what you’ll need for your Brownie Trifle:
-
NESTLÉ® TOLL HOUSE® Brownies & More Chocolate Baking Mix
A fantastic time-saver, this baking mix promises delicious brownies every time. If you’re feeling adventurous, you can swap it with your favorite homemade brownie recipe. Just make sure it’s rich and fudgy! -
2 large Eggs
Eggs are essential for that perfect fudgy texture in brownies. In a pinch, you could use flax eggs (1 tablespoon of ground flaxseed mixed with 2.5 tablespoons of water) for a vegan option. -
1/2 cup Vegetable oil
This adds moisture to your brownies. If you’re looking for a healthier substitute, feel free to use applesauce or melted coconut oil! -
1 package Instant chocolate fudge pudding mix
This mix is a lifesaver for quick desserts, offering intense chocolate flavor. If you want to get fancy, consider using homemade pudding for an extra layer of creaminess. -
2 cups Cold milk
You’ll need this to prepare your pudding. Substitute with almond milk or any other non-dairy option for a vegan treat! -
1 cup Heavy cream
This will be whipped into fluffy clouds of perfection. If you need a lighter alternative, use coconut cream or whipped topping. -
1/4 cup Sugar
Just a hint of sweetness for your whipped cream. If you prefer a sugar-free option, you can use stevia or your favorite sugar substitute. -
1 teaspoon Vanilla extract
Adds a warm, delightful flavor to your whipped cream and pudding. If you’re out, almond extract would work in a pinch!
Step-by-Step Instructions
Let’s get baking! Here’s how to whip up this Brownie Trifle:
-
Preheat your oven: Start by preheating your oven to 350°F (175°C). This ensures your brownies will bake evenly and come out gooey.
-
Prepare the brownies: In a mixing bowl, combine the NESTLÉ® TOLL HOUSE® Brownies & More Chocolate Baking Mix, eggs, and vegetable oil. Mix until just combined—overmixing can lead to dense brownies.
-
Bake the brownies: Pour the batter into a greased 9×9-inch baking pan. Bake in your preheated oven for about 20-25 minutes, or until a toothpick inserted in the center comes out with a few moist crumbs. Remove from the oven and let cool. (This is the perfect time to sneak a corner piece for yourself—we won’t tell!)
-
Make the chocolate pudding: While the brownies cool, grab a mixing bowl and whisk together the chocolate pudding mix and cold milk. Beat for about two minutes until it thickens. Set it aside in the fridge for a little while to firm up.
-
Whip the cream: In a large mixing bowl, use an electric mixer or a whisk to whip the heavy cream until it begins to thicken. Gradually add the sugar and vanilla extract, then continue whipping until you achieve soft peaks. You want it fluffy, but not overbeaten.
-
Assemble the trifle: In your favorite trifle dish or any clear bowl, start layering. Begin with a layer of brownies, followed by chocolate pudding, and then a layer of whipped cream. Repeat until all the components are used, finishing with a dollop of whipped cream on top.
-
Chill and serve: Let the trifle chill in the fridge for at least 2 hours before serving. This allows all the flavors to meld together beautifully. Trust me—you don’t want to skip this step!
Serving Suggestions
To serve your Brownie Trifle, scoop out generous portions into dessert bowls or small glasses. For an eye-catching finish, sprinkle some chocolate shavings or crushed nuts on top. Fresh berries or a drizzle of chocolate sauce can elevate your presentation even further. Remember, the key to a stunning trifle is showing off those beautiful layers!
Recipe Variations
Feel like switching things up? Here are some fun twists on the classic Brownie Trifle:
- Mint Chocolate Brownie Trifle: Add a few drops of peppermint extract to your whipped cream for a refreshing minty flavor.
- Peanut Butter Swirl: Layer creamy peanut butter between the brownies and pudding for that perfect sweet-salty combo.
- Fruit Explosion Trifle: Incorporate fresh fruits like raspberries or strawberries in between layers for a pop of color and flavor.
- Coffee Lover’s Delight: Mix a tablespoon of instant coffee granules into your pudding for a mocha flavor that coffee enthusiasts will love.
- Gluten-Free Option: Substitute the brownie mix with a gluten-free baking mix to enjoy this dessert without the gluten!
Chef’s Notes
This Brownie Trifle has evolved from a simple dessert into a family favorite! I often reminisce about experimenting with various flavors and textures—it’s amazing how a few small tweaks can take a basic recipe to the next level. A funny memory I cherish is when I thought adding crushed candy bars would make it even better, only to realize I created a sugar bomb! But hey, that’s the beauty of cooking: sometimes the mishaps lead to the most delicious discoveries.
FAQs and Troubleshooting
1. My pudding didn’t thicken—what went wrong?
If your pudding is runny, double-check that you used instant pudding mix and not the cook-and-serve kind. Also, ensure you’ve whisked it for the full two minutes, which helps it set properly.
2. Can I make the trifle a day ahead of time?
Absolutely! In fact, making it the day before allows the flavors to develop beautifully. Just be cautious with the whipped cream—if you’re making it ahead, whip it just before serving, or use stabilized whipped cream to keep it fluffy.
3. What if my brownies turn out too dry?
If the brownies seem dry, they may have been overbaked. To ensure gooey, fudgy brownies, keep an eye on them while baking and use the toothpick test. A few moist crumbs indicate they’re perfect!
4. Can I substitute the heavy cream for something lighter?
Yes, you can use whipped topping for a lower-calorie option. Additionally, coconut cream is a wonderful dairy-free alternative that adds a unique flavor.
Nutritional Info
- (Optional section can vary based on portions, though it can serve as a helpful guide.)
- Serving size: 1/10 of trifle
- Calories: 350
- Total Fat: 22g
- Saturated Fat: 10g
- Carbohydrates: 36g
- Sugars: 18g
- Protein: 5g
Now, gather your ingredients and allow your inner chef to shine. This Brownie Trifle will not only satisfy your sweet tooth but also give you a moment to bond over the love of cooking and the joy of dessert. Here’s to creating delicious memories—one layer at a time! Enjoy!
PrintBrownie Trifle

An indulgent Brownie Trifle layered with rich brownies, chocolate pudding, and fluffy whipped cream, perfect for gatherings or treating yourself.
- Prep Time: 20 minutes
- Cook Time: 25 minutes
- Total Time: 145 minutes
- Yield: 10 servings 1x
- Category: Dessert
- Method: Baking
- Cuisine: American
- Diet: Vegetarian
Ingredients
- 1 package NESTLÉ® TOLL HOUSE® Brownies & More Chocolate Baking Mix
- 2 large Eggs
- 1/2 cup Vegetable oil
- 1 package Instant chocolate fudge pudding mix
- 2 cups Cold milk
- 1 cup Heavy cream
- 1/4 cup Sugar
- 1 teaspoon Vanilla extract
Instructions
- Preheat your oven to 350°F (175°C).
- Combine the brownie mix, eggs, and vegetable oil in a mixing bowl.
- Pour the batter into a greased 9×9-inch baking pan and bake for 20-25 minutes.
- Whisk together the chocolate pudding mix and cold milk until thickened, then chill.
- Whip the heavy cream until it starts to thicken, then gradually add sugar and vanilla until soft peaks form.
- Layer the brownies, chocolate pudding, and whipped cream in a trifle dish, repeating layers and ending with whipped cream.
- Chill in the fridge for at least 2 hours before serving.
Notes
For variations, consider adding mint extract, peanut butter, fresh fruits, or coffee granules to the layers.
Nutrition
- Serving Size: 1 serving
- Calories: 350
- Sugar: 18g
- Sodium: 300mg
- Fat: 22g
- Saturated Fat: 10g
- Unsaturated Fat: 9g
- Trans Fat: 0g
- Carbohydrates: 36g
- Fiber: 1g
- Protein: 5g
- Cholesterol: 100mg
Keywords: brownie, trifle, dessert, chocolate, easy recipe
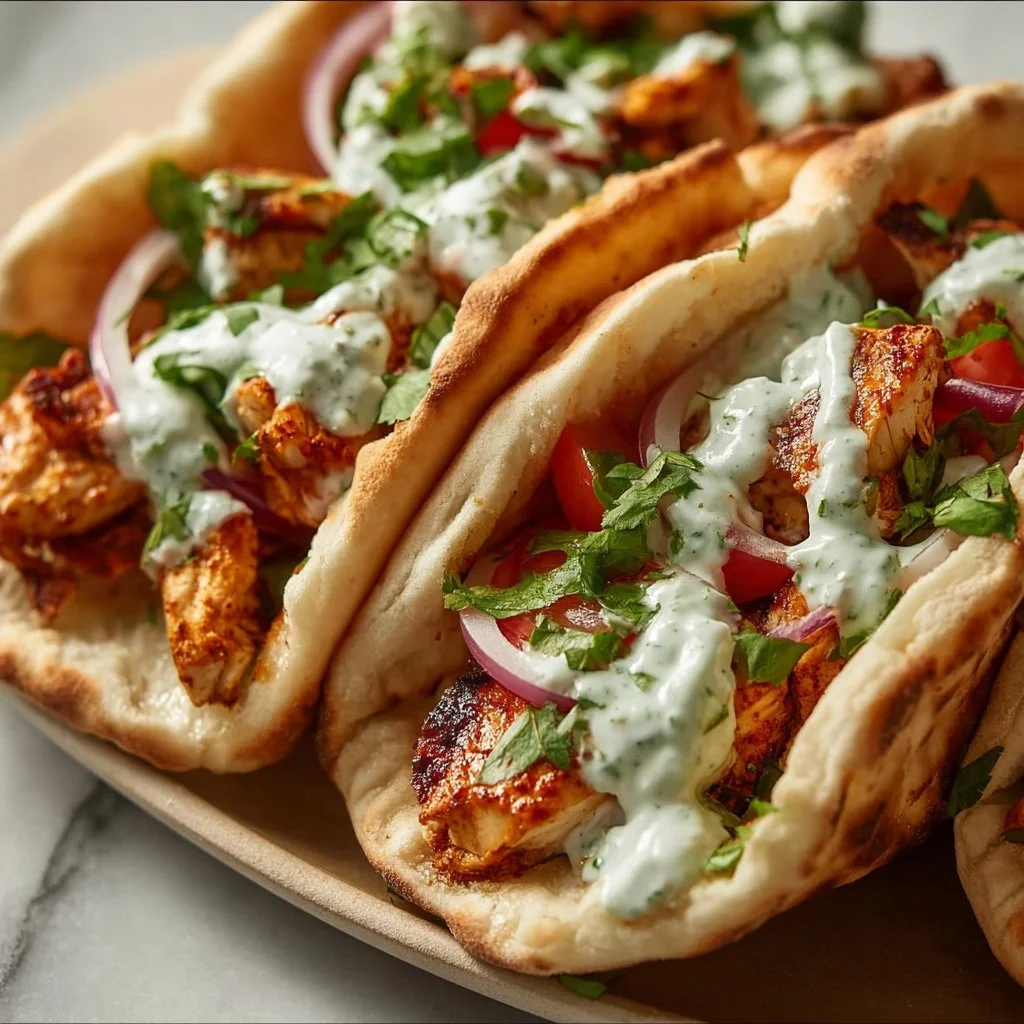
Sheet Pan Chicken Pitas with Herby Ranch Recipe
Sheet Pan Chicken Pitas with Herby Ranch: A Deliciously Easy Weeknight Meal
Welcome back to Clean Plate Cravings! Today, I’m thrilled to take you on a delightful culinary journey with my Sheet Pan Chicken Pitas with Herby Ranch. If you’ve been searching for a mouthwatering meal that’s as easy to prepare as it is to enjoy, you’ve hit the jackpot! This recipe is packed with juicy chicken, vibrant veggies, and a creamy herby ranch sauce that will take your taste buds to a whole new level.
I have a secret to share: cooking doesn’t have to be a time-consuming chore. With a sheet pan and a few fresh ingredients, dinner can be on the table in no time, leaving you free to unwind and enjoy your evening. As I guide you through this recipe, you’ll discover just how enjoyable healthy cooking can be.
Personal Story
Let me take you back to a warm summer evening at my parents’ backyard. The grill was fired up, and the smell of marinated chicken filled the air while vibrant bell peppers were tossed in oil and spices, caramelizing into summer perfection. My siblings and I were in charge of the music, and we danced around the kitchen, already dreaming of sneaking bites of that flavorful chicken. We’d always end our night gathered around the patio table, sharing stories, laughter, and, of course, serving each other bell pepper and chicken pitas just like these.
Fast forward a few years, and I wanted to recreate that nostalgic joy in my own kitchen—this time with an easy, modern twist. These Sheet Pan Chicken Pitas are inspired by those warm memories but streamlined for everyday life. Each bite brings me back to those summer nights filled with love, laughter, and plenty of food. Now, let’s bring that joy to your kitchen!
Ingredients
Here’s what you’ll need to whip up these scrumptious chicken pitas:
For the Chicken + Veggies:
- 1.5 lbs boneless, skinless chicken breasts or thighs: Chicken thighs are juicier, while breasts are leaner—pick what you prefer! You can also swap in turkey if you’re looking for a lean alternative.
- 1 red bell pepper, sliced: Sweet and colorful, red peppers add a touch of sweetness. Green or yellow can work, but I find red to be extra vibrant!
- 1 yellow bell pepper, sliced: Adds a wonderful sweetness; feel free to mix and match with other colors for a rainbow effect.
- 1 red onion, sliced: The sharpness of red onion adds depth. If you prefer a milder taste, try a sweet onion or shallots.
- 2 tbsp olive oil: A staple for cooking that provides healthy fats. Avocado oil is a great substitute if you’re looking for a higher smoke point.
- 2 tsp garlic powder: Grab it for ease; fresh minced garlic works too—1 clove should do!
- 2 tsp paprika: It adds a beautiful color and depth of flavor—smoked paprika will give a more complex taste.
- 1 tsp dried oregano: A classic herb to heighten flavor; thyme or Italian seasoning can also be a fabulous substitute.
- ½ tsp cumin: This adds warmth and a subtle earthiness; for a different vibe, try coriander instead.
- ½ tsp chili flakes (optional): For a hint of heat! Omit if you prefer it milder.
- Salt and pepper, to taste: Essentials for bringing all the flavors together!
For the Herby Ranch:
- ½ cup mayonnaise: This creamy base is perfect for tanking the ranch flavor—Greek yogurt is a lighter option that works beautifully too.
- ½ cup sour cream or Greek yogurt: Either option pairs well; if you want to lighten it, opt for non-fat Greek yogurt.
- 2 tbsp milk (to thin): Use your choice of milk—dairy or plant-based will do the trick!
- 2 tbsp fresh parsley, finely chopped: Fresh herbs brighten the dish! Basil or cilantro can provide a unique twist.
- 1 tbsp fresh dill, chopped (or 1 tsp dried): Dill adds a refreshing taste; you can swap in thyme if that’s what you have on hand.
- 1 tbsp fresh chives, chopped (or green onion): Chives add a mild onion flavor; shallots are great too if chives are unavailable.
- 1 tsp garlic powder: For that extra kick, and to keep things simple. Fresh minced garlic is an option too.
- 1 tsp onion powder: This is a must-have for flavor; you can also use chopped shallots in a pinch.
- 1 tbsp lemon juice or vinegar: A splash of acidity brightens everything up; apple cider vinegar can be an excellent choice too!
- Salt and pepper, to taste: Always add seasoning to bring out the flavors!
For Assembly:
- 4 pitas (pocket or flatbread style): Use a whole-wheat or gluten-free option to suit your dietary needs.
- 1 cup shredded lettuce or greens: Adds a fresh crunch; swap in kale or arugula if you’re feeling fancy.
- 1 tomato, sliced: You can use heirloom tomatoes for a pop of color or cherry tomatoes for sweetness.
- Optional toppings:
- Feta cheese: A crumbly brine adds tang; if you’re avoiding dairy, try a plant-based feta.
- Pickled onions: For that sweet and sour crunch, easily make your own by soaking onions in vinegar!
- Cucumber: Sliced or diced, it adds a refreshing crunch.
- Hot sauce: Spice things up if you dare!
Step-by-Step Instructions
Now that we have our ingredients ready, let’s get cooking! Here are your detailed steps for this tasty dish:
-
Preheat Your Oven: Preheat your oven to 425°F (220°C). This high heat will ensure that your chicken and veggies get beautifully caramelized and flavorful.
-
Prep the Chicken and Veggies: In a large bowl, combine your bite-sized pieces of chicken, sliced red and yellow bell peppers, and red onion. This is where the magic begins! Drizzle the olive oil over the chicken and veggies, and sprinkle in the garlic powder, paprika, oregano, cumin, chili flakes (if using), salt, and pepper.
Chef Tip: Use your hands to toss everything together! It’s messy, but it’s also the best way to ensure that all the pieces are evenly coated.
-
Arrange on the Sheet Pan: Spread the chicken and veggie mixture in a single layer on a large baking sheet.
Chef Hack: Line your baking sheet with parchment paper or foil for easy clean-up!
-
Roast in the Oven: Place the sheet pan in your preheated oven and roast for about 20-25 minutes, or until the chicken is cooked through and the veggies are tender and slightly caramelized. Give them a shake halfway through cooking for even browning.
-
Prepare the Herby Ranch: While the chicken and veggies are roasting, whisk together the mayonnaise, sour cream (or Greek yogurt), milk, parsley, dill, chives, garlic powder, onion powder, and lemon juice in a small bowl.
Chef Insight: Taste your herby ranch as you mix. If you love it extra herby, add more parsley or chives. Adjust salt and pepper as needed!
-
Prepare the Pitas: Lightly warm your pitas in a skillet or wrap them in foil and place them in the oven for the last 5 minutes of the chicken’s cooking time.
Tip: Warming pitas makes them more pliable and enhances their flavor, so don’t skip this step!
-
Assemble the Pitas: Once the chicken and veggies are cooked, take them out of the oven. Start with your warmed pita, add a generous amount of shredded lettuce, a scoop of your chicken and veggie mix, and finish it off with slices of tomato and your delicious herby ranch.
Presentation Tip: For a pop of color and taste, add those optional toppings—feta cheese, pickled onions, and a drizzle of hot sauce!
-
Serve: Enjoy your assembled pitas warm; each bite should be bursting with flavor.
Serving Suggestions
These Sheet Pan Chicken Pitas are perfect for a casual dinner or lunch. Serve them alongside a fresh side salad or some sweet potato fries for a complete meal. You can also dish up the chicken and veggies on a beautiful platter and let everyone assemble their pitas for a fun, interactive dining experience.
Recipe Variations
- Spicy Sheet Pan Chicken: Add sliced jalapeños or sprinkle cayenne pepper for an extra kick!
- Mediterranean Twist: Swap the herby ranch for tzatziki sauce and add sliced olives and cucumber for a Mediterranean flair.
- BBQ Chicken Pitas: Toss the chicken in your favorite barbecue sauce before roasting and serve with coleslaw.
- Veggie-Heavy Pitas: Add zucchini, asparagus, or mushrooms to the sheet pan for extra veggies and flavor.
- Low-Carb Option: Skip the pitas entirely and serve the chicken and veggies in a bed of leafy greens, drizzled with ranch!
Chef’s Notes
Cooking is all about experimentation and personal touches. Over the years, this recipe has evolved for me, using whatever fresh ingredients I have on hand or embracing seasonal veggies. Sometimes, I switch up the spices or add a pinch of something unexpected. On one particularly chaotic weeknight, I accidentally used lemon juice instead of vinegar in the ranch, and guess what? It wasn’t just good; it was a revelation. So, don’t be afraid to make it your own!
FAQs and Troubleshooting
Q: What if I don’t have a sheet pan?
A: No worries! You can use any baking dish or casserole dish you have; just ensure it’s large enough to avoid crowding the chicken and veggies.
Q: My chicken is dry; what did I do wrong?
A: Overcooking is the most common culprit for dry chicken. Use an instant-read thermometer to ensure the chicken reaches 165°F (75°C) for perfect juiciness.
Q: Can I prep this meal in advance?
A: Absolutely! You can marinate the chicken and veggies the night before, or even fully assemble your pitas, wrap them, and keep them in the fridge for the next day. Just warm them up when you’re ready to eat.
Q: Can I use frozen chicken?
A: While it’s best to thaw your chicken before cooking, in a pinch, you can cook frozen chicken pieces, just adjust cooking time accordingly (they may need an extra 10-15 minutes).
Nutritional Info (Optional)
This meal is not only delicious but also balanced! Each serving provides protein, healthy fats, and plenty of vitamins from the veggies. Adjust portions for a more precise nutritional profile based on your specific dietary needs.
And there you have it: a flavorful, hearty meal that’s perfect for busy weeknights and fun gatherings alike. I hope you enjoy making and devouring these Sheet Pan Chicken Pitas with Herby Ranch as much as I do! Happy cooking and remember—keep it fresh, simple, and seriously delicious!
PrintSheet Pan Chicken Pitas with Herby Ranch

A mouthwatering meal packed with juicy chicken, vibrant veggies, and a creamy herby ranch sauce, perfect for a quick weeknight dinner.
- Prep Time: 15 minutes
- Cook Time: 25 minutes
- Total Time: 40 minutes
- Yield: 4 servings 1x
- Category: Main Course
- Method: Roasting
- Cuisine: Mediterranean
- Diet: Balanced
Ingredients
- 1.5 lbs boneless, skinless chicken breasts or thighs
- 1 red bell pepper, sliced
- 1 yellow bell pepper, sliced
- 1 red onion, sliced
- 2 tbsp olive oil
- 2 tsp garlic powder
- 2 tsp paprika
- 1 tsp dried oregano
- ½ tsp cumin
- ½ tsp chili flakes (optional)
- Salt and pepper, to taste
- ½ cup mayonnaise
- ½ cup sour cream or Greek yogurt
- 2 tbsp milk (to thin)
- 2 tbsp fresh parsley, finely chopped
- 1 tbsp fresh dill, chopped (or 1 tsp dried)
- 1 tbsp fresh chives, chopped (or green onion)
- 1 tsp garlic powder
- 1 tsp onion powder
- 1 tbsp lemon juice or vinegar
- 4 pitas (pocket or flatbread style)
- 1 cup shredded lettuce or greens
- 1 tomato, sliced
- Optional toppings: feta cheese, pickled onions, cucumber, hot sauce
Instructions
- Preheat your oven to 425°F (220°C).
- Prep the chicken and veggies by combining chicken, red and yellow bell peppers, and red onion in a large bowl. Drizzle olive oil and sprinkle garlic powder, paprika, oregano, cumin, chili flakes, salt, and pepper.
- Arrange the chicken and veggie mixture in a single layer on a large baking sheet.
- Roast in the oven for about 20-25 minutes, or until cooked through and tender.
- Prepare the herby ranch by whisking together mayonnaise, sour cream, milk, parsley, dill, chives, garlic powder, onion powder, and lemon juice in a small bowl.
- Prepare the pitas by warming them in a skillet or in the oven for the last 5 minutes of the chicken’s cooking time.
- Assemble the pitas with warmed pita, shredded lettuce, chicken and veggies, and herby ranch.
- Serve warm, enjoy each flavorful bite!
Notes
Feel free to customize the herbs and spices based on your preferences. This dish pairs well with sweet potato fries or a fresh side salad.
Nutrition
- Serving Size: 1 serving
- Calories: 400
- Sugar: 5g
- Sodium: 500mg
- Fat: 15g
- Saturated Fat: 3g
- Unsaturated Fat: 8g
- Trans Fat: 0g
- Carbohydrates: 42g
- Fiber: 4g
- Protein: 25g
- Cholesterol: 70mg
Keywords: chicken pitas, herby ranch, sheet pan meal, quick dinner, weeknight meal