Cleanplate Cravings

Cleanplate Cravings

June 25, 2026 |

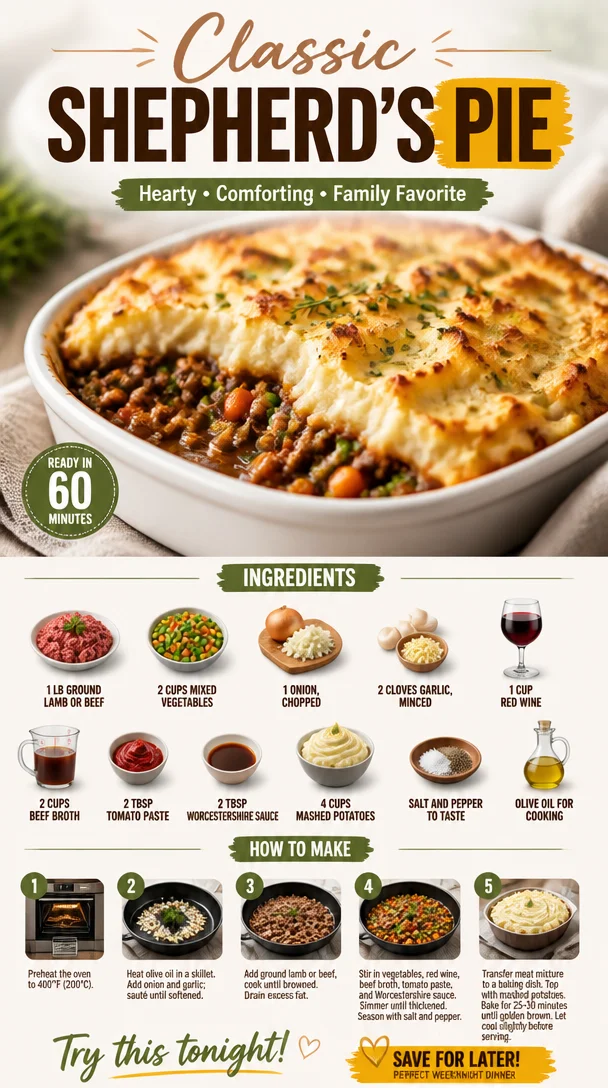
Shepherd’s Pie

Delicious and hearty Shepherd's Pie topped with creamy mashed potatoes

Comforting Shepherd’s Pie: A Cozy Culinary Journey

Welcome back to Clean Plate Cravings, food-loving friends! Today, we’re diving into a dish that warms both the belly and the soul—Shepherd’s Pie. With its layers of hearty meat, vibrant veggies, and creamy mashed potatoes, this recipe is the ultimate comfort food that brings a smile to your face with every bite. Shepherd’s Pie is that cozy hug for your stomach we all need sometimes, especially as we ease into the cooler months.

As I whisk you through this delightful journey of flavors and textures, we’ll explore not just how to make this delicious dish but also reminisce about why it holds a special place in my heart. After all, food isn’t just about nutrition; it’s about stories, memories, and the love we share in our kitchens.

So, grab your apron, and let’s get cooking!

A Fond Memory in the Kitchen

I can still remember the first time I made Shepherd’s Pie as a teenager. It was a chilly Sunday afternoon, and my family was all gathered in the kitchen, laughing and sharing stories as the aromas of our favorite foods danced through the air. My grandmother took the lead, guiding me through the entire process from browning the meat to whipping up the creamiest mashed potatoes.

As we stirred the pot, she shared tales of her youth—how her mother would make this comforting dish when the weather turned cold and friends gathered around the table. It wasn’t just a meal; it was a celebration of love, warmth, and togetherness. To this day, every time I make Shepherd’s Pie, I’m transported back to that cozy kitchen filled with laughter, the kind of warmth that stays with you long after the last bite.

Ingredients

Let’s break down the ingredients you’ll need for this classic dish. Each ingredient plays a pivotal role in delivering that rich, savory flavor everyone craves, so let’s dive in:

  • 1 lb ground lamb or beef: Choose ground lamb for a traditional Shepherd’s Pie, or opt for ground beef if you prefer. Both are packed with flavor! If you’re looking for a leaner option, go for ground turkey.

  • 2 cups mixed vegetables (carrots, peas, corn): A colorful mix adds not just nutrition but also a pleasing texture contrast. Frozen mixes are perfectly fine and super convenient!

  • 1 onion, chopped: Onions are the base of any great savory dish. They add depth to the flavor profile. Shallots or green onions can be good alternatives for a milder taste.

  • 2 cloves garlic, minced: Garlic brings a beautiful aromatic quality. If you’re in a pinch, garlic powder works, but fresh garlic is always best!

  • 1 cup red wine: Wine adds acidity and richness. Any dry red will work, but if you prefer not to cook with alcohol, you can substitute with beef broth mixed with a splash of vinegar.

  • 2 cups beef broth: This is essential for that juicy filling. Homemade broth is fantastic if you have it, but store-bought works just as well.

  • 2 tablespoons tomato paste: This thickens the filling and adds a touch of sweetness. If you’re fresh out, ketchup can do the trick in a pinch!

  • 2 tablespoons Worcestershire sauce: This wonderful umami booster takes the flavor up a notch. If you’re avoiding gluten, ensure you pick a gluten-free brand.

  • 4 cups mashed potatoes: Creamy, dreamy mashed potatoes are the topping star! Make them with cream and butter, or lighten them up with a splash of milk and olive oil.

  • Salt and pepper to taste: Always taste as you go! These simple seasonings will enhance every flavor in your pie.

  • Olive oil for cooking: A staple in my kitchen! You could also use butter for a richer flavor.

Step-by-Step Instructions

Now that we’ve gathered our ingredients, let’s get into the nitty-gritty of making this Shepherd’s Pie. I promise, the process is simple and totally worth it!

  1. Preheat Your Oven: Start by preheating your oven to 400°F (200°C). This will ensure your pie bakes evenly and the top gets the perfect golden crust.

  2. Cook the Meat: In a large skillet, heat 2 tablespoons of olive oil over medium heat. Once it’s shimmering, add your ground lamb or beef. Break it up with a spatula and cook until browned, about 5-7 minutes. The key here is to get that nice, rich color to build flavor.

  3. Sauté the Vegetables: Add the chopped onion and minced garlic to the browned meat. Sauté for about 3-4 minutes until the onion is translucent and the garlic is fragrant—your kitchen will smell amazing! This is where you can add a little pinch of salt to help the onions sweat.

  4. Incorporate the Veggies: Toss in your mixed vegetables. Stir everything together for another 3 minutes until the veggies are warmed through. This gives them a chance to mingle and absorb flavors.

  5. Deglaze with Red Wine: Pour in your cup of red wine, scraping up any delicious bits stuck at the bottom of the skillet. Let it simmer for about 2-3 minutes until it reduces slightly. Not a wine fan? Just skip this step or use that beef broth splash mentioned before!

  6. Make It Saucy: Stir in your beef broth, tomato paste, and Worcestershire sauce. Season it generously with salt and pepper. Bring this mixture to a gentle boil, then reduce the heat and let it simmer for about 10 minutes. This helps thicken the filling and blend those incredible flavors.

  7. Prepare the Mashed Potatoes: While your filling simmers, if you’re using leftover mashed potatoes, give them a quick mash to warm them up and ensure they’re smooth. If you’re making them from scratch, boil your potatoes in salted water until fork-tender, then mash them with butter and cream (or olive oil) until fluffy!

  8. Assemble the Pie: In a baking dish (a 9×9 square dish works great), pour in the meat and vegetable mixture, spreading it evenly. Then, dollop your mashed potatoes on top, using the back of a spoon to create waves and peaks—this will help achieve a crispy top as it bakes!

  9. Bake: Pop your Shepherd’s Pie in the preheated oven for about 25-30 minutes until the top is golden brown and crisp. For extra crunch, you can place it under the broiler for a minute or two—just don’t walk away!

  10. Cool and Serve: Once done, take it out and let it cool for about 5-10 minutes before serving. This helps meld the flavors further!

Serving Suggestions

When it comes to serving Shepherd’s Pie, I love to keep it simple and rustic. Spoon generous portions onto plates, and if you’re feeling fancy, garnish with fresh herbs like parsley or chives. Serve with a side salad or some crusty bread to soak up every last bit of deliciousness. And let’s be honest, reheating leftovers the next day might just be the highlight of your week!

Recipe Variations

Feel free to get creative with Shepherd’s Pie! Here are a few variations that could spice things up:

  1. Vegetarian Delight: Substitute the meat with lentils or mushrooms and use vegetable broth. You won’t miss the meat!

  2. Spicy Twist: Add some diced jalapeños or a pinch of cayenne to the filling for a kick of heat.

  3. Cheesy Mashed Potatoes: Stir in some grated cheese (like cheddar or Parmesan) into the mashed potatoes before layering—it adds an irresistible cheesy crust.

  4. Herb-Infused: Mix in some fresh herbs (like thyme or rosemary) to the meat filling for a more aromatic flavor.

  5. Sweet Potato Mash: Replace traditional potatoes with sweet potatoes for a nutritious twist, adding a hint of sweetness to the dish!

Chef’s Notes

Shepherd’s Pie has evolved quite a bit over the years in my kitchen. Initially, I used to shy away from making it because I thought it would be too complicated, but it turns out, it’s one of the easiest and most satisfying dishes you can whip up! Plus, it is a fantastic way to clean out your fridge—just toss in whatever veggies you have on hand.

And here’s a funny little kitchen story: I once made this for a potluck, and let’s just say, my friends were so hooked that they asked for seconds before even finishing their first! So, take my advice, always make more than you think you’ll need!

FAQs and Troubleshooting

1. What if my mashed potatoes are too dry?
No worries! If you happen to find your mash a bit dry, add a touch of warm milk or melted butter and mix until it reaches your desired creaminess.

2. Can I prepare Shepherd’s Pie in advance?
Absolutely! You can make the filling and mashed potatoes a day ahead and assemble the pie when you’re ready to bake. Just keep it covered in the fridge!

3. How do I make it gluten-free?
Just swap the Worcestershire sauce for a gluten-free brand and ensure your beef broth is also gluten-free. The rest of the recipe is naturally gluten-free!

4. Can I freeze Shepherd’s Pie?
Yes! Once assembled, cover it tightly with aluminum foil and freeze. When you’re ready to enjoy it, let it thaw in the fridge overnight before baking.

Nutritional Info

While this dish is comfort food at its finest, I understand the importance of balancing indulgence with health. A typical serving of Shepherd’s Pie (about 1/4 of the recipe) can contain roughly:

  • Calories: 450
  • Protein: 25 grams
  • Fat: 20 grams
  • Carbohydrates: 45 grams
  • Fiber: 5 grams

Remember, the nutrition can vary based on your specific ingredients and portions, so feel free to adjust as per your dietary needs!


And there you have it—my heartwarming take on Shepherd’s Pie! I hope you find as much joy in making it as I have over the years. Let this dish not only nourish your body but also bring a sense of warmth and comfort to your table. Happy cooking, friends!

Print

Comforting Shepherd’s Pie

A heartwarming dish filled with layers of savory meat, vibrant veggies, and creamy mashed potatoes, perfect for cozy gatherings.

  • Prep Time: 20 minutes
  • Cook Time: 40 minutes
  • Total Time: 60 minutes
  • Yield: 4 servings 1x
  • Category: Main Course
  • Method: Baking
  • Cuisine: British
  • Diet: Meat-based

Ingredients

Scale
  • 1 lb ground lamb or beef
  • 2 cups mixed vegetables (carrots, peas, corn)
  • 1 onion, chopped
  • 2 cloves garlic, minced
  • 1 cup red wine
  • 2 cups beef broth
  • 2 tablespoons tomato paste
  • 2 tablespoons Worcestershire sauce
  • 4 cups mashed potatoes
  • Salt and pepper to taste
  • Olive oil for cooking

Instructions

  1. Preheat your oven to 400°F (200°C).
  2. Cook the meat in a large skillet with olive oil until browned, about 5-7 minutes.
  3. Sauté the onion and garlic for about 3-4 minutes until fragrant.
  4. Incorporate the mixed vegetables and stir for another 3 minutes.
  5. Deglaze the skillet with red wine and simmer for 2-3 minutes.
  6. Make it saucy by adding beef broth, tomato paste, and Worcestershire sauce; simmer for 10 minutes.
  7. Prepare the mashed potatoes if making from scratch or warm leftover ones.
  8. Assemble the pie in a baking dish with the meat mix and top with mashed potatoes.
  9. Bake for about 25-30 minutes until golden brown.
  10. Cool for 5-10 minutes before serving.

Notes

Feel free to customize with different vegetables or make it vegetarian with lentils.

Nutrition

  • Serving Size: 1 serving
  • Calories: 450
  • Sugar: 5g
  • Sodium: 600mg
  • Fat: 20g
  • Saturated Fat: 8g
  • Unsaturated Fat: 10g
  • Trans Fat: 0g
  • Carbohydrates: 45g
  • Fiber: 5g
  • Protein: 25g
  • Cholesterol: 70mg

Keywords: shepherd's pie, comfort food, baking, hearty meal, British cuisine
Did you make this recipe?

Share a photo and tag us — we can't wait to see what you've made!

June 25, 2026 |

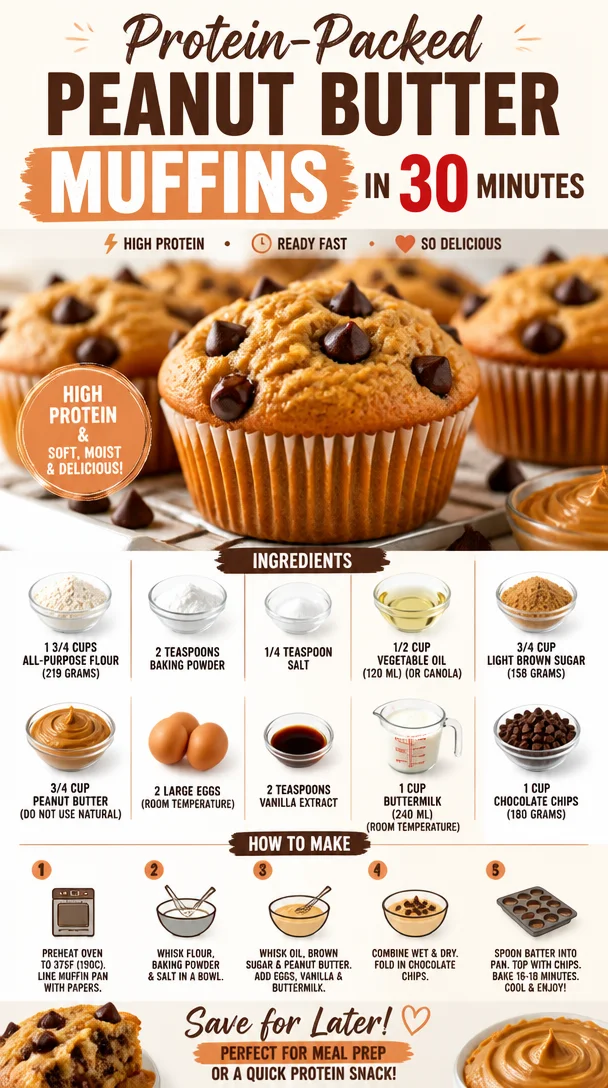
Protein-Packed Peanut Butter Muffins in 30 Minutes

Delicious protein-packed peanut butter muffins baked to perfection.

Irresistible Peanut Butter Muffins: A Love Letter to Comfort and Flavor

Welcome to Clean Plate Cravings, where flavor and health go hand in hand. I’m Ava Carter, your friendly guide to a world of nourishing delights! Today, we’re diving into a recipe that is bound to make your mornings brighter and your taste buds dance—Peanut Butter Muffins. These little bites of joy are perfect for breakfast, snack time, or whenever that sweet (and slightly nutty) craving strikes.

You see, these muffins are more than just a treat; they’re a celebration of comfort, nostalgia, and the delightful simplicity of homemade food. I can’t wait to share my love for peanut butter baking and the irresistible aroma that fills the kitchen when these muffins are in the oven. Whether you’re a busy parent looking for easy breakfast ideas or a foodie like me who loves to whip up something delicious, you’re in the right spot!

A Whiff of Nostalgia

Growing up, my mornings revolved around the rich smell of peanut butter wafting through the house. My mom had a knack for transforming simple ingredients into incredible concoctions, and the star of the show was often her peanut butter cookies. While I adored those crispy treats, I soon discovered the joy of muffins—especially when they come infused with that creamy nutty goodness.

One particular Saturday, I recall standing by the kitchen counter, eagerly waiting to sneak a bite straight from the mixing bowl while my mom whipped up a batch of her famous peanut butter muffins. The excitement was palpable! We would sprinkle chocolate chips into the batter and giggle as we imagined the muffins being alive with warm, gooey pockets of chocolate. They never lasted long in our home, and I can still hear the muffled crunch as I bit into the soft, fluffy muffins, topped with a smear of peanut butter for good measure.

Fast forward to today, and I’ve crafted my own version of those beloved muffins, drawing inspiration from my childhood while adding my unique twist. Let’s embark on this delicious journey together!

Ingredients You’ll Need

Here’s what you’ll need to create these mouthwatering Peanut Butter Muffins:

  • 1 3/4 cups all-purpose flour (219 grams): This is the foundation of your muffins. For a healthier alternative, consider using whole wheat flour, which will give your muffins a heartier texture and more fiber.

  • 2 teaspoons baking powder: This is your trusty leavening agent, ensuring your muffins rise beautifully. Make sure it’s fresh for the best results!

  • 1/4 teaspoon salt: Just a pinch enhances all the flavors in your muffins. If you’re watching your sodium intake, feel free to use a low-sodium option.

  • 1/2 cup vegetable oil (120 ml) (or canola): This keeps your muffins moist and delicious. If you prefer a lighter touch, you can substitute with applesauce.

  • 3/4 cup light brown sugar (158 grams): This adds sweetness and a hint of caramel flavor. If you’re looking for a lower-sugar option, coconut sugar is a great substitute.

  • 3/4 cup peanut butter (do not use natural): Creamy and indulgent, this is the star of the show! Opt for classic, creamy peanut butter for the best texture.

  • 2 large eggs (room temperature): Eggs provide structure and moisture; for an egg-free version, try using flaxseed meal mixed with water as a binder.

  • 2 teaspoons vanilla extract: This is the magic ingredient that elevates the flavors. You can also try almond extract for a different taste profile.

  • 1 cup buttermilk (240 ml) (room temperature): Buttermilk gives your muffins a tender crumb. If you don’t have any, you can create a quick version by adding a tablespoon of vinegar to regular milk and letting it sit for a few minutes.

  • 1 cup chocolate chips (180 grams): Because who says we can’t indulge? Choose dark chocolate for a richer flavor or try butterscotch chips for a fun twist.

Step-by-Step Instructions

Now that we have our ingredients ready, let’s get cooking! Follow these simple steps to whip up your Peanut Butter Muffins:

  1. Preheat the Oven: First things first, let’s get that oven preheating to 350°F (175°C). The even heat will help our muffins rise perfectly!

  2. Prepare the Muffin Tin: While the oven warms up, generously grease a muffin tin with cooking spray or use paper liners for easy removal later. This makes cleanup a breeze!

  3. Mix Dry Ingredients: In a large mixing bowl, whisk together the flour, baking powder, and salt. This step ensures even distribution of the baking powder, which is crucial for achieving that fluffy muffin texture.

  4. Combine Wet Ingredients: In a separate bowl, mix the vegetable oil, brown sugar, and peanut butter until smooth. The combination might feel thick, but that’s totally normal! Add in the eggs one at a time, ensuring they are fully incorporated after each addition. Stir in the vanilla extract and buttermilk until everything is well combined.

  5. Combine Wet and Dry Mixtures: Pour the wet mixture into the bowl with the dry ingredients. Gently fold them together until just combined—overmixing can lead to dense muffins, and we want fluffy, light treats!

  6. Add the Chocolate Chips: Gently fold in the chocolate chips (or butterscotch chips if you’re feeling adventurous!). Reserve a handful to sprinkle on top before baking for that extra touch.

  7. Fill the Muffin Tin: Using a cookie scoop or spoon, divide the batter evenly among the prepared muffin cups. Fill each cup about two-thirds full to allow room for the muffins to rise.

  8. Bake: Pop your muffins into the preheated oven and bake for 18-20 minutes, or until a toothpick inserted into the center comes out clean. Inhale deeply—your kitchen will smell divine!

  9. Cool and Enjoy: Once they’re baked, remove the muffins from the oven and allow them to cool in the tin for about 5 minutes. Transfer them to a wire rack to cool completely (if you can resist the temptation of warm muffins).

Serving Suggestions

When it comes to serving up these delightful Peanut Butter Muffins, the possibilities are endless! Enjoy them warm with a drizzle of honey or a sprinkle of sea salt for an extra pop of flavor. Pair your muffins with a fresh fruit salad or yogurt for a well-rounded breakfast or snack. You can even pack them in lunchboxes for a delightful treat that everyone will love!

Recipe Variations

Feeling creative? Here are a few fun variations to mix things up:

  • Nutty Banana Muffins: Mash a ripe banana into the batter for a fruity twist and a dose of natural sweetness.

  • Cocoa-Crazy Muffins: Add 1/4 cup of cocoa powder for a chocolate peanut butter experience that’s sure to satisfy your sweet tooth.

  • Crunchy Granola Muffins: Stir in some granola or chopped nuts for added texture and crunch.

  • Spiced Pumpkin Muffins: Swap out peanut butter for pumpkin puree and add warm spices like cinnamon, nutmeg, and cloves for a cozy fall treat.

  • Dairy-Free Option: Use almond milk instead of buttermilk and a vegan butter spread in place of regular butter for a dairy-free delight.

Chef’s Notes

These Peanut Butter Muffins are a recipe I’ve worked on and perfected over the years, and they hold a special place in my heart. I love tweaking the ingredients based on what I have on hand or experimenting with different mix-ins like dried fruit. The best part? They always turn out delicious!

Each time I make them, I’m reminded of those cherished mornings spent in the kitchen with my family. There’s nothing like the feeling of sharing something homemade with loved ones—so don’t be shy about topping these muffins with your favorite nut butter or even a dollop of jelly!

FAQs and Troubleshooting

Q1: Why did my muffins turn out dense?
A1: Densely packed muffins are often a result of overmixing the batter. Remember to gently fold the wet and dry ingredients together until just combined for a fluffy texture.

Q2: Can I use natural peanut butter instead?
A2: I recommend using creamy non-natural peanut butter for the best texture. Natural peanut butter can make the muffins too crumbly, as it has a different fat content.

Q3: How do I store these muffins?
A3: Store your muffins in an airtight container at room temperature for up to three days, or freeze them for up to three months. Just pop them in the microwave for a few seconds when you’re ready to enjoy!

Q4: What should I do if my muffins overflowed?
A4: No worries—muffins can be a bit unpredictable sometimes! Ensure you fill the muffin cups no more than two-thirds full next time. If they do overflow, simply trim the excess once they’re cooled—no one will know!

Nutritional Info (Optional)

Each muffin contains approximately:

  • Calories: 250
  • Protein: 6g
  • Carbohydrates: 30g
  • Fat: 12g
  • Fiber: 2g
  • Sugar: 12g

*Nutrition may vary based on ingredients used and portion sizes.


And there you have it—comforting, delicious Peanut Butter Muffins that are as fun to make as they are to eat! I can’t wait for you to try this recipe, breathe in those heavenly aromas, and share joyous moments around your table. Let’s keep it fresh, simple, and seriously delicious. Happy baking, friends!

Print

Irresistible Peanut Butter Muffins

Delicious Peanut Butter Muffins perfect for breakfast or snacks, infused with the comforting aroma of peanut butter and chocolate.

  • Prep Time: 15 minutes
  • Cook Time: 20 minutes
  • Total Time: 35 minutes
  • Yield: 12 servings 1x
  • Category: Breakfast
  • Method: Baking
  • Cuisine: American
  • Diet: Vegetarian

Ingredients

Scale
  • 1 3/4 cups all-purpose flour (219 grams)
  • 2 teaspoons baking powder
  • 1/4 teaspoon salt
  • 1/2 cup vegetable oil (120 ml)
  • 3/4 cup light brown sugar (158 grams)
  • 3/4 cup peanut butter (not natural)
  • 2 large eggs (room temperature)
  • 2 teaspoons vanilla extract
  • 1 cup buttermilk (240 ml, room temperature)
  • 1 cup chocolate chips (180 grams)

Instructions

  1. Preheat the oven to 350°F (175°C).
  2. Prepare the muffin tin with cooking spray or paper liners.
  3. Mix the flour, baking powder, and salt in a large bowl.
  4. Combine the vegetable oil, brown sugar, and peanut butter until smooth; add eggs, then vanilla and buttermilk.
  5. Combine the wet and dry mixtures until just blended.
  6. Add the chocolate chips, reserving some to sprinkle on top.
  7. Fill each muffin cup about two-thirds full with batter.
  8. Bake for 18-20 minutes, or until a toothpick comes out clean.
  9. Cool in the tin for 5 minutes then transfer to a wire rack.

Notes

Store muffins in an airtight container for up to 3 days or freeze for 3 months. Serve warm with honey or sea salt.

Nutrition

  • Serving Size: 1 muffin
  • Calories: 250
  • Sugar: 12g
  • Sodium: 200mg
  • Fat: 12g
  • Saturated Fat: 2g
  • Unsaturated Fat: 8g
  • Trans Fat: 0g
  • Carbohydrates: 30g
  • Fiber: 2g
  • Protein: 6g
  • Cholesterol: 30mg

Keywords: peanut butter muffins, breakfast muffins, easy muffins, chocolate chip muffins

Did you make this recipe?

Share a photo and tag us — we can't wait to see what you've made!

June 25, 2026 |

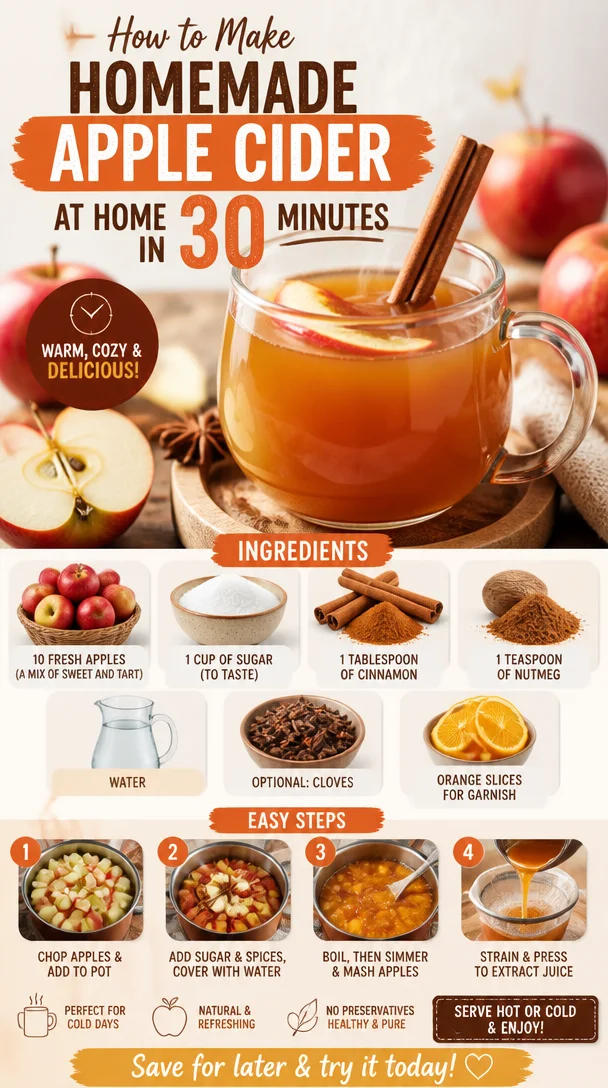
How to Make Homemade Apple Cider at Home in 30 Minutes

A glass of homemade apple cider with fresh apples on a wooden table.

The Warm Embrace of Homemade Apple Cider

Ah, autumn! That wonderful time of year when the air turns crisp, the leaves transform into a beautiful tapestry of orange and gold, and the scent of freshly baked goods wafts from every kitchen. One of my all-time favorite fall traditions is making homemade apple cider. There’s something so magical about gathering the family, rolling up our sleeves, and transforming a mountain of apples into a warm, spiced elixir that fills the house with cozy aromas. This isn’t just a recipe; it’s a journey that ties me back to my childhood and those golden afternoons spent outdoors, surrounded by friends and family while trees danced in the wind.

As I embarked on my cider-making adventures, I learned that real food is about connection—not just to what’s in our bowls but to the traditions and memories that shape our love for cooking. Homemade apple cider is not just about quenching your thirst; it’s about creating moments, sharing laughter, and embracing the warmth of that beloved fall flavor. So, gather your favorite apples, cozy up in your kitchen, and let’s dive into crafting the perfect homemade apple cider that will undoubtedly impress friends and family alike.

A Slice of Memory

I can still remember the first time I helped my grandmother make apple cider. We would visit her quaint little home in the country every autumn, and it was always a delightful adventure filled with fallen leaves and the occasional apple-picking expedition! She had this old, wooden cider press, aged and cracked but full of character. One afternoon, I stood by her side, plucking apples from a heaping wicker basket and marveling at her gentle hands as she sliced through the fruit.

“Good cider starts with good apples, honey,” she would say, her eyes twinkling as she shared stories behind each apple’s journey from tree to table. Watching her combine sweet and tart varieties brought the idea of balance in cooking to life for me. The whole process was magical—seeing the apples transform in the pot as we added spices, tasting the rich concoction dribbling from the press into our glasses. Sipping warm apple cider, we would sit cozied up on the porch, reminiscing, laughing, and getting lost in the smell of cinnamon and cloves lingering in the air.

Those precious moments are woven into the heart of every batch of cider I create today. Each sip brings me back, reminding me of the flavors of home and love that nourished my soul. Making homemade apple cider is more than following a recipe; it’s about carrying on a cherished legacy that continues to bring warmth and joy.

Ingredients for the Perfect Apple Cider

Here’s what you’ll need to create this delicious fall staple:

  • 10 Fresh Apples (a mix of sweet and tart)
    Choose apples like Honeycrisp, Fuji, Granny Smith, or Braeburn. The mix of sweet and tart apples enhances the cider’s flavor profile. Don’t hesitate to experiment!

  • 1 Cup of Sugar (to taste)
    Adjust this based on your apple selection. If your apples are particularly sweet, you may want to start with less sugar and add more after tasting!

  • 1 Tablespoon of Cinnamon
    This warm spice adds that quintessential flavor. Feel free to use ground cinnamon or stick cinnamon for an extra aromatic touch.

  • 1 Teaspoon of Nutmeg
    Nutmeg has a warm, spicy flavor that beautifully complements the sweetness of the apples.

  • Water
    The base for your cider, this should be enough to cover the apples in the pot.

  • Optional: Cloves
    Cloves add a wonderful depth of flavor. Use sparingly, as they can be potent!

  • Optional: Orange Slices for Garnish
    A few slices add a delightful brightness when serving. Plus, they look stunning in your cider!

Step-by-Step Instructions

Now, let’s get cooking! Follow these steps for a cider that can warm any chilly evening:

  1. Prepare the Apples
    Start by washing your apples thoroughly to remove any dirt or residues. Core and slice them into quarters. You don’t need to peel them; the skins add depth to your cider (and they’re a source of pectin!).

  2. Combine Ingredients in a Pot
    Place your sliced apples in a large pot and add enough water to cover them. Stir in the sugar, cinnamon, nutmeg, and cloves (if using). Start with less sugar and adjust later after tasting.

  3. Bring to a Boil
    Over medium-high heat, bring the mixture to a boil. Once boiling, reduce the heat to low and let it simmer. This is where the magic happens—your kitchen will soon be filled with the aromatic scent of spiced apples.

  4. Simmer Away
    Let the cider simmer for about 2 hours. Stir occasionally, making sure the apples are breaking down. The longer you let it simmer, the richer the flavor will be!

  5. Smash and Strain
    Using a potato masher, mash the apples to help release more juices. Once they’re well broken down, it’s time to strain. Place a fine mesh strainer or a cheesecloth over a large bowl and pour the mixture through it, allowing all that delicious liquid to pass through while leaving the solids behind.

  6. Sweeten and Serve
    Taste your cider! Add more sugar if desired and stir well. If you like your cider extra warm, you can gently heat it again on the stove. Once sweetened to your liking, ladle it into mugs.

  7. Garnish (Optional)
    For the final touch, add a slice of orange to your mug, and maybe even a cinnamon stick for stirring.

And voilà—your homemade apple cider is ready to be enjoyed!

Serving Suggestions

Serve this delightful apple cider warm in your favorite mugs, garnished with an orange slice or a cinnamon stick. It’s perfect for cozy gatherings by the fireplace or holiday parties. Consider pairing it with pumpkin bread, caramel apples, or even a charcuterie board to keep that fall vibe going.

Recipe Variations

  • Spiced Apple Cider Punch: Add in a splash of rum for an adult twist!
  • Pumpkin Spice Cider: Mix in a teaspoon of pumpkin spice for an autumn-inspired drink.
  • Fruit-Infused Cider: Feel free to throw in some sliced pears or cranberries for an extra layer of flavor.
  • Sweetener Swap: Substitute sugar with maple syrup or honey for a more natural sweetness.
  • Dehydrated Garnishes: Use dehydrated apple slices for a stunning garnish.

Chef’s Notes

Every time I make this recipe, it feels as if I’m crafting a piece of art filled with nostalgia and flavor. Embrace the imperfections—the best cider comes from experimenting with flavors and quantities. Sometimes, my cider turns out sweeter, other times spicier, but that’s the beauty of homemade. Remember that you can freeze the leftovers, too! Pour them into ice cube trays for easy use in cocktails or for future cider hot chocolates.

FAQs and Troubleshooting

  1. Can I use any type of apple?
    Absolutely! A mix is best for depth of flavor, but use what you like.

  2. How do I reduce the sweetness?
    If you find your cider is too sweet, add a squeeze of lemon juice for a bit of acidity, or increase the tart apple ratio next time.

  3. What if I over-simmered my cider?
    If the cider tastes too concentrated or strong, dilute it with a bit of water and reheat gently.

  4. Can I make this in a slow cooker?
    Yes! Combine all the ingredients in a slow cooker and set to low for 6-8 hours for a hands-off approach.

Nutritional Info

While each serving’s nutritional content can vary depending on the specific ingredients used, here’s a general guideline per cup:

  • Calories: ~120
  • Sugar: ~25g (varies with sweetener used)
  • Fiber: ~2g (due to apple skins)

So, my fellow foodies, now you’re ready to craft a batch of your very own homemade apple cider. Whether you’re sharing it with loved ones or savoring it solo, it promises to warm your heart and soul as well. Here’s to the magic of fall, family memories, and the joy of good food. Happy sipping!

Print

Homemade Apple Cider

Craft a warm, spiced elixir of homemade apple cider perfect for cozy gatherings.

  • Prep Time: 15 minutes
  • Cook Time: 120 minutes
  • Total Time: 135 minutes
  • Yield: 4 servings 1x
  • Category: Beverage
  • Method: Stovetop
  • Cuisine: American
  • Diet: Vegan

Ingredients

Scale
  • 10 Fresh Apples (a mix of sweet and tart)
  • 1 Cup of Sugar (to taste)
  • 1 Tablespoon of Cinnamon
  • 1 Teaspoon of Nutmeg
  • Water (enough to cover the apples)
  • Optional: Cloves
  • Optional: Orange Slices for Garnish

Instructions

  1. Prepare the Apples: Wash your apples thoroughly to remove any dirt or residues. Core and slice them into quarters.
  2. Combine Ingredients in a Pot: Place your sliced apples in a large pot and add enough water to cover them. Stir in the sugar, cinnamon, nutmeg, and cloves (if using).
  3. Bring to a Boil: Over medium-high heat, bring the mixture to a boil. Once boiling, reduce the heat to low and let it simmer.
  4. Simmer Away: Let the cider simmer for about 120 minutes, stirring occasionally.
  5. Smash and Strain: Using a potato masher, mash the apples. Strain the mixture through a fine mesh strainer or cheesecloth into a large bowl.
  6. Sweeten and Serve: Taste your cider! Add more sugar if desired. Ladle it into mugs.
  7. Garnish (Optional): Add a slice of orange to your mug, and maybe even a cinnamon stick for stirring.

Notes

Experiment with different apple varieties and spices for unique flavors. Leftover cider can be frozen in ice cube trays.

Nutrition

  • Serving Size: 1 cup
  • Calories: 120
  • Sugar: 25g
  • Sodium: 5mg
  • Fat: 0g
  • Saturated Fat: 0g
  • Unsaturated Fat: 0g
  • Trans Fat: 0g
  • Carbohydrates: 31g
  • Fiber: 2g
  • Protein: 0g
  • Cholesterol: 0mg

Keywords: apple cider, homemade cider, fall drinks, spiced cider

Did you make this recipe?

Share a photo and tag us — we can't wait to see what you've made!

June 25, 2026 |

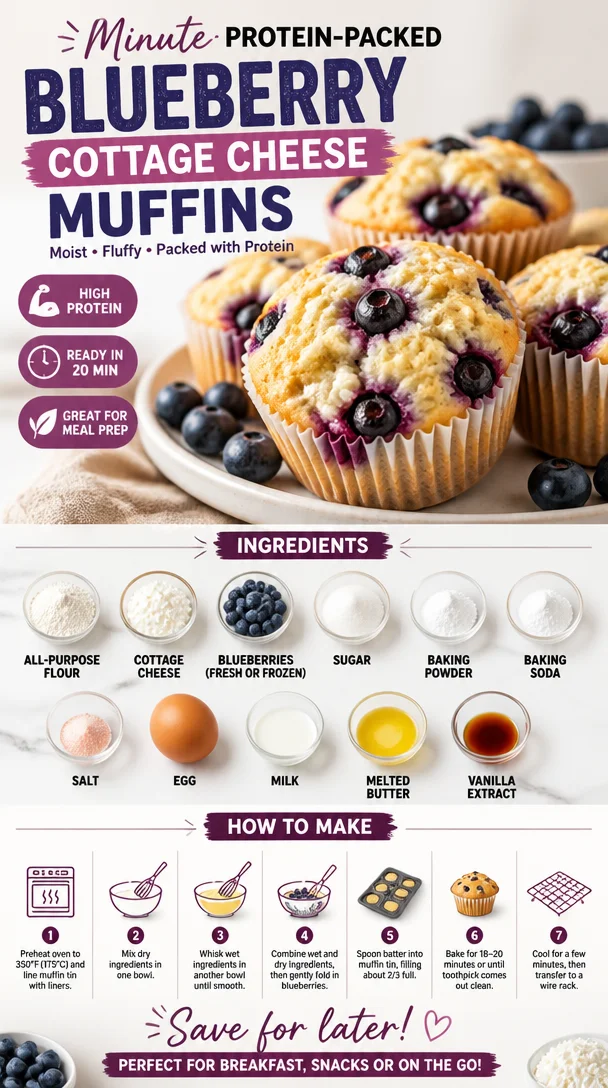
Minute Protein-Packed Blueberry Cottage Cheese Muffins

Delicious minute protein-packed blueberry cottage cheese muffins fresh out of the oven.

Blueberry Cottage Cheese Muffins: A Delightful Twist for Your Breakfast Table

Welcome to my kitchen! Today, I’m thrilled to share a recipe that combines tradition with a contemporary twist: Blueberry Cottage Cheese Muffins. If you’re like me and enjoy a cozy morning with a warm muffin in hand, you’re in for a treat. These muffins are not only fluffy and delicious, but they also pack a punch of protein thanks to the cottage cheese, making them a perfect choice for starting your day off right!

Now, I know what you’re probably thinking. Cottage cheese in muffins? It may sound a bit offbeat, but hear me out! This magical ingredient makes your muffins incredibly moist while adding a subtle tang that pairs beautifully with the natural sweetness of blueberries. Plus, they are easy to whip up, perfect for busy mornings or cozy weekends. Trust me; your taste buds will be singing!

A Stroll Down Memory Lane

Let me take you back to my childhood for a moment. Growing up, muffins were a staple in our home. My mom had a special muffin tin that was a bit battered but filled with memories. Saturday mornings meant kitchen dance parties and the incredible smell of muffins baking in the oven. One of our favorites? Blueberry muffins. My mom usually made them with fresh blueberries, and the anticipation of pulling them out of the oven was absolutely magical.

As I grew older and ventured into cooking, I wanted to preserve that nostalgia while adding my own spin. Enter cottage cheese! This unexpected addition was inspired by my quest for healthier baking options that didn’t compromise on taste. And sprinkle in the fun of enjoying muffins that are not only delicious but also nutritious? Yes, please!

Ingredients You’ll Need

Here’s what you’ll need to create these scrumptious Blueberry Cottage Cheese Muffins:

  • 1 cup all-purpose flour: The foundation of our muffins. You can swap this for whole wheat flour for a healthier option.

  • 1/2 cup cottage cheese: This creamy ingredient adds moisture and protein. If you’re dairy-free, use a plant-based yogurt or ricotta.

  • 1/2 cup blueberries (fresh or frozen): Blueberries are the star here! You can replace them with raspberries or chopped strawberries for a delicious swap.

  • 1/4 cup sugar: For sweetness! You can substitute with honey or maple syrup, but adjust the liquid in the recipe accordingly.

  • 1/2 teaspoon baking powder: This helps the muffins rise. Ensure your baking powder is fresh for the best results.

  • 1/4 teaspoon baking soda: A little boost to make these muffins fluffy!

  • 1/4 teaspoon salt: Just a pinch to enhance all those yummy flavors.

  • 1 large egg: Acts as a binder. If vegan, you can use flaxseed meal mixed with water as an egg replacer.

  • 1/4 cup milk: Use whatever milk you have on hand—dairy, almond, oat, or soy milk will all work!

  • 2 tablespoons melted butter: For richness. You can substitute with coconut oil or a vegan butter for a dairy-free option.

  • 1 teaspoon vanilla extract: Adds warmth and depth to the muffins.

Step-by-Step Instructions

Ready to bake? Grab your ingredients, preheat that oven, and let’s get started!

  1. Preheat the Oven: Preheat your oven to 375°F (190°C). This is crucial! A preheated oven ensures those muffins bake evenly, providing you with a lovely golden color.

  2. Prepare the Muffin Tin: Grease a 12-cup muffin tin or line it with muffin liners. This makes for easy cleanup, and no one likes sticky muffins!

  3. Mix the Dry Ingredients: In a medium bowl, whisk together the flour, baking powder, baking soda, salt, and sugar. Make sure they are well combined; this helps in getting an even rise!

  4. Combine the Wet Ingredients: In another bowl, mix together the cottage cheese, egg, milk, melted butter, and vanilla extract. Yes, cottage cheese can be lumpy; don’t worry! Those lumps will bake into delicious bites.

  5. Fold it All Together: Pour the wet mixture into the dry mixture and gently stir until just combined. Be careful not to overmix; a few lumps are perfectly okay.

  6. Add the Blueberries: Gently fold in the blueberries. If you’re using frozen blueberries, there’s no need to thaw; just toss them in straight from the freezer.

  7. Fill the Muffin Tins: Scoop the batter into the muffin cups, filling each about 2/3 of the way full. This allows space for them to rise without spilling over.

  8. Bake to Perfection: Place the muffin tin in the preheated oven and bake for 18-20 minutes, or until the tops are golden brown and a toothpick comes out clean. The aroma will be irresistible!

  9. Cool and Enjoy: Once baked, let the muffins cool in the tin for about 5 minutes before transferring them to a wire rack to cool completely. Or, if you’re like me, dig right in while they’re still warm!

Serving Suggestions

These muffins are perfect on their own but also pair beautifully with a spread of butter or a dollop of cream cheese. You can also serve them alongside a refreshing yogurt parfait or enjoy them as a grab-and-go breakfast with a cup of coffee.

Recipe Variations

  1. Nutty Blueberry Muffins: Add 1/4 cup of chopped walnuts or pecans for an extra crunch.

  2. Zesty Lemon Blueberry Muffins: Add the zest of one lemon for a bright flavor boost.

  3. Cinnamon Swirl: Mix in 1/2 teaspoon ground cinnamon to the batter or create a cinnamon sugar topping for added sweetness.

  4. Oatmeal Muffins: Substitute 1/4 cup of the flour for rolled oats for a heartier muffin.

  5. Chocolate Chip Surprise: Replace half of the blueberries with chocolate chips for a delightful twist!

Chef’s Notes

Every recipe has a story, and this one is no exception. I first experimented with cottage cheese in baking after a friend mentioned it as a healthy alternative. I was skeptical, but diving into this project changed my baking game forever! I loved how incredibly moist the muffins turned out, while still being lighter than traditional recipes. Over the years, I’ve made countless batches and have fun experimenting with different flavor combinations. The best part? Every muffin tells a story of experimentation, creativity, and, most importantly, deliciousness!

FAQs and Troubleshooting

Q: Why did my muffins come out dense?
A: Overmixing the batter can lead to dense muffins. Mix until just combined for a light, fluffy texture.

Q: Can I use other fruits?
A: Absolutely! Feel free to swap in seasonal fruits like peaches or apples. Just keep in mind that the moisture content may change slightly.

Q: How can I store these muffins?
A: Store your muffins in an airtight container at room temperature for up to three days. You can also freeze them for up to three months—just thaw before you enjoy!

Q: How do I know when the muffins are done?
A: A toothpick inserted into the center should come out clean or with a few moist crumbs. If it’s gooey, they need more baking time.

Nutritional Info (optional)

These muffins not only taste great but also offer a nutritious kick! Each muffin is packed with protein and fiber, perfect for fueling your busy mornings.

So there you have it—a simple, delicious recipe for Blueberry Cottage Cheese Muffins that will warm your heart and fill your stomach. I hope you enjoy making and eating these as much as I do! Keep it fresh, fun, and utterly delicious, and let those kitchen adventures continue! Happy baking!

Print

Blueberry Cottage Cheese Muffins

Fluffy and delicious muffins that combine cottage cheese and blueberries for a high-protein breakfast treat.

  • Prep Time: 15 minutes
  • Cook Time: 20 minutes
  • Total Time: 35 minutes
  • Yield: 12 muffins 1x
  • Category: Breakfast
  • Method: Baking
  • Cuisine: American
  • Diet: Vegetarian

Ingredients

Scale
  • 1 cup all-purpose flour
  • 1/2 cup cottage cheese
  • 1/2 cup blueberries (fresh or frozen)
  • 1/4 cup sugar
  • 1/2 teaspoon baking powder
  • 1/4 teaspoon baking soda
  • 1/4 teaspoon salt
  • 1 large egg
  • 1/4 cup milk
  • 2 tablespoons melted butter
  • 1 teaspoon vanilla extract

Instructions

  1. Preheat the oven to 375°F (190°C).
  2. Grease a 12-cup muffin tin or line it with muffin liners.
  3. Mix the dry ingredients: whisk together the flour, baking powder, baking soda, salt, and sugar.
  4. Combine the wet ingredients: mix together the cottage cheese, egg, milk, melted butter, and vanilla extract.
  5. Fold the wet mixture into the dry mixture until just combined.
  6. Add the blueberries and gently fold them in.
  7. Fill the muffin tins about 2/3 full with batter.
  8. Bake for 18-20 minutes until golden and a toothpick comes out clean.
  9. Cool in the tin for 5 minutes before transferring to a wire rack.

Notes

These muffins are perfect on their own or with butter and cream cheese. Store in an airtight container for up to three days, or freeze for up to three months.

Nutrition

  • Serving Size: 1 muffin
  • Calories: 180
  • Sugar: 6g
  • Sodium: 200mg
  • Fat: 6g
  • Saturated Fat: 3g
  • Unsaturated Fat: 3g
  • Trans Fat: 0g
  • Carbohydrates: 25g
  • Fiber: 1g
  • Protein: 6g
  • Cholesterol: 30mg

Keywords: blueberry muffins, healthy muffins, cottage cheese muffins, breakfast recipes, baking

Did you make this recipe?

Share a photo and tag us — we can't wait to see what you've made!

June 25, 2026 |

Pumpkin and Sweet Potato Soup

Bowl of pumpkin and sweet potato soup garnished with herbs and spices.

Cozy Up with Pumpkin and Sweet Potato Soup: A Flavorful Journey

As the leaves start to turn and the air fills with that crisp fall aroma, there’s nothing quite like curling up with a warm bowl of soup to nourish your body and soul. Today, I’m excited to share a beloved recipe for Pumpkin and Sweet Potato Soup that’s perfect for this cozy season. Combining vibrant flavors, comforting textures, and a myriad of health benefits, this soup could easily become your new go-to dish when the temperature drops.

There’s something nostalgic about a warm soup steaming in a bowl, reminding me of my childhood. I remember cozy afternoons spent in my grandmother’s kitchen, where the scent of simmering vegetables and rich spices would waft through the air. She taught me the way to infuse love into every dish, turning fresh ingredients into something magical. I fondly remember the days when we’d carve pumpkins for Halloween, saving the pulp to create her famous creamy pumpkin soup. She’d tell me stories of how pumpkin is not just for pies but for hearty meals that warm the heart.

Inspired by those moments, I decided to recreate a vibrant soup that combines sweet potato’s subtle sweetness with pumpkin’s rich, earthy flavor, all while being nestled in creamy coconut milk. Trust me; it’s as tasty as it is comforting. So grab your apron, and let’s dive into this delightful kitchen adventure!

Personal Story: A Taste of Childhood

One of my favorite childhood memories revolves around those first chilly days of fall. At school, we’d gather together to talk about our plans for Halloween. The true magic, however, came when I arrived home. My grandma would always have her pumpkin soup bubbling on the stovetop, and as the aroma filled the room, I felt all my worries melt away.

She would often share stories of how pumpkins are celebrated in various cultures and how much goodness can be packed into such a simple ingredient. We would gather around the table, my cousins and I, and savor each spoonful while fighting off chilly drafts. Every bite was a warm hug, and that simple soup became a symbol of not just food, but family, tradition, and love. When I make this Pumpkin and Sweet Potato Soup today, I feel connected to those moments and can almost hear my grandma’s laughter echoing in the background.

Now, let’s recreate this warm dish together, adding our own modern twist to the family tradition!

Ingredients

Gather the following ingredients to whip up this soothing soup:

  • 2 cups pumpkin puree: You can use canned puree or roast fresh pumpkin to scoop out its flesh. Canned is great for convenience, but fresh brings a robust flavor.
  • 2 cups sweet potatoes, peeled and diced: These bring a sweet, creamy texture. If you don’t have sweet potatoes, regular potatoes will suffice, but they won’t add the same sweetness.
  • 1 onion, chopped: A basic yet flavorful base for the soup. Yellow or white onions work best. If you’re sensitive to onions, leeks or shallots can be swapped in.
  • 2 cloves garlic, minced: Fresh garlic adds a punch of flavor. If you’re in a pinch, granulated garlic will do, but fresh is always better!
  • 4 cups vegetable or chicken broth: Broth is the key to delicious flavor. Homemade is ideal, but store-bought works well and saves time.
  • 1 can coconut milk: This ties the soup together with a creamy texture and subtle sweetness. Almond or cashew milk can be used, but the soup won’t be as creamy.
  • 1 teaspoon ginger, grated: Fresh ginger adds warmth and spice. Ground ginger can be a substitute, but reduce the quantity to 1/4 teaspoon.
  • 1 teaspoon cinnamon: This will enhance the sweetness and give the soup that cozy aroma. You can swap it for nutmeg or allspice for a different flavor profile.
  • Salt and pepper to taste: Essential for balancing flavors.

Let’s gather those ingredients, and get ready for a delightful cooking adventure!

Step-by-Step Instructions

  1. Sauté the aromatics: In a large pot over medium heat, add a splash of olive oil (or any oil of your choice). Once hot, throw in the chopped onions and cook for about 5 minutes until they become semi-translucent. This step is crucial as it builds the foundation of flavor for your soup! Don’t forget to stir occasionally!

  2. Add garlic and ginger: Toss in the minced garlic and grated ginger! Sauté for an additional minute until fragrant, but be careful not to burn the garlic – trust me, burnt garlic can spoil your whole pot of soup!

  3. Incorporate sweet potatoes: Now, add the diced sweet potatoes and stir to combine. Cook for about 2-3 minutes, allowing them to absorb the flavors from the aromatics.

  4. Pour in the broth: Next, add the vegetable or chicken broth, bringing everything to a gentle boil. The broth will bring the soup to life! Once it’s simmering, reduce the heat and let it cook for about 15 minutes or until the sweet potatoes are tender.

  5. Blend the soup: Time for some magic! Once the sweet potatoes are tender, turn off the heat. Using an immersion blender, blend the mixture until smooth and creamy. If you don’t have one, carefully transfer to a blender in batches (let the soup cool slightly before blending!). This step ensures a velvety texture that’s downright dreamy!

  6. Add pumpkin and coconut milk: Now, return the blended soup to the pot (if you used a blender) and stir in the pumpkin puree and coconut milk. This is the moment where your soup gets irresistibly creamy!

  7. Season it right: Add cinnamon, salt, and pepper to taste. Let it simmer for another 5-10 minutes to let those flavors meld together—trust me, your patience will pay off!

  8. Serve it up: Time to dish out your masterpiece! I suggest drizzling a little extra coconut milk on top, or perhaps a sprinkle of chopped herbs for color if you’re feeling fancy.

Serving Suggestions

When serving this lovely soup, consider garnishing with a sprinkle of pumpkin seeds or a drizzle of coconut cream. You could even pop some crusty bread or a warm baguette on the side for a hearty meal. In the fall, a touch of sage or roasted pumpkin seeds adds an earthy element, while fresh parsley can brighten things up—your choice!

Recipe Variations

Here are a few fun twists to keep your soup interesting:

  1. Spicy kick: Add a diced jalapeño or a pinch of red pepper flakes to the onions for a hint of heat.
  2. Herbaceous delight: Experiment with fresh herbs like thyme, rosemary, or cilantro to bring a fragrant twist.
  3. Creamy swap: Instead of coconut milk, try Greek yogurt for a tangy creaminess (just add it at the end to avoid curdling).
  4. Protein boost: Stir in cooked lentils or chickpeas to make the soup more filling while adding an extra layer of texture.
  5. Nutty goodness: Top with chopped toasted nuts like almonds or walnuts for a crunch that contrasts beautifully with the creamy soup.

Chef’s Notes

This Pumpkin and Sweet Potato Soup holds a special place in my heart, much like that cherished family recipe. Over time, I’ve made adjustments, adding spices here and there, and even swapping in different broths for new flavors. The best part of cooking is how it evolves and reflects your unique taste! I love to experiment with seasonal ingredients, and this soup is as versatile as it is delicious.

Funny story—one year, I decided to impress some friends with this recipe. I grabbed the wrong container and dumped a whole tablespoon of cayenne pepper instead of just a pinch! Let me tell you, we had a fiery night! But, we learned to embrace the heat, and it ended up being a crowd favorite. Sometimes, culinary ‘mistakes’ lead to the best discoveries!

FAQs and Troubleshooting

1. My soup is too thick—what can I do?

No worries! Just add extra broth or water until you reach your desired consistency. Heat it back up, and it’ll come together again!

2. Can I make this soup ahead of time?

Absolutely! In fact, the flavors deepen over time. Simply store it in an airtight container in the fridge for up to a week, or freeze it for later.

3. What if I don’t have pumpkin puree?

You can substitute with butternut squash or even leave it out if you’d like a sweeter potato soup instead. Adjust the spices to your taste since pumpkin has a unique flavor.

4. Can I make it vegan?

Yes! Just ensure your broth is veggie-based, and you’re all set with the ingredients listed. The coconut milk is inherently vegan, adding that creamy goodness!

Nutritional Info

(For 1 serving of soup—approx. 1 cup)

  • Calories: 240
  • Protein: 4 g
  • Fat: 12 g
  • Carbohydrates: 32 g
  • Fiber: 5 g

There you have it, your very own cozy bowl of Pumpkin and Sweet Potato Soup! I hope you enjoy crafting this dish in your kitchen as much as I do. Remember, cooking is all about joy, exploration, and sharing moments. Don’t hesitate to get creative and make it your own. Happy cooking, foodies!

Print

Pumpkin and Sweet Potato Soup

A warm and comforting soup combining pumpkin and sweet potatoes, perfect for chilly days.

  • Prep Time: 15 minutes
  • Cook Time: 30 minutes
  • Total Time: 45 minutes
  • Yield: 4 servings 1x
  • Category: Soup
  • Method: Simmering
  • Cuisine: American
  • Diet: Vegan

Ingredients

Scale
  • 2 cups pumpkin puree
  • 2 cups sweet potatoes, peeled and diced
  • 1 onion, chopped
  • 2 cloves garlic, minced
  • 4 cups vegetable or chicken broth
  • 1 can coconut milk
  • 1 teaspoon ginger, grated
  • 1 teaspoon cinnamon
  • Salt and pepper to taste

Instructions

  1. Sauté the aromatics: In a large pot over medium heat, add a splash of olive oil. Once hot, add the chopped onions and cook for about 5 minutes until semi-translucent.
  2. Add garlic and ginger: Toss in the minced garlic and grated ginger, and sauté for an additional minute until fragrant.
  3. Incorporate sweet potatoes: Add the diced sweet potatoes and stir to combine, cooking for about 2-3 minutes.
  4. Pour in the broth: Add the vegetable or chicken broth and bring to a gentle boil. Once simmering, reduce the heat and cook for about 15 minutes or until the sweet potatoes are tender.
  5. Blend the soup: Turn off the heat and blend the mixture until smooth and creamy using an immersion blender.
  6. Add pumpkin and coconut milk: Return the blended soup to the pot and stir in the pumpkin puree and coconut milk.
  7. Season it right: Add cinnamon, salt, and pepper to taste and let it simmer for another 5-10 minutes.
  8. Serve it up: Dish out the soup and consider garnishing with extra coconut milk or chopped herbs.

Notes

This soup is versatile; feel free to experiment with ingredients and spices to suit your taste.

Nutrition

  • Serving Size: 1 cup
  • Calories: 240
  • Sugar: 5g
  • Sodium: 400mg
  • Fat: 12g
  • Saturated Fat: 10g
  • Unsaturated Fat: 2g
  • Trans Fat: 0g
  • Carbohydrates: 32g
  • Fiber: 5g
  • Protein: 4g
  • Cholesterol: 0mg

Keywords: pumpkin soup, sweet potato soup, fall recipe, vegan soup, cozy meals

Did you make this recipe?

Share a photo and tag us — we can't wait to see what you've made!

June 25, 2026 |

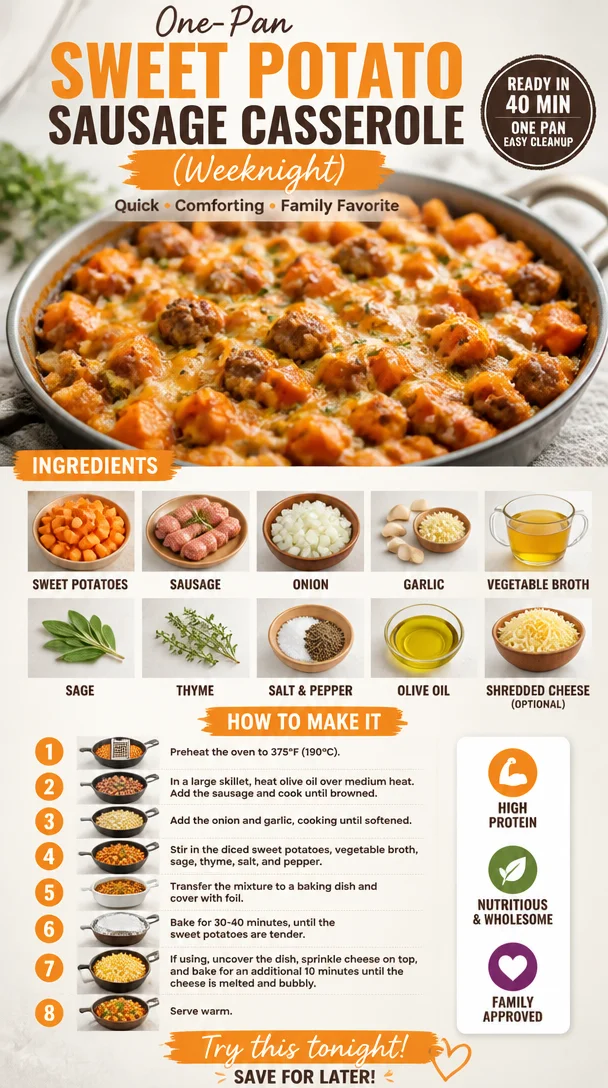
One-Pan Sweet Potato Sausage Casserole (Weeknight)

One-Pan Sweet Potato Sausage Casserole with herbs and spices

Sweet Potato and Sausage Casserole: A Delightful Comfort Dish

Welcome back to Clean Plate Cravings, my dear foodies! Today, we’re diving into a dish that’s near and dear to my heart: Sweet Potato and Sausage Casserole. This is comfort food at its finest—simple, hearty, and bursting with flavors. Whenever I whip up this casserole, I can’t help but reminisce about cozy family dinners filled with laughter and love. So, grab your aprons and let’s dive into this delicious recipe!

A Taste of Nostalgia

Growing up, my family had Tuesday night dinners that were always the highlight of my week. My mom would create simple yet satisfying meals, which became our warm refuge from busy, chaotic days. One dish that often graced our table was a hearty sweet potato casserole. The blend of the sweet potatoes with the savory sausage was an unbeatable combination that everyone looked forward to.

One rainy evening, I remember my mom inviting my friends over for dinner. We were all bundled up, giggling and sharing stories about school as the aroma of the casserole wafted through the house. When it finally came out of the oven, we dove in face-first, all while debating the “proper” way to eat it. For us, there was no wrong way when it tasted this good! This casserole not only fed our bellies but also filled our hearts with warmth and joy.

As I’ve grown and ventured into my own kitchen, I’ve kept those delightful flavors alive and added a few of my own twists. Each time I prepare this dish, it’s a little reminder of those cherished moments—both in the kitchen and around the dining table. Let’s make these memories together!

Ingredients

Here’s what you need to whip up this delightful Sweet Potato and Sausage Casserole:

  • 2 large sweet potatoes, peeled and diced
    Sweet potatoes are the star of this dish, providing natural sweetness and a creamy texture once baked. If you’re running low, butternut squash or pumpkin can make an excellent substitute.

  • 1 pound sausage (Italian or any preferred type)
    I love using Italian sausage because it adds a great depth of flavor. If you prefer a lighter option, turkey sausage works beautifully too, or even a plant-based sausage for a vegetarian twist.

  • 1 onion, diced
    Onions lend a nice aromatic base to the casserole. If you’re short on time, shallots or leeks can fit in seamlessly.

  • 2 cloves garlic, minced
    Garlic is a must! It adds that delightful savoriness. If you’re not a fan or out, garlic powder can step in—just use about 1/4 teaspoon.

  • 1 cup vegetable broth
    This helps keep the casserole moist and adds flavor. You can also use chicken broth if you prefer, or for a heartier option, try a low-sodium beef broth.

  • 1 teaspoon sage
    Sage has a lovely earthy flavor that complements the sausage beautifully. If you’re out, thyme or rosemary can take the stage instead!

  • 1 teaspoon thyme
    Another aromatic herb that brings depth. You can substitute with Italian seasoning or herbs de Provence.

  • Salt and pepper to taste
    Essential for highlighting all those lovely flavors. Freshly cracked black pepper and sea salt always amplify the taste—don’t skimp out!

  • Olive oil
    Just a drizzle for sautéing the onion and garlic. You can also use avocado oil or coconut oil based on preference.

  • 1 cup shredded cheese (optional)
    For a melty finish. Cheddar, gouda, or mozzarella would work well. If you want it dairy-free, nutritional yeast can give it a nice cheesy flavor!

Step-by-Step Instructions

Now let’s get cooking! Follow these simple steps for a mouthwatering Sweet Potato and Sausage Casserole that’ll impress your family and friends.

  1. Preheat your oven to 400°F (200°C)
    Start by preheating the oven because this casserole will need a hot space to get bubbly and golden. It’s like giving your dish a warm welcome!

  2. Sauté the onion and garlic
    In a large skillet over medium heat, drizzle about a tablespoon of olive oil. Once hot, add in the diced onion and sauté until it becomes translucent—about 5 minutes. Then, toss in the minced garlic and sauté for another minute until fragrant. Pro tip: Add a pinch of salt to the onions while they cook to draw out moisture and enhance their sweetness!

  3. Brown the sausage
    Next, add the sausage into your skillet, breaking it apart with a spoon as it cooks. Sauté until it’s nicely browned, about 7-10 minutes. This step builds layers of flavor. If you’re using a leaner sausage, be mindful; it may not produce a lot of fat for flavor.

  4. Combine sweet potatoes and seasonings
    Once the sausage is cooked through, toss in the diced sweet potatoes, sage, thyme, and season with salt and pepper. Stir to combine. This is where the magic happens—those sweet potatoes soak up all those incredible flavors.

  5. Add broth
    Pour in the vegetable broth, stirring everything together well. The broth brings moisture to the dish, ensuring the sweet potatoes cook through and stay tender.

  6. Bake the casserole
    Transfer this glorious mixture to a greased baking dish (about 9×13 inch works well) and spread it evenly. Cover with aluminum foil and pop it into the preheated oven. Bake for about 25 minutes.

  7. Uncover and add cheese (if using)
    After 25 minutes, remove the foil and sprinkle shredded cheese on top if you’re using it. Return it to the oven for about an additional 10-15 minutes, or until the sweet potatoes are fork-tender and the cheese is bubbly and golden.

  8. Let it cool and serve!
    Once out of the oven, let your casserole cool for a few minutes. I know it’s tempting to dive right in, but giving it a moment helps the flavors settle and makes serving easier!

Serving Suggestions

To serve, gently scoop portions onto plates—you can pair this casserole with a crisp green salad or roasted veggies for a complete meal. Drizzle a bit of balsamic glaze over the top for an extra pop of flavor and a beautiful presentation. A sprinkle of fresh herbs, like parsley or chives, adds vibrant color and freshness too!

Recipe Variations

Here are a few creative twists you can explore with this casserole:

  • Sweet and Spicy: Add some diced jalapeños or crushed red pepper flakes to the sausage while browning for a spicy kick.
  • Veggie Twist: Mix in some chopped spinach, kale, or bell peppers for extra nutrients.
  • Cheesy Delight: Try different cheeses—pepper jack for heat or gouda for creamy richness.
  • Low-Carb Option: Replace sweet potatoes with cauliflower for a lower-carb version.
  • Breakfast Makeover: Swap out the sausage for crumbled bacon or breakfast sausage, and serve it alongside eggs for a brunch-lovers’ delight!

Chef’s Notes

Every casserole tells a story, and this one does too! Over the years, I’ve modified this recipe to include whatever I have on hand, and it always turns out deliciously! One time, I had some leftover caramelized onions from a previous dinner, and—oh my gosh!—that addition took the flavor to an entirely new level! Don’t be afraid to experiment and make this dish your own.

And let’s be real—who doesn’t love a one-pan meal? This casserole is not only satisfying but also perfect for meal prep. Just store it in an airtight container in the fridge for up to three days, and you’re all set for busy weeknights!

FAQs and Troubleshooting

  1. Can I assemble this casserole ahead of time?
    Absolutely! You can prep everything the night before, cover it in the fridge, and then bake it when you’re ready.

  2. What if my sweet potatoes are still hard after baking?
    Every oven is different! If they’re not tender after the recommended baking time, cover the casserole again and give it another 10-15 minutes in the oven.

  3. Can I freeze this casserole?
    Yes! Just make sure it’s completely cooled before wrapping tightly and placing in the freezer. It should last up to 3 months. Thaw overnight in the fridge before reheating.

  4. What should I do if I’m sensitive to sausage flavors?
    You can substitute the sausage with cooked lentils or chickpeas for a similar protein punch without the strong meaty flavor. Season them well to bring out that savoriness!

Nutritional Info

Though nutritional information may vary based on specific ingredients used, here’s a rough estimation per serving (assuming 8 servings):

  • Calories: 350
  • Protein: 16g
  • Carbohydrates: 40g
  • Dietary Fiber: 6g
  • Total Fat: 14g

Eating well shouldn’t feel like a chore, and this Sweet Potato and Sausage Casserole is the perfect example of how flavorful and wholesome meals can be fun to make and share. I can’t wait for you to try this out in your kitchen! Remember, food is all about love and connection. So go ahead—dive right in, make new memories, and enjoy every delicious bite! Happy cooking!

Print

Sweet Potato and Sausage Casserole

A hearty and comforting Sweet Potato and Sausage Casserole that combines the natural sweetness of sweet potatoes with savory sausage, perfect for family dinners.

  • Prep Time: 15 minutes
  • Cook Time: 40 minutes
  • Total Time: 55 minutes
  • Yield: 8 servings 1x
  • Category: Main Course
  • Method: Baking
  • Cuisine: American
  • Diet: Omnivore

Ingredients

Scale
  • 2 large sweet potatoes, peeled and diced
  • 1 pound sausage (Italian or any preferred type)
  • 1 onion, diced
  • 2 cloves garlic, minced
  • 1 cup vegetable broth
  • 1 teaspoon sage
  • 1 teaspoon thyme
  • Salt and pepper to taste
  • Olive oil
  • 1 cup shredded cheese (optional)

Instructions

  1. Preheat your oven to 400°F (200°C).
  2. Sauté the onion and garlic in olive oil until translucent, about 5 minutes.
  3. Brown the sausage in the skillet until nicely browned, 7-10 minutes.
  4. Combine the sweet potatoes, sage, thyme, salt and pepper with the sausage mixture.
  5. Add the broth and stir to combine.
  6. Bake the mixture in a greased baking dish covered with foil for about 25 minutes.
  7. Uncover and add cheese if using, returning to the oven for 10-15 minutes until golden.
  8. Let it cool a few minutes before serving.

Notes

Feel free to experiment with vegetable substitutions and spices. This dish can be prepared ahead of time or frozen for later use.

Nutrition

  • Serving Size: 1 serving
  • Calories: 350
  • Sugar: 7g
  • Sodium: 600mg
  • Fat: 14g
  • Saturated Fat: 5g
  • Unsaturated Fat: 7g
  • Trans Fat: 0g
  • Carbohydrates: 40g
  • Fiber: 6g
  • Protein: 16g
  • Cholesterol: 40mg

Keywords: casserole, sweet potato, sausage, comfort food, family dinner

Did you make this recipe?

Share a photo and tag us — we can't wait to see what you've made!

June 25, 2026 |

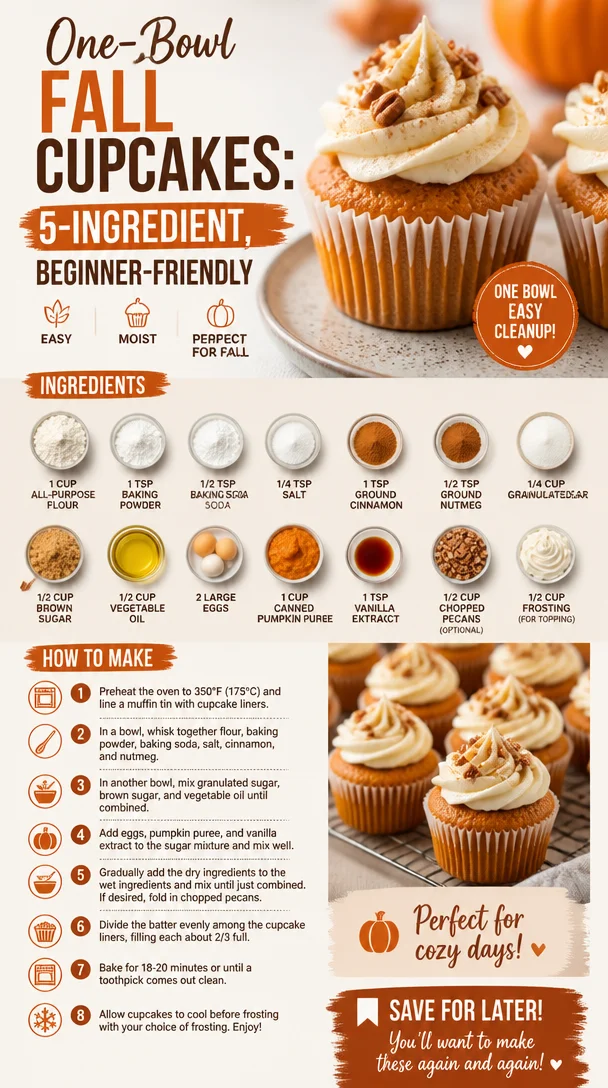
One-Bowl Fall Cupcakes: 5-Ingredient, Beginner-Friendly

Delicious one-bowl fall cupcakes topped with autumn-themed decorations

Impossible Perfect Fall Cupcakes: A Celebration of Autumn Flavors

Welcome to another delightful food journey at Clean Plate Cravings! If there’s one thing I adore about fall, it’s the abundance of warm spices, cozy gatherings, and the simple joy of baking something that wraps around you like a hug. Today, I’m thrilled to share my recipe for Impossible Perfect Fall Cupcakes. These little treats capture the essence of autumn with every bite—think soft, moist, and warmly spiced pumpkin flavor that feels like a nostalgic walk through fallen leaves.

The leaves are changing color, and there’s a crispness in the air, making it the perfect time to whip up these delightful cupcakes. So grab your apron, turn on your favorite playlist, and let’s create something that not only tastes incredible but brings a smile to everyone’s face.

There’s something magical about baking. It transforms simple ingredients into something special, a tangible, edible piece of love. Whether you’re serving them at a cozy family gathering, a festive potluck, or just savoring them at home with a cup of tea, these cupcakes will make your heart happy. Plus, what could be better than sharing them with friends and family and enjoying the aroma of freshly baked goods wafting through your kitchen? You’re in for a treat!

A Personal Touch

Let me take you on a little journey back in time. Picture this: I’m just a kid, standing on a stool in my grandmother’s kitchen. The warm, buttery smell fills the air as she mixes her famous pumpkin spice batter. She turns to me with a twinkle in her eye, says we’re making “magical muffins,” and you know what? They really felt like magic as we watched them rise in the oven.

Years later, I realized that those little moments, standing on tiptoes, pouring flour, and sneaking raw batter, weren’t just about the treats we were making; they were about the bonds we were building. Today, every time I whip up these Impossible Perfect Fall Cupcakes, I think of my grandma and the love she poured into every recipe. It’s not just a cupcake. It’s a slice of nostalgia, an invitation to create new memories, and a delicious way to celebrate the flavors of fall.

Ingredients

Let’s get into the nitty-gritty of what makes these cupcakes truly special. Here’s what you’ll need:

  • 1 cup all-purpose flour
    Your base ingredient! For a gluten-free option, swap with a 1:1 gluten-free flour blend.

  • 1 tsp baking powder
    This helps our cupcakes rise to perfection, giving them that lovely fluffiness.

  • 1/2 tsp baking soda
    Along with the baking powder, this ensures we achieve that light texture we crave.

  • 1/4 tsp salt
    A pinch of salt amplifies all the flavors—trust me, it’s essential!

  • 1 tsp ground cinnamon
    This magic spice is synonymous with fall, adding warmth and a hint of sweetness.

  • 1/2 tsp ground nutmeg
    Nutmeg has a slightly sweet and woody flavor. Just a dash will elevate our cupcakes.

  • 1/4 cup granulated sugar
    For that classic sweetness! You can use coconut sugar for a deeper taste.

  • 1/2 cup brown sugar
    The molasses in brown sugar adds moisture and a rich flavor—so good!

  • 1/2 cup vegetable oil
    Keeps our cupcakes moist and tender. You can use melted coconut oil for a subtler flavor.

  • 2 large eggs
    Eggs act as a binder, adding richness to the batter.

  • 1 cup canned pumpkin puree
    This is the star of the show! It brings moisture and that delicious fall flavor.

  • 1 tsp vanilla extract
    Enhances the sweetness and rounds out the flavors beautifully.

  • 1/2 cup chopped pecans (optional)
    These add a delightful crunch. If you’re nut-free, feel free to skip or replace them with sunflower seeds!

  • 1/2 cup frosting (for topping)
    Use your favorite cream cheese frosting or get adventurous with a maple buttercream!

Step-by-Step Instructions

Ready to bring these fall vibes to life? Let’s dive into the baking process!

  1. Preheat the Oven
    Preheat your oven to 350°F (175°C). This step is crucial, as a hot oven ensures your cupcakes rise beautifully. Don’t forget to line your cupcake pan with cupcake liners—these will make cleanup a breeze!

  2. Whisk Dry Ingredients
    In a medium bowl, whisk together the flour, baking powder, baking soda, salt, cinnamon, and nutmeg until well combined. Whisking ensures an even distribution of the leavening agents and spices. And it’s a great way to get those lovely aromas wafting around your kitchen!

  3. Mix Sugars and Wet Ingredients
    In a large mixing bowl, combine the granulated sugar, brown sugar, and vegetable oil. With a whisk, mix until well combined. Then add your eggs, pumpkin puree, and vanilla extract. Mix until everything is smooth and creamy. Here’s a quick chef tip: If your pumpkin puree is super thick, give it a quick stir before adding it to help it blend seamlessly.

  4. Combine Wet and Dry Mixtures
    Add the dry ingredients to the wet mixture in batches. Gently fold using a spatula, mixing just until combined. Avoid overmixing to ensure your cupcakes remain tender—think fluffy clouds rather than dense bricks!

  5. Add Pecans
    If you’re using pecans, fold them into the batter at this stage. Want to get adventurous? Toss in some chocolate chips or dried cranberries for an extra flavor kick!

  6. Fill the Liners
    Spoon the batter into the lined cupcake pan, filling each cup about two-thirds full. This allows space for the cupcakes to rise without overflowing.

  7. Bake
    Pop the cupcake pan into your preheated oven and bake for 18-20 minutes or until a toothpick inserted in the center comes out clean. Halfway through baking, you can rotate the pan to ensure even cooking.

  8. Cool Down
    Remove the cupcakes from the oven and let them cool in the pan for about 5 minutes. Then, transfer them to a wire rack to cool completely. Patience is key here—frosting warm cupcakes can lead to melty messes!

  9. Frost and Serve!
    Once cooled, frost generously with your choice of frosting. A cream cheese frosting is a classic match! To add a special touch, sprinkle some chopped pecans or a dash of cinnamon on top. Just like that, you’ve transformed simple ingredients into an autumn masterpiece!

Serving Suggestions

Serve your Impossible Perfect Fall Cupcakes on a beautiful platter, dusted with a sprinkle of powdered sugar or a light coating of cinnamon. Pair them with steaming mugs of cider, creamy hot chocolate, or even a spiced chai latte for a heartwarming gathering. Add a few cinnamon sticks or decorative autumn leaves to the platter for a festive touch!

Recipe Variations

  1. Pumpkin Spice Latte Cupcakes: Add a tablespoon of instant coffee granules to the batter for that coffee kick!
  2. Chocolate Chip Pumpkin Cupcakes: Sprinkle chocolate chips throughout for an unexpected melty surprise.
  3. Vegan Version: Swap eggs for flax eggs (1 tbsp flaxseed meal + 2.5 tbsp water per egg) and substitute vegetable oil with applesauce.
  4. Gluten-Free Delight: Use a gluten-free flour blend for a safe and scrumptious option that everyone can enjoy.
  5. Savory Twist: Incorporate feta and spinach into the batter for a unique savory variation!

Chef’s Notes

These cupcakes have become a staple in my home, evolving with each season. I’ve tried countless iterations, from adding applesauce for extra moisture to experimenting with different frostings. One of my fondest memories is making these cupcakes during a family gathering, where everyone brought their own takes on toppings. Let me tell you, nothing beats a table full of desserts made with love!

Remember, cooking is a flowing journey, and while a recipe serves as a guide, add your flair! You might just create your own kitchen masterpiece.

FAQs and Troubleshooting

Q: My cupcakes came out dense—what went wrong?
A: Overmixing the batter can lead to dense cupcakes. Mix until just combined and check the freshness of your leavening agents (baking powder and baking soda).

Q: How do I store leftovers?
A: Store in an airtight container at room temperature for up to 2 days or in the refrigerator for about a week.

Q: Can I freeze these cupcakes?
A: Absolutely! Freeze unfrosted cupcakes in a single layer on a baking sheet, then transfer to a zip-top bag once frozen. They can be frozen for up to 3 months.

Q: Will using fresh pumpkin make a difference?
A: Fresh pumpkin can add a richer flavor, but make sure to cook and puree it until smooth before using. Canned pumpkin is consistent and convenient, but fresh can elevate it!

Nutritional Info

While these cupcakes are as delicious as they are comforting, keep in mind that enjoyment is equally essential as nutrition. A single cupcake has a decent dose of pumpkin goodness, providing vitamin A and fiber. Enjoy these treats in moderation and share them with others to spread the love!

So there you have it—the impossible perfect fall cupcakes that will warm your heart, nourish your soul, and make every guest at your table feel cherished. Let’s create memories one cupcake at a time—happy baking!

Print

Impossible Perfect Fall Cupcakes

Celebrate autumn with these soft, moist cupcakes infused with pumpkin and warm spices, perfect for cozy gatherings.

  • Prep Time: 15 minutes
  • Cook Time: 20 minutes
  • Total Time: 35 minutes
  • Yield: 12 servings 1x
  • Category: Dessert
  • Method: Baking
  • Cuisine: American
  • Diet: Vegetarian

Ingredients

Scale
  • 1 cup all-purpose flour
  • 1 tsp baking powder
  • 1/2 tsp baking soda
  • 1/4 tsp salt
  • 1 tsp ground cinnamon
  • 1/2 tsp ground nutmeg
  • 1/4 cup granulated sugar
  • 1/2 cup brown sugar
  • 1/2 cup vegetable oil
  • 2 large eggs
  • 1 cup canned pumpkin puree
  • 1 tsp vanilla extract
  • 1/2 cup chopped pecans (optional)
  • 1/2 cup frosting (for topping)

Instructions

  1. Preheat your oven to 350°F (175°C).
  2. Whisk together the flour, baking powder, baking soda, salt, cinnamon, and nutmeg in a medium bowl.
  3. Combine the granulated sugar, brown sugar, and vegetable oil in a large mixing bowl; mix until smooth. Add eggs, pumpkin puree, and vanilla extract; mix until creamy.
  4. Add the dry ingredients to the wet mixture in batches and fold until combined.
  5. Fold in chopped pecans if using.
  6. Spoon the batter into cupcake liners, filling each about two-thirds full.
  7. Bake for 18-20 minutes or until a toothpick comes out clean.
  8. Cool for 5 minutes in the pan, then transfer to a wire rack to cool completely.
  9. Frost with your choice of frosting and enjoy!

Notes

These cupcakes can be customized with chocolate chips or made vegan by substituting eggs with flax eggs and oil with applesauce.

Nutrition

  • Serving Size: 1 cupcake
  • Calories: 200
  • Sugar: 14g
  • Sodium: 250mg
  • Fat: 10g
  • Saturated Fat: 1g
  • Unsaturated Fat: 9g
  • Trans Fat: 0g
  • Carbohydrates: 28g
  • Fiber: 2g
  • Protein: 3g
  • Cholesterol: 25mg

Keywords: cupcakes, fall recipes, pumpkin spice, cozy desserts, baking

Did you make this recipe?

Share a photo and tag us — we can't wait to see what you've made!

June 25, 2026 |

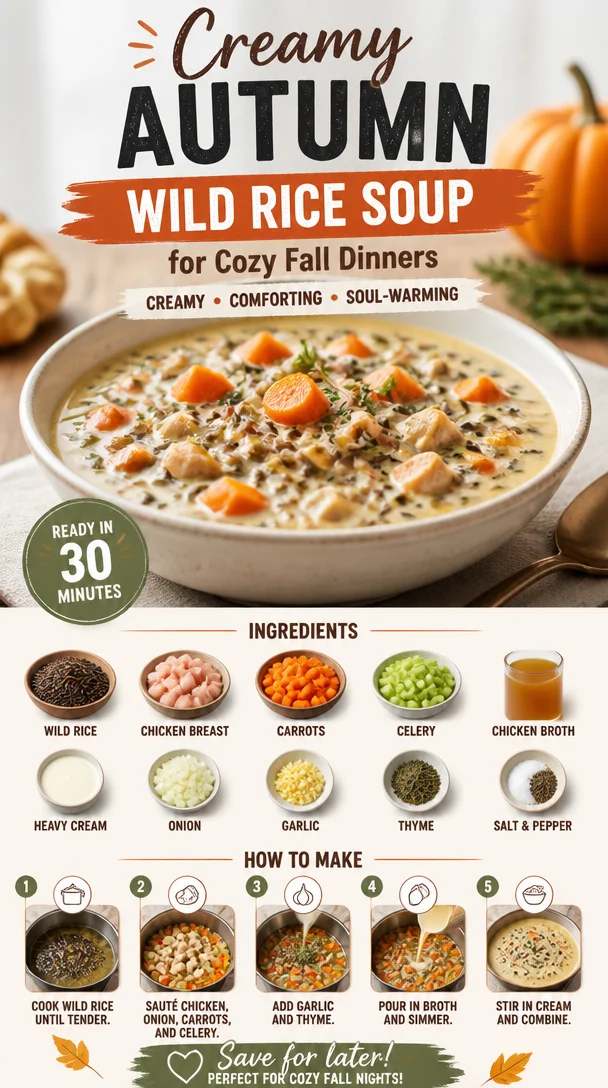
Creamy Autumn Wild Rice Soup for Cozy Fall Dinners

Bowl of creamy autumn wild rice soup with vegetables and herbs

Cozy Autumn Wild Rice Soup: A Delicious Fall Comfort Food Recipe

As the leaves begin to change and the crisp autumn air settles in, there’s nothing quite like a warm bowl of soup to wrap you in a cozy embrace. One of my all-time favorite recipes, which captures the essence of this season perfectly, is my Cozy Autumn Wild Rice Soup. Not only is it hearty and nourishing, but it also brims with flavors that will remind you of pumpkin patches and colorful foliage. This soup is truly a celebration of fall, and I’m excited to share it with you!

Imagine the rich aroma of sautéed onions and garlic engulfing your kitchen, mingling with notes of thyme and earthy wild rice. This dish brings together the best of autumn’s produce, offering a satisfying blend of textures and flavors that nourish your body and soul. Plus, it’s easy to make, perfect for meal prep, and an ideal centerpiece for a chilly day.

Whether you’re serving it at a cozy dinner with friends or enjoying a quiet night in with a good book, this Cozy Autumn Wild Rice Soup is sure to bring joy to your table. So, grab your favorite soup pot, and let’s get cooking!

A Little Kitchen Memory

This Cozy Autumn Wild Rice Soup brings back fond memories of my childhood when my family would gather in the kitchen on Sunday afternoons. My mother had a way of transforming the simplest of ingredients into a warm, comforting meal that made everything feel right in the world. I remember the excitement of chopping fresh veggies as she stirred her famous soup on the stovetop, the smell filling every nook and cranny of our home.

One autumn, we decided to try something different — we had just discovered wild rice during one of our family trips to the local farmer’s market. It was a bit of a novelty in our kitchen back then, and combining those nutty, chewy grains with seasonal veggies felt like a delightful adventure. The first taste was such a revelation; it was like a warm hug from the inside out! We laughed, shared stories, and fought over who got the last bowl, which led to my mom’s famous “whoever helps cook gets first dibs” rule.

Every spoonful was packed with love, and to this day, this soup reminds me how food weaves together moments that become cherished memories. Let’s create our own magic in the kitchen together!

Ingredients

Here’s what you will need for this Cozy Autumn Wild Rice Soup, along with some helpful tips for each ingredient:

  • Wild Rice: This nutty, hearty grain serves as the base of our soup. Wild rice is actually a water plant and has a unique texture compared to regular rice. You can substitute with brown rice if necessary, but keep in mind the cooking time may vary.

  • Olive Oil: Used for sautéing your vegetables, olive oil adds a fruity flavor to the mix. If you’re looking for a different taste, avocado or coconut oil works well too.

  • Yellow Onion: A classic base for almost any soup, yellow onion provides sweetness and depth. If you’re out of yellow onion, shallots or red onion can be used as a substitute.

  • Garlic Cloves: Freshly minced garlic infuses the soup with an aromatic flair. If fresh garlic isn’t available, garlic powder can work in a pinch (1/8 teaspoon per clove).

  • Carrots & Celery: These vegetables add structure and sweetness to the soup. Feel free to swap them out for bell peppers or parsnips if you’re craving something different.

  • Mushrooms: I love using cremini or button mushrooms for added umami. If you’re not a fan of mushrooms, try diced zucchini or extra greens instead.

  • Vegetable Broth: This is the soul of our soup! Use low-sodium vegetable broth to control the saltiness or chicken stock if you prefer. For a creamier texture, replace some with coconut milk.

  • Pumpkin Puree: A seasonal favorite, pumpkin puree adds creaminess and a subtle sweetness. You can also use butternut squash puree or sweet potato for an equally tasty alternative.

  • Dried Thyme and Sage: These herbs bring warmth and earthiness to the dish. Fresh herbs can be substituted; just double the amount as they are less concentrated in flavor than their dried counterparts.

  • Salt and Pepper: Essential seasonings that elevate the dish – always adjust to your taste.

  • Spinach or Kale (optional): For an added nutritional boost, toss in some spinach or kale towards the end of cooking. If you don’t have fresh greens, frozen spinach works too!

Step-by-Step Instructions

Step 1: Prepare the Wild Rice

Start by rinsing your wild rice under cold water in a fine-mesh strainer. This removes any excess starch and debris. In a medium pot, add 2 cups of water and the rinsed wild rice. Bring it to a boil, then reduce the heat and simmer covered for about 45 minutes or until tender. This might seem like a long time, but trust me—the nutty taste is so worth it!

Step 2: Sauté the Aromatics

In a large heavy-bottomed soup pot, heat 2 tablespoons of olive oil over medium heat. Add the chopped onion and sauté until translucent, about 5 minutes. This is where the magic begins! The fragrance will wrap around you like a familiar blanket. Next, toss in the minced garlic and stir for another minute until fragrant. Be careful not to burn the garlic – it can turn bitter.

Step 3: Add the Veggies

Now, it’s time to add depth by incorporating diced carrots, celery, and mushrooms into the pot. Sauté these for about 5-7 minutes, until the vegetables begin to soften. Listening to the sizzle will be music to your ears! Stir in the dried thyme and sage now; releasing their oils will elevate the flavor.

Step 4: Pour in the Broth

Once your veggies are ready, pour in those lovely 6 cups of vegetable broth along with the cooked wild rice. Add the pumpkin puree, stirring well to combine everything. At this stage, you’ll start to see the beautiful color come together, just like a sunset in a bowl. Bring the mixture to a gentle boil, then reduce the heat to low and simmer for about 20 minutes. This allows the flavors to marry beautifully.

Step 5: Add Greens and Season

If you’re including spinach or kale, add it in the last 5 minutes of cooking. This will keep it vibrant and prevent overcooking. Season with salt and pepper to taste. Don’t forget to give it a little taste test; adjust the seasoning if it needs a pinch more.

Step 6: Serve & Enjoy!

Once it’s ready, ladle your Cozy Autumn Wild Rice Soup into bowls. You can garnish with a sprinkle of fresh herbs or a drizzle of olive oil for that fancy touch. Make sure to grab a piece of crusty bread or some homemade croutons to serve alongside!

Serving Suggestions

When you’re spooning out this delicious soup, consider serving it with a warm slice of artisanal bread or a simple side salad filled with vibrant greens. It can also shine as a starter for a larger autumn feast! Consider topping each bowl with a dollop of sour cream or Greek yogurt for added creaminess and brightness.

Recipe Variations

  1. Creamy Coconut Version: Stir in a can of coconut milk for a luxuriant, creamy texture and a hint of sweetness.

  2. Loaded with Protein: Add shredded rotisserie chicken or turkey for a heartier version. Perfect for post-Thanksgiving leftovers!

  3. Spice It Up: Incorporate a pinch of red pepper flakes for a kick of heat that contrasts nicely with the creamy elements.

  4. Vegan Twist: Keep it entirely plant-based by utilizing vegetable broth and ensuring all your ingredients are vegan (skip any dairy garnishes).

  5. Herb-Infused: Experiment with fresh herbs like parsley or dill as a finishing touch to change up the flavor profile!

Chef’s Notes

Creating this Cozy Autumn Wild Rice Soup has been a journey of discovery in my culinary life. Originally, it began as a basic vegetable soup, but over time, I learned to play with flavors, textures, and seasonal ingredients. I love how each batch can turn out slightly different depending on what I have on hand. I often indulge in funny moments when my family asks for the “mystery ingredient” that may have snuck in!

This soup has evolved into our family’s go-to recipe whenever the leaves turn, a dish that invokes comfort and warmth, and brings everyone around the table. I hope it becomes a cherished part of your fall tradition too!

FAQs and Troubleshooting

1. My soup is too thick; what can I do?

No worries! If your soup becomes thicker than you’d like, simply add more vegetable broth or water, stirring until you reach your desired consistency.

2. Can I freeze this soup?

Absolutely! This soup freezes beautifully. Just let it cool completely, then transfer to airtight containers or freezer bags. It’ll keep for up to 3 months. Thaw and reheat gently on the stovetop.

3. I forgot to soak my wild rice; will it still work?

Yes, unsoaked wild rice can still be used; just increase the cooking time by about 10-15 minutes, ensuring it cooks fully and reaches that perfect tenderness.

4. How can I make it spicier?

For a kick, consider adding diced jalapeños when you sauté the vegetables or a dash or two of your favorite hot sauce at the end. Adjust to your spice preference!

Nutritional Info (Optional)

While exact nutritional content can vary based on specific ingredients and serving sizes, a typical serving (about 1.5 cups) of Cozy Autumn Wild Rice Soup contains approximately:

  • Calories: 250
  • Protein: 7g
  • Carbohydrates: 36g
  • Fiber: 8g
  • Fat: 9g

Conclusion

There you have it! A delightful recipe for Cozy Autumn Wild Rice Soup that embodies the flavors of the season. It’s not just a meal; it’s an experience, a tradition, and an opportunity to fill your home with love and comfort. I hope you enjoy making this soup as much as I do, and that it brings warmth and joy to your table throughout the fall season. Happy cooking!

Print

Cozy Autumn Wild Rice Soup

A warm and hearty soup perfect for the autumn season, brimming with the flavors of wild rice and seasonal vegetables.

  • Prep Time: 15 minutes
  • Cook Time: 45 minutes
  • Total Time: 60 minutes
  • Yield: 6 servings 1x
  • Category: Soup
  • Method: Stovetop
  • Cuisine: American
  • Diet: Vegetarian

Ingredients

Scale
  • 1 cup Wild Rice
  • 2 tablespoons Olive Oil
  • 1 Yellow Onion, chopped
  • 2 Garlic Cloves, minced
  • 2 Carrots, diced
  • 2 Celery stalks, diced
  • 1 cup Mushrooms, sliced
  • 6 cups Vegetable Broth
  • 1 cup Pumpkin Puree
  • 1 teaspoon Dried Thyme
  • 1 teaspoon Dried Sage
  • Salt and Pepper to taste
  • 1 cup Spinach or Kale (optional)

Instructions

  1. Prepare the Wild Rice: Rinse the wild rice under cold water. In a medium pot, add 2 cups of water and the rinsed wild rice. Bring to a boil, then reduce heat and simmer covered for about 45 minutes or until tender.
  2. Sauté the Aromatics: In a large pot, heat olive oil over medium heat. Add the chopped onion and sauté until translucent, about 5 minutes. Add minced garlic and stir for another minute.
  3. Add the Veggies: Incorporate diced carrots, celery, and mushrooms. Sauté for 5-7 minutes until softened. Stir in the dried thyme and sage.
  4. Pour in the Broth: Add the vegetable broth and the cooked wild rice. Stir in the pumpkin puree. Bring to a boiling point, then reduce heat and simmer for about 20 minutes.
  5. Add Greens and Season: If using, add spinach or kale in the last 5 minutes of cooking. Season with salt and pepper to taste.
  6. Serve & Enjoy: Ladle soup into bowls and garnish with fresh herbs or olive oil. Serve with crusty bread.

Notes

This soup can be frozen for up to 3 months. Adjust the thickness with additional broth as necessary.

Nutrition

  • Serving Size: 1.5 cups
  • Calories: 250
  • Sugar: 3g
  • Sodium: 600mg
  • Fat: 9g
  • Saturated Fat: 1g
  • Unsaturated Fat: 7g
  • Trans Fat: 0g
  • Carbohydrates: 36g
  • Fiber: 8g
  • Protein: 7g
  • Cholesterol: 0mg

Keywords: wild rice soup, autumn soup, cozy recipes, fall recipes, vegetarian soup

Did you make this recipe?

Share a photo and tag us — we can't wait to see what you've made!

June 25, 2026 |

Pumpkin Cobbler

Delicious homemade pumpkin cobbler served in a baking dish

Discover the Joy of Pumpkin Cobbler: A Cozy Treat for All Seasons

Fall may be famous for its leaves blanketing the ground in fiery colors and chilly evenings wrapped in soft sweaters, but the true star of the season undeniably has to be pumpkin! Yes, my friends, pumpkin isn’t just an autumn delight—it’s your all-year-round buddy in the kitchen. That’s why I’m absolutely thrilled to share with you my ultimate Pumpkin Cobbler recipe!

Pumpkin Cobbler is like a warm hug for your taste buds, combining the comforting spices of fall with a delightful texture that’s sure to keep you coming back for more. If you’re anything like me, you’ve fondly held onto memories of family gatherings, where the kitchen was alive with laughter and the heavenly aroma of spices wafted through the air. This dish is a love letter to those moments where food became a celebration of togetherness.

Imagine this: the first bite of warm, fluffy pumpkin filling with the sweet, crunchy topping, pairing perfectly with a dollop of whipped cream or a scoop of vanilla ice cream. It’s like autumn on a plate! Plus, it’s simple enough for a weeknight treat yet impressive enough to serve at a holiday gathering. So, roll up your sleeves, gather your ingredients, and let’s dive into this scrumptious adventure together!

A Pumpkin-Fueled Memory

I still remember the first time I tasted pumpkin cobbler. It was at my grandma’s kitchen during one crisp November afternoon. She would whisk together the ingredients while telling stories of her childhood—an alchemy that felt magical to me. As the cobbler baked, the whole house filled with the scent of cinnamon and nutmeg, transforming our small gathering into a cozy retreat.

Grandma always said that cooking is love made visible and that each ingredient holds a story. It wasn’t just about the food; it was about the memories we created around it. I can still see my cousins and I sneakily trying to swipe a taste from the almost-too-hot baking dish while Grandma chuckled, saying the best way to enjoy life is to share it with those you love.

Those cherished memories inspire every batch of pumpkin cobbler I make today. It’s as much about the flavors as it is about sharing good times with family and friends. So, let’s keep that spirit alive and create some delicious moments together!

Ingredients

Here’s what you need to whip up this delightful Pumpkin Cobbler:

  • 15 ounces Pumpkin Puree: The star of the show! Use canned or homemade puree, but make sure it’s pure pumpkin, not pumpkin pie filling.
  • 3 whole Eggs: These act as the binding agents, giving the cobbler its structure. Substitute with flax eggs for a vegan option!
  • 2/3 cup Brown Sugar: This gives the cobbler a rich, caramel-like flavor. You can use coconut sugar for a healthier option.
  • 1 cup Whole Milk: Adds creaminess. Use almond or oat milk for a dairy-free alternative.
  • 1/2 teaspoon Salt: Enhances all the flavors—don’t skip this!
  • 1 1/2 teaspoons Ground Cinnamon: The warm backbone of this dish—every bite should sing of cinnamon-spiced goodness.
  • 1/2 teaspoon Ground Ginger: Adds a zesty kick that makes your taste buds dance.
  • 1/2 teaspoon Ground Allspice: A hint of warmth and depth; it’s worth seeking out if you don’t already have it.
  • 1/4 teaspoon Ground Nutmeg: Just a sprinkle adds a cozy, holiday-like atmosphere.
  • 1 cup All-Purpose or Whole Wheat Pastry Flour: For a heartier texture, whole wheat adds extra nutrients.
  • 1/2 cup Brown Sugar: This is for the topping—a sweet and crispy crown that contrasts beautifully with the pumpkin layer.
  • 1/2 cup Granulated Sugar: Balances the sweetness.
  • 1 cup Walnuts or Pecans, Chopped (Optional): Adds crunch and richness. Feel free to use any favorite nuts here.
  • 1 teaspoon Baking Powder: Ensures our cobbler rises just right.
  • 1/2 teaspoon Ground Cinnamon: A touch in the topping adds flavor complexity.
  • 1/8 teaspoon Ginger, Ground: Enhances the flavors without overpowering.
  • 1/8 teaspoon Allspice, Ground: A little sprinkle goes a long way!
  • 1/8 teaspoon Nutmeg, Ground: Just enough for warmth.
  • 1 whole Egg: For the topping—helps bind everything and adds richness.
  • 1 teaspoon Pure Vanilla Extract: Because every great dessert deserves a splash of vanilla!
  • 1/2 cup Butter, Melted: Brings everything together and adds moisture; feel free to substitute olive oil for a healthier option.

Step-by-Step Instructions

Ready to dive into the deliciousness? Follow these simple steps to create your Pumpkin Cobbler:

  1. Preheat Your Oven:
    Preheat your oven to 350°F (175°C). This way, it’s nice and toasty by the time your cobbler is ready to bake.

  2. Mix the Pumpkin Base:
    In a large mixing bowl, whisk together the pumpkin puree, eggs, brown sugar, milk, salt, cinnamon, ginger, allspice, and nutmeg until smooth. Feel free to channel your inner chef and get a little vigorous with that whisk! This not only combines the ingredients but also introduces air for a lighter texture.

  3. Prepare for the Crust:
    In another bowl, combine the flour, brown sugar, granulated sugar, walnuts or pecans, and baking powder. Mix well and set aside. This is your cobbler topping, and the mix of sugars will give it that sweet crust we’re looking for.

  4. Incorporate the Dry Ingredients:
    Gradually add the flour mixture to the pumpkin mixture, stirring just until combined. Avoid over-mixing here to keep your cobbler tender—nobody likes a tough cobbler.

  5. Prepare the Topping:
    In a small bowl, combine the remaining cinnamon, ginger, allspice, nutmeg, and the additional egg. Once mixed, pour melted butter into the egg-spice blend, mixing well. Then gently fold this into your dry topping mixture, ensuring everything is just moistened.

  6. Assemble the Cobbler:
    Grease a 9×13 inch baking dish with butter or non-stick spray, and pour the pumpkin filling into the dish. Spread the topping mixture over the pumpkin evenly, allowing the crust to peek through for that beautiful texture.

  7. Bake Away!:
    Place your creation in the oven and bake for about 45-55 minutes or until the filling is set and the topping is golden brown. The kitchen will be filled with that heavenly scent of warm spices—get ready for some serious drooling!

  8. Cool and Serve:
    Once baked, allow your cobbler to cool for about 15-20 minutes. This helps it set up a bit more, making it easier to slice and serve.

Serving Suggestions

To serve your Pumpkin Cobbler, scoop a generous portion onto a plate while it’s still warm. Top it off with a cloud of whipped cream or a scoop of vanilla ice cream—because can anything make it better? Garnish with a sprinkle of cinnamon and a few chopped walnuts on top to add a little decorative flair. Your guests will be impressed, and you’ll be basking in the warmth of compliment-filled conversations.

Recipe Variations

  • Gluten-Free Option: Substitute the all-purpose flour with a gluten-free flour blend for a gluten-free delight!
  • Spiced Pumpkin Cobbler: Add a dash of cayenne pepper or chili powder for a surprising kick that pairs well with sweet!
  • Chocolate Chip Pumpkin Cobbler: Stir in a cup of chocolate chips for decadence—because why not?
  • Fruit Add-Ins: Toss in some dried cranberries or raisins for an extra texture and flavor twist.
  • Sweet Potato Cobbler: Swap out the pumpkin for sweet potato puree for a delightful variation.

Chef’s Notes

Pumpkin Cobbler has come a long way since my first nostalgic bite in my grandmother’s cozy kitchen. I’ve played with the spices and the textures over the years, and every twist brings out a new layer of flavor that just warms my heart. I remember an epic kitchen fail where, in my excitement, I added salt instead of sugar—yikes! Lesson learned: always double-check! But hey, that’s what cooking is all about—experiments, laughter, and a sprinkle of chaos.

I encourage you to be playful with this recipe. Add your touch—your memories, your preferences—as it transforms into something that feels uniquely yours.

FAQs and Troubleshooting

  1. What should I do if my cobbler comes out soggy?
    Make sure all the liquid ingredients are measured correctly and that the baking time is sufficient. If it’s still soggy, consider letting it cool longer to allow for setting.

  2. Can I make this recipe ahead of time?
    Absolutely! Prepare the pumpkin filling and topping separately, then store in the fridge. Just assemble and bake when you’re ready for that warm, fresh dessert.

  3. How do I store leftovers?
    Store in an airtight container in the refrigerator for up to 3-4 days (if it lasts that long!). Reheat in the oven or microwave for a quick treat.

  4. Is it okay if I skip the nuts?
    Definitely! Feel free to omit the nuts or replace them with sunflower seeds for a nut-free option. The cobbler will still be delicious!

Nutritional Info

While I usually steer clear of strict nutritional info, it’s good to know that each generous slice of Pumpkin Cobbler is packed with Vitamin A, fiber, and those amazing spices that are known for their anti-inflammatory properties. Enjoy in moderation, and don’t forget—it tastes even better when shared!


And there you have it, my food-loving friends! A heartwarming journey into the world of Pumpkin Cobbler. I hope this recipe lights up your kitchen as much as it does mine. Let’s bring out the aprons, create some delightful memories, and above all, enjoy every bite. Happy cooking!

Print

Pumpkin Cobbler

A warm and cozy pumpkin cobbler that combines the comforting spices of fall with a delightful texture, perfect for any occasion.

  • Prep Time: 15 minutes
  • Cook Time: 45 minutes
  • Total Time: 60 minutes
  • Yield: 8 servings 1x
  • Category: Dessert
  • Method: Baking
  • Cuisine: American
  • Diet: Vegetarian

Ingredients

Scale
  • 15 ounces Pumpkin Puree
  • 3 whole Eggs
  • 2/3 cup Brown Sugar
  • 1 cup Whole Milk
  • 1/2 teaspoon Salt
  • 1 1/2 teaspoons Ground Cinnamon
  • 1/2 teaspoon Ground Ginger
  • 1/2 teaspoon Ground Allspice
  • 1/4 teaspoon Ground Nutmeg
  • 1 cup All-Purpose or Whole Wheat Pastry Flour
  • 1/2 cup Brown Sugar (for topping)
  • 1/2 cup Granulated Sugar
  • 1 cup Walnuts or Pecans, Chopped (Optional)
  • 1 teaspoon Baking Powder
  • 1/2 teaspoon Ground Cinnamon (for topping)
  • 1/8 teaspoon Ground Ginger (for topping)
  • 1/8 teaspoon Ground Allspice (for topping)
  • 1/8 teaspoon Ground Nutmeg (for topping)
  • 1 whole Egg (for topping)
  • 1 teaspoon Pure Vanilla Extract
  • 1/2 cup Butter, Melted

Instructions

  1. Preheat your oven to 350°F (175°C).
  2. Mix together the pumpkin puree, eggs, brown sugar, milk, salt, cinnamon, ginger, allspice, and nutmeg until smooth.
  3. Prepare the cobbler topping by combining the flour, brown sugar, granulated sugar, walnuts or pecans, and baking powder in another bowl.
  4. Incorporate the flour mixture into the pumpkin mixture, stirring just until combined.
  5. Prepare the topping by mixing the remaining spices with the additional egg and melted butter.
  6. Assemble the cobbler by pouring the pumpkin filling into a greased 9×13 inch baking dish and spreading the topping mixture over the pumpkin.
  7. Bake for 45-55 minutes or until the filling is set and the topping is golden brown.
  8. Cool for 15-20 minutes before serving.

Notes

Serve warm with whipped cream or vanilla ice cream. For variations, consider gluten-free flour or adding chocolate chips.

Nutrition

  • Serving Size: 1 serving
  • Calories: 350
  • Sugar: 28g
  • Sodium: 150mg
  • Fat: 18g
  • Saturated Fat: 10g
  • Unsaturated Fat: 7g
  • Trans Fat: 0g
  • Carbohydrates: 45g
  • Fiber: 3g
  • Protein: 6g
  • Cholesterol: 70mg

Keywords: pumpkin cobbler, dessert, fall recipe, cozy treat

Did you make this recipe?

Share a photo and tag us — we can't wait to see what you've made!

June 25, 2026 |

Lemon Streusel Muffins: 30-Minute Recipe for Busy Mornings

Freshly baked Lemon Streusel Muffins on a wooden table

Lemon Streusel Muffins: A Bright Bite of Sunshine

Welcome back, fellow food lovers! Today, we’re diving into a delightful treat that’s sure to brighten your morning and put a smile on your face—Lemon Streusel Muffins! Imagine waking up to the aroma of fresh-baked muffins filled with zesty lemon goodness, perfectly topped with a sweet, crumbly streusel. Sounds tempting, right?

These muffins aren’t just a feast for the senses; they’re also incredibly easy to whip up, making them a perfect choice for busy weekdays or leisurely brunches. So grab your apron, and let’s get ready to create some muffin magic!

Personal Story: A Zesty Childhood Memory

Growing up, my kitchen was always filled with the comforting sounds of my mom baking. Each weekend, her special treat was a batch of muffins, and as I’m sure you can guess, lemon muffins were in heavy rotation. I remember the first time I helped—my little hands covered in flour while I grated lemons for zest and watched my mom effortlessly concoct her magical streusel topping.

One particularly sunny Saturday, she decided to let me take the lead in muffin-making. I was so excited; the smell of lemons filled the air, and I could hardly wait for them to come out of the oven. As we pulled them out, molten streusel bubbling away, I took a big whiff and knew I was going to cherish that day forever.

Fast forward to today, and I still find myself coming back to this recipe. Every time I smell that zesty citrus aroma wafting through my kitchen, I’m transported back to those joyful mornings with my mom, flour-covered but filled with love. Now it’s my turn to share that joy with you!

Ingredients

Let’s gather our ingredients and make magic happen! Here’s what you’ll need for these scrumptious Lemon Streusel Muffins:

  • 1 1/2 cups all-purpose flour
    This is the base of your muffins, giving them structure. For a gluten-free option, try using gluten-free all-purpose flour!

  • 1/2 cup sugar
    This will sweeten your muffins! If you’re looking for a less refined option, coconut sugar or honey can also do the trick—just adjust the liquid content accordingly.

  • 2 tsp baking powder
    The magic ingredient that makes your muffins rise! Ensure it’s fresh for the best results—check the expiration date!

  • 1/2 tsp salt
    Salt enhances the flavors, balancing the sweetness. Don’t skip it—it’s like the secret superhero of baking!

  • 1/2 cup milk
    Milk adds moisture. If you’re dairy-free, almond milk or oat milk work beautifully as substitutes.

  • 1/3 cup vegetable oil
    This keeps the muffins moist and tender. For a healthier twist, you can use applesauce—just know it may change the texture slightly.

  • 1 large egg
    Eggs bind everything together. If you’re going vegan, a flaxseed meal or chia seed substitute can work wonders!

  • 1 tsp vanilla extract
    Vanilla adds a lovely depth of flavor. Homemade vanilla extract is a great way to up your baking game!

  • Zest of 1 lemon
    Zest brings an intense lemon flavor; just the yellow part for a bright kick! If you only have bottled lemon zest, that’ll work in a pinch but may not be as vibrant.

  • 1/4 cup fresh lemon juice
    This is where the real lemon magic happens! Use freshly squeezed lemon juice for the best flavor.

  • 1/2 cup streusel topping (made with flour, sugar, butter)
    This simple topping is a game-changer! You can make it from scratch or buy a ready-made version for a quick fix.

Step-by-Step Instructions

Now that we’ve gathered our ingredients, let’s get baking! This process is not only straightforward but also incredibly rewarding. Here’s how to create these lemony delights:

  1. Preheat Your Oven:
    Preheat your oven to 375°F (190°C). This is the perfect temperature to get your muffins to rise beautifully and develop a lovely golden crust.

  2. Prepare Your Muffin Pan:
    Grab a standard 12-cup muffin pan and either grease it lightly or line it with muffin liners. Lining is my preferred method because it makes cleanup a breeze and adds a pop of color!

  3. Mix Dry Ingredients:
    In a medium bowl, whisk together the flour, sugar, baking powder, and salt. This ensures even distribution of the baking powder, preventing any floury clumps in your muffins.

    Chef Hack: If you’re feeling fancy, sift the dry ingredients before mixing; it’ll make your muffins extra fluffy!

  4. Combine Wet Ingredients:
    In a large bowl, whisk together the milk, vegetable oil, egg, vanilla extract, lemon zest, and lemon juice. This wonderful mixture will add moisture and that zesty flavor that makes these muffins sing!

  5. Combine Wet and Dry Mixtures:
    Gradually fold the dry ingredients into the wet ingredients using a spatula or wooden spoon. Be careful not to overmix—lumps are okay! Overmixing can lead to tough muffins, and nobody wants that!

  6. Fill Muffin Cups:
    Spoon the batter into the prepared muffin pan, filling each cup about 2/3 full. This will give them room to rise without overflowing.

    Chef Tip: Use an ice cream scoop for perfect muffin portions and less mess!

  7. Prepare the Streusel Topping:
    In a small bowl, mix together your streusel topping ingredients (flour, sugar, and butter) using a fork until crumbly. The texture should resemble small peas. Sprinkle this heavenly mixture over the muffin batter in your pan.

  8. Bake Time:
    Pop the muffin pan into the preheated oven and bake for about 18-20 minutes or until a toothpick inserted in the center comes out clean or with just a few crumbs.

    Pro Tip: Rotate your muffin pan halfway through baking for even browning!

  9. Cool & Enjoy:
    Once baked, let the muffins cool in the pan for about 10 minutes, then transfer them to a wire rack to cool completely. The aroma is going to be hard to resist!

Serving Suggestions

These Lemon Streusel Muffins are perfect served warm, perhaps with a pat of butter or a drizzle of honey. They also pair beautifully with a cup of tea or coffee. For an extra touch, sprinkle a bit of powdered sugar on top for a lovely presentation. You can even add a side of fresh berries for a pop of color and flavor!

Recipe Variations

Want to switch things up? Here are a few fun variations to consider:

  1. Blueberry Lemon Muffins: Add a cup of fresh or frozen blueberries for a delightful fruity twist!
  2. Glazed Lemon Muffins: After baking, drizzle with a simple glaze made from powdered sugar and lemon juice.
  3. Lemon Poppy Seed Muffins: Add 1-2 tablespoons of poppy seeds to the batter for added texture and flavor.
  4. Coconut Lemon Muffins: Mix in some shredded coconut for a tropical flair!
  5. Lemon Chia Muffins: Swap the egg for a chia seed "egg" (1 tablespoon chia seeds mixed with 2.5 tablespoons water) for a vegan option.

Chef’s Notes

This recipe is one of those beautifully adaptable creations that has seen some love over the years. I started with my mom’s base recipe but have added and changed things to suit my evolving taste. I’ve tried incorporating Greek yogurt for extra moisture, play with different sweeteners, and even made a mini muffin version for those times when I want just a little taste.

Every time I make these muffins, I can’t help but reminisce about those childhood kitchen adventures. It reminds me that cooking and baking should always be filled with joy, creativity, and sometimes just a little chaos!

FAQs and Troubleshooting

Q: Why did my muffins come out dense?
A: This could be due to overmixing or using too much flour. Measure flour by gently spooning it into a measuring cup, then leveling off.

Q: Can I freeze these muffins?
A: Absolutely! Cool completely, then place them in an airtight container or a freezer bag. They’ll last up to three months. Thaw them at room temperature or pop them in the microwave for a quick heat-up.

Q: How do I know when my muffins are done?
A: The toothpick test is your best friend! If it comes out clean or with a few crumbs, you’re golden. Overbaking can result in dry muffins, so keep a close eye on them.

Q: How can I make these muffins gluten-free?
A: Use a gluten-free all-purpose flour blend, and ensure your baking powder is gluten-free as some brands may contain gluten as an anti-caking agent.

Nutritional Info (Optional)

While I won’t get into the nitty-gritty here, remember that these muffins are a wonderful balance of flavor and nourishment, especially with the bright notes coming from those fresh, zesty lemons! They’re perfect for enjoying in moderation as part of a balanced diet.

So there you have it! A recipe that’s not just delicious but also packed with memories and possibilities. I can’t wait for you to try these Lemon Streusel Muffins and make some joyful kitchen memories of your own! Happy baking, friends!

Print

Lemon Streusel Muffins

Bright and zesty Lemon Streusel Muffins topped with a sweet crumbly streusel, perfect for any morning.

  • Prep Time: 10 minutes
  • Cook Time: 20 minutes
  • Total Time: 30 minutes
  • Yield: 12 servings 1x
  • Category: Breakfast
  • Method: Baking
  • Cuisine: American
  • Diet: Vegetarian

Ingredients

Scale
  • 1 1/2 cups all-purpose flour
  • 1/2 cup sugar
  • 2 tsp baking powder
  • 1/2 tsp salt
  • 1/2 cup milk
  • 1/3 cup vegetable oil
  • 1 large egg
  • 1 tsp vanilla extract
  • Zest of 1 lemon
  • 1/4 cup fresh lemon juice
  • 1/2 cup streusel topping (made with flour, sugar, butter)

Instructions

  1. Preheat your oven to 375°F (190°C).
  2. Prepare a standard 12-cup muffin pan by greasing it or lining it with muffin liners.
  3. Mix together the flour, sugar, baking powder, and salt in a medium bowl.
  4. Combine the milk, vegetable oil, egg, vanilla extract, lemon zest, and lemon juice in a large bowl.
  5. Fold the dry ingredients into the wet ingredients being careful not to overmix.
  6. Fill the muffin cups about 2/3 full with batter.
  7. Prepare the streusel topping by mixing flour, sugar, and butter until crumbly, then sprinkle over the batter.
  8. Bake for 18-20 minutes or until a toothpick comes out clean.
  9. Cool in the pan for 10 minutes before transferring to a wire rack.

Notes

These muffins can be served warm with butter or honey, and you can also freeze them for later enjoyment.

Nutrition

  • Serving Size: 1 muffin
  • Calories: 260
  • Sugar: 12g
  • Sodium: 200mg
  • Fat: 10g
  • Saturated Fat: 1g
  • Unsaturated Fat: 7g
  • Trans Fat: 0g
  • Carbohydrates: 36g
  • Fiber: 1g
  • Protein: 3g
  • Cholesterol: 25mg

Keywords: lemon muffins, breakfast, pastries, baking, muffins, easy recipes

Did you make this recipe?

Share a photo and tag us — we can't wait to see what you've made!