Cleanplate Cravings

Cleanplate Cravings

June 25, 2026 |

Fall Pumpkin Ravioli with Garlic Brown Butter Sauce
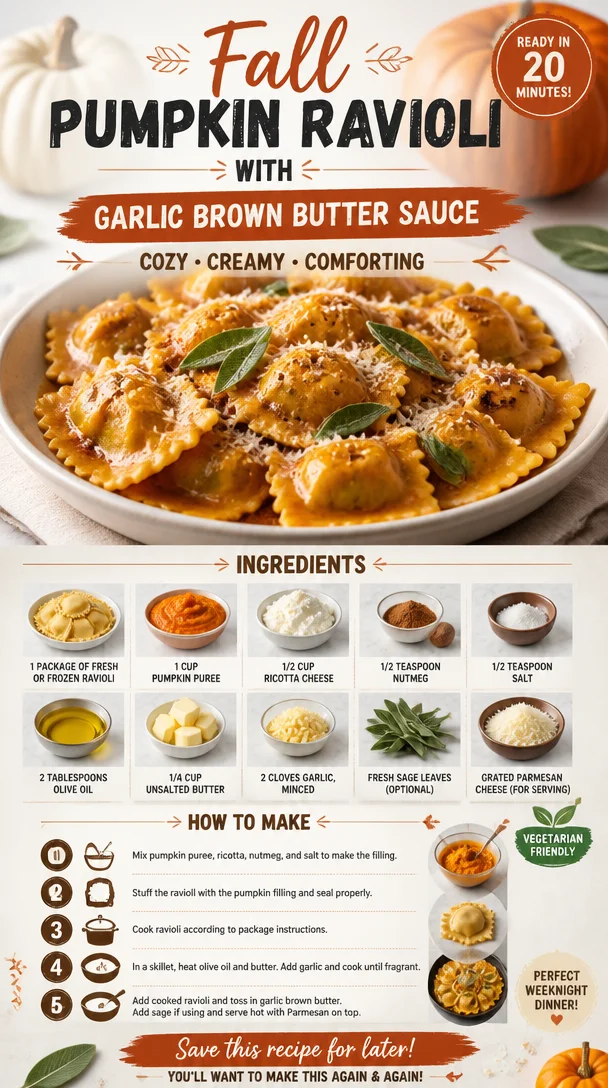
Delicious Fall Pumpkin Ravioli drizzled with garlic brown butter sauce

Homemade Pumpkin Ravioli with Garlic Brown Butter

Welcome, fellow food lovers! Today I’m here to share a recipe that perfectly captures the essence of fall—Homemade Pumpkin Ravioli with Garlic Brown Butter. If you’re anything like me, there’s something magical about the aroma of pumpkin wafting through your kitchen, especially as the leaves turn golden, and everything feels cozy.

This dish beautifully balances that rich pumpkin flavor with a nutty garlic brown butter sauce that’ll have you doing a happy dance in your kitchen. Homemade ravioli might sound intimidating, but trust me, once you see how easy and fun it can be, you’ll want to make it again and again. So, roll up those sleeves, and let’s dive in!

A Journey to the Heart of Pumpkin Ravioli

This dish holds a special place in my heart. Let me take you back to a sunny October afternoon several years ago when I decided to host my very first fall dinner party. I wanted to impress my friends with something unique, and after flipping through an old family recipe book, I stumbled upon a simple yet elegant pumpkin ravioli recipe.

With my hands dusted in flour and a sprinkling of fall ambiance all around, I felt a connection to my roots and cooking traditions. As my friends arrived, the excitement in the air was palpable. We laughed, shared stories, and enjoyed our homemade ravioli tossed in a garlic brown butter sauce. The warmth and laughter flowed freely, marking that evening as one of my most cherished memories in the kitchen.

Ingredients

Let’s make magic happen! Here’s what you’ll need for your pumpkin ravioli:

  • 1 package of fresh or frozen ravioli: While you can absolutely use store-bought ravioli to save time, opt for fresh ones if you can. They’ll really elevate the dish!

  • 1 cup pumpkin puree: This is the star of the show! You can use canned pumpkin puree or make your own by roasting and pureeing fresh pumpkins. If you want to switch things up, try using sweet potato puree for a different flavor profile.

  • 1/2 cup ricotta cheese: Adds creaminess and richness to the filling. If you’re looking for a lighter option, cottage cheese can be a nice substitute.

  • 1/2 teaspoon nutmeg: Essential for that warm, cozy flavor that’s synonymous with fall. You can swap this for freshly grated nutmeg, which has a more robust aroma.

  • 1/2 teaspoon salt: Balances the flavors and helps enhance the sweetness of the pumpkin. Feel free to adjust this based on your taste.

  • 2 tablespoons olive oil: Used to sauté the garlic and gives a healthy dose of flavor. Avocado oil works well too!

  • 1/4 cup unsalted butter: For that luscious brown butter sauce. If you want to keep it dairy-free, go for coconut oil or a vegan butter substitute.

  • 2 cloves garlic, minced: Adds depth and richness to the sauce. If you’re a garlic lover, feel free to add more!

  • Fresh sage leaves (optional): Lightly frying sage leaves in the brown butter brings a delightful flavor. If you’re not a fan of sage, try using thyme or parsley.

  • Grated Parmesan cheese (for serving): A beautiful finishing touch! Nutritional yeast is a great plant-based alternative if you want a dairy-free option.

Step-by-Step Instructions

Sit back, relax, and let’s get cooking! Here’s how to make your pumpkin ravioli from scratch.

  1. Prepare the Filling: In a mixing bowl, combine the pumpkin puree, ricotta cheese, nutmeg, and salt. Mix until smooth and creamy. That’s it for the filling! It’s delightful on its own, too. Consider tasting a little for seasoning—after all, a great chef always samples!

  2. Roll out the Ravioli Dough: If you’re making homemade pasta (which I highly recommend), roll out your dough to a thin sheet using a pasta machine or a rolling pin. Dusting with flour helps prevent sticking and makes things so much easier.

  3. Form the Ravioli: Use a round cookie cutter or a glass to cut out circles from the pasta sheet. Place a small spoonful of your pumpkin filling in the center of each circle. Don’t overfill; about a teaspoon should do!

  4. Seal the Ravioli: Wet the edges of the pasta circles with a little water, and fold them over to create a half-moon shape. Press the edges tightly to seal, and if you want a decorative touch, seal the edges with a fork.

  5. Cook the Ravioli: Bring a large pot of salted water to a gentle boil. Carefully drop the ravioli in and cook for about 3-4 minutes, until they float to the surface. Fresh ravioli usually cooks faster, so keep an eye on them!

  6. Make the Garlic Brown Butter Sauce: While the ravioli cook, heat the olive oil and butter in a saucepan over medium heat. Add the minced garlic and cook for 1-2 minutes until fragrant. Be careful not to let it burn, as burnt garlic is never fun!

  7. Brown the Butter: Allow the butter to melt and bubble, and watch it turn golden brown. You want those nutty aromas! Once it reaches that rich color, add in some fresh sage leaves if using. Stir for an additional minute.

  8. Combine: Once the ravioli are cooked, use a slotted spoon to transfer them to the pan with the brown butter sauce. Toss gently to coat without breaking the ravioli.

  9. Plate It Up: Serve your gorgeous pumpkin ravioli in shallow bowls. Drizzle the garlic brown butter sauce over the top and finish with a generous sprinkle of grated Parmesan cheese.

Serving Suggestions

To make your dinner extra special, consider serving the pumpkin ravioli with a simple arugula salad dressed with lemon vinaigrette. The peppery greens contrast beautifully with the creamy ravioli and adds a refreshing crunch. Pair it with a light Pinot Grigio or an herbal tea to round out the experience!

Recipe Variations

Feel free to get creative! Here are a few fun twists to consider:

  1. Spicy Pumpkin Ravioli: Add a pinch of cayenne pepper or chili flakes to your filling for a bit of heat.
  2. Nutty Sage Variations: Toast some walnuts or pine nuts and sprinkle them over the ravioli for added crunch and flavor.
  3. Creamy Alfredo Twist: Swap the garlic brown butter for a light Alfredo sauce for an indulgent variation.
  4. Vegetarian Option: Replace the ricotta cheese with a vegan alternative or a blend of sautéed mushrooms for a hearty, earthy flavor.

Chef’s Notes

I love how this recipe has evolved over the years! Initially, I was quite nervous about making pasta from scratch. But after several attempts (and a couple of mishaps), I finally nailed it! There’s something so rewarding about creating a dish that’s not only comforting but also brimming with nostalgia. It reminds me of family gatherings during the holidays, sharing food and love around the table. Cooking should always feel approachable; it’s about experimenting, learning, and having fun!

FAQs and Troubleshooting

  1. What can I do if my ravioli keep breaking?

    • If the pasta dough is too dry, it can crack easily. Make sure to knead it well and keep it covered with a cloth to prevent drying out. If it’s too wet, sprinkle a bit of flour while rolling.
  2. How can I store leftover ravioli?

    • Allow cooked ravioli to cool and store them in an airtight container in the fridge for up to 3 days. You can also freeze uncooked ravioli in a single layer on a cookie sheet, then transfer to a freezer bag.
  3. Is it possible to make this recipe gluten-free?

    • Absolutely! Substitute regular pasta sheets for gluten-free options available at most grocery stores. It might take a bit of trial and error, but it can be done.
  4. Can I prepare the filling ahead of time?

    • Yes, feel free to prepare the filling a day in advance. Just store it in the fridge in an airtight container.

Nutritional Info

While I focus on flavor first and foremost, here’s a little breakdown for those interested. Each serving of pumpkin ravioli with garlic brown butter contains approximately:

  • Calories: 350
  • Protein: 15g
  • Carbohydrates: 40g
  • Fat: 15g
  • Fiber: 4g

Remember, these are rough estimates and can vary based on specific ingredients used.

There you have it—a delightful, homemade pumpkin ravioli that is not only delicious but also holds the power to create memories that last a lifetime. So grab your apron, call up some friends, and share this fantastic dish! Happy cooking, and enjoy the cozy flavors of fall!

Print

Homemade Pumpkin Ravioli with Garlic Brown Butter

A delightful fall recipe featuring homemade pumpkin ravioli tossed in a nutty garlic brown butter sauce.

  • Prep Time: 30 minutes
  • Cook Time: 10 minutes
  • Total Time: 40 minutes
  • Yield: 4 servings 1x
  • Category: Main Course
  • Method: Baking
  • Cuisine: Italian
  • Diet: Vegetarian

Ingredients

Scale
  • 1 package of fresh or frozen ravioli
  • 1 cup pumpkin puree
  • 1/2 cup ricotta cheese
  • 1/2 teaspoon nutmeg
  • 1/2 teaspoon salt
  • 2 tablespoons olive oil
  • 1/4 cup unsalted butter
  • 2 cloves garlic, minced
  • Fresh sage leaves (optional)
  • Grated Parmesan cheese (for serving)

Instructions

  1. Prepare the filling: In a mixing bowl, combine the pumpkin puree, ricotta cheese, nutmeg, and salt. Mix until smooth and creamy.
  2. Roll out the ravioli dough: Roll out your dough to a thin sheet using a pasta machine or a rolling pin, dusting with flour.
  3. Form the ravioli: Use a round cookie cutter to cut out circles, placing a small spoonful of filling in the center of each.
  4. Seal the ravioli: Wet the edges with water, fold them over, and press tightly to seal.
  5. Cook the ravioli: Bring a pot of salted water to a gentle boil and cook the ravioli for about 3-4 minutes until they float.
  6. Make the garlic brown butter sauce: Heat olive oil and butter in a saucepan over medium heat, adding minced garlic.
  7. Brown the butter: Allow the butter to melt, bubble, and turn golden brown, adding sage leaves if using.
  8. Combine: Use a slotted spoon to transfer the cooked ravioli to the pan with the brown butter sauce and toss gently.
  9. Plate it up: Serve in shallow bowls, drizzled with the garlic brown butter and topped with grated Parmesan cheese.

Notes

Serve with a simple arugula salad dressed with lemon vinaigrette for a refreshing crunch.

Nutrition

  • Serving Size: 1 serving
  • Calories: 350
  • Sugar: 5g
  • Sodium: 400mg
  • Fat: 15g
  • Saturated Fat: 4g
  • Unsaturated Fat: 6g
  • Trans Fat: 0g
  • Carbohydrates: 40g
  • Fiber: 4g
  • Protein: 15g
  • Cholesterol: 30mg

Keywords: pumpkin, ravioli, fall recipes, garlic butter, homemade pasta
Did you make this recipe?

Share a photo and tag us — we can't wait to see what you've made!

June 25, 2026 |

Pumpkin Muffins

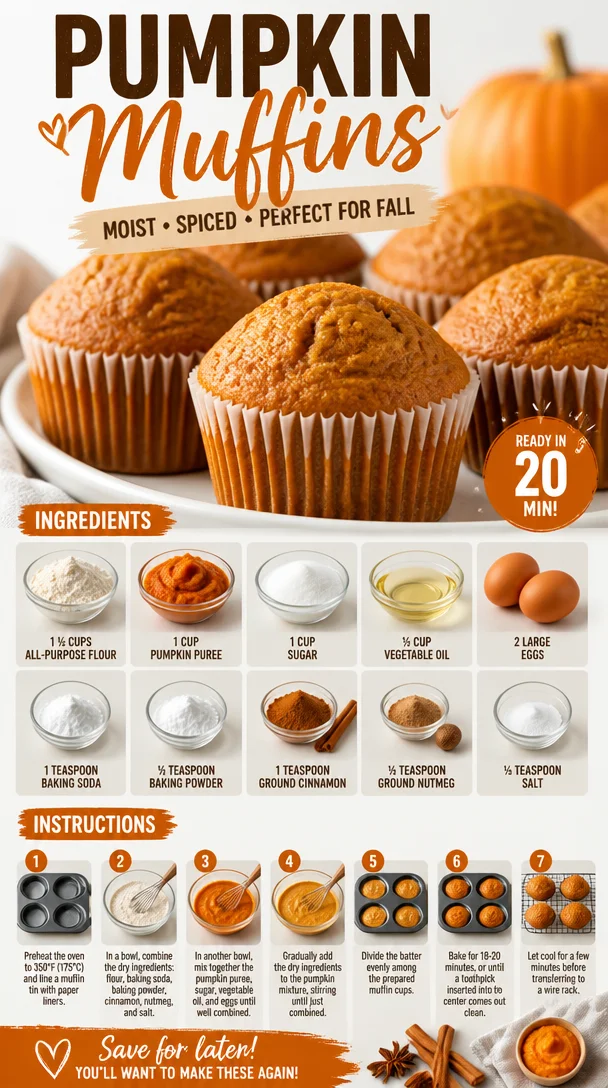
Freshly baked pumpkin muffins topped with spices and a golden crust.

The Ultimate Pumpkin Muffins: Warm, Cozy, and Oh-So Delicious!

As the leaves begin to turn and a crisp chill fills the air, my mind inevitably drifts to one of my all-time favorite fall treats: pumpkin muffins. There is just something comforting about the smell of warm spices wafting through the kitchen. It’s like a cozy hug on a cool morning! At Clean Plate Cravings, we love to celebrate seasonal flavors, and pumpkin is at the top of my list.

In my kitchen, pumpkin muffins are more than just a delicious snack; they are a symbol of nostalgia and connection. I remember the first time I baked them with my grandmother in her sunlit kitchen, filled with the rich, comforting aroma of cinnamon and nutmeg. We would sing our favorite tunes while mixing ingredients, and she insisted on using only the freshest pumpkin puree—which, at the time, felt like a top-secret tip I had yet to discover. Whenever I munch on these muffins, I can almost hear her laughter and feel her warmth wrapping around me like a cozy blanket.

Not only are pumpkin muffins a treat for the taste buds, but they also come packed with nutrients. Full of fiber and flavor, they make a perfect breakfast option or afternoon snack, keeping you satisfied and energized throughout the day. So whether it’s a busy morning or a quiet afternoon, I’m excited to share my recipe for these delightful pumpkin muffins, along with a sprinkle of kitchen wisdom gained through the years. Ready? Let’s get baking!

Ingredients You’ll Need

Here’s a simple and straightforward list of ingredients to whip up these pumpkin muffins, along with helpful notes to guide you:

  • 1 ½ cups all-purpose flour: This is the backbone of the muffins. For gluten-free options, try using a cup-for-cup gluten-free flour blend.

  • 1 cup pumpkin puree: Make sure it’s pure pumpkin, not pumpkin pie filling! You can also substitute with homemade pumpkin puree if you’re feeling adventurous.

  • 1 cup sugar: Regular granulated sugar works well; if you’re aiming for less sweetness, you can reduce the quantity or use coconut sugar for a deeper flavor.

  • ½ cup vegetable oil: This gives your muffins a moist texture. You can swap it for melted coconut oil or applesauce for a healthier twist.

  • 2 large eggs: These bind the ingredients together and add moisture. If you’re looking for a vegan option, you can use flax eggs (1 tablespoon flaxseed meal mixed with 2.5 tablespoons water, let sit for 5 minutes).

  • 1 teaspoon baking soda: This will help your muffins rise beautifully. Always check for freshness—baking soda should be active for best results.

  • ½ teaspoon baking powder: A little extra leavening to ensure those muffins are light and fluffy.

  • 1 teaspoon ground cinnamon: This warm spice brings out the best in pumpkin and is a classic flavor pairing.

  • ½ teaspoon ground nutmeg: A touch of nutmeg adds a warm, spicy depth that’s quintessentially fall.

  • ¼ teaspoon salt: Salt enhances all the flavors. Don’t skip it!

Step-by-Step Instructions

Ready to transform those ingredients into a batch of delightful pumpkin muffins? Here’s how to do it:

  1. Preheat the Oven: Start by preheating your oven to 350°F (175°C). This ensures your muffins will rise properly and bake evenly.

  2. Mix Dry Ingredients: In a medium bowl, whisk together the flour, baking soda, baking powder, cinnamon, nutmeg, and salt. This will help ensure the spices and leaveners are evenly distributed throughout the flour.

  3. Prepare the Wet Ingredients: In another large mixing bowl, combine the pumpkin puree, sugar, and vegetable oil. Use a whisk to blend everything together until it’s creamy and homogenous. The beauty of this step? You can feel free to sneak a spoonful of that pumpkin goodness—it’s just too tempting!

  4. Add in the Eggs: Crack the eggs into the pumpkin mixture and whisk until fully incorporated. You want everything perfectly mixed as it helps create that tender muffin texture.

  5. Combine Wet and Dry: Gradually add the dry ingredients into the wet mixture, stirring gently with a spatula or wooden spoon. Be careful not to overmix! You want just to combine until there are no visible dry spots. A few lumps are perfectly fine. This is a key tip to keep those muffins tender!

  6. Prepare Your Muffin Tin: Line a muffin tin with paper liners or generously grease it with cooking spray (trust me, you don’t want the muffins to stick!). Scoop the batter evenly into each muffin cup, filling it about ¾ full to allow room for rising.

  7. Bake: Pop that muffin tin into your preheated oven and bake for 20–25 minutes, or until a toothpick inserted into the center comes out clean. Your kitchen will smell heavenly! If you have an extra batch, you might even want to rotate the muffin tin halfway through for even baking—but that’s just my little chef hack!

  8. Cooling: Once baked, remove the muffins from the oven and let them cool in the pan for about 5 minutes. This allows them to firm up a bit. Then, transfer them to a wire rack to cool completely. (Pro tip: if you can wait long enough, they taste even better once they’ve cooled!)

Serving Suggestions

These pumpkin muffins are fantastic on their own but also pair wonderfully with a dollop of cream cheese spread or a drizzle of maple syrup. You can serve them warm or at room temperature with a cup of coffee or tea. For a beautiful presentation, dust the tops with a sprinkle of powdered sugar or extra cinnamon before serving.

Recipe Variations

Just like the changing seasons, these muffins can be easily adapted to fit your cravings:

  • Chocolate Chip Pumpkin Muffins: Stir in a handful of semi-sweet or dark chocolate chips for a delightful twist.

  • Nutty Cinnamon Crunch: Add a handful of chopped walnuts or pecans to the batter for crunch and flavor.

  • Spiced Up Pumpkin Muffins: Mix in some ginger or allspice for a bolder, spicier muffin.

  • Cranberry-Pumpkin Muffins: Toss in fresh or dried cranberries for a tart contrast to the sweet pumpkin.

Chef’s Notes

Over the years, I’ve played with this recipe—experimenting with different spices, sweetness levels, and add-ins. This recipe has evolved into one of my go-to treats because it’s so versatile and forgiving! One time, I ran out of vegetable oil and used melted butter instead, and I was shocked by how good it turned out—rich and flavorful! Remember, the kitchen is your playground; it’s all about having fun and making these muffins your own.

FAQs and Troubleshooting

1. Why are my muffins dense?
This usually happens from overmixing the batter. Be gentle and mix only until combined!

2. Can I freeze pumpkin muffins?
Absolutely! Allow them to cool completely, then wrap them in foil or freezer bags. They’re perfect for quick snacks or breakfasts later on.

3. How can I tell when my muffins are done?
A toothpick inserted in the center should come out clean or with a few moist crumbs—not wet batter!

4. What can I do if my muffins are too dry?
Next time, check your baking time. Also, adding some applesauce can help retain moisture in future batches.

Nutritional Info (optional)

While the exact nutritional content can vary depending on specific ingredients used, a single pumpkin muffin made from this recipe generally contains:

  • Approximate Calories: 210
  • Protein: 3g
  • Carbohydrates: 30g
  • Fat: 9g
  • Fiber: 1.5g

Closing Thoughts

Creating these pumpkin muffins is not just about the final product; it’s about enjoying the process, making memories, and savoring the flavors of the season. So whether you’re gathering with friends or enjoying a quiet moment to yourself, these muffins will bring a warm smile to any occasion. I can’t wait to hear how yours turn out! Happy baking, fellow foodies!

Print

Ultimate Pumpkin Muffins

Delicious and cozy pumpkin muffins, perfect for fall, packed with warm spices and nutrients.

  • Prep Time: 10 minutes
  • Cook Time: 25 minutes
  • Total Time: 35 minutes
  • Yield: 12 servings 1x
  • Category: Breakfast
  • Method: Baking
  • Cuisine: American
  • Diet: Vegetarian

Ingredients

Scale
  • 1 ½ cups all-purpose flour
  • 1 cup pumpkin puree
  • 1 cup sugar
  • ½ cup vegetable oil
  • 2 large eggs
  • 1 teaspoon baking soda
  • ½ teaspoon baking powder
  • 1 teaspoon ground cinnamon
  • ½ teaspoon ground nutmeg
  • ¼ teaspoon salt

Instructions

  1. Preheat the oven to 350°F (175°C).
  2. Mix dry ingredients: Whisk together the flour, baking soda, baking powder, cinnamon, nutmeg, and salt.
  3. Prepare the wet ingredients: In another bowl, combine pumpkin puree, sugar, and vegetable oil.
  4. Add in the eggs and whisk until fully combined.
  5. Combine the wet and dry ingredients gently until mixed.
  6. Prepare your muffin tin by lining it or greasing it.
  7. Bake the muffins for 20–25 minutes or until a toothpick comes out clean.
  8. Cooling: Let the muffins cool in the pan for 5 minutes before transferring to a wire rack.

Notes

Serve muffins warm or at room temperature. Great with cream cheese or maple syrup.

Nutrition

  • Serving Size: 1 muffin
  • Calories: 210
  • Sugar: 10g
  • Sodium: 200mg
  • Fat: 9g
  • Saturated Fat: 1g
  • Unsaturated Fat: 8g
  • Trans Fat: 0g
  • Carbohydrates: 30g
  • Fiber: 1.5g
  • Protein: 3g
  • Cholesterol: 30mg

Keywords: pumpkin muffins, fall recipes, cozy baking, seasonal flavors, snacks

Did you make this recipe?

Share a photo and tag us — we can't wait to see what you've made!

June 25, 2026 |

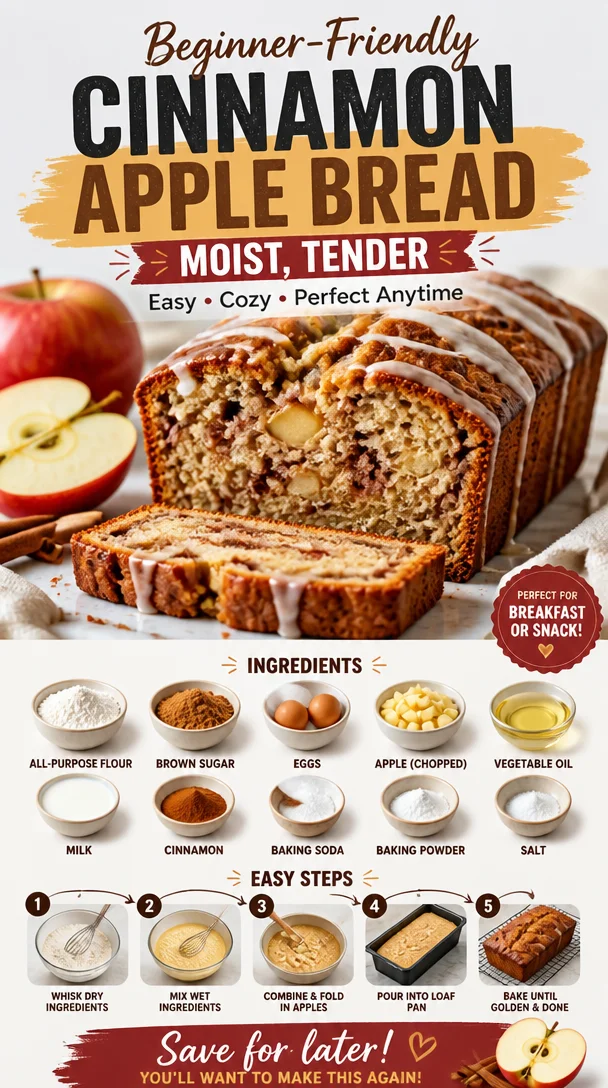
Beginner-Friendly Cinnamon Apple Bread: Moist, Tender

Moist and tender cinnamon apple bread freshly baked with apples and cinnamon.

Moist and Tender Cinnamon Apple Bread: A Slice of Heaven

Welcome, fellow food lovers! Today, we’re diving into the delightful world of Moist and Tender Cinnamon Apple Bread. If you have ever walked into a bakery and been greeted by the warm, intoxicating aroma of freshly baked bread infused with cinnamon and warm apples, then you already know the kind of magic we’re talking about. This recipe captures that essence, transforming simple ingredients into an unforgettable experience that will make your taste buds dance!

In our fast-paced lives, the kitchen can sometimes feel like a chore, but I firmly believe it should be a joyful space where creativity flourishes. This cinnamon apple bread recipe is not just about indulging in nostalgic flavors; it’s about celebrating the joy of cooking and creating comfort food that brings people together. So, grab your apron and let’s get baking!

A Slice of Home: My Personal Story

I’ll always remember my grandmother’s kitchen in the fall—everything seemed like a scene from a cozy movie. It was bustling with warmth, love, and the incredible aroma of spices wafting through the air. One of my fondest memories is her whipping up a batch of cinnamon apple bread, and our family would gather around the kitchen table, eagerly waiting for that first slice to be revealed.

As I watched her carefully peel and chop apples while singing old tunes, I realized that cooking isn’t just about feeding our bodies; it’s about feeding our souls. Each ingredient she used seemed to carry a story, just like the hands that knead the dough. Fast forward to today, I still cherish those moments and replicate her cinnamon apple bread in my own kitchen, adding my little twists while holding on to the legacy she left me. Whenever I bake this bread now, it’s like wrapping myself in a warm hug, making memories all over again.

Ingredients: What You’ll Need

Let’s gather our ingredients! Here’s a breakdown of what you’ll need to create this delightful treat.

  • 2 cups all-purpose flour
    The backbone of this bread. You can swap with whole wheat flour for added nutrients or gluten-free all-purpose flour if you need a gluten-free option. Just remember, the texture might change slightly.

  • 1 tsp baking soda
    This is your leavening agent that helps the bread rise to glorious heights. No substitutes here, as it’s crucial for the right texture!

  • 1 tsp baking powder
    A little extra rise never hurts! For a gluten-free version, ensure your baking powder is also gluten-free—most are.

  • 1/2 tsp salt
    Elevates flavors! Feel free to use sea salt or Himalayan salt for a gourmet touch.

  • 1 tsp ground cinnamon
    The star of the show! If you want a spicier flavor profile, try adding a dash of nutmeg or allspice.

  • 1/2 cup unsalted butter, softened
    This gives moisture and richness. If you’re looking for a dairy-free option, coconut oil is a great substitute, though it may slightly change the flavor.

  • 1 cup granulated sugar
    Sweeten the deal! You could use brown sugar for a deeper flavor or coconut sugar for a more health-conscious choice.

  • 2 large eggs
    Bind it all together! If you’re vegan, mashed bananas or unsweetened applesauce can work as substitutes; typically, 1/4 cup of either will replace one egg.

  • 1 tsp vanilla extract
    Adds a lovely depth of flavor. Always opt for pure vanilla for the best taste!

  • 1 1/2 cups of peeled, diced apples
    Fresh apples bring moisture and sweetness. Granny Smith are tart and perfect, but feel free to mix in your favorites like Honeycrisp or Fuji!

  • 1/2 cup chopped nuts (optional)
    For a crunch! Walnuts or pecans are excellent choices. If you need it nut-free, simply omit them or add seeds like pumpkin or sunflower.

Step-by-Step Instructions: Let’s Bake!

Baking this Cinnamon Apple Bread is a breeze! Follow these easy steps, and I promise you’ll be left with a gorgeous loaf that will impress anyone.

  1. Preheat your oven to 350°F (175°C). This step is crucial for getting that perfect bake, so don’t skip it!

  2. Prepare your baking dish by greasing a 9×5 inch loaf pan with butter or non-stick spray. You can also line it with parchment paper for an easy release later—just make sure to leave some overhang for easy removal.

  3. In a large bowl, whisk together the flour, baking soda, baking powder, salt, and cinnamon. This step is not just about mixing; it’s about awakening those aromas! As you whisk, breathe in that comforting scent!

  4. In another bowl, cream together the softened butter and sugar until light and fluffy. This usually takes about 3-4 minutes. Want to feel like a pro? Use a hand mixer or stand mixer to make it easier. This step is vital for achieving a beautifully moist bread.

  5. Add in the eggs, one at a time, mixing well after each addition. Follow this with the vanilla extract to bring that delightful flavor into the mix.

  6. Gradually add the dry ingredient mixture into the wet mixture. Do this in three additions, stirring gently until just combined. Overmixing can lead to a denser texture—aim for a slightly lumpy consistency.

  7. Fold in the diced apples and nuts if you’re using them. Imagine the crispy apples creating pockets of sweetness and freshness—it’s heavenly!

  8. Pour the batter into your prepared loaf pan and use a spatula to smooth out the top.

  9. Bake for 50-60 minutes, or until a toothpick inserted into the center comes out clean (or with just a few crumbs attached). Check around the 50-minute mark—nobody likes a dry loaf!

  10. Once baked, let it cool in the pan for about 10 minutes before transferring it to a wire rack to cool completely. This helps to set the texture.

Now, how easy was that? Enjoy the sweet, spiced aroma filling your kitchen—trust me, the anticipation makes it all worth it!

Serving Suggestions: How to Present Your Bread

Once your loaf has cooled down, it’s time to slice and serve! I love to enjoy my cinnamon apple bread warm, slathered with a generous pat of butter or a drizzle of honey. For a fun twist, try toasting the slices just before serving; this adds a delightful crunch that makes each bite even more satisfying.

You can also dust powdered sugar on top for a touch of sophistication, or serve it alongside a scoop of vanilla ice cream for an indulgent dessert. The options are endless, and whatever you choose, it’ll look as good as it tastes!

Recipe Variations: Add Your Unique Twist

Now that you have the classic version perfected, let’s play around with some creative variations:

  • Pumpkin Spice Twist: Add 1/2 cup of pumpkin puree for a fall-inspired version, adjusting the flour slightly to maintain consistency.
  • Chocolate Chip Delight: Fold in 1/2 cup of chocolate chips—because who doesn’t love chocolate?
  • Coconut Strudel: Add shredded coconut to the batter for a tropical flair, or sprinkle some on top before baking.
  • Gluten-Free Goodness: Use a 1:1 gluten-free baking blend instead of all-purpose flour, making it great for those with gluten sensitivities.
  • Nut-Free Alternative: Swap out nuts for seeds or simply leave them out completely—this doesn’t affect the overall flavor!

Get creative and make this recipe your own!

Chef’s Notes: My Kitchen Insights

Baking is a journey, and every recipe tells a story! This cinnamon apple bread has gone through various tweaks over the years. There was that one time I was in a hurry and forgot to cream the sugar and butter together—let me tell you, the texture was decidedly different! But you know what? It still tasted delicious, and that’s the beauty of cooking. Perfect doesn’t exist in my kitchen, only delicious.

So, if you find yourself overwhelmed or something doesn’t seem just right, don’t stress! The best meals often come from happy accidents. Life’s too short for perfect bread; it’s all about enjoying the process!

FAQs and Troubleshooting: Common Concerns

Q: My bread came out too dense. What did I do wrong?
A: This can happen if the batter is overmixed or the flour is packed too tightly. When incorporating dry ingredients, stir gently and only until combined.

Q: Can I use frozen apples?
A: Yes! Just make sure to thaw and drain excess moisture before adding them to your batter to avoid soggy bread.

Q: How do I store leftover bread?
A: Keeping the bread in an airtight container at room temperature will keep it fresh for 3-4 days. For longer storage, wrap it tightly in plastic wrap and freeze for up to 3 months. Just thaw at room temperature before enjoying!

Q: Can I halve this recipe?
A: Absolutely! Just follow the same steps but use a smaller loaf pan. You can also bake it in muffin tins for adorable mini breads!

Nutritional Info

While I encourage you to enjoy this delightful treat, it’s also good to be mindful of portions! Here’s a quick overview of what one serving (1 slice) contains (calculated on a typical loaf):

  • Calories: 210
  • Protein: 3g
  • Fat: 8g
  • Carbohydrates: 33g
  • Fiber: 1g
  • Sugar: 10g

Remember, these values can change based on ingredient substitutions.

Now you’re all set to make your very own Moist and Tender Cinnamon Apple Bread! I hope this delightful recipe brings as much joy to your kitchen as it has to mine over the years. So gather your ingredients, embrace the process, and most importantly—enjoy every bite! Happy baking!

Print

Moist and Tender Cinnamon Apple Bread

A delightful cinnamon apple bread filled with the nostalgic flavors of warm spices and sweet apples.

  • Prep Time: 15 minutes
  • Cook Time: 60 minutes
  • Total Time: 75 minutes
  • Yield: 8 servings 1x
  • Category: Dessert
  • Method: Baking
  • Cuisine: American
  • Diet: Vegetarian

Ingredients

Scale
  • 2 cups all-purpose flour
  • 1 tsp baking soda
  • 1 tsp baking powder
  • 1/2 tsp salt
  • 1 tsp ground cinnamon
  • 1/2 cup unsalted butter, softened
  • 1 cup granulated sugar
  • 2 large eggs
  • 1 tsp vanilla extract
  • 1 1/2 cups peeled, diced apples
  • 1/2 cup chopped nuts (optional)

Instructions

  1. Preheat your oven to 350°F (175°C).
  2. Prepare your baking dish by greasing a 9×5 inch loaf pan with butter or non-stick spray.
  3. In a large bowl, whisk together the flour, baking soda, baking powder, salt, and cinnamon.
  4. In another bowl, cream together the softened butter and sugar until light and fluffy.
  5. Add in the eggs, one at a time, mixing well after each addition.
  6. Gradually add the dry ingredient mixture into the wet mixture.
  7. Fold in the diced apples and nuts if you’re using them.
  8. Pour the batter into your prepared loaf pan and smooth out the top.
  9. Bake for 50-60 minutes, or until a toothpick comes out clean.
  10. Once baked, let it cool in the pan for about 10 minutes before transferring it to a wire rack to cool completely.

Notes

Serve warm with butter or a drizzle of honey. Toasting slices adds a delightful crunch.

Nutrition

  • Serving Size: 1 slice
  • Calories: 210
  • Sugar: 10g
  • Sodium: 200mg
  • Fat: 8g
  • Saturated Fat: 5g
  • Unsaturated Fat: 3g
  • Trans Fat: 0g
  • Carbohydrates: 33g
  • Fiber: 1g
  • Protein: 3g
  • Cholesterol: 30mg

Keywords: cinnamon apple bread, dessert, baking, comfort food, fall recipes

Did you make this recipe?

Share a photo and tag us — we can't wait to see what you've made!

June 25, 2026 |

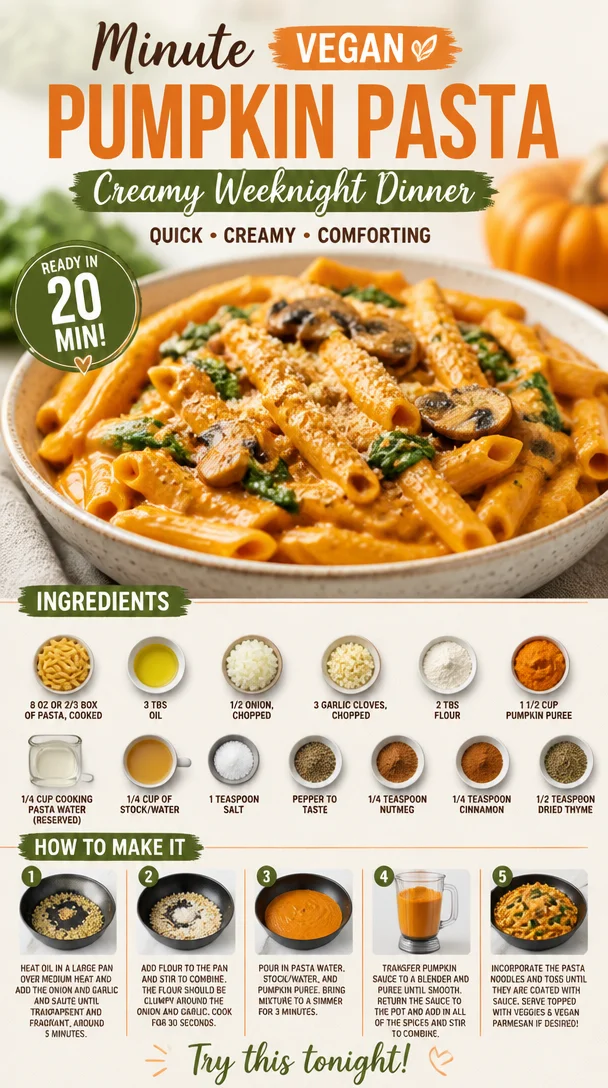
Minute Vegan Pumpkin Pasta: Creamy Weeknight Dinner

A bowl of creamy vegan pumpkin pasta garnished with herbs.

10-Minute Vegan Pumpkin Pasta: A Cozy Fall Delight

Welcome to my kitchen, friends! Today, we’re diving into a dish that’s perfect for those busy days when you want a meal that’s quick but still feels like a warm hug. If you’re anything like me, you’re always on the lookout for recipes that are not only easy but also packed with flavor. Enter this delightful 10-Minute Vegan Pumpkin Pasta!

Imagine this: a chilly autumn evening, the leaves outside are turning a vibrant orange, and the air is filled with the scent of spices. Nothing quite warms the soul like a bowl of creamy pumpkin pasta. This dish is a celebration of fall’s best flavors, and it comes together in a flash. With just a handful of ingredients and less than 10 minutes in the kitchen, you’ll be twirling your fork in a comforting bowl of pasta before you know it.

When I first experimented with this dish, I wanted to create something that evoked nostalgia while being really accessible. The creaminess of the pumpkin puree plays beautifully with the spices, which remind me of my grandma’s kitchen during Thanksgiving. She would make a pumpkin pie that was heavenly—and trust me, this pasta gives me all those warm, fuzzy feelings while being completely plant-based. It’s a meal that feels indulgent but is actually nourishing for your body. So, let’s get cooking!

A Nostalgic Kitchen Memory

As I mentioned, my love for pumpkin dishes stems from my childhood, where the scent of cinnamon, nutmeg, and freshly baked pies filled my grandparents’ home every fall. I remember pulling up a chair to help Grandma in her kitchen, surrounded by mismatched dishware, seasonal decorations, and the warmth of her ever-present smile. That place felt magical, and the dining table was a gathering spot for family and stories to unfold.

One specific memory stands out while making pumpkin puree for her famous pies. Grandma would always let me taste the puree, declaring it "liquid gold." I can hear her laughing now as I threw in a pinch of cinnamon, a dash of nutmeg, and swirled in the palpable excitement of the upcoming holiday feasts. While we were all about the pies then, I’ve taken that same energy and transformed it into a savory vegan pasta that has quickly become a staple in my recipe repertoire.

There’s something so special about cooking with ingredients that evoke those warm memories. Pumpkins have a way of bringing people together, creating not just meals but meaningful moments. So grab your favorite apron, and let’s whip up a dish that not only tantalizes your taste buds but also warms your heart.

Ingredients

Here’s what you’ll need to create this flavorful dish:

  • 8 oz or 2/3 box of pasta, cooked
    Any pasta works! I love using whole wheat or gluten-free options for a healthy twist. Just make sure to cook it al dente; it will continue cooking in the sauce!

  • 3 tablespoons oil
    Extra virgin olive oil is my go-to for its robust flavor, but avocado oil or even a hint of flavored oil (like garlic-infused) can work wonders too! A little goes a long way!

  • 1/2 onion, chopped
    A sweet onion adds depth to the flavor. If you’re in a pinch, shallots or even leeks can be an exciting substitute.

  • 3 garlic cloves, chopped
    Fresh garlic imparts incredible flavor. If you’re in a hurry, garlic powder can work too, but fresh is always best!

  • 2 tablespoons flour
    This helps thicken the sauce. You can use all-purpose flour, gluten-free flour, or nutritional yeast for a cheesy flavor.

  • 1 1/2 cups pumpkin puree
    Look for canned pumpkin puree for ease, but if you’re feeling adventurous, roast fresh pumpkin to make your own!

  • 1/4 cup cooking pasta water
    This starchy water will help bind your sauce and pasta together perfectly. Don’t forget to save some before draining!

  • 1/4 cup of stock/water
    Vegetable stock works great here, adding even more flavor to the dish. You can also use plain water if you’re in a pinch.

  • 1 teaspoon salt
    Adjust to your liking, but remember that the stock might already contain some salt, so you may want to start lightly.

  • Pepper to taste
    Freshly cracked black pepper is the best! If you want a kick, consider adding red pepper flakes.

  • 1/4 teaspoon nutmeg
    Nutmeg adds warmth, perfect for fall. A little goes a long way; you don’t want it to overpower the dish.

  • 1/4 teaspoon cinnamon
    Just a hint for that cozy factor. If you want a more robust flavor, go ahead and add more!

  • 1/2 teaspoon dried thyme
    This herb adds an earthy note that complements the pumpkin beautifully. Fresh thyme is lovely as well if you have it on hand!

Step-by-Step Instructions

Ready to get cooking? Let’s do this!

  1. Boil the Pasta: Start by bringing a large pot of salted water to a boil. Add your pasta and cook according to package instructions until al dente. Remember to reserve 1/4 cup of that starchy pasta water before draining! Trust me on this one; it’s liquid magic.

  2. Sauté the Onions and Garlic: In a large skillet, heat the olive oil over medium heat. Add the chopped onions and sauté them for about 3-4 minutes until they start to soften and become translucent. You want to hear that sizzle! Then, add in the garlic and cook for an additional minute. The aroma will be irresistible!

  3. Create the Roux: Next, sprinkle in the flour while whisking constantly to avoid clumps. You’re creating a roux that will thicken our sauce. Cook for about 1-2 minutes until lightly golden. This is when your kitchen will start to smell like something magical is happening!

  4. Add the Pumpkin: Stir in the pumpkin puree, cooking for another 2 minutes. This step helps develop the flavors. Then pour in the reserved pasta water and stock. We want a smooth and creamy consistency, so keep stirring!

  5. Season It Up: Now’s the time to add the salt, pepper, nutmeg, cinnamon, and thyme. Taste as you go! If it needs a little more spice or salt, don’t be shy. This dish should sing with flavor!

  6. Combine Pasta and Sauce: Toss your cooked pasta into the skillet and stir until every strand is coated with that dreamy pumpkin goodness. If it’s too thick, add a touch more stock or water to loosen it up.

  7. Serve and Enjoy: Once everything is well combined and heated through, it’s time to plate up! You can garnish with fresh herbs, a sprinkle of chili flakes, or even some vegan parmesan if you’re feeling fancy.

Serving Suggestions

This dish is best served warm, right from the stove! I love plating it up in a large, rustic bowl, garnishing with freshly cracked black pepper and a sprinkle of dried thyme on top. You might also want to pair it with a side of crispy garlic bread or a fresh, leafy salad to balance out the richness of the pumpkin. Trust me, this comforting dish is perfect for cozy nights in or entertaining friends!

Recipe Variations

Want to switch things up? Here are a few exciting variations to keep things fresh:

  • Add Greens: Toss in some fresh spinach or kale during the last minute of cooking for a boost of color and nutrients.

  • Nutty Flavor: Add a handful of toasted walnuts or pine nuts for a delightful crunch.

  • Spicy Twist: Mix in some sautéed bell peppers or a dash of hot sauce to give your pasta a kick!

  • Creamy Vegan Option: Stir in a tablespoon of coconut cream or cashew cream for an extra creamy texture.

  • Herb Swap: Try fresh sage instead of thyme for an earthy flavor that complements the pumpkin perfectly.

Chef’s Notes

As I’ve played around with this recipe, I’ve swapped out ingredients and even tried different pasta shapes. While the original is undeniably comforting, I’ve found that whole grain or chickpea pasta can elevate the dish with additional nutrients. Plus, I’ve discovered that seasoning can truly make or break a dish—don’t be scared to add a little extra spice or herbs until it feels just right. Once, I forgot to save the pasta water and had to improvise. Let’s just say, the result wasn’t as silky as usual! Lesson learned—always save that liquid gold!

FAQs and Troubleshooting

1. What type of pasta should I use?
Feel free to use any type you have on hand! Whole wheat, gluten-free, or even chickpea pasta are fabulous options!

2. Can I substitute fresh pumpkin for canned?
Absolutely! Just roast the pumpkin until soft, scoop the flesh, and blend until smooth before adding it to the dish.

3. How can I make this dish more filling?
Adding protein to your plate can make it heartier. Consider white beans or lentils tossed in at the end!

4. What if my sauce is too thick?
No worries! Simply add a little more pasta water or stock, stirring until you reach your desired creamy consistency.

Nutritional Info

This dish is not only comforting but also loaded with nutrients! With pumpkin as the star, you get a great source of vitamins A and C, fiber, and antioxidants. Pair that with whole grain pasta for a filling meal that energizes you. If you want specifics, I recommend looking up the nutritional content of your specific ingredients used!


And there you have it—your new go-to 10-Minute Vegan Pumpkin Pasta! Cooking should feel fun and accessible, and this recipe is a beautiful testament to that. Enjoy this cozy fall dish, make some magical memories in your kitchen, and, as always, keep your plates clean and your cravings satisfied!

Print

10-Minute Vegan Pumpkin Pasta

A quick and flavorful vegan pasta dish featuring creamy pumpkin, perfect for cozy fall evenings.

  • Prep Time: 5 minutes
  • Cook Time: 5 minutes
  • Total Time: 10 minutes
  • Yield: 2 servings 1x
  • Category: Main Course
  • Method: Stovetop
  • Cuisine: Italian
  • Diet: Vegan

Ingredients

Scale
  • 8 oz pasta, cooked (whole wheat or gluten-free)
  • 3 tablespoons extra virgin olive oil
  • 1/2 onion, chopped
  • 3 garlic cloves, chopped
  • 2 tablespoons flour
  • 1 1/2 cups pumpkin puree
  • 1/4 cup cooking pasta water
  • 1/4 cup vegetable stock or water
  • 1 teaspoon salt
  • Pepper to taste
  • 1/4 teaspoon nutmeg
  • 1/4 teaspoon cinnamon
  • 1/2 teaspoon dried thyme

Instructions

  1. Boil the pasta: Bring a large pot of salted water to a boil and cook pasta according to package instructions until al dente, reserving 1/4 cup pasta water.
  2. Sauté the onions and garlic: In a skillet, heat olive oil over medium heat, sauté onions for 3-4 minutes, then add garlic for an additional minute.
  3. Create the roux: Sprinkle in flour while whisking to avoid clumps and cook for 1-2 minutes until lightly golden.
  4. Add the pumpkin: Stir in pumpkin puree and cook for another 2 minutes, then add reserved pasta water and stock.
  5. Season it up: Add salt, pepper, nutmeg, cinnamon, and thyme, adjusting to taste.
  6. Combine pasta and sauce: Toss cooked pasta in the skillet until well coated, adding more stock if too thick.
  7. Serve and enjoy: Plate up the pasta, garnishing with herbs or vegan parmesan if desired.

Notes

This dish pairs beautifully with crispy garlic bread or a fresh salad. You can also add greens or nuts for extra flavor and nutrition.

Nutrition

  • Serving Size: 1 serving
  • Calories: 350
  • Sugar: 3g
  • Sodium: 600mg
  • Fat: 15g
  • Saturated Fat: 2g
  • Unsaturated Fat: 10g
  • Trans Fat: 0g
  • Carbohydrates: 45g
  • Fiber: 5g
  • Protein: 10g
  • Cholesterol: 0mg

Keywords: vegan pasta, pumpkin pasta, fall recipes, quick meals, comfort food

Did you make this recipe?

Share a photo and tag us — we can't wait to see what you've made!

June 25, 2026 |

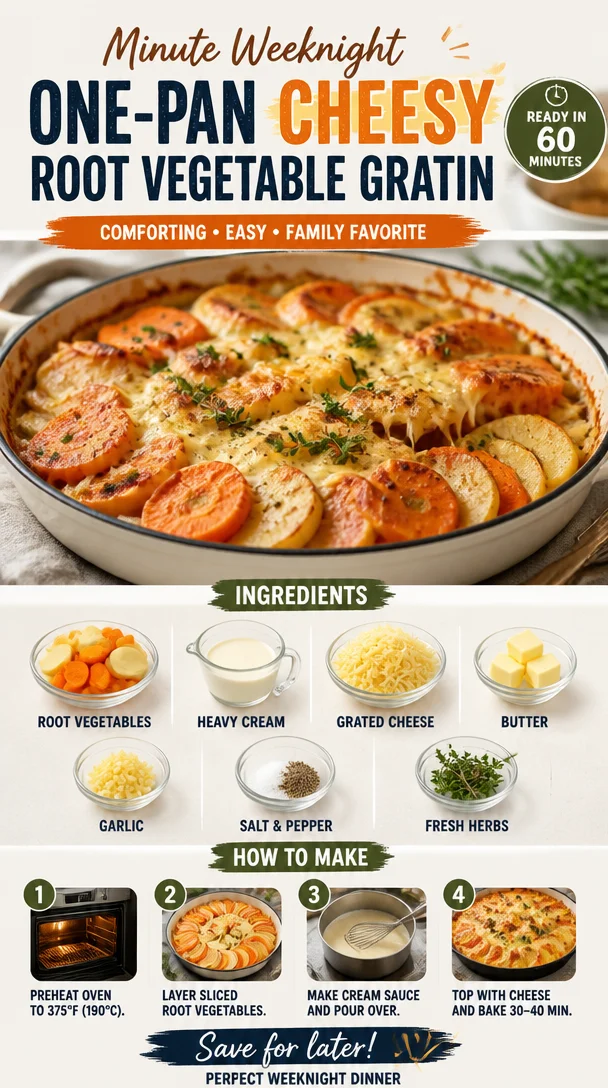
Minute Weeknight One-Pan Cheesy Root Vegetable Gratin

Delicious cheesy root vegetable gratin in a one-pan recipe for easy cooking.

Cheesy Root Vegetable Gratin: A Cozy Delight

Welcome to the comforting world of Cheesy Root Vegetable Gratin! If you’re searching for a dish that wraps you in warmth like a cozy blanket on a chilly evening, you’ve just struck gold. This gratin is not just about layers of glorious root vegetables; it’s about a delightful experience of flavors that dance on your palate. Imagine the creaminess of heavy cream, the richness of melted cheese, and the earthy undertones of various root veggies—doesn’t that sound like a hug from your favorite home-cooked meal?

As a chef who celebrates fresh, nourishing food, I’m super excited to share this recipe with you because it absolutely embodies my mission with Clean Plate Cravings. Eating well doesn’t mean compromising on taste. So, let your kitchen fill with the enticing aroma as we dive into this wonderful gratin that’s perfect for any occasion, from a casual weeknight dinner to a festive gathering with friends.

Join me as we chop, slice, and layer our way to creating a dish that will have your taste buds singing and your heart full. Grab your favorite apron, and let’s get started!

A Trip Down Memory Lane

Let me take you back to when I was a kid, eagerly waiting for family gatherings at my grandma’s house. Her kitchen was always alive with laughter, stories, and, of course, mouthwatering aromas. One dish that stood out among the spread was her root vegetable gratin, which was an ingenious way to make nutritious veggies taste exceptional.

I still remember standing on a stool, peeking over the countertop, watching her expertly slice the vegetables. With every layer she added, she’d sprinkle cheese and pour cream, all while telling me stories of her childhood—how she would gather fresh produce from the local farmers’ market. Those memories shaped my love for cooking and the joy it brings to those we share it with.

I’ve taken my grandma’s traditional gratin recipe and given it a little twist. It’s no longer just a nostalgic dish; it’s a celebration of flavors, textures, and the simple joy of cooking. So, let’s embrace the spirit of those family gatherings as we create our own version of this heartwarming dish.

Ingredients

Here’s a rundown of the ingredients you’ll need to whip up this delicious Cheesy Root Vegetable Gratin:

  • 2 cups root vegetables (carrots, parsnips, and potatoes), sliced
    These versatile vegetables bring a wonderful sweetness and texture to the dish. Feel free to swap them out with other root veggies like sweet potatoes or turnips!

  • 1 cup heavy cream
    This is the secret ingredient that creates a rich, creamy base for our gratin. If you’re watching your dairy intake, you can substitute it with coconut milk or cashew cream for a non-dairy version.

  • 1 cup grated cheese (Gruyère or cheddar)
    Cheese is always a crowd-pleaser. Gruyère lends a nutty flavor, while cheddar adds sharpness. Mix and match based on your taste preferences— mozzarella works too for a gooey texture!

  • 2 tablespoons butter
    Just a little bit of butter adds a luxurious richness. If you’re looking for a dairy-free option, olive oil or vegan butter will do the trick.

  • 1 clove garlic, minced
    Garlic adds depth to our gratin. You can play around with roasted garlic for a sweeter, milder flavor or use garlic powder for a simple substitution.

  • Salt and pepper to taste
    Seasoning is key to bringing out the flavors. I love using sea salt and freshly cracked black pepper for a pop of flavor.

  • Fresh herbs (such as thyme or parsley) for garnish
    Herbs add a lovely fresh note at the end and can transform the look of your dish. Feel free to mix in rosemary or chives according to your taste!

Step-by-Step Instructions

Now that we have all our ingredients, it’s time to roll up our sleeves and get cooking! Just follow these simple steps, and you’ll be enjoying a gorgeous gratin in no time.

  1. Preheat your oven
    Start by preheating your oven to 375°F (190°C). This ensures your gratin bakes evenly and gets that amazing golden top.

  2. Prepare the root vegetables
    Thinly slice your root vegetables about 1/8 inch thick for even cooking. A mandoline slicer can make this step super quick and easy. Plus, they look so pretty in layers!

  3. Sauté the garlic
    In a medium-sized pan, melt the butter over medium heat. Add the minced garlic and sauté for about 1 minute until it becomes fragrant. Be careful not to let it burn; you want it just golden.

  4. Combine cream and garlic
    Pour in the heavy cream, stirring to combine it with the garlic. Sprinkle in some salt and pepper to taste. This mixture becomes the heavenly sauce that will envelop our veggies!

  5. Assemble the gratin
    In a greased baking dish, start layering your root vegetables. Begin with a layer of potatoes or carrots, followed by a sprinkle of cheese. Pour a little of the cream sauce over it, and continue layering until you’ve used up all the ingredients. End with a generous layer of cheese on top—trust me, that melty goodness is key!

  6. Bake
    Cover the dish with foil and bake in the preheated oven for 30 minutes. This allows the vegetables to soften. After that, remove the foil and bake for another 15–20 minutes until the top is beautifully golden and bubbly.

  7. Rest and garnish
    Once out of the oven, let your gratin rest for about 5-10 minutes before serving. This helps it to set, making it easier to cut into portions. Garnish with fresh herbs for that final touch!

Serving Suggestions

This Cheesy Root Vegetable Gratin is incredibly versatile! Serve it hot from the oven as a comforting side dish to accompany your favorite roast or grilled meats. You can also include a fresh green salad on the side for a lovely balanced meal. If you’re feeling fancy, plate individual servings in ramekins for an elegant touch at dinner parties.

Recipe Variations

Looking to jazz things up? Here are a few playful variations you can try:

  1. Herb-Infused Cream
    Infuse your heavy cream with fresh herbs like rosemary or basil by gently warming the cream and letting the herbs steep for 10 minutes. This will add a delightful depth of flavor.

  2. Spicy Twist
    Add a pinch of crushed red pepper flakes to your cream sauce, bringing a kick of heat that pairs wonderfully with the sweetness of the root vegetables.

  3. Savory Mushrooms
    Incorporate sautéed mushrooms into the layers for an earthy flavor that complements the richness of the gratin perfectly.

  4. Nutty Crunch
    Sprinkle toasted breadcrumbs or crushed nuts over the top before the final bake. This adds an irresistible crunchy texture that contrasts beautifully with the creamy interior.

  5. Dairy-Free Delight
    For those avoiding dairy, swap the heavy cream for coconut milk, and use a blend of nutritional yeast and nuts to create a cheesy flavor that’s completely plant-based.

Chef’s Notes

Oh, where do I start? This recipe has become a staple in my home and continues to evolve. The great thing about this gratin is its adaptability. I often experiment with different types of cheese based on what’s in my refrigerator. One time, I even mixed leftover cheese from a fondue night with some sharp cheddar, and it turned out splendidly!

I also love sharing this dish with friends, and I get such a kick out of hearing their stories about their own family recipes. Food brings us together, igniting joy and connection, just like how my grandma’s cooking did for us all those years ago.

FAQs and Troubleshooting

Here are some common questions and potential hiccups you might encounter while making your Cheesy Root Vegetable Gratin:

  1. Why did my gratin turn out watery?
    This can happen if you use watery vegetables or don’t let it rest long enough after baking. Make sure to slice your vegetables evenly and be mindful of the moisture they contain.

  2. Can I prepare this gratin in advance?
    Absolutely! You can slice your veggies and prepare your sauce a day ahead. Just assemble everything in the baking dish and refrigerate. When you’re ready, bake it straight from the fridge—just add a few extra minutes to the baking time.

  3. What if I don’t have Gruyère?
    No worries! You can use any melty cheese you have on hand, such as mozzarella, Monterey Jack, or even vegan cheese alternatives for a delicious result.

  4. How do I store leftovers?
    Allow your gratin to cool, then store it in an airtight container in the refrigerator. It will keep well for 3–4 days. Warm it up in the oven or microwave, but be sure to add a splash of cream or milk to keep it moist.

Nutritional Info

While I don’t typically dwell on numbers, it’s always good to know the general nutritional benefits! This gratin is rich in vitamins due to the vegetables, and when enjoyed in moderation, offers a delicious way to incorporate heart-healthy fats and proteins into your meals. Just remember that balance, as with life, is key!

So there you have it—your guide to making a crowd-pleasing Cheesy Root Vegetable Gratin! I hope you feel inspired to give it a try and perhaps even add your own personal touch. Remember, cooking is not just about following recipes; it’s about expressing your creativity and, most importantly, sharing love through food. Enjoy!

Print

Cheesy Root Vegetable Gratin

A comforting dish featuring layers of root vegetables, rich cream, and melted cheese, perfect for cozy evenings.

  • Prep Time: 15 minutes
  • Cook Time: 45 minutes
  • Total Time: 60 minutes
  • Yield: 4 servings 1x
  • Category: Side Dish
  • Method: Baking
  • Cuisine: French
  • Diet: Vegetarian

Ingredients

Scale
  • 2 cups root vegetables (carrots, parsnips, and potatoes), sliced
  • 1 cup heavy cream
  • 1 cup grated cheese (Gruyère or cheddar)
  • 2 tablespoons butter
  • 1 clove garlic, minced
  • Salt and pepper to taste
  • Fresh herbs (such as thyme or parsley) for garnish

Instructions

  1. Preheat your oven to 375°F (190°C).
  2. Prepare your root vegetables by slicing them about 1/8 inch thick.
  3. Sauté the garlic in a medium-sized pan with melted butter over medium heat for about 1 minute.
  4. Combine the heavy cream and sautéed garlic, then season with salt and pepper.
  5. Assemble the gratin by layering the root vegetables, cheese, and cream sauce in a greased baking dish.
  6. Bake covered with foil for 30 minutes, then uncover and bake for another 15–20 minutes until golden.
  7. Rest for 5-10 minutes before serving and garnish with fresh herbs.

Notes

You can prepare this gratin in advance and refrigerate before baking. Also, substitute heavy cream with coconut milk for a dairy-free option.

Nutrition

  • Serving Size: 1 serving
  • Calories: 400
  • Sugar: 6g
  • Sodium: 450mg
  • Fat: 20g
  • Saturated Fat: 10g
  • Unsaturated Fat: 8g
  • Trans Fat: 0g
  • Carbohydrates: 35g
  • Fiber: 4g
  • Protein: 12g
  • Cholesterol: 60mg

Keywords: gratin, root vegetables, cheesy, comfort food, vegetarian

Did you make this recipe?

Share a photo and tag us — we can't wait to see what you've made!

June 18, 2026 |

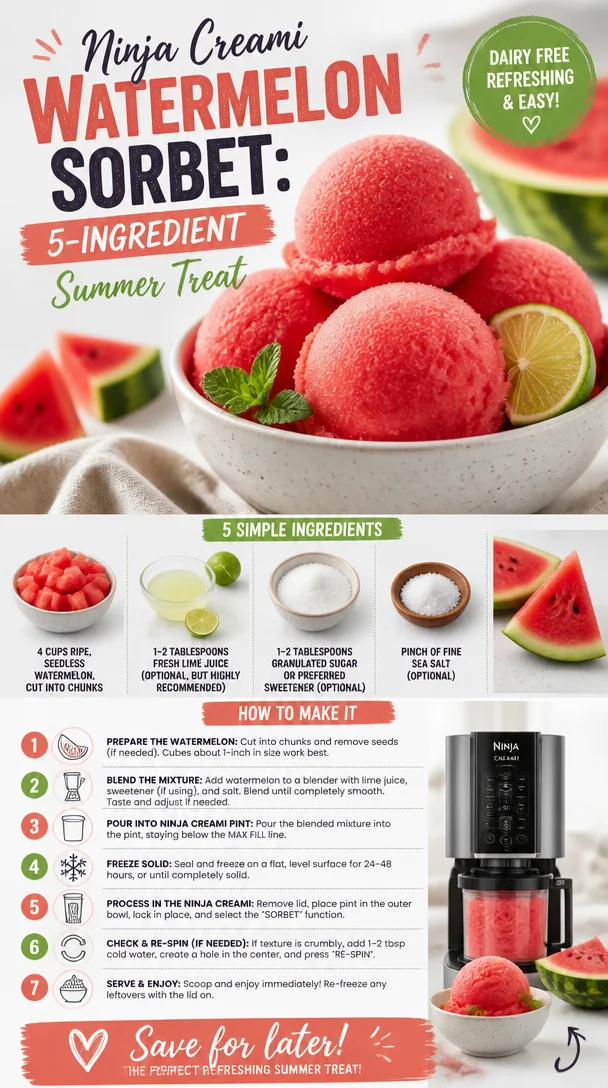
Ninja Creami Watermelon Sorbet: 5-Ingredient Summer Treat

Refreshing Ninja Creami watermelon sorbet made with 5 ingredients.

Easy Ninja Creami Watermelon Sorbet Recipe: Summer Delight!

As the sun shines brightly and the temperatures rise, there’s nothing quite like a refreshing treat to cool you down. Enter the Easy Ninja Creami Watermelon Sorbet! This vibrant, fruity sorbet is not only an explosion of flavor, but it’s also an easy recipe you can whip up in no time. The light, summery taste of watermelon combined with a hint of lime is the perfect way to celebrate the warm weather. Whether you’re lounging by the pool, hosting a backyard barbecue, or just trying to beat the heat, this sorbet is your sweetest solution.

I’m Ava Carter, and I’m thrilled to share a recipe that’s not only incredibly delicious but also brings back some of my fondest summer memories. Picture this: a lazy afternoon, family lounging under a big oak tree, laughter echoing as we indulge in ice-cold treats. Watermelon was always on our picnic blanket—it was juicy, sweet, and so refreshing after a hot day. Fast forward to now, and that nostalgia inspires my love for this sorbet. It captures those sunny days perfectly, and every spoonful feels like a little bite of summertime joy.

So grab your Ninja Creami, and let’s create something that will not only tantalize your taste buds but also take you back to those wonderful warm days. With minimal ingredients and a dash of creativity, you’ll be enjoying a frozen dessert that’s all-natural and oh-so-satisfying.

Personal Story

Growing up, summers meant visiting my grandparents’ farm, where we’d spend long days picking fresh fruit from their sprawling garden. Watermelon was always a highlight—huge, sweet, and dripping with juice, it was a staple of our family gatherings. We’d sit on the porch, spitting out seeds and giggling as we raced to see who could finish their slice first. Those simple moments created lasting memories, always filled with laughter and love. Fast forward to today, and I channel that nostalgic joy into creating recipes that evoke those summer feelings. My Ninja Creami Watermelon Sorbet embodies those blissful days, allowing me to relive them with each scoop!

Ingredients

Here’s what you’ll need to create this delectable sorbet:

  • 4 cups ripe, seedless watermelon, cut into chunks

    • Choose the ripest watermelon you can find—it ensures maximum sweetness and flavor. If you happen to have seeds, just make sure to remove them for a smoother texture.
  • 1-2 tablespoons fresh lime juice (optional, but highly recommended)

    • This adds a zesty flavor that beautifully complements the sweetness of the watermelon. If you don’t have lime, fresh lemon juice works just as well!
  • 1-2 tablespoons granulated sugar or preferred sweetener (optional)

    • Depending on the natural sweetness of your watermelon, you might prefer to add a hint of sweetener. Alternatives like honey, agave syrup, or any sugar substitute can work—just adjust to your preference!
  • Pinch of fine sea salt (optional)

    • Salt enhances the flavor, bringing out the natural sweetness of the fruit. A tiny pinch is all you need to elevate the taste without making it salty!

Step-by-Step Instructions

Ready to get started? Let’s break it down step by step!

  1. Prepare the Watermelon:

    • Start by cutting your watermelon into small chunks. Aim for even-sized pieces, as this will help them freeze uniformly. The more prolific the watermelon, the better the sorbet. Feel free to sample a chunk for sweetness—nothing beats freshly cut watermelon!
  2. Freeze the Watermelon:

    • Spread the watermelon chunks on a baking sheet lined with parchment paper in a single layer. This helps prevent them from sticking together. Pop the tray in the freezer for about 2-3 hours until the watermelon is completely frozen solid. I usually do this the night before so I’m ready to blend in the morning—it really helps for meal prep!
  3. Blend the Watermelon:

    • Once frozen, toss the watermelon chunks into your Ninja Creami. If you’re adding lime juice and sweetener, this is the moment to include them too. Blend on the sorbet setting until smooth and creamy. Don’t forget to scrape down the sides if needed. Trust me, the aroma will take you back to those summers!
  4. Taste and Adjust:

    • Give your sorbet a quick taste. This is where those chef instincts come in! If it’s sweet enough, fantastic! If you prefer a bit more zing, add more lime juice or sweetener as needed and blend again.
  5. Pack It Up:

    • Transfer your creamy mixture into a freezer-safe container, ensuring it’s packed well to avoid ice crystals forming. Smooth out the top, cover it, and let it chill for another hour for the perfect scoop-able texture.
  6. Scoop and Enjoy:

    • When you’re ready to treat yourself, take your sorbet out of the freezer and let it sit for a few minutes to soften up. Scoop it into your favorite bowls or cones, and enjoy that refreshing summer bliss!

Serving Suggestions

To serve, I love to add a sprig of mint on top for a pop of color and fresh aroma. You can also dress it up with a sprinkle of toasted coconut or a drizzle of chocolate sauce for an indulgent twist. For an Instagram-ready moment, serve it in a chilled bowl or glass, topped with a thin slice of lime. It’s as delightful to look at as it is to eat!

Recipe Variations

Feeling adventurous? Here are a few ideas to make this sorbet your own:

  • Berry Blast: Add a cup of frozen strawberries or blueberries for a mixed berry delight. This adds flavor and a fun color!

  • Tropical Twist: Incorporate chunks of pineapple or a splash of coconut milk for an instant tropical vibe.

  • Herbal Infusion: Add a few basil leaves or mint to the blending process for a refreshing herbaceous touch.

  • Creamy Sorbet: For a creamier texture, mix in a splash of coconut cream or Greek yogurt before blending. It’s a game-changer!

  • Spicy Kick: For adventurous palates, add a dash of cayenne pepper or jalapeño for a sweet-and-spicy experience.

Chef’s Notes

This Easy Ninja Creami Watermelon Sorbet has undergone quite a culinary journey! Originally, I simply blended frozen watermelon and called it good, but as I experimented with flavors and textures, it transformed into this delightful recipe. I chuckle thinking about some of my earlier attempts at nutty sorbets that turned out more like frozen mush! However, every endeavor has led to this refreshing treat that I can share with all of you. It’s moments like these that remind me why I love cooking: it’s all about learning, experimenting, and sharing joy through food.

FAQs and Troubleshooting

1. Can I use other melons for this recipe?

Absolutely! Cantaloupe or honeydew melon can also be used for delicious sorbet variations. Just follow the same instructions!

2. Why isn’t my sorbet coming out creamy?

If your sorbet is grainy or icy, it may need more blending. Use the "sorbet" function on your Ninja Creami or blend it a little longer until smooth. You could also try adding a little bit of water to help the texture.

3. How long can I store the sorbet?

This sorbet can be stored for up to two weeks in the freezer. Just ensure it’s sealed tightly in an airtight container to prevent freezer burn.

4. What if my watermelon isn’t sweet enough?

No worries! Just add a bit more sweetener to taste after blending. Remember, sometimes the ripeness of fruit can really vary, so it’s always good to taste first!

Nutritional Info

While I’m all about enjoying delicious flavors, if you’re curious, here’s a rough breakdown per serving (about ½ cup):

  • Calories: 60
  • Protein: 1g
  • Fat: 0g
  • Carbohydrates: 16g
  • Fiber: 1g
  • Sugar: 12g

Now that you’re equipped with this easy, vibrant recipe packed full of summery goodness, I can’t wait for you to try it! Whip out that Ninja Creami and dive into a bowl of watermelon delight. Here’s to making fresh, feel-good memories in your kitchen—one sorbet scoop at a time! Enjoy, and as always, happy cooking!

Print

Easy Ninja Creami Watermelon Sorbet

A refreshing watermelon sorbet perfect for summer, combining the sweetness of ripe watermelon with a hint of lime.

  • Prep Time: 10 minutes
  • Cook Time: 0 minutes
  • Total Time: 135 minutes
  • Yield: 4 servings 1x
  • Category: Dessert
  • Method: Blending and Freezing
  • Cuisine: American
  • Diet: Vegan

Ingredients

Scale
  • 4 cups ripe, seedless watermelon, cut into chunks
  • 1–2 tablespoons fresh lime juice (optional)
  • 1–2 tablespoons granulated sugar or preferred sweetener (optional)
  • A pinch of fine sea salt (optional)

Instructions

  1. Prepare the watermelon: Cut your watermelon into small chunks.
  2. Freeze the watermelon: Spread the chunks on a baking sheet lined with parchment paper and freeze for 2-3 hours.
  3. Blend the watermelon: Toss the frozen chunks into your Ninja Creami, adding lime juice and sweetener if desired. Blend on the sorbet setting.
  4. Taste and adjust: Sample the sorbet and add more lime or sweetener if needed, then blend again.
  5. Pack it up: Transfer the mixture into a freezer-safe container and let it chill for another hour.
  6. Scoop and enjoy: Serve the sorbet in bowls, optionally garnished with mint or other toppings.

Notes

This sorbet can be made using other melons like cantaloupe or honeydew. It can be stored for up to two weeks in an airtight container.

Nutrition

  • Serving Size: 1/2 cup
  • Calories: 60
  • Sugar: 12g
  • Sodium: 5mg
  • Fat: 0g
  • Saturated Fat: 0g
  • Unsaturated Fat: 0g
  • Trans Fat: 0g
  • Carbohydrates: 16g
  • Fiber: 1g
  • Protein: 1g
  • Cholesterol: 0mg

Keywords: sorbet, watermelon, summer dessert, refreshing, vegan

Did you make this recipe?

Share a photo and tag us — we can't wait to see what you've made!

June 18, 2026 |

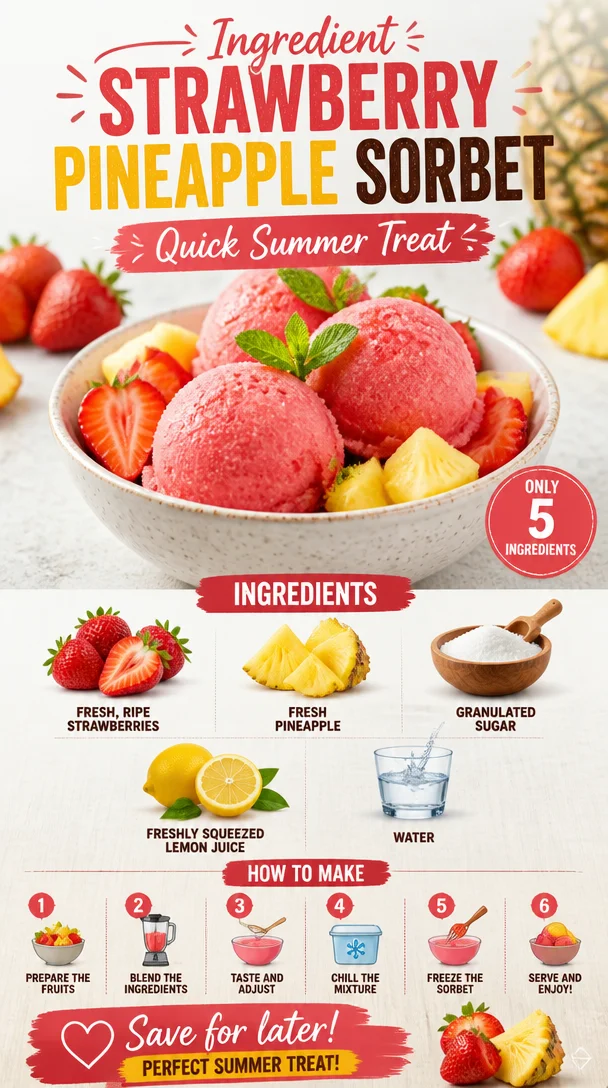
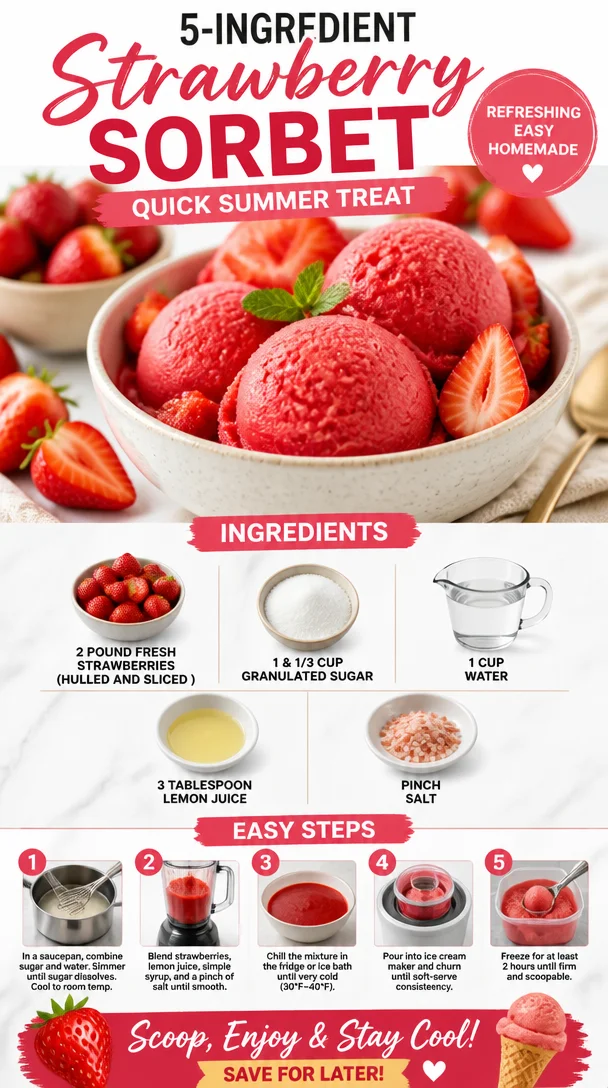
Ingredient Strawberry Pineapple Sorbet: Quick Summer Treat

Delicious strawberry pineapple sorbet served in a bowl, perfect summer dessert

Delicious Strawberry Pineapple Sorbet Recipe for Refreshing Bliss

Introduction

Hey there, fellow food lovers! If you’re anything like me, there’s nothing quite as satisfying on a warm day as a scoop of sweet, refreshing sorbet. Today, I’m thrilled to share with you my Delicious Strawberry Pineapple Sorbet Recipe—a little slice of heaven that’s not only easy to make but also bursts with tropical flavor! There’s something magical about the combination of strawberries and pineapple; it’s like a fruity hug in every bite.

Picture this: It’s a sunny afternoon, the kids are playing in the yard, and my friends and I are lounging on the patio, sipping lemonade. The air is filled with laughter and the sweet scent of summer blooms. To top off the day, I bring out a bowl of this vibrant, homemade sorbet, and suddenly, it feels like a mini vacation! That’s the kind of bliss we all need in our lives, right?

The best part about making sorbet at home? You control the sweetness and flavors. This recipe is a great starting point, and you can even get creative with the ingredients. Are you ready to create some icy, fruity magic in your kitchen? Let’s dive in!

Personal Story

Growing up in a small town, summer was always synonymous with fresh fruit. We would often visit the local farmer’s market where the air was heavy with the aroma of ripe strawberries and pineapples. I remember one particular summer when my grandma decided to host a backyard barbecue. Amidst the burgers and hotdogs sizzling on the grill, she pulled out her old ice cream maker and announced that we were making sorbet. I still have that image in my mind—my cousins and I were on juice patrol, squeezing lemons and tasting the concoction at every stage while Grandma spun the machine like a pro.

That day, we made the most fantastic strawberry pineapple sorbet. The sweet, tangy flavor was the highlight of the meal, and it instantly cooled us down after hours of playing in the sun. It didn’t just stay as a treat; it became a family tradition, enjoyed at every gathering and barbecue. Now, as I share this recipe with you, I can’t help but smile, knowing that I’m passing down a little piece of my childhood.

Ingredients

Let’s gather our ingredients! For this Delicious Strawberry Pineapple Sorbet, you’ll need:

  • Fresh, Ripe Strawberries: The star of our sorbet! Choose bright red, fragrant strawberries. Look for ones that are firm and shiny. You can substitute with frozen strawberries in a pinch, but fresh ones bring that unbeatable flavor.

  • Fresh Pineapple: Sweet, juicy, and tropical, fresh pineapple enhances the flavor profile of this sorbet. Prioritize ripe pineapples; they should smell fragrant at the base and feel slightly soft when pressed. Canned pineapple can work, but drain the syrup for best results.

  • Granulated Sugar: This sweetens the sorbet and helps achieve that creamy texture. You can substitute with honey or agave to make it a bit healthier, but keep in mind that it may alter the flavor slightly.

  • Freshly Squeezed Lemon Juice: This brightens the overall flavor of your sorbet and balances the sweetness. Fresh is key—bottled lemon juice just doesn’t compare in taste.

  • Water: Used for blending and creating the desired consistency. If you’d like to swap out plain water, using coconut water can elevate the tropical taste!

Step-by-Step Instructions

Now let’s roll up our sleeves and get down to business. Here’s how you’ll make the Delicious Strawberry Pineapple Sorbet!

  1. Prepare the Fruit: Start by washing 2 cups of fresh strawberries. Remove the stems and cut them in half. Dice 2 cups of fresh pineapple, making sure to remove the skin and core. Place the fruit bits in separate bowls.

    Chef’s Tip: Use overripe fruit for extra sweetness. If your strawberries are a little past their prime, they’ll still shine in this sorbet!

  2. Blend the Strawberries: In a blender or food processor, combine the halved strawberries along with 1/2 cup of sugar and 2 tablespoons of freshly squeezed lemon juice. Blend until smooth and creamy.

    Chef Hack: Give the mixture a quick taste. If your berries are sweet enough, you may not need the entire amount of sugar!

  3. Blend the Pineapple: Next, combine the diced pineapple with another 1/2 cup of sugar and 2 tablespoons of freshly squeezed lemon juice. Blend until you achieve a smooth mixture.

    Insider Tip: You can also add a pinch of salt to enhance the flavor of the fruit. Salt works wonders in sweets!

  4. Mix it Together: Now comes the fun part! In a large bowl, fold together the strawberry and pineapple mixtures.

    Chef’s Note: For a little extra zing, a splash of coconut rum can be added here—this is optional, of course, but oh-so-delicious!

  5. Icy Magic Time: Transfer the mixture to a shallow container (like a baking dish) for faster freezing. Cover it with plastic wrap or a lid, and pop it in the freezer for about 4-6 hours until it’s firm.

    Freezing Tip: If you’ve got a little ice cream maker, feel free to use it! Follow the manufacturer’s instructions for churning this mixture for an ultra-smooth texture.

  6. Scoop and Enjoy: Once your sorbet is frozen, let it sit at room temperature for a few minutes before scooping. This helps to soften it slightly for easier serving.

    Serving Note: For an elegant touch, serve your sorbet in a chilled glass and garnish with a sprig of mint or a slice of fresh fruit!

Serving Suggestions

This Delicious Strawberry Pineapple Sorbet is perfect for sunny days, barbecues, or simply as a sweet treat after dinner. Serve it in charming little bowls, topped with fresh mint or a drizzle of coconut milk for an extra tropical vibe. You can even scoop it into a waffle cone for a delightful twist!

Recipe Variations

Let’s get creative! Here are some fun variations you can try:

  • Berry Blast Sorbet: Add a cup of blueberries or raspberries to the mix for an even fruitier flavor.

  • Mango Magic: Substitute fresh mango for the pineapple for a creamy tropical delight.

  • Coconut Swirl: Mix in a little coconut cream for a richer, creamier texture and beachy flavor.

  • Herb Infusion: Experiment by muddling fresh basil or mint before blending for a refreshing herbal note.

  • Citrus Zing: Add a tablespoon of orange zest to your mixture for an extra citrus kick!

Chef’s Notes

Making this sorbet has become a summer ritual in my house, just like it was with my grandma so many years ago. I love to throw my friends into the mix for a fun afternoon of chatting and creating. Over the years, I’ve added various fruits and flavors that have marked special occasions—like turning it into a "happy birthday" treat with rainbow sprinkles or enjoying it as the perfect refreshing snack after a heat wave.

Remember, the key to a great sorbet is using ripe, fresh fruits, so always choose the best you can find. Don’t hesitate to make this recipe your own!

FAQs and Troubleshooting

Here are some common questions I often hear about making sorbet:

  1. My sorbet turned out icy! What did I do wrong?

    • If your sorbet has icy crystals, it may have been stored in the freezer for too long or not blended thoroughly enough. To fix it, let it soften slightly, then blend it again until smooth.
  2. Can I make this sorbet without an ice cream maker?

    • Absolutely! This recipe is designed to work without one. Just freeze it in a shallow dish and stir it every hour for the first three hours to break up any ice crystals.
  3. How long does this sorbet last in the freezer?

    • If stored properly in an airtight container, your sorbet can last up to two weeks in the freezer.
  4. Can I use frozen fruit instead?

    • Yes! Frozen fruit can work well, but it’s best to thaw it a bit beforehand to ensure a smooth blend.

Nutritional Info

While this recipe is a treat, it’s also light and refreshing! Each serving is naturally low in calories and packed with vitamin C from the fruit. Enjoy in moderation as part of a balanced diet—after all, life is about indulging every now and then!


And there you have it—a refreshing, delicious Strawberry Pineapple Sorbet recipe that’s brimming with flavor and summertime nostalgia. I hope you enjoy making this treat as much as I do! Cheers to sweet and sunny days ahead!

Print

Delicious Strawberry Pineapple Sorbet

A refreshing and fruity Strawberry Pineapple Sorbet, perfect for warm days and summer gatherings.

  • Prep Time: 15 minutes
  • Cook Time: 360 minutes
  • Total Time: 375 minutes
  • Yield: 4 servings 1x
  • Category: Dessert
  • Method: Freezing
  • Cuisine: American
  • Diet: Vegan

Ingredients

Scale
  • 2 cups fresh, ripe strawberries
  • 2 cups fresh pineapple, diced
  • 1/2 cup granulated sugar
  • 1/2 cup granulated sugar (for pineapple)
  • 4 tablespoons freshly squeezed lemon juice
  • Water (for blending)

Instructions

  1. Prepare the fruit: Wash strawberries, remove stems, and cut in half. Dice fresh pineapple, removing skin and core. Place in separate bowls.
  2. Blend the strawberries: In a blender, combine strawberries with 1/2 cup sugar and 2 tablespoons lemon juice. Blend until smooth.
  3. Blend the pineapple: Combine diced pineapple with 1/2 cup sugar and 2 tablespoons lemon juice. Blend until smooth.
  4. Mix it together: Fold strawberry and pineapple mixtures in a large bowl.
  5. Icy magic time: Transfer the mixture to a shallow container and freeze for about 4-6 hours until firm.
  6. Scoop and enjoy: Let sit at room temperature for a few minutes before scooping.

Notes

For added flavor, try mixing in a splash of coconut rum or serving with fresh mint.

Nutrition

  • Serving Size: 1 serving
  • Calories: 120
  • Sugar: 25g
  • Sodium: 5mg
  • Fat: 0g
  • Saturated Fat: 0g
  • Unsaturated Fat: 0g
  • Trans Fat: 0g
  • Carbohydrates: 31g
  • Fiber: 1g
  • Protein: 1g
  • Cholesterol: 0mg

Keywords: sorbet, strawberry, pineapple, dessert, summer treat

Did you make this recipe?

Share a photo and tag us — we can't wait to see what you've made!

June 18, 2026 |

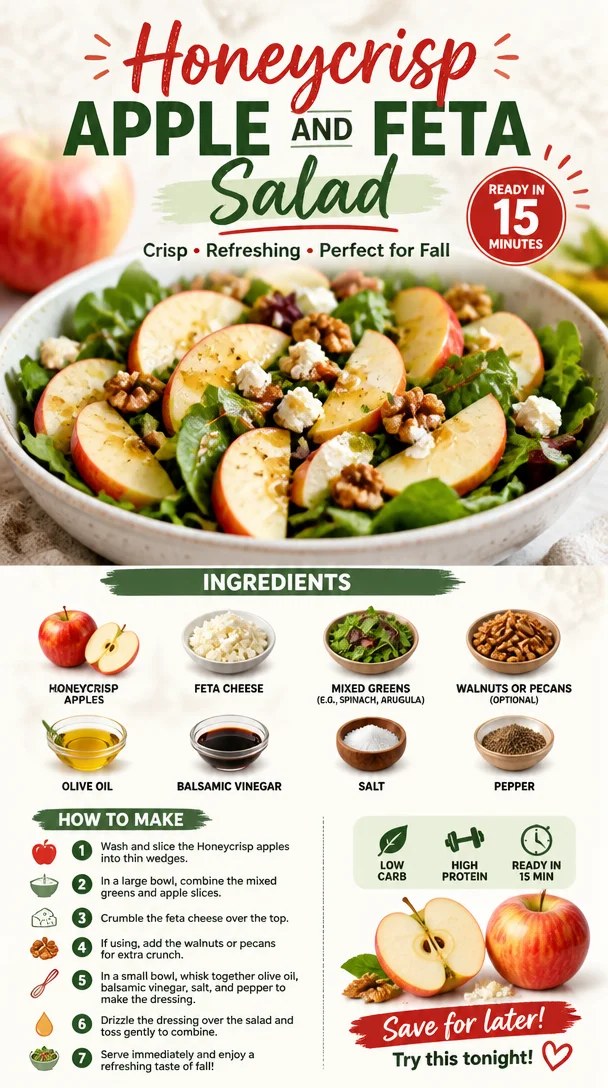
Honeycrisp Apple and Feta Salad

Honeycrisp Apple and Feta Salad with fresh greens and dressing

Honeycrisp Apple and Feta Salad: A Crisp and Zesty Delight

Hello, beautiful foodies! Welcome back to Clean Plate Cravings, your go-to spot for fresh, feel-good meals that make everyday cooking a total joy. Today, we’re diving into a dish that perfectly captures the essence of seasonal eating—the delightful Honeycrisp Apple and Feta Salad. Trust me; this salad is not just a side dish; it’s a vibe! Bursting with sweet-and-tangy flavors and a satisfying crunch, it’s perfect for lunch or as a vibrant side at dinner.

Imagine crunching into a crisp, juicy Honeycrisp apple, its natural sweetness dancing with the creamy, salty morsels of feta cheese, all mingling atop a bed of fresh mixed greens. Sounds divine, right? And let’s not forget the crunchy walnuts or pecans for that added texture and a drizzle of olive oil and balsamic vinegar that marries the flavors beautifully. Seriously, this salad is like a hug for your taste buds—light yet filling and oh-so-satisfying!

Now, let’s set the scene. Picture a sunlit kitchen, the aroma of fresh greens filling the air, and the excited chatter of friends gathered around the table. This salad isn’t just about the ingredients; it’s about the experience—the laughter and stories shared, the clinking of glasses, the joy of good food. So, grab your aprons, and let’s whip up a bowl of pure deliciousness!

A Taste of Nostalgia

Every time I make this Honeycrisp Apple and Feta Salad, I’m transported back to my childhood, wandering through the autumn farmer’s market with my grandmother. She’d always insist we pick the glossy, red Honeycrisp apples—the ones that looked like they were plucked straight from a fairy tale. Their crunch always reminded me of the excitement of autumn, with the leaves changing colors and the air getting that perfect chill.

One crisp Saturday, we decided to get adventurous and gather ingredients for a simple salad. We found fresh arugula and some feta cheese from a local dairy farmer. I remember snacking on the apples while we prepped, and the laughter as we tossed everything together became one of those cherished family moments. I can still see her mixing it all in a big bowl, her joy evident as we shared bites. That memory sticks with me, and now, as I create my own versions of this beloved dish, I’m reminded of how food can unite us and create lasting memories.

Ingredients

Let’s gather our ingredients and get ready to whip up some salad magic! Here’s what you’ll need:

  • Honeycrisp Apples (2)
    Sweet, crisp, and juicy—Honeycrisp apples add a delightful crunch and natural sweetness to the salad. Not into Honeycrisps? Try Granny Smith for a tart kick or Fuji apples for another sweet option.

  • Feta Cheese (1 cup, crumbled)
    Creamy and briny, feta is the star that ties this dish together. If you’re looking for a vegan option, crumble some firm tofu and toss it in a little nutritional yeast for a cheesy flavor without dairy.

  • Mixed Greens (4 cups, such as spinach and arugula)
    Fresh greens form the salad’s base, providing essential nutrients and a lovely peppery kick from the arugula. You can swap in kale or romaine if you’re feeling adventurous!

  • Walnuts or Pecans (½ cup, optional)
    These nuts provide a delightful crunch. If you’re nut-free, sunflower seeds or pumpkin seeds can be a great alternative.

  • Olive Oil (¼ cup)
    A good-quality extra virgin olive oil enhances the salad’s flavor. You can use avocado oil for a milder taste or nut oil for a different dimension.

  • Balsamic Vinegar (2 tablespoons)
    This tangy addition balances the sweetness of the apples beautifully. For a different flavor profile, try apple cider vinegar or red wine vinegar.

  • Salt and Pepper (to taste)
    Essential for bringing out the flavors in all ingredients. Make sure to season generously, but always taste as you go!

Step-by-Step Instructions

Now that we’ve got our ingredients prepped, let’s bring this salad together. Follow along, and let’s create something magical!

Step 1: Prep the Apples

Begin by washing your Honeycrisp apples thoroughly. Slice them into thin wedges or bite-sized cubes—whatever suits your fancy. Chef’s tip: Leave the skin on! It adds color and additional nutrients.

Step 2: Prep the Greens

Next up, take your mixed greens and give them a nice rinse if they’re not pre-washed. Spin them in a salad spinner to remove excess water. We want those greens to be fresh and vibrant! Chef’s hack: You can mix and match greens—try adding some kale for added texture or some romaine for crunch!

Step 3: Crumble the Feta

Time to take that luscious feta cheese and crumble it into little pieces over your greens. Feel free to use your fingers—food is meant to be touched and enjoyed! Quick tip: If you let the feta come to room temperature before crumbling, it’ll be easier to break up.

Step 4: Add the Nuts

If you’re using nuts, now’s the time to toast them lightly in a dry skillet over medium heat for about 4-5 minutes until they are golden and fragrant. Toasting enhances their flavor immensely! If you prefer softer nuts, you can skip this step, but I highly recommend it!

Step 5: Assemble

In a large salad bowl, toss the greens, apple slices, and crumble feta together. Once combined, sprinkle the toasted nuts on top.

Step 6: Make the Dressing

In a small bowl, whisk together olive oil, balsamic vinegar, salt, and pepper to make your dressing. This step is where you can let your creativity shine—play with the proportions! Chef’s tip: If you love a bit of sweetness, add a teaspoon of honey or maple syrup to the dressing.

Step 7: Dress the Salad

Drizzle your homemade dressing over the salad and toss gently. You want the greens to be lightly coated, not drenched. Chef’s advice: Take a moment to taste and adjust the seasoning. Maybe it needs a little more salt, or perhaps a dash more balsamic?

Step 8: Serve

Now comes the best part—serving! To plate, simply scoop the salad onto individual plates or a large serving platter for sharing. Drizzle a bit more balsamic on top if you wish for a beautiful presentation.

Serving Suggestions

This Honeycrisp Apple and Feta Salad shines as a stand-alone meal, but it pairs beautifully with grilled chicken, fish, or even stuffed bell peppers for a hearty dinner. It also makes for an incredible side at BBQs, potlucks, or family gatherings. A light sprinkling of extra nuts or seeds right before serving adds that final touch of elegance!

Recipe Variations

Love experimenting in the kitchen? Here are a few creative twists to elevate your salad game further:

  1. Add Roasted Vegetables: Toss in some roasted sweet potatoes or beets for added depth and flavor.

  2. Add Fresh Herbs: Finely chop fresh mint or basil and mix it in for a refreshing herbal note.

  3. Use Different Cheeses: Swap feta for goat cheese, blue cheese, or a vegan cheese alternative.

  4. Sweeten it Up: Mix in some dried cranberries, raisins, or pomegranate seeds for bursts of sweetness.

  5. Spice it Up: A sprinkle of cayenne or chili flakes can give the salad a surprising kick!

Chef’s Notes

This Honeycrisp Apple and Feta Salad has been a staple in my kitchen for years. Each time I make it, I find new ways to bring my personality into the mix. It’s evolved from a simple family recipe to a canvas for my creativity—whether that means experimenting with new nuts or dressing variations. People often forget that salads can be just as exciting as hearty meals.

On a funny note, I once borrowed my grandmother’s recipe, and in a moment of distraction, I accidentally combined the dressing with orange juice instead of balsamic vinegar. Let’s just say the reaction was memorable, and I quickly realized that cooking is all about adapting and finding joy—even in kitchen blunders!

FAQs and Troubleshooting

1. What if my salad wilts quickly?
To keep your salad fresh, keep the dressing separate until you’re ready to serve. Moisture can cause greens to wilt quickly!

2. How can I make this salad more filling?
Add protein! Grilled chicken, chickpeas, or even sliced hard-boiled eggs can make this salad a complete meal.

3. Can I make this ahead of time?
Absolutely! Make the salad ahead, but keep the dressing separate until just before serving for the best freshness.

4. What can I substitute for apples?
If you’re out of Honeycrisp apples or want a change, pears or even peaches can work beautifully in this salad, adding their unique sweetness!

Nutritional Info

This Honeycrisp Apple and Feta Salad is not only delicious but also packed with nutrients. Here’s a quick breakdown per serving (approximate values):

  • Calories: 320
  • Protein: 10g
  • Fat: 22g (mostly healthy fats from olive oil and nuts)
  • Carbohydrates: 30g
  • Fiber: 5g

Enjoy this energizing, satisfying, and absolutely delicious salad! It’s not just food; it’s a celebration of flavor, fun, and all things fresh. Now, go ahead, get your hands dirty, and whip up this delightful dish! Don’t forget to share your own kitchen stories and variations in the comments below; I can’t wait to hear them! Happy cooking!

Print

Honeycrisp Apple and Feta Salad

A crisp and zesty salad featuring crunchy Honeycrisp apples, creamy feta, and fresh mixed greens, drizzled with olive oil and balsamic vinegar.

  • Prep Time: 15 minutes
  • Cook Time: 5 minutes
  • Total Time: 20 minutes
  • Yield: 4 servings
  • Category: Salad
  • Method: No-Cook
  • Cuisine: American
  • Diet: Vegetarian

Ingredients

  • Honeycrisp Apples (2)
  • Feta Cheese (1 cup, crumbled)
  • Mixed Greens (4 cups, such as spinach and arugula)
  • Walnuts or Pecans (½ cup, optional)
  • Olive Oil (¼ cup)
  • Balsamic Vinegar (2 tablespoons)
  • Salt and Pepper (to taste)

Instructions

  1. Prep the Apples: Begin by washing your Honeycrisp apples thoroughly. Slice them into thin wedges or bite-sized cubes—whatever suits your fancy. Chef’s tip: Leave the skin on!
  2. Prep the Greens: Next up, take your mixed greens and give them a nice rinse if they’re not pre-washed. Spin them in a salad spinner to remove excess water.
  3. Crumble the Feta: Time to take that luscious feta cheese and crumble it into little pieces over your greens.
  4. Add the Nuts: If you’re using nuts, now’s the time to toast them lightly in a dry skillet over medium heat for about 4-5 minutes.
  5. Assemble: In a large salad bowl, toss the greens, apple slices, and crumbled feta together. Sprinkle the toasted nuts on top.
  6. Make the Dressing: In a small bowl, whisk together olive oil, balsamic vinegar, salt, and pepper.
  7. Dress the Salad: Drizzle your homemade dressing over the salad and toss gently.
  8. Serve: To plate, scoop the salad onto individual plates or a large serving platter.

Notes

Keep the dressing separate until serving to prevent wilting. Feel free to experiment with different nuts and add protein for a more filling meal.

Nutrition

  • Serving Size: 1 serving
  • Calories: 320
  • Sugar: 15g
  • Sodium: 250mg
  • Fat: 22g
  • Saturated Fat: 5g
  • Unsaturated Fat: 14g
  • Trans Fat: 0g
  • Carbohydrates: 30g
  • Fiber: 5g
  • Protein: 10g
  • Cholesterol: 15mg

Keywords: salad, healthy, Honeycrisp, feta, easy recipe

Did you make this recipe?

Share a photo and tag us — we can't wait to see what you've made!

June 18, 2026 |

Ingredient No-Bake Chunky Monkey Frozen Yogurt Bark

Chunky monkey frozen yogurt bark made with bananas and chocolate

Chunky Monkey Frozen Yogurt Bark: A Deliciously Fun Treat

Welcome back to the cozy corners of Clean Plate Cravings! Today, we’re diving into a delicious treat that’ll keep your taste buds dancing and your health goals on track: Chunky Monkey Frozen Yogurt Bark. Picture this: it’s a sunny afternoon, the kids (or the kid in you) are home from school, and you want something that feels indulgent without that post-snack guilt. This recipe checks all the boxes!

Chunky Monkey was inspired by a delightful flavor combination of peanut butter, bananas, and chocolate—an iconic trio that has been satisfying cravings for ages. The best part? You only need a few wholesome ingredients to whip up this cool snack. Not only is it a crowd-pleaser, but it also offers a perfect balance of protein, healthy fats, and a little sweetness. Plus, it’s super fun to make! So, in true Clean Plate Cravings style, let’s keep it fresh, simple, and seriously delicious.

Imagine the creamy yogurt melding beautifully with the sweet banana, a luscious drizzle of peanut butter, and the satisfying crunch of walnuts topped off with a sprinkle of chocolate chips. It’s like a party in your mouth! And you know what? This isn’t just a dessert; it’s a vibrant snack that you can feel good about enjoying. Whether you’re entertaining friends or looking to treat yourself after a long day, this Chunky Monkey Frozen Yogurt Bark is your go-to.

Now grab those mixing bowls and let’s jump into an adventure that brings the kitchen to life!

A Sweet Memory

Growing up, my kitchen was always a hub of laughter and experimentation. I remember those summer days spent with my grandmother, armed with an array of ingredients and a goal to make the sweetest treats. One particular afternoon, we decided to create a frozen yogurt bark after discovering the vibrant flavors of bananas and peanut butter together.

With the sun streaming through the window, we carefully layered yogurt, arranged banana slices, and creatively sprinkled on chocolate chips and walnuts. I can still hear her chuckling every time a chocolate chip rolled off the counter. Every scoop was filled with laughter and love as we taste-tested our creation and eagerly awaited it to freeze. That warm memory of a simple kitchen adventure keeps me inspired even today, and I’m excited to share this fun and easy recipe with all of you!

Ingredients

Here’s what you’ll need to create your own Chunky Monkey Frozen Yogurt Bark:

  • 1 cup plain yogurt
    A base for all delightful toppings! Greek yogurt adds a protein punch and a thicker texture, while non-dairy yogurt can replace it if you’re vegan or lactose intolerant.

  • 1 banana, sliced
    Fresh bananas add natural sweetness and a creamy texture. Feel free to use frozen banana slices if you want to give it a frosty twist!

  • 1/4 cup peanut butter
    Get that creamy, nutty goodness! You can swap this with almond butter or sunflower seed butter for nut-free options.

  • 1/4 cup chocolate chips
    Because who doesn’t love a bit of chocolate? Dark chocolate is a great alternative if you’re looking for a healthier option.

  • 1/4 cup chopped walnuts
    They offer that perfect crunch! You can use any nuts you like or skip them altogether for a nut-free bark.

  • Honey to taste
    A natural sweetener for balancing flavors. Substitute with maple syrup or agave nectar for a vegan option.

Step-by-Step Instructions

Ready to bring this fruity delight to life? Follow these steps for a super simple and fun process!

  1. Prepare Your Baking Tray
    Grab a baking sheet or pan (around 8×8 inches) and line it with parchment paper, letting the edges hang over for easy removal later. This will make your life much easier during the grand unveiling of your frozen bark!

  2. Mix the Yogurt
    In a medium-sized bowl, scoop your plain yogurt and give it a quick stir to smooth it out. If you like, add a drizzle of honey to sweeten it to your liking. Mixing it a bit beforehand ensures you get that smooth, creamy consistency throughout the bark!

  3. Spread It Out
    Pour the yogurt onto the prepared baking sheet and gently spread it out using a spatula or the back of a spoon. Make it around 1/2 inch thick, so it’s easy to break into pieces later.

  4. Add the Toppings
    Here comes the fun part! Start by layering your banana slices evenly across the yogurt. Next, drizzle that glorious peanut butter on top. Don’t worry if it doesn’t look perfect—that’s part of its charm! Follow with a sprinkle of chocolate chips and chopped walnuts.

  5. Freeze!
    Now it’s time for the freezer. Place your baking sheet in the freezer and let it chill for at least 3-4 hours, or until the yogurt is fully frozen. Pro tip: If you want to speed up the process, set it closer to the back of the freezer where it’s colder.

  6. Break and Enjoy
    Once frozen solid, take it out and lift the bark using the parchment paper. Break it into chunks (or squares if you’re feeling fancy) and serve immediately. You can think of it as edible art—each piece is uniquely its own masterpiece!

Serving Suggestions

Serving this delicious Chunky Monkey Frozen Yogurt Bark is as easy as it gets! Place the pieces on a colorful plate or in a fun bowl, and don’t hesitate to drizzle a bit more peanut butter or a sprinkle of more chocolate chips on top. It’s perfect for a snack time treat, dessert for gatherings, or as a refreshing afternoon pick-me-up. Just imagine digging in with friends or family—it’s sure to lift everyone’s spirits!

Recipe Variations

Here are a few creative twists you can try to make this recipe your own:

  • Fruity Fiesta: Swap out the bananas for strawberries or mixed berries to add a pop of color and extra flavor!
  • Nutty Delight: Replace walnuts with pecans or hazelnuts for a different crunch or use seeds for a nut-free option.
  • Chocolate Overload: Use dark chocolate chunks instead of chips for a more intense cocoa flavor or drizzle melted chocolate on top.
  • Tropical Twist: Add some shredded coconut or use coconut yogurt for a dreamy tropical version.
  • Sweet Spice: Sprinkle some cinnamon or nutmeg in the yogurt before spreading it for a warm, spiced flavor.

Chef’s Notes

Isn’t it amazing how recipes can evolve over time? I started making this frozen yogurt bark during hot summer days with friends. Over the years, I’ve played with flavors and ingredients, and each change has opened up a world of delicious possibilities! One time, I went a little wild and even added a dash of cayenne pepper to the peanut butter! It was surprisingly good—a little spicy kick with that sweet and creamy combo!

Remember, the best part about cooking is experimenting and having fun. Don’t ever hesitate to add your personal touch!

FAQs and Troubleshooting

Here are some common questions you might have while whipping up your Chunky Monkey Frozen Yogurt Bark:

  • What if my yogurt mixture is too runny?
    It’s best to use thicker yogurt, like Greek, for the right consistency. If it’s too runny, let it sit in the fridge for a bit to thicken before spreading.

  • How do I store leftovers?
    Keep any leftovers in an airtight container in the freezer for up to 2 weeks. Just remember to separate the layers with parchment paper if you stack them!

  • Can I make this dairy-free?
    Absolutely! Simply swap out the plain yogurt for your favorite non-dairy alternative, like almond, coconut, or oat yogurt.

  • Why is my bark breaking unevenly?
    If the yogurt wasn’t fully frozen, you might end up with uneven breaks. Make sure to let it freeze completely before breaking!

Nutritional Info

While I usually focus on the fun aspect of food, here’s a quick glance at the nutritional benefits of this delightful snack:

  • Calories: Approximately 150 per serving
  • Protein: 6g
  • Fat: 7g (primarily healthy fats from peanut butter and walnuts)
  • Carbohydrates: 18g
  • Fiber: 2g

There you have it—an effortlessly delicious recipe that’s bound to brighten up your days! Now prep this Chunky Monkey Frozen Yogurt Bark, sit back, and enjoy the fun, flavorful, and guilt-free treat. Happy snacking!

Print

Chunky Monkey Frozen Yogurt Bark

A delicious and fun treat combining yogurt, bananas, peanut butter, and chocolate. Perfect for healthy snacking!

  • Prep Time: 15 minutes
  • Cook Time: 240 minutes
  • Total Time: 255 minutes
  • Yield: 4 servings 1x
  • Category: Dessert
  • Method: Freezing
  • Cuisine: American
  • Diet: Vegetarian

Ingredients

Scale
  • 1 cup plain yogurt
  • 1 banana, sliced
  • 1/4 cup peanut butter
  • 1/4 cup chocolate chips
  • 1/4 cup chopped walnuts
  • Honey to taste

Instructions

  1. Prepare your baking tray: Grab a baking sheet or pan (around 8×8 inches) and line it with parchment paper.
  2. Mix the yogurt: In a medium-sized bowl, scoop your plain yogurt and give it a quick stir. Add honey to sweeten if desired.
  3. Spread it out: Pour the yogurt onto the prepared baking sheet and gently spread it out to about 1/2 inch thick.
  4. Add the toppings: Layer banana slices, drizzle peanut butter, and sprinkle chocolate chips and walnuts on top.
  5. Freeze! Place your baking sheet in the freezer for 3-4 hours, or until fully frozen.
  6. Break and enjoy: Lift the bark using the parchment paper and break it into chunks.

Notes

You can substitute any toppings based on your preference. Store leftovers in an airtight container in the freezer for up to 2 weeks.

Nutrition

  • Serving Size: 1 piece
  • Calories: 150
  • Sugar: 10g
  • Sodium: 60mg
  • Fat: 7g
  • Saturated Fat: 1g
  • Unsaturated Fat: 6g
  • Trans Fat: 0g
  • Carbohydrates: 18g
  • Fiber: 2g
  • Protein: 6g
  • Cholesterol: 3mg

Keywords: frozen yogurt, healthy snack, dessert, peanut butter, banana, chocolate

Did you make this recipe?

Share a photo and tag us — we can't wait to see what you've made!

June 18, 2026 |

Ingredient Strawberry Sorbet: Quick Summer Treat

Delicious homemade strawberry sorbet served in a bowl for a summer treat

Hey there, fellow food lovers! If you’re looking for a refreshing treat that screams summer and brings back those nostalgic childhood memories, I’ve got just the recipe for you: delicious Strawberry Sorbet! Imagine juicy, ripe strawberries pureed into a smooth, icy delight, kissed with a touch of lemon to balance the sweetness. It’s that perfect, feel-good dessert that brings a smile to your face and a cool boost on a hot day.

Let me take you on a little journey back to a sun-soaked afternoon when I first learned to whip up this gem. I was just a kid, running around the backyard with my siblings and cousins, our hands sticky with melted popsicle drippings and our laughter filling the air. My grandmother, a culinary wizard who knew how to make magic with fresh fruits, decided to surprise us with a special treat—her homemade strawberry sorbet. With the intoxicating aroma of fresh strawberries wafting through the kitchen, I couldn’t resist sneaking spoonfuls straight from the blender!

Silly me, I thought making sorbet was a complex affair reserved for fancy ice cream parlors. But my grandma let me in on the secret: it’s as easy as blending, freezing, and enjoying! From that day on, strawberry sorbet became our go-to summer delight, and I knew I had to recreate that memory. Lucky for you, I’m here to share that very recipe, perfect for any occasion, whether you’re hosting a summer soiree, enjoying a cozy night in, or looking for a sweet indulgence that fits your clean eating goals.

So grab your favorite apron, and let’s dive into the colorful world of strawberries, sugar, and pure joy. I promise you, with just a few simple ingredients, you’ll be enjoying this delightful sorbet in no time!

Personal Story

Let me take you back to a sunny Saturday afternoon spent at my grandparents’ home in the countryside. Picture this: the sun starting to dip behind the trees, casting a warm golden glow on everything it touches. My grandma had just returned from a trip to the local farmer’s market with a basket brimming with the freshest strawberries you could ever imagine. Their sweet, vibrant aroma wafted through the kitchen as she began to prepare her famed strawberry sorbet.

As I sneaked into the kitchen, entranced by the sight of those luscious red berries, she caught my eye and grinned, “Want to help, Ava?” Of course, I jumped at the chance! We hulled and sliced those juicily ripe berries together while she shared stories of her childhood and how her mother used to make the same sorbet on hot summer days. I remember giggling as I pretended to be a professional chef, creating my own berry masterpieces, all the while stealing bites of the sweet fruit.

When the mixture was finally ready, my grandma poured it into a container, and we eagerly awaited—impatiently, I might add—the moment it would transform into frosty perfection. I can still hear the sound of that sorbet machine whirring; the anticipation was almost as delicious as the treat itself. Finally, when the time came, she spooned out the first serving, topping it off with a sprig of mint from her garden. That first bite was pure bliss, refreshing and bursting with flavor, and it instantly transported me to lazy summer days filled with laughter and joy.

Those moments in the kitchen with my grandma are memories I cherish deeply, and every time I make strawberry sorbet, I feel like I’m revisiting that special time. It’s a sweet reminder that cooking is so much more than just making food—it’s about creating connections, sharing stories, and enjoying life’s simple pleasures.

Ingredients

Here’s what you’ll need to create your own batch of heavenly Strawberry Sorbet:

  • 2 pounds fresh strawberries (hulled and sliced)
    The star of the show! Use ripe, juicy strawberries for the best flavor. If strawberries aren’t available, you can substitute with other berries, like raspberries or peaches.

  • 1 & 1/3 cups granulated sugar
    This will sweeten the sorbet and help achieve the perfect texture. If you’re looking for a healthier alternative, consider using honey or agave syrup—just adjust the quantity to your taste as they are sweeter.

  • 1 cup water
    This will help dissolve the sugar and create a smooth blend. If you want to infuse a different flavor, you can use fruit juice instead, like orange or lemonade!

  • 3 tablespoons lemon juice
    A splash of freshness! This brightens the flavor of the strawberries. Freshly squeezed lemon juice is best, but bottled will do in a pinch.

  • Pinch of salt
    Adding a tiny bit of salt enhances the flavors and balances the sweetness. Don’t skip it!

And there you have it—simple and accessible ingredients that come together to create a delightful dessert. Now let’s get to the fun part!

Step-by-Step Instructions

Follow these easy steps, and you’ll have your sorbet chillin’ in no time. Are you ready? Let’s do this!

Step 1: Prepare Your Strawberries

Start by hulling and slicing your fresh strawberries. This is the fun part! Get your kids involved or turn on some music to enjoy while you work. When you’re done, place the sliced strawberries in a mixing bowl.

Chef Tip: Look for strawberries that are bright red and fragrant. If they are slightly overripe, that’s okay! They’ll still work beautifully in this recipe.

Step 2: Sweeten the Strawberries

Sprinkle the sugar over the strawberries, mixing gently to ensure they’re well coated. Let them sit for about 15-20 minutes to allow the sugar to draw out the natural juices.

Chef Insight: This process is known as maceration, and it enhances the flavor while creating a lovely syrup! You can use this trick on other fruits, too; it works magic for peaches or even mangoes!

Step 3: Blend It Up

After letting the strawberries macerate, transfer them into a blender or food processor. Add in the water, lemon juice, and a pinch of salt. Blend until you achieve a smooth, vibrant mixture.

Chef Hack: If you love a chunkier texture, leave a few berries whole or pulse the blender a few times rather than completely pureeing them.

Step 4: Taste Test

Now’s the moment of truth! Give your strawberry mixture a little taste. If it needs more sweetness, feel free to add a bit more sugar or a splash of honey. Remember, you want a refreshing flavor that burst in your mouth!

Chef Tip: Trust your taste buds! Feel free to adjust the sweetness and acidity to your liking.

Step 5: Chill It Down

Pour the mixture into a shallow, airtight container. Cover it and pop it into the freezer for about 4-6 hours, or until completely frozen. If you’re in a hurry, you can also use an ice cream maker to churn your sorbet!

Chef Secret: If using an ice cream maker, follow the manufacturer’s instructions. The process usually takes around 20-30 minutes for creamy results!

Step 6: Serve and Enjoy

Once your sorbet is nice and frozen, take it out and let it sit for a few minutes at room temperature to soften before scooping. It’ll make serving so much easier! Scoop it into bowls, garnish with fresh mint, and enjoy your delightful creation!

Serving Suggestion: For a touch of elegance, serve the sorbet in stylish dessert cups, and drizzle a little extra lemon juice or a berry compote on top for added flair.

Serving Suggestions

Strawberry Sorbet is effortlessly versatile. Serve it in bowls topped with a sprig of fresh mint for that perfect touch of color and freshness. You can also scoop it into a cone for a fun, ice cream-inspired treat. Feeling fancy? Pair it with slices of pound cake or alongside some dark chocolate for a decadent dessert experience. The vibrant red hue of the sorbet is not only a feast for the palate but also a visual delight!

Recipe Variations

  • Berry Medley Sorbet: Combine strawberries with other berries like blueberries or raspberries for a mixed berry sorbet that’s bursting with flavor!
  • Peachy Strawberry: Add ripe peaches to the mix for a delightful variation that brings a bit of Southern sweetness.
  • Mango Tango: Swap half the strawberries for ripe mango for a tropical twist that takes you straight to paradise.
  • Herbal Twist: Infuse a hint of mint or basil by blending a few leaves in with the strawberries before freezing, adding a refreshing herbal note.
  • Coconut Cream Sorbet: For a creamy, tropical delight, add a cup of coconut cream to the mixture for a coconut-strawberry fusion.

Chef’s Notes

Over the years, this Strawberry Sorbet recipe has turned into a cherished family tradition. It’s been handed down through generations, and each summer, you’ll find my siblings and I gathering in the kitchen to rekindle those memories while creating new ones with our kids. The best part? Everyone makes it their own! Some add a splash of orange zest, while others like to experiment with different sweeteners. The variations are endless, but the laughter and joy remain constant.

And while you may think the recipe is perfection as it is, I’ve had my fair share of kitchen mishaps—like the time I accidentally grabbed cayenne pepper instead of salt (who knew sorbet could have a kick?). It’s all part of the culinary adventure, and believe me, every mistake teaches us something new. If you make the wrong turn, just laugh it off and try again. Cooking is just as much about joy as it is about satisfying your cravings!

FAQs and Troubleshooting

Q: Can I use frozen strawberries instead of fresh?

Absolutely! Frozen strawberries are a fantastic alternative. Just let them thaw slightly before blending, and you’re good to go.

Q: Why is my sorbet too hard to scoop?

If your sorbet becomes rock-solid, try letting it sit at room temperature for a bit before scooping. You can also mix in a bit more water or lemon juice to soften it up for next time!

Q: How long can I store the sorbet?

In an airtight container, your sorbet will last in the freezer for about a month. Just remember to cover it well to avoid freezer burn—nobody wants that!

Q: Can I make this sorbet without sugar?

You can attempt a sugar-free version using sugar substitutes like stevia or monk fruit. Adjust quantities to suit your taste buds, and enjoy guilt-free!

Nutritional Info (Optional)

For those of you interested in the numbers, this Strawberry Sorbet generally contains about 120 calories per half-cup serving, with a healthy dose of vitamin C and antioxidants from the strawberries!


And there you have it! A delightful, indulgent, and vibrant Strawberry Sorbet recipe that’s as fun to make as it is to eat. Each scoop transports you back to those sunny summer afternoons filled with laughter and love. So get in the kitchen, whip up a batch, and don’t forget to share your creations! Happy sorbet-making!

Print

Strawberry Sorbet

A refreshing and delightful strawberry sorbet that captures the essence of summer with ripe strawberries and a touch of lemon.

  • Prep Time: 20 minutes
  • Cook Time: 360 minutes
  • Total Time: 380 minutes
  • Yield: 6 servings 1x
  • Category: Dessert
  • Method: Blending & Freezing
  • Cuisine: American
  • Diet: Vegan

Ingredients

Scale
  • 2 pounds fresh strawberries (hulled and sliced)
  • 1 & 1/3 cups granulated sugar
  • 1 cup water
  • 3 tablespoons lemon juice
  • Pinch of salt

Instructions

  1. Prepare your strawberries by hulling and slicing them, then place in a mixing bowl.
  2. Sprinkle the sugar over the strawberries and mix gently; let sit for 15-20 minutes.
  3. Transfer the strawberries into a blender, add water, lemon juice, and salt; blend until smooth.
  4. Taste the mixture and adjust sweetness as needed.
  5. Pour the mixture into a shallow container and freeze for 4-6 hours.
  6. Serve the sorbet in bowls garnished with fresh mint.

Notes

For variations, try adding other fruits like peaches or blending in mint for a refreshing twist.

Nutrition

  • Serving Size: 1/2 cup
  • Calories: 120
  • Sugar: 25g
  • Sodium: 5mg
  • Fat: 0g
  • Saturated Fat: 0g
  • Unsaturated Fat: 0g
  • Trans Fat: 0g
  • Carbohydrates: 30g
  • Fiber: 2g
  • Protein: 1g
  • Cholesterol: 0mg

Keywords: strawberry, sorbet, dessert, summer treat, vegan dessert

Did you make this recipe?

Share a photo and tag us — we can't wait to see what you've made!