Cleanplate Cravings

Cleanplate Cravings

June 18, 2026 |

Patriotic 4th of July Charcuterie Board in 15 Minutes
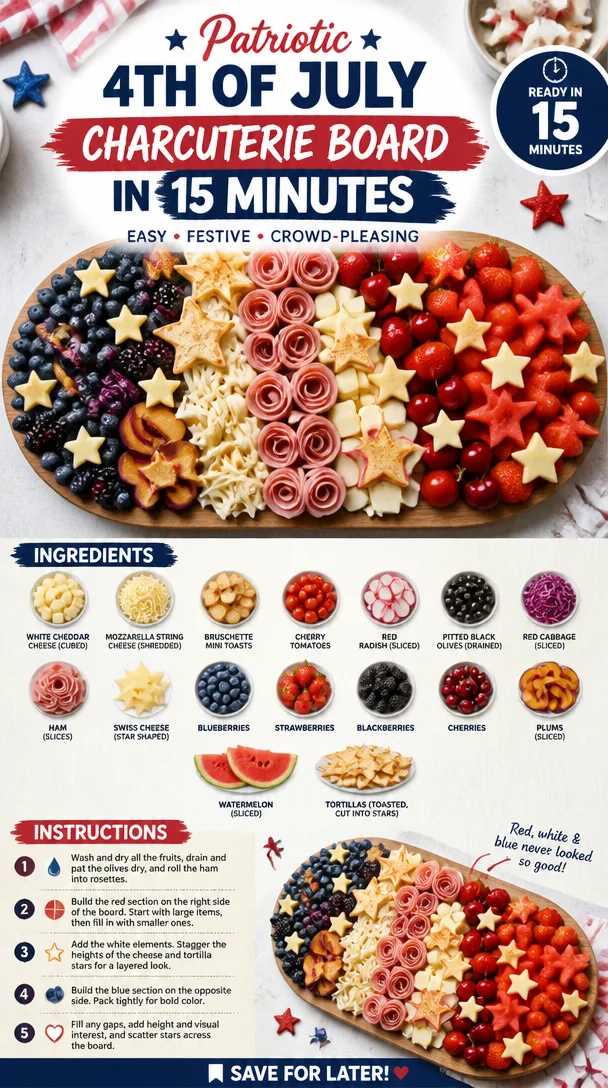
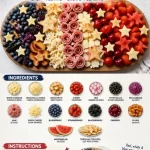
Patriotic 4th of July charcuterie board with red, white, and blue snacks

Celebrate Independence Day with a Festive 4th of July Charcuterie Board

The 4th of July isn’t just another day on the calendar—it’s a celebration of freedom, friendship, and fun! It’s that magical time of year when the sun shines bright, the skies explode with fireworks, and families gather for backyard BBQs, potlucks, and picnics. And what better way to bring people together than with a stunning, eye-catching charcuterie board that pays homage to the red, white, and blue?

Alright, friends! Today, I’m really excited to share my crowd-pleasing 4th of July Charcuterie Board that’s not only packed with vibrant flavors but also super easy to whip up. Picture this: a delightful array of cheeses, meats, fresh fruits, and veggies that offer something for everyone. And let’s not forget the added fun of shaping some of these ingredients into festive stars! So, put on your apron and get ready to impress your guests with a showstopper of a platter.

Now, let me take you down memory lane for a moment.

A Nostalgic Kitchen Memory

Growing up, the 4th of July was a big deal in my family. We would gather at my grandparents’ house every year for what felt like the ultimate family reunion. My grandma, who had a green thumb like no other, would always have her famous garden bursting with colorful veggies—those crisp cucumbers and juicy tomatoes were the stars of the show, but what I loved most were her charcuterie boards.

While my cousins were busy deciding who would take the first swing at the piñata, I found myself captivated by the way my grandma arranged the food. With a simple wooden board, she created an edible tapestry, artfully placing slices of cheese and salami next to an explosion of fresh berries. There was something magical about those platters—every bite was a tribute to summer and laughter.

Now, as an adult, I channel that same enthusiasm whenever I create a charcuterie board for my friends and family. It’s not just about the food but about the connections we make over the dining table and the memories we share. So let’s dive right in!

Ingredients

To bring my festive vision to life, here’s what you’ll need to create a dazzling 4th of July Charcuterie Board:

  • 1 cup white cheddar cheese (cubed)
    A classic favorite that’s creamy and slightly sharp. You can substitute with mild cheddar or even a pepper jack if you’re looking for a kick!

  • 1/2 cup mozzarella string cheese sticks (shredded)
    Great for that pull-apart goodness! If you’re feeling adventurous, fresh mozzarella balls are a delightful alternative.

  • 1/2 cup Bruschette mini toasts
    Crispy and crunchy—these are perfect for spreading toppings. If you can’t find mini toasts, try using pita chips or your favorite crackers.

  • 1 cup cherry tomatoes
    Juicy and full of flavor. Use grape tomatoes as an alternative, or even roasted sun-dried tomatoes for a twist.

  • 1/2 cup red radish (sliced)
    Adds a crisp texture and a little peppery zing. If you’re not a fan, consider using cucumber slices for a milder crunch.

  • 1/2 cup pitted black olives (drained)
    A savory snack that balances the sweetness of fruits. Kalamata olives would also be fantastic in this mix.

  • 1/2 cup red cabbage (sliced)
    Adds vibrant color and crunch. In a pinch, feel free to swap it for green cabbage or finely shredded kale.

  • 8 slices ham
    Smoky and hearty—perfect for meat lovers. Turkey bacon or roasted vegetables work for those seeking a lighter option.

  • 7 Swiss cheese slices (cut into stars)
    Mild and nutty, Swiss is perfect for shaping into fun emblems of celebration. Alternatively, any semi-soft cheese like Gouda will do the trick.

  • 1 cup blueberries
    Tart and sweet—these little gems scream 4th of July! If needed, blackberries can serve as an equally delicious substitute.

  • 1 cup strawberries
    Fresh and vibrant, they add a pop of red! Swap with raspberries if you prefer something a little different.

  • 1 cup blackberries
    Sweet and juicy, a great contrast to the cheddar. If you’re missing these, feel free to add more blueberries instead!

  • 1 cup cherries
    Juicy and sweet, they elevate your board to a whole new level! Pitted plums can also take their place beautifully.

  • 3 plums (sliced)
    Perfectly sweet and a bit tangy—use any seasonal stone fruit like peaches or nectarines in their place.

  • 1/4 watermelon (sliced)
    Refreshing and hydrating, a must-have during summer gatherings. For a different take, make a fruit salsa with pineapple or cantaloupe!

  • 5 tortillas (toasted, cut into stars)
    A whimsical addition that adds crunch! If you want a gluten-free version, use corn tortillas instead.

Step-by-Step Instructions

Now that we’ve gathered our ingredients, let’s get started on assembling this beautiful charcuterie board! Follow these easy steps and note my chef hacks along the way:

  1. Choose Your Board:
    Grab your favorite serving platter or wooden board. I recommend using something spacious enough to fit all your goodies. Just imagine how stunning it will look!

  2. Start with the Cheese:
    Begin by placing your cubed white cheddar in a cluster on one end of the board. Make sure to leave some space for meats and fruits. My tip? Vary the sizes of the cheese cubes to create visual interest!

  3. Add the Meat:
    Next to the cheese, lay out your slices of ham. I like to fold the slices to create little "florals" or pinwheels. It adds a gourmet touch—without the effort!

  4. Incorporate the Veggies:
    Now it’s time to sprinkle in the veggies. Scatter your sliced radishes and cherry tomatoes around the board. And don’t forget the red cabbage! You can create a small pile in the center of the board—it adds great height!

  5. Layer on the Fun Shapes:
    Get those star-shaped Swiss cheese pieces on there! Use a small star cutter for fun shapes, and let your inner artist shine! Nestle these in between the meats and cheeses for a festive flair.

  6. Introduce the Crunch:
    Next, strategically place the Bruschette mini toasts around the edges of the board or in a small bowl if you prefer. This gives guests a great place to scoop their delicious toppings!

  7. Fruity Burst of Flavor:
    Now let’s get colorful! Create little clusters of blueberries, strawberries, blackberries, cherries, and sliced plums. Toss them gently so they don’t get bruised. Use their vibrant hues to balance out the board visually!

  8. Watermelon Wonder:
    Lastly, squeeze in those watermelon slices. They provide a refreshing contrast to the other flavors, and they look absolutely stunning! If you cut them into star shapes too, you’ll really blow everyone away.

  9. Finishing Touches:
    As a final touch, fill in any empty gaps with the olives and toasted tortillas. You want your board to be abundant and inviting!

And there you have it! An Instagram-worthy 4th of July Charcuterie Board that showcases the best of summer’s flavors.

Serving Suggestions

To serve your charcuterie board, simply place it on a large table or picnic blanket and let your guests dig in! Pair it with some festive beverages like refreshing lemonade, sparkling water, or perhaps a nice glass of rosé! Encourage everyone to mix and match flavors; there’s no wrong way to enjoy this platter. And remember—sharing is caring!

Recipe Variations

Looking to switch it up? Here are a few creative twists, flavor options, and dietary swaps for your charcuterie board:

  1. Mediterranean Twist:
    Swap out the mozzarella and ham for some feta cheese and prosciutto. Add some hummus for dipping, and serve alongside pita!

  2. Spicy Kick:
    Add jalapeño-flavored cheeses or spicy salami for those who like a little heat!

  3. All-Vegan Version:
    Replace all meats and cheeses with plant-based alternatives like cashew cheese and roasted veggies. Load up on different nuts and seeds too!

  4. Tropical Mix:
    Incorporate tropical fruits like mango, pineapple, and kiwi—perfect for a summer fiesta!

  5. Dessert Board:
    Swap out the savory elements with chocolate-covered pretzels, mini cupcakes, and a selection of your favorite cookies!

Chef’s Notes

Creating a themed charcuterie board is one of my favorite ways to celebrate special occasions. It’s so rewarding to watch my friends and family gather around it, creating their pairings! Over the years, I’ve learned that what’s important is to use quality ingredients you love—don’t feel pressured to stick to any strict rules.

Make it your own! Trust me; your guests will appreciate the effort, and you’ll have some fun connecting over food!

FAQs and Troubleshooting

1. Can I prepare the charcuterie board in advance?
Absolutely! You can prep all the ingredients a few hours ahead of time. Just cover the board tightly with plastic wrap to keep things fresh and vibrant.

2. What if I don’t have a large enough board?
No problem! Use multiple smaller boards or even large plates to spread everything out. A bit of creativity goes a long way!

3. How do I keep fruit from browning?
To keep things looking fresh, toss your apple slices or any fruit that browns quickly in lemon juice or a little sparkling water just before serving.

4. Can I use leftover ingredients?
Of course! This is a fantastic way to use up leftover cheese, meat, or even veggies lurking in your fridge. Don’t let good food go to waste—let your inner chef shine!

Nutritional Info

While these ingredients can vary, a typical serving of this charcuterie board includes a delightful balance of protein, healthy fats, and carbohydrates, making it not just delicious but also quite satisfying!


And there you have it—a cheerful, mouth-watering 4th of July Charcuterie Board that’s sure to become a staple at your summer gatherings! Remember, the focus here is on fun, flavor, and creating connections. Here’s to delicious food that brings us all together! Enjoy and celebrate with love, laughter, and of course, plenty of yummy bites!

Print

4th of July Charcuterie Board

Celebrate Independence Day with a vibrant and delicious charcuterie board that showcases festive red, white, and blue ingredients. Perfect for summer gatherings!

  • Prep Time: 30 minutes
  • Cook Time: 0 minutes
  • Total Time: 30 minutes
  • Yield: 8 servings 1x
  • Category: Appetizer
  • Method: No-Cook
  • Cuisine: American
  • Diet: Vegetarian

Ingredients

Scale
  • 1 cup white cheddar cheese (cubed)
  • 1/2 cup mozzarella string cheese sticks (shredded)
  • 1/2 cup Bruschette mini toasts
  • 1 cup cherry tomatoes
  • 1/2 cup red radish (sliced)
  • 1/2 cup pitted black olives (drained)
  • 1/2 cup red cabbage (sliced)
  • 8 slices ham
  • 7 Swiss cheese slices (cut into stars)
  • 1 cup blueberries
  • 1 cup strawberries
  • 1 cup blackberries
  • 1 cup cherries
  • 3 plums (sliced)
  • 1/4 watermelon (sliced)
  • 5 tortillas (toasted, cut into stars)

Instructions

  1. Choose your board: Grab your favorite serving platter or wooden board.
  2. Start with the cheese: Place your cubed white cheddar in a cluster on one end of the board.
  3. Add the meat: Lay out your slices of ham next to the cheese.
  4. Incorporate the veggies: Scatter your sliced radishes and cherry tomatoes around the board.
  5. Layer on the fun shapes: Get those star-shaped Swiss cheese pieces on the board.
  6. Introduce the crunch: Place the Bruschette mini toasts around the edges.
  7. Fruity burst of flavor: Create clusters of blueberries, strawberries, blackberries, cherries, and sliced plums.
  8. Watermelon wonder: Squeeze in the watermelon slices.
  9. Finishing touches: Fill in any empty gaps with olives and toasted tortillas.

Notes

Prep ingredients a few hours ahead of time and cover tightly to keep fresh. Use quality ingredients you love for the best results.

Nutrition

  • Serving Size: 1 serving
  • Calories: 450
  • Sugar: 18g
  • Sodium: 700mg
  • Fat: 28g
  • Saturated Fat: 10g
  • Unsaturated Fat: 12g
  • Trans Fat: 0g
  • Carbohydrates: 35g
  • Fiber: 5g
  • Protein: 15g
  • Cholesterol: 45mg

Keywords: 4th of July, charcuterie board, summer party, appetizer, festive food
Did you make this recipe?

Share a photo and tag us — we can't wait to see what you've made!

June 18, 2026 |

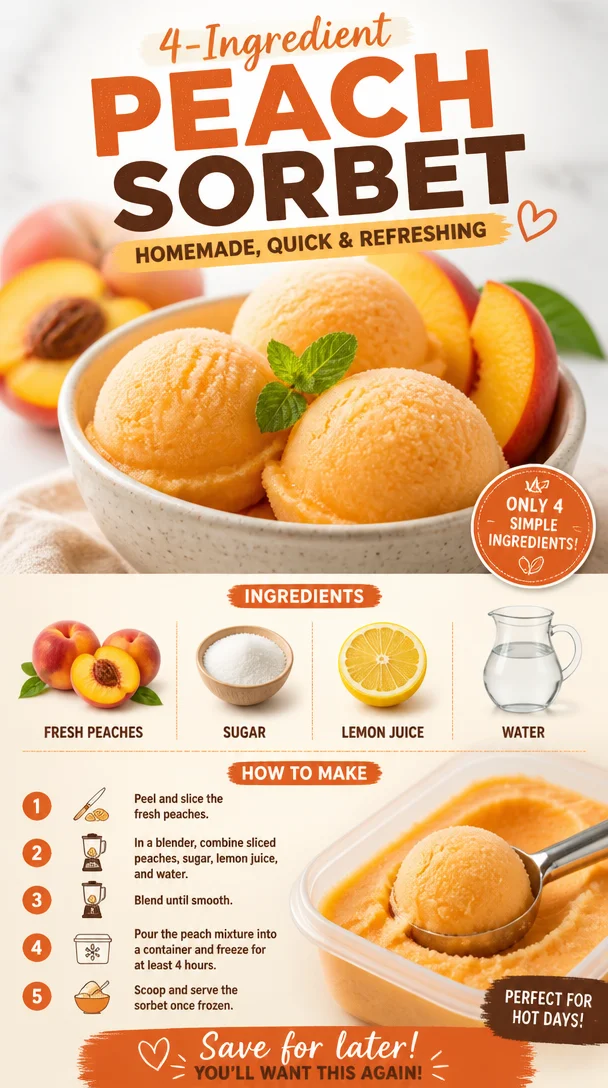
Ingredient Peach Sorbet: Homemade, Quick & Refreshing

Homemade peach sorbet in a bowl with fresh peaches, a refreshing dessert option.

Homemade Peach Sorbet: A Sweet Summer Delight

Ah, summer—the season that brings longer days, sunshine, and delectable fruits ripe for the picking! Among the treasure trove of summer produce, juicy peaches reign supreme for me. Whether you bite into one fresh off the tree, toss them on the grill, or let them shine in a stunning dessert, peaches have a way of stealing the spotlight and warming your heart. Today, I’m thrilled to share a recipe that’s not only refreshing but also incredibly easy to make: homemade peach sorbet.

Picture this: it’s a warm afternoon, your friends are gathered, laughter fills the air, and the sun casts a golden glow all around. You casually stroll into the kitchen, emerge with a bowl of lusciously smooth peach sorbet, and serve it up with a flourish. That’s how you become the star of your own summer soirée! This sorbet is creamy, vibrant, and makes for a perfect way to cool down, but it’s also a celebration of summer flavors that anyone can whip up. So let’s dive into how to create this simple and delightful treat together!

Personal Story

Growing up, summer vacations at my grandparents’ farm were the highlight of my childhood. Their backyard was filled with fruit trees, but none captured my heart quite like the peach tree. I remember the thrill of waking up to fresh peach cobbler baking in the oven. My grandmother would often take me to the orchard, and we would pick the ripest, sun-kissed peaches until our arms were loaded. Later, we’d sit on the porch, peach juice running down our arms, savoring every juicy bite as we shared stories.

One sunny afternoon, my grandma decided we’d make her famous peach sorbet—this delightful recipe was a cherished tradition passed down through generations. I can still taste its creamy sweetness and hear her soft laughter as we struggled to keep it from melting before we could scoop it into our bowls. Fast forward to today, and every time I make this peach sorbet, I’m transported back to that porch and those precious summer moments. It’s not just a dessert; it’s a slice of nostalgia wrapped in peachy goodness.

Ingredients

Here’s what you’ll need to make this delightful peach sorbet:

  • Fresh Peaches: The star of the show! Choose ripe, fragrant peaches that yield slightly when pressed. If you can’t find peaches, nectarines work beautifully as a substitute!

  • Sugar: This brings out the natural sweetness of the peaches. You can adjust the quantity—use more if your peaches are tart or less if they are super sweet. For a healthier option, try using honey or agave syrup.

  • Lemon Juice: A splash of acidity brightens up the flavors and balances the sweetness. Fresh lemon juice is ideal, but bottled juice will work well too. You can swap this for lime juice if you’re feeling adventurous!

  • Water: This helps to blend everything smoothly and creates the right texture. If you want a more intense peach flavor, consider replacing some water with peach juice.

Step-by-Step Instructions

  1. Prep Your Peaches: Start by washing your fresh peaches thoroughly. Slice them in half, remove the pits, and chop them into smaller chunks. Pro tip: If you find peeling peaches tricky, blanch them in boiling water for 30 seconds and then plunge them into ice water; the skins will slide off easily!

  2. Blend the Ingredients: Toss the chopped peaches into a blender or food processor along with 1 cup of sugar, 2 tablespoons of fresh lemon juice, and ½ cup of water. Blend until you achieve a smooth, silky consistency. Taste it—add more sugar or lemon juice according to your preference!

  3. Chill the Mixture: Pour the peach mixture into a shallow dish and cover it tightly with plastic wrap or a lid. Place it in the freezer for about 2-3 hours, or until it’s firm but still slightly soft. This prevents ice crystals from forming and helps achieve a creamy texture.

  4. Churn It: Once the mixture is nicely chilled, it’s time to churn! For this, I recommend using an ice cream maker (if you have one!). Pour the mixture into the machine and churn for about 20-25 minutes until it’s creamy and fluffy. In case you don’t have an ice cream maker, no worries! Just keep stirring the mixture every 30 minutes to break up the ice crystals as it freezes.

  5. Final Freeze: Transfer the churned sorbet into an airtight container and let it freeze for another 1-2 hours. This final step is key for achieving that perfect scoopable texture!

  6. Serve: Once your sorbet is ready, scoop it into bowls and garnish with fresh mint sprigs, slices of peaches, or a drizzle of honey. Take a moment to admire the vibrant color before diving in!

Serving Suggestions

For a sun-kissed summer treat, serve this peach sorbet in a chilled bowl or elegant dessert glass. You can also pair it with a dollop of whipped cream for extra indulgence or serve it alongside a slice of almond cake for a delightful contrast of flavors and textures.

Recipe Variations

  • Berry Bliss: Add a handful of strawberries or raspberries to the peach mixture for a berry-infused sorbet with a tangy twist.

  • Tropical Vibes: Mix in some diced mango or pineapple for a tropical flair that brings the beach to your backyard.

  • Herbal Infusion: Try adding a sprig of basil or mint while blending for a refreshing herbal note that elevates the flavor.

  • Coconut Love: Substitute coconut water for part of the regular water to create a tropical, creamy sorbet.

Chef’s Notes

Creating this peach sorbet has been a culinary journey for me! I began with my grandmother’s classic recipe, but over the years, I’ve played around with different fruits and flavors, discovering a world of endless possibilities. I’ll never forget the time I accidentally added jalapeños while trying a spicy version for a summer barbecue—it was an unexpected hit! Remember, cooking is about experimenting and having fun. Don’t be afraid to adjust the ingredients to fit your taste or dietary needs.

FAQs and Troubleshooting

Q: What if my sorbet turns out icy?
A: This is often due to having too much water or not churning it enough. If it’s icy, let it sit at room temperature for about 10-15 minutes before serving to soften it up!

Q: Can I use frozen peaches instead of fresh?
A: Absolutely! Just make sure they’re thawed and drained of excess liquid before blending. Frozen peaches can be a convenient option if fresh ones aren’t available.

Q: How long will the peach sorbet last in the freezer?
A: It can last about 2-3 weeks in an airtight container. To maintain the best texture, be sure to seal it tightly.

Q: Can I skip the sugar?
A: While this will reduce the sweetness, you can definitely adjust or replace it with a natural sweetener. Just taste as you go to find the right balance!

Nutritional Info

While I won’t bore you with numbers, know that this peach sorbet is a fantastic way to indulge in a guilt-free treat. Each scoop is packed with vitamins, antioxidants, and the wonderful natural flavors of peaches, making it the perfect summer dessert.

So there you have it—your guide to creating a refreshing homemade peach sorbet that’s bursting with flavor and memories! Gather those sun-kissed peaches, invite some friends over, and let this sorbet be the star of your summer parties. Happy cooking, and even happier eating! 🍑✨

Print

Homemade Peach Sorbet

A refreshing homemade peach sorbet that’s creamy, vibrant, and perfect for summer gatherings.

  • Prep Time: 15 minutes
  • Cook Time: 0 minutes
  • Total Time: 180 minutes
  • Yield: 4 servings 1x
  • Category: Dessert
  • Method: Freezing
  • Cuisine: American
  • Diet: Vegetarian

Ingredients

Scale
  • 4 cups ripe peaches, chopped
  • 1 cup sugar (adjust to taste)
  • 2 tablespoons fresh lemon juice
  • ½ cup water

Instructions

  1. Prep your peaches: Wash, slice, and chop peaches; blanch if needed.
  2. Blend the ingredients: Combine peaches, sugar, lemon juice, and water in a blender.
  3. Chill the mixture: Freeze the blended mixture for 2-3 hours.
  4. Churn it: Use an ice cream maker or stir every 30 minutes if not available.
  5. Final freeze: Store in an airtight container for 1-2 hours.
  6. Serve: Scoop and garnish with mint or peach slices.

Notes

Adjust sugar based on peach ripeness. Serve in chilled bowls for best presentation.

Nutrition

  • Serving Size: 1 serving
  • Calories: 150
  • Sugar: 25g
  • Sodium: 1mg
  • Fat: 0g
  • Saturated Fat: 0g
  • Unsaturated Fat: 0g
  • Trans Fat: 0g
  • Carbohydrates: 38g
  • Fiber: 2g
  • Protein: 1g
  • Cholesterol: 0mg

Keywords: peach sorbet, summer dessert, frozen treat, vegetarian dessert

Did you make this recipe?

Share a photo and tag us — we can't wait to see what you've made!

June 18, 2026 |

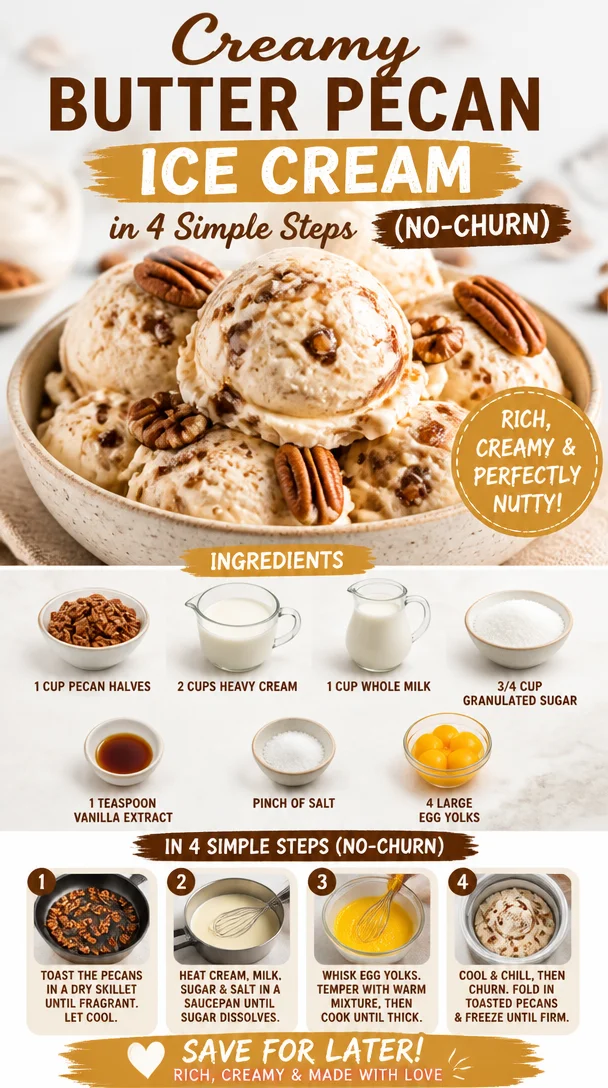
Creamy Butter Pecan Ice Cream in 4 Simple Steps (No-Churn)

Delicious no-churn creamy butter pecan ice cream served in a bowl.

Indulge in Homemade Butter Pecan Ice Cream: A Sweet Escape

Ah, ice cream. Is there anything more comforting than a scoop of this frozen delight on a hot summer day or maybe even a cozy winter night? Today, we’re diving into one of my all-time favorite flavors: Butter Pecan Ice Cream. It’s rich, creamy, and has just the right amount of crunch from the toasty pecans. But more than that, it holds a special place in my heart—and I can’t wait to share that with you!

Picture this: a sunny afternoon, the kind where the air is warm, and laughter resonates from the backyard. My mom would whisk me and my siblings away to the tiny local ice cream shop that housed every flavor imaginable. But there was one treat that stood out every single time—Butter Pecan. It was this magical combo of sweet cream and those slightly salty, toasted nuts that had me coming back for more. Those bites always felt like a little hug, comforting and familiar. It became a tradition, one that I carried into adulthood, and I found the joy of replicating that sweet treat at home.

Fast forward to today, and every scoop I make brings back those cherished memories. Making ice cream at home is more than just a kitchen project—it’s an experience. You get to control the quality of ingredients, the sweetness, and, most importantly, you can add a dash of love! Are you ready to transform your kitchen into a mini ice cream parlor? Let’s jump in!

Ingredients

Gather these ingredients for your homemade Butter Pecan Ice Cream, and feel free to get creative with substitutions:

  • 1 cup pecan halves: The star of the show! These nuts provide a rich flavor and satisfying crunch. If you can’t find pecans, walnuts or almonds can be a good alternative, but they’ll change the flavor profile slightly.

  • 2 cups heavy cream: For that luxurious creaminess we all adore in ice cream. You can substitute half-and-half if you’re looking for something lighter, but the texture won’t be quite as rich.

  • 1 cup whole milk: This adds a nice body to the ice cream. Skim milk will work if you want to cut calories, but the ice cream will be less creamy.

  • 3/4 cup granulated sugar: Essential for sweetness! If you’re watching your sugar intake, you can opt for coconut sugar or even a sugar substitute like erythritol or Stevia (but follow the substituting guidelines as they can be much sweeter).

  • 1 teaspoon vanilla extract: Pure vanilla extract elevates the flavor. If you’re in a pinch, vanilla bean paste or even imitation vanilla in small quantities will do.

  • Pinch of salt: Salt is great for balancing out the sweetness and enhancing flavors.

  • 4 large egg yolks: These are crucial for creating a custard base that leads to a creamy texture. If you’re looking for an egg-free version, you can explore avocado-based or coconut-based ice creams, but the texture will be different.

Now that we have our ingredients ready, let’s embark on this delicious journey!

Step-by-Step Instructions

  1. Toasted Pecans: Start by toasting your pecan halves. In a dry skillet over medium heat, add the pecans and stir often until they’re golden brown and fragrant, about 5-7 minutes. Keep an eye on them—nuts can go from perfectly toasted to burnt in the blink of an eye. This step really brings out their lovely flavor!

  2. Making the Cream Base: In a medium saucepan, combine the heavy cream and whole milk. Heat the mixture over medium heat until it begins to steam, but don’t let it boil. This is where the magic begins! Heating helps to mix the flavors beautifully.

  3. Mixing the Sugar and Egg Yolks: In a bowl, whisk together the granulated sugar, egg yolks, and a pinch of salt until it’s pale and thick. This step is crucial; it forms the custard base.

  4. Tempering the Eggs: Once your cream and milk are hot, you’ll want to temper the egg mixture. Gradually add about half of the hot cream mixture to the egg yolks, whisking constantly. This prevents the eggs from scrambling. Then slowly whisk this back into the saucepan with the cream mixture.

  5. Thickening the Base: Continue to cook this new mixture over medium heat, stirring often, until it thickens enough to coat the back of a spoon (this will take about 8-10 minutes). You’re looking for a custard-like consistency. If you’re ever unsure, use a thermometer—around 170°F is your magic number!

  6. Cooling the Base: Once thickened, remove the saucepan from the heat and stir in the vanilla extract. Let it cool at room temperature for about 15-20 minutes and then refrigerate it until completely chilled, ideally 4 hours or overnight.

  7. Churning Time: Pour the cooled mixture into your ice cream maker and churn according to the manufacturer’s instructions. This typically takes 20-25 minutes. If you don’t have an ice cream maker, you can put the mixture in a shallow dish, freeze it, and stir every 30 minutes to break up ice crystals!

  8. Add the Pecans: In the last few minutes of churning, add in your toasted pecans, mixing them in so they’re evenly distributed throughout the ice cream.

  9. Freezing: Transfer your ice cream to an airtight container and freeze for at least 4 hours, or until it’s firm.

And voila! You’ve just made rich and creamy Butter Pecan Ice Cream from scratch!

Serving Suggestions

When it comes to serving your homemade ice cream, the options are endless! Scoop generous servings into beautiful bowls or cone holders, and if you want to treat yourself or impress guests, drizzle some warm caramel sauce over the top. You can also sprinkle additional toasted pecans for that extra crunch. Not only does this look stunning, but it adds wonderful texture!

Recipe Variations

  1. Maple Butter Pecan: Swap out the sugar for maple syrup for a delightful twist that adds depth and a hint of autumn flavor.

  2. Chocolate Swirl: Add swirls of chocolate ganache as the ice cream is churning for a decadent take on this classic.

  3. Spiced Version: Spice things up a bit! Incorporate a dash of cinnamon or nutmeg into the cream base for a warm, cozy flavor.

  4. Nut-Free Alternative: Try adding cookie crumbles (like gluten-free Oreos) instead of nuts for a completely different texture and flavor.

Chef’s Notes

Butter Pecan Ice Cream has always been a work in progress for me. My first attempts were more of a frozen pudding—delicious, but not quite right. With time (and perhaps a few too many failed batches), I learned the importance of balancing flavors and achieving that perfect creamy texture. And the beauty of making ice cream at home: you can always customize it to your taste!

One of my fondest memories making this ice cream was when I decided to host a cooking party with friends. We all took turns churning and taste-testing different flavors. It turned into a fun competition, and I’ll never forget the look on my friend’s face when he tried my Butter Pecan—and promptly declared it the best he’d ever tasted!

FAQs and Troubleshooting

  1. Why did my ice cream come out icy?

    • This can happen if there’s too much water in your mixture or it was not churned long enough. Be sure to cook your base adequately and follow churn times.
  2. Can I skip the egg yolks?

    • Yes! While the egg yolks create that rich custard base, you can make a simple version using just cream, milk, sugar, and vanilla. It’ll still taste great!
  3. What if my ice cream is too soft?

    • It might need more time in the freezer. If it’s too soft when you transfer it, let it harden for a few hours, and it should set up nicely.
  4. Can I make this dairy-free?

    • Absolutely! Substitute coconut cream for the heavy cream and almond milk for the whole milk. You may need to tweak the sweetness, but it can work beautifully!

Nutritional Info

While I believe that ice cream is meant to be enjoyed in moderation and made with love, here’s a quick note on the nutritional aspect (per serving):

  • Calories: Around 250-300 (depending on serving size)
  • Fat: Approximately 20g (mostly from cream and eggs)
  • Sugar: About 20g
  • Protein: 4g

Each playful spoonful of this Butter Pecan Ice Cream promises deliciousness, warm memories, and the kind of satisfaction to make your taste buds dance! So gather your ingredients, roll up your sleeves, and let’s whip up this delightful treat together. You won’t just be making ice cream; you’ll be crafting sweet memories one scoop at a time! 🍦

Print

Homemade Butter Pecan Ice Cream

Indulge in rich and creamy Butter Pecan Ice Cream with a satisfying crunch from toasted pecans, a delightful treat for any occasion.

  • Prep Time: 20 minutes
  • Cook Time: 20 minutes
  • Total Time: 240 minutes
  • Yield: 8 servings 1x
  • Category: Dessert
  • Method: Freezing
  • Cuisine: American
  • Diet: Vegetarian

Ingredients

Scale
  • 1 cup pecan halves
  • 2 cups heavy cream
  • 1 cup whole milk
  • 3/4 cup granulated sugar
  • 1 teaspoon vanilla extract
  • Pinch of salt
  • 4 large egg yolks

Instructions

  1. Toast the pecans in a dry skillet over medium heat for 5-7 minutes.
  2. Combine heavy cream and whole milk in a saucepan and heat until steaming.
  3. Whisk together granulated sugar, egg yolks, and salt until pale and thick.
  4. Temper the egg mixture by gradually adding hot cream while whisking.
  5. Cook the mixture over medium heat until thickened, about 8-10 minutes.
  6. Remove from heat and stir in vanilla extract. Cool for 15-20 minutes.
  7. Churn the cooled mixture in an ice cream maker for 20-25 minutes.
  8. Add toasted pecans in the last few minutes of churning.
  9. Freeze in an airtight container for at least 4 hours before serving.

Notes

For variations, try swapping sugar for maple syrup or adding chocolate ganache swirls.

Nutrition

  • Serving Size: 1 serving
  • Calories: 300
  • Sugar: 20g
  • Sodium: 75mg
  • Fat: 20g
  • Saturated Fat: 12g
  • Unsaturated Fat: 6g
  • Trans Fat: 0g
  • Carbohydrates: 24g
  • Fiber: 1g
  • Protein: 4g
  • Cholesterol: 100mg

Keywords: ice cream, dessert, butter pecan, homemade ice cream, summer treat

Did you make this recipe?

Share a photo and tag us — we can't wait to see what you've made!

June 18, 2026 |

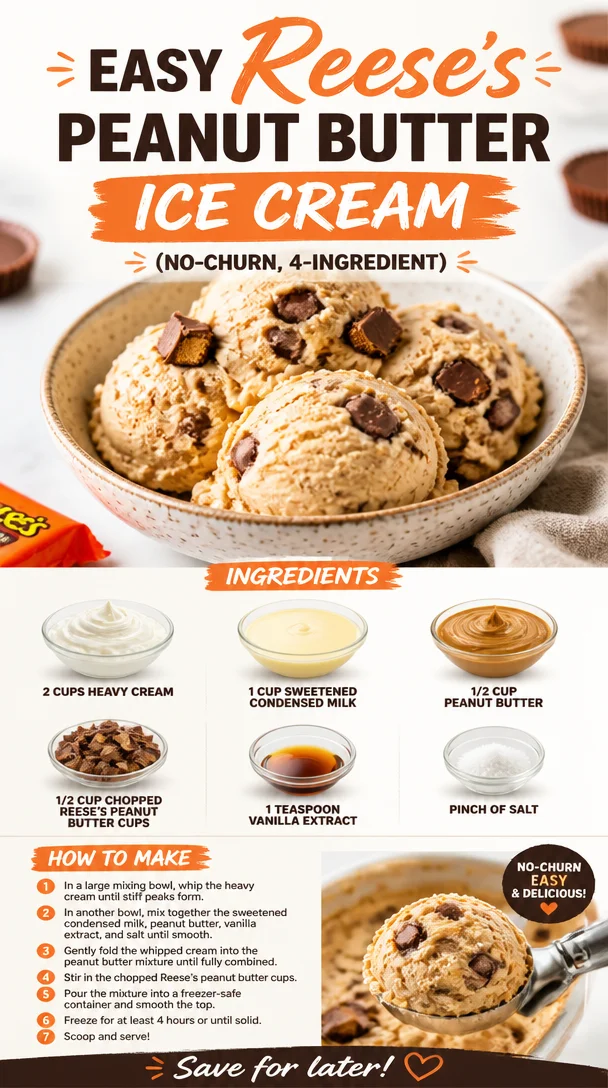
Easy Reese’s Peanut Butter Ice Cream (No-Churn, 4-Ingredient)

Creamy Reese's Peanut Butter Ice Cream made with 4 simple ingredients.

Indulge in the Decadence of Homemade Reese’s Peanut Butter Ice Cream

Hey there, fellow food lovers! Ava here, and today I’m incredibly excited to share a recipe that combines two of America’s favorite indulgences: ice cream and peanut butter cups! If you’ve ever found yourself daydreaming about a creamy, dreamy dessert that echoes your childhood, look no further. Today, we’re making Reese’s Peanut Butter Ice Cream, a treat that’s as delightful as it sounds and totally worth the brain freeze!

A Moment of Nostalgia

Before we dive into the creamy goodness of this recipe, let me take you back to one of those hot summer days from my childhood. Picture this: the sun is blazing, and the air is thick with the chatter of kids playing outside. It was the perfect day for ice cream, and my friends and I would race down to the local ice cream shop, the one with the huge colorful sign that read “Scoops of Joy.” My favorite? The peanut butter cup flavor!

I remember the thrill of anticipation as I watched the ice cream being scooped, my mouth watering with excitement. Each scoop was a swirl of creamy, peanut buttery heaven, dotted with chunks of chocolatey, crunchy Reese’s cups. I’d savor every spoonful, completely oblivious to the drippy chaos that was happening all around me. That first bite would always take me back to how simple things could be when you followed your cravings and shared good food with great friends.

Creating my own version of that nostalgic ice cream treat was inevitable. Fast forward to today, and I’m sharing my ultimate Reese’s Peanut Butter Ice Cream recipe that captures all those childhood flavors. Get ready to scoop up some happiness!

Ingredients You’ll Need

Let’s gather the stars of our show! Here’s what you’ll need for this luscious homemade ice cream:

  • 2 cups heavy cream: The magic ingredient! This will provide a rich, creamy base. If you’re looking for a lighter option, you can substitute with coconut cream for a dairy-free version.

  • 1 cup sweetened condensed milk: This adds sweetness and creaminess. If you want a less sugary alternative, you could try evaporated milk, though the texture will be slightly different.

  • 1/2 cup peanut butter: The creamy dream that binds the flavor! Use any brand you love—or even homemade peanut butter if you’re feeling adventurous. For a twist, try crunchy peanut butter for added texture.

  • 1/2 cup chopped Reese’s peanut butter cups: The true stars! You can use mini or regular-sized cups. If you’re in the mood to mix it up, try swapping these for any other chocolate candy you adore.

  • 1 teaspoon vanilla extract: This enhances the flavor profile. Pure vanilla is recommended for the best taste, but imitation will work too in a pinch.

  • Pinch of salt: A little salt elevates the flavors—don’t skip it! If you’re feeling cheeky, add a touch of sea salt just before serving for a delightful salty-sweet contrast.

Step-by-Step Instructions

Ready to whip up this creamy goodness? Let’s make some ice cream magic!

  1. Whip the Cream: In a large bowl, use an electric mixer to whip the heavy cream until stiff peaks form. This usually takes about 3-5 minutes. Remember to start at a lower speed to avoid a whipped cream explosion!

  2. Mix the Base: In a separate bowl, combine the sweetened condensed milk, peanut butter, vanilla extract, and a pinch of salt. Use a whisk to blend everything until smooth. Make sure the peanut butter is well incorporated—no lumps allowed!

  3. Fold It Together: With a spatula, gently fold the whipped cream mixture into the peanut butter blend. You want the mixture to stay airy and light, so use a gentle folding motion. Be patient and take your time—it’ll be worth it!

  4. Add the Chunks: Once the base is mixed, fold in the chopped Reese’s peanut butter cups. This is where the magic really happens! Incorporate them evenly throughout the mixture for those delightful bursts of chocolate and peanut butter bliss.

  5. Chill and Freeze: Transfer the mixture into an airtight container. Smooth the top with your spatula, cover with a lid, and put it in the freezer. You’ll want to let it freeze for at least 6 hours—overnight is even better if you can wait that long!

Serving Suggestions

When you’re ready to serve, scoop out generous portions of your Reese’s Peanut Butter Ice Cream into bowls or cones. Drizzle a little extra peanut butter on top for that gourmet touch, and don’t forget to sprinkle more chopped Reese’s cups or even some crushed nuts if you like! Serve with a big smile and enjoy every moment of indulgence.

Recipe Variations

Want to switch things up? Here are a few fun variations to try:

  1. Chocolate Peanut Butter Swirl: Add a swirl of chocolate fudge sauce into the ice cream before freezing for extra chocolatey goodness.

  2. Banana Base: Replace half of the peanut butter with mashed bananas for a creamy, fruity twist.

  3. Dairy-Free Delight: Use coconut cream and coconut milk instead of dairy for a vegan-friendly treat—just make sure to use dairy-free candies!

  4. Crunchy Topping: Add some crushed pretzels or nuts to the mix for an unexpected crunch that will take your ice cream to the next level.

  5. Chocolate Chips: Swap out some Reese’s cups with chocolate chips or even mini marshmallows for a unique flavor combo.

Chef’s Notes

I’ve been at this ice cream game for a while now, and let me tell you, each batch is a little labor of love. One funny thing that happened during my early attempts was when I accidentally switched the sweetened condensed milk with canned pumpkin. Let’s just say, “Pumpkin Spice Peanut Butter Ice Cream” was a hard sell! But hey, every mishap in the kitchen is an opportunity for creativity, right? Over the years, this recipe has evolved to capture the essence of that local ice cream shop, and every time I scoop a bowl, it brings me back to simpler times and sweeter memories.

FAQs and Troubleshooting

1. Why is my ice cream not freezing properly?
This could be due to not mixing the ingredients thoroughly. Make sure the heavy cream is whipped to stiff peaks before folding into the mixture. Also, ensure your freezer is set to a proper freezing temperature.

2. Can I use natural peanut butter?
Yes! Just keep in mind that natural peanut butter tends to be more runny. You may want to blend in a bit of powdered sugar to achieve a thicker consistency.

3. How do I store leftovers?
Keep any leftover ice cream in an airtight container with a layer of parchment paper on top to prevent ice crystals from forming.

4. Can I churn this in an ice cream maker?
Absolutely! If you have an ice cream maker, follow the manufacturer’s instructions. Just pour your mixture into the churner instead of freezing it directly in the container.

Nutritional Info

While this recipe is meant for indulgence rather than calorie counting, a typical serving contains approximately:

  • Calories: 300 per scoop
  • Total Fat: 24g
  • Saturated Fat: 12g
  • Sugar: 20g
  • Protein: 5g

Feel free to adjust portion sizes based on your treat levels because life is too short not to enjoy ice cream!


So there you have it, my amazing friends! A recipe bursting with nostalgia, flavor, and oh-so-creamy goodness! Whether you’re enjoying it after dinner, on a hot summer’s day, or just because—it’s all about pleasure in every scoop. Happy making, and may your kitchen adventures be as tasty as your dreams! Let’s scoop it up!

Print

Reese’s Peanut Butter Ice Cream

A creamy, dreamy homemade ice cream that combines the rich flavors of peanut butter and Reese’s cups, capturing childhood memories.

  • Prep Time: 15 minutes
  • Cook Time: 0 minutes
  • Total Time: 360 minutes
  • Yield: 6 servings 1x
  • Category: Dessert
  • Method: No-churn
  • Cuisine: American
  • Diet: Vegetarian

Ingredients

Scale
  • 2 cups heavy cream
  • 1 cup sweetened condensed milk
  • 1/2 cup peanut butter
  • 1/2 cup chopped Reese’s peanut butter cups
  • 1 teaspoon vanilla extract
  • Pinch of salt

Instructions

  1. Whip the cream: In a large bowl, use an electric mixer to whip the heavy cream until stiff peaks form, about 3-5 minutes.
  2. Mix the base: In a separate bowl, combine the sweetened condensed milk, peanut butter, vanilla extract, and pinch of salt. Whisk until smooth.
  3. Fold it together: Gently fold the whipped cream into the peanut butter mixture until airy.
  4. Add the chunks: Fold in the chopped Reese’s peanut butter cups evenly throughout the mixture.
  5. Chill and freeze: Transfer to an airtight container, smooth the top, cover, and let freeze for at least 6 hours or overnight.

Notes

For serving, drizzle extra peanut butter on top and sprinkle with additional chopped Reese’s cups or crushed nuts. Feel free to experiment with different variations!

Nutrition

  • Serving Size: 1 serving
  • Calories: 350
  • Sugar: 20g
  • Sodium: 150mg
  • Fat: 24g
  • Saturated Fat: 12g
  • Unsaturated Fat: 8g
  • Trans Fat: 0g
  • Carbohydrates: 36g
  • Fiber: 1g
  • Protein: 5g
  • Cholesterol: 70mg

Keywords: ice cream, peanut butter, dessert, homemade, Reese's, childhood memories

Did you make this recipe?

Share a photo and tag us — we can't wait to see what you've made!

June 18, 2026 |

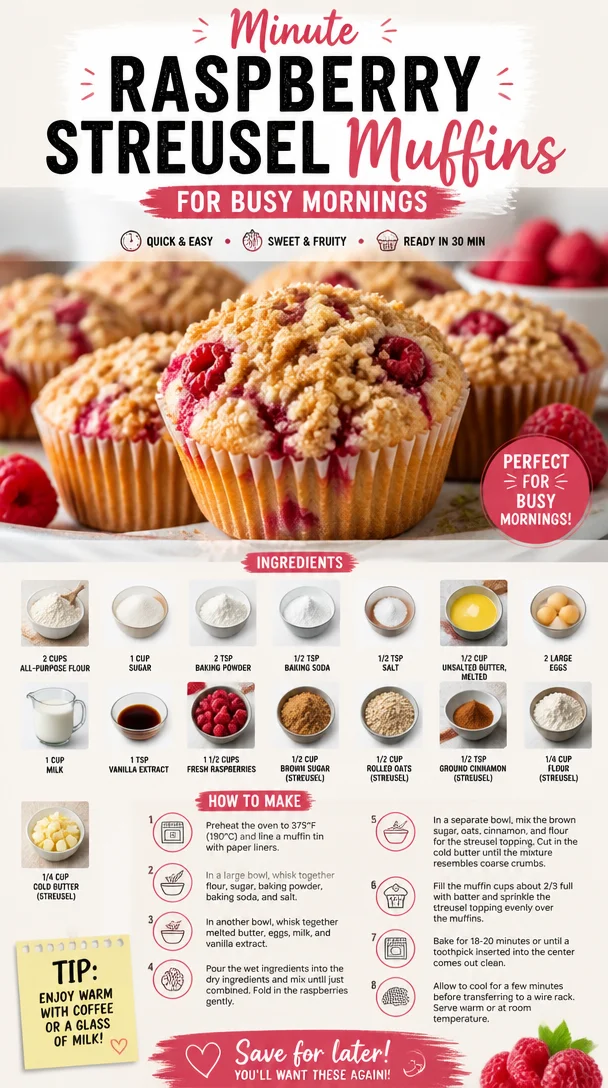
Minute Raspberry Streusel Muffins for Busy Mornings

Freshly baked minute raspberry streusel muffins on a kitchen table

Raspberry Streusel Muffins: A Berry Delicious Journey

Welcome to a sweet little corner of the kitchen where fresh berries and buttery goodness come together in the form of fluffy raspberry streusel muffins! If your mornings call for a delightfully sweet pick-me-up that doesn’t compromise on flavor or that scrumptious homemade charm, you’ve landed in just the right spot. As we dive into this recipe, let me take you on a journey filled with nostalgia, a sprinkle of culinary wisdom, and the joy of baking—because who doesn’t love starting their day with a berry-licious treat?

A Sweet Memory

Growing up, the scent of freshly baked goods wafting through the house was a signal that something magical was happening in the kitchen. My mom was the queen of muffins, and Saturday mornings were our little tradition. She’d pull out her trusty mixing bowl, and soon the kitchen would fill with laughter and the comforting aroma of baked delights. One of my personal favorites? You guessed it—raspberry muffins! I remember sitting at the kitchen table, my finger poised for the very first taste, while she lovingly sprinkled the streusel topping, her secret weapon for that perfect crumbly finish.

Fast forward to today, and every time I whip up a batch of these raspberry streusel muffins, I’m transported back to those carefree weekends filled with love and laughter. This recipe is not just about creating something delicious; it’s about evoking those cherished memories and sharing that warmth with all of you. So, grab your apron, and let’s make some magic in the kitchen!

Ingredients

  • 2 cups all-purpose flour: This forms the base of our muffins. Feel free to substitute with whole wheat flour for a heartier texture or a gluten-free blend if you’re avoiding gluten.

  • 1 cup sugar: Sweetness is key for our muffins! You can use coconut sugar or a sugar substitute if you’re looking to cut back on refined sugars.

  • 2 teaspoons baking powder: This is our rising agent; it gives muffins their fluffy texture. Just make sure it’s fresh for the best results!

  • 1/2 teaspoon baking soda: Works alongside the baking powder to help the muffins rise nicely.

  • 1/2 teaspoon salt: A crucial balance to enhance the sweetness without being overpowering.

  • 1/2 cup unsalted butter, melted: This provides richness and moisture. If you prefer a dairy-free option, melted coconut oil works wonderfully.

  • 2 large eggs: Essential for binding the ingredients together and enriching the flavor. Chia eggs are an easy vegan substitute for a similar effect.

  • 1 cup milk: Whole milk adds creaminess, but almond milk or oat milk are fantastic alternatives for a lighter twist.

  • 1 teaspoon vanilla extract: The secret ingredient that brings warmth and enhances the flavor of the muffins.

  • 1 1/2 cups fresh raspberries: The star of the show! Fresh is best for that burst of berry flavor, though frozen raspberries can also work in a pinch—just allow them to defrost first.

  • For the Streusel Topping:

    • 1/2 cup brown sugar: This creates that deliciously sweet, caramel-like finish.
    • 1/2 cup rolled oats: Provides texture and a wholesome feel to the crumb topping. Quick oats can be used, too.
    • 1/2 teaspoon ground cinnamon: Adds a lovely warmth; feel free to adjust this based on how spicy you like it!
    • 1/4 cup flour: Helps bind the streusel together without turning it into pudding.
    • 1/4 cup cold butter: Cold butter is key here for that crumbly streusel texture; you can use a vegan butter substitute if desired.

Step-by-Step Instructions

  1. Preheat Your Oven to 375°F (190°C): That’s right! This is your essential first step. Preheating ensures an evenly baked muffin from the moment you place them in the oven.

  2. Prep Your Muffin Tin: Line a standard muffin tin with paper liners or give it a generous spritz of non-stick spray. Don’t skip this step; nobody wants to be scraping muffins out of the tin on a Sunday morning!

  3. Mix Dry Ingredients: In a large mixing bowl, whisk together the flour, sugar, baking powder, baking soda, and salt until combined. This step ensures every muffin is evenly flavored—no lumps allowed!

  4. Combine Wet Ingredients: In another bowl, mix the melted butter, eggs, milk, and vanilla extract. Whisk until smooth and creamy. You want a unified mixture that sings with sweet vanilla notes.

  5. Combine the Mixtures: Pour the wet ingredients into the dry ingredients, gently folding them together. This is where the magic happens! Mix until just combined—over-mixing can lead to dense muffins, and we want fluffy delights!

  6. Add the Raspberries: Gently fold in the fresh raspberries. Take care not to crush them; we want those gorgeous berry bursts intact!

  7. Prepare the Streusel Topping: In a small bowl, combine the brown sugar, rolled oats, ground cinnamon, flour, and cold butter. Use your fingers or a pastry cutter to mix until crumbly. This topping is where your muffins will get their divine texture.

  8. Fill the Muffin Tin: Spoon the batter evenly into the prepared muffin tin, filling each cup about two-thirds full. Then, sprinkle a generous amount of streusel topping over each muffin.

  9. Bake: Pop the muffin tin into your preheated oven and bake for 18-20 minutes, or until golden brown and a toothpick inserted into the center comes out clean. Keep an eye on them; every oven is different!

  10. Cool & Serve: Allow the muffins to cool in the tin for about 5 minutes before transferring them to a wire rack. Don’t rush this; the cooling really helps the muffins set!

Serving Suggestions

Serve these raspberry streusel muffins warm with a drizzle of honey or a spread of your favorite jam for an extra treat on the side. They pair wonderfully with a freshly brewed cup of coffee or a refreshing iced tea. You can even plate them on a lovely cake stand as a centerpiece for brunch—it’s almost too pretty to eat… almost!

Recipe Variations

  • Berry Medley: Swap out the raspberries for any combination of your favorite berries—blueberries, blackberries, or strawberries all work great!

  • Zesty Twist: Add the zest of one lemon or orange to the batter for a refreshing citrus kick that complements the berries beautifully.

  • Nutty Crumble: Toss in some chopped nuts, like walnuts or pecans, for an extra crunch in both the muffins and the streusel topping.

  • Chocolate Lover’s Delight: Mix in some dark chocolate chips for those days when you want an indulgent treat.

  • Vegan Version: Substitute the eggs with flax eggs (1 tbsp ground flaxseed + 2.5 tbsp water = 1 egg) and use your favorite plant-based milk and butter.

Chef’s Notes

These muffins have evolved over time in my kitchen—what started as a simple raspberry muffin recipe has transformed into an award-winning brunch item in my home! I remember one morning I had a few extra berries on hand, and in a moment of inspiration, I decided to throw them in. That’s when I realized that cooking is all about embracing the moment and going with your gut. Every iteration of this recipe has been a joy, each bringing a new twist that adds to the family lore. And trust me, nothing feels better than watching loved ones enjoying every delicious bite of something you’ve made with care.

FAQs and Troubleshooting

1. Why are my muffins dense?
Dense muffins may be due to overmixing the batter. Mix until just combined to maintain that fluffy texture!

2. Can I use frozen raspberries?
Absolutely! Just make sure to let them thaw and drain excess moisture to prevent the batter from getting too wet.

3. How can I tell when my muffins are done baking?
A toothpick inserted into the center should come out clean or with a few moist crumbs—not wet batter. Keep an eye on the tops; they should be golden brown!

4. Can I store these muffins? How long do they last?
Yes! Store cooled muffins in an airtight container at room temperature for up to 3 days or in the fridge for about a week. They freeze beautifully too—just pop them in a freezer bag for up to 3 months!

Nutritional Info (optional)

While I focus on flavor and enjoyment, it’s nice to keep the nutritional balance in mind. Each muffin (without added toppings) generally contains:

  • Calories: 250
  • Protein: 5g
  • Carbs: 36g
  • Fiber: 2g
  • Sugar: 12g
  • Fat: 10g

Enjoy these delightful raspberry streusel muffins guilt-free, knowing they are a tasty treat to fuel your day!

So there you have it, friends! A recipe that’s more than just a set of instructions—it’s about creating memories, nourishing your body, and most importantly, indulging your taste buds in a delightful berry adventure. Whether you’re sharing these with family, friends, or just treating yourself, every bite is sure to bring joy. Happy baking! 🌟

Print

Raspberry Streusel Muffins

Delightful raspberry streusel muffins that evoke sweet memories and fill your mornings with flavor.

  • Prep Time: 15 minutes
  • Cook Time: 20 minutes
  • Total Time: 35 minutes
  • Yield: 12 muffins 1x
  • Category: Breakfast
  • Method: Baking
  • Cuisine: American
  • Diet: Vegetarian

Ingredients

Scale
  • 2 cups all-purpose flour
  • 1 cup sugar
  • 2 teaspoons baking powder
  • 1/2 teaspoon baking soda
  • 1/2 teaspoon salt
  • 1/2 cup unsalted butter, melted
  • 2 large eggs
  • 1 cup milk
  • 1 teaspoon vanilla extract
  • 1 1/2 cups fresh raspberries
  • 1/2 cup brown sugar (for streusel topping)
  • 1/2 cup rolled oats (for streusel topping)
  • 1/2 teaspoon ground cinnamon (for streusel topping)
  • 1/4 cup flour (for streusel topping)
  • 1/4 cup cold butter (for streusel topping)

Instructions

  1. Preheat your oven to 375°F (190°C).
  2. Prep your muffin tin by lining it with paper liners or spraying with non-stick spray.
  3. Mix dry ingredients: In a large bowl, whisk together the flour, sugar, baking powder, baking soda, and salt.
  4. Combine wet ingredients: In another bowl, mix the melted butter, eggs, milk, and vanilla extract until smooth.
  5. Combine the mixtures: Pour wet ingredients into dry ingredients and gently fold until just combined.
  6. Add the raspberries, folding gently to keep them intact.
  7. Prepare the streusel topping in a small bowl by mixing brown sugar, oats, ground cinnamon, flour, and cold butter until crumbly.
  8. Fill the muffin tin with batter and top with streusel.
  9. Bake for 18-20 minutes until golden and a toothpick comes out clean.
  10. Cool for 5 minutes in the tin before transferring to a wire rack.

Notes

For extra flavors, add lemonade zest or swap out the raspberries for other berries!

Nutrition

  • Serving Size: 1 muffin
  • Calories: 250
  • Sugar: 12g
  • Sodium: 150mg
  • Fat: 10g
  • Saturated Fat: 6g
  • Unsaturated Fat: 3g
  • Trans Fat: 0g
  • Carbohydrates: 36g
  • Fiber: 2g
  • Protein: 5g
  • Cholesterol: 70mg

Keywords: muffins, raspberry muffins, breakfast recipes, baking, sweet treats

Did you make this recipe?

Share a photo and tag us — we can't wait to see what you've made!

June 18, 2026 |

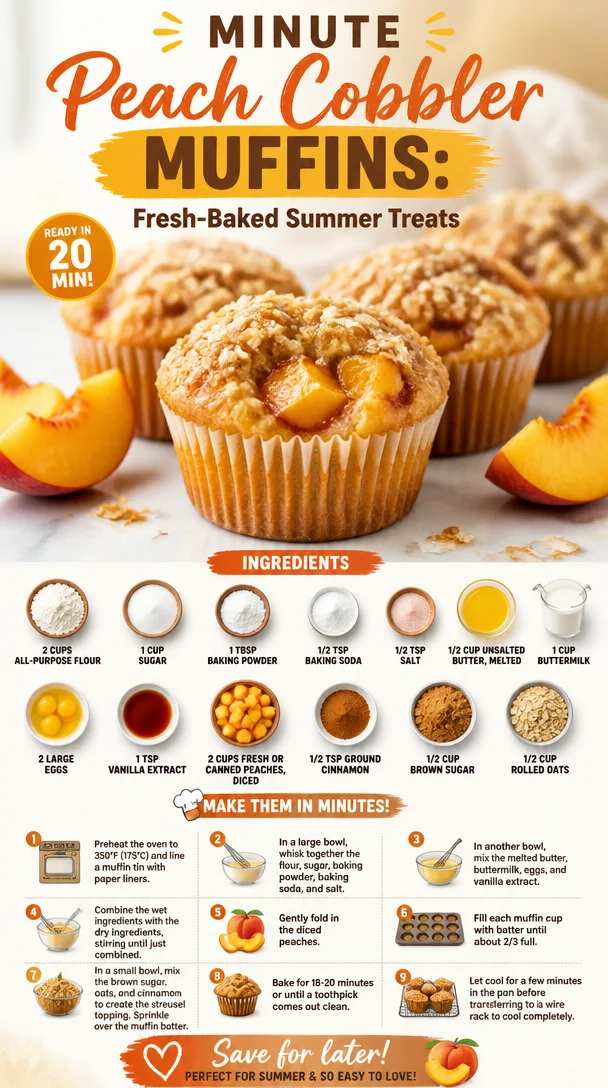
Minute Peach Cobbler Muffins: Fresh-Baked Summer Treats

Freshly baked minute peach cobbler muffins with peaches on a table

Homemade Peach Cobbler Muffins: A Sweet Slice of Joy

Hey there, fellow food enthusiasts! Welcome back to Clean Plate Cravings, where each recipe is crafted to bring a bit of sunshine to your plate. Today, we’re diving into a delightful treat that perfectly encapsulates the essence of summer sweetness: Homemade Peach Cobbler Muffins! These muffins blend the comforting flavors of a warm peach cobbler with the easy, delicious nature of a muffin, making them the perfect addition to breakfast or a sweet afternoon snack.

Imagine biting into a warm muffin fresh from the oven, the juicy peaches bursting with flavor and a hint of cinnamon dancing on your taste buds. Seriously, what’s not to love? They are tender, moist, and just sweet enough to make you smile, but they won’t leave you feeling heavy. Plus, they’re quick to whip up, making them an easy go-to for busy mornings or unexpected guests. So grab your apron, and let’s get started!

A Little Slice of Nostalgia

Growing up, my grandmother was the queen of muffins. Whenever I’d visit her house, the aroma of fresh-baked goods would greet me at the door, wrapping me in a warm embrace. One of the highlights of those visits was her famous peach cobbler — the kind that could make your knees weak! She’d often make a hybrid version by baking her cobbler in muffin tins, and I fondly remember hopping onto the counter, my little hands covered in flour, as she taught me all her secret tricks.

Sometimes, we’d even mix in some fresh peaches that we’d picked ourselves at a local orchard. The joy of biting into that first muffin—warm, fluffy, and bursting with luscious peach goodness—was pure bliss. This recipe is my homage to those nostalgic days and the love that went into each delicious bite. Trust me, once you try these muffins, you’ll be transported back to summers spent in a cozy kitchen, laughter, and sweet smiles all around.

Ingredients You’ll Need

To whip up these scrumptious Peach Cobbler Muffins, here’s your shopping list:

  • 2 cups all-purpose flour: This will be the base of our muffins. You can substitute with whole wheat flour for a heartier texture, but make sure to adjust the liquid ingredients slightly.

  • 1 cup sugar: Sweetness is key! For a healthier alternative, feel free to use coconut sugar or a sugar substitute like stevia—just follow the package equivalents.

  • 1 tablespoon baking powder: This leavening agent gets those muffins rising to the occasion!

  • 1/2 teaspoon baking soda: A little extra lift!

  • 1/2 teaspoon salt: Always a must to enhance the flavors and balance sweetness.

  • 1/2 cup unsalted butter, melted: Richness in every bite! You can use coconut oil or vegetable oil if you prefer a dairy-free option.

  • 1 cup buttermilk: Adds moisture and a slight tang. If you don’t have buttermilk, mix a cup of milk with a tablespoon of vinegar and let it sit for five minutes.

  • 2 large eggs: Helps bind everything together. For a vegan option, you can use flaxseed meal mixed with water.

  • 1 teaspoon vanilla extract: Because everything is better with vanilla!

  • 2 cups fresh or canned peaches, diced: The star of the show! If using canned peaches, be sure to drain them well.

  • 1/2 teaspoon ground cinnamon: For that cozy, warm flavor that pairs beautifully with peaches.

  • 1/2 cup brown sugar: A little more depth of flavor. Feel free to go all brown sugar for a richer taste!

  • 1/2 cup rolled oats: Adds a wonderful texture and a little heartiness to the muffins.

Step-by-Step Instructions

  1. Preheat your oven: Start by preheating your oven to 375°F (190°C). While you’re at it, line a muffin tin with paper liners or lightly grease it with cooking spray for easy removal.

  2. Mix the dry ingredients: In a large bowl, whisk together the all-purpose flour, sugar, baking powder, baking soda, salt, and cinnamon. This ensures that the leavening agents are evenly distributed, which is crucial for fluffy muffins.

    Chef Tip: Sifting your flour before measuring can help remove any lumps, making for a more tender muffin!

  3. Prepare the wet ingredients: In another bowl, combine the melted butter, buttermilk, eggs, and vanilla extract. Whisk until well blended. You want these ingredients to be combined but not over-mixed. It’s all about keeping it light and airy!

  4. Combine wet and dry: Pour the wet ingredients into the dry ingredients. Gently mix with a spatula or wooden spoon until just combined. Don’t fret if there are a few lumps; that’s perfectly fine! Overmixing can lead to tough muffins, and nobody wants that.

  5. Fold in the peaches: Gently fold in the diced peaches. You want them evenly distributed throughout without smashing them into oblivion. The goal is to have juicy flavor pockets in every bite!

  6. Fill the muffin cups: Divide the batter evenly among the muffin tins. Aim to fill each cup about 3/4 full for that perfect bakery-style rise.

    Little Chef Hack: If you have a cookie scoop, use it! It makes filling the tins so much easier and mess-free.

  7. Add the toppings: In a small bowl, combine the rolled oats and brown sugar for a crunchy topping. Sprinkle a generous amount over each muffin before popping them in the oven.

  8. Baking time: Bake in your preheated oven for about 20-25 minutes, or until a toothpick inserted in the center comes out clean. Your kitchen is about to smell heavenly!

    Pro Tip: If the tops are browning too quickly, cover them loosely with foil halfway through baking.

  9. Cool it down: Once baked, remove the muffins from the oven and allow them to cool in the pan for about 5 minutes before transferring them to a wire rack to cool completely.

Serving Suggestions

These peach cobbler muffins are delightful on their own, but why not elevate the experience? Serve them warm with a pat of butter or drizzle a little honey on top for extra sweetness. Pair them with your favorite coffee or tea, and you’ve got a cozy little afternoon treat! They also make a wonderful breakfast paired with Greek yogurt and fresh fruit.

Recipe Variations

Feeling a little adventurous? Here are a few creative twists you can try out:

  • Berry Fusion: Substitute half the peaches with blueberries or raspberries for a mixed fruit muffin!

  • Spiced Up: Add a dash of nutmeg or allspice along with the cinnamon for a warm, spiced flavor.

  • Nutty Addition: Toss in some chopped pecans or walnuts for a delightful crunch.

  • Coconut Delight: Add some shredded coconut to the batter for a tropical twist.

  • Gluten-Free Goodness: Substitute the all-purpose flour with a 1:1 gluten-free flour blend.

Chef’s Notes

As I experimented with these muffins, I found myself making little tweaks here and there — like the addition of oats and brown sugar for crunch! It’s so satisfying to watch them rise in the oven and smell that peachy goodness wafting through the house. Over the years, I’ve simplified the recipe to make it more approachable, and I think you’ll find it’s just the right balance of easy and rewarding!

And here’s a funny story: the first time I made these muffins for my friends, I accidentally swapped the salt and sugar! Let’s just say it resulted in some very confused expressions. Now, I double-check my measurements—every. Single. Time!

FAQs and Troubleshooting

Q: Can I use frozen peaches instead of fresh?
Absolutely! Just thaw them, pat them dry, and then chop. They’ll add wonderful flavor!

Q: My muffins turned out too dense. What happened?
This can happen if the flour is over-mixed or if there’s too much flour in the batter. Make sure to scoop and level your flour rather than packing it into the measuring cup.

Q: How do I store these muffins?
Store them in an airtight container at room temperature for up to 3 days. For longer storage, you can freeze them for up to 3 months!

Q: Can I make these as mini muffins?
You bet! Just reduce the baking time to around 12-15 minutes, keeping an eye on them to avoid over-baking.

Nutritional Info (if applicable)

While I believe in enjoying treats like these muffins in moderation, if you’re curious about the nutritional content, a muffin typically contains approximately 200 calories, 8 grams of fat, and 3 grams of protein, depending on the specific ingredients used. The health benefits of peaches and oats add extra fiber and vitamins, making them a smart choice for a snack!


So there you have it! Homemade Peach Cobbler Muffins that are sure to delight your taste buds and warm your soul. I hope you enjoy making and sharing these as much as I do. Happy baking, my friends!

Print

Homemade Peach Cobbler Muffins

Delightful muffins blending the comforting flavors of peach cobbler with the convenience of a muffin, perfect for breakfast or a sweet snack.

  • Prep Time: 15 minutes
  • Cook Time: 25 minutes
  • Total Time: 40 minutes
  • Yield: 12 servings 1x
  • Category: Snack
  • Method: Baking
  • Cuisine: American
  • Diet: Vegetarian

Ingredients

Scale
  • 2 cups all-purpose flour
  • 1 cup sugar
  • 1 tablespoon baking powder
  • 1/2 teaspoon baking soda
  • 1/2 teaspoon salt
  • 1/2 cup unsalted butter, melted
  • 1 cup buttermilk
  • 2 large eggs
  • 1 teaspoon vanilla extract
  • 2 cups fresh or canned peaches, diced
  • 1/2 teaspoon ground cinnamon
  • 1/2 cup brown sugar
  • 1/2 cup rolled oats

Instructions

  1. Preheat your oven to 375°F (190°C) and prepare a muffin tin.
  2. Mix the dry ingredients in a large bowl: flour, sugar, baking powder, baking soda, salt, and cinnamon.
  3. Prepare the wet ingredients in another bowl: combine melted butter, buttermilk, eggs, and vanilla extract.
  4. Combine the wet ingredients with the dry until just mixed.
  5. Fold in the diced peaches gently.
  6. Fill the muffin cups about 3/4 full with the batter.
  7. Add a mixture of rolled oats and brown sugar on top of each muffin.
  8. Bake for 20-25 minutes, or until a toothpick comes out clean.
  9. Cool in the pan for 5 minutes, then transfer to a wire rack.

Notes

Serve warm with butter or honey for an extra treat. Can also be paired with coffee or yogurt.

Nutrition

  • Serving Size: 1 muffin
  • Calories: 200
  • Sugar: 10g
  • Sodium: 180mg
  • Fat: 8g
  • Saturated Fat: 5g
  • Unsaturated Fat: 3g
  • Trans Fat: 0g
  • Carbohydrates: 30g
  • Fiber: 2g
  • Protein: 3g
  • Cholesterol: 30mg

Keywords: peach, muffins, dessert, baking, summer recipes

Did you make this recipe?

Share a photo and tag us — we can't wait to see what you've made!

June 18, 2026 |

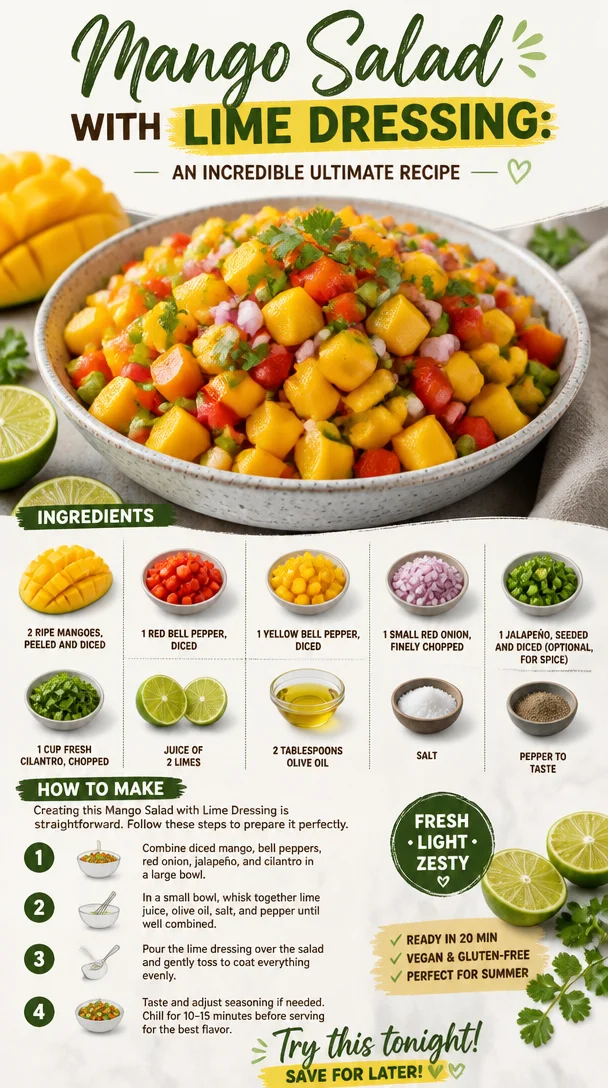
Mango Salad with Lime Dressing: An Incredible Ultimate Recipe

Delicious mango salad with lime dressing served in a bowl

Mango Salad with Lime Dressing: An Incredible Ultimate Recipe

Welcome to Clean Plate Cravings, where today we’re diving headfirst into the vibrant world of a Mango Salad with Lime Dressing! Picture this: the sun is shining, the breeze is light, and you’re enjoying a dish that’s as refreshing as a summer day. Filled with bright, tropical flavors that will make your taste buds dance, this salad is perfect for any occasion. Whether it’s a family barbecue, a picnic in the park, or a simple weeknight dinner, this salad packs a punch of flavor with every bite.

There’s something so magical about a good mango salad, don’t you think? The combination of sweet mango, crunchy bell peppers, and zesty lime dressing creates a fiesta in your mouth, making you forget about the world’s troubles, at least for a little while. It’s not just a side dish; it’s a star player meant to brighten up your day!

Let me tell you, I have a soft spot for mango salads. During my childhood summers, my family would unite at my grandma’s house for big gatherings. And without fail, there’d be a huge bowl of mango salad that dictated the mood of the day. Kids would run around chasing each other, while the adults gathered around the table, laughing and reminiscing. It was bliss. And the best part? The sweet aroma of ripe mangoes mixed with the lime and cilantro was nothing short of sublime.

As I grew older and started dabbling in the kitchen, I was determined to recreate that feeling. I’d start experimenting with different flavors and ingredients, all while trying to bottle up the essence of those carefree summer afternoons. Over the years, this mango salad has become a staple, evolving with my culinary journey, and I’m thrilled to share my ultimate version with you today!

So grab your apron, unleash your inner culinary wizard, and let’s whip up this simple, yet incredible mango salad that will leave you and your guests craving more!


Ingredients

  • 2 ripe mangoes, peeled and diced
    The star of our show! Choose mangoes that are slightly soft to the touch for optimal sweetness and flavor. If mangoes aren’t in season, you could use diced pineapple as a substitute for a similar tropical vibe.

  • 1 red bell pepper, diced
    This adds a lovely crunch and sweetness to the salad. If you’re in the mood for a bit more heat, you can swap it with a spicier variety, like a poblano pepper.

  • 1 yellow bell pepper, diced
    The yellow pepper is not just for aesthetics; it brings an additional layer of sweetness. Feel free to use whatever color bell pepper you prefer—green, orange, or even a mix!

  • 1 small red onion, finely chopped
    This adds a wonderful zing. For a milder flavor, soak the chopped onion in cold water for a few minutes before adding it to the salad to tone down its sharpness.

  • 1 jalapeño, seeded and diced (optional, for spice)
    A little kick! If you’re not a fan of spice, feel free to leave this out, or substitute with a pinch of cayenne pepper for a gentler warmth.

  • 1 cup fresh cilantro, chopped
    Fresh cilantro brightens the whole dish; its herbs lend a refreshing note. If you’re not a fan of cilantro, you can use fresh parsley or basil as a substitute.

  • Juice of 2 limes
    The acidic punch from the lime balances out the sweetness of the mangoes beautifully. If limes aren’t available, freshly squeezed lemon juice works just fine too!

  • 2 tablespoons olive oil
    The oil helps to bring everything together, providing richness to the dressing. For a twist, swap it for avocado oil or sesame oil.

  • Salt and pepper to taste
    Basic, but essential! The right seasonings enhance the vibrant flavors of the salad.


Step-by-Step Instructions

  1. Prepare your ingredients.
    Start by washing all your fresh produce under cold water. Peel the mangoes and chop them into bite-sized cubes. Use a sharp knife for clean cuts, and make sure to cut around the pit, as it can be tricky to navigate. When you’re chomping down, you want all your ingredients to be effortless to eat.

  2. Dice those bell peppers.
    Grab your red and yellow bell peppers. Slice them in half, remove the seeds, and then chop them into similar-sized pieces as your mangoes. This way, every bite will be harmonious!

  3. Chop the red onion.
    Take your small red onion and finely chop it. It’s best if the pieces are as small as possible so they don’t overwhelm the other flavors. And remember, if the scent of raw onion sends you running, soaking it in cold water for a few minutes can help reduce its intensity. Drain before adding to the salad.

  4. Handle the heat. (Optional)
    If you’re including jalapeño for a kick, carefully slice it in half and remove the seeds (unless you want to unleash the heat!). Dice it finely. If you prefer a milder option, just stick with bell peppers.

  5. Toss in the herbs.
    Next, chop up a cup of fresh cilantro. You’ll want to include both the leaves and the tender stems, as they’re packed with flavor.

  6. Make the dressing.
    In a small bowl, whisk together the lime juice, olive oil, salt, and pepper. You want to achieve a well-balanced dressing that’s tangy but not overpowering. Adjust according to your taste; if you like it a bit sweeter, add a teaspoon of honey or agave syrup.

  7. Combine everything.
    In a large mixing bowl, combine the diced mangoes, bell peppers, red onion, jalapeño, and cilantro. Now, pour over your lime dressing. Using a spatula or large spoon, gently toss everything together, making sure every piece is coated. Taste and adjust seasoning if necessary!

  8. Chill for a bit.
    Let the salad sit for about 15 to 30 minutes. This allows the flavors to meld beautifully, giving it that ideal zesty flavor. Trust me: it’s worth the wait!


Serving Suggestions

When you’re ready to serve, dish out generous portions into colorful bowls. For an added touch, you can sprinkle more cilantro on top or even throw in some extra lime wedges for that visual flair. Not only does this make for a beautiful presentation, but it also invites guests to customize their own dish with a bit more zesty lime if they wish. Enjoy!


Recipe Variations

  • Tropical Twist: Add diced avocado for a creamy texture that complements the sweetness of the mango.
  • Protein-Packed: Toss in grilled chicken or shrimp for a heartier main dish.
  • Nutty Crunch: A handful of roasted peanuts or cashews can add a delightful crunch and depth of flavor.
  • Sweet & Spicy: Mix in a tablespoon or two of diced jalapeños with mango chutney for a sweet and spicy version.
  • Quinoa Base: Serve the salad over a bed of fluffy quinoa for a nutritious and filling option.

Chef’s Notes

Every time I make this mango salad, I’m transported back to those sun-soaked summer days with my family. It’s funny—what started as just a summer dish has become my go-to for every season and occasion. The beauty of this salad is how it adapts. One day, I might toss in some black beans and corn for a Mexican twist, and the next, I’m serving it alongside grilled fish or tacos.

So here’s a little chef hack: If you want to take your mango salad to the next level, grill the mangoes for a few minutes. The smoky flavor adds a fantastic depth that’s absolutely insane.


FAQs and Troubleshooting

Q: My mangoes are too hard. Can I still use them?
A: Definitely! Just dice them and let them sit in a bit of lime juice for 10 minutes. This will soften them a tad.

Q: How do I keep my avocado from browning?
A: If adding avocado, squeeze a little extra lime juice on it right before serving to keep it fresh and green!

Q: Can I make this salad ahead of time?
A: While you can prep all the ingredients and store them separately for a few days, I recommend combining them just an hour or so before serving to keep everything fresh and crunchy.

Q: What can I do if my salad is too salty?
A: If it turned out too salty, add a little more diced mango or bell pepper to balance it out.


Nutritional Info

While I usually encourage you to focus more on flavor than numbers, if you’re curious, here’s a quick rundown per serving (based on a 4-serving yield):

  • Calories: 150
  • Protein: 2g
  • Carbohydrates: 20g
  • Fiber: 4g
  • Fats: 7g

There you have it! A refreshing Mango Salad with Lime Dressing that’s bursting with flavor, nostalgia, and pure joy. Remember, it’s about keeping things simple yet satisfying. Enjoy making this salad as much as I enjoyed sharing my story and recipe with you! Happy cooking, my foodie friend! 🍽️

Print

Mango Salad with Lime Dressing

A refreshing mango salad with zesty lime dressing, perfect for any occasion.

  • Prep Time: 15 minutes
  • Cook Time: 0 minutes
  • Total Time: 15 minutes
  • Yield: 4 servings 1x
  • Category: Salad
  • Method: No Cooking
  • Cuisine: Tropical
  • Diet: Vegan

Ingredients

Scale
  • 2 ripe mangoes, peeled and diced
  • 1 red bell pepper, diced
  • 1 yellow bell pepper, diced
  • 1 small red onion, finely chopped
  • 1 jalapeño, seeded and diced (optional)
  • 1 cup fresh cilantro, chopped
  • Juice of 2 limes
  • 2 tablespoons olive oil
  • Salt and pepper to taste

Instructions

  1. Prepare your ingredients.
  2. Dice those bell peppers.
  3. Chop the red onion.
  4. Handle the heat. (Optional)
  5. Toss in the herbs.
  6. Make the dressing.
  7. Combine everything.
  8. Chill for a bit.

Notes

Enjoy the salad with additional lime wedges and cilantro for a vibrant presentation.

Nutrition

  • Serving Size: 1 serving
  • Calories: 150
  • Sugar: 14g
  • Sodium: 150mg
  • Fat: 7g
  • Saturated Fat: 1g
  • Unsaturated Fat: 6g
  • Trans Fat: 0g
  • Carbohydrates: 20g
  • Fiber: 4g
  • Protein: 2g
  • Cholesterol: 0mg

Keywords: mango salad, lime dressing, refreshing salad, tropical flavors, summer dish

Did you make this recipe?

Share a photo and tag us — we can't wait to see what you've made!

June 18, 2026 |

Thai Peanut Chicken Crunch Slaw Salad

Thai Peanut Chicken Crunch Slaw Salad with colorful vegetables and dressing

Thai Peanut Chicken Crunch Slaw Salad: A Fresh and Flavorful Feast

Introduction

Hey there, food lovers! Today, we’re diving into a dish that’s as colorful as it is delicious: Thai Peanut Chicken Crunch Slaw Salad. If you’re like me and believe that salads should be exciting and satisfying, then you’re in for a treat. This salad is a vibrant festival of flavors and textures, guaranteed to tickle your taste buds while leaving you feeling fresh and energized.

Now, let’s be real: how many times have you been stuck at a boring old salad bar, feeling uninspired by limp greens and a drizzle of bland dressing? Blech! That’s not how we do things around here. Cooking should be fun, and salads should be more than just rabbit food. That’s where my Thai Peanut Chicken Crunch Slaw Salad comes in: it’s crunchy, creamy, tangy, and oh-so-delicious!

Imagine this: fresh, crisp veggies mingled with tender, juicy chicken all coated in a luscious peanut sauce that’s bursting with flavor. Plus, it’s super easy to whip up, so you can enjoy it on busy nights or impress that special someone at your next dinner party. Let’s unpack the magic of this salad and create something extraordinary together!

Personal Story

Let me take you down memory lane for a moment. Growing up, my family and I would visit a little Thai restaurant that was tucked away in our neighborhood. It was one of those hidden gems where the flavors were as vibrant as the decor. I still remember the aroma that greeted us as we stepped inside, a delightful blend of spices that felt like a warm hug.

One summer evening, I decided to test my culinary skills by trying to recreate one of their most popular dishes: a spicy peanut chicken salad. I had no idea what I was doing, but the whole process felt like an adventure! I chopped away at those veggies like a pro (or at least I thought so) and mixed my ingredients with abandon, all the while imagining the smiles on my family’s faces when they tasted it.

The end result was deliciously satisfying—a chaotic, colorful bowl of goodness that elicited happy sighs all around. It quickly became a family favorite, and soon enough, I was experimenting with even more vibrant ingredients and flavors. It was that evening that sparked my passion for bringing fresh, fun recipes to the world. Fast forward to today, and now I’m excited to share one of my all-time favorites with you: the Thai Peanut Chicken Crunch Slaw Salad!

Ingredients

Here’s what you’ll need to create this mouthwatering dish:

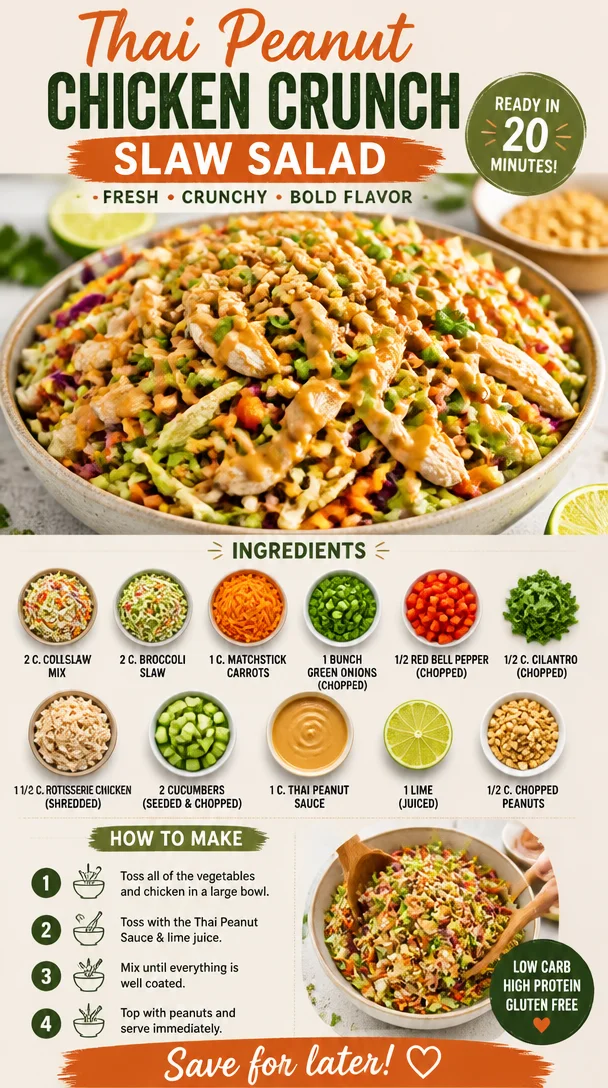
  • 2 cups coleslaw mix: A crunchy base that adds great texture. You can substitute with shredded cabbage if you’re in a pinch!

  • 2 cups broccoli slaw: Packed with nutrients and a bit more crunch. If you can’t find this, a julienned carrot or bell pepper works well too.

  • 1 cup matchstick carrots: For added color and sweetness. Shredded carrots can be used as a quick substitute.

  • 1 bunch green onions (chopped): Adds a fresh, mild onion flavor. Feel free to swap for shallots if you like a bolder bite.

  • 1/2 red bell pepper (chopped): Sweet and crunchy. Any color bell pepper can work here—get creative!

  • 1/2 cup cilantro (chopped): Freshness overload! If cilantro isn’t your thing, fresh parsley or mint could also be delightful.

  • 1 1/2 cups rotisserie chicken (shredded): Perfect for saving time and adding flavor. You can also use grilled chicken for a smoky touch.

  • 2 cucumbers (seeded & chopped): Refreshing and hydrating! You can replace them with zucchini for a fun twist.

  • 1 cup Thai peanut sauce: The star of the show! If you’re up for it, making your own sauce is a cinch, and I can share a quick recipe if you’d like!

  • 1 lime (juiced): Brightens everything up! Lemon adds a similar zing if you don’t have lime on hand.

  • 1/2 cup chopped peanuts: For that satisfying crunch. Feel free to substitute with sunflower seeds or almonds if you want to mix it up.

Step-by-Step Instructions

Let’s get cooking! Follow these easy steps to make your Thai Peanut Chicken Crunch Slaw Salad.

  1. Prepare the Veggies: Start by rinsing and chopping all your veggies. Get them looking as vibrant as possible—your salad should be a feast for the eyes! Take a moment to admire that rainbow of colors in your bowl. Pro tip: a sharp knife will make chopping a breeze and keep all those beautiful colors intact.

  2. Shred the Chicken: If you’re using a rotisserie chicken, shred it into bite-sized pieces. It should be tender and juicy, ready to mingle with those veggies. If you want to add an extra layer of flavor, toss the chicken in a bit of the peanut sauce before adding it to the salad. Trust me, this little hack elevates the dish!

  3. Mixing it Up: In a large mixing bowl, combine the coleslaw mix, broccoli slaw, matchstick carrots, green onions, red bell pepper, cilantro, cucumbers, and chicken. Gently toss everything together, ensuring a lovely blend of colors and textures. Don’t worry if it looks a little chaotic; that’s the beauty of a good slaw!

  4. Drizzle the Dressing: Time to add the star—a generous drizzle of that creamy Thai peanut sauce! Now, this is where you can really customize it to your taste; start with about 3/4 of a cup and add more if you like it extra saucy. Toss again until everything is nicely coated.

  5. The Citrus Kick: Squeeze the lime juice over the salad and toss once more. The lime adds a zing that cuts through the richness of the peanut sauce, taking your salad to the next level.

  6. Nuts About It: Finish off with the chopped peanuts. You can either sprinkle them on top for a beautiful presentation or mix them right in for an all-around crunch.

Serving Suggestions

Time to dig in! Serve your Thai Peanut Chicken Crunch Slaw Salad in a large bowl for a family-style meal or plate it individually for a more elegant touch. Dress it up with additional peanuts or cilantro on top for that extra pop. This salad thrives as a light lunch or a delightful side dish at dinner—and it pairs beautifully with grilled shrimp or fish!

Recipe Variations

Feeling adventurous? Here are some fun twists on this recipe to keep things interesting:

  • Spicy Kick: Add sliced jalapeños or a dash of sriracha to the peanut sauce for a spicy kick that will wake up your taste buds!

  • Protein Packed: Swap out the chicken for cooked tofu or chickpeas if you want to make a vegetarian or vegan version.

  • Sweet Surprise: Toss in some diced mango or pineapple for a touch of sweetness that pairs wonderfully with the savory peanut sauce.

  • Herb Swap: Experiment with different herbs. Mint, basil, or even dill can add a completely different flavor profile to your salad.

  • Grain Add-In: For extra heartiness, serve your salad on a bed of quinoa or add cooked rice noodles for a filling, complete meal.

Chef’s Notes

Over the years, this salad has become a staple in my kitchen! I love how versatile it is—you can honestly throw in whatever you have in the fridge! There was one time I decided to clean out my pantry and found some neglected bell peppers and a bit of cabbage. I tossed it all together, and that version ended up being a huge hit among my friends at a potluck!

And let’s be honest, the fun of cooking is trying new things, right? So don’t shy away from experimenting. Who knows what delicious combinations you’ll come up with?

FAQs and Troubleshooting

Q: Can I prepare this salad in advance?
A: Absolutely! You can pre-cut the veggies and store them in the fridge. However, I’d recommend waiting to dress the salad until just before serving to keep everything crunchy.

Q: How do I store leftovers?
A: Store any leftovers in an airtight container in the fridge for up to 2-3 days. The peanuts may lose some crunch, but the flavors will still be fantastic!

Q: What if I can’t find rotisserie chicken?
A: No worries! You can easily cook and shred your own chicken at home, or use any leftover protein you have on hand.

Q: Can I use bottled peanut sauce?
A: Sure thing! Just choose a good-quality peanut sauce that you love. You’ll enjoy a shortcut without sacrificing flavor.

Nutritional Info

This Thai Peanut Chicken Crunch Slaw Salad is not only delicious but also packed with nutrients:

  • Calories: Approximately 400 per serving (depending on portion sizes and dressing usage)
  • Protein: A good source of protein from the chicken and peanuts
  • Fiber: The veggies provide a nice boost of fiber, keeping you full and satisfied
  • Vitamins: Rich in vitamins A, C, and K from all the fresh produce

So, there you have it! A fresh, flavorful Thai Peanut Chicken Crunch Slaw Salad that’s bursting with color and nutrition. No matter the occasion, I hope you give this recipe a try and make it your own! Remember, good food should be fun—so grab your whisk, put on your favorite tunes, and let’s cook up some love! Happy eating!

Print

Thai Peanut Chicken Crunch Slaw Salad

A vibrant and flavorful salad featuring crunchy veggies and juicy chicken, all coated in a luscious peanut sauce.

  • Prep Time: 15 minutes
  • Cook Time: 15 minutes
  • Total Time: 30 minutes
  • Yield: 4 servings 1x
  • Category: Salad
  • Method: Mixing
  • Cuisine: Thai
  • Diet: Gluten-Free

Ingredients

Scale
  • 2 cups coleslaw mix
  • 2 cups broccoli slaw
  • 1 cup matchstick carrots
  • 1 bunch green onions (chopped)
  • 1/2 red bell pepper (chopped)
  • 1/2 cup cilantro (chopped)
  • 1 1/2 cups rotisserie chicken (shredded)
  • 2 cucumbers (seeded & chopped)
  • 1 cup Thai peanut sauce
  • 1 lime (juiced)
  • 1/2 cup chopped peanuts

Instructions

  1. Prepare the Veggies: Start by rinsing and chopping all your veggies.
  2. Shred the Chicken: If you’re using a rotisserie chicken, shred it into bite-sized pieces.
  3. Mixing it Up: In a large mixing bowl, combine the coleslaw mix, broccoli slaw, matchstick carrots, green onions, red bell pepper, cilantro, cucumbers, and chicken.
  4. Drizzle the Dressing: Add the creamy Thai peanut sauce and toss to coat.
  5. The Citrus Kick: Squeeze lime juice over the salad and toss.
  6. Nuts About It: Finish off with chopped peanuts sprinkled on top.

Notes

This salad is versatile; feel free to add other vegetables or proteins based on your preference.

Nutrition

  • Serving Size: 1 serving
  • Calories: 400
  • Sugar: 6g
  • Sodium: 500mg
  • Fat: 20g
  • Saturated Fat: 3g
  • Unsaturated Fat: 15g
  • Trans Fat: 0g
  • Carbohydrates: 30g
  • Fiber: 5g
  • Protein: 25g
  • Cholesterol: 60mg

Keywords: salad, Thai, chicken salad, healthy, quick recipe, peanut sauce

Did you make this recipe?

Share a photo and tag us — we can't wait to see what you've made!

June 18, 2026 |

One-Pan Peach Cobbler: Fresh, Canned, or Frozen (Easy)

Delicious one-pan peach cobbler with fresh, canned, and frozen peaches.

The Ultimate Homemade Peach Cobbler Recipe: A Sweet Slice of Nostalgia

Ah, peach cobbler. The very mention of it can transport you back to those sunny afternoons of your childhood, where the air was thick with laughter, sweet summer breezes, and the tantalizing aroma of baked peaches wafting through the kitchen. If your mouth is already watering, you’re in good company! Whether you’re using fresh, canned, or frozen peaches, this homemade peach cobbler recipe is a delightful way to embrace that nostalgia while creating a dish that will have everyone swooning.

Now, I can’t emphasize enough how this recipe is not just about throwing some peaches in a dish and slapping a crust on top. Oh no, my friends, this is about crafting a love letter to summer. My journey with peach cobbler started in my grandmother’s kitchen, where she would pull out her old, worn cookbook and remind me that the secret to a perfect cobbler is all about balance—sweetness, warmth, and that irresistible flaky crust that crumbles just right.

Some of my fondest memories are tied to helping her prepare this dish, learning the art of patience as we let those peaches marinate with a sprinkle of sugar, and watching them transform into a bubbling, golden masterpiece in the oven. So, while you’re mixing, baking, and savoring, know that you’re not just whipping up dessert; you’re creating memories, just like I did with my beloved grandma.

And here’s the best part: You can enjoy this peach cobbler no matter the season! Using fresh peaches in summer or those frozen gems straight out of your freezer makes it a year-round staple. Ready to dig into this deliciousness? Let me share the simple steps you need to create your own peach cobbler masterpiece!

Ingredients

  • Peaches (fresh, canned, or frozen): Use about 4 cups for this recipe. Fresh peaches are amazing in summer, but if you have canned or frozen on hand, they work just as well. If using frozen, let them thaw but don’t drain the juices—who doesn’t love a little extra peachy goodness?

  • Granulated sugar: About ¾ cup for sweetening the peaches and enhancing their natural flavors. You can adjust this based on the sweetness of your peaches or swap for coconut sugar for a healthier twist.

  • All-purpose flour: You’ll need 1 cup for the cobbler topping. Gluten-free flour blends can substitute here. Just be sure to check that they have xanthan gum for proper binding!

  • Baking powder: 2 teaspoons is what we’ll need to give our crust a nice rise. Make sure it’s fresh for the best results!

  • Salt: A pinch (about ¼ teaspoon) will enhance the flavors in both the peaches and the topping. It’s magic, I tell you!

  • Milk: ½ cup of milk (dairy or plant-based) will bring everything together in our cobbler batter. Almond or oat milk works beautifully if you’re dairy-free.

  • Butter: ½ cup (1 stick), melted. Butter makes everything better! If you prefer oil, coconut oil is a great alternative, just be sure it’s melted too.

  • Vanilla extract: 1 teaspoon adds that extra layer of flavor. Feel free to get creative with other extracts like almond or even a hint of cinnamon.

Step-by-Step Instructions

  1. Preheat your oven: Start by preheating your oven to 375°F (190°C). This allows the peach cobbler to bake evenly and ensures you get that golden-brown crust.

  2. Prepare the peaches: In a mixing bowl, toss your prepared peaches with ½ cup of sugar. If you’re using fresh peaches, peel, slice, and dice them. For frozen peaches, just let them thaw until they can be cut into manageable slices. Let this mixture sit while the sugar works its magic to draw out the juices—about 15 minutes is perfect.

  3. Make the batter: In another bowl, whisk together the flour, remaining sugar, baking powder, and salt. This dry mix is the base of your topping. Then, gradually whisk in the milk and melted butter (and vanilla extract if you’re using it) until everything is smooth and combined. Don’t overmix; it’s okay if there are a few lumps!

  4. Combine fruit and batter: Pour the peach mixture into a greased baking dish (about 9×13 inches works great) and then gently spoon your batter over the top. You want those bubbling juices to peek through the batter without completely mixing.

  5. Bake it up: Slide your cobbler into the oven, and bake for about 30-40 minutes, or until the topping is golden brown and a toothpick inserted comes out clean. Keep an eye on it—if the edges start to darken too quickly, you can tent it with foil.

  6. Cool and serve: Once it’s out of the oven, let it cool for about 15 minutes before serving. This helps the juices set a bit, but let’s be real—it’s hard to resist digging in right away!

Serving Suggestions

Serve this peach cobbler warm with a generous scoop of vanilla ice cream or a dollop of whipped cream for the ultimate indulgence. If you’re feeling fancy, sprinkle some toasted almonds or pecans on top for a lovely crunch. It’s also delightful with a drizzle of caramel sauce or a sprinkle of cinnamon for extra warmth!

Recipe Variations

  • Berry Peach Cobbler: Mix in some fresh or frozen blueberries or raspberries for a delightful burst of flavor.

  • Spicy Peach Cobbler: Add a teaspoon of cinnamon and a pinch of nutmeg to the peach mixture for a seasonal twist that warms up those cozy evenings.

  • Coconut Peach Cobbler: Substitute half the milk for coconut milk, and sprinkle shredded coconut on top for a tropical vibe.

  • Oat Topping: Swap half of the flour for rolled oats to create a chewy, hearty topping that adds texture and nutrition.

Chef’s Notes

This peach cobbler recipe has seen its fair share of evolution in my kitchen over the years. What started as a classic dish has transformed into a vehicle for creativity. I can’t tell you how many times I’ve mixed fruits or added unexpected spices just to see what would happen! Some experiments turned into instant favorites.

My funniest kitchen story with peach cobbler involves using lavender instead of vanilla once—I thought I was being inventive but ended up with a very floral dessert! It was a polite "no, thank you" from my friends that day. Now I stick with beloved flavors but still keep that spirit of experimentation alive.

FAQs and Troubleshooting

1. My cobbler topping is too dense. What went wrong?

  • This could be due to overmixing the batter. Aim for a lumpy but uniform batter—mix just until you combine. Too much mixing can lead to gluten development, making your topping dense.

2. How do I know when it’s done?

  • The cobbler is finished when the top is golden brown, and the juices are bubbling around the edges. A toothpick inserted into the center of the topping should come out clean or with a few moist crumbs (not wet batter).

3. Can I make this ahead?

  • Yes! You can prepare it a few hours in advance and keep it covered in the fridge before baking. Just add about 5-10 minutes to the baking time if baking straight from the fridge.

4. What if I don’t have any peaches?

  • No problem! You can substitute with almost any fruit you like, such as apples, cherries, or even mixed frozen berries. Just adjust the sugar according to the sweetness of the fruit.

Nutritional Info

While peach cobbler is definitely a treat, it can be made a bit healthier without losing any of its deliciousness! Each serving (assuming 9 servings from the above recipe) contains approximately:

  • Calories: 250
  • Protein: 3g
  • Carbohydrates: 38g
  • Fat: 10g
  • Fiber: 2g

And there you have it—a sweet slice of nostalgia that’s easy to recreate no matter the time of year. So gather up those peaches, call your friends and family, and make some memories with this fabulous peach cobbler! Happy cooking! 🍑✨

Print

Ultimate Homemade Peach Cobbler

A delightful and nostalgic peach cobbler recipe, perfect for any season using fresh, canned, or frozen peaches.

  • Prep Time: 15 minutes
  • Cook Time: 40 minutes
  • Total Time: 55 minutes
  • Yield: 9 servings 1x
  • Category: Dessert
  • Method: Baking
  • Cuisine: American
  • Diet: Vegetarian

Ingredients

Scale
  • 4 cups peaches (fresh, canned, or frozen)
  • ¾ cup granulated sugar
  • 1 cup all-purpose flour
  • 2 teaspoons baking powder
  • ¼ teaspoon salt
  • ½ cup milk (dairy or plant-based)
  • ½ cup butter, melted
  • 1 teaspoon vanilla extract

Instructions

  1. Preheat your oven to 375°F (190°C).
  2. Prepare the peaches by tossing them with ½ cup of sugar in a mixing bowl.
  3. Make the batter by whisking together flour, remaining sugar, baking powder, and salt, then gradually whisk in milk and melted butter.
  4. Combine the peach mixture with the batter by pouring the peaches into a greased baking dish and spooning the batter over the top.
  5. Bake for about 30-40 minutes or until the topping is golden brown.
  6. Cool for about 15 minutes before serving.

Notes

Serve warm with vanilla ice cream or whipped cream for the ultimate treat. Feel free to mix in other fruits or spices for variations.

Nutrition

  • Serving Size: 1 serving
  • Calories: 250
  • Sugar: 10g
  • Sodium: 150mg
  • Fat: 10g
  • Saturated Fat: 6g
  • Unsaturated Fat: 3g
  • Trans Fat: 0g
  • Carbohydrates: 38g
  • Fiber: 2g
  • Protein: 3g
  • Cholesterol: 30mg

Keywords: peach cobbler, dessert, summer recipe, baked dessert, nostalgic dessert

Did you make this recipe?

Share a photo and tag us — we can't wait to see what you've made!

June 18, 2026 |

Minute Frozen Yogurt Bark: Creamy, Crunchy Treat

Delicious Minute Frozen Yogurt Bark topped with fruits and nuts for a crunchy treat

Frozen Yogurt Bark: The Ultimate Refreshing Treat

Hey there, fellow food lovers! Have you ever come home from a long day, craving something sweet but also guilt-free? If you’re nodding your head, then let’s talk about a delightful little treat that will make your taste buds sing without weighing you down: Frozen Yogurt Bark.

This isn’t just any ordinary snack—it’s a celebration of vibrant colors, refreshing flavors, and creamy goodness that you can whip up in no time. Imagine a canvas of creamy yogurt blanketed with pops of juicy berries, a sprinkle of coconut, and maybe even a cheeky handful of sugar-free chocolate chips. It’s the ideal combination of health and indulgence, and trust me, it’s as easy as pie (or should I say bark?) to make!

A Little Backstory

Growing up, my mom had this incredible way of turning simple snacks into magical treats. One hot summer afternoon, she introduced my siblings and me to a version of this yogurt delight. I still vividly remember the thrill of spreading yogurt on a baking sheet, rolling the fruits into it like they were little gems, and then eagerly watching as it froze into a delectable masterpiece.

The excitement of breaking that bark into pieces was like unwrapping a gift on Christmas morning! It was a ritual that brought us all together—playing taste testers, arguing over who got the biggest slice, and inevitably turning it into a messy but oh-so-fun experience. Today, I recreate that magic and share it with you, dear friends, because life is too short not to enjoy delicious, wholesome treats that bring back good memories.

Ingredients

Ready to gather those fresh ingredients? Here’s what you’ll need to make your own Frozen Yogurt Bark:

  • 2 cups low-carb yogurt: Choose your favorite flavor like vanilla or go for plain and add your twist with fresh fruits and toppings. If you’re looking for a dairy-free version, coconut or almond yogurt works wonders too!

  • 1/2 cup raspberries: These little ruby-red beauties are packed with antioxidants and bring a delightful tartness to the mix. Feel free to swap in strawberries or blueberries if you prefer!

  • 1/2 cup blackberries: Full of flavor and fiber, blackberries add a fun burst of goodness. If you can’t find them, other berries or even chopped bananas will do the trick!

  • Coconut flakes (optional): Toasted or plain, coconut flakes add a wonderful texture and a tropical twist. If you’re not a coconut fan, just skip it or substitute with chopped nuts for added crunch.

  • Sugar-free chocolate chips (optional): For the chocolate lovers out there, these make a heavenly addition! If you’re avoiding chocolate altogether, consider adding a drizzle of honey or agave syrup instead.

Step-by-Step Instructions

Okay, let’s roll up our sleeves and get to the fun part! Here’s how to create your very own Frozen Yogurt Bark:

  1. Prepare Your Baking Sheet: Line a baking sheet with parchment paper—this makes for easy removal and cleanup later. Pro tip: if you crinkle the parchment a bit before placing it down, it’ll lay flat and hold its shape better.

  2. Mix Up the Yogurt: In a mixing bowl, take your low-carb yogurt and stir it up! You can add a splash of vanilla extract or a drizzle of maple syrup for extra flavor if you like. Not too much though; we want to keep it light and healthy!

  3. Spread the Yogurt: Pour the yogurt mixture onto your prepared baking sheet and spread it out evenly. Aim for about 1/2 inch thickness so it freezes perfectly. It should look like a creamy canvas ready for embellishment.

  4. Add the Berries: Now, sprinkle your raspberries and blackberries across the yogurt. Gently press them in a bit so they adhere well when frozen. This is where the magic happens! Don’t be afraid to get creative with your fruit placement—let those colors shine!

  5. Sprinkle the Toppings: If you’re using coconut flakes or sugar-free chocolate chips, sprinkle them over the top. Remember, you can never have too much of a good thing, but make sure it’s evenly distributed for maximum yumminess.

  6. Freeze It Out: Pop the baking sheet into the freezer for at least 4 hours, or until the yogurt is completely frozen. This is the hardest part—waiting! You might want to set a timer as a reminder; the anticipation is real!

  7. Break It Up: Once frozen, remove the bark from the freezer. Using your hands or a sharp knife, break it into pieces (like breaking brittle) and watch it shatter delightfully. Presentation tip: you can break them into jagged pieces for a rustic look, or cut them into neat squares if you wanna impress someone special.

Serving Suggestions

When serving Frozen Yogurt Bark, get a little fancy! Arrange the pieces on a colorful platter, maybe even drizzle a touch of melted dark chocolate or honey over the top for an extra treat. This bark doubles as a frozen dessert and a fun snack that’s perfect for summer gatherings or a cozy movie night. Trust me; your friends won’t stop raving about your amazing culinary skills!

Recipe Variations

Let’s spice things up! Here are a few fun twists you can try to make your Frozen Yogurt Bark even more exciting:

  • Nutty Delight: Add chopped walnuts, almonds, or pecans instead of coconut for a crunchy twist.

  • Tropical Fruit Burst: Swap out the berries for tropical fruits like pineapple, mango, or kiwi for a summery vibe.

  • Chocolate Lovers’ Dream: Mix in cocoa powder to the yogurt for a chocolate base and sprinkle with chocolate chips.

  • Nut Butter Swirl: Drizzle almond or peanut butter on top before freezing to make it extra creamy and indulgent.

  • Spicy Cinnamon: Add a pinch of cinnamon or chili powder to the yogurt for a warm and spicy surprise!

Chef’s Notes

Ah, the beauty of frozen treats! One of the coolest things about Frozen Yogurt Bark is that it can be modified based on whatever ingredients you have on hand or what’s in season. Over the years, I’ve genuinely enjoyed experimenting with various toppings and flavors. Sometimes I throw in granola for crunch, or yogurt with unexpected spices like cardamom for a fun twist. It’s like a blank canvas that never gets old!

And yes, I’ve had my share of culinary mishaps—like the time I didn’t line the baking sheet properly and ended up with a stuck yogurt slab that became a science experiment. Pro tip: Always check the parchment paper; it’s your best friend in the kitchen!

FAQs and Troubleshooting

1. Can I use regular yogurt instead of low-carb yogurt?
Absolutely! Just be mindful of the sugar content. Greek yogurt works beautifully, giving it a thicker texture!

2. My bark is too soft and not breaking nicely. What did I do wrong?
It’s likely that your yogurt wasn’t frozen long enough. Make sure to freeze it for at least 4 hours for the best results. If it’s still soft, pop it back in!

3. How do I store any leftovers?
Store your bark in an airtight container in the freezer between layers of parchment paper. It should stay fresh for about two weeks, but trust me, it will probably disappear long before then!

4. Can I mix different fruits?
Definitely! Feel free to mix fruits and even add in some nuts or seeds for extra texture. Just keep an eye on the weight of the fruits so it doesn’t get too soggy.

Nutritional Info

This Frozen Yogurt Bark recipe is not only delicious but also packed with nutrition! Here’s a rough breakdown for one piece (assuming 8 pieces in total):

  • Calories: Approximately 80 kcal
  • Protein: 5g
  • Carbohydrates: 7g
  • Fat: 3g
  • Fiber: 2g
  • Sugar: 2g (natural from fruits)

So there you have it, my dear friends—an easy, fun, and nutritious treat perfect for any occasion. Try making this Frozen Yogurt Bark for yourself and let your creativity shine! That first bite will take you back to my childhood, and I know it’ll spark a smile on your face too. Happy freezing, and remember to keep it fresh and delicious!

Print

Frozen Yogurt Bark

A delightful guilt-free treat made with creamy yogurt, vibrant berries, and optional toppings that you can whip up in no time.

  • Prep Time: 10 minutes
  • Cook Time: 0 minutes
  • Total Time: 250 minutes
  • Yield: 8 servings 1x
  • Category: Dessert
  • Method: Freezing
  • Cuisine: American
  • Diet: Vegetarian

Ingredients

Scale
  • 2 cups low-carb yogurt
  • 1/2 cup raspberries
  • 1/2 cup blackberries
  • Coconut flakes (optional)
  • Sugar-free chocolate chips (optional)

Instructions

  1. Prepare your baking sheet: Line a baking sheet with parchment paper.
  2. Mix up the yogurt: Stir the low-carb yogurt in a mixing bowl.
  3. Spread the yogurt: Pour the yogurt mixture onto the prepared baking sheet and spread it out evenly.
  4. Add the berries: Sprinkle raspberries and blackberries across the yogurt.
  5. Sprinkle the toppings: Add coconut flakes or sugar-free chocolate chips if using.
  6. Freeze it out: Place in the freezer for at least 240 minutes, or until frozen solid.
  7. Break it up: Remove from the freezer and break it into pieces.

Notes

Feel free to modify with different fruits and toppings based on what’s in season or your personal preference.

Nutrition

  • Serving Size: 1 piece
  • Calories: 80
  • Sugar: 2g
  • Sodium: 50mg
  • Fat: 3g
  • Saturated Fat: 1g
  • Unsaturated Fat: 2g
  • Trans Fat: 0g
  • Carbohydrates: 7g
  • Fiber: 2g
  • Protein: 5g
  • Cholesterol: 5mg

Keywords: Frozen Yogurt Bark, Healthy Snack, Guilt-free Dessert, Quick Treat

Did you make this recipe?

Share a photo and tag us — we can't wait to see what you've made!