Cleanplate Cravings

Cleanplate Cravings

June 18, 2026 |

Easy Banana Magic Cake
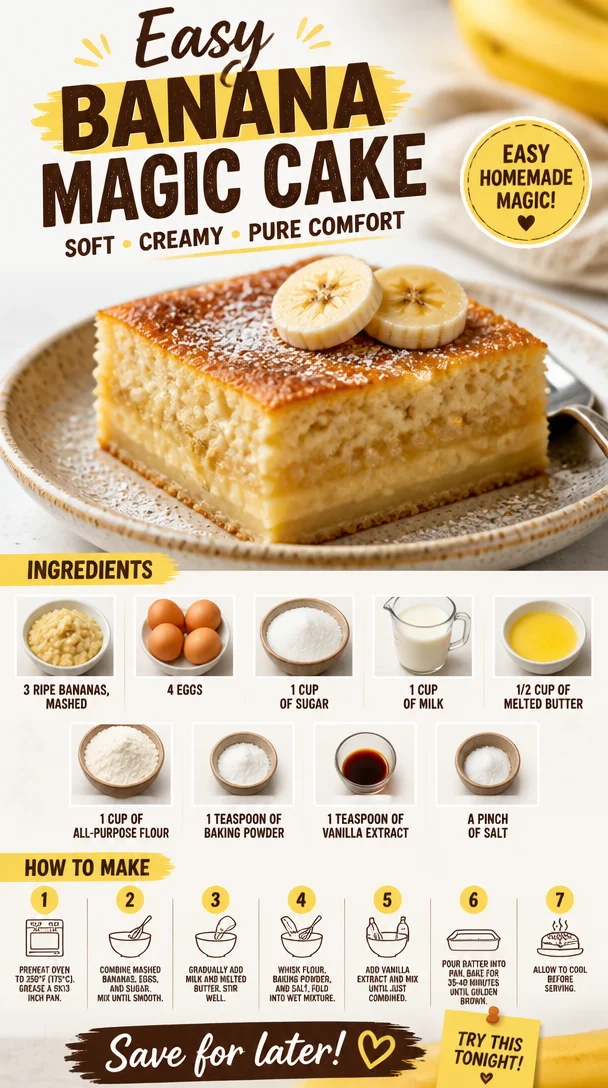
Slice of easy banana magic cake topped with whipped cream and banana slices

Easy Banana Magic Cake

Welcome back, food lovers! Today, I’ve got a special treat that’s bound to awaken your inner bakery wizard: the Easy Banana Magic Cake! If you’ve ever had one of those days when you’re craving something sweet but don’t want to spend hours in the kitchen, this cake is for you. It’s super simple, ridiculously delicious, and—best of all—it requires ingredients you probably already have at home. So, roll up your sleeves, put on that apron, and let’s dive into this banana-infused goodness together!

Introduction

Have you ever had one of those days where everything seems to call for a dose of comfort? You know the kind—where the sun may be shining, but you’re craving something warm and sweet that wraps you in cozy nostalgia? For me, that’s where this Easy Banana Magic Cake comes into play!

Imagine a cake that’s just the right amount of fluffy, with light layers that melt in your mouth. The moment you’re graced with the aroma wafting through your kitchen, you’ll feel the stresses of the day melt away. There’s just something magical about bananas, isn’t there? Growing up, my mother would always make banana bread with the overripe bananas that no one wanted to eat. But I wanted to take that beloved family recipe and transform it into something just as comforting but with a fun twist!

This cake isn’t just another banana treat; it’s a delightful contrast of creamy and light, creating the perfect balance of sweetness. The best part? You can whip it up in no time! Whether you’re serving it for brunch, dessert, or just for yourself with a cup of coffee, this cake is sure to be a hit for anyone who takes a bite. So let’s sprinkle a bit of magic into our kitchens and create a sweet masterpiece today!

Personal Story

Growing up, my family had a knack for good food and even better stories. There was this one summer afternoon when my cousin and I decided to have a banana cake baking competition. I vividly remember racing against the clock, trying to mash bananas with the fervor of a professional chef while she was nonchalantly tossing hers into the bowl. The house was filled with laughter, flour explosions, and a bit of friendly rivalry.

We ended up creating banana cakes that were so different but equally delicious. I remember the taste of my creation; it was soft, airy, and enough to make anyone smile! That day was more than just about baking; it was about shared memories, laughter, and the joy of creating something with love. That spirit, that warmth—that’s what I strive to capture in every recipe I share. Fast forward to today, and I find myself recreating that deliciousness with this Easy Banana Magic Cake.

Ingredients

Let’s break down the key players in this delightful cake, shall we? Here’s what you’ll need:

  • 3 Ripe Bananas: Mashed to create a luscious base. The riper the bananas, the sweeter and more flavorful your cake will be. If you’re in a pinch, you can substitute them with unsweetened applesauce (about 1 cup) for a different flavor!

  • 4 Eggs: These are essential for binding the ingredients and adding richness. If you’re looking for a vegan swap, 1/4 cup of unsweetened flaxseed meal mixed with 3/4 cup of water works like a charm!

  • 1 Cup of Sugar: This sweetness helps achieve a delectable caramelization while baking. If you’re looking for a healthier alternative, coconut sugar or honey can be used, but keep in mind that quantity adjustments might be necessary.

  • 1 Cup of Milk: This adds moisture to the cake. If you’re dairy-free, almond milk or oat milk will work beautifully!

  • 1/2 Cup of Melted Butter: For that rich, buttery flavor. If you need to make it dairy-free, coconut oil or vegan butter is a fantastic substitute.

  • 1 Cup of All-Purpose Flour: This provides structure. Whole wheat flour can give it a lovely nuttiness, though it may alter the texture slightly.

  • 1 Teaspoon of Baking Powder: Our loyal leavening agent! If you’re out, you can use 1/3 teaspoon of baking soda combined with 2/3 teaspoon of cream of tartar.

  • 1 Teaspoon of Vanilla Extract: This brings out the flavors and adds an aromatic touch. If you’re feeling adventurous, almond extract can provide a lovely twist!

  • A Pinch of Salt: Just enough to balance the sweetness and amplify all those delicious flavors.

Step-by-Step Instructions

Now that we’ve gathered all our ingredients, let’s dive into the cooking magic!

  1. Preheat Your Oven: First things first, preheat your oven to 350°F (175°C). This is key as it ensures an even bake.

  2. Prepare Your Baking Pan: Grease a 9×13-inch baking dish with a bit of butter or oil—nothing fancy, just enough to prevent sticking. You can also line it with parchment paper for an easy release!

  3. Mash the Bananas: In a large mixing bowl, mash those ripe bananas until they’re smooth and creamy. Leave some small chunks if you like a bit of texture, but the smoother, the better if you want that melt-in-your-mouth vibe.

  4. Whisk the Eggs: In a separate bowl, crack in the eggs and whisk until they’re light and frothy. This incorporates air, which helps with the fluffiness of your cake.

  5. Combine Sugar and Wet Ingredients: Add the sugar, milk, melted butter, and vanilla to the eggs, whisking until everything is combined. The mixture should be smooth and slightly thick.

  6. Mix Wet and Dry Together: Gradually add in the mashed bananas. Now, sprinkle the flour, baking powder, and salt over the wet mixture. Fold everything together with a spatula until just combined. Be careful not to overmix—it’s okay if there are a few lumps!

  7. Pour it Into the Baking Dish: Gently pour the batter into your prepared baking dish. Give it a little jiggle to level it out!

  8. Bake to Perfection: Pop it in the oven and let it bake for about 30-40 minutes. Your kitchen will start to smell heavenly! Keep an eye on it after around 30 minutes; it’s done when a toothpick inserted in the center comes out clean.

  9. Cool and Serve: Once baked, allow the cake to cool in the pan for about 10 minutes before transferring it to a wire rack to cool completely. Trust me, the wait is worth it!

Serving Suggestions

When it comes to serving this Easy Banana Magic Cake, the choices are limitless! You can simply slice it up and serve it as is, or sprinkle some powdered sugar on top for an elegant touch. For an extra indulgence, pair it with a dollop of whipped cream or a scoop of vanilla ice cream on the side. Drizzle some caramel sauce over it, and you’ll have dessert perfection right there!

Recipe Variations

Now, let’s chat about how you can get creative with this recipe:

  • Nutty Banana Magic Cake: Add 1 cup of chopped walnuts or pecans into the batter for a delightful crunch!

  • Choco-Banana Delight: Toss in a cup of chocolate chips for a decadent twist that will make your heart skip a beat.

  • Coconut Banana Magic Cake: Add 1/2 cup of shredded coconut for a tropical flair that brings a whole new level of yum!

  • Spicy Banana Magic Cake: Want to give it a kick? A teaspoon of cinnamon or a dash of nutmeg will warm things up beautifully.

  • Gluten-Free Option: Substitute the all-purpose flour with a gluten-free flour blend! Just make sure it includes xanthan gum for the right texture.

Chef’s Notes

Making this Easy Banana Magic Cake has become a cherished tradition in my home. I love experimenting with different variations each time! You can truly be as creative as you want—whether you want to keep it classic or go wild with flavor combos. One time I made it with peanut butter swirl, which was an absolute game-changer! Just swirl some peanut butter into the batter before baking for a rich, nutty flavor.

Oh, and I can’t forget the times when I’ve used it as a base for birthday cakes—just layer it with frosting, and voilà! You’ve got yourself a showstopper.

FAQs and Troubleshooting

  1. What should I do if my cake is too dense?

    • A dense cake often means it was overmixed or overbaked. Be sure to mix until just combined and check the cake for doneness early!
  2. Can I use frozen bananas?

    • Absolutely! Just make sure to thaw them completely and drain any excess water before mashing. Frozen bananas are often more flavorful!
  3. What can I do with leftovers?

    • Store it in an airtight container at room temperature for up to 3 days or refrigerate it for a week. It also freezes beautifully—just wrap it tightly!
  4. What can I do if I don’t have baking powder?

    • You can make a DIY replacement using 1/4 teaspoon of baking soda mixed with 1/2 teaspoon of vinegar or lemon juice as a leavening agent.

Nutritional Info (Optional)

While I don’t usually focus on numbers, it’s always nice to know! Each serving of this Easy Banana Magic Cake has approximately:

  • Calories: 210
  • Carbohydrates: 30g
  • Fat: 8g
  • Protein: 3g
  • Sugar: 12g

Remember, it’s all about balance! This cake is a treat, so savor every bite!


And there you have it, my fellow foodies! Your kitchen adventure awaits with this Easy Banana Magic Cake. I can’t wait for you to take your first bite and share it with loved ones. Remember, food brings us together—let’s make it magical! Happy baking!

Print

Easy Banana Magic Cake

A fluffy and delightful banana-infused cake that’s easy to make and perfect for any occasion.

  • Prep Time: 15 minutes
  • Cook Time: 30 minutes
  • Total Time: 45 minutes
  • Yield: 8 servings 1x
  • Category: Dessert
  • Method: Baking
  • Cuisine: American
  • Diet: Vegetarian

Ingredients

Scale
  • 3 Ripe Bananas, mashed
  • 4 Eggs
  • 1 Cup of Sugar
  • 1 Cup of Milk
  • 1/2 Cup of Melted Butter
  • 1 Cup of All-Purpose Flour
  • 1 Teaspoon of Baking Powder
  • 1 Teaspoon of Vanilla Extract
  • A Pinch of Salt

Instructions

  1. Preheat your oven to 350°F (175°C).
  2. Prepare a 9×13-inch baking dish with grease or parchment paper.
  3. Mash the ripe bananas in a large mixing bowl.
  4. Whisk the eggs in a separate bowl until light and frothy.
  5. Combine sugar, milk, melted butter, and vanilla with the eggs, whisking until smooth.
  6. Mix in the mashed bananas, then fold in the flour, baking powder, and salt until just combined.
  7. Pour the batter into the prepared baking dish.
  8. Bake for 30-40 minutes until a toothpick comes out clean.
  9. Cool in the pan for 10 minutes before transferring to a wire rack.

Notes

For variations, consider adding nuts, chocolate chips, or a swirl of peanut butter for extra flavor.

Nutrition

  • Serving Size: 1 serving
  • Calories: 210
  • Sugar: 12g
  • Sodium: 150mg
  • Fat: 8g
  • Saturated Fat: 4g
  • Unsaturated Fat: 4g
  • Trans Fat: 0g
  • Carbohydrates: 30g
  • Fiber: 1g
  • Protein: 3g
  • Cholesterol: 70mg

Keywords: banana cake, easy dessert, baking, comfort food

Did you make this recipe?

Share a photo and tag us — we can't wait to see what you've made!

June 18, 2026 |

Minute Banana Scones with Cinnamon Cream Cheese Glaze

Delicious banana scones with cinnamon cream cheese glaze on a plate

The Ultimate Banana Scones with Cinnamon Cream Cheese Glaze: A Delicious Twist on a Classic

Welcome, fellow food lovers! Today, we’re diving into the scrumptious world of Banana Scones with Cinnamon Cream Cheese Glaze, a recipe that holds a special place in my heart and my kitchen. If you’re anything like me, there’s something magical about the aroma of baked goods wafting through your home. And what could be better than combining the rich flavor of ripe bananas with the indulgence of creamy frosting? Trust me, these scones are the perfect blend of comfort and delight.

Growing up, the highlight of my Saturdays was visiting my grandma’s cozy kitchen. With flour dust dancing in the sunlight streaming through the window, we would whip up all kinds of treats, but it was her banana recipes that always stole the show. She had this magical way of turning ripe bananas into soft, fluffy desserts that seemed to melt in your mouth. I remember giggling as I mashed those bananas, and I always tried to sneak a taste of the batter before it made its way into the oven. That joyous experience is what inspired me to create these Banana Scones, to bring a taste of nostalgia back into my modern kitchen.

So, whether you’re looking for a delightful snack to share with friends or simply want to treat yourself to something special, these scones are calling your name. They’re light, fluffy, and topped with a creamy glaze that’ll make your taste buds sing. Let’s gather our ingredients and jump into making this deliciousness together!

Ingredients

Here’s what you’ll need to whip up these fabulous Banana Scones with Cinnamon Cream Cheese Glaze:

  • 2 ripe bananas, mashed: The real star of the show! Ripe bananas are naturally sweet and full of moisture, giving your scones a wonderful flavor. If you’re in a pinch, you can substitute with unsweetened applesauce (1/2 cup) for a similar texture, though the flavor will differ.

  • 2 cups all-purpose flour: This is our base, providing structure and fluffiness. If you need a gluten-free option, you can use a 1:1 gluten-free flour blend.

  • 1/4 cup granulated sugar: Just a touch of sweetness for that perfect bite. For a healthier alternative, consider coconut sugar or a zero-calorie sweetener, adjusting according to your taste preferences.

  • 1 tablespoon baking powder: This will help those scones rise beautifully in the oven. Ensure your baking powder is fresh for optimal fluffiness!

  • 1/2 teaspoon salt: A crucial ingredient that enhances all the other flavors. If you’re watching your sodium intake, you can reduce this to a pinch.

  • 1/2 teaspoon ground cinnamon: This adds warmth and flavor. If you love a little more spice, feel free to add an extra dash or combine with nutmeg for a unique twist.

  • 1/4 cup unsalted butter, cold and diced: The secret to flaky scones! The cold butter creates little pockets of steam as it melts, making your scones tender. For a dairy-free option, you can swap in coconut oil.

  • 1/2 cup milk: This hydrates our dry ingredients. You can use any non-dairy milk (like almond or oat milk) for a lactose-free version.

  • 1 egg: A binding agent and a source of richness. To make it vegan, substitute with 1/4 cup of unsweetened applesauce.

  • 4 oz cream cheese, softened: This creates the luscious glaze that takes these scones from good to drool-worthy. If you prefer a dairy-free version, vegan cream cheese can work just as well.

  • 1 cup powdered sugar: For sweetness in our glaze. You can use coconut powdered sugar as an alternative for a healthier version.

  • 1 teaspoon vanilla extract: This adds a delightful depth to the glaze. Feel free to experiment with almond extract for a different flavor profile.

  • 1 tablespoon milk (for glaze): This helps adjust the consistency of the glaze to your liking.

  • 1/4 teaspoon ground cinnamon (for glaze): A sprinkle of warmth and spice for the finishing touch!

Step-by-Step Instructions

Now, let’s dive into the baking process! Follow these steps, and you’ll soon be enjoying the fruits of your labor (pun intended!).

  1. Preheat your oven to 400°F (200°C). This high temperature is key to a golden-brown scone, so don’t skip this step!

  2. Mash the bananas in a large mixing bowl. Use a fork to get them nice and smooth. You want about 1 cup of banana puree, so grab those ripest bananas you can find! Remember, the riper they are, the sweeter they will be.

  3. In another bowl, whisk together the flour, sugar, baking powder, salt, and ground cinnamon. This dry mix lays the foundation for your scones. Make sure to sift if your flour has lumps—that extra step goes a long way!

  4. Add the diced cold butter to the flour mixture. Using a pastry cutter or your fingertips, cut the butter into the flour until it resembles coarse crumbs. You want to see tiny pea-sized pieces of butter scattered throughout. This step is crucial for achieving that flaky texture!

  5. In a separate bowl, combine the milk, egg, and mashed bananas. Whisk until well blended.

  6. Pour the wet ingredients into the dry ingredients. Gently mix with a spatula or wooden spoon until just combined. Be careful not to overmix—overworking the dough can lead to tough scones.

  7. Turn the dough out onto a floured surface and gently pat it into a rectangle about 1 inch thick. For that rustic look, no need for perfection here!

  8. Cut your scones into triangles (or use a round cutter if you’re feeling fancy!). Place them on a parchment-lined baking sheet. Give them a little space, as they’ll puff up during baking.

  9. Bake in the preheated oven for 15-20 minutes or until golden brown. Keep an eye on them towards the end! The edges should turn a lovely amber hue, and your kitchen will smell heavenly.

  10. While the scones are baking, let’s prepare the cinnamon cream cheese glaze! In a mixing bowl, combine the softened cream cheese, powdered sugar, vanilla extract, milk, and ground cinnamon. Whisk until smooth and creamy. Adjust the milk for your desired glaze consistency—more for a thinner glaze, less for drizzling.

  11. Once the scones are done, let them cool on a wire rack for about 10 minutes. As they cool, you might be tempted to dive right in—resist the urge! The glaze is worth the wait.

  12. Drizzle the glaze over the scones once they’ve cooled. I like to go wild with it, but feel free to be more controlled if you prefer. The sticky sweetness of the glaze will seep into every nook and cranny, elevating your scones to heavenly heights.

Serving Suggestions

To serve these Banana Scones, arrange them on a charming platter for a delightful brunch or afternoon tea. Pair with a cup of hot coffee or tea for a perfect pairing! You can even wedge some fresh banana slices or a sprinkle of chopped nuts, like pecans or walnuts, on the sides for a beautiful presentation.

Recipe Variations

Feel like customizing your scones further? Here are a few creative twists:

  • Nutty Banana Scones: Toss in some chopped walnuts or pecans for an added crunch.
  • Chocolate Chip Twist: Fold in half a cup of chocolate chips for a rich, sweet surprise in every bite.
  • Berrylicious: Replace one banana with 1/2 cup of your favorite berries (strawberries or blueberries work beautifully).
  • Coconut Flavored: Add shredded coconut to the dough and use coconut milk for a tropical flair.
  • Spiced Up: Add a pinch of nutmeg or ginger for additional depth of flavor in both the scones and the glaze.

Chef’s Notes

Every time I make these scones, I can’t help but reminisce about my grandma’s kitchen and the laughs we shared. I’ve tried various incarnations of this recipe over the years, but none evoke the warmth as well as the classic banana and cinnamon combo. These scones have become a staple in my own home, loved by friends and family alike.

The best part? They freeze beautifully! Just bake, cool, and pop them in a freezer-safe bag. When you’re ready to enjoy, simply reheat in a toaster oven for a warm, fresh taste anytime.

FAQs and Troubleshooting

Q: My scones turned out too dry. What happened?
A: The most likely culprit is overmixing or possibly not enough moisture from the bananas. Be sure to mix until just combined and ensure your bananas are ripe enough to provide ample moisture.

Q: Can I make these scones ahead of time?
A: Absolutely! You can prepare the dough in advance and refrigerate it for up to 24 hours before baking. You can also bake them, cool, and store them in an airtight container for up to three days.

Q: Can I use other flavors in the glaze?
A: Definitely! Feel free to swap out the vanilla extract with almond extract or even a citrus zest for a refreshing twist.

Q: My glaze didn’t set properly. What can I do?
A: If your glaze is too thin, try adding more powdered sugar to thicken it. If too thick, a splash of milk can help loosen it up!

Nutritional Info

While indulgent, these scones are a delightful way to enjoy a treat with a side of nutrition from the bananas. Each scone provides a good dose of potassium and fiber, making them a more wholesome indulgence than your average dessert.


I hope this recipe brings as much joy to your kitchen as it does to mine. There’s nothing quite like baking something from scratch, especially when it’s shared with loved ones. So gather your ingredients, turn up the music, and enjoy every bite of these Banana Scones with Cinnamon Cream Cheese Glaze! Happy baking! 🥳

Print

Ultimate Banana Scones with Cinnamon Cream Cheese Glaze

Delightful banana scones topped with a creamy cinnamon glaze, perfect for a comforting snack or brunch.

  • Prep Time: 20 minutes
  • Cook Time: 20 minutes
  • Total Time: 40 minutes
  • Yield: 8 servings 1x
  • Category: Snack
  • Method: Baking
  • Cuisine: American
  • Diet: Vegetarian

Ingredients

Scale
  • 2 ripe bananas, mashed
  • 2 cups all-purpose flour
  • 1/4 cup granulated sugar
  • 1 tablespoon baking powder
  • 1/2 teaspoon salt
  • 1/2 teaspoon ground cinnamon
  • 1/4 cup unsalted butter, cold and diced
  • 1/2 cup milk
  • 1 egg
  • 4 oz cream cheese, softened
  • 1 cup powdered sugar
  • 1 teaspoon vanilla extract
  • 1 tablespoon milk (for glaze)
  • 1/4 teaspoon ground cinnamon (for glaze)

Instructions

  1. Preheat your oven to 400°F (200°C).
  2. Mash the bananas in a large mixing bowl until smooth.
  3. Whisk together the flour, sugar, baking powder, salt, and ground cinnamon in another bowl.
  4. Add the diced cold butter to the flour mixture, cutting it in until it resembles coarse crumbs.
  5. Combine milk, egg, and mashed bananas in a separate bowl and whisk until blended.
  6. Pour the wet ingredients into the dry ingredients and gently mix until just combined.
  7. Turn the dough out onto a floured surface and pat it into a rectangle about 1 inch thick.
  8. Cut the dough into triangles and place them on a parchment-lined baking sheet.
  9. Bake for 15-20 minutes or until golden brown.
  10. Prepare the glaze by mixing cream cheese, powdered sugar, vanilla, milk, and ground cinnamon until smooth.
  11. Cool the scones on a wire rack for 10 minutes before drizzling with glaze.

Notes

These scones freeze beautifully; bake, cool, and store them in a freezer-safe bag.

Nutrition

  • Serving Size: 1 scone
  • Calories: 250
  • Sugar: 15g
  • Sodium: 200mg
  • Fat: 10g
  • Saturated Fat: 5g
  • Unsaturated Fat: 5g
  • Trans Fat: 0g
  • Carbohydrates: 35g
  • Fiber: 2g
  • Protein: 4g
  • Cholesterol: 50mg

Keywords: banana scones, cinnamon glaze, baked goods, brunch, snack

Did you make this recipe?

Share a photo and tag us — we can't wait to see what you've made!

June 18, 2026 |

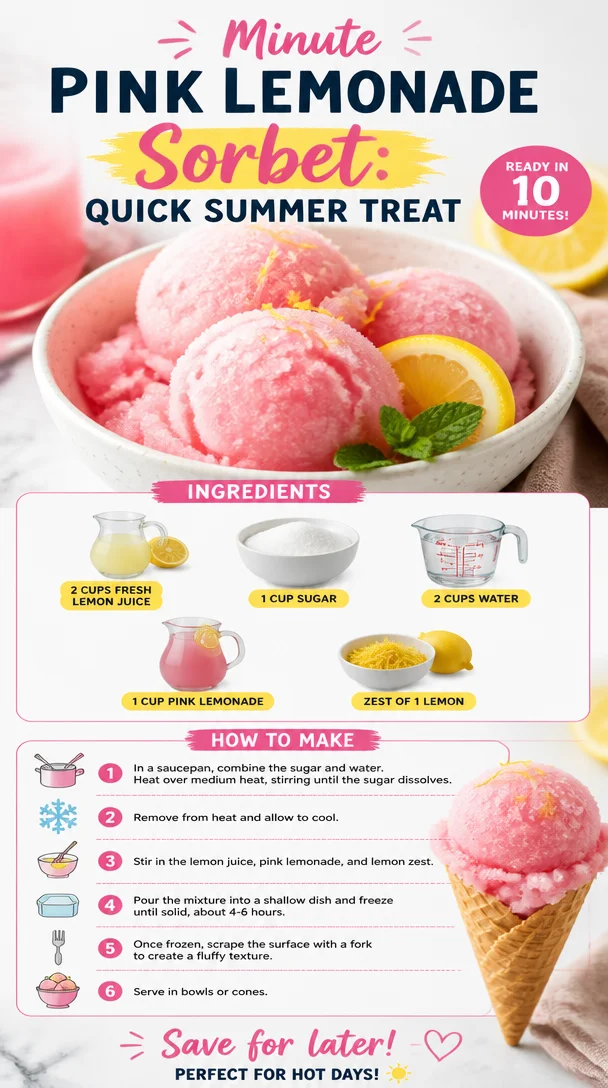
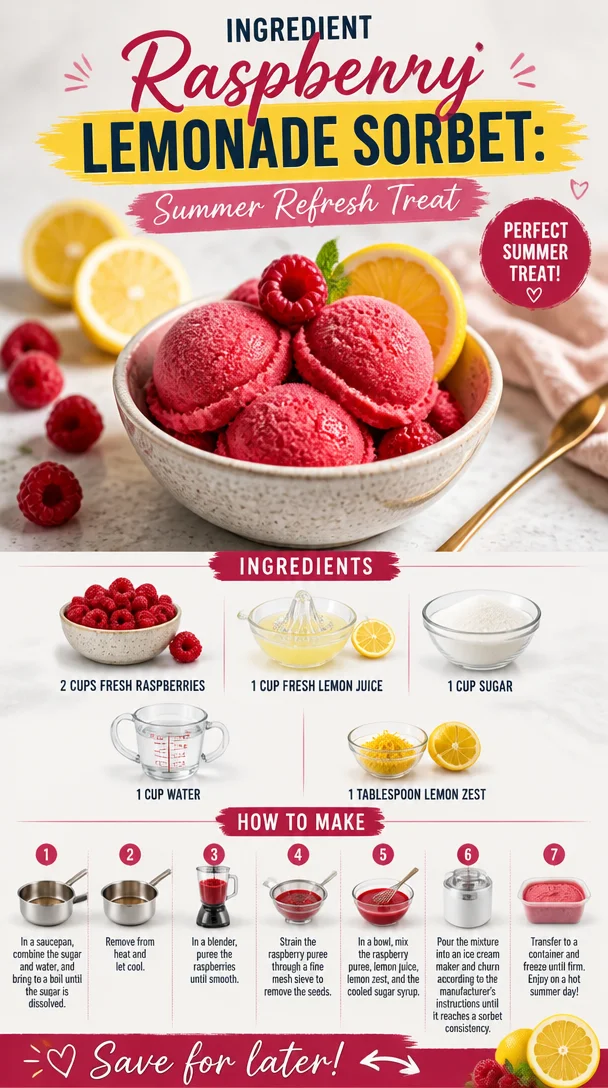
Minute Pink Lemonade Sorbet: Quick Summer Treat

A bowl of pink lemonade sorbet, a refreshing summer dessert.

Refreshing Pink Lemonade Sorbet: A Delightful Summer Treat

Ah, summer! The season when the sun shines a little brighter, the days stretch out longer, and outdoor gatherings come alive. Nothing screams summer quite like a refreshing, icy treat, and if there’s one dessert that captures the essence of sunshine and joy, it’s Pink Lemonade Sorbet. This vibrant, zesty dessert combines the tartness of fresh lemons with just a touch of sweetness, giving you that perfect balance of flavors that leaves you feeling both refreshed and satisfied.

I have fond memories of running around my childhood backyard during sweltering summer afternoons, playing games with friends, and, of course, indulging in that glorious, pink-hued lemonade my mom used to whip up. The first sip was always the best—cold and sweet with a zing of tartness that brought a little twinkle to my eye. As I got older, I wanted to recreate that magic, but with a fun twist. Enter Pink Lemonade Sorbet! This delightful frozen treat takes all the joys of summer lemonade and turns it into a dessert that’s simple to make, and sure to impress.

Not only is this sorbet delicious, but it’s also a breeze to whip up. With just a handful of ingredients and a few steps, you’ll find yourself savoring a bowl of this icy goodness in no time. Whether you’re hosting a summer barbecue, lounging by the pool, or just looking for a sweet treat to brighten your day, this pink lemonade sorbet is a delightful way to indulge.

Personal Story

One of my favorite summers ever was spent at my grandparents’ lake house. Every evening, my grandmother would take a break from her amazing meals and surprise us with homemade lemonade. We’d sit out on the porch, the warm breeze brushing against our skin, laughing and sharing stories as we enjoyed the refreshing drink. One hot afternoon, she decided to get adventurous and added a splash of pink lemonade flavoring. It was like a party in my mouth! That’s the moment I realized how flavors can transport you back to special times and places.

Fast forward a few years, and I found myself combining that memory with my newfound passion for making frozen desserts. Thus, the Pink Lemonade Sorbet was born! Every time I make this treat, I’m reminded of those carefree summers, fun-filled laughter, and my grandmother’s loving spirit. Now, let’s dive into the recipe. You’ll want to get started as soon as you hear how easy and delightful this is!

Ingredients

  • 2 cups fresh lemon juice: Fresh lemons are key! You’ll get that bright tartness that’s essential for achieving that refreshing flavor. If you don’t have fresh lemons, you can use bottled lemon juice, but make sure it’s 100% juice for the best results.

  • 1 cup sugar: Sugar will balance the tartness of the lemons and create a smooth texture. If you’re looking for alternatives, consider using honey or agave syrup. Just reduce the quantity a little since they are sweeter.

  • 2 cups water: Water helps to dilute the strength of the lemon juice. You can substitute sparkling water if you want to add a fun fizz to your sorbet!

  • 1 cup pink lemonade: This gives the sorbet its gorgeous color and enhances the flavor. If you prefer a more natural option, you can make your own pink lemonade by mixing lemon juice with a little cranberry juice or raspberry puree.

  • Zest of 1 lemon: Lemon zest is packed with essential oils, which means it adds a deeper lemon flavor. Don’t skip this step, or your sorbet might be lacking that zing! If you’re in a pinch, try using lime zest for a fun twist.

Step-by-Step Instructions

  1. Prep Your Lemons: Start by zesting your lemon. This might seem like a small step, but trust me, it packs a punch! Use a microplane or fine grater to avoid any bitter white pith. Set the zest aside. Now, juice those lemons! One way to get the most juice out of your lemons is to roll them on the counter before cutting them open.

  2. Make the Syrup: In a medium saucepan, combine the sugar and water over medium heat. Stir until the sugar is completely dissolved. This is your simple syrup base! It should take just a few minutes. Once dissolved, remove from heat and let it cool.

  3. Mix It All Together: In a mixing bowl, combine the fresh lemon juice, cooled simple syrup, pink lemonade, and the lemon zest. Whisk it all together until well combined. The mixture should smell fantastic!

  4. Chill the Mixture: For best results, chill the mixture in the refrigerator for about 30 minutes. This helps the flavors meld together beautifully and makes the blending process easier.

  5. Blend and Freeze: Once chilled, pour the mixture into an ice cream maker (if you have one) and churn according to the manufacturer’s instructions until it reaches a soft-serve consistency. If you don’t have an ice cream maker, you can pour the mixture into a freezer-safe dish, and every 30 minutes, use a fork to scrape and stir the sorbet until it’s frozen (usually about 2-4 hours).

  6. Final Freeze: Once it’s churned and fluffy, transfer the sorbet to an airtight container and freeze it for another 2-4 hours until set.

  7. Serve and Enjoy: Scoop out your pink lemonade sorbet and serve it in chilled bowls. You can garnish it with a twist of lemon zest or a sprig of mint for a lovely touch!

Serving Suggestions

To serve your Pink Lemonade Sorbet, scoop it into chilled bowls or elegant glasses. Consider topping it with fresh mint leaves for a pop of color, or add a sprinkle of edible flowers to impress your guests. To take it over the top, serve it alongside a slice of lemon cake or a handful of fresh berries. Your taste buds will thank you!

Recipe Variations

If you’re feeling a bit adventurous, why not try these fun twists?

  • Berry Twist: Blend in some pureed strawberries or raspberries with the lemon mixture for a berry lemon sorbet.

  • Herbal Infusion: Infuse the simple syrup with fresh basil or mint leaves for a refreshing herbal note. Just strain the herbs out before mixing!

  • Coconut Cream: For a creamy variation, add 1 cup of coconut cream to the lemon mixture. This will transform your sorbet into a creamy delight that still retains that zesty flavor.

  • Wine Sorbet: For an adult twist, add a splash of your favorite white wine into the mixture before freezing. It will create a wonderfully refreshing sorbet perfect for summer gatherings.

Chef’s Notes

I must admit, my first attempts at making sorbet were hilarious! I had a few boozy misadventures when I thought, "Why not add a little rum to the mix?" While that didn’t quite fit the classic profile, the experiment inspired me! I also learned that a little patience goes a long way. The key is to let the sorbet freeze completely before diving in. I’ve tasted the pre-freeze version more times than I care to count! So my advice? Wait for that full freezing period for the absolute best experience.

FAQs and Troubleshooting

Q: Why is my sorbet icy instead of smooth?
A: An icy sorbet usually means the mixture was frozen too quickly. Make sure to stir it regularly when you’re using the manual freezing method. And if you have an ice cream maker, this will help achieve a smoother texture.

Q: Can I use artificial sweeteners?
A: Absolutely! If you’d like to cut down on sugar, feel free to swap it with your preferred sweetener. Just check the conversion rates as they can vary in sweetness.

Q: How long does the sorbet last?
A: Pink Lemonade Sorbet can be stored in an airtight container in the freezer for up to a month. However, for optimal flavor, I recommend enjoying it within the first couple of weeks.

Q: Can I make this without an ice cream maker?
A: Definitely! Just follow the scraping and stirring method mentioned earlier. It requires a bit more attention but is totally doable!

Nutritional Info

(Approximate values per serving of sorbet, based on 8 servings)

  • Calories: 130
  • Total Fat: 0g
  • Saturated Fat: 0g
  • Cholesterol: 0mg
  • Sodium: 5mg
  • Total Carbohydrates: 33g
  • Dietary Fiber: 0g
  • Sugars: 30g
  • Protein: 0g

There you have it, my fabulous foodie friends! Dive into this refreshing world of Pink Lemonade Sorbet that conjures up beautiful memories while delivering a satisfying treat. So grab those lemons, get creative, and let’s make every day a little sweeter with this delightful dessert. Cheers!

Print

Refreshing Pink Lemonade Sorbet

A vibrant, zesty dessert combining the tartness of fresh lemons with a touch of sweetness, perfect for summer.

  • Prep Time: 15 minutes
  • Cook Time: 10 minutes
  • Total Time: 45 minutes
  • Yield: 8 servings 1x
  • Category: Dessert
  • Method: Freezing
  • Cuisine: American
  • Diet: Vegan

Ingredients

Scale
  • 2 cups fresh lemon juice
  • 1 cup sugar
  • 2 cups water
  • 1 cup pink lemonade
  • Zest of 1 lemon

Instructions

  1. Prep your lemons by zesting and juicing them.
  2. Make the syrup by combining sugar and water in a saucepan over medium heat until dissolved.
  3. Mix the fresh lemon juice, cooled syrup, pink lemonade, and lemon zest in a bowl.
  4. Chill the mixture in the refrigerator for about 30 minutes.
  5. Blend and freeze the mixture in an ice cream maker or use a manual scraping method every 30 minutes until frozen.
  6. Serve the sorbet in chilled bowls, optionally garnished with lemon zest or mint.

Notes

For a smooth texture, regularly stir if using the manual freezing method. Enjoy within a few weeks for optimal flavor.

Nutrition

  • Serving Size: 1 serving
  • Calories: 130
  • Sugar: 30g
  • Sodium: 5mg
  • Fat: 0g
  • Saturated Fat: 0g
  • Unsaturated Fat: 0g
  • Trans Fat: 0g
  • Carbohydrates: 33g
  • Fiber: 0g
  • Protein: 0g
  • Cholesterol: 0mg

Keywords: sorbet, lemonade, summer dessert, refreshing treat, frozen dessert

Did you make this recipe?

Share a photo and tag us — we can't wait to see what you've made!

June 18, 2026 |

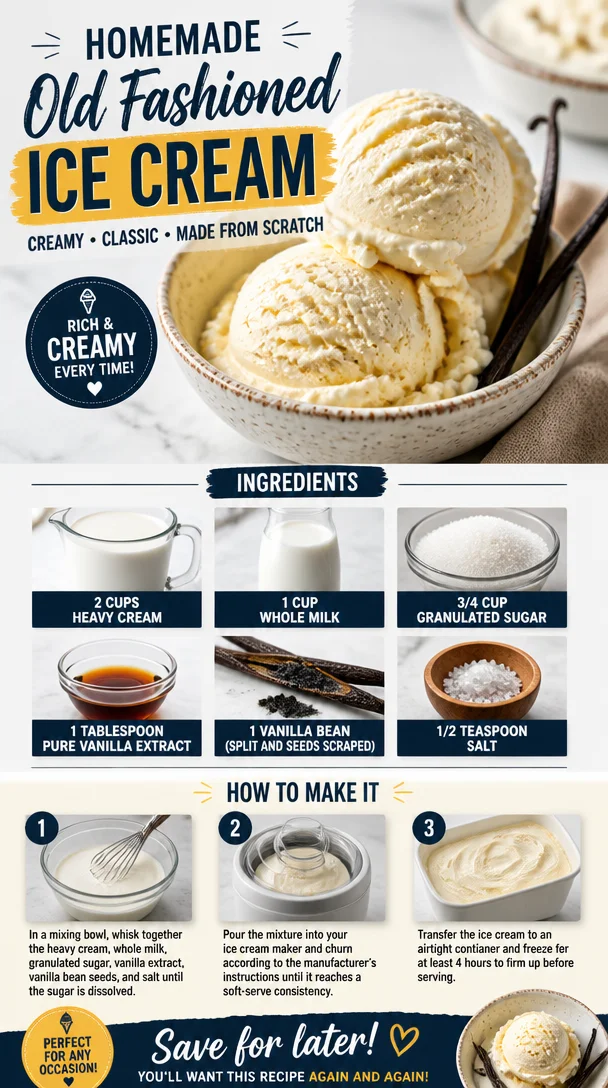
Homemade Old Fashioned Ice Cream

Homemade old fashioned ice cream with fresh ingredients in a bowl

Homemade Old Fashioned Ice Cream: A Creamy Delight

Ah, the sweet, nostalgic lure of homemade ice cream! It’s a summer tradition that takes me back to sun-soaked afternoons with my family, gathered around the old crank ice cream maker that seemed to be more of a workout than a kitchen tool! With each churn, the refreshing aroma of sweet cream filled the air, mixing with laughter and the occasional splash of melting ice. Making ice cream at home has a certain magic to it; it’s not just about satisfaction in a bowl—it’s about the memories we create while making it.

When I think of the perfect summertime treat, nothing beats the experience of sharing a scoop (or three!) of rich, creamy ice cream. It’s pure joy on a hot day, and there’s something wonderfully satisfying about crafting it from scratch, knowing just what goes into that heavenly mixture. Today, we’ll dive into the simple art of making old-fashioned vanilla ice cream, the classic that never goes out of style.

So, roll up your sleeves and let’s embark on this delicious journey together! Homemade ice cream isn’t just a treat; it’s a celebration of freshness, fun, and flavors that warm the heart.


A Whimsical Memory

Growing up, my family had a tradition every Fourth of July: we would transform our backyard into a mini carnival complete with homemade ice cream. Armed with a sun-hat, lots of ice, and an endless supply of enthusiasm, we’d usher in that sweet summer delight. My dad would take charge of the ice cream maker, and us kids would stand anxiously watching, ready to dive in once it was ready.

I can still picture it: walking around with our paper bowls, letting the sun warm our cheeks while we savored scoop after scoop of creamy goodness. My mom’s secret touch was a hint of vanilla bean, which elevated our humble bowl of ice cream to a whole new level. This yearly tradition was more than just a dessert; it was a lesson in patience, a bonding experience, and a taste of childhood delight. Now, whenever I whip up a batch of homemade ice cream, I’m instantly transported back to those roaring summers filled with joy, laughter, and, of course, ice cream!


Ingredients

Here’s what you’ll need to create your very own homemade old-fashioned vanilla ice cream:

  • 2 cups heavy cream
    Rich and creamy, heavy cream provides the base for a luscious texture. You can substitute with coconut cream for a dairy-free option or use half and half for a lighter version.

  • 1 cup whole milk
    Whole milk adds smoothness and richness to the ice cream. If you’re looking for a lower-fat option, feel free to use 1% or 2% milk, but remember it may change the creaminess.

  • 3/4 cup granulated sugar
    Sweetness is key here! Organic cane sugar or coconut sugar works as a great alternative, though it may slightly alter the color and flavor.

  • 1 tablespoon pure vanilla extract
    Pure vanilla extract adds that quintessential flavor we’re all familiar with. If you’re feeling adventurous, you can substitute with almond extract, but go easy on it—it’s stronger!

  • 1 vanilla bean (split and seeds scraped)
    This is where the magic happens! The seeds contain flavor profiles that elevate your ice cream. If you don’t have a vanilla bean, just increase the pure vanilla extract by a teaspoon.

  • 1/2 teaspoon salt
    A pinch of salt enhances all the flavors, balancing out the sweetness and giving a full-bodied taste.


Step-by-Step Instructions

Getting started is easy! Here’s how to make your homemade old-fashioned ice cream:

Step 1: Mix the Base

In a large mixing bowl, whisk together heavy cream, whole milk, and granulated sugar until the sugar is completely dissolved. This usually takes about 2-3 minutes. Chef Tip: If you want to speed things up, you can heat up the milk slightly on the stove, then mix in the sugar, but allow it to cool back down before adding in the cream.

Step 2: Add the Flavor

Now, add the pure vanilla extract and the seeds from the vanilla bean into the mixture. The aroma will hit you right away and infuse your mix with incredible flavor. Stir well to combine.

Step 3: Chill Out

Cover your mixture with plastic wrap and let it chill in the refrigerator for at least 2 hours, or overnight if you have the patience! This step allows the flavors to mingle and strengthens that dreamy vanilla essence. Chef Hack: Make this the night before your ice cream party for maximum flavor impact!

Step 4: Churn Away

Once chilled, pour the mixture into your ice cream maker, following the manufacturer’s instructions. Churn until it thickens (usually about 20-25 minutes). If you don’t have an ice cream maker, no worries! Pour the mixture into a shallow dish, freeze for an hour, whisk it to break up the ice crystals, and repeat every 30 minutes for about 2-3 hours. It’s a little more work, but trust me, it’s worth it!

Step 5: Freeze or Enjoy

Once the ice cream reaches a soft-serve consistency, you can either enjoy it right away or transfer it to an airtight container to freeze for later. Soft ice cream is amazing, but letting it freeze for a few hours in the container creates that iconic scoopable texture. Chef’s Tip: Place a piece of parchment paper directly on top of the ice cream before sealing it for an extra layer of protection!


Serving Suggestions

You can’t go wrong when it comes to serving this ice cream! For a stylish presentation, scoop into chilled bowls and sprinkle with a bit of chocolate sauce, fresh fruit, or crushed cookies. If you’re feeling festive, create an ice cream sundae bar with fun toppings like whipped cream, nuts, and sprinkles—let your guests customize their dream dessert!


Recipe Variations

Want to get creative? Here are a few twists on the classic recipe:

  1. Chocolate Chip Cookie Dough: Fold in chunks of cookie dough and chocolate chips after you churn but before you freeze. Yum!
  2. Minty Fresh: Add a few drops of peppermint extract and green food coloring for a refreshing mint flavor.
  3. Fruit Infusions: Puree your favorite fruits (strawberries, peaches, or bananas) and swirl them into the base after churning for a fruity twist.
  4. Espresso Delight: Mix in a shot of espresso for a coffee-flavored treat that’s perfect for caffeine lovers.
  5. Nutty Variations: Add chopped nuts or swirl in nut butter after churning for added crunch and flavor.

Chef’s Notes

Every ice cream-making experience is like a splash of creativity and personal flair! While I cherish the classic vanilla, I’ve had my fair share of culinary experiments—like the time I accidentally mistook cayenne pepper for cinnamon! Let’s just say some concoctions turned out a bit… interesting. Over the years, my homemade ice cream recipes have evolved into a blend of my fondest food memories and a sprinkle of adventurous spirit. With each batch, I encourage you to add your personal touch—whether that’s adjusting sweetness, tweaking flavoring, or adding your favorite mix-ins. After all, the kitchen is your canvas!


FAQs and Troubleshooting

Q: Why is my ice cream icy instead of creamy?
A: The key is to ensure the sugar is fully dissolved before churning. Also, frequent stirring during the freezing process (if not using a maker) helps break up ice crystals!

Q: Can I make this without an ice cream maker?
A: Absolutely! Just follow the whisking method mentioned above, and you’ll still achieve a delicious treat!

Q: Is it safe to eat raw eggs?
A: This recipe doesn’t contain raw eggs, so rest easy! Just make sure to use pasteurized ingredients.

Q: Can I use flavored extract other than vanilla?
A: Yes! You can customize flavors with almond, coconut, or even citrus extracts. Just remember to adjust the quantity to suit your taste.


Nutritional Info

(Your nutritional details can be included here if needed, keeping in mind serving sizes and adjustments based on variations made.)


Remember, cooking is all about making memories and enjoying the process! Dive into this homemade old-fashioned ice cream recipe and share the joy of cool, creamy goodness with family and friends. Cheers to summer, delicious treats, and good times ahead!

Print

Homemade Old Fashioned Ice Cream

A simple and nostalgic recipe for homemade old-fashioned vanilla ice cream, perfect for summer celebrations.

  • Prep Time: 15 minutes
  • Cook Time: 25 minutes
  • Total Time: 140 minutes
  • Yield: 4 servings 1x
  • Category: Dessert
  • Method: Churning
  • Cuisine: American
  • Diet: Vegetarian

Ingredients

Scale
  • 2 cups heavy cream
  • 1 cup whole milk
  • 3/4 cup granulated sugar
  • 1 tablespoon pure vanilla extract
  • 1 vanilla bean (split and seeds scraped)
  • 1/2 teaspoon salt

Instructions

  1. Mix the Base: In a large mixing bowl, whisk together heavy cream, whole milk, and granulated sugar until the sugar is completely dissolved.
  2. Add the Flavor: Now, add the pure vanilla extract and the seeds from the vanilla bean into the mixture.
  3. Chill Out: Cover your mixture with plastic wrap and let it chill in the refrigerator for at least 120 minutes, or overnight.
  4. Churn Away: Once chilled, pour the mixture into your ice cream maker, following the manufacturer’s instructions.
  5. Freeze or Enjoy: Once the ice cream reaches a soft-serve consistency, transfer it to an airtight container to freeze for later.

Notes

Chef’s Tip: Place a piece of parchment paper directly on top of the ice cream before sealing it for an extra layer of protection!

Nutrition

  • Serving Size: 1 serving
  • Calories: 350
  • Sugar: 25g
  • Sodium: 100mg
  • Fat: 30g
  • Saturated Fat: 18g
  • Unsaturated Fat: 8g
  • Trans Fat: 0g
  • Carbohydrates: 30g
  • Fiber: 0g
  • Protein: 4g
  • Cholesterol: 90mg

Keywords: ice cream, homemade ice cream, vanilla ice cream, summer dessert, old-fashioned ice cream

Did you make this recipe?

Share a photo and tag us — we can't wait to see what you've made!

June 18, 2026 |

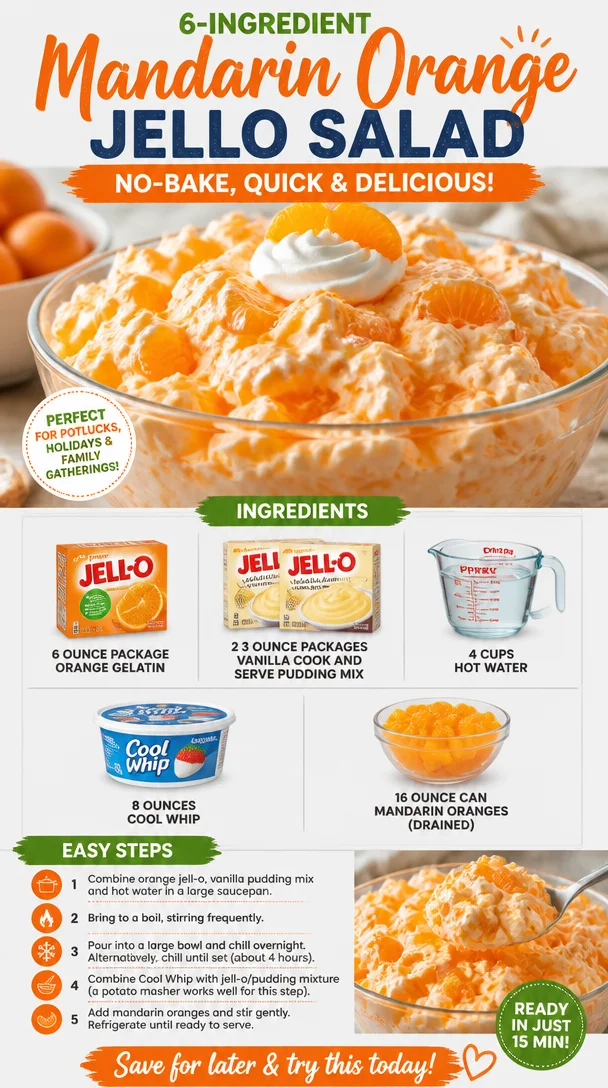
Ingredient Mandarin Orange Jello Salad (No-Bake, Quick)

Delicious Mandarin Orange Jello Salad with bright oranges and gelatin

Whip Up Nostalgia with Mandarin Orange Jello Salad

Hey there, fellow foodies! Today, I’m diving into those nostalgic recipes that not only bring a smile to our faces but also a little warmth to our hearts. You know which one I’m talking about—Mandarin Orange Jello Salad! This delightful, colorful dish is the ultimate throwback to family gatherings and potlucks, where it often sat proudly among the main dishes and desserts. It’s a dish that screams comfort with a hint of whimsy, and trust me, it’s as easy to make as it is to enjoy.

Picture this: a vibrant salad made with orange gelatin, creamy pudding, and bursts of fruity goodness from mandarin oranges, all jazzed up with a fluffy blanket of Cool Whip. It’s the perfect combination of flavors and textures—it’s bright, it’s creamy, and let’s be honest, it’s just plain fun to eat! Whether you’re whipping it up for a family dinner or a summer barbecue, this dish will quickly become a favorite for all ages.

And here’s the best part: this recipe is more than just a dish. It’s a walk down memory lane. The colors remind me of summer picnics under the sun—not a care in the world! The laughter and chatter of family around the table, the clinking of spoons against glass dishes, and my aunt declaring that yes, she makes the best version of this salad. It’s a festival of flavors and textures that adds joy to any meal.

So, are you ready to roll up your sleeves and bring some sunshine into your kitchen? Let’s get started!

Personal Story

While I was growing up, our family gatherings were rich with tradition and filled with beloved recipes passed down through generations. But then there was this one dish—my grandmother’s Mandarin Orange Jello Salad—that became a legend all on its own. I can’t tell you how many times I heard my relatives debating whose version was the best!

I still remember standing on my tiptoes to sneak a taste of the salad before it made its way to the dinner table, its vibrant orange hue practically beckoning me. The tangy sweetness of the orange gelatin coupled with the smooth, creamy pudding was an irresistible combination. It was more than a side dish; it was a cherished recipe that evoked joy and laughter, and it was always the first to disappear!

As I started cooking, I vowed to make this dish my own—modernizing it just a bit while still holding onto its nostalgic roots. Today, I’m excited to share that version with you, seasoned with love and my own personal twists!

Ingredients

  • 6-ounce package orange gelatin
    The star of the show! This adds a sweet, tangy flavor and a vibrant color to your salad. If you’re looking for an alternative, you can try using sugar-free gelatin for a lighter option.

  • 2 (3-ounce) packages vanilla cook and serve pudding mix
    This gives the salad its creaminess. You can substitute with a sugar-free version if you’re aiming to cut down on sugar or use a different flavor like coconut for a fun twist.

  • 4 cups hot water
    Needed to dissolve the gelatin and pudding mix properly. Make sure the water is hot, not boiling, to ensure everything combines smoothly.

  • 8 ounces Cool Whip
    This fluffy topping brings everything together. You can easily swap this with homemade whipped cream if you’re feeling adventurous!

  • 16-ounce can mandarin oranges (drained)
    These little gems add a fresh, fruity burst. If you can’t find canned, fresh mandarin oranges (or even peaches!) make a great alternative.

Step-by-Step Instructions

  1. Dissolve the gelatin
    Start by boiling 4 cups of water. In a large mixing bowl, pour in the 6-ounce package of orange gelatin. Once the water is hot, gradually pour it into the bowl, stirring continuously until the gelatin is fully dissolved. You’ll know it’s ready when the mixture is smoothly bright orange. Chef’s tip: using a whisk instead of a spoon can speed up this process!

  2. Add the pudding mix
    Next, sprinkle in the 2 packages of vanilla cook and serve pudding mix. Stir well to combine, ensuring there are no lumps. The pudding will start to thicken as you mix. Pro tip: if it seems too thick, it’s okay to add a little more hot water.

  3. Cool the mixture
    Allow your gelatin and pudding mixture to cool at room temperature for about 10 minutes. This step is important because you don’t want to melt the Cool Whip when you mix it in! Remember, patience is key here!

  4. Fold in the Cool Whip
    After cooling, gently fold in the 8 ounces of Cool Whip until it’s evenly combined. This step adds that heavenly creaminess while keeping the mix light and airy. Be gentle—overmixing will deflate the beautiful texture you’ve created!

  5. Incorporate the oranges
    Now, it’s time to add the star fruit! Carefully fold in the 16-ounce can of drained mandarin oranges. Take a moment to admire how the round golden pieces pop against the orange backdrop—it’s like sunshine in a bowl! Hint: reserve a few oranges for garnish later!

  6. Refrigerate
    Transfer the mixture to a lovely serving dish or individual cups for a classy touch. Cover with plastic wrap and refrigerate for at least 4 hours or until it’s set. Chef’s note: overnight chilling is even better! Allergies? Make sure to check your canned fruits for any additives!

  7. Serve and enjoy
    Once the salad is set and delightful, scoop it into bowls. You can garnish with a few extra mandarin oranges or even a sprig of mint for a pop of color. Grab your favorite spoon, and dive in! This is the best part—enjoying the fruits of your labor with friends and family is what it’s all about!

Serving Suggestions

When it comes to serving this Mandarin Orange Jello Salad, it’s all about presentation! Serve it in a glass bowl or individual dessert cups for a fun, party-ready feel. You can even add a drizzle of honey or sprinkle some chopped nuts on top for a little crunch. Pair it with a savory dish like grilled chicken or a fresh salad, and you have a winning combination perfect for any gathering!

Recipe Variations

Now, let’s spice things up a bit! Here are a few fun twists to this classic recipe:

  1. Berry Bliss: Replace the mandarin oranges with a mix of fresh berries (strawberries, blueberries, and raspberries) for a tangy twist.

  2. Tropical Paradise: Add crushed pineapple and a splash of coconut extract for an island-inspired version.

  3. Nutty Delight: Fold in some chopped walnuts or pecans for added crunch and nuttiness.

  4. Citrus Medley: Mix in some lemon or lime zest along with the oranges for an extra burst of zesty flavor.

  5. Light and Fresh: Use Greek yogurt instead of some of the Cool Whip to make it even more nutritious while keeping that lovely creaminess!

Chef’s Notes

My journey with Mandarin Orange Jello Salad has certainly evolved over the years. I used to make it just like my grandmother did, but as my cooking skills grew, I started experimenting a bit—adding a hint of lime zest here, swapping in fresh fruit there.

One of my most memorable kitchen fails was when I decided to try a low-carb version using gelatin and cream cheese. Let’s just say, the texture wasn’t quite what I hoped for, and my family dubbed it "orange sludge." Lesson learned, right? Sometimes, sticking to tradition holds its own charm!

FAQs and Troubleshooting

1. Can I make this salad ahead of time?
Absolutely! In fact, it tastes even better the next day after the flavors have had time to meld together. Just cover it well and store it in the refrigerator.

2. What do I do if my Jello doesn’t set?
This can happen if the gelatin wasn’t fully dissolved or if the mixture didn’t cool adequately before adding the Cool Whip. Keep it in the fridge longer to see if it firms up.

3. Can I replace the Cool Whip?
Yes! You can whip heavy cream until soft peaks form and fold it in instead, but keep in mind that it may not be as sweet. Adjust sugar to taste if needed.

4. What’s the best way to store leftovers?
Keep any leftovers in an airtight container in the refrigerator for up to 3 days. Just be aware that the texture might change slightly, but it’ll still be delicious!

Nutritional Info

While I won’t get too bogged down in numbers, this refreshing salad is a delightful treat that’s perfect for special occasions without the guilt. It packs a punch of vitamins from the oranges and can easily be adjusted to fit various dietary needs!


I hope you are as excited to make this Mandarin Orange Jello Salad as I am to share it! It’s not just a recipe, but a way to celebrate the connections between food, family, and friends. Enjoy this light, refreshing dish with loved ones, and may it become a cherished favorite in your home just like it did in mine! Happy cooking! 🍊✨

Print

Mandarin Orange Jello Salad

A vibrant, nostalgic salad featuring orange gelatin, creamy pudding, and mandarin oranges, all topped with Cool Whip.

  • Prep Time: 15 minutes
  • Cook Time: 0 minutes
  • Total Time: 240 minutes
  • Yield: 8 servings 1x
  • Category: Dessert
  • Method: Refrigeration
  • Cuisine: American
  • Diet: Vegetarian

Ingredients

Scale
  • 1 (6-ounce) package orange gelatin
  • 2 (3-ounce) packages vanilla cook and serve pudding mix
  • 4 cups hot water
  • 8 ounces Cool Whip
  • 1 (16-ounce) can mandarin oranges (drained)

Instructions

  1. Dissolve the gelatin by boiling 4 cups of water and pouring it over the orange gelatin in a mixing bowl, stirring until fully dissolved.
  2. Add the pudding mix and stir well to combine, ensuring no lumps remain.
  3. Cool the mixture at room temperature for about 10 minutes.
  4. Fold in the Cool Whip gently until combined.
  5. Incorporate the drained mandarin oranges, folding them in carefully.
  6. Refrigerate for at least 4 hours or until set.
  7. Serve the salad in bowls, optionally garnishing with extra mandarin oranges or mint.

Notes

For variations, try adding fresh berries, crushed pineapple, or nuts for added crunch. Make ahead for best flavor.

Nutrition

  • Serving Size: 1 serving
  • Calories: 200
  • Sugar: 25g
  • Sodium: 150mg
  • Fat: 6g
  • Saturated Fat: 3g
  • Unsaturated Fat: 3g
  • Trans Fat: 0g
  • Carbohydrates: 35g
  • Fiber: 1g
  • Protein: 2g
  • Cholesterol: 10mg

Keywords: jello salad, orange salad, dessert, nostalgic recipes, family gatherings

Did you make this recipe?

Share a photo and tag us — we can't wait to see what you've made!

June 18, 2026 |

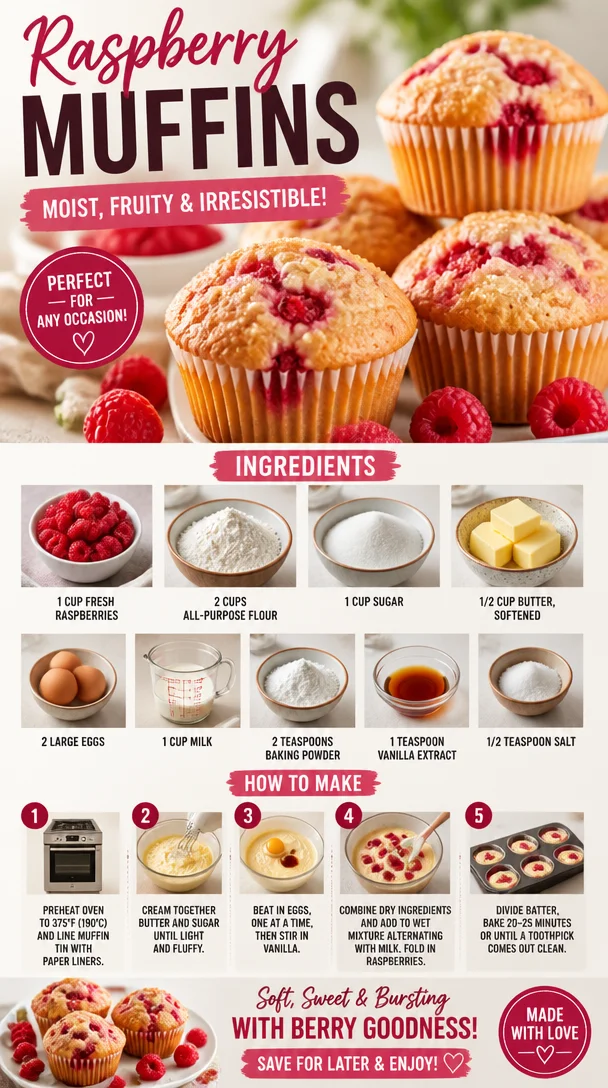
Raspberry Muffins

Freshly baked raspberry muffins on a wooden table

Whip Up Some Joy: The Ultimate Raspberry Muffins Recipe

Welcome, fellow foodies! I’m Ava Carter, and today, we’re diving into one of my absolute favorite treats—the mouthwatering, tantalizing Raspberry Muffins. If you’re searching for a recipe that’s packed with flavor, isn’t overly complicated, and brings a little sunshine into your kitchen, you’ve just hit the jackpot!

Picture this: a basket of golden-brown muffins, just out of the oven, bursting with bright, juicy raspberries that are begging to be devoured. The first bite reveals a perfectly moist crumb, a balance of sweetness from the sugar, and a slight tang from the raspberries. Pair these beauties with a steaming cup of coffee or tea, and you’ve got the ultimate breakfast or snack. Trust me; these muffins are not just food—they’re a hug in a muffin cup!

Let me take you on a little journey while we explore the magic of Raspberry Muffins. For me, baking has always been about connections—sharing laughter, stories, and those unforgettable moments. This particular recipe harks back to my childhood. I remember standing in my grandma’s cozy kitchen, surrounded by the warmth of freshly baked goods, with the sweet, slightly tart aroma of raspberries wafting through the air. We would pick ripe raspberries in her garden, their vibrant color and luscious taste inspiring us to create all sorts of yummy treats.

Those raspberry muffins were a staple in her house, and every bite brought with it a flood of memories. I still channel those same feelings every time I whip up a batch. Whether it’s for breakfast on a lazy Sunday or to impress a group of friends, these muffins never fail to bring a smile to my face.

Ingredients: Fresh and Fabulous

Here’s what you’ll need to create these delightful Raspberry Muffins:

  • 1 cup fresh raspberries
    This is the star of the show! Fresh raspberries provide a burst of flavor and color. If fresh ones are unavailable, you can substitute with frozen raspberries—just make sure to thaw and drain them first to avoid excess moisture.

  • 2 cups all-purpose flour
    The backbone of your muffins, all-purpose flour gives them structure. For a healthier twist, you can experiment with whole wheat flour or gluten-free flour blends.

  • 1 cup sugar
    Sweetness is key! You can adjust this to your taste, or use coconut sugar for a more wholesome option.

  • 1/2 cup butter, softened
    Butter keeps your muffins moist and adds richness. You can also use coconut oil or a plant-based butter for a dairy-free alternative.

  • 2 large eggs
    Eggs provide moisture and help bind the ingredients together. For a vegan option, try flax eggs (1 tablespoon ground flaxseed + 2.5 tablespoons water per egg, mixed and let sit for a few minutes).

  • 1 cup milk
    Milk adds a tender crumb. You can use almond milk, oat milk, or any other plant-based milk if you prefer a dairy-free option.

  • 2 teaspoons baking powder
    This little powerhouse is essential for making your muffins rise and develop that lovely texture.

  • 1 teaspoon vanilla extract
    Vanilla adds a touch of warmth and enhances the overall flavor. If you’re feeling adventurous, you can experiment with other extracts like almond or lemon.

  • 1/2 teaspoon salt
    A pinch of salt balances the sweetness and rounds out the flavors.

Let’s make magic happen!

Step-by-Step Instructions: Your Guide to Muffin Mastery

Now that we have our ingredients ready, let’s get baking! Follow these steps, and I promise you’ll have a kitchen full of beautiful Raspberry Muffins in no time.

Step 1: Preheat the Oven

Preheat your oven to 375°F (190°C). This step is crucial for achieving that perfect, fluffy texture. While the oven is heating up, you can prepare your muffin tins.

Step 2: Prepare Your Muffin Tins

Grease a 12-cup muffin tin with cooking spray or line it with muffin liners. This little step helps your muffins release easily and makes cleanup a breeze!

Step 3: Mix the Dry Ingredients

In a large bowl, whisk together the flour, sugar, baking powder, and salt until well combined. This helps aerate the flour, ensuring your muffins will be light and fluffy.

Step 4: Cream the Butter and Sugar

In another bowl, you’ll want to cream together the softened butter and the remaining sugar until the mixture is light and fluffy. This usually takes about 3-5 minutes. Creaming helps to incorporate air, making your muffins lighter.

Step 5: Add the Eggs and Vanilla

Beat in the eggs, one at a time, along with the vanilla extract. Make sure everything is mixed well, so the batter comes together beautifully. Don’t skip the vanilla—it elevates the flavor!

Step 6: Combine Wet and Dry

Now, slowly add the dry mixture to your wet ingredients, alternating with the milk. You want to start and end with the dry ingredients (dry-wet-dry). Doing this helps create a smooth, cohesive batter without over-mixing, which can lead to tough muffins. Gently fold in those gorgeous raspberries, being careful not to break them too much.

Step 7: Fill the Muffin Tins

Spoon the batter into the prepared muffin tins, filling each cup about two-thirds full. This leaves room for the muffins to rise without overflowing.

Step 8: Bake, Bake, Bake!

Pop those muffin tins into the oven and bake for 18-20 minutes, or until the tops are a beautiful golden brown and a toothpick inserted into the center comes out clean.

Step 9: Cool and Enjoy

Once baked, remove the muffins from the oven and let them cool in the tin for about 5 minutes before transferring them to a wire rack to cool completely. The waiting is the hardest part, I know—your kitchen will smell divine!

Serving Suggestions: Muffin Masterpieces

To serve these Raspberry Muffins, feel free to drizzle a touch of honey or maple syrup on top for extra sweetness. A dollop of yogurt alongside makes a perfect pairing. If you want, grab a plate, stack a few muffins, and sprinkle some extra raspberries around. It adds a lovely touch of color and makes for an enticing presentation!

Recipe Variations: Get Creative!

These muffins are incredibly versatile—here are some fun ideas to switch things up:

  • Lemon Zest: Incorporate the zest of one lemon into the batter for a fresh citrus twist that pairs beautifully with the raspberries.

  • Almonds: Add chopped almonds to the mix for crunch and a lovely nutty flavor.

  • Chocolate Chips: Toss in some dark chocolate chips for a decadent treat that’s hard to resist.

  • Oat Topping: Sprinkle some oats with a drizzle of honey on top before baking for an extra chewy layer.

  • Veggies: Feel free to toss in grated carrots or zucchini for added moisture and flavor—who knew muffins could be healthy and breakfast-y?

Chef’s Notes: A Dash of Nostalgia

As I mentioned earlier, this recipe comes from my cherished childhood memories. Each batch takes me back to my grandma’s kitchen, a haven of laughter, love, and, of course, delicious food. Over the years, I’ve tweaked this recipe a bit—experimenting with different fruits and flavors, but the classic Raspberry Muffins always remain a favorite in my household.

I once made these muffins for a brunch gathering, and they disappeared in no time! The best compliment I received was from a friend who said they tasted just like nostalgia with a hint of summer—a mix of warmth and the tantalizing sweetness of fresh raspberries.

FAQs and Troubleshooting

Q: My muffins came out dense. What happened?
A: It’s likely that the batter was over-mixed. When combining the wet and dry ingredients, mix just until combined!

Q: Can I use frozen raspberries?
A: Absolutely! Just be sure to thaw and drain them first to avoid excess moisture in your batter. You can also fold them in gently to avoid a blueberry effect!

Q: How can I store these muffins?
A: Store in an airtight container at room temperature for up to 3 days, or in the fridge for up to a week. You can also freeze them for a longer shelf life—just make sure they’re sealed tightly!

Q: What if I don’t have milk?
A: You can substitute with yogurt, sour cream, or a plant-based milk for a dairy-free version!

Nutritional Info (Optional)

This recipe yields about 12 muffins, and here’s an estimated calorie breakdown for one muffin:

  • Calories: 200
  • Total Fat: 8g
  • Saturated Fat: 5g
  • Carbohydrates: 28g
  • Sugar: 12g
  • Protein: 3g

Keep in mind that these values can vary based on specific ingredients and portion sizes.

The thing about these Raspberry Muffins is that they are more than just a recipe. They’re a way to share love, a little slice of nostalgia, and a delicious treat to brighten up any day. I hope you make a batch, enjoy every crumb, and maybe even create your own fond memories in the kitchen! Happy baking!

Print

Raspberry Muffins

Deliciously moist Raspberry Muffins bursting with fresh raspberries, perfect for breakfast or a snack.

  • Prep Time: 15 minutes
  • Cook Time: 20 minutes
  • Total Time: 35 minutes
  • Yield: 12 muffins 1x
  • Category: Breakfast
  • Method: Baking
  • Cuisine: American
  • Diet: Vegetarian

Ingredients

Scale
  • 1 cup fresh raspberries
  • 2 cups all-purpose flour
  • 1 cup sugar
  • 1/2 cup butter, softened
  • 2 large eggs
  • 1 cup milk
  • 2 teaspoons baking powder
  • 1 teaspoon vanilla extract
  • 1/2 teaspoon salt

Instructions

  1. Preheat your oven to 375°F (190°C).
  2. Prepare a 12-cup muffin tin by greasing it or lining it with liners.
  3. Mix the flour, sugar, baking powder, and salt in a large bowl.
  4. Cream together the softened butter and sugar until light and fluffy.
  5. Add the eggs one at a time, along with the vanilla extract, mixing well.
  6. Combine the dry mixture with the wet ingredients, alternating with the milk.
  7. Fold in the raspberries gently.
  8. Fill the muffin tins about two-thirds full with the batter.
  9. Bake for 18-20 minutes or until golden brown and a toothpick comes out clean.
  10. Cool in the tin for 5 minutes, then transfer to a wire rack to cool completely.

Notes

Feel free to add lemon zest, almonds, or chocolate chips for variations. These muffins are best enjoyed fresh but can be stored in an airtight container.

Nutrition

  • Serving Size: 1 muffin
  • Calories: 200
  • Sugar: 12g
  • Sodium: 200mg
  • Fat: 8g
  • Saturated Fat: 5g
  • Unsaturated Fat: 2g
  • Trans Fat: 0g
  • Carbohydrates: 28g
  • Fiber: 1g
  • Protein: 3g
  • Cholesterol: 30mg

Keywords: Raspberry, Muffins, Breakfast, Baking, Snack

Did you make this recipe?

Share a photo and tag us — we can't wait to see what you've made!

June 18, 2026 |

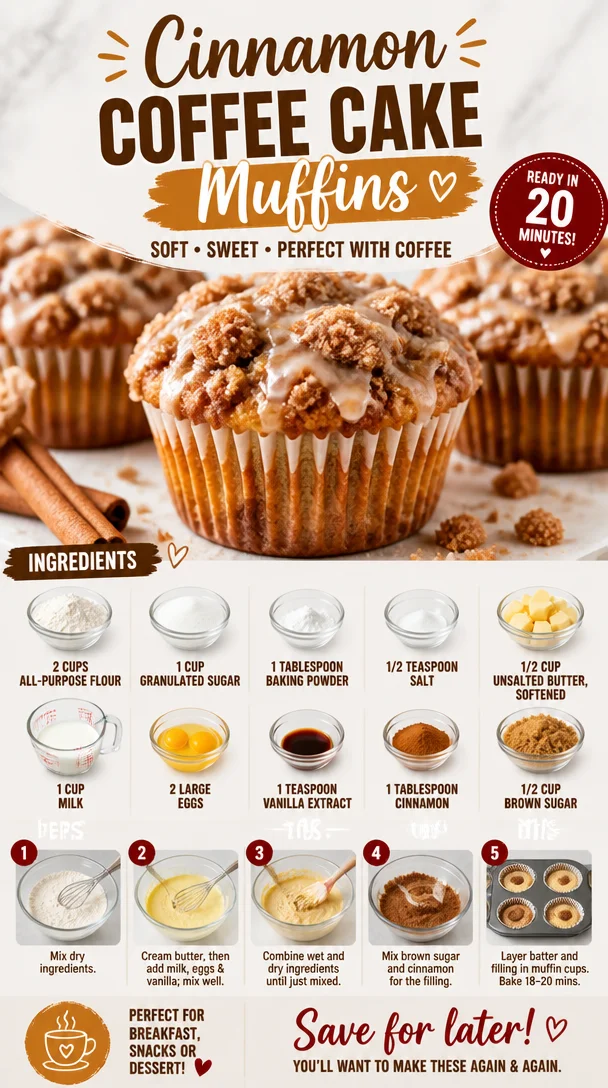
Cinnamon Coffee Cake Muffins

Delicious cinnamon coffee cake muffins topped with a streusel crumble.

Cinnamon Coffee Cake Muffins: A Warm Hug in Every Bite

Ah, cinnamon coffee cake muffins! Just the name brings back sweet memories of lazy Sunday mornings spent in my grandmother’s cozy kitchen, the warm aroma of cinnamon wafting through the air. There was something truly magical about those mornings—the bustling of the coffee pot brewing, the anticipation of fresh muffins rising in the oven, and of course, the delightful chatter that filled the room. This recipe is all about those cherished moments, where simplicity meets flavor, and comfort food takes center stage.

Whether you’re looking for a breakfast treat to pair with your coffee or a sweet snack to share with friends, these cinnamon coffee cake muffins deliver both nostalgia and scrumptiousness. They’re fluffy, moist, and topped with a heavenly crumbly cinnamon-sugar streusel that adds the perfect crunch. Trust me, once you pop these muffins in your mouth, you’ll feel like a kid again! So, let’s roll up our sleeves, preheat that oven, and dive into the delightful world of cinnamon coffee cake muffins.

A Personal Story with a Pinch of Cinnamon

Growing up, weekends were family time, and nothing brought us together like a batch of freshly baked muffins. My grandmother had a way of turning ordinary ingredients into something extraordinary, and her cinnamon coffee cake muffins were no exception. I can still remember standing on a wobbly stool, watching her expertly mix the batter while sneaking spoonfuls of sugar (okay, maybe a little too much!) when she wasn’t looking.

What made her muffins even more special was the love she put into them. Each time we baked together, she would share little stories about her own childhood—stories filled with laughter, and sometimes a few kitchen mishaps that made us crack up. You know those heartwarming moments that wrap around you like a warm blanket? That’s what these muffins conjure for me. So, as we gather our ingredients and get started on this delightful journey, remember: it’s not just about baking—it’s about creating memories, one muffin at a time.

Ingredients

  • 2 cups all-purpose flour
    A classic choice for muffins, providing the perfect structure while keeping them light. If you want to make them a bit healthier, try using whole wheat flour or a gluten-free blend!

  • 1 cup granulated sugar
    This sweetener helps the muffins rise and caramelize beautifully, giving that golden crust. For a lower-calorie option, coconut sugar works wonders without compromising flavor.

  • 1 tablespoon baking powder
    The secret that helps our muffins rise to fluffy perfection! Always check the expiry date; old baking powder can leave your muffins flat.

  • 1/2 teaspoon salt
    A tiny but mighty ingredient that brings out the sweetness in our muffins. Don’t skip it—balance is key!

  • 1/2 cup unsalted butter, softened
    This rich ingredient provides moisture and flavor. If you’re in a dairy-free mood, melted coconut oil is a fantastic alternative.

  • 1 cup milk
    I love whole milk for creamy richness, but feel free to swap with almond milk or oat milk to fit any dietary needs!

  • 2 large eggs
    Eggs are the binding force! For a vegan option, consider using flaxseed eggs or applesauce.

  • 1 teaspoon vanilla extract
    This adds a lovely depth of flavor. Make sure to use pure vanilla extract for the best results!

  • 1 tablespoon cinnamon
    The star of our muffins! The warm aroma is simply irresistible. Try adding a little nutmeg for extra warmth if you’re feeling adventurous!

  • 1/2 cup brown sugar
    Mixed with cinnamon, this creates a delicious streusel topping. You can easily use white sugar if you don’t have brown sugar available.

Step-by-Step Instructions

  1. Preheat Your Oven
    Start by preheating your oven to 350°F (175°C). It’s essential for ensuring your muffins rise perfectly.

  2. Prepare Your Muffin Tin
    While the oven heats, line a muffin tin with paper liners or grease it lightly with butter. This will help keep your muffins from sticking and make for an easy cleanup.

  3. Mix Dry Ingredients
    In a large mixing bowl, whisk together the all-purpose flour, granulated sugar, baking powder, salt, and cinnamon. This step is vital for distributing the leavening agent evenly, which leads to splendidly fluffy muffins.

  4. Cream Butter and Sugar
    In a separate bowl, beat the softened unsalted butter until creamy, then gradually add the brown sugar. This step gets air into the butter, creating a fluffy texture. You can mix by hand, but I recommend using a handheld mixer for the best results!

  5. Combine Eggs and Vanilla
    Add the eggs and vanilla extract to the butter-sugar mixture and beat until it’s fully combined. The batter should be smooth and creamy. Don’t worry if it looks different from cake batter; it will come together nicely when you add the flour mixture!

  6. Blend Wet and Dry Ingredients
    Gradually add the dry ingredients to the wet mixture, alternating with milk. Start and end with the dry ingredients, mixing gently until just combined. Overmixing is a common mistake that leads to tougher muffins; we want tender beauties here!

  7. Fill the Muffin Tin
    Using a spoon or ice cream scoop, fill each muffin cup about 3/4 full with batter. This allows room for rising without overflowing.

  8. Create the Streusel Topping
    In a small bowl, combine cinnamon, brown sugar, and a bit of flour. Sprinkle this crumbly mix generously over your muffin batter. The more, the merrier!

  9. Bake
    Pop the muffin tin into the preheated oven and bake for 18-20 minutes or until a toothpick comes out clean from the center. Keep an eye on them the last few minutes for perfectly golden tops!

  10. Cool and Enjoy
    Once baked, let the muffins cool in the tin for a few minutes before transferring them to a wire rack. Now, you can either enjoy them warm (my favorite!) or let them cool completely for later.

Serving Suggestions

Serve these glorious cinnamon coffee cake muffins warm, dusted with powdered sugar or drizzled with a simple glaze of icing sugar and milk. Pair them with a hot cup of coffee, or even a steaming chai latte for a delightful breakfast or afternoon treat. They also make fantastic grab-and-go snacks, perfect for busy mornings!

Recipe Variations

  1. Apple Cinnamon Muffins: Fold in diced apples for a fruity twist!

  2. Nutty Cinnamon Muffins: Add chopped walnuts or pecans to the batter for extra crunch and flavor.

  3. Pumpkin Spice Muffins: Substitute 1/2 cup of milk with pumpkin puree and adjust the spices for a fall-inspired treat!

  4. Chocolate Chip Cinnamon Muffins: Toss in a handful of chocolate chips to satisfy those sweet cravings.

  5. Lemon Zest Twist: Add the zest of a lemon to brighten up the flavor profile—cinnamon and citrus are a delightful combination!

Chef’s Notes

These muffins have a special place in my heart, evolving over the years as I’ve fine-tuned my recipe. I once had a baking disaster when my toddler decided to "help" by adding a cup of salt instead of sugar. We laughed so hard (and made a mess), but it taught me the importance of enjoying the process. Baking is just as much about the journey and the joy shared as it is about the final product.

FAQs and Troubleshooting

Q: My muffins turned out dense. What went wrong?
A: Overmixing the batter can lead to a dense texture. Mix until just combined for perfect fluffiness.

Q: Can I freeze these muffins?
A: Absolutely! Let them cool completely, then place them in an airtight container or freezer bag. They’ll stay fresh in the freezer for up to 3 months.

Q: How can I store the leftover muffins?
A: Store your muffins in an airtight container at room temperature for up to 3 days. For longer storage, refrigerate them!

Q: What if I don’t have baking powder?
A: You can substitute baking powder with a mix of cream of tartar and baking soda (1/2 teaspoon baking soda + 1 teaspoon cream of tartar = 1 teaspoon baking powder).

Nutritional Info (Optional)

While I believe in enjoying every bite without counting calories, here’s a rough estimate for the nutritional information per muffin:

  • Calories: 220
  • Protein: 3g
  • Fat: 8g
  • Carbohydrates: 35g
  • Fiber: 1g
  • Sugar: 10g

Conclusion

Whipping up these cinnamon coffee cake muffins is about much more than just satisfying your taste buds; it’s about creating memories that last a lifetime. Each bite is a reminder of warmth and love and a chance to share those moments with friends and family. So, gather your loved ones, start baking, and let the magic unfold in your own kitchen. Remember, whether you’re a novice or a seasoned pro, there’s always room for a bit of joy, a sprinkle of laughter, and a dash of cinnamon in every kitchen adventure. Happy baking!

Print

Cinnamon Coffee Cake Muffins

Fluffy and moist cinnamon coffee cake muffins topped with a delightful crumbly cinnamon-sugar streusel, bringing warmth and nostalgia to your mornings.

  • Prep Time: 15 minutes
  • Cook Time: 20 minutes
  • Total Time: 35 minutes
  • Yield: 12 servings 1x
  • Category: Breakfast
  • Method: Baking
  • Cuisine: American
  • Diet: Vegetarian

Ingredients

Scale
  • 2 cups all-purpose flour
  • 1 cup granulated sugar
  • 1 tablespoon baking powder
  • 1/2 teaspoon salt
  • 1/2 cup unsalted butter, softened
  • 1 cup milk
  • 2 large eggs
  • 1 teaspoon vanilla extract
  • 1 tablespoon cinnamon
  • 1/2 cup brown sugar

Instructions

  1. Preheat your oven to 350°F (175°C).
  2. Prepare a muffin tin with paper liners or grease it with butter.
  3. Mix dry ingredients: whisk together flour, sugar, baking powder, salt, and cinnamon.
  4. Cream butter until creamy, then gradually add brown sugar.
  5. Combine eggs and vanilla with the butter-sugar mixture until smooth.
  6. Blend dry ingredients into the wet mixture, alternating with milk.
  7. Fill each muffin cup about 3/4 full with batter.
  8. Create the streusel topping by combining cinnamon, brown sugar, and flour, then sprinkle over the batter.
  9. Bake for 18-20 minutes or until a toothpick comes out clean.
  10. Cool the muffins in the tin for a few minutes before transferring to a wire rack.

Notes

Serve warm or let cool completely for later. Muffins can be frozen for up to 3 months.

Nutrition

  • Serving Size: 1 muffin
  • Calories: 220
  • Sugar: 10g
  • Sodium: 200mg
  • Fat: 8g
  • Saturated Fat: 5g
  • Unsaturated Fat: 3g
  • Trans Fat: 0g
  • Carbohydrates: 35g
  • Fiber: 1g
  • Protein: 3g
  • Cholesterol: 30mg

Keywords: cinnamon muffins, coffee cake muffins, breakfast muffins

Did you make this recipe?

Share a photo and tag us — we can't wait to see what you've made!

June 18, 2026 |

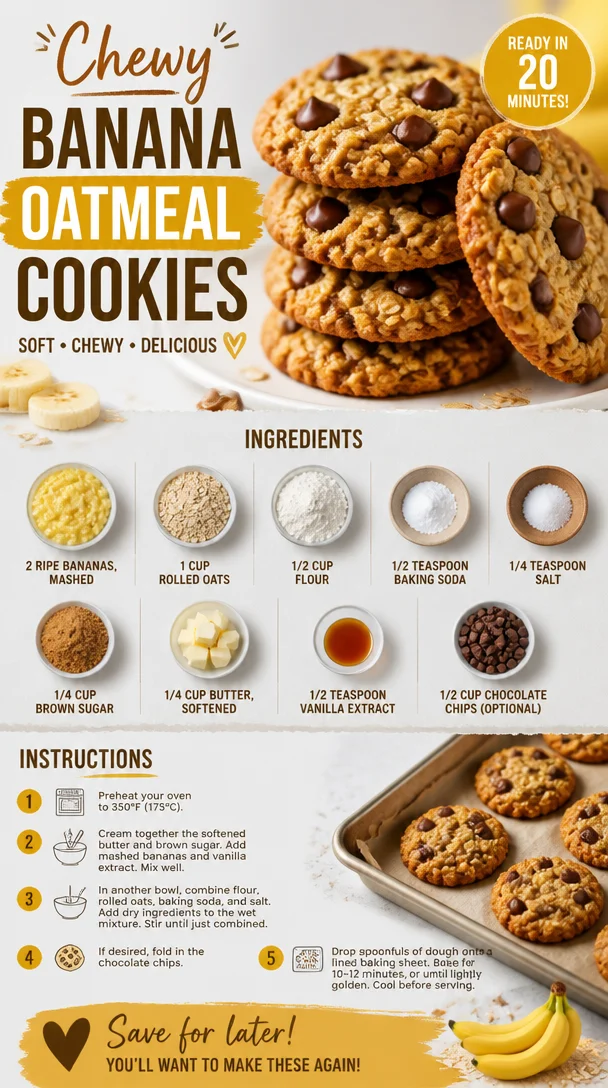
Chewy Banana Oatmeal Cookies

Delicious chewy banana oatmeal cookies on a baking tray

Chewy Banana Oatmeal Cookies: A Tasty Twist on Sweet Memories

Welcome back, food lovers! Today, we’re diving into a delightful treat that will tickle your taste buds and fill your kitchen with the sweet aroma of freshly baked goodness—Chewy Banana Oatmeal Cookies! If you’ve ever found yourself staring at a bunch of overly ripe bananas, wondering how to give them a second life, this recipe is your answer.

Bananas are so versatile, aren’t they? They go from breakfast smoothies to fluffy pancakes, and now, they’ll shine in the spotlight as the star ingredient in these chewy cookies. The best part? They’re not just delicious; they’re also wholesome and packed with easy-to-find ingredients. Trust me, these cookies are the perfect balance of chewy, hearty, and oh-so-sweet—a delightful treat that’ll make your afternoon snack feel a bit more special.

With each bite, you’ll get that comforting banana flavor mingled with the heartiness of oats, along with a hint of chocolatey goodness if you choose to add the chocolate chips! Picture a cozy afternoon, maybe a warm cup of tea or coffee in hand, and a batch of freshly baked cookies on the table. Sounds lovely, right?

So roll up your sleeves and join me in the kitchen as we whip up these delicious cookies. Let’s make some magic happen!

A Sweet Memory: The Influence of Bananas

Every time I spot a ripe banana, it takes me back to my grandmother’s kitchen. She had a knack for turning overripe bananas into something extraordinary. I remember standing on a little stool beside her, eyes wide and heart open to the world of flavors she created.

Her classic banana bread was always a hit, but it was during one of those cherished weekends that we first decided to play with the idea of cookies. Armed with nothing but our adventurous spirits and a longing for something sweet, we mashed bananas until they became a puddle of fruity goodness. I can still feel the joy radiating through me as I scooped spoonfuls of the batter onto the baking sheet.

As the cookies baked, the aroma filled the entire house, a melody of sweetness that made our hearts dance in anticipation. When they came out of the oven, they weren’t just cookies; they were little bites of love—warm, chewy, and bursting with the playful spirit of a carefree afternoon. This Chewy Banana Oatmeal Cookies recipe is my tribute to those unforgettable moments, serving to bridge generations through the joy of baking.

Ingredients: Let’s Gather Our Goodies

Before we jump into the cooking, let’s gather our star ingredients! Each component plays a vital role in creating that chewy, delicious cookie we’re after. Here’s what you’ll need:

  • 2 ripe bananas, mashed
    The riper, the better! Look for bananas with lots of brown spots—this means they’re sweet and ready to be mashed into a delightful puree.

  • 1 cup rolled oats
    These provide great texture and chewiness. You can substitute with quick oats in a pinch, though they’ll alter the final texture slightly.

  • 1/2 cup flour
    A little bit of all-purpose flour helps give the cookies structure. For a gluten-free option, use almond or oat flour, but keep in mind the texture will vary.

  • 1/2 teaspoon baking soda
    This helps your cookies rise and gives them lightness. Make sure it’s fresh for the best results!

  • 1/4 teaspoon salt
    This enhances the flavors and balances the sweetness. Don’t skip it!

  • 1/4 cup brown sugar
    Adds a lovely caramel flavor and moisture. Light or dark brown sugar works here—feel free to adjust to taste!

  • 1/4 cup butter, softened
    Brings richness to the cookies. You can substitute with coconut oil or vegan butter for a dairy-free option.

  • 1/2 teaspoon vanilla extract
    A little touch of vanilla makes everything better. Use pure vanilla extract for the best flavor!

  • 1/2 cup chocolate chips (optional)
    Add these for a little extra indulgence! Dark, semi-sweet, or even a splash of white chocolate can take these cookies to another level.

Step-by-Step Instructions: Let’s Bake Some Cookies!

Ready to get baking? Here’s a detailed breakdown to guide you through the process—you’re going to love how easy and fun this is!

  1. Preheat Your Oven
    Set your oven to 350°F (175°C). Preheating is crucial for that perfect bake!

  2. Prep the Baking Sheet
    Line a baking sheet with parchment paper or a silicone baking mat. This will prevent the cookies from sticking and make for easier cleanup!

  3. Mash the Bananas
    Grab a bowl and mash those ripe bananas using a fork. The final texture should be smooth with just a few small chunks—chunky banana bits add a nice touch!

  4. Cream the Butter and Sugar
    In a separate mixing bowl, beat the softened butter and brown sugar together until creamy. This is where the magic begins. Beat them until smooth and fluffy, about 2–3 minutes.

  5. Add in the Mashed Bananas and Vanilla
    Incorporate the mashed bananas and vanilla extract into the butter-sugar mixture. Mix until combined; this will create a beautiful, fragrant batter!

  6. Combine Dry Ingredients
    In another bowl, whisk together the rolled oats, flour, baking soda, and salt. Combining these separately ensures even distribution when mixing.

  7. Bring it All Together
    Gradually add the dry ingredients into the wet mixture. Stir gently until everything is well combined. Here, you’re looking for a thick dough—don’t overmix!

  8. Fold in the Chocolate Chips (if using)
    If you’re adding chocolate chips, this is the time to fold them in carefully. The more chocolate, the merrier!

  9. Scoop and Shape
    Using a spoon or cookie scoop, place rounded tablespoonfuls of dough onto the prepared baking sheet, leaving space in between, as they will spread slightly.

  10. Bake and Enjoy
    Place the baking sheet in the preheated oven for 10-12 minutes or until the edges are golden brown. The center may look a bit soft, but they’ll firm up as they cool.

  11. Cool and Serve
    Let them cool on the baking sheet for a few minutes before transferring them to a wire rack. Trust me, the smell is heavenly, and waiting is the hardest part!

Serving Suggestions: Time to Dig In!

These chewy banana oatmeal cookies are perfect as a snack or dessert. They pair wonderfully with a cold glass of milk or a warm cup of tea or coffee. Serve them warm, and watch as friends and family beam with delight. You can also plate them up for a fun cookie platter—add some fresh fruit or nuts for color and crunch!

Recipe Variations: Get Creative!

Feeling adventurous? Here are some fun variations to customize your Chewy Banana Oatmeal Cookies:

  1. Nutty Crunch
    Add 1/2 cup of your favorite nuts (like walnuts or pecans) for a delightful crunch.

  2. Spiced Up
    Sprinkle in some cinnamon or nutmeg for a warm, cozy flavor twist.

  3. Coconut Lover
    Fold in some shredded coconut for a tropical touch.

  4. Dried Fruit Delight
    Swap out chocolate chips for dried fruit like cranberries or apricots for a sweet, chewy bite.

  5. Protein Boost
    Make these cookies even more filling by adding a scoop of protein powder—great as a post-workout snack!

Chef’s Notes: A Personal Touch

Over the years, my Chewy Banana Oatmeal Cookies have evolved quite a bit. I’ve experimented with different add-ins like peanut butter, or even a pinch of espresso powder for a coffee vibe! Each version brings back memories of my grandmother’s kitchen, where love was the secret ingredient. What matters most is to keep the essence—these cookies should be easy, satisfying, and full of the warmth of home.

And no matter how many batches I make, I always have that giddy excitement when I pull them out of the oven. They vanish fast, so I always keep a few hidden for myself!

FAQs and Troubleshooting: Let’s Clear Up Confusion

Q1: My cookies spread too much; what did I do wrong?

  • A: If your cookies spread too much, it could be that your butter was too warm. Make sure to soften the butter but not melt it completely. Also, chilling the dough in the fridge for 30 minutes before baking can help maintain their shape.

Q2: How do I store leftovers?

  • A: Keep your cookies in an airtight container at room temperature for up to a week. For longer freshness, you can freeze them! Just make sure to layer them with parchment paper in between to prevent sticking.

Q3: Can I make these ahead of time?

  • A: Absolutely! You can prepare the dough in advance and keep it in the refrigerator for up to 2 days, or freeze it for up to a month. Just scoop and bake directly from the fridge or freezer, adding a minute or two to the bake time.

Q4: Can I use other types of sugars?

  • A: Yes! Feel free to experiment with different sugars like coconut sugar, maple syrup (though you’ll need to adjust the flour as it adds moisture), or even honey.

Nutritional Info

While I’m all about enjoying food without guilt, I know tracking nutrition can be useful. Here’s a rough estimate for one cookie (without chocolate chips):

  • Calories: 80
  • Protein: 1.5g
  • Carbohydrates: 11g
  • Fat: 3.5g
  • Fiber: 1g
  • Sugar: 4g

(Note: Adjusting the recipe will affect these values, of course!)


And there you have it! Your ultimate guide to making Chewy Banana Oatmeal Cookies that will not only satisfy your sweet tooth but also evoke memories of cozy kitchens and loving family moments. Enjoy baking, and be sure to share your culinary journey with friends and family. Happy baking!

Print

Chewy Banana Oatmeal Cookies

Delicious and wholesome cookies made with ripe bananas and oats, perfect for a delightful snack or dessert.

  • Prep Time: 10 minutes
  • Cook Time: 12 minutes
  • Total Time: 22 minutes
  • Yield: 12 servings 1x
  • Category: Dessert
  • Method: Baking
  • Cuisine: American
  • Diet: Vegetarian

Ingredients

Scale
  • 2 ripe bananas, mashed
  • 1 cup rolled oats
  • 1/2 cup flour
  • 1/2 teaspoon baking soda
  • 1/4 teaspoon salt
  • 1/4 cup brown sugar
  • 1/4 cup butter, softened
  • 1/2 teaspoon vanilla extract
  • 1/2 cup chocolate chips (optional)

Instructions

  1. Preheat your oven to 350°F (175°C).
  2. Prep a baking sheet lined with parchment paper or a silicone baking mat.
  3. Mash the ripe bananas in a bowl using a fork until smooth.
  4. Cream the softened butter and brown sugar together until creamy.
  5. Add the mashed bananas and vanilla, mixing until combined.
  6. Combine rolled oats, flour, baking soda, and salt in another bowl.
  7. Bring the dry ingredients into the wet mixture gradually and mix until well combined.
  8. Fold in chocolate chips if using.
  9. Scoop rounded tablespoonfuls of dough onto the baking sheet, leaving space in between.
  10. Bake for 10-12 minutes or until edges are golden brown.
  11. Cool on the baking sheet for a few minutes before transferring to a wire rack.

Notes

These cookies are perfect with a glass of milk or a warm cup of tea. Feel free to experiment with different add-ins like nuts or dried fruit.

Nutrition

  • Serving Size: 1 cookie
  • Calories: 80
  • Sugar: 4g
  • Sodium: 100mg
  • Fat: 3.5g
  • Saturated Fat: 1.5g
  • Unsaturated Fat: 2g
  • Trans Fat: 0g
  • Carbohydrates: 11g
  • Fiber: 1g
  • Protein: 1.5g
  • Cholesterol: 10mg

Keywords: banana cookies, oatmeal cookies, chewy cookies, healthy snacks, baking

Did you make this recipe?

Share a photo and tag us — we can't wait to see what you've made!

June 18, 2026 |

Ingredient Raspberry Lemonade Sorbet: Summer Refresh Treat

Bowl of vibrant raspberry lemonade sorbet topped with fresh raspberries and mint

Raspberry Lemonade Sorbet: A Refreshing Delight

Welcome, sorbet lovers! Today, we’re diving into a dish that feels like summer in a bowl—Raspberry Lemonade Sorbet. This delightful frozen treat combines the vibrant flavors of fresh raspberries and zesty lemons, making it a perfect way to cool off on a warm day. Plus, it’s simple enough for anyone to make, even if you’re new to the kitchen.

Imagine this: You’ve spent the day soaking in the sunshine, lounging around with friends, and you’re in desperate need of a refreshing pick-me-up. This sorbet is a delightful solution! With the bright notes of lemon mingling with the sweetness of ripe raspberries, each spoonful will transport you to berry fields and lemon orchards, no matter where you are.

The best part? You only need a handful of ingredients to whip up this fantastic sorbet. You might have most of them in your kitchen already! And let me tell you, once you try this recipe, you’ll wonder how you ever lived without it. So grab your blender, and let’s get started on this fruity masterpiece!

A Sweet Childhood Memory

Let me take you back to my childhood for a minute. Growing up, summer meant heading to my grandmother’s house in the countryside, where the gardens were bursting with ripe fruit. One of my favorite traditions was picking fresh raspberries in her garden. I can still feel the warm sun on my back as I searched through the bushes, aiming to find the biggest, juiciest berries.

Once we gathered enough, my grandmother would mix up a refreshing raspberry lemonade that was always served at our family barbecues. It was tart, sweet, and oh-so-refreshing on those hot afternoons. In my teenage years, I remember experimenting with different flavor combos, but the classic raspberry and lemon combination always had a special place in my heart.

As I grew older, those sunny afternoons inspired me to create this Raspberry Lemonade Sorbet. Every scoop is a celebration of those sweet, simple memories made under the sun with family and friends. So let’s bring a little nostalgia and joy back into your kitchen!

Ingredients

Here’s what you’ll need to create this refreshing Raspberry Lemonade Sorbet:

  • 2 cups fresh raspberries
    Juicy and vibrant, fresh raspberries are the star of this dish. You can substitute with frozen raspberries if fresh aren’t available, but fresh provides the best texture and flavor.

  • 1 cup fresh lemon juice
    Freshly squeezed is best! Bottled lemon juice can be used in a pinch, but the flavor won’t be as bright. If you want a sweeter sorbet, consider adding a bit more sugar to balance the tartness.

  • 1 cup sugar
    This is what brings all the flavors together and helps create that amazing texture. You can swap it with honey or agave if you’re looking for a more natural sweetener, though it might alter the taste slightly.

  • 1 cup water
    Just plain ol’ water to dilute the mixture. Sparkling water can add a nice fizzy twist if you want to get creative!

  • 1 tablespoon lemon zest
    Zest brings depth to the flavor and enhances the lemony punch. If you’re out of lemons, orange zest can be a lovely alternative for a slightly different flavor profile.

Step-by-Step Instructions

Now let’s get down to the nitty-gritty of making this sorbet!

  1. Blend the Raspberries
    Start by placing the raspberries in a blender or food processor. Pulse until smooth, and if you want a super silky texture, you can strain the mixture through a fine mesh sieve to remove the seeds. This is a bit of extra effort, but trust me, it creates a luxurious sorbet!

  2. Make a Simple Syrup
    In a small saucepan, combine the sugar and water. Heat over medium heat, stirring until the sugar has fully dissolved. This should only take a few minutes. Let it cool slightly while you squeeze the lemons.

  3. Juice the Lemons
    Roll the lemons on the countertop to soften them before slicing them in half and juicing them. Try to remove any seeds that sneak in during this process. Straining the juice also helps prevent pesky seeds from ruining your sorbet.

  4. Combine Ingredients
    In a large bowl, mix the blended raspberries, fresh lemon juice, and lemon zest. Slowly pour in your cooled simple syrup, tasting as you go to find your perfect sweetness balance. If you like it tarter, keep the sugar level low; if you prefer it sweeter, add a bit more sugar syrup!

  5. Chill the Mixture
    Cover your sorbet mixture and pop it in the refrigerator for about 1-2 hours. This step allows the flavors to meld beautifully. It also helps the mixture to be chilled when you hit the ice cream maker.

  6. Churn the Sorbet
    Once your mixture has chilled, pour it into your ice cream maker and churn according to the manufacturer’s instructions. It should take about 20-25 minutes to reach that soft-serve consistency we all love.

  7. Freeze Until Firm
    Transfer the churned sorbet into an airtight container and let it freeze for an additional 3-4 hours, or until firm. Be sure to store it in the coldest part of your freezer to maintain that perfect texture.

  8. Enjoy!
    Scoop out the sorbet and enjoy this refreshing treat! If it becomes too hard in the freezer, let it sit at room temperature for a few minutes before scooping.

Serving Suggestions

This Raspberry Lemonade Sorbet can brighten up any dessert table. Serve it in chilled bowls or cones for a fun summer treat. You can also add mint leaves or a sprinkle of lemon zest on top for an extra pop of color and flavor! Pair it with fresh berries or a drizzle of raspberry sauce for an elegant presentation, or simply enjoy it on its own—because it’s just that good!

Recipe Variations

Here are a few fun twists you might consider:

  • Minty Fresh: Add some chopped fresh mint leaves to the mixture for a refreshing herbal note.
  • Coconut Cream Twist: Swirl in some coconut cream before freezing for a tropical touch.
  • Berry Blend: Mix in other berries like strawberries or blueberries for a mixed berry sorbet.
  • Lime Boost: Substitute some of the lemon juice with lime juice for a zesty lime-berry flavor.
  • Spicy Kick: Add a pinch of cayenne pepper for a surprising heat that pairs beautifully with the sweetness.

Chef’s Notes

When I first made this sorbet, I was simply trying to recreate that childhood joy—what I didn’t expect was how much it would become a hit at summer gatherings. I still remember the first time I served it to friends; they couldn’t get enough! Now, it’s a staple whenever I need a refreshing dessert.

I lovingly make this sorbet every summer, experimenting with new variations each time. It has morphed from being just a simple treat into a family favorite with everyone asking for seconds. It’s amazing how a dish can create those lasting memories.

FAQs and Troubleshooting

  • Can I make this sorbet without an ice cream maker?
    Yes! After blending your ingredients, pour the mixture into a shallow dish and place it in the freezer. Every 30 minutes, scrape it with a fork until it’s frozen and fluffy. It won’t be as smooth as churned sorbet but still delicious!

  • What if my sorbet is too hard?
    If it’s super hard, just let it sit out for 5-10 minutes before trying to scoop. You can also blend it again for a softer texture.

  • How long does the sorbet last in the freezer?
    It should last about 2-3 weeks if stored properly in an airtight container. After this time, the flavor can start to fade.

  • Can I adjust the sweetness?
    Absolutely! This recipe is adjustable based on your taste. Just remember that the sweetness may change once frozen, so taste as you go!

Nutritional Info

While I typically focus on enjoyment over specifics, here’s a ballpark estimate for a serving of Raspberry Lemonade Sorbet (1/2 cup):

  • Calories: ~130
  • Total Fat: 0g
  • Sodium: 1mg
  • Total Carbohydrates: 33g
  • Sugars: 29g
  • Protein: 1g

Enjoy this delightful Raspberry Lemonade Sorbet as a refreshing companion to your summertime adventures. Trust me, it’s like a scoop of sunshine on your tongue! Happy sorbet-making, friends!

Print

Raspberry Lemonade Sorbet

A refreshing and vibrant frozen treat that combines fresh raspberries and zesty lemons, perfect for cooling off on a warm day.

  • Prep Time: 10 minutes
  • Cook Time: 10 minutes
  • Total Time: 120 minutes
  • Yield: 4 servings 1x
  • Category: Dessert
  • Method: Freezing
  • Cuisine: American
  • Diet: Vegan

Ingredients

Scale
  • 2 cups fresh raspberries
  • 1 cup fresh lemon juice
  • 1 cup sugar
  • 1 cup water
  • 1 tablespoon lemon zest

Instructions

  1. Blend the raspberries in a blender until smooth. Strain if desired for a silky texture.
  2. Make a simple syrup by heating sugar and water in a saucepan until dissolved. Let cool.
  3. Juice the lemons, removing seeds, and strain the juice if necessary.
  4. Combine blended raspberries, lemon juice, and lemon zest in a bowl. Add cooled simple syrup, adjusting sweetness to taste.
  5. Chill the mixture in the refrigerator for 1-2 hours.
  6. Churn the sorbet mixture in an ice cream maker according to manufacturer instructions for 20-25 minutes.
  7. Freeze the churned sorbet in an airtight container for 3-4 hours until firm.
  8. Enjoy! Scoop and serve, letting sit at room temperature for easier scooping if too hard.

Notes

Consider adding mint leaves or lemon zest on top when serving for an extra pop of flavor.

Nutrition

  • Serving Size: 1/2 cup
  • Calories: 130
  • Sugar: 29g
  • Sodium: 1mg
  • Fat: 0g
  • Saturated Fat: 0g
  • Unsaturated Fat: 0g
  • Trans Fat: 0g
  • Carbohydrates: 33g
  • Fiber: 2g
  • Protein: 1g
  • Cholesterol: 0mg

Keywords: sorbet, raspberry, lemonade, dessert, summer treat, refreshing, vegan

Did you make this recipe?

Share a photo and tag us — we can't wait to see what you've made!

June 18, 2026 |

Ingredient Summer Mediterranean Watermelon Feta Salad

Colorful Mediterranean watermelon feta salad with fresh ingredients

Mediterranean Watermelon Salad with Feta: A Refreshing Culinary Escape

Welcome to the vibrant world of flavors that is Clean Plate Cravings! Today, we are diving into a dish that beautifully balances the sweet, juicy essence of watermelon with the savory zing of feta cheese—yes, I’m talking about the Mediterranean Watermelon Salad with Feta! This dish acts as a delightful bridge between the warm, sun-soaked shores of the Mediterranean and your own kitchen table. The refreshing nature of this salad makes it not only a feast for the eyes but also a treat for your taste buds, especially during those balmy summer nights or as a zesty addition to picnics.

When I think about this salad, I’m reminded of sun-drenched days spent in my grandmother’s garden, where she would let me pick the juiciest watermelons straight off the vine. We’d often gather friends and family around a long table, loaded with vibrant dishes, laughter, and warmth. Feeling inspired? Let’s create that same cozy atmosphere right in your own home as we explore this beautiful dish together!

A Walk Down Memory Lane

One of my happiest childhood memories revolves around summer barbecues at my grandma’s house. Her garden was magic—a kaleidoscope of colors buzzing with life. She used to make this watermelon salad that twinkled with the freshness of mint and the creamy tang of feta cheese. I remember the first time I tasted it; it was like a burst of summer in my mouth! The crunch of cucumber combined with the juicy watermelon was so refreshing that I thought I had discovered the secret to happiness. As we sat on her porch, the smell of grilled meat wafting through the air and everyone around the table sharing stories and laughter, I realized how food connects us all. This salad has been a staple ever since, evolving with each gathering, yet always holding onto that delightful sweetness that keeps us coming back for more.

Ingredients

The best part about Mediterranean Watermelon Salad with Feta is the simplicity of its ingredients. Here’s what you’ll need:

  • Watermelon (4 cups, diced): The star of the show! Choose a ripe, juicy watermelon for that sweet burst of flavor. If watermelon isn’t your jam, cantaloupe or honeydew can be great substitutes, giving you a different flavor profile but still maintaining that refreshing feel.

  • Feta cheese (1 cup, crumbled): This creamy, tangy cheese pairs perfectly with the sweetness of watermelon. If you’re not a fan of feta, goat cheese or even a vegan feta can work beautifully in this dish, offering a different twist.

  • Cucumber (1 cup, diced): Adds a delightful crunch and balances the sweetness. For a bit of flair, you could try using Persian cucumbers, which are smaller and have a thinner skin, meaning less peeling!

  • Mint leaves (1/4 cup, chopped): Fresh mint adds an aromatic layer that makes this salad sing. If mint isn’t available, fresh basil or even cilantro could offer interesting alternatives.

  • Red onion (1/4 cup, thinly sliced): A bit of bite that enhances the overall flavor profile. If raw onion is too harsh for your palate, try soaking them in cold water for a few minutes to mellow the flavor.

  • Lemon juice (2 tablespoons): This brightens the dish up and ties all the flavors together. Feel free to mix things up with lime juice for a zesty twist!

  • Olive oil (1 tablespoon): Adds richness and helps to emulsify the dressing. Opt for extra virgin olive oil for its robust flavor.

  • Salt and pepper to taste: Seasoning is key! Always taste before serving and adjust to your personal preference.

Step-by-Step Instructions

Now that we’ve gathered our ingredients, let’s get cooking! Don’t worry; this recipe is as simple as it is delicious.

  1. Prepare the Watermelon: Start by cutting your watermelon into bite-sized cubes. A great tip is to slice off a thin portion from the bottom when it’s still intact; this keeps the watermelon steady while you cut. Trust me; it’s a game changer!

  2. Dice the Cucumber: While the watermelon is the star, the cucumber provides that much-needed crunch. Simply slice it in half lengthwise, scoop out the seeds if you’d like (this reduces extra water), and then cut it into small pieces.

  3. Chop the Mint: You’ll want to use fresh mint here for a fabulous aroma that brightens the whole salad. Stack your mint leaves, roll them up like a cigar, and use a sharp knife to thinly slice them. It’s called a chiffonade technique and makes for a beautiful presentation!

  4. Prep the Red Onion: Slice the onion very thinly. If you desire a milder flavor, quickly rinse the sliced onions under cold water to reduce their bite.

  5. Combine All Ingredients: In a large mixing bowl, add the watermelon, cucumber, feta cheese, red onion, and chopped mint. Gently toss them together to ensure everything is well distributed.

  6. Make the Dressing: In a small bowl, whisk together the lemon juice, olive oil, salt, and pepper. Keep it light—this salad is all about refreshing flavors!

  7. Dress the Salad: Pour the dressing over the salad and give it another gentle toss. Be careful not to crush the feta; we want those delightful little chunks to remain intact!

  8. Taste and Adjust: This is my favorite part! Give your salad a taste. Does it need a little more salt to enhance the flavors, or perhaps a squeeze of extra lemon juice? Adjust as needed.

  9. Chill: If you have time, pop the salad in the fridge for about 30 minutes before serving. This allows the flavors to meld and enhances that refreshing vibe.

Serving Suggestions

To serve, scoop the Mediterranean Watermelon Salad into a large, beautiful bowl or plate. If you want to impress your guests, try layering the ingredients in a clear glass; it makes the vibrant colors pop! Drizzle a little extra olive oil and a sprinkle of mint on top for that finishing touch. Serve this alongside grilled meats, pita bread, or even as a stand-alone treat at your next summer gathering. The options are endless!

Recipe Variations

Let’s shake things up a bit! Here are a few creative twists you can make to this Mediterranean Watermelon Salad:

  • Add Avocado: For an extra creamy texture, throw in some diced ripe avocado. It blends beautifully with the feta and adds a nice richness!

  • Sweet and Spicy: Drizzle a bit of honey and a pinch of crushed red pepper flakes for a sweet-heat combo that will have your taste buds dancing.

  • Nuts for Crunch: Toss in a handful of toasted walnuts or almonds for an extra crunch and elevated nutrition.

  • Grain Bowls: Turn this salad into a meal by serving it over a bed of quinoa, couscous, or farro for added sustenance.

  • Herbal Variations: Swap out mint for other fresh herbs, like dill or parsley, to give the dish a completely new vibe.

Chef’s Notes

Over the years, this Mediterranean Watermelon Salad has gone through transformations and variations—each bite evoking nostalgia for those summer days in grandma’s garden. I’ve added fruits like diced strawberries or even pomegranate seeds for a burst of color and flavor. Remember, this is your canvas! Every time I prepare it, I make small adjustments using whatever is fresh or seasonal. It’s a recipe that grows with you, welcoming creativity and experimentation—two things I absolutely adore in the kitchen!

FAQs and Troubleshooting

Here are answers to some common questions and troubleshooting tips to help make your salad a success:

Q1: How do I choose a ripe watermelon?
A: Look for a watermelon that feels heavy for its size. The field spot (the yellowish marking on the rind) should be a creamy yellow color, indicating ripeness.

Q2: Can I make this salad ahead of time?
A: While it’s best enjoyed fresh, you can prepare the ingredients ahead and keep them separate. Mix them just before serving to retain freshness.

Q3: How can I store leftovers?
A: Store any leftovers in an airtight container in the fridge for up to two days. The salad may release some moisture, so it’s best to consume it sooner rather than later!

Q4: What can I do if the salad is too watery?
A: If you find your salad is too watery, try using less watermelon or salting your cucumbers beforehand to draw out excess water. Another tip is simply to avoid mixing the dressing until you’re ready to serve!

Nutritional Info

While I like to focus on tasty delights, keeping an eye on nutrition can be essential for many. Here’s a rough estimate for a serving of this salad:

  • Calories: 150
  • Protein: 4g
  • Fat: 8g
  • Carbohydrates: 15g
  • Fiber: 1g

Note: Nutritional content may vary based on specific ingredient choices and portions.

So there you have it, my friends! A delightful Mediterranean Watermelon Salad with Feta that’s perfect for any occasion. Grab your favorite people, whip up this salad, and dive into those memories of happy times spent around the table. Remember, food is meant to be enjoyed, so let’s keep it fresh, simple, and seriously delicious! Happy cooking!

Print

Mediterranean Watermelon Salad with Feta

A refreshing salad that contrasts sweet watermelon with tangy feta cheese, ideal for summer gatherings and picnics.

  • Prep Time: 10 minutes
  • Cook Time: 0 minutes
  • Total Time: 10 minutes
  • Yield: 4 servings 1x
  • Category: Salad
  • Method: No-Cook
  • Cuisine: Mediterranean
  • Diet: Vegetarian

Ingredients

Scale
  • 4 cups Watermelon, diced
  • 1 cup Feta cheese, crumbled
  • 1 cup Cucumber, diced
  • 1/4 cup Mint leaves, chopped
  • 1/4 cup Red onion, thinly sliced
  • 2 tablespoons Lemon juice
  • 1 tablespoon Olive oil
  • Salt and pepper to taste

Instructions

  1. Prepare the watermelon by cutting it into bite-sized cubes.
  2. Dice the cucumber and remove the seeds if desired.
  3. Chop the mint leaves using the chiffonade technique.
  4. Prep the red onion by slicing it very thinly.
  5. Combine all ingredients in a large mixing bowl.
  6. Make the dressing by whisking together lemon juice, olive oil, salt, and pepper.
  7. Dress the salad with the dressing and gently toss.
  8. Taste and adjust seasoning if necessary.
  9. Chill the salad in the fridge for about 30 minutes before serving.

Notes

For added richness, consider mixing in diced avocado or nuts. This salad can be adjusted with seasonal ingredients.

Nutrition

  • Serving Size: 1 serving
  • Calories: 150
  • Sugar: 11g
  • Sodium: 400mg
  • Fat: 8g
  • Saturated Fat: 4g
  • Unsaturated Fat: 4g
  • Trans Fat: 0g
  • Carbohydrates: 15g
  • Fiber: 1g
  • Protein: 4g
  • Cholesterol: 30mg

Keywords: watermelon salad, Mediterranean salad, feta salad, summer salad, refreshing salad

Did you make this recipe?

Share a photo and tag us — we can't wait to see what you've made!