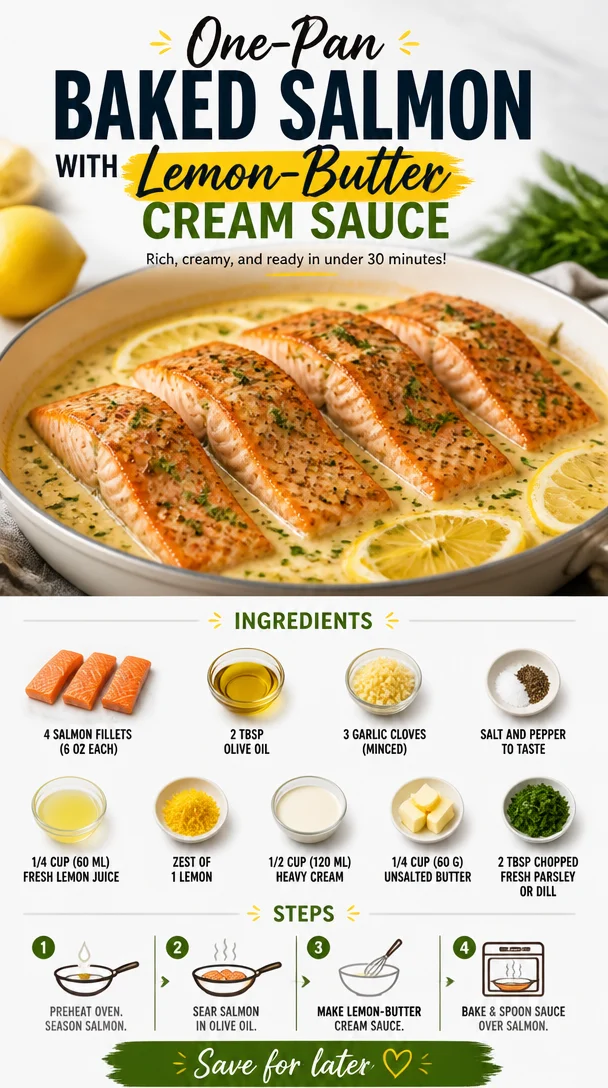
One-Pan Baked Salmon with Lemon-Butter Cream Sauce
Baked Salmon with Lemon Butter Cream Sauce: A Flavorful Journey
Welcome, fellow foodies! Today, we’re embarking on a culinary adventure together—a delicious trek into the world of baked salmon with lemon butter cream sauce. If you’re anything like me, you know that cooking should be fun, creative, and above all, satisfying. And here at Clean Plate Cravings, I’m all about making your kitchen experiences enjoyable and hassle-free. This dish is a fantastic way to impress family and friends or simply treat yourself to something wonderfully tasty and healthy.
Imagine buttery salmon, flaking at the touch of a fork, bathed in a luscious lemony cream sauce. It’s a symphony of flavors—all while being simple enough to whip together on a busy weeknight. What more could you want? So, roll up those sleeves as we dive into the secrets behind this delightful dish, sprinkled with stories and insights that make cooking all the more enjoyable!
A Personal Culinary Memory
Let me take you back a few years to a summer evening that forever changed my relationship with salmon. I was visiting my grandparents’ beach house, where summer sunsets painted the sky with swirling hues of orange and pink. My grandma was in the kitchen, and the scent of zesty lemon and fresh herbs wafted through the air as she prepared her famous salmon fillets.
Her technique was simple but magical; she always said the key was to let the quality of the ingredients shine. Watching her gently whisk together butter, lemon juice, and cream while chatting effortlessly with me about life made the meal even more special. After she popped that salmon into the oven, we carried our plates outside to enjoy dinner on the deck. Each bite was a burst of freshness, a perfect complement to the sound of waves crashing nearby. It wasn’t just a meal; it was a memory, a celebration of family, flavor, and the beauty of simple ingredients coming together.
Fast forward to today, and that experience has inspired me to recreate and share my own version of baked salmon with lemon butter cream sauce. I’ve added my twist, of course, but the essence remains the same: it’s all about enjoying good food surrounded by good company.
Ingredients
Here’s what you’ll need to make this delectable dish:
-
4 salmon fillets (6 oz each)
Freshness is key! Look for wild-caught salmon if possible. If you can’t find salmon, try substituting with trout or cod, which will also catch that luscious sauce beautifully. -
2 tbsp olive oil
A good extra virgin olive oil can elevate the dish’s flavor. If you prefer, avocado oil makes a wonderful alternative due to its high smoke point and mild flavor. -
3 garlic cloves (minced)
Garlic is the superstar here! It brings warmth and depth to the sauce. If you’re not a fan of fresh garlic, garlic powder can work in a pinch—just use about a teaspoon. -
Salt and pepper to taste
Essential seasonings! Sea salt or kosher salt will bring out all the flavors, while freshly cracked pepper adds a hint of spice. -
1/4 cup fresh lemon juice
Freshly squeezed lemon juice is a game-changer—it brightens the dish and balances the richness of the cream. Bottled lemon juice won’t offer the same depth, but you can use it if you’re in a hurry. -
Zest of 1 lemon
Don’t discard that lemon peel! It holds aromatic oils that enhance the lemon flavor. If you’d like a different twist, lime zest or orange zest can be substituted for a unique citrus note. -
1/2 cup heavy cream
For a creamy, luxurious sauce! If you want a lighter version, feel free to swap with half-and-half or coconut cream for a dairy-free option. -
1/4 cup unsalted butter
Butter adds richness that complements the salmon. Ghee is a great dairy-free alternative while maintaining that buttery flavor. -
2 tbsp chopped fresh parsley or dill
Fresh herbs give the dish a delightful finishing touch! Dill works great with salmon, but basil or chives can also lend their unique herby flair.
Step-by-Step Instructions
Ready to make magic happen in the kitchen? Follow these steps to create your orange-hued masterpiece!
-
Prep Your Ingredients
Start by preheating your oven to 375°F (190°C). While that’s warming up, gather your gorgeous salmon fillets and pat them dry with a paper towel. This helps to achieve a nice sear later. Sprinkle salt and pepper on both sides—don’t be shy! -
Sizzle Those Fillets
In a large oven-safe skillet, heat the olive oil over medium-high heat. Once it’s shimmering, add the salmon fillets skin-side down. Let them sear for about 4–5 minutes or until they’re beautifully golden. This step creates a lovely crust. -
Flip and Finish Searing
Gently flip the salmon using a spatula. It’s okay if some of the seasoning comes off; you’ll have more flavors coming soon! Cook for another 2 minutes on the other side, then transfer the salmon to a plate. -
Make That Sauce!
In the same pan, lower the heat to medium and toss in the minced garlic. Sauté it for about 30 seconds until fragrant—watch it closely; you don’t want to burn it! Pour in the fresh lemon juice, scraping up any tasty bits stuck to the bottom of the pan. -
Cream it Up
Now for the star of our show—add the heavy cream and butter. Stir continuously until the butter melts and the sauce thickens slightly, usually about 2–3 minutes. Toss in the lemon zest and mix to combine. -
Back to the Fillets
Return the salmon fillets to the skillet, skin-side down, allowing them to bathe in that luscious lemon butter sauce. Spoon the sauce over the top to soak in all that flavor. -
Bake to Perfection
Pop the skillet in the preheated oven and let it bake for about 10–12 minutes or until the salmon flakes easily with a fork. The internal temperature should reach 145°F (63°C). -
Garnish and Enjoy!
Before serving, sprinkle with fresh parsley or dill. Plate it up nice and pretty, maybe with a side of veggies or rice. There you have it—a stunning dish you’ve whipped up in no time!
Serving Suggestions
When it comes to plating your baked salmon, let’s make it as beautiful as it is delicious. I love to serve it on a bed of wilted spinach or alongside some roasted asparagus for that vibrant green contrast. Drizzle some of that lemon butter cream sauce over the top and add a slice of lemon for visual appeal. It’s all about making your dining experience a feast for the eyes, too!
Recipe Variations
The beauty of this dish lies in its versatility. Here are a few creative twists you can try:
- Mediterranean Twist: Add kalamata olives and sun-dried tomatoes in the sauce for a Mediterranean flair.
- Spicy Kick: Mix in a pinch of red pepper flakes with the garlic for a zesty punch.
- Herbaceous Delight: Swap out parsley or dill for fresh tarragon or chervil to change the flavor profile.
- Citrus Burst: Mix lemon with lime and orange juice for a citrus medley that brightens the sauce.
- Asian Inspiration: Incorporate soy sauce and sesame oil in place of lemon juice for an Asian twist on this classic!
Chef’s Notes
As I reflect on this dish, I can’t help but chuckle at my early cooking attempts when I was a teenager. My first encounter with salmon was disastrous! I overcooked it and smothered it in far too much lemon juice, thinking it would save my culinary travesty. Lesson learned: balance is key! Now, years later, I embrace the beautiful simplicity of baked salmon with lemon butter cream sauce. It has evolved into one of my go-to recipes, and I hope it becomes a staple in your kitchen, too!
FAQs and Troubleshooting
-
What type of salmon is best for this recipe?
Wild-caught salmon is preferred for its flavor and texture, but farmed salmon works too. Just be cautious about where it’s sourced! -
Can I make this ahead of time?
You can prep the sauce and marinate the salmon ahead of time. Just bake it fresh when you’re ready to eat—there’s nothing like enjoying a meal made with love! -
Why is my sauce too thin?
If your sauce isn’t thickening, let it simmer on low heat for a bit longer. You can also mix in a small cornstarch slurry (cornstarch mixed with water) to help it along. -
Can I use frozen salmon?
Absolutely! Just make sure to fully thaw it in the fridge before cooking to ensure even cooking throughout.
Nutritional Info
- Calories: Approximately 400 per serving
- Protein: 32g
- Carbohydrates: 5g
- Fat: 30g (with 15g saturated fat)
- Fiber: 0g
And there you have it, a complete guide to making baked salmon with lemon butter cream sauce! I hope this recipe becomes a favorite for you and your loved ones just like it is for me. It’s easy, flavor-packed, and most importantly, a wonderful way to connect over good food. Happy cooking, my friends! 🍋✨
PrintBaked Salmon with Lemon Butter Cream Sauce
A delicious baked salmon recipe with a rich lemon butter cream sauce that’s easy to prepare and perfect for impressing guests.
- Prep Time: 15 minutes
- Cook Time: 12 minutes
- Total Time: 27 minutes
- Yield: 4 servings 1x
- Category: Main Course
- Method: Baking
- Cuisine: American
- Diet: Pescatarian
Ingredients
- 4 salmon fillets (6 oz each)
- 2 tbsp olive oil
- 3 garlic cloves (minced)
- Salt and pepper to taste
- 1/4 cup fresh lemon juice
- Zest of 1 lemon
- 1/2 cup heavy cream
- 1/4 cup unsalted butter
- 2 tbsp chopped fresh parsley or dill
Instructions
- Prep your ingredients by preheating your oven to 375°F (190°C). Pat the salmon fillets dry and sprinkle salt and pepper on both sides.
- Sizzle those fillets by heating the olive oil in a large oven-safe skillet over medium-high heat. Add the salmon fillets skin-side down and sear for about 4–5 minutes.
- Flip the salmon gently and cook for another 2 minutes on the other side, then transfer to a plate.
- Make the sauce by adding minced garlic to the same pan and sauté for about 30 seconds. Pour in the lemon juice and scrape the bits stuck to the pan.
- Cream it up by adding heavy cream and butter to the pan. Stir until the butter melts and the sauce thickens (about 2–3 minutes).
- Return the salmon to the skillet, skin-side down, and spoon the sauce over the top.
- Bake for about 10–12 minutes or until the salmon flakes easily with a fork, reaching an internal temperature of 145°F (63°C).
- Garnish with fresh parsley or dill before serving.
Notes
Serve over wilted spinach or alongside roasted asparagus for a perfect pairing.
Nutrition
- Serving Size: 1 serving
- Calories: 400
- Sugar: 1g
- Sodium: 400mg
- Fat: 30g
- Saturated Fat: 15g
- Unsaturated Fat: 10g
- Trans Fat: 0g
- Carbohydrates: 5g
- Fiber: 0g
- Protein: 32g
- Cholesterol: 80mg
Keywords: salmon, baked salmon, lemon butter sauce, easy dinner, healthy recipe
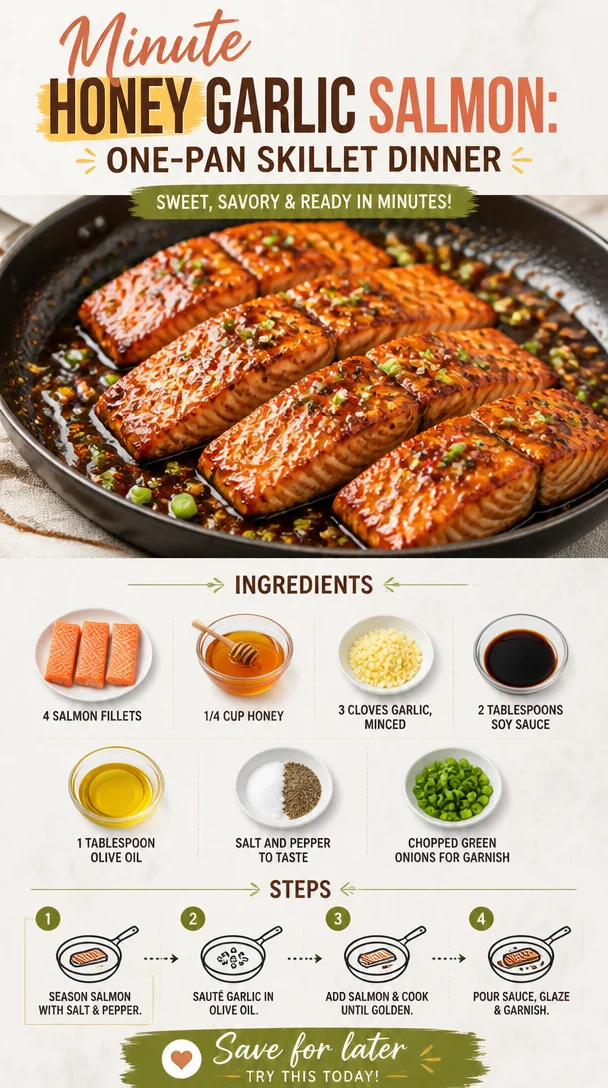
Minute Honey Garlic Salmon: One-Pan Skillet Dinner
Honey Garlic Salmon: A Delicious Journey to the Heart of Flavor
Welcome to Clean Plate Cravings, where healthy eating meets delicious flavors! Today, I want to take you on a culinary adventure centered around one of my absolute favorite dishes: Honey Garlic Salmon. This recipe is a perfect harmony of sweet and savory that will have your taste buds dancing in delight. Whether you’re a busy professional, a parent juggling kids’ schedules, or just someone who loves good food, this honey garlic salmon dish is here to rescue your weeknight dinners!
Imagine this: it’s a busy Monday evening after a long day, and the thought of cooking feels overwhelming. But fear not! With just a handful of ingredients and a quick cooking method, this honey garlic salmon can transform your mundane Monday into a vibrant food experience. What more could you ask for? It’s quick, it’s easy, and most importantly, it’s absolutely finger-licking good!
Personal Story
Let me share a little story about how honey garlic salmon became a staple in my kitchen. I remember the first time I made this dish. It was a chilly autumn evening, and I had invited a couple of friends over for dinner. Wanting to impress, I scoured through my recipe box and stumbled upon an old family recipe for honey garlic glazed chicken. It was great, but I had salmon sitting in my fridge, and I thought, "Why not give it a whirl?"
I marinated the salmon fillets in a decadent mixture of honey and garlic, letting those flavors mingle and create something magical. When I pulled the salmon out of the oven, my friends were instantly captivated. The aroma enveloped our dining area, luring everyone to the table. We dug in, and I watched as they enjoyed every bite, the sweet and savory glaze perfectly enveloping the succulent salmon.
That night was filled with laughter, stories, and an overwhelming sense of joy around the table as we savored each and every bite of honey garlic salmon. Since then, it has become my go-to recipe for gatherings, weeknight dinners, and even special occasions. It symbolizes warmth and good company, and I can’t wait for you to create your own unforgettable moments around this dish!
Ingredients
Here’s what you’ll need to bring this honey garlic salmon to life:
-
4 salmon fillets
Look for wild-caught salmon if possible; it tends to be fresher and often tastier than farmed. If you’re on a budget, feel free to substitute it with any white fish like cod or tilapia. -
1/4 cup honey
The star ingredient! It adds a natural sweetness that balances beautifully with the savory elements. If you’re looking for a dietary swap, you can use maple syrup or agave nectar for a vegan alternative. -
3 cloves garlic, minced
Garlic not only adds flavor but is also great for heart health. Don’t have fresh garlic? Garlic powder can work in a pinch—about 1 teaspoon will do. -
2 tablespoons soy sauce
It adds depth and umami to the dish. If you’re gluten-free, opt for tamari instead—most brands are a perfect substitute. -
1 tablespoon olive oil
This helps to sear the salmon and ensures a crispy skin while keeping it moist. Avocado oil could be a great alternative as well! -
Salt and pepper to taste
Essential seasoning to enhance the flavors—don’t skip this part! -
Chopped green onions for garnish
This adds a fresh burst of color and flavor at the end. You can also swap these out for sesame seeds or cilantro for a different twist!
Step-by-Step Instructions
Now let’s get cooking! Follow these simple steps to make your honey garlic salmon shine.
-
Preheat the Oven
Set your oven to 400°F (200°C). Preheating your oven is crucial for achieving that perfect cook on your salmon. You want a hot oven to get that lovely caramelization from the honey! -
Prepare the Marinade
In a small bowl, combine honey, minced garlic, and soy sauce. Give it a good stir to mix all those flavors together. Here’s a little tip: taste your marinade! This way, you can adjust sweetness or saltiness to your preference. If it’s too sweet, a splash more soy sauce can balance things out. -
Season the Salmon
Place your salmon fillets on a baking sheet lined with parchment paper (easy cleanup alert!). Drizzle with olive oil, then sprinkle with salt and pepper. If you’re feeling adventurous, a light brush of the marinade on top will give the fish a great start! -
Marinate the Salmon
Pour your honey garlic mixture over the salmon, ensuring each fillet is coated. If you have time, let it marinate for about 15-30 minutes—this truly allows flavors to seep into the fish, but if you’re short on time, you can skip this step. -
Bake
Pop those beauties into your preheated oven and let them bake for about 12-15 minutes, depending on the thickness of your fillets. Check them halfway through, and drizzle some of the marinade on top for extra flavor. You know your salmon is done when it flakes easily with a fork. -
Serve with Style
Once your salmon is perfectly baked, remove it from the oven and let it rest for a couple of minutes. This allows the juices to redistribute, keeping it moist and tasty. Garnish with chopped green onions for a pop of color!
Serving Suggestions
Plating matters, my friends! For a gorgeous presentation, serve your honey garlic salmon on a bed of fluffy rice or quinoa with steamed veggies on the side. Drizzling a little extra marinade over the top can give it that “wow factor!” Add a lemon wedge on the side for that citrusy twist, and watch your guests swoon over this dish.
Recipe Variations
Ready to switch things up? Here are a few fun ways to customize your honey garlic salmon:
-
Spicy Honey Garlic Salmon
Add a teaspoon of chili flakes or sriracha to the marinade for a kick! -
Asian-Inspired Twist
Add a splash of rice vinegar and a teaspoon of sesame oil to your marinade for an even deeper flavor profile. -
Herb-Infused Salmon
Mix in some fresh herbs like dill or basil after baking for an additional flavor burst. -
Roasted Veggie Side
Toss some zucchini, bell peppers, or asparagus on the same baking sheet for a one-pan meal. -
Citrus Garlic Salmon
Squeeze in some fresh orange or lime juice for a bright flavor boost!
Chef’s Notes
You know, cooking is all about experimentation to find what works best for you. This honey garlic salmon recipe has evolved over the years, and I’ve tried countless variations, each time discovering new flavors and combinations that I love. One of my favorite memories is when I mixed in some ginger—talk about a flavor explosion! Keep playing in the kitchen until you find your perfect blend. The more you cook, the more confident you’ll become!
FAQs and Troubleshooting
1. My salmon is dry! What did I do wrong?
Overcooking is the culprit! Always check your salmon a few minutes before the suggested cooking time, and remember that it continues to cook a bit after you take it out.
2. Can I use frozen salmon?
Absolutely! Just make sure to thaw it first in the refrigerator overnight before marinating and cooking.
3. What should I serve with honey garlic salmon?
The world is your oyster! Rice, quinoa, or even cauliflower rice all pair wonderfully. Don’t forget some bright, roasted veggies to balance the meal.
4. Can I make this dish ahead of time?
Yes! You can marinate the salmon in advance and keep it in the fridge for up to 24 hours. Just remember to cook it fresh for the best flavor and texture!
Nutritional Info
While I usually keep my focus on flavor, here’s a little nutrition breakdown for those curious:
- Calories: Approximately 380 per serving (based on one salmon fillet)
- Protein: 34 grams
- Fat: 12 grams
- Carbs: 30 grams (from the honey and soy sauce)
Remember, oh foodie friends, nutrition can vary based on the specific ingredients you choose, so feel free to adapt to your dietary needs!
So there you have it! I hope you’re inspired to make this Honey Garlic Salmon dish—and the best part? It comes together in no time flat! I can’t wait for you to dive into this recipe, and please share your kitchen adventures with me. Happy cooking!
PrintHoney Garlic Salmon
A perfect harmony of sweet and savory, this honey garlic salmon dish transforms mundane weeknight dinners into delightful culinary experiences.
- Prep Time: 15 minutes
- Cook Time: 15 minutes
- Total Time: 30 minutes
- Yield: 4 servings 1x
- Category: Main Course
- Method: Baking
- Cuisine: American
- Diet: Gluten-Free
Ingredients
- 4 salmon fillets
- 1/4 cup honey
- 3 cloves garlic, minced
- 2 tablespoons soy sauce
- 1 tablespoon olive oil
- Salt and pepper to taste
- Chopped green onions for garnish
Instructions
- Preheat the oven to 400°F (200°C).
- Combine honey, minced garlic, and soy sauce in a small bowl to make the marinade.
- Place salmon fillets on a baking sheet lined with parchment paper, drizzle with olive oil, and season with salt and pepper.
- Pour the honey garlic mixture over the salmon to coat.
- Let it marinate for 15-30 minutes if time allows.
- Bake for 12-15 minutes, until the salmon flakes easily with a fork.
- Remove from the oven, let rest, and garnish with chopped green onions before serving.
Notes
Serve with fluffy rice or quinoa and steamed veggies for a complete meal. A lemon wedge adds a nice touch!
Nutrition
- Serving Size: 1 serving
- Calories: 380
- Sugar: 24g
- Sodium: 800mg
- Fat: 12g
- Saturated Fat: 2g
- Unsaturated Fat: 8g
- Trans Fat: 0g
- Carbohydrates: 30g
- Fiber: 0g
- Protein: 34g
- Cholesterol: 70mg
Keywords: honey garlic salmon, easy salmon recipe, healthy dinner
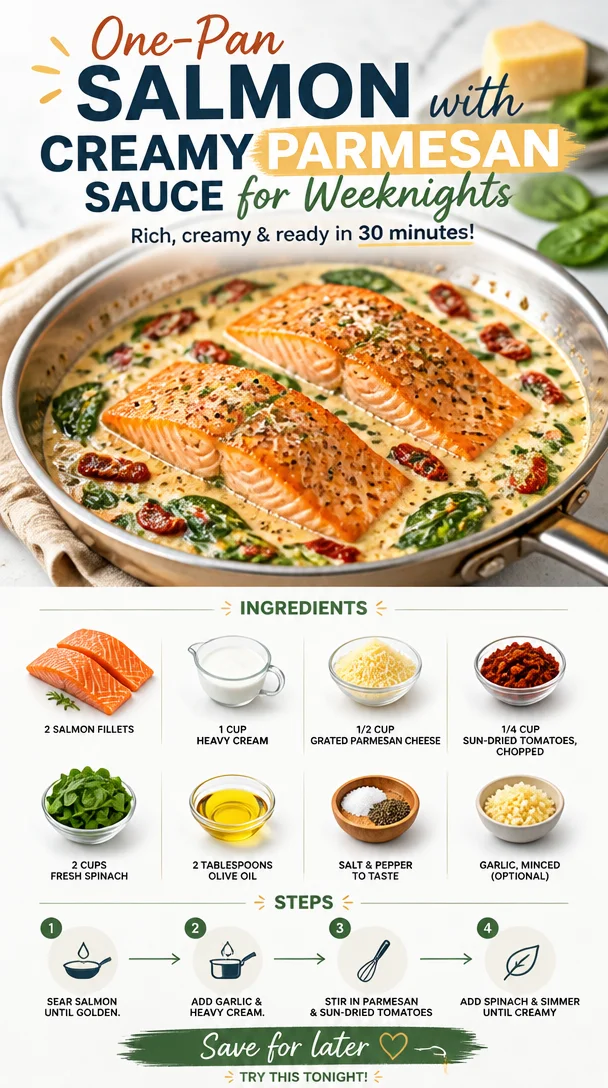
One-Pan Salmon with Creamy Parmesan Sauce for Weeknights
Pan Seared Salmon in Parmesan Cream Sauce: A Delicious Journey
Nothing says comfort food like a beautifully seared salmon fillet nestled in a luscious cream sauce. Welcome to the world of Clean Plate Cravings, where we believe that you don’t have to compromise on flavor or satisfaction when pursuing a healthier lifestyle. Let’s dive into a dish that’s as vibrant as it is indulgent: Pan Seared Salmon in Parmesan Cream Sauce.
This dish is perfect for busy weeknights or a weekend dinner party; it brings that restaurant-quality flair right to your kitchen. Trust me, your family and friends will be raving! And the best part? It’s simple and made with accessible ingredients that you can whip up in no time.
A Fresh Perspective on an Old Favorite
Growing up, my family made a habit of gathering around the dinner table, sharing stories and laughter, with a “healthy” dose of delicious food. One of my fondest memories is of my grandmother—who had a knack for transforming ordinary, everyday meals into extraordinary experiences. I can still picture her in the kitchen, spinning tales about each dish she prepared.
But there was one dish that always stood out: her take on salmon. She would pan-sear it to perfection, and the way the flavors danced together on the plate was pure magic. Fast forward to today, and here I am, creating my rendition of that timeless meal—lighter, fresher, but still bursting with nostalgia.
Ingredients for the Perfect Dish
Here’s what you’ll need to make this mouthwatering Pan Seared Salmon in Parmesan Cream Sauce:
- 2 salmon fillets: I recommend skin-on for maximum flavor and texture. If you’re not a fan of salmon, trout or halibut make great substitutes.
- 1 cup heavy cream: This creates that luxurious, creamy base. For a lighter option, consider coconut cream or unsweetened almond milk, though the texture may differ slightly.
- 1/2 cup grated Parmesan cheese: Freshly grated will give a better flavor and texture, but pre-grated works in a pinch. Nutritional yeast can be a great dairy-free alternative!
- 1/4 cup sun-dried tomatoes, chopped: These add a rich, tangy punch. If you have fresh tomatoes on hand, you can roast them quickly or even add a splash of balsamic vinegar instead.
- 2 cups fresh spinach: Perfect for wilted greens, synonymous with freshness. For a twist, you can use kale or arugula.
- 2 tablespoons olive oil: This will give your salmon a lovely sear. Feel free to swap it for avocado oil for a different flavor profile.
- Salt and pepper to taste: Essential for seasoning! Don’t be shy—seasoning enhances all the flavors.
- Garlic, minced (optional): Adds depth and flavor. If you’re not a garlic fan, feel free to omit it or even use garlic powder.
Step-by-Step Directions
Now, let’s bring this beautiful dish to life! Follow these simple steps and let’s make some magic happen:
-
Get the Pan Heating: Heat 2 tablespoons of olive oil in a skillet over medium-high heat. You want it hot enough to create a lovely sear on the salmon, but watch for smoking!
Pro Tip: To test if your oil is ready, drop a small piece of the salmon into the pan. If it sizzles, you’re good to go!
-
Sear the Salmon: Season both sides of the salmon fillets with salt and pepper. Place them skin-side down into the hot skillet. Cook for about 4-5 minutes without moving them. This gives that crispy skin we all love.
Little Chef Hack: Gently press down on the salmon with a spatula to ensure an even sear.
-
Flip and Cook: After 4-5 minutes, carefully flip the fillets and cook for another 3-4 minutes on the flesh side. The salmon is done when it flakes easily with a fork.
Chef Insight: Cooking time can vary based on the thickness of fillets; aim for an internal temperature of 145°F (63°C).
-
Remove and Set Aside: Once cooked, carefully transfer the salmon to a plate and cover it with foil to keep warm while you prepare the sauce.
-
Create the Cream Sauce: In the same skillet, lower the heat to medium and add minced garlic (if using). Sauté for about 30 seconds until fragrant.
Tip: Make sure you scrape any tasty bits left in the pan—this is where a lot of the flavor hides!
-
Pour in the Cream: Add your cup of heavy cream and bring it to a gentle simmer. Stir continuously, allowing it to thicken slightly.
-
Add Cheese and Tomatoes: Stir in the grated Parmesan and chopped sun-dried tomatoes. Mix until the cheese has melted and the sauce is creamy and luscious.
-
Throw in the Spinach: Add in the fresh spinach and let it wilt down, stirring it into the sauce for that vibrant green color.
Mom’s Tip: If you want a bit of zing, a splash of lemon juice goes a long way here!
-
Combine and Serve: Return the salmon to the pan, spooning some of the Parmesan cream sauce over the top. Let it warm through for about a minute.
Serving Suggestions
For plating, consider a vibrant dish for a beautiful presentation. Place the salmon fillet on a warm plate, generously drizzle with the creamy Parmesan sauce, and finish with a sprinkle of freshly cracked pepper and a few sun-dried tomatoes on top. Serve alongside a simple side salad or roasted veggies for a complete meal that looks as amazing as it tastes!
Recipe Variations
Who doesn’t love a little creativity in the kitchen? Here are a few twists to keep this dish fresh and exciting:
- Herb-Infused Cream: Add fresh herbs like basil or dill to the sauce for an aromatic twist.
- Spicy Kick: Toss in some red pepper flakes with the garlic to spice it up a notch.
- Zesty Citrus: Replace some of the cream with lemon juice or a splash of white wine for a zesty touch.
- Nutty Flavor: Stir in a tablespoon of toasted pine nuts or walnut pieces for crunch.
- Dairy-Free Delight: Swap the cream and cheese for coconut cream and nutritional yeast for a dairy-free alternative.
Chef’s Notes
This recipe has evolved over time, shaped by my love for bold flavors and health-conscious choices. I initially started with a more traditional approach, but as I focused on lighter ingredients without skimping on taste, this version emerged. I’ve had many evenings where the kitchen filled with laughter as we enjoyed this dish, and each time, the joy feeds my passion for creating delicious meals that are nourishing, too.
And remember, kitchen mishaps are part of the process! Just the other day, I mistook cayenne for paprika while making this dish for friends. What was intended to be mildly flavored salmon turned into a spicy adventure that everyone loved. Sometimes the best recipes come from happy accidents!
FAQs and Troubleshooting
1. My salmon is sticking to the pan. What did I do wrong?
That’s often a sign that the pan wasn’t hot enough at the start or that there wasn’t enough oil. Always ensure your oil is shimmering before adding the salmon and use skin-on fillets for an easier release.
2. The sauce turned out too thin, how can I thicken it?
If your sauce is too thin, simply let it simmer a little longer—this will reduce and thicken it. If you want a quick fix, try mixing in a teaspoon of cornstarch slurry (cornstarch mixed with a little cold water) to help it along.
3. What if I don’t like sun-dried tomatoes?
No problem! You can swap them for roasted red peppers, olives, or even fresh cherry tomatoes, depending on what you have on hand or your personal preference.
4. Can I prep this meal ahead of time?
Definitely! You can marinate the salmon with seasonings in advance and prepare the sauce beforehand (just add the spinach before serving). Simply reheat the sauce gently and add the cooked salmon just before serving.
Nutritional Info
While I generally steer clear of strict nutritional breakdowns, enjoying salmon provides a lovely dose of omega-3 fatty acids, while the cream and Parmesan offer calcium and healthy fats. So go ahead, indulge in a splash of goodness that also loves your body!
So there you have it! A delightful journey through Pan Seared Salmon in Parmesan Cream Sauce—flavorful, satisfying, and crafted with love. I hope this dish adds a pinch of joy to your dining table, and I can’t wait to hear about your kitchen adventures. Happy cooking!
PrintPan Seared Salmon in Parmesan Cream Sauce
A comforting dish featuring beautifully seared salmon fillets in a luscious Parmesan cream sauce, perfect for busy weeknights or special occasions.
- Prep Time: 15 minutes
- Cook Time: 15 minutes
- Total Time: 30 minutes
- Yield: 2 servings 1x
- Category: Main Course
- Method: Pan-Searing
- Cuisine: Mediterranean
- Diet: Pescatarian
Ingredients
- 2 salmon fillets, skin-on
- 1 cup heavy cream
- 1/2 cup grated Parmesan cheese
- 1/4 cup sun-dried tomatoes, chopped
- 2 cups fresh spinach
- 2 tablespoons olive oil
- Salt and pepper to taste
- Garlic, minced (optional)
Instructions
- Heat 2 tablespoons of olive oil in a skillet over medium-high heat.
- Season both sides of the salmon fillets with salt and pepper.
- Place them skin-side down into the hot skillet.
- Cook for about 4-5 minutes without moving them.
- Gently press down on the salmon with a spatula.
- Flip the fillets and cook for another 3-4 minutes on the flesh side.
- Remove the salmon to a plate and cover with foil.
- Add minced garlic (if using) to the skillet and sauté for 30 seconds.
- Pour in the heavy cream and bring to a gentle simmer.
- Add in the grated Parmesan and chopped sun-dried tomatoes.
- Stir in the fresh spinach and let it wilt down.
- Return the salmon to the pan and spoon the sauce over the top.
Notes
For a zesty touch, consider adding lemon juice to the sauce. This dish pairs wonderfully with a side salad or roasted vegetables.
Nutrition
- Serving Size: 1 fillet
- Calories: 450
- Sugar: 5g
- Sodium: 500mg
- Fat: 28g
- Saturated Fat: 12g
- Unsaturated Fat: 12g
- Trans Fat: 0g
- Carbohydrates: 5g
- Fiber: 1g
- Protein: 36g
- Cholesterol: 80mg
Keywords: salmon, cream sauce, easy dinner, seafood recipe, healthy comfort food
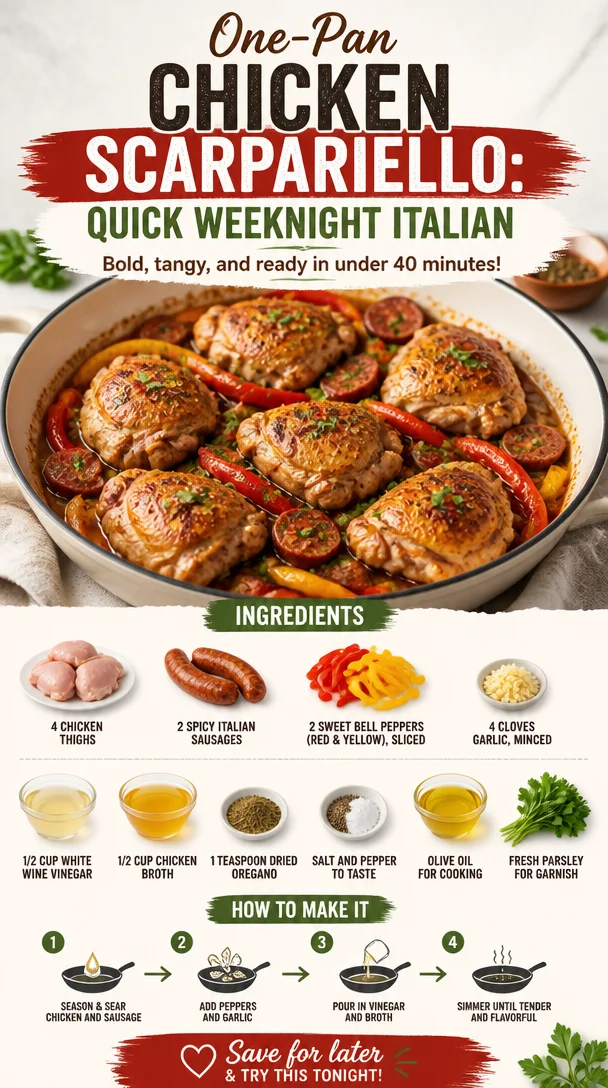
One-Pan Chicken Scarpariello: Quick Weeknight Italian
Chicken Scarpariello: A Flavorful Adventure in Every Bite
Hello, fellow food lovers! Today, I’m bubbling with excitement to share with you a dish that brings a smile to my face and warmth to my heart: Chicken Scarpariello. If you’re looking for a recipe that combines juicy chicken thighs, zesty sausages, vibrant bell peppers, and a delightful white wine vinegar sauce, you’ve landed in the right kitchen! 🥳
This dish is not only packed with flavor; it also holds a special place in my culinary journey. Growing up, I spent countless evenings in the kitchen with my grandmother, a skilled cook from the Old Country. She had this incredible knack for taking humble ingredients and turning them into something magical. One evening, while we were rummaging through her pantry, she whipped up her version of Chicken Scarpariello, and I’ll never forget the intoxicating aroma that filled the air. Every bite was a celebration of flavors and memories. The spicy sausages danced beautifully with the sweet bell peppers and garlic, creating a melody that still plays in my mind.
Today, as I share my rendition of Chicken Scarpariello with you, I hope to instill a sense of nostalgia, joy, and the excitement of cooking right in your own kitchen. So, buckle up your apron and let’s get started on this flavor-packed culinary adventure!
Ingredients
Gather these fantastic ingredients for our Chicken Scarpariello:
-
4 chicken thighs: I love using bone-in, skin-on chicken thighs for their rich flavor and juicy texture. If you prefer, boneless thighs can work too!
-
2 spicy Italian sausages: The seasoning in these sausages adds a delightful kick. If you’re not into heat, feel free to swap them out for sweet Italian sausages instead.
-
2 sweet bell peppers (red and yellow), sliced: They not only add color but also a crunch and sweetness that balances the dish beautifully. Any bell pepper works, so mix it up if you’d like!
-
4 cloves garlic, minced: Garlic is a flavor powerhouse here. Use fresh, but if you’re in a pinch, pre-minced garlic from a jar can save time.
-
1/2 cup white wine vinegar: This ingredient brings acidity and brightness to the dish. If you’re out of white wine vinegar, you can use apple cider vinegar as a substitute.
-
1/2 cup chicken broth: Homemade is best, but store-bought works too. Just make sure it’s low-sodium to control the salt content in your recipe.
-
1 teaspoon dried oregano: This herb adds a lovely earthy flavor to complement the other ingredients. Fresh oregano can elevate the dish even further if you have it on hand.
-
Salt and pepper to taste: A simple seasoning, but don’t skip them; they build the flavor up beautifully.
-
Olive oil for cooking: A splash of good-quality olive oil will make all the difference in sautéing your chicken and veggies to perfection.
-
Fresh parsley for garnish: Nothing brightens up a dish like a sprinkle of fresh herbs. Plus, they add a lovely pop of color!
Step-by-Step Instructions
-
Prep Your Ingredients: Start by gathering all your ingredients and chopping the bell peppers, mincing the garlic, and slicing the sausages. This makes cooking much smoother. Trust me; your future self will thank you!
-
Sear the Chicken: In a large skillet or Dutch oven, heat 2 tablespoons of olive oil over medium-high heat. Season the chicken thighs generously with salt and pepper. Place them skin-side down in the hot pan. Let them cook without moving for about 6-7 minutes, until the skin is golden and crispy. This is where the magic begins—listen for that sizzle!
-
Add the Sausages: Once the chicken is beautifully browned, remove it from the pan and set it aside. In the same skillet, add the sliced spicy Italian sausages and sauté for about 3-4 minutes until they start to brown. This step adds depth to the flavor base.
-
Introduce the Garlic and Peppers: Add minced garlic to the pan with the sausages and stir for about 30 seconds until fragrant. Then, toss in the sliced bell peppers. They should sizzle upon contact! Stir everything together and cook for another 5-6 minutes until the peppers are tender yet still vibrant.
-
Deglaze with Vinegar: It’s time to bring out those flavors! Pour in the white wine vinegar, scraping up any browned bits from the bottom of the pan. These little bits are flavor gold! Allow the vinegar to cook down for about 2 minutes, letting the acidity work its magic.
-
Add Broth and Oregano: Pour in the chicken broth and stir in the dried oregano. Bring the mixture to a gentle simmer. This is where the sauce starts to come together. The aroma fills the kitchen—you can practically taste it!
-
Return Chicken to the Pan: Nestle the chicken thighs back into the skillet, skin-side up. Cover the pan with a lid, reduce the heat to medium-low, and let it simmer for about 30 minutes. This slow cooking allows the flavors to meld. Pro tip: If you want even more flavor, flip the thighs halfway through cooking!
-
Final Seasoning: After 30 minutes, check the chicken for doneness (it should reach an internal temperature of 165°F). Add salt and pepper to taste. The smell should be absolutely irresistible at this point!
-
Garnish and Serve: Remove the pan from heat and sprinkle with freshly chopped parsley. This adds that gorgeous pop of green and freshness.
Serving Suggestions
When it comes to serving Chicken Scarpariello, presentation is key! I recommend serving it family-style right in the pan for a rustic touch, or you can plate it up by resembling an artful splash of sauce under the chicken for a gourmet feel. Pair it with a simple green salad, crusty bread, or over a bed of fluffy rice or polenta to soak up that savory sauce. Your guests will be begging for seconds!
Recipe Variations
Let’s shake things up! Here are a few creative twists you can try with this classic Chicken Scarpariello:
-
Herb Explosion: Add fresh thyme and rosemary to elevate the flavor profile. Just toss them in while the chicken simmers.
-
Veggie Boost: Sneak in more veggies! Carrots, zucchini, or mushrooms would be fantastic additions.
-
Heat it Up: If you want to spice things up even more, add a pinch of red pepper flakes for an additional kick.
-
Citrusy Twist: Drizzle some fresh lemon juice right before serving for a bright, zesty finish.
-
Sweet & Savory Combo: Adding a tablespoon of honey can create a delightful contrast to the vinegar, giving it a unique flavor profile.
Chef’s Notes
Oh, where do I begin? Chicken Scarpariello has evolved quite a bit since my grandmother first introduced me to the concept. I remember her saying, “Food is about love, and love should never be boring.” That mantra stuck with me and inspired the way I cook. Over the years, I’ve played with the ingredients, adding my own twists here and there. It’s amazing how versatile this dish is! You can easily turn it into a one-pan dinner or a cozy weekday meal that feels special. And hey, whenever I make this dish, I’m instantly transported back to those joyful kitchen moments with her. Food truly has a funny way of connecting us to our roots.
FAQs and Troubleshooting
-
Can I use chicken breasts instead of thighs?
Absolutely! Just keep in mind that chicken breasts may dry out more easily, so adjust the cooking time accordingly. They’ll need about 20 minutes if boneless. -
What if I don’t have white wine vinegar?
No problem! Apple cider vinegar or even lemon juice can serve as great substitutes. Just adjust the amount to taste, as they vary in acidity. -
How do I know if my chicken is cooked through?
Use a meat thermometer to check; the internal temperature should read 165°F. Also, the juices should run clear when you cut into it. -
What can I serve this with?
Chicken Scarpariello goes great with rice, polenta, or crusty bread. You could also serve it with a side of roasted vegetables for a well-rounded meal!
In conclusion, I’m thrilled you joined me on this culinary journey through the flavors of Chicken Scarpariello. This dish is more than just a recipe; it’s about traditions, memories, and connection. So get those ingredients ready, invite loved ones into your kitchen, and create your own delicious memories. Happy cooking, friends! 🍽️
PrintChicken Scarpariello

A flavor-packed dish combining juicy chicken thighs, zesty sausages, and vibrant bell peppers in a delightful white wine vinegar sauce.
- Prep Time: 15 minutes
- Cook Time: 40 minutes
- Total Time: 55 minutes
- Yield: 4 servings 1x
- Category: Main Course
- Method: Sautéing
- Cuisine: Italian
- Diet: Omnivore
Ingredients
- 4 chicken thighs, bone-in, skin-on
- 2 spicy Italian sausages, sliced
- 2 sweet bell peppers (red and yellow), sliced
- 4 cloves garlic, minced
- 1/2 cup white wine vinegar
- 1/2 cup chicken broth
- 1 teaspoon dried oregano
- Salt and pepper to taste
- Olive oil for cooking
- Fresh parsley for garnish
Instructions
- Prep your ingredients: Start by gathering and chopping the bell peppers, mincing the garlic, and slicing the sausages.
- Sear the chicken: In a large skillet, heat olive oil over medium-high heat, season chicken with salt and pepper, and cook skin-side down for 6-7 minutes until golden.
- Add the sausages: Remove chicken, add sliced sausages to the skillet, and sauté for 3-4 minutes until browned.
- Introduce the garlic and peppers: Add minced garlic and sauté for 30 seconds, then add bell peppers and cook for another 5-6 minutes.
- Deglaze with vinegar: Pour in white wine vinegar, scraping up browned bits, and cook for about 2 minutes.
- Add broth and oregano: Pour in chicken broth, stir in oregano, and bring to a gentle simmer.
- Return chicken to the pan: Nestle chicken thighs back into the skillet, cover, and simmer for about 30 minutes.
- Final seasoning: Check chicken doneness at 165°F and adjust salt and pepper to taste.
- Garnish and serve: Remove from heat, sprinkle with parsley, and serve your Chicken Scarpariello!
Notes
For extra flavor, flip the chicken halfway through cooking. Serve family-style or plate with sauce underneath the chicken.
Nutrition
- Serving Size: 1 serving
- Calories: 450
- Sugar: 5g
- Sodium: 700mg
- Fat: 20g
- Saturated Fat: 6g
- Unsaturated Fat: 12g
- Trans Fat: 0g
- Carbohydrates: 40g
- Fiber: 4g
- Protein: 30g
- Cholesterol: 100mg
Keywords: Chicken Scarpariello, Italian cuisine, comfort food, easy dinner, family meal
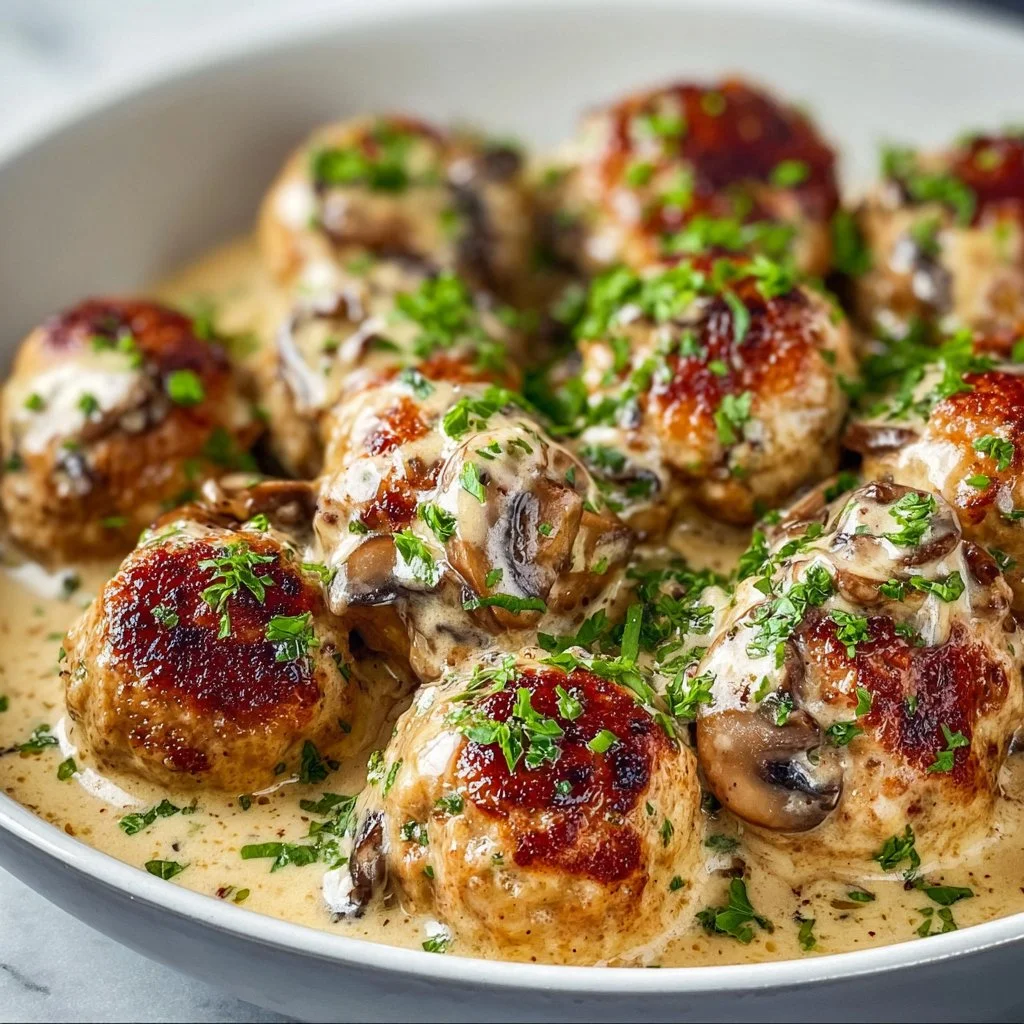
One-Pan Creamy Mushroom Chicken Meatballs in 25 Minutes
Creamy Mushroom Chicken Meatballs: A Comforting Delight
Welcome to Clean Plate Cravings! Today, I’m thrilled to share one of my all-time favorite recipes: Creamy Mushroom Chicken Meatballs. This dish is the epitome of comfort food, with a twist of sophistication that makes it perfect for weeknight dinners or special occasions. Now, who can resist tender meatballs enveloped in a luscious, creamy mushroom sauce? It’s simply divine!
When I first created this recipe, I wanted to blend the warmth of a traditional spaghetti and meatballs dish with the richness of gourmet flavors. I couldn’t wait to make it for family and friends. Picture this: a cozy afternoon, the aroma of garlic and mushrooms wafting through the kitchen, and laughter ringing out from the dining room. It’s these little moments that make cooking so magical to me.
As I stirred the sauce and formed the meatballs, I was flooded with memories of my grandmother’s kitchen. She had this incredible ability to turn simple ingredients into crowd-pleasing meals. I remember her deft hands shaping meatballs, every one perfectly rounded, as she hummed a tune while whisking together a velvety sauce. It was a dance of flavors and love, which undoubtedly inspired my culinary journey.
So, let’s dive into this flavorful recipe that’s not only delicious but also brings a slice of my childhood into your home. Whether you’re cooking for yourself, your family, or a group of friends, these Creamy Mushroom Chicken Meatballs will surely become a cherished addition to your recipe repertoire!
Ingredients
Here’s what you’ll need to whip up these flavorful meatballs:
-
1 pound ground chicken
- A lean meat option that keeps the meatballs juicy while allowing the creamy sauce to shine. If you want a richer flavor, you can substitute with ground turkey or even a mix of chicken and pork.
-
1/2 cup breadcrumbs
- These provide structure and help keep the meatballs tender. You can use regular or panko breadcrumbs. For a gluten-free option, try almond flour or gluten-free breadcrumbs.
-
1/4 cup grated Parmesan cheese
- This adds a savory depth to the meatballs. Feel free to substitute with Pecorino Romano or omit it for a dairy-free version.
-
1 egg
- The binding agent that holds everything together. If you need an egg substitute, use a flaxseed meal mixture (1 tablespoon flaxseed meal + 3 tablespoons water) per egg.
-
2 cloves garlic, minced
- Adds a delightful aroma and flavor. More garlic lovers can add an extra clove or two!
-
Salt and pepper, to taste
- Essential for enhancing the flavors of your dish. Don’t be shy—season generously!
-
2 tablespoons olive oil
- Perfect for browning the meatballs. Can be replaced with avocado oil or melted butter for a richer taste.
-
8 ounces mushrooms, sliced
- Use your favorite variety, I love cremini or button mushrooms for their texture and flavor. Portobello can also add a nice, meaty base.
-
1 cup heavy cream
- This creates the rich, creamy sauce that makes this dish indulgent. For a lighter option, you can use half-and-half or coconut cream for a dairy-free alternative.
-
1/2 cup chicken broth
- Adds depth to the sauce. If you prefer vegetarian, go for vegetable broth instead.
-
1 teaspoon thyme
- Fresh or dried, this herb pairs beautifully with the creamy sauce and mushrooms. You can substitute with rosemary or Italian seasoning if that’s what you have on hand.
Step-by-Step Instructions
Ready to get started? Grab your apron, and let’s make these creamy mushroom chicken meatballs!
-
Prepare the meatball mixture: In a mixing bowl, combine the ground chicken, breadcrumbs, grated Parmesan cheese, egg, minced garlic, salt, and pepper. Use your hands to gently mix until everything is just combined—be careful not to overwork it!
Chef’s Tip: Using your hands is the best way to ensure all ingredients blend well, but don’t forget to wash them afterward!
-
Shape the meatballs: Roll the mixture into golf ball-sized meatballs (about 1.5 inches in diameter). Place them on a plate or baking sheet as you work.
Pro Tip: For even cooking, try to make them all the same size. If you want to be extra fancy, use a small cookie scoop!
-
Brown the meatballs: In a large skillet, heat the olive oil over medium heat. Once hot, gently add the meatballs in batches, making sure not to overcrowd the pan. Brown them on all sides for about 5-7 minutes.
Chef Hack: If they stick to the pan, give them a little extra time to sear, and they should release beautifully!
-
Cook the mushrooms: Once browned, remove the meatballs from the skillet and set aside. In the same skillet, add the sliced mushrooms. Sauté them for about 5 minutes or until they’re tender and browned.
Tip: If the pan seems dry, add a splash more oil. Get those mushrooms nice and caramelized for extra flavor!
-
Make the sauce: Pour in the heavy cream and chicken broth. Stir well to combine with the mushrooms. Sprinkle in the thyme, and let it simmer for about 3-4 minutes until it thickens slightly.
Cooking Hack: If you prefer a super creamy sauce, feel free to whisk in a little more cream as you go!
-
Bring it all together: Return the browned meatballs to the skillet, gently nestling them in the creamy sauce. Cover and let simmer for an additional 10 minutes, allowing the meatballs to cook through and absorb the flavors.
Tip: You can temp the meatballs with a meat thermometer—165°F ensures they are perfectly cooked!
-
Taste and season: Give the sauce a final taste and adjust the salt and pepper as needed. If you’d like, throw in some fresh parsley or chives at this stage for an extra burst of color and flavor.
Chef Note: A squeeze of lemon at the end really brightens up the dish!
Serving Suggestions
To serve these creamy mushroom chicken meatballs, I love to plate them over a bed of buttery mashed potatoes, creamy polenta, or even whole wheat spaghetti for that classic touch! Drizzle some of the luscious sauce over the top and garnish with fresh herbs like parsley or thyme.
Pair it with a crisp, green salad dressed with a tangy vinaigrette to cut through the creaminess, or some roasted veggies for a colorful side. The options are limitless!
Recipe Variations
Feel free to play around with this recipe! Here are a few fun twists to consider:
-
Add Spinach or Kale: Stir in some fresh spinach or kale into the sauce for added nutrients and color.
-
Cheesy Version: Mix in some shredded mozzarella or fontina cheese with the sauce for a melty finish that’s irresistible.
-
Spicy Kick: Add a sprinkle of red pepper flakes or some diced jalapeños into the meatball mixture for a spicy twist.
-
Herb Variations: Try using fresh basil or oregano instead of thyme for a different flavor profile.
-
Mushroom Medley: Use a variety of mushrooms like shiitake, portobello, and oyster for an earthy, sophisticated flavor.
Chef’s Notes
Every recipe has a story, and this one is no different! I remember the countless evenings spent experimenting with different sauces and spices as I tried to recreate my grandmother’s famous meatballs. The journey of discovering what works, what doesn’t, and remembering the people you love along the way is what makes cooking magical.
I’ve evolved this recipe over the years, starting with a classic beef meatball version when I was a kid. Now, I adore how light ground chicken feels while still being flavorful and hearty. Plus, the creamy sauce makes everything feel like a warm hug!
FAQs and Troubleshooting
1. My meatballs fell apart while cooking! What did I do wrong?
It’s likely that they needed an extra binding agent. Make sure to measure your breadcrumbs and egg accurately. If they feel too loose, a little more breadcrumb or even some grated cheese can help bind them better.
2. Can I make this recipe ahead of time?
Absolutely! You can prepare the meatballs and sauce, then store them separately in the refrigerator for up to 2 days. Reheat gently before serving.
3. How do I store leftovers?
Store any leftover meatballs in an airtight container in the fridge for up to 3 days. You can also freeze them—just make sure to separate them before putting them in a freezer bag for easier thawing!
4. Can I use other meats instead of chicken?
Yes, you can substitute ground turkey, pork, or beef for a different flavor and texture experience!
Nutritional Info
While the exact nutritional content can vary based on specific ingredients used, here’s a rough estimate for one serving of Creamy Mushroom Chicken Meatballs (based on six servings):
- Calories: 360
- Protein: 25g
- Fat: 25g
- Carbohydrates: 14g
- Fiber: 1g
Note: Adjustments in ingredients may alter nutritional values, so be sure to keep track of substitutions!
And there you have it—Creamy Mushroom Chicken Meatballs that will make you feel right at home, whether you’re cooking for yourself or for a crowd. Thanks for joining me in this kitchen adventure, and happy cooking! Here’s to many delicious meals ahead!
PrintCreamy Mushroom Chicken Meatballs

Tender meatballs enveloped in a luscious, creamy mushroom sauce, blending traditional comfort food with gourmet flavors.
- Prep Time: 15 minutes
- Cook Time: 30 minutes
- Total Time: 45 minutes
- Yield: 6 servings 1x
- Category: Main Course
- Method: Baking
- Cuisine: Italian
- Diet: Gluten-Free
Ingredients
- 1 pound ground chicken
- 1/2 cup breadcrumbs
- 1/4 cup grated Parmesan cheese
- 1 egg
- 2 cloves garlic, minced
- Salt and pepper, to taste
- 2 tablespoons olive oil
- 8 ounces mushrooms, sliced
- 1 cup heavy cream
- 1/2 cup chicken broth
- 1 teaspoon thyme
Instructions
- Prepare the meatball mixture: In a mixing bowl, combine the ground chicken, breadcrumbs, grated Parmesan cheese, egg, minced garlic, salt, and pepper. Use your hands to gently mix until everything is just combined.
- Shape the meatballs: Roll the mixture into golf ball-sized meatballs (about 1.5 inches in diameter). Place them on a plate or baking sheet.
- Brown the meatballs: In a large skillet, heat the olive oil over medium heat. Once hot, gently add the meatballs in batches, browning them on all sides for about 5-7 minutes.
- Cook the mushrooms: Once browned, remove the meatballs and set them aside. In the same skillet, add the sliced mushrooms and sauté for about 5 minutes or until tender.
- Make the sauce: Pour in the heavy cream and chicken broth, stir well with the mushrooms, and sprinkle in the thyme. Let it simmer for about 3-4 minutes until it thickens slightly.
- Bring it all together: Return the meatballs to the skillet, gently nestling them in the sauce. Cover and let simmer for an additional 10 minutes.
- Taste and season: Adjust the salt and pepper as needed and add fresh parsley or chives for extra flavor.
Notes
Serve over buttery mashed potatoes, creamy polenta, or whole wheat spaghetti. Pair with a crisp salad or roasted veggies.
Nutrition
- Serving Size: 1 serving
- Calories: 360
- Sugar: 5g
- Sodium: 600mg
- Fat: 25g
- Saturated Fat: 10g
- Unsaturated Fat: 10g
- Trans Fat: 0g
- Carbohydrates: 14g
- Fiber: 1g
- Protein: 25g
- Cholesterol: 90mg
Keywords: chicken meatballs, creamy sauce, comfort food, Italian recipe, easy dinner
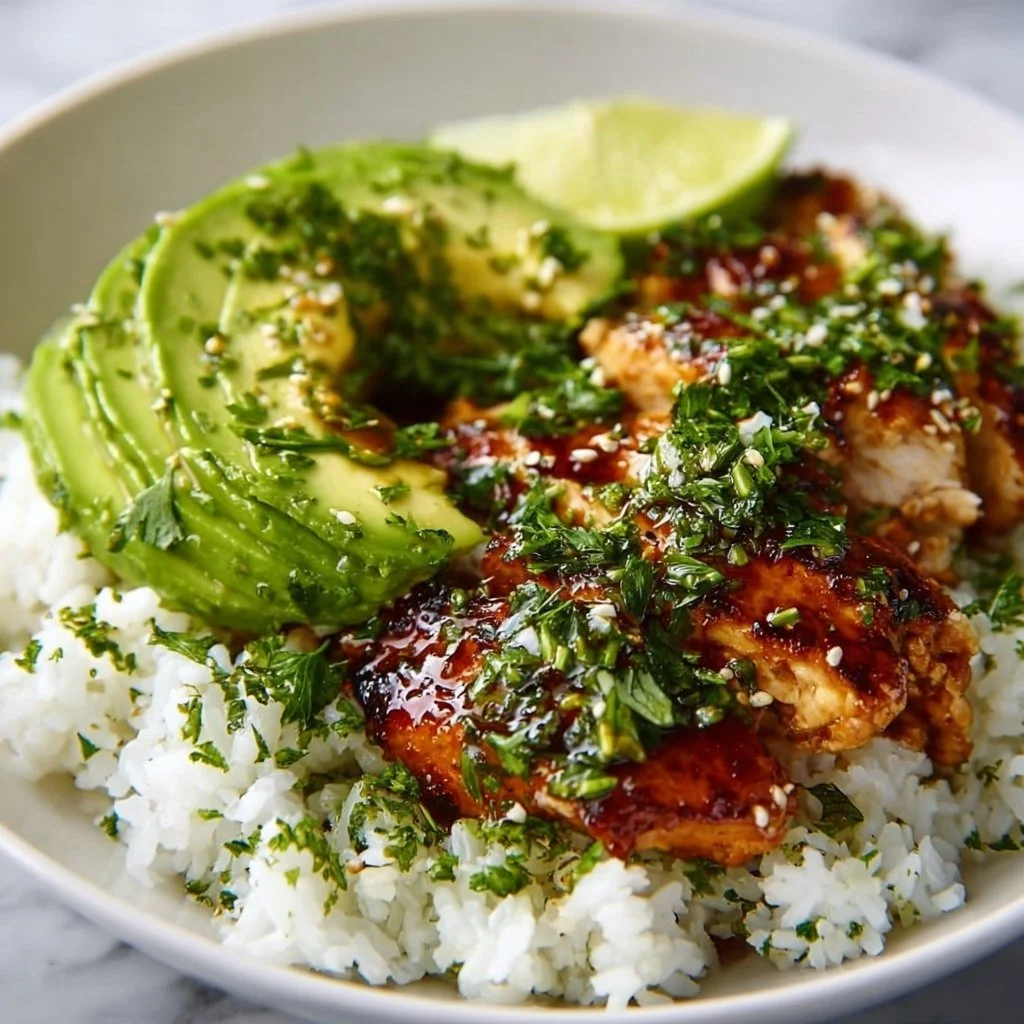
One-Pan Honey-Lime Chicken with Avocado Rice (Weeknight)
Honey Lime Chicken with Avocado Rice: A Vibrant and Satisfying Meal
Welcome, food lovers! Today, we’re whipping up something that’s not just a feast for your taste buds but a total delight for your senses. Picture this: succulent, sticky honey lime chicken drizzled with a zesty glaze, layered on a bed of creamy avocado rice—it’s like a sunny day on a plate! This dish isn’t just perfect for a weeknight meal; it invites that warm, feel-good vibe we all crave after a long day. And trust me, no complicated techniques involved here—just pure, clean goodness.
What makes this meal stand out? It’s all about balance. You have the sweetness of honey marrying beautifully with the bright acidity of lime, while the creamy avocado rice has just the right amount of richness to round it all out. It’s simple, it’s delicious, and I know you’re going to look forward to making it often. So, grab your apron and let’s get started!
A Culinary Memory
Growing up in a bustling household, dinner time was the most exciting event of the day. My parents had a knack for getting everyone involved in the kitchen, and that’s where my love for cooking was born. I distinctly remember one summer when we decided to transform our backyard into a mini taco stand for family friends. We served chicken marinated in an array of flavors, but my favorite was always the honey-lime marinade.
Everyone would gather around, chatting and laughing while we grilled the chicken to juicy perfection. The aroma of that sweet and tangy mixture wafted through the air, and nothing could make you happier than biting into a piece of grilled chicken sprinkled with fresh cilantro. These moments shaped my love for food—specifically, dishes that bring people together and create lasting memories. And now, I’m sharing that love with you through this honey lime chicken recipe, paired with creamy avocado rice to bring a bit of those summer vibes right into your kitchen.
Ingredients
For our delicious honey lime chicken with avocado rice, these vibrant ingredients will bring this dish to life. Here’s what you’ll need:
- 2 chicken breasts: Opt for skinless, boneless for ease. You can also use thighs if you prefer dark meat!
- 1/4 cup honey: This sweet nectar not only fuels your body but gives the chicken that drool-worthy glaze. Use agave syrup for a vegan alternative!
- 2 tablespoons lime juice: Fresh squeezed is always best, but bottled will do in a pinch. It adds the perfect zing to the honey!
- 2 avocados: Creamy and nutritious, they’re the star of our rice! Using ripe ones makes all the difference.
- 1 cup cooked rice: Any rice will work—brown, white, or even quinoa for a twist!
- 1 tablespoon olive oil: A heart-healthy fat that helps sauté the chicken and adds flavor.
- Salt and pepper to taste: Always essential for enhancing flavors!
- Chopped cilantro (optional, for garnish): A fresh finish that livens up the dish and adds a pop of color.
Step-by-Step Instructions
Now, let’s dive into the cooking process! It’s easier than you might think, and I’m here to guide you through every step.
-
Marinate the Chicken:
- In a bowl, combine the honey, lime juice, salt, and pepper. This is your marinade! Add the chicken breasts, ensuring they’re well-coated.
- Let them marinate for at least 30 minutes. If you’re short on time, even 10 minutes will add flavor, but letting it sit longer helps the magic happen. The chicken absorbs all that sweet and tangy goodness.
-
Cook the Rice:
- If you’re using leftover rice, simply reheat it up while you cook the chicken. If starting from scratch, cook according to the package directions, and then fluff it up with a fork when done.
- While your rice cooks, pulse up those avocados!
-
Sauté the Chicken:
- Heat the olive oil in a skillet over medium-high heat. Once the oil shimmers, add your marinated chicken.
- Cook for about 5-7 minutes on one side until golden and then flip. Here’s a little chef hack: resist the urge to poke or move the chicken around too much; let it develop a nice crust!
-
Glaze It Up:
- Once flipped, pour any remaining marinade into the pan. This will create a fabulous glaze. Continue to cook for another 5-7 minutes or until the chicken reaches an internal temperature of 165°F.
- Make sure to baste the chicken with the glaze as it cooks. This extra tenderizes the meat and enhances that sticky, delicious flavor.
-
Prepare the Avocado Rice:
- As the chicken finishes cooking, in a bowl, mash the avocados with a fork until creamy yet a little chunky for texture. Mix in the cooked rice, salt, and a squeeze of lime juice for brightness.
- I like to allow the rice to come to room temp—this makes it light and fluffy!
-
Serve Up:
- Once everything is ready, slice the chicken into strips to reveal those juicy, marinated layers. Serve over the avocado rice and garnish with fresh cilantro for that pop of green freshness.
Serving Suggestions
When plating this dish, I like using a shallow bowl for a beautiful presentation—the creamy avocado rice acts as a cushion for the juicy chicken. Make sure to drizzle extra honey-lime sauce over the top for an enticing shine. A sprinkle of cilantro adds color and fragrant freshness that’s impossible to resist. To elevate, serve it with lime wedges on the side for a little extra zing!
Recipe Variations
I love flexibility in cooking! Here are some creative ideas to play with the honey lime chicken and avocado rice:
-
Spice it Up: Add a touch of chili powder or cayenne pepper to the marinade for a kick. Alternatively, sprinkle red pepper flakes in the avocado rice for an added zing!
-
Tropical Twist: Mix in chopped pineapple or mango to the rice for a tropical version of this dish. It pairs beautifully with the honey and lime!
-
Herb it Up: Use fresh basil or parsley instead of cilantro if you’re not a fan! Fresh herbs lighten up the dish and keep it fresh.
-
Grain-Free Option: Swap the rice for cauliflower rice to keep things low-carb. Just sauté it with a bit of lime juice for flavor!
-
Veggie Power: Add grilled vegetables like bell peppers and zucchini to create a complete meal. The colorful veggies bring extra nutrients and crunch!
Chef’s Notes
Over the years, this honey lime chicken has evolved from a quick summer dish into one of my go-to meals for entertaining. I remember making it for friends and seeing their eyes light up after the first bite. It’s that reaction that keeps me experimenting! The avocados were an inspired addition one day after I had leftovers from a guacamole-making session. They perfectly balance the dish and give it that creamy texture we all love. Plus, it’s a great way to use avocados—because who doesn’t want more greens on their plate?
FAQs and Troubleshooting
-
What if my chicken isn’t cooking evenly?
- Make sure to flatten the chicken breasts a bit with a meat mallet for even cooking. If they’re uneven in thickness, they’ll cook differently—thicker parts will take longer, leading to dryness.
-
Can I use frozen chicken?
- Yes, but I recommend thawing it completely before marinating and cooking to ensure the flavors penetrate properly and for even cooking throughout.
-
What if my rice turns out mushy?
- Ensure you’re measuring water correctly based on the type of rice you’re using. For fluffy rice, rinse the grains before cooking to remove excess starch.
-
How can I prevent my avocados from browning?
- The key is to squeeze some lime juice on the mashed avocado immediately. The acidity helps slow down oxidation!
Nutritional Info
(Hypothetical serving size for readers—adjust based on your portioning)
- Calories: 480
- Protein: 30g
- Carbs: 55g
- Fat: 15g
- Fiber: 10g
Now that you’ve got the scoop on this delicious Honey Lime Chicken with Avocado Rice, there’s nothing stopping you from diving into this scrumptious creation! Remember, cooking is about having fun, experimenting, and sharing—so don’t hesitate to make it your own. I can’t wait to hear how you enjoyed this recipe and the memories you create along the way. Happy cooking, my friends!
PrintHoney Lime Chicken with Avocado Rice
A vibrant and satisfying meal with succulent honey lime chicken layered on creamy avocado rice.
- Prep Time: 10 minutes
- Cook Time: 20 minutes
- Total Time: 30 minutes
- Yield: 4 servings 1x
- Category: Main Course
- Method: Sautéing
- Cuisine: Mexican
- Diet: Paleo
Ingredients
- 2 skinless, boneless chicken breasts
- 1/4 cup honey
- 2 tablespoons lime juice
- 2 ripe avocados
- 1 cup cooked rice
- 1 tablespoon olive oil
- Salt and pepper to taste
- Chopped cilantro (optional, for garnish)
Instructions
- Marinate the chicken: In a bowl, combine the honey, lime juice, salt, and pepper. Add the chicken, ensuring they’re well-coated, and let them marinate for 30 minutes.
- Cook the rice: If using leftover rice, reheat it while cooking the chicken. If starting from scratch, cook according to package directions.
- Sauté the chicken: Heat olive oil in a skillet over medium-high heat. Add marinated chicken and cook for 5-7 minutes on one side until golden, then flip.
- Glaze the chicken: Pour remaining marinade into the pan and cook for another 5-7 minutes or until the chicken reaches an internal temperature of 165°F.
- Prepare the avocado rice: Mash the avocados, mix in the cooked rice, salt, and a squeeze of lime juice.
- Serve up: Slice the chicken and serve it over the avocado rice, garnished with fresh cilantro.
Notes
For a kick, add chili powder to the marinade or red pepper flakes to the rice.
Nutrition
- Serving Size: 1 serving
- Calories: 480
- Sugar: 12g
- Sodium: 500mg
- Fat: 15g
- Saturated Fat: 2g
- Unsaturated Fat: 10g
- Trans Fat: 0g
- Carbohydrates: 55g
- Fiber: 10g
- Protein: 30g
- Cholesterol: 70mg
Keywords: chicken, avocado, lime, honey, healthy recipe