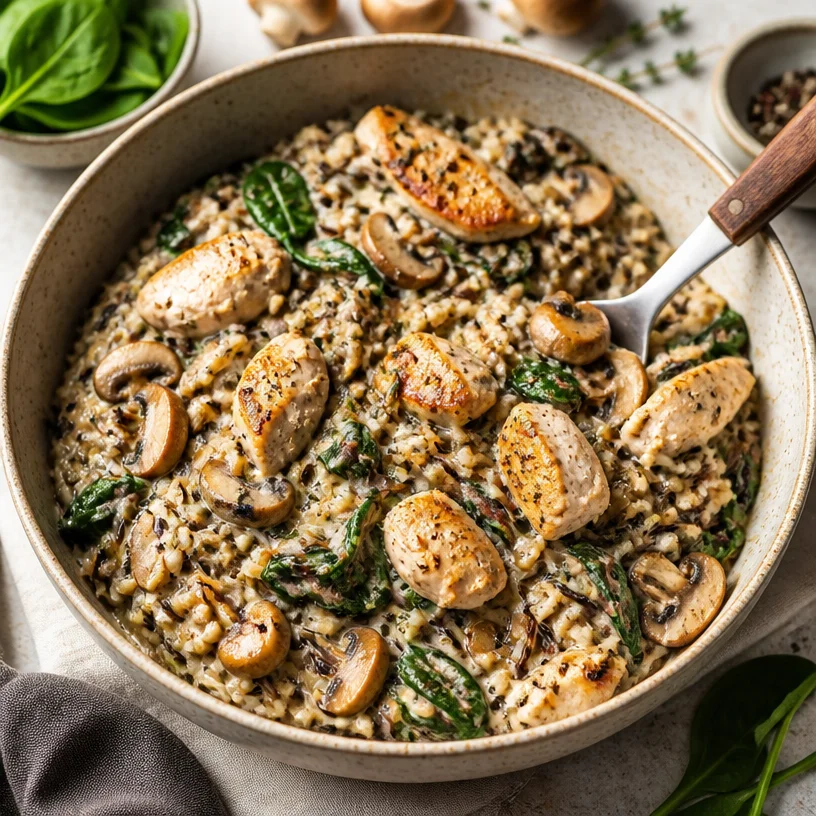
Minute One-Pan Chicken Wild Rice Bowl for Weeknights
Chicken Wild Rice Bowl: A Wholesome Delight
Welcome to the cozy corner of our kitchen! Today, we’re diving into a dish that perfectly embodies everything I stand for here at Clean Plate Cravings: the Chicken Wild Rice Bowl. This vibrant, nourishing meal isn’t just delicious, it’s an experience, a warm hug in a bowl, if you will. Imagine sinking your fork into tender chicken, earthy mushrooms, and wholesome wild rice, all topped off with fresh spinach. Are you ready for this culinary adventure? Let’s get to it!
A Nostalgic Kitchen Memory
When I think of wild rice, I’m transported back to my childhood kitchen, where the aroma of something bubbling away on the stove would set the scene. My mom often cooked with wild rice, believing it to be the jewel of grains. I remember one evening in particular, she invited our neighbor, Mrs. Hargrove, over for dinner. Now, Mrs. Hargrove was a culinary force in our neighborhood—her apple pie was scandalously good! That evening, Mom made her famous chicken and wild rice dish, packed with goodies from our garden. The clinking of pots, the rhythmic chopping of garlic, and the laughter in our kitchen made it unforgettable.
As we sat around the table, Mrs. Hargrove marveled at the wild rice, “This isn’t just food; it’s love on a plate!” That memory stuck with me, and today, I believe in that same idea. Cooking is about nourishment, yes, but also about connection—sharing moments, stories, flavors. So, let’s recreate that love today!
Ingredients You’ll Need
For our Chicken Wild Rice Bowl, here’s what you’ll need:
-
Chicken Breast (or thighs): Protein-packed and juicy, chicken can be easily substituted with tofu or chickpeas for a vegetarian version. A simple marinade of olive oil and herbs can elevate the flavor!
-
Wild Rice: This nutty, fiber-rich grain is the star of our dish. If you can’t find wild rice, brown rice, or quinoa can make a great substitute, just be mindful of cooking times!
-
Mushrooms (button or cremini): Earthy mushrooms add depth to the dish. Feel free to swap them out for zucchini or bell peppers if you’re in the mood for something different.
-
Fresh Spinach: This leafy green packs a nutritional punch. You can use kale or Swiss chard in its place, but you may want to cook them a bit longer as they’re heartier than spinach.
-
Chicken Broth (or vegetable broth): Using broth instead of water enhances the flavor! Homemade broth is ideal, but a good-quality store-bought version works just as well.
Step-by-Step Instructions
Ready to bring this dish to life? Let’s get started!
-
Cook the Wild Rice: Begin by rinsing the wild rice under cold water. In a medium pot, combine 1 cup of wild rice with 3 cups of chicken or vegetable broth. Bring to a boil, then reduce the heat to low, cover, and simmer for 40-50 minutes until the rice is tender. Chef’s tip: If the rice is not all cooked after 50 minutes, don’t worry! Just add a bit more liquid and keep cooking until it’s done.
-
Prep the Chicken: While the rice is cooking, take 1 pound of chicken breast or thighs. Season them generously with salt, pepper, and your favorite herbs like thyme or rosemary. Little hack: Let the chicken rest at room temperature for about 15 minutes before cooking for even cooking.
-
Sear the Chicken: Heat 2 tablespoons of olive oil in a large skillet over medium-high heat. Add the chicken and cook for about 5-7 minutes on each side until golden brown and fully cooked. Use a meat thermometer to ensure the internal temperature reaches 165°F (75°C). Once cooked, remove from the pan and let it rest for about 10 minutes before slicing. Pro tip: This rest time allows the juices to redistribute, keeping your chicken moist!
-
Sauté the Mushrooms: In the same skillet, add another drizzle of olive oil if needed, and toss in about 8 ounces of sliced mushrooms. Sauté them for 5-6 minutes until they’re nicely browned. Chef’s insight: Adding a sprinkle of salt while cooking mushrooms helps to draw out their moisture, making them more flavorful!
-
Add the Spinach: Toss in a hefty handful of fresh spinach, about 4 cups. Stir until just wilted. This will take just a minute or two. Hack: If you want more color and nutrients, throw in some cherry tomatoes or bell peppers with the spinach!
-
Combine: Once the wild rice is ready, fluff it with a fork, and then stir it into the mushroom and spinach mixture. Slice the resting chicken and gently mix it that wholesome rice medley. Note: Save a few mushroom pieces and spinach for garnish!
Serving Suggestions
To present this dish beautifully, scoop generous portions of the chicken wild rice mixture into bowls. You can drizzle a little olive oil on top or a squeeze of lemon for brightness. Don’t forget to garnish with those reserved mushrooms and spinach, and maybe a sprinkle of fresh herbs like parsley or chives to put a little flourish on your creation!
Recipe Variations
-
Mediterranean Twist: Add some sun-dried tomatoes, kalamata olives, and feta cheese to the mix for a Mediterranean flair.
-
Spicy Kick: Incorporate a teaspoon of red pepper flakes or a dollop of spicy harissa paste to the sautéed mushrooms for a little heat!
-
Savory Flavor: You could also experiment with different herbs like dill or cilantro. They offer unique flavors that can completely change the dish while keeping it fresh and fun.
-
Nutty Crunch: Before serving, sprinkle some toasted walnuts or pecans for an added crunch and healthy fats!
-
Summer Fresh: In the warm months, consider adding grilled zucchini or fresh corn off the cob for a seasonal touch.
Chef’s Notes
This recipe really is a canvas—don’t hesitate to make it your own! Over the years, I’ve watched this dish evolve in my kitchen, adapting to whatever I have on hand. One day, I had leftover roasted sweet potatoes, and the dish transformed into an unexpected delight. Cooking is all about creativity, and I encourage you to experiment!
And let’s be real—that’s half the fun! And oh, those evenings spent with family, laughing over a hearty bowl of chicken wild rice? That’s what it’s all about, folks. Food is about connection, memories, and expressions of love.
FAQs and Troubleshooting
Q1: Why is my wild rice not cooking properly?
A: Sometimes, wild rice can be a little fickle. If it’s still hard after cooking, add a little more broth or water and give it extra time. Just remember to cover it so the steam keeps it tender!
Q2: Can I make this dish ahead of time?
A: Absolutely! You can prepare everything in advance and store each component in the fridge. Simply reheat when ready to serve, and this makes for a fantastic meal prep option!
Q3: How do I ensure my chicken stays juicy?
A: The two key factors here are resting and cooking at the right temperature. Also, don’t overcook it—using a meat thermometer takes the guesswork out and helps achieve that perfect juicy bite!
Q4: What if I want to make it vegan?
A: Great question! You can swap the chicken for your favorite plant-based protein like chickpeas or lentils, and use vegetable broth. The mushrooms and spices will keep it packed with flavor!
Nutritional Info (per serving, approx)
- Calories: 450
- Protein: 35g
- Carbs: 45g
- Fat: 15g
- Fiber: 6g
And there you have it! Your Chicken Wild Rice Bowl is more than just a meal; it’s a celebration of flavors and memories. Thank you for joining me today, and I can’t wait to hear how your culinary adventure turns out! Keep it fresh, simple, and delicious, my foodie friends!
PrintChicken Wild Rice Bowl
A vibrant and nourishing Chicken Wild Rice Bowl packed with tender chicken, earthy mushrooms, and wholesome wild rice topped with fresh spinach.
- Prep Time: 15 minutes
- Cook Time: 50 minutes
- Total Time: 65 minutes
- Yield: 4 servings 1x
- Category: Main Course
- Method: Stovetop
- Cuisine: American
- Diet: Gluten-Free
Ingredients
- 1 pound Chicken Breast (or thighs)
- 1 cup Wild Rice
- 8 ounces Mushrooms (button or cremini)
- 4 cups Fresh Spinach
- 3 cups Chicken Broth (or vegetable broth)
- 2 tablespoons Olive Oil
- Salt and pepper to taste
- Your favorite herbs (thyme, rosemary)
Instructions
- Cook the Wild Rice: Rinse the wild rice under cold water. In a medium pot, combine wild rice with chicken or vegetable broth. Bring to a boil, reduce heat to low, cover, and simmer for 40-50 minutes until tender.
- Prep the Chicken: Season chicken with salt, pepper, and herbs. Let it rest at room temperature for 15 minutes.
- Sear the Chicken: Heat olive oil in a large skillet over medium-high heat. Add chicken and cook for about 5-7 minutes on each side until golden brown and fully cooked. Let it rest before slicing.
- Sauté the Mushrooms: In the same skillet, add more olive oil if needed and add sliced mushrooms. Sauté for 5-6 minutes until browned.
- Add the Spinach: Toss in spinach and stir until just wilted, about 1-2 minutes.
- Combine: Fluff the wild rice and stir it into the mushroom and spinach mixture. Slice the resting chicken and mix into the rice medley.
Notes
For extra flavor, consider drizzling some olive oil or squeezing lemon juice on top before serving. Garnish with fresh herbs.
Nutrition
- Serving Size: 1 bowl
- Calories: 450
- Sugar: 2g
- Sodium: 600mg
- Fat: 15g
- Saturated Fat: 3g
- Unsaturated Fat: 10g
- Trans Fat: 0g
- Carbohydrates: 45g
- Fiber: 6g
- Protein: 35g
- Cholesterol: 75mg
Keywords: chicken, wild rice, bowl, healthy, comforting, family meal
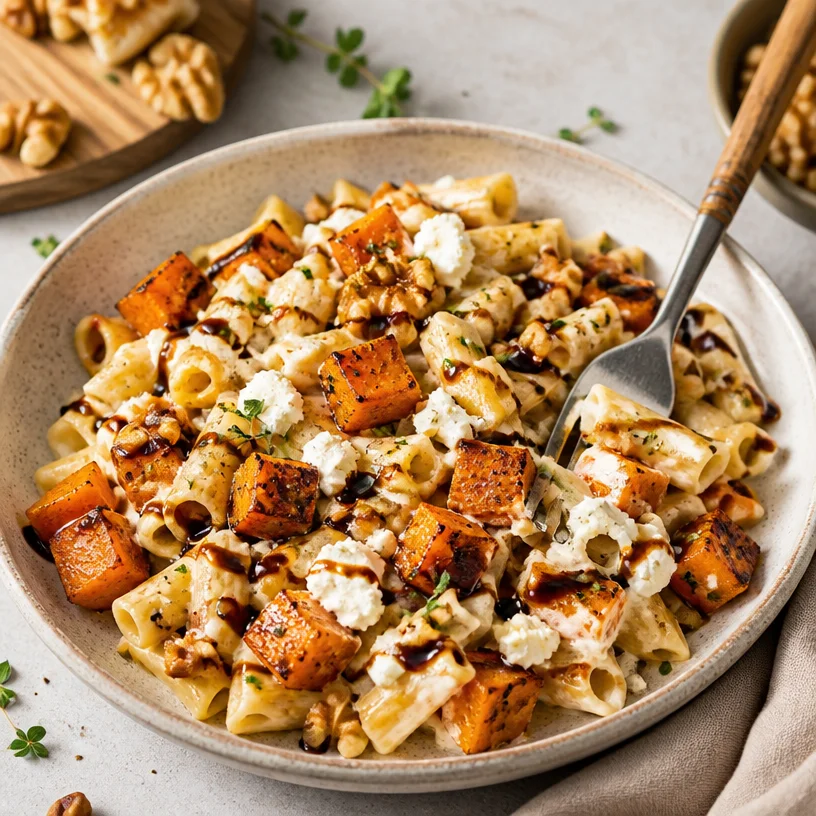
One-Pan Roasted Winter Squash Pasta for Cozy Weeknights
Roasted Winter Squash Pasta: A Cozy Dish for Chilly Days
Hello, food lovers! I’m Ava Carter, and today, we are diving into a dish that perfectly encapsulates the essence of comfort food—Roasted Winter Squash Pasta. With the winter chill creeping in, there’s nothing quite like a warm bowl of pasta that not only satisfies your cravings but also nourishes your body and spirit. This recipe is one I’ve savored over the years; it’s simple yet packed with flavor, and best of all, it’s guilt-free!
Picture this: You come home after a long day, your shoes soaked from the rain, and the only thing on your mind is coziness. What if I told you that you can whip up a delicious, wholesome meal in less than an hour, using just a handful of ingredients? That’s the magic of Roasted Winter Squash Pasta! Whether you’re preparing a solo meal or hosting friends for dinner, this dish is versatile enough for any occasion and gets everyone involved in the kitchen.
As we dive into this recipe, you’ll appreciate how the natural sweetness of the roasted squash pairs beautifully with tangy goat cheese, creating a rich, comforting flavor profile that wraps you in a warm embrace. Plus, it’s an excellent way to incorporate seasonal produce into your diet while keeping it exciting and creative!
So grab those aprons and let’s get cooking—because who says healthy eating can’t be delicious and fun?
Personal Story
I’ll never forget the first time I made roasted squash pasta. It was one of those crisp autumn afternoons, and I had just come back from the farmers’ market, my bags laden with fresh produce and the rich aroma of autumn. I had picked up a beautiful butternut squash, its bright orange flesh promising a sweetness that melted my heart.
Back in my cozy kitchen, I set to work, chopping up the squash and tossing it with olive oil and a sprinkle of salt. As it roasted, the sweet scent filled my home, creating a cozy nook that invited me to come to the table. I had invited a few close friends over for dinner that night, and as we sat around the table, sharing stories and laughter—giggling about our culinary mishaps and debating over the best pasta shapes—we savored every bite. The combination of nutty walnuts, creamy goat cheese, and the warm squash felt like a hug in every forkful.
That night turned into a cherished memory, and ever since, Roasted Winter Squash Pasta has become a staple in my kitchen, a meal that brings together friends and family to enjoy the simple pleasures of life.
Ingredients
Let’s gather our ingredients! Here’s what you’ll need to create this delightful dish:
-
1 butternut squash (or kabocha, or delicata)
This star of our dish brings natural sweetness and a creamy texture when roasted. If you can find kabocha or delicata squash, feel free to use those as they offer slightly different flavor profiles but work beautifully in this recipe. -
1 onion, chopped
The onion adds a touch of sweetness and depth to the dish. I love using yellow onions, but red onions work just as well if you want a bit more color! -
2 tablespoons olive oil
A heart-healthy fat that not only aids in roasting but also enhances flavor. You can swap the olive oil for melted coconut oil or even avocado oil if you’re looking for different nuances. -
Salt and pepper to taste
Essential elements for bringing out the flavors of our ingredients. No dish should ever be without a pinch of salt and a dash of pepper! -
8 oz pasta of choice
Use your favorite! I often go for whole wheat spaghetti or gluten-free pasta, but feel free to get creative—rigatoni or penne would work great too. -
4 oz goat cheese
This adds creaminess and offers a tangy twist to the dish. If you’re not a fan of goat cheese, parmesan or ricotta would be excellent substitutes. -
Pasta water (reserved from cooking pasta)
This starchy water is a secret weapon to make your sauce silky. Don’t forget to save a bit before draining! -
1/2 cup toasted walnuts
Crunchy, nutty goodness that complements the sweetness of the squash. If you’re nut-free, sunflower seeds or pumpkin seeds could be delicious substitutes. -
Balsamic glaze (for drizzling)
A sweet and tangy finishing touch that brings a lovely balance to the dish. You can make your own by reducing balsamic vinegar, or you can buy it pre-made!
Step-by-Step Instructions
Now that we’ve gathered our ingredients, let’s get down to the business of cooking! Follow these steps to create your delicious Roasted Winter Squash Pasta.
-
Preheat the Oven
Preheat your oven to 400°F (200°C). A hot oven is key to roasting vegetables, as it caramelizes sugars and adds depth to our dish. -
Prepare the Squash
Carefully cut the butternut squash in half lengthwise and scoop out the seeds. (Pro tip: A sturdy, sharp knife makes it much easier.) Cut the squash into cubes and place them in a large bowl. Next, toss the cubed squash with 1 tablespoon of olive oil, salt, and pepper, ensuring the pieces are evenly coated. -
Roast the Squash
Spread the seasoned squash in a single layer on a baking sheet lined with parchment paper. Roast it in the preheated oven for about 25-30 minutes, or until it’s fork-tender and slightly caramelized. Don’t forget to give it a flip halfway through for even roasting! -
Cook the Pasta
While the squash is roasting, set a large pot of water to boil and salt it generously. Add your pasta of choice and cook according to the package instructions until al dente. (Tip: Reserve 1 cup of the pasta cooking water before draining!) -
Sauté the Onions
In a large skillet, heat the remaining tablespoon of olive oil over medium heat. Add the chopped onion and sauté until soft and translucent, about 5-7 minutes. Season with a pinch of salt to bring out their natural sweetness. If you want to add a little depth, incorporate minced garlic during the last minute—trust me, it elevates everything! -
Combine it All
Once the squash is done roasting, add it to the skillet with the sautéed onions. Stir to combine. Then, add the drained pasta to the skillet, tossing everything together. -
Make it Creamy
Here comes the fun part! Crumble in the goat cheese and add a splash of reserved pasta water. Toss everything together until the cheese melts and coats the pasta—voilà! You should have a creamy, luscious sauce that’s silky and delicious. -
Finish with Nuts and Glaze
Finally, toss in the toasted walnuts—they add the perfect crunch! Plate this beauty up, and don’t forget a drizzle of balsamic glaze on top for that irresistible tangy-sweet finish.
Serving Suggestions
To serve your Roasted Winter Squash Pasta, I recommend plating it in wide, shallow bowls. This allows all the colors and textures to shine! Add a sprinkle of freshly cracked black pepper and an extra drizzle of balsamic glaze to elevate the presentation. Want to wow your guests? Garnish with a few parsley leaves or microgreens for that gourmet touch!
Recipe Variations
Now that you’ve mastered the classic Roasted Winter Squash Pasta, feel free to get creative! Here are some fun variations to inspire you:
-
Add Greens: Toss in some fresh spinach or kale while mixing in the pasta for an extra dose of nutrients.
-
Spice it Up: Add a pinch of red pepper flakes when sautéing the onions for a little heat!
-
Herby Twist: Mix in fresh herbs like sage or thyme with the roasted squash to amplify the autumnal flavors.
-
Cheese Swap: Use feta or blue cheese instead of goat cheese for a different flavor profile.
-
Vegan Version: Make it completely plant-based by omitting the cheese and using nutritional yeast for a cheesy flavor.
Chef’s Notes
This Roasted Winter Squash Pasta has evolved over the years, just like my cooking style. I’ve experimented with different cheeses, spices, and even added a dollop of cream for extra decadence. What started as a simple comfort food has transformed into a versatile dish that adapts to whatever I have on hand. One time, I even added a splash of white wine to deglaze the pan while sautéing the onions, and it took the dish to new realms of flavor—definitely worth a try!
FAQs and Troubleshooting
1. Why is my squash not roasting properly?
If your squash isn’t caramelizing, make sure you’ve cut it into evenly sized pieces and don’t overcrowd the baking sheet. Give it space to breathe!
2. Can I use other pasta shapes?
Absolutely! While I love long pasta for this dish, feel free to use shapes like farfalle or orecchiette. Just keep an eye on the cooking time!
3. How can I store leftovers?
Store any leftovers in an airtight container in the fridge for up to 3 days. Reheat gently in a skillet with a splash of water to prevent it from drying out.
4. What can I substitute for goat cheese?
If you’re not a fan of goat cheese, creamy ricotta or tangy feta could work wonders—or even a vegan cheese if you prefer a plant-based option!
Nutritional Info
While the exact nutritional info may vary depending on the specific brands and quantities you use, here’s a rough breakdown:
- Servings: 4
- Calories per serving: ~400
- Protein: 15g
- Carbs: 50g
- Fats: 18g
At the end of the day, let this recipe be a canvas for your flavors and preferences! I can’t wait to hear how yours turns out. So go on, get in the kitchen, and enjoy the simple pleasure of creating something fantastic. Happy cooking!
PrintRoasted Winter Squash Pasta

A cozy dish that combines roasted winter squash with creamy goat cheese for a warm, comforting pasta meal perfect for chilly days.
- Prep Time: 15 minutes
- Cook Time: 30 minutes
- Total Time: 45 minutes
- Yield: 4 servings 1x
- Category: Main Course
- Method: Baking
- Cuisine: Italian
- Diet: Vegetarian
Ingredients
- 1 butternut squash (or kabocha, or delicata)
- 1 onion, chopped
- 2 tablespoons olive oil
- Salt and pepper to taste
- 8 oz pasta of choice
- 4 oz goat cheese
- Pasta water (reserved from cooking pasta)
- 1/2 cup toasted walnuts
- Balsamic glaze (for drizzling)
Instructions
- Preheat the oven to 400°F (200°C).
- Prepare the butternut squash by cutting it in half, scooping out the seeds, and chopping it into cubes. Toss with 1 tablespoon olive oil, salt, and pepper.
- Roast the seasoned squash on a baking sheet for 25-30 minutes until fork-tender.
- Cook the pasta in a large pot of salted boiling water according to package instructions until al dente. Reserve 1 cup of pasta water before draining.
- Sauté the chopped onion in a skillet with the remaining tablespoon of olive oil over medium heat for 5-7 minutes.
- Combine the roasted squash with the sautéed onions, then add the drained pasta, tossing to mix.
- Make it creamy by crumbling in the goat cheese and adding a splash of reserved pasta water, mixing until combined.
- Finish with toasted walnuts and drizzle with balsamic glaze before serving.
Notes
Garnish with freshly cracked black pepper and microgreens for an elevated presentation. Leftovers can be stored in an airtight container for up to 3 days.
Nutrition
- Serving Size: 1 serving
- Calories: 400
- Sugar: 6g
- Sodium: 500mg
- Fat: 18g
- Saturated Fat: 4g
- Unsaturated Fat: 12g
- Trans Fat: 0g
- Carbohydrates: 50g
- Fiber: 5g
- Protein: 15g
- Cholesterol: 20mg
Keywords: pasta, winter squash, vegetarian recipe, comfort food, goat cheese
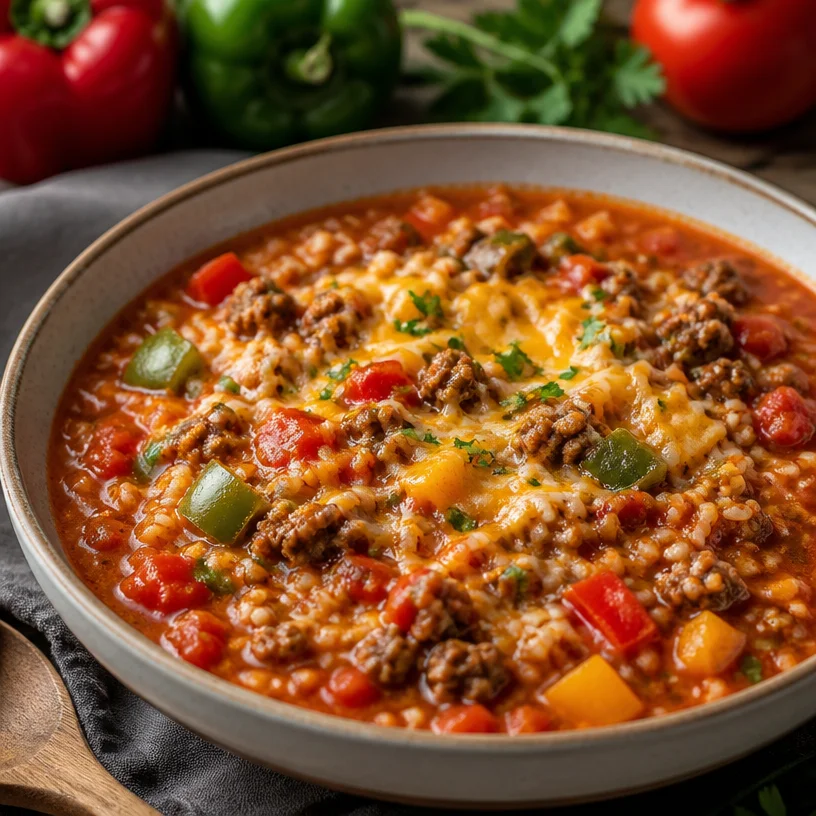
Minute One-Pan Stuffed Pepper Soup for Busy Weeknights
Unleashing the Comfort: My Cheesy Stuffed Pepper Soup Recipe
Welcome back to the cozy kitchen of Clean Plate Cravings! Today, I’m excited to share a dish that radiates comfort and warmth—Stuffed Pepper Soup. This soup is like a warm hug on a chilly day, with vibrant flavors and nourishing ingredients that will fuel your body and satisfy your taste buds.
There’s something incredibly satisfying about a bowl of homemade soup. It’s comforting, heartwarming, and ideal for that moment when you just want to curl up with a blanket and enjoy a bowl of goodness. The idea for this particular soup came from long, cold winter evenings spent with my family. I remember my mom whipping up stuffed peppers during the week while I would hover around the kitchen, waiting to sneak bites of the filling. The smell would waft through the house and capture her efforts, making the prospect of dinner all the more inviting.
But let’s face it, stuffed peppers can be a bit fussy to prepare—hollowing out the peppers, stuffing them, and then baking. So, I thought, why not turn that joyous experience into an easy, hearty soup instead? This recipe captures all the flavors of stuffed peppers while keeping it simple and straightforward. Let’s dive right in!
Personal Story
One of my favorite memories from childhood was when we’d have family dinners. My mom would make stuffed peppers—a dish I never thought I’d crave as a kid! I’d be in the living room watching cartoons, and the aroma would swirl around, pulling me into the kitchen like a moth to a flame.
We’d gather around the dinner table, and that dish always sparked conversations about our day. My younger brother would dive into debates about the best superhero while the peppers simmered on the stove; they were more than just food; they were a family bonding experience. Fast forward to today, I’ve transformed that nostalgic dish into a deliciously comforting Stuffed Pepper Soup that embodies those memories while being quicker to prepare. Every bowl takes me back, reminding me of late-night family talks and those simple moments that mean the most.
Ingredients
Here’s what you’ll need for this delightful Stuffed Pepper Soup:
-
Ground Beef
Rich in protein and flavor, ground beef serves as the hearty base of this soup. You can substitute it with ground turkey, chicken, or even plant-based meat for a lighter or vegetarian twist. -
Bell Peppers
Choose your favorite colors—red, yellow, or green! Sweet bell peppers add a gorgeous vibrancy and flavor to the soup. If you want something spicier, try using jalapeños or poblano peppers. -
White or Brown Rice
Rice gives the soup a comforting, filling texture. If you’re going grain-free, quinoa or cauliflower rice works beautifully as a substitute. -
Diced Tomatoes
Canned diced tomatoes provide acidity and sweetness, which meld perfectly with the spices. Feel free to swap for fresh tomatoes during the summer months or use fire-roasted tomatoes for extra depth. -
Onion and Garlic
These aromatics form the flavor base of the soup. Aromatics like leeks or shallots can also be used if you prefer a milder taste. -
Beef Broth
Broth adds a rich flavor to the soup. If you’re looking for a lighter option, vegetable broth works wonders too. -
Italian Seasoning
The herb blend brings the classic flavors of Italian stuffed peppers to the soup. You can easily create your own mix using dried basil, oregano, and thyme. -
Salt and Pepper
Essential for seasoning—always taste before serving! Feel free to add cayenne pepper for a bit of kick.
Step-by-Step Instructions
Let’s roll up our sleeves and get cooking! Follow these directions, and before you know it, you’ll be enjoying a comforting bowl of Stuffed Pepper Soup.
-
Prepare Your Ingredients
Start by dicing the onion and mincing the garlic. Wash and chop your bell peppers into small pieces, ensuring they’re bite-sized for the soup. Oh, and have a little fun with it—let your chopping be as colorful as those peppers! -
Sauté the Aromatics
In a large pot over medium heat, drizzle in a splash of olive oil. Once hot, add the diced onion, stirring occasionally until it becomes translucent, about 4-5 minutes. Add in the minced garlic and sauté for another minute; trust me, you want that garlic aroma wafting through your kitchen! -
Brown the Beef
Add the ground beef to the pot, breaking it apart with a wooden spoon. Cook it until browned and fully cooked, about 6-8 minutes. Don’t forget to drain any excess fat to keep it light! The browning of the beef adds a layer of flavor—this is where it all begins! -
Add the Peppers and Spice
Toss in your chopped bell peppers and sprinkle in your Italian seasoning, salt, and pepper. Stir everything together for a couple of minutes until the peppers begin to soften—your kitchen should be smelling amazing already! -
Incorporate the Rice and Tomatoes
Now, mix in the uncooked rice and the can of diced tomatoes (do not drain). Pour in the beef broth or vegetable broth and mix thoroughly. Here’s a little chef hack: If you want a creamier soup, throw in a splash of cream or milk at this point—but it’s totally optional! -
Bring to a Simmer
Raise the heat to bring the soup to a gentle boil, then lower it to a simmer. Cover the pot with a lid and let it cook for 20-25 minutes or until the rice is cooked. Take a moment to steal a taste; adjust the seasoning as needed. -
Final Touch
When the rice is tender, give the soup a good stir, and if you love cheese (who doesn’t?), top with mozzarella or cheddar for an extra gooey finish. Let it melt slightly before serving. This is your moment to bask in the aromas and flavors that have come to life in your pot!
Serving Suggestions
To serve, ladle the soup into deep bowls, ensuring everyone gets a hearty portion of those beautiful peppers and rice. For an extra touch of indulgence, sprinkle with shredded cheese or a dollop of sour cream and garnish with fresh parsley or basil. It can also be paired with crusty bread or a simple side salad for a comforting, well-rounded meal.
Recipe Variations
Feel free to get creative with this recipe! Here are a few fun twists you might want to try:
-
Spicy Kick: Add chopped jalapeños or a dash of hot sauce for some extra heat. Spice lovers, rejoice!
-
Cheesy Delight: Stir in cream cheese or cream at the end for a creamier texture. How about a sprinkle of feta for a tangy twist?
-
High Protein: For a plant-based alternative, substitute ground beef with lentils or quinoa and add extra veggies like zucchini or spinach.
-
Herbaceous Upgrade: Use fresh herbs like cilantro or parsley to brighten the dish.
-
Curry Twist: Introduce curry powder for a delightful spin that blends beautifully with the existing flavors—think stuffed peppers with an exotic twist!
Chef’s Notes
This soup recipe has evolved quite a bit over the years. Initially, it started as a hodgepodge of whatever vegetables were on sale. I remember once throwing in some corn, and it surprisingly enhanced the sweetness of the dish! It was a hit, and that serendipitous moment prompted me to embrace improvisation in the kitchen. That’s what cooking is all about—experimentation, laughter, and delicious discoveries. So, don’t hesitate! Use what’s in your pantry; you might surprise yourself with a new favorite!
FAQs and Troubleshooting
Q: Can I make this soup in advance?
Absolutely! This soup actually tastes better the next day as the flavors meld together. Store it in an airtight container in the fridge for up to 3 days, or freeze it for up to 3 months.
Q: My soup is too watery. What do I do?
If your soup turns out a bit too watery, let it simmer uncovered for a few more minutes to reduce. Alternatively, mix a tablespoon of cornstarch with water and add it to the soup to thicken it up.
Q: What if I don’t like tomatoes?
No worries! You can replace diced tomatoes with tomato sauce for a smoother texture, or skip them entirely and increase the broth for a different flavor profile.
Q: Can I make this vegetarian?
Definitely! Simply omit the ground beef and swap the broth with vegetable broth, adding your choice of beans (like black beans or kidney beans) for protein and heartiness.
Nutritional Info (Optional)
While I generally focus on flavor first, I understand the importance of nutritional values too! Here’s a quick rundown per serving (about 1.5 cups):
- Calories: 320
- Protein: 20g
- Carbohydrates: 40g
- Fiber: 3g
- Fat: 10g
This Stuffed Pepper Soup is not only a treat for your taste buds, but it’s also nourishing and satisfying.
So there you have it! A warm, inviting bowl of Stuffed Pepper Soup, infused with love, nostalgia, and a dash of creativity. Grab your ladle and dig in—let the comforting flavors wrap around you like a cozy blanket. Happy cooking!
PrintCheesy Stuffed Pepper Soup

A comforting and hearty soup that captures all the flavors of stuffed peppers without the fuss.
- Prep Time: 15 minutes
- Cook Time: 30 minutes
- Total Time: 45 minutes
- Yield: 4 servings 1x
- Category: Main Course
- Method: Stovetop
- Cuisine: American
- Diet: Paleo
Ingredients
- 1 lb Ground Beef
- 2 Bell Peppers, chopped
- 1 cup White or Brown Rice
- 1 can Diced Tomatoes
- 1 Onion, diced
- 2 cloves Garlic, minced
- 4 cups Beef Broth
- 2 tsp Italian Seasoning
- Salt and Pepper to taste
- Optional: Shredded Cheese for serving
Instructions
- Prepare your ingredients by dicing the onion and mincing the garlic. Chop the bell peppers into small pieces.
- Sauté the onion in a large pot over medium heat with olive oil until translucent, about 4-5 minutes. Add garlic and sauté for another minute.
- Brown the ground beef in the pot, breaking it apart and cooking until fully browned, about 6-8 minutes. Drain excess fat.
- Add the chopped bell peppers, Italian seasoning, salt, and pepper, stirring until the peppers soften, about 2 minutes.
- Incorporate the uncooked rice, diced tomatoes (with juice), and beef broth. Mix thoroughly.
- Bring to a gentle boil, then lower to a simmer. Cover and cook for 20-25 minutes or until rice is cooked.
- Final touches: Stir the soup, add cheese if desired, and let it melt slightly before serving.
Notes
This soup tastes even better the next day! Store in the fridge for up to 3 days, or freeze for up to 3 months.
Nutrition
- Serving Size: 1 serving
- Calories: 320
- Sugar: 5g
- Sodium: 700mg
- Fat: 10g
- Saturated Fat: 4g
- Unsaturated Fat: 6g
- Trans Fat: 0g
- Carbohydrates: 40g
- Fiber: 3g
- Protein: 20g
- Cholesterol: 75mg
Keywords: stuffed pepper soup, comfort food, easy soup recipe
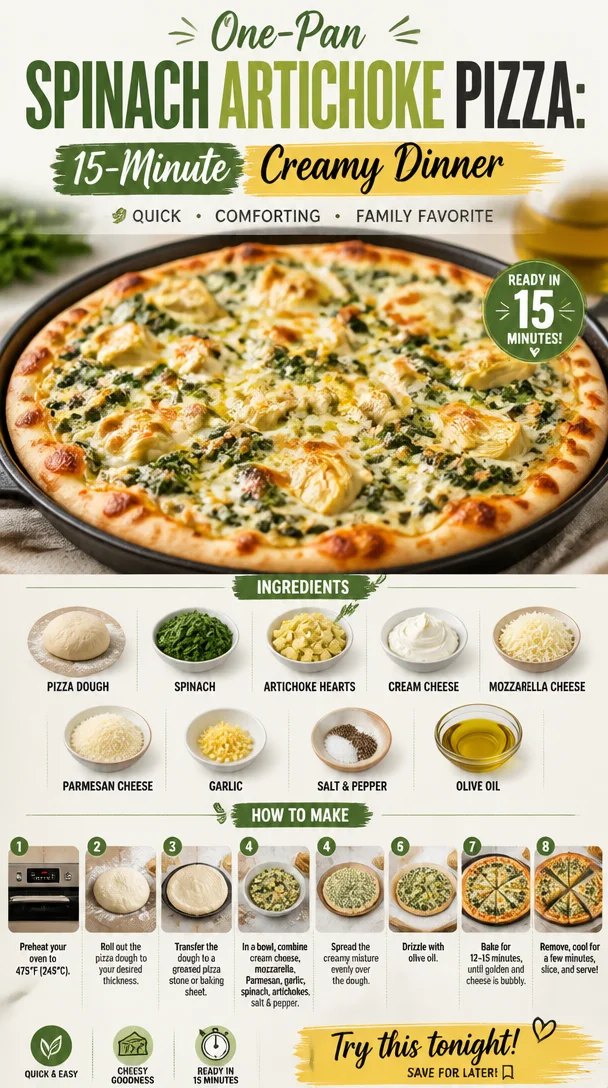
One-Pan Spinach Artichoke Pizza: 15-Minute Creamy Dinner
Spinach Artichoke Pizza: A Flavorful Twist on a Classic Favorite
Welcome back, food lovers! Today, we’re diving into a recipe that’s going to take your pizza night from ordinary to extraordinary: Spinach Artichoke Pizza! Yep, you read that right. This pie combines all the goodness of the classic spinach artichoke dip you love with the comforting embrace of pizza dough. Trust me, it’s as delightful as it sounds, and I can’t wait for you to try it!
Introduction
If you haven’t yet experienced the joy of spinach and artichoke as a pizza topping, you’re in for a wonderful surprise. This pizza recipe embodies everything I believe in when it comes to clean eating: fresh ingredients, vibrant flavors, and pure satisfaction after every bite. Not only is it a fantastic way to incorporate more greens into your diet, but it also comes together in no time at all, making it perfect for those busy weeknights, casual hangouts, or even a little self-care moment on the weekend.
As someone who spent countless weekends in a bustling kitchen, chatting and laughing with friends while cooking up delicious meals, I cherish how food brings people together. My love for pizza started way back when my family and I would gather around the dining table, crafty little hands at work making our own pies. It was a beautiful mess—toppings flying, flour everywhere, and endless laughter ringing in the air. This Spinach Artichoke Pizza is inspired by those beautiful moments, where ingredients become a canvas, and sharing food feels like an art of its own.
So grab your apron, roll up those sleeves, and let’s indulge in the flavors of this delectable dish!
Personal Story
Growing up, my mom had this incredible knack for turning our favorite appetizers into main courses. One evening, tired after a long day, she whipped up a sumptuous spinach artichoke dip—an absolute classic at our family gatherings. I remember gathering around the coffee table with my siblings, chips in hand, devouring that creamy dip faster than you could say “extras!” Those moments were always filled with cozy chats and contagious laughter.
In an effort to spice up our weekly dinners, I decided to turn that memorable appetizer into a hearty meal: Spinach Artichoke Pizza! It was like taking a joyful trip down memory lane, with each gooey, cheesy slice reminding me of that unforgettable dip that brought our family closer. This pizza is not just food; it’s a reminder of the love and warmth that comes with sharing meals, and I can’t wait for you to create your own delicious memory with it!
Ingredients
Alright, let’s gather our stars for this delicious pizza! Here’s what you’ll need:
-
1 pizza dough: You can use store-bought or make your own from scratch! It gives you that perfect chewy crust that holds all the goodness.
-
1 cup spinach, chopped: Fresh spinach is ideal, but you can use frozen as well—just be sure to thaw and drain it well. Spinach is packed with iron and vitamins that are great for your health.
-
1 cup artichoke hearts, chopped: Canned or frozen artichokes work beautifully. They bring a delightful tanginess to the pizza that complements the creaminess of the cheese.
-
1 cup cream cheese, softened: This is the secret ingredient that brings creaminess and a rich flavor. Light cream cheese can work too if you’re looking for a healthier option.
-
1 cup mozzarella cheese, shredded: Because what’s pizza without gooey, melty cheese? You can use part-skim mozzarella for a lighter option or mix in some gouda for a smoky flavor.
-
1/2 cup Parmesan cheese, grated: The nutty flavor of Parmesan takes this pizza to the next level. Grate it fresh for a superior taste!
-
2 cloves garlic, minced: Fresh garlic adds zest and aroma. If you’re short on fresh, garlic powder can work in a pinch—just a teaspoon should do!
-
Salt and pepper to taste: Essential seasonings! Don’t be shy; they bring out the flavors of all the ingredients.
-
Olive oil: A drizzle of olive oil to finish it off keeps the crust crispy and adds a nice depth of flavor to your pizza.
Step-by-Step Instructions
Now that we have our ingredients in front of us, let’s get cooking! Follow these simple steps to create your Spinach Artichoke Pizza:
-
Preheat Your Oven: Start by preheating your oven to 475°F (245°C). A hot oven is key to achieving that crunchy crust we all adore.
-
Prepare the Pizza Dough: If you’re using store-bought dough, take it out of the fridge to come to room temperature for about 30 minutes. It makes stretching so much easier! If you’re feeling ambitious and want to make your dough, go for it—just allow it to rise for about an hour beforehand.
-
Roll It Out: On a floured surface, roll out your pizza dough into your desired thickness. I love a crispy thin crust, but go thicker if that’s your style! Transfer the rolled dough to a pizza stone or a baking sheet (lightly greased or lined with parchment).
-
Mix the Sauce: In a bowl, combine your cream cheese with minced garlic, a pinch of salt, and pepper. Stir until nicely blended. This will serve as your base sauce, and it’s going to be wonderfully creamy.
-
Add Spinach and Artichokes: Gently fold in the chopped spinach and artichoke hearts until they’re well incorporated. This mixture is where the magic happens!
-
Spread the Mixture: Evenly spread the creamy spinach-artichoke mix on top of your rolled-out dough, leaving a little edge for the crust. You want it to be smooth and inviting!
-
Heavenly Cheese Layer: Sprinkle mozzarella cheese generously on top. Don’t be stingy! Then follow it up with a shower of grated Parmesan. It’s all about that melty, cheesy goodness.
-
Drizzle Olive Oil: For an added depth of flavor and nice golden color, drizzle a little olive oil over the top and give a light sprinkle of extra salt and pepper.
-
Bake: Slide your masterpiece into the oven and let it bake for about 12-15 minutes, or until the cheese is bubbly and the crust is golden brown.
-
Slice and Serve: Once out of the oven, let your pizza cool for a minute before slicing it up. You can sprinkle some red pepper flakes for an extra kick if you’re feeling adventurous!
Serving Suggestions
To serve, you can either cut your pizza into traditional wedges or charismatic squares for a fun twist. A fresh side salad drizzled with lemon vinaigrette pairs deliciously with this creamy pizza. If you want to keep things casual, serve it straight from the oven to the table on a wooden pizza board for that rustic, homey vibe. Cheers to delicious bites and great company!
Recipe Variations
- Meat Lovers: Add cooked chicken or sausage for an extra protein boost!
- Spicy Kick: Toss in some diced jalapeños or crushed red pepper flakes for a fiery touch.
- Cheese Overload: Go cheese crazy! Mix in cheddar or feta for added flavor.
- Mediterranean Twist: Top with olives and sun-dried tomatoes for a Mediterranean flair.
- Gluten-Free: Use a gluten-free pizza crust—there are plenty of delicious options available today!
Chef’s Notes
This recipe has evolved quite a bit since I first tried it! Initially, I kept it simple, but over time, I found that adding garlic and tweaking the cheese ratios made it richer and more flavorful. Also, I discovered that a hint of red pepper flakes can elevate the pizza to a new level of deliciousness. Plus, it’s always a joy to gather feedback from friends and family, and they’ve shared their ingenious twists that inspired me as well. It’s a reminder that cooking is as much about collaboration and connection as it is about the food itself.
FAQs and Troubleshooting
Q: My crust turned out soggy. What happened?
A: This can happen if there’s too much moisture in the toppings. Make sure to drain the artichokes thoroughly and use fresh spinach instead of frozen if possible. Also, pre-baking the crust for a few minutes before adding the toppings helps!
Q: Can I use other cheeses?
A: Absolutely! Feel free to go wild with your cheese choices. Gouda, fontina, or even a sprinkle of goat cheese can bring unique flavors to your pizza.
Q: How do I store leftovers?
A: Wrap individual slices in plastic wrap and store them in the fridge for up to 3 days. You can reheat in the oven for the best texture!
Q: What if I can’t find artichokes?
A: Don’t fret! You can substitute with roasted red peppers or sun-dried tomatoes to keep that vibrant flavor profile intact.
Nutritional Info
While nutrition may vary based on the specific products and brands used, this Spinach Artichoke Pizza is generally a well-balanced choice, rich in vegetables and flavors that satisfy without leaving you heavy. It’s a fun way to indulge while staying mindful of your health!
Let’s keep those kitchen adventures rolling! I can’t wait to hear how your Spinach Artichoke Pizza turns out. Remember, cooking is about joy and creativity, so feel free to add your own flair! Enjoy every bite!
PrintSpinach Artichoke Pizza
A delicious twist on the classic spinach artichoke dip, transformed into a flavorful pizza.
- Prep Time: 15 minutes
- Cook Time: 15 minutes
- Total Time: 30 minutes
- Yield: 4 servings 1x
- Category: Main Course
- Method: Baking
- Cuisine: Italian
- Diet: Vegetarian
Ingredients
- 1 pizza dough
- 1 cup spinach, chopped
- 1 cup artichoke hearts, chopped
- 1 cup cream cheese, softened
- 1 cup mozzarella cheese, shredded
- 1/2 cup Parmesan cheese, grated
- 2 cloves garlic, minced
- Salt and pepper to taste
- Olive oil
Instructions
- Preheat your oven to 475°F (245°C).
- Prepare the pizza dough by bringing it to room temperature for about 30 minutes.
- Roll out your pizza dough on a floured surface into your desired thickness.
- Mix the sauce by combining cream cheese with minced garlic, salt, and pepper in a bowl.
- Add chopped spinach and artichoke hearts, folding them into the mixture.
- Spread the spinach-artichoke mix evenly on top of the rolled-out dough.
- Sprinkle mozzarella cheese and grated Parmesan generously over the mixture.
- Drizzle olive oil on top and add a light sprinkle of salt and pepper.
- Bake for 12-15 minutes or until the cheese is bubbly and the crust is golden brown.
- Slice and serve once cooled slightly.
Notes
For extra flavors, consider mixing in some jalapeños or adding a sprinkle of red pepper flakes before serving.
Nutrition
- Serving Size: 1 serving
- Calories: 350
- Sugar: 5g
- Sodium: 400mg
- Fat: 12g
- Saturated Fat: 4g
- Unsaturated Fat: 6g
- Trans Fat: 0g
- Carbohydrates: 45g
- Fiber: 3g
- Protein: 15g
- Cholesterol: 30mg
Keywords: Pizza, Spinach, Artichoke, Vegetarian, Comfort Food
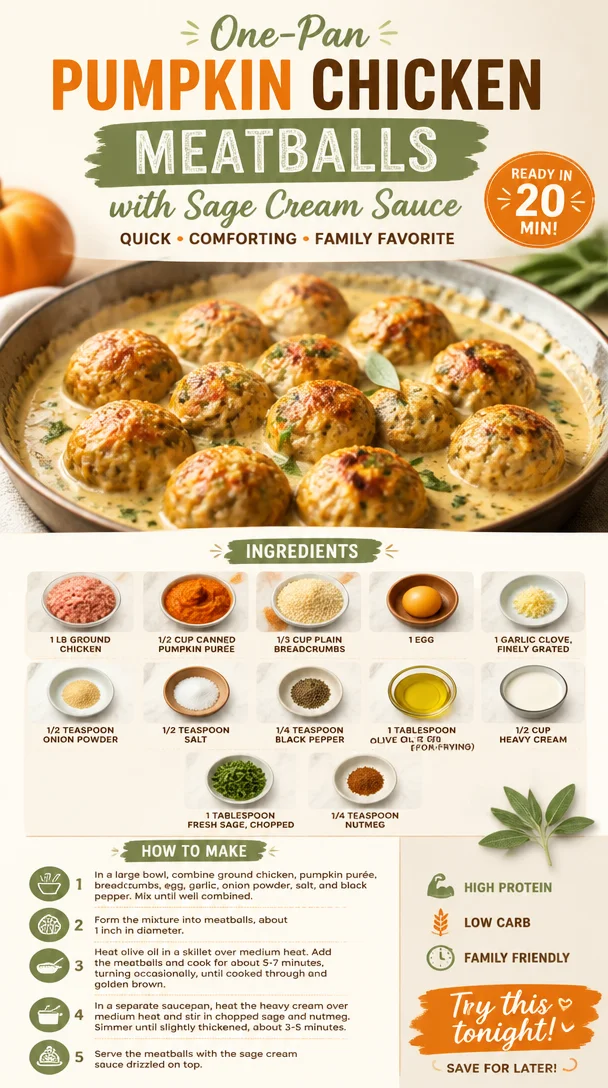
One-Pan Pumpkin Chicken Meatballs with Sage Cream Sauce
Pumpkin Chicken Meatballs with Sage Cream Sauce: A Comforting Dish to Celebrate Fall
Welcome back to Clean Plate Cravings, food lovers! Today, we’re diving into a delightful dish that perfectly embodies the fall season: Pumpkin Chicken Meatballs with Sage Cream Sauce. These tender meatballs blend the cozy flavors of pumpkin and sage in a way that’ll have your taste buds dancing! I believe that cooking should bring joy and a sense of comfort, and what better way to do that than with a dish that enchants both your palate and your soul?
I will always remember hunting for pumpkins as a kid in late September. My family would make the trek to a local pumpkin patch, where we’d pick the biggest, roundest pumpkins we could find. The crisp air was filled with laughter as we navigated through rows of orange believers, and my mom always had the best pumpkin recipes to try at home. There’s something magical about pumpkins, don’t you think? They turn into more than just a seasonal decoration; they can become meals that warm your heart and home!
So grab your apron and let’s cook together. Let’s make those meatballs and top them off with a creamy sage sauce that truly captures the essence of fall!
A Cozy Kitchen Memory
As a child, my fondest memories came from experimenting in the kitchen with my grandma. She was the queen of comfort food, and her pumpkin recipes always had a special place at the table. One chilly afternoon, she introduced me to her famous pumpkin meatballs. We spent hours measuring, mixing, and occasionally sneaking bites of the delicious mixture. I can still hear the sound of laughter as we created something from scratch, and it ignited a passion within me that I carry into my cooking today. She taught me that cooking is not just about following a recipe but about infusing love and joy into every bite, and that is exactly what we’re going to do today!
Ingredients
Here’s everything you need for those delicious Pumpkin Chicken Meatballs with Sage Cream Sauce. Each ingredient is handpicked to keep our dish vibrant and full of flavor!
-
1 lb ground chicken
A lean, protein-rich option that provides a perfect base for our meatballs. Feel free to substitute with ground turkey for a slightly different flavor! -
1/2 cup canned pumpkin purée
Adds moisture and a hint of sweetness. Don’t confuse it with pumpkin pie filling; we want pure pumpkin for this dish! You can swap it with butternut squash purée if you’re looking for an alternative. -
1/3 cup plain breadcrumbs
Helps bind the meatballs together while providing texture. If you’re gluten-free, try using almond flour or gluten-free breadcrumbs! -
1 egg
Acts as a binding agent and adds richness. If you’re vegan, a flax egg (1 tablespoon of ground flaxseed mixed with 3 tablespoons of water) works beautifully too. -
1 garlic clove, finely grated
Offers aromatic depth. You can easily swap fresh garlic for garlic powder—just use about 1/4 teaspoon. -
1/2 teaspoon onion powder
Adds subtle sweetness and a hint of flavor without overpowering the dish. -
1/2 teaspoon salt
Essential for enhancing all the other flavors. Feel free to reduce the quantity if you’re watching your sodium intake. -
1/4 teaspoon black pepper
A pinch for warmth and spice. Adjust according to your taste preferences! -
1 tablespoon olive oil (for pan-frying)
A healthy option for cooking that adds flavor. You can replace it with avocado oil for a different yet delicious twist. -
1/2 cup heavy cream
Creates a luscious sauce. If you want a lighter version, you could use half-and-half or even coconut cream for dairy-free! -
1 tablespoon fresh sage, chopped
This herb adds vibrant flavor and aroma. If fresh isn’t available, dried sage also works; just use about 1 teaspoon. -
1/4 teaspoon nutmeg
Adds warmth and depth to the sauce. It’s a must for that cozy, autumn flavor!
Step-by-Step Instructions
Ready to cook? Here’s how to transform these fresh ingredients into mouthwatering meatballs with a luscious cream sauce.
Step 1: Prepare the Meatball Mixture
In a large mixing bowl, combine the ground chicken, canned pumpkin purée, breadcrumbs, egg, grated garlic, onion powder, salt, and black pepper. Use your hands (don’t be shy!) to mix everything together until evenly combined. Tip: If you’re concerned about raw chicken, you can always cook a small patty of the mixture to taste for seasoning—adjust as needed!
Step 2: Form the Meatballs
Once everything is well-mixed, grab a tablespoon and scoop out portions of the mixture to form meatballs. Try to keep them about 1 inch in diameter for even cooking. Lightly roll them between your palms for that perfect ball shape! Place them on a plate or a baking sheet as you prepare to cook them.
Step 3: Pan-Fry the Meatballs
In a skillet, heat the olive oil over medium-high heat. When it’s hot (but not smoking), add the meatballs in batches to avoid overcrowding the pan. Cook for about 6-7 minutes, turning occasionally until they are browned and cooked through. Tip from Chef Ava: Use a spatula to gently flip them over—they can be delicate! Internal temperature should reach 165°F for safety.
Step 4: Make the Sage Cream Sauce
While the meatballs are cooking, you can start the sauce. In a separate saucepan, add the heavy cream and bring it to a gentle simmer over medium-low heat. Stir in the chopped sage and nutmeg. Let it bubble away for about 3-5 minutes until slightly thickened. Keep an eye on it to prevent burning—stir occasionally! If the sauce gets too thick for your liking, don’t hesitate to add a splash of chicken broth or water to bring it back to the right consistency.
Step 5: Combine Meatballs and Sauce
Once the meatballs are cooked and your sauce is ready, carefully transfer the meatballs into the saucepan with the sage cream sauce. Gently toss to coat each meatball with that luscious sauce and let it simmer together for another 2-3 minutes. This is where the magic happens; the flavors meld beautifully!
Serving Suggestions
There’s something deliciously satisfying about seeing your creation come together on a plate. Serve your Pumpkin Chicken Meatballs with Sage Cream Sauce over a bed of creamy polenta, or sautéed spinach for a vibrant pop of color! You can also pile them onto whole-grain pasta or nestled in a warm bowl of quinoa. Finish off with fresh sage leaves and a sprinkle of cracked black pepper for that wow factor!
Recipe Variations
-
Spicy Kick: Add a pinch of red pepper flakes into the meatball mixture for those who love a little heat.
-
Herb Infusion: Switch out the fresh sage for chopped fresh thyme or rosemary for a different aromatic experience!
-
Cheesy Delight: Fold in some grated parmesan cheese into the meatball mixture for bonus flavor!
-
Sweet & Savory: Mix in a few tablespoons of dried cranberries or raisins into the meatball mixture for a delightful sweet twist.
-
Zesty Touch: Add a squeeze of fresh lemon juice to the cream sauce for a zesty brightness.
Chef’s Notes
I love how this recipe has evolved over the years. Originally inspired by my grandma’s classic meatballs, I’ve made countless adjustments to make it my own—incorporating pumpkin was a game-changer! It not only adds a wonderful flavor but gives a comforting fall twist that I absolutely adore. This dish also sparks joy in my kitchen; it reminds me to celebrate the simple moments while enjoying a hearty meal.
FAQs and Troubleshooting
1. What if my meatballs fall apart while cooking?
You may not have added enough breadcrumbs or the mixture might be too wet. You can always adjust by adding a little more breadcrumbs to hold them together!
2. Can I bake the meatballs instead of pan-frying?
Absolutely! Preheat your oven to 400°F (200°C) and place the meatballs on a lined baking sheet. Bake for about 20-25 minutes or until cooked through.
3. Can I freeze these meatballs?
Yes! These meatballs freeze wonderfully. Just make sure they are completely cooled before placing them in an airtight container or freezer bag. Thaw in the fridge overnight before reheating.
4. How do I know when the meatballs are done?
Use a meat thermometer to check; they should reach an internal temperature of 165°F (75°C). Alternatively, you can cut one in half and check that there’s no pink inside.
Nutritional Info
While I won’t dive too deep into numbers, I can tell you that these little morsels are packed with protein from the chicken, healthy fats from the olive oil and cream, and, of course, the added benefits of pumpkin—like fiber and vitamins A and C!
I hope you find joy in making and serving these Pumpkin Chicken Meatballs with Sage Cream Sauce. Let it fill your kitchen with warmth and comfort, while bringing a taste of fall to your family table. Remember, healthy eating should be about enjoyable experiences, and these meatballs perfectly encapsulate that philosophy. Happy cooking!
PrintPumpkin Chicken Meatballs with Sage Cream Sauce

A comforting dish featuring tender pumpkin chicken meatballs topped with a creamy sage sauce, perfect for fall.
- Prep Time: 15 minutes
- Cook Time: 30 minutes
- Total Time: 45 minutes
- Yield: 4 servings 1x
- Category: Main Course
- Method: Pan-frying
- Cuisine: American
- Diet: Paleo
Ingredients
- 1 lb ground chicken
- 1/2 cup canned pumpkin purée
- 1/3 cup plain breadcrumbs
- 1 egg
- 1 garlic clove, finely grated
- 1/2 teaspoon onion powder
- 1/2 teaspoon salt
- 1/4 teaspoon black pepper
- 1 tablespoon olive oil (for pan-frying)
- 1/2 cup heavy cream
- 1 tablespoon fresh sage, chopped
- 1/4 teaspoon nutmeg
Instructions
- Prepare the Meatball Mixture: In a large mixing bowl, combine the ground chicken, canned pumpkin purée, breadcrumbs, egg, grated garlic, onion powder, salt, and black pepper. Use your hands to mix everything together until evenly combined.
- Form the Meatballs: Grab a tablespoon and scoop out portions of the mixture to form meatballs about 1 inch in diameter. Place them on a plate or a baking sheet.
- Pan-Fry the Meatballs: In a skillet, heat the olive oil over medium-high heat. Cook the meatballs in batches for about 6-7 minutes, turning occasionally until browned and cooked through.
- Make the Sage Cream Sauce: In a separate saucepan, add the heavy cream and bring it to a gentle simmer over medium-low heat. Stir in the chopped sage and nutmeg, simmer for 3-5 minutes until slightly thickened.
- Combine Meatballs and Sauce: Transfer the meatballs into the saucepan with the sage cream sauce. Gently toss to coat and let it simmer together for another 2-3 minutes.
Notes
For a lighter version, consider substituting heavy cream with half-and-half or coconut cream. For variation, you can add red pepper flakes for heat or fold in parmesan cheese for extra flavor.
Nutrition
- Serving Size: 1 serving
- Calories: 350
- Sugar: 5g
- Sodium: 400mg
- Fat: 12g
- Saturated Fat: 4g
- Unsaturated Fat: 6g
- Trans Fat: 0g
- Carbohydrates: 45g
- Fiber: 3g
- Protein: 15g
- Cholesterol: 30mg
Keywords: pumpkin, chicken meatballs, sage sauce, fall recipes, comfort food
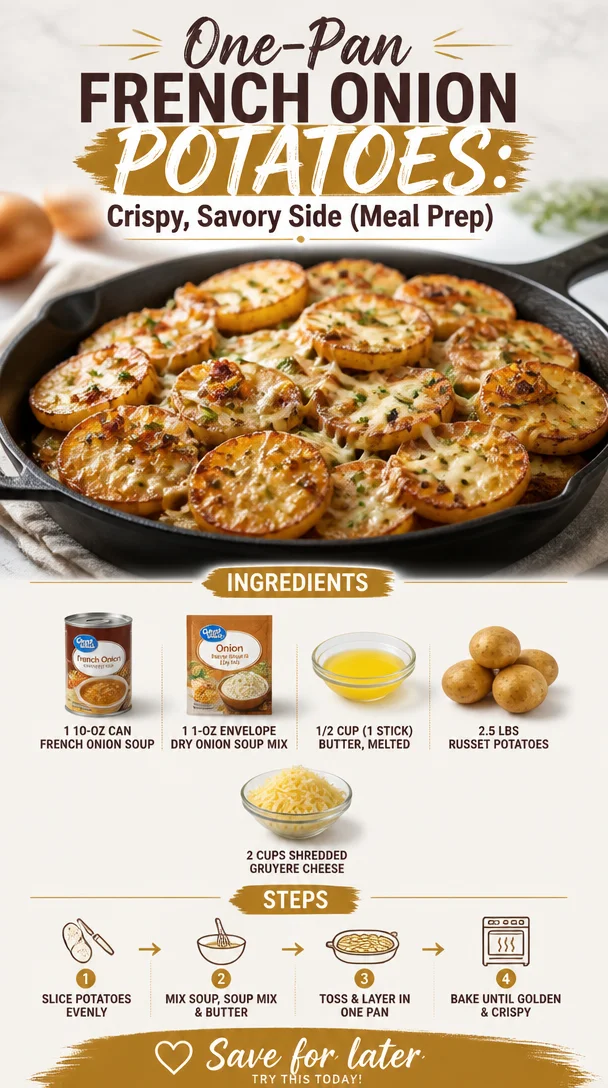
One-Pan French Onion Potatoes: Crispy, Savory Side (Meal Prep)
Indulge in Comfort: Cheesy French Onion Potatoes Recipe
Welcome to the savory world of French Onion Potatoes—a dish that feels like a warm hug on a chilly evening. If you’re a fan of rich flavors and comforting textures, then you’re in for a mouthwatering experience! I’m Ava Carter, and today we’re diving into a recipe that will not only tantalize your taste buds but also fill your home with an irresistible aroma. Who can resist the symphony of sweet onions, melted cheese, and tender potatoes?
French Onion Potatoes are a delightful fusion of two classic favorites: creamy potatoes and the robust taste of French onion soup. This dish embodies everything I believe in about food: it should be real, satisfying, and made with love. I can already picture the smiles on everyone’s faces when they take the first bite. So, whether you’re gearing up for a cozy family dinner or prepping for a potluck, these cheesy delights are sure to steal the spotlight.
Let’s embark on this culinary journey together. Grab your apron and chef’s hat (even if it’s just for fun!), and let’s get cooking. This recipe doesn’t require any fancy equipment—just your trusty oven, a few ingredients, and a whole lot of love.
A Trip Down Memory Lane
Thinking about French onion potatoes takes me back to my childhood kitchen, where my little hands would be involved in every cooking adventure my mother embarked on. She had a special love for hearty dishes, especially ones that made the house smell amazing. One snowy evening, we decided to make something special—a recipe she had come across that transformed simple potatoes into a cheesy, savory masterpiece.
As we peeled and chopped the russet potatoes together, she told me stories of her own childhood, sharing tales filled with laughter and love. By the time we pulled the bubbling tray of French onion potatoes out of the oven, the air was thick with anticipation. The moment we served it, the cheese was perfectly golden, and the aroma wafted through the house, drawing everyone to the table.
Those moments were more than just meal prep; they were memories, laughter, and the magic that food can create. Now, every time I make this dish, I’m reminded of the warmth of family and the joy of sharing good food. Let’s dive into making your own batch of nostalgia!
Ingredients
Here’s what you’ll need for these scrumptious French Onion Potatoes:
-
10-oz can French onion soup: This hearty base delivers the classic flavors we love without needing to simmer onions for hours. If you’re looking for a vegetarian option, some brands offer veggie-based French onion soups!
-
1-oz envelope dry onion soup mix: This little packet is packed with flavor magic! You can also make your own version at home by blending onion powder, garlic powder, and dried herbs.
-
1/2 cup (1 stick) butter, melted: Butter brings richness and depth to this dish. For a lighter option, you can substitute with olive oil or a plant-based butter.
-
2.5 lbs russet potatoes: These starchy gems are perfect for baking due to their high starch content. If you’d like a different texture, you can use Yukon gold potatoes, which are creamier.
-
2 cups shredded gruyere cheese: The star player! Gruyere offers a nutty, rich flavor that complements the dish beautifully. If you’re feeling adventurous, feel free to mix in some mozzarella or sharp cheddar for an extra cheesy experience.
Step-by-Step Instructions
Ready to get your kitchen filled with delicious smells? Here’s how to create your French Onion Potatoes!
-
Preheat Your Oven: Start by preheating your oven to 375°F (190°C). This ensures that your potatoes will bubble and brown beautifully when they meet the heat.
-
Prepare Your Potatoes: Take those russet potatoes and give them a good scrub under cold water. There’s no need to peel—leave the skins on for extra nutrition and texture! Cut each potato into thin slices, about 1/4 inch thick. The more uniform the slices, the better they’ll cook together. Pro tip: If you have a mandoline slicer, now’s the time to use it!
-
Melt the Butter: In a small pot or microwave-safe bowl, melt the butter until bubbling. This step brings out the wonderful flavor of butter while ensuring your potatoes don’t stick together.
-
Mix the Soups and Spices: In a large bowl, combine the can of French onion soup and the dry onion soup mix. Stir in the melted butter, ensuring it’s well incorporated. This mixture is the heart of the dish, giving it that signature flavor punch.
-
Layer the Potatoes: Grab a 9×13 inch baking dish and start layering those potato slices. Begin by placing a third of the potatoes at the bottom, followed by a layer of the soup mixture, and then a sprinkle of gruyere cheese. Repeat this process two more times, finishing with a generous layer of cheese on top.
-
Bake, Bake, Bake: Cover your dish with aluminum foil, making sure it’s tightly sealed. Pop it in the oven and let it bake for 30 minutes. This allows the potatoes to cook through. After 30 minutes, remove the foil and bake for an additional 15-20 minutes until the top is golden and bubbling.
-
Check for Doneness: The potatoes should be tender when pierced with a fork. If they need a little more time, don’t hesitate to pop them back in for a few more minutes.
-
Serve and Enjoy: Let the dish sit for a few minutes to settle, then scoop out a portion and get ready to savor those creamy, cheesy bites. The aroma alone will have everyone flocking to the dining table!
Serving Suggestions
Plate this dish with a simple green salad or some roasted veggies on the side to balance out the richness of the potatoes. A light drizzle of olive oil and a sprinkle of fresh herbs can elevate the presentation. Don’t shy away from adding a dollop of sour cream or a sprinkle of chives on top for a gourmet touch!
Recipe Variations
Feel free to customize your French Onion Potatoes to suit your taste or dietary preferences:
-
Add Protein: Layer in some cooked crumbled bacon or shredded chicken for a heartier option.
-
Veggie Boost: Mix in some sautéed mushrooms or spinach to add colorful veggies to the mix.
-
Spice It Up: For some kick, toss in a pinch of red pepper flakes or a touch of smoked paprika for smoky flavor.
-
Dairy-Free: Swap the butter for olive oil and use a dairy-free cheese blend to make this dish suitable for lactose intolerant friends.
-
Gluten-Free: Ensure your onion soup mix is gluten-free (there are plenty of options on the market!), and you’re good to go!
Chef’s Notes
Over the years, I’ve had a blast experimenting with this recipe. What started as a nostalgic winter dish has transformed into a crowd-pleaser for every season. I remember a summer potluck where I presented this dish with a twist—I used smoked Gouda instead of gruyere, and let me tell you, it was a hit! It’s a great reminder that cooking is all about being adventurous and making it your own.
FAQs and Troubleshooting
Q: Can I make this dish ahead of time?
A: Yes! You can prepare it a day in advance, cover it tightly with foil, and refrigerate. Just add a few extra minutes to the baking time when you’re ready to cook it.
Q: What should I do if my potatoes are still hard after cooking?
A: If your potatoes aren’t tender after the initial 30 minutes, cover them with the foil and check them every 5 minutes until they’re soft. The baking time can vary depending on how thickly you sliced them.
Q: Can I freeze leftovers?
A: Absolutely! Just be sure to let the dish cool completely before transferring it to an airtight container. It’ll keep in the freezer for up to three months—when you’re ready, thaw it overnight in the fridge and reheat!
Q: How can I make this dish spicier?
A: Feel free to toss in some diced jalapeños or a sprinkle of cayenne pepper to infuse some heat!
Nutritional Info
While I believe in enjoying food that fuels and delights, let’s not forget the importance of balance. Each serving of French Onion Potatoes is rich, comforting, and can easily be lightened up with serving sizes or side choices.
And there you have it, friends! Your journey to mastering Cheesy French Onion Potatoes starts now. I encourage you to gather your loved ones around the table and enjoy this dish, making memories as rich and flavorful as the food itself. Happy cooking!
PrintCheesy French Onion Potatoes

A comforting dish that combines the rich flavors of French onion soup with creamy, cheesy potatoes.
- Prep Time: 15 minutes
- Cook Time: 45 minutes
- Total Time: 60 minutes
- Yield: 4 servings 1x
- Category: Main Course
- Method: Baking
- Cuisine: French
- Diet: Vegetarian
Ingredients
- 1 (10-oz) can French onion soup
- 1 (1-oz) envelope dry onion soup mix
- 1/2 cup (1 stick) butter, melted
- 2.5 lbs russet potatoes, sliced
- 2 cups shredded gruyere cheese
Instructions
- Preheat your oven to 375°F (190°C).
- Prepare the russet potatoes by scrubbing them under cold water and slicing into 1/4 inch thick slices.
- Melt the butter in a pot or microwave until bubbling.
- Mix the French onion soup with the dry onion soup mix and melted butter in a large bowl.
- Layer a third of the potato slices in a baking dish, followed by the soup mixture and a sprinkle of cheese; repeat twice more.
- Bake covered with foil for 30 minutes, then remove foil and bake for an additional 15-20 minutes until golden.
- Check for doneness with a fork.
- Serve and enjoy your cheesy, creamy potatoes!
Notes
Feel free to customize with protein or veggies. For a lighter option, substitute butter with olive oil.
Nutrition
- Serving Size: 1 serving
- Calories: 350
- Sugar: 5g
- Sodium: 400mg
- Fat: 12g
- Saturated Fat: 4g
- Unsaturated Fat: 6g
- Trans Fat: 0g
- Carbohydrates: 45g
- Fiber: 3g
- Protein: 15g
- Cholesterol: 30mg
Keywords: cheesy potatoes, French onion, comfort food, vegetarian recipe
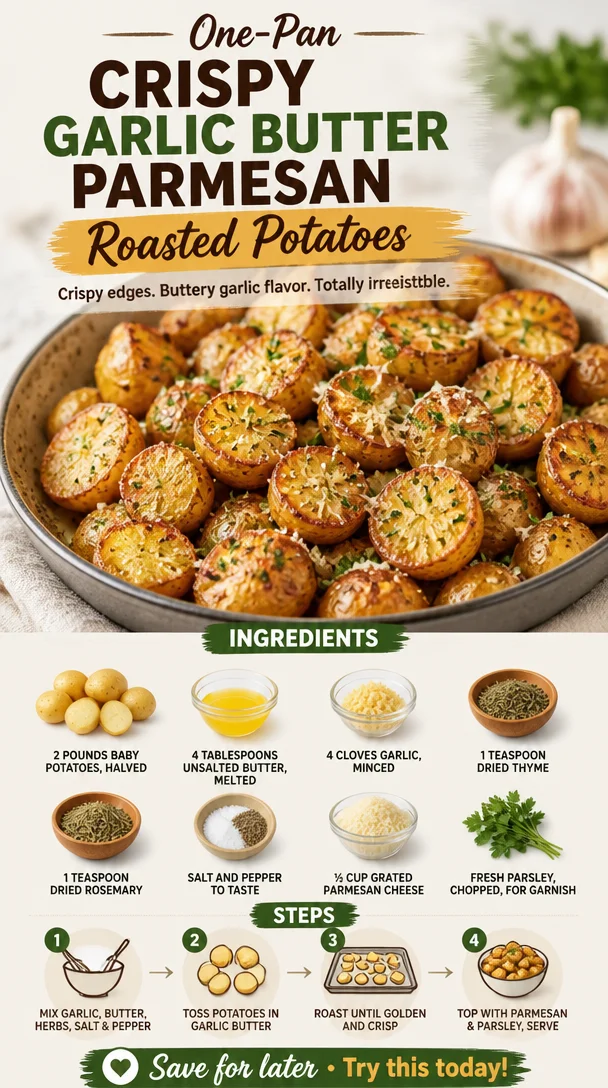
One-Pan Crispy Garlic Butter Parmesan Roasted Potatoes
Garlic Butter Parmesan Roasted Potatoes: A Feel-Good Classic
Welcome to my cozy kitchen! Today, we’re diving into a nostalgic recipe that’s pure comfort—Garlic Butter Parmesan Roasted Potatoes. There’s something magical about potatoes, don’t you think? They can be fluffy, crispy, or creamy, and they soak up all that delicious flavor like a champ. This dish is the epitome of satisfying and makes a fantastic side for any meal. Plus, it’s incredibly simple to whip up, which is just the way we like it here at Clean Plate Cravings.
Introduction
I grew up in a household where potatoes were practically a food group. My mom had a repertoire of potato recipes that ranged from buttery mashed potatoes on Sundays to crispy roasted ones on weeknights. Each bite was a little celebration of flavor and comfort, a reminder that meals could be nourishing without sacrificing taste.
And that’s precisely what I want to share with you today: a dish that sings with spices, embraces the zing of garlic, and is generously bathed in rich, creamy butter. These Garlic Butter Parmesan Roasted Potatoes will take you back to the warmth of home-cooked meals while fitting perfectly into the busy lifestyle we all lead today.
Imagine this—your family gathers around the table, and the aroma of roasted garlic wafts through the air. Everyone’s eyes light up as you serve up these golden, crispy potatoes. It’s all about making those little moments special, and with this recipe, you can do exactly that, adding a touch of indulgence to your everyday meals. So roll up your sleeves, grab your apron, and let’s create something beautiful together!
Personal Story
I’ll never forget the first time I attempted to make roasted potatoes on my own. I was in college, living in a tiny apartment with just a hot plate and a questionable oven. My friends decided to host a potluck, and I was determined to impress them. Channeling my mom’s flair for cooking, I concocted a garlic butter potato dish that I thought would wow everyone.
With nowhere near the kitchen supplies I needed, I executed it with a mismatched array of utensils and even a little improvisation along the way. When those potatoes came out of the oven—golden brown, crisp on the edges, and glistening with garlic magic—I felt like a culinary rock star. My friends devoured them, and for that one evening, I was the queen of the kitchen. That memory still warms my heart, and it reminds me how cooking, even in the most humble settings, can create bonds and joy among friends.
Ingredients
Here’s what you’ll need to make these delightful Garlic Butter Parmesan Roasted Potatoes:
-
2 pounds baby potatoes, halved
Look for smaller potatoes for the best texture. Red or yellow baby potatoes work beautifully. If you can’t find baby potatoes, just cut regular potatoes into 1-inch chunks. -
4 tablespoons unsalted butter, melted
Butter adds richness! Unsalted is best so you can control the saltiness. If you prefer an alternative, you could swap in olive oil for a lighter option. -
4 cloves garlic, minced
Fresh garlic infuses this dish with a robust flavor. If you’re in a pinch, jarred minced garlic works well, about 1 teaspoon per clove. -
1 teaspoon dried thyme
Thyme provides a lovely earthy note. You can substitute it with dried oregano or Italian seasoning if that’s what you have on hand. -
1 teaspoon dried rosemary
Rosemary adds a delightful aroma. Fresh rosemary can be used if you happen to have it; just double the amount! -
Salt and pepper to taste
Essential for bringing all the flavors together. Feel free to adjust according to your taste preferences. -
½ cup grated Parmesan cheese
Cheesy goodness! You can use freshly grated cheese for better flavor. Pecorino Romano can be a great substitute if you’re looking for a sharper flavor. -
Fresh parsley, chopped, for garnish
A sprinkle of parsley adds a fresh touch. If you don’t have parsley, chives or basil can also brighten up the dish.
Step-by-Step Instructions
Now that we’ve got our ingredients lined up, let’s dive into the cooking!
-
Preheat Your Oven
Start by preheating your oven to 400°F (200°C). This ensures that our potatoes get that perfect crispy texture. While it’s heating, you can prep your ingredients. -
Prep the Potatoes
Rinse your baby potatoes under cold water and give them a good scrub. Halve them for optimal roasting. You want them to be roughly the same size so they cook evenly. -
Make the Garlic Butter Mixture
In a small bowl, combine the melted butter with the minced garlic, thyme, rosemary, salt, and pepper. Stir it together until it’s all blended. The aroma will already start to make your mouth water! -
Toss the Potatoes
Place the halved potatoes in a large mixing bowl and pour the garlic butter mixture over them. Toss them gently with your hands or a large spatula until every potato is well-coated. -
Spread on a Baking Sheet
Line a large baking sheet with parchment paper for easy cleanup. Spread the potatoes in a single layer, cut side down if you want an extra crispy texture. This way, they’ll fry up nicely in the oven. -
Roast the Potatoes
Pop the baking sheet into your preheated oven and roast the potatoes for about 25-30 minutes, or until they are golden brown and crisp. Halfway through, use a spatula to flip them for even roasting. This is a great time to make sure your oven is doing its job—some spots may cook quicker than others! -
Add the Parmesan
In the final 10 minutes of roasting, sprinkle the grated Parmesan cheese evenly over the potatoes. The cheese will melt and create a delightful crust. You can also give them a quick broil at the end if you want an extra crunch! -
Garnish and Serve
Once the potatoes are golden and cheese is melted, remove them from the oven. Let them cool for just a minute before transferring them to your serving platter. Garnish with freshly chopped parsley for a pop of color.
Serving Suggestions
Serve these Garlic Butter Parmesan Roasted Potatoes alongside grilled chicken, steak, or a vibrant salad for a balanced meal. They also make a fantastic side to bring to gatherings or barbecues—trust me, they’ll disappear in no time! You can arrange them in a lovely serving bowl and allow everyone to scoop their share.
Recipe Variations
Here are a few fun ways to mix it up:
-
Herb Variations: Try using fresh herbs like dill or tarragon for a different flavor profile.
-
Spicy Kick: Add a pinch of red pepper flakes to the garlic butter for a spicy twist.
-
Lemon Zest: Grate some lemon zest over the potatoes just after they come out of the oven for a zesty bite.
-
Cheese Options: Mix it up by using feta or goat cheese for a tangy twist.
-
Sweet and Savory: Toss in some diced sweet potatoes or carrots for a colorful and different take.
Chef’s Notes
These Garlic Butter Parmesan Roasted Potatoes have been a staple in my kitchen for years, and I love how they work with just about any main dish. You can easily customize them based on your mood or what you have in the pantry. Once, I even added leftover vegetables—still delicious!
One of my funniest kitchen mishaps happened while making this dish. In my excitement, I knocked over the garlic into the butter, which resulted in a garlicky pool rather than a mixture. But you know what? The more, the merrier, right? The garlic was a hit, proving that sometimes "mistakes" lead to the best discoveries!
FAQs and Troubleshooting
Q: Why didn’t my potatoes get crispy?
A: Make sure you preheat your oven and spread the potatoes in a single layer on the baking sheet. Crowding them can cause steaming instead of roasting.
Q: Can I cook these potatoes in advance?
A: Absolutely! Prepare the potatoes and toss them in the garlic butter mixture ahead of time, then store them in the fridge. When you’re ready, pop them into the oven—just add a few extra minutes to the cooking time!
Q: Can I use larger potatoes?
A: Yes! Just cut them into uniform pieces, about 1-inch in size, for even cooking. You may need to adjust the cooking time slightly.
Q: How can I tell if the potatoes are done?
A: They should be golden brown and fork-tender—meaning a fork can easily pierce through.
Nutritional Info (per serving)*
*Calories: 200 | Protein: 5g | Carbs: 30g | Fat: 8g | Fiber: 3g
Conclusion
That’s it! Now you have a delectable recipe for Garlic Butter Parmesan Roasted Potatoes that will surely impress anyone who gathers at your table. Remember, cooking is all about having fun and making memorable experiences, and I hope this dish brings warmth and cheer to your kitchen. So, roll up your sleeves, invite some friends over, and enjoy every bite together!
Keep it fresh, simple, and seriously delicious—happy cooking!
PrintGarlic Butter Parmesan Roasted Potatoes

A comforting side dish featuring crispy roasted baby potatoes tossed in garlic butter and Parmesan cheese.
- Prep Time: 15 minutes
- Cook Time: 30 minutes
- Total Time: 45 minutes
- Yield: 4 servings 1x
- Category: Side Dish
- Method: Roasting
- Cuisine: American
- Diet: Vegetarian
Ingredients
- 2 pounds baby potatoes, halved
- 4 tablespoons unsalted butter, melted
- 4 cloves garlic, minced
- 1 teaspoon dried thyme
- 1 teaspoon dried rosemary
- Salt and pepper to taste
- ½ cup grated Parmesan cheese
- Fresh parsley, chopped, for garnish
Instructions
- Preheat your oven to 400°F (200°C).
- Rinse your baby potatoes under cold water and halve them.
- Combine melted butter with minced garlic, thyme, rosemary, salt, and pepper in a bowl.
- Toss the halved potatoes in the garlic butter mixture until well-coated.
- Spread the potatoes on a lined baking sheet in a single layer.
- Roast for 25-30 minutes, flipping halfway through.
- Add Parmesan cheese in the last 10 minutes of roasting.
- Garnish with freshly chopped parsley and serve.
Notes
You can customize the recipe with different herbs or cheeses, and they also pair wonderfully with grilled meats or salads.
Nutrition
- Serving Size: 1 serving
- Calories: 200
- Sugar: 1g
- Sodium: 300mg
- Fat: 8g
- Saturated Fat: 4g
- Unsaturated Fat: 3g
- Trans Fat: 0g
- Carbohydrates: 30g
- Fiber: 3g
- Protein: 5g
- Cholesterol: 20mg
Keywords: potatoes, roasted, garlic butter, Parmesan, side dish
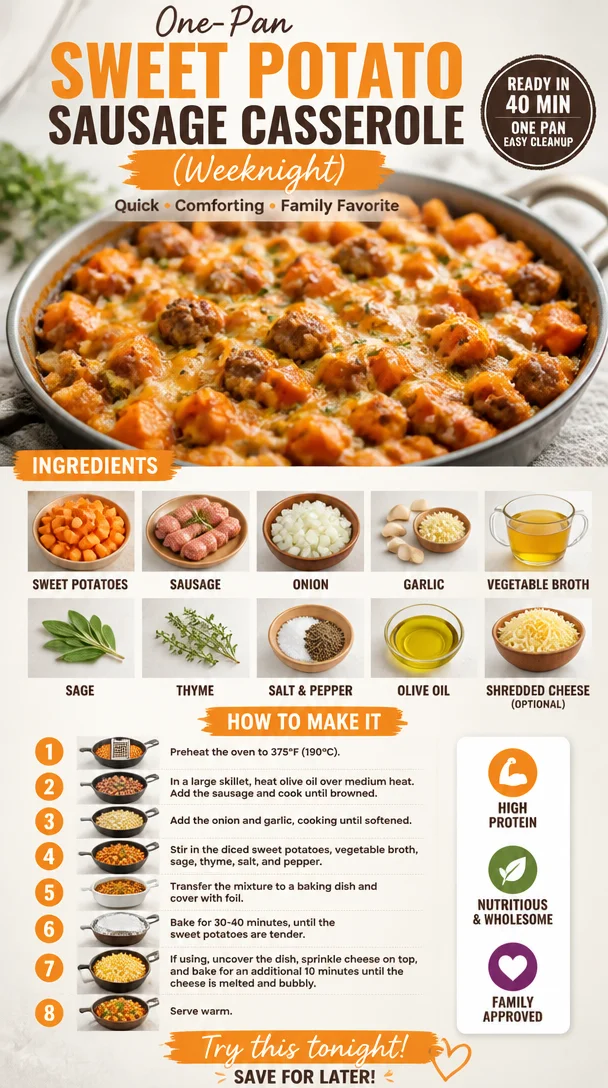
One-Pan Sweet Potato Sausage Casserole (Weeknight)
Sweet Potato and Sausage Casserole: A Delightful Comfort Dish
Welcome back to Clean Plate Cravings, my dear foodies! Today, we’re diving into a dish that’s near and dear to my heart: Sweet Potato and Sausage Casserole. This is comfort food at its finest—simple, hearty, and bursting with flavors. Whenever I whip up this casserole, I can’t help but reminisce about cozy family dinners filled with laughter and love. So, grab your aprons and let’s dive into this delicious recipe!
A Taste of Nostalgia
Growing up, my family had Tuesday night dinners that were always the highlight of my week. My mom would create simple yet satisfying meals, which became our warm refuge from busy, chaotic days. One dish that often graced our table was a hearty sweet potato casserole. The blend of the sweet potatoes with the savory sausage was an unbeatable combination that everyone looked forward to.
One rainy evening, I remember my mom inviting my friends over for dinner. We were all bundled up, giggling and sharing stories about school as the aroma of the casserole wafted through the house. When it finally came out of the oven, we dove in face-first, all while debating the “proper” way to eat it. For us, there was no wrong way when it tasted this good! This casserole not only fed our bellies but also filled our hearts with warmth and joy.
As I’ve grown and ventured into my own kitchen, I’ve kept those delightful flavors alive and added a few of my own twists. Each time I prepare this dish, it’s a little reminder of those cherished moments—both in the kitchen and around the dining table. Let’s make these memories together!
Ingredients
Here’s what you need to whip up this delightful Sweet Potato and Sausage Casserole:
-
2 large sweet potatoes, peeled and diced
Sweet potatoes are the star of this dish, providing natural sweetness and a creamy texture once baked. If you’re running low, butternut squash or pumpkin can make an excellent substitute. -
1 pound sausage (Italian or any preferred type)
I love using Italian sausage because it adds a great depth of flavor. If you prefer a lighter option, turkey sausage works beautifully too, or even a plant-based sausage for a vegetarian twist. -
1 onion, diced
Onions lend a nice aromatic base to the casserole. If you’re short on time, shallots or leeks can fit in seamlessly. -
2 cloves garlic, minced
Garlic is a must! It adds that delightful savoriness. If you’re not a fan or out, garlic powder can step in—just use about 1/4 teaspoon. -
1 cup vegetable broth
This helps keep the casserole moist and adds flavor. You can also use chicken broth if you prefer, or for a heartier option, try a low-sodium beef broth. -
1 teaspoon sage
Sage has a lovely earthy flavor that complements the sausage beautifully. If you’re out, thyme or rosemary can take the stage instead! -
1 teaspoon thyme
Another aromatic herb that brings depth. You can substitute with Italian seasoning or herbs de Provence. -
Salt and pepper to taste
Essential for highlighting all those lovely flavors. Freshly cracked black pepper and sea salt always amplify the taste—don’t skimp out! -
Olive oil
Just a drizzle for sautéing the onion and garlic. You can also use avocado oil or coconut oil based on preference. -
1 cup shredded cheese (optional)
For a melty finish. Cheddar, gouda, or mozzarella would work well. If you want it dairy-free, nutritional yeast can give it a nice cheesy flavor!
Step-by-Step Instructions
Now let’s get cooking! Follow these simple steps for a mouthwatering Sweet Potato and Sausage Casserole that’ll impress your family and friends.
-
Preheat your oven to 400°F (200°C)
Start by preheating the oven because this casserole will need a hot space to get bubbly and golden. It’s like giving your dish a warm welcome! -
Sauté the onion and garlic
In a large skillet over medium heat, drizzle about a tablespoon of olive oil. Once hot, add in the diced onion and sauté until it becomes translucent—about 5 minutes. Then, toss in the minced garlic and sauté for another minute until fragrant. Pro tip: Add a pinch of salt to the onions while they cook to draw out moisture and enhance their sweetness! -
Brown the sausage
Next, add the sausage into your skillet, breaking it apart with a spoon as it cooks. Sauté until it’s nicely browned, about 7-10 minutes. This step builds layers of flavor. If you’re using a leaner sausage, be mindful; it may not produce a lot of fat for flavor. -
Combine sweet potatoes and seasonings
Once the sausage is cooked through, toss in the diced sweet potatoes, sage, thyme, and season with salt and pepper. Stir to combine. This is where the magic happens—those sweet potatoes soak up all those incredible flavors. -
Add broth
Pour in the vegetable broth, stirring everything together well. The broth brings moisture to the dish, ensuring the sweet potatoes cook through and stay tender. -
Bake the casserole
Transfer this glorious mixture to a greased baking dish (about 9×13 inch works well) and spread it evenly. Cover with aluminum foil and pop it into the preheated oven. Bake for about 25 minutes. -
Uncover and add cheese (if using)
After 25 minutes, remove the foil and sprinkle shredded cheese on top if you’re using it. Return it to the oven for about an additional 10-15 minutes, or until the sweet potatoes are fork-tender and the cheese is bubbly and golden. -
Let it cool and serve!
Once out of the oven, let your casserole cool for a few minutes. I know it’s tempting to dive right in, but giving it a moment helps the flavors settle and makes serving easier!
Serving Suggestions
To serve, gently scoop portions onto plates—you can pair this casserole with a crisp green salad or roasted veggies for a complete meal. Drizzle a bit of balsamic glaze over the top for an extra pop of flavor and a beautiful presentation. A sprinkle of fresh herbs, like parsley or chives, adds vibrant color and freshness too!
Recipe Variations
Here are a few creative twists you can explore with this casserole:
- Sweet and Spicy: Add some diced jalapeños or crushed red pepper flakes to the sausage while browning for a spicy kick.
- Veggie Twist: Mix in some chopped spinach, kale, or bell peppers for extra nutrients.
- Cheesy Delight: Try different cheeses—pepper jack for heat or gouda for creamy richness.
- Low-Carb Option: Replace sweet potatoes with cauliflower for a lower-carb version.
- Breakfast Makeover: Swap out the sausage for crumbled bacon or breakfast sausage, and serve it alongside eggs for a brunch-lovers’ delight!
Chef’s Notes
Every casserole tells a story, and this one does too! Over the years, I’ve modified this recipe to include whatever I have on hand, and it always turns out deliciously! One time, I had some leftover caramelized onions from a previous dinner, and—oh my gosh!—that addition took the flavor to an entirely new level! Don’t be afraid to experiment and make this dish your own.
And let’s be real—who doesn’t love a one-pan meal? This casserole is not only satisfying but also perfect for meal prep. Just store it in an airtight container in the fridge for up to three days, and you’re all set for busy weeknights!
FAQs and Troubleshooting
-
Can I assemble this casserole ahead of time?
Absolutely! You can prep everything the night before, cover it in the fridge, and then bake it when you’re ready. -
What if my sweet potatoes are still hard after baking?
Every oven is different! If they’re not tender after the recommended baking time, cover the casserole again and give it another 10-15 minutes in the oven. -
Can I freeze this casserole?
Yes! Just make sure it’s completely cooled before wrapping tightly and placing in the freezer. It should last up to 3 months. Thaw overnight in the fridge before reheating. -
What should I do if I’m sensitive to sausage flavors?
You can substitute the sausage with cooked lentils or chickpeas for a similar protein punch without the strong meaty flavor. Season them well to bring out that savoriness!
Nutritional Info
Though nutritional information may vary based on specific ingredients used, here’s a rough estimation per serving (assuming 8 servings):
- Calories: 350
- Protein: 16g
- Carbohydrates: 40g
- Dietary Fiber: 6g
- Total Fat: 14g
Eating well shouldn’t feel like a chore, and this Sweet Potato and Sausage Casserole is the perfect example of how flavorful and wholesome meals can be fun to make and share. I can’t wait for you to try this out in your kitchen! Remember, food is all about love and connection. So go ahead—dive right in, make new memories, and enjoy every delicious bite! Happy cooking!
PrintSweet Potato and Sausage Casserole
A hearty and comforting Sweet Potato and Sausage Casserole that combines the natural sweetness of sweet potatoes with savory sausage, perfect for family dinners.
- Prep Time: 15 minutes
- Cook Time: 40 minutes
- Total Time: 55 minutes
- Yield: 8 servings 1x
- Category: Main Course
- Method: Baking
- Cuisine: American
- Diet: Omnivore
Ingredients
- 2 large sweet potatoes, peeled and diced
- 1 pound sausage (Italian or any preferred type)
- 1 onion, diced
- 2 cloves garlic, minced
- 1 cup vegetable broth
- 1 teaspoon sage
- 1 teaspoon thyme
- Salt and pepper to taste
- Olive oil
- 1 cup shredded cheese (optional)
Instructions
- Preheat your oven to 400°F (200°C).
- Sauté the onion and garlic in olive oil until translucent, about 5 minutes.
- Brown the sausage in the skillet until nicely browned, 7-10 minutes.
- Combine the sweet potatoes, sage, thyme, salt and pepper with the sausage mixture.
- Add the broth and stir to combine.
- Bake the mixture in a greased baking dish covered with foil for about 25 minutes.
- Uncover and add cheese if using, returning to the oven for 10-15 minutes until golden.
- Let it cool a few minutes before serving.
Notes
Feel free to experiment with vegetable substitutions and spices. This dish can be prepared ahead of time or frozen for later use.
Nutrition
- Serving Size: 1 serving
- Calories: 350
- Sugar: 7g
- Sodium: 600mg
- Fat: 14g
- Saturated Fat: 5g
- Unsaturated Fat: 7g
- Trans Fat: 0g
- Carbohydrates: 40g
- Fiber: 6g
- Protein: 16g
- Cholesterol: 40mg
Keywords: casserole, sweet potato, sausage, comfort food, family dinner
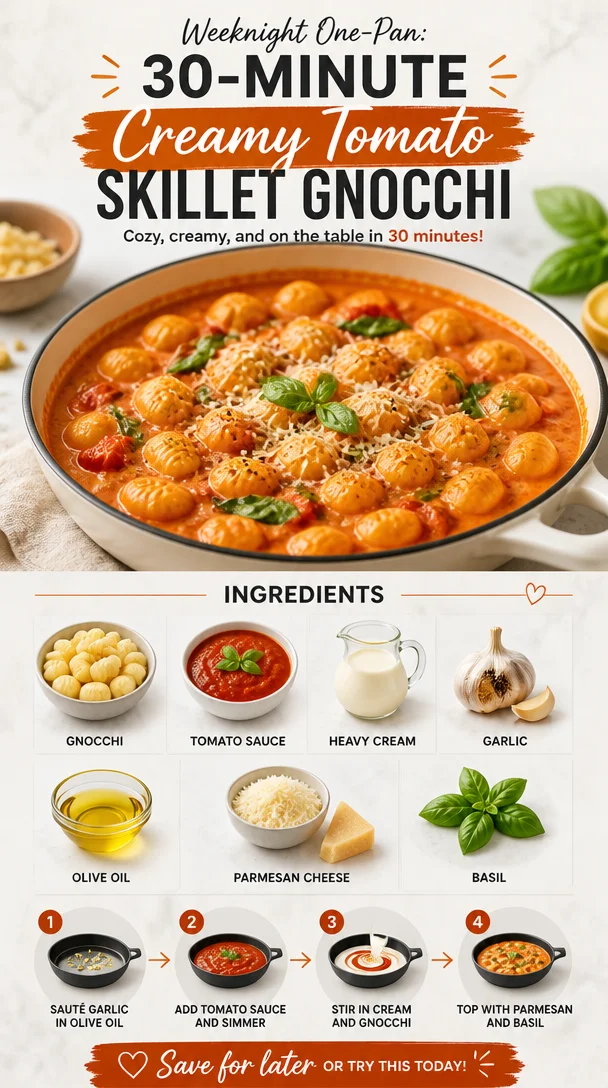
Weeknight One-Pan: 30-Minute Creamy Tomato Skillet Gnocchi
30-Minute Creamy Tomato Gnocchi: A Wholesome Comfort in Every Bite
Welcome, food lovers! If you’re looking for a quick, comforting meal that packs a ton of flavor and feels downright indulgent, you’ve landed in the right spot. Today, we’re diving into the world of creamy tomato gnocchi, a dish that not only satisfies your cravings but also warms your heart. With velvety textures and vibrant colors, this dish is your ticket to a cozy night in or a delightful dinner party.
But let’s be real; this creamy wonder can be on your table in just 30 minutes! Yes, you heard that right—30 minutes from prep to plate. In our busy lives, it’s so easy to feel like home-cooked meals are just too much of a hassle. Well, let’s change that narrative, shall we? You can whip up a dish that feels like a warm hug, all while juggling work, family, and the never-ending to-do list.
What’s even better is that this recipe brings together some of my favorite ingredients. Picture yourself savoring pillowy gnocchi coated in a luscious tomato sauce enriched with heavy cream, garlic, and just a sprinkle of parmesan cheese. Add a twirl of fresh basil, and you have a beautiful dish that invites everyone to sit down and enjoy.
Speaking of beauty, there’s something so nostalgic about gnocchi. It reminds me of lazy Sunday afternoons spent in the kitchen, where the biggest decision was whether to go with marinara or Alfredo sauce, and all sides involved were happy with whatever choice was made. So let’s roll up our sleeves, grab those ingredients, and find out how to make this delightful dish!
A Nostalgic Spin
Let me take you back for a moment. My first experience with gnocchi was in my grandmother’s cozy kitchen, where the air was always filled with the smell of fresh garlic and simmering tomatoes. She had a knack for making everything from scratch. I remember standing on my little stool beside her as we rolled out the dough, her seasoned hands guiding me through the art of creating those adorable little dumplings.
My favorite part? The impromptu taste tests! She would always sneak a forkful of the simmering sauce right under my nose, and I would giggle as the warm flavors spread across my palate. Those moments etched themselves into my heart, turning gnocchi from a mere dish into a symbol of togetherness and love.
Fast forward to today, I find myself recreating those memories in my own kitchen, sharing that same warmth and comfort with friends and loved ones. This 30-minute creamy tomato gnocchi not only connects me to my roots but also makes it accessible for anyone craving the same joy. And hey, you don’t even need to roll out any dough!
Ingredients
Here’s what you’ll need to bring this dish to life:
-
Gnocchi: The star of the show! You can find gnocchi in the pasta aisle of your grocery store, usually made from potatoes. If you’re feeling adventurous, you can even make your own, but store-bought creates a wonderful base that cooks up in a flash.
-
Tomato Sauce: A classic marinara or a roasted tomato sauce works beautifully. If you want to elevate the flavor, look for a brand with high-quality ingredients or even make your own!
-
Heavy Cream: This is what gives our dish that irresistible creaminess. You can swap it for half-and-half for a lower-fat option, or even coconut cream if you want a dairy-free alternative.
-
Garlic: Fresh garlic is a must! It brings a fragrant punch that elevates every bite. Alternatively, you could use garlic powder if you’re in a pinch, but fresh is always best.
-
Olive Oil: Don’t skip on the good stuff; high-quality olive oil enhances flavors and brings a lush texture. Feel free to substitute with avocado oil if you’re looking for a different profile.
-
Parmesan Cheese: Grated Parmesan adds a salty element that perfectly complements the creamy sauce. For a vegan alternative, nutritional yeast can provide that cheesy oomph without the dairy!
-
Basil: Fresh basil is a game-changer! Its fragrant aroma and taste take the dish to new heights. You can substitute with dried basil; just remember, fresh herbs have a brighter flavor!
Step-by-Step Instructions
Now that we have our ingredients, let’s talk about how to bring it all together.
-
Cook the Gnocchi:
Start by bringing a large pot of salted water to a boil. It’s essential to season your water well—this is where your gnocchi will start to absorb flavor. Once boiling, toss in your gnocchi. You’ll know they’re done when they float to the top, typically about 2-3 minutes. Give them a minute more to cook through, and then drain them in a colander. -
Sauté Garlic:
In a large skillet over medium heat, add 1 tablespoon of olive oil. Once it shimmers, toss in minced garlic. Sauté for about 30 seconds until it’s fragrant, but be careful not to let it turn brown. Burnt garlic can turn bitter and ruin that beautiful sauce! -
Add Tomato Sauce:
Pour in your tomato sauce and bring it to a gentle simmer. This is where the magic happens! The garlic will infuse the sauce, making it even more flavorful. Keep it bubbling away for about 3-4 minutes, allowing those flavors to meld together. -
Introduce the Cream:
Once your sauce is simmering, slowly mix in the heavy cream (or your choice of alternative). Stir it well to combine, and watch as it transforms into a dreamy, creamy concoction. Season with salt and pepper to taste—don’t be shy! Taste as you go so you get just the right balance. -
Toss in Gnocchi:
After your sauce has reached creamy perfection, add the drained gnocchi into the skillet. Gently toss to coat every piece in that luscious sauce. You want each gnocchi to bask in the creaminess! -
Finish with Cheese and Basil:
Sprinkle in the grated Parmesan cheese and fresh basil, stirring to incorporate them into the dish. Let it warm through for another minute so the cheese melts into the sauce beautifully. -
Plating:
Grab your plates and serve this masterpiece while it’s hot. A quick drizzle of olive oil or a sprinkle of more cheese on top adds a lovely finishing touch.
Serving Suggestions
To plate this creamy tomato gnocchi, I love using wide, shallow bowls that allow the dish to shine. A light drizzle of extra virgin olive oil and a few torn basil leaves on top gives a fresh pop. You may want to serve it with a side salad or some freshly baked bread to soak up all that glorious sauce. Trust me, your guests will be asking for seconds!
Recipe Variations
Looking to mix things up? Here are a few creative twists you can try with this recipe:
- Add Veggies: Toss in some sautéed spinach, mushrooms, or zucchini for an extra nutrition boost.
- Protein Packed: Add grilled chicken or Italian sausage for an added protein punch.
- Spice It Up: Feel free to add red pepper flakes to the sauce for a touch of heat if you like some spice.
- Herb Swap: Swap basil for fresh parsley or even arugula for a peppery twist.
- Make it Vegan: Replace the heavy cream with cashew cream and the cheese with a nut-based alternative.
Chef’s Notes
This recipe is a staple in my household and has morphed over the years based on what I have on hand or the season. I’ve hosted countless dinner parties where this dish has stolen the spotlight! One time, I forgot to buy cream, and I creatively substituted it with Greek yogurt. It turned out surprisingly delicious and added a tangy edge to the sauce that was a big hit! Don’t hesitate to make this your own—swap, experiment, and enjoy!
FAQs and Troubleshooting
-
What if my gnocchi is mushy?
This can happen if they’re overcooked. Always keep an eye on them; they cook quickly. When you see them float, that’s your cue! -
Can I make this ahead of time?
Absolutely! You can prepare the sauce a day ahead, but I suggest adding the gnocchi fresh when you’re ready to serve. -
What if my sauce is too thick?
Just add a splash of pasta water or more cream to thin it out to your desired consistency. -
How do I store leftovers?
Store in an airtight container in the fridge for up to 3 days. You can reheat on the stovetop or microwave, adding a splash of water or cream to loosen it up.
Nutritional Info
While I won’t bore you with exact numbers, this dish is rich in flavors while offering balanced nutrients. It’s a great source of carbohydrates from gnocchi, healthy fats from olive oil and cream, and protein from Parmesan. And that’s not to mention the fresh basil, which is loaded with antioxidants!
In conclusion, this 30-minute creamy tomato gnocchi is not just a recipe—it’s a love letter to those cozy dinners and cherished kitchen memories. So grab your ingredients, gather your loved ones, and make some delicious memories of your own. Happy cooking!
Print30-Minute Creamy Tomato Gnocchi
A quick, comforting dish featuring pillowy gnocchi coated in a luscious creamy tomato sauce, perfect for a cozy night in or a dinner party.
- Prep Time: 10 minutes
- Cook Time: 20 minutes
- Total Time: 30 minutes
- Yield: 4 servings 1x
- Category: Main Course
- Method: Stovetop
- Cuisine: Italian
- Diet: Vegetarian
Ingredients
- 1 package of gnocchi
- 1 cup tomato sauce
- 1/2 cup heavy cream
- 2 cloves garlic, minced
- 1 tablespoon olive oil
- 1/4 cup grated Parmesan cheese
- Fresh basil, for garnish
Instructions
- Cook the gnocchi by bringing a large pot of salted water to a boil. Add the gnocchi and cook until they float, about 2-3 minutes. Drain.
- Sauté garlic in olive oil in a skillet over medium heat for about 30 seconds.
- Add tomato sauce and let it simmer for 3-4 minutes.
- Introduce heavy cream, stirring to combine. Season with salt and pepper.
- Toss in the drained gnocchi and coat well with the sauce.
- Finish with grated Parmesan and fresh basil, warming through for another minute.
- Plate and serve hot with a drizzle of olive oil on top.
Notes
Feel free to add veggies, proteins, or swap ingredients based on your preferences. This dish can be made ahead but add gnocchi fresh when ready to serve.
Nutrition
- Serving Size: 1 serving
- Calories: 350
- Sugar: 5g
- Sodium: 400mg
- Fat: 12g
- Saturated Fat: 4g
- Unsaturated Fat: 6g
- Trans Fat: 0g
- Carbohydrates: 45g
- Fiber: 3g
- Protein: 15g
- Cholesterol: 30mg
Keywords: gnocchi, creamy tomato sauce, Italian comfort food, quick dinner
One-Pan Turmeric Rice with Chickpeas (Mediterranean Diet)
Turmeric Rice with Chickpeas: A Flavorful Journey to Healthy Eating
Welcome to another delicious adventure here at Clean Plate Cravings! Today, we’re diving into a vibrant and nutritious dish that’s as satisfying as it is nourishing. Get ready for a recipe that’s not just easy on the palate but also a feast for the eyes—Turmeric Rice with Chickpeas. This dish is inspired by the Mediterranean diet, bursting with flavors and packed with nutrients, making it a fantastic choice for a wholesome meal.
Eating well doesn’t have to be boring or bland, and this dish is a shining example of that philosophy. The warm, aromatic spice of turmeric combined with the creamy texture of chickpeas creates a symphony of flavors that your taste buds will thank you for. Whether you’re looking to eat healthier, explore meatless options, or impress your friends with your culinary skills, you’ve come to the right place.
As we journey through this recipe together, I promise a fun and approachable cooking experience. What’s great about Turmeric Rice with Chickpeas is that it’s adaptable and can easily fit into any busy day. Now, without further ado, let’s get cooking!
Personal Story
Let me take you back in time to my early days in the kitchen, where my love for food truly began. I was a teenager, ardently shadowing my grandmother as she stirred away in her quaint little kitchen, creating magic with such simple ingredients. One dish that particularly caught my eye was her vibrant yellow rice, simmering gently while the golden hues of turmeric filled the room.
“Food should not just nourish; it should delight your senses,” she would say, her eyes twinkling with passion. She introduced me to the wonders of spices, especially turmeric, and the way it could transform an ordinary dish into something extraordinary. I can still remember the comforting aroma wafting through the house with each pot she simmered. Those days laid the foundation for my culinary adventures, inspiring me to create dishes that bring joy, comfort, and nourishment.
Years later, I’ve taken that same essence and created this Turmeric Rice with Chickpeas recipe—a nod to my grandmother and a testament to how food can create lasting memories.
Ingredients
Let’s gather our ingredients, shall we? Here’s what you’ll need for this delightful dish:
-
2 tablespoons extra virgin olive oil
A staple in Mediterranean cooking, this oil is rich in healthy fats and adds a depth of flavor. Feel free to substitute with avocado oil if you want a different take. -
1 leek (chopped, or a large onion)
Leeks bring a subtle sweetness and a unique twist compared to regular onions. If leeks aren’t an option, any onion will work just fine! -
3 cloves garlic (grated)
Garlic is a superstar in just about every recipe! Grated garlic infuses the oil quickly, giving your dish a beautiful aromatic base. -
1 teaspoon turmeric
This golden spice is known for its powerful anti-inflammatory properties, not to mention the stunning color it brings to the dish! If you’re looking for a milder flavor, you can use less. -
1 teaspoon dried oregano
A herb that pairs perfectly with Mediterranean flavors! If you’re out of oregano, thyme can be a lovely substitute. -
5 cups spinach (about 5 cups chopped)
Spinach is nutrient-dense and wilts down beautifully. You can also mix in other greens like kale or Swiss chard for added variety. -
½ cup basmati rice (or jasmine rice — uncooked)
Both rice types give a lovely texture; basmati has a nuttier flavor, while jasmine adds a touch of sweetness. -
2 cans chickpeas (15 oz / 400 g each can — drained and rinsed)
These little legumes are not only filling but also an excellent source of protein and fiber. For a homemade option, 3 cups of cooked chickpeas works too. -
3 cups vegetable broth (add more to taste if you like a brothier dish)
Choosing good quality broth can elevate your dish significantly. If you’re in a pinch, water will do in a pinch, but the flavor will vary! -
½ teaspoon salt (or more to taste) + black pepper to taste
Seasoning is key! Adjust according to your taste preferences. -
1 lemon (the juice)
Fresh lemon juice brightens up the whole dish! If you don’t have any lemons, a splash of vinegar can help achieve a similar effect. -
4 dollops Greek yogurt
A tangy and creamy finish that adds a delightful contrast to the spices. For a dairy-free option, try coconut yogurt or a nut-based alternative.
Step-by-Step Instructions
Now let’s get right into the cooking! Follow these steps, and you’ll have a delicious dish in no time.
-
Sauté the Base
In a large pot or skillet, heat your extra virgin olive oil over medium heat. Add the chopped leeks (or onion) and sauté for about 3–4 minutes until they start to soften. Don’t rush this step; let them turn translucent and fragrant. This will create a beautiful base for your dish. -
Add Garlic & Spices
Toss in the grated garlic along with the turmeric and oregano. Stir continuously for about 1 minute until the garlic becomes fragrant. The aroma will be intoxicating! Remember, burnt garlic can turn your dish bitter; keep an eye on it! -
Incorporate the Spinach
Gradually add in the chopped spinach. It might seem like a lot, but trust me, it wilts down significantly! Stir it into your sauté until it’s bright green and reduces in volume, about 2–3 minutes. -
Stir in the Rice & Broth
Once the spinach is wilted, pour in the uncooked basmati (or jasmine) rice. Stir well to ensure the rice is coated with all the flavorful goodness from the pot. Then, add the vegetable broth. Bring the mixture to a boil. -
Simmer
Once boiling, reduce the heat to low, cover the pot, and let it simmer for about 15–20 minutes, or until the rice is tender and has absorbed most of the liquid. If you prefer it brothier, feel free to taste the broth and add more as needed! -
Add Chickpeas & Final Touches
When the rice is done cooking, stir in the drained chickpeas, salt, and pepper. Let it heat through for another 5 minutes, allowing all the flavors to meld together. Finally, squeeze in the fresh lemon juice—this will elevate the flavors to an entirely new level. -
Serve
Once everything is well combined and heated through, remove from heat. You can let it rest for a moment before serving.
Serving Suggestions
Plating this beautiful Turmeric Rice with Chickpeas is all about showcasing the delightful colors on the plate! I love to serve it in a deep bowl, topped with a generous dollop of Greek yogurt, a sprinkle of fresh herbs like parsley or cilantro, and a few lemon wedges on the side for good measure. The bright hues of yellow and green are sure to impress and make your meal feel special!
Recipe Variations
Feeling adventurous? Here are a few creative twists to elevate your Turmeric Rice with Chickpeas:
-
Spicy Kick: Add some diced jalapeños or a pinch of red chili flakes while sautéing the garlic to give it a nice heat.
-
Nuts & Seeds: For extra crunch, sprinkle roasted pine nuts or toasted sunflower seeds on top before serving.
-
Herb Infusion: Swap out dried oregano for fresh herbs like dill or parsley for a vibrant flavor contrast.
-
Add Protein: If you’re looking for a heartier option, toss in some grilled chicken, shrimp, or sautéed tofu.
-
Different Grains: Substitute your rice with quinoa or farro for a nutty flavor and additional texture.
Chef’s Notes
As I reflect on this recipe, I smile at how it has evolved over the years. Initially, it was simply a quick weeknight dinner, but then it transformed into a family favorite and the star of countless potlucks. Every time I make it, I’m reminded of my grandmother, her kitchen filled with love, and the essence of togetherness that food can create.
Whenever you’re in need of comfort or a burst of flavor without fuss, bookmark this dish! It’s not just a recipe; it’s part of my story and, hopefully, part of yours too.
FAQs and Troubleshooting
-
What if my chickpeas are too hard?
If you’re using dried chickpeas, make sure to soak them overnight and cook them thoroughly before adding to the dish. If they’re canned, check for freshness and proper storage; old cans can lead to firmer beans. -
Can I use a different type of rice?
Absolutely! Just keep in mind that cooking times may vary. Quick-cooking brown rice or quinoa will require adjustments to the broth and cooking time. -
How can I make this dish vegan?
The recipe is already vegan! Simply skip the Greek yogurt and use a plant-based alternative if desired. -
Can I prep this meal ahead of time?
Definitely! You can prepare it a day in advance. Just store it in the fridge and reheat with a splash of broth to regain moisture.
Nutritional Info
While the exact nutrition will depend on specific brands and serving sizes, here’s a general idea of the goodness each serving can offer:
- Calories: ~350
- Protein: ~15g
- Fiber: ~10g
- Healthy Fats: ~8g
There you have it, a delicious journey through Turmeric Rice with Chickpeas! It’s colorful, easy to prepare, and packed with nutrients. Let this dish be your guide to exploring the joys of healthy eating without compromising on flavor. I can’t wait to hear how it turns out for you, so make sure to share your culinary adventures with the hashtag #CleanPlateCravings. Happy cooking!
PrintTurmeric Rice with Chickpeas
A vibrant and nutritious dish combining turmeric rice and chickpeas, inspired by the Mediterranean diet.
- Prep Time: 10 minutes
- Cook Time: 25 minutes
- Total Time: 35 minutes
- Yield: 4 servings 1x
- Category: Main Course
- Method: Stovetop
- Cuisine: Mediterranean
- Diet: Vegan
Ingredients
- 2 tablespoons extra virgin olive oil
- 1 leek (chopped, or a large onion)
- 3 cloves garlic (grated)
- 1 teaspoon turmeric
- 1 teaspoon dried oregano
- 5 cups spinach (about 5 cups chopped)
- ½ cup basmati rice (or jasmine rice — uncooked)
- 2 cans chickpeas (15 oz / 400 g each can — drained and rinsed)
- 3 cups vegetable broth
- ½ teaspoon salt (or more to taste) + black pepper to taste
- 1 lemon (the juice)
- 4 dollops Greek yogurt
Instructions
- Sauté the leeks: In a large pot or skillet, heat the olive oil over medium heat. Add chopped leeks and sauté for about 3–4 minutes until they start to soften.
- Add garlic & spices: Toss in the grated garlic along with turmeric and oregano, stir continuously for about 1 minute until fragrant.
- Incorporate the spinach: Gradually add the chopped spinach and stir until it’s bright green and reduces in volume, about 2–3 minutes.
- Stir in the rice & broth: Pour in the uncooked rice and stir well to coat. Add vegetable broth and bring to a boil.
- Simmer: Reduce heat to low, cover the pot, and let it simmer for about 15–20 minutes until the rice is tender.
- Add chickpeas & final touches: Stir in the drained chickpeas, salt, and pepper. Heat through for another 5 minutes and squeeze in fresh lemon juice.
- Serve: Once combined, remove from heat and rest briefly before serving.
Notes
This dish can be made in advance and reheated with a splash of broth if necessary. Adjust seasoning to taste.
Nutrition
- Serving Size: 1 serving
- Calories: 350
- Sugar: 2g
- Sodium: 600mg
- Fat: 12g
- Saturated Fat: 2g
- Unsaturated Fat: 8g
- Trans Fat: 0g
- Carbohydrates: 45g
- Fiber: 10g
- Protein: 15g
- Cholesterol: 0mg
Keywords: turmeric rice, chickpeas, healthy recipe, vegan meal, Mediterranean diet