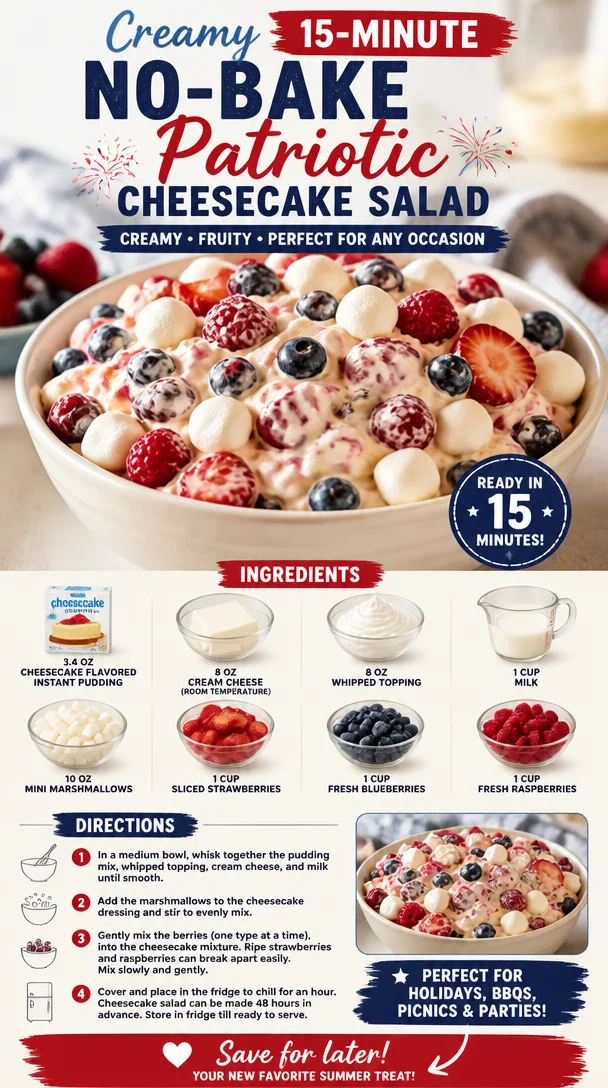
Creamy 15-Minute No-Bake Patriotic Cheesecake Salad
Red, White, and Blue Cheesecake Salad: A Festive Delight
Welcome to another exciting culinary journey with me, Ava Carter, here at Clean Plate Cravings! Today, we’re diving into a dish that’s not just a feast for your taste buds but also a delightful treat for the eyes. You guessed it—we’re making a Red, White, and Blue Cheesecake Salad! Perfect for all your summer gatherings, barbecues, and patriotic celebrations, this dessert combines the creamy goodness of cheesecake with the fresh, vibrant flavors of strawberries, blueberries, and raspberries.
Imagine a dish that has the richness of cheesecake yet feels light and refreshing. This salad is not just a dessert; it’s an experience that brings all the nostalgic flavors you love together in one colorful bowl. And the best part? It’s super easy to whip up! So grab your apron and let’s get started!
A Bite of Nostalgia
Growing up, my family took summer barbecues very seriously. One dish that almost always made an appearance was an eye-catching jello salad layered with fruit, whipped cream, and, of course, lots of love. Fast forward to my culinary adventures as an adult, and I realized that I wanted to capture that nostalgic summer magic but with a twist. Enter the Red, White, and Blue Cheesecake Salad!
I remember the first time I made it for a Fourth of July picnic. The sun was shining, the grill was sizzling, and I was feeling adventurous in the kitchen. As I mixed the creamy cheesecake filling, it brought back memories of my grandmother whisking up her iconic desserts. The laughter, the joy, and the aroma of good food filled my heart. When I laid it out on the picnic table, it was like I had created a work of art. The vibrant red, white, and blue colors sparkled in the sunlight, and I knew I had stumbled upon something special. It was an instant hit! Everyone dove in, and it felt amazing to share something that not only tasted good but also sparked happy memories. So let’s recreate that magic together today!
Ingredients
Here’s what you’ll need to make this delicious Red, White, and Blue Cheesecake Salad:
-
3.4 oz Cheesecake flavored instant pudding
This is the magic ingredient that gives our salad that rich cheesecake flavor without all the hassle of baking. If you can’t find cheesecake-flavored pudding, vanilla works well too! -
8 oz Cream Cheese (room temperature)
The creaminess of cream cheese is essential for achieving that dreamy texture. Make sure it’s softened to avoid lumps. You can substitute with a dairy-free cream cheese if you prefer. -
8 oz Whipped Topping
This brings the salad together and adds a light, airy feel. If you prefer a healthier alternative, you can use Greek yogurt or homemade whipped cream. -
1 cup Milk
Milk helps combine everything smoothly. Almond or soy milk can be a great substitute if you’re dairy-free. -
10 oz Mini Marshmallows
These little bites of fluffiness add a fun texture. You can opt for sugar-free marshmallows if you’re looking to cut down on sugar. -
1 cup Sliced Strawberries
Juicy and vibrant, strawberries offer that fresh sweetness. Feel free to swap out for cherries for a similar tangy-sweet flavor. -
1 cup Fresh Blueberries
They’re not just pretty; blueberries pack a nutritional punch too! If you can’t get fresh blueberries, frozen ones will work—just thaw them first. -
1 cup Fresh Raspberries
These tart beauties provide a lovely contrast to the sweetness of the cheesecake flavor. Blackberries are a suitable alternative if you prefer.
Step-by-Step Instructions
Now that we have our ingredients, let’s dive into the making of our Red, White, and Blue Cheesecake Salad! Follow these easy steps, and remember to have fun along the way.
-
Mix the Cheesecake Filling:
In a large mixing bowl, combine the room-temperature cream cheese and the cheesecake-flavored pudding mix. Using a hand mixer, beat them together on medium speed until smooth. This is where the magic begins! A tip: make sure your cream cheese is really soft so you don’t end up with lumps. Nobody wants a chunky cheesecake salad! -
Add the Milk:
Gradually pour in the milk while continuing to beat the mixture. This is going to make it nice and creamy. You want to achieve a smooth, pourable consistency. If you find it too thick, a splash more milk won’t hurt! -
Fold in the Whipped Topping:
Here comes the fun part! Carefully fold in the whipped topping using a spatula or wooden spoon to keep it light and fluffy. Think of this as adding air to your dessert—a light and airy cheesecakey hug! -
Incorporate the Marshmallows:
Next, stir in the mini marshmallows, allowing that delightful fluffiness to blend with the creamy filling. You’ll love the way they pop in your mouth! -
Add the Fresh Berries:
Throw in your sliced strawberries, blueberries, and raspberries. Fold them in gently to maintain their shape. The vibrant colors are essential for that stunning presentation! -
Chill:
Transfer your mixture to a large serving bowl or individual dessert cups. Cover it with plastic wrap and chill for at least 1 hour in the refrigerator. This helps the flavors meld together and gives you a refreshing salad! -
Serve and Admire:
Once it’s chilled and set, it’s time to dig in! Grab a big scoop—don’t be shy—and enjoy this beautiful cheesecake salad that’s sure to impress!
Serving Suggestions
Presentation is key, my friends! To take it up a notch, you can layer the salad in individual parfait glasses or jars for an extra touch. Drizzle with honey or sprinkle some crushed graham crackers on top for added crunch and a nod to traditional cheesecake crust. Garnish with a mint leaf or sprinkle a little extra fruit on top to make it look absolutely delectable!
Recipe Variations
Want to get creative? Here are some fun twists on this classic dessert:
-
Add Citrus: A splash of lemon or lime juice can brighten up the flavors beautifully—just be mindful to add it gradually!
-
Chocolate Drizzle: Drizzle some melted chocolate or chocolate sauce on top for a fudgey twist that pairs excellently with the cheesecake flavor.
-
Nutty Crunch: Toss in some chopped nuts like pecans or walnuts for a delightful crunch and added texture.
-
Different Pudding Flavors: Experiment with different pudding flavors like vanilla or chocolate for a unique take on the salad.
-
Vegan Version: Substitute all dairy ingredients with dairy-free alternatives to make this salad vegan-friendly while keeping it delicious!
Chef’s Notes
Oh, the joy of creating in the kitchen! This cheesecake salad was born from trial and error and a touch of whimsy. I remember the first time I plated it for a family gathering—the looks on everyone’s faces when they took their first bite was priceless. It’s delightful when a recipe becomes a family favorite, and it warms my heart to see it shared at gatherings year after year. Over time, I’ve adapted this recipe to accommodate dairy-free folks and to include even more vibrant fruits. It’s all about flexibility and making it your own!
FAQs and Troubleshooting
Q: My cheesecake salad turned out too runny; what went wrong?
A: The most common culprit is not using enough instant pudding mix. Make sure to stick to the recipe for the right texture or let it chill longer in the fridge to firm up.
Q: Can I prepare this salad in advance?
A: Absolutely! You can make it a day ahead; just make sure to store it in the fridge to keep it fresh. Just give it a light stir before serving; it might settle a bit.
Q: How long does this salad last in the fridge?
A: Typically, it stays fresh for about 3 days. But I doubt it will last that long—it’s too delicious to resist!
Q: Can I use frozen berries?
A: Yes! Just make sure to thaw and drain excess liquid before adding them to avoid making the salad watery.
Nutritional Info
For those curious about the nutritional aspect, here’s a quick breakdown per serving (based on 8 servings):
- Calories: 210
- Protein: 3g
- Fat: 9g
- Carbohydrates: 29g
- Fiber: 1g
- Sugars: 15g
This is a rough estimate, and variations can occur based on the specific ingredients used.
So there you have it, my culinary friends—a vibrant, creamy, delicious Red, White, and Blue Cheesecake Salad that’s perfect for any occasion! Remember to enjoy the process, have fun in the kitchen, and keep it fresh and fabulous. Until next time, happy cooking!
PrintRed, White, and Blue Cheesecake Salad
A festive and refreshing cheesecake salad perfect for summer gatherings and patriotic celebrations.
- Prep Time: 15 minutes
- Cook Time: 60 minutes
- Total Time: 75 minutes
- Yield: 8 servings 1x
- Category: Dessert
- Method: No-Bake
- Cuisine: American
- Diet: Vegetarian
Ingredients
- 3.4 oz Cheesecake flavored instant pudding
- 8 oz Cream Cheese (room temperature)
- 8 oz Whipped Topping
- 1 cup Milk
- 10 oz Mini Marshmallows
- 1 cup Sliced Strawberries
- 1 cup Fresh Blueberries
- 1 cup Fresh Raspberries
Instructions
- Mix the Cheesecake Filling: In a large mixing bowl, combine the room-temperature cream cheese and the cheesecake-flavored pudding mix. Using a hand mixer, beat them together on medium speed until smooth.
- Add the Milk: Gradually pour in the milk while continuing to beat the mixture until smooth and creamy.
- Fold in the Whipped Topping: Carefully fold in the whipped topping using a spatula to keep it light and fluffy.
- Incorporate the Marshmallows: Stir in the mini marshmallows until evenly mixed.
- Add the Fresh Berries: Gently fold in the sliced strawberries, blueberries, and raspberries.
- Chill: Transfer the mixture to a large serving bowl or individual cups and refrigerate for at least 1 hour.
- Serve and Admire: Once chilled, serve and enjoy your beautiful cheesecake salad!
Notes
Presentation can be enhanced by layering in parfait glasses and garnishing with mint.
Nutrition
- Serving Size: 1 serving
- Calories: 210
- Sugar: 15g
- Sodium: 300mg
- Fat: 9g
- Saturated Fat: 4g
- Unsaturated Fat: 4g
- Trans Fat: 0g
- Carbohydrates: 29g
- Fiber: 1g
- Protein: 3g
- Cholesterol: 30mg
Keywords: cheesecake salad, summer dessert, patriotic dessert, easy salad, no-bake dessert
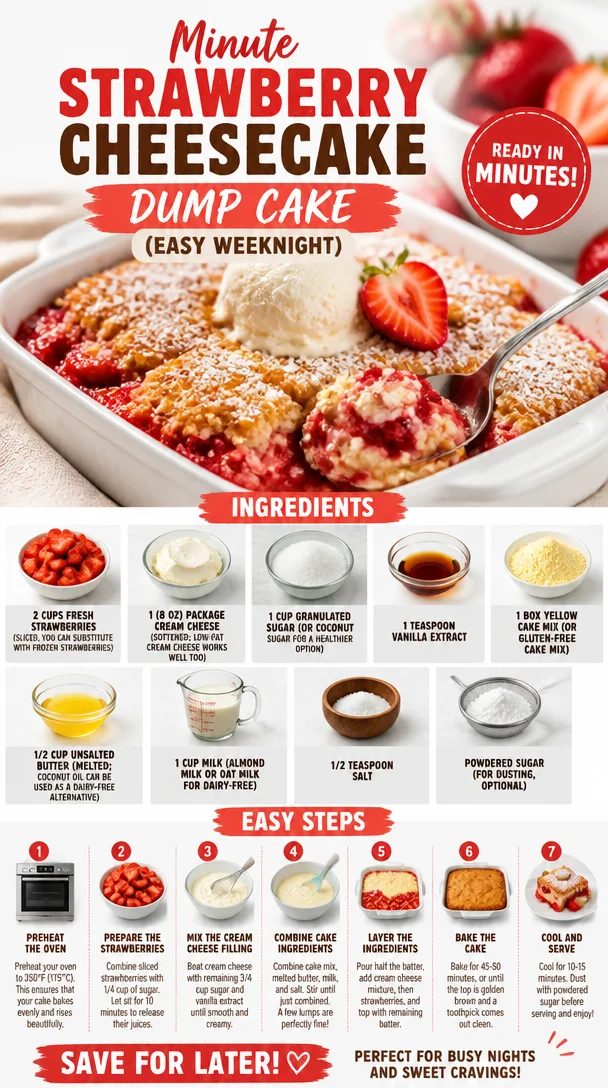
Minute Strawberry Cheesecake Dump Cake (Easy Weeknight)
Strawberry Cheesecake Dump Cake Recipe: A Deliciously Simple Treat
Welcome back to Clean Plate Cravings, where we turn fresh ingredients into feel-good dishes that satisfy both the heart and the taste buds! Today, I’m thrilled to share one of my all-time favorite desserts: the Strawberry Cheesecake Dump Cake. If you’ve never had a dump cake, you’re in for a treat! This beautiful dessert blends the creamy richness of cheesecake with the fresh sweetness of strawberries, all while being ridiculously easy to whip up.
Now, let’s talk about why I love this dessert so much! First of all, it’s perfect for those days when life gets a little hectic and you need something delicious with minimal effort. What’s better than a dessert that requires just a few ingredients and a simple mix? Plus, it’s a crowd-pleaser—whether you’re serving a small family gathering or a big backyard barbecue, you can rest assured everyone will love it.
A Taste of Nostalgia
Growing up, summer meant family picnics in the park, where my grandma would always bring her famous strawberry cheesecake. I remember running around with my cousins, the scent of barbecued burgers filling the air, and my grandma, with her trademark sun hat, carefully arranging her desserts on a colorful picnic blanket. When it came time for dessert, there was always a race to get a slice before it disappeared! Fast forward to today, and I’ve taken those cherished memories and turned them into a dessert that captures all that joy without all the fuss. This Strawberry Cheesecake Dump Cake brings the essence of those picnics right to your kitchen and ensures each bite is as heartwarming as my grandma’s original.
Ingredients
Let’s gather our ingredients for this scrumptious dessert! Here’s what you’ll need:
-
2 cups fresh strawberries (sliced): If strawberries are out of season or you prefer convenience, feel free to substitute with frozen strawberries. Just make sure to thaw and drain them before using.
-
1 (8 oz) package cream cheese (softened): Cream cheese adds that luscious cheesecake texture. Want a healthier option? Low-fat cream cheese works beautifully too!
-
1 cup granulated sugar: This sweetener marries the cheesecake layer and cake. For a healthier twist, use coconut sugar—it has a lovely caramel flavor!
-
1 teaspoon vanilla extract: A splash of vanilla elevates the flavor profile. You can also use almond extract for a different note.
-
1 box yellow cake mix: The base of our cake! If gluten is a concern, there are gluten-free options available; just make sure to check the packaging.
-
1/2 cup unsalted butter (melted): Butter leads to a moist cake; coconut oil is a fantastic dairy-free alternative if that’s your preference.
-
1 cup milk: It can be any kind—whole, almond milk, or oat milk all work wonderfully.
-
1/2 teaspoon salt: A pinch of salty goodness offsets the sweetness for a balanced flavor.
-
Powdered sugar (for dusting, optional): This adds a lovely finishing touch. Feel free to skip it for a less sweet option!
Step-by-Step Instructions
Now that our ingredients are ready, let’s dive into the kitchen and create this delightful dessert!
-
Preheat the Oven: Preheat your oven to 350°F (175°C). This ensures that our cake bakes evenly from the moment it goes in.
-
Prepare the Baking Dish: Grab a 9×13 inch baking dish. Lightly grease it with cooking spray or butter; this helps prevent any sticking, ensuring we can serve our cake without any fuss.
-
Mix the Cheesecake Layer: In a medium bowl, beat the softened cream cheese, granulated sugar, and vanilla extract together until smooth and creamy. If you have a hand mixer, it’s a lifesaver for this step! Make sure there are no lumps. You’ll want this layer to be velvety and dreamy.
-
Layer the Strawberries: Spread the sliced strawberries evenly over the bottom of your prepared baking dish. This fruity layer is the heart of our dessert, so take your time arranging them.
-
Add the Cheesecake Layer: Pour the cream cheese mixture over the strawberries, spreading it evenly with a spatula. Just imagine those strawberries soaking up all that creamy goodness!
-
Prepare the Cake Layer: In a separate bowl, combine the cake mix and salt. Next, sprinkle the cake mixture evenly over the cheesecake layer—don’t worry about getting it perfect! The magic happens when it bakes.
-
Melt the Butter: Drizzle the melted butter evenly over the top of the cake mix. This step is crucial; the butter will help to create a golden crust as the cake bakes.
-
Add Milk: Finally, pour the milk over everything. Don’t mix—this is a dump cake, after all! The milk will create a beautiful texture once it’s baked.
-
Bake: Place the dish in the oven and bake for about 40–45 minutes or until the top is golden brown and the center is set. Your kitchen will fill with the heavenly aroma of strawberries and sweet cake—trust me, it’s hard to wait!
-
Cool: Once baked, bring the cake out and let it cool for about 10–15 minutes. This cooling time is essential for the layers to settle and come together.
Serving Suggestions
To serve this gorgeous Strawbery Cheesecake Dump Cake, scoop generous portions into dessert bowls or plates. If you’re feeling a bit fancy, top with a dollop of whipped cream and a sprinkle of powdered sugar for that café-style presentation! Fresh mint leaves or a few extra strawberry slices on top make it look even more irresistible. Your guests will be impressed, and you know what? They won’t even have to know how simple it was to make!
Recipe Variations
Want to switch things up? Here are a few creative twists on this recipe:
-
Berry Blast: Swap out strawberries for blueberries, raspberries, or mixed berries for a berry medley dump cake.
-
Chocolate Chip Variation: Add a cup of chocolate chips in the cheesecake layer for a deliciously rich contrast.
-
Nutty Crunch: Stir in some chopped nuts, like pecans or walnuts, with the cake mix for added texture.
-
Coconut Delight: Sprinkle shredded coconut on top of the cake mix for a tropical touch.
-
Lemon Zing: Add a tablespoon of lemon juice and some zest to the cheesecake layer for a refreshing citrus twist.
Chef’s Notes
As with any recipe, it’s fun to play around and make it your own! I’ve made this dump cake countless times, and each version brings back those summer memories. The best part? You can whip it up with whatever fruit is in season or even your favorite frozen options in the freezer.
I once experimented with peaches and a hint of cinnamon, and let me tell you, it was a new summer favorite! The recipe continues to evolve with my cravings and the seasons—and it never fails to impress.
FAQs and Troubleshooting
Can I make this ahead of time?
Absolutely! You can prepare it a day in advance and store it in the fridge. Just let it sit at room temperature for a bit before serving.
What if my cake mix clumps?
If you notice lumps while sprinkling the cake mix, simply break them up gently with a fork. Do not worry about it being perfectly layered; it’ll bake beautifully regardless!
Can I use another type of cheese?
You can try ricotta or mascarpone as alternatives to cream cheese. The texture will change slightly, but it’ll still deliver a delicious flavor!
Why is my dump cake too soggy?
If your fruit was too wet, you might need to drain them a bit before using. Also, ensure that your oven temperature is accurate—an oven thermometer can help if you have any doubts.
Nutritional Info
Although this recipe’s main focus is indulgence, incorporating fresh strawberries does provide some nutritional benefits. Strawberries are rich in antioxidants, vitamins, and fiber!
So, there you have it! My go-to recipe for a Strawberry Cheesecake Dump Cake that’s as scrumptious as it is simple. I hope you enjoy making this delightful dessert just as much as I do. Now grab your ingredients and get ready to create sweet, joyful moments in your kitchen. Happy baking!
PrintStrawberry Cheesecake Dump Cake
A deliciously simple dessert that combines creamy cheesecake and fresh strawberries in an easy dump cake.
- Prep Time: 15 minutes
- Cook Time: 45 minutes
- Total Time: 60 minutes
- Yield: 8 servings 1x
- Category: Dessert
- Method: Baking
- Cuisine: American
- Diet: Vegetarian
Ingredients
- 2 cups fresh strawberries (sliced)
- 1 (8 oz) package cream cheese (softened)
- 1 cup granulated sugar
- 1 teaspoon vanilla extract
- 1 box yellow cake mix
- 1/2 cup unsalted butter (melted)
- 1 cup milk
- 1/2 teaspoon salt
- Powdered sugar (for dusting, optional)
Instructions
- Preheat the oven to 350°F (175°C).
- Prepare a 9×13 inch baking dish by lightly greasing it.
- Mix the cream cheese, granulated sugar, and vanilla extract until smooth.
- Layer the sliced strawberries evenly in the baking dish.
- Add the cheesecake mixture over the strawberries.
- Prepare the cake mix with salt and sprinkle it over the cheesecake layer.
- Melt the butter and drizzle it over the cake mix.
- Add the milk over everything without mixing.
- Bake for 40–45 minutes or until golden brown and set.
- Cool for 10–15 minutes before serving.
Notes
Top with whipped cream and powdered sugar before serving. For variations, try different berries or add chocolate chips!
Nutrition
- Serving Size: 1 serving
- Calories: 350
- Sugar: 25g
- Sodium: 300mg
- Fat: 16g
- Saturated Fat: 8g
- Unsaturated Fat: 6g
- Trans Fat: 0g
- Carbohydrates: 45g
- Fiber: 2g
- Protein: 5g
- Cholesterol: 30mg
Keywords: strawberry, cheesecake, dump cake, dessert, easy dessert
Beginner-Friendly Cinnamon Roll Cookies: Easy, Gooey Treats
The Sweetest Twist: Cinnamon Roll Cookies Recipe
There’s something undeniably cozy about the scent of cinnamon wafting through your kitchen, isn’t there? It’s like wrapping yourself in a warm blanket and settling into a comfy chair with a good book. That’s the feeling I want to evoke in you today with my take on a classic favorite: Cinnamon Roll Cookies. Yes, you heard that right—cookies that capture all the flavors of a delicious cinnamon roll, but come together in a delightful, chewy cookie form!
These cookies are not just a dessert; they are a celebration of texture and flavor that can elevate any day, whether gloomy or sunny. A hint of vanilla, the warmth of cinnamon, and the decadent frosting hugged around every bite make these cookies the ultimate treat. They are perfect for sharing with friends, family gatherings, or, let’s be honest, hiding away for yourself (we won’t tell!).
In this blog post, I’ll take you through every step of crafting these delectable cookies. Whether you’re a seasoned baker or new to the kitchen, this recipe is approachable, so you can whip it up without feeling overwhelmed. Plus, I’ll share some fun stories, culinary tips, and a few delightful variations to keep things fresh every time you bake. So grab your apron, and let’s dive into this delightful cookie adventure together!
A Little Background on My Love for Cinnamon Rolls
Growing up, Sundays were sacred in our household. They began with the cozy ritual of Sunday brunch, where the aroma of freshly baked cinnamon rolls filled the air—the cinnamon, brown sugar, and butter swirled together with tender dough crafted by my mom’s magical hands. Each bite was a warm hug that melted my heart and fueled my day.
One Sunday, however, things took a delicious twist. My mom decided to experiment with a cookie version of our beloved cinnamon rolls. She gathered us around the kitchen, and even though our expectations were high, the moment we took a bite, we were all in agreement—these were divine! The light, chewy texture combined with the rich flavor of cinnamon was an instant hit. The best part? We could eat more than one without feeling guilty!
That memory sticks with me, and it’s why I’m so excited to share this Cinnamon Roll Cookies recipe with you. Not only are these cookies reminiscent of those cherished Sunday mornings, but they bring a modern twist to a classic favorite. Let’s keep those sweet memories alive—one cookie at a time!
Ingredients
Let’s gather our ingredients before diving into the baking process. Here’s what you’ll need:
-
2 cups All-Purpose Flour
This forms the base of your cookie—use a scoop and level method for perfect measurements! If you’re gluten-free, opt for a 1:1 gluten-free flour blend, and it should work just as beautifully. -
1 cup Butter, softened
The butter provides richness and moisture to our cookies. I recommend unsalted butter for better flavor control. In a pinch, you can swap in coconut oil for a dairy-free version—just ensure it’s softened. -
1 cup Sugar
Regular granulated sugar gives these cookies their sweetness and helps create a nice, chewy texture. Feel free to substitute with coconut sugar for a healthier twist, but cookies may be darker in color. -
1 teaspoon Vanilla Extract
Pure vanilla extract enhances the flavor profile wonderfully. If you find yourself out of vanilla, a touch of almond extract can add a unique spin. -
1 teaspoon Baking Powder
This is essential for fluffiness; it gives the cookies a lovely lift. Don’t confuse it with baking soda, as they serve different purposes! -
1/2 teaspoon Salt
Salt balances the sweetness and enhances all the flavors in the cookies. Sea salt is a great option here if you have it! -
1/2 cup Brown Sugar
Brown sugar adds that irresistible caramel flavor, and the moisture it contains helps keep the cookies soft. For a lighter flavor, use light brown sugar instead. -
2 teaspoons Cinnamon
The star of the show! Fresh ground cinnamon works best for the richest flavor; if you have a spice grinder, using whole sticks is the way to go! -
1 Egg
The egg binds everything together while also contributing to the richness. For a vegan replacement, you can use a flaxseed egg (1 tablespoon flaxseed meal mixed with 2.5 tablespoons water). -
1/2 cup Powdered Sugar (for icing)
The icing drizzled on top is the crowning glory for these cookies. If you’re avoiding refined sugars, powdered coconut sugar is a perfect alternative!
Step-by-Step Instructions
Alright, let’s channel our inner baker and get these cookies in the oven! Follow these steps for a stress-free baking experience:
-
Preheat Your Oven
Start by preheating your oven to 350°F (175°C). This ensures that your cookies bake evenly from the moment they hit the tray—no one likes doughy centers! -
Prepare Your Baking Sheet
Line a baking sheet with parchment paper. This prevents sticking and ensures even baking. Alternatively, you can grease the baking sheet but trust me, parchment is a lifesaver! -
Mix the Dry Ingredients
In a medium bowl, whisk together the all-purpose flour, baking powder, salt, and cinnamon. This step is crucial as it helps the baking powder distribute evenly throughout the flour. A well-mixed dry ingredient blend means perfectly risen cookies! -
Cream the Butter and Sugars
In a large mixing bowl, use an electric mixer to cream together the softened butter, granulated sugar, and brown sugar until it’s light and fluffy—about 2-3 minutes. This incorporates air into the batter for a lighter cookie. Pro tip: Your butter should be soft but not melting! -
Add the Egg and Vanilla
Beat in the egg and vanilla extract until well combined. Here’s where that delicious aroma starts to fill your kitchen! -
Combine Wet and Dry Ingredients
Gradually add the dry ingredient mixture to the wet mixture, stirring with a spatula until just combined. Avoid over-mixing, as this can make the cookies tough! -
Scoop & Shape
Using a cookie scoop (or a tablespoon), drop mounds of dough onto the prepared baking sheet, leaving enough space in between for spreading. You can roll them into balls for a more polished look. Want to jazz it up? Gently press down on the tops to create a little flat area for the icing to pool later. -
Bake the Cookies
Pop them in the oven and bake for 10-12 minutes, or until the edges are lightly golden and the centers are just set. Resist the urge to over-bake, as they will continue to cook on the tray after you take them out. My secret? Set a timer for 10 minutes, and start checking—every oven is a bit different! -
Cool Down
Once baked, allow the cookies to cool on the baking sheet for about 5 minutes before transferring them to a wire rack. This helps them firm up a bit without losing that soft center. -
Make the Icing
Whisk the powdered sugar with a splash of milk (about 1-2 tablespoons) until smooth. Drizzle this sweet icing over the warm cookies using a fork for that charming rustic look. If you’d like a thicker icing, simply reduce the amount of milk! -
Enjoy
Wait until the icing sets (or don’t!) and dig in! Nothing beats a warm cinnamon roll cookie fresh out of the oven.
Serving Suggestions
These Cinnamon Roll Cookies are delightful as is! However, I always encourage a little creativity. Consider serving them on a fun platter with a side of whipped cream or custard for dipping. If it’s a celebration, stack them up like a birthday cake and shower them with colorful sprinkles for a festive touch!
Recipe Variations
Your culinary journey doesn’t have to end here! Mix it up with these creative twists:
-
Nutty Boost
Add 1/2 cup of chopped pecans or walnuts for a delightful crunch that complements the soft cookies. -
Chocolate Drizzle
After icing the cookies, drizzle them with melted chocolate for an indulgent twist. You can also use dark chocolate chips instead of half the granulated sugar for a chocolaty experience. -
Apple Cinnamon Roll
Fold in 1 cup of finely chopped apples to bring a fruity note to the cookies—think fresh apple pie meets cinnamon roll! -
Spiced Up
Amp up the cinnamon to 3 teaspoons for a spicier flavor, or add a dash of nutmeg or cardamom for a unique twist! -
Vegan Delight
Replace the butter with vegan buttery sticks and use a flaxseed egg to make these delightful cookies plant-based!
Chef’s Notes
Ah, the journey of perfecting this recipe has been a delightful ride! Initially, my cinnamon roll cookies were a bit too cakey (oops!). After many experiments, I stumbled upon the right balance of ingredients that created the chewy texture you see here. I also remember the time I forgot to add sugar and ended up with a batch of bizarre flour cookies—definitely not my finest moment! But every "oops" in the kitchen leads you to those precious "aha!" moments, doesn’t it?
So don’t be shy—have fun with this recipe and put your own spin on things!
FAQs and Troubleshooting
1. Why are my cookies spreading too much?
This could be due to using melted butter instead of softened or not chilling the dough slightly before baking. If your kitchen is particularly warm, consider chilling the dough for 30 minutes before baking.
2. My cookies feel dry. How can I avoid that?
Overbaking is usually the culprit! Keep an eye on them towards the end of the bake time. They should look a little underbaked when you take them out, as they will continue to set while cooling.
3. Can I freeze the cookies?
Absolutely! You can freeze the cookie dough in advance. Just shape it into balls, chill them, and then store them in an airtight container. They’ll last about 3 months. When you’re ready to bake, just pop them into the oven straight from the freezer (add a minute or two to the baking time).
4. How can I make these gluten-free?
Swap out the all-purpose flour for a 1:1 gluten-free flour blend. Add in a teaspoon of xanthan gum if your blend doesn’t already include it—this helps bind the ingredients together for the perfect texture.
Nutritional Info (optional)
Each cookie contains approximately 180 calories, with 8g of fat, 24g of carbohydrates, 1g of protein, and 9g of sugar. For a healthier alternative, consider using natural sweeteners and almond flour; the nutritional profile will vary.
And there you have it, friends! Your journey into the delightful world of Cinnamon Roll Cookies is just a step away. Each bite is a little piece of heaven, and I can’t wait for you to experience the joy these cookies bring! Happy baking!
PrintCinnamon Roll Cookies
Delightful cookies that capture all the flavors of a delicious cinnamon roll in a chewy form.
- Prep Time: 15 minutes
- Cook Time: 12 minutes
- Total Time: 27 minutes
- Yield: 24 cookies 1x
- Category: Dessert
- Method: Baking
- Cuisine: American
- Diet: Vegetarian
Ingredients
- 2 cups All-Purpose Flour
- 1 cup Butter, softened
- 1 cup Sugar
- 1 teaspoon Vanilla Extract
- 1 teaspoon Baking Powder
- 1/2 teaspoon Salt
- 1/2 cup Brown Sugar
- 2 teaspoons Cinnamon
- 1 Egg
- 1/2 cup Powdered Sugar (for icing)
Instructions
- Preheat your oven to 350°F (175°C).
- Prepare a baking sheet lined with parchment paper.
- Mix the dry ingredients in a bowl: flour, baking powder, salt, and cinnamon.
- Cream the butter, granulated sugar, and brown sugar in a large mixing bowl until light and fluffy.
- Add the egg and vanilla extract, mixing until combined.
- Combine the wet and dry ingredients, stirring until just mixed.
- Scoop mounds of dough onto the baking sheet, leaving space between them.
- Bake for 10-12 minutes until edges are lightly golden.
- Cool on the baking sheet for 5 minutes, then transfer to a wire rack.
- Make the icing by whisking powdered sugar with a splash of milk.
- Drizzle icing over the warm cookies and enjoy!
Notes
For vegan cookies, replace butter with vegan buttery sticks and use a flaxseed egg.
Nutrition
- Serving Size: 1 cookie
- Calories: 180
- Sugar: 9g
- Sodium: 180mg
- Fat: 8g
- Saturated Fat: 5g
- Unsaturated Fat: 3g
- Trans Fat: 0g
- Carbohydrates: 24g
- Fiber: 0g
- Protein: 1g
- Cholesterol: 30mg
Keywords: cinnamon roll, cookies, dessert, baking, sweet treats