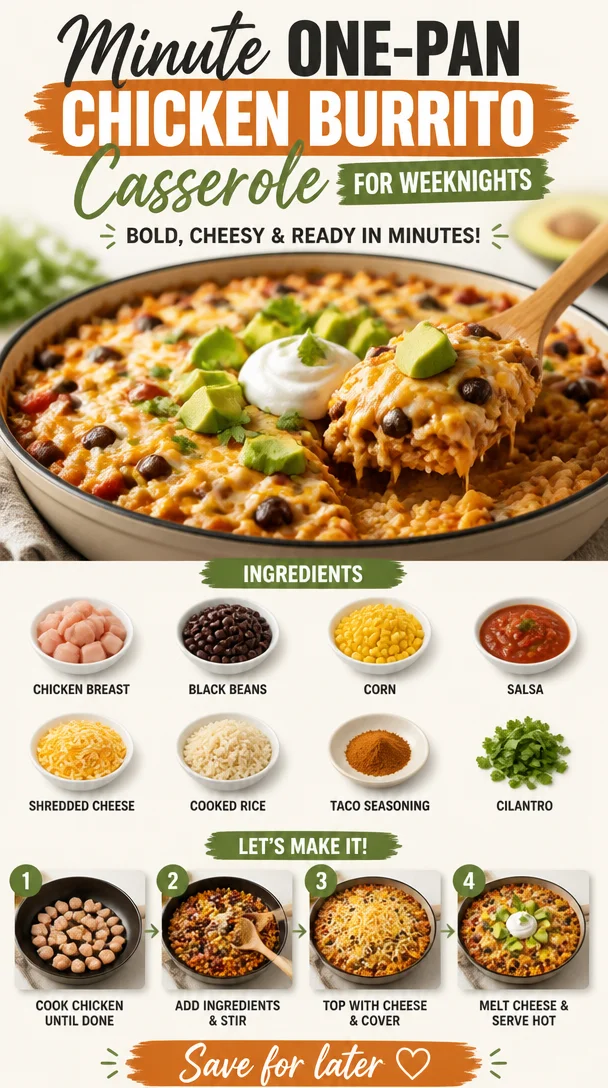
Minute One-Pan Chicken Burrito Casserole for Weeknights
Chicken Burrito Casserole: A Comforting Classic That Delivers Flavor and Warmth
Hello, fellow foodies! Today, we’re diving into one of my absolute favorite recipes that feels like a warm hug: Chicken Burrito Casserole. This dish effortlessly combines the hearty, comforting elements of a casserole with all the spicy, zesty flavors we love in burritos. If you’re looking for a meal that’s easy to prepare, family-friendly, and utterly delicious, you’ve found your winner!
Picture this: a busy weeknight when you want to whip up something that not only fills your belly but also ignites your taste buds with excitement. This Chicken Burrito Casserole checks all the boxes. Imagine layers of tender chicken, colorful veggies, zesty spices, and ooey-gooey cheese—all baked to perfection and served hot from the oven. Sounds dreamy, right?
This dish is perfect for meal prep, easy enough for beginners, and versatile enough for any palate. It embraces everything we love about burritos, minus the fuss of rolling them up. Plus, it’s a hit with friends and family—everyone will be asking for seconds!
So grab your apron, turn up the music, and let’s get ready to create a wholesome dish that brings people together. This Chicken Burrito Casserole isn’t just about the food; it’s about sharing delicious moments around the table.
A Nostalgic Kitchen Memory
Let me take you back to a particularly vivid memory from my childhood. I remember coming home from school, the rich aroma of spices wafting through the air as my mom prepped one of our family favorites—burritos. Those after-school moments were sacred. We would gather around the kitchen island, my siblings and I hunched over a plate, eagerly awaiting our turn to fill our soft tortillas with all the delicious fixings.
But there was one day that stands out vividly in my mind. My mom decided to mix things up and made a burrito casserole instead. We were skeptical at first—where was the fun of rolling our own burritos? But as soon as we took our first bite, oh boy! The gooey melted cheese, the perfectly seasoned chicken, and the burst of flavors conquered our taste buds in an instant. From that moment on, burrito casseroles became our family’s go-to for a fun, flavorful meal.
Fast forward to today, when I find myself sharing this timeless recipe with everyone who needs a little comfort in their life. It’s a beautiful reminder of how food can be a bridge connecting generations, cultures, and memories.
Ingredients
Here’s what you’ll need to create this mouthwatering Chicken Burrito Casserole:
-
Cooked Chicken Breast: (about 3 cups, shredded)
You can use rotisserie chicken for convenience or poach some chicken breast at home. If you’re vegetarian, feel free to substitute with black beans or chickpeas for a protein-packed alternative! -
Tortillas: (10-12 corn or flour tortillas)
I prefer corn for the traditional taste, but flour tortillas work well too! For gluten-free options, you can use corn tortillas or even a grain-free tortilla. -
Black Beans: (1 can, drained and rinsed, or 1.5 cups cooked black beans)
These add protein and fiber! If you’re not a fan of black beans, try pinto beans or kidney beans for a different flavor. -
Corn: (1 cup, frozen or canned)
Sweet, crisp corn enhances the texture! If you can get your hands on fresh corn, it elevates the dish even further. -
Diced Tomatoes: (1 can, with juice)
Tomatoes provide acidity and moisture. Substitute with fresh chopped tomatoes or salsa for an extra kick. -
Onion: (1 medium onion, diced)
Sautéed onions add depth. You can swap out with leeks or shallots if you want to switch things up. -
Red Bell Pepper: (1, diced)
Sweet and colorful, red bell peppers brighten up the dish. Any bell pepper variety can work here! -
Chili Powder: (1 tablespoon)
This is where the flavors really start to pop! Feel free to use other spices like cumin or paprika if you prefer a different spice profile. -
Garlic Powder: (1 teaspoon)
It’s a must for savory dishes! Fresh garlic is a great substitute if you prefer a bold flavor. -
Cumin: (1 teaspoon)
Cumin brings warmth and authenticity. You could replace it with a pinch of taco seasoning if you have it on hand. -
Shredded Cheese: (2 cups, such as cheddar or Monterey Jack)
Creamy and melty, cheese is the finishing touch! For a dairy-free version, try cashew cheese or nutritional yeast. -
Fresh Cilantro: (for garnish)
This adds a refreshing touch. If you’re not a cilantro fan, green onions or parsley can be used instead.
Step-by-Step Instructions
Ready to get cooking? Let’s dive into the steps to create your Chicken Burrito Casserole!
Step 1: Preheat Your Oven
Preheat your oven to 375°F (190°C). Prepping ahead of time will ensure your casserole is perfectly baked without any fuss later on!
Step 2: Dice the Veggies
While the oven heats up, let’s get chopping! Dice the onion and red bell pepper. This is where you can let your creativity shine. Want to throw in some zucchini or mushrooms? Go for it! The more veggies you add, the healthier your casserole becomes.
Step 3: Sauté on the Stovetop
In a large skillet over medium heat, drizzle a little olive oil. Add your diced onion and red bell pepper. Sauté for about 5-7 minutes until they are soft and fragrant. This step is crucial because it brings out the natural sweetness of the veggies and adds a ton of flavor.
Step 4: Add the Chicken and Spices
Now, stir in your shredded chicken, black beans, corn, diced tomatoes, chili powder, garlic powder, and cumin. Give everything a good stir to combine all the ingredients evenly. Let it cook for about 5 minutes, allowing the flavors to meld together. This is also your moment to taste test—don’t be shy!
Step 5: Layer the Dish
Grab a 9×13 inch baking dish and start layering. Begin by spreading a couple of spoonfuls of the chicken mixture evenly at the bottom of the dish. Then, line the tortillas over the mixture, covering the entire surface. Don’t worry too much about gaps; they’ll fill in as the casserole bakes.
Step 6: Add More Goodness
Spread another layer of the chicken mixture over the tortillas, and then sprinkle half of your shredded cheese on top. Repeat this layering process with more tortillas, the remaining chicken mixture, and top it off with the remaining cheese. It’s all about those delicious layers that create that moment of bliss when you dive in!
Step 7: Bake It Up
Cover the dish with aluminum foil (to avoid sticking) and bake in the preheated oven for 20 minutes. After that, remove the foil and bake for an additional 10-15 minutes, or until the edges are bubbly and the cheese is melted and golden. Your kitchen will smell like heaven right about now!
Step 8: Garnish and Serve
Once baked, take the casserole out of the oven and let it sit for about 10 minutes before serving. This will allow everything to settle and make for easier slicing. Garnish with fresh cilantro for that vibrant pop of color and flavor!
Serving Suggestions
Serve your Chicken Burrito Casserole with a side of tangy guacamole or fresh salsa. You could even serve it alongside a light leafy green salad dressed with lime vinaigrette to contrast the rich flavors of the casserole. The beauty of this dish is that it’s a complete meal on its own, but adding a refreshing side balances the richness beautifully.
Recipe Variations
Feel like switching things up? Here are a few creative variations you can try:
- Spicy Kick: Add diced jalapeños to the chicken mixture for an extra kick of heat!
- Vegetarian Delight: Replace the chicken with a mix of your favorite vegetables like zucchini, mushrooms, and more beans.
- Taco Fiesta: Swap out the cilantro for fresh corn salsa for a zesty surprise.
- Cheesy Goodness: Experiment with different cheese blends, like pepper jack for a spicier rendition.
- BBQ Twist: Incorporate BBQ sauce into the chicken mixture for a smoky flavor profile.
Chef’s Notes
This recipe has evolved over the years as I’ve experimented with different ingredients and flavor combinations. I’ve swapped in various beans, added seasonal veggies, and even used leftover barbecue chicken to make it feel fresh and new every time. There’s simply no wrong way to make a burrito casserole, and that’s part of the joy!
Sometimes, I’ll throw on some diced avocados right before serving for a creamy contrast that everyone loves. Also, keep in mind that this recipe freezes beautifully! Prepare a double batch, then freeze one for a rainy day—it’s like an instant meal waiting for you!
FAQs and Troubleshooting
Can I make this dish ahead of time?
Absolutely! You can prepare the casserole up to the baking step, cover it, and store it in the fridge for up to 24 hours. Just pop it in the oven when you’re ready!
Why did my casserole turn out soggy?
If the casserole has too much moisture, it can turn soggy. Make sure to drain the canned ingredients and not to overload with liquid.
Can I substitute the chicken for another protein?
Yes! Feel free to try turkey, beef, or even tofu for a plant-based option. Just make sure to adjust cooking times based on the protein used.
How do I store leftover casserole?
Keep any leftovers in an airtight container and store them in the fridge for up to four days. Reheat in the oven or microwave until warmed through!
Nutritional Info
If you’re tracking nutrition, here’s a quick overview (per serving, assuming 8 servings):
- Calories: 380
- Protein: 25g
- Carbohydrates: 40g
- Fats: 15g
- Fiber: 6g
(Note: Nutritional info may vary based on ingredient brands and portion sizes.)
And there you have it! Your Chicken Burrito Casserole is officially ready to be devoured. Thank you for joining me today, and I can’t wait to hear how your version turns out. Remember: good food is all about connection, exploration, and joy. So keep it fresh, keep it simple, and keep enjoying every delicious bite!
PrintChicken Burrito Casserole
A comforting Chicken Burrito Casserole that delivers flavorful layers of chicken, black beans, corn, and cheese, all baked to perfection.
- Prep Time: 15 minutes
- Cook Time: 30 minutes
- Total Time: 45 minutes
- Yield: 8 servings 1x
- Category: Main Course
- Method: Baking
- Cuisine: Mexican
- Diet: None
Ingredients
- 3 cups cooked chicken breast, shredded
- 10–12 corn or flour tortillas
- 1 can black beans, drained and rinsed
- 1 cup corn, frozen or canned
- 1 can diced tomatoes, with juice
- 1 medium onion, diced
- 1 red bell pepper, diced
- 1 tablespoon chili powder
- 1 teaspoon garlic powder
- 1 teaspoon cumin
- 2 cups shredded cheese (cheddar or Monterey Jack)
- Fresh cilantro, for garnish
Instructions
- Preheat your oven to 375°F (190°C).
- Dice the onion and red bell pepper.
- Sauté in a large skillet over medium heat with olive oil for about 5-7 minutes.
- Add the shredded chicken, black beans, corn, diced tomatoes, chili powder, garlic powder, and cumin.
- Layer the ingredients in a 9×13 inch baking dish starting with the chicken mixture, followed by the tortillas, then more chicken, and finally the cheese.
- Cover with aluminum foil and bake for 20 minutes, then remove the foil and bake for another 10-15 minutes.
- Garnish with fresh cilantro before serving.
Notes
This recipe freezes beautifully, so consider making a double batch!
Nutrition
- Serving Size: 1 serving
- Calories: 380
- Sugar: 4g
- Sodium: 600mg
- Fat: 15g
- Saturated Fat: 7g
- Unsaturated Fat: 5g
- Trans Fat: 0g
- Carbohydrates: 40g
- Fiber: 6g
- Protein: 25g
- Cholesterol: 70mg
Keywords: chicken casserole, burrito casserole, comfort food, Mexican dish, easy recipe
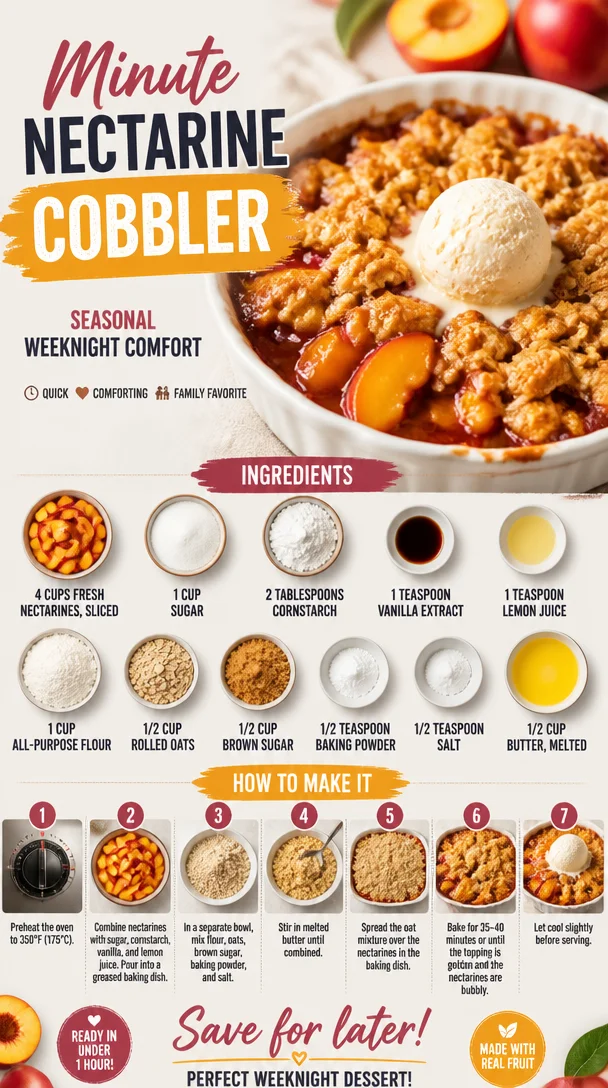
Minute Nectarine Cobbler: Seasonal Weeknight Comfort
A Fresh Take on Nectarine Cobbler: The Sweet Slice of Summer
Hey there, fellow food lovers! Today, we’re diving into a fruit-laden delight that captures the essence of sunny days and lazy afternoons—Fresh Nectarine Cobbler. This dish embodies everything we adore about summer: juicy nectarines that burst with flavor, a crumbly topping that whispers comfort, and an aroma that dances through the kitchen inviting you to indulge.
Introduction
Imagine it’s a warm Saturday afternoon. The sky is blue, the sun is shining, and you’re lounging on the porch, savoring the sweet fragrance of summer. You take a quick trip to the farmer’s market and come back with a basket brimming with perfectly ripe nectarines. The moment you sink your teeth into one, juice dribbling down your chin, you realize you can’t let these beauties sit idly on the kitchen counter. What’s the best way to celebrate them? Nectarine cobbler, of course!
This cobbler is not just any dessert—it’s the sweet embrace of nostalgia, warm and welcoming, just like grandma used to make. There’s something magical about that first spoonful, the way the sweet nectarines mingle with the buttery crumble on top. Each bite tells a story, bringing back memories of family gatherings and backyard BBQs, where laughter echoed around the table as we savored every last crumb.
And while you might think cobbler sounds complicated, I’m here to tell you it’s as easy as pie—or, dare I say, even easier! With simple ingredients you likely have on hand and a few straightforward steps, you can whip up a delightful dessert that will impress your family and friends. So, roll up your sleeves, and let’s make some magic happen in the kitchen!
Personal Story
I first fell in love with the idea of cobblers during a summer spent at my grandparents’ home in the countryside. Each week, we’d visit the local orchard, where my grandmother would let me pick the ripest fruit, often resulting in a few strays ending up in my mouth before making it home! One day, we came back with an enormous basket overflowing with nectarines.
That evening, the kitchen filled with laughter and the clinking of spoons against bowls as we mixed ingredients and created our masterpiece. My grandmother’s enthusiasm was infectious; she showed me how to slice the fruit just right and how a pinch of salt could enhance the sweetness of the nectarines. I never knew baking could be so much fun! When the cobbler finally emerged from the oven, golden brown and bubbling, I’ll never forget the look on her face as she handed me a warm bowl, ice cream melting perfectly on top. It was pure bliss.
Now, whenever I make nectarines cobbler, I can’t help but recall those joyful summer days, and I can’t wait to create new memories with all of you and this delightful recipe!
Ingredients
Here’s what you’ll need to whip up this Fresh Nectarine Cobbler, along with some handy tips:
-
4 cups fresh nectarines, sliced: Pick ripe, juicy ones for the best flavor! If nectarines aren’t available, feel free to substitute peaches or even plums—just adjust the sugar based on the fruit’s sweetness.
-
1 cup sugar: This is essential for balancing the tartness of the nectarines. You can substitute with coconut sugar or any granulated sugar of your choice for a different flavor.
-
2 tablespoons cornstarch: This helps thicken the fruit’s juices as it bakes. If you don’t have cornstarch on hand, arrowroot powder or all-purpose flour can work in a pinch.
-
1 teaspoon vanilla extract: Adds a lovely depth of flavor. If you’re feeling adventurous, try almond extract for a nutty twist!
-
1 teaspoon lemon juice: Brightens up the filling and complements the sweetness of the nectarines. Lime juice can work too, providing another layer of zest.
-
1 cup all-purpose flour: This creates the base for the topping. Gluten-free flour blends are a perfect alternative if you’re avoiding gluten.
-
½ cup rolled oats: These add a delightful texture. For a nutty crunch, consider using crushed nuts instead!
-
½ cup brown sugar: The molasses in the brown sugar enhances the caramelization when baked. Light brown sugar works just as well, though dark brown will intensify the flavor.
-
½ teaspoon baking powder: Key for that enticing rise in the topping! Be sure it’s fresh for optimal results.
-
½ teaspoon salt: Just a pinch brings out the natural flavors in your dish. Sea salt or kosher salt works wonderfully.
-
½ cup butter, melted: This is what makes the topping deliciously rich. If you’re looking for a dairy-free alternative, melted coconut oil or vegan butter can do the trick.
Step-by-Step Instructions
-
Preheat that Oven: Kick things off by preheating your oven to 350°F (175°C). This ensures your cobbler has a warm, inviting home to rise in.
-
Prepare Your Nectarines: Slice the nectarines into thin wedges—about ¼ inch thick. Toss them in a large bowl with sugar, cornstarch, vanilla extract, and lemon juice. Let them sit for about 10 minutes to allow the sugars to draw out their juices—trust me, this is where the magic begins!
-
Make the Topping: In a separate bowl, whisk together the flour, rolled oats, brown sugar, baking powder, and salt. Then, drizzle in the melted butter. Use a fork or your fingers to combine until the mixture resembles coarse crumbs. It should be a little messy—embrace it!
-
Combine Fruit and Topping: Pour the nectarine mixture into a greased baking dish (about 8×8 inches works perfectly). Evenly distribute the crumble topping over the nectarines, making sure to cover as much of the fruit as possible. This helps to create that gorgeous, golden crust we all crave.
-
Bake It Up: Slide the dish into your preheated oven. Let it bake for about 30-35 minutes, or until the topping is golden brown and the nectarines are bubbly. Keep an eye on it—the aroma will have everyone flocking to the kitchen!
-
Cool and Serve: Once baked, remove the cobbler from the oven and allow it to cool for 10-15 minutes. This lets the juices thicken up a bit more and makes it easier to serve.
Serving Suggestions
For plating, scoop generous portions of the cobbler into bowls (the deeper the better!). Top with a scoop of vanilla ice cream or a dollop of freshly whipped cream for that classic touch. Drizzle a touch of caramel sauce for an extra touch of indulgence, and garnish with a sprig of fresh mint if you’re feeling fancy!
Recipe Variations
-
Berry & Nectarine Mash-Up: Mix in some fresh berries like blueberries or raspberries for a colorful twist and added antioxidants!
-
Nutty Topping: Add chopped nuts (think almonds or pecans) to the topping mixture for a delightful crunch.
-
Spiced Cobbler: Kick it up a notch by adding a teaspoon of cinnamon or nutmeg to the nectarines for a warm, cozy flavor that’s perfect for fall.
-
Coconut Delight: Swap regular oats for unsweetened shredded coconut for a tropical vibe.
-
Vegan Twist: Replace the butter with coconut oil and use a flax egg instead of regular egg (1 tablespoon ground flaxseed + 3 tablespoons water for every egg).
Chef’s Notes
Every time I make this cobbler, I’m reminded of the joy that comes from simple ingredients coming together to create something spectacular. What’s funny is how I initially struggled with the topping—trying to get it just right! I once forgot to add sugar to the topping, and while it was still good, it just didn’t have the “wow” factor. Now I ensure every component sings together in harmony. Over the years, I’ve played with flavors, and each version has its own special place in my heart.
FAQs and Troubleshooting
1. Can I use frozen nectarines?
Yes, you certainly can! Just make sure to thaw and drain them first to prevent excess moisture in the cobbler.
2. Why is my cobbler soggy?
If your cobbler turns out soggy, it’s usually due to overripe fruit or not allowing it enough time to cool. Ensure to let it rest before serving for best texture.
3. Can I make it ahead of time?
Absolutely! You can prep the fruit filling and topping separately and store them in the fridge overnight. Just assemble and bake when you’re ready.
4. How do I store leftovers?
Store leftover cobbler in an airtight container in the fridge for up to 3 days—though it rarely lasts that long in my house!
Nutritional Info
While I won’t bore you with numbers, I’ll say this: nectarines are a great source of vitamins A and C, while the oats provide fiber that keeps you feeling satisfied. If you indulge in a scoop of ice cream on top, it transforms this dessert into a total treat—just don’t forget to savor every bite!
So there you have it—a Fresh Nectarine Cobbler recipe that’s easy enough for every home cook to master. I can’t wait for you to give it a try and share it with loved ones. Remember, the best dishes are made with love and a pinch of nostalgia. Happy baking!
PrintFresh Nectarine Cobbler
A delightful summer dessert featuring juicy nectarines topped with a crumbly mixture, perfect for warm days and family gatherings.
- Prep Time: 15 minutes
- Cook Time: 35 minutes
- Total Time: 50 minutes
- Yield: 8 servings 1x
- Category: Dessert
- Method: Baking
- Cuisine: American
- Diet: Vegetarian
Ingredients
- 4 cups fresh nectarines, sliced
- 1 cup sugar
- 2 tablespoons cornstarch
- 1 teaspoon vanilla extract
- 1 teaspoon lemon juice
- 1 cup all-purpose flour
- ½ cup rolled oats
- ½ cup brown sugar
- ½ teaspoon baking powder
- ½ teaspoon salt
- ½ cup butter, melted
Instructions
- Preheat the oven to 350°F (175°C).
- Slice the nectarines into thin wedges and mix with sugar, cornstarch, vanilla extract, and lemon juice. Allow to sit for 10 minutes.
- In a bowl, whisk together flour, rolled oats, brown sugar, baking powder, and salt. Drizzle in melted butter and mix until coarse crumbs form.
- Pour the nectarine mixture into a greased baking dish. Evenly distribute the crumble topping over the nectarines.
- Bake for 30-35 minutes or until the topping is golden brown and the nectarines are bubbly.
- Cool for 10-15 minutes before serving.
Notes
Serve with a scoop of vanilla ice cream or whipped cream. You can customize with nuts or spices for a unique touch.
Nutrition
- Serving Size: 1 serving
- Calories: 270
- Sugar: 22g
- Sodium: 180mg
- Fat: 10g
- Saturated Fat: 6g
- Unsaturated Fat: 4g
- Trans Fat: 0g
- Carbohydrates: 40g
- Fiber: 3g
- Protein: 3g
- Cholesterol: 30mg
Keywords: nectarine cobbler, summer dessert, fruit dessert, easy recipe, baking
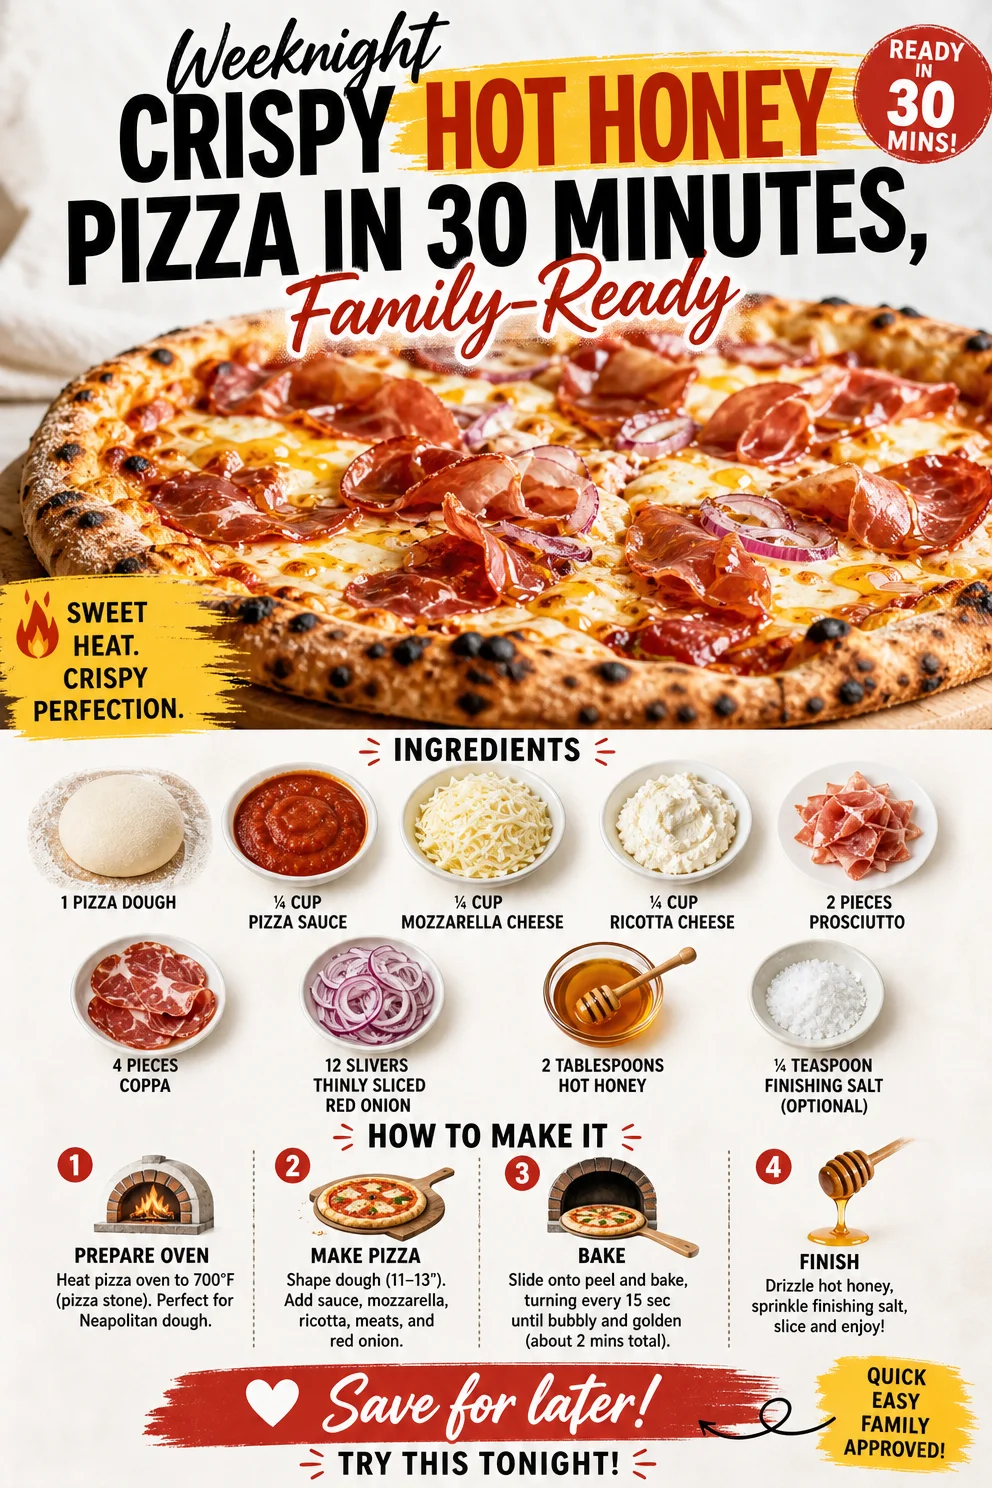
Weeknight Crispy Hot Honey Pizza in 30 Minutes, Family-Ready
Hot Honey Pizza: A Slice of Flavorful Paradise
Hey there, fellow food lovers! If you’ve landed here, you’re probably on the lookout for a pizza that doesn’t just satisfy your cravings but also jazzes up your taste buds. Well, get ready, because today we’re about to whip up a spectacular Hot Honey Pizza that’s as fun to make as it is to eat!
There’s something magical about pizza, isn’t there? It’s like the universal language of comfort food. From casual Friday nights to celebratory gatherings, pizza brings people together—and when you add the breathtaking heat of hot honey, oh boy, you’ve got an irresistible masterpiece on your hands!
Imagine this: a hot, crispy crust bubbling with gooey mozzarella and creamy ricotta, layered with savory prosciutto and coppa, and garnished with sweet yet spicy drizzles of hot honey that tingle your senses. Sounds divine, right? And let me tell you about the first time I made it—because every great recipe comes with its own story.
A Slice of Nostalgia
Flashback to a sunny summer afternoon a few years ago. I was at a cozy little Italian restaurant, celebrating a friend’s birthday. It was one of those places that felt like home—dim lights, mellow music, and the enchanting aroma of freshly baked pizza wafting through the air. That’s when I first encountered hot honey on pizza. I was skeptical at first. Hot honey? On pizza? But bravely, I took my first bite.
The moment that sweet heat hit my taste buds, I knew I had stumbled upon something extraordinary. The contrast between the gooey cheese and the warm, spicy drizzle was unlike anything else. My friends and I couldn’t stop talking about it; we even ordered a second pizza just to experience that magic again! It inspired me to recreate this beauty at home, and that’s how my beloved Hot Honey Pizza was born, full of flavors and memories. Now I’m excited to share it with you!
Ingredients
To craft this delightfully spicy, cheesy wonder, you’ll need the following ingredients:
- 1 Pizza Dough: You can use store-bought or make your own. If you go store-bought, opt for fresh dough from the bakery section for the best flavor and texture.
- ¼ Cup Pizza Sauce: A simple tomato sauce works wonders. Check the label for low sugar content. You can also blend canned tomatoes with garlic and herbs for a homemade touch!
- ¼ Cup Mozzarella Cheese: The classic gooey cheese! If you’re feeling adventurous, try buffalo mozzarella or even vegan cheese alternatives.
- ¼ Cup Ricotta Cheese: Creamy and luscious, ricotta cheese adds a layer of richness. If you’re dairy-free, swap it with cashew cheese or another nut-based option.
- 2 Pieces Prosciutto, Shredded: This adds a lovely saltiness. If you prefer a vegetarian option, use marinated artichokes or olives instead.
- 4 Pieces Coppa: A delightful cured meat; consider swapping with salami or pepperoni based on your preference.
- 12 Slivers Thinly Sliced Red Onion: For a bit of crunch and zing! If red onions are too sharp for your liking, try caramelizing them first for a sweeter flavor.
- 2 Tablespoons Hot Honey: A sweet, spicy drizzle that takes everything up a notch! If you’re feeling adventurous, try infusing plain honey with chili flakes or sriracha.
- ¼ Teaspoon Finishing Salt (Optional): A sprinkle of flaky sea salt right before serving enhances flavors beautifully.
Step-by-Step Instructions
Now that we’ve got our ingredients lined up, let’s dive into making this homemade Hot Honey Pizza! Trust me; you’ll want to grab a slice as soon as it’s out of the oven.
1. Preheat Your Oven
Preheat your oven to the hottest setting, typically around 475°F (245°C) or higher if your oven allows. This step is crucial for that perfect crispy crust! If you’re using a pizza stone, pop it in the oven to heat up as well.
2. Roll Out the Dough
On a floured surface, take your pizza dough and roll it out into your desired shape—round, square, or rustic! Just be sure to make it about ¼ inch thick for that nice texture. If it’s too sticky, lightly flour your rolling pin. Chef’s Tip: If your dough keeps bouncing back, let it rest for a few minutes to relax the gluten.
3. Spread the Sauce
Once rolled out, carefully transfer the dough to a pizza peel or a baking sheet lined with parchment paper. Spread ¼ cup of pizza sauce evenly over the crust, leaving a little room at the edges for that golden crust. Bonus Tip: Add a sprinkle of dried oregano or basil for extra flavor!
4. Load Up on Cheese
Now, sprinkle ¼ cup of mozzarella evenly over the pizza. Then dollop ¼ cup of ricotta in strategic spots; it’ll melt beautifully in the oven! Note: For an added fun moment, you can use your fingers to fashion little ricotta ‘clouds’ on top!
5. Add the Meats and Onions
Next, layer on 2 pieces of shredded prosciutto and 4 pieces of coppa. Make sure to distribute them evenly; every bite should have that delicious meaty flavor. Top it off with those lovely 12 slivers of red onion for that crispy crunch! Chef Note: The onions will caramelize slightly in the oven, adding sweetness.
6. Bake It Up
Slide the pizza into your hot oven (on the pizza stone if you have one). Bake for about 12–15 minutes or until the crust is golden brown and the cheese is melted and bubbly. Check on it around the 10-minute mark to avoid overbaking!
7. Drizzle with Hot Honey
Once the pizza is out of the oven, let it cool for a minute. Then, drizzle 2 tablespoons of hot honey over the top. If you really love spice, don’t hold back! Chef’s Tip: A honey drizzle adds an irresistible sweetness that contrasts beautifully with the saltiness of the meats!
8. Finish with Finishing Salt
For a little flair, sprinkle ¼ teaspoon of finishing salt over the top if desired. This will just enhance all those lovely flavors and bring everything together!
Serving Suggestions
Slice your Hot Honey Pizza into wedges and transfer them to a large platter or individual plates. Serve it alongside a simple arugula salad with lemon vinaigrette for a refreshing contrast. Guests will love the unexpected warmth and crunch of the pizza paired with the zesty salad! 🍕✨
Recipe Variations
Feeling adventurous? Here are some creative twists to this Hot Honey Pizza:
- Veggie Lover’s Delight: Add bell peppers, mushrooms, and spinach for a delicious veggie version.
- Pineapple Passion: Toss on some pineapple chunks for a sweet and savory Hawaiian twist!
- BBQ Chicken: Swap out the meats for shredded BBQ chicken and drizzle with extra hot honey.
- Spicy Veggie: Add jalapeños or banana peppers for a deeper kick of heat!
- Mediterranean Flair: Use feta cheese, kalamata olives, and roasted red peppers for an exotic Mediterranean pizza.
Chef’s Notes
This Hot Honey Pizza has truly become a staple in my kitchen. Over the years, I’ve experimented with different cheeses and toppings, and I have to say, each version has its own unique charm! I still remember the first time I made this for my family; their reactions were priceless! It’s a recipe that brings everyone together, laughing and sharing stories around the table—just the way food should be.
FAQs and Troubleshooting
Q: My pizza dough keeps sticking. What can I do?
Sometimes dough can be sticky. Be sure to flour your surface generously, and if it’s too much trouble, let it rest for a bit.
Q: How can I tell when the pizza is done?
The cheese should be melted and bubbly, and the crust should be golden brown. A simple lift with a spatula will show you a nice golden bottom!
Q: Can I make the dough ahead of time?
Absolutely! You can make it a day in advance and keep it covered in the fridge. Just bring it to room temperature before rolling out.
Q: What if I don’t have hot honey?
No biggie! You can easily infuse regular honey with chili flakes or hot sauce to achieve that sweet and spicy goodness.
And there you have it—your roadmap to creating a Hot Honey Pizza that will make your taste buds dance! So grab your apron and get ready to create a masterpiece in your kitchen. Remember, food is meant to be enjoyed, so make it fun, share it with loved ones, and savor every single bite! Happy cooking, my foodie friends! 🌶️🍯🍕
PrintHot Honey Pizza

A deliciously spicy and cheesy pizza topped with prosciutto, coppa, and a sweet hot honey drizzle.
- Prep Time: 15 minutes
- Cook Time: 15 minutes
- Total Time: 30 minutes
- Yield: 4 servings 1x
- Category: Main Course
- Method: Baking
- Cuisine: Italian
- Diet: None
Ingredients
- 1 Pizza Dough
- ¼ Cup Pizza Sauce
- ¼ Cup Mozzarella Cheese
- ¼ Cup Ricotta Cheese
- 2 Pieces Prosciutto, Shredded
- 4 Pieces Coppa
- 12 Slivers Thinly Sliced Red Onion
- 2 Tablespoons Hot Honey
- ¼ Teaspoon Finishing Salt (Optional)
Instructions
- Preheat your oven to the hottest setting, typically around 475°F (245°C).
- Roll out the dough on a floured surface to about ¼ inch thickness.
- Spread ¼ cup of pizza sauce evenly over the crust.
- Load up with ¼ cup of mozzarella and dollop on ¼ cup of ricotta.
- Add 2 pieces of shredded prosciutto and 4 pieces of coppa, then top with 12 slivers of red onion.
- Bake for 12–15 minutes or until the crust is golden brown.
- Drizzle 2 tablespoons of hot honey over the top after baking.
- Finish with optional finishing salt if desired.
Notes
For a vegetarian option, substitute meats with marinated artichokes or olives. Experiment with different cheeses and toppings for variations.
Nutrition
- Serving Size: 1 slice
- Calories: 350
- Sugar: 8g
- Sodium: 600mg
- Fat: 15g
- Saturated Fat: 6g
- Unsaturated Fat: 7g
- Trans Fat: 0g
- Carbohydrates: 40g
- Fiber: 2g
- Protein: 14g
- Cholesterol: 35mg
Keywords: Hot Honey Pizza, Spicy Pizza, Italian Recipe, Comfort Food, Easy Pizza Recipe
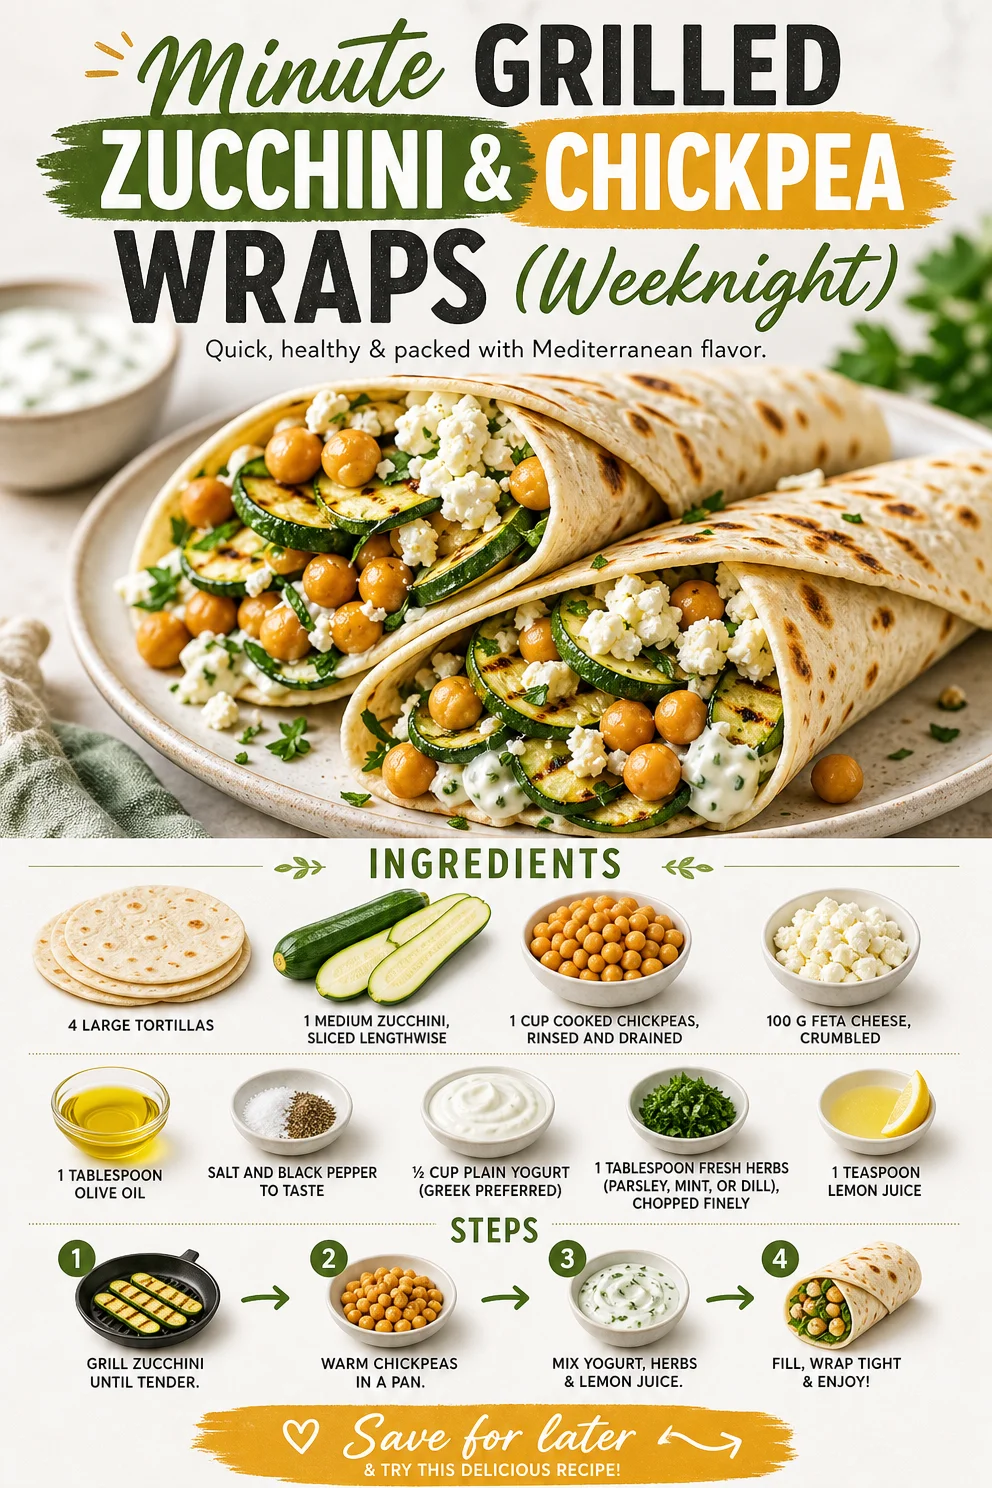
Minute Grilled Zucchini & Chickpea Wraps (Weeknight)
Grilled Zucchini and Chickpea Wraps: A Fresh Take on Flavor
Welcome back, food lovers! Today, we’re diving into a dish that embodies everything I stand for at Clean Plate Cravings: fresh, vibrant flavors that are easy to whip up! We’re making Grilled Zucchini and Chickpea Wraps—a fantastic option for a healthy lunch or a light dinner. These wraps are loaded with wholesome ingredients and are completely customizable to suit your tastes. Ready your grilling tools and let’s create some culinary magic together!
A Personal Favorite: The Zucchini Chronicles
Before we dive into the recipe, let me share a fun little story. Growing up, summer was magical for many reasons, but one of the highlights was visiting my grandmother’s garden. She had a green thumb that could cultivate anything—from tomatoes to zucchinis, those long, crispy vegetables always found their way into our meals. I vividly remember the excitement of picking fresh zucchinis with her, each one a token of summer’s bounty.
We’d often grill them right away, tossing them on the BBQ while they sizzled and charred to perfection, filling the air with their smoky aroma. Not only did we savor the flavors, but we also bonded over our love for food and cooking. Goodness, the memories of her secret seasoning mixes and her laughter still bring a smile to my face!
Inspired by those fond cooking experiences, I created this Grilled Zucchini and Chickpea Wrap recipe. It’s a nod to those summer days and the joy of eating fresh, light meals.
Ingredients That Shine
Let’s gather our ingredients! Here’s what you’ll need for your wraps:
-
4 large tortillas or flatbreads
These serve as the base. I love whole wheat or spinach-flavored options for added nutrition. Gluten-free? No problem! There are plenty of delicious gluten-free wraps available. -
1 medium zucchini, sliced lengthwise
Fresh zucchini brings a subtle sweetness and a lovely texture. You can swap it for eggplant or yellow squash depending on your mood. -
1 cup cooked chickpeas, rinsed and drained
Protein-packed and hearty! Canned beans make this dish quick and easy, but you can also use cooked lentils for a twist. -
100 g feta cheese, crumbled
This is the perfect creamy, tangy addition. Feel free to replace it with goat cheese or omit it for a dairy-free version. -
1 tablespoon olive oil
A drizzle enhances the grilling process and locks in flavors. Avocado oil is a great alternative if you prefer. -
Salt and black pepper to taste
These simple seasoning essentials elevate your dish. Experiment! Try smoked salt or add a pinch of chili powder for a kick. -
½ cup plain yogurt (Greek preferred)
Creamy, refreshing, and a great pairing for chips! You could also use a plant-based yogurt if you’re going dairy-free. -
1 tablespoon fresh herbs (parsley, mint, or dill), chopped finely
Fresh herbs boost flavor and freshness. You can mix and match as desired—basil and cilantro work beautifully as well! -
1 teaspoon lemon juice
A splash of lemon juice adds brightness and balances the flavors. Lime juice can step in if you’re feeling zesty!
Step-by-Step Instructions: Let’s Get Cooking!
Are you ready to grill? Let’s get our hands dirty (in a good way!) and follow these steps:
-
Prep Your Grill or Pan
Start by preheating your grill or stovetop grill pan. You want it hot for those signature grill marks! If grilling outside, aim for medium heat; if on the stovetop, turn it to medium-high. -
Slice the Zucchini and Season
While the grill is heating up, slice your zucchini lengthwise into about ¼-inch thick strips. Drizzle olive oil over them and season with salt and black pepper. Be liberal—this is where flavor starts! -
Grill the Zucchini
Place each slice on the grill and cook for about 2-3 minutes on each side, until you see beautiful grill marks and the zucchini is tender. Note: Patience is key. Resist the urge to flip too soon to avoid sticking! -
Prepare the Chickpeas
In a bowl, combine your rinsed chickpeas with a sprinkle of salt, pepper, and a touch of olive oil. Give them a gentle toss. This adds flavor and keeps them cohesive. -
Warm Your Tortillas or Flatbreads
After your zucchini is done, it’s time to warm the tortillas! Place them on the grill for about a minute on each side or pop them in the microwave wrapped in a damp paper towel for 30 seconds. This makes them pliable and perfect for wrapping! -
Build Your Wrap
Now, it’s assembly time! Lay your warm tortilla on a plate, spread a generous dollop of yogurt, and layer with grilled zucchini, chickpeas, and crumbled feta. Don’t skimp on the ingredients—it’s a wrap, not a minimalist art project! -
Add Fresh Herbs and Lemon Juice
Sprinkle chopped herbs on top and finish with a squeeze of fresh lemon juice. It’s like adding the final brushstroke to a masterpiece! -
Wrap and Serve
Fold in the sides of the tortilla, then roll it up tightly from the bottom. Give it a gentle press to hold everything together. Place it seam-side down on the plate.
Serving Suggestions: Make It Pop!
For an impressive presentation, slice your wraps in half diagonally and show off those vibrant layers! Arrange them on a colorful platter alongside extra yogurt for dipping. You can also toss a light salad of mixed greens, cherry tomatoes, and cucumber on the side for a refreshing crunch. Add a sprinkle of herbs on top, and voilà, you’re all set!
Recipe Variations: Get Creative!
The beauty of these wraps lies in their versatility! Here are a few ways to tweak this recipe and keep things exciting:
-
Add Roasted Vegetables: Try incorporating bell peppers, mushrooms, or even grilled corn for extra texture and flavor!
-
Swap the Greens: Instead of yogurt, spread a layer of hummus or baba ganoush for a different taste profile.
-
Make It Spicy: Add a scattering of sliced jalapeños or drizzle your favorite hot sauce for a fiery kick!
-
Use Different Cheeses: Experiment with shredded cheddar or pepper jack for a more robust flavor.
-
Vegan Variation: For a plant-based twist, skip the feta altogether and replace yogurt with almond or cashew cream.
Chef’s Notes: A Journey Through Flavors
As a chef, it’s easy to get attached to recipes, but I’ve learned to embrace evolution in cooking. When I first experimented with these wraps, I distinctly used just zucchini and chickpeas. Over time, I found myself adding new flavors and toppings that reflected my mood and the seasons!
Remember, cooking is about enjoyment and experimenting with what you have on hand. So if you find yourself suddenly inspired by a rogue vegetable in your fridge—go ahead and toss it in!
FAQs and Troubleshooting
1. What if my zucchinis are too soggy?
If your zucchini seems a bit mushy after grilling, try slicing them thinner next time or sprinkling a little salt on the slices beforehand to draw out excess moisture.
2. Can I make these in advance?
Absolutely! You can grill the zucchini and mix the chickpeas ahead of time. Assemble them freshly with the tortillas on the day you plan to serve for optimal flavor and texture.
3. How do I store leftovers?
Leftover wraps can be stored in an airtight container in the fridge for up to 2 days. To reheat, wrap in foil and warm gently in the oven to avoid sogginess.
4. What if I don’t have a grill?
No grill? No problem! A stovetop pan or a broiler works just as well! For the oven, place the zucchini strips on a baking sheet and roast at 400°F until tender.
Nutritional Info
While I’m not a nutritionist, I can tell you that these wraps are brimming with protein, fiber, and healthy fats! Each serving is a delicious way to fuel your body without sacrificing flavor.
Final Word
Creating a delicious dish can be both a rewarding and pleasurable endeavor, especially when you know it’s good for your body! I can’t wait for you to try these Grilled Zucchini and Chickpea Wraps. It’s a dish that truly nails the balance of fresh, fast, and flavor-packed! Happy cooking, friends, and remember—keep it fresh, simple, and seriously delicious!
PrintGrilled Zucchini and Chickpea Wraps
A vibrant dish loaded with fresh flavors, making a healthy lunch or light dinner effortlessly delicious.
- Prep Time: 10 minutes
- Cook Time: 10 minutes
- Total Time: 20 minutes
- Yield: 4 servings 1x
- Category: Main Course
- Method: Grilling
- Cuisine: Mediterranean
- Diet: Vegetarian
Ingredients
- 4 large tortillas or flatbreads
- 1 medium zucchini, sliced lengthwise
- 1 cup cooked chickpeas, rinsed and drained
- 100 g feta cheese, crumbled
- 1 tablespoon olive oil
- Salt and black pepper to taste
- ½ cup plain yogurt (Greek preferred)
- 1 tablespoon fresh herbs (parsley, mint, or dill), chopped finely
- 1 teaspoon lemon juice
Instructions
- Prep your grill or pan by preheating it to medium-high heat.
- Slice the zucchini lengthwise into ¼-inch thick strips, drizzle with olive oil, and season with salt and pepper.
- Grill the zucchini for about 2-3 minutes on each side until tender.
- Prepare the chickpeas by combining them with salt, pepper, and olive oil in a bowl.
- Warm the tortillas on the grill for about a minute on each side or in the microwave for 30 seconds.
- Build your wrap by laying a tortilla on a plate, spreading yogurt, and adding zucchini, chickpeas, and feta.
- Add fresh herbs and a squeeze of lemon juice on top.
- Wrap tightly and serve seam-side down.
Notes
These wraps are highly customizable. Try adding different vegetables, spices, or cheese to suit your taste!
Nutrition
- Serving Size: 1 wrap
- Calories: 350
- Sugar: 5g
- Sodium: 400mg
- Fat: 12g
- Saturated Fat: 4g
- Unsaturated Fat: 6g
- Trans Fat: 0g
- Carbohydrates: 45g
- Fiber: 8g
- Protein: 15g
- Cholesterol: 30mg
Keywords: zucchini wraps, chickpea wraps, healthy lunch, vegetarian recipe, grilling
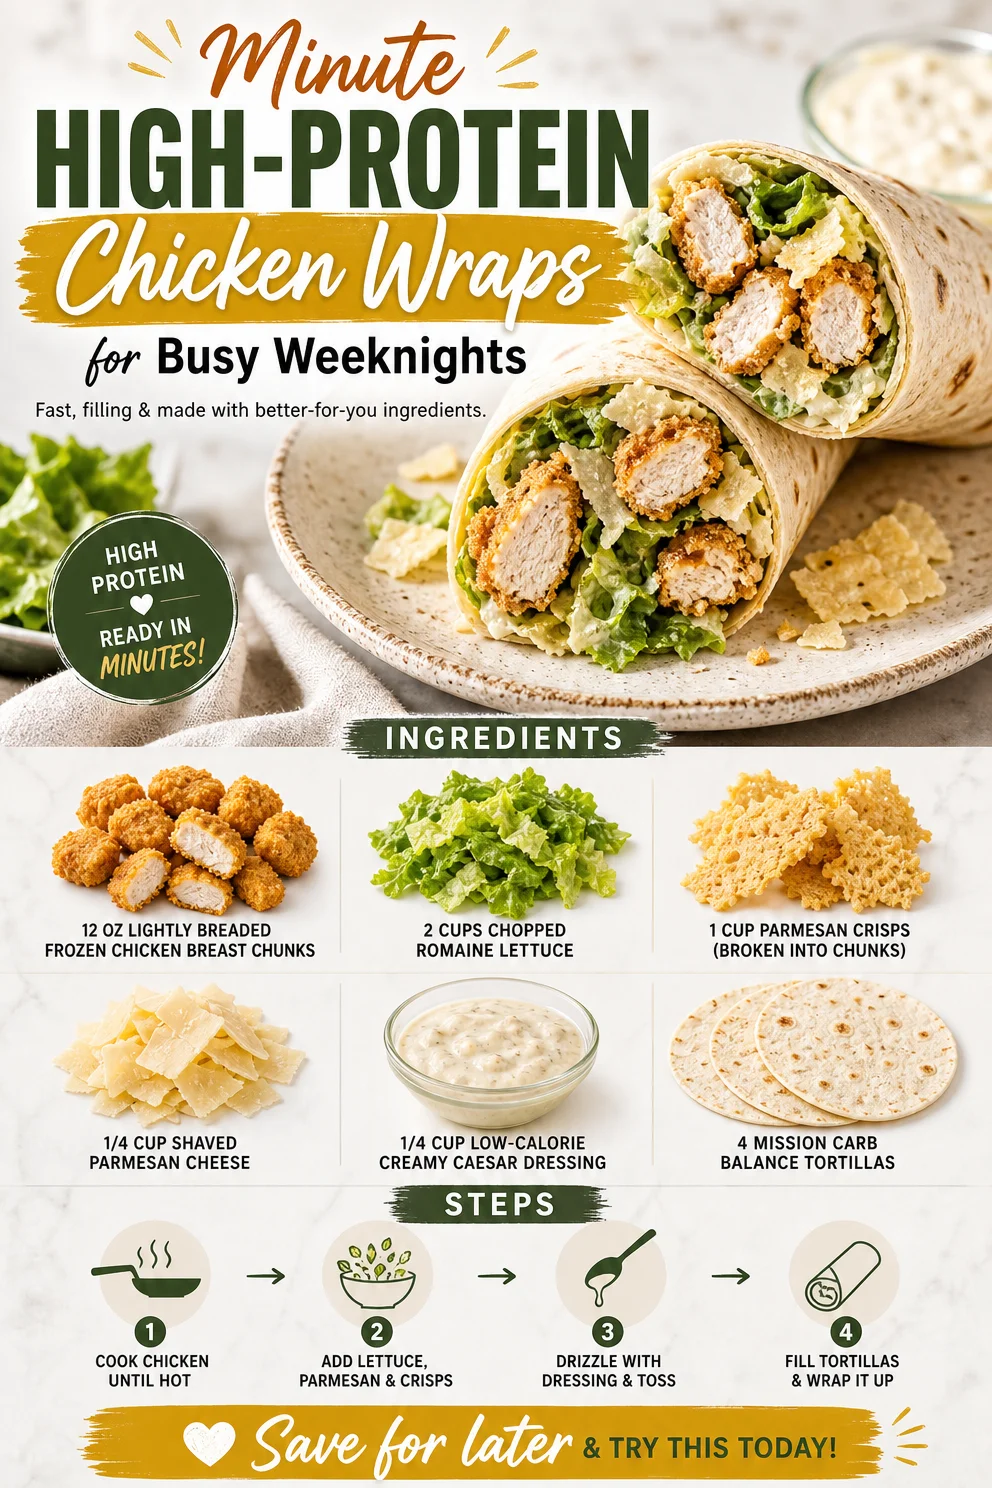
Minute High-Protein Chicken Wraps for Busy Weeknights
High Protein Chicken Wraps: A Delicious Twist on Healthy Eating
Welcome to another tasty adventure in the kitchen at Clean Plate Cravings! Today, we’re whipping up something that’s not just easy to make, but also packed with protein and flavor—High Protein Chicken Wraps! These wraps are the perfect meal for anyone looking to enjoy a fulfilling, healthful dish without sacrificing taste. They’re great for lunch, dinner, or even a snack, and you’ll love how simple it is to bring them to life with just a few ingredients.
Now, let’s take a moment to break down why these wraps are a game changer. First off, they’re quick to assemble, which is perfect for those of us who lead busy lives (let’s be honest, we’re all there sometimes!). With lightly breaded frozen chicken breast chunks as the star of the show, these wraps pack a protein punch that’ll keep you feeling satisfied for hours. Plus, let’s not forget the fresh and crunchy romaine lettuce, savory Parmesan crisps, and the creamy, dreamy Caesar dressing that ties it all together.
As a chef, I believe that food is not just about nourishment; it’s about joy, creativity, and connecting with the people you love. The vibrant flavors in these wraps make them perfect for any gathering—whether you’re meal prepping for the week or hosting friends for a cozy night in. So roll up your sleeves, grab your favorite cutting board, and let’s dive into this delicious recipe!
A Journey Down Memory Lane
Let me take you back to a summer afternoon when I was a teenager, back when my love affair with food blossomed. My best friend, Lily, and I decided to have a “wrap-off” after seeing a food truck festival in town. We invited a group of friends, each tasked with creating the best wrap using whatever ingredients we could find in our kitchens.
Lily brought an assortment of ingredients she had from baking experiments gone wild, while I opted for a simple approach with grilled chicken, fresh veggies, and a tangy sauce. As we all gathered around the table, taste-testing one another’s creations and laughing until our bellies hurt, I realized then how powerful food could be—not just as a source of nourishment but as a catalyst for connection.
Years later, I’m still drawn to wraps, and now I’ve elevated them into these High Protein Chicken Wraps, perfect for any occasion. They bring me back to that vibrant summer day, and I hope they can do the same for you!
Ingredients
Here’s what you’ll need for these yummy High Protein Chicken Wraps:
-
12 oz lightly breaded frozen chicken breast chunks
- Chef Insight: These provide a convenient and crunchy protein base. You can swap them for grilled chicken strips or even some spicy fried tofu if you’re looking for plant-based protein!
-
2 cups chopped romaine lettuce
- Substitution Tip: Any leafy green works here! Spinach or kale will add a bit of a different flavor profile and can sneak in more nutrients.
-
1 cup Parmesan crisps (broken into chunks)
- Substitution Tip: If you’re looking for extra crunch, feel free to swap in other crispy elements like crushed tortilla chips or baked pita chips.
-
1/4 cup shaved Parmesan cheese
- Chef Insight: This adds a creamy, cheesy depth. Nutritional yeast can be a great vegan substitute if you’re looking to cut out dairy.
-
1/4 cup low-calorie creamy Caesar dressing
- Tip: Experiment with different dressings like ranch or a balsamic vinaigrette if you’re feeling adventurous.
-
4 Mission Carb Balance tortillas
- Substitution Tip: Try gluten-free wraps or lettuce leaves for a low-carb alternative.
Step-by-Step Instructions
Let’s get cooking! These wraps can come together in under 30 minutes if you have your ingredients prepped. Here’s how to make these delicious wraps:
-
Cook the Chicken
- Start by preheating your oven according to the instructions on the frozen chicken packaging. Spread the chicken chunks out on a baking sheet in an even layer. Bake until they are golden and crispy, usually around 15 minutes.
- Chef’s Tip: To ensure the crispiest results, flip the chicken halfway through cooking. The last 5 minutes can also be a great time to set your oven to broil to get that extra crunch!
-
Prep the Veggies
- While your chicken is baking, go ahead and chop those romaine lettuce leaves. The crunch from the lettuce is what brings life to the wraps, so don’t skimp on this step!
- Pro Tip: You can also toss the chopped lettuce with a splash of lemon juice or a dash of salt to enhance its flavor while you wait!
-
Assemble the Wraps
- Once the chicken is crispy and your lettuce is prepped, it’s time to build your masterpiece. Lay out a tortilla on a clean, flat surface.
- Begin layering by placing handfuls of chopped romaine, followed by the chicken chunks.
- Add the Parmesan crisps and sprinkle on the shaved Parmesan cheese. Drizzle with the creamy Caesar dressing to your liking.
- Chef Hack: If you want to avoid messy wraps, don’t overstuff them! About a cup of chicken and greens is usually a good starting point.
-
Wrap It Up!
- Fold in the sides of the tortilla and then roll it up tightly from the bottom to the top. Voila! You’ve created a wrap that’s ready to go.
- Pro Tip: If wrapping is tricky, you can also cut the tortilla’s edges to create a better folding experience.
-
Slice and Serve
- For a nice presentation, slice your wrap in half diagonally and lay it on a plate with the cut side facing upwards, showing off all those glorious layers.
- Serving Suggestion: Serve with some extra dressing for dipping and a few extra Parmesan crisps on the side for crunch!
Recipe Variations
Feeling adventurous? Here are some fun twists you can try with this recipe:
-
Buffalo Chicken Wrap: Swap the Caesar dressing for buffalo sauce and add some crumbled blue cheese to give it a spicy kick.
-
Mediterranean Twist: Use feta cheese instead of Parmesan, add diced cucumbers, cherry tomatoes, and a drizzle of tzatziki for a refreshing touch.
-
Southwest Style: Incorporate corn, black beans, avocado, and some sprinkle of taco seasoning for a fiesta in every bite.
-
Vegan Option: Replace chicken with crispy chickpeas and use a vegan Caesar or tahini dressing for a plant-based delight!
-
Breakfast Wrap: Use scrambled eggs instead of chicken, add diced tomatoes, spinach, and a sprinkle of cheese for a hearty morning meal.
Chef’s Notes
This recipe has a special place in my heart, and it’s seen some evolution over the years. Initially, I made it with whatever leftovers I and my family had in the fridge, but I’ve tailored it to keep the flavors balanced and satisfying. Experimenting with different dressings and textures over time has taught me a few things about wraps—each fold holds a story, and every bite is a chance for creativity!
I also remember the disastrous time I tried to showcase my “chef-ness” by making a wrap for a picnic only to realize I’d forgotten to put any dressing on it! Cue dry chicken and sad lettuce. Now, I always ensure to add that creamy touch; it truly makes a huge difference!
FAQs and Troubleshooting
-
Q: Can I make these wraps ahead of time?
- A: Absolutely! Just keep the wraps tightly wrapped in foil or plastic wrap in the fridge for up to 2 days. They may lose some crispiness, but they’ll still be tasty!
-
Q: What can I do if my chicken is undercooked?
- A: Make sure to cook the chicken according to package directions. If it’s undercooked, pop it back into the oven until it’s heated all the way through—better safe than sorry!
-
Q: How can I prevent my wraps from getting soggy?
- A: To avoid soggy wraps, make sure to keep the dressing on the side until you’re ready to eat. You can also use thicker spreads or hummus as a base to prevent moisture.
-
Q: Can I freeze the wraps?
- A: Yes! Wrap them tightly in foil or plastic before freezing. Just remember to let them thaw in the fridge overnight before enjoying them.
Nutritional Info (Optional)
While nutritional content will vary based on specific ingredient brands used, here’s a rough estimate per wrap:
- Calories: 350
- Protein: 30g
- Carbohydrates: 30g
- Fat: 15g
Enjoy the process, and remember to keep it fresh, healthy, and full of flavor. Happy cooking, friends!
PrintHigh Protein Chicken Wraps
A delicious and healthy chicken wrap packed with protein, fresh veggies, and creamy Caesar dressing.
- Prep Time: 15 minutes
- Cook Time: 15 minutes
- Total Time: 30 minutes
- Yield: 4 servings 1x
- Category: Main Course
- Method: Baking
- Cuisine: American
- Diet: High Protein
Ingredients
- 12 oz lightly breaded frozen chicken breast chunks
- 2 cups chopped romaine lettuce
- 1 cup Parmesan crisps (broken into chunks)
- 1/4 cup shaved Parmesan cheese
- 1/4 cup low-calorie creamy Caesar dressing
- 4 Mission Carb Balance tortillas
Instructions
- Preheat your oven according to the instructions on the frozen chicken packaging. Spread the chicken chunks out on a baking sheet in an even layer. Bake until they are golden and crispy, usually around 15 minutes.
- Chop the romaine lettuce leaves while the chicken is baking.
- Layer a tortilla on a clean, flat surface. Place chopped romaine, chicken chunks, Parmesan crisps, and shaved Parmesan cheese. Drizzle with Caesar dressing.
- Fold in the sides of the tortilla and roll it up tightly from the bottom to the top.
- Slice the wrap in half diagonally and serve with extra dressing for dipping.
Notes
Wraps can be made ahead of time; keep them tightly wrapped in the fridge for up to 2 days. To avoid sogginess, keep dressing on the side until ready to eat.
Nutrition
- Serving Size: 1 wrap
- Calories: 350
- Sugar: 3g
- Sodium: 700mg
- Fat: 15g
- Saturated Fat: 5g
- Unsaturated Fat: 8g
- Trans Fat: 0g
- Carbohydrates: 30g
- Fiber: 4g
- Protein: 30g
- Cholesterol: 40mg
Keywords: chicken wraps, high protein, healthy recipe, quick meal, easy dinner
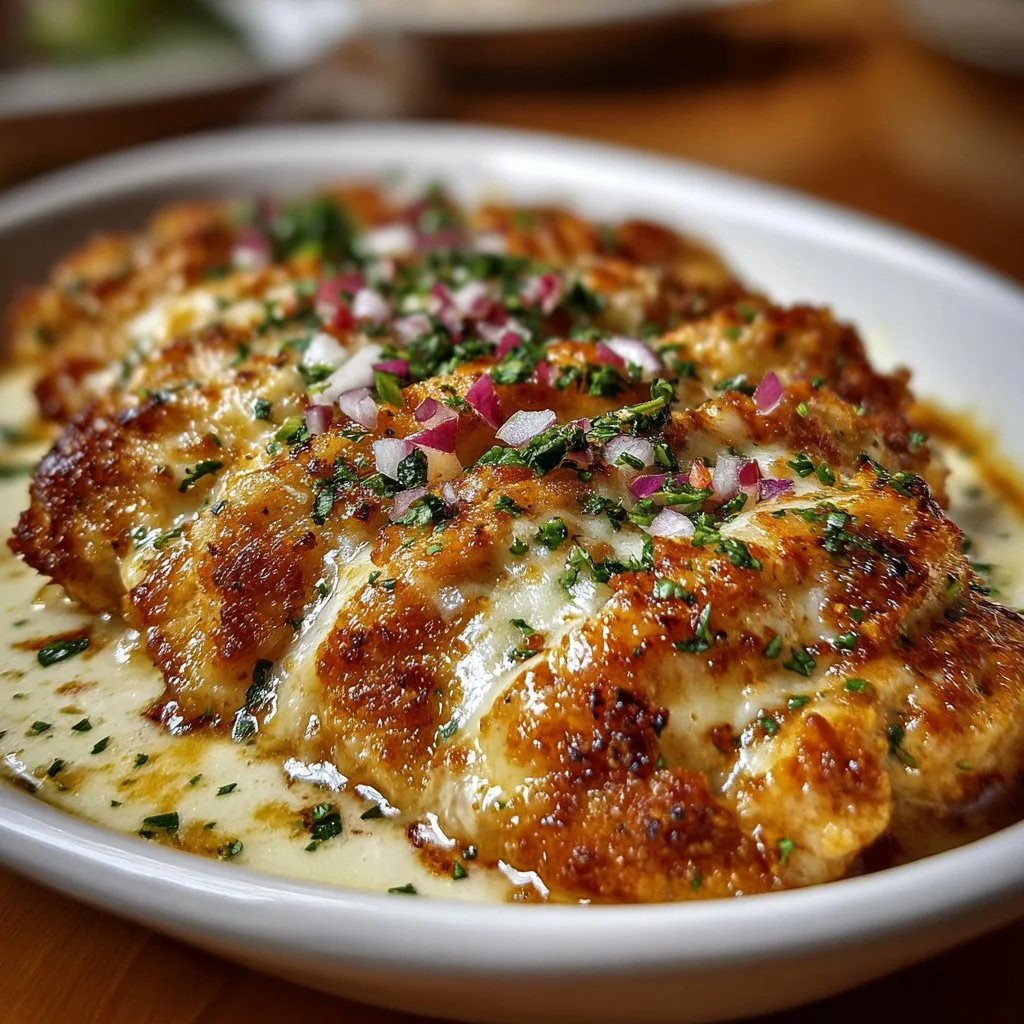
Longhorn Parmesan Chicken Copycat: Crispy Weeknight Recipe
Crispy, Cheesy Longhorn Steakhouse Parmesan Chicken Recipe
Welcome to Clean Plate Cravings, where delicious meets nutritious! Today, I’m thrilled to share with you one of my absolute favorite dishes: Longhorn Steakhouse Parmesan Chicken. This recipe is not only a nod to a classic American eatery but also a way to bring restaurant-quality flavors right into your cozy kitchen. Whether you’re preparing a family dinner or hosting friends, this dish will leave everyone craving more. So, grab your apron and let’s get cooking!
Introduction
When it comes to comfort food, chicken reigns supreme—especially when it’s breaded, cheesy, and crispy! Longhorn Steakhouse’s Parmesan Chicken is a delectable treat that’s surprisingly easy to whip up at home. Imagine succulent, juicy chicken breasts encased in a golden, crunchy breadcrumb coating, topped with melted mozzarella and a sprinkle of Parmesan cheese. Yes, please!
This recipe strikes a glorious balance between being indulgent and nourishing. Picture this: after a long day, you sit down to a plate of crispy chicken served with a fresh side salad or some roasted veggies. It’s a meal that not only feels like a weekend splurge but also leaves you satisfied and happy without the heavy feeling that often comes after dining out.
I believe that eating well shouldn’t mean forfeiting flavor or fun. That’s why today, I’ve put a unique spin on the traditional Longhorn Parmesan Chicken, infusing it with healthier ingredients while retaining that crave-worthy, comforting essence. Whether you’re a foodie at heart or someone just starting to explore the culinary world, this recipe is approachable, delicious, and absolutely worth the effort!
So let’s dive into my kitchen story that inspired this recipe before we begin!
Personal Story
Growing up, dinner was a cherished time in our household. My parents worked hard, but every Sunday, we made it a point to gather around the table for a homemade feast. One of my father’s specialties was chicken—fried, baked, or grilled, it didn’t matter. He had a knack for transforming simple ingredients into something magical.
I still remember the first time I tasted a version of Parmesan chicken at a family celebration. It was crispy, cheesy, and so flavorful that I couldn’t stop eating! My father had meticulously breaded each piece and served it with a homemade marinara sauce and pasta.
That meal left a mark on me, igniting my passion for cooking and teaching me how a handful of ingredients could create something memorable. Fast-forward to today, that dish transformed into a recipe that’s lighter yet equally satisfying. Each time I make this Longhorn-inspired Parmesan Chicken, I’m reminded of those Sunday dinners filled with laughter, stories, and of course, that delicious chicken!
Ingredients
Here’s what you’ll need for this delish dish:
- 4 boneless, skinless chicken breasts (about 6 ounces each)
- These are the star of the show! Use fresh chicken for better flavor. If you can’t find boneless, skinless, feel free to use thighs or even turkey cutlets.
- 2 tablespoons olive oil
- This adds richness and helps the breadcrumbs get golden brown. Avocado oil works too if you prefer a higher smoke point!
- 1 teaspoon garlic powder
- Oodles of flavor without the hassle! In a pinch, fresh garlic can work; just sauté it lightly beforehand.
- 1 teaspoon onion powder
- Adds depth to the dish. If you’re looking for a fresh twist, caramelized onions can substitute beautifully.
- 1/2 teaspoon smoked paprika
- Smoky, sweet goodness. Regular paprika is fine if you prefer less smokiness.
- 1/2 teaspoon salt
- Essential for making flavors pop. Use sea salt or pink Himalayan salt for a fancier touch!
- 1/4 teaspoon black pepper
- A little spice goes a long way. Adjust according to your heat preference.
- 1/2 cup panko breadcrumbs
- The secret to that crispy texture! You can use gluten-free panko too if needed.
- 1/3 cup grated Parmesan cheese
- Nutty and savory, Parmesan elevates the flavors. Pecorino Romano can be an excellent substitute if you’re feeling adventurous.
- 1/3 cup shredded mozzarella cheese
- Provides that gooey, melty bountifulness. Feel free to swap with provolone if you want something different!
- 2 tablespoons unsalted butter, melted
- Richness and flavor booster. You can replace it with olive oil for a healthier option.
- 1 tablespoon mayonnaise
- Helps bind the breadcrumbs and chicken for that irresistible crunch. Greek yogurt can work wonders as a substitute too!
- 1 teaspoon dried parsley
- For a pop of color and subtle herbal flavor. Fresh parsley or even basil can amp up the freshness.
- 1/2 teaspoon garlic powder (additional)
- Double the garlic, double the love!
- Fresh parsley (for garnish)
- For that vibrant finishing touch. It’s all about those looks!
- Lemon wedges
- A squeeze of lemon brightens the flavors beautifully. Trust me on this one!
Step-by-Step Instructions
Ready to bring this recipe to life? Let’s get cooking!
- Preheat Your Oven:
- Preheat your oven to 375°F (190°C). This is crucial for achieving that lovely, crispy crust while keeping the chicken juicy inside.
- Prepare the Chicken:
- Take your chicken breasts and, if they’re thick, consider butterflying them or pounding them to an even thickness. This ensures they cook evenly. Season with a mix of salt, smoked paprika, garlic powder, and onion powder on both sides. This adds layers of flavor right from the start!
- Set Up Your Bread Crumb Mixture:
- In a mixing bowl, combine the panko breadcrumbs, grated Parmesan cheese, melted butter, and dried parsley. This lovely mixture is where all the crunch comes from! Toss everything together until the panko is evenly coated in the butter and the cheese is distributing evenly.
- Coat the Chicken:
- First, brush each chicken breast with mayonnaise on both sides (trust me, this will keep them moist and flavorful). Then, dredge each piece in the breadcrumb mixture, pressing gently to ensure the crumbs stick. You want a nice, thick layer to get that glorious crunch we’re aiming for!
- Arrange in the Baking Dish:
- Place each coated chicken breast on a baking sheet lined with parchment paper or lightly greased. Be sure to leave space between each piece! This helps them cook evenly and become beautifully crispy.
- Bake Away:
- Pop that tray into your preheated oven and let it bake for about 25-30 minutes, or until the chicken is golden brown and cooked through (the internal temperature should reach 165°F or 74°C). If you want an extra crispy coating, you can broil the chicken for the last 2-3 minutes—just keep a keen eye on it!
- Add the Cheeses:
- Once out of the oven, sprinkle your shredded mozzarella on top of the chicken and pop it back in the oven just until it melts (about 2-3 minutes). This is where your dish goes from great to WOW!
- Garnish & Serve:
- Once the cheese has melted perfectly, take out the chicken, garnish with freshly chopped parsley, and serve with lemon wedges on the side. A squeeze of fresh lemon over the crispy chicken takes it to a whole new level of deliciousness!
Serving Suggestions
For a complete meal, plate your Longhorn Parmesan Chicken alongside a crisp green salad or a serving of roasted Brussels sprouts. The acidity of the lemon and the freshness of the parsley brighten up the richness of the chicken beautifully! Consider a side of whole grain rice or quinoa for a wholesome touch.
Recipe Variations
Want to mix things up? Here are some creative twists you can try:
- Spicy Kick: Add a pinch of cayenne pepper to the seasoning mix for a spicy version of this dish.
- Herb-Infused: Use fresh herbs like thyme or basil in the breadcrumb mixture for an herbaceous flair.
- Asian-Inspired: Use sesame oil instead of olive oil and top with a sprinkle of toasted sesame seeds and scallions for a nifty twist.
- Stuffed Chicken: Add a layer of spinach and ricotta cheese inside the chicken before coating for a stuffed version.
Chef’s Notes
Cooking this delicious Longhorn-inspired Parmesan Chicken takes me back to those nostalgic family dinners. Over time, I’ve learned to add my twists, and the feedback has been overwhelmingly positive! From dinner parties to casual meals, the simplicity and straightforwardness of this recipe allow it to evolve and grow with each cook. Honestly, it’s hard to mess this one up—so don’t overthink it! And who doesn’t love a dish that leaves your kitchen smelling like heaven?
FAQs and Troubleshooting
1. My chicken isn’t crispy! What did I do wrong?
Ensure that you’re baking it at the right temperature and give them enough space on the baking sheet. Crowding the pan can lead to steaming rather than crisping.
2. Can I use chicken thighs instead of breasts?
Absolutely! Thighs are a fantastic option if you prefer richer flavors. Just keep an eye on the cooking time, as they might take a few minutes less than breasts.
3. What if I don’t have panko?
You can use regular breadcrumbs, but panko gives you that extra crunch. You’ll want to bake them slightly longer if using regular breadcrumbs.
4. How can I reheat leftovers?
For best results, reheat in the oven at 350°F (175°C) for about 10-15 minutes or until heated through. Avoid the microwave if you can, as it may turn your crispy chicken soggy.
Nutritional Info
(Per serving)
- Calories: 350
- Protein: 40g
- Carbohydrates: 16g
- Fat: 15g
- Fiber: 1g
This dish is not only satisfying, but it’s also packed with protein, making it a superb option for those looking to fuel up after a long day or a workout.
Whether you’re making this Longhorn Steakhouse Parmesan Chicken for a special occasion or just a casual weeknight dinner, it’s sure to impress. Let me know how yours turns out, and enjoy every delightful bite! Happy cooking!
PrintCrispy, Cheesy Longhorn Steakhouse Parmesan Chicken

A healthier take on Longhorn Steakhouse’s classic Parmesan Chicken, featuring crispy breaded chicken breasts topped with gooey cheese.
- Prep Time: 15 minutes
- Cook Time: 30 minutes
- Total Time: 45 minutes
- Yield: 4 servings 1x
- Category: Main Course
- Method: Baking
- Cuisine: American
- Diet: Gluten-Free
Ingredients
- 4 boneless, skinless chicken breasts (about 6 ounces each)
- 2 tablespoons olive oil
- 1 teaspoon garlic powder
- 1 teaspoon onion powder
- 1/2 teaspoon smoked paprika
- 1/2 teaspoon salt
- 1/4 teaspoon black pepper
- 1/2 cup panko breadcrumbs
- 1/3 cup grated Parmesan cheese
- 1/3 cup shredded mozzarella cheese
- 2 tablespoons unsalted butter, melted
- 1 tablespoon mayonnaise
- 1 teaspoon dried parsley
- 1/2 teaspoon garlic powder (additional)
- Fresh parsley (for garnish)
- Lemon wedges
Instructions
- Preheat your oven to 375°F (190°C).
- Prepare the chicken by butterflying or pounding to even thickness and seasoning with salt, smoked paprika, garlic powder, and onion powder.
- Set up your breadcrumb mixture by combining panko, Parmesan cheese, melted butter, and dried parsley.
- Coat each chicken breast with mayonnaise, then dredge in the breadcrumb mixture.
- Arrange the coated chicken breasts on a baking sheet lined with parchment paper.
- Bake for 25-30 minutes until golden brown and cooked through.
- Add shredded mozzarella on top and return to oven until melted (about 2-3 minutes).
- Garnish with chopped parsley and serve with lemon wedges.
Notes
For a complete meal, serve with a green salad or roasted veggies. Squeeze fresh lemon over the chicken for enhanced flavor.
Nutrition
- Serving Size: 1 serving
- Calories: 350
- Sugar: 2g
- Sodium: 800mg
- Fat: 15g
- Saturated Fat: 7g
- Unsaturated Fat: 6g
- Trans Fat: 0g
- Carbohydrates: 16g
- Fiber: 1g
- Protein: 40g
- Cholesterol: 70mg
Keywords: Parmesan Chicken, Crispy Chicken, Comfort Food, Healthy Recipe, Easy Dinner