Blueberry Mojito: 5-Minute Summer Cocktail for Busy Nights
Cheers to Summer: The Perfect Blueberry Mojito Recipe
Hey there, fellow food enthusiasts! Today, I’m excited to share a refreshing treat that will brighten up your sunny days and elevate your gatherings: the Blueberry Mojito. This delightful cocktail combines the vibrant sweetness of fresh blueberries, the zesty kick of lime, and the cool aroma of mint. You might even find yourself sipping one while lounging on the patio, feeling like summer never has to end.
I love a good mojito, but there’s something special about this blueberry twist. It’s not just about the flavors; it’s about the memories tied to it—the laughter, the sunshine, the feeling of being carefree. So grab your muddler, and let’s dive into making the best Blueberry Mojito you’ve ever had!
A Taste of Summer: My Blueberry Mojito Story
I’ll never forget that summer afternoon at Grandma’s house, where everything felt alive with excitement. The air was thick with the smell of blooming flowers, and the sound of laughter filled the garden. It was then, surrounded by family and the tantalizing aroma of herb-infused drinks, that I experienced my first mojito. I watched my aunts and uncles as they muddled mint leaves and squeezed limes, creating this magical potion that sparkled in the sunlight.
One day, I decided to join the fun and add a personal touch: blueberries from our garden. I remember plucking the ripest berries, their deep blue hue promising sweetness. When I blended them into the mojitos that day, the flavors exploded! The tangy lime sang harmoniously with the blueberries’ sweetness, and the fresh mint was the icing on the cake. Surrounded by family, with our glasses clinking and laughter spilling into the warm air, that blueberry mojito became the unofficial drink of our summer gatherings. And now? I’m thrilled to share that same joy with you!
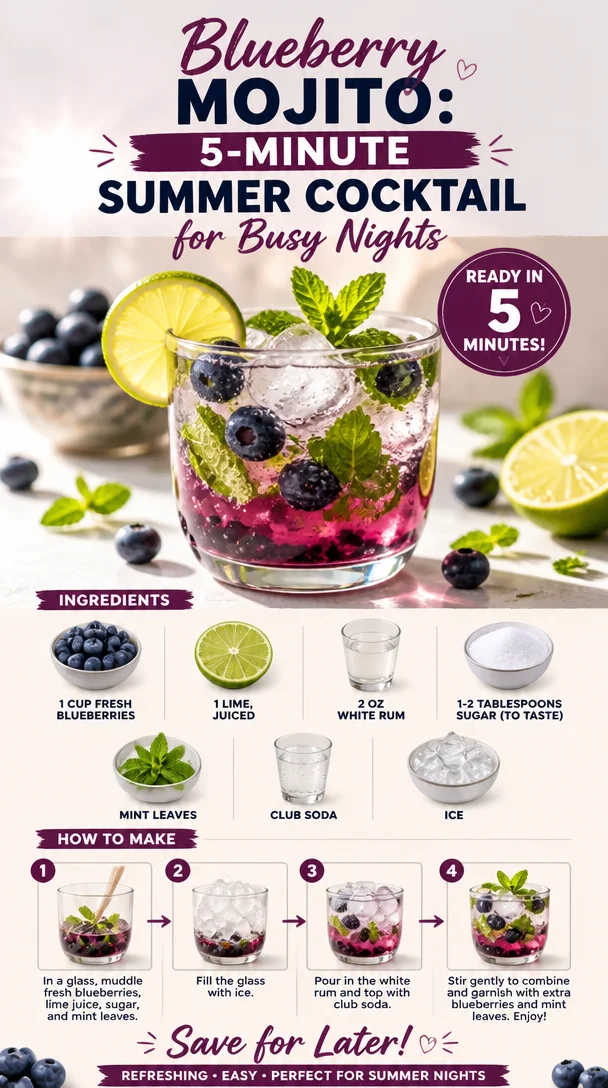
Ingredients
Let’s talk about what you’ll need to whip up this refreshing Blueberry Mojito:
-
1 cup fresh blueberries: Fresh berries are the star of this drink! They provide a natural sweetness and a pop of color. If blueberries aren’t in season, you can use frozen ones, but let them thaw beforehand for best results.
-
1 lime, juiced: The lime adds the necessary tartness to balance the sweetness of the blueberries. If you’re not a fan of lime, lemon can be a delightful substitute.
-
2 oz white rum: This is what gives your mojito its kick! Light rum works best, but if you prefer a deeper flavor, a spiced rum can add an interesting twist.
-
1-2 tablespoons sugar (to taste): Sugar enhances the sweetness of the mint and blueberries. You can also use simple syrup, agave, or honey for a different sweetness profile.
-
Mint leaves: Fresh mint is a must here. It brings that cooling refreshing flavor we love in mojitos. If you can’t find fresh mint, you might try a mint syrup for flavor, but it won’t have the same aromatic delight.
-
Club soda: This adds fizz and lightness to the drink. If you like a stronger kick, feel free to cut back the soda a bit.
-
Ice: Essential for serving the drink cold! The more, the merrier, in my opinion.
Step-by-Step Instructions
Let’s get down to the nitty-gritty of making this lovely Blueberry Mojito!
-
Muddle the blueberries and mint: In a sturdy glass or cocktail shaker, combine your blueberries and about 10 mint leaves. Using a muddler (or the back of a wooden spoon), gently crush the blueberries and mint together. The goal here is to release the juices of the berries and the oils from the mint without pulverizing everything into a mush. This will create a beautiful, fragrant base for your mojito.
-
Squeeze in the lime juice: Now, bring some zesty goodness into the mix! Cut your lime in half and squeeze the juice over the muddled blueberries and mint. Give it a slight stir. This will activate the mint even more, allowing it to release its natural oils.
-
Add your sugar: Sprinkle in the sugar to balance the tart lime and tangy blueberry flavors. Start with 1 tablespoon, stir well, and taste! You can always add more if you like it sweeter.
-
Pour in the rum: Measure out your white rum and pour it over the muddled ingredients. This is where the magic begins! The rum will blend beautifully with the sweetness of the blueberries and the refreshing mint. Give it a good stir to combine all those luscious flavors.
-
Fill your glass with ice: Now, grab your favorite glass—whether it’s a mason jar or a cocktail glass—and fill it halfway with ice. Don’t be shy here, ice is your best friend.
-
Top with club soda: Top your ice-filled glass with club soda. Pour it slowly to keep the fizz alive! Stir gently to combine all ingredients without losing the bubbles.
-
Garnish and enjoy: Add a few whole blueberries and a sprig of mint for garnish. Maybe throw in a lime wheel for good measure. There you have it! Your gorgeous Blueberry Mojito is ready to be sipped and savored.
Serving Suggestions
Presentation is key! Serve your Blueberry Mojito in a clear glass to show off those vibrant colors. Garnish with fresh mint leaves, a couple of whole blueberries floating atop the drink, and maybe a slice of lime hanging on the rim. This way, every time your guests take a sip, they’ll be reminded of the refreshing flavors packed into this delightful cocktail.
Recipe Variations
Feeling adventurous? Here are a few twists to make this mojito unique:
-
Berry Blend: Swap out or mix different berries like strawberries or raspberries for a berry medley mojito.
-
Herbal Surprise: Experiment by adding basil or cilantro in place of or with mint for a different herbal note.
-
Coconut Twist: Replace some of the club soda with coconut water for a tropical vibe.
-
Zingy Ginger: Add a slice of fresh ginger while muddling the mint and blueberries for a spicy kick.
-
Mocktail Version: Skip the rum for a refreshing non-alcoholic drink. Just amp up the club soda and perhaps add a bit of extra lime juice.
Chef’s Notes
I’ve made this mojito more times than I can count, and you know what? It’s never the same twice! I often switch it up based on what berries are fresh at the market or what’s in season. Each version is like a new memory waiting to happen. I also like to make a big batch for parties, which can be fun! Just multiply the ingredients and have guests serve themselves. Nothing breaks the ice better than a DIY cocktail bar at a summer gathering!
FAQs and Troubleshooting
Q1: Can I use frozen blueberries instead of fresh?
Absolutely! Frozen blueberries work just fine; just be sure to thaw them beforehand, so they blend well with the mint and lime.
Q2: What if I don’t have a muddler?
No problem! You can use the back of a spoon or a sturdy cup to muddle the ingredients. The goal is to release those wonderful flavors, so any tool that can smash the berries gently will do the trick.
Q3: Is it possible to make this drink ahead of time?
You can prepare the muddled base with blueberries, mint, and lime juice ahead of time and store it in the fridge. Just add the rum, ice, and club soda right before serving for the best taste and fizz.
Q4: How do I make it less sweet?
You can reduce the sugar or even ditch it altogether! If you want some sweetness without sugar, try adding a splash of sparkling flavored water or a bit of agave syrup.
Nutritional Info
(If applicable. You may want to include some estimates on calories, sugar content, etc., based on the ingredients used. For a standard serving: approximately 150 calories if made with sugar, but this can vary widely depending on sweetness and serving size.)
So there you have it—my take on the Blueberry Mojito! Bursting with flavors and unforgettable memories, this drink is bound to bring sunshine into any gathering. I hope you enjoy making and sipping it just as much as I do. Cheers to fresh flavors, vibrant gatherings, and the beautiful taste of summer! 🍹
PrintBlueberry Mojito

A refreshing blueberry twist on the classic mojito, perfect for summer gatherings.
- Prep Time: 10 minutes
- Cook Time: 0 minutes
- Total Time: 10 minutes
- Yield: 1 serving 1x
- Category: Cocktail
- Method: Muddling
- Cuisine: American
- Diet: Vegetarian
Ingredients
- 1 cup fresh blueberries
- 1 lime, juiced
- 2 oz white rum
- 1–2 tablespoons sugar (to taste)
- Fresh mint leaves
- Club soda
- Ice
Instructions
- Muddle the blueberries and mint in a glass or cocktail shaker.
- Squeeze in the lime juice and stir.
- Add the sugar and adjust to taste.
- Pour in the white rum and stir well.
- Fill your glass with ice.
- Top with club soda and stir gently.
- Garnish with whole blueberries and a mint sprig.
Notes
For a non-alcoholic version, skip the rum and add more club soda.
Nutrition
- Serving Size: 1 serving
- Calories: 150
- Sugar: 15g
- Sodium: 10mg
- Fat: 0g
- Saturated Fat: 0g
- Unsaturated Fat: 0g
- Trans Fat: 0g
- Carbohydrates: 38g
- Fiber: 2g
- Protein: 1g
- Cholesterol: 0mg
Keywords: blueberry mojito, summer cocktail, refreshing drinks, easy cocktails
Ingredient Nectarine Frozen Yogurt: Quick Summer Treat
The Sweetest Summer Delight: Nectarine Frozen Yogurt
Hey there, fellow food lovers! Today, we’re diving into a sensational summertime treat that’s as easy to whip up as it is delicious—Nectarine Frozen Yogurt! If you’re anything like me, the hotter months beckon for something cool, creamy, and full of flavor. This recipe checks all those boxes and then some!
Picture this: You’ve spent a long, sun-soaked day soaking up rays and enjoying all the vibrancy of summer. What better way to celebrate the season than with a bowl of homemade frozen yogurt that’s not only delectable but also packed with nutrients? Not to mention, you can control the sweetness and flavors to fit your taste buds perfectly!
In this post, I’ll share not just how to make this refreshing dessert but also some personal stories that tie it all together. Whether you’re treating yourself after a long day or impressing friends at a summer barbecue, trust me, this Nectarine Frozen Yogurt is going to be your new go-to. Let’s get into it!
A Bit of Nostalgia with Nectarines
I’ll never forget the summer when I was about eight years old, running around my grandmother’s garden. Between the glorious rows of tomatoes and cucumbers, there stood this beautiful nectarines tree. My grandmother would send me to collect the ripest nectarines. The excitement I felt every time I picked a fuzzy golden orb was indescribable!
One afternoon, as I sat beneath that tree, juice dripping down my chin, I had a thought—why not freeze them for later? But, back then, I had no clue how to make frozen yogurt! Fast forward a couple of decades, and the idea of serving this ambrosial fruit in a frozen dessert brings back warm memories of that garden and the simple joys of summer.
Now, that sense of nostalgia is embedded in every scoop of my Nectarine Frozen Yogurt. It’s not just about making something cold; it’s about diving into sweet memories and enjoying the moment. Trust me when I say there’s nothing quite like it!
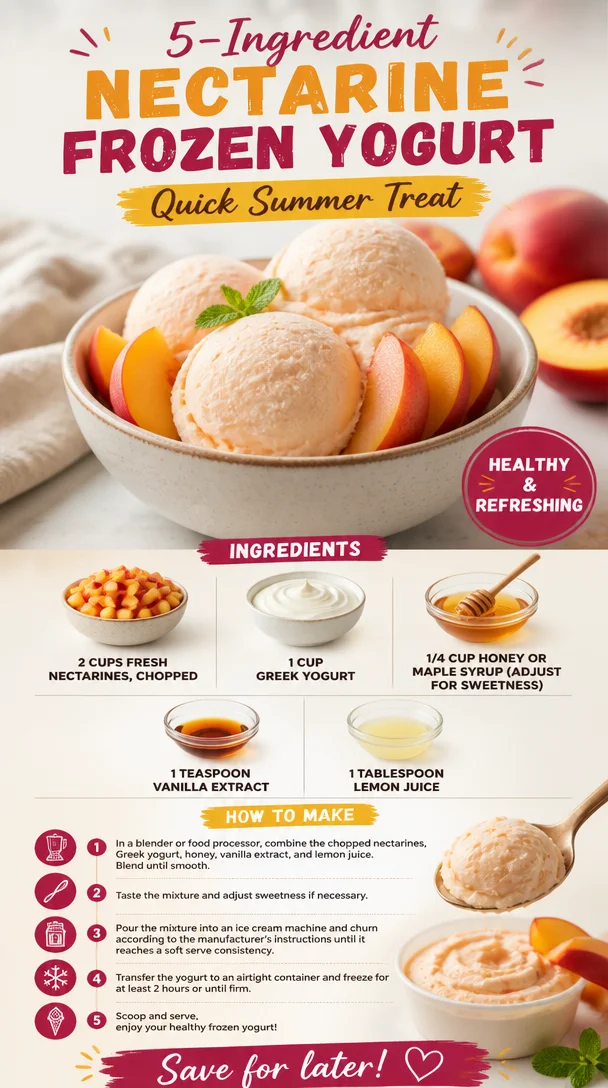
Ingredients
Here’s what you’ll need to make your very own Nectarine Frozen Yogurt:
-
2 cups fresh nectarines, chopped
Juicy and sweet, nectarines are the star of this show! If nectarines aren’t in season, peaches can make a delightful substitute. -
1 cup Greek yogurt
This yogurt is creamy and tangy, offering a healthy twist. If you prefer a dairy-free version, try coconut yogurt—it adds a lovely tropical hint! -
1/4 cup honey or maple syrup
Just the right amount of sweetness! Depending on your taste, you can adjust this ingredient. Agave syrup works well too if you’re looking for plant-based options. -
1 teaspoon vanilla extract
A splash of vanilla elevates the flavors. Feel free to use pure vanilla for richness, or vanilla bean paste for those delightful specks! -
1 tablespoon lemon juice
Brightens the whole mix and balances sweetness! If you’re out of lemons, a splash of lime juice will work wonders too.
Step-by-Step Instructions
Alright, let’s roll up our sleeves and turn those beautiful nectarines into a creamy, dreamy dessert. Here’s how to do it, step by step!
-
Prepare the Nectarines
Start by washing the nectarines thoroughly. After all, we want to remove any residues from the garden! Chop them into small pieces. The smaller, the better, as they’ll blend more easily. Make sure you remove the pit, of course—nobody wants a surprise crunch in their frozen yogurt!Chef Hack: Don’t stress if your nectarines are a bit too ripe. They’ll blend easier, and those sweet juices will make your yogurt even more scrumptious!
-
Blend It Up
Grab a blender or a food processor and toss in the chopped nectarines. Add the Greek yogurt, sweetener (honey or maple syrup), vanilla extract, and lemon juice.Tip: For a speedier blend, chop the nectarines smaller. It’ll save your blender motor from working too hard!
-
Strike a Balance
Blend all the ingredients until your mixture is smooth and creamy. Stop and taste it! Adjust the sweetness or acidity with more honey or lemon juice, depending on your preference. This is your creation, after all!Chef Insight: Sometimes, the natural sweetness of nectarines can surprise you! Always start with a little sweetness, and you can add more if you like.
-
Freeze the Mixture
Pour the blended mixture into a freezer-safe container. Spread it out with a spatula for even freezing. Cover it tightly with a lid or plastic wrap to avoid ice crystals.Little Chef Tip: If you have an ice cream maker, this step is even easier! Just churn it according to the manufacturer’s instructions.
-
Time to Chill
Let it freeze for at least 4–5 hours or overnight if you can wait! The longer, the better it sets up. -
Scoop and Serve
Once frozen, let the yogurt sit at room temperature for about 10-15 minutes before scooping. This softens it up for the perfect scoopability.Bonus Cue: Use a warm scoop or an ice cream scoop for easier serving. Just run it under hot water for a few seconds!
Serving Suggestions
Now that you’ve mastered the art of making Nectarine Frozen Yogurt, it’s time to serve it up! A beautiful scoop of frozen yogurt in a chilled bowl always impresses. Add some fresh mint leaves for an extra touch and a pop of color that complements the golden hues of the nectarines.
Want to elevate your presentation even more? Serve alongside fresh berries, a drizzle of honey, or a sprinkle of granola. Trust me, a bit of crunch can turn your dessert into a masterpiece!
Recipe Variations
Here are a few creative twists you might want to try:
-
Berry Bliss: Add a cup of frozen mixed berries to the blend for a mixed-fruit flavor explosion. Blueberries and strawberries pair wonderfully with nectarines.
-
Spicy Zing: Incorporate a pinch of ground ginger or cinnamon for a warming spice that complements the sweetness of the nectarines beautifully.
-
Nutty Delight: Add almond or cashew butter for a nutty flavor and extra creaminess!
-
Coconut Cream: For a tropical vibe, substitute Greek yogurt with coconut yogurt and add shredded coconut flakes in the mixture.
Chef’s Notes
This recipe has truly evolved over the years. What started as a simple summer dessert has turned into my go-to healthy treat anytime I need a refresh! I once experimented with adding different fruits, and while nectarines come out on top, the recipe remains playful. Did I ever tell you about the time I almost forgot to add sweetener? Let’s just say, while it’s cute to be optimistic about the sweetness of fruit, not all fruits can sweeten a whole batch of yogurt!
So do yourself a favor—taste as you go! You might discover your new favorite twist along the way.
FAQs and Troubleshooting
-
What if my frozen yogurt turned out too hard?
If it’s rock solid, let it sit at room temperature for a bit before serving. Next time, try adding a bit more yogurt or reducing freezing time. -
Can I make this with other fruits?
Absolutely! Peaches, berries, or even mangoes work beautifully. The trick is to adjust sweetness based on the fruit’s natural sugars. -
How long will it last in the freezer?
It’ll be best consumed within two weeks. After that, the texture might change, but it’ll still be delicious! -
What can I do with leftovers?
If you have any leftover frozen yogurt, consider blending it into smoothies for a creamy treat, or using it as a topping for pancakes or waffles!
Nutritional Info
(If applicable—this can vary based on ingredients and serving size.)
Nectarine Frozen Yogurt is not only a flavorful treat but also a healthy option that is rich in protein from Greek yogurt and antioxidants from nectarines. It’s a guilt-free indulgence that satisfies your sweet tooth while keeping you refreshed!
So there you have it, my friends—a delightful recipe that combines aching nostalgia, the joy of cooking, and the love for simple yet delicious food. I know you’ll love whipping up this Nectarine Frozen Yogurt as much as I do! Grab your nectarines, and let’s make some memories in the kitchen! Happy eating!
PrintNectarine Frozen Yogurt

A refreshing and creamy summer treat made with fresh nectarines and Greek yogurt, perfect for cooling down on hot days.
- Prep Time: 15 minutes
- Cook Time: 300 minutes
- Total Time: 315 minutes
- Yield: 4 servings 1x
- Category: Dessert
- Method: Freezing
- Cuisine: American
- Diet: Vegetarian
Ingredients
- 2 cups fresh nectarines, chopped
- 1 cup Greek yogurt
- 1/4 cup honey or maple syrup
- 1 teaspoon vanilla extract
- 1 tablespoon lemon juice
Instructions
- Prepare the nectarines by washing them thoroughly and chopping into small pieces, removing the pit.
- Grab a blender or food processor and add the nectarines, Greek yogurt, sweetener, vanilla extract, and lemon juice.
- Blend all the ingredients until smooth and creamy, adjusting sweetness or acidity to taste.
- Pour the mixture into a freezer-safe container and spread it out. Cover tightly.
- Let it freeze for at least 4–5 hours or overnight.
- Once frozen, let it sit at room temperature for 10-15 minutes before scooping.
Notes
For a creamier texture, consider using an ice cream maker. Serve with fresh mint, berries, honey, or granola for added flavor.
Nutrition
- Serving Size: 1 serving
- Calories: 200
- Sugar: 25g
- Sodium: 75mg
- Fat: 3g
- Saturated Fat: 1g
- Unsaturated Fat: 2g
- Trans Fat: 0g
- Carbohydrates: 35g
- Fiber: 2g
- Protein: 5g
- Cholesterol: 10mg
Keywords: nectarine, frozen yogurt, summer dessert, healthy treat, homemade yogurt
Beginner-Friendly No-Bake Oreo Cheesecake Cups (Quick Prep)
No Bake Oreo Cheesecake Cups: A Dessert to Crave
Welcome back to Clean Plate Cravings, where we whip up delightful, fresh, and feel-good recipes for every occasion! Today, I’m excited to share a delectable treat that’s bound to bring a smile to your face and joy to your taste buds: No Bake Oreo Cheesecake Cups. These heavenly little cups are not only a breeze to make, but they’re also packed with flavor and irresistible creaminess. So let’s roll up our sleeves, dive into the kitchen, and create something truly special together!
A Sweet Nostalgic Memory
Before we jump into the recipe, let me take you on a little trip down memory lane. I remember the first time I had an Oreo cheesecake. I was at a summer picnic, and one of my friends brought this divine dessert. It was a hot day, and the lush, creamy texture of the cheesecake paired with the crunchy Oreo crust was sheer bliss. I took my first bite and immediately knew I had discovered something magical!
Every summer since then, I’ve made it my mission to recreate that perfect cheesecake. After countless experiments and some hilarious kitchen fails (thank goodness for forgiving friends!), I landed on this no-bake version that’s indeed the star of the show. So, let’s bring that nostalgic flavor into our kitchens!
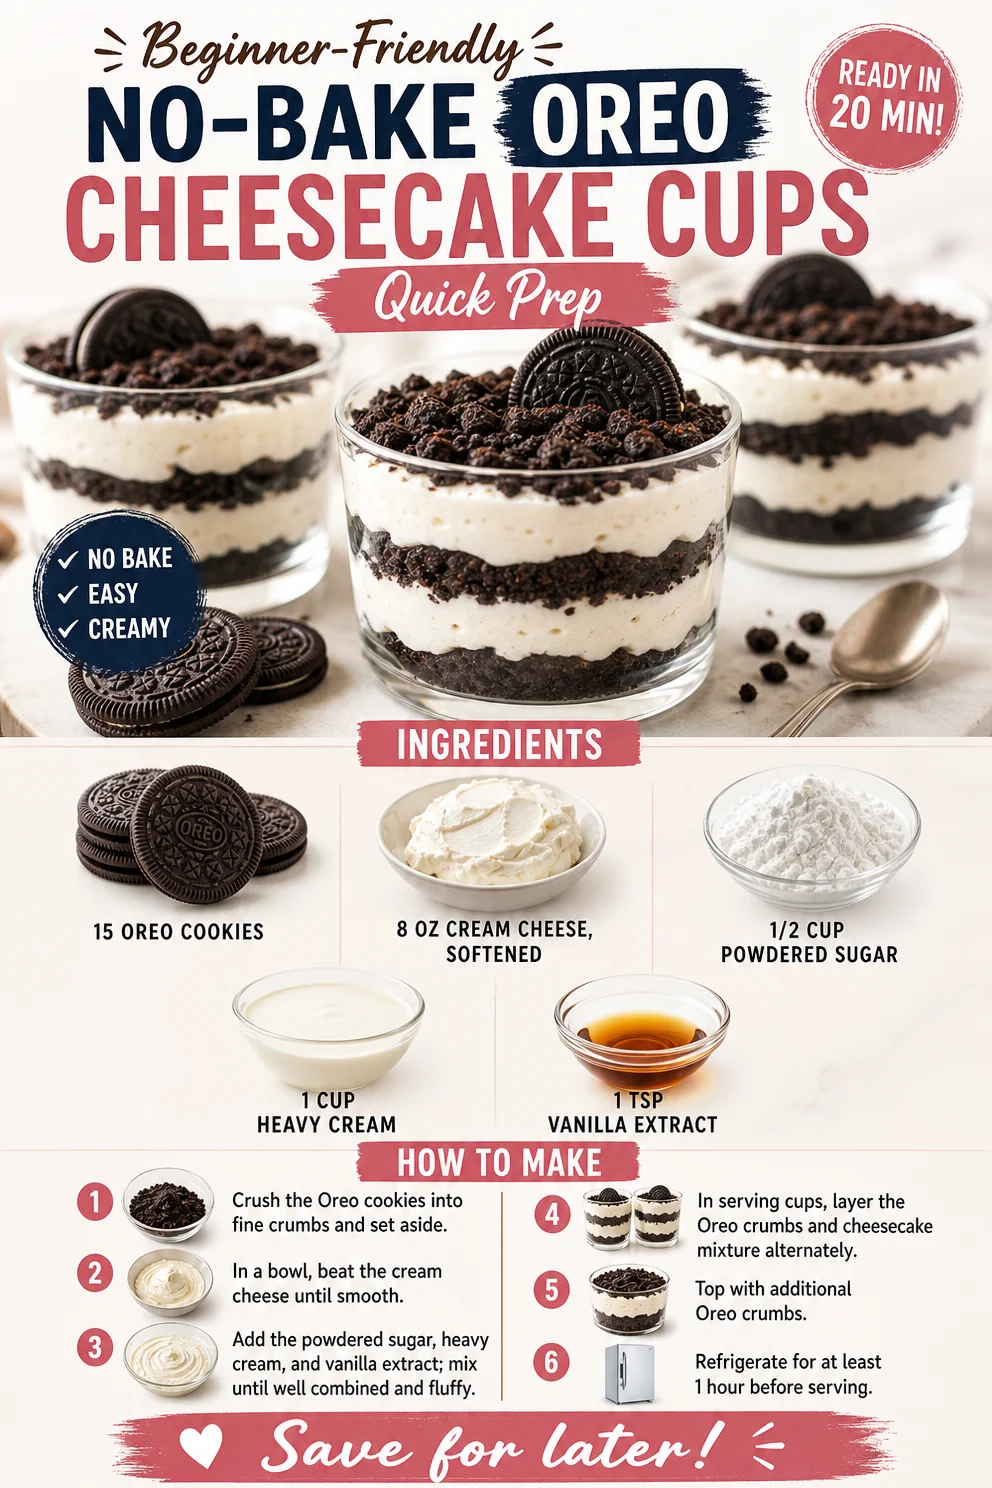
Ingredients
Here’s what you’ll need to make these delightful No Bake Oreo Cheesecake Cups:
-
15 Oreo cookies: A classic cookie that provides the perfect base with its crunchy texture and sweet cocoa flavor. Don’t have Oreos? Try any chocolate sandwich cookie!
-
8 oz cream cheese, softened: Cream cheese gives our cheesecake its rich and creamy texture. To make it lighter, use mascarpone cheese or even a dairy-free cream cheese alternative.
-
1/2 cup powdered sugar: This sweet component gives balance without being overly sweet. If you need a sugar alternative, powdered erythritol works beautifully!
-
1 cup heavy cream: Heavy cream is whipped to create that light and fluffy texture. For a lighter version, you can use whipped coconut cream.
-
1 tsp vanilla extract: The essence of vanilla infuses warmth and sweetness into the cheesecake. Pure vanilla extract is always the best choice, but imitation vanilla will work in a pinch!
Step-by-Step Instructions
Ready to bring these Oreo Cheesecake Cups to life? Here’s how to do it!
-
Crush the Oreos: Start by placing your Oreo cookies in a zip-top bag. Seal it tightly and give them a good crush with a rolling pin or a heavy object until you have fine crumbs. Not only will this release stress, but it’ll also create a fantastic crust! Alternatively, you can use a food processor for this job.
-
Make the Cookie Crust: In a mixing bowl, combine the crushed Oreos with 2 tablespoons of melted butter. Stir until everything is moistened. This is your delicious crust! Spoon a heaping tablespoon of the mixture into the bottom of each serving cup or jar and press down gently.
-
Prepare the Cheesecake Filling: In another bowl, beat the softened cream cheese with an electric mixer until smooth. Add the powdered sugar and vanilla extract, blending well until combined. You’ll find the mixture becoming thick and creamy—don’t worry, you’re on the right track!
-
Whip the Heavy Cream: In a separate bowl, whip the heavy cream until stiff peaks form. You’ll know it’s ready when you turn the bowl upside down, and nothing falls out! This fluffy whipped cream will lighten our cheesecake mixture beautifully.
-
Fold it All Together: Gently fold the whipped cream into the cream cheese mixture. Use a spatula and be gentle—the key here is to maintain that light, airy texture. Keep folding until just incorporated.
-
Assemble the Cups: Now comes the fun part! Layer the cheesecake filling over the Oreo crust in each cup. You can use a piping bag for a more polished look or just spoon it in (we’re keeping it relaxed here!). Add another layer of crushed Oreos on top for that lovely crunch.
-
Chill and Enjoy: Refrigerate the Oreo cheesecake cups for at least 2 hours or until set. The waiting is the hardest part, but believe me, it’s worth it!
Serving Suggestions
When it’s time to serve, it’s all about presentation! You can keep it simple by adding a dollop of whipped cream on top and maybe a sprinkle of crushed Oreos for visual appeal. If you’re feeling extra indulgent, drizzle some chocolate syrup or a touch of caramel sauce. Voilà! Your dreamy dessert is ready to impress!
Recipe Variations
Want to change things up? Here are a few creative twists to consider:
-
Mint Chocolate Oreo Cheesecake Cups: Use mint-flavored Oreos for a refreshing spin!
-
Peanut Butter Lover’s Variation: Add a few tablespoons of creamy peanut butter to the cheesecake filling for added richness.
-
Fruit-Filled Delight: Layer in some fresh strawberries or raspberries in between the crust and filling for a fruity touch.
-
Chocolate Lovers’ Dream: Incorporate mini chocolate chips into the filling or top with chocolate shavings for an extra decadence.
Chef’s Notes
This recipe has become my go-to dessert for gatherings, family celebrations, and even cozy nights in! Each time, I love to tweak the ingredients based on what I have at hand or the mood of the occasion. One memorable moment was when I accidentally added too much cream cheese—who knew it could turn into a super creamy masterpiece? My friends loved the unexpected twist!
FAQs and Troubleshooting
-
Can I prepare these cups in advance?
Absolutely! These cheesecake cups can be made a day ahead and stored in the refrigerator until you’re ready to serve. -
What if my mixture is too thick?
If it’s too thick, try adding a splash of milk or cream to loosen it up while still maintaining its structure. -
Can I use low-fat cream cheese?
Yes, you can! Just remember that the texture may be slightly different, but it will still be delicious. -
Can I freeze these cheesecake cups?
Yes, they can be frozen! Just make sure to cover them well. When you’re ready to enjoy, thaw them in the fridge overnight before serving.
Nutritional Info
While I always advocate for enjoying dessert without guilt, if you’re curious about the nutritional info per serving (assuming 6 cups total), each cup contains approximately:
- Calories: 250
- Protein: 3g
- Carbohydrates: 28g
- Fat: 15g
- Sugar: 8g
And there you have it, my friends! I can’t wait for you to try these No Bake Oreo Cheesecake Cups; they’re a delightful treat that feels just like a hug in dessert form. So, grab your ingredients, get your friends or family involved, and enjoy the fantastic flavors of this creamy treat. Happy indulging!
PrintNo Bake Oreo Cheesecake Cups
Delightful no bake Oreo cheesecake cups that are creamy, packed with flavor, and incredibly easy to make.
- Prep Time: 20 minutes
- Cook Time: 0 minutes
- Total Time: 120 minutes
- Yield: 6 servings 1x
- Category: Dessert
- Method: No-Bake
- Cuisine: American
- Diet: Vegetarian
Ingredients
- 15 Oreo cookies
- 8 oz cream cheese, softened
- 1/2 cup powdered sugar
- 1 cup heavy cream
- 1 tsp vanilla extract
Instructions
- Crush the Oreos: Place the Oreo cookies in a zip-top bag, seal tightly, and crush until fine crumbs form.
- Make the Cookie Crust: Combine the crushed Oreos with 2 tablespoons of melted butter in a mixing bowl.
- Prepare the Cheesecake Filling: Beat the softened cream cheese with an electric mixer until smooth, then add in the powdered sugar and vanilla extract.
- Whip the Heavy Cream: In a separate bowl, whip the heavy cream until stiff peaks form.
- Fold it All Together: Gently fold the whipped cream into the cream cheese mixture until incorporated.
- Assemble the Cups: Layer the cheesecake filling over the Oreo crust in each cup, adding more crushed Oreos on top.
- Chill and Enjoy: Refrigerate for at least 2 hours or until set before serving.
Notes
These cheesecake cups can be made in advance and kept in the refrigerator. Perfect for gatherings or as a family treat!
Nutrition
- Serving Size: 1 cup
- Calories: 250
- Sugar: 8g
- Sodium: 200mg
- Fat: 15g
- Saturated Fat: 9g
- Unsaturated Fat: 5g
- Trans Fat: 0g
- Carbohydrates: 28g
- Fiber: 1g
- Protein: 3g
- Cholesterol: 30mg
Keywords: Oreo cheesecake, no bake dessert, easy cheesecake recipe, creamy dessert
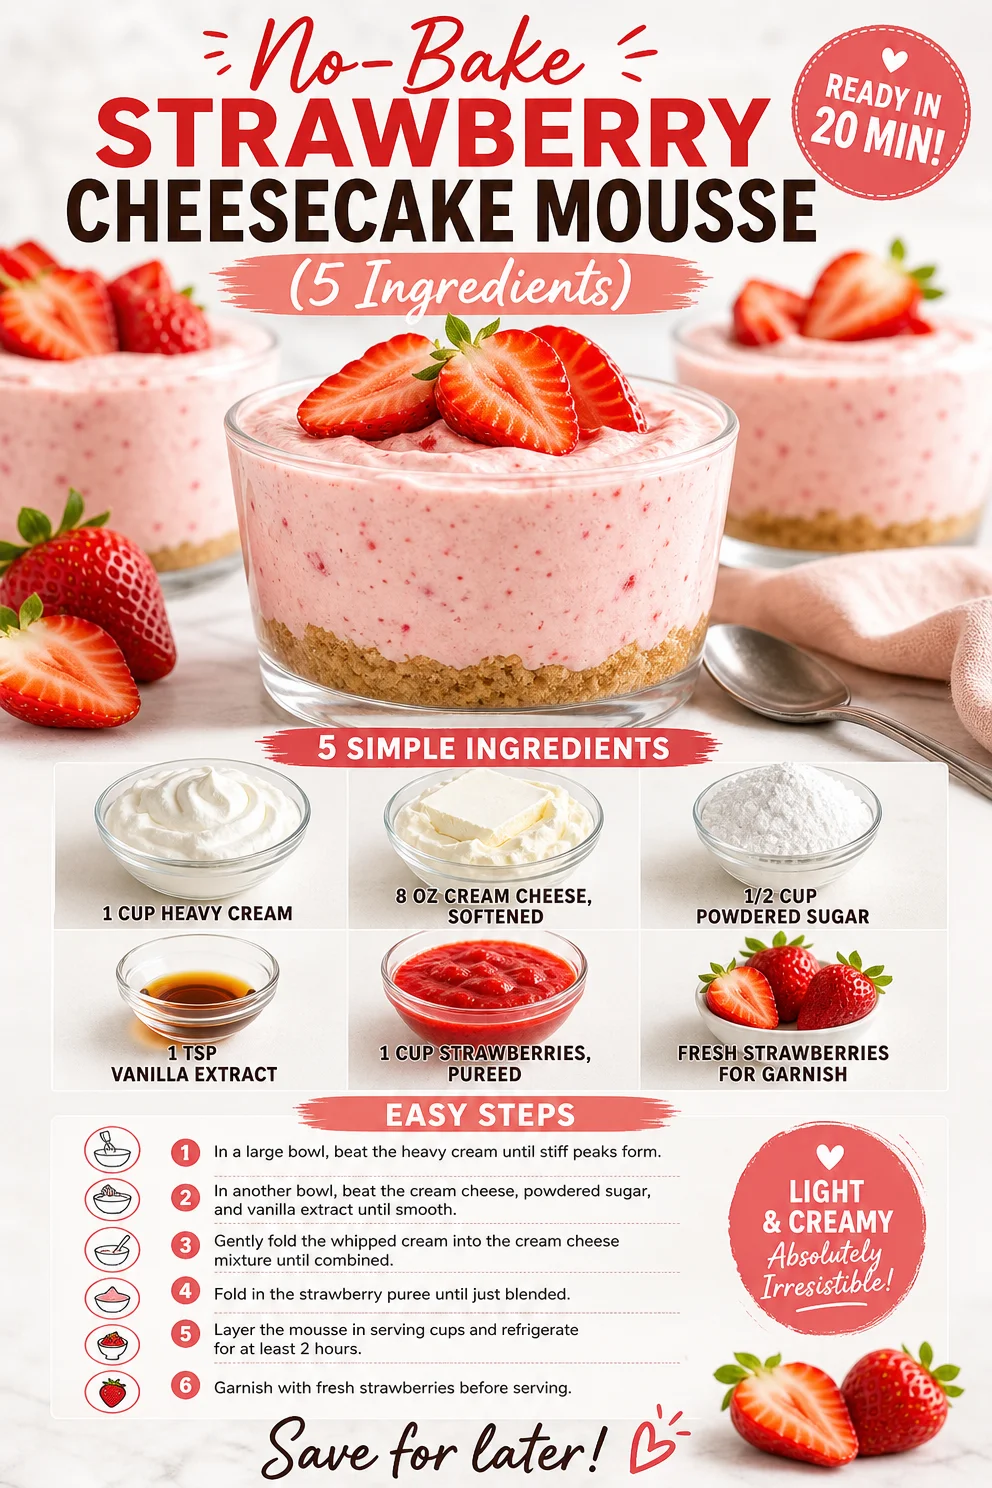
No-Bake Strawberry Cheesecake Mousse (5 Ingredients)
Indulge in Strawberry Cheesecake Mousse: A Sweet Symphony of Flavor and Nostalgia
Welcome back to Clean Plate Cravings, food lovers! Today, we’re diving headfirst into a delightful treat that dances around your taste buds like a summer breeze—Strawberry Cheesecake Mousse. Yes, you read that right! This dessert is a luscious combination of creamy cheesecake and fresh strawberries, whipped up into an airy mousse that’s as satisfying to make as it is to devour.
Imagine sinking into a fluffy cloud of this sweet, fruity mousse after a long day. It’s light yet indulgent, satisfying your sweet tooth without weighing you down. Plus, it’s incredibly simple to whip up, making it a perfect choice for both casual dinners and fancy gatherings. The best part? You don’t even need to be a professional chef to impress your family and friends with this delectable treat!
The flavor profile is a marriage of sweet and creamy, punctuated with the tartness of fresh strawberries that makes it the perfect showstopper for any occasion. I’ll guide you through every step, sharing tips and tricks along the way, so you will feel like an absolute rock star in the kitchen. So grab your mixing bowl and spatula, and let’s make some magic happen!
A Sweet Memory to Share
Before we dive into the recipe, I want to take you back to a cherished memory of mine. Growing up, my family had a sweet tradition of having dessert every Sunday evening. My grandma would whip up a variety of fabulous treats, but the showstopper was always her famous strawberry cheesecake. It was a no-bake delight, rich and creamy, just like me!
I remember the smell of fresh strawberries filling the kitchen as we mashed them down to a pulpy bliss, mixing them with cream cheese and sugar while waiting for the mouse to firm up. Sundays became a celebration—not just of dessert, but of family and laughter. My cousins and I would sit eagerly at the table, with our forks poised, as grandma presented her masterpiece.
This Strawberry Cheesecake Mousse is inspired by that beloved tradition, making it a fitting tribute to those warm, nostalgic Sundays filled with family bonding and deliciousness. I hope this dessert brings you similar joy, creating sweet memories with your loved ones.
Ingredients
Here’s what you’ll need to craft this delicious Strawberry Cheesecake Mousse:
-
1 cup heavy cream: The star ingredient for that rich and fluffy mousse texture. You can substitute it with full-fat coconut milk for a dairy-free option, but it might alter the flavor a bit.
-
8 oz cream cheese, softened: This brings the classic cheesecake flavor. For a lighter option, you can use Neufchatel cheese, which has less fat but retains the creamy consistency.
-
1/2 cup powdered sugar: Sweetens the deal! You can use granulated sugar if you prefer; just be sure to whip it longer to dissolve the sugar completely.
-
1 tsp vanilla extract: Adds a warm, vanilla flavor that complements the strawberries beautifully. Feel free to use almond extract for a different taste twist!
-
1 cup strawberries, pureed: Fresh strawberries are best, but you can also use frozen berries; just make sure to thaw and drain them well before pureeing to remove excess moisture.
-
Fresh strawberries for garnish: Because what’s a dessert without a little bling on top?
Step-by-Step Instructions
Alright, let’s get down to the nitty-gritty of creating this heavenly mousse! Follow these steps, and you’ll have a spectacular dessert ready to impress.
-
Prep your ingredients: Gather all your ingredients, ensuring the cream cheese is at room temperature (this makes it easier to blend). A quick tip: you can soften cream cheese in the microwave for about 15-20 seconds—just be careful not to melt it!
-
Whip the cream: In a mixing bowl, pour in the heavy cream. Using an electric mixer (or a whisk if you’re up for a workout!), whip the cream until stiff peaks form. This step usually takes about 3-5 minutes. The texture should be airy and hold its shape well. Tip: Start on low speed to avoid splattering cream everywhere!
-
Mix the cream cheese: In another large bowl, combine the softened cream cheese and powdered sugar. Use the electric mixer to blend until smooth and creamy, about 2-3 minutes. This is where the magic happens, transforming your ingredients into a dreamy, cheesecake-like base.
-
Add vanilla and strawberries: Now it’s time to add the vanilla extract and the pureed strawberries to the cream cheese mixture. Stir gently until all ingredients are well incorporated. This is your opportunity to taste and adjust sweetness if needed!
-
Fold in the whipped cream: This is a crucial step to ensure your mousse stays light and fluffy. Gently fold the whipped cream into the strawberry mixture using a spatula. You want to retain the airiness, so fold gently without over-mixing.
-
Chill your mousse: Once everything is combined, divide the lovely mousse into serving dishes or glasses. Cover them with plastic wrap and refrigerate for at least an hour, allowing the flavors to meld together and the mousse to firm up. This is a great time to relax and wipe down your kitchen—because we all love a clean workspace!
-
Garnish and serve: Once chilled, it’s time to serve! Top each mousse with a fresh strawberry for that pop of color and vibrant flavor. Get ready to dig in!
Serving Suggestions
To elevate the presentation and make it even more appealing, consider serving the mousse in clear glasses to showcase those beautiful layers. Swirl in some pureed strawberries or drizzle with a bit of chocolate sauce for an elegant touch. You could also pair this mousse with a shortbread cookie or some crushed graham crackers for an added crunch.
This dessert is perfect for dinner parties, special gatherings, or simply to indulge yourself after a long day!
Recipe Variations
Feeling adventurous? Here are some fun twists you can try:
-
Berry Medley Mousse: Substitute the strawberries with a mix of raspberries, blueberries, and blackberries for a vibrant berry medley.
-
Chocolate Strawberry Cheesecake Mousse: Melt some dark chocolate and swirl it into the cream cheese mixture for an enticing chocolatey hit.
-
Minty Fresh Mousse: Toss in some fresh mint leaves into the puree for a refreshing flavor that pairs beautifully with strawberries.
-
Lemon Zest Twist: Add a teaspoon of lemon zest which complements the strawberries and cheesecake flavors beautifully.
Chef’s Notes
This recipe holds a special place in my heart because it’s one of those simple indulgences that never fails to make an appearance during family gatherings. Over the years, I’ve played around with the base—a dash of lemon juice here or some chocolate there. One time, I even threw in some crushed pretzels for a salty crunch, and it was a hit!
I cherish the lightness of this dessert. It’s satisfying without the heaviness of a traditional cheesecake, making it perfect year-round. Plus, it can easily be made ahead of time, freeing up your day for more fun activities or simply lounging in your favorite chair!
FAQs and Troubleshooting
1. My mousse turned out runny! What happened?
This usually happens if the heavy cream wasn’t whipped enough or if it was folded too vigorously with the cream cheese mixture. Make sure to whip it until stiff peaks form and gently fold to retain the airiness.
2. Can I use low-fat cream cheese?
You can! Just remember that the texture and flavor may be slightly different, but it’ll still be delicious.
3. How long can I store leftovers?
You can keep the mousse covered in the fridge for up to 2-3 days. Just give it a quick stir before serving again.
4. Can I freeze this mousse?
While it’s best served fresh, you can freeze the mousse. Just make sure to store it in an airtight container. When ready to enjoy, let it thaw overnight in the fridge for the best texture.
Nutritional Info
Each serving (based on 4 servings) contains approximately:
- Calories: 275
- Protein: 5g
- Carbohydrates: 23g
- Fat: 20g
- Sugars: 14g
(Note: Nutritional values may vary based on portions, brands, and specific ingredient types used.)
With all these delightful insights, tips, and a dash of nostalgia, your journey into the land of Strawberry Cheesecake Mousse should be a breeze. I can’t wait for you to try this recipe! Not only will it add a touch of sweetness to your life, but it will also create lasting memories filled with laughter and deliciousness. Happy cooking!
PrintStrawberry Cheesecake Mousse
A delightful, airy dessert combining creamy cheesecake and fresh strawberries, perfect for any occasion.
- Prep Time: 15 minutes
- Cook Time: 0 minutes
- Total Time: 60 minutes
- Yield: 4 servings 1x
- Category: Dessert
- Method: No-Bake
- Cuisine: American
- Diet: Vegetarian
Ingredients
- 1 cup heavy cream
- 8 oz cream cheese, softened
- 1/2 cup powdered sugar
- 1 tsp vanilla extract
- 1 cup strawberries, pureed
- Fresh strawberries for garnish
Instructions
- Prep your ingredients: Gather all your ingredients, ensuring the cream cheese is at room temperature.
- Whip the cream: In a mixing bowl, pour in the heavy cream and whip until stiff peaks form, about 3-5 minutes.
- Mix the cream cheese: In another large bowl, combine the softened cream cheese and powdered sugar, blending until smooth, about 2-3 minutes.
- Add vanilla and strawberries: Incorporate the vanilla extract and pureed strawberries into the cream cheese mixture, stirring gently.
- Fold in the whipped cream: Gently fold the whipped cream into the strawberry mixture using a spatula.
- Chill your mousse: Divide the mousse into serving dishes and refrigerate for at least 1 hour.
- Garnish and serve: Top each mousse with a fresh strawberry before serving.
Notes
Consider serving in clear glasses to showcase layers. Pair with shortbread cookies or graham crackers for added crunch.
Nutrition
- Serving Size: 1 serving
- Calories: 275
- Sugar: 14g
- Sodium: 200mg
- Fat: 20g
- Saturated Fat: 12g
- Unsaturated Fat: 8g
- Trans Fat: 0g
- Carbohydrates: 23g
- Fiber: 1g
- Protein: 5g
- Cholesterol: 40mg
Keywords: strawberry, cheesecake, mousse, dessert, no-bake
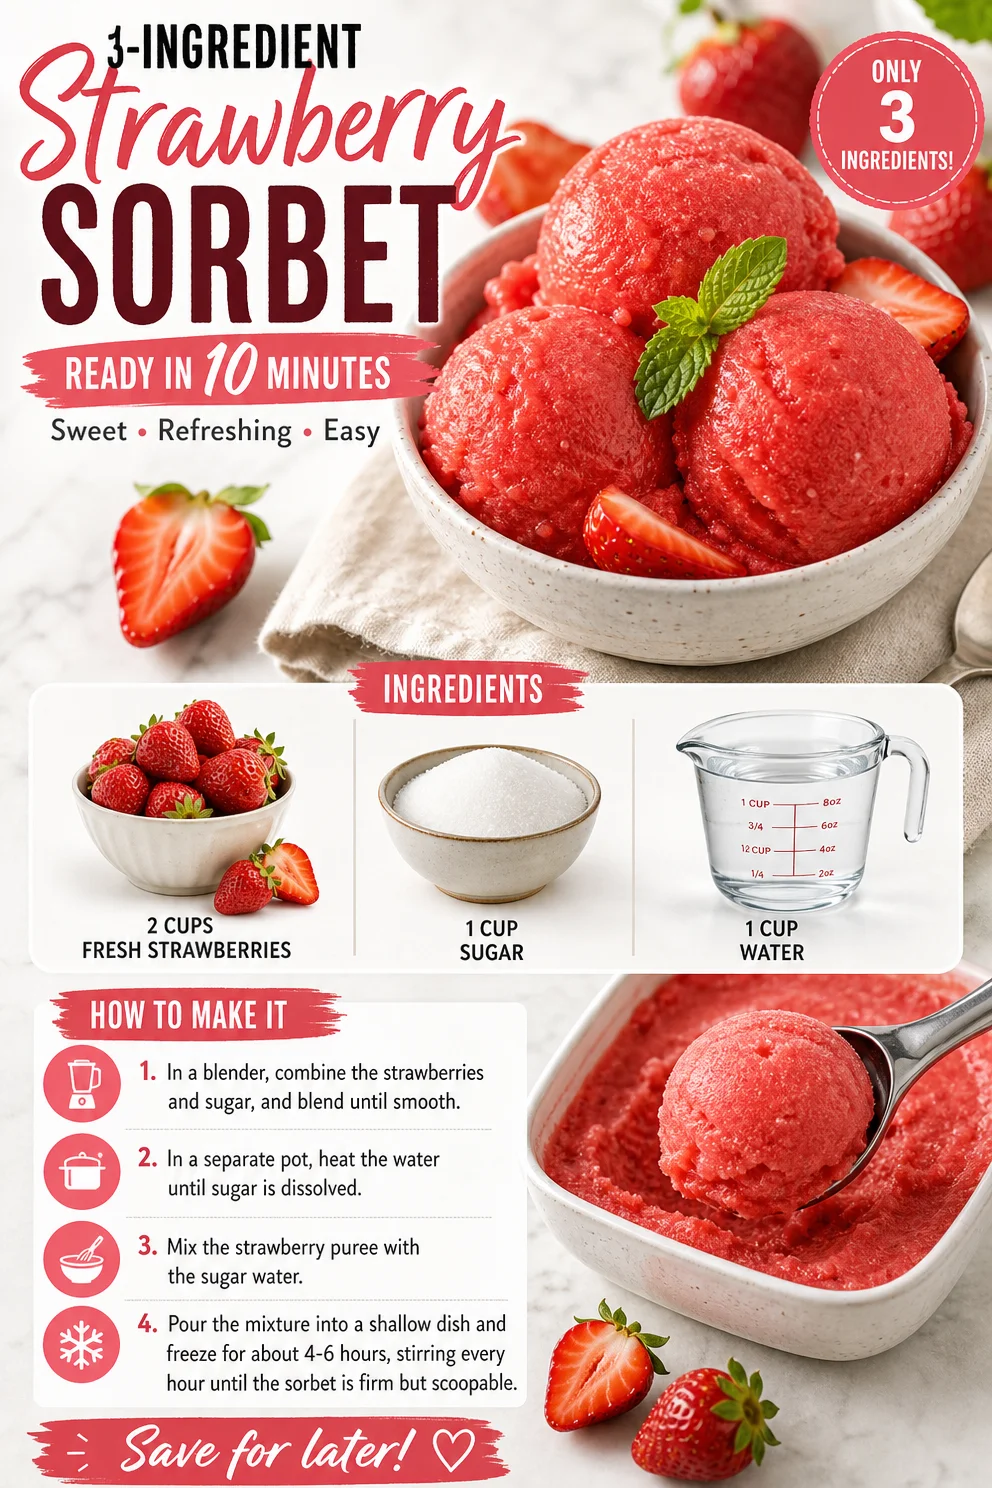
Ingredient Strawberry Sorbet: Ready in 10 Minutes
Easy 3-Ingredient Strawberry Sorbet: A Refreshing Delight
Spring has finally sprung, and with it comes a burst of fresh fruit goodness! If you’re like me and can’t resist the allure of vibrant strawberries in the market, then get ready to fall head over heels for this easy 3-Ingredient Strawberry Sorbet. This delightful treat is not only a fantastic way to cool off on a hot day, but it’s also a memories-in-the-making dessert that you can whip up in just a few simple steps.
Can we talk about how versatile strawberries are? Sweet, juicy, and bursting with flavor, they remind me of my childhood summers spent picking fresh fruit from the local farm. Each berry plucked was sweeter than the last, and I would often get covered in juice, my hands red from the delicious mess. I remember coming home with buckets overflowing with strawberries, the anticipation of what we could create next hanging in the air. And guess what our go-to creation always was? Sorbet!
That’s right—who could resist a spoonful of that icy, fruity goodness? As a kid, I would hover around the kitchen, eager to help with the process. Whether it was dumping strawberries into the blender or sneaking a taste of the final product, those moments were all about joy and creativity in the kitchen. Fast forward to today, and I still delight in making this airy concoction that is all about simple ingredients and pure, unadulterated flavor. It’s a nostalgic reminder of my childhood while also being the ultimate refreshing dessert for any occasion.
So, let’s not waste another moment! Grab your blender and let’s dive into this fabulous world of vibrant strawberry bliss. Trust me, you’ll love how easy and rewarding this recipe is to make!
Ingredients
-
2 cups fresh strawberries
The star of our show! Look for ripe, sweet strawberries for the best flavor. If you can’t find fresh ones, feel free to use frozen strawberries—just let them thaw a bit before blending. -
1 cup sugar
This sweetener balances the tartness of the berries and helps achieve that smooth sorbet consistency. If you’re watching your sugar intake, you can swap in a natural sweetener like agave or honey—just adjust the amounts to taste. -
1 cup water
Water is essential for blending everything smoothly. If you want to enhance the flavor even more, you could use coconut water or fruit juice; they’ll add an extra layer of deliciousness to your sorbet.
Step-by-Step Instructions
-
Prep the Strawberries
Start by washing your strawberries under cold water. Remove the green tops and any bruised spots. If they’re particularly large, consider halving them for easier blending. Remember, the fresher your strawberries, the brighter your sorbet will be! -
Make the Simple Syrup
In a medium saucepan, combine 1 cup of sugar and 1 cup of water. Bring it to a gentle simmer over medium heat, stirring occasionally until the sugar completely dissolves. This should only take a few minutes. Once done, remove it from the heat and let it cool. Pro tip: If you want to infuse some extra flavor, toss in a sprig of mint while the syrup simmers. -
Blend It All Together
Once your simple syrup has cooled, it’s time to blend. Add the strawberries and simple syrup to your blender. Blend until smooth—around 30 seconds should do it! If you prefer a chunkier texture, pulse it a few times instead of blending continuously. Remember to taste as you go; after all, you’re the chef! -
Freeze the Mixture
After blending, pour the strawberry mixture into a shallow dish or ice cream maker. If you’re using a shallow dish, spread it out evenly to help it freeze more quickly. Cover it with plastic wrap and place it in the freezer for about 4-6 hours, or until it’s firm. Don’t forget to stir it every hour! This aeration will create that luscious, fluffy texture. -
Serve and Enjoy
Once your sorbet is frozen solid, you can either scoop it out or blend it for a smoother consistency before serving. If it’s too hard, let it sit at room temperature for a few minutes to soften. And voilà! You’ve just created a frozen treat that’s perfect for all ages.
Serving Suggestions
When it comes to serving your strawberry sorbet, presentation is key! Use a chilled bowl or a fancy glass to scoop the sorbet into. Garnish with a sprig of fresh mint or a few whole berries for that pop of color. I love serving it with a splash of balsamic reduction drizzled over the top—it adds a sophisticated touch that’s sure to impress your guests!
Recipe Variations
-
Berry Medley Sorbet: Mix in other berries like blueberries or raspberries for a mixed berry sorbet. Just keep the total quantity at 2 cups!
-
Citrus Zest Sorbet: Add the zest of a lime or lemon to the strawberries for a refreshing citrus kick.
-
Creamy Strawberry Sorbet: For a creamier texture, blend in ½ cup of coconut milk or Greek yogurt with the strawberries. This gives it a rich, decadent feel!
-
Herb-Infused Sorbet: Add a few basil or mint leaves while blending for a refreshing herbal note that’s simply divine.
-
Substitute Sweeteners: As mentioned, try using honey or maple syrup instead of sugar for a natural variation.
Chef’s Notes
This recipe has been a cherished part of my kitchen since those carefree childhood days. While the basics have remained the same, I’ve enjoyed experimenting with different fruits and flavors along the way. It’s amazing how just three simple ingredients can transport you back to sun-soaked afternoons and laughter-filled family gatherings. Remember, kitchen experiments can sometimes go hilariously wrong—like the time I tried to add too much lemon juice and ended up with a sorbet that tasted more like lemonade. But those moments are part of the fun! Always remember: if a recipe doesn’t go as planned, adapt! Embrace the chaos, and most importantly, enjoy the process.
FAQs and Troubleshooting
-
What if my sorbet is too hard?
If your sorbet is rock solid, let it sit out for a few minutes before scooping. You can also blend it again if you want a softer texture. -
Can I use frozen strawberries?
Absolutely! Just let them thaw a bit before blending. Using frozen strawberries can actually yield a frosty texture that’s perfect for sorbet. -
How long does the sorbet last?
Homemade sorbet can be stored in the freezer for up to a month. Just be sure to cover it tightly to avoid freezer burn! -
Can I make this sorbet without sugar?
Yes, try a natural sweetener like agave or honey. The sweetness will vary, so start with a smaller amount, taste, and adjust as needed.
Nutritional Info
While I love whipping up delicious treats, I also keep things balanced! This sorbet is naturally low in fat and can be made without any added preservatives. Each serving serves as a refreshing dessert that can fit into a wholesome eating plan.
And there you have it! A delicious Easy 3-Ingredient Strawberry Sorbet that’s not only refreshing but also wraps up all those childhood memories in a sweet, cold treat. So, whether you’re treating yourself after a long day or impressing friends at your next gathering, this simple recipe is guaranteed to make everyone smile. Enjoy!
PrintEasy 3-Ingredient Strawberry Sorbet
A refreshing and easy strawberry sorbet made with only three ingredients. Perfect for hot days and nostalgic moments in the kitchen.
- Prep Time: 15 minutes
- Cook Time: 10 minutes
- Total Time: 360 minutes
- Yield: 4 servings 1x
- Category: Dessert
- Method: Blending and Freezing
- Cuisine: American
- Diet: Vegan
Ingredients
- 2 cups fresh strawberries
- 1 cup sugar
- 1 cup water
Instructions
- Prep the strawberries by washing, removing the tops, and halving if large.
- Make the simple syrup by combining sugar and water in a saucepan, simmering until sugar dissolves.
- Blend the cooled simple syrup with strawberries until smooth.
- Freeze the mixture in a shallow dish, stirring every hour for about 4-6 hours until firm.
- Serve the sorbet in a chilled bowl, garnished with mint or berries.
Notes
For a creamier texture, add coconut milk or Greek yogurt. This sorbet can also be made with frozen strawberries, just thaw before blending.
Nutrition
- Serving Size: 1 serving
- Calories: 120
- Sugar: 20g
- Sodium: 5mg
- Fat: 0g
- Saturated Fat: 0g
- Unsaturated Fat: 0g
- Trans Fat: 0g
- Carbohydrates: 30g
- Fiber: 2g
- Protein: 0g
- Cholesterol: 0mg
Keywords: strawberry sorbet, frozen dessert, easy sorbet, summer treat, vegan dessert

Minute Apple Cobbler: Quick, Cozy Weeknight Dessert
Easy Apple Cobbler: A Cozy Deliciousness
Welcome to the delightful world of Easy Apple Cobbler! If you think about comfort food, the image of warm, fragrant apples enveloped in a buttery, flaky topping often comes to mind. The ability to whip this up in no time is just one of the reasons I find apple cobbler to be pure magic! Whether it’s for a dinner party, family gathering, or just a cozy night on the couch, this dish checks all the boxes. With a handful of simple ingredients, you can create a sweet, satisfying dessert that’ll have everyone begging for seconds.
I can remember the first time I had apple cobbler — it was a chilly autumn afternoon, and the scent wafting from the kitchen was nothing short of enchanting. I was visiting my grandma, who had a talent for turning simple ingredients into something extraordinary. We spent the day picking fresh apples from her backyard—a mix of Granny Smith and Honeycrisp—her favorites. As we peeled and sliced, she shared stories of her childhood and how apple cobbler was a staple in her home. It wasn’t just a recipe; it was a connection, a celebration of all things cozy and heartwarming. That day, we laughed, we reminisced, and most importantly, we baked. When it finally emerged from the oven, crust bubbling and golden-brown, I knew we had created something special. Now, I carry that cherished memory with me every time I make this apple cobbler.
Let’s dive into this easy recipe that’ll soon become a beloved staple in your kitchen!
Ingredients
-
1 can of sweet rolls: These doughy nuggets provide the perfect base for the cobbler topping. You can substitute them with homemade biscuit dough or crescent rolls if you’re feeling adventurous!
-
2 cups of sliced apples: Fresh apples are the star of the show! I love using a mix of tart and sweet apples for a layer of complexity. Feel free to swap out with pears or peaches for a fruity twist.
-
1 teaspoon of cinnamon: This fragrant spice adds warmth and earthy notes to your cobbler. If you want a bolder flavor, consider using apple pie spice or even a dash of nutmeg.
-
Frosting for drizzling (optional): A simple drizzle can elevate your cobbler to a whole new level of indulgence. Store-bought chocolate or vanilla frosting works perfectly, but you can also whip up a quick glaze with powdered sugar, milk, and a splash of vanilla if you’re feeling crafty.
Step-by-Step Instructions
-
Preheat the oven: Start by preheating your oven to 350°F (175°C). A well-preheated oven will help your cobbler bake evenly and achieve that golden crust.
-
Prepare the apples: While the oven is warming, wash, peel, and slice your apples. Aim for thin slices so they cook evenly. If you’re using a mix of apple varieties, slice them all at once and toss with a sprinkle of lemon juice to avoid browning.
-
Toss with cinnamon: In a large bowl, add your sliced apples and the cinnamon. Give it a good toss! You want each apple slice to be coated in that fragrant spice. If you’re feeling extra adventurous, add a tablespoon of brown sugar for some extra caramelization.
-
Open the sweet rolls: Carefully pop open the can of sweet rolls. The dough is usually sectioned, which gives you that rustic cobbler topping. Set it aside for a moment as we prepare the apples.
-
Assemble the cobbler: Grease a baking dish (an 8×8 or 9×9 inch works great). Pour the seasoned apples evenly into the dish, then take the sweet roll dough and tear each piece into smaller pieces or leave them whole if you prefer. Layer them over the apples, covering as much surface area as possible.
-
Bake: Pop the baking dish in the oven and let it work its magic for about 25-30 minutes. You’re looking for a nice, golden brown color on the dough and bubbly apples underneath.
-
Drizzle the frosting: While the cobbler is baking, prepare your frosting if you’re using it! You can either melt the store-bought frosting in the microwave for about 15 seconds for a drizzly consistency or mix up your homemade glaze. Once the cobbler is out and slightly cooled, drizzle it generously over the top for a sweet finishing touch.
-
Serve and enjoy: Let it cool for a few minutes, then scoop it into bowls. It’s delicious on its own or with a scoop of vanilla ice cream. Trust me, it’s heavenly!
Serving Suggestions
To make your apple cobbler a visual treat, consider serving it in wide, shallow bowls or ramekins. A scoop of vanilla ice cream melting on top of the warm cobbler is not only delicious but also creates a lovely contrast in temperature. Garnish with a sprinkle of cinnamon or a few fresh mint leaves for added color.
Recipe Variations
-
Mix it up with nuts: Add a handful of chopped walnuts or pecans to your apple filling for an added crunch and nutty flavor.
-
Cranberry apple cobbler: Toss in some fresh or dried cranberries for a tangy contrast to the sweet apples.
-
Spiced-up version: Add a teaspoon of allspice or cardamom to your apple mixture for an aromatic twist.
-
Caramel apple cobbler: Drizzle some caramel sauce over the apples before adding the sweet rolls for an indulgent dessert.
-
Gluten-free option: Use gluten-free biscuit dough in place of sweet rolls for a fabulous gluten-free treat.
Chef’s Notes
Every time I make this Easy Apple Cobbler, I can’t help but chuckle at how many essay drafts I’ve written in pursuit of the perfect recipe. Some versions missed the mark, but this one—the sweet rolls—always brings the nostalgic feel of cooking with my grandma. I can still hear her laughter and see her smiling face as we shared our love for good food, and I think that’s what makes this dish special. It’s filled with love, joy, and some seriously flavorful apples!
FAQs and Troubleshooting
1. My dough didn’t cook through! What happened?
Don’t worry; this happens sometimes! Make sure your oven is fully preheated, and if your sweet rolls look too brown on top but are undercooked inside, you can cover them loosely with foil and let them bake for a few more minutes.
2. Can I use frozen apples?
Absolutely! Just remember to thaw them fully and drain excess moisture before mixing with your cinnamon.
3. What’s the best way to store leftovers?
Allow your cobbler to cool completely, then store it in an airtight container in the fridge for up to three days. Reheat slices in the microwave, and they’ll be just as delightful!
4. Can I make this ahead of time?
Certainly! You can prepare the apple filling the day before and assemble it right before baking. Just remember that the baking time may need slight adjustments if your ingredients are cold from the fridge.
Nutritional Info
While exact nutritional content can vary based on ingredients and portions, this Easy Apple Cobbler can generally provide:
- Calories: Approximately 270 per serving (based on 8 servings)
- Protein: 3g
- Carbohydrates: 35g
- Fat: 12g
- Fiber: 2g
I hope you enjoy making this Easy Apple Cobbler as much as I do! Remember, the kitchen is all about exploration, laughter, and sharing with loved ones. So what are you waiting for? Grab those apples and let’s get cooking! Your own cozy kitchen story awaits!
PrintEasy Apple Cobbler

A cozy apple cobbler featuring warm, fragrant apples enveloped in a buttery, flaky topping. Perfect for any occasion!
- Prep Time: 15 minutes
- Cook Time: 30 minutes
- Total Time: 45 minutes
- Yield: 8 servings 1x
- Category: Dessert
- Method: Baking
- Cuisine: American
- Diet: Vegetarian
Ingredients
- 1 can of sweet rolls
- 2 cups of sliced apples
- 1 teaspoon of cinnamon
- Frosting for drizzling (optional)
Instructions
- Preheat the oven to 350°F (175°C).
- Prepare the apples by washing, peeling, and slicing them thinly.
- Toss the sliced apples with cinnamon in a large bowl.
- Open the can of sweet rolls and set it aside.
- Assemble the cobbler by greasing a baking dish, pouring in the seasoned apples, and layering the sweet roll dough on top.
- Bake for 25-30 minutes until golden brown and bubbly.
- Drizzle the frosting over the cobbler once baked and slightly cooled.
- Serve warm in bowls, optionally with vanilla ice cream.
Notes
Feel free to mix in nuts or swap apples for pears or peaches. Serve with a scoop of ice cream for an indulgent treat!
Nutrition
- Serving Size: 1 serving
- Calories: 270
- Sugar: 15g
- Sodium: 500mg
- Fat: 12g
- Saturated Fat: 4g
- Unsaturated Fat: 6g
- Trans Fat: 0g
- Carbohydrates: 35g
- Fiber: 2g
- Protein: 3g
- Cholesterol: 30mg
Keywords: apple cobbler, dessert, quick dessert, baking, easy recipe, cozy recipe
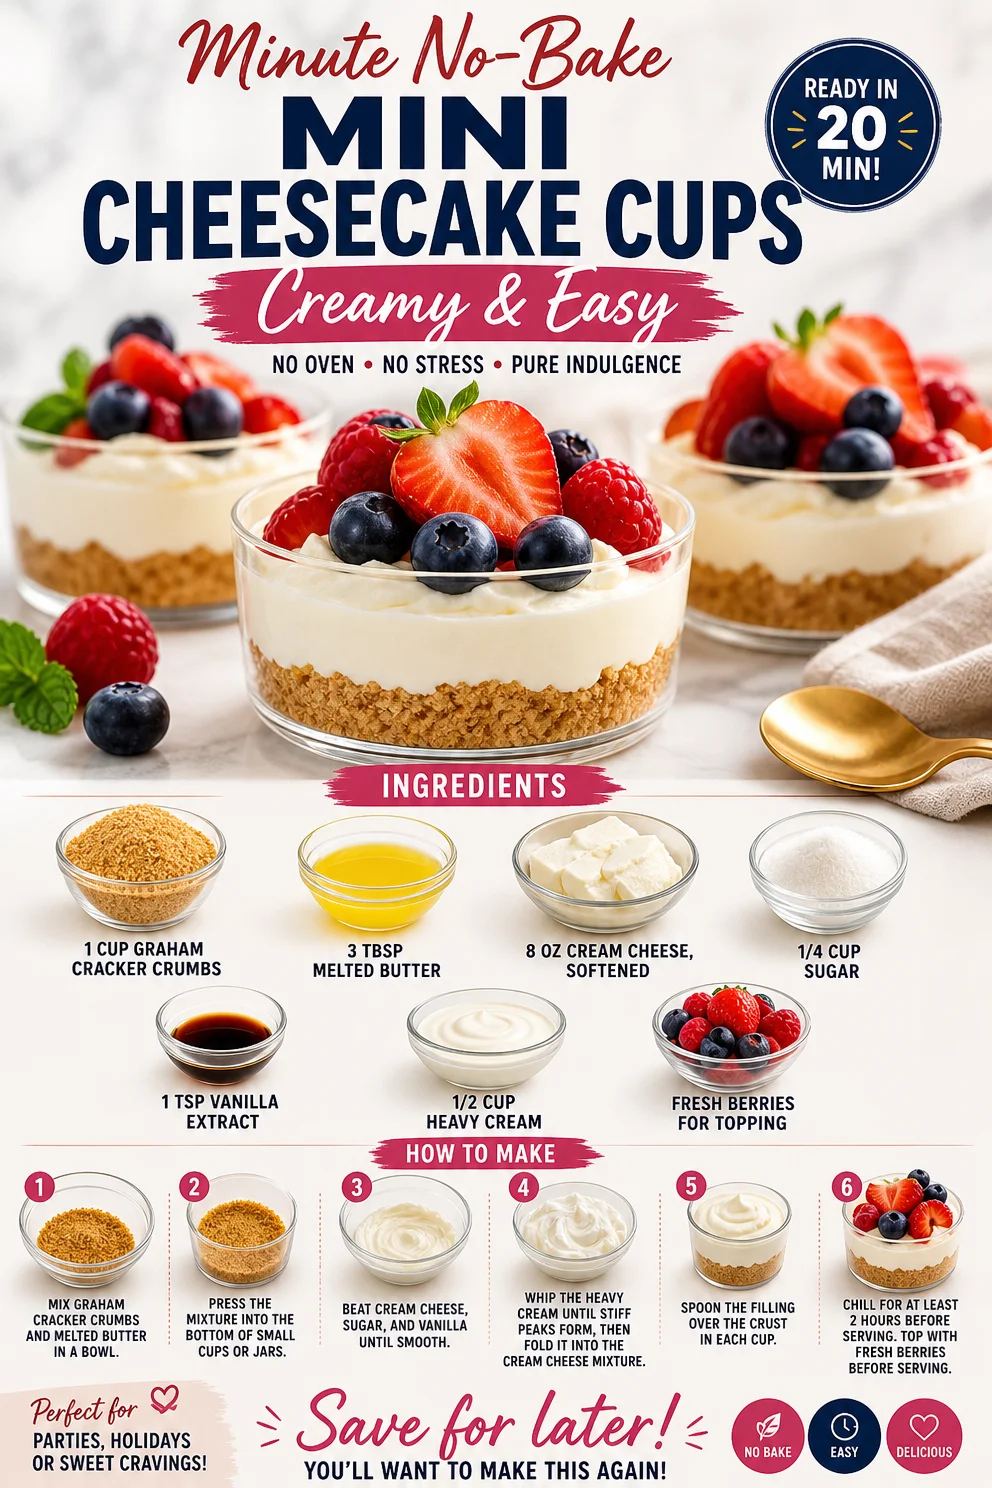
Minute No-Bake Mini Cheesecake Cups (Creamy & Easy)
Irresistible No-Bake Mini Cheesecake Cups in 15 Minutes
Introduction
Hey there, fellow food lovers! If you’re anything like me, you probably have a constant craving for something sweet, creamy, and utterly delicious. Lucky for you, I have just the treat in mind: No-Bake Mini Cheesecake Cups! These little gems are all about enjoying the rich, decadent flavor of cheesecake without the fuss of baking. And the best part? You can whip them up in just 15 minutes!
I’ve always been a huge fan of cheesecakes, but there’s something extra special about the mini version that brings a delightful playfulness to dessert time. Picture this: a buttery graham cracker crust cradling a velvety cream cheese filling, topped with fresh, juicy berries. It’s the kind of dessert that makes your taste buds dance and your heart sing.
Making these No-Bake Mini Cheesecake Cups is not only a treat for yourself but also a fantastic way to impress friends and family. Whether you’re hosting a casual gathering, celebrating a special occasion, or just need a sweet pick-me-up after a long day, these mini cheesecakes are about to become your go-to recipe.
In this post, I’ll share a little backstory that will take you on a trip down memory lane, guide you through the ingredients needed, and offer step-by-step instructions that will make you feel like a pro in the kitchen. So grab your apron, and let’s dive into the delicious world of no-bake cheesecake!
Personal Story
Let me take you back to a particularly memorable summer afternoon from my childhood. My grandmother, a passionate baker with an unbeatable sweet tooth, was preparing her famous cheesecake for our family BBQ. I can still picture the sun shining through the kitchen window, illuminating her apron as she expertly mixed cream cheese with sugar. The rich aroma filled the air, and I was captivated by the creamy filling as it piled up high in her springform pan.
However, in true grandma fashion, she insisted on letting it bake for hours before it was ready to serve, leaving me with a long wait—and an even longer craving! Fast forward to today, while I cherish her traditional recipe, I often find myself reminiscing about those lazy summers spent waiting for that first slice. The idea of a mini cheesecake that doesn’t require an oven was born out of my desire to indulge in that classic dessert quickly!
These No-Bake Mini Cheesecake Cups evoke those tender memories, allowing me to recreate the joy of cheesecake anytime I want without the long wait. Best of all, I can share this delightful treat with friends and family, just like my grandmother did with me. So, let’s create our own cherished moments together—one mini cheesecake cup at a time!
Ingredients
-
1 cup graham cracker crumbs
- This creates the crunchy crust! You can easily make your own by crushing whole graham crackers in a food processor or using store-bought crumbs for convenience.
-
3 tbsp melted butter
- The butter adds richness and helps bind the crust together. If you’re looking for a lighter option, you can swap it with coconut oil or even applesauce for a healthier twist.
-
8 oz cream cheese, softened
- The star of the show! Softening the cream cheese makes it easier to mix and creates that smooth, creamy texture we all crave. For a lighter version, try using low-fat cream cheese or yogurt.
-
1/4 cup sugar
- This adds sweetness to the filling. Feel free to adjust the sweetness based on your preference—honey or maple syrup can be great substitutes!
-
1 tsp vanilla extract
- Vanilla enhances the flavor, infusing it with warmth. If you’re feeling adventurous, consider adding a splash of almond or lemon extract for a unique twist.
-
1/2 cup heavy cream
- This is what gives our cheesecake filling its luscious texture. For a dairy-free alternative, you might opt for coconut cream instead.
-
Fresh berries for topping
- Berries not only enhance the aesthetics but also add a burst of freshness to each bite. Feel free to use strawberries, blueberries, raspberries, or whatever is in season!
Step-by-Step Instructions
-
Prepare the Crust:
Start by mixing the graham cracker crumbs and melted butter in a medium bowl until combined. You want the texture to resemble wet sand. If it feels too dry, drizzle in a bit more melted butter. This will help the crumbs stick together. -
Distribute into Cups:
Using a spoon or your fingers, press the crumb mixture firmly into the bottom of your mini dessert cups or muffin tins. Make sure to pack it tightly so your crust holds its shape. A flat-bottomed glass works wonders for this! -
Mix the Filling:
In another bowl, beat the softened cream cheese until smooth and creamy. I recommend using an electric mixer for this step to avoid any lumps. Gradually add the sugar and vanilla extract, mixing until fully incorporated. -
Whip the Cream:
In a separate bowl, whip the heavy cream until soft peaks form. This is where the magic happens! Gently fold the whipped cream into the cream cheese mixture. Use a spatula in a gentle upward motion to keep the mixture light and airy. -
Combine Fillings:
Once the whipped cream is incorporated, your cheesecake filling is ready! Spoon the mixture into your pre-prepared cups, filling each one generously. You can go as high as you want—these mini cheesecakes are meant to be decadent! -
Chill in the Fridge:
Cover your mini cheesecake cups with plastic wrap and let them chill in the fridge for at least 1 hour. This will help set the filling. If you’re in a rush, even 30 minutes will do the trick. -
Top with Berries:
Just before serving, load up each cheesecake with fresh berries. This not only looks beautiful but adds a refreshing touch to every rich bite.
And voilà! Your No-Bake Mini Cheesecake Cups are ready to dazzle your taste buds and impress your guests!
Serving Suggestions
To serve these adorable cheesecake cups, arrange them on a colorful platter for an eye-catching display. You can also drizzle some homemade berry sauce or a sprinkle of powdered sugar on top for added flair. If you want to create a more interactive experience, set out extra berries and toppings so your guests can customize their mini cheesecakes. Enjoy with a fork, or for the adventurous, dig in directly with a spoon!
Recipe Variations
-
Chocolate Lovers’ Delight:
Swirl in some melted chocolate into your cheesecake filling for a chocolate version! You can even top it with chocolate shavings. -
Citrus Twist:
Add a teaspoon of lemon or orange zest to the filling for a bright, zesty flavor that’ll perk up your palate. -
Nutty Crust:
Mix in crushed nuts, like pecans or almonds, with the graham cracker crumbs for a nutty crunch. You can also use crushed cookies like Oreos for a fun twist! -
Vegan Version:
Replace the cream cheese with a vegan cream cheese alternative, use coconut cream instead of heavy cream, and sweeten with maple syrup for a delicious dairy-free option. -
Mini Layered Cheesecake:
Layer the filling with different flavored yogurt for a fun and colorful presentation! Each layer can have a unique flavor profile that keeps things exciting.
Chef’s Notes
Food has a funny way of transporting us back in time. Whenever I make these Mini Cheesecake Cups, I think about my grandma’s kitchen, that summer day, and the family gatherings filled with laughter. This recipe has evolved over the years—what started as a simple cheesecake has transformed into a crowd-pleasing, no-bake delight that’s perfect for any occasion. Plus, it’s a time-saver that lets you focus on what really matters: savouring those sweet moments with loved ones.
FAQs and Troubleshooting
-
What if my cheesecake filling is lumpy?
Make sure you’re mixing the cream cheese until it’s really smooth before adding the sugar. If you find lumps after combining everything, you can quickly whip it with a blender! -
Can I make these ahead of time?
Absolutely! You can make them a day in advance. Just keep them in the fridge, covered, until you’re ready to serve them. -
What if I don’t have mini cups?
No worries! You can use a muffin tin or even a large dessert dish for a family-style cheesecake. Just adjust the chilling time accordingly. -
How long can I store these?
They’ll stay fresh in an airtight container in the fridge for about 3-4 days. Although, I doubt they’ll last that long—the taste is simply irresistible!
Nutritional Info
While I’m not a dietitian, I can tell you these No-Bake Mini Cheesecake Cups are a delightful treat worth enjoying in moderation! If you’re interested in specific nutritional info (calories, sugar content, etc.), feel free to use an online calculator based on the ingredients you choose.
So there you have it! No-Bake Mini Cheesecake Cups that are quick, easy, and utterly delicious. Now it’s your turn to create some sweet memories in the kitchen. Happy baking (or, should I say, chilling)! Enjoy!
PrintNo-Bake Mini Cheesecake Cups
Quick and easy no-bake mini cheesecake cups topped with fresh berries, perfect for satisfying your sweet cravings in just 15 minutes.
- Prep Time: 15 minutes
- Cook Time: 0 minutes
- Total Time: 75 minutes
- Yield: 4 servings 1x
- Category: Dessert
- Method: No-Bake
- Cuisine: American
- Diet: Vegetarian
Ingredients
- 1 cup graham cracker crumbs
- 3 tbsp melted butter
- 8 oz cream cheese, softened
- 1/4 cup sugar
- 1 tsp vanilla extract
- 1/2 cup heavy cream
- Fresh berries for topping
Instructions
- Prepare the crust: Start by mixing the graham cracker crumbs and melted butter in a medium bowl until combined.
- Distribute into cups: Press the crumb mixture firmly into the bottom of mini dessert cups or muffin tins.
- Mix the filling: Beat the softened cream cheese until smooth, then add the sugar and vanilla extract.
- Whip the cream: In a separate bowl, whip the heavy cream until soft peaks form, then fold into the cream cheese mixture.
- Combine fillings: Spoon the mixture into the prepared cups, filling each one generously.
- Chill in the fridge: Cover with plastic wrap and chill for at least 1 hour.
- Top with berries: Just before serving, add fresh berries on top of each cheesecake.
Notes
These mini cheesecakes can be made a day in advance and are perfect for any occasion.
Nutrition
- Serving Size: 1 cup
- Calories: 220
- Sugar: 10g
- Sodium: 200mg
- Fat: 14g
- Saturated Fat: 8g
- Unsaturated Fat: 6g
- Trans Fat: 0g
- Carbohydrates: 22g
- Fiber: 1g
- Protein: 3g
- Cholesterol: 40mg
Keywords: cheesecake, no-bake dessert, mini cheesecake, easy dessert, quick recipe
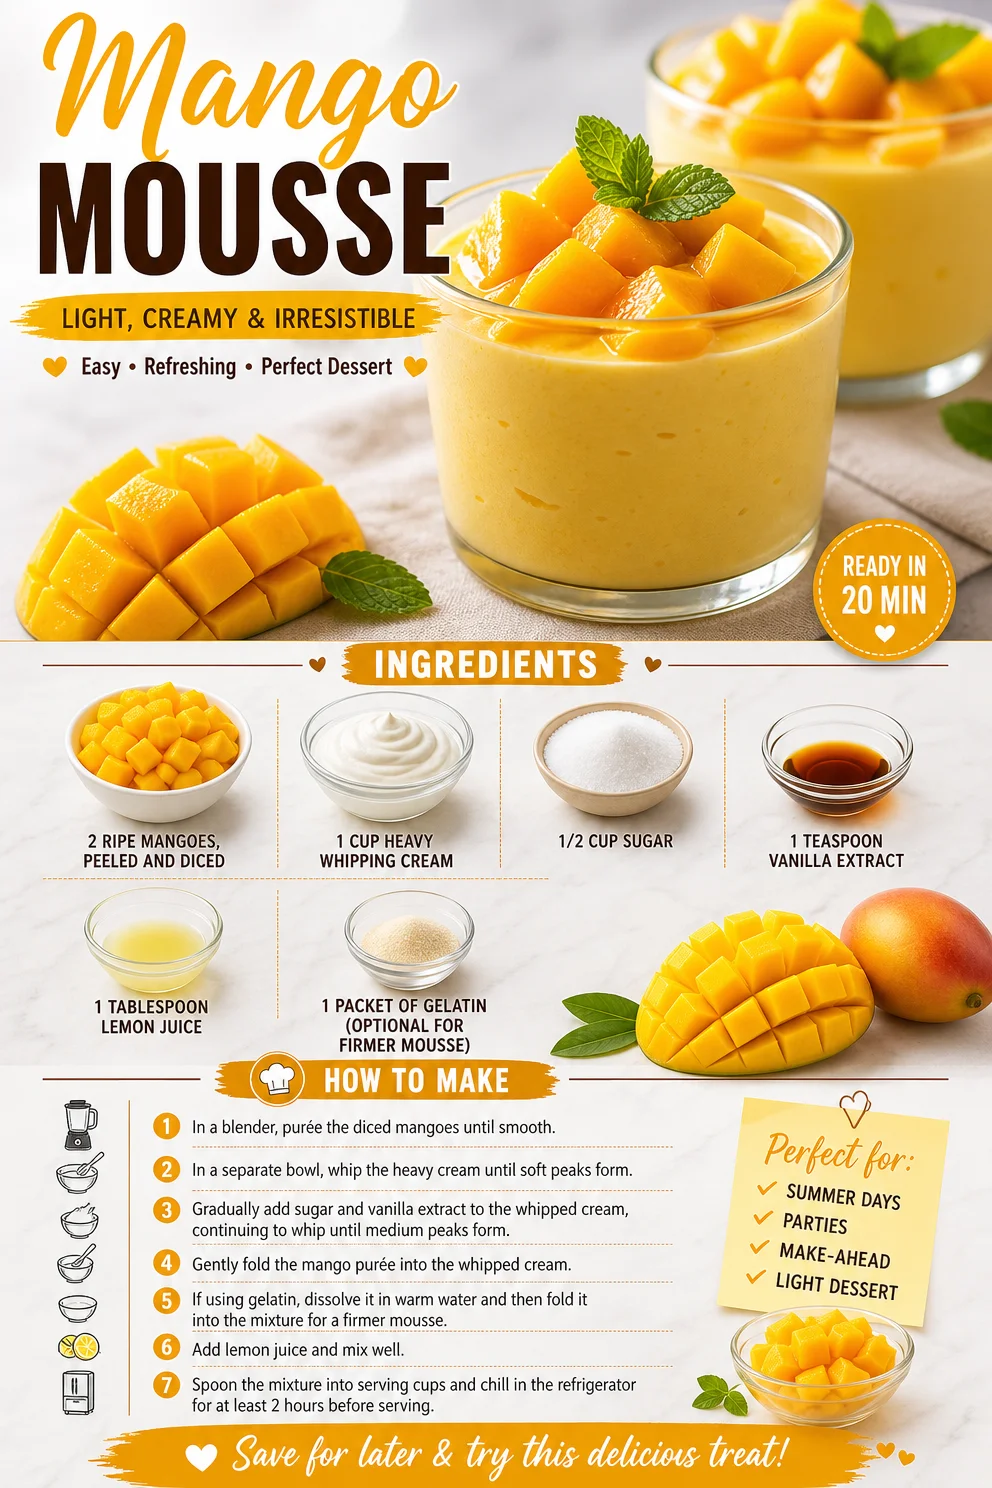
Mango Mousse
Whip Up Some Sunshine: The Magic of Mango Mousse
Ah, mango mousse—the dessert that whispers sweet nothings to your taste buds while wrapping you in a warm, tropical embrace. If you’ve ever dove into that first spoonful, experiencing the creamy yet fruity delight dancing on your palate, you’ll know exactly what I mean. It’s like summer vacation captured in a bite!
Today, I want to share a family-favorite recipe for mango mousse that not only brings the flavors of tropical goodness to your kitchen but also carries with it a cherished memory I hold dear. You see, cooking isn’t just about the ingredients or the fancy techniques; it’s about connection, creativity, and sharing love through food—something I’m excited to explore with you.
So, pull up a chair, grab your cooking utensils, and let’s dive into the world of mango mousse. It captures the essence of summer days spent with friends and family, where laughter mingles with the sweet aroma of mango and a hint of cream. Trust me; you’ll want to make this a regular in your dessert rotation!
A Bite of Nostalgia
Let me take you back to the sun-soaked afternoons of my childhood when my grandmother would whip up her famous mango mousse. Each summer, my cousins and I would gather at her house, our faces covered in sticky popsicle remnants from the fruit stands nearby. The air would be filled with the scents of ripe fruits, and laughter would echo in the kitchen as Grandma played the role of the mad scientist in her culinary lab.
The best part? We were her sous chefs! I can still picture it—mangoes piled high, a shiny silver bowl filled with whipped cream, and Grandma’s warm smile lighting up the room. She would tell us stories about her favorite mangoes as she diced them with the precision of a seasoned chef, and we’d eagerly await our turn to whip the cream. The anticipation grew as we churned our ingredients, knowing dessert was just a few whisking moments away.
When that fluffy, golden mousse hit the table, we were all in bliss. It felt like indulging in summer itself, vibrant and light. This recipe is my homage to those joyful summer days, bringing a touch of nostalgia and a whole lot of flavor to your kitchen.
Ingredients
To create this delightful mango mousse, you’ll need the following:
-
2 ripe mangoes, peeled and diced
Look for mangoes that yield slightly when pressed; that means they’re ready for the sweet dive into dessert! If mangos aren’t in season, you can substitute with frozen mango, just be sure to thaw and drain excess moisture. -
1 cup heavy whipping cream
This is the secret to a rich, velvety mousse. For a lighter version, you can swap in coconut cream or a plant-based alternative, though the texture will be slightly different. -
1/2 cup sugar
Adjust the sweetness to your taste! If you prefer a healthier option, you can use agave syrup or honey; keep in mind that liquid sweeteners may alter the mousse’s consistency slightly. -
1 teaspoon vanilla extract
Always opt for pure vanilla extract over imitation for an authentic flavor boost. The depth of the vanilla harmonizes beautifully with mango. -
1 tablespoon lemon juice
This not only enhances the mango flavor but also helps to keep the mousse from browning. Fresh lemon will give you the brightest taste, but bottled lemon juice works in a pinch. -
1 packet of gelatin (optional for firmer mousse)
If you want a more stable mousse perfect for beautiful plating, use this. For a plant-based option, try agar-agar but remember to adjust the cooking time according to the package instructions.
Step-by-Step Instructions
Now, let’s get our hands a little sticky and create that luscious mango mousse:
-
Prep the Mangoes
Start by peeling and dicing your fresh mangoes, which is arguably the most vital step! The riper, the better! Cut around the pit and chop the sweet flesh into cubes. If you’ve chosen frozen mango, just make sure it’s thoroughly thawed before proceeding. Place these glorious chunks into a blender. -
Blend Until Smooth
Blend the diced mangoes until the texture is silky—no lumps allowed! This should take about 30 seconds. If you’re feeling adventurous, toss in a sprinkle of cinnamon for an extra layer of flavor! -
Whip the Cream
In a separate bowl, use an electric mixer to whip the heavy cream until it forms soft peaks. Trust me, there’s something joyfully therapeutic about watching that cream transform before your eyes. Whip until it’s light and fluffy—don’t overdo it, or you’ll end up with buttery clumps. -
Combine with Sugar and Vanilla
Gradually add in the sugar and vanilla extract as you continue to whip the cream. The sweetness should complement the mango without overpowering it; it’s a delicate dance of flavors! -
Add the Lemon Juice
Once your cream is nice and whipped, add the lemon juice and proceed to gently fold in the mango puree. This step is key—use a spatula and fold the mixture rather than stirring. We want to keep that light, airy texture! -
Incorporate Gelatin (if using)
If you’re opting for that extra firmness with gelatin, dissolve a packet in a small amount of warm water according to the package instructions. Allow it to cool slightly before gently folding it into your mousse mixture. -
Chill the Mousse
Spoon your delightful mixture into serving glasses or a large bowl and let it chill in the refrigerator for at least 2–3 hours—this allows the flavors to meld beautifully while setting the texture. I find that the longer it chills, the better it gets! -
Serve and Enjoy
Once it’s set and chilled, take a moment to admire your masterpiece before serving. A little mango wedge or a sprig of mint on top gives it that chef-level finish!
Serving Suggestions
When it comes to plating, keep it simple and elegant. Present the mango mousse in clear glasses or bowls to showcase its beautiful, vibrant color. You can garnish with additional diced mango, a drizzle of honey, or even some crushed pistachios for that delicious crunch. If you’re feeling extra festive, a dollop of whipped cream on top with a sprinkle of lime zest can elevate your presentation and flavor profile even further.
Recipe Variations
Now let’s get a little creative! Here are a few fun twists to try with your mango mousse:
-
Coconut Mango Mousse: Swap half of the heavy cream with coconut cream for a tropical coconut flavor that pairs beautifully with mango.
-
Spicy Mango Mousse: Add a touch of cayenne pepper or finely chopped jalapeños for a sweet and spicy kick that tantalizes the senses.
-
Berry Fusion: Incorporate other fruits such as chopped strawberries or blueberries into the mousse for a mixed-berry delight that bursts in flavor.
-
Chocolate Drizzle: Top the mousse with melted dark chocolate for an indulgent dessert experience! It adds a rich contrast to the fruity flavors.
-
Tropical Twist: Mix in a bit of pineapple or passion fruit puree for an even fruitier flair that keeps the tropical vibes going strong!
Chef’s Notes
This mango mousse has been a staple on my dessert table for years, evolving as I explored different flavor profiles and techniques. I remember a time I accidentally whipped the cream too much, and instead of throwing it away, I folded some of it back into the mango puree, and voila! It was a happier accident that made me appreciate the beauty in imperfection in the kitchen.
Mangoes are versatile delights! I try to use the freshest ones at their peak ripeness, but even a can of good-quality mango puree can save the day now and then. Cooking is a journey of flavors, and I invite you to take the reins and make this mango mousse your own.
FAQs and Troubleshooting
1. My mousse didn’t set. What happened?
No worries! The most common culprits are under-whipping the cream or not letting the mousse chill long enough. If you used gelatin, ensure it was properly dissolved and incorporated.
2. Can I make this ahead of time?
Absolutely! This dessert is perfect for prepping a day in advance. Just cover it well and keep it in the fridge until you’re ready to serve.
3. How can I make this dairy-free?
Great question! You can swap the heavy cream for coconut cream or a dairy-free whipping cream. Just make sure the texture and flavor balance works for you.
4. What should I do if it’s too sweet?
If you find the mousse overly sweet, add a little more lemon juice to balance the sweetness. A touch of sea salt can also help bring all the flavors together!
Nutritional Info
(Optional based on preference and can be modified depending on specific nutritional needs.)
- Serving Size: 1 portion
- Calories: Approximately 150
- Fat: 10g
- Carbohydrates: 15g
- Protein: 2g
So there you have it, friends! A sunny, cheerful mango mousse recipe that brings back the essence of summer right into your home. I hope you feel inspired to whip this up for your next gathering or simply treat yourself to a taste of sunshine. Happy cooking!
PrintMango Mousse
A delightful mango mousse that captures the essence of summer with its creamy, tropical flavor.
- Prep Time: 15 minutes
- Cook Time: 0 minutes
- Total Time: 180 minutes
- Yield: 4 servings 1x
- Category: Dessert
- Method: No-Cook
- Cuisine: Tropical
- Diet: Vegetarian
Ingredients
- 2 ripe mangoes, peeled and diced
- 1 cup heavy whipping cream
- 1/2 cup sugar
- 1 teaspoon vanilla extract
- 1 tablespoon lemon juice
- 1 packet of gelatin (optional for firmer mousse)
Instructions
- Prep the mangoes by peeling and dicing them, then place them in a blender.
- Blend until smooth—about 30 seconds.
- Whip the cream in a separate bowl until soft peaks form.
- Combine the sugar and vanilla into the whipped cream.
- Add the lemon juice and gently fold in the mango puree.
- Incorporate gelatin if you’re using it, following package instructions.
- Chill the mousse in the refrigerator for at least 2–3 hours.
- Serve and enjoy with garnishes like mango wedges or mint.
Notes
Feel free to customize your mousse with toppings or mix-ins like coconut, berries, or chocolate.
Nutrition
- Serving Size: 1 serving
- Calories: 150
- Sugar: 15g
- Sodium: 30mg
- Fat: 10g
- Saturated Fat: 6g
- Unsaturated Fat: 4g
- Trans Fat: 0g
- Carbohydrates: 15g
- Fiber: 1g
- Protein: 2g
- Cholesterol: 30mg
Keywords: mango mousse, dessert, tropical dessert, summer recipe, easy dessert
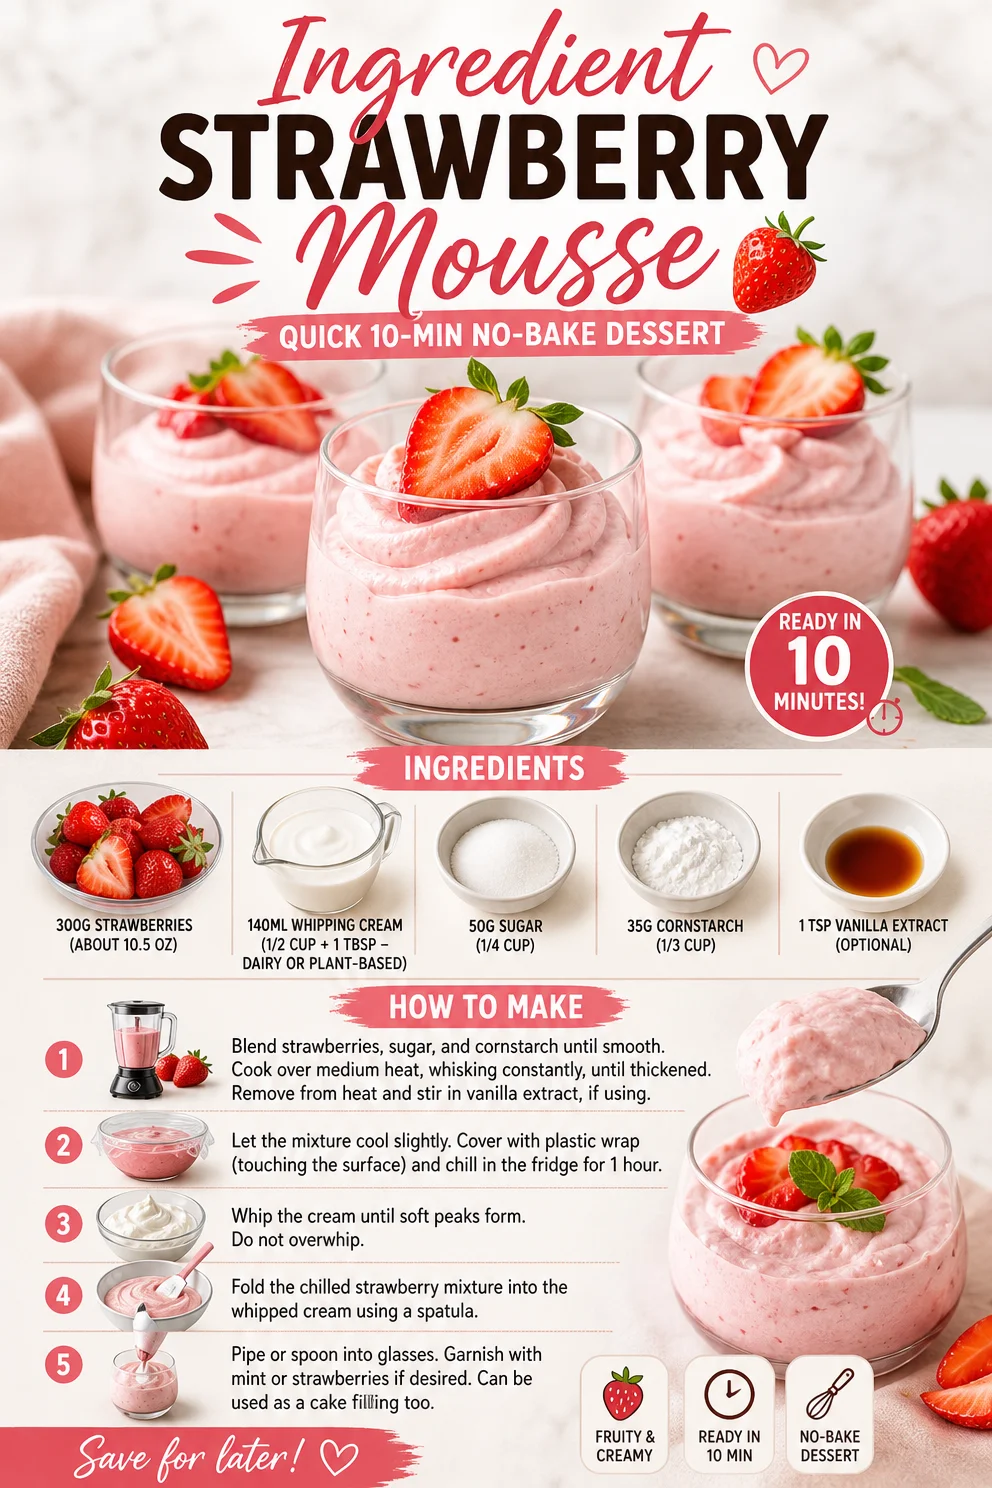
Ingredient Strawberry Mousse: Quick 10-Min No-Bake Dessert
4-Ingredient Strawberry Mousse – So Light, So Dreamy!
Welcome, food lovers! 🌟 Today, we’re diving into a dessert that’s as light and airy as a cloud, yet rich with flavor—Strawberry Mousse! If you’ve ever craved something romantic and delicious without the fuss, you’re in the right place. Picture this: a velvety, smooth mousse that’s perfect for impressing guests, celebrating special occasions, or simply treating yourself after a long day. You might be wondering, "Is that even possible with just four ingredients?" Yes, yes it is! And trust me, you’ll be licking the bowl clean.
I’m Ava Carter, and I firmly believe that cooking should be a joyful and liberating experience, not something that adds stress to your day. This Strawberry Mousse recipe is not just easy; it offers a delicious way to connect with wholesome ingredients without any complicated techniques or hidden nasties. So, let’s roll up our sleeves, gather these fantastic ingredients, and whip up some magic in the kitchen!
A Sweet Memory in Every Bite
Let me take you back in time. I remember sitting at my grandmother’s kitchen table during those lazy summer weekends. The air was rich with the scent of fresh strawberries, and the garden was bursting with ripe fruits, evoking memories of a blissful childhood. Each time my grandmother made her famous Strawberry Mousse, it became an occasion. We would gather around the table, sharing stories and laughter as she dolloped fluffy clouds of mousse into ice-cold bowls.
The mesmerizing pink color, the delicate tang of strawberries, and the lightness of the mousse were always met with squeals of delight. Those moments created more than just sweet treats; they crafted lasting bonds and treasured memories. Today, I want to share that nostalgia with all of you. Let’s create your very own Strawberry Mousse memory! 🌸💕
Ingredients
Here’s how simple this dessert is:
-
300g Strawberries (about 10.5 oz)
Juicy, sweet strawberries are the star of our show. Choose fresh, ripe berries for the best flavor. If strawberries are out of season, you could substitute with raspberries or even mango for a different twist! -
140ml Whipping Cream (1/2 cup + 1 tbsp)
This creamy base gives the mousse its indulgent texture. Feel free to swap for a dairy-free version with coconut cream or almond whipped cream. Just ensure it’s thick enough to whip! -
50g Sugar (1/4 cup)
We’ll sweeten the deal! You can adjust this based on the natural sweetness of your strawberries; if they’re super sweet, you may want less sugar. Alternatively, honey or maple syrup works too. -
35g Cornstarch (1/3 cup)
This acts as our stabilizer, giving the mousse structure without weighing it down. If you’re looking for a gluten-free option, cornstarch is perfect. You could also use arrowroot starch. -
1 tsp Vanilla Extract (optional)
This is where you can add a warm, aromatic twist. Most recipes benefit from this classic addition, but feel free to omit if you’re keeping it pure and simple.
Step-by-Step Instructions
Now that we’ve gathered our star players, let’s get to the fun part—the actual making! 🎉
-
Prep Your Strawberries
Start by washing your strawberries thoroughly under cool water. Remove the green tops and slice them in half for quicker blending. The more surface area, the easier they will blend into a luscious puree! -
Blend the Strawberries
In a blender or food processor, add the sliced strawberries. Blend until smooth—about 30 seconds should do the trick! If you prefer a chunky mousse, pulse a few times to leave some strawberry bits. Yum! -
Strain if Desired
For an extra silky mousse, you can strain the strawberry puree through a fine mesh sieve. This step is optional, but it guarantees a smooth texture. Use a spatula to push through as much liquid as possible. -
Whip Your Cream
In a mixing bowl, pour in the whipping cream. With an electric mixer, whip until it forms soft peaks. Watch closely! Once it holds its shape but is still silky, stop! Overwhipped cream can become grainy. -
Combine with Strawberries
Gently fold the strawberry puree into the whipped cream. Use a spatula and mix carefully to keep that airy texture—grace, my friend! Add in your sugar and optional vanilla extract during this step for sweetness. -
Thicken with Cornstarch
In a small bowl, mix the cornstarch with a tablespoon of cold water to create a slurry. Heat it in a microwave or stovetop for about 30 seconds until it thickens slightly. This step is key to helping your mousse hold its shape. Once thickened, fold it into the strawberry mixture. -
Chill
Transfer your mousse into dessert cups or a large bowl. Chill in the refrigerator for at least two hours, or until set. This is the hardest part—waiting! -
Serve & Enjoy!
Once chilled and set, it’s time for a taste test! Grab your favorite spoons, heap on some more chopped strawberries or mint for garnish, and dig in!
Serving Suggestions
When you’re ready to serve, think about presentation! Layer your mousse in elegant glass jars or bowls for that wow factor. Garnish with a sprinkle of fresh strawberries on top, maybe even a sprig of mint for that classic touch. Not only does it look beautiful, but it also adds a fresh, aromatic pop that makes every bite more delightful.
Recipe Variations
Feeling adventurous? Here are a few creative twists to give your mousse a personal touch:
- Chocolate Strawberry Mousse: Add 2 tablespoons of melted dark chocolate into the strawberry mixture for a decadent twist.
- Citrus Burst: Add a teaspoon of lemon or lime juice to the strawberries for a zesty spin!
- Nutty Delight: Fold in crushed nuts like almonds or hazelnuts for texture and flavor.
- Berry Medley: Instead of just strawberries, mix in blueberries or blackberries for a tangy blend.
- Coconut Cream: Substitute the whipping cream with coconut cream for a tropical flair!
Chef’s Notes
This recipe has traveled with me through many kitchens, evolving each time I make it. I find it fascinating how the simplest recipes can bring comfort and joy. One time, I made it for a friend’s birthday, and it vanished almost instantly! Not only was it a hit, but it also sparked a cooking session where we experimented together. This certainly reminded me that cooking connects us, and each dish holds a story.
FAQs and Troubleshooting
1. Why is my mousse not setting?
If your mousse isn’t thickening, ensure that your cornstarch slurry was cooked until it thickened before folding it in. If you skipped that step, the mousse might remain runny.
2. Can I use frozen strawberries?
Absolutely! You just need to thaw them first and make sure to drain excess liquid. This might slightly alter the texture but will still be delicious.
3. My cream didn’t whip properly; what did I do wrong?
Ensure your bowl and whisk are clean and dry. Any fat residue can prevent the cream from whipping. Also, using cold cream right out of the fridge is essential.
4. Can I make this recipe ahead of time?
Yes! You can prepare it a day in advance and just store it in the fridge until you’re ready to serve. This can actually enhance the flavors!
Nutritional Information
(Assuming serving size 1/2 cup)
- Calories: 150
- Protein: 2g
- Carbs: 24g
- Sugars: 16g
- Fat: 7g
- Fiber: 2g
And there you have it! A dreamy, fluffy, and delectable 4-Ingredient Strawberry Mousse ready to be enjoyed! Cooking should be about simplicity and joy, so I hope this recipe sparks memories or creates new ones for you.
Remember, the kitchen is a place to nurture creativity and make a little magic happen—so get in there and start whisking. Happy cooking! 🍓✨
Print4-Ingredient Strawberry Mousse
A light and airy strawberry mousse made with just four simple ingredients, perfect for any occasion.
- Prep Time: 15 minutes
- Cook Time: 0 minutes
- Total Time: 120 minutes
- Yield: 4 servings 1x
- Category: Dessert
- Method: Chilling
- Cuisine: French
- Diet: Vegetarian
Ingredients
- 300g Strawberries (about 10.5 oz)
- 140ml Whipping Cream (1/2 cup + 1 tbsp)
- 50g Sugar (1/4 cup)
- 35g Cornstarch (1/3 cup)
- 1 tsp Vanilla Extract (optional)
Instructions
- Prep your strawberries by washing them and slicing in half.
- Blend the strawberries until smooth, about 30 seconds.
- Strain the puree for a silky texture, if desired.
- Whip the cream until soft peaks form, being careful not to overwhip.
- Combine the strawberry puree with the whipped cream, folding gently.
- Thicken the mixture by adding the cornstarch slurry after heating it slightly.
- Chill the mousse in the refrigerator for at least two hours, until set.
- Serve with additional strawberries or mint for garnish.
Notes
Try adding chocolate or citrus for a different twist on flavor. This mousse can be prepared a day in advance for enhanced flavor.
Nutrition
- Serving Size: 1 serving
- Calories: 150
- Sugar: 16g
- Sodium: 5mg
- Fat: 7g
- Saturated Fat: 4g
- Unsaturated Fat: 2g
- Trans Fat: 0g
- Carbohydrates: 24g
- Fiber: 2g
- Protein: 2g
- Cholesterol: 30mg
Keywords: strawberry mousse, dessert, easy dessert, summer dessert
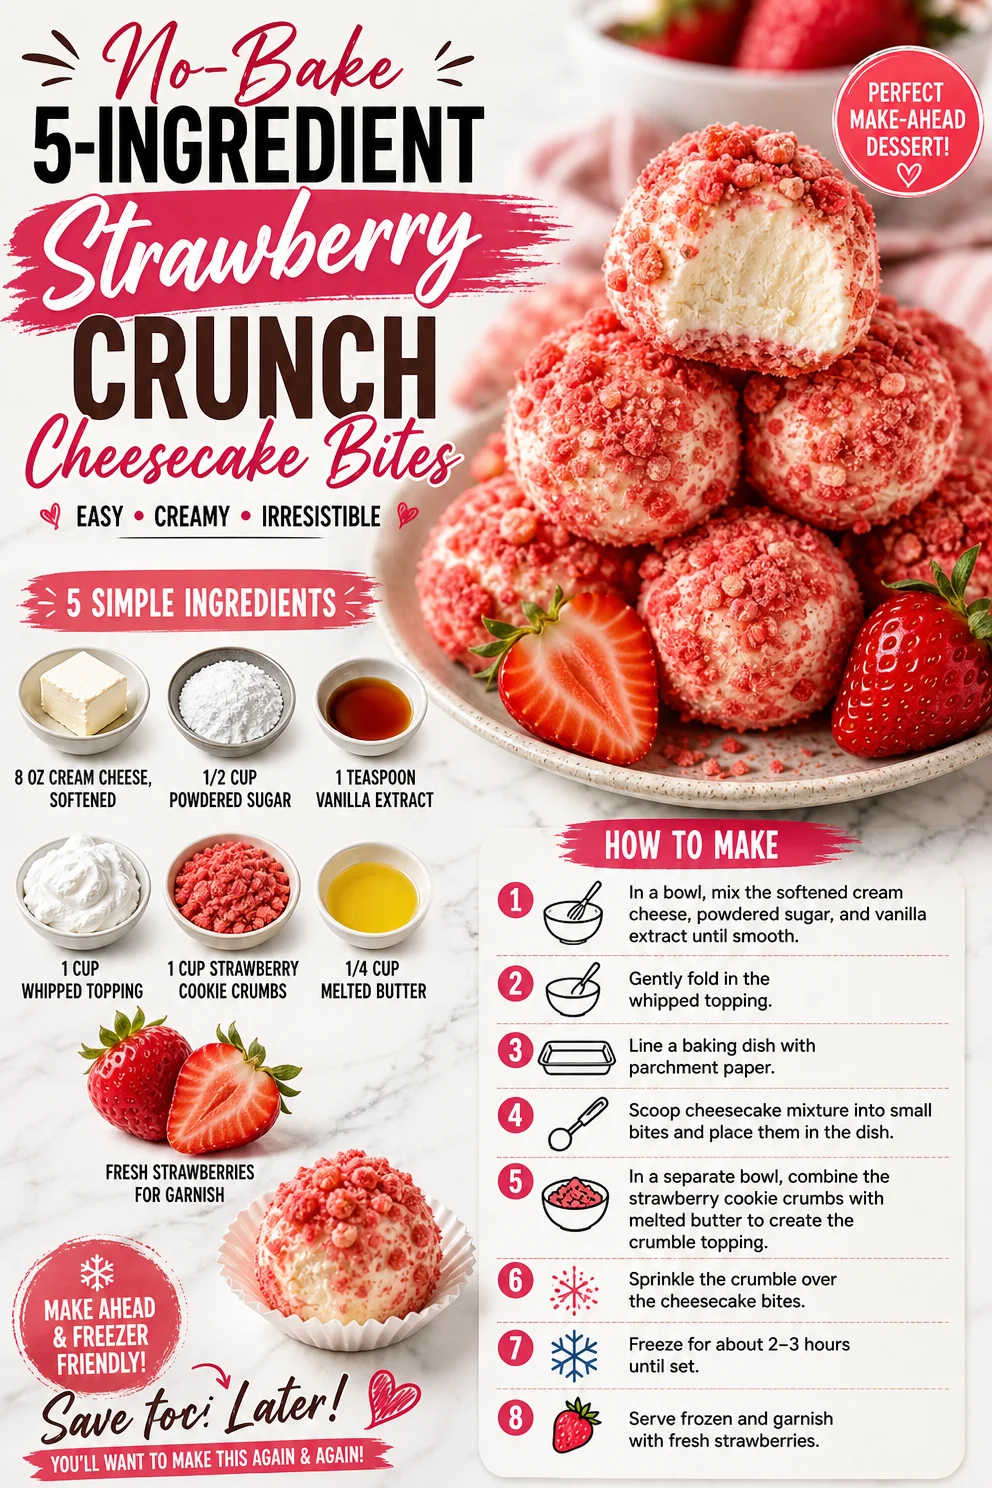
No-Bake 5-Ingredient Strawberry Crunch Cheesecake Bites
Strawberry Crunch Cheesecake Bites: A Sweet, Nostalgic Treat
Hey there, fellow food lovers! It’s your friend Ava here and today we’re diving into a sweet indulgence that combines creamy decadence with a pop of crunch and a burst of strawberry goodness. Yes, you guessed it, we’re making Strawberry Crunch Cheesecake Bites! These little morsels are not just delicious; they hold a special place in my heart, and I can’t wait to share the story behind them.
A Slice of Nostalgia
Growing up, my family had a tradition during summer barbecues—an unspoken competition of who could bring the sweetest, most delightful dessert. My grandmother always impressed us with her strawberry shortcakes, each layer of fresh berries, creamy filling, and buttery biscuit leaving us pleading for just one more slice.
One summer, as I stood precariously on a stool helping her out in the kitchen, we decided to switch things up. Combining her love for cheesecake with my craving for shortcake, we created these Strawberry Crunch Cheesecake Bites. I vividly remember the first time we took a bite; it was as if fireworks lit up our taste buds! The way the creamy cheesecake melted in our mouths while the crunchy cookie layer added a perfect texture was pure magic. Those moments spent giggling in the kitchen, surrounded by flour dust and berry stains, have shaped my cooking style today—simple yet joyful, and bursting with flavor!
I hope these bites bring you the same joy they bring to me because they are perfect for any occasion, or no occasion at all!
Ingredients
Let’s gather our ingredients for these delightful bites:
-
8 oz cream cheese, softened
Cream cheese is the star of this show. It adds that rich, smooth texture we associate with cheesecake. If you’re looking for a lighter option, try using Neufchâtel cheese, which has less fat but still gives you that creamy goodness! -
1/2 cup powdered sugar
Powdered sugar gives the cheesecake a sweet touch without being overly gritty. In a pinch? You can omit the sugar or use a sugar alternative like erythritol for a lower-calorie option. -
1 teaspoon vanilla extract
Nothing warms the heart quite like vanilla. It enhances the sweetness and adds depth to your cheesecake. Use pure vanilla extract for a better flavor, but in a pinch, imitation vanilla will work, too. -
1 cup whipped topping
This fluffy element lightens up our cheesecake mix, giving it that airy texture. You can easily swap this for homemade whipped cream if you’re feeling adventurous—just whip some heavy cream until stiff peaks form. -
1 cup strawberry cookie crumbs (or crushed strawberry shortcake bars)
This is where the magic happens! Use strawberry cookies for that perfect crunch and sweet flavor. If you can’t find them, crushed shortcake bars make a delicious alternative. Feel free to crush up some graham crackers, too! -
1/4 cup melted butter
The melted butter helps bind our cookie crumbs into a beautiful crust. Unsalted butter is best for maintaining flavor balance, but coconut oil is a fun swap if you want a dairy-free twist. -
Fresh strawberries for garnish
Fresh strawberries are the rockstars of this recipe—garnishing with them gives that appealing touch and fresh burst of flavor. This is optional, of course, but why not spring for the fresh stuff when it’s so beautifully vibrant?
Step-by-Step Instructions
Now that we’ve got our ingredients prepped, let’s get cooking!
-
Prepare the Cheesecake Mixture
In a large mixing bowl, combine the softened cream cheese, powdered sugar, and vanilla extract. Using an electric mixer, beat the mixture on medium speed until it’s smooth and creamy—about 2 minutes. A little tip here: make sure your cream cheese is softened enough (leave it at room temperature for about 30 minutes) to avoid lumps. Trust me; nobody wants a lumpy cheesecake! -
Fold in the Whipped Topping
Gently fold in the whipped topping until fully combined. This step adds airiness to the mixture, keeping that luscious cheesecake light and fluffy. Use a spatula and a gentle folding motion, kind of like you’re tucking the whipped topping into a warm blanket! -
Prepare the Crunchy Cookie Base
In another bowl, mix together the strawberry cookie crumbs and melted butter until the crumbs are evenly coated. When your mixture looks like wet sand, it’s ready! Press this mixture firmly into the bottom of your chosen mini dessert cups or a muffin tin lined with cupcake liners. Pro tip: Use the back of a tablespoon to pack it down tightly so they hold together perfectly when you bite into them! -
Fill with Cheesecake Mixture
Spoon the creamy cheesecake mixture on top of the pressed cookie base. Try to smooth out the tops for a lovely presentation—unless, of course, you love that homemade look. Don’t be afraid to use a piping bag if you want a fancier finish! -
Chill Until Set
Cover your dessert cups with plastic wrap or foil, and place them in the fridge for at least 2 hours to let them set. This is the perfect time to whip up a batch of your favorite cocktails or simply relax with a good book while dreaming of your creamy, crunchy treat! -
Garnish and Serve
Before serving, pop a fresh strawberry piece on top of each cheesecake bite. You can even drizzle a bit of chocolate sauce or strawberry puree if you’re feeling extra fancy!
Serving Suggestions
These Strawberry Crunch Cheesecake Bites are perfect for picnics, parties, or just a sweet little treat after dinner. Serve them chilled, and for a fun touch, place them on a colorful platter alongside whole fresh strawberries and mint leaves to brighten up your table. It’s like a little spring party on a plate!
Recipe Variations
Let’s get creative! Here are a few fun twists to try on this classic recipe:
-
Chocolate Lovers’ Delight: Swap the strawberry cookie crumbs for crushed chocolate cookies, and mix some melted chocolate into the cheesecake mixture for a divine chocolate strawberry cheesecake combo.
-
Caribbean Vacation: Add a splash of coconut extract to your cheesecake mixture and substitute crushed pineapple for the strawberry layer for a tropical vibe!
-
Berry Medley: Use a mix of berries—raspberries, blueberries, and strawberries—to make a berry explosion!
-
Vegan Option: Substitute cream cheese with a cashew cream or a vegan cream cheese. Ensure that your whipped topping is also dairy-free for a completely plant-based dessert.
Chef’s Notes
As with many of my recipes, this one has evolved over time. Initially, I stuck strictly to the classic strawberry flavor. However, after hearing from friends and love ones about their flavor preferences, I started experimenting with different combinations, much to my delight! The look of surprise and joy as they took their first bites inspired me to keep trying new variations. So don’t hesitate to make this recipe your own!
Oh, and I can’t forget the time I accidentally left the cheesecake bites out of the fridge for a few hours. Instead of panicking, I decided to embrace it! The bites were slightly warm and extra creamy, with the crust becoming soft but still delicious. Sometimes the magic happens in the unexpected—and that’s what you can find when you embrace your kitchen adventures!
FAQs and Troubleshooting
1. Why are my cheesecake bites not setting?
If your bites haven’t set, they likely need more chilling time. Make sure they’re covered well and give them a few more hours in the fridge.
2. Can I freeze these bites?
You absolutely can! Just be sure to wrap them tightly in plastic wrap or aluminum foil. Thaw them in the refrigerator before serving for the best texture.
3. My crust is too crumbly! What went wrong?
You might not have used enough melted butter to bind the crumbs. If this happens, simply mix in a bit more melted butter until you reach the desired consistency.
4. How can I make these bites lower in sugar?
Substituting the powdered sugar with a sugar alternative like Stevia or monk fruit is a great option! You can also reduce the sugar a bit and see how you like it. Taste as you go—cooking is all about finding what pleases your palate!
Nutritional Info (Optional, if applicable)
While indulgent, each Strawberry Crunch Cheesecake Bite is a perfect balance of flavor and satisfaction! For those counting calories, know there are options to lower sugar and calorie counts, but these little treats are meant to be enjoyed in moderation!
And there you have it! A delightful recipe that combines sweet nostalgia with homemade goodness. You’ll find that these Strawberry Crunch Cheesecake Bites are the perfect treat for anytime you want something easy, delicious, and guaranteed to impress. So get in that kitchen, make a mess, and enjoy every bite—after all, life is too short for boring food! Let’s keep things fresh and flavorful!
PrintStrawberry Crunch Cheesecake Bites
Creamy cheesecake bites with a crunchy strawberry cookie base, perfect for any occasion.
- Prep Time: 20 minutes
- Cook Time: 0 minutes
- Total Time: 120 minutes
- Yield: 12 servings 1x
- Category: Dessert
- Method: Chilling
- Cuisine: American
- Diet: Vegetarian
Ingredients
- 8 oz cream cheese, softened
- 1/2 cup powdered sugar
- 1 teaspoon vanilla extract
- 1 cup whipped topping
- 1 cup strawberry cookie crumbs (or crushed strawberry shortcake bars)
- 1/4 cup melted butter
- Fresh strawberries for garnish
Instructions
- Prepare the cheesecake mixture: In a large mixing bowl, combine the softened cream cheese, powdered sugar, and vanilla extract. Beat until smooth and creamy.
- Fold in the whipped topping until fully combined.
- Prepare the crunchy cookie base: Mix strawberry cookie crumbs and melted butter in another bowl until evenly coated. Press firmly into mini dessert cups.
- Fill with cheesecake mixture: Spoon the creamy cheesecake mixture on top of the pressed cookie base.
- Chill until set: Cover with plastic wrap or foil, and refrigerate for at least 2 hours.
- Garnish and serve: Top each cheesecake bite with a fresh strawberry piece before serving.
Notes
These bites can be frozen; wrap tightly and thaw in the refrigerator before serving. Experiment with flavors for a fun twist.
Nutrition
- Serving Size: 1 bite
- Calories: 150
- Sugar: 8g
- Sodium: 160mg
- Fat: 9g
- Saturated Fat: 4g
- Unsaturated Fat: 4g
- Trans Fat: 0g
- Carbohydrates: 15g
- Fiber: 0g
- Protein: 2g
- Cholesterol: 30mg
Keywords: strawberry cheesecake bites, dessert, summer treats, no bake cheesecake