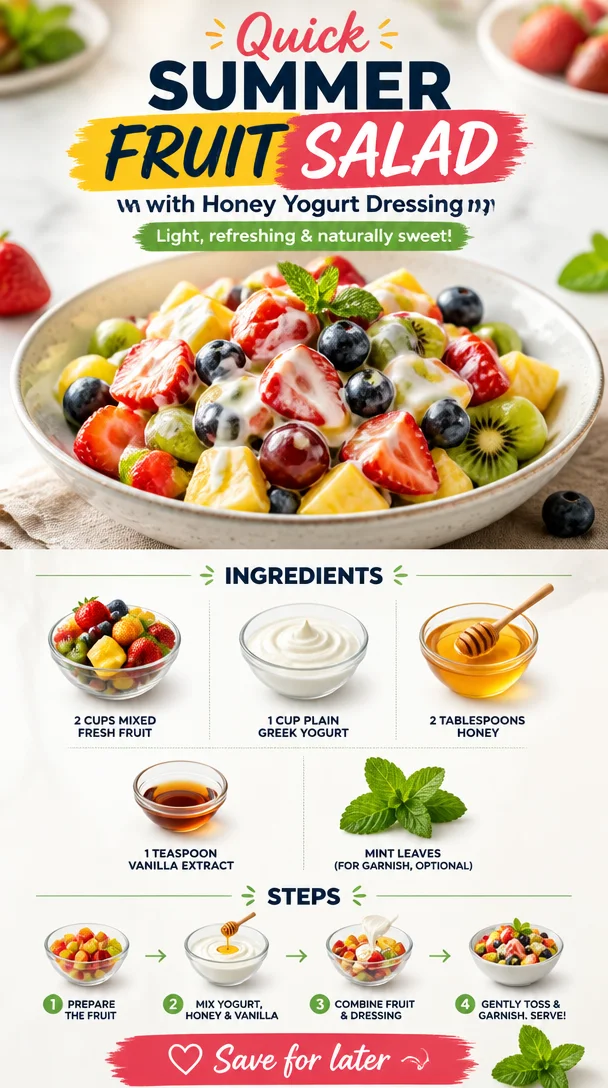
Quick Summer Fruit Salad with Honey Yogurt Dressing
A Refreshing Treat: Fruit Salad with Honey Yogurt Dressing
Welcome, food lovers! Today, we’re diving into the world of fresh, vibrant flavors with a deliciously simple recipe: Fruit Salad with Honey Yogurt Dressing. On a sunny afternoon or as a snack during a busy day, this dish is a perfect way to brighten your mood and nourish your body. Nothing beats the refreshing burst of fresh fruit combined with a creamy, slightly sweet yogurt dressing. Whether you’re treating yourself or impressing your friends, this fruit salad is a delightful option that keeps things light and lively.
A Walk Down Memory Lane: The Magic of Fruit Salad
Let me take you back to my childhood. I remember those summer days spent at my grandmother’s house, where the sunlight poured through the kitchen windows, casting a warm glow on everything it touched. Grandma had this magical way of transforming simple ingredients into moments that truly mattered. Every time we visited, her famous fruit salad was front and center on the dining table—a colorful masterpiece that beckoned for attention! She would gather whatever fruits were in season, often including strawberries, blueberries, or whatever was fresh from her backyard garden.
As a child, I didn’t fully appreciate the complexities of flavor combinations, but the explosion of sweetness when biting into a juicy strawberry or the subtle creaminess of yogurt that accompanied it was pure bliss. Grandma would whip up her special honey yogurt dressing, telling us how it made everything better—she was right! We would gather around the table, share stories, and savor those bright, exuberant flavors together. It was more than just a dish; it was a celebration of family, laughter, and love.
Now, decades later, I still find joy in creating fruit salad. It’s a dish that’s evolved with me, adopting new ingredients and combinations, but the essence remains the same—a burst of flavors and a tool for sharing joy. So, let’s round up some fresh ingredients and make some delicious memories together!
Ingredients
Here’s what you’ll need for your vibrant Fruit Salad with Honey Yogurt Dressing:
-
2 cups mixed fresh fruit:
- Options: strawberries, blueberries, kiwi, pineapple, and grapes are all fantastic picks. Feel free to swap in any seasonal fruit you love! If you’re feeling adventurous, add some citrus for a zesty twist or consider swap-outs like mango or raspberries.
-
1 cup plain Greek yogurt:
- Tip: Greek yogurt is creamier than regular yogurt and packs a protein punch, making it a satisfying base for our dressing. If you want a lighter version, you can use low-fat or non-fat yogurt. For a dairy-free option, coconut yogurt will add a delightful tropical flavor!
-
2 tablespoons honey:
- Why: Honey adds natural sweetness and works beautifully with the yogurt, creating a perfectly balanced dressing. If you’re looking for a vegan option, maple syrup is an excellent substitute—just use it in the same amount.
-
1 teaspoon vanilla extract:
- Chef Insight: A touch of vanilla enhances the overall flavor of the dressing and pairs perfectly with the fruit. If you want to get fancy, consider adding a pinch of cinnamon or even a splash of almond extract for a unique twist.
-
Mint leaves (for garnish, optional):
- Touch of freshness: Mint leaves not only add a pop of beautiful green, but they also elevate your dish with a refreshing aroma. If mint isn’t available, basil or even edible flowers can make a stunning garnish!
Step-by-Step Instructions
Now that we’ve gathered our ingredients, let’s jump into the kitchen and whip up this delightful fruit salad together!
-
Wash your fruits:
- Start by thoroughly washing all your fresh fruits under cool running water. For berries, a gentle touch is best to avoid bruising. If you’re using tougher fruits like apples or pears, no need to worry about their durability! Just make sure to check for any hidden dirt or residue.
-
Prep the fruit:
- Slice the strawberries into bite-sized pieces, halve the grapes, and chop the kiwi and pineapple into manageable chunks. You want all pieces to be similar in size so everyone can enjoy a balanced bite in each serving. While prepping, remember to let your creativity shine—mix and match fruits as you go!
-
Mix the yogurt dressing:
- In a mixing bowl, combine the Greek yogurt, honey, and vanilla extract. Whisk until your mixture is smooth and creamy. Try not to over-whisk it, as you want it to maintain that lovely, velvety texture! Taste it—if you want it a tad sweeter, feel free to add a touch more honey.
-
Combine the fruits:
- In a large serving bowl, gently toss all your prepared fruits together. This is where you can admire the rainbow of colors! Make sure to be gentle—no one likes squished fruit.
-
Drizzle with dressing:
- Once your fruit is beautifully mixed, pour the yogurt dressing over the fruit. Use a soft spatula to gently combine everything, ensuring each piece of fruit is well-coated in that luscious dressing.
-
Garnish and serve:
- Finally, sprinkle your fresh mint leaves on top for a beautiful presentation and fresh aroma. You can serve it right away, or if you want the flavors to meld a little longer, cover it and pop it in the fridge for about 30 minutes.
Serving Suggestions
When it comes to plating your fruit salad, you can keep it casual or make it a bit more elegant! Serve it in glass bowls or jars to highlight the beautiful colors of the fruits. For a kid-friendly option, scoop some fruit salad into fun, colorful cups. If you’re entertaining, consider arranging the fruit salad on a large platter, maybe even drizzling some extra honey on top for an artful touch. Either way, however you serve it, you’re sure to impress!
Recipe Variations
Want to switch things up? Here are a few fun variations to keep your fruit salad fresh and exciting:
-
Tropical Twist: Use tropical fruits like mango, papaya, and shredded coconut for a vacation vibe. Drizzle with lime juice instead of honey for a zesty kick.
-
Berry Blast: Combine various berries—blackberries, raspberries, and strawberries—and add a sprinkle of chia seeds for added nutrition.
-
Spiced Delight: For a warm flavor profile, mix in a pinch of cinnamon into your yogurt sauce, and consider adding roasted nuts for a delightful crunch.
-
Creamy Nutty Addition: Fold in a tablespoon of almond or peanut butter into the yogurt dressing for an extra layer of creaminess and protein.
-
Citrus Burst: Incorporate citrus fruits like oranges and grapefruits along with a splash of orange juice in the dressing for an uplifting, tangy version.
Chef’s Notes
This fruit salad has become a staple in my kitchen over the years. What I love most about it is its adaptability—no two salads are ever the same! Some days I crave tropical fruits, while other days, I find myself reaching for juicy berries. Not only is it a great way to use up leftover fruit before it spoils, but it’s also an amazing canvas for creativity. Plus, I love that I can make it ahead of time as part of my meal prep for the week! And don’t even get me started on how many compliments I’ve received during potluck parties—bring this to one, and you’ll be a rock star!
FAQs and Troubleshooting
Q: Can I use frozen fruit?
A: While fresh fruit is best for texture, you can use frozen fruit in a pinch! Just be sure to let it thaw and drain the excess liquid to keep your salad from getting soggy.
Q: How can I store leftover fruit salad?
A: Keep any leftover fruit salad in an airtight container in the fridge. It’ll stay fresh for about 1-2 days. However, note that the fruit may become a bit mushy over time, so enjoy it as soon as you can!
Q: Is there a way to make this a more substantial meal?
A: Absolutely! You can easily add a handful of granola or nuts for extra crunch and nourishment, making it a filling breakfast or snack option.
Q: What if I don’t have Greek yogurt?
A: No problem! You can use regular yogurt or any other plant-based alternative. Just remember that the flavor and creaminess might vary slightly.
Nutritional Info
This section is optional; if you’d like, let’s talk about the health benefits of our fruit salad! It’s low in calories, rich in vitamins, and ideal for hydration, thanks to the variety of fruit. Plus, pairing fruits with yogurt adds protein and probiotics, making it a balanced option for any time of day.
So there you have it, my friends! A simple yet delightful recipe for a vibrant Fruit Salad with Honey Yogurt Dressing that’s sure to become a favorite in your kitchen. Enjoy every bite, reminisce about the beautiful moments food brings into our lives, and remember to share the joy with those you love! Happy cooking!
PrintFruit Salad with Honey Yogurt Dressing
A refreshing fruit salad with a creamy honey yogurt dressing, perfect for warm days and gatherings.
- Prep Time: 15 minutes
- Cook Time: 0 minutes
- Total Time: 15 minutes
- Yield: 4 servings 1x
- Category: Salad
- Method: N/A
- Cuisine: American
- Diet: Vegetarian
Ingredients
- 2 cups mixed fresh fruit (strawberries, blueberries, kiwi, pineapple, grapes)
- 1 cup plain Greek yogurt
- 2 tablespoons honey
- 1 teaspoon vanilla extract
- Mint leaves (for garnish, optional)
Instructions
- Wash your fruits under cool running water.
- Prep the fruit by slicing strawberries, halving grapes, and chopping kiwi and pineapple.
- Mix the yogurt, honey, and vanilla extract in a bowl until smooth.
- Combine the fruits in a large serving bowl and gently toss.
- Drizzle the yogurt dressing over the mixed fruit.
- Garnish with fresh mint leaves and serve.
Notes
You can prepare this ahead of time, and adjust the sweetness by adding more honey if desired.
Nutrition
- Serving Size: 1 serving
- Calories: 180
- Sugar: 20g
- Sodium: 50mg
- Fat: 2g
- Saturated Fat: 0g
- Unsaturated Fat: 2g
- Trans Fat: 0g
- Carbohydrates: 37g
- Fiber: 3g
- Protein: 6g
- Cholesterol: 6mg
Keywords: fruit salad, healthy snack, summer recipes, yogurt dressing, easy dessert
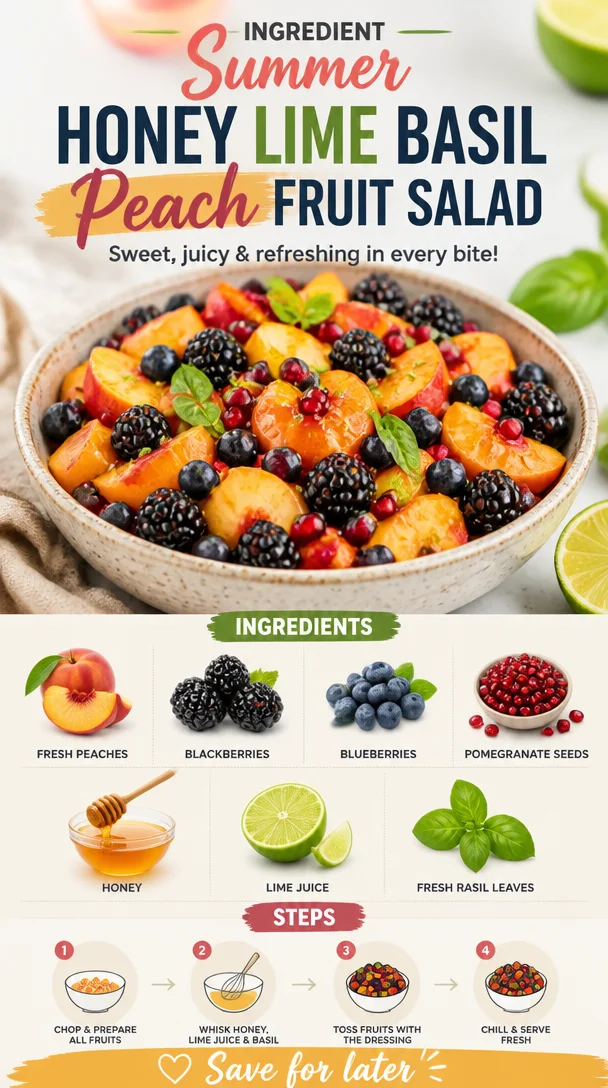
Ingredient Summer Honey Lime Basil Peach Fruit Salad
Honey Lime Basil Peach Fruit Salad: A Fresh Twist on Summer Classics
Welcome back, my foodie friends! Today, I’m excited to share one of my absolute favorite summer delights: Honey Lime Basil Peach Fruit Salad. This vibrant salad bursts with flavor and color and brings together the sweetness of ripe peaches, the tartness of berries, and a hint of aromatic basil. Honestly, what could be better on a hot summer day?
Picture this: the summer sun is shining, the warm breeze is blowing, and you’re sitting outside with a bowl of this refreshing fruit salad. Every bite is a celebration of summer’s bounty. This dish is not just a side; it’s a delightful centerpiece for any backyard barbecue or picnic, and let me assure you, it’s as easy to make as it is delicious!
One of the best things about this salad is how simple it is. No elaborate cooking techniques are required—just a bit of chopping and tossing. And the flavors? Oh boy, they sing! The sweet honey and zesty lime juice elevate the fruits to a whole new level, while the fresh basil adds an unexpected twist that takes this salad from ordinary to extraordinary. Trust me, you’ll be going back for seconds (or thirds!).
So grab your apron, channel your inner chef, and let’s dive into this delightful dish. Not only will it leave you feeling refreshed and satisfied, but it’s also a fantastic way to showcase those juicy summer peaches and berries while bringing a whimsical touch to your table.
A Sweet Summer Memory
Before we dive into the recipe, I want to take you back to a sunny afternoon from a few years ago. It was the tail end of summer, and I was visiting my grandmother out in the countryside. She always had a knack for turning the simplest ingredients into magical creations. One afternoon, she brought a basket of sun-ripened peaches and berries fresh from her garden to the kitchen.
We spent the day chatting and laughing as we sliced the peaches and tossed in the berries. She drizzled honey and squeezed some lime juice over the mix, and just like that, we had a fruit salad that was bursting with flavor. It quickly became a tradition—each summer, we would make our fruit salad, and I would always be the one to add a few sprigs of basil from her herb garden. Those moments spent with her, full of love and laughter, made this dish special, and it’s a cherished memory I hold dear.
Now, let’s recreate that radiant moment with this Honey Lime Basil Peach Fruit Salad!
Ingredients
Here’s what you’ll need to whip up this refreshing salad:
-
Fresh Peaches: Ripe, juicy peaches are the star of this salad. Choose peaches that are slightly soft to the touch for maximum sweetness. If you can’t find fresh peaches, feel free to use nectarines as a substitute!
-
Blackberries: These little gems add a delicious tartness. If they’re out of season, you can use raspberries or even sliced strawberries for a similar vibe.
-
Blueberries: Sweet and pop-in-your-mouth blueberries are an essential here! If you’re feeling adventurous, try swapping them for cherries or any sweet berry you love.
-
Pomegranate Seeds: For a burst of crunch and tangy flavor, the pomegranate seeds are a game-changer. If you can’t find fresh pomegranate, you can use a sprinkle of dried cranberries or leave them out entirely.
-
Honey: This natural sweetener enhances the flavors beautifully. For a vegan version, maple syrup works just as well.
-
Lime Juice: The acidity of the lime juice cuts through the sweetness and balances the dish perfectly. Freshly squeezed is best, but bottled lime juice can suffice in a pinch.
-
Fresh Basil Leaves: Ah, the unexpected ingredient! Chopped fresh basil offers a lovely aromatic twist. If you’re not a fan, mint could offer a refreshing alternative.
Step-by-Step Instructions
Alright, my culinary companions, let’s get this salad whipped up! You won’t believe how quickly it comes together.
-
Gather Your Ingredients: Make sure you have all the ingredients ready. It’s always good to have a clean kitchen counter—trust me; it makes the process more enjoyable!
-
Prep the Peaches: Start by washing the peaches thoroughly. You can either slice them into wedges or chop them into bite-sized pieces—whatever catches your fancy! Just remove the pit. Pro tip: If you want to peel them, blanch them in boiling water for 30 seconds to loosen the skin first.
-
Toss in the Berries: In a large mixing bowl, combine the sliced peaches with blackberries and blueberries. Gently fold them together—be careful not to squish the delicate berries; they have a mind of their own!
-
Add the Pomegranate Seeds: If you’re using fresh pomegranate, cut one in half and gently tap the back with a wooden spoon to release the seeds. Toss those beautiful red jewels into the mix. They not only add flavor but also make the salad visually stunning!
-
Prepare the Dressing: In a small bowl, whisk together the honey and lime juice until smooth. If you prefer a thinner dressing, you can add a teaspoon of water to help it glide over the fruits more easily.
-
Drizzle and Toss: Pour the honey-lime mixture over your fruit medley and give everything a gentle toss to ensure the dressing coats every piece. This is where the magic happens!
-
Chop the Basil: Finally, chop the fresh basil leaves and sprinkle them over the top of your salad. Give it one last gentle toss to incorporate that aromatic goodness.
-
Taste Test: This is the most important step—taste your salad! Adjust the honey or lime juice according to your preference. This salad should be perfectly balanced between sweet and tangy.
-
Refrigerate: Allow the salad to chill in the refrigerator for about 15-30 minutes. This allows the flavors to meld even more beautifully.
Serving Suggestions
Now it’s time to plate up this beautiful creation! Serve the Honey Lime Basil Peach Fruit Salad in a large, colorful bowl for a buffet-style vibe, or drizzle it into individual serving bowls to showcase the vibrant colors. Garnish with a sprig of basil on top, and consider adding a scoop of creamy yogurt or a dollop of whipped coconut cream for an extra indulgent touch. Whether you’re serving it as a dessert, a side dish, or a light lunch, it’s sure to impress!
Recipe Variations
Feeling adventurous? Here are a few creative twists to customize your fruit salad:
-
Tropical Twist: Swap peaches for diced mango or pineapple for a refreshing tropical flair. Add shredded coconut for an even more beachy vibe!
-
Nutty Crunch: Sprinkle some toasted almonds or walnuts on top for a satisfying crunch. It adds texture and healthy fats too!
-
Citrus Burst: Add segments of orange or grapefruit to brighten up the salad and introduce another layer of acidity.
-
Spicy Kick: For a kick of heat, sprinkle in a pinch of red pepper flakes or chopped jalapeños. It sounds wild, but you’ll be surprised at how good spicy and sweet can be together!
-
Berry Party: Use any combination of berries you desire! Swap blackberries for raspberries or strawberries to create your perfect blend.
Chef’s Notes
Let me tell you, this recipe has a special place in my heart. Over the years, I’ve played around with seasonal fruits to keep things fresh and exciting. I once made it with summer melon and added a splash of orange juice instead of lime—it was a massive hit at a family gathering!
Every time I make this salad, I think of that joyful sunny afternoon with my grandmother, and it reminds me of how food can create memories that last a lifetime. Enjoy every bite, and remember that food should always be enjoyed, never rushed!
FAQs and Troubleshooting
-
Can I make this salad in advance?
- Absolutely! However, I recommend assembling everything except the dressing a few hours ahead. When you’re ready to enjoy it, drizzle the dressing and toss! It keeps the fruit fresh and prevents them from getting soggy.
-
What if I have leftover salad?
- This salad is best enjoyed fresh, but if you have leftovers, store them in an airtight container in the refrigerator. Just know the berries may lose some of their texture. Give it a little stir before serving!
-
Can I use frozen fruit?
- While fresh fruit yields the best texture and flavor, you can use thawed frozen fruit in a pinch. However, try to avoid mushy, overripe varieties.
-
How can I adjust the sweetness?
- If you like it sweeter, definitely add more honey. For a lower-sugar version, consider using a sugar substitute or even omitting the honey altogether, as the fruit is naturally sweet.
Nutritional Info
This light and refreshing fruit salad packs a nutritional punch! It’s high in vitamins C and A, fiber, and antioxidants. Each serving is around 120 calories, depending on the portion size, and it’s low in fat—making it a guilt-free treat!
So, there you have it! Your perfect recipe for a Honey Lime Basil Peach Fruit Salad. Whether you’re enjoying it at a barbecue, a picnic, or simply as a light dessert at home, I hope it brings as much joy to your kitchen as it has to mine. Happy cooking, and remember: keep it fresh, simple, and delicious!
PrintHoney Lime Basil Peach Fruit Salad
A vibrant and refreshing fruit salad combining ripe peaches, berries, and aromatic basil with a honey-lime dressing.
- Prep Time: 10 minutes
- Cook Time: 0 minutes
- Total Time: 30 minutes
- Yield: 4 servings 1x
- Category: Salad
- Method: No Cooking
- Cuisine: American
- Diet: Vegetarian
Ingredients
- 4 Fresh Peaches, chopped
- 1 cup Blackberries
- 1 cup Blueberries
- 1/2 cup Pomegranate Seeds
- 2 tablespoons Honey
- 2 tablespoons Lime Juice
- 1/4 cup Fresh Basil Leaves, chopped
Instructions
- Gather your ingredients.
- Prep the peaches by washing them thoroughly and chopping them into bite-sized pieces.
- Toss in the blackberries and blueberries in a large mixing bowl.
- Add the pomegranate seeds to the fruit mix.
- Prepare the dressing by whisking together honey and lime juice until smooth.
- Drizzle the honey-lime mixture over the fruit and toss gently.
- Chop the basil leaves and sprinkle over the salad.
- Taste the salad and adjust the flavors as needed.
- Refrigerate for 15-30 minutes before serving.
Notes
Serve with a scoop of creamy yogurt or whipped coconut cream for extra indulgence. Great for barbecues or picnics.
Nutrition
- Serving Size: 1 serving
- Calories: 120
- Sugar: 14g
- Sodium: 5mg
- Fat: 0g
- Saturated Fat: 0g
- Unsaturated Fat: 0g
- Trans Fat: 0g
- Carbohydrates: 30g
- Fiber: 4g
- Protein: 1g
- Cholesterol: 0mg
Keywords: fruit salad, summer salad, peach salad, refreshing salad, healthy dessert
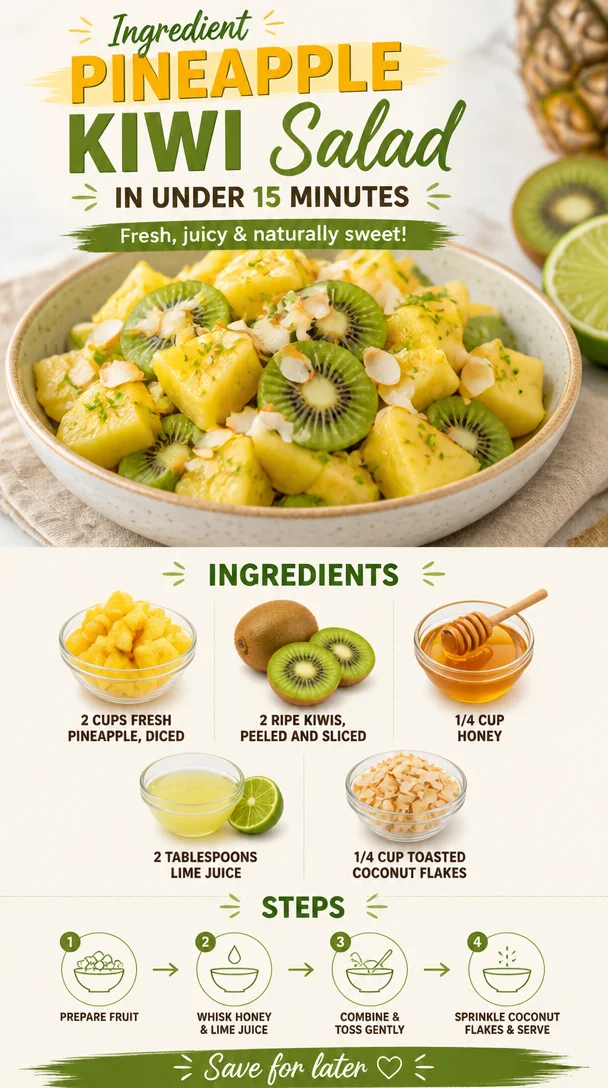
Ingredient Pineapple Kiwi Salad in Under 15 Minutes
The Ultimate Pineapple Kiwi Salad: A Refreshing Taste of Summer
Welcome to another delicious adventure at Clean Plate Cravings! Today, I’m excited to share a dish that embodies the joy of fresh, vibrant flavors—Pineapple Kiwi Salad. This salad is not just a simple side; it’s a celebration of sunshine, sweetness, and a little tropical zing that will awaken your taste buds and perk up your day!
Fresh fruit salads are a classic favorite, but there’s something truly magical about the luscious pairing of juicy pineapple and tangy kiwis. This stunning combo not only looks delightful on your plate but also fills you with that warm, happy feeling—like a mini-vacation in a bowl.
When I think about sweet, ripe pineapples and the crunchy texture of kiwi, I can’t help but drift back to lazy summer afternoons spent at my grandma’s house. She used to whip up the most incredible fruit salads, each bite bursting with sunshine and laughter. One particular memory stands out, where we were sitting on her porch, enjoying a simple meal that included her rendition of a tropical fruit salad. It was a hit not just for its taste, but also for the joy it brought to our family gatherings. That moment ignited my love for creative cooking, particularly with fresh ingredients that make our bodies feel good.
So, let’s dive into this refreshing Pineapple Kiwi Salad that’s sure to transport you straight into those carefree summer days!
Personal Story
It was one of those picture-perfect summer days, where the sun was shining, and the birds were singing. We were all gathered at Grandma’s house for our annual family barbecue. As the grill was fired up, I could smell the delightful mix of smoky and savory wafting through the air. Grandma was in the kitchen, deftly slicing fruit as she prepped a feast.
After a hearty meal of grilled meats and colorful veggie skewers, Grandma presented her colorful fruit salad like it was a trophy. The vibrant yellow of the pineapple and the electric green of the kiwis seemed to glow under the afternoon sun. “A little sweet surprise just for you all!” she smiled, urging us to dig in.
Each bite came with a hint of nostalgia; it reminded me of sun-kissed beaches, sandy toes, and laughter echoing off the waves. Grandma’s fruit salad wasn’t just a dish—it was a memory, a hug from the past that we could taste and savor. So, with that cherished memory tucked away, let’s create our own version of this delightful fruit salad that pays homage to those sunny days!
Ingredients
Here’s what you’ll need and a little insight into why these ingredients work so well together:
-
2 cups fresh pineapple, diced
Fresh pineapple adds a juicy sweetness and vibrant color. If you don’t have fresh, use canned pineapple in juice—just make sure to drain it well! -
2 ripe kiwis, peeled and sliced
Kiwis provide a tangy kick and a unique texture. For a fun twist, try substituting with star fruit or even green grapes! -
1/4 cup honey
Honey acts as our natural sweetener, enhancing the flavors without overpowering them. You can substitute with agave syrup or maple syrup if you’re looking for a vegan option. -
2 tablespoons lime juice
This adds a delightful tang that balances the sweetness of the fruit. Lemon juice can be replaced if that’s what you have on hand. -
1/4 cup toasted coconut flakes
Toasting the coconut adds a nutty crunch and an extra layer of flavor. If you prefer a nut-free version, you can leave this out or substitute with sliced almonds.
Step-by-Step Instructions
Now that we’ve gathered our ingredients, let’s get cooking! Here’s how to make this easy and refreshing Pineapple Kiwi Salad:
-
Prep Your Ingredients
Start by gathering all your ingredients on the counter. This brings everything to your reach and keeps the kitchen organized. It’s also a good time to reminisce about summertime! -
Dice the Pineapple
Take your fresh pineapple and slice it into quarters. Remove the core and chop it into bite-sized cubes. Chef Hack: If fresh pineapples intimidate you, look for pre-diced options at your local grocery store to save time! -
Slice the Kiwis
Carefully peel the kiwis and slice them into rounds. If you’re feeling fancy, you can cut them into stars! Chef Insight: The riper the kiwi, the sweeter it is; look for ones that yield slightly to pressure but aren’t mushy! -
Mix the Honey and Lime Juice
In a small bowl, whisk together the honey and lime juice until they’re combined. This dressing will elevate your fruit salad with a fresh burst of flavor. Tip: If you want a thicker sauce, consider adding a sprinkle of chia seeds for added texture and nutrition. -
Combine the Fruit
In a large mixing bowl, gently combine the diced pineapple and sliced kiwis. Drizzle the honey-lime dressing over the top and toss carefully to coat all the fruit without mashing them. Chef Tip: The dressing can be made ahead of time and stored in the fridge to allow the flavors to meld a bit more! -
Toast the Coconut
In a dry skillet over medium heat, toast the coconut flakes for a few minutes until they are golden brown. Keep an eye on them, as they can burn quickly! Once toasted, allow them to cool. Note: Don’t skip this step; the toasty flavor makes a big difference! -
Serve & Enjoy
Transfer your Pineapple Kiwi Salad to a serving dish or individual bowls. Top with the toasted coconut flakes and an extra squeeze of lime juice if desired. Enjoy immediately for the best texture and flavor!
Serving Suggestions
Serving this refreshing salad can be as fun as making it. I love to present it in a clear glass bowl, showcasing all those beautiful colors, or in halved pineapple shells for an extra festive touch—talk about an Instagram-worthy moment! You can also serve it alongside grilled chicken or fish as a bright and zesty accompaniment, or simply as a vibrant centerpiece for any summer gathering.
Recipe Variations
Feeling creative? Here are some twists you can try with your Pineapple Kiwi Salad:
- Minty Fresh Twist: Add a handful of chopped fresh mint to provide a refreshing herbal note.
- Berry Blast: Mix in some strawberries or blueberries for an added burst of color and sweetness.
- Nutty Delight: Toss in a handful of chopped walnuts or pecans for some crunch and a protein boost.
- Spicy Kick: Add a pinch of cayenne pepper or finely diced jalapeño for a surprising kick that contrasts nicely with the sweetness.
- Citrusy Zing: Swap out lime juice for orange juice for a sweeter, citrusy twist.
Chef’s Notes
This Pineapple Kiwi Salad has become a staple in my household, especially for potluck gatherings and summer picnics! I love how flexible it is—there’s really no wrong way to put it together. Over time, I’ve experimented with various fruit combinations, and I’ve even served it as a dessert by pairing it with a scoop of coconut ice cream. As with all recipes, this salad has evolved, but the heart of it—celebrating fresh ingredients and sharing joy—remains constant.
I also remember a time when I forgot to toast the coconut! Trust me, the next batch was perfectly toasted because no one ever wants a redo on a fruit salad presentation—it’s all about those little details!
FAQs and Troubleshooting
-
Q: Can I make this salad ahead of time?
A: Yes, you can, but I recommend making the salad no more than a couple of hours in advance. If you anticipate leftovers, store the dressing separately to prevent the fruit from getting mushy. -
Q: My pineapple isn’t sweet enough; what can I do?
A: If your pineapple isn’t sweet, you can add a touch more honey or even a sprinkle of sugar to enhance the flavor. Make sure it’s ripe next time, though! -
Q: How do I choose the right kiwi?
A: Look for kiwis that are slightly soft when squeezed gently. Avoid overly hard or mushy kiwis; they should feel just right! -
Q: Can I use frozen fruit?
A: While fresh is best for texture, frozen fruits work in a pinch. Just let them thaw and drain well; however, be prepared for a different texture!
Nutritional Info (Optional)
This Pineapple Kiwi Salad is not just delicious; it’s also packed with nutrients. Each serving provides a healthy dose of vitamin C, potassium, and dietary fiber. It’s light, refreshing, and makes for a guilt-free treat!
So, grab those vibrant ingredients and let’s whip up this delightful Pineapple Kiwi Salad! Whether it’s a side dish for your next barbecue or simply a refreshing snack on a hot day, this salad is sure to bring smiles to your table. Happy cooking!
PrintPineapple Kiwi Salad
A refreshing salad that combines juicy pineapple and tangy kiwis, perfect for summer gatherings.
- Prep Time: 10 minutes
- Cook Time: 5 minutes
- Total Time: 15 minutes
- Yield: 4 servings 1x
- Category: Salad
- Method: No cooking required
- Cuisine: Tropical
- Diet: Vegan
Ingredients
- 2 cups fresh pineapple, diced
- 2 ripe kiwis, peeled and sliced
- 1/4 cup honey
- 2 tablespoons lime juice
- 1/4 cup toasted coconut flakes
Instructions
- Prep your ingredients by gathering them on the counter for easy access.
- Dice the pineapple into bite-sized cubes after removing the core.
- Slice the kiwis into rounds.
- Mix the honey and lime juice in a small bowl until combined.
- Combine the pineapple and kiwi gently in a large bowl and drizzle with the honey-lime dressing.
- Toast the coconut flakes in a dry skillet until golden brown.
- Serve the salad topped with toasted coconut and enjoy immediately.
Notes
This salad can be made ahead of time, but store the dressing separately to prevent fruit from getting mushy.
Nutrition
- Serving Size: 1 serving
- Calories: 180
- Sugar: 25g
- Sodium: 5mg
- Fat: 3g
- Saturated Fat: 1g
- Unsaturated Fat: 2g
- Trans Fat: 0g
- Carbohydrates: 42g
- Fiber: 3g
- Protein: 2g
- Cholesterol: 0mg
Keywords: Pineapple salad, Kiwi salad, Summer recipes, Fruit salad, Refreshing salad
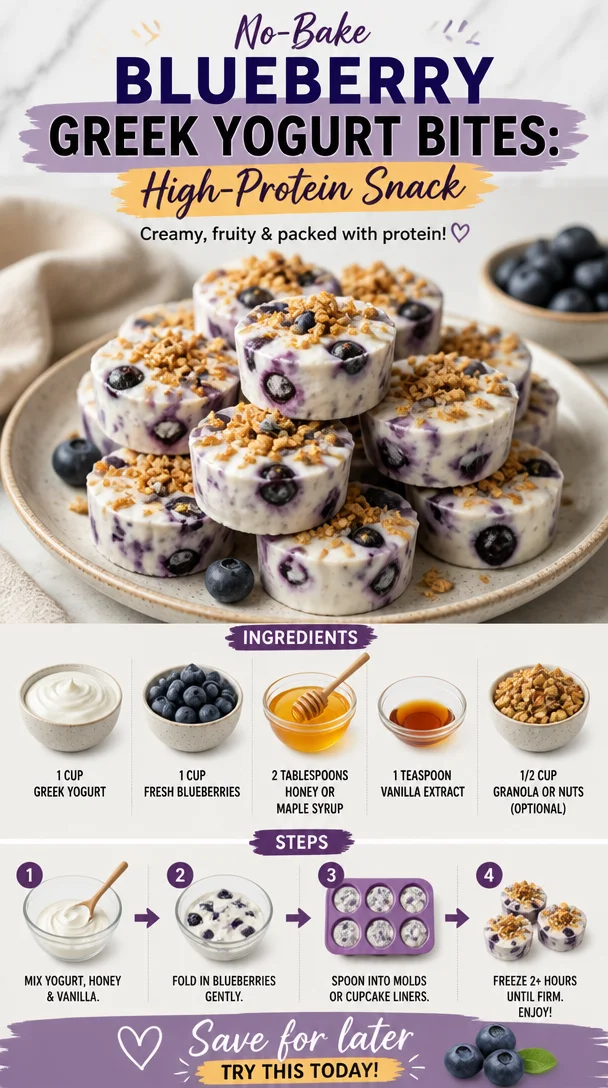
No-Bake Blueberry Greek Yogurt Bites: High-Protein Snack
Refreshingly Delicious Blueberry Greek Yogurt Bites
When it comes to healthy snacking, it’s easy to find yourself reaching for the same old options—maybe a handful of nuts or a sad apple that’s been sitting in the fridge a little too long. Well, my dear foodies, I’m here to change that narrative with a vibrant, tasty, and oh-so-easy recipe that you’ll be craving week after week: Blueberry Greek Yogurt Bites! These delightful little bites are a perfect blend of creamy Greek yogurt, juicy blueberries, and a touch of sweetness, all frozen to create a satisfying and refreshing treat.
As a chef, I see food as a celebration, and snacks like these are the perfect way to bring joy into your everyday routine. Picture this: it’s a sunny afternoon; you’re lounging on your patio or perhaps enjoying a picnic in the park. You unwrap a Blueberry Greek Yogurt Bite, take a bite, and instantly feel a wave of happiness wash over you. Who says healthy eating can’t be fun?
And the best part? These bites are super customizable! Whether you’re looking for a morning pick-me-up, a midday boost, or a healthier dessert option, these creamy, fruity delights will keep you energized without any guilt. Ready to dive in? Let’s roll up our sleeves and make these scrumptious bites together!
My Blueberry Journey: A Sweet Slice of Nostalgia
Growing up, my grandmother had a knack for turning every family gathering into a delicious feast, and one of her specialties was berry picking. Each summer, we’d eagerly await those weekend morning trips to the local farm, armed with buckets and sun hats, ready to hunt for the ripest blueberries. The feeling of plucking those plump blueberries off the bushes, staining our fingers with vibrant blue juice, was magical. We weren’t just picking fruit; we were making memories.
After a fruitful day at the farm, my grandmother would gather us all in the kitchen to whip up her famous blueberry yogurt parfaits. One bite of those creamy layers filled with blueberries and a drizzle of honey takes me straight back to those sun-soaked afternoons. Fast forward to today, and while I may not be berry picking every weekend, I still seek to invite that nostalgia into my cooking. That’s where these Blueberry Greek Yogurt Bites come in—a modern twist that’s just as delightful and packed with love!
Ingredients
Let’s gather our ingredients and get ready to create something fabulous:
-
1 cup Greek yogurt: The star of our dish! Greek yogurt is rich and creamy, packed with protein, and supports gut health. If you want a non-dairy option, go for coconut or almond-based yogurt.
-
1 cup fresh blueberries: Bursting with antioxidants and natural sweetness, blueberries add a delicious-tart flavor. If fresh are out of season, feel free to use frozen blueberries—just thaw and drain any excess water before use.
-
2 tablespoons honey or maple syrup: This adds a touch of sweetness to balance the tanginess of the yogurt. For a raw alternative, agave nectar works wonderfully too!
-
1 teaspoon vanilla extract: A hint of vanilla elevates the flavors and gives our bites that extra oomph. You could also use almond extract for a fun twist!
-
1/2 cup granola or nuts (optional): This is all about texture! Granola brings a delightful crunch, while nuts like chopped almonds or walnuts can add healthy fats. Feel free to skip this if you prefer a smoother bite.
Step-by-Step Instructions
-
Prep Your Ingredients: Gather all your ingredients and ensure your blueberries are clean and dry. This will really make a difference when you pop these bites out of the mold!
-
Mix the Yogurt and Sweetener: In a mixing bowl, combine the Greek yogurt, honey (or maple syrup), and vanilla extract. Use a spatula to mix until smooth and well incorporated. Here’s a chef hack: taste it! Adjust the sweetness to your liking. If you love it sweeter, just add a drizzle more of honey, and mix again.
-
Fold in the Blueberries: Now for the fun part! Gently fold in the fresh blueberries into your yogurt mixture. Be gentle to avoid mashing them up; we want those lovely bursts of flavor in every bite.
-
Pour into Molds: Grab your silicone ice cube trays or muffin tins (lightly greased for easy release). Spoon the yogurt-blueberry mixture into the molds, filling them about 3/4 full. If you’re using granola or nuts, sprinkle some on top for an added crunch.
-
Freeze: Place the molds in the freezer and allow the mixture to freeze for at least 4 hours, or until completely firm.
-
Pop Them Out: Once frozen, remove the molds from the freezer. To release the bites, simply pull gently on the sides of the silicone mold or run warm water over the outside of a metal mold. They should pop right out!
-
Serve & Enjoy: Enjoy immediately, or store the bites in an airtight container in the freezer for those moments when you need a pick-me-up!
Serving Suggestions
These Blueberry Greek Yogurt Bites are best enjoyed fresh from the freezer! Serve them on a colorful platter for a fun snack option at parties or keep them ready in your freezer for a quick grab-and-go breakfast. They also work beautifully alongside a warm slice of whole-grain toast or a smoothie for a balanced breakfast spread.
Recipe Variations
Get creative and shake things up with these fun spins:
-
Berry Blast: Substitute blueberries for your favorite berries—think strawberries, raspberries, or even cherries! Mix and match for a berry medley.
-
Nutty Delight: Add a tablespoon of nut butter (like almond or peanut butter) to your yogurt mixture for a creamy, protein-packed treat.
-
Zesty Citrus: Add the zest of a lemon or orange to the mixture for a zesty pop of flavor that brightens up the bites.
-
Chocolate Swirl: For the chocolate lovers, drizzle some melted dark chocolate over the tops of the bites before freezing, or fold in some mini chocolate chips!
Chef’s Notes
This recipe holds a special place in my heart! I originally concocted it when I was looking for a healthy snack option to keep my energy up during long cooking sessions. As my friends began to taste them, they kept coming back with requests for more! What started as a simple snack evolved into a delicious treat that friends and family adore. Now, it’s one of my go-to recipes for potlucks, and they always vanish before I get the chance to enjoy one myself.
Remember, cooking is all about experimenting. If you have leftover yogurt or fruit, throw it into this mix! It may surprise you how delightful your accidental creations turn out.
FAQs and Troubleshooting
1. Can I use frozen blueberries?
Absolutely! Just thaw them beforehand and drain any excess liquid so they don’t water down your mixture.
2. What if my bites are too hard?
If your bites end up too frozen, you can let them sit at room temperature for a few minutes to soften before enjoying them, or pop them in the microwave for just a few seconds to get the perfect creamy texture.
3. I don’t have silicone molds—what should I do?
No worries! You can use paper muffin cups placed in a regular muffin tin, or even an ice cube tray—just make sure to lightly grease it for the easiest release.
4. How long can I store these bites in the freezer?
These yogurt bites can be stored in an airtight container for up to 3 months. Just make sure to keep them frozen until you’re ready to eat!
Nutritional Info
These Blueberry Greek Yogurt Bites are not only a treat for your taste buds but also a healthy choice. Each bite is packed with protein, antioxidants, healthy fats (if you include nuts), and a touch of natural sweetness—making them the perfect guilt-free snack option.
Now that you’ve got the scoop on these delightful Blueberry Greek Yogurt Bites, it’s time to head into your kitchen and whip up a batch. Trust me, not only will they satisfy your cravings, but they’ll also bring a smile to your face and love to your heart! Happy snacking!
PrintRefreshingly Delicious Blueberry Greek Yogurt Bites
A vibrant, tasty, and healthy snack made with creamy Greek yogurt and juicy blueberries, perfect for a guilt-free treat.
- Prep Time: 15 minutes
- Cook Time: 0 minutes
- Total Time: 255 minutes
- Yield: 12 servings 1x
- Category: Snack
- Method: Freezing
- Cuisine: American
- Diet: Vegetarian
Ingredients
- 1 cup Greek yogurt
- 1 cup fresh blueberries
- 2 tablespoons honey or maple syrup
- 1 teaspoon vanilla extract
- 1/2 cup granola or nuts (optional)
Instructions
- Prep Your Ingredients: Gather all your ingredients and ensure your blueberries are clean and dry.
- Mix the Yogurt and Sweetener: In a mixing bowl, combine the Greek yogurt, honey (or maple syrup), and vanilla extract. Use a spatula to mix until smooth.
- Fold in the Blueberries: Gently fold in the fresh blueberries into your yogurt mixture.
- Pour into Molds: Spoon the yogurt-blueberry mixture into silicone ice cube trays or muffin tins, filling them about 3/4 full.
- Freeze: Place the molds in the freezer and allow to freeze for at least 240 minutes, or until firm.
- Pop Them Out: Remove the molds from the freezer and release the bites by pulling gently on the sides.
- Serve & Enjoy: Enjoy immediately or store in an airtight container in the freezer.
Notes
These bites can be customized with various fruits, nuts, or flavorings. Perfect for grab-and-go snacks!
Nutrition
- Serving Size: 1 bite
- Calories: 50
- Sugar: 6g
- Sodium: 40mg
- Fat: 1g
- Saturated Fat: 0g
- Unsaturated Fat: 1g
- Trans Fat: 0g
- Carbohydrates: 10g
- Fiber: 1g
- Protein: 2g
- Cholesterol: 5mg
Keywords: blueberry, yogurt bites, healthy snacks, frozen treats, easy recipe

Minute Healthy Raspberry Oatmeal Cookies (Meal Prep)
Healthy Raspberry Oatmeal Cookies: A Feel-Good Delight
Hey there, foodie friends! Today I’m super excited to share a recipe that’s truly close to my heart—Healthy Raspberry Oatmeal Cookies. If you’re anything like me, you cherish those moments when you can indulge without the guilt. And trust me, these cookies bring all the deliciousness while keeping it wholesome. Let’s dive into the world of vibrant flavors, good-for-you ingredients, and a sprinkle of nostalgia!
Introduction
As someone who believes that healthy eating can be a true delight, I’m always on the lookout for recipes that are both nourishing and scrumptious. Cookies might typically be seen as a guilty pleasure, but today, we’re flipping the script! These Healthy Raspberry Oatmeal Cookies are not only packed with wholesome ingredients, but they also deliver that sweet satisfaction we all crave.
Picture this: You walk into your kitchen, and the tangy aroma of fresh raspberries fills the air. The sun is shining, birds are chirping outside, and you’ve got your favorite tunes playing. You pull these cookies out of the oven, and they are warm, chewy, and just a little crispy on the edges. Yes, my friends, this is what life is all about!
I created this recipe with the idea that healthful eating should be accessible and enjoyable. With just a handful of simple ingredients, you can whip up a batch that’s perfect for breakfast, an afternoon snack, or even a guilt-free dessert. They’re bursting with juicy raspberries, bringing you not just flavor but also a boost of antioxidants. And the best part? You can feel good about every single bite!
So, grab your apron, and let’s get baking! You’ll want to make a double batch because these cookies won’t last long.
Personal Story
This recipe reminds me of carefree afternoons spent in my grandmother’s kitchen. She was the queen of baking, whipping up a storm with whatever she had on hand. I can still hear her laughter as we baked together, flour dusting our hair and the joyful chaos of mixing bowls and spoons filling the air. One day, I remember her pulling out a colorful basket of freshly picked raspberries from her garden. “We’re making cookies!” she exclaimed, her eyes twinkling with excitement.
We mashed those sweet little berries into a simple dough, and within an hour, the house was filled with the most heavenly aroma. It was the first time I learned that you could create magic with just a few staple ingredients and a lot of love. Ever since then, I’ve treasured the idea of incorporating fresh fruits into baked goods—something that’s easy, delicious, and beautifully nostalgic. This recipe is a tribute to those memories, sharing the love and joy of baking with raspberries in every bite!
Ingredients
Let’s gather our ingredients and get cooking! Here’s what you’ll need:
-
1 cup rolled oats: The heart of our cookies! Rolled oats provide a chewy texture and significant health benefits. They’re packed with fiber, keeping you full and satisfied. If you need a gluten-free option, you can easily find gluten-free rolled oats.
-
1/2 cup whole wheat flour: This adds a nutty flavor and extra nutrients compared to all-purpose flour. You can swap for almond flour or oat flour for a gluten-free twist!
-
1/2 teaspoon baking soda: This will help our cookies rise and give them the perfect texture. Remember, fresh baking soda is key—check that expiration date!
-
1/4 teaspoon salt: A pinch of salt enhances the flavors in our sweet cookies. If you prefer a sweet-savory combo, a sprinkle of sea salt on top after baking is divine.
-
1/2 cup coconut sugar or brown sugar: Either option adds a lovely caramel flavor. Coconut sugar is lower on the glycemic index, making it a great alternative.
-
1/4 cup coconut oil, melted: This brings richness and moisture to our cookies. If you prefer, you could also use unsalted butter or even nut butter for a different taste.
-
1/4 cup unsweetened applesauce: This is our secret ingredient! It keeps the cookies soft and moist while adding natural sweetness. You can make your own if you’re feeling adventurous!
-
1 teaspoon vanilla extract: Always a must for bakery vibes! Use pure vanilla extract for the best flavor.
-
1 cup fresh raspberries: The stars of the show! They burst with juicy flavor and provide antioxidants. Frozen raspberries work in a pinch, just remember to thaw and drain them first.
Step-by-Step Instructions
Now that we have our ingredients lined up, let’s jump into the making of these delightful cookies—follow these steps, and you’ll be a cookie champion in no time!
-
Preheat your oven: Set your oven to 350°F (175°C) and line a baking sheet with parchment paper. This will ensure our cookies don’t stick and have a lovely golden color.
-
Mix the dry ingredients: In a large mixing bowl, combine the rolled oats, whole wheat flour, baking soda, and salt. Give them a good stir with a whisk—it’s like a warm-up for our cookie dough!
-
Combine the wet ingredients: In another bowl, whisk together the melted coconut oil, coconut sugar (or brown sugar), applesauce, and vanilla extract until smooth. It should be a lovely, creamy texture!
-
Combine the mixtures: Gradually add the wet ingredients to the dry mixture, stirring until well combined. This is where the magic starts to happen—watch as it transforms into a cohesive dough.
-
Fold in the raspberries: Gently fold in the fresh raspberries, careful not to break them too much. You want those juicy pockets of goodness throughout each cookie!
-
Scoop the dough: Using a cookie scoop or two tablespoons, drop rounds of cookie dough onto the prepared baking sheet, spacing them about 2 inches apart. Remember, they’ll spread a little bit, so give them room to breathe!
-
Bake and cool: Pop them in the oven for about 12-15 minutes, until the edges are golden and the centers look set. Let them cool on the baking sheet for a few minutes before transferring them to a wire rack to cool completely.
-
Enjoy!: Now comes the best part—sink your teeth into these warm, chewy delights. You might want to hide some away for later, but no judgment if you can’t resist!
Serving Suggestions
These cookies are delightful on their own but can also be plated in fun ways! Serve them warm with a dollop of Greek yogurt or a drizzle of honey for extra deliciousness. They’re perfect for breakfast alongside your morning coffee or as a satisfying midday snack. Feel free to stack them on a beautiful plate to impress your friends or family—they’ll think you’re a professional baker!
Recipe Variations
Want to switch things up? Here are some fun variations you can try out!
-
Chocolate Chip Raspberry: Mix in a handful of dark chocolate chips for a delightful chocolate-raspberry combo. Who doesn’t love chocolate, right?
-
Nutty Delight: Add 1/2 cup of chopped nuts like walnuts or almonds for added crunch and nutrition.
-
Coconut Bliss: Fold in some unsweetened shredded coconut for an extra tropical flavor.
-
Spiced Up: Add a pinch of cinnamon or nutmeg to the dry ingredients for a warm, cozy flavor.
-
Zesty Lemon: Add a teaspoon of lemon zest to brighten up the flavors and create a refreshing twist!
Chef’s Notes
As a chef, I love experimenting in the kitchen, and this recipe has come a long way since my early days of baking. I remember my first batch being a bit crumbly—too much flour and not enough moisture! Through trial and error, I’ve perfected this mix to achieve the ideal chewy and tender cookie. You can play around with the sweetness, too. If you prefer a less sugary option, reduce the sugar and add a touch more applesauce.
Oh, and here’s a funny tidbit—I once swapped the coconut sugar for regular white sugar without realizing it, and they turned out so much sweeter! My taste testers loved it, but I learned to stick to my trusty coconut sugar for that perfect balance.
FAQs and Troubleshooting
1. Can I use frozen raspberries?
Absolutely! Just make sure to thaw and drain them thoroughly to avoid excessive moisture in your cookies.
2. How do I store these cookies?
Store them in an airtight container at room temperature for about a week. They also freeze well—just layer them with parchment paper and pop them in a freezer bag for up to three months!
3. Can I make these vegan?
Yes! Substitute the coconut oil with a plant-based butter alternative and ensure your sugar is vegan-friendly.
4. Why are my cookies falling apart?
This might happen if you’ve added too much flour or not enough moisture. Next time, try measuring your flour properly or adding a tad more applesauce until you get the right consistency.
Nutritional Info (Optional)
(This section may be omitted if not applicable)
Each cookie has roughly:
- Calories: 120
- Protein: 2g
- Fats: 5g
- Carbohydrates: 18g
- Fiber: 2g
- Sugar: 6g
There you have it, my foodie friends! A delightful recipe for Healthy Raspberry Oatmeal Cookies that’s sure to bring a little joy to your day. These cookies are not just delicious; they encapsulate the spirit of home baking and the joy of nourishing our bodies. So, roll up those sleeves, gather your ingredients, and bake away! Happy baking!
PrintHealthy Raspberry Oatmeal Cookies

Wholesome and delicious cookies packed with juicy raspberries and rolled oats. Perfect for breakfast or a guilt-free snack.
- Prep Time: 15
- Cook Time: 15
- Total Time: 30
- Yield: 12 cookies 1x
- Category: Dessert
- Method: Baking
- Cuisine: American
- Diet: Vegetarian
Ingredients
- 1 cup rolled oats
- 1/2 cup whole wheat flour
- 1/2 teaspoon baking soda
- 1/4 teaspoon salt
- 1/2 cup coconut sugar or brown sugar
- 1/4 cup coconut oil, melted
- 1/4 cup unsweetened applesauce
- 1 teaspoon vanilla extract
- 1 cup fresh raspberries
Instructions
- Preheat your oven: Set your oven to 350°F (175°C) and line a baking sheet with parchment paper.
- Mix the dry ingredients: In a large mixing bowl, combine the rolled oats, whole wheat flour, baking soda, and salt.
- Combine the wet ingredients: In another bowl, whisk together the melted coconut oil, coconut sugar, applesauce, and vanilla extract until smooth.
- Combine the mixtures: Gradually add the wet ingredients to the dry mixture, stirring until well combined.
- Fold in the raspberries: Gently fold in the fresh raspberries.
- Scoop the dough: Drop rounds of cookie dough onto the prepared baking sheet, spacing them about 2 inches apart.
- Bake and cool: Bake for about 12-15 minutes, until the edges are golden and the centers look set.
- Enjoy: Sink your teeth into these warm, chewy delights.
Notes
Store cookies in an airtight container at room temperature for about a week. They also freeze well for up to three months.
Nutrition
- Serving Size: 1 cookie
- Calories: 120
- Sugar: 6g
- Sodium: 120mg
- Fat: 5g
- Saturated Fat: 4g
- Unsaturated Fat: 1g
- Trans Fat: 0g
- Carbohydrates: 18g
- Fiber: 2g
- Protein: 2g
- Cholesterol: 0mg
Keywords: raspberry, oatmeal, cookies, healthy, dessert
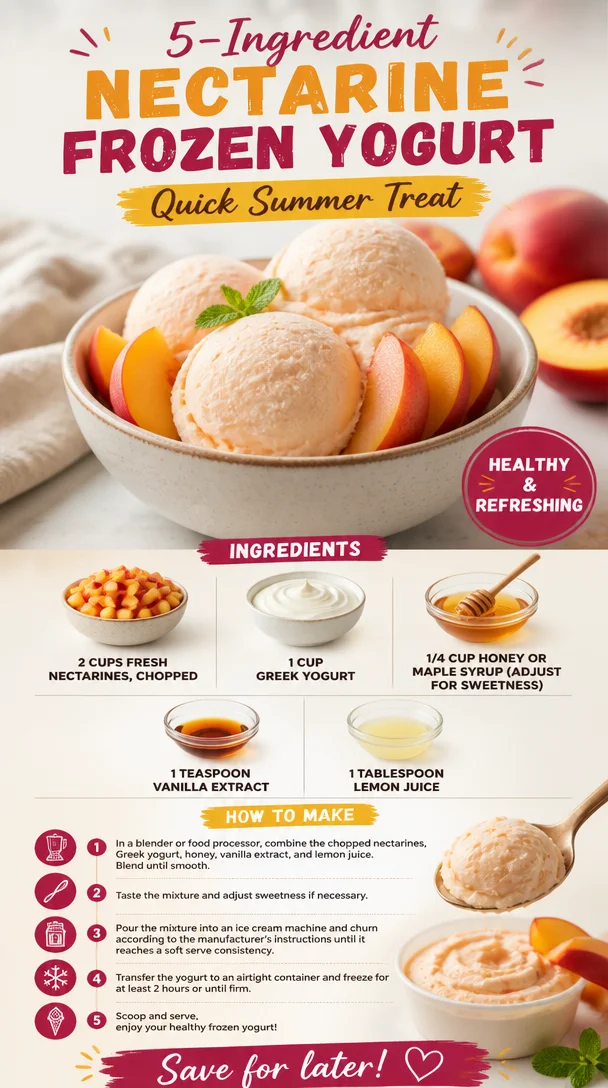
Ingredient Nectarine Frozen Yogurt: Quick Summer Treat
The Sweetest Summer Delight: Nectarine Frozen Yogurt
Hey there, fellow food lovers! Today, we’re diving into a sensational summertime treat that’s as easy to whip up as it is delicious—Nectarine Frozen Yogurt! If you’re anything like me, the hotter months beckon for something cool, creamy, and full of flavor. This recipe checks all those boxes and then some!
Picture this: You’ve spent a long, sun-soaked day soaking up rays and enjoying all the vibrancy of summer. What better way to celebrate the season than with a bowl of homemade frozen yogurt that’s not only delectable but also packed with nutrients? Not to mention, you can control the sweetness and flavors to fit your taste buds perfectly!
In this post, I’ll share not just how to make this refreshing dessert but also some personal stories that tie it all together. Whether you’re treating yourself after a long day or impressing friends at a summer barbecue, trust me, this Nectarine Frozen Yogurt is going to be your new go-to. Let’s get into it!
A Bit of Nostalgia with Nectarines
I’ll never forget the summer when I was about eight years old, running around my grandmother’s garden. Between the glorious rows of tomatoes and cucumbers, there stood this beautiful nectarines tree. My grandmother would send me to collect the ripest nectarines. The excitement I felt every time I picked a fuzzy golden orb was indescribable!
One afternoon, as I sat beneath that tree, juice dripping down my chin, I had a thought—why not freeze them for later? But, back then, I had no clue how to make frozen yogurt! Fast forward a couple of decades, and the idea of serving this ambrosial fruit in a frozen dessert brings back warm memories of that garden and the simple joys of summer.
Now, that sense of nostalgia is embedded in every scoop of my Nectarine Frozen Yogurt. It’s not just about making something cold; it’s about diving into sweet memories and enjoying the moment. Trust me when I say there’s nothing quite like it!
Ingredients
Here’s what you’ll need to make your very own Nectarine Frozen Yogurt:
-
2 cups fresh nectarines, chopped
Juicy and sweet, nectarines are the star of this show! If nectarines aren’t in season, peaches can make a delightful substitute. -
1 cup Greek yogurt
This yogurt is creamy and tangy, offering a healthy twist. If you prefer a dairy-free version, try coconut yogurt—it adds a lovely tropical hint! -
1/4 cup honey or maple syrup
Just the right amount of sweetness! Depending on your taste, you can adjust this ingredient. Agave syrup works well too if you’re looking for plant-based options. -
1 teaspoon vanilla extract
A splash of vanilla elevates the flavors. Feel free to use pure vanilla for richness, or vanilla bean paste for those delightful specks! -
1 tablespoon lemon juice
Brightens the whole mix and balances sweetness! If you’re out of lemons, a splash of lime juice will work wonders too.
Step-by-Step Instructions
Alright, let’s roll up our sleeves and turn those beautiful nectarines into a creamy, dreamy dessert. Here’s how to do it, step by step!
-
Prepare the Nectarines
Start by washing the nectarines thoroughly. After all, we want to remove any residues from the garden! Chop them into small pieces. The smaller, the better, as they’ll blend more easily. Make sure you remove the pit, of course—nobody wants a surprise crunch in their frozen yogurt!Chef Hack: Don’t stress if your nectarines are a bit too ripe. They’ll blend easier, and those sweet juices will make your yogurt even more scrumptious!
-
Blend It Up
Grab a blender or a food processor and toss in the chopped nectarines. Add the Greek yogurt, sweetener (honey or maple syrup), vanilla extract, and lemon juice.Tip: For a speedier blend, chop the nectarines smaller. It’ll save your blender motor from working too hard!
-
Strike a Balance
Blend all the ingredients until your mixture is smooth and creamy. Stop and taste it! Adjust the sweetness or acidity with more honey or lemon juice, depending on your preference. This is your creation, after all!Chef Insight: Sometimes, the natural sweetness of nectarines can surprise you! Always start with a little sweetness, and you can add more if you like.
-
Freeze the Mixture
Pour the blended mixture into a freezer-safe container. Spread it out with a spatula for even freezing. Cover it tightly with a lid or plastic wrap to avoid ice crystals.Little Chef Tip: If you have an ice cream maker, this step is even easier! Just churn it according to the manufacturer’s instructions.
-
Time to Chill
Let it freeze for at least 4–5 hours or overnight if you can wait! The longer, the better it sets up. -
Scoop and Serve
Once frozen, let the yogurt sit at room temperature for about 10-15 minutes before scooping. This softens it up for the perfect scoopability.Bonus Cue: Use a warm scoop or an ice cream scoop for easier serving. Just run it under hot water for a few seconds!
Serving Suggestions
Now that you’ve mastered the art of making Nectarine Frozen Yogurt, it’s time to serve it up! A beautiful scoop of frozen yogurt in a chilled bowl always impresses. Add some fresh mint leaves for an extra touch and a pop of color that complements the golden hues of the nectarines.
Want to elevate your presentation even more? Serve alongside fresh berries, a drizzle of honey, or a sprinkle of granola. Trust me, a bit of crunch can turn your dessert into a masterpiece!
Recipe Variations
Here are a few creative twists you might want to try:
-
Berry Bliss: Add a cup of frozen mixed berries to the blend for a mixed-fruit flavor explosion. Blueberries and strawberries pair wonderfully with nectarines.
-
Spicy Zing: Incorporate a pinch of ground ginger or cinnamon for a warming spice that complements the sweetness of the nectarines beautifully.
-
Nutty Delight: Add almond or cashew butter for a nutty flavor and extra creaminess!
-
Coconut Cream: For a tropical vibe, substitute Greek yogurt with coconut yogurt and add shredded coconut flakes in the mixture.
Chef’s Notes
This recipe has truly evolved over the years. What started as a simple summer dessert has turned into my go-to healthy treat anytime I need a refresh! I once experimented with adding different fruits, and while nectarines come out on top, the recipe remains playful. Did I ever tell you about the time I almost forgot to add sweetener? Let’s just say, while it’s cute to be optimistic about the sweetness of fruit, not all fruits can sweeten a whole batch of yogurt!
So do yourself a favor—taste as you go! You might discover your new favorite twist along the way.
FAQs and Troubleshooting
-
What if my frozen yogurt turned out too hard?
If it’s rock solid, let it sit at room temperature for a bit before serving. Next time, try adding a bit more yogurt or reducing freezing time. -
Can I make this with other fruits?
Absolutely! Peaches, berries, or even mangoes work beautifully. The trick is to adjust sweetness based on the fruit’s natural sugars. -
How long will it last in the freezer?
It’ll be best consumed within two weeks. After that, the texture might change, but it’ll still be delicious! -
What can I do with leftovers?
If you have any leftover frozen yogurt, consider blending it into smoothies for a creamy treat, or using it as a topping for pancakes or waffles!
Nutritional Info
(If applicable—this can vary based on ingredients and serving size.)
Nectarine Frozen Yogurt is not only a flavorful treat but also a healthy option that is rich in protein from Greek yogurt and antioxidants from nectarines. It’s a guilt-free indulgence that satisfies your sweet tooth while keeping you refreshed!
So there you have it, my friends—a delightful recipe that combines aching nostalgia, the joy of cooking, and the love for simple yet delicious food. I know you’ll love whipping up this Nectarine Frozen Yogurt as much as I do! Grab your nectarines, and let’s make some memories in the kitchen! Happy eating!
PrintNectarine Frozen Yogurt

A refreshing and creamy summer treat made with fresh nectarines and Greek yogurt, perfect for cooling down on hot days.
- Prep Time: 15 minutes
- Cook Time: 300 minutes
- Total Time: 315 minutes
- Yield: 4 servings 1x
- Category: Dessert
- Method: Freezing
- Cuisine: American
- Diet: Vegetarian
Ingredients
- 2 cups fresh nectarines, chopped
- 1 cup Greek yogurt
- 1/4 cup honey or maple syrup
- 1 teaspoon vanilla extract
- 1 tablespoon lemon juice
Instructions
- Prepare the nectarines by washing them thoroughly and chopping into small pieces, removing the pit.
- Grab a blender or food processor and add the nectarines, Greek yogurt, sweetener, vanilla extract, and lemon juice.
- Blend all the ingredients until smooth and creamy, adjusting sweetness or acidity to taste.
- Pour the mixture into a freezer-safe container and spread it out. Cover tightly.
- Let it freeze for at least 4–5 hours or overnight.
- Once frozen, let it sit at room temperature for 10-15 minutes before scooping.
Notes
For a creamier texture, consider using an ice cream maker. Serve with fresh mint, berries, honey, or granola for added flavor.
Nutrition
- Serving Size: 1 serving
- Calories: 200
- Sugar: 25g
- Sodium: 75mg
- Fat: 3g
- Saturated Fat: 1g
- Unsaturated Fat: 2g
- Trans Fat: 0g
- Carbohydrates: 35g
- Fiber: 2g
- Protein: 5g
- Cholesterol: 10mg
Keywords: nectarine, frozen yogurt, summer dessert, healthy treat, homemade yogurt
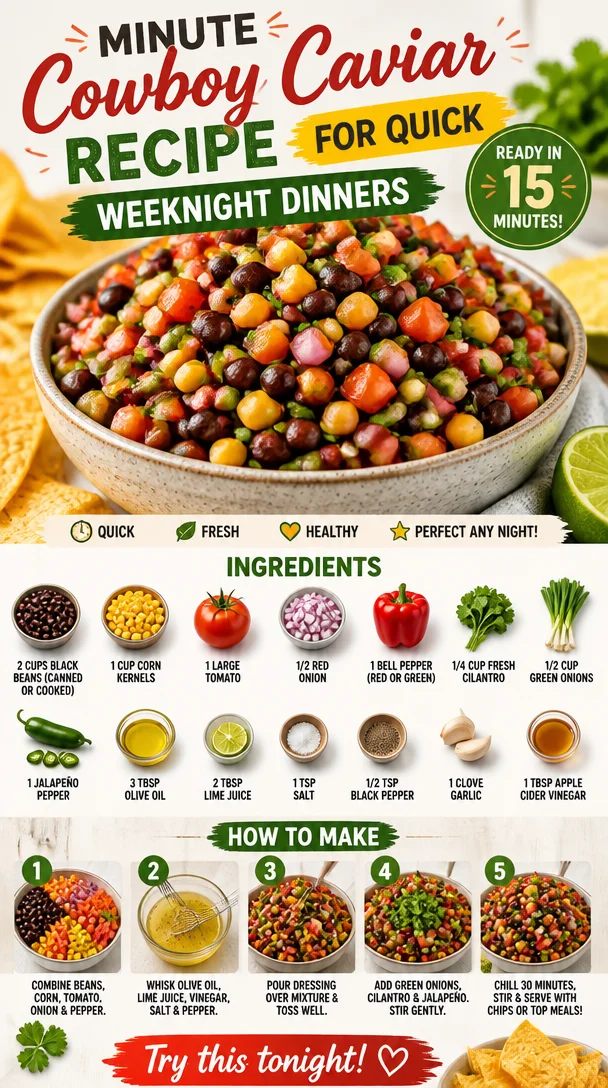
Minute Cowboy Caviar Recipe for Quick Weeknight Dinners
Cowboy Caviar: A Flavorful Fiesta in a Bowl
Welcome to the wild and wonderful world of Cowboy Caviar—where vibrant colors and bold flavors meet! If you’re looking for a dish that will not only tantalize your taste buds but also ignite your culinary creativity, you’re in the right spot. This zesty appetizer (or main dish, if you’re feeling adventurous) is the answer to all your snacking prayers. Picture a hearty blend of black beans, corn, fresh veggies, and a zesty dressing that’ll make your mouth water. It’s like a summer fiesta in your mouth, and trust me, you’ll want to dive right in!
So, what’s the story behind this drool-worthy dish? Cowboy Caviar is a classic appetizer with Tex-Mex roots, often served during gatherings, family cookouts, or at your neighbor’s BBQ. Each ingredient packs a punch, providing not just flavor, but plenty of nutrients to keep you feeling your best. And the best part? It’s incredibly versatile—great as a dip, a side salad, or even a topping for grilled meats or tacos. Let’s face it: once you make this dish, you’ll be the star of every potluck!
Now, roll up your sleeves, and let’s get cooking! Grab your ingredients, and get ready to whip up some Cowboy Caviar that even the cowboys would be proud of!
A Personal Story: The Perfect Summer Memory
Let me take you back to my childhood summers spent at my grandparents’ ranch in Texas. Nothing felt more liberating than spending long sunny days outside with family and friends, all while the smell of BBQ wafted through the air. In the center of it all? A giant bowl of Cowboy Caviar that my grandmother would make featuring fresh produce from her garden.
As kids, we would gather around, dipping crunchy tortilla chips into this rainbow of deliciousness while laughing and sharing stories. The freshness of every ingredient popped in our mouths—crunchy bell peppers, creamy black beans, and zesty jalapeños. It was a fiesta of flavors that always sparked joy. What I love most about Cowboy Caviar is that it reminds me of those carefree summer days, where we all connected over good food and laughter. Today, I still make this dish (with my own flair, of course), and every bite takes me right back to my grandmother’s kitchen.
Ingredients: Let’s Gather the Good Stuff
Here’s all you need to create your very own Cowboy Caviar masterpiece:
- 2 cups black beans (canned or cooked): A fabulous source of plant-based protein and fiber. For a twist, you can swap in pinto beans or kidney beans for a different flavor profile.
- 1 cup corn kernels: Fresh or frozen works great! You can also use canned corn; just be sure to rinse it well. Grilled corn adds a smoky flavor that’s to die for!
- 1 large tomato: Juicy and ripe, tomatoes are the star of the show. For a heartier version, you might try cherry tomatoes or even diced avocados for creaminess.
- 1/2 red onion: This onion adds a crunch and subtle sweetness. If red onion’s a bit too strong for you, use green onions or shallots as substitutes.
- 1 bell pepper (red or green): Use whichever you prefer! Red peppers give a sweeter taste, while green adds a nice bite. Feeling adventurous? Try a poblano pepper for a smoky flavor!
- 1/4 cup fresh cilantro: Bright and herbaceous, cilantro elevates the flavor. If you’re not a cilantro fan, parsley or even mint can work just as well.
- 1/2 cup green onions: These provide a delightful punch! Scallions can also be used here—just slice them thinly for a little zing!
- 1 jalapeño pepper: For heat! Adjust the amount depending on your spice tolerance. If you want it milder, remove the seeds and membranes.
- 3 tbsp olive oil: This is the base for your dressing, giving it a silky texture. Avocado oil works well too and provides a unique flavor.
- 2 tbsp lime juice: Freshly squeezed is best! It adds brightness. If you’re out of lime, lemon juice is a great substitute.
- 1 tsp salt: Season to your taste, but this enhances all the flavors.
- 1/2 tsp black pepper: A classic seasoning to round out the flavors.
- 1 clove garlic: Fresh garlic adds depth. Use garlic powder in a pinch, about 1/4 tsp.
- 1 tbsp apple cider vinegar: A splash of acidity that brightens everything up! Feel free to use red wine vinegar or even balsamic for a different twist.
Step-by-Step Instructions: Let’s Get Cooking!
-
Prepare Your Ingredients: Start by rinsing your black beans thoroughly if using canned ones. Drain the corn as well. Freshness is key, so if you’ve got time, you can cook your own beans and corn!
-
Chop, Chop!: Dice your tomatoes, red onion, and bell pepper into bite-sized pieces—it doesn’t have to be perfect. I love a rustic chop for that homemade feel! Gather your cilantro and green onions; both should be finely chopped for maximum flavor.
-
Handle the Heat: Time to tackle that jalapeño! Wearing gloves (trust me!), slice it in half, remove the seeds for less heat if desired, and finely chop. Here’s a chef hack: the seeds carry most of the spice, so adjust to your taste!
-
Mix It All Together: In a large mixing bowl, combine the black beans, corn, diced tomatoes, bell pepper, red onion, cilantro, green onions, and jalapeño. Feel free to get your hands in there and mix—it’s a labor of love!
-
Make the Dressing: In a smaller bowl, whisk together the olive oil, lime juice, apple cider vinegar, salt, black pepper, and minced garlic. Don’t skip the whisking—it helps emulsify everything into a glorious dressing!
-
Combine and Taste: Pour the dressing over your veggie mixture and stir gently to coat everything evenly. Here’s a pro tip: let the Cowboy Caviar sit for at least 30 minutes before serving to allow the flavors to meld together for a more harmonious taste.
-
Adjust and Enjoy: After chilling, taste it! You might need a pinch more salt or lime juice depending on your preference. It’s all about personalizing this dish to make it your own!
Serving Suggestions: How to Make It Shine
Presentation is key! Serve your Cowboy Caviar in a vibrant bowl, and garnish with extra cilantro for a pop of freshness. Pair it with crispy tortilla chips for dipping or even over a bed of greens for a light salad. Want to kick it up a notch? Serve it alongside grilled fish or chicken for a complete meal. It’s visually stunning and utterly scrumptious—perfect for impressing your guests!
Recipe Variations: Get Creative!
- Tropical Twist: Add diced mango or pineapple for a sweet and tangy flair that pairs beautifully with the spice.
- Mediterranean Style: Swap the black beans for chickpeas and add feta cheese, olives, and herbs like oregano.
- Superfood Boost: Toss in some quinoa or farro for added texture and nutrition—this transforms the Cowboy Caviar into a hearty main dish.
- Dairy-Free Creaminess: Add diced avocado right before serving for a rich, creamy finish that balances the heat.
- Spicy Sriracha Option: Drizzle a little Sriracha over the top if you want a real kick! The spice will dance with the freshness you’ve created.
Chef’s Notes: A Dash of History
My Cowboy Caviar recipe has evolved over the years as I’ve experimented with different ingredients. Growing up, I was simply a ‘don’t mess with a classic’ kind of chef. Over time, though, I’ve discovered that adding a touch of something unexpected (like that tropical mango surprise) keeps this dish fresh and exciting. Just like me, it has matured! And who doesn’t love a recipe that grows with you?
Have a little fun with it! Cooking is all about improvisation and creating memories. Whether it’s a family gathering or a cozy night in, I believe there’s magic in every bite.
FAQs and Troubleshooting: Let’s Clear It Up
1. Can I make Cowboy Caviar ahead of time?
Absolutely! In fact, I recommend letting it sit in the fridge for a few hours or overnight. This allows the flavors to meld beautifully. Just be sure to give it a stir before serving!
2. What do I do if it’s too spicy?
If you find your Cowboy Caviar has too much heat, try balancing it out with a little extra lime juice or even some diced avocado. Both will help tone things down!
3. Can I freeze Cowboy Caviar?
While you can freeze it, the texture of the veggies won’t hold up well when thawed. It’s best enjoyed fresh, but leftovers can be stored in an airtight container for about 3 days in the fridge.
4. I don’t like black beans—what can I use instead?
No problem! You can substitute any type of beans you prefer, like chickpeas or white beans. Just adjust the flavor to your liking—you’ll still have a delicious dish!
Nutritional Info (Optional)
For those counting nutrients, here’s a quick breakdown per serving (assuming about 1/2 cup):
- Calories: 120
- Protein: 4g
- Carbs: 20g
- Fiber: 6g
- Fat: 3g
Now you’re armed with everything you need to make the ultimate Cowboy Caviar! It’s fresh, flavorful, and fun to make. I can’t wait for you to take this recipe to your kitchen, so let’s whip up a bowl of joy, shall we? Happy cooking, foodies!
PrintCowboy Caviar
A vibrant and flavorful Tex-Mex appetizer made with black beans, corn, and fresh veggies, perfect for snacking or as a side dish.
- Prep Time: 15 minutes
- Cook Time: 0 minutes
- Total Time: 15 minutes
- Yield: 4 servings 1x
- Category: Appetizer
- Method: Mixing
- Cuisine: Tex-Mex
- Diet: Vegetarian
Ingredients
- 2 cups black beans (canned or cooked)
- 1 cup corn kernels (fresh or frozen)
- 1 large tomato, diced
- 1/2 red onion, chopped
- 1 bell pepper (red or green), chopped
- 1/4 cup fresh cilantro, chopped
- 1/2 cup green onions, chopped
- 1 jalapeño pepper, finely chopped
- 3 tbsp olive oil
- 2 tbsp lime juice
- 1 tsp salt
- 1/2 tsp black pepper
- 1 clove garlic, minced
- 1 tbsp apple cider vinegar
Instructions
- Prepare your ingredients by rinsing black beans and draining corn.
- Chop tomatoes, red onion, and bell pepper into bite-sized pieces.
- Handle the jalapeño, removing seeds if desired.
- Mix black beans, corn, tomatoes, bell pepper, red onion, cilantro, green onions, and jalapeño in a large bowl.
- Make the dressing by whisking together olive oil, lime juice, apple cider vinegar, salt, black pepper, and minced garlic.
- Combine the dressing with the veggie mixture and stir gently.
- Adjust seasoning as needed and let sit for 30 minutes before serving.
Notes
Great as a dip with tortilla chips or as a topping for grilled meats.
Nutrition
- Serving Size: 1/2 cup
- Calories: 120
- Sugar: 3g
- Sodium: 300mg
- Fat: 3g
- Saturated Fat: 0.5g
- Unsaturated Fat: 2.5g
- Trans Fat: 0g
- Carbohydrates: 20g
- Fiber: 6g
- Protein: 4g
- Cholesterol: 0mg
Keywords: Cowboy Caviar, Tex-Mex, appetizer, dip, salad, black beans, corn, fresh veggies
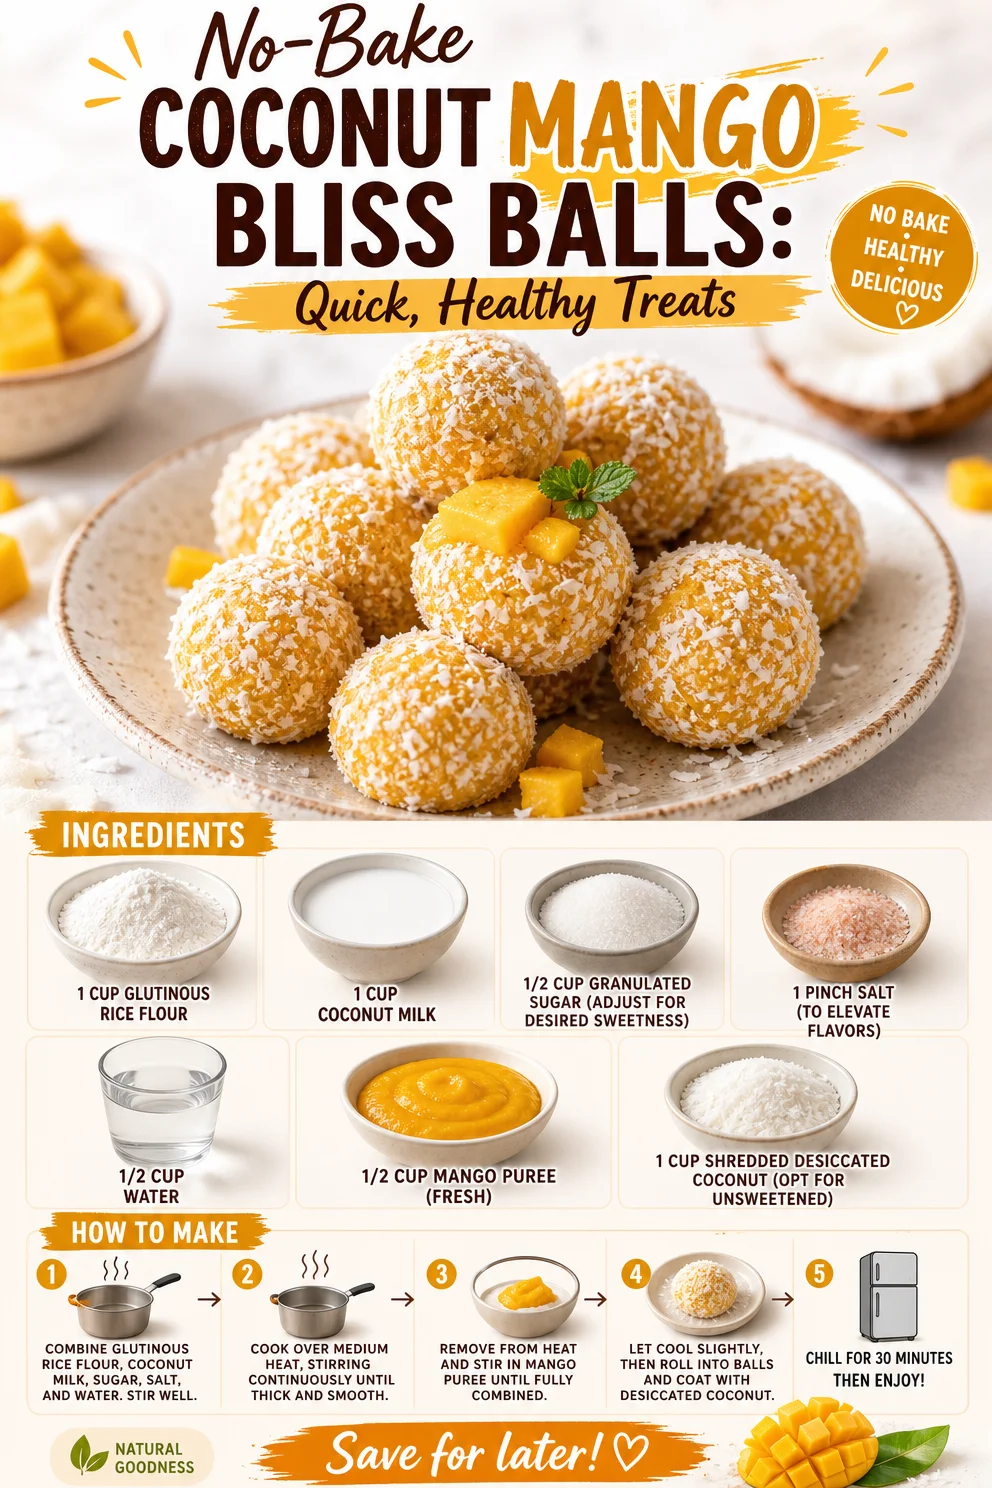
No-Bake Coconut Mango Bliss Balls: Quick, Healthy Treats
Coconut Mango Bliss Balls: A Sweet Escape to Paradise
Welcome to the sunny side of life! If you’re someone who has ever dreamt of being whisked away to a tropical paradise, you’re in for a delightful treat. Today, we’re diving into a recipe that brings the beach to your kitchen: Coconut Mango Bliss Balls. These little bites of joy are not only a beautiful combination of flavors but also carry a touch of nostalgia that makes cooking all the more exciting.
Introduction
I can still remember standing in my grandmother’s kitchen when I was a kid, the warm sun spilling through the windows as she whipped up one of her famous treats. There was something magical about how a few simple ingredients could transform into something so delicious. One particular recipe that always stood out was her tropical coconut and mango concoction. She would often make these blissful little bites during family gatherings, and I’d watch her create these mouthwatering goodies, a twinkle of joy in her eyes.
Now, fast-forward to today, and I’m thrilled to share an evolved version of those cherished treats with you! Coconut Mango Bliss Balls are not just your average snack; they embody everything I love about food: bright flavors, ease of preparation, and the power to transport you to a blissful place with one delightful bite.
These bliss balls are perfect for an afternoon snack, a healthy dessert, or even as a fun addition to your meal prep routine. Plus, they’re super customizable—healthy eating should bring joy, not restrictions! So, puff out your chest, grab that apron, and let’s turn your kitchen into a tropical retreat!
Personal Story
Every time I roll these Coconut Mango Bliss Balls, I’m greeted by a wave of nostalgia. It reminds me of my first trip to the beach with my family. As kids, my siblings and I raced across the warm, golden sand, chasing after the crashing waves while our parents lounged nearby, sipping on tropical drinks. My grandmother had prepared a cooler packed with snacks, including her famous coconut and mango goodies.
There’s a vivid memory of biting into those bliss balls as I sat on the sand, the salty breeze brushing against my face, while the sheer sweetness of the coconut and mango danced on my tongue. It felt like encapsulating summer in one delicious bite! It’s not just about the taste but the memories and the experiences we share around food. That’s why I adore creating and sharing recipes—because every meal has the potential to create a fond memory.
Ingredients
Let’s gather our ingredients and start this delicious journey! Here’s what you’ll need:
-
1 cup glutinous rice flour
This flour gives our bliss balls a chewy texture. If you can’t find glutinous rice flour, feel free to use regular rice flour, but the texture might be slightly different. -
1 cup coconut milk
Creamy and rich, coconut milk lends a lusciousness to our mixture. For a lighter option, you can substitute with coconut almond milk or even oat milk. -
1/2 cup granulated sugar
Adjust the sweetness to your liking! You may want to swap it for coconut sugar or even a natural sweetener like maple syrup for a less refined option. -
1 pinch salt
Just a sprinkle to enhance all those fabulous flavors; trust me, you won’t regret it! -
1/2 cup water
This helps bring the mixture together and dissolve the sugar. It’s your liquid magic. -
1/2 cup mango puree (fresh)
Use ripe, juicy mangoes for the best flavor! If fresh mango isn’t available, consider using thawed frozen mango, or even store-bought puree. -
1 cup shredded desiccated coconut (unsweetened)
This adds texture and a delightful coconutty flavor to our bliss balls. Unsweetened coconut is preferred to keep things healthy without adding refined sugars.
Step-by-Step Instructions
Alright, let’s get cooking! These bliss balls are not only simple to make but ridiculously fun to prepare. Here’s how to whip them up:
-
Combine Dry Ingredients
In a large mixing bowl, combine the glutinous rice flour and salt. Give it a gentle whisk to mix them well; think of it as giving your rice flour a spa day! -
Mix Wet Ingredients
In a separate bowl, whisk together the coconut milk, water, and granulated sugar. Stir until the sugar is dissolved. This is where the magic begins! -
Combine and Form the Dough
Gradually add the wet mixture to the dry ingredients. Use a spatula or your hands to combine everything until you form a cohesive dough. It should be slightly sticky but manageable. Don’t be afraid to get your hands dirty! -
Add Mango Puree
Gently fold in the mango puree. This is where the flavor explosion occurs! The aroma of ripe mango will whisk you away to a tropical paradise even before you take a bite. -
Shape the Bliss Balls
Use your hands to form small balls, about the size of a tablespoon. Roll them between your palms until they’re nice and smooth. If you need a little extra coconut coating on the outside, feel free to roll them in shredded desiccated coconut for an extra touch of tropical bliss! -
Chill and Set
Place your bliss balls on a plate lined with parchment paper and refrigerate for about 30 minutes. This will help them firm up. While they chill, you can clean up the kitchen (or sneak a taste of the leftover dough—no judgment here!).
Serving Suggestions
These Coconut Mango Bliss Balls delight the senses, not just in taste but also in presentation. Serve them on a vibrant platter, perhaps surrounded by fresh mango slices or sprinkled with extra shredded coconut for a fun, tropical vibe! Add a sprig of mint for a pop of color, and you’ve got yourself a stunning treat that’s just as pleasing to the eyes as it is to the taste buds.
Recipe Variations
Let’s get creative! Here are a few ideas to switch things up:
-
Chocolate Coconut Bliss Balls: Add 1-2 tablespoons of cocoa powder to the dry ingredients for a chocolatey twist. You can also drizzle melted dark chocolate over the finished balls for a decadent treat.
-
Protein-Packed Version: Incorporate a scoop of your favorite protein powder to boost nutrition!
-
Tropical Fruit Fusion: Mix in diced pineapple or a splash of lime juice for an extra zing!
-
Nutty Addition: Fold in some crushed cashews or almonds into the mixture for added crunch.
-
Vegan Swaps: Ensure all ingredients are labeled vegan, swapping granulated sugar for coconut sugar or maple syrup to keep it plant-based.
Chef’s Notes
As with any recipe, feel free to adapt it to your taste. When I first started making these bliss balls, I accidentally added too much coconut milk and turned them into a delectable coconut-mango pudding instead! Not everything has to come out perfectly—to me, that’s the essence of home cooking. So if you find yourself in a sticky situation (pun intended!), don’t be afraid to play around.
These bliss balls have also evolved beyond just a sweet treat; they’re now a staple in my meal prep rotation, enjoyed on busy days when I need a quick fuel-up. They quickly went from being a summer treat to a year-round favorite, embodying the goal of Clean Plate Cravings: keeping food exciting and adaptable!
FAQs and Troubleshooting
How do I store Coconut Mango Bliss Balls?
Keep them in an airtight container in the fridge for up to a week. You can also freeze them for up to a month; just thaw when you’re ready to enjoy!
The dough is too sticky; what should I do?
If your dough feels overly sticky, simply sprinkle in a bit more glutinous rice flour, a tablespoon at a time, until you can easily roll them into balls.
Can I use fresh mango instead of puree?
You can! Just blend fresh mango until smooth, or finely chop it and fold it into the mixture for a chunkier texture.
What if I want a sweeter bite?
Feel free to increase the sugar to 3/4 cup or replace it with a sweeter fruit puree, like banana or apple sauce for added flavor without the extra sugar!
Nutritional Info (Optional)
These bliss balls are not just delectable—they also pack a nutritional punch! Each serving contains healthy fats from the coconut, natural sugars from mango, and fiber from the rice flour. With mindful portioning, they make for an energizing snack that keeps you feeling fulfilled.
There you have it! Your sweet escape to paradise in the form of Coconut Mango Bliss Balls. I hope you enjoy making them as much as I love sharing this recipe with you. Remember, the kitchen is a place for joy, creativity, and delicious experimentation. Happy cooking!
PrintCoconut Mango Bliss Balls

Delightful tropical treats made with coconut and mango, perfect for snacking or as a healthy dessert.
- Prep Time: 15 minutes
- Cook Time: 0 minutes
- Total Time: 45 minutes
- Yield: 20 servings 1x
- Category: Snack
- Method: No-Cook
- Cuisine: Tropical
- Diet: Vegan
Ingredients
- 1 cup glutinous rice flour
- 1 cup coconut milk
- 1/2 cup granulated sugar
- 1 pinch salt
- 1/2 cup water
- 1/2 cup mango puree (fresh)
- 1 cup shredded desiccated coconut (unsweetened)
Instructions
- Combine Dry Ingredients: In a large mixing bowl, combine the glutinous rice flour and salt. Give it a gentle whisk to mix them well.
- Mix Wet Ingredients: In a separate bowl, whisk together the coconut milk, water, and granulated sugar until the sugar is dissolved.
- Combine and Form the Dough: Gradually add the wet mixture to the dry ingredients, mixing with a spatula or your hands to form a cohesive dough.
- Add Mango Puree: Gently fold in the mango puree until well incorporated.
- Shape the Bliss Balls: Use your hands to form small balls, about the size of a tablespoon.
- Chill and Set: Place the bliss balls on a plate lined with parchment paper and refrigerate for about 30 minutes.
Notes
Feel free to customize with chocolate, nuts, or additional fruits for a variety of flavors.
Nutrition
- Serving Size: 1 ball
- Calories: 120
- Sugar: 6g
- Sodium: 5mg
- Fat: 6g
- Saturated Fat: 5g
- Unsaturated Fat: 1g
- Trans Fat: 0g
- Carbohydrates: 15g
- Fiber: 1g
- Protein: 2g
- Cholesterol: 0mg
Keywords: Coconut, Mango, Bliss Balls, Healthy Snacks, Vegan Dessert
Keto Fried Mushrooms
Keto Fried Mushrooms: A Crispy Delight That Wins Hearts
Welcome to my kitchen, food lovers! Today, I’m excited to take you on a culinary adventure that’s all about crispy, crunchy flavors that tickle your taste buds without the carbs. Yes, you guessed it! We’re diving into the delicious world of Keto Fried Mushrooms.
Now, whether you’re on a keto journey, looking to add more veggies into your meals, or just craving something delightful to snack on, these mushrooms are your ticket to happiness. Why? Because they’re fluffy on the inside with a golden, crispy coating that adds a satisfying crunch to every bite. Plus, they make a perfect snack, side dish, or even a party appetizer that will leave your friends and family wanting more!
Before we jump into the cooking process, let’s take a moment to appreciate the wondrous and versatile mushroom. Not only are they low in carbs, but they’re also packed with flavor and nutrients, proving that healthy eating can be absolutely fabulous! Alright, grab your apron, and let’s get cooking!
A Little Kitchen Story
Growing up, my family had a cozy little restaurant where good food brought everyone together. One dish that never failed to disappear from the menu was our crispy fried mushrooms. My mom used to whip them up for our family gatherings, and they quickly became the star of every meal.
I’ll never forget those weekends when friends would come to our place, seeking not just a meal but an experience. I’d watch eagerly as my mom tossed mushrooms in a zesty batter, her laughter mixing with the sizzling sounds of them frying in the pan. The aroma filled the air, creating an atmosphere of excitement and anticipation that was hard to resist.
Those moments instilled in me a love for food that is both comforting and delightful. They also taught me that cooking is more than just following recipes—it’s about sharing joy, creating connection, and savoring life’s little pleasures. So, as I share this keto-friendly fried mushroom recipe, I want you to feel the same love and joy that was present in my childhood kitchen.
Ingredients
Now, let’s talk about what you’ll need for these delectable Keto Fried Mushrooms:
-
2 cups mushrooms, sliced: Choose your favorite type, such as button, cremini, or shiitake. Mushrooms are low in carbs, high in fiber, and an excellent source of antioxidants. Substitution Tip: If you want a different texture or flavor, try using zucchini slices or eggplant.
-
1/4 cup almond flour: This is our crispy coating that keeps the mushrooms light while giving them a delicate crunch. Chef’s Insight: Almond flour is keto-friendly and gluten-free, making it perfect for those looking for healthier options. If you’re nut-free, you can swap it with finely crushed pork rinds for a unique twist.
-
1/2 teaspoon garlic powder: Garlic is a flavor powerhouse in any dish. It also brings a satisfying aroma that makes your kitchen smell amazing. Substitute: If you love fresh flavors, go for fresh minced garlic!
-
1/2 teaspoon onion powder: Helps to enhance the overall flavor profile of the dish, adding a touch of sweetness. Fun Fact: You can use chives or green onions for a fresh kick.
-
Salt and pepper to taste: Essential seasoning that amplifies flavor. Don’t be shy; taste as you go!
-
Oil for frying: I recommend avocado oil for its high smoke point and health benefits, but you can also use olive oil or coconut oil. Pro Tip: Avoid using vegetable oil as it’s not ideal for high-heat cooking.
Step-by-Step Instructions
Now, it’s time to roll up your sleeves and dive into the cooking! Let’s make these Keto Fried Mushrooms together, shall we?
Step 1: Prepare the Mushrooms
Start by cleaning your mushrooms under running cold water. Gently scrub with a cloth to remove any dirt. Once you’ve cleaned them, slice the mushrooms evenly, about 1/4 inch thick, so they cook evenly and get that nice crispy crust.
Step 2: Create Your Coating
In a medium bowl, combine the almond flour, garlic powder, onion powder, salt, and pepper. Stir them together until they’re well mixed. This flour blend is not only keto-friendly but also gluten-free! You can adjust seasoning according to your preference—feel free to add a splash of your favorite spice!
Step 3: Heat the Oil
In a large skillet, heat about 1/2 inch of your chosen oil over medium-high heat. To check if the oil is hot enough, you can drop a small piece of mushroom in; if it sizzles right away, you’re ready to go!
Step 4: Coat the Mushrooms
Take each sliced mushroom and dip it into the almond flour mixture, making sure to coat it evenly. Shake off any excess flour. This step is crucial because it ensures that each bite delivers that crispy texture we’re after.
Step 5: Fry the Mushrooms
Carefully place the coated mushrooms into the hot oil, a few at a time—don’t overcrowd the skillet! Fry them until they turn golden brown, typically about 2-3 minutes on each side. Use a slotted spoon to turn them for an even fry. You’ll know they’re done when they are beautifully crispy and golden.
Step 6: Drain and Serve
Once fried, use the slotted spoon to transfer the mushrooms to a plate lined with paper towels, which will absorb the excess oil. Repeat with the remaining mushrooms.
Chef’s Tip:
Get creative here—while the mushrooms fry, play some upbeat music or enjoy a fun chat with friends. Cooking is meant to be enjoyable, after all!
Serving Suggestions
These crispy Keto Fried Mushrooms are perfect as they are, but I love to serve them with a vibrant, zesty dipping sauce. A creamy garlic aioli or spicy ranch complements the flavors beautifully! For presentation, simply arrange the mushrooms on a colorful platter, garnished with fresh herbs like parsley or chives. Don’t shy away from getting a little fancy with the plating—this is your moment, food artist!
Recipe Variations
Want to mix things up a bit? Here are a few delicious variations to try:
- Cheesy Delight: Add 1/4 cup of grated Parmesan cheese to your almond flour mix for an extra layer of flavor.
- Spicy Kick: Incorporate some cayenne pepper or chili powder into the coating for a spicier version.
- Herb Infusion: Mix in fresh herbs like thyme or oregano along with the coat for a fragrant twist.
- Sweet & Savory: Try adding a splash of balsamic vinegar to the frying oil for a hint of sweetness.
- Paleo-Friendly: Instead of almond flour, use coconut flour for a different flavor profile (note: you may need to adjust the amount).
Chef’s Notes
As a chef who believes in the transformative power of food, I’ve played around with variations of fried mushrooms over the years. I’d say my favorite discovery was the cheese infusion; it adds a lovely savoriness that’s hard to resist.
One time, I accidentally added way too much cayenne pepper while experimenting, and let’s just say, it was a bit of a spicy surprise! Lesson learned: always adjust seasonings gradually. Cooking is all about experimenting, and sometimes the best dishes come from unexpected places.
FAQs and Troubleshooting
1. Why are my mushrooms soggy?
- This usually happens because of excess moisture or overcrowding in the frying pan. Make sure to dry the mushrooms thoroughly before coating and frying them in batches.
2. Can I bake these instead of frying?
- Absolutely! Lay them out on a baking sheet lined with parchment paper, spray with cooking oil, and bake at 400°F (200°C) for about 15-20 minutes, flipping halfway through.
3. What should I serve with my fried mushrooms?
- These mushrooms pair wonderfully with a fresh salad, grilled protein, or even on top of a keto pizza for some added crunch!
4. How do I store leftovers?
- Store any leftovers in an airtight container in the fridge for up to 3 days. To reheat, place them in a hot skillet for a couple of minutes to regain their crispy texture.
Nutritional Info
While this keto-friendly dish is best enjoyed fresh, if you happen to have leftovers, you won’t have to feel guilty! Each serving contains approximately:
- Calories: 150
- Net Carbs: 5g
- Protein: 5g
- Fat: 12g
And there you have it—my delightful recipe for Keto Fried Mushrooms! I hope you enjoy making these as much as I did sharing them with you. Remember, cooking is about love, creativity, and, most importantly, having fun! Happy cooking!
PrintKeto Fried Mushrooms

Crispy, crunchy keto-friendly mushrooms that make a perfect snack or appetizer.
- Prep Time: 10 minutes
- Cook Time: 15 minutes
- Total Time: 25 minutes
- Yield: 4 servings 1x
- Category: Appetizer
- Method: Frying
- Cuisine: Keto
- Diet: Keto
Ingredients
- 2 cups mushrooms, sliced
- 1/4 cup almond flour
- 1/2 teaspoon garlic powder
- 1/2 teaspoon onion powder
- Salt and pepper to taste
- Oil for frying
Instructions
- Prepare the mushrooms by cleaning them under running cold water and slicing them evenly, about 1/4 inch thick.
- Create the coating by mixing almond flour, garlic powder, onion powder, salt, and pepper in a medium bowl.
- Heat about 1/2 inch of oil in a large skillet over medium-high heat.
- Coat each mushroom slice in the almond flour mixture, shaking off any excess flour.
- Fry the coated mushrooms in the hot oil until they turn golden brown, about 2-3 minutes on each side.
- Drain on paper towels and serve with a dipping sauce of your choice.
Notes
For a fancy touch, serve with a zesty dipping sauce like garlic aioli or spicy ranch.
Nutrition
- Serving Size: 1 serving
- Calories: 150
- Sugar: 1g
- Sodium: 200mg
- Fat: 12g
- Saturated Fat: 1g
- Unsaturated Fat: 11g
- Trans Fat: 0g
- Carbohydrates: 5g
- Fiber: 2g
- Protein: 5g
- Cholesterol: 0mg
Keywords: keto, fried mushrooms, low carb appetizer, crispy snack, healthy eating