Ingredient Nectarine Frozen Yogurt: Quick Summer Treat
The Sweetest Summer Delight: Nectarine Frozen Yogurt
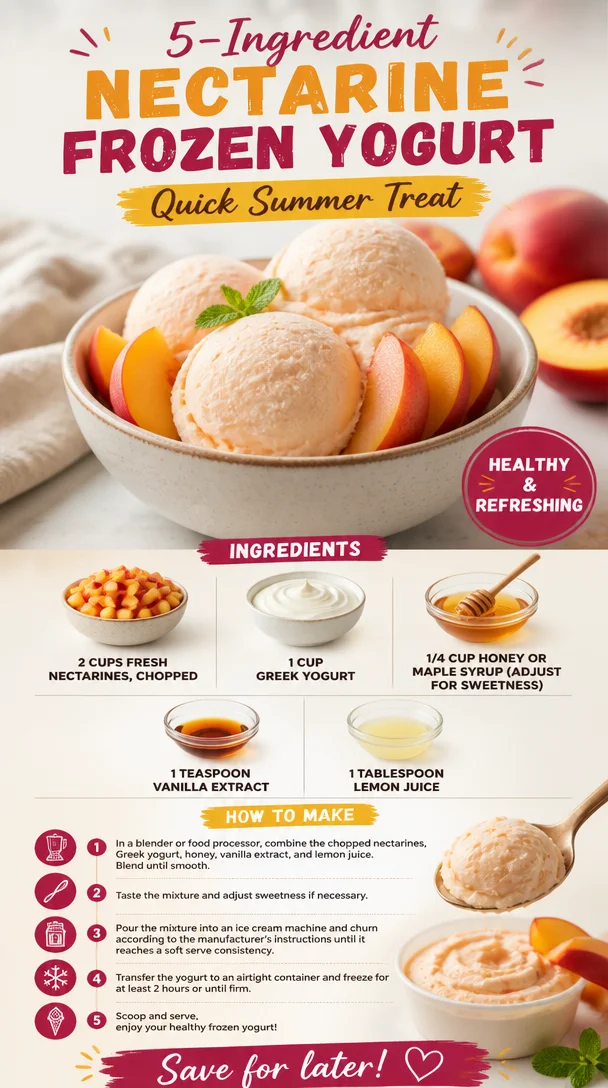
Hey there, fellow food lovers! Today, we’re diving into a sensational summertime treat that’s as easy to whip up as it is delicious—Nectarine Frozen Yogurt! If you’re anything like me, the hotter months beckon for something cool, creamy, and full of flavor. This recipe checks all those boxes and then some!
Picture this: You’ve spent a long, sun-soaked day soaking up rays and enjoying all the vibrancy of summer. What better way to celebrate the season than with a bowl of homemade frozen yogurt that’s not only delectable but also packed with nutrients? Not to mention, you can control the sweetness and flavors to fit your taste buds perfectly!
In this post, I’ll share not just how to make this refreshing dessert but also some personal stories that tie it all together. Whether you’re treating yourself after a long day or impressing friends at a summer barbecue, trust me, this Nectarine Frozen Yogurt is going to be your new go-to. Let’s get into it!
A Bit of Nostalgia with Nectarines
I’ll never forget the summer when I was about eight years old, running around my grandmother’s garden. Between the glorious rows of tomatoes and cucumbers, there stood this beautiful nectarines tree. My grandmother would send me to collect the ripest nectarines. The excitement I felt every time I picked a fuzzy golden orb was indescribable!
One afternoon, as I sat beneath that tree, juice dripping down my chin, I had a thought—why not freeze them for later? But, back then, I had no clue how to make frozen yogurt! Fast forward a couple of decades, and the idea of serving this ambrosial fruit in a frozen dessert brings back warm memories of that garden and the simple joys of summer.
Now, that sense of nostalgia is embedded in every scoop of my Nectarine Frozen Yogurt. It’s not just about making something cold; it’s about diving into sweet memories and enjoying the moment. Trust me when I say there’s nothing quite like it!
Ingredients
Here’s what you’ll need to make your very own Nectarine Frozen Yogurt:
-
2 cups fresh nectarines, chopped
Juicy and sweet, nectarines are the star of this show! If nectarines aren’t in season, peaches can make a delightful substitute. -
1 cup Greek yogurt
This yogurt is creamy and tangy, offering a healthy twist. If you prefer a dairy-free version, try coconut yogurt—it adds a lovely tropical hint! -
1/4 cup honey or maple syrup
Just the right amount of sweetness! Depending on your taste, you can adjust this ingredient. Agave syrup works well too if you’re looking for plant-based options. -
1 teaspoon vanilla extract
A splash of vanilla elevates the flavors. Feel free to use pure vanilla for richness, or vanilla bean paste for those delightful specks! -
1 tablespoon lemon juice
Brightens the whole mix and balances sweetness! If you’re out of lemons, a splash of lime juice will work wonders too.
Step-by-Step Instructions
Alright, let’s roll up our sleeves and turn those beautiful nectarines into a creamy, dreamy dessert. Here’s how to do it, step by step!
-
Prepare the Nectarines
Start by washing the nectarines thoroughly. After all, we want to remove any residues from the garden! Chop them into small pieces. The smaller, the better, as they’ll blend more easily. Make sure you remove the pit, of course—nobody wants a surprise crunch in their frozen yogurt!Chef Hack: Don’t stress if your nectarines are a bit too ripe. They’ll blend easier, and those sweet juices will make your yogurt even more scrumptious!
-
Blend It Up
Grab a blender or a food processor and toss in the chopped nectarines. Add the Greek yogurt, sweetener (honey or maple syrup), vanilla extract, and lemon juice.Tip: For a speedier blend, chop the nectarines smaller. It’ll save your blender motor from working too hard!
-
Strike a Balance
Blend all the ingredients until your mixture is smooth and creamy. Stop and taste it! Adjust the sweetness or acidity with more honey or lemon juice, depending on your preference. This is your creation, after all!Chef Insight: Sometimes, the natural sweetness of nectarines can surprise you! Always start with a little sweetness, and you can add more if you like.
-
Freeze the Mixture
Pour the blended mixture into a freezer-safe container. Spread it out with a spatula for even freezing. Cover it tightly with a lid or plastic wrap to avoid ice crystals.Little Chef Tip: If you have an ice cream maker, this step is even easier! Just churn it according to the manufacturer’s instructions.
-
Time to Chill
Let it freeze for at least 4–5 hours or overnight if you can wait! The longer, the better it sets up. -
Scoop and Serve
Once frozen, let the yogurt sit at room temperature for about 10-15 minutes before scooping. This softens it up for the perfect scoopability.Bonus Cue: Use a warm scoop or an ice cream scoop for easier serving. Just run it under hot water for a few seconds!
Serving Suggestions
Now that you’ve mastered the art of making Nectarine Frozen Yogurt, it’s time to serve it up! A beautiful scoop of frozen yogurt in a chilled bowl always impresses. Add some fresh mint leaves for an extra touch and a pop of color that complements the golden hues of the nectarines.
Want to elevate your presentation even more? Serve alongside fresh berries, a drizzle of honey, or a sprinkle of granola. Trust me, a bit of crunch can turn your dessert into a masterpiece!
Recipe Variations
Here are a few creative twists you might want to try:
-
Berry Bliss: Add a cup of frozen mixed berries to the blend for a mixed-fruit flavor explosion. Blueberries and strawberries pair wonderfully with nectarines.
-
Spicy Zing: Incorporate a pinch of ground ginger or cinnamon for a warming spice that complements the sweetness of the nectarines beautifully.
-
Nutty Delight: Add almond or cashew butter for a nutty flavor and extra creaminess!
-
Coconut Cream: For a tropical vibe, substitute Greek yogurt with coconut yogurt and add shredded coconut flakes in the mixture.
Chef’s Notes
This recipe has truly evolved over the years. What started as a simple summer dessert has turned into my go-to healthy treat anytime I need a refresh! I once experimented with adding different fruits, and while nectarines come out on top, the recipe remains playful. Did I ever tell you about the time I almost forgot to add sweetener? Let’s just say, while it’s cute to be optimistic about the sweetness of fruit, not all fruits can sweeten a whole batch of yogurt!
So do yourself a favor—taste as you go! You might discover your new favorite twist along the way.
FAQs and Troubleshooting
-
What if my frozen yogurt turned out too hard?
If it’s rock solid, let it sit at room temperature for a bit before serving. Next time, try adding a bit more yogurt or reducing freezing time. -
Can I make this with other fruits?
Absolutely! Peaches, berries, or even mangoes work beautifully. The trick is to adjust sweetness based on the fruit’s natural sugars. -
How long will it last in the freezer?
It’ll be best consumed within two weeks. After that, the texture might change, but it’ll still be delicious! -
What can I do with leftovers?
If you have any leftover frozen yogurt, consider blending it into smoothies for a creamy treat, or using it as a topping for pancakes or waffles!
Nutritional Info
(If applicable—this can vary based on ingredients and serving size.)
Nectarine Frozen Yogurt is not only a flavorful treat but also a healthy option that is rich in protein from Greek yogurt and antioxidants from nectarines. It’s a guilt-free indulgence that satisfies your sweet tooth while keeping you refreshed!
So there you have it, my friends—a delightful recipe that combines aching nostalgia, the joy of cooking, and the love for simple yet delicious food. I know you’ll love whipping up this Nectarine Frozen Yogurt as much as I do! Grab your nectarines, and let’s make some memories in the kitchen! Happy eating!
PrintNectarine Frozen Yogurt

A refreshing and creamy summer treat made with fresh nectarines and Greek yogurt, perfect for cooling down on hot days.
- Prep Time: 15 minutes
- Cook Time: 300 minutes
- Total Time: 315 minutes
- Yield: 4 servings 1x
- Category: Dessert
- Method: Freezing
- Cuisine: American
- Diet: Vegetarian
Ingredients
- 2 cups fresh nectarines, chopped
- 1 cup Greek yogurt
- 1/4 cup honey or maple syrup
- 1 teaspoon vanilla extract
- 1 tablespoon lemon juice
Instructions
- Prepare the nectarines by washing them thoroughly and chopping into small pieces, removing the pit.
- Grab a blender or food processor and add the nectarines, Greek yogurt, sweetener, vanilla extract, and lemon juice.
- Blend all the ingredients until smooth and creamy, adjusting sweetness or acidity to taste.
- Pour the mixture into a freezer-safe container and spread it out. Cover tightly.
- Let it freeze for at least 4–5 hours or overnight.
- Once frozen, let it sit at room temperature for 10-15 minutes before scooping.
Notes
For a creamier texture, consider using an ice cream maker. Serve with fresh mint, berries, honey, or granola for added flavor.
Nutrition
- Serving Size: 1 serving
- Calories: 200
- Sugar: 25g
- Sodium: 75mg
- Fat: 3g
- Saturated Fat: 1g
- Unsaturated Fat: 2g
- Trans Fat: 0g
- Carbohydrates: 35g
- Fiber: 2g
- Protein: 5g
- Cholesterol: 10mg
Keywords: nectarine, frozen yogurt, summer dessert, healthy treat, homemade yogurt
Beginner French Macarons with Raspberry Lemon Buttercream
French Macarons with Raspberry Lemon Buttercream: A Sweet Adventure Awaits!
Welcome to a magical corner of the kitchen where delicate French pastries meet vibrant flavors—yes, I’m talking about macarons! If you’ve ever stood in awe of these colorful, airy delights, you’re not alone. My discovery of macarons was like unearthing a treasure chest filled with flavors, textures, and a sprinkle of culinary challenge. Today, I’m excited to share my favorite recipe for French macarons filled with a luscious raspberry lemon buttercream. Trust me, once you bite into these little beauties, you’ll feel like you’ve taken a trip to a quaint patisserie in Paris!
As you embark on this baking adventure, let’s talk about why making macarons is not just about following a recipe; it’s about creating memories. These little meringue-based sandwiches have a reputation for being finicky, but that’s part of their charm! If you’ve ever found yourself worrying about whether your macarons will have “feet” or if the weather might impact your egg whites, grab a whisk and join me. I promise you’ll gain confidence and fill your kitchen with delightful aromas and colors as we create something truly special!
A Sweet Memory
Let’s take a little trip down memory lane. I vividly remember the first time I tried my hand at making macarons. It was a rainy Sunday afternoon, the kind that calls for hot tea and sweet treats. With a handful of almond flour and some vibrant food coloring, I was ready to embark on my macaron journey! I was nervous, but the moment I piped those little rounds onto the silicone mat, my heart fluttered with excitement.
The first batch, I remember so clearly, had a few “oops” moments—some were slightly cracked, while others were perfect and round. But the taste! Oh, it was pure bliss. I filled them with a simple buttercream, tasting each one with glee and a sense of accomplishment. Those macarons sparked not only a love of baking but a quest to explore flavors and learn more. That rainy day turned into countless afternoons of experimentation, laughter, and tasty treats shared with friends. I can still picture the joy on my friends’ faces as they bit into those sweet surprises, and that feeling of creating happiness with food has fueled my passion ever since.
Ingredients List
Let’s gather our ingredients to make these dreamy macarons with raspberry lemon buttercream. Here’s what you need:
-
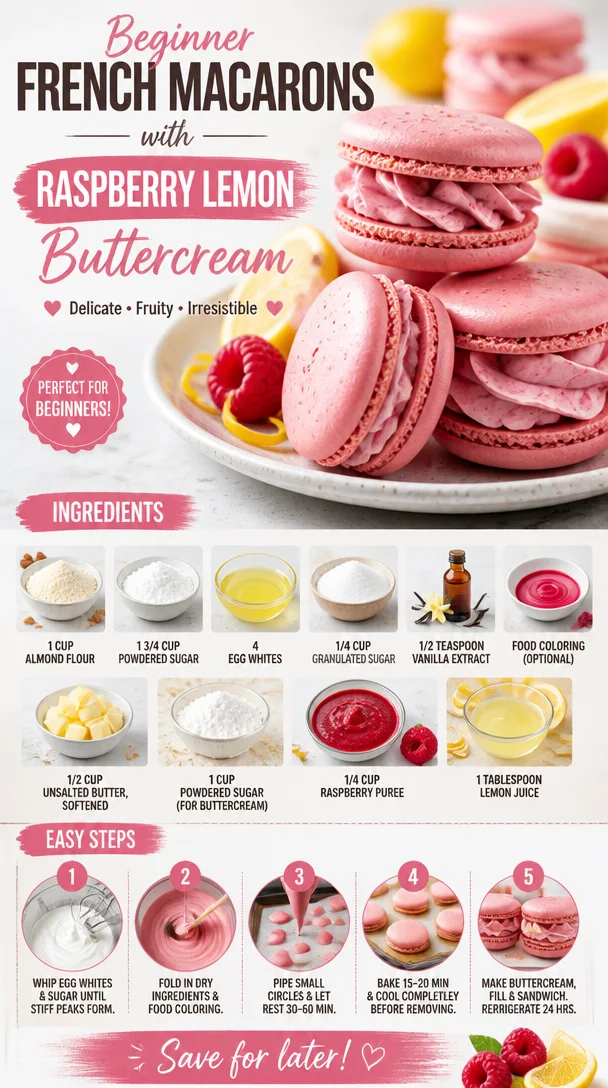
1 cup almond flour: The cornerstone of the macaron, almond flour gives these treats their signature texture. If you’re nut-free, you could try sunflower seed flour as a substitute, although the color may be slightly greenish.
-
1 3/4 cups powdered sugar: Sweetens and balances the almond flour. You can use store-bought or make your own by blending granulated sugar in a blender until fine.
-
4 large egg whites: The stars of the show! Aged egg whites (left uncovered in the fridge for a day) work best, as they create a better meringue. You can save the yolks for a custard or rich hollandaise sauce.
-
1/4 cup granulated sugar: This is added to stabilize the egg whites and create a shine. If you’re looking to reduce sugar, you could try using a natural sweetener like monk fruit, but it may impact texture.
-
1/2 teaspoon vanilla extract: A splash of flavor! While vanilla is classic, feel free to experiment with almond extract for a twist.
-
Food coloring (optional): Because who doesn’t love a pop of color in their treats? Gel food coloring works best, as liquid can alter the texture of your batter.
-
1/2 cup unsalted butter, softened: The base for our buttercream. Make sure it’s soft, not melted—room temperature is key for achieving a smooth texture.
-
1 cup powdered sugar (for buttercream): Sweetness again! This will ensure our buttercream is luscious and sweet enough to balance the tartness of the raspberry.
-
1/4 cup raspberry puree: Fresh or frozen raspberries blended to a smooth consistency. This adds a lovely fruitiness. If you don’t have raspberries, feel free to substitute with strawberry or passion fruit puree.
-
1 tablespoon lemon juice: For that zing! Freshly squeezed is best for maximum brightness, so go ahead and squeeze away.
Step-by-Step Instructions
Ready to make some macarons? Let’s dive into the process!
-
Prep your workspace: Start by preheating your oven to 300°F (150°C). Line two baking sheets with parchment paper or a silicone mat. Having everything organized will make the whole process smoother, so I recommend measuring out all your ingredients beforehand!
-
Sift your dry ingredients: In a mixing bowl, sift together the almond flour and powdered sugar. This eliminates clumps and creates a fine mixture, which is crucial for a smooth macaron shell. If you notice any large bits of almond flour, just discard them. Remember, the finer the better!
-
Whip your egg whites: In a clean, dry mixing bowl, start to beat the egg whites on medium speed until they become frothy. Gradually add the granulated sugar while continuing to whip them until soft peaks form. This usually takes around 3-4 minutes. If you’re feeling fancy, you can add in your food coloring at this point for a beautiful pastel hue.
-
Achieve stiff peaks: Increase the speed to high and whip until the egg whites reach stiff peaks—meaning that they stand straight up without drooping. Don’t overbeat, or your meringue can become dry.
-
Macaronage time: Gently fold the sifted almond flour and powdered sugar mixture into the whipped egg whites. Use a silicone spatula and fold carefully to maintain the airiness of the mixture. The batter should flow slowly, like lava, and create a smooth surface when piped. This step is crucial—overmix and your macarons will flatten; undermix and they won’t spread evenly.
-
Pipe those circles: Transfer your batter into a piping bag fitted with a round tip. Pipe small rounds onto your prepared baking sheets, leaving space between each—for macarons like personal space! Give the baking sheet a good tap on the counter to release any trapped air bubbles.
-
Let them rest: This is one of the most important parts of making macarons. Let the piped macarons rest for 30-60 minutes until they form a skin and are no longer sticky to touch. You can poke your finger gently to test; if it doesn’t stick to your finger, they’re ready for the oven!
-
Bake: Pop your trays into the preheated oven and bake for 15-20 minutes. Rotate the trays halfway through for even baking. You’ll know they’re done when they don’t wobble and have a lovely foot—a sign of a successful macaron!
-
Cool down: Once baked, let them cool completely on the trays before removing them. Trying to remove them too soon can lead to heartbreak and broken shells.
-
Whip up the buttercream: While cooling, let’s whip up that raspberry lemon buttercream! In a mixing bowl, beat the softened butter until creamy. Gradually add in the powdered sugar and beat until well combined. Then, add in the raspberry puree and lemon juice, mixing until everything is silky smooth. Taste it—if you want more zing, add a bit more lemon juice!
-
Assemble: Pair your macaron shells that are similar in size. Spoon or pipe a dollop of buttercream onto one shell and sandwich it with another. Press gently and voilà—you’ve got a beautifully filled macaron!
Serving Suggestions
When serving these delicious macarons, I like to display them on a rustic wooden platter or a cute cake stand. You can also pile them into a glass jar tied with twine for an adorable touch. Consider pairing them with a cup of tea or coffee, or even a refreshing glass of lemonade to complement the raspberry and lemon flavors. Don’t forget to snap a few pictures before devouring them—these treats are not only tasty but also stunning!
Recipe Variations
What’s that? You want to play with flavors? You got it! Here are a few creative twists to keep the macaron love alive:
-
Chocolate Hazelnut Buttercream: Swap the raspberry and lemon for a rich chocolate hazelnut spread—hello, Nutella!
-
Matcha Green Tea: Add matcha powder to your macaron batter and fill it with a smooth vanilla buttercream for a beautiful green treat!
-
Salted Caramel: Use homemade or store-bought salted caramel as a filling for a decadent touch.
-
Lavender Honey: Infuse your buttercream with lavender (use culinary-grade lavender) and honey for a floral twist.
-
Pistachio Coconut: Substitute some of the almond flour with pistachio flour, and use coconut extract in your buttercream for a tropical flavor.
Chef’s Notes
As with any recipe, macarons can evolve over time. I remember my early days of macaron-making when every batch was a surprise. I learned that the key is precision and patience. Each successful batch is a little victory, and even mistakes taught me invaluable lessons. And hey, with a bit of humor! Once, I accidentally baked a batch on a ridiculously humid day, and let’s just say they came out as lovely little puddles. I took it with a smile and turned that into a lesson on kitchen conditions!
Also, remember, practice makes perfect! After a few tries, you’ll not only gain skill but also discover flavors that become your personal favorites.
FAQs and Troubleshooting
-
Why didn’t my macarons have feet?
This could be due to overmixing the batter, underbaking, or not allowing them to rest before baking. Make sure you’re gentle when folding and tap the trays to release air. -
Why did my macarons crack?
Cracked shells often indicate that the oven temperature was too high or the macarons did not rest long enough before baking. Try reducing your oven temperature slightly and extending the resting time. -
Can I store macarons?
Absolutely! Store them in an airtight container in the fridge for up to a week, or freeze them for longer storage. Allow them to come to room temperature before serving. -
Can I use liquid food coloring?
While you can, it’s better to use gel food coloring to avoid altering the moisture content. If using liquid food coloring, adjust the dry ingredients slightly.
Nutritional Info
While I focus on enjoyment rather than strict nutritional values with treats like macarons, each one typically contains around 100 calories, depending on the filling and size. Remember, moderation is key—enjoy these delightful treats as part of a balanced lifestyle!
Making French macarons with raspberry lemon buttercream is a joyful experience filled with challenges, laughter, and most importantly, flavor. So, roll up your sleeves, invite a friend, and let’s create something beautiful in the kitchen that will fill your hearts and bellies. Happy baking, foodies!
PrintFrench Macarons with Raspberry Lemon Buttercream

Delicate French macarons filled with a luscious raspberry lemon buttercream, perfect for a sweet adventure.
- Prep Time: 30 minutes
- Cook Time: 20 minutes
- Total Time: 50 minutes
- Yield: 20 macarons 1x
- Category: Dessert
- Method: Baking
- Cuisine: French
- Diet: Vegetarian
Ingredients
- 1 cup almond flour
- 1 3/4 cups powdered sugar
- 4 large egg whites
- 1/4 cup granulated sugar
- 1/2 teaspoon vanilla extract
- Food coloring (optional)
- 1/2 cup unsalted butter, softened
- 1 cup powdered sugar (for buttercream)
- 1/4 cup raspberry puree
- 1 tablespoon lemon juice
Instructions
- Prep your workspace: Preheat your oven to 300°F (150°C) and line baking sheets with parchment paper.
- Sift your dry ingredients: Sift together the almond flour and powdered sugar.
- Whip your egg whites: Beat egg whites on medium speed, gradually adding granulated sugar until soft peaks form.
- Achieve stiff peaks: Increase speed to high and whip until stiff peaks form.
- Macaronage time: Gently fold the dry mixture into the egg whites.
- Pipe those circles: Transfer batter to a piping bag and pipe rounds onto baking sheets.
- Let them rest: Allow piped macarons to rest for 30-60 minutes.
- Bake: Bake for 15-20 minutes, rotating trays halfway through.
- Cool down: Let macarons cool completely before removing them from the sheets.
- Whip up the buttercream: Beat softened butter, then add powdered sugar, raspberry puree, and lemon juice.
- Assemble: Pair shells, fill with buttercream, and sandwich them together.
Notes
Practice makes perfect! Don’t be discouraged by initial challenges.
Nutrition
- Serving Size: 1 macaron
- Calories: 100
- Sugar: 12g
- Sodium: 50mg
- Fat: 4g
- Saturated Fat: 2g
- Unsaturated Fat: 2g
- Trans Fat: 0g
- Carbohydrates: 14g
- Fiber: 0g
- Protein: 2g
- Cholesterol: 10mg
Keywords: French macarons, raspberry lemon buttercream, dessert, baking, treats
Patriotic Red, White, and Blue Cake Balls: No-Bake Treat
Red, White, and Blue Cake Balls: A Festive Treat for Every Celebration!
Welcome to Clean Plate Cravings! I’m Ava Carter, and today we’re diving into a delightful treat that’ll have you celebrating in style: Red, White, and Blue Cake Balls! Perfect for summer barbecues, Fourth of July gatherings, or just because you need a burst of festive fun in your day, these cake balls are as tasty as they are eye-catching. Picture this: a moist white cake transformed into luscious balls of joy, coated in velvety white chocolate, and sprinkled with all the patriotic flair your heart desires. Are you ready to roll up your sleeves and create something truly special? Let’s get started!
A Sweet Slice of Nostalgia
Let me take you back to a sun-drenched July afternoon when I was just a little girl, knees scraped from playing outside and a grin plastered on my face. Each year, my family would have a potluck for Independence Day, where everyone brought their favorite dish to share. My Aunt Linda was known for her incredible dessert table, and her pièce de résistance was a layered red, white, and blue cake.
I remember scampering around, stealing tastes of whipped cream and sneaking sprinkles whenever no one was looking. But it was her cake, bursting with flavor and patriotism, that always stole the show. Inspired by those joyful days, I wanted to create something that captured that same spirit but in a fun, bite-sized treat. Enter the Red, White, and Blue Cake Balls! A little piece of nostalgia packed with a whole lot of love.
Ingredients
Before we let the fun begin, let’s gather everything we need to whip up these dazzling cake balls:
-
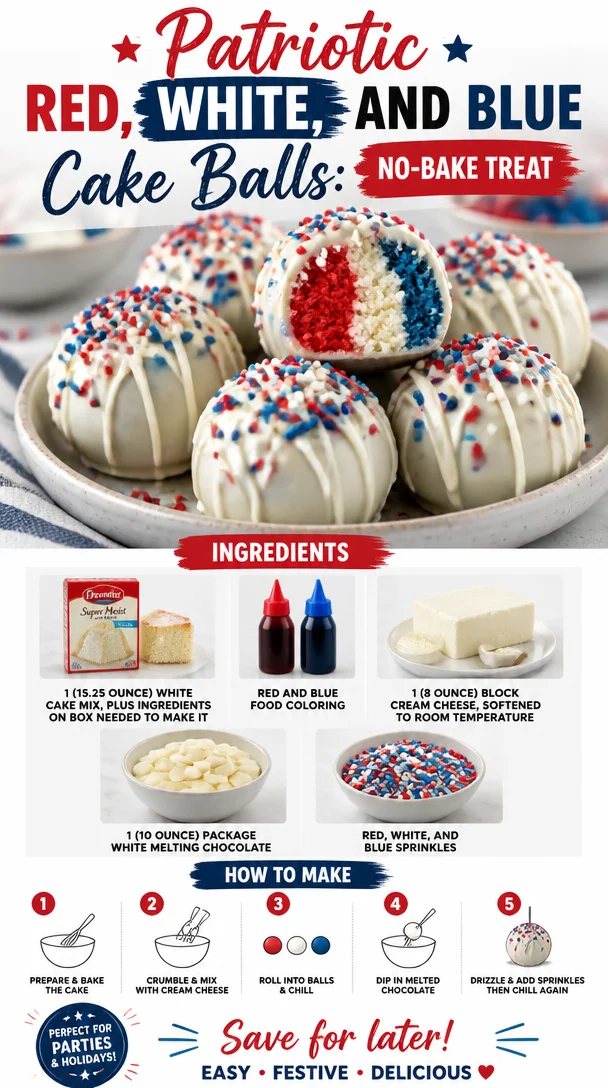
1 (15.25-ounce) white cake mix
This is the base of the cake balls. Go for a box mix for convenience, or use your favorite homemade white cake recipe! -
Ingredients on box needed to make it
Usually, this includes eggs, oil, and water. Tweak the quantities as per your box instructions. -
Red and blue food coloring
Don’t be shy with the colors! This is what makes our cake balls eye-catching. You can use gel or liquid coloring based on what’s available. -
1 (8-ounce) block of cream cheese, softened to room temperature
This will give our cake balls a creamy texture and a deliciously tangy flavor. Want a lighter option? Swap it out for Greek yogurt! -
1 (10-ounce) package of white melting chocolate
This is the star of our outer coating, giving each cake ball a beautiful white shell. If you’re feeling adventurous, you can also try dark chocolate or yogurt-coating. -
Red, white, and blue sprinkles
These are perfect for the final touch! Use classic sprinkles or even themed edible glitter for extra sparkle.
Step-by-Step Instructions
Alright, let’s get baking! Grab your mixing bowl and let’s create these beauties step by step.
-
Bake the Cake
Preheat your oven according to the instructions on the cake mix box. Prepare your cake pans as directed (usually greasing and flouring them). Mix the cake batter following the box instructions, but leave out the food coloring for now. Pour the batter into the pan, and let it bake until golden brown and a toothpick inserted in the center comes out clean. While it bakes, take a moment to savor that smell wafting through your kitchen—it’s heavenly! -
Cool the Cake
Once the cake is out of the oven, allow it to cool in the pan for about 10-15 minutes. Then, turn it out onto a wire rack to cool completely. This is key because if the cake is warm, it’ll be harder to crumble without it clumping together later. Plus, nobody likes burnt fingers! -
Color the Cake
When the cake is cool, it’s time to crumble it up. Use your hands or a fork to break the cake into small crumbs. Next, divide the crumbs into two bowls: one for the red cake and one for the blue. Add the red and blue food coloring to their respective bowls, mixing until you achieve vibrant colors. This step is super fun—just like playing with dough as a kid! -
Create the Cake Mixture
Now, it’s time to incorporate the softened cream cheese! Add about half of the cream cheese to each bowl of crumbled cake. Mix thoroughly until all the ingredients are well combined. You want a consistency that’s moldable but not too wet. If it feels too dry, add a little more cream cheese until it holds together. -
Shape the Balls
Grab a tablespoon or a small cookie scoop, and form small balls of the cake mixture. Aim for about 1-inch bites; they will be adorably palm-sized! Roll them gently between your palms to smooth out any edges. Don’t forget to make some red and some blue ones—you’ll want a mix for the final display! -
Chill the Cake Balls
Place the cake balls onto a lined baking sheet and pop them into the fridge for about an hour to firm up. This is a crucial step since it will make coating them with chocolate much easier. If you’re short on time, just 20-30 minutes in the freezer will do the trick! -
Melt the White Chocolate
While the cake balls are chilling, get your melting chocolate ready! Follow the package instructions for melting in the microwave or using a double boiler. Be careful not to overheat the chocolate; it should be silky smooth and ready to coat! -
Coat the Cake Balls
Once your cake balls are well-chilled, it’s time for the best part! Dip each ball into the melted white chocolate, ensuring it’s fully coated. I like to use a fork to help lift the balls out of the chocolate and let the excess drip off. -
Add the Sprinkles
Immediately after coating each ball, place it back on the baking sheet and sprinkle with the festive red, white, and blue sprinkles. This step adds that perfect touch of flair, so don’t forget it! -
Chill Again
For the final lap, return the coated cake balls to the fridge for about 30 minutes to set the chocolate shell. This is when they firm up beautifully, making them ready to serve!
Serving Suggestions
Now that your Red, White, and Blue Cake Balls are cool and set, it’s time to show them off! Arrange them on a festive platter, adding some themed decor like mini flags or edible flowers for a gorgeous presentation. You could even serve them in cupcake liners for a cute, portable option. Perfect for summer parties, barbecues, and family gatherings—your guests will be delighted!
Recipe Variations
Feeling inspired? Here are some exciting twists you can try with these cake balls:
- Chocolate Cake Mix: Swap the white cake mix for a chocolate cake mix for a rich twist. The combo of colors will still be stunning!
- Cream Cheese Swirl: Add some raspberry or strawberry jam to the cream cheese for a fruity flavor burst.
- Nutty Delight: Mix in some finely chopped nuts for added texture and a nutty flavor.
- Flavor Infusions: Incorporate a teaspoon of vanilla or almond extract into the cake batter for an extra flavor kick.
- Dairy-Free Option: Use dairy-free cream cheese and melting chocolate to create a vegan-friendly version!
Chef’s Notes
As a chef who loves to experiment, this recipe holds a special place in my heart. I’ve made it repeatedly and can attest to how forgiving it is. You can always tweak the colors or flavors based on your mood and the season! I remember one time, I forgot to add the food coloring and ended up with a surprise white cake ball—delicious, but not quite as festive! So, keep the colors in mind, and feel free to get creative.
FAQs and Troubleshooting
Here are a few common questions and solutions if you encounter any hiccups as you make these delightful cake balls:
-
What if the cake balls are too dry?
If the mixture is crumbling apart, simply add more cream cheese gradually until the desired consistency is achieved. -
My chocolate is too thick! What should I do?
If your melting chocolate is too thick, you can add a small amount of coconut oil or shortening. This will help thin it out while still keeping it velvety. -
How do I store the cake balls?
Store any leftovers in an airtight container in the fridge for up to a week. They also freeze well, so you can enjoy them later! -
Can I use other food colorings?
Yes! Just make sure whichever food coloring you use is gel or liquid type and is safe for baking.
Nutritional Info
While enjoying these cake balls, keep in mind they’re meant as a delightful treat rather than a daily snack. A single ball has approximately 150 calories, but indulge in moderation, and savor each bite!
Now that you have a recipe to create these beautiful Red, White, and Blue Cake Balls, I’m excited to see how your creations turn out! Whether it’s a simple family gathering or a big summer celebration, these cake balls are sure to be a hit. Happy baking, and remember—keep it fresh, simple, and seriously delicious!
PrintRed, White, and Blue Cake Balls

Delightful cake balls perfect for summer barbecues and Fourth of July gatherings, combining moist white cake, creamy filling, and festive colors.
- Prep Time: 30 minutes
- Cook Time: 30 minutes
- Total Time: 60 minutes
- Yield: 24 servings 1x
- Category: Dessert
- Method: Baking
- Cuisine: American
- Diet: Vegetarian
Ingredients
- 1 (15.25-ounce) white cake mix
- Ingredients on box needed to make it (usually eggs, oil, and water)
- Red and blue food coloring
- 1 (8-ounce) block of cream cheese, softened
- 1 (10-ounce) package of white melting chocolate
- Red, white, and blue sprinkles
Instructions
- Preheat your oven according to the instructions on the cake mix box.
- Prepare your cake pans as directed.
- Mix the cake batter following the box instructions, leaving out the food coloring for now.
- Pour the batter into the pan and let it bake until golden brown and a toothpick comes out clean.
- Cool the cake in the pan for about 10-15 minutes, then turn it out onto a wire rack to cool completely.
- Crumble the cooled cake into small crumbs, dividing them into two bowls.
- Add red and blue food coloring to the respective bowls, mixing well.
- Create the cake mixture by adding half of the cream cheese to each bowl and mixing until combined.
- Form small balls of the cake mixture using a tablespoon or cookie scoop.
- Chill the cake balls on a lined baking sheet for about an hour in the fridge.
- Melt the white chocolate according to package instructions.
- Dip each chilled cake ball into the melted chocolate, ensuring it’s fully coated.
- Add the sprinkles immediately after coating.
- Chill again for about 30 minutes to set the chocolate shell.
Notes
These cake balls are perfect for summer parties and can be customized with different cake mixes and flavors.
Nutrition
- Serving Size: 1 cake ball
- Calories: 150
- Sugar: 10g
- Sodium: 160mg
- Fat: 7g
- Saturated Fat: 4g
- Unsaturated Fat: 2g
- Trans Fat: 0g
- Carbohydrates: 20g
- Fiber: 0g
- Protein: 2g
- Cholesterol: 20mg
Keywords: cake balls, red white blue, festive dessert, summer treats, Fourth of July treats
Minute Cowboy Caviar Recipe for Quick Weeknight Dinners
Cowboy Caviar: A Flavorful Fiesta in a Bowl
Welcome to the wild and wonderful world of Cowboy Caviar—where vibrant colors and bold flavors meet! If you’re looking for a dish that will not only tantalize your taste buds but also ignite your culinary creativity, you’re in the right spot. This zesty appetizer (or main dish, if you’re feeling adventurous) is the answer to all your snacking prayers. Picture a hearty blend of black beans, corn, fresh veggies, and a zesty dressing that’ll make your mouth water. It’s like a summer fiesta in your mouth, and trust me, you’ll want to dive right in!
So, what’s the story behind this drool-worthy dish? Cowboy Caviar is a classic appetizer with Tex-Mex roots, often served during gatherings, family cookouts, or at your neighbor’s BBQ. Each ingredient packs a punch, providing not just flavor, but plenty of nutrients to keep you feeling your best. And the best part? It’s incredibly versatile—great as a dip, a side salad, or even a topping for grilled meats or tacos. Let’s face it: once you make this dish, you’ll be the star of every potluck!
Now, roll up your sleeves, and let’s get cooking! Grab your ingredients, and get ready to whip up some Cowboy Caviar that even the cowboys would be proud of!
A Personal Story: The Perfect Summer Memory
Let me take you back to my childhood summers spent at my grandparents’ ranch in Texas. Nothing felt more liberating than spending long sunny days outside with family and friends, all while the smell of BBQ wafted through the air. In the center of it all? A giant bowl of Cowboy Caviar that my grandmother would make featuring fresh produce from her garden.
As kids, we would gather around, dipping crunchy tortilla chips into this rainbow of deliciousness while laughing and sharing stories. The freshness of every ingredient popped in our mouths—crunchy bell peppers, creamy black beans, and zesty jalapeños. It was a fiesta of flavors that always sparked joy. What I love most about Cowboy Caviar is that it reminds me of those carefree summer days, where we all connected over good food and laughter. Today, I still make this dish (with my own flair, of course), and every bite takes me right back to my grandmother’s kitchen.
Ingredients: Let’s Gather the Good Stuff
Here’s all you need to create your very own Cowboy Caviar masterpiece:
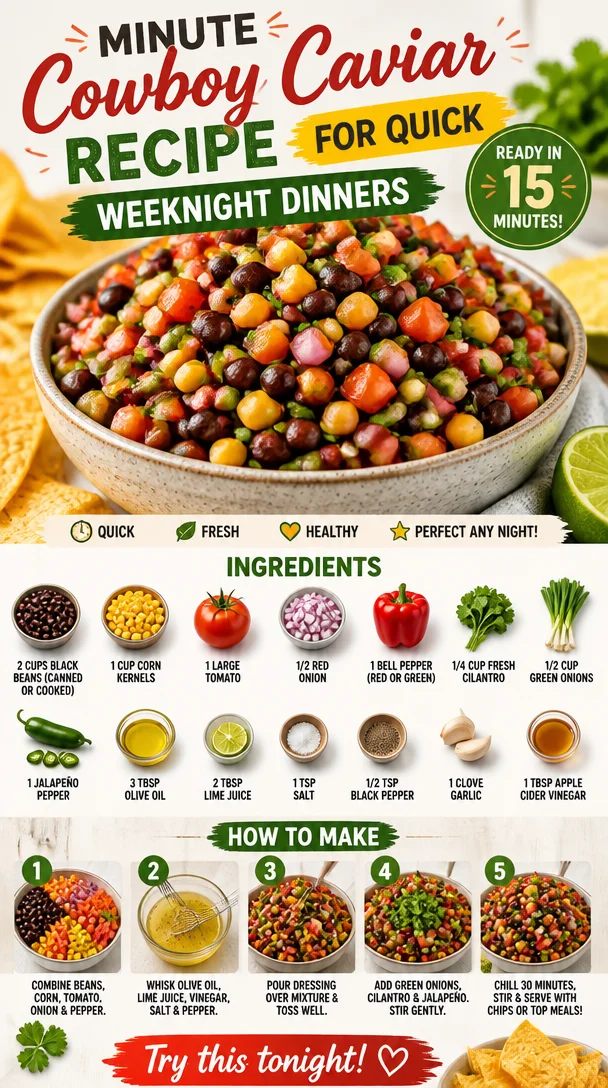
- 2 cups black beans (canned or cooked): A fabulous source of plant-based protein and fiber. For a twist, you can swap in pinto beans or kidney beans for a different flavor profile.
- 1 cup corn kernels: Fresh or frozen works great! You can also use canned corn; just be sure to rinse it well. Grilled corn adds a smoky flavor that’s to die for!
- 1 large tomato: Juicy and ripe, tomatoes are the star of the show. For a heartier version, you might try cherry tomatoes or even diced avocados for creaminess.
- 1/2 red onion: This onion adds a crunch and subtle sweetness. If red onion’s a bit too strong for you, use green onions or shallots as substitutes.
- 1 bell pepper (red or green): Use whichever you prefer! Red peppers give a sweeter taste, while green adds a nice bite. Feeling adventurous? Try a poblano pepper for a smoky flavor!
- 1/4 cup fresh cilantro: Bright and herbaceous, cilantro elevates the flavor. If you’re not a cilantro fan, parsley or even mint can work just as well.
- 1/2 cup green onions: These provide a delightful punch! Scallions can also be used here—just slice them thinly for a little zing!
- 1 jalapeño pepper: For heat! Adjust the amount depending on your spice tolerance. If you want it milder, remove the seeds and membranes.
- 3 tbsp olive oil: This is the base for your dressing, giving it a silky texture. Avocado oil works well too and provides a unique flavor.
- 2 tbsp lime juice: Freshly squeezed is best! It adds brightness. If you’re out of lime, lemon juice is a great substitute.
- 1 tsp salt: Season to your taste, but this enhances all the flavors.
- 1/2 tsp black pepper: A classic seasoning to round out the flavors.
- 1 clove garlic: Fresh garlic adds depth. Use garlic powder in a pinch, about 1/4 tsp.
- 1 tbsp apple cider vinegar: A splash of acidity that brightens everything up! Feel free to use red wine vinegar or even balsamic for a different twist.
Step-by-Step Instructions: Let’s Get Cooking!
-
Prepare Your Ingredients: Start by rinsing your black beans thoroughly if using canned ones. Drain the corn as well. Freshness is key, so if you’ve got time, you can cook your own beans and corn!
-
Chop, Chop!: Dice your tomatoes, red onion, and bell pepper into bite-sized pieces—it doesn’t have to be perfect. I love a rustic chop for that homemade feel! Gather your cilantro and green onions; both should be finely chopped for maximum flavor.
-
Handle the Heat: Time to tackle that jalapeño! Wearing gloves (trust me!), slice it in half, remove the seeds for less heat if desired, and finely chop. Here’s a chef hack: the seeds carry most of the spice, so adjust to your taste!
-
Mix It All Together: In a large mixing bowl, combine the black beans, corn, diced tomatoes, bell pepper, red onion, cilantro, green onions, and jalapeño. Feel free to get your hands in there and mix—it’s a labor of love!
-
Make the Dressing: In a smaller bowl, whisk together the olive oil, lime juice, apple cider vinegar, salt, black pepper, and minced garlic. Don’t skip the whisking—it helps emulsify everything into a glorious dressing!
-
Combine and Taste: Pour the dressing over your veggie mixture and stir gently to coat everything evenly. Here’s a pro tip: let the Cowboy Caviar sit for at least 30 minutes before serving to allow the flavors to meld together for a more harmonious taste.
-
Adjust and Enjoy: After chilling, taste it! You might need a pinch more salt or lime juice depending on your preference. It’s all about personalizing this dish to make it your own!
Serving Suggestions: How to Make It Shine
Presentation is key! Serve your Cowboy Caviar in a vibrant bowl, and garnish with extra cilantro for a pop of freshness. Pair it with crispy tortilla chips for dipping or even over a bed of greens for a light salad. Want to kick it up a notch? Serve it alongside grilled fish or chicken for a complete meal. It’s visually stunning and utterly scrumptious—perfect for impressing your guests!
Recipe Variations: Get Creative!
- Tropical Twist: Add diced mango or pineapple for a sweet and tangy flair that pairs beautifully with the spice.
- Mediterranean Style: Swap the black beans for chickpeas and add feta cheese, olives, and herbs like oregano.
- Superfood Boost: Toss in some quinoa or farro for added texture and nutrition—this transforms the Cowboy Caviar into a hearty main dish.
- Dairy-Free Creaminess: Add diced avocado right before serving for a rich, creamy finish that balances the heat.
- Spicy Sriracha Option: Drizzle a little Sriracha over the top if you want a real kick! The spice will dance with the freshness you’ve created.
Chef’s Notes: A Dash of History
My Cowboy Caviar recipe has evolved over the years as I’ve experimented with different ingredients. Growing up, I was simply a ‘don’t mess with a classic’ kind of chef. Over time, though, I’ve discovered that adding a touch of something unexpected (like that tropical mango surprise) keeps this dish fresh and exciting. Just like me, it has matured! And who doesn’t love a recipe that grows with you?
Have a little fun with it! Cooking is all about improvisation and creating memories. Whether it’s a family gathering or a cozy night in, I believe there’s magic in every bite.
FAQs and Troubleshooting: Let’s Clear It Up
1. Can I make Cowboy Caviar ahead of time?
Absolutely! In fact, I recommend letting it sit in the fridge for a few hours or overnight. This allows the flavors to meld beautifully. Just be sure to give it a stir before serving!
2. What do I do if it’s too spicy?
If you find your Cowboy Caviar has too much heat, try balancing it out with a little extra lime juice or even some diced avocado. Both will help tone things down!
3. Can I freeze Cowboy Caviar?
While you can freeze it, the texture of the veggies won’t hold up well when thawed. It’s best enjoyed fresh, but leftovers can be stored in an airtight container for about 3 days in the fridge.
4. I don’t like black beans—what can I use instead?
No problem! You can substitute any type of beans you prefer, like chickpeas or white beans. Just adjust the flavor to your liking—you’ll still have a delicious dish!
Nutritional Info (Optional)
For those counting nutrients, here’s a quick breakdown per serving (assuming about 1/2 cup):
- Calories: 120
- Protein: 4g
- Carbs: 20g
- Fiber: 6g
- Fat: 3g
Now you’re armed with everything you need to make the ultimate Cowboy Caviar! It’s fresh, flavorful, and fun to make. I can’t wait for you to take this recipe to your kitchen, so let’s whip up a bowl of joy, shall we? Happy cooking, foodies!
PrintCowboy Caviar
A vibrant and flavorful Tex-Mex appetizer made with black beans, corn, and fresh veggies, perfect for snacking or as a side dish.
- Prep Time: 15 minutes
- Cook Time: 0 minutes
- Total Time: 15 minutes
- Yield: 4 servings 1x
- Category: Appetizer
- Method: Mixing
- Cuisine: Tex-Mex
- Diet: Vegetarian
Ingredients
- 2 cups black beans (canned or cooked)
- 1 cup corn kernels (fresh or frozen)
- 1 large tomato, diced
- 1/2 red onion, chopped
- 1 bell pepper (red or green), chopped
- 1/4 cup fresh cilantro, chopped
- 1/2 cup green onions, chopped
- 1 jalapeño pepper, finely chopped
- 3 tbsp olive oil
- 2 tbsp lime juice
- 1 tsp salt
- 1/2 tsp black pepper
- 1 clove garlic, minced
- 1 tbsp apple cider vinegar
Instructions
- Prepare your ingredients by rinsing black beans and draining corn.
- Chop tomatoes, red onion, and bell pepper into bite-sized pieces.
- Handle the jalapeño, removing seeds if desired.
- Mix black beans, corn, tomatoes, bell pepper, red onion, cilantro, green onions, and jalapeño in a large bowl.
- Make the dressing by whisking together olive oil, lime juice, apple cider vinegar, salt, black pepper, and minced garlic.
- Combine the dressing with the veggie mixture and stir gently.
- Adjust seasoning as needed and let sit for 30 minutes before serving.
Notes
Great as a dip with tortilla chips or as a topping for grilled meats.
Nutrition
- Serving Size: 1/2 cup
- Calories: 120
- Sugar: 3g
- Sodium: 300mg
- Fat: 3g
- Saturated Fat: 0.5g
- Unsaturated Fat: 2.5g
- Trans Fat: 0g
- Carbohydrates: 20g
- Fiber: 6g
- Protein: 4g
- Cholesterol: 0mg
Keywords: Cowboy Caviar, Tex-Mex, appetizer, dip, salad, black beans, corn, fresh veggies
Patriotic 4th of July Cookies: 30-Minute Party-Ready Treats
Celebrate Independence Day with Delicious 4th of July Cookies
The 4th of July is just around the corner, and there’s nothing quite like a celebratory cookie to sweeten the occasion! Picture this: the sizzling summer sun, laughter echoing through the backyard as friends and family gather for a festive barbecue while fireworks twinkle in the twilight sky. Everyone is eagerly anticipating dessert, and what could be more perfect than a plate of vibrant, fun, and delectable 4th of July cookies? Not only do these cookies bring a pop of color, but they also infuse joy with each crunchy, chocolatey bite. So grab your apron, put on your favorite tunes, and let’s create a treat that will make your 4th of July extra special!
When I think back to my childhood celebrations, the 4th of July holds a treasure trove of happy memories. Each year, my family and I would set up a BBQ in our backyard, draping the picnic table in red, white, and blue decorations. My mom had this magical cookie recipe that she would whip up, filling the kitchen with the irresistible smell of freshly baked treats. I can still remember the triumphant moment when she pulled the cookies out of the oven, their golden edges crisp and their centers gooey with melted M&M’s. Together, we would decorate them with sprinkles, making them look as festive as a firework show. These cookies became a tradition, a tribute to the spirit of Independence Day, and they certainly delighted our taste buds year after year.
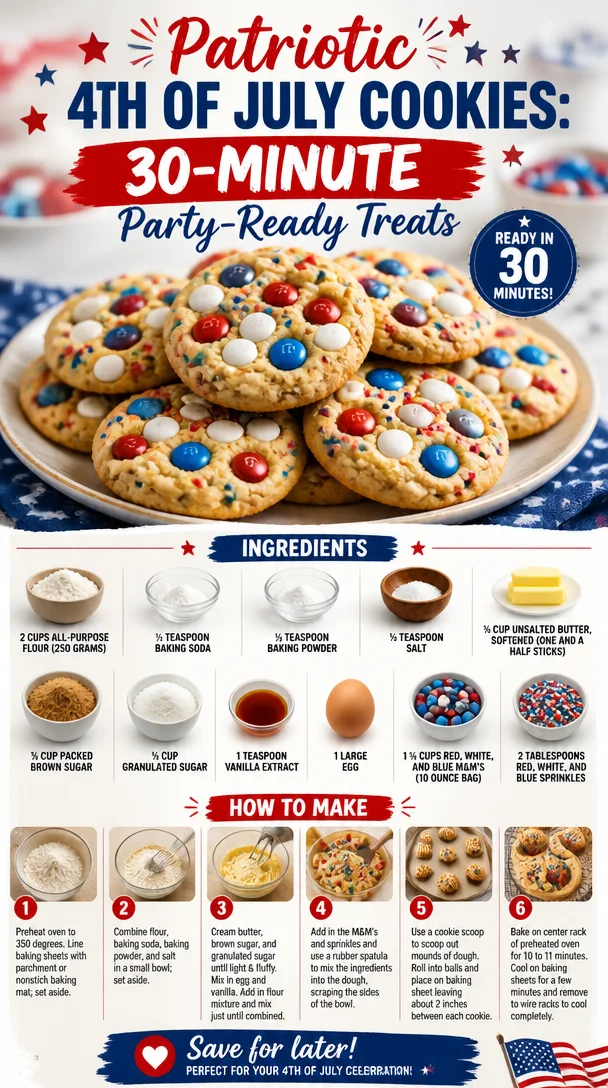
This year, I invite you to carry on that tradition—or perhaps start a new one—by making my 4th of July cookies! They’re chewy, buttery, and absolutely bursting with the colorful crunch of Red, White, and Blue M&M’s. With a sprinkle of festive joy on top, these easy-to-make cookies are just what you need to celebrate the occasion in style. So, let’s dive into the ingredients and get ready to bake some sweet memories!
Ingredients
-
2 cups all-purpose flour (250 grams)
The foundation of your cookies! If you want a gluten-free option, consider using almond flour or a gluten-free all-purpose mix. -
½ teaspoon baking soda
This will give your cookies a little lift. If you don’t have baking soda on hand, you can substitute it with baking powder (just use double the amount!). -
½ teaspoon baking powder
Adding extra lightness and fluffiness! It’s essential for achieving that perfect cookie texture. -
½ teaspoon salt
A little salt enhances the sweetness of your cookies. If you’re watching sodium intake, feel free to halve the amount. -
¾ cup unsalted butter, softened (1.5 sticks)
Buttery goodness is what makes these cookies melt in your mouth! If you need a dairy-free option, try vegan butter or coconut oil. -
¾ cup packed brown sugar
This adds moisture and a lovely rich flavor. If you’re out, you can substitute it with an equal amount of granulated sugar (though the flavor might be more one-dimensional). -
½ cup granulated sugar
Sweetness is important! Coconut sugar is a great substitute if you want a lower glycemic option. -
1 teaspoon vanilla extract
This is a must for that warm, inviting flavor. Feel free to use almond extract for a different twist! -
1 large egg
This binds the ingredients together. In a pinch, a flax egg (1 tablespoon ground flaxseed mixed with 2.5 tablespoons of water) works as a fantastic egg substitute. -
1 ¼ cups Red, White, and Blue M&M’s (10-ounce bag)
The star of our cookies! You can easily swap these out for your favorite chocolate candies or even chopped chocolate for a gourmet touch. -
2 tablespoons Red, White, and Blue Sprinkles
Because what’s a celebration without a little extra fun? Use any sprinkles you love for a festive touch.
Step-by-Step Instructions
-
Preheat Your Oven
Warm up that kitchen to 350°F (175°C). Preheating ensures your cookies bake evenly and come out perfectly golden. -
Prep Your Baking Sheets
Line two baking sheets with parchment paper. Not only does this prevent sticking, but it also makes for easy cleanup—an absolute chef hack! -
Combine Dry Ingredients
In a large bowl, whisk together the all-purpose flour, baking soda, baking powder, and salt. This step helps to evenly distribute the leavening agents and prevents clumps in your cookies. -
Cream Butter and Sugars
In a separate bowl, beat together the softened unsalted butter, packed brown sugar, and granulated sugar until the mixture is light and fluffy. This usually takes about 2-3 minutes with an electric mixer. Pro tip: let your butter sit out before mixing for a super creamy texture! -
Add the Egg and Vanilla
Mix in the egg and vanilla extract until combined. The batter will be slightly loose, and that’s exactly what you want! -
Incorporate Dry Ingredients
Gradually add the dry ingredient mixture into the wet mixture, stirring until just combined. Be careful not to overmix here—your cookies will thank you! -
Fold in M&M’s and Sprinkles
Gently fold in the Red, White, and Blue M&M’s and sprinkles. At this point, your dough should be vibrant and full of color! I like to reserve a few M&M’s and sprinkles to top the cookies before baking for that extra festive flair. -
Scoop the Dough
Using a cookie scoop or a tablespoon, drop rounded balls of dough onto the prepared baking sheets, leaving about 2 inches of space between each ball. This allows them room to spread out. -
Bake the Cookies
Pop them into the oven and bake for 10-12 minutes, or until the edges are lightly golden. They may look a little underdone in the center, but that’s perfect! They’ll continue to cook while cooling. -
Cooling Time
Let the cookies cool on the baking sheet for about 5 minutes, then transfer them to a wire rack to cool completely. This is the hardest part—waiting for the cookies to cool while trying to resist the sweet smell!
Serving Suggestions
For presentation, arrange the cookies on a beautiful platter or stack them high in a festive tin for a fun 4th of July treat! You can also serve them alongside a scoop of vanilla ice cream for a delightful dessert sundae that showcases the colors of the holiday. Enjoy these cookies throughout your backyard festivities, and don’t forget to snap some pictures to capture the sweet moments!
Recipe Variations
- Chocolate Chip Explosion: Swap out half of the M&M’s for semi-sweet chocolate chips for a richer, chocolatey flavor.
- Nutty Crunch: Add chopped nuts like pecans or walnuts for an extra crunch.
- Gluten-Free Delight: Use a gluten-free all-purpose flour blend to make these cookies gluten-free without sacrificing flavor.
- Holiday Twist: Change the M&M colors to make these cookies year-round with seasonal themes—not just for the 4th of July!
Chef’s Notes
These cookies have been a staple in my baking repertoire for years, evolving with little tweaks and adjustments over time. One year, I accidentally left out the baking soda and ended up with pancakes instead of cookies. Talk about a baking blunder! But they were delightful in their own way, and I still sometimes make a pancake version for breakfast!
When baking, remember that it’s all about creating joy in the kitchen. Lean into what works for you—whether that means using different mix-ins or even changing up the color palette to fit the season. Remember, the goal is to create not just cookies, but delightful memories!
FAQs and Troubleshooting
-
Why are my cookies spreading too much?
Ensure your butter isn’t too soft; if it’s melted, that could lead to overly flat cookies. Chill the dough for about 30 minutes before scooping if needed. -
How do I store leftover cookies?
To keep them fresh, store your cookies in an airtight container at room temperature for up to a week. If it’s really hot, you might want to refrigerate them! -
Can I freeze these cookies?
Absolutely! Freeze the cookies after baking by placing them in a single layer on a baking sheet. Once solid, transfer to a zip-top bag for up to 3 months. Thaw at room temperature when ready to enjoy.
Embrace your inner chef, and feel free to tweak the recipe to make it your own. Happy baking and have a wonderful 4th of July celebration with unforgettable, delicious cookies! 🎆🥳
Print4th of July Cookies

Celebrate Independence Day with these vibrant and festive 4th of July cookies made with colorful M&M’s and sprinkles!
- Prep Time: 15 minutes
- Cook Time: 12 minutes
- Total Time: 27 minutes
- Yield: 24 cookies 1x
- Category: Dessert
- Method: Baking
- Cuisine: American
- Diet: Vegetarian
Ingredients
- 2 cups all-purpose flour (250 grams)
- ½ teaspoon baking soda
- ½ teaspoon baking powder
- ½ teaspoon salt
- ¾ cup unsalted butter, softened (1.5 sticks)
- ¾ cup packed brown sugar
- ½ cup granulated sugar
- 1 teaspoon vanilla extract
- 1 large egg
- 1 ¼ cups Red, White, and Blue M&M’s (10-ounce bag)
- 2 tablespoons Red, White, and Blue Sprinkles
Instructions
- Preheat your oven to 350°F (175°C).
- Line two baking sheets with parchment paper.
- Whisk together the all-purpose flour, baking soda, baking powder, and salt in a large bowl.
- Beat together the softened unsalted butter, packed brown sugar, and granulated sugar until light and fluffy.
- Mix in the egg and vanilla extract until combined.
- Gradually add the dry ingredient mixture into the wet mixture, stirring until just combined.
- Fold in the Red, White, and Blue M&M’s and sprinkles.
- Scoop rounded balls of dough onto the prepared baking sheets, leaving about 2 inches of space between each.
- Bake for 10-12 minutes, or until the edges are lightly golden.
- Cool the cookies on the baking sheet for about 5 minutes before transferring them to a wire rack.
Notes
Store cookies in an airtight container at room temperature for up to a week. They can also be frozen for up to 3 months.
Nutrition
- Serving Size: 1 cookie
- Calories: 150
- Sugar: 12g
- Sodium: 100mg
- Fat: 8g
- Saturated Fat: 5g
- Unsaturated Fat: 3g
- Trans Fat: 0g
- Carbohydrates: 20g
- Fiber: 0g
- Protein: 2g
- Cholesterol: 30mg
Keywords: 4th of July, cookies, festive dessert, M&M's, baking
Peach Mojito
Sip into Summer with a Peach Mojito: A Refreshing Twist on a Classic Cocktail
Welcome, friends! Today, we’re diving deep into summer’s sweetness with a delightful Peach Mojito that’s not only refreshing but also packed with flavor. Trust me; this drink will be the star of your next gathering or the perfect companion for a quiet evening on the porch. Imagine the sun setting, a warm breeze blowing, and you sipping on a beautifully vibrant cocktail that not only cools you down but also transports you straight to peach paradise.
This cocktail is a fantastic twist on the classic mojito. While a traditional mojito charms us with its minty freshness and brightness from lime, adding ripe peaches takes it to the next level. It’s like summer in a glass—sunshine, happiness, and all the good vibes. So, let’s start this peachy adventure together, shall we?
Personal Story: A Peachy Summer Memory
I remember my first encounter with peaches that made a significant impact on me. It was one hot summer day, and my grandma invited our family for a weekend barbecue in her backyard, which smelled lush with blooming flowers and grilled delights. She always had a knack for creating magic with simple ingredients, and that day, she had a basket full of ripened, juicy peaches.
She called the kids (yes, including me!) to help her prepare a refreshing drink. Underneath the shade of the big oak tree, my grandma showed us how to muddle the peaches and mint with sugar, explaining how it brings out the natural flavors. I felt like a seasoned chef as we mixed everything together, giggling and getting a bit sticky with peach juice. That first sip, icy cold with the aromatic mint and the hint of lime, was heavenly! I knew then that peaches would always hold a special place in my heart, and now, every time I make this Peach Mojito, I’m transported back to those wonderful summer days spent with my grandma.
Ingredients
Here are the essentials for crafting this peachy delight:
-
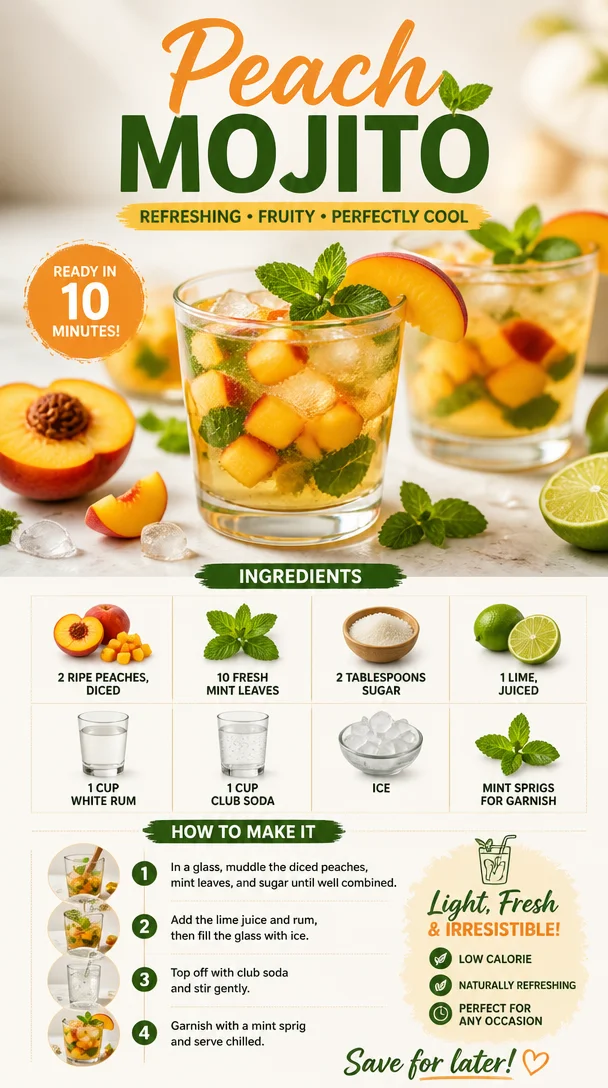
2 ripe peaches, diced
- These should be juicy and sweet! If peaches aren’t in season, you can use frozen peaches—just let them thaw before blending.
-
10 fresh mint leaves
- Fresh mint is key to that refreshing flavor. If you’re out of mint, basil can be a fun alternative, giving a unique spin to your drink.
-
2 tablespoons sugar
- This balances the tartness of the lime and enhances the sweetness of the peaches. For a healthier option, consider using agave or honey instead!
-
1 lime, juiced
- Fresh lime juice brightens up your drink. If limes aren’t available, try lemon juice for a slightly different zing.
-
1 cup white rum
- This is the spirit that makes it a cocktail! You could use vodka if you prefer or even make it a mocktail by omitting the alcohol altogether.
-
1 cup club soda
- Adds effervescence! If you’re feeling adventurous, flavored sparkling water can elevate your cocktail even more.
-
Ice
- Essential for chill and refreshment; crushed ice works particularly well for a snow-like consistency.
-
Mint sprigs for garnish
- Not just for looks—it adds a burst of fresh aroma every time you take a sip!
Step-by-Step Instructions
Now that we have our ingredients ready, let’s get down to the fun part—making the Peach Mojito!
-
Prep the Ingredients:
- Start by washing your peaches and mint leaves thoroughly. Dice the peaches into small chunks, around an inch in size. Having them well-sized makes it easier to muddle and ensures you get maximum flavor.
-
Muddle the Ingredients:
- In a sturdy glass or cocktail shaker, add the diced peaches and mint leaves. Sprinkle the sugar on top of them.
- Now, using a muddler or the back end of a wooden spoon, gently press the ingredients together. The goal here is to gently crush the mint and peaches to release their flavors without pulverizing them—think gentle squeezing rather than aggressive smashing. This is your "flavor explosion" step!
-
Juice the Lime:
- Squeeze the juice from your lime directly into the muddled mixture. Fresh lime juice does wonders, bringing acidity and brightness to the peach and mint concoction. If you’re like me and love a bit more tang, feel free to add a splash extra!
-
Add the Rum:
- Here comes the fun part! Pour one cup of white rum into the mixture. Stir it gently to combine everything. This is where those laid-back beach vibes start to come out as the spirit weaves through the muddled deliciousness.
-
Fill with Ice:
- Grab your favorite glass (I love a mason jar for cocktails) and fill it halfway with ice. Crushed ice will work wonderfully here, making your drink extra frosty and refreshing.
-
Top with Club Soda:
- Carefully pour the club soda over the ice until the glass is filled to the brim. This adds a bubbling lift to your drink! Give it a gentle stir to combine—be nice; you don’t want to disturb those beautiful peach pieces too much.
-
Garnish and Serve:
- Finally, for that extra pop, add a mint sprig on top. Now, if you’re feeling fancy, you can even rim your glass with sugar before pouring in your cocktail for a sweet finish.
Now you’re ready to sip and soak up those summer vibes!
Serving Suggestions
For a fabulous presentation, consider serving the Peach Mojito in tall cocktails glasses or mason jars. This not only provides ample space for the ice but also allows the layers of peach and mint to shine through. Serve with a straw for fun, and don’t forget to showcase that fresh mint sprig!
Recipe Variations
Feel free to mix things up! Here are some fun variations to try with your Peach Mojito:
-
Berry Peach Mojito: Add a handful of muddled blueberries or raspberries with the peaches for a mixed berry twist.
-
Spiced Peach Mojito: Infuse your rum with a hint of cinnamon or nutmeg for a delightful autumnal taste.
-
Tropical Peach Mojito: Mix in some diced pineapple or mango along with the fresh peaches to transport your taste buds to an island paradise.
-
Peach Basil Mojito: For a fragrant change, sub out mint for fresh basil, creating a unique flavor experience.
-
Non-Alcoholic Peach Mojito: Skip the rum and increase the club soda, and you’ve got a delicious refreshment perfect for everyone!
Chef’s Notes
Every recipe I create has a little story to tell, and this Peach Mojito is no different! I initially crafted this drink for a summer gathering, and it quickly became a hit! Each summer since, I’ve tweaked it—sometimes adding other fruits, other times experimenting with herbs. It never fails to put smiles on faces! One summer, I had a mishap where I accidentally grabbed thyme instead of mint; surprisingly, it was a lovely surprise! Who knew thyme could work so beautifully in cocktails?
FAQs and Troubleshooting
1. Can I use canned peaches?
- Sure! Just make sure to drain them properly. Adjust the sugar based on how sweet they are!
2. What if my mojito is too sweet?
- If your mojito turns out a bit too sugary for your liking, add a splash more lime juice or club soda to balance it out.
3. How do I muddle without making a mess?
- Take it easy when muddling. Go slow! Press gently, allowing the flavors to meld without turning everything into a mushy mess.
4. Can I make this ahead of time?
- You can prepare the muddled mixture in advance, but hold off on adding the club soda and ice until you’re ready to serve, to maintain the fizz.
Nutritional Info (Optional)
While the exact numbers can vary based on the proportions you choose, here’s an estimated breakdown for one serving of Peach Mojito:
- Calories: 200
- Fat: 0g
- Carbohydrates: 20g
- Sugars: 16g
- Protein: 0g
With this recipe, you’re not only going to impress your friends but also create lasting summer memories, one sip at a time! Cheers to enjoying the flavors of summer with this fabulous Peach Mojito. Get those peaches ready and let’s shake things up! 🍑🌿🍹
PrintPeach Mojito

A delightful twist on the classic mojito featuring juicy peaches and fresh mint for a refreshing summer cocktail.
- Prep Time: 10 minutes
- Cook Time: 0 minutes
- Total Time: 10 minutes
- Yield: 1 serving 1x
- Category: Cocktail
- Method: Mixing
- Cuisine: American
- Diet: Vegetarian
Ingredients
- 2 ripe peaches, diced
- 10 fresh mint leaves
- 2 tablespoons sugar
- 1 lime, juiced
- 1 cup white rum
- 1 cup club soda
- Ice
- Mint sprigs for garnish
Instructions
- Prep the ingredients: Wash the peaches and mint leaves thoroughly and dice the peaches.
- Muddle the ingredients: In a glass or shaker, add diced peaches and mint leaves with sugar. Gently press together with a muddler.
- Juice the lime: Squeeze fresh lime juice into the muddled mixture.
- Add the rum: Pour one cup of white rum into the mixture and stir gently.
- Fill with ice: Select your favorite glass and fill it halfway with ice.
- Top with club soda: Carefully pour club soda over the ice and stir gently.
- Garnish and serve: Add a mint sprig on top for garnish.
Notes
For an elevated taste, consider riming your glass with sugar or experiment with different fruits and herbs.
Nutrition
- Serving Size: 1 serving
- Calories: 200
- Sugar: 16g
- Sodium: 0mg
- Fat: 0g
- Saturated Fat: 0g
- Unsaturated Fat: 0g
- Trans Fat: 0g
- Carbohydrates: 20g
- Fiber: 1g
- Protein: 0g
- Cholesterol: 0mg
Keywords: peach mojito, summer cocktail, refreshing drink
Minute Huckleberry Scones: Beginner-Friendly Recipe
Indulge Your Senses with Huckleberry Scones: A Whimsical Baking Adventure
Welcome to my kitchen! Today, we’re diving into an aromatic adventure that’ll fill your home with delicious smells, bring a smile to your face, and make your taste buds dance. Have you ever heard of huckleberry scones? Whether you’re a seasoned home baker or just getting started, these delightful treats are perfect for breakfast, brunch, or even a comforting afternoon snack. Let’s stick around, because I promise you’ll love the magic that fresh huckleberries bring to these flaky delights!
A Sprinkle of Nostalgia
Let me take you back to my childhood, where wild huckleberry bushes grew in abundance near my family’s summer cabin. It was one of our favorite family traditions to set off on berry-picking adventures. My siblings and I would race each other, buckets in tow, trying to see who could gather the most berries—though let’s be honest, a fair bit of huckleberry snacking happened along the way! There was something truly enchanting about plucking those sweet, tiny berries right off the bush, their deep purple hues glowing like jewels against the lush greenery.
After our berry-picking escapades, we’d return home joyfully, sticky-fingered and bursting with excitement. My mom would whip up a batch of huckleberry scones that quickly became a family favorite. The aroma wafting from the oven would lure us into the kitchen, and before long, there were scones cooling on the counter, adorned with a drizzled glaze and bursting with flavor. Today, I’m bringing that cherished memory to life with my own huckleberry scone recipe, and I can’t wait to share it with you!
Ingredients You’ll Need
Before we dive into the kitchen, let’s gather everything we need. Here’s what you’ll need for these scrumptious huckleberry scones:
-
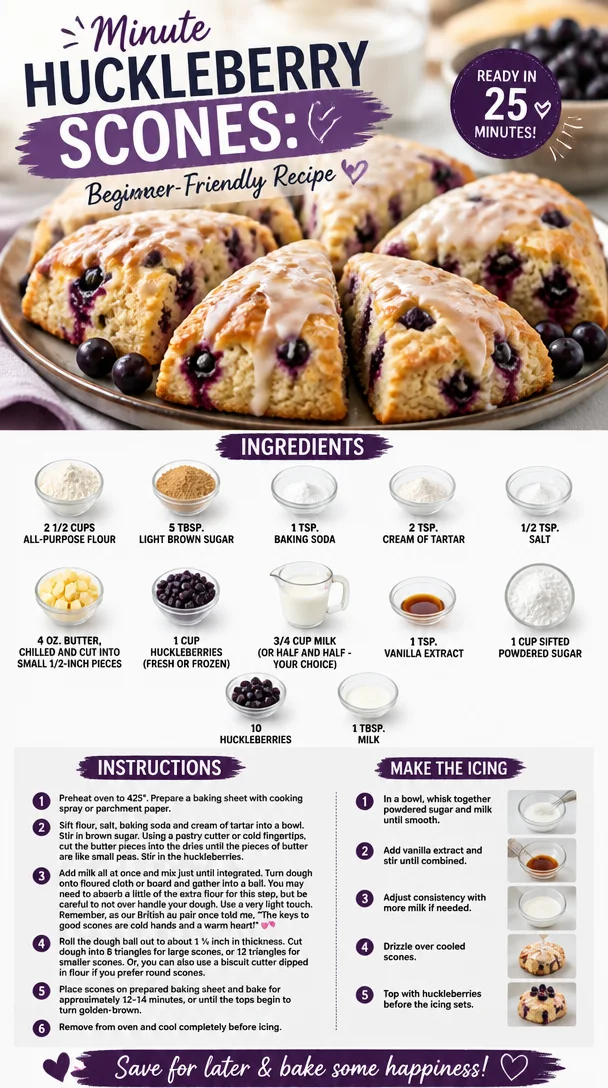
2 1/2 cups all-purpose flour
This serves as the base of our scones. To make them gluten-free, you can substitute with a gluten-free all-purpose flour blend. -
5 tbsp light brown sugar
It adds a lovely warm sweetness. If you’re out of brown sugar, you can substitute with granulated sugar with a sprinkle of molasses to mimic that deep flavor. -
1 tsp baking soda
This ingredient helps the scones rise. If you’re lacking baking soda, you can double the baking powder in the recipe instead. -
2 tsp cream of tartar
It works with the baking soda to create a light, fluffy texture. If you don’t have cream of tartar, you can use lemon juice or white vinegar as a replacement (1/2 tsp per 1 tsp cream of tartar). -
1/2 tsp salt
Enhances all the flavors. A pinch of sea salt will work just as well too! -
4 oz butter (chilled and cut into small 1/2-inch pieces)
Cold butter is essential for flaky scones! You can use vegan butter or margarine if you’re looking for a dairy-free option. -
1 cup huckleberries (fresh or frozen)
The star of our show! If you can’t find huckleberries, blueberries make a delicious substitute. -
3/4 cup milk (or half and half – your choice)
Milk brings moisture to the dough. Use almond or oat milk for a dairy-free alternative. -
1 tsp vanilla extract
Adds a beautiful depth of flavor. You can also try almond extract for a different twist. -
1 cup sifted powdered sugar
This will be used for our glaze, adding sweetness. If you need a healthier option, try using coconut sugar and water for a rustic glaze. -
10 additional huckleberries
These are for garnishing, but don’t hesitate to toss a handful into the dough for extra flavor! -
1 tbsp milk
For thinning the glaze to the perfect pourable consistency.
Now that our ingredients are assembled, let’s move on to the fun part—making these lovely scones!
Step-by-Step Instructions
-
Preheat the Oven
Preheat your oven to 400°F (200°C). You want your oven nice and hot to ensure those scones rise beautifully! -
Mix Dry Ingredients
In a large mixing bowl, whisk together the flour, brown sugar, baking soda, cream of tartar, and salt until well combined. This is where your scones begin their journey—so get that whisk moving! -
Cut in the Butter
Add in the chilled, diced butter. Using a pastry cutter or your fingers, rub the butter into the dry mixture until it resembles coarse crumbs. This is where the magic happens; the cold butter creates flaky layers! If it starts to feel too warm, pop it in the fridge for a few minutes. -
Mix in Huckleberries
Gently fold in the huckleberries—be careful not to crush them too much. You want those little bursts of flavor intact! If you’re using frozen huckleberries, there’s no need to thaw them. -
Make the Dough
In a separate bowl, combine the milk and vanilla extract. Pour this mixture into the dry ingredients and stir until just combined. Don’t overmix—some lumps are perfectly fine. Overmixing can lead to tough scones, and who wants that? -
Form the Scones
Turn the dough out onto a floured surface. Gently pat it into a rectangle about 1-inch thick. Using a sharp knife or pizza cutter, slice it into squares or triangles. -
Prep for Baking
Line a baking sheet with parchment paper and place your scone pieces on it. Give them a little space to breathe; they’ll grow as they bake! -
Bake
Bake for about 15-20 minutes, or until the tops are golden brown and a toothpick inserted into the center comes out clean. You’ll know they’re done when your kitchen smells like heaven! -
Cool and Glaze
Allow the scones to cool on a wire rack. While they’re cooling, mix the powdered sugar with 1 tablespoon of milk to make a glaze. Once the scones are cool, drizzle the glaze over the tops, and garnish with a few additional huckleberries for visual appeal.
Serving Suggestions
When it comes time to serve your huckleberry scones, I suggest pairing them with a dollop of fresh whipped cream or a pat of creamy butter. Beautifully dust them with a sprinkle of powdered sugar for extra sweetness, and serve them with your favorite tea or coffee. These scones are also delightful next to a bowl of fresh fruit or yogurt for a more balanced breakfast.
Recipe Variations
-
Lemon Zest: Add the zest of one lemon to the dough for a refreshing citrus twist.
-
Totally Berry: Mix in a variety of berries—raspberries, blueberries, and blackberries—along with the huckleberries for a mixed-berry scone.
-
Nutty Delight: Add chopped walnuts or pecans for an extra crunch.
-
Maple Glaze: Swap out the powdered sugar glaze for a maple syrup glaze for a fun flavor change.
-
Vegan-Friendly: Substitute the butter with coconut oil and use a plant-based milk for an entirely vegan treat!
Chef’s Notes
As I bake these huckleberry scones, I can’t help but reminisce about Family Berry Sundays, where everyone gathered at our kitchen table, chattering excitedly while I whipped up a batch. Over the years, I’ve learned to experiment with different flavor combos and techniques, from trying crispy edges to tender bottoms. It’s all part of the journey! Don’t be surprised if you find a few crumbly bits left over after your first taste—they’re inevitably irresistible.
FAQs and Troubleshooting
Q: My scones turned out hard. What happened?
A: The most likely culprit is overmixing. Mix the dough just until everything comes together. Also, ensure your butter is cold; no warm butter here!
Q: How can I store my scones?
A: Store leftover scones in an airtight container at room temperature for up to two days. You can also freeze them before baking—just bake them straight from the freezer, adding a minute or two to the baking time.
Q: Can I use frozen huckleberries?
A: Absolutely! Just toss them in frozen; there’s no need to thaw. It will add a lovely color and flavor to your scones.
Q: What if I don’t have huckleberries?
A: No problem! Substitute with blueberries or even cranberries for a tart twist.
Conclusion
I hope you enjoyed this little escapade into the world of huckleberry scones! These treats are not just delicious, but they also bundle up fond memories of simple times and happy places. So grab your apron and get baking, because the delightful aroma of huckleberry scones will fill your kitchen with warmth and joy. And remember, no matter how they turn out, the most important ingredient is always love! Happy baking, friends!
PrintHuckleberry Scones
Delicious huckleberry scones that are flaky, sweet, and perfect for breakfast or brunch.
- Prep Time: 15 minutes
- Cook Time: 20 minutes
- Total Time: 35 minutes
- Yield: 8 servings 1x
- Category: Baked Goods
- Method: Baking
- Cuisine: American
- Diet: Vegetarian
Ingredients
- 2 1/2 cups all-purpose flour
- 5 tbsp light brown sugar
- 1 tsp baking soda
- 2 tsp cream of tartar
- 1/2 tsp salt
- 4 oz butter (chilled and cut into small 1/2-inch pieces)
- 1 cup huckleberries (fresh or frozen)
- 3/4 cup milk (or half and half)
- 1 tsp vanilla extract
- 1 cup sifted powdered sugar
- 10 additional huckleberries (for garnishing)
- 1 tbsp milk (for thinning the glaze)
Instructions
- Preheat your oven to 400°F (200°C).
- Mix together the flour, brown sugar, baking soda, cream of tartar, and salt until well combined.
- Cut in the chilled, diced butter until it resembles coarse crumbs.
- Fold in the huckleberries gently.
- Combine the milk and vanilla extract, then pour it into the dry ingredients and stir until just combined.
- Turn the dough out onto a floured surface and pat it into a rectangle about 1-inch thick.
- Slice the dough into squares or triangles.
- Line a baking sheet with parchment paper and place your scone pieces on it.
- Bake for about 15-20 minutes until golden brown.
- Cool on a wire rack and drizzle with glaze made from powdered sugar and milk.
Notes
Serve with fresh whipped cream or a pat of butter. Can add mix-ins like lemon zest or nuts for variation.
Nutrition
- Serving Size: 1 scone
- Calories: 250
- Sugar: 8g
- Sodium: 200mg
- Fat: 10g
- Saturated Fat: 6g
- Unsaturated Fat: 4g
- Trans Fat: 0g
- Carbohydrates: 32g
- Fiber: 1g
- Protein: 3g
- Cholesterol: 30mg
Keywords: scones, huckleberry, baking, breakfast, brunch
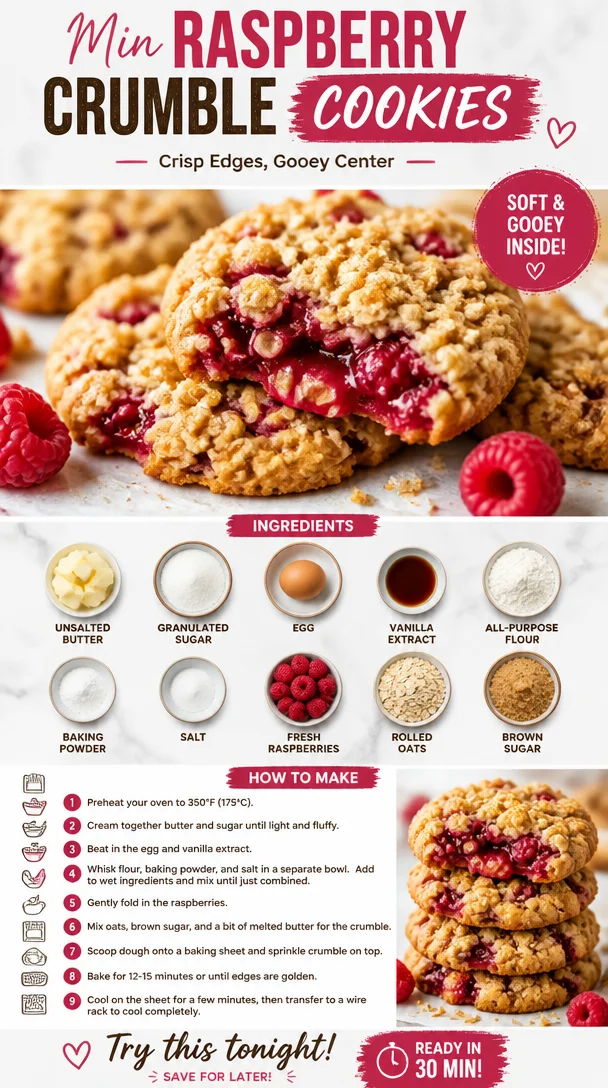
Min Raspberry Crumble Cookies: Crisp Edges, Gooey Center
Raspberry Crumble Cookies: A Sweet Collaboration of Tart and Sweet
Welcome to Clean Plate Cravings! I’m thrilled to share with you not just a recipe today, but an experience—the delicious journey of baking Raspberry Crumble Cookies. If you’re anything like me, you can appreciate that perfect combination of sweet and tart, especially when it’s nestled within the warm embrace of a cookie. These gems are crisp on the outside, chewy on the inside, and they burst with the vibrant flavor of fresh raspberries. Plus, they come together so quickly, making them the ultimate treat for any time of the day.
Baking is not just about the end result; it’s also about the memories created as you stir, mix, and taste! When I was a kid, weekends were reserved for baking sessions in my grandmother’s kitchen. The scent of cookies baking would waft through the house, warming every nook—and my heart. I remember standing on a stool, my little hands eagerly mixing the ingredients, while my grandma would share stories about her own childhood adventures. One of her specialties was a raspberry dessert that she made every summer when the berries were fresh and bursting with flavor. I can still picture the way she carefully folded those juicy gems into whatever delightful creation she was whipping up.
Today, Raspberry Crumble Cookies are a nod to those cherished memories. Each bite reminds me of those sunlit afternoons spent in the kitchen, and I can’t wait for you to create your own sweet memories with this recipe!
Ingredients
Let’s gather what you’ll need to create these delightful cookies. Here’s a breakdown:
-
1 cup unsalted butter, softened
This is your fat base that will give the cookies their rich flavor and tenderness. If you don’t have unsalted butter, you can use salted butter and just reduce the added salt in the recipe. -
1 cup granulated sugar
This will add sweetness to the dough. If you’re looking for a less sweet option, you could substitute some of the sugar with coconut sugar for a deeper flavor and a healthier twist. -
1 egg
Eggs act as a binder, helping to hold everything together. If you’re vegan or allergic, a flax egg (1 tablespoon ground flaxseed mixed with 2.5 tablespoons water) works great too. -
1 teaspoon vanilla extract
Pure vanilla enhances the flavor profile of these cookies. When possible, opt for pure vanilla extract rather than imitation for a richer taste. -
2 cups all-purpose flour
This is the main structure of your cookies! For gluten-free variations, try a 1:1 gluten-free flour blend. -
1 teaspoon baking powder
This leavening agent helps give the cookies a lovely lift. If you’re out, you can substitute with baking soda (just use about half a teaspoon). -
1/2 teaspoon salt
Salt amplifies flavors, making sweet treats even more delicious. Feel free to use kosher salt as it’s great for baking! -
1 cup fresh raspberries
The star ingredient! Fresh is key here for that burst of flavor, but if you’re in a pinch, frozen raspberries will work—just be sure to thaw and drain them first. -
1/2 cup rolled oats
These add a delightful chewiness and a bit of texture to the cookies. If you want them gluten-free, just ensure the oats are certified gluten-free. -
1/4 cup brown sugar
This adds a caramel-like depth to your cookies. Light or dark brown sugar can be used, depending on your personal preference.
Step-by-Step Instructions
-
Preheat the Oven: Start by preheating your oven to 350°F (175°C). This ensures that your cookies will bake evenly.
-
Cream the Butter and Sugars: In a large mixing bowl, combine the softened unsalted butter, granulated sugar, and brown sugar. Beat these together with a mixer on medium speed for about 2-3 minutes, until the mixture is light and fluffy. Here’s a pro tip: let your butter sit out for about 30 minutes before using it. This will soften it perfectly for creaming!
-
Add the Egg and Vanilla: Once you have that perfect fluffy texture, add in the egg and vanilla extract. Mix until combined—don’t overdo it, just a minute or so will suffice.
-
Mix Dry Ingredients: In a separate bowl, whisk together the flour, baking powder, and salt. Gradually add this dry mixture to your wet ingredients, mixing on low speed until just combined. You want to avoid overmixing, which can lead to tough cookies instead of tender ones!
-
Fold in Raspberries and Oats: At this point, fold in the fresh raspberries and rolled oats using a spatula. Be gentle; you want to keep those lovely berries intact! Remember this is your moment to add personality to your cookies—tricky but rewarding!
-
Scoop the Dough: Line a baking sheet with parchment paper for easy cleanup. Use a cookie scoop or two spoons to drop heaping tablespoons of dough onto the prepared sheet, spacing them about 2 inches apart.
-
Bake: Place the cookie sheets in the preheated oven and bake them for 12-15 minutes or until the edges are golden brown.
-
Cool and Enjoy: Once your cookies are out of the oven, let them cool on the baking sheet for about 5 minutes before transferring them to a wire rack to cool completely. This will give them a chance to set up a little more, making them perfect.
Serving Suggestions
These Raspberry Crumble Cookies can be served alone for a delightful snack or paired with a scoop of vanilla ice cream for an indulgent dessert. If you want to impress your friends, stack them on a cake stand and dust them with powdered sugar for a beautiful presentation!
Recipe Variations
Get creative with this basic cookie recipe! Here are a few delicious twists to consider:
-
Chocolate Chip Raspberry Cookies: Add a cup of semi-sweet or dark chocolate chips for a rich contrast to the tartness of the raspberries.
-
Nutty Oatmeal Raspberry Cookies: Toss in some chopped nuts—like almonds or walnuts—for added crunch and flavor.
-
Coconut Raspberry Cookies: Substitute half of the rolled oats with shredded coconut for a tropical twist.
-
Lemon-Raspberry Cookies: Add the zest of one lemon to the dough for a bright, citrusy flavor that complements the raspberries perfectly.
-
Vegan Raspberry Cookies: Replace the butter with coconut oil, the egg with a flax egg, and use vegan chocolate chips if you choose.
Chef’s Notes
As with any recipe, I feel it’s essential to experiment. Early on, I made these cookies with blueberries, and while they were a hit, nothing compares to the sheer delight of raspberries. The evolution of this cookie has been a delightful journey, from my grandmother’s classic recipes to the modern adaptations I enjoy today. Who knew something so tasty could hold so many memories?
FAQs and Troubleshooting
-
Why are my cookies spreading too much?
If your cookies spread excessively, it could be due to the butter being too warm during mixing, or you might not have used enough flour. Always measure your ingredients properly! -
Can I use frozen raspberries?
Absolutely! Just be sure to thaw and drain them to avoid excess moisture that could alter the dough’s consistency. -
How do I store these cookies?
Keep them in an airtight container at room temperature for up to a week. For longer storage, you can freeze them and enjoy them later! -
What if my dough is too dry?
If you find your dough is too crumbly, try adding a tablespoon of milk or water at a time until it reaches your desired consistency.
Nutritional Info
While I like to keep things flexible, it may be useful to know that each cookie has roughly 150 calories, with 7g of fat, 20g of carbs, and 1g of protein. These numbers can vary based on ingredient brands and any variations you make to the recipe!
I hope you’re as excited as I am to bake these Raspberry Crumble Cookies! Grab your apron and let the adventure begin—can’t wait to hear about your kitchen stories too! Happy baking!
PrintRaspberry Crumble Cookies
A delightful combination of sweet and tart, these Raspberry Crumble Cookies are crisp on the outside and chewy on the inside, bursting with fresh raspberry flavor.
- Prep Time: 15 minutes
- Cook Time: 15 minutes
- Total Time: 30 minutes
- Yield: 24 cookies 1x
- Category: Dessert
- Method: Baking
- Cuisine: American
- Diet: Vegetarian
Ingredients
- 1 cup unsalted butter, softened
- 1 cup granulated sugar
- 1 egg
- 1 teaspoon vanilla extract
- 2 cups all-purpose flour
- 1 teaspoon baking powder
- 1/2 teaspoon salt
- 1 cup fresh raspberries
- 1/2 cup rolled oats
- 1/4 cup brown sugar
Instructions
- Preheat the oven to 350°F (175°C).
- Cream the butter and sugars in a large mixing bowl for about 2-3 minutes until light and fluffy.
- Add the egg and vanilla extract, mixing until combined.
- Mix the flour, baking powder, and salt in a separate bowl, then gradually combine with the wet ingredients.
- Fold in the raspberries and oats gently.
- Scoop the dough onto a lined baking sheet, spacing them about 2 inches apart.
- Bake for 12-15 minutes until the edges are golden brown.
- Cool on the baking sheet for 5 minutes before transferring to a wire rack.
Notes
For a richer flavor, let the butter sit out to soften before using. Experiment with variations like adding nuts or chocolate chips for added texture.
Nutrition
- Serving Size: 1 cookie
- Calories: 150
- Sugar: 10g
- Sodium: 60mg
- Fat: 7g
- Saturated Fat: 4g
- Unsaturated Fat: 2g
- Trans Fat: 0g
- Carbohydrates: 20g
- Fiber: 1g
- Protein: 1g
- Cholesterol: 30mg
Keywords: raspberry cookies, dessert, baking, easy cookie recipe, crumble cookies
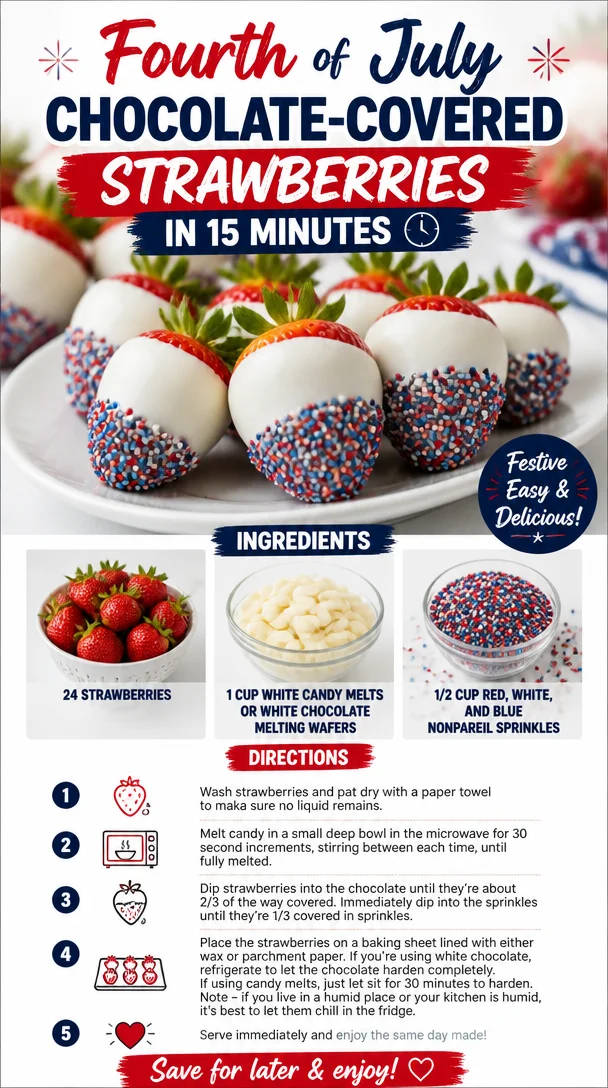
Fourth of July Chocolate-Covered Strawberries in 15 Minutes
4th of July Chocolate Covered Strawberries: A Festive Treat!
The 4th of July is that magical time of year when we gather with friends and family, deck the halls with red, white, and blue, and fire up the grill for some good old-fashioned outdoor fun! And what better way to celebrate than with a sweet treat that not only looks stunning but tastes divine? Today, we’re diving into the world of Chocolate Covered Strawberries, spruced up with festive sprinkles to match the holiday vibe. These beauties are not just a feast for the taste buds; they’re a treat for the eyes too!
Now, before we jump into the recipe, let me share a little personal story with you. Strawberry season is a cherished time for me. As a kid, my family would spend weekends visiting local farms, picking fresh strawberries right off the vine. Those sweet, juicy gems were the highlight of our summer. We’d often bring them home and dip them in chocolate or just enjoy them fresh, straight from the basket. The memory of sharing those strawberries over giggles and laughter while the summer sun warmed our cheeks is a reminder of how simple ingredients can create unforgettable moments.
This year, as we gear up to celebrate Independence Day, I wanted to capture that nostalgia in a festive way with Chocolate Covered Strawberries. They’re easy to make, incredibly delicious, and a perfect crowd-pleaser, giving everyone that sweet taste of summer while fitting right into our patriotic theme. Let’s get started, shall we?
Ingredients
-
24 Strawberries: The star of our show! Look for firm, ripe strawberries with bright green leaves. Freshness is key! If strawberries aren’t in season, you can use other berries like raspberries or blackberries for a delicious twist.
-
1 Cup White Candy Melts or White Chocolate Melting Wafers: These are so easy to work with! You’ll have rich, creamy melted chocolate once they’re heated. If you prefer dark chocolate or milk chocolate instead, feel free to swap!
-
1/2 Cup Red, White, and Blue Nonpareil Sprinkles: These add that festive flair! You can find them at most bakeries or online retailers. If you can’t locate the trio, choose any mix of colorful sprinkles to brighten up your dessert.
Step-by-Step Instructions
-
Prep Your Strawberries: Start by washing the strawberries under cold water. Pat them dry thoroughly with paper towels—this step is crucial because water can prevent the chocolate from adhering properly. Avoid letting them soak; we want them dry and ready for dipping!
Chef Tip: Look for strawberries that are larger and more plump for a fuller bite, plus they will look gorgeous once dipped!
-
Melt the Candy Melts: In a microwave-safe bowl, add the white candy melts. Heat them in the microwave in 30-second intervals, stirring in between, until completely melted and smooth. This usually takes about 2 minutes total.
Chef Hack: Make sure to stop heating as soon as the melts are mostly melted. Stirring helps to melt the remaining pieces without scorching.
-
Dip the Strawberries: Hold the strawberry by the green leaves, and dip it into the melted chocolate, swirling it 360 degrees to coat evenly. Let the excess chocolate drip back into the bowl.
Quick Tip: For a more even coat, dip twice! Just let the first coat set for a minute in the fridge before re-dipping.
-
Add the Sprinkles: While the chocolate is still wet, gently roll the chocolate-covered strawberry in the sprinkles, or spoon the sprinkles over the chocolate-covered part. This will ensure a festive finish!
Insider Note: Don’t hesitate to get creative here! Mix sprinkles for a whole new look or even use crushed nuts for a different texture.
-
Set the Strawberries: Place each dipped strawberry on a baking sheet lined with parchment paper or a decorative tray. Once you’ve dipped all the strawberries, pop them in the fridge for about 30 minutes to set.
Chef Secret: If you want an extra shine on your chocolate, let the dipped strawberries sit at room temperature for a few minutes before popping them into the fridge!
Serving Suggestions
Once your strawberries have set, arrange them on a beautiful platter with decorations that match your 4th of July theme—a few sparklers or even mini American flags will underscore the festive spirit. For an elegant touch, you can even drizzle melted dark chocolate over the sprinkles for that wow factor.
Recipe Variations
-
Chocolate Combo: Try using a combination of white chocolate and dark or milk chocolate. Swirl them together for a marbled effect!
-
Flavor Infusion: Add a few drops of peppermint extract to your melted chocolate for a refreshing twist.
-
Nutty Crunch: Instead of sprinkles, chop up nuts or use finely crushed graham crackers for a deliciously different texture.
-
Fruit Fusion: Experiment with other fruits like banana slices or pineapples for a tropical twist!
-
Sugar-Free Option: If you’re watching your sugar intake, opt for sugar-free candy melts.
Chef’s Notes
These Chocolate Covered Strawberries have come to mean a lot to me over the years. They’ve become a staple at every summer gathering! Whether it’s a 4th of July barbecue or a simple backyard picnic, they never fail to bring smiles. Originally, I started out making them just with chocolate, but as I started experimenting with sprinkles and toppings, they evolved into the fun, colorful treats we know today.
Funny enough, I once tried to make them with jelly-filled strawberries—let’s just say that was a total disaster! The jelly leaked everywhere and I needed a lot more chocolate to hide my mistakes. But as all great recipes do, that led me to devise the perfect method, ensuring every bite is as sweet as summer memories.
FAQs and Troubleshooting
1. Why isn’t the chocolate sticking to my strawberries?
Make sure the strawberries are completely dry before dipping! Any moisture can cause the chocolate to slide right off.
2. Can I make these ahead of time?
Absolutely! You can make these covered strawberries the night before your event. Just keep them refrigerated until you’re ready to serve.
3. What if the chocolate hardens and becomes clumpy?
If your chocolate starts to harden while you’re working, gently reheat it in short increments in the microwave, stirring frequently to regain the smooth texture.
4. My chocolate is too thick to dip. What should I do?
If your melted chocolate gets too thick, you can add a little bit of coconut oil or shortening to thin it out. Be sure to stir well until fully incorporated.
Nutritional Info (Optional)
Serving Size: 1 chocolate-covered strawberry
Calories: Approximately 50
Fat: 2g (Depends on choice of chocolate)
Carbohydrates: 8g
Sugar: 6g
Protein: 0.5g
There you have it, my fellow food enthusiasts! With just a few ingredients and easy steps, you can whip up these delightful Chocolate Covered Strawberries that everyone will adore. They’re perfect for getting into the holiday spirit while showcasing your culinary skills. Happy 4th of July, and here’s to many sweet memories ahead! Enjoy every bite, and don’t forget to share your creations! 🍓❤️💙
Print4th of July Chocolate Covered Strawberries
Delicious and festive chocolate covered strawberries, perfect for the 4th of July celebration!
- Prep Time: 15 minutes
- Cook Time: 5 minutes
- Total Time: 20 minutes
- Yield: 24 servings 1x
- Category: Dessert
- Method: No Cooking Required
- Cuisine: American
- Diet: Vegetarian
Ingredients
- 24 Strawberries
- 1 Cup White Candy Melts or White Chocolate Melting Wafers
- 1/2 Cup Red, White, and Blue Nonpareil Sprinkles
Instructions
- Prep your strawberries by washing and thoroughly drying them.
- Melt the candy melts in a microwave-safe bowl in 30-second intervals until smooth.
- Dip the strawberries into the melted chocolate, swirling to coat evenly.
- Add the sprinkles while the chocolate is still wet.
- Set the dipped strawberries on a baking sheet lined with parchment to cool in the fridge for 30 minutes.
Notes
For extra shine, let the dipped strawberries sit at room temperature for a few minutes before refrigerating.
Nutrition
- Serving Size: 1 chocolate-covered strawberry
- Calories: 50
- Sugar: 6g
- Sodium: 10mg
- Fat: 2g
- Saturated Fat: 1g
- Unsaturated Fat: 1g
- Trans Fat: 0g
- Carbohydrates: 8g
- Fiber: 0g
- Protein: 0.5g
- Cholesterol: 0mg
Keywords: chocolate strawberries, 4th of July dessert, festive treats, summer snacks
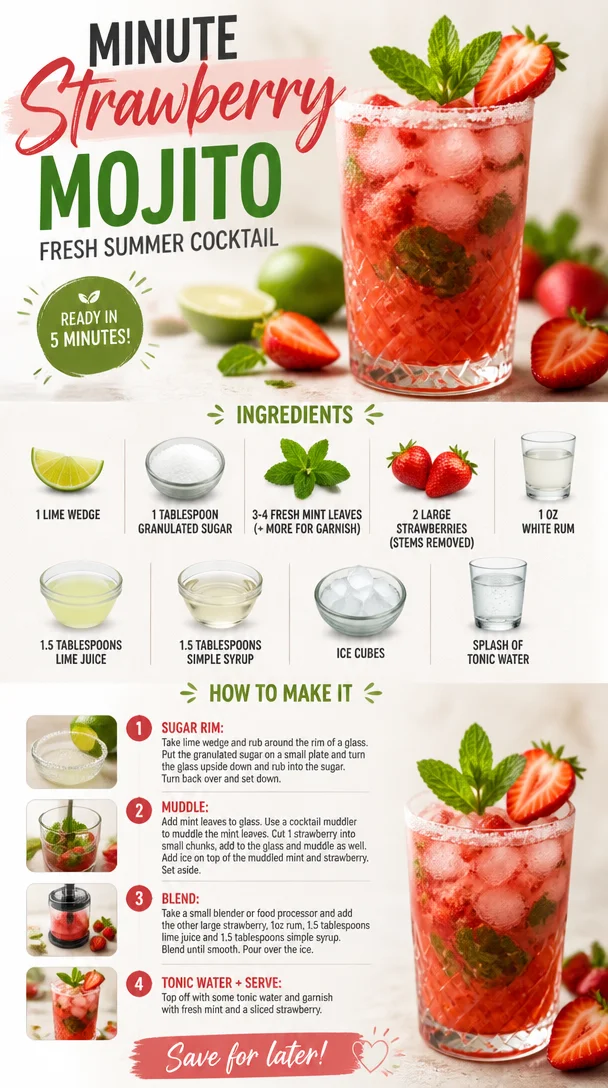
Minute Strawberry Mojito: Fresh Summer Cocktail
Refreshing Strawberry Mojito Recipe: A Splash of Summer in Every Sip
Ah, the joys of summer! When the sun is shining, the breeze is warm, and the days stretch lazily ahead of us, there’s nothing quite like indulging in a refreshing drink. If you’re like me, that’s where a delightful Strawberry Mojito comes in—a drink that encapsulates the essence of summer in every fizzy sip.
There’s something wonderfully nostalgic about this cocktail. Every time I whip one up, I’m transported back to my childhood summers spent at my grandparents’ beachside cottage. My grandmother had a vibrant garden overflowing with spearmint, and the delightful aroma would mingle with salt air as we prepared for family gatherings. We’d pluck fresh strawberries from the local market and muddle them with mint, lime, and sugar—her secret to crafting the perfect summer drink. She’d always say, "A good mojito is all about balance—sweet, tart, and refreshing." With her cheerful spirit guiding my hands, I can still hear her laughter mingling with the sound of waves crashing in the distance as we enjoyed that first sip.
Now, I want to share this nostalgic flavor with you! Ready to dive into this vibrant twist on a classic drink? Let’s shake up a Strawberry Mojito together that will surely help you make your own sunny memories.
Ingredients
Here’s what you’ll need for this refreshing Strawberry Mojito:
-
1 lime wedge: This will provide a zesty kick. If you’re out of limes, you can substitute with lemon for a slightly different flavor profile, but limes are truly the star of the show here.
-
1 tablespoon granulated sugar: This will sweeten our drink. For a healthier alternative, you can swap in honey or agave syrup, though it might slightly alter the texture!
-
3-4 fresh mint leaves (+ more for garnish): The fresh mint is key for that refreshing, aromatic flavor. If you can’t find fresh mint, you could use mint extract in a pinch, but be careful—it’s potent!
-
2 large strawberries (stems removed): Fresh strawberries lend the beautiful red color and sweetness. If they’re out of season, feel free to use frozen strawberries—just make sure to let them thaw before mashing.
-
1 oz white rum: A standard mojito uses white rum, but you can use vodka or even a non-alcoholic rum substitute if you’re looking for a zero-proof version.
-
1.5 tablespoons fresh lime juice: Freshly squeezed lime juice enhances the flavor immensely. Bottled lime juice is convenient but usually lacks the same punch.
-
1.5 tablespoons simple syrup: You can buy this pre-made, but it’s super easy to make at home with equal parts sugar and water. If you love a surprisingly sweet drink, add an extra splash!
-
Ice cubes: Essential for chilling your drink and keeping it refreshing.
-
Splash of tonic water: This is optional but adds an effervescent touch. You can replace it with club soda or sparkling water for a lighter twist.
Step-by-Step Instructions
Now that we have all our ingredients ready, let’s get to the fun part—creating this refreshing drink!
-
Prepare Your Glass: Start by grabbing a sturdy glass, ideally a highball or a rocks glass. The clear glass shows off the vibrant colors—so tempting!
-
Muddle the Lime and Sugar: Place your lime wedge in the bottom of the glass along with the granulated sugar. Use a muddler or the back of a sturdy spoon to gently press and twist the lime. This will release the juice and dissolve the sugar, forming a sweet citrus base. Take care not to pulverize the lime too much; you want juice, not pulp!
-
Add Fresh Mint: Toss in the mint leaves—3 to 4 should do. Using the muddler, gently press (don’t crush!) the mint leaves. This releases the delightful minty oils without turning them to mush. If you smell the mint, you’re on the right track!
-
Incorporate Strawberries: Now, let’s add our strawberries. Use a fork or muddler to gently break them up just enough to release their juice. Be careful not to whisk them into a smoothie!
-
Pour in the Liquids: Add 1 oz of white rum, followed by 1.5 tablespoons of fresh lime juice and 1.5 tablespoons of simple syrup. Give it a gentle stir to combine.
-
Fill with Ice: Don’t hold back! Fill your glass with ice cubes to the brim, allowing the cold to mix with those vibrant flavors.
-
Top it Off: Finish your drink with a splash of tonic water or club soda. This bubbly top will give your mojito a refreshing fizz!
-
Garnish Like a Pro: Take a couple of mint leaves and gently slap them between your hands to release their aroma, then place them on top of your drink for that gorgeous presentation. If you’re feeling extra fancy, add a slice of strawberry or lime to the rim.
And voilà! Your Strawberry Mojito is complete. Now it’s time to enjoy the fruits of your labors (pun intended!).
Serving Suggestions
For an inviting presentation, serve your mojito with a colorful straw in the glass and place it on a rustic wooden bar or vibrant picnic table. Pair it with some fresh fruit or a platter of light snacks for a perfect summer afternoon. You might even want to make a pitcher of these babies for your next barbecue or get-together—trust me, they’ll be a hit!
Recipe Variations
Feeling adventurous with your Strawberry Mojito? Here are a few fun variations to try:
-
Berry Medley Mojito: Mix things up by adding raspberries or blueberries for a delightful color and flavor explosion!
-
Coconut Mojito: Swap out the simple syrup with coconut syrup and use coconut water instead of tonic for a tropical twist.
-
Spicy Strawberry Mojito: If you’re in the mood for a kick, add a slice of jalapeño to the muddling process for a spicy surprise.
-
Herb-Infused Mojito: Combine mint with basil or rosemary for a unique herbaceous flair.
-
Non-Alcoholic Virgin Mojito: Simply skip the rum and replace it with additional soda water to create a refreshing mocktail!
Chef’s Notes
This Strawberry Mojito has been a staple in my summer repertoire for years, and it’s evolved so much over time! I remember the first time I tried to impress friends at a barbecue by attempting this recipe. Let’s just say that I was a tad too heavy-handed with the sugar and mint—my poor friends had an overly sweet concoction that was more like dessert than a drink!
Through trial and error (and feedback from friends), I’ve honed it to achieve the perfect balance of sweet, tart, and refreshing flavors. I’ve also come to appreciate how versatile this recipe is—it’s one of those classic cocktails that can always be customized to suit your preferences or the season!
FAQs and Troubleshooting
1. My mojito is too sweet; what can I do?
Don’t worry! If you find it too sugary, add a splash of soda or tonic water to help dilute it.
2. Can I make this drink in advance?
While it’s best served fresh, you can prep the lime, sugar, and muddled strawberries in advance. Just mix and add the rum and tonic when you’re ready to drink!
3. What if I’m not a fan of mint?
You can absolutely skip the mint and experiment with other herbs, like fresh basil, which still gives you a refreshing element!
4. How do I store leftover ingredients?
Keep any leftover strawberries and lime slices in the fridge. Mint can be placed in a glass of water in the fridge to keep it fresh for a few days.
Nutritional Info
For those mindful of nutritional content, here’s a general breakdown per serving:
- Calories: ~150
- Carbohydrates: 20g
- Sugar: 15g
- Protein: 0g
You can adjust the simple syrup and sugar content to keep the drink lower in calories.
So there you have it—the ultimate summertime refresher that is as delightful to make as it is to sip. Whether you’re lounging by the pool or hosting friends for a barbecue, this Strawberry Mojito will be your new go-to drink. Let the fizz bubble, the strawberries shine, and the memories flow! Enjoy and cheers to delicious mornings, lazy afternoons, and vibrant evenings spent sipping on this refreshing treat!
PrintRefreshing Strawberry Mojito
A delightful and refreshing twist on the classic mojito, featuring strawberries and mint for a perfect summer drink.
- Prep Time: 10 minutes
- Cook Time: 0 minutes
- Total Time: 10 minutes
- Yield: 1 serving 1x
- Category: Beverage
- Method: Mixing
- Cuisine: American
- Diet: None
Ingredients
- 1 lime wedge
- 1 tablespoon granulated sugar
- 3–4 fresh mint leaves (+ more for garnish)
- 2 large strawberries (stems removed)
- 1 oz white rum
- 1.5 tablespoons fresh lime juice
- 1.5 tablespoons simple syrup
- Ice cubes
- Splash of tonic water (optional)
Instructions
- Prepare Your Glass: Grab a sturdy glass, ideally a highball or a rocks glass.
- Muddle the Lime and Sugar: Place the lime wedge in the bottom of the glass along with the granulated sugar and gently press to release juice and dissolve the sugar.
- Add Fresh Mint: Toss in the mint leaves and gently press with the muddler to release the minty oils.
- Incorporate Strawberries: Use a fork or muddler to gently break up the strawberries just enough to release their juice.
- Pour in the Liquids: Add the white rum, fresh lime juice, and simple syrup, then give it a gentle stir.
- Fill with Ice: Fill your glass with ice cubes to the brim.
- Top it Off: Finish with a splash of tonic water or club soda.
- Garnish Like a Pro: Slap mint leaves between your hands and place them on top of the drink for garnish.
Notes
Serve with a straw and pair with fresh fruit or light snacks. For a pitcher, multiply the ingredients accordingly.
Nutrition
- Serving Size: 1 serving
- Calories: 150
- Sugar: 15g
- Sodium: 5mg
- Fat: 0g
- Saturated Fat: 0g
- Unsaturated Fat: 0g
- Trans Fat: 0g
- Carbohydrates: 20g
- Fiber: 1g
- Protein: 0g
- Cholesterol: 0mg
Keywords: Strawberry Mojito, summer drink, refreshing cocktail