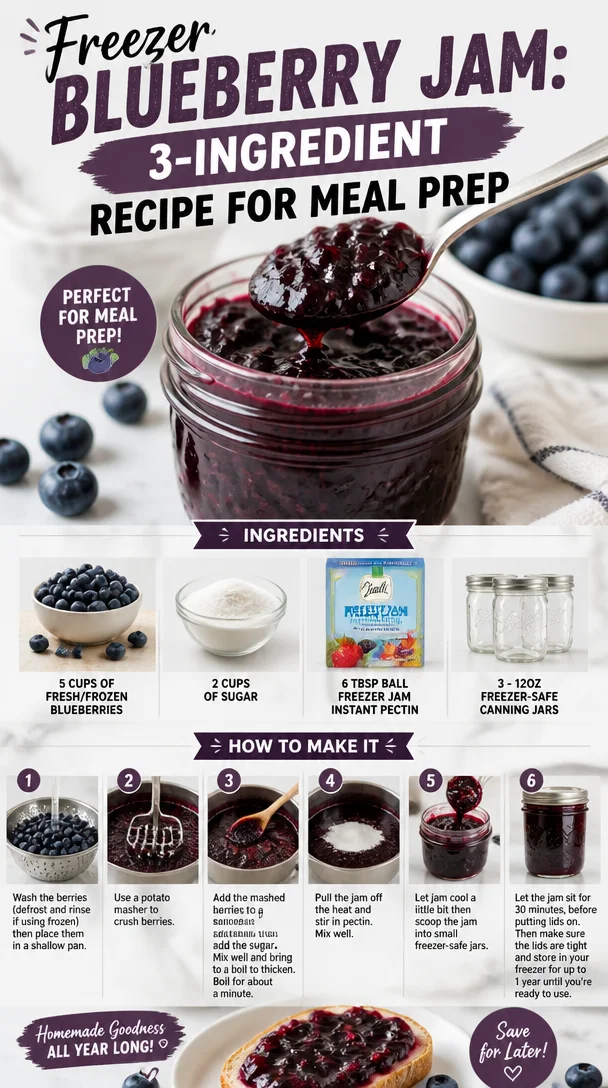
Freezer Blueberry Jam: 3-Ingredient Recipe for Meal Prep
Embrace the Sweetness: A Guide to Freezer Blueberry Jam
Welcome to Clean Plate Cravings! Today, we’re diving into a delightful kitchen adventure that will make your taste buds sing: making your very own freezer blueberry jam. If you’ve ever marveled at the perfect jar of jam on a bakery shelf or wished you could bottle up the summer sweetness of fresh blueberries, then this recipe is for you. Not only is this homemade jam simple to make, but it also bursts with flavor, nostalgia, and a touch of creativity.
Jam-making might seem intimidating, but I promise you it doesn’t have to be! In fact, my freezer blueberry jam recipe is so uncomplicated and foolproof that you’ll feel like a pro in no time. Whether you spread it on your morning toast, dollop it onto a scoop of vanilla ice cream, or incorporate it into your baking, this jam will transform everyday meals into something extraordinary.
So grab your freshest blueberries, roll up those sleeves, and let’s get started—because there’s no better feeling than sharing homemade goodness with friends and family!
A Sweet Memory to Cherish
Growing up, my summers were filled with lazy afternoons spent at my grandparents’ farmhouse. The sprawling yard promised adventure, but my favorite spot? It was always the blueberry patch. With sun-kissed cheeks and fingers stained purple from picking, I’d race my cousins to see who could fill their bucket first. We would pluck the juiciest berries, laughing and competing while our grandparents churned out the most divine blueberry pies and jams in the kitchen.
One particular summer, my grandma decided it would be a great time to teach us how to make jam. We stood by the stove, my little hands struggling to stir the bubbling mixture as she chattered about the art of preserving. The smell of warm blueberries dancing with sugar still lingers in my memory. I can still hear her gentle voice guiding me, "Jam is like a little time capsule for those sweet moments. You just need the right ingredients!"
That day ignited my passion for cooking and preserving, and I’ve often thought back on it. Making my own freezer blueberry jam has allowed me to recreate those sunny memories every time I pop open a jar. Each spoonful is a reminder of home, laughter, and the delicious joy of summer. Now, in every scrumptious bite, I invite you to relish those fresh blueberry moments too!
Ingredients for Freezer Blueberry Jam
To whip up a batch of this amazing freezer blueberry jam, you’ll need just a handful of ingredients. Here’s what you’ll need:
-
5 Cups of Fresh or Frozen Blueberries
Juicy blueberries are the star here! Fresh is great during their peak season, but frozen berries work wonderfully too. Just make sure they’re unsweetened and without any added ingredients. -
2 Cups of Sugar
Sugar isn’t just for sweetness; it also acts as a preservative! If you’re looking for a less sugary alternative, consider using less sugar or a natural sugar substitute. Just remember, this may alter both the texture and flavor. -
6 TBSP Ball Freezer Jam Instant Pectin
This magical ingredient helps your jam set without the long cooking process traditional jams require. If you can’t find it, other low-sugar pectins work well too—just follow the packet instructions! -
3 – 12 Oz Freezer-Safe Canning Jars
Make sure to have your jars ready! Glass jars are perfect, but plastic containers also do the trick. Just remember that the jars need to be freezer-safe to avoid any breaks as they expand.
Step-by-Step Instructions
Are you ready to create your own jam? Let’s walk through the steps together!
-
Prep Your Ingredients
Start by washing your blueberries gently under cold water. If you’re using frozen ones, there’s no need to thaw them—you can toss them in straight from the freezer! -
Mash Those Berries
Place your washed blueberries into a large mixing bowl. Using a potato masher (or a fork, get creative!), gently mash them to your preferred consistency. I love leaving a few whole berries for texture, but if you prefer a smooth jam, go wild with the mashing! -
Mix in the Sugar and Pectin
Once the blueberries are mashed, add the sugar and the instant pectin. Give that a good stir! Let it sit for about 10 minutes to allow the sugar to draw out the juice. This also helps dissolve the pectin. -
Time for Stirring!
After the initial resting period, stir the mixture vigorously for about 3–4 minutes. You’re looking for a thickened consistency, and it should look glossy. This is where the magic happens! -
Transfer to Jars
Grab your canning jars and ladle the jam into them, leaving about 1/2 inch of space at the top. (Trust me—this is crucial; the jam will expand in the freezer!) Wipe the rims of the jars to remove any sticky bits and seal them with the lids. -
Set and Chill
Let your filled jars sit at room temperature for about 24 hours to set. After that, pop them in the freezer. Your jam will be good in the freezer for up to a year (if it lasts that long!), and you could also store jars in the fridge for up to three weeks. -
Enjoy the Goodness
After 24 hours, your freezer blueberry jam will be perfectly set and ready to spread on toast, stir into yogurt, or spoon over pancakes. It’s deliciously versatile!
Serving Suggestions
When it comes to serving your homemade blueberry jam, the possibilities are endless. Spread it lavishly over warm biscuits, slather it on whole-grain toast for breakfast, or pair it with creamy brie cheese for an elegant appetizer. Want a special treat? Swirl it into your morning oatmeal or use it as a delightful topping for desserts like cheesecake or ice cream. You could even experiment by mixing it into your favorite salad dressings for a sweet tang!
Recipe Variations
Feeling adventurous? Here are a few delightful twists to elevate your blueberry jam experience:
-
Lemon Zest Surprise: Add the zest of one lemon to the mixture before jarring for a zesty, citrusy punch.
-
Spicy Kick: Mix in a pinch of cayenne or a dash of ginger for a surprising spicy note that pairs beautifully with cheese.
-
Herbal Infusion: Experiment by adding a sprig of fresh mint or thyme while simmering for a fresh, aromatic finish.
-
Berry Medley: Switch out half the blueberries for mashed strawberries or raspberries for a mixed berry jam.
Chef’s Notes
This blueberry jam is more than just a recipe; it’s a journey that’s evolved over the years. I still remember the first batch I made that didn’t set. I laughed when I opened a jar to find a blueberry soup instead! Since then, I’ve learned to be patient and follow the steps, savor the process, and remember that every kitchen endeavor is an opportunity to learn—even if that means a soupy jam every now and then.
Feel free to share your own kitchen mishaps! After all, those make for the best stories and delicious lessons.
FAQs and Troubleshooting
1. Why isn’t my jam setting?
Don’t panic! A few things could be going on. Ensure you used the right amount of pectin, properly mixed in the sugar, and allowed it to sit long enough. If it’s still runny after a day, try using it as a syrup instead!
2. Can I use frozen blueberries?
Absolutely! In fact, frozen blueberries can work just as well as fresh when it comes to making jam. This makes it a year-round treat!
3. How long will my jam last?
In the freezer, it should last up to a year. In the fridge, enjoy it within three weeks for the best flavor.
4. Can I adjust the sugar content?
Certainly! Reducing sugar alters the taste and consistency, so if you prefer less sugar, consider using low-sugar pectin, and remember—the jam will be less sweet!
Nutritional Info
While the nutritional specifics can vary based on ingredient choices and portion sizes, here’s a quick overview for a typical serving of this freezer blueberry jam:
- Calories: Approximately 50 calories per tablespoon
- Total Carbohydrates: 13g
- Total Sugars: 11g
- Fiber: 0.5g
- Protein: 0.1g
And there you have it—your guide to making scrumptious freezer blueberry jam! I hope this recipe inspires you to create, share, and savor every moment in the kitchen. Because nothing beats the joy of spreading a little love (and jam!) in your life. Happy cooking!
PrintFreezer Blueberry Jam
A simple and delicious recipe for homemade freezer blueberry jam that captures the sweetness of summer.
- Prep Time: 15 minutes
- Cook Time: 10 minutes
- Total Time: 25 minutes
- Yield: 4 servings 1x
- Category: Condiment
- Method: No Cook
- Cuisine: American
- Diet: Vegetarian
Ingredients
- 5 cups Fresh or Frozen Blueberries
- 2 cups Sugar
- 6 tbsp Ball Freezer Jam Instant Pectin
- 3 – 12 oz Freezer-Safe Canning Jars
Instructions
- Prep your ingredients by washing blueberries gently under cold water.
- Mash those berries in a large mixing bowl until you reach your preferred consistency.
- Mix in the sugar and instant pectin, and let it sit for about 10 minutes.
- Stir the mixture vigorously for about 3-4 minutes until thickened.
- Transfer the jam into jars, leaving about 1/2 inch of space at the top.
- Set jars at room temperature for 24 hours before freezing.
- Enjoy your blueberry jam on toast or desserts once set!
Notes
This jam can last up to a year in the freezer and up to three weeks in the fridge. Consider adding lemon zest or mixing in other berries for variations.
Nutrition
- Serving Size: 1 tablespoon
- Calories: 50
- Sugar: 11g
- Sodium: 0mg
- Fat: 0g
- Saturated Fat: 0g
- Unsaturated Fat: 0g
- Trans Fat: 0g
- Carbohydrates: 13g
- Fiber: 0.5g
- Protein: 0.1g
- Cholesterol: 0mg
Keywords: blueberry jam, homemade jam, freezer jam, summer recipes, fruit preserves
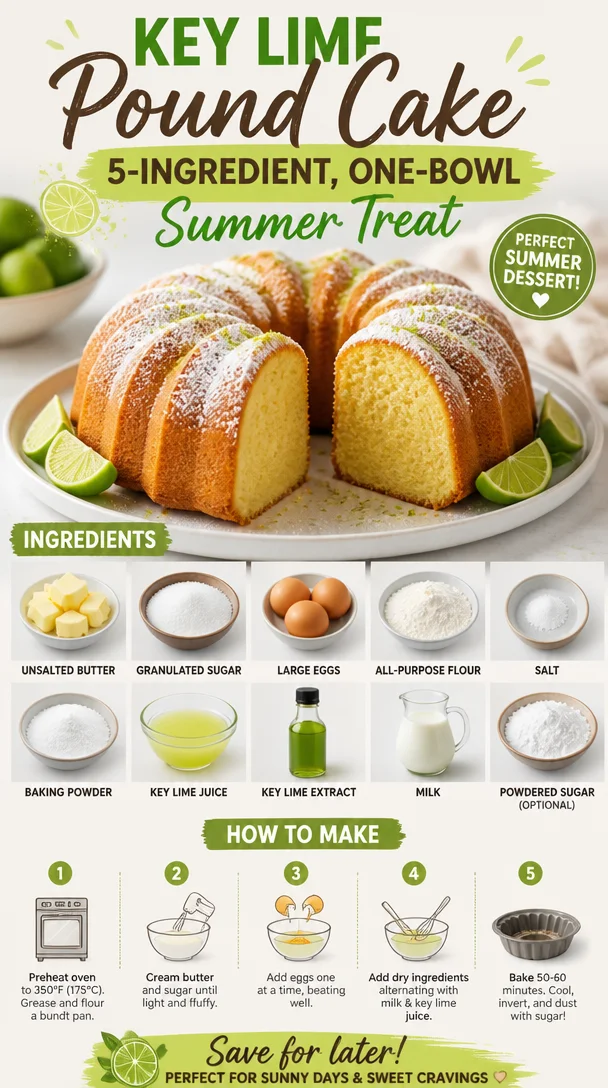
Key Lime Pound Cake: 5-Ingredient, One-Bowl Summer Treat
Key Lime Pound Cake: A Slice of Sunshine
Hello, fellow food lovers! Today, we’re diving into a vibrant and tangy treat that will awaken your taste buds and bring a ray of sunshine into your kitchen: Key Lime Pound Cake. Oh, how I love this cake! It’s like a little slice of the tropics, transporting you straight to a serene beach setting with every bite. Not only is this cake incredibly delightful and bursting with flavor, but it also boasts a texture that’s perfectly dense and moist—ideal for any occasion, be it a family gathering, a cozy afternoon tea, or simply a treat for yourself.
As the name suggests, this cake carries the bright, zesty sweetness of key limes—a unique fruit celebrated in Florida and known for its distinct tartness that makes it all the more refreshing. Trust me, once you bake this cake, your house will be filled with an aroma that could warm the coldest of hearts! So, let’s roll up our sleeves and get to baking this cheerful confection that’s sure to impress.
A Taste of Nostalgia
Let me take you back to my childhood when my grandma would whip up her famous Key Lime Pie on special occasions. Those family gatherings were filled with laughter, love, and, of course, the intoxicating scent of citrus wafting through the air. I remember rushing to the kitchen, excited to help mix the ingredients—my little hands covered in flour and my face smudged with whatever I could ‘taste test.’
One summer, she decided to switch things up and introduced us to her Key Lime Pound Cake. I was hesitant at first because, for me, pie was queen. But the moment I took my first bite, I was hooked! The cake was airy yet rich, sweet yet tangy. It was bursting with flavor and the perfect way to end a warm summer evening. Even now, every time I bake this cake, I can hear her cheerful laugh and see her twinkling eyes, and it brings such warmth and joy to my heart. So, let’s create a piece of that memory together with this delicious Key Lime Pound Cake recipe!
Ingredients
Before we get into the cooking, let’s gather our ingredients to ensure we create the best Key Lime Pound Cake ever:
-
1 cup unsalted butter, softened
The base of our cake! It gives the cake that wonderful richness. If you’re looking for a lighter option, you can substitute it with equal parts of Greek yogurt or applesauce for a healthier twist. -
2 cups granulated sugar
This sweetener is essential for balancing the tartness of the key lime. If you’re in the mood for natural sugars, coconut sugar or honey can make decent alternatives, but they might alter the texture slightly. -
4 large eggs
Eggs add moisture and richness. If you prefer an egg-free version, try using flax eggs (1 tablespoon of ground flaxseed mixed with 3 tablespoons of water), which work surprisingly well in baked goods. -
3 cups all-purpose flour
This will give structure to the cake. You can easily substitute with a gluten-free flour blend if you’re gluten-sensitive. -
1/2 teaspoon salt
Just a pinch! Salt enhances all the flavors and balances out the sweetness. -
1 teaspoon baking powder
This is our leavening agent, which helps the cake rise. Don’t confuse it with baking soda, as they serve different purposes. -
1/2 cup key lime juice
Fresh key lime juice is the star of our show! If you can’t find key limes, regular lime juice will do—just remember, it’s a bit less tart! -
2 teaspoons key lime extract
This boosts the key lime flavor! You could leave it out if you’re using fresh key limes, but it adds an extra punch. -
1/2 cup milk
Whole milk works best, but almond milk or oat milk are great dairy-free alternatives that won’t change the cake’s texture much. -
Powdered sugar for dusting (optional)
A lovely finishing touch! It adds a delicate sweetness and visual appeal—perfect for a sprinkle on top right before serving.
Step-by-Step Instructions
Alright, let’s get this cake baking! Follow along with these steps:
-
Preheat Your Oven
Start by preheating your oven to 350°F (175°C). This is an essential leap because we want our cake to bake evenly. While it’s warming up, you can prep the pan! -
Prep the Pan
Grab a 9×5-inch loaf pan and grease it well with butter or cooking spray. You can also line it with parchment paper for extra protection against sticking. I always find that a parchment lining helps make the cake come out without a hitch. -
Cream the Butter and Sugar
In a large mixing bowl, beat the softened butter and granulated sugar together until the mixture is pale and fluffy—this should take about 3-5 minutes. It’s all about incorporating air for a light texture. Pro tip: Use room temperature butter for the best results! -
Add the Eggs
One at a time, add the eggs to the butter and sugar mixture, beating well after each addition. This allows the eggs to incorporate fully and prevents a curdled batter. Don’t forget to scrape down the sides of the bowl! -
Mix Dry Ingredients
In a separate bowl, whisk together the flour, salt, and baking powder. This ensures that the leavening agent is evenly distributed throughout the flour, which is crucial for a good rise. -
Incorporate the Dry Mixture
Gradually add the dry ingredients to the wet mixture, alternating with the milk, and mix on low speed. Be careful not to overmix; you want a smooth batter without lumps but not a gluten-glutened mess. -
Bring in the Zest and Juice
Now it’s time for the star players—add the key lime juice and key lime extract! This is where your batter transforms into a delightful citrus party. Fold it in gently with a spatula to keep that airy texture. -
Pour the Batter
Transfer the batter into your prepared loaf pan, smoothing the top with a spatula. Give it a little wiggle to settle the batter in all corners. -
Bake the Cake
Pop that cake into your preheated oven and bake for around 60-70 minutes, or until a toothpick inserted into the center comes out clean. The aroma at this point will have you dancing in the kitchen, I promise! -
Cool Down
Once baked, let the cake cool in the pan for about 10 minutes before transferring it to a wire rack to cool completely. This cooling step is vital; letting it rest too long in the pan could trap moisture and make it soggy.
Serving Suggestions
When your Key Lime Pound Cake is cooled and ready to go, it’s time to serve! I love to slice it thick and dust the top with some powdered sugar for that charming touch. Pair each slice with a dollop of whipped cream or a scoop of vanilla ice cream for a decadent treat. You could also garnish it with thin slices of fresh key lime or zest for that mouthwatering presentation. Serve it at a summer picnic or with a cup of coffee—trust me, it’s the perfect match!
Recipe Variations
Feeling adventurous? Here are a few fun twists you could try with your Key Lime Pound Cake:
-
Coconut Infusion: Toss in some shredded coconut to the batter for a tropical flair that pairs beautifully with the lime.
-
Berry Bliss: Fold in some fresh raspberries or blueberries for a delightful burst of flavor and color.
-
Cream Cheese Swirl: Before baking, swirl some cream cheese mixture (just beat together cream cheese, sugar, and a bit of lime juice) into the batter for a rich, tangy surprise in each slice.
-
Lime Glaze: Create a simple glaze with powdered sugar and key lime juice to drizzle over the cake once it’s cooled for extra sweetness and a citrusy kick.
-
Gluten-Free Version: Swap all-purpose flour with a gluten-free blend for a delicious dessert anyone can enjoy!
Chef’s Notes
Every time I bake this cake, I think of my grandma’s warm hugs and her delightful laughter. This recipe has evolved a lot over the years, from those summer baking days in her cozy kitchen to me whipping it up in my modern space. Each ingredient carries a bit of nostalgia and joy, and I love the memories that come alive while baking. Feel free to experiment—I’ve honestly had friends ask for a cake this simple off my blog just because they wanted to recreate the cheerful vibes of family gatherings. Food is love, right?
FAQs and Troubleshooting
Q: My cake is sinking in the middle! What happened?
A: A sinking cake can be due to several reasons: overmixing the batter, too much leavening agent, or underbaking. Make sure to follow the step-by-step mixing and check for doneness with a toothpick!
Q: How can I store leftovers?
A: To maintain freshness, wrap the cooled cake tightly in plastic wrap or foil and store it at room temperature for up to 3 days or in the refrigerator for up to a week.
Q: Can I freeze this cake?
A: Absolutely! Wrap each slice individually and place them in an airtight container. You can freeze them for up to three months. Just let them thaw in the fridge, and they’ll taste as good as fresh!
Q: Why is my cake dry?
A: Dry cake can result from overbaking or using old ingredients (like flour). Always double-check your oven temperature and the date on your baking powder!
Nutritional Info (Optional)
While indulging in desserts is a special treat, knowing the nutritional aspect is always helpful. A slice of this delicious Key Lime Pound Cake has approximately:
- Calories: 320
- Fat: 15g
- Carbohydrates: 45g
- Sugar: 25g
- Protein: 4g
Now grab those ingredients, tie that apron tight, and let’s bake up some sunshine in cake form! Your kitchen (and heart) will thank you. Happy baking! 🍰✨
PrintKey Lime Pound Cake

A vibrant and tangy Key Lime Pound Cake that transports you to the tropics with every bite. Moist, dense, and bursting with flavor, it’s perfect for any occasion.
- Prep Time: 15 minutes
- Cook Time: 70 minutes
- Total Time: 85 minutes
- Yield: 8 servings 1x
- Category: Dessert
- Method: Baking
- Cuisine: American
- Diet: Vegetarian
Ingredients
- 1 cup unsalted butter, softened
- 2 cups granulated sugar
- 4 large eggs
- 3 cups all-purpose flour
- 1/2 teaspoon salt
- 1 teaspoon baking powder
- 1/2 cup key lime juice
- 2 teaspoons key lime extract
- 1/2 cup milk
- Powdered sugar for dusting (optional)
Instructions
- Preheat your oven to 350°F (175°C).
- Grab a 9×5-inch loaf pan and grease it with butter or cooking spray.
- Cream the softened butter and granulated sugar together until pale and fluffy.
- Add the eggs one at a time, beating well after each addition.
- Whisk together the flour, salt, and baking powder in a separate bowl.
- Gradually add the dry ingredients to the wet mixture, alternating with the milk.
- Add the key lime juice and extract, folding gently to combine.
- Transfer the batter into the prepared loaf pan and smooth the top.
- Bake for 60-70 minutes, or until a toothpick inserted comes out clean.
- Cool in the pan for about 10 minutes before transferring to a wire rack.
Notes
Serve with whipped cream or vanilla ice cream and garnish with key lime slices for an even more delightful presentation.
Nutrition
- Serving Size: 1 slice
- Calories: 320
- Sugar: 25g
- Sodium: 200mg
- Fat: 15g
- Saturated Fat: 9g
- Unsaturated Fat: 5g
- Trans Fat: 0g
- Carbohydrates: 45g
- Fiber: 1g
- Protein: 4g
- Cholesterol: 100mg
Keywords: cake, dessert, key lime, pound cake, tropical, summer, baked goods
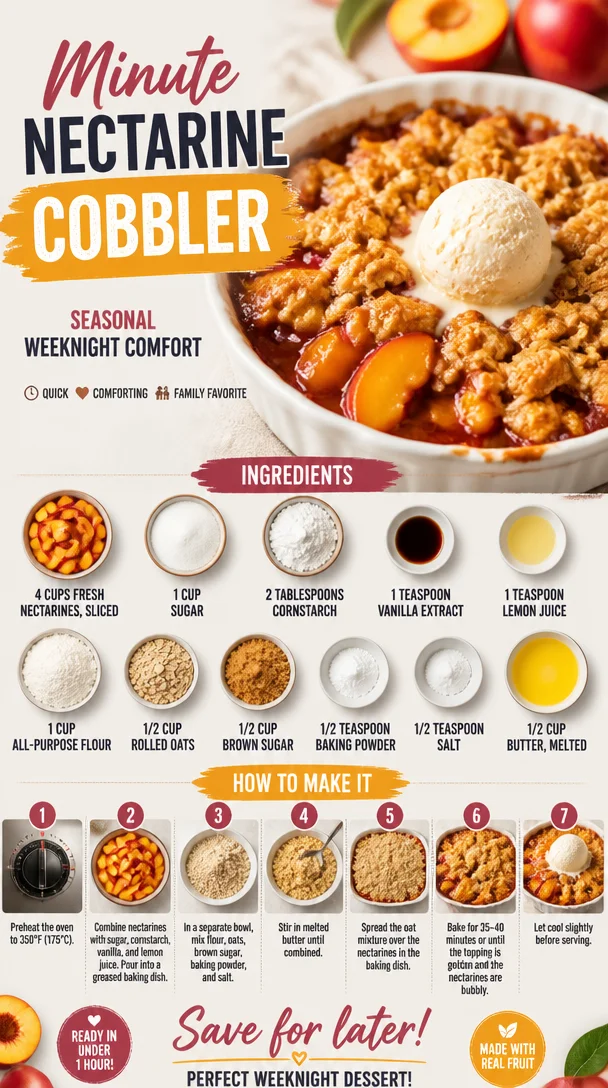
Minute Nectarine Cobbler: Seasonal Weeknight Comfort
A Fresh Take on Nectarine Cobbler: The Sweet Slice of Summer
Hey there, fellow food lovers! Today, we’re diving into a fruit-laden delight that captures the essence of sunny days and lazy afternoons—Fresh Nectarine Cobbler. This dish embodies everything we adore about summer: juicy nectarines that burst with flavor, a crumbly topping that whispers comfort, and an aroma that dances through the kitchen inviting you to indulge.
Introduction
Imagine it’s a warm Saturday afternoon. The sky is blue, the sun is shining, and you’re lounging on the porch, savoring the sweet fragrance of summer. You take a quick trip to the farmer’s market and come back with a basket brimming with perfectly ripe nectarines. The moment you sink your teeth into one, juice dribbling down your chin, you realize you can’t let these beauties sit idly on the kitchen counter. What’s the best way to celebrate them? Nectarine cobbler, of course!
This cobbler is not just any dessert—it’s the sweet embrace of nostalgia, warm and welcoming, just like grandma used to make. There’s something magical about that first spoonful, the way the sweet nectarines mingle with the buttery crumble on top. Each bite tells a story, bringing back memories of family gatherings and backyard BBQs, where laughter echoed around the table as we savored every last crumb.
And while you might think cobbler sounds complicated, I’m here to tell you it’s as easy as pie—or, dare I say, even easier! With simple ingredients you likely have on hand and a few straightforward steps, you can whip up a delightful dessert that will impress your family and friends. So, roll up your sleeves, and let’s make some magic happen in the kitchen!
Personal Story
I first fell in love with the idea of cobblers during a summer spent at my grandparents’ home in the countryside. Each week, we’d visit the local orchard, where my grandmother would let me pick the ripest fruit, often resulting in a few strays ending up in my mouth before making it home! One day, we came back with an enormous basket overflowing with nectarines.
That evening, the kitchen filled with laughter and the clinking of spoons against bowls as we mixed ingredients and created our masterpiece. My grandmother’s enthusiasm was infectious; she showed me how to slice the fruit just right and how a pinch of salt could enhance the sweetness of the nectarines. I never knew baking could be so much fun! When the cobbler finally emerged from the oven, golden brown and bubbling, I’ll never forget the look on her face as she handed me a warm bowl, ice cream melting perfectly on top. It was pure bliss.
Now, whenever I make nectarines cobbler, I can’t help but recall those joyful summer days, and I can’t wait to create new memories with all of you and this delightful recipe!
Ingredients
Here’s what you’ll need to whip up this Fresh Nectarine Cobbler, along with some handy tips:
-
4 cups fresh nectarines, sliced: Pick ripe, juicy ones for the best flavor! If nectarines aren’t available, feel free to substitute peaches or even plums—just adjust the sugar based on the fruit’s sweetness.
-
1 cup sugar: This is essential for balancing the tartness of the nectarines. You can substitute with coconut sugar or any granulated sugar of your choice for a different flavor.
-
2 tablespoons cornstarch: This helps thicken the fruit’s juices as it bakes. If you don’t have cornstarch on hand, arrowroot powder or all-purpose flour can work in a pinch.
-
1 teaspoon vanilla extract: Adds a lovely depth of flavor. If you’re feeling adventurous, try almond extract for a nutty twist!
-
1 teaspoon lemon juice: Brightens up the filling and complements the sweetness of the nectarines. Lime juice can work too, providing another layer of zest.
-
1 cup all-purpose flour: This creates the base for the topping. Gluten-free flour blends are a perfect alternative if you’re avoiding gluten.
-
½ cup rolled oats: These add a delightful texture. For a nutty crunch, consider using crushed nuts instead!
-
½ cup brown sugar: The molasses in the brown sugar enhances the caramelization when baked. Light brown sugar works just as well, though dark brown will intensify the flavor.
-
½ teaspoon baking powder: Key for that enticing rise in the topping! Be sure it’s fresh for optimal results.
-
½ teaspoon salt: Just a pinch brings out the natural flavors in your dish. Sea salt or kosher salt works wonderfully.
-
½ cup butter, melted: This is what makes the topping deliciously rich. If you’re looking for a dairy-free alternative, melted coconut oil or vegan butter can do the trick.
Step-by-Step Instructions
-
Preheat that Oven: Kick things off by preheating your oven to 350°F (175°C). This ensures your cobbler has a warm, inviting home to rise in.
-
Prepare Your Nectarines: Slice the nectarines into thin wedges—about ¼ inch thick. Toss them in a large bowl with sugar, cornstarch, vanilla extract, and lemon juice. Let them sit for about 10 minutes to allow the sugars to draw out their juices—trust me, this is where the magic begins!
-
Make the Topping: In a separate bowl, whisk together the flour, rolled oats, brown sugar, baking powder, and salt. Then, drizzle in the melted butter. Use a fork or your fingers to combine until the mixture resembles coarse crumbs. It should be a little messy—embrace it!
-
Combine Fruit and Topping: Pour the nectarine mixture into a greased baking dish (about 8×8 inches works perfectly). Evenly distribute the crumble topping over the nectarines, making sure to cover as much of the fruit as possible. This helps to create that gorgeous, golden crust we all crave.
-
Bake It Up: Slide the dish into your preheated oven. Let it bake for about 30-35 minutes, or until the topping is golden brown and the nectarines are bubbly. Keep an eye on it—the aroma will have everyone flocking to the kitchen!
-
Cool and Serve: Once baked, remove the cobbler from the oven and allow it to cool for 10-15 minutes. This lets the juices thicken up a bit more and makes it easier to serve.
Serving Suggestions
For plating, scoop generous portions of the cobbler into bowls (the deeper the better!). Top with a scoop of vanilla ice cream or a dollop of freshly whipped cream for that classic touch. Drizzle a touch of caramel sauce for an extra touch of indulgence, and garnish with a sprig of fresh mint if you’re feeling fancy!
Recipe Variations
-
Berry & Nectarine Mash-Up: Mix in some fresh berries like blueberries or raspberries for a colorful twist and added antioxidants!
-
Nutty Topping: Add chopped nuts (think almonds or pecans) to the topping mixture for a delightful crunch.
-
Spiced Cobbler: Kick it up a notch by adding a teaspoon of cinnamon or nutmeg to the nectarines for a warm, cozy flavor that’s perfect for fall.
-
Coconut Delight: Swap regular oats for unsweetened shredded coconut for a tropical vibe.
-
Vegan Twist: Replace the butter with coconut oil and use a flax egg instead of regular egg (1 tablespoon ground flaxseed + 3 tablespoons water for every egg).
Chef’s Notes
Every time I make this cobbler, I’m reminded of the joy that comes from simple ingredients coming together to create something spectacular. What’s funny is how I initially struggled with the topping—trying to get it just right! I once forgot to add sugar to the topping, and while it was still good, it just didn’t have the “wow” factor. Now I ensure every component sings together in harmony. Over the years, I’ve played with flavors, and each version has its own special place in my heart.
FAQs and Troubleshooting
1. Can I use frozen nectarines?
Yes, you certainly can! Just make sure to thaw and drain them first to prevent excess moisture in the cobbler.
2. Why is my cobbler soggy?
If your cobbler turns out soggy, it’s usually due to overripe fruit or not allowing it enough time to cool. Ensure to let it rest before serving for best texture.
3. Can I make it ahead of time?
Absolutely! You can prep the fruit filling and topping separately and store them in the fridge overnight. Just assemble and bake when you’re ready.
4. How do I store leftovers?
Store leftover cobbler in an airtight container in the fridge for up to 3 days—though it rarely lasts that long in my house!
Nutritional Info
While I won’t bore you with numbers, I’ll say this: nectarines are a great source of vitamins A and C, while the oats provide fiber that keeps you feeling satisfied. If you indulge in a scoop of ice cream on top, it transforms this dessert into a total treat—just don’t forget to savor every bite!
So there you have it—a Fresh Nectarine Cobbler recipe that’s easy enough for every home cook to master. I can’t wait for you to give it a try and share it with loved ones. Remember, the best dishes are made with love and a pinch of nostalgia. Happy baking!
PrintFresh Nectarine Cobbler

A delightful summer dessert featuring juicy nectarines topped with a crumbly mixture, perfect for warm days and family gatherings.
- Prep Time: 15 minutes
- Cook Time: 35 minutes
- Total Time: 50 minutes
- Yield: 8 servings 1x
- Category: Dessert
- Method: Baking
- Cuisine: American
- Diet: Vegetarian
Ingredients
- 4 cups fresh nectarines, sliced
- 1 cup sugar
- 2 tablespoons cornstarch
- 1 teaspoon vanilla extract
- 1 teaspoon lemon juice
- 1 cup all-purpose flour
- ½ cup rolled oats
- ½ cup brown sugar
- ½ teaspoon baking powder
- ½ teaspoon salt
- ½ cup butter, melted
Instructions
- Preheat the oven to 350°F (175°C).
- Slice the nectarines into thin wedges and mix with sugar, cornstarch, vanilla extract, and lemon juice. Allow to sit for 10 minutes.
- In a bowl, whisk together flour, rolled oats, brown sugar, baking powder, and salt. Drizzle in melted butter and mix until coarse crumbs form.
- Pour the nectarine mixture into a greased baking dish. Evenly distribute the crumble topping over the nectarines.
- Bake for 30-35 minutes or until the topping is golden brown and the nectarines are bubbly.
- Cool for 10-15 minutes before serving.
Notes
Serve with a scoop of vanilla ice cream or whipped cream. You can customize with nuts or spices for a unique touch.
Nutrition
- Serving Size: 1 serving
- Calories: 270
- Sugar: 22g
- Sodium: 180mg
- Fat: 10g
- Saturated Fat: 6g
- Unsaturated Fat: 4g
- Trans Fat: 0g
- Carbohydrates: 40g
- Fiber: 3g
- Protein: 3g
- Cholesterol: 30mg
Keywords: nectarine cobbler, summer dessert, fruit dessert, easy recipe, baking
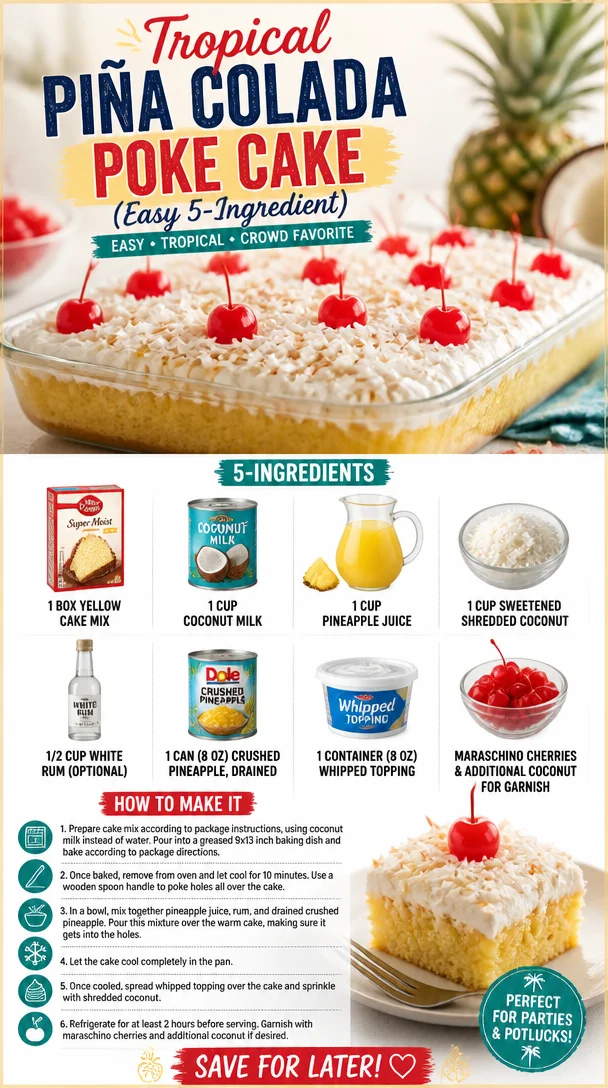
Tropical Piña Colada Poke Cake (Easy 5-Ingredient)
Dive Into Summer with Piña Colada Poke Cake
Welcome to sunshine-filled days and sweet indulgences! If you’re looking for a dessert that captures the essence of summer in every bite, you’ve arrived at the right place. Today, we’re whipping up something that’s as fun to make as it is to eat: a Piña Colada Poke Cake! This delightful dessert marries the tropical flavors of coconut and pineapple, giving you a taste of paradise right at home.
There’s a certain magic that happens when I think about the word “poke cake.” It conjures up images of sunny barbecues, joyful gatherings with friends, and long, lazy afternoons. Picture this: you’ve just wrapped up a day of fun in the sun, and there’s a cooling breeze in the air. The moment you cut into that sumptuous cake, the delightful aroma of coconut and pineapple wafts through the air, lifting everyone’s spirits. Yep, that’s the kind of dessert we’re talking about!
But let’s dive a little deeper into my relationship with poke cakes. I remember the very first time I made one. It was for a backyard BBQ during a family reunion. My Aunt Marge, the queen of all desserts, brought out her legendary chocolate poke cake, and everyone went wild for it. Inspired, I decided to take a risk and try my hand at creating a tropical version. With a few trials and errors, my Piña Colada Poke Cake was born! The sheer joy on my family’s faces as they devoured the cake sparked something amazing in me.
Since then, I’ve perfected this recipe, and each time I bake it, I’m taken back to those sun-kissed days filled with laughter and love. It’s truly a celebration of life and flavors, and I can’t wait to share this journey with you. Let’s get started!
Ingredients
Let’s gather our ingredients! Here’s what you’ll need:
-
1 box yellow cake mix: The foundation of our poke cake. You can use any brand—it’s all about convenience! Substitute with a homemade cake if you’re feeling adventurous.
-
1 cup coconut milk: This creamy ingredient adds a luscious texture and tropical flavor. If you’re looking for a lighter option, almond milk could work, though it’ll change the flavor profile a bit.
-
1 cup pineapple juice: Pure pineapple juice brings a burst of freshness. If you prefer a less sugary version, opt for unsweetened juice or even fresh pineapple puree!
-
1 cup sweetened shredded coconut: This is where the magic happens! The sweet coconut texture adds depth. If you’re aiming for a less sweet outcome, you could use unsweetened coconut instead.
-
1/2 cup white rum (optional): For that true piña colada experience! If you prefer to skip the spirits, simply substitute with an extra 1/2 cup of pineapple juice or coconut milk.
-
1 can (8 oz) crushed pineapple, drained: This adds moisture and tropical flavor. Fresh crushed pineapple could be used, just ensure it’s drained well.
-
1 container (8 oz) whipped topping: This fluffy goodness makes for a light, creamy layer on top. For a dairy-free alternative, coconut whipped cream is divine!
-
Maraschino cherries and additional coconut for garnish: The finishing touch! These vibrant cherries take the cake to the next level; they scream “tropical celebration!”
Step-by-Step Instructions
Ready to bake? Let’s get this show on the road! Here’s a step-by-step guide on how to create your Piña Colada Poke Cake.
-
Preheat Your Oven: Set your oven to 350°F (175°C). Preheating ensures an even bake, giving you that light and fluffy cake you crave.
-
Prepare the Cake Mix: In a large mixing bowl, combine the yellow cake mix, coconut milk, and pineapple juice. Mix according to the instructions on the box. Some people like to use a hand mixer for a fluffier texture, but whisking by hand works just fine too!
-
Bake the Cake: Pour the batter into a greased 9×13-inch baking dish. Bake it in your preheated oven for about 30-35 minutes, or until a toothpick inserted in the center comes out clean. My little tip here? Keep an eye on it! Every oven is a bit different.
-
Let it Cool: Once it’s done, pull the cake out and let it cool in the pan for about 10-15 minutes. This cooling period allows the cake to settle, making it easier for the next step.
-
Poke It Up!: Grab a wooden skewer or the handle of a wooden spoon and poke holes throughout the cake, about an inch apart. This is where all that delicious liquid flavor will seep in!
-
Prepare the Soak: In a medium bowl, mix the drained crushed pineapple with the coconut milk and white rum (if using). Pour this mix evenly over the poked cake, allowing it to soak in every flavorful drop. Just imagine the dreamy taste at this stage!
-
Chill: Cover the cake with plastic wrap and refrigerate for at least 2 hours (or overnight if you can wait!). This allows all those flavors to meld beautifully together.
-
Top It Off: Once chilled, spread the whipped topping over the cake for a luscious finish. Then, get creative! Sprinkle the sweetened shredded coconut on top, and add Maraschino cherries for a pop of color.
-
Serve and Enjoy: Slice up your creation, serve it on a nice plate, and enjoy the compliments that come pouring in. Don’t forget to snap a pic for social media before it disappears!
Serving Suggestions
When it’s time to serve, a few simple presentation tips can elevate this dish! Place a generous slice of your Piña Colada Poke Cake on a plate and sprinkle with extra coconut for that visual appeal. Add a Maraschino cherry on top for a classic touch. You can even throw in a few pineapple wedges on the side, or serve it with a scoop of coconut ice cream for a delightful twist. Happy serving!
Recipe Variations
Feeling adventurous? Here are some fun variations to keep your dessert game strong:
-
Mango Madness: Substitute crushed pineapple with crushed mango for a different tropical twist.
-
Berry Bonanza: Add a layer of fresh berries on top—the tartness complements the sweet coconut beautifully.
-
Chocolate Lovers: Drizzle melted dark chocolate over the whipped topping for a decadent finish.
-
Coconut-Free: Substitute all coconut ingredients with almond or oat versions for a nutty flavor.
-
Extra Boozy: Swap the rum with your favorite liqueur like Malibu for an even more tropical vibe!
Chef’s Notes
I can’t stress enough how much joy this recipe brings to my kitchen. It’s not just about the flavors but the moments it creates. Each time I pull this cake from the fridge, I remember that sunny BBQ with family and friends. It’s interesting how recipes evolve too! From my initial attempt to its current state, I love that it’s adaptable for your taste and dietary needs. Plus, it’s a recipe that gets people excited—it’s hard to resist that tropical allure!
FAQs and Troubleshooting
What if my cake falls apart when I poke it?
No worries! If your cake seems crumbly, it might be slightly overbaked. Just take it easy with the poking—you’ll still get all those luscious flavors into every bite.
Can I make this cake gluten-free?
Absolutely! Just swap the yellow cake mix with a gluten-free blend. There are plenty of great options out there now that work just as well!
How long will leftovers last?
Assuming there are leftovers (which is often not the case), you can store your poked cake in the refrigerator for up to 3-4 days, covered with plastic wrap.
Can I freeze this cake?
Yes! You can freeze the cake either whole or in individual slices. Just wrap it well in plastic wrap and foil to prevent freezer burn. It’s great for those unexpected dessert cravings!
Nutritional Info
While it’s definitely a special treat, knowing the nutrition can help you enjoy it fully. This Piña Colada Poke Cake serves approximately 12 slices, and each slice contains about:
- Calories: 350
- Total Fat: 15g
- Saturated Fat: 9g
- Cholesterol: 30mg
- Sodium: 200mg
- Total Carbohydrates: 49g
- Dietary Fiber: 1g
- Sugars: 30g
- Protein: 4g
Remember, balance is key when it comes to indulgence!
And there you have it—a delightful journey into making a Piña Colada Poke Cake. I hope you enjoy every moment in the kitchen and every bite of your creation. It’s time to share the love of food and all its joyous flavors! Happy baking, my foodie friends! 🍍🌴
PrintPiña Colada Poke Cake
A delightful dessert that combines the tropical flavors of coconut and pineapple in a moist poke cake, perfect for summer gatherings.
- Prep Time: 15 minutes
- Cook Time: 35 minutes
- Total Time: 50 minutes
- Yield: 12 servings 1x
- Category: Dessert
- Method: Baking
- Cuisine: Tropical
- Diet: Vegetarian
Ingredients
- 1 box yellow cake mix
- 1 cup coconut milk
- 1 cup pineapple juice
- 1 cup sweetened shredded coconut
- 1/2 cup white rum (optional)
- 1 can (8 oz) crushed pineapple, drained
- 1 container (8 oz) whipped topping
- Maraschino cherries and additional coconut for garnish
Instructions
- Preheat your oven to 350°F (175°C).
- Prepare the cake mix by combining the yellow cake mix, coconut milk, and pineapple juice in a large bowl.
- Bake the batter in a greased 9×13-inch baking dish for about 30-35 minutes.
- Let it cool in the pan for 10-15 minutes.
- Poke holes in the baked cake, about an inch apart.
- Prepare the soak by mixing drained crushed pineapple with coconut milk and white rum, then pour over the poked cake.
- Chill the cake in the refrigerator for at least 2 hours.
- Top with whipped topping, shredded coconut, and Maraschino cherries.
- Serve and enjoy your tropical treat!
Notes
This recipe can be varied by substituting crushed pineapple with mango or adding berries on top.
Nutrition
- Serving Size: 1 slice
- Calories: 350
- Sugar: 30g
- Sodium: 200mg
- Fat: 15g
- Saturated Fat: 9g
- Unsaturated Fat: 3g
- Trans Fat: 0g
- Carbohydrates: 49g
- Fiber: 1g
- Protein: 4g
- Cholesterol: 30mg
Keywords: cake, dessert, summer, tropical, poke cake, piña colada
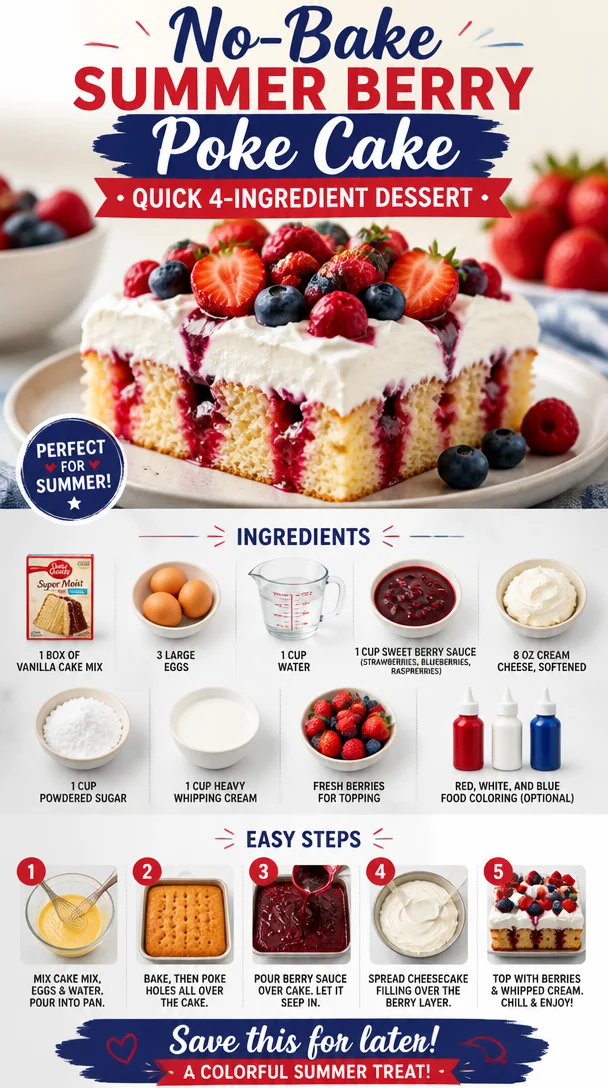
No-Bake Summer Berry Poke Cake: Quick 4-Ingredient Dessert
Get Ready to Dive into Summer with This Scrumptious Summer Berry Poke Cake!
Hey there, fellow foodies! It’s Ava Carter here, your go-to chef for all things delicious and nutritious. Today, I’m super excited to share a recipe that’s not only easy to whip up but also perfect for beating the summer heat—my delightful Summer Berry Poke Cake! This cake is a burst of flavor that screams sunshine and joy, making it an absolute hit for those warm weather gatherings, picnics, or even just a cozy day at home.
Imagine this: a soft, moist vanilla cake soaked in a luscious berry sauce, topped with a heavenly cream cheese frosting and crowned with fresh berries. Sounds dreamy, right? And let me tell you, the best part about this cake is that it’s not just about taste; it’s about creating memories too. So, grab your apron, and let’s get baking!
A Slice of Nostalgia: The Story Behind My Summer Berry Poke Cake
Every time I make this Summer Berry Poke Cake, I’m transported back to my childhood summers spent in Grandma’s kitchen. Oh, the memories! Grandma would whip this cake up on warm afternoons when my cousins and I would come running in from the backyard, our faces flushed from play and our tummies rumbling. The air would be filled with the sweet aroma of fluffy cake and berries, enticing us into the kitchen like moths to a flame.
We’d watch in awe as she poked tiny holes into the freshly baked cake, pouring that vibrant berry sauce all over. I remember the giggles as we fought over who got to add the freshest strawberries and blueberries on top. That special family tradition became a summer staple, a delicious reminder that food is more than just sustenance—it’s a way to connect, celebrate, and create joy. Today, I’m sharing that same joy with you, hoping you’ll create your own cherished moments with this ever-delicious berry beauty!
Ingredients You’ll Need
-
1 box of vanilla cake mix
A classic base for our cake, rich and fluffy! If you’re feeling adventurous, you could substitute with a lemon cake mix for a zesty twist. -
3 large eggs
Adding richness and acting as a binder, the eggs will help your cake rise beautifully. For an egg-free alternative, try flax eggs (1 tablespoon ground flaxseed mixed with 2.5 tablespoons water per egg). -
1 cup water
This keeps the cake moist. You can swap plain water for milk if you want a little extra richness in the flavor. -
1 cup sweet berry sauce
A blend of strawberries, blueberries, and raspberries creates that signature summer flavor. You can make your own sauce or pick up a store-bought version. -
8 oz cream cheese, softened
Essential for our frosting, adding creamy texture and tanginess. If you need a dairy-free option, use vegan cream cheese. -
1 cup powdered sugar
Sweetening things up! Sifting it can help achieve that perfect smooth frosting texture. -
1 cup heavy whipping cream
For fluffy frosting that holds its shape. If you’re low on cream, you can mix in some Greek yogurt for a lighter option. -
Fresh berries for topping
Think of it as nature’s confetti! Any combination of strawberries, blueberries, and raspberries works. -
Red, white, and blue food coloring (optional)
Perfect for a festive touch, especially around the Fourth of July! A few drops can make your cake even more visually stunning.
Step-by-Step Instructions
1. Preheat Your Oven:
Start by preheating your oven to 350°F (175°C). This ensures that your cake gets that perfect rise as soon as it hits the heat. A well-prepped oven is key to a fluffy, perfect cake!
2. Prepare the Cake Mix:
In a large mixing bowl, combine the box of vanilla cake mix, 3 large eggs, and 1 cup of water. Use an electric mixer on medium speed for about 2 minutes until the batter is smooth and blended. Tip: Don’t overmix! This can lead to a dense cake. Your batter should be light and airy.
3. Bake the Cake:
Pour the batter into a greased 9×13-inch baking pan. Bake in the preheated oven for 25-30 minutes or until a toothpick inserted in the center comes out clean. Chef’s hack: Set a timer for 25 minutes; check for doneness, and be careful not to open the oven door too soon!
4. Poke the Cake:
Once baked, allow the cake to cool in the pan for about 10 minutes. Then, take a fork or the handle of a wooden spoon and poke holes all over the top of the cake. This is where the magic happens! The holes will allow the berry sauce to seep in, making the cake super moist and flavorful.
5. Pour on the Berry Sauce:
In a separate bowl, mix your sweet berry sauce until it’s well combined. Pour this luscious sauce all over the entire poke cake, making sure to cover it evenly. Let it soak in as it cools completely—this is the star moment of your cake!
6. Make the Frosting:
In a clean mixing bowl, beat the softened cream cheese with an electric mixer until smooth and creamy. Gradually add powdered sugar, then mix in the heavy whipping cream until you achieve that luxurious frosting consistency. Little tip: Start slow to avoid a powdered sugar cloud!
7. Frost the Cake:
Once the cake is completely cooled, spread the cream cheese frosting evenly across the top. Use a spatula for a smooth finish, or get creative with a swirl pattern!
8. Add Fresh Berries:
Now comes the fun part! Top your frosted cake with fresh berries of your choice. Arrange them in a colorful pattern! Don’t skimp on the berries—this is a berry poke cake, after all!
Serving Suggestions
Slice up your Summer Berry Poke Cake and serve it chilled, perhaps with a dollop of whipped cream on the side. It’s perfect for afternoon gatherings or as a light dessert after a summer barbecue. For an extra touch, consider dusting with powdered sugar before serving—who doesn’t love that elegant finish?
Recipe Variations
-
Berry Swirl Cake: Instead of a plain berry sauce, swirl it right into the cake batter before baking for a delightful marbled effect.
-
Coconut Cream Frosting: Mix in some coconut cream with your frosting for a tropical twist.
-
Lemon Zest Add-In: Add zest from one lemon to your cake batter for a refreshing zing!
-
Gluten-Free Option: Use a gluten-free vanilla cake mix for a lovely gluten-free alternative that everyone can enjoy.
-
Sugar Alternatives: If you’re watching sugar intake, replace powdered sugar with a sugar-free version.
Chef’s Notes
This Summer Berry Poke Cake has truly evolved over the years. I remember the first time I attempted to create it—I accidentally forgot to add the eggs! The cake turned out dense and flat, but I added double the frosting and fresh berries, and guess what? Everyone loved it! That mistake taught me that a little creativity in the kitchen goes a long way. It’s all about having fun, experimenting, and not taking things too seriously.
FAQs and Troubleshooting
1. My cake didn’t rise. What went wrong?
Ensure that your baking powder and other ingredients are fresh and still active! Also, check that you mixed it just enough—over-mixing can lead to a dense texture.
2. How can I get a smooth frosting?
Make sure your cream cheese is at room temperature, and sift your powdered sugar to avoid lumps—this gives you that beautifully smooth texture.
3. Can I make this cake a day ahead?
Absolutely! Just keep it covered in the fridge. The flavors often blend overnight, making it even more delicious!
4. What if my berry sauce is too runny?
Try thickening it with a bit of cornstarch mixed with water, simmered on low heat until it reaches your desired consistency.
Nutritional Info
Per serving, roughly: 300 calories, 15g fat, 40g carbohydrates, 3g protein. (Nutritional values can vary based on specific brands and measurements.)
So there you have it, my dear food lovers! Dive into the season with this fabulous Summer Berry Poke Cake, and let it bring a little sunshine to your kitchen. Embrace the flavors, share the joy, and remember—food is all about love, laughter, and those cozy moments spent with family and friends. Happy baking! 🌟
PrintSummer Berry Poke Cake
A delightful and moist vanilla cake soaked in berry sauce, topped with cream cheese frosting and fresh berries, perfect for summer gatherings.
- Prep Time: 15 minutes
- Cook Time: 30 minutes
- Total Time: 45 minutes
- Yield: 12 servings 1x
- Category: Dessert
- Method: Baking
- Cuisine: American
- Diet: Vegetarian
Ingredients
- 1 box of vanilla cake mix
- 3 large eggs
- 1 cup water
- 1 cup sweet berry sauce
- 8 oz cream cheese, softened
- 1 cup powdered sugar
- 1 cup heavy whipping cream
- Fresh berries for topping
- Red, white, and blue food coloring (optional)
Instructions
- Preheat your oven to 350°F (175°C).
- Combine the vanilla cake mix, eggs, and water in a large mixing bowl and mix for about 2 minutes until smooth.
- Pour the batter into a greased 9×13-inch baking pan and bake for 25-30 minutes.
- Cool the cake in the pan for 10 minutes, then poke holes all over the top.
- Mix your sweet berry sauce until well combined and pour it over the cake.
- Beat the softened cream cheese until smooth, gradually add powdered sugar, then mix in heavy whipping cream until you achieve a luxurious frosting.
- Spread the cream cheese frosting evenly across the top of the cooled cake.
- Top the cake with fresh berries in a colorful pattern.
Notes
Serve chilled with a dollop of whipped cream on the side. For added elegance, dust with powdered sugar before serving.
Nutrition
- Serving Size: 1 slice
- Calories: 300
- Sugar: 20g
- Sodium: 350mg
- Fat: 15g
- Saturated Fat: 8g
- Unsaturated Fat: 5g
- Trans Fat: 0g
- Carbohydrates: 40g
- Fiber: 2g
- Protein: 3g
- Cholesterol: 90mg
Keywords: berry poke cake, summer dessert, vanilla cake, berry sauce, cream cheese frosting
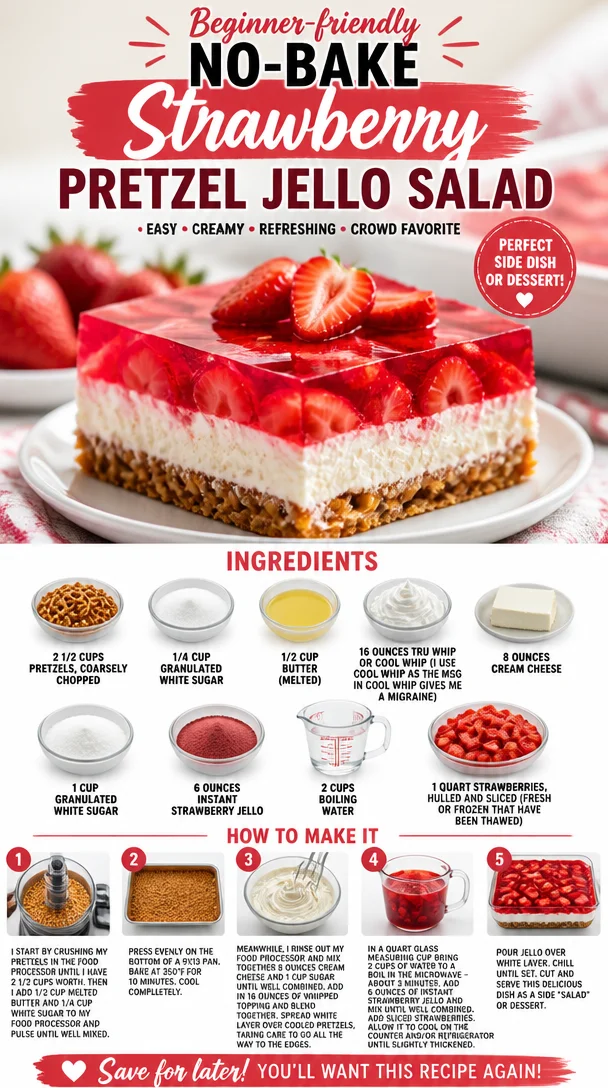
Beginner-friendly No-Bake Strawberry Pretzel Jello Salad
The Best Strawberry Pretzel Jello Salad Recipe
Welcome back, food lovers! Today, I’m diving into a delightful throwback that combines nostalgia with an undeniable pop of flavor: the Famous Strawberry Pretzel Jello Salad. You might be wondering, “What’s so special about jello salad?” Well, let me tell you; this dish is not just a side but a vibrant star that can brighten any gathering. It’s that sweet-and-salty, crunchy-and-smooth creation that dances on your taste buds like it’s at a summer picnic under the sun.
This recipe is a chat with good times, gatherings, and laughter. Picture this: a warm sunny day spent with family at our annual summer BBQ. My Aunt May would arrive, her kitchen always cluttered with a cornucopia of salads and sides, but the clear favorite was her strawberry jello salad—an eye-catching centerpiece adorned with bright pink strawberries, surrounded by a glistening layer of vivid gelatin, all resting on a buttery pretzel crust.
I remember my cousins and I couldn’t wait to dive into it; the crunch of those pretzels contrasted perfectly with the creamy layer and the stellar fruit. There was something magical about how Aunt May brought flavors together, proudly declaring, “Everyone needs a little sweetness in life!” It was never just a salad; it was a delectable memory in the making, a dish overflowing with love and laughter. Today, we’re recreating that magic with my version of Aunt May’s classic recipe, and trust me, you’ll want to make this one more than once!
Ingredients
Let’s roll into the pantry and gather our supplies! Here’s what you’ll need for the best Strawberry Pretzel Jello Salad:
-
2 1/2 cups pretzels, coarsely chopped
These salty, crunchy delights form the perfect base for our salad, giving that fantastic contrast to the sweet layers. If you can’t access pretzel sticks or bites, you can use crushed crackers as a substitute; they’ll provide a different texture but still work beautifully! -
1/4 cup granulated white sugar
This sugar adds just the right amount of sweetness to our pretzel crust, helping to mellow the saltiness of the pretzels. Need a substitute? Brown sugar or even coconut sugar could do the trick if you want a different depth of flavor. -
1/2 cup butter (melted)
Butter brings richness to the pretzel crust. If you prefer a plant-based option, use coconut oil or a dairy-free alternative! -
16 ounces tru whip or Cool Whip
I use Cool Whip because, let’s be honest, it’s nostalgic and creamy! For a fluffier dish, feel free to use homemade whipped cream if you have the extra time. Just remember to fold it in gently! -
8 ounces cream cheese
The backbone of our creamy layer, cream cheese brings that beloved richness. If you want a lighter version, you can swap half of it with Greek yogurt. -
1 cup granulated white sugar
This sugary goodness makes the creamy layer so sweet and delightful. If you’re cutting back on sugar, you can use a sugar substitute like erythritol or agave syrup. -
6 ounces instant strawberry jello
This is where the magic happens! The jello gives a burst of strawberry flavor and that gorgeous pink hue. If you want to shake things up, you can substitute with raspberry or peach jello for a unique spin! -
2 cups boiling water
This helps dissolve the jello mix and gives it the perfect texture to set. No substitutes needed here—just boil away! -
1 quart strawberries, hulled and sliced (fresh or frozen that have been thawed)
Fresh strawberries bring brightness, but frozen ones work too if you thaw them first. They add that lovely fruity freshness! Alternatively, mix in some blueberries or crushed pineapple for even more fruity flair.
Step-by-Step Instructions
Ready to get creative? Let’s turn those ingredients into a star-studded dish that’ll leave everyone craving more!
-
Preheat your oven to 350°F (175°C)
Preheating your oven is key to getting that lovely crust. You’ll want it hot and ready to go by the time our crust is mixed! -
Make the Pretzel Crust
In a large mixing bowl, combine the coarsely chopped pretzels, 1/4 cup of granulated sugar, and melted butter.
Chef Tip: Use your hands to really mix those ingredients together! You want to ensure every pretzel is coated with buttery goodness. -
Press into a Baking Dish
Lightly coat a 9×13 inch baking dish with non-stick spray or butter for easy removal. Then, pour your pretzel mixture into the dish and press it firmly into an even layer.
Hack: Use a flat-bottomed measuring cup to press it down evenly! This helps prevent crusty edges from burning in the process. -
Bake the Crust
Place the dish in the preheated oven and bake for about 10 minutes, until the crust is golden and fragrant. Remove it and let it cool completely.
Chef Insight: This step is super important because it solidifies that lovely salty crunch we want to complement the creamy layers! -
Prepare the Cream Cheese Layer
In a medium bowl, beat the cream cheese until smooth and creamy—this should take about 2 minutes. Add in 1 cup of granulated sugar and the Cool Whip and mix until it’s all well incorporated and fluffy.
Pro Tip: If your cream cheese is too cold, it might clump. Let it sit at room temperature for about 30 minutes before mixing! -
Spread the Cream Cheese Mixture
Once your pretzel crust has cooled, evenly spread the cream cheese mixture over it. Use a spatula to smooth it out nicely.
Chef Hack: Make sure to leave a border of pretzel crust around the edges so the jello can set properly! -
Prepare the Jello
In a mixing bowl, dissolve your 6 ounces of strawberry jello in 2 cups of boiling water. Stir until fully mixed and let it cool slightly for about 10 minutes.
Tip: You don’t want it too hot when layering, or it might melt the cream cheese layer! -
Add the Strawberries
Stir your hulled and sliced strawberries into the cooled jello mixture. Pour this on top of the cream cheese layer, spreading it gently with a spatula.
Chef Insight: Pushing the strawberries into the jello will help create beautiful layers and keep them suspended! -
Chill Until Set
Cover the dish with plastic wrap and refrigerate for at least 4 hours or overnight if you can resist! It needs to set properly to be the star of the show.
Tip: The longer you let it chill, the better the flavors meld together! -
Serve & Enjoy
When you’re ready to serve, cut into squares and watch everyone dive in! You can add a dollop of extra whipped cream on top for a little flair!
Chef Note: This dish is even better the next day as the flavors have a chance to deepen!
Serving Suggestions
Serve your Strawberry Pretzel Jello Salad in vibrant, colorful bowls or plate it in a fancy dish for a touch of elegance. You can sprinkle a few extra sliced strawberries on top or even a couple of mint leaves for that fresh pop. Trust me, your guests will be asking for the recipe!
Recipe Variations
Feeling adventurous? Here are a few fun variations to mix things up:
-
Fruit Medley: Incorporate a mix of berries like raspberries and blueberries for a burst of color. Blend them into the jello for a spectrum of fruity flavors!
-
Nutty Crunch: Add chopped pecans or walnuts to the pretzel crust for extra crunch and a nutty taste—so good!
-
Creamy Layer Twist: Swap out half the cream cheese for vanilla yogurt—it’s a lighter option that still tastes incredible!
-
Savory Sweet: Drizzle a little honey or maple syrup into the cream cheese mixture for an unexpected twist of flavor.
-
Layered Delight: Elevate your salad by layering both strawberry and pineapple jello with a cream cheese layer in between for a double delight!
Chef’s Notes
Over the years, this recipe has seen its fair share of love and twists! From family gatherings to potlucks, it never fails to bring smiles. I remember one summer family reunion, the kids were supposed to keep their paws off it until dinner, but distractions and giggles led to half the salad disappearing before the meal. Oh, those mischievous little hands! Now, I always make two batches—one for the main event and the other for late-night snacking. It’s a must-have for any festive occasion, and I love how it evolves with every generation!
FAQs and Troubleshooting
Q1: Why did my jello salad separate when I served it?
A: Separation often happens if the jello was too hot when poured over the layers. Make sure to let it cool before adding it to the cream cheese layer.
Q2: Can I make this ahead of time?
A: Absolutely! In fact, it gets better with time. Just ensure you cover it tightly in the fridge to maintain freshness.
Q3: What if I don’t have instant jello?
A: If you only have regular gelatin, you can create a similar flavor by combining fruit and sugar, but be mindful of the setting process. Instant jello makes it super easy!
Q4: My cream cheese mixture is clumpy—what can I do?
A: Ensure your cream cheese is at room temperature before mixing! If it’s already mixed and clumpy, try blending it again with a splash of milk to smooth it out.
Nutritional Info
(Optional—Insert here if applicable based on preferred nutrition standards.)
And there you have it! This Strawberry Pretzel Jello Salad is not just a recipe; it’s a festivity of flavors, textures, and memories that will keep calling you back into the kitchen. Enjoy making it and, even more, enjoy sharing it with your loved ones! Let’s keep it fresh, simple, and delicious. Happy cooking!
PrintThe Best Strawberry Pretzel Jello Salad
A delightful and nostalgic Strawberry Pretzel Jello Salad that combines sweet, salty, crunchy, and creamy layers for a perfect summer dish.
- Prep Time: 15 minutes
- Cook Time: 10 minutes
- Total Time: 240 minutes
- Yield: 12 servings 1x
- Category: Dessert
- Method: Baking
- Cuisine: American
- Diet: Vegetarian
Ingredients
- 2 1/2 cups pretzels, coarsely chopped
- 1/4 cup granulated white sugar
- 1/2 cup butter, melted
- 16 ounces Cool Whip
- 8 ounces cream cheese
- 1 cup granulated white sugar
- 6 ounces instant strawberry jello
- 2 cups boiling water
- 1 quart strawberries, hulled and sliced
Instructions
- Preheat your oven to 350°F (175°C).
- Combine pretzels, 1/4 cup sugar, and melted butter in a large mixing bowl.
- Press mixture into a lightly greased 9×13 inch baking dish.
- Bake for about 10 minutes until golden and fragrant, then let cool.
- Beat cream cheese until smooth; add sugar and Cool Whip, mixing until fluffy.
- Spread cream cheese mixture over cooled pretzel crust.
- Dissolve strawberry jello in boiling water, let cool slightly.
- Stir in hulled strawberries and pour over cream cheese layer.
- Cover with plastic wrap and refrigerate for at least 4 hours.
- Serve cut into squares, optionally topping with whipped cream.
Notes
This dish is even better the next day as the flavors meld together.
Nutrition
- Serving Size: 1 serving
- Calories: 250
- Sugar: 28g
- Sodium: 350mg
- Fat: 10g
- Saturated Fat: 6g
- Unsaturated Fat: 4g
- Trans Fat: 0g
- Carbohydrates: 34g
- Fiber: 1g
- Protein: 3g
- Cholesterol: 30mg
Keywords: strawberry, jello salad, dessert, summer dessert, nostalgic recipes
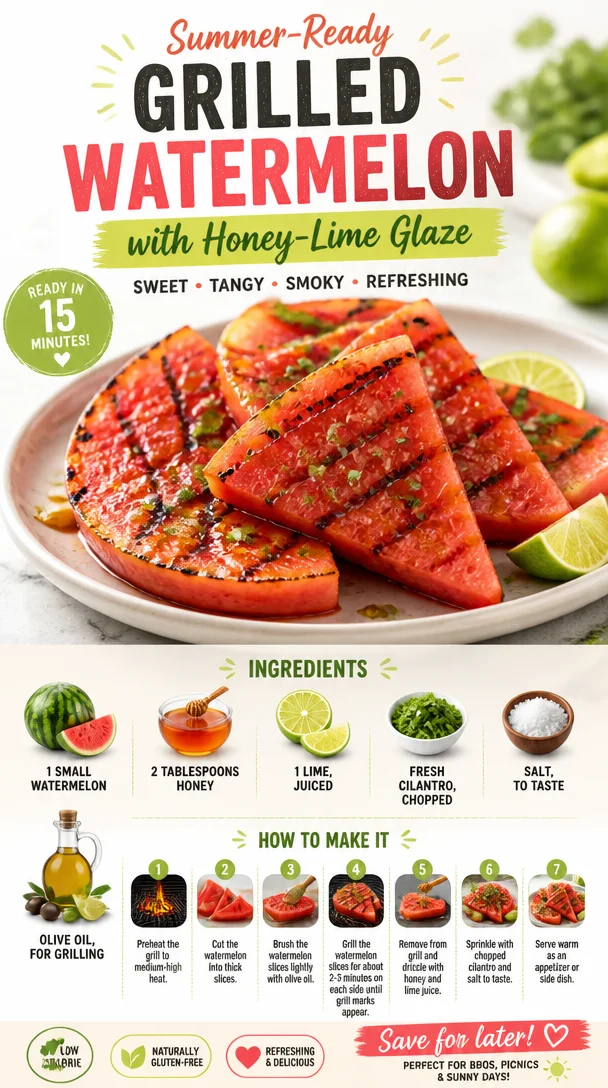
Summer-Ready Grilled Watermelon with Honey-Lime Glaze
Grilled Watermelon with Honey and Lime: A Summer Delight
Welcome to Clean Plate Cravings! If you’re here, you’re likely on a journey for fresh, vibrant, and feel-good meals. Today, I’m thrilled to share a recipe that’s not just easy to make—it’s utterly delightful: Grilled Watermelon with Honey and Lime. Trust me, once you sink your teeth into this sweet, smoky treat, you’ll want to keep it in your summer rotation all season long!
A Taste of Nostalgia
Let’s take a walk down memory lane, shall we? I’ll never forget the summer family barbecues at my grandparents’ house. My grandma, with her sunhat perched jauntily atop her head, would be in charge of the grill, flipping burgers, but what really stole the show was her grilled watermelon. As the sweet scent of caramelizing fruit filled the air, we kids would hover around the grill, waiting impatiently for that first slice. Fast forward to today, and I’ve taken grandma’s incredible idea and given it a little fresh twist. With a drizzle of honey and a zing of lime, it’s modernized but still pays homage to those sunny days spent with family.
Ingredients
Let’s talk ingredients! Here’s what you’ll need to whip up this refreshing grilled treat:
-
1 small watermelon: Look for one that’s firm, seedless, and has a symmetrical shape. These will yield the best grilling results. If watermelon isn’t your vibe, try swapping in cantaloupe for a twist!
-
2 tablespoons honey: This adds a touch of sweetness and helps create that gorgeous caramelized effect on the grill. Feel free to substitute with maple syrup or agave nectar for a vegan option.
-
1 lime, juiced: The bright acidity cuts through the sweetness, balancing the dish perfectly. If you don’t have lime, lemon can work in a pinch—just remember, it packs a different punch!
-
Fresh cilantro, chopped: This herb adds a fresh layer to the dish, making it vibrant. If cilantro isn’t your thing, fresh mint or basil can provide a lovely alternative, too!
-
Salt, to taste: Just a pinch of salt enhances all the flavors and balances the sweetness. It’s the secret ingredient that can bring everything together, so don’t skip it!
-
Olive oil, for grilling: A light brush of olive oil prevents sticking and adds a hint of richness. You can use avocado oil if you’re looking for a higher smoke point.
Step-by-Step Instructions
Ready to bring this dish to life? Let’s dive into the cooking process.
-
Prep the Watermelon: Start by cutting the watermelon into thick slices, about 1-inch each. Keep the rind on—this helps the slices hold their shape when grilling. Think of them as little juicy boats waiting to be flavored!
-
Make the Honey-Lime Drizzle: In a small bowl, mix together the honey and lime juice until well combined. This drizzle is the magic sauce that will elevate our grilled watermelon, so give it a little taste—sweet, tart, and refreshing all at once.
-
Heat the Grill: Preheat your grill to medium-high. You want it hot enough to get those lovely grill marks but not so hot that it scorches the watermelon. If you’re using a stovetop grill pan, preheat it similarly.
-
Oil the Grill: Brush your grill grates lightly with olive oil—this helps prevent sticking and creates those beautiful sear marks. You can use a paper towel dipped in oil held with tongs for this job.
-
Grill the Watermelon: Place the watermelon slices directly onto the grill. Let them grill for about 3-4 minutes on each side. You’re looking for those beautiful char marks and slightly softened flesh. You might hear some sizzle—this means you’re doing it right! Take this time to enjoy the smell; your kitchen (or backyard) should be filled with summer goodness.
-
Drizzle and Serve: Once those slices are perfectly grilled, remove them from the grill and drizzle your honey-lime mixture generously over each slice. Then sprinkle with a pinch of salt and finish with a sprinkle of freshly chopped cilantro. Voilà, your masterpiece is ready!
Serving Suggestions
Grilled watermelon is not only a dish but an experience! Serve it warm as an appetizer or side dish alongside your favorite grilled meats or even atop a bed of greens for a refreshing salad. You can also dress it up for dessert by pairing it with a scoop of vanilla ice cream for an extra indulgent treat!
Recipe Variations
Want to get adventurous? Here are a few ideas to switch things up:
-
Spicy Twist: Add a pinch of chili powder or cayenne pepper to your honey-lime drizzle for a spicy kick!
-
Feta Crumble: Crumble some feta cheese on top before serving for a savory-sweet contrast.
-
Balsamic Drizzle: Instead of honey, try adding a balsamic reduction for a tangy flavor.
-
Herbed Variation: Swap cilantro for fresh mint or basil to change up the herb profile entirely.
-
Grill Them All: You could also grill peaches, pineapple, or even zucchini alongside your watermelon for a colorful platter.
Chef’s Notes
I’ll admit—this recipe has come a long way since those childhood barbecues. The first time I tried grilling watermelon, I wasn’t sure what to expect. It didn’t take long to realize how deliciously unexpected the flavors were! Over the years, I’ve played with it and now love adding herbs and different drizzles. It’s one of those versatile dishes that tells a story of summer both in flavor and memory.
FAQs and Troubleshooting
Q: Can I make this dish ahead of time?
A: Grilled watermelon is best enjoyed fresh off the grill. If you need to prep in advance, store the grilled slices in the fridge for a couple of hours—just be sure to reheat them gently on the grill or in a pan to regain that lovely texture.
Q: What if my watermelon is too watery?
A: Smaller, seedless watermelons tend to be less watery and sweeter. If you find your watermelon is too juicy, you can grill it longer to help caramelize the sugars while reducing moisture.
Q: How do I know when the watermelon is done?
A: You want soft grill marks but firm mango-flavored flesh. If it’s too mushy, it may have been on the grill too long. Keep an eye on it as it grills!
Q: Can this recipe be adapted for a camping trip?
A: Absolutely! Just slice your watermelon ahead of time, pack your olive oil and drizzle ingredients, then grill it up over an open flame or portable grill. It’s a showstopper around the campfire!
Nutritional Info
While we won’t dive too deep into the numbers (because let’s face it—food is about joy, not just calories), grilled watermelon is low in calories, packed with hydration, and filled with vitamins A and C, making it a nutritious choice for those sunny days.
So there you have it, my dear foodies! Grilled Watermelon with Honey and Lime is your new summer staple that’s all about fresh flavors and feel-good vibes. I hope you enjoy preparing this dish as much as I enjoyed sharing it with you! Now, grab that watermelon, fire up the grill, and let’s create some delicious moments together!
PrintGrilled Watermelon with Honey and Lime
A refreshing summer dish featuring grilled watermelon drizzled with honey and lime.
- Prep Time: 10 minutes
- Cook Time: 10 minutes
- Total Time: 20 minutes
- Yield: 4 servings 1x
- Category: Dessert
- Method: Grilling
- Cuisine: American
- Diet: Vegetarian
Ingredients
- 1 small watermelon, firm and seedless
- 2 tablespoons honey (or maple syrup for a vegan option)
- 1 lime, juiced
- Fresh cilantro, chopped
- Salt, to taste
- Olive oil, for grilling
Instructions
- Prep the watermelon: Cut into 1-inch thick slices, keeping the rind on.
- Make the honey-lime drizzle by mixing honey and lime juice.
- Heat the grill to medium-high temperature.
- Oil the grill grates lightly with olive oil.
- Grill the watermelon slices for 3-4 minutes on each side, looking for char marks.
- Drizzle the honey-lime mixture over the grilled slices and sprinkle with salt and chopped cilantro.
Notes
Serve warm as an appetizer or side dish, or dress it up with ice cream for dessert!
Nutrition
- Serving Size: 1 serving
- Calories: 80
- Sugar: 14g
- Sodium: 20mg
- Fat: 0g
- Saturated Fat: 0g
- Unsaturated Fat: 0g
- Trans Fat: 0g
- Carbohydrates: 20g
- Fiber: 1g
- Protein: 1g
- Cholesterol: 0mg
Keywords: grilled watermelon, summer recipe, healthy dessert, fruity dessert, easy recipes
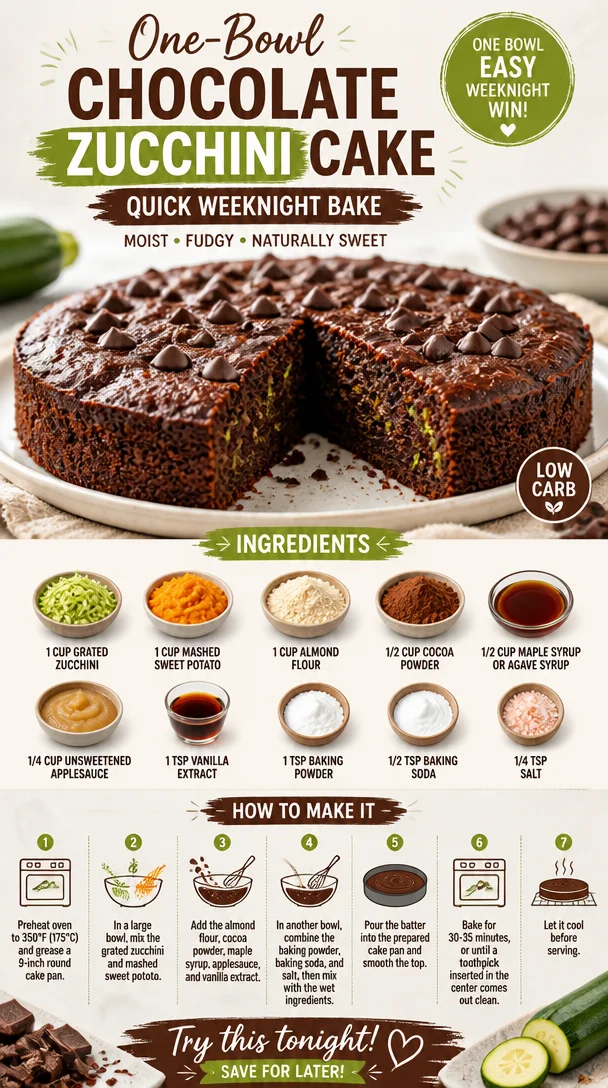
One-Bowl Chocolate Zucchini Cake: Quick Weeknight Bake
A Decadent Delight: Chocolate Zucchini Cake Recipe
Welcome back, fellow foodies! Today, we’re diving into an absolute gem of a recipe that’s not only a feast for your taste buds but also a sneaky way to sneak in some nutrition – we’re talking about Chocolate Zucchini Cake! Yes, you heard that right. This luscious cake combines rich chocolatey goodness with the moisture of zucchini, making it incredibly moist and fluffy. Whether you’re trying to use up some surplus zucchini from your garden (or your next-door neighbor’s garden), or you just have a craving for something sweet and delicious, this cake is here to satisfy.
So, let’s roll up our sleeves and get baking! But first, let me share a little backstory that makes this recipe even more special.
A Slice of Nostalgia
This Chocolate Zucchini Cake recipe brings back fond memories from my childhood when my grandmother would whip it up on lazy summer afternoons. I can still see her in the kitchen, apron tied snugly around her waist, a mischievous twinkle in her eye as she beckoned me closer to the counter. The smell of chocolate wafted through the air, an intoxicating blend of sweetness and warmth that made my heart flutter.
“Trust me, my dear,” she would say, sliding a slice of still-warm cake in front of me. “You’ll never know there’s zucchini in it!” I often wondered how she pulled off this chocolate magic trick. As a kid, I was skeptical, but one bite into that cake and I was convinced! The rich flavor and moist texture were utterly irresistible.
Those afternoons were filled with laughter, flour-covered countertops, and the pure joy of creating something together. Now, as I share this recipe with you, I feel connected to those memories every time I bake it. It’s a reminder that cooking is about love, creativity, and, of course, a touch of sweetness.
Ingredients
Let’s check out the ingredients you’ll need for this decadent Chocolate Zucchini Cake!
-
1 cup grated zucchini: Zucchini adds moisture and a subtle sweetness. You can use yellow squash as a fun substitute if you’re looking for a little variety! Just be sure to squeeze out any excess moisture beforehand to avoid a soggy batter.
-
1 cup mashed sweet potato: This natural sweetener adds creaminess and depth of flavor. Canned sweet potato works perfectly here but feel free to roast and mash your own if you’re looking for that homemade touch!
-
1 cup almond flour: Almond flour gives this cake a lovely nutty flavor and keeps it gluten-free. If you need a substitution, oat flour or a gluten-free all-purpose blend can do the trick.
-
1/2 cup cocoa powder: You can’t have a chocolate cake without cocoa powder! For a deeper flavor, opt for Dutch-processed cocoa. But if you’re going for an intense chocolate hit, feel free to use a mix of cocoa and dark chocolate.
-
1/2 cup maple syrup or agave syrup: This natural sweetener elevates the cake while keeping it moist. Honey can work too, but it’s a bit sweeter, so adjust to taste.
-
1/4 cup unsweetened applesauce: Applesauce adds moisture with a subtle sweet flavor. You can substitute it with more mashed banana or additional sweet potato if you wish.
-
1 tsp vanilla extract: This aromatic ingredient amplifies flavors and gives the cake a warm, inviting essence. Make sure to go for real vanilla extract – your taste buds will thank you!
-
1 tsp baking powder: This leavening agent helps the cake rise beautifully. Always double-check its freshness for the best results!
-
1/2 tsp baking soda: A little extra oomph for rising! If you’re out of baking soda, you can replace it with more baking powder at a 1:3 ratio.
-
1/4 tsp salt: A pinch of salt enhances all the flavors; it’s like a secret weapon in baking! Feel free to use sea salt for a more robust taste.
Step-by-Step Instructions
Now that we have our ingredients lined up like a culinary dream team, let’s get into the magic of making this cake!
-
Preheat Your Oven
Preheat your oven to 350°F (175°C). This is crucial, as it allows your cake to rise and bake evenly. It’s like a warm-up for your batter! -
Prepare Your Baking Pan
Grab an 8-inch square cake pan (or round if you prefer) and grease it lightly with oil or cooking spray. You can also line it with parchment paper for easy removal. Trust me; you don’t want a beautiful cake stuck in the pan! -
Grate the Zucchini
Using a box grater or food processor, grate your zucchini finely. Once you’ve got a cup, place it in a clean kitchen towel and wring out any excess moisture. This step is super important for achieving that perfect cake consistency. -
Mash the Sweet Potato
If using fresh sweet potatoes, roast them until tender, then scoop the flesh into a bowl and mash. If you prefer the canned version, make sure it’s unsweetened and mash it up until smooth. -
Mix the Wet Ingredients
In a large mixing bowl, combine the grated zucchini, mashed sweet potato, maple syrup (or agave), applesauce, and vanilla extract. Use a whisk or spatula to combine until the mixture is smooth and well-combined. I love getting my hands in here too – the texture is so satisfying! -
Combine the Dry Ingredients
In another bowl, sift together the almond flour, cocoa powder, baking powder, baking soda, and salt. Sifting helps remove lumps and guarantees a lighter cake. Just think of it as a mini workout! -
Combine Wet and Dry
Gradually incorporate the dry mixture into the wet ingredients. Gently fold them together using a spatula or wooden spoon, taking care not to overmix. You want a beautifully blended batter, not a tough one! -
Pour and Bake
Pour the batter into your prepared cake pan, smoothing the top with a spatula. Pop it in the preheated oven and bake for about 25-30 minutes, or until a toothpick inserted in the center comes out clean. The smell wafting through your kitchen will be pure bliss! -
Cool Down
Once done, remove the cake from the oven and let it cool in the pan for about 10 minutes. Then, carefully turn it out onto a wire rack to cool completely – if you can resist not diving in right away!
Serving Suggestions
When it comes to serving this chocolatey creation, presentation is key! Dust the top with a sprinkle of powdered sugar for a fancy touch, or drizzle with a little melted dark chocolate. For an extra indulgent treat, serve a slice warm with a dollop of whipped coconut cream or your favorite ice cream. Your friends and family will be in chocolate heaven!
Recipe Variations
Here are a few delicious twists to keep this Chocolate Zucchini Cake vibrant and exciting:
- Add Mix-Ins: Toss in a handful of chocolate chips or chopped walnuts for added texture.
- Nut Butter Swirl: Dollop some almond or peanut butter into the batter before baking for a surprise creamy center.
- Spiced Delight: Add a pinch of cinnamon or espresso powder to the batter to deepen the flavors.
- Frosting Options: Top with a light frosting made from Greek yogurt and cocoa powder for a yogurt-based treat, or keep it simple with a vegan cream cheese frosting.
Chef’s Notes
This recipe has evolved over time, and I can’t help but smile every time I bake it. Initially, I made it just for myself during my health-conscious foodie phase, but soon my friends caught wind of this chocolate delight. It became an instant favorite at gatherings, and I love seeing the surprised expressions when I reveal the star ingredient: zucchini!
There was one time I forgot to strain the zucchini, and let’s just say it was a very "moist" cake! But hey, those moments are what make cooking so adventurous, right? Each time I bake, I remember my grandmother’s laughter and love infusing each bite.
FAQs and Troubleshooting
1. Why is my cake too dense?
If your cake is dense, it might be due to overmixing the batter or not measuring the ingredients accurately. Make sure to fold gently and use the right measurements, especially with the flour!
2. Can I freeze this cake?
Absolutely! This Chocolate Zucchini Cake freezes beautifully. Wrap it tightly in plastic wrap and foil to prevent freezer burn. When you’re ready, thaw it in the fridge overnight.
3. What if I don’t have almond flour?
No worries! You can substitute almond flour with any other nut flour, or a gluten-free all-purpose flour work perfectly if you’re aiming for a gluten-free alternative.
4. Can I use other vegetables?
Definitely! Carrots are a fantastic swap if you want to try a veggie twist. Just prepare them similarly by grating, and you’ll end up with a deliciously moist cake.
Nutritional Info
While I won’t delve too deeply into numbers, I will say this Chocolate Zucchini Cake is a delightful treat that provides a nice serving of fiber thanks to the veggies! It’s a little less sweet and heavy than traditional cakes, making it a great guilt-free indulgence.
So there you have it! A fun and fabulous recipe for Chocolate Zucchini Cake that’s sure to impress and delight. Let me know when you try it and if you make any variations! Happy baking, and remember to keep it fresh and delicious.
PrintChocolate Zucchini Cake

A decadent and moist chocolate zucchini cake that is both delicious and nutritious.
- Prep Time: 15 minutes
- Cook Time: 30 minutes
- Total Time: 45 minutes
- Yield: 8 servings 1x
- Category: Dessert
- Method: Baking
- Cuisine: American
- Diet: Vegetarian
Ingredients
- 1 cup grated zucchini
- 1 cup mashed sweet potato
- 1 cup almond flour
- 1/2 cup cocoa powder
- 1/2 cup maple syrup or agave syrup
- 1/4 cup unsweetened applesauce
- 1 tsp vanilla extract
- 1 tsp baking powder
- 1/2 tsp baking soda
- 1/4 tsp salt
Instructions
- Preheat your oven to 350°F (175°C).
- Prepare an 8-inch square or round cake pan by greasing it lightly with oil or cooking spray.
- Grate the zucchini finely and squeeze out excess moisture using a clean kitchen towel.
- Mash the sweet potato until smooth.
- Mix the wet ingredients: zucchini, sweet potato, maple syrup (or agave), applesauce, and vanilla extract in a large bowl.
- Combine the dry ingredients: almond flour, cocoa powder, baking powder, baking soda, and salt in another bowl.
- Combine the wet and dry mixtures gently without overmixing.
- Pour the batter into the prepared pan and smooth the top.
- Bake for about 25-30 minutes, or until a toothpick comes out clean.
- Cool in the pan for 10 minutes, then transfer to a wire rack to cool completely.
Notes
Top with powdered sugar or melted dark chocolate for serving. Can add chocolate chips or nuts for extra texture.
Nutrition
- Serving Size: 1 slice
- Calories: 250
- Sugar: 14g
- Sodium: 180mg
- Fat: 9g
- Saturated Fat: 1g
- Unsaturated Fat: 5g
- Trans Fat: 0g
- Carbohydrates: 38g
- Fiber: 4g
- Protein: 4g
- Cholesterol: 0mg
Keywords: Chocolate Zucchini Cake, Healthy Dessert, Moist Cake, Baking, Zucchini Recipes
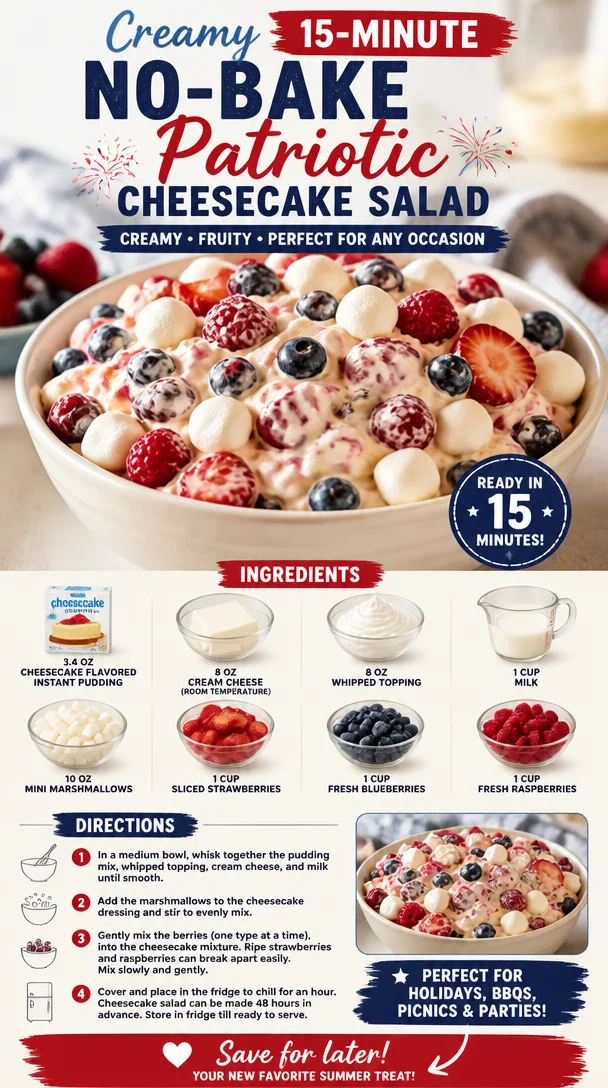
Creamy 15-Minute No-Bake Patriotic Cheesecake Salad
Red, White, and Blue Cheesecake Salad: A Festive Delight
Welcome to another exciting culinary journey with me, Ava Carter, here at Clean Plate Cravings! Today, we’re diving into a dish that’s not just a feast for your taste buds but also a delightful treat for the eyes. You guessed it—we’re making a Red, White, and Blue Cheesecake Salad! Perfect for all your summer gatherings, barbecues, and patriotic celebrations, this dessert combines the creamy goodness of cheesecake with the fresh, vibrant flavors of strawberries, blueberries, and raspberries.
Imagine a dish that has the richness of cheesecake yet feels light and refreshing. This salad is not just a dessert; it’s an experience that brings all the nostalgic flavors you love together in one colorful bowl. And the best part? It’s super easy to whip up! So grab your apron and let’s get started!
A Bite of Nostalgia
Growing up, my family took summer barbecues very seriously. One dish that almost always made an appearance was an eye-catching jello salad layered with fruit, whipped cream, and, of course, lots of love. Fast forward to my culinary adventures as an adult, and I realized that I wanted to capture that nostalgic summer magic but with a twist. Enter the Red, White, and Blue Cheesecake Salad!
I remember the first time I made it for a Fourth of July picnic. The sun was shining, the grill was sizzling, and I was feeling adventurous in the kitchen. As I mixed the creamy cheesecake filling, it brought back memories of my grandmother whisking up her iconic desserts. The laughter, the joy, and the aroma of good food filled my heart. When I laid it out on the picnic table, it was like I had created a work of art. The vibrant red, white, and blue colors sparkled in the sunlight, and I knew I had stumbled upon something special. It was an instant hit! Everyone dove in, and it felt amazing to share something that not only tasted good but also sparked happy memories. So let’s recreate that magic together today!
Ingredients
Here’s what you’ll need to make this delicious Red, White, and Blue Cheesecake Salad:
-
3.4 oz Cheesecake flavored instant pudding
This is the magic ingredient that gives our salad that rich cheesecake flavor without all the hassle of baking. If you can’t find cheesecake-flavored pudding, vanilla works well too! -
8 oz Cream Cheese (room temperature)
The creaminess of cream cheese is essential for achieving that dreamy texture. Make sure it’s softened to avoid lumps. You can substitute with a dairy-free cream cheese if you prefer. -
8 oz Whipped Topping
This brings the salad together and adds a light, airy feel. If you prefer a healthier alternative, you can use Greek yogurt or homemade whipped cream. -
1 cup Milk
Milk helps combine everything smoothly. Almond or soy milk can be a great substitute if you’re dairy-free. -
10 oz Mini Marshmallows
These little bites of fluffiness add a fun texture. You can opt for sugar-free marshmallows if you’re looking to cut down on sugar. -
1 cup Sliced Strawberries
Juicy and vibrant, strawberries offer that fresh sweetness. Feel free to swap out for cherries for a similar tangy-sweet flavor. -
1 cup Fresh Blueberries
They’re not just pretty; blueberries pack a nutritional punch too! If you can’t get fresh blueberries, frozen ones will work—just thaw them first. -
1 cup Fresh Raspberries
These tart beauties provide a lovely contrast to the sweetness of the cheesecake flavor. Blackberries are a suitable alternative if you prefer.
Step-by-Step Instructions
Now that we have our ingredients, let’s dive into the making of our Red, White, and Blue Cheesecake Salad! Follow these easy steps, and remember to have fun along the way.
-
Mix the Cheesecake Filling:
In a large mixing bowl, combine the room-temperature cream cheese and the cheesecake-flavored pudding mix. Using a hand mixer, beat them together on medium speed until smooth. This is where the magic begins! A tip: make sure your cream cheese is really soft so you don’t end up with lumps. Nobody wants a chunky cheesecake salad! -
Add the Milk:
Gradually pour in the milk while continuing to beat the mixture. This is going to make it nice and creamy. You want to achieve a smooth, pourable consistency. If you find it too thick, a splash more milk won’t hurt! -
Fold in the Whipped Topping:
Here comes the fun part! Carefully fold in the whipped topping using a spatula or wooden spoon to keep it light and fluffy. Think of this as adding air to your dessert—a light and airy cheesecakey hug! -
Incorporate the Marshmallows:
Next, stir in the mini marshmallows, allowing that delightful fluffiness to blend with the creamy filling. You’ll love the way they pop in your mouth! -
Add the Fresh Berries:
Throw in your sliced strawberries, blueberries, and raspberries. Fold them in gently to maintain their shape. The vibrant colors are essential for that stunning presentation! -
Chill:
Transfer your mixture to a large serving bowl or individual dessert cups. Cover it with plastic wrap and chill for at least 1 hour in the refrigerator. This helps the flavors meld together and gives you a refreshing salad! -
Serve and Admire:
Once it’s chilled and set, it’s time to dig in! Grab a big scoop—don’t be shy—and enjoy this beautiful cheesecake salad that’s sure to impress!
Serving Suggestions
Presentation is key, my friends! To take it up a notch, you can layer the salad in individual parfait glasses or jars for an extra touch. Drizzle with honey or sprinkle some crushed graham crackers on top for added crunch and a nod to traditional cheesecake crust. Garnish with a mint leaf or sprinkle a little extra fruit on top to make it look absolutely delectable!
Recipe Variations
Want to get creative? Here are some fun twists on this classic dessert:
-
Add Citrus: A splash of lemon or lime juice can brighten up the flavors beautifully—just be mindful to add it gradually!
-
Chocolate Drizzle: Drizzle some melted chocolate or chocolate sauce on top for a fudgey twist that pairs excellently with the cheesecake flavor.
-
Nutty Crunch: Toss in some chopped nuts like pecans or walnuts for a delightful crunch and added texture.
-
Different Pudding Flavors: Experiment with different pudding flavors like vanilla or chocolate for a unique take on the salad.
-
Vegan Version: Substitute all dairy ingredients with dairy-free alternatives to make this salad vegan-friendly while keeping it delicious!
Chef’s Notes
Oh, the joy of creating in the kitchen! This cheesecake salad was born from trial and error and a touch of whimsy. I remember the first time I plated it for a family gathering—the looks on everyone’s faces when they took their first bite was priceless. It’s delightful when a recipe becomes a family favorite, and it warms my heart to see it shared at gatherings year after year. Over time, I’ve adapted this recipe to accommodate dairy-free folks and to include even more vibrant fruits. It’s all about flexibility and making it your own!
FAQs and Troubleshooting
Q: My cheesecake salad turned out too runny; what went wrong?
A: The most common culprit is not using enough instant pudding mix. Make sure to stick to the recipe for the right texture or let it chill longer in the fridge to firm up.
Q: Can I prepare this salad in advance?
A: Absolutely! You can make it a day ahead; just make sure to store it in the fridge to keep it fresh. Just give it a light stir before serving; it might settle a bit.
Q: How long does this salad last in the fridge?
A: Typically, it stays fresh for about 3 days. But I doubt it will last that long—it’s too delicious to resist!
Q: Can I use frozen berries?
A: Yes! Just make sure to thaw and drain excess liquid before adding them to avoid making the salad watery.
Nutritional Info
For those curious about the nutritional aspect, here’s a quick breakdown per serving (based on 8 servings):
- Calories: 210
- Protein: 3g
- Fat: 9g
- Carbohydrates: 29g
- Fiber: 1g
- Sugars: 15g
This is a rough estimate, and variations can occur based on the specific ingredients used.
So there you have it, my culinary friends—a vibrant, creamy, delicious Red, White, and Blue Cheesecake Salad that’s perfect for any occasion! Remember to enjoy the process, have fun in the kitchen, and keep it fresh and fabulous. Until next time, happy cooking!
PrintRed, White, and Blue Cheesecake Salad

A festive and refreshing cheesecake salad perfect for summer gatherings and patriotic celebrations.
- Prep Time: 15 minutes
- Cook Time: 60 minutes
- Total Time: 75 minutes
- Yield: 8 servings 1x
- Category: Dessert
- Method: No-Bake
- Cuisine: American
- Diet: Vegetarian
Ingredients
- 3.4 oz Cheesecake flavored instant pudding
- 8 oz Cream Cheese (room temperature)
- 8 oz Whipped Topping
- 1 cup Milk
- 10 oz Mini Marshmallows
- 1 cup Sliced Strawberries
- 1 cup Fresh Blueberries
- 1 cup Fresh Raspberries
Instructions
- Mix the Cheesecake Filling: In a large mixing bowl, combine the room-temperature cream cheese and the cheesecake-flavored pudding mix. Using a hand mixer, beat them together on medium speed until smooth.
- Add the Milk: Gradually pour in the milk while continuing to beat the mixture until smooth and creamy.
- Fold in the Whipped Topping: Carefully fold in the whipped topping using a spatula to keep it light and fluffy.
- Incorporate the Marshmallows: Stir in the mini marshmallows until evenly mixed.
- Add the Fresh Berries: Gently fold in the sliced strawberries, blueberries, and raspberries.
- Chill: Transfer the mixture to a large serving bowl or individual cups and refrigerate for at least 1 hour.
- Serve and Admire: Once chilled, serve and enjoy your beautiful cheesecake salad!
Notes
Presentation can be enhanced by layering in parfait glasses and garnishing with mint.
Nutrition
- Serving Size: 1 serving
- Calories: 210
- Sugar: 15g
- Sodium: 300mg
- Fat: 9g
- Saturated Fat: 4g
- Unsaturated Fat: 4g
- Trans Fat: 0g
- Carbohydrates: 29g
- Fiber: 1g
- Protein: 3g
- Cholesterol: 30mg
Keywords: cheesecake salad, summer dessert, patriotic dessert, easy salad, no-bake dessert
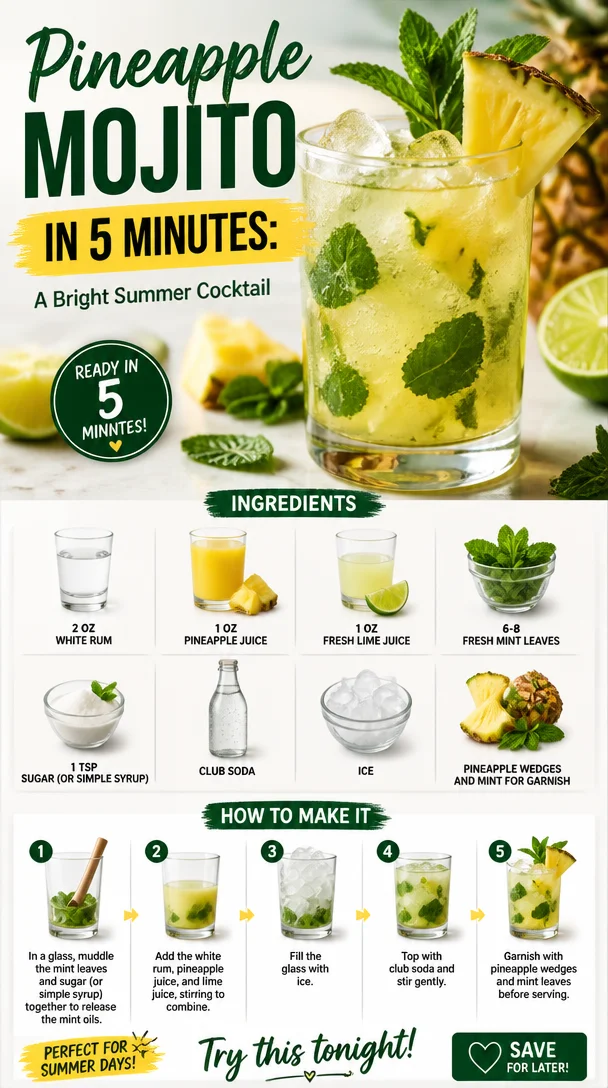
Pineapple Mojito in 5 Minutes: A Bright Summer Cocktail
Sip Into Summer: The Ultimate Pineapple Mojito Recipe
Welcome, fellow food lovers! Pull up a chair, grab a glass, and let’s dive into a refreshing recipe that will transport you straight to a sun-soaked beach: the Pineapple Mojito! Not only is this drink bursting with tropical flavors, but it also has a way of making every gathering feel like a mini vacation. Whether you’re hosting friends on the patio or simply unwinding after a long day, this mojito offers the perfect blend of sweetness and zest, all while being super easy to whip up.
But first, let’s chat about why I love this drink so darn much. The vibrant combination of succulent pineapple, zesty lime, and aromatic mint just screams summer, doesn’t it? Each sip is like a hug from the sunshine. As the days get longer and warmer, there’s nothing more inviting than treating yourself to a refreshing beverage that feels like pure bliss. The beauty of the Pineapple Mojito is that it feels festive, light, and delightful—perfect for relaxing and unwinding or turning any casual get-together into a tropical soiree. Trust me; your taste buds will thank you!
A Toast to Nostalgia
Let’s rewind the tape to a delightful summer I spent with my family on a tiny island where the air smelled of salt and the sun set in a spectacular burst of crimson and gold hues. I remember our evenings being filled with laughter as we gathered around the outdoor table, where my uncle would play bartender. The drink of choice? You guessed it—mojitos!
But one evening, my aunt decided to shake things up, literally, bringing in fresh pineapple and an adventure in mixology. Watching her crush mint leaves with sugar and mix it with bright green lime juice and golden pineapple was nothing short of culinary magic. The first sip had me dreaming of summer sunsets and sandy beaches. That memory became a part of my culinary journey, inspiring not only this recipe but a lifelong love affair with crafting cocktails.
Creating this Pineapple Mojito reminds me of those carefree days, and I can’t wait for you to experience that same joy!
Ingredients
Here’s what you’ll need to create your very own Pineapple Mojito:
-
2 oz white rum: The base of our cocktail, white rum provides a smooth and slightly sweet flavor that pairs perfectly with tropical fruits. Feel free to swap it out for coconut rum if you’re feeling adventurous!
-
1 oz pineapple juice: Fresh is best, but store-bought works too. If you can’t find pineapple juice, you can substitute it with another tropical fruit juice, like passion fruit or orange juice.
-
1 oz fresh lime juice: Nothing beats the bright acidity of freshly squeezed lime. Bottled lime juice can do in a pinch, but the fresh stuff elevates the drink.
-
6-8 fresh mint leaves: Mint brings that gorgeous herbal aroma and flavor. If you’re out of mint, a little bit of basil can offer a unique twist.
-
1 tsp sugar (or simple syrup): Sweetness balances the tartness. If you’re watching your sugar intake, consider a natural sweetener like agave nectar or honey.
-
Club soda: For that bubbly finish! You can replace it with sparkling water or lemon-lime soda for added sweetness.
-
Ice: Essential for that refreshing chill. Crushed ice works nicely for a mojito with a fun texture.
-
Pineapple wedges and mint for garnish: Always garnish for a touch of flair! These create visual appeal and hint at the flavors within.
Step-by-Step Instructions
Alright, let’s roll up our sleeves and get mixing! Follow these steps to create your Pineapple Mojito:
-
Muddle the Mint: In a sturdy glass or cocktail shaker, add the fresh mint leaves and sugar (or simple syrup). Using a muddler or the back of a spoon, gently press the mint leaves to release their essential oils. Tip: Be careful not to shred the mint; just a gentle press will do the trick!
-
Add the Juices: Pour in the fresh lime juice and pineapple juice over the muddled mint. Chef Hack: If you want an extra pop of flavor, consider adding a splash of coconut water to amplify that tropical vibe.
-
Mix with Rum: Measure out your white rum and add it to the mixture. Using a cocktail shaker, add some ice and shake it like you mean it! You want to mix those flavors without losing all those precious mint oils. Shaking also chills the drink wonderfully.
-
Strain Into a Glass: If you used a shaker, strain the mixture into a glass filled with ice. If you’re using a muddling glass, simply add ice and pour straight in. Note: For a smoother drink, consider fine-straining your mixture to remove mint bits, but a little texture can be fun!
-
Top with Club Soda: Carefully pour club soda over your mixture, giving it that refreshing fizz. Use a spoon to stir gently and mix it up. Extra Tip: You can adjust the amount of soda based on how strong you like your drink!
-
Garnish and Serve: Finish off your mojito with a colorful pineapple wedge and a sprig of fresh mint for garnishing. Not only will this make it look stunning, but guests will also know exactly what flavors to expect!
Serving Suggestions
To really impress your guests (or yourself!), serve your Pineapple Mojito in a chilled glass with a decorative straw. Setting the glass on a colorful napkin alongside some sliced fruits can elevate the presentation. If you’re feeling fancy, you could even put your mojitos in a punch bowl for a crowd-pleasing centerpiece at your next gathering!
Recipe Variations
Feeling adventurous? Here are a few creative twists you can try:
-
Mango Mojito: Substitute pineapple juice with fresh mango puree for a unique twist!
-
Spicy Pineapple Mojito: Add a slice of jalapeño when muddling the mint for a spicy kick!
-
Coconut Pineapple Mojito: Mix in some coconut cream along with the juices for a creamy, tropical version of this cocktail.
-
Herb Fusion: Experiment with different herbs like rosemary or sage instead of mint for a more fragrant alternative.
Chef’s Notes
This Pineapple Mojito has evolved beautifully over time in my kitchen. Initially, I couldn’t get the ratios quite right, but after lots of experimentation (and plenty of tasting!), I found the perfect balance that brings out the best in every ingredient. Even my friends start to look for my version when summer rolls around! The great thing about cocktails is they’re so forgiving; you can tweak them based on what you have or what you’re craving. Plus, each time you make a batch, you’re creating new memories—the heart of great food!
FAQs and Troubleshooting
-
Can I use frozen fruit instead of fresh?
Absolutely! Frozen pineapple can provide great flavor, especially if you blend it before adding it to your mojito. Just be mindful of the water content; adjust the ice accordingly. -
What if I don’t have fresh mint?
You can use dried mint in a pinch, but fresh mint really gives that bright flavor. If using dried, reduce the amount as it’s more concentrated. -
My mojito tastes too sour. What do I do?
Add a little extra sugar or simple syrup to balance it out. Also, ensure you’re using quality ingredients, especially with your juicing. -
Can I make a non-alcoholic version?
Absolutely! Just replace the rum with extra pineapple juice and add a little more soda to keep that refreshing fizz. You’ll still have a delicious mocktail.
Nutritional Info
While the Pineapple Mojito is more about enjoyment than nutrition, here’s a rough estimate per serving if you’re curious:
- Calories: 200
- Carbohydrates: 20g
- Sugars: 14g
- Alcohol Content: 14% ABV (based on proper measure)
Now that you have the recipe down, gather your ingredients, put on some summer tunes, and let your kitchen transform into a tropical paradise. Cheers to refreshing sips, fun memories, and all around good vibes! Enjoy your Pineapple Mojito—it’s going to be a hit!
PrintPineapple Mojito

A refreshing Pineapple Mojito that combines succulent pineapple, zesty lime, and aromatic mint for a taste of summer bliss.
- Prep Time: 10 minutes
- Cook Time: 0 minutes
- Total Time: 10 minutes
- Yield: 1 serving 1x
- Category: Cocktail
- Method: Mixing
- Cuisine: Tropical
- Diet: Vegetarian
Ingredients
- 2 oz white rum
- 1 oz pineapple juice
- 1 oz fresh lime juice
- 6–8 fresh mint leaves
- 1 tsp sugar (or simple syrup)
- Club soda
- Ice
- Pineapple wedges and mint for garnish
Instructions
- Muddle the mint: In a sturdy glass or cocktail shaker, add the fresh mint leaves and sugar (or simple syrup). Using a muddler or the back of a spoon, gently press the mint leaves to release their essential oils.
- Add the juices: Pour in the fresh lime juice and pineapple juice over the muddled mint.
- Mix with rum: Measure out your white rum and add it to the mixture. Using a cocktail shaker, add some ice and shake it well.
- Strain into a glass: If you used a shaker, strain the mixture into a glass filled with ice.
- Top with club soda: Carefully pour club soda over your mixture, giving it that refreshing fizz.
- Garnish and serve: Finish off your mojito with a colorful pineapple wedge and a sprig of fresh mint for garnishing.
Notes
For variation, try mango puree or a spicy kick with jalapeño. You can also make a non-alcoholic version by replacing rum with extra pineapple juice.
Nutrition
- Serving Size: 1 serving
- Calories: 200
- Sugar: 14g
- Sodium: 10mg
- Fat: 0g
- Saturated Fat: 0g
- Unsaturated Fat: 0g
- Trans Fat: 0g
- Carbohydrates: 20g
- Fiber: 0g
- Protein: 0g
- Cholesterol: 0mg
Keywords: mojito, cocktail, pineapple