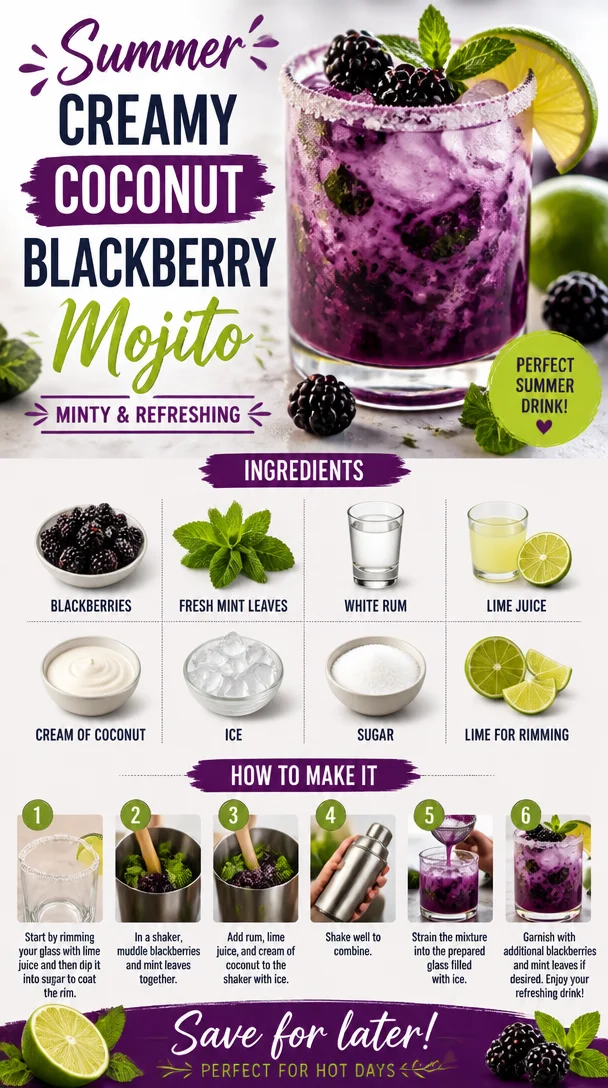
Summer Creamy Coconut Blackberry Mojito: Minty & Refreshing
The Creamy Coconut Blackberry Mojito: A Tropical Twist on a Classic!
Hey there, fellow food lovers! Welcome back to Clean Plate Cravings, where we craft delectable dishes that leave us feeling energized and excited about food. Today, I have a delightful treat for you that’s perfect for relaxing weekends or sunny days—it’s my Creamy Coconut Blackberry Mojito!
Imagine sipping a refreshing drink, where the subtle sweetness of coconut mingles with the tart zing of blackberries and the aromatic freshness of mint. Ahhh, can you feel the tropical vibes already? This drink is not just about taste; it’s an experience that brings back memories of soft ocean breezes and lively beach parties. Plus, who doesn’t love a mojito, am I right?
A Sip Down Memory Lane
Before we dive into the recipe, let me share a little story that warms my heart every time I make this creamy coconut blackberry mojito. One summer, I found myself in a stunning beachside cottage with some of my closest friends. It was a spontaneous getaway, and the long days were filled with laughter, games, and of course, lots of good food and drinks!
One evening, we decided to experiment with cocktails and create a new twist on the classic mojito. Armed with fresh blackberries picked from a nearby bush and a can of creamy coconut, we mixed it all together, and boy, did we strike gold! Each sip was like a taste of paradise. The blackberries added a pop of color and flavor to the traditional mojito, and the coconut cream made it irresistibly lush. It’s a memory that still makes me smile today!
Ingredients
Now, let’s gather the ingredients. This is where the fun begins!
-
Blackberries: These juicy gems are not only delicious but also packed with antioxidants. If you can’t find fresh blackberries, frozen ones work just as well! They may be slightly mushy, but their taste stays intact.
-
Fresh mint leaves: Essential for that characteristic mojito freshness! You can substitute with mint extract in a pinch, but fresh mint really elevates the drink.
-
White rum: The spirit that brings the party! Feel free to swap it out for coconut rum for an extra tropical kick.
-
Lime juice: Freshly squeezed is always best, but bottled lime juice works in a hurry. Just watch for added sugars if you’re keeping it clean!
-
Cream of coconut: This is the star of our show! It adds creaminess and sweetness. If you’re looking for a lighter option, you can use coconut milk, but it won’t be quite as rich.
-
Ice: Because we need it chilled and refreshing!
-
Sugar: Just a touch to balance the tartness of the blackberries and lime. If you’re watching your sugar intake, try agave syrup or even stevia as alternatives.
-
Lime for rimming: This little detail brings extra flavor to every sip. You can also use coarse salt or sugar for a fun twist!
Step-by-Step Instructions
Ready to shake things up in the kitchen? Here’s how to craft your creamy coconut blackberry mojito step-by-step!
-
Prepare Your Glasses: Start by rimming your glass with lime juice, then dip it in granulated sugar (or salt, if you prefer). This extra step jazzes up your drink and adds a delightful sweetness to every sip!
-
Muddle the Blackberries and Mint: In a sturdy glass, toss in a handful of fresh blackberries and a few mint leaves. Using a muddler (or the bottom of a wooden spoon if you don’t have one), gently mash them together. You want to release the blackberry juices and mint oils, but be careful not to shred the mint leaves too much—they can turn bitter if over-muddled.
-
Add the Sweetness: Now, sprinkle in about a tablespoon of sugar. Muddle it again to help dissolve the sugar into the blackberry-mint mixture. If your blackberries are sweet enough, feel free to skip this step or adjust it to your taste.
-
Mix in the Rum and Lime Juice: Pour in 2 ounces of white rum and the juice of half a lime (around 1 ounce). Give it a good stir to combine all those beautiful flavors together. The rum should absorb the fruity and minty goodness wonderfully.
-
Blend in the Cream of Coconut: Now, for the moment of creaminess! Add about 2 ounces of cream of coconut. This transforms your mojito from just refreshing to something truly indulgent. Use a spoon to mix everything together, carefully incorporating the creamy element.
-
Add Ice: Time to chill it! Fill the glass with ice—don’t be shy, pack it in there! The ice will help to meld all the flavors while keeping your drink cold and refreshing.
-
Final Touches: Top off your cocktail with club soda for that zesty fizz. Feel free to adjust the amount based on your personal preference for fizz! Stir gently to combine.
-
Garnish: For the finishing touch, garnish with extra blackberries or a sprig of fresh mint. Not only does it look beautiful, but it also adds a fragrant aroma that’ll entice your senses before your first sip.
Serving Suggestions
Once you’ve completed your creamy coconut blackberry mojito, it’s time to serve it up! I love serving mine in a tall, chilled glass with a fun straw and the beautiful garnish peeking out. You can even pair it with an equally fresh appetizer, like a watermelon salad or shrimp skewers, to complement those tropical flavors!
Recipe Variations
Feeling adventurous? Here are a few creative twists on this classic:
-
Berry Blast: Mix in other berries like strawberries or raspberries for a berry explosion of flavor!
-
Coconut Limeade: Replace blackberries with lime juice for a lighter, more citrusy coconut limeade.
-
Spicy Spin: Add a touch of jalapeño for a spicy kick! Just use a small slice muddled in with the mint.
-
Non-Alcoholic Version: Swap out the rum for coconut water and add a splash of soda water for a refreshing mocktail.
-
Frozen Mojito: Blend all the ingredients with ice for a slushy version that’s perfect for summer parties.
Chef’s Notes
As I share this recipe, I can’t help but smile remembering that spontaneous beachside cocktail experiment. Over time, I’ve refined the balances in this recipe, finding the perfect blend of flavors. If you find yourself wanting to go lighter, just know that each swap you make can lead to delightful new variations. Don’t hesitate to customize the sweetness or creaminess to your liking!
FAQs and Troubleshooting
1. Can I make this mojito ahead of time?
Absolutely! You can prepare the muddled blackberry and mint mixture and store it in the fridge for a few hours before serving. Just add the ice and soda just before serving to keep it fresh.
2. My mojito turned out too sweet. What can I do?
If your drink ends up too sweet, add a splash more lime juice or soda to balance it out. The acidity will cut through the sweetness, giving it that refreshing bite.
3. What if I don’t like blackberries?
No problem! Use your favorite fruits. Watermelon, peaches, or pomegranate would be delicious, just be mindful of adjusting sugar levels based on the fruit’s sweetness.
4. How can I make this a sugar-free drink?
You can use a sugar substitute like stevia or monk fruit sweetener to keep the flavor without the calories. Make sure to adjust according to your taste.
Nutritional Info
While the specific nutritional information will vary based on the specific ingredients used, here’s a rough estimate per serving:
- Calories: 220
- Total Fat: 5g
- Saturated Fat: 4g
- Carbohydrates: 30g
- Fiber: 2g
- Sugars: 24g
- Protein: 1g
And that’s a wrap, friends! Your creamy coconut blackberry mojito is ready to delight your taste buds and make you feel like you’re lounging on a sun-soaked beach. I can already see you enjoying this drink, maybe with a colorful sunset in the background and good company by your side. Cheers to vibrant flavors, good times, and the joy of clean plate cravings! Enjoy! ☀️🍹
PrintCreamy Coconut Blackberry Mojito
A refreshing drink with the subtle sweetness of coconut mingling with tart blackberries and aromatic mint.
- Prep Time: 10 minutes
- Cook Time: 0 minutes
- Total Time: 10 minutes
- Yield: 1 serving 1x
- Category: Beverage
- Method: Mixing
- Cuisine: Tropical
- Diet: Vegetarian
Ingredients
- 1 cup Blackberries
- 10 Fresh mint leaves
- 2 ounces White rum
- 1 ounce Lime juice
- 2 ounces Cream of coconut
- Ice
- 1 tablespoon Sugar
- Lime for rimming
Instructions
- Prepare Your Glasses: Rims with lime juice and dip in granulated sugar.
- Muddle the Blackberries and Mint: Mash the blackberries and mint leaves in a glass.
- Add the Sweetness: Sprinkle in sugar and muddle again.
- Mix in the Rum and Lime Juice: Pour in white rum and lime juice, stir to combine.
- Blend in the Cream of Coconut: Add cream of coconut and mix well.
- Add Ice: Fill the glass with ice.
- Final Touches: Top with club soda and stir gently.
- Garnish: Add extra blackberries or mint leaves.
Notes
Feel free to customize sweetness and creaminess to your liking. Experiment with different fruits or make it non-alcoholic by swapping rum for coconut water.
Nutrition
- Serving Size: 1 serving
- Calories: 220
- Sugar: 24g
- Sodium: 0mg
- Fat: 5g
- Saturated Fat: 4g
- Unsaturated Fat: 1g
- Trans Fat: 0g
- Carbohydrates: 30g
- Fiber: 2g
- Protein: 1g
- Cholesterol: 0mg
Keywords: mojito, cocktail, coconut, blackberry, refreshing drink
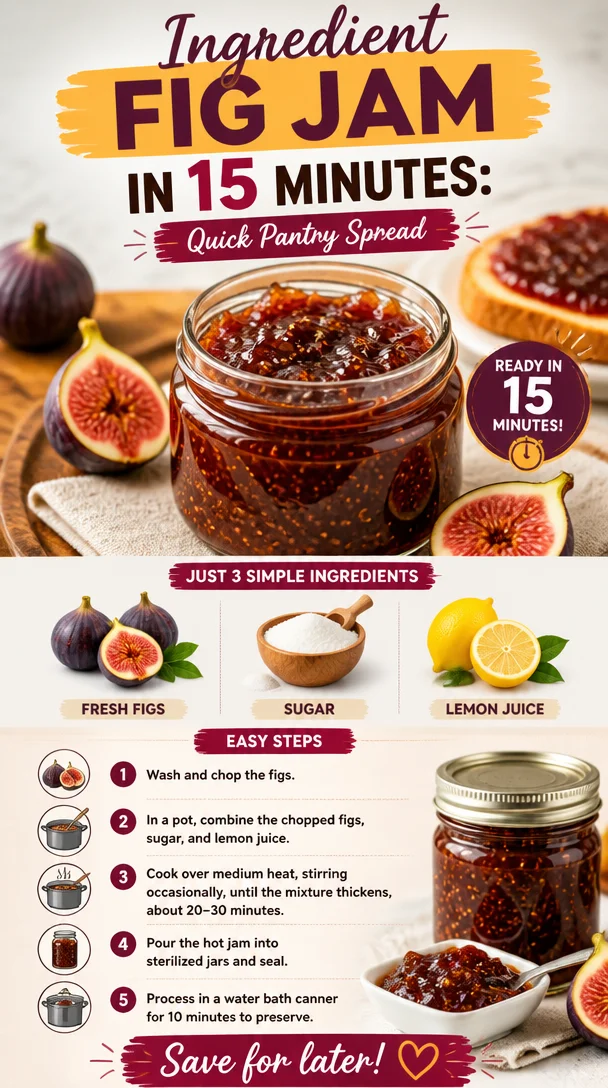
Ingredient Fig Jam in 15 Minutes: Quick Pantry Spread
3-Ingredient Fig Jam: A Sweet Adventure in Simplicity
Welcome, flavor enthusiasts and curious cooks! Today, we’re diving into a delightful recipe that captures the essence of simplicity while delivering a burst of sweetness and nostalgia—3-Ingredient Fig Jam. If you’re ready to elevate your snacking, topping, or breakfast game, you’re in the right place! Fig jam is not just a treat; it’s a celebration of fresh ingredients that come together to bring a little luxurious sweetness to your everyday meals.
Introduction
When I think about figs, I can’t help but smile. These little gems conjure up memories of sunny afternoons spent in orchards, the trees heavy with ripe fruit, their sweet aroma filling the air. If you’ve ever bitten into a ripe fig, you know the joy that comes from its tender flesh and delightful burst of flavor. And let’s be honest—figs are the ultimate gourmet ingredient that can elevate any dish without breaking a sweat!
Now, making fig jam might sound like a tedious process reserved for the culinary elite, but I’m here to tell you that it’s as easy as can be! With just three simple ingredients—fresh figs, sugar, and lemon juice—you’ll whip up a jar of jam that’s ready to spread, spoon, or savor on whatever your heart desires. This recipe is not just perfect for enhancing your breakfast, but it’s also a wonderful gift for friends and family, bringing a taste of homemade love. So, grab your apron, and let’s embark on this sweet adventure together!
Personal Story
Growing up, my grandmother always had a knack for transforming simple ingredients into something special. I remember summers at her cozy kitchen, filled with the sounds of simmering pots and the sweet scent of fruits bubbling on the stove. One of my fondest memories was the day she taught me how to make fig jam. The figs were plucked fresh from the tree in her backyard—you could almost hear the fruit laughing as you picked them!
As we stood over the stove, I eagerly watched the figs transform into a luscious, thick jam, their vibrant color deepening with every stir. The jam brought us together around the table, slathered on warm homemade bread or spooned atop creamy yogurt. It was those moments of connection and joy that inspired me to create Clean Plate Cravings, a place where I could share those very experiences and help others cultivate their own kitchen memories. So let’s continue this tradition today with a fig jam that is as bright and cheerful as those afternoons with Grandma!
Ingredients
-
Fresh Figs: The star of our show! Fresh figs are naturally sweet and juicy, making them perfect for jam. Look for plump, unblemished figs in varying shades of purple or green. If you can’t find fresh figs, you can use dried figs; just soak them in warm water for a few hours to plump them up before use.
-
Sugar: This ingredient helps to thicken and sweeten our jam. You can use regular granulated sugar, but feel free to switch it up with brown sugar for a deeper caramel flavor or coconut sugar for a healthier twist. Keep in mind that different sugars may affect sweetness levels, so taste as you go!
-
Lemon Juice: A splash of lemon juice brightens the jam and adds balance by cutting through the sweetness. Freshly squeezed is best, but bottled lemon juice can work in a pinch. If you’re feeling adventurous, you could also try other citrus juices, like orange or grapefruit, for a unique flavor profile.
Step-by-Step Instructions
-
Prepare the Figs: Start by giving your figs a good rinse under cold water. Pat them dry with a clean kitchen towel. Remove the stems and cut the figs in half or quarters, depending on their size. This makes it easier for them to break down during cooking. The exciting part? You can snack on a few while you prep!
-
Combine Ingredients: In a medium-sized pot, combine your chopped figs, sugar, and lemon juice. Make sure the figs are evenly coated with the sugar; this will help extract their natural juices during cooking.
-
Cook the Mixture: Place your pot on the stove over medium heat. Stir occasionally until the mixture begins to break down, which should take about 5-10 minutes. As you stir, you can mash the figs with the back of your spoon for a smoother consistency, or leave them chunkier if you prefer.
-
Simmer: Once your mixture comes to a gentle bubble, reduce the heat to low and let it simmer for about 20-30 minutes. Keep stirring occasionally to prevent sticking. You’ll notice the mixture will thicken and darken in color. Tip: If you want your jam to be a bit thicker, test it by placing a spoonful on a plate and seeing if it sets up to your liking.
-
Cool and Store: Once cooked, remove your pot from the heat and allow the jam to cool slightly. Then pour it into a clean jar with a tight-fitting lid. If you’re planning to store it long-term, make sure to do this while the jam is still hot to create a vacuum seal. Let it cool completely before refrigerating.
-
Enjoy: Your fig jam is now ready to be enjoyed! Spread it on toast, dollop it onto cheese plates, or stir it into your morning oats. The possibilities are endless!
Serving Suggestions
When it comes to serving this fig jam, it’s all about presentation and pairing. For an elegant touch, spoon it into a charming jar and tie a pretty ribbon around it for gifting. If you’re enjoying it at home, try serving it on a beautifully arranged charcuterie board alongside some creamy goat cheese, crunchy nuts, and sliced baguette. For breakfast, spread it on warm buttered toast or swirl it into yogurt for a delightful treat.
Recipe Variations
Now, let’s get creative with some variations on this classic fig jam:
-
Spiced Fig Jam: Add a pinch of cinnamon or a dash of vanilla extract to your fig mixture for a warm, cozy flavor.
-
Herb-Infused: Toss in a few sprigs of rosemary or thyme while it simmers for a unique herbal twist. Just remember to remove them before storing!
-
Nutty Addition: Stir in some chopped almonds or walnuts to add a lovely crunch and enhance the texture of the jam.
-
Citrus Zest: Add lemon or orange zest alongside the juice for an extra zing of freshness that brightens the whole dish.
-
Chili Flake Kick: Spice things up by adding a pinch of red chili flakes for a surprising kick in your spread.
Chef’s Notes
One of the things I love most about this recipe is its incredible versatility. It’s evolved over the years as I experimented with different fruits from my local farmer’s market. I’ve had days when the figs were in short supply, and I’ve mixed in some ripe peaches or apples to bulk up the jam, and it turned out amazing! Each jar feels like a little bit of magic and tradition, connecting me back to those sunny summer afternoons in my grandmother’s kitchen.
Another funny kitchen story: I once stored my fig jam in a very cute but very small jar, and it wasn’t long before I found myself wrestling with a sticky mess when trying to scoop some out. Pro tip: always use a clean spoon, and don’t be afraid to go big with your jar!
FAQs and Troubleshooting
-
How do I know if my jam is thick enough? A great test is to place a spoonful on a plate and run your finger through it. If it holds its shape, you’re good to go! If it’s still too runny, continue simmering for a few more minutes.
-
Can I can this jam for long-term storage? Absolutely! Make sure to sterilize your jars, pour in hot jam, seal tightly, and process in a boiling water bath for about 10 minutes to seal them properly.
-
What if I don’t have fresh figs? No worries! Dried figs work in a pinch. Just soak them in warm water first until soft, then chop and follow the same steps in the recipe.
-
Can I reduce the sugar? While sugar helps with preservation and thickness, you can experiment with natural sweeteners like honey or maple syrup—but keep in mind that these may alter the flavor and texture a bit.
Nutritional Info
While the nutritional content can vary based on ingredient brands and the number of servings, here’s a rough estimate per tablespoon serving:
- Calories: 35
- Fat: 0g
- Carbohydrates: 9g
- Sugar: 8g
- Fiber: 0.5g
So there you have it—a bright, delicious, and super easy recipe for homemade 3-Ingredient Fig Jam! This jam is not just a spread; it’s a celebration of fresh ingredients and sweet memories waiting to be made. Dive in, enjoy every jar, and remember that the kitchen is the best place to create your own flavor stories. Happy cooking!
Print3-Ingredient Fig Jam
A simple and delightful recipe for homemade fig jam using just three ingredients: fresh figs, sugar, and lemon juice.
- Prep Time: 10 minutes
- Cook Time: 30 minutes
- Total Time: 40 minutes
- Yield: 2 cups 1x
- Category: Condiment
- Method: Cooking
- Cuisine: American
- Diet: Vegan
Ingredients
- 2 cups fresh figs, stemmed and chopped
- 1 cup granulated sugar
- 2 tablespoons lemon juice
Instructions
- Prepare the figs: Rinse under cold water, pat dry, remove stems, and chop.
- Combine ingredients: In a pot, mix chopped figs, sugar, and lemon juice.
- Cook the mixture: Over medium heat, stir until figs break down (5-10 minutes).
- Simmer: Reduce heat to low and simmer for 20-30 minutes, stirring occasionally.
- Cool and store: Allow the jam to cool before transferring to a jar.
- Enjoy: Spread on toast or use as a topping for desserts.
Notes
Try variations by adding spices like cinnamon or herbs like rosemary for unique flavors.
Nutrition
- Serving Size: 1 tablespoon
- Calories: 35
- Sugar: 8g
- Sodium: 0mg
- Fat: 0g
- Saturated Fat: 0g
- Unsaturated Fat: 0g
- Trans Fat: 0g
- Carbohydrates: 9g
- Fiber: 0.5g
- Protein: 0g
- Cholesterol: 0mg
Keywords: fig jam, homemade jam, easy recipe, condiment, vegan recipe
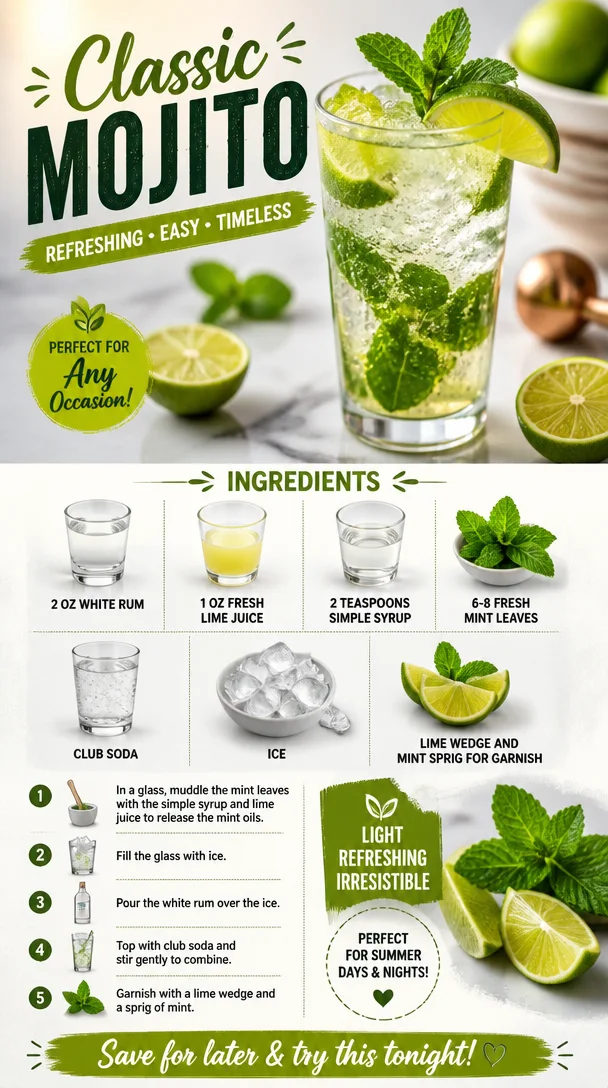
Classic Mojito
Refreshing Classic Mojito Recipe: A Taste of Summer in Your Glass!
Welcome to another delightful journey in the kitchen! Today, we’re diving into the world of one of the most refreshing cocktails that’s perfect for warm evenings, sunny afternoons, or anytime you need a little pick-me-up: the classic Mojito! This drink is not just a refreshing thirst-quencher; it’s a celebration of vibrant flavors, a burst of minty goodness, and the zing of fresh lime. Perfectly mixed, it dances on your palate with a light, crisp fizz that makes you feel like you’re lounging on a beach somewhere tropical—even if you’re just in your backyard.
What I love most about Mojitos is how they embody the joyful spirit of summer. They’re the perfect companion to anything life throws your way—whether you’re hosting a backyard barbecue, enjoying a cozy evening on the porch with friends, or simply soaking up the sun after a long day. The beauty of this cocktail lies in its simplicity, using fresh, everyday ingredients that you probably already have on hand. So, grab your muddler, and let’s shake things up!
A Trip Down Memory Lane: The First Mojito
I still remember the first time I made a Mojito. It was a balmy summer night, and I was hosting a small gathering with friends. We were all longing for something to cool us down, and I had this wild idea to try my hand at making cocktails. As I muddled fresh mint and lime, a slight drizzle began—a perfect soundtrack for a cozy evening indoors. There’s something magical about the fragrance of mint releasing its oils, wafting through the air, promising deliciousness.
As I poured the rum and soda into the glass, we all gathered around the table, eager to give my creation a try. With the first sip, laughter erupted. The combination of fresh mint and zesty lime was a delightful surprise, refreshing yet complex. That night became a cherished memory and sparked my love for cocktail crafting. Since then, every summer, I’ve turned to the Mojito as a go-to drink, often experimenting with new flavor twists. To me, making Mojitos is more than just a drink; it’s about sharing good times and celebrating the beauty of fresh, flavorful ingredients.
Ingredients: Gather Your Essentials
Here’s what you need to whip up this refreshing Mojito. Make sure to gather these ingredients before we get started!
-
2 oz white rum
A smooth and light spirit that acts as the base of our drink. If you prefer a lighter cocktail, you can use less rum or swap with vodka, but the flavor will change slightly! -
1 oz fresh lime juice
Nothing beats the bright and zesty flavor of freshly squeezed lime juice! Bottled juice can work in a pinch, but trust me, fresh is always better. You can substitute with lemon juice if you’re in a bind, though the taste will differ. -
2 teaspoons simple syrup
This sweetener can be made easily by dissolving sugar in hot water. You can adjust the sweetness to your liking, or use agave syrup or honey as a substitute. -
6-8 fresh mint leaves
Mint is the star of the Mojito! Use fresh leaves for the best flavor, and feel free to experiment with other herbs like basil for a unique twist. -
Club soda
This bubbly addition brings the cocktail to life! If you want a more intense flavor, consider using flavored soda water or tonic water. -
Ice
The crunch of ice is essential for keeping your Mojito refreshingly chilled. Crushed ice can enhance the drink’s texture! -
Lime wedge and mint sprig for garnish
A lovely garnish elevates your drink’s presentation. It’s all about the details, right?
Step-by-Step Instructions to Craft Your Mojito
Ready to mix? Follow these step-by-step instructions for the perfect Mojito, with my little tips along the way!
-
Muddle the Mint and Lime
In a sturdy glass (I love using a highball glass for this!), place 6-8 fresh mint leaves and the lime juice. Using a muddler or the back of a spoon, gently press down and twist to release the mint’s essential oils. Tip: Don’t pulverize the mint; just gently muddle it to avoid bitterness. -
Add Simple Syrup
Pour in 2 teaspoons of simple syrup. Adjust to taste! If you want a sweeter Mojito, add more syrup. If you prefer it less sweet, start with a smaller amount. Chef Insight: This is where you can get creative—try flavored simple syrups like ginger or lavender for a twist! -
Incorporate the Rum
Pour in your 2 oz of white rum. That’s where the fun starts! Stir everything gently to combine, allowing the flavors to meld perfectly. -
Fill with Ice
Add ice to the glass—crushed ice is fantastic if you like a slushy texture, but any ice will do! It’ll keep your drink cool and refreshing. -
Top with Club Soda
Gently pour club soda over the ice to fill the glass. The bubbles will add some sparkle and liveliness to your drink! -
Garnish and Serve
Give it a gentle stir to mix everything but preserve the bubbles. Finally, garnish with a lime wedge and a sprig of fresh mint. This is the finishing touch that says, “Cheers!”
Serving Suggestions: How to Present
When it comes to serving your Mojito, presentation matters! Serve it in a tall glass filled with ice, and for added flair, consider using a fun straw. You can even place the mint sprig right on top of the drink so that its refreshing aroma captivates everyone as they sip. Feel free to get creative with your glassware—something colorful can elevate the vibe!
Recipe Variations: Get Creative with Flavors
Why not switch things up a bit? Here are a few fun variations to inspire your Mojito-making journey:
-
Berry Mojito
Add muddled strawberries, raspberries, or blueberries for a fruity twist! The sweetness from the berries complements the tart lime perfectly. -
Pineapple Mojito
Replace fresh lime juice with fresh pineapple juice and toss in some pineapple chunks for a tropical flavor that’ll transport you to the beach! -
Spicy Mojito
For the adventurous, add a few slices of jalapeño to your muddling stage for a spicy kick that balances beautifully with the mint and lime. -
Coconut Mojito
Swap out the rum for coconut rum, and add a splash of coconut water for a creamy, dreamy drink! -
Herb-Infused Mojito
Get creative with herbs! Add fresh basil or even sage along with the mint for an aromatic infusion that changes the entire profile of the drink.
Chef’s Notes: A Little Extra Love
Making Mojitos has been a summer tradition in my kitchen for years now. As I mentioned, my first experience crafting them was filled with laughter and good vibes, and every season, it brings me back to that wonderful memory. Over time, I’ve tweaked the recipe and played around with ingredients, discovering that my favorite Mojito of all is the one shared with friends. Remember, each drink is a blank canvas: don’t be afraid to try something new and make it your own!
FAQs and Troubleshooting
Here are some common questions or hiccups you might encounter while making your Mojito:
-
Why is my Mojito too bitter?
If you’ve muddled the mint too hard, it can release bitter notes. Use a gentle touch next time to avoid this! -
Can I use dried mint?
Fresh mint is key for the best flavor. Dried mint lacks the oils and freshness, so it’s not recommended for Mojitos. -
How can I adjust the sweetness?
Taste as you go! Use the simple syrup sparingly and adjust according to your sweetness preference. -
What can I use instead of rum?
If you’re looking for a non-alcoholic version, you can substitute with a mix of sparkling water and a hint of rum extract for flavor.
Nutritional Info (Optional)
A classic Mojito contains approximately:
- Calories: 150-180 (depending on the sweetness)
- Carbohydrates: 19g
- Sugars: 14g
- Fat: 0g
- Protein: 0g
By using less sweetener or flavored sparkling water, you can make a lighter version without sacrificing any of the flavor!
So there you have it—the classic Mojito recipe bursting with fresh flavors and good vibes! Whether you’re sipping on your porch, hosting a gathering, or simply wanting to cool down, this drink will never disappoint. Get into the kitchen, shake things up, and let the Mojito magic unfold! Cheers!
PrintClassic Mojito

A refreshing classic cocktail perfect for summer with vibrant flavors of mint and lime.
- Prep Time: 10 minutes
- Cook Time: 0 minutes
- Total Time: 10 minutes
- Yield: 1 serving 1x
- Category: Cocktail
- Method: Mixing
- Cuisine: Cuban
- Diet: Vegetarian
Ingredients
- 2 oz white rum
- 1 oz fresh lime juice
- 2 teaspoons simple syrup
- 6–8 fresh mint leaves
- Club soda
- Ice
- Lime wedge and mint sprig for garnish
Instructions
- Muddle the mint and lime in a sturdy glass to release the mint’s essential oils.
- Add simple syrup to adjust sweetness to your liking.
- Incorporate the white rum and stir gently.
- Fill the glass with ice, preferably crushed.
- Top with club soda, pouring gently to preserve the bubbles.
- Garnish with a lime wedge and sprig of mint before serving.
Notes
Serve in a tall glass with ice and feel free to experiment with flavors like berries or coconut.
Nutrition
- Serving Size: 1 cocktail
- Calories: 150
- Sugar: 14g
- Sodium: 10mg
- Fat: 0g
- Saturated Fat: 0g
- Unsaturated Fat: 0g
- Trans Fat: 0g
- Carbohydrates: 19g
- Fiber: 0g
- Protein: 0g
- Cholesterol: 0mg
Keywords: Mojito, cocktail, summer drink, refreshing beverage, mint lime drink
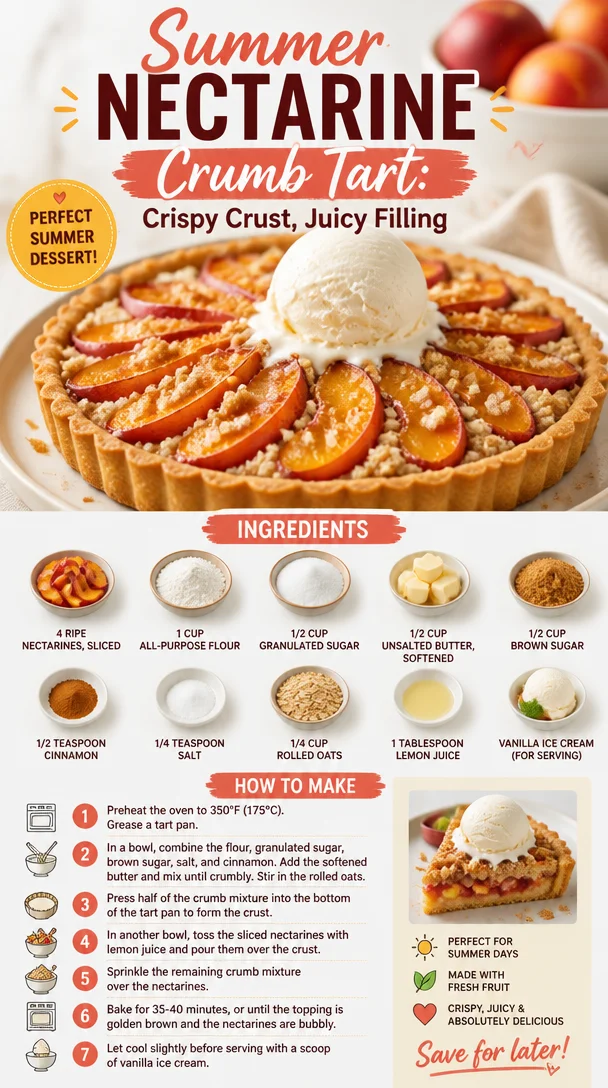
Summer Nectarine Crumb Tart: Crispy Crust, Juicy Filling
A Sweet Summertime Treat: Nectarine Crumb Tart
Welcome back, fellow foodies! Today, we’re diving into a delightful kitchen adventure with a recipe that’s perfect for summer gatherings or simply to savor on a lazy afternoon: Nectarine Crumb Tart. Picture this: a buttery, crumbly crust hugging ripe, juicy nectarines, all topped with a crunchy, golden topping. This tart not only looks beautiful on your table but is also bursting with flavor that will make your taste buds sing. Can you feel that summertime vibe already?
"Why nectarines?" you ask. Well, let me tell you, nectarines are the unsung heroes of summer fruits. Their silky skin and sweet, succulent flesh just scream sunshine and happiness. Plus, they’re so versatile! Whether you’re baking, grilling, or just slicing them up for a snack, they fit right into any culinary scenario. So, let’s roll up our sleeves and get baking!
A Fun Kitchen Memory
Before we dive into the details of our Nectarine Crumb Tart, let me share a little story. One of my warmest memories in the kitchen is from a summer spent at my grandmother’s house. Every August, when the nectarines were ripe and overflowing at the local farm stand, she would invite me over for our special baking sessions. We spent countless afternoons laughing and chatting while we made sweet treats—nectarine cobblers, jams, and of course, crumb tarts.
I still remember the moment we pulled a golden-brown tart out of the oven. The buttery aroma wafting through her kitchen was almost magical. We waited for it to cool, but not without sneaking a few bites of the crumb topping. While it was cooling, we’d sit on the porch, sipping iced tea, letting the warm breeze carry our laughter away. That’s the beauty of cooking; it’s not just about the food—it’s about the memories we create along the way. So, let’s recreate a bit of that magic together with this Nectarine Crumb Tart!
Ingredients
Here’s everything you’ll need to whip up this delightful tart, along with some quick chef tips for each ingredient:
- 4 ripe nectarines, sliced: Choose nectarines that yield slightly to gentle pressure. If you’re in a pinch, peaches work well too!
- 1 cup all-purpose flour: This will form the base of our crust. For a gluten-free option, substitute with almond flour or a 1:1 gluten-free blend.
- 1/2 cup granulated sugar: This will sweeten the tart nicely, but feel free to swap out for coconut sugar for a deeper flavor.
- 1/2 cup unsalted butter, softened: Butter brings rich flavor to our crust. If you’re looking for a dairy-free version, try using coconut oil.
- 1/2 cup brown sugar: This adds a lovely molasses flavor to the crumb topping. You can substitute it with more granulated sugar if you prefer.
- 1/2 teaspoon cinnamon: A warm spice that enhances the sweetness of our nectarines. Nutmeg can also be a lovely alternative if that’s what you have on hand.
- 1/4 teaspoon salt: Balances out the sweetness. Don’t skip this!
- 1/4 cup rolled oats: These will give our crumb topping a hearty texture. Quick oats can be a convenient substitute if that’s what you have.
- 1 tablespoon lemon juice: This brightens up the flavor of the nectarines. Lime juice could also work in a pinch!
- Vanilla ice cream (for serving): Because what’s a tart without a little scoop of ice cream? For a dairy-free option, try coconut or almond milk ice cream!
Step-by-Step Instructions
Now that you’ve gathered your ingredients, let’s get down to the nitty-gritty of making this Nectarine Crumb Tart. Follow these steps, and remember, a little laughter and patience go a long way in the kitchen!
-
Preheat your oven: First things first, preheat your oven to 350°F (175°C). This is crucial because we want our tart to bake evenly and perfectly golden brown.
-
Prepare the crust: In a mixing bowl, cream together the softened butter and granulated sugar until it’s light and fluffy. This will take about 2-3 minutes. It’s essential for creating a tender crust! Chef tip: Use a hand mixer for ease, but if you’re feeling nostalgic, a wooden spoon will do just fine!
-
Add the dry ingredients: Gradually mix in the flour, brown sugar, cinnamon, and salt. It’ll start to resemble a crumbly dough. Don’t stress if it looks a bit dry; we’ll make it work!
-
Form the crust: Press about two-thirds of this mixture into the bottom of a greased tart pan (9 or 10 inches works great). Use your fingers to create an even layer. Note: Don’t panic if it doesn’t look perfect; it’ll come together beautifully in the oven!
-
Arrange the nectarines: Evenly distribute the sliced nectarines over the crust. Drizzle with lemon juice for that extra zing.
-
Make the crumb topping: With the remaining dough mixture, add the rolled oats and give it a quick mix. Then, sprinkle this over the nectarines, creating a rustic crumb layer. Chef hack: To achieve a more even golden color, make sure to break up any large clumps of the topping.
-
Bake: Place your tart in the preheated oven and bake for about 30-35 minutes, or until the top is golden and the nectarines are bubbly. Ah, that aroma is going to make your kitchen feel like a bakery! Pro tip: If you notice the edges are browning too much, cover them gently with aluminum foil.
-
Cool down: Once baked, let your tart cool for at least 15-20 minutes before serving. This helps the juices settle and makes slicing a breeze.
Serving Suggestions
Serving this Nectarine Crumb Tart is an art form in itself. Slice it into generous wedges and serve on a beautiful platter. A scoop of vanilla ice cream on the side is a must; the creaminess pairs wonderfully with the tart’s sweetness. You could even garnish with fresh mint leaves for a pop of color and freshness!
Recipe Variations
One of the best things about this recipe is its flexibility! Here are a few ideas to switch things up:
- Berry Delight: Swap out half the nectarines for fresh blueberries or raspberries for a mixed berry tart.
- Spiced Up: Add a pinch of nutmeg or ginger to the crumb topping for a warm twist.
- Nutty Crunch: Incorporate chopped walnuts or pecans into the crumb topping for an added crunch and nutty flavor.
- Syrup Drizzle: Drizzle some caramel or honey over the tart before serving for an extra indulgent touch.
- Sweet Swaps: Use agave syrup or maple syrup in place of granulated sugar for a different sweetness profile.
Chef’s Notes
Ah, the evolution of recipes! This Nectarine Crumb Tart has gone through many adaptations since that summer with my grandma. I’ve experimented with different fruits, from plums to apples, and each time has been a delightful surprise. The most memorable twist? I once made a savory version with bacon bits and goat cheese—let’s just say that one didn’t last long at my potluck!
FAQs and Troubleshooting
-
What if my dough is too crumbly?
If your crumb mixture doesn’t hold together, try adding a teaspoon of water or milk, one at a time, until it’s workable. -
Can I prep this in advance?
Absolutely! You can prepare the tart the night before and store it covered in the refrigerator. Just bake it fresh the next day for a warm treat. -
How do I store leftovers?
Store any leftover tart in an airtight container at room temperature for 2-3 days. You can also refrigerate it if you prefer. -
What if my nectarines are hard?
If you have underripe nectarines, place them in a brown paper bag with an apple or banana for a couple of days. They’ll ripen beautifully!
Nutritional Info (Optional)
While I always recommend enjoying dessert in moderation, it’s good to know what you’re eating! A slice of Nectarine Crumb Tart (without ice cream) contains approximately:
- Calories: 250
- Protein: 3g
- Carbohydrates: 35g
- Fat: 12g
- Fiber: 2g
Remember to adjust based on your specific ingredient substitutions!
Alright, my friends! There you have it—a delightful recipe for Nectarine Crumb Tart that promises to bring back joyful memories and create new ones in your kitchen. Share it with family and friends, and don’t forget to leave a comment about your own kitchen adventures with this recipe. Let’s keep the love for food fresh and flowing! Happy baking!
PrintNectarine Crumb Tart
A delightful summer tart with a buttery crumb crust and juicy nectarines, perfect for gatherings or a lazy afternoon.
- Prep Time: 15 minutes
- Cook Time: 35 minutes
- Total Time: 50 minutes
- Yield: 8 servings 1x
- Category: Dessert
- Method: Baking
- Cuisine: American
- Diet: Vegetarian
Ingredients
- 4 ripe nectarines, sliced
- 1 cup all-purpose flour
- 1/2 cup granulated sugar
- 1/2 cup unsalted butter, softened
- 1/2 cup brown sugar
- 1/2 teaspoon cinnamon
- 1/4 teaspoon salt
- 1/4 cup rolled oats
- 1 tablespoon lemon juice
- Vanilla ice cream (for serving)
Instructions
- Preheat your oven to 350°F (175°C).
- Prepare the crust by creaming butter and granulated sugar until light and fluffy.
- Add the flour, brown sugar, cinnamon, and salt gradually.
- Form the crust by pressing two-thirds of the mixture into a greased tart pan.
- Arrange the sliced nectarines over the crust and drizzle with lemon juice.
- Make the crumb topping by adding rolled oats to the remaining dough mixture.
- Bake for about 30-35 minutes or until golden and bubbly.
- Cool for 15-20 minutes before serving.
Notes
Slice and serve with vanilla ice cream for a delightful treat. Garnish with fresh mint leaves for added freshness.
Nutrition
- Serving Size: 1 slice
- Calories: 250
- Sugar: 15g
- Sodium: 100mg
- Fat: 12g
- Saturated Fat: 7g
- Unsaturated Fat: 3g
- Trans Fat: 0g
- Carbohydrates: 35g
- Fiber: 2g
- Protein: 3g
- Cholesterol: 30mg
Keywords: nectarine tart, summer dessert, crumb tart, easy baking, fruity dessert

Minute Nectarine Lemonade: Bright Summer Refresher
Refreshing Nectarine Lemonade: A Taste of Summer Bliss
When life hands you lemons, make lemonade! But let’s take that classic refreshment up a notch. With sun-kissed nectarines and zesty lemons, this Nectarine Lemonade isn’t just any thirst-quencher; it’s a celebration in a glass. Picture yourself lounging on a warm summer afternoon, a gentle breeze in the air, and a glass of this vibrant drink in hand—you’ve got a moment worth savoring!
Nectarines not only bring a delightful sweetness to your lemonade but also a beautiful, inviting color that makes every sip feel like a special occasion. Whether you’re hosting a backyard barbecue, enjoying a picnic in the park, or just needing a refreshing treat after a long day, this recipe will take you back to sunny days and joyful memories.
Before we dive into the recipe, let’s take a little journey back in time.
Personal Story
I still remember those golden summer days when my grandmother would whip up her famous lemonade. But it wasn’t just any lemonade—it was made with fresh, juicy peaches from her garden. The sweet scent would fill the air as she blended the fruit and mixed it with bright lemon juice. Those hot afternoons were spent on the porch, sipping her drinks and sharing stories about family adventures.
Years later, I thought about how I could incorporate that cherished memory into my own cooking style. Enter nectarines! They became my fruity companion, adding sweetness and flavor that reminds me of my grandmother’s loving touch. Each time I prepare this refreshing nectar flavored lemonade, I’m transported back to those sunny days, surrounded by family and laughter. This recipe is a little slice of nostalgia that I can’t wait to share with you!
Ingredients
Let’s get down to the nitty-gritty—the ingredients that will make this Nectarine Lemonade shine!
-
4 ripe nectarines, pitted and diced
Sweet, juicy nectarines are the star of this drink! They add natural sweetness and a touch of tartness. If you can’t find nectarines, feel free to substitute with peaches, plums, or even mangoes for a different fruity twist. -
1 cup fresh lemon juice
Freshly squeezed lemon juice brings that zesty brightness we all love. Instead of bottled lemon juice, go for the fresh stuff—it really elevates the flavor! If you want a less tart drink, you can adjust this to your taste. -
1 cup sugar (or to taste)
The sugar balances the tartness of the lemons and nectarines. You can use granulated sugar, honey, or agave syrup for a more natural sweetener. Start with ¾ cup and add more if you prefer it sweeter. -
4 cups water
This is the backbone of your lemonade. Use cold water to help chill the drink quickly. You can also experiment with sparkling water for a fizzy twist! -
Ice cubes
Perfect for keeping your lemonade icy cold! You can make ice cubes with lemonade itself for an extra flavor boost. -
Lemon slices and mint leaves for garnish
These are your finishing touches! Lemon slices add visual appeal, while fresh mint leaves provide a pop of color and a refreshing aroma.
Step-by-Step Instructions
Now, let’s make that Nectarine Lemonade!
Step 1: Prepare the Nectarines
Start by pitting and dicing your nectarines. You want them ripe and sweet, so there’s no need to rush through this step. Slice them into quarters, remove the pit, and then chop them into smaller pieces. If you’re feeling adventurous, you can even save a few slices for garnish!
Chef’s Tip: Make sure your nectarines are ripe! This will ensure maximum sweetness and flavor in your lemonade.
Step 2: Blend It Up!
Throw the diced nectarines into a blender and add 1 cup of fresh lemon juice. Blend them until they form a smooth puree. If you like a chunkier texture, blend just until combined.
Tip: If you’ve got a high-powered blender, this step can be done in no time!
Step 3: Combine and Sweeten
In a large pitcher, pour the blended nectarines and lemon juice mixture. Add 4 cups of water and stir well. This is the time to taste your lemonade mixture. If it’s too tart, add sugar a little at a time until it reaches your desired sweetness. Remember, flavors can mellow once it’s chilled.
Chef Hack: If you find it too sweet for your taste, add a splash more lemon juice to balance it out!
Step 4: Chill Out
Let your mixture chill in the refrigerator for at least an hour. This will allow all the flavors to meld beautifully. Plus, nothing beats a cold drink on a hot day!
Tip: If you’re short on time, you can serve it immediately over ice, but chilling definitely improves the flavor.
Step 5: Serve It Gorgeous
Once chilled, grab your favorite glasses and fill them with ice cubes. Pour your vibrant Nectarine Lemonade over the ice, filling the glasses about three-quarters full.
Serving Suggestion: Garnish each glass with a lemon slice on the rim and a sprig of fresh mint for that extra flair!
Recipe Variations
Want to shake things up a bit? Here are some fun variations you can try:
-
Herbal Infusion: Add a few sprigs of fresh basil or rosemary while blending the nectarines for an aromatic touch.
-
Citrus Medley: Mix in other citrus juices like lime or orange for a zesty twist.
-
Spiced Nectarine Lemonade: A pinch of ground ginger or a dash of cinnamon stirred into the mixture adds a warm, spicy depth to the flavor.
-
Boozy Option: For adult get-togethers, mix in a splash of vodka or gin for a refreshing cocktail twist.
-
Berry Blast: Throw in a handful of blended strawberries or raspberries along with the nectarines for a fruity explosion of flavors!
Chef’s Notes
This Nectarine Lemonade recipe has evolved over time, just like my cooking style. Initially, I tried adding a bit of lavender syrup for a floral note, which was delightful but didn’t quite hit the spot for a refreshing lemonade. Sometimes simplicity is best! Now, this recipe is my go-to for gatherings, and everyone loves it!
One of my favorite kitchen memories is when I made this lemonade for a picnic. I packed it up in a mason jar, and it became the highlight of our day out. Just goes to show, a good drink can elevate any occasion!
FAQs and Troubleshooting
Q1: Can I use frozen nectarines for this recipe?
Absolutely! Just thaw the nectarines and blend them as you would with fresh ones. You might need to adjust the water content to reach your desired consistency.
Q2: The lemonade is too sweet/tart! What can I do?
If it’s too sweet, simply add a splash more lemon juice. If it’s too tart, stir in some extra sugar or a little honey until balanced.
Q3: How long will this lemonade last in the fridge?
Fresh Nectarine Lemonade is best enjoyed within 24-48 hours. After that, the flavors may begin to degrade and the fruit may change texture.
Q4: Can I make this a day ahead of time?
Yes! This lemonade can be made a day in advance and stored in the refrigerator. This allows the flavors to meld together nicely!
Nutritional Info
While I focus primarily on flavor and enjoyment, it’s also worth noting that nectarines are a great source of vitamins A and C, as well as fiber. Depending on how much sugar you add, your drink can range from a delightful treat to a more wholesome refreshment.
There you have it! The perfect combination of sweet nectarines and zesty lemons to brighten your day. Whether you’re sipping it solo or sharing with friends, this Nectarine Lemonade is sure to bring smiles all around. So, roll up your sleeves, gather those ingredients, and let’s get to blending! Happy sipping!
PrintRefreshing Nectarine Lemonade

This vibrant Nectarine Lemonade combines sweet nectarines and zesty lemons for a refreshing summer drink that’s perfect for any occasion.
- Prep Time: 15 minutes
- Cook Time: 0 minutes
- Total Time: 60 minutes
- Yield: 4 servings 1x
- Category: Beverage
- Method: Blending
- Cuisine: American
- Diet: Vegetarian
Ingredients
- 4 ripe nectarines, pitted and diced
- 1 cup fresh lemon juice
- 1 cup sugar (or to taste)
- 4 cups water
- Ice cubes
- Lemon slices and mint leaves for garnish
Instructions
- Prepare the nectarines by pitting and dicing them.
- Blend the diced nectarines and fresh lemon juice until smooth.
- Combine the blended mixture with water in a large pitcher and adjust sweetness with sugar.
- Chill the mixture in the refrigerator for at least an hour.
- Serve over ice, garnished with lemon slices and fresh mint.
Notes
This lemonade can be made a day ahead for the best flavor. Adjust sweetness to your liking, and feel free to experiment with other fruit additions.
Nutrition
- Serving Size: 1 serving
- Calories: 200
- Sugar: 35g
- Sodium: 5mg
- Fat: 0g
- Saturated Fat: 0g
- Unsaturated Fat: 0g
- Trans Fat: 0g
- Carbohydrates: 50g
- Fiber: 2g
- Protein: 1g
- Cholesterol: 0mg
Keywords: nectarine lemonade, summer drink, refreshing beverage, lemonade recipe, fruity drinks
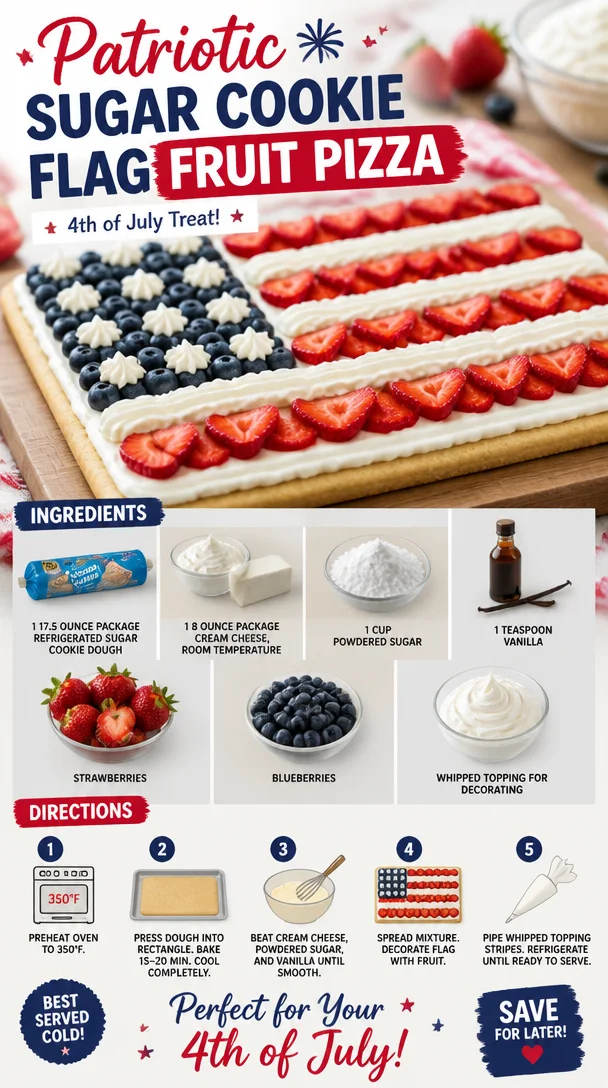
Patriotic Sugar Cookie Flag Fruit Pizza (4th of July Treat)
A Slice of Summer: Sugar Cookie Flag Fruit Pizza
As the sun begins to shine brighter and the days grow longer, we know one thing for sure: it’s time to celebrate! And what better way to celebrate summer gatherings, barbecues, and festive holidays than with a delicious, eye-catching dessert? Enter the Sugar Cookie Flag Fruit Pizza—a delightful twist on traditional fruit pizza that will have everyone raving about your kitchen prowess.
This dessert is not just about taste; it’s a vibrant centerpiece that captures the very essence of summer. It’s wonderfully easy to make, which makes it perfect for novice bakers and seasoned pros alike. Picture a buttery, sweet cookie crust topped with creamy frosting and finished off with a vibrant medley of fresh fruits arranged to create an American flag. The flavor is casual yet festive, and every bite feels like summer on your tongue.
Let’s face it: life can be hectic. But that doesn’t mean we can’t indulge in a delicious, homemade dessert! This recipe keeps things simple with minimal ingredients and maximum flavor. No fuss, no frills—just pure joy. Gather your friends and family around, because once you start making this colorful fruit pizza, you’ll want to whip it up again and again.
A Sweet Memory from My Childhood
Growing up, my summer weekends were filled with laughter, backyard barbecues, and of course, Grandma’s famous desserts. One summer, she decided to mix things up and introduced the family to a vibrant fruit pizza for an Independence Day celebration. I can still picture the stars and stripes of strawberries and blueberries, shining brightly on that creamy white canvas.
Grandma, with her infectious laughter and heartwarming stories, would proudly present her creation on a picnic table draped with a red, white, and blue tablecloth. As we dug in, my cousins and I debated who got to be the “flag builder” this year. Those sweet moments of joy and friendly competition are etched in my memory forever.
Seeing how a simple dish could bring family together made cooking more than just a chore—it became a cherished ritual. Now, as I put my own spin on that delightful recipe, I can’t help but pass along the same joy to you. Grab your favorite people, and let’s dive into this fun, colorful, and simple creation!
Ingredients to Create Kitchen Magic
Let’s break down the ingredients you’ll need for this scrumptious Sugar Cookie Flag Fruit Pizza:
-
1 17.5-ounce package refrigerated sugar cookie dough: This is your base—a soft, buttery cookie that will serve as the perfect canvas. If you’re feeling adventurous, you can make your own sugar cookie dough, but the refrigerated version saves time and keeps things easy!
-
1 8-ounce package cream cheese, room temperature: This will give your pizza a luscious, creamy layer. If you’re looking for a lighter option, feel free to use Neufchâtel cream cheese, which has less fat but still packs a delicious punch!
-
1 cup powdered sugar: This adds sweetness and helps achieve that creamy frosting texture. If you’re avoiding refined sugar, try using a powdered sugar substitute available in most health food stores.
-
1 teaspoon vanilla extract: A dash of vanilla adds a warm, sweet flavor that enhances all the other ingredients! If you’re out of vanilla, almond extract can work as an interesting and slightly nutty substitute.
-
Strawberries: The star of your flag! Fresh strawberries add sweetness, tartness, and a beautiful red hue. If strawberries aren’t in season, raspberries can also add a nice burst.
-
Blueberries: These little gems bring a refreshing note and add to the flag theme beautifully. They’re also super nutritious! If you want to mix things up, try using blackberries for a deeper flavor.
-
Whipped topping: Use this as an optional finishing touch for added lightness and creaminess. You can use homemade whipped cream or store-bought for convenience.
Step-by-Step Instructions: Baking Up a Storm!
Now that we’ve got our ingredients ready, let’s get those creative juices flowing! Follow these simple steps to create a fantastic fruit pizza that will have everyone clamoring for seconds.
-
Preheat your oven: Set your oven to 350°F (175°C). This ensures your sugar cookies bake to golden perfection.
-
Prepare the cookie crust: Open your package of refrigerated sugar cookie dough and slice it into rounds. Place those rounds on a lightly greased baking sheet, spacing them about 2 inches apart. Now, here’s a chef hack: use the bottom of a glass to gently press each round into a larger disk. This way, you’ll create a seamless crust!
-
Bake to golden goodness: Pop the baking sheet into the preheated oven and bake for about 10-12 minutes, or until the edges are lightly golden. Keep an eye on them—no one wants over-baked cookies! They will continue to firm up as they cool.
-
Make the frosting: While the cookies cool, grab a large mixing bowl. Combine your cream cheese, powdered sugar, and vanilla extract. Mix until the mixture is smooth and creamy—this is your luscious frosting! You can do this with an electric mixer, but a whisk works just fine if you’re feeling a bit like a strong chef today.
-
Spread the frosting: Once your cookies have cooled completely, carefully spread a generous layer of that creamy frosting across the cookie crust. You want to cover it fully for a beautiful surface for your toppings.
-
Create your flag: Now comes the fun part! Arrange the blueberries in the top left corner, creating a "star" field. Then, make rows of strawberries to form the stripes of the flag. This is where you can get creative—make each row perfectly straight or allow for some organic flair—it’s all about having fun!
-
Chill and Serve: Pop your beautiful fruit pizza into the fridge for about 30 minutes to allow the frosting to firm up slightly. Once you’re ready to serve, slice it into wedges just like pizza. Trust me, it’s way easier than cutting into squares!
Serving Suggestions: Presentation Matters
When it comes to serving this beauty, presentation is key! Slice the fruit pizza into triangles that resemble pizza slices, and place them on colorful dessert plates. You can even garnish the plate with a couple of extra berries or a sprig of mint for that pop of freshness. For a more festive touch, consider adding some star-shaped sprinkles or edible glitter for a special occasion.
Recipe Variations to Spice Things Up
Feeling a little adventurous with your fruit pizza? Here are a few creative variations to switch things up:
-
Chocolate Drizzle: Melt some dark or white chocolate and swirl it on top of your frosting for a decadent touch.
-
Seasonal Variations: Change the fruits depending on the season! Use peaches, kiwi, or raspberries for a summer vibe, or apples and pears in the fall.
-
Nutty Crunch: Sprinkle some chopped nuts, like pecans or walnuts, over the top for added crunch and flavor.
-
Herbal Infusion: Add a hint of freshness by layering on some finely chopped mint or basil between the fruit for an unexpected twist.
-
Gluten-Free Alternative: Swap the sugar cookie dough for a gluten-free version, and you can easily enjoy this treat while accommodating dietary needs.
Chef’s Notes: A Recipe that Dances Through Time
This recipe is a love letter to the sweetness of summer, but it’s also a reminder of how recipes can evolve over time. From my childhood memories with Grandma to my own family traditions, each version of the fruit pizza reflects the people, flavors, and moments that shape us.
I once tried to make a tropical version with mangoes and coconut cream, and while it never made it to the official recipe, it was a sweet mess that sparked laughter and creativity in the kitchen. Cooking should always be about discovery, so don’t be afraid to put your own spin on it!
FAQs and Troubleshooting
1. Can I make the cookie crust ahead of time?
Absolutely! You can prepare the sugar cookie crust in advance. Just store it in an airtight container for a couple of days, then frost and top it right before serving.
2. How can I prevent my fruit from getting soggy?
To keep things fresh, wait until serving time to slice your fruit and add it to the pizza. You can even toss the fruit in a little lemon juice to prevent browning.
3. My frosting is too runny; what can I do?
If your frosting is too runny, just add a bit more powdered sugar, a tablespoon at a time, until it reaches your desired consistency.
4. What if I don’t like cream cheese?
No problem! You can swap the cream cheese for Greek yogurt or a whipped mascarpone for a different flavor. You’ll still get that creamy base without the tanginess of cream cheese.
Nutritional Info (if applicable)
While indulging in sweet treats is all about balance, it’s worthwhile to know that each slice of this Sugar Cookie Flag Fruit Pizza is packed with vitamins from the fruit, and the recipe can easily be tailored to fit various dietary preferences. Adjust the sugar content and toppings as needed!
So there you have it—a delightful, festive Sugar Cookie Flag Fruit Pizza that is sure to become a summer staple in your kitchen. Embrace the sweetness of life, share this treat with loved ones, and, most importantly, keep those good memories rolling in the kitchen. After all, it’s not just about the food; it’s about the love and stories we create along the way. Let’s keep it fresh, simple, and seriously delicious!
PrintSugar Cookie Flag Fruit Pizza
A vibrant and delicious dessert featuring a buttery sugar cookie crust topped with creamy frosting and fresh fruits arranged to create an American flag.
- Prep Time: 15 minutes
- Cook Time: 12 minutes
- Total Time: 45 minutes
- Yield: 8 servings 1x
- Category: Dessert
- Method: Baking
- Cuisine: American
- Diet: Vegetarian
Ingredients
- 1 17.5-ounce package refrigerated sugar cookie dough
- 1 8-ounce package cream cheese, room temperature
- 1 cup powdered sugar
- 1 teaspoon vanilla extract
- 2 cups fresh strawberries
- 1 cup blueberries
- Whipped topping (optional)
Instructions
- Preheat your oven to 350°F (175°C).
- Prepare the cookie crust by slicing the refrigerated dough into rounds and placing them on a greased baking sheet.
- Bake for about 10-12 minutes, until the edges are lightly golden.
- Make the frosting by mixing cream cheese, powdered sugar, and vanilla until smooth.
- Spread the frosting over the cooled cookie crust.
- Arrange the blueberries in the top left corner to create a star field, and make rows of strawberries for the flag stripes.
- Chill in the fridge for about 30 minutes before slicing and serving.
Notes
For a creative twist, consider adding chocolate drizzle, seasonal fruits, or a sprinkle of nuts on top.
Nutrition
- Serving Size: 1 slice
- Calories: 250
- Sugar: 15g
- Sodium: 200mg
- Fat: 10g
- Saturated Fat: 5g
- Unsaturated Fat: 4g
- Trans Fat: 0g
- Carbohydrates: 35g
- Fiber: 2g
- Protein: 3g
- Cholesterol: 25mg
Keywords: fruit pizza, sugar cookies, summer dessert, festive dessert, patriotic dessert
Minute Cherry & Blueberry Pie: Quick Summer Classic
Cherry and Blueberry Pie: A Wholesome Family Classic
Welcome, foodies! Today we’re diving into a beloved staple that tantalizes taste buds and warms hearts: Cherry and Blueberry Pie. This delicious dessert is a beautiful marriage of sweet cherries and luscious blueberries, all encased in a buttery, flaky crust that’s simply irresistible.
To me, pies are the ultimate symbol of comfort food. They bring back memories of family gatherings, sunny picnics, and cozy nights on the porch, watching the stars after dinner. The aroma of pie baking in the oven stirs nostalgia in the air, instantly whisking me back to my childhood and the wonderful kitchen moments shared with my grandma.
Personal Story
I vividly remember the summer my grandma decided to teach me the art of pie-making. I was about eight years old, standing on a stool so I could reach the counter. She had a way of making everything feel like a big adventure. Armed with a basket of fresh cherries and blueberries from the local farmer’s market, we set out to create the perfect pie.
With her flour-dusted apron and that twinkle in her eye, she showed me how to mix the fruits with just the right amount of sugar and lemon juice. The joy was in the journey as much as in the finished product. I learned not just how to make a pie but how love and care transform simple ingredients into something magical.
We spent the afternoon chatting, laughing, and, of course, tasting the filling as we went. The final product was a pie so delicious that I remember wanting to keep it all to myself. Sure enough, it became a family favorite, feeding not just our bellies but our souls. And every time I make this Cherry and Blueberry Pie, I’m reminded of those sunny days spent laughing in the kitchen.
Let’s create some beautiful pie memories together, shall we?
Ingredients
Here’s what you’ll need for this scrumptious Cherry and Blueberry Pie:
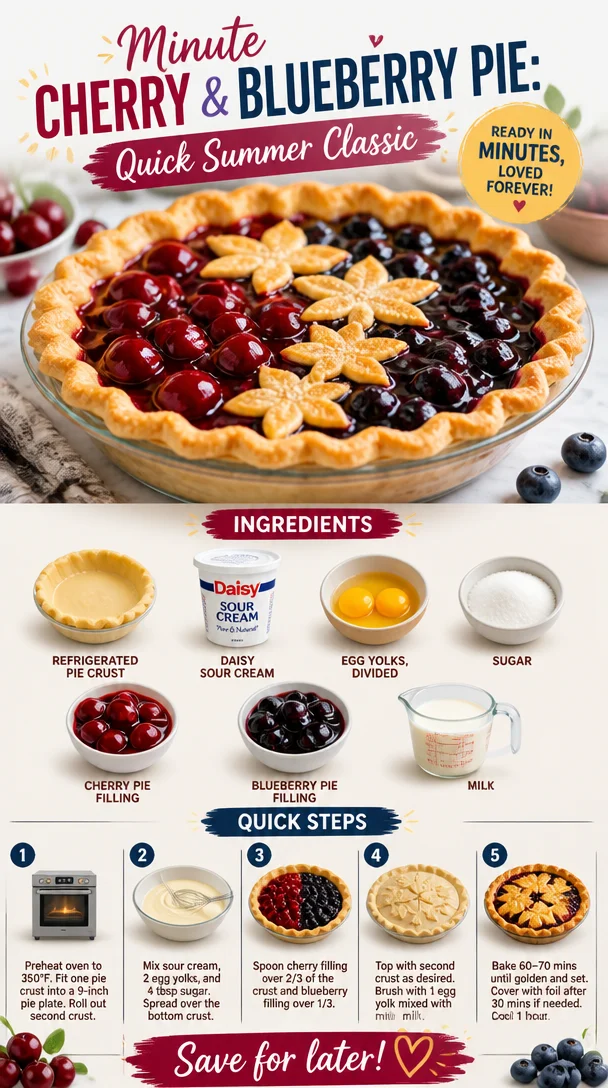
-
Refrigerated Pie Crust: A classic shortcut! You can make your own if you’re up for it, but don’t be afraid to grab a store-bought crust for convenience. It’ll save you time and still yield a delicious pie.
-
Daisy Sour Cream: This isn’t just for dipping! Sour cream adds an amazing creaminess and tang to your filling, balancing the sweetness of the fruits perfectly. If you’re feeling adventurous, try Greek yogurt as a substitute for a healthier twist.
-
Egg Yolks (divided): These will help bind your filling for a rich, luscious texture. Save the egg whites for breakfast or a meringue!
-
Sugar: This is your sweetener. Ground sugar (like superfine sugar) dissolves quicker, while brown sugar adds a lovely depth of flavor.
-
Cherry Pie Filling: Store-bought is fine, but if you’re using fresh cherries, you’ll need about 2 cups, pitted and halved. Just add your sugar and lemon juice!
-
Blueberry Pie Filling: Just like the cherry filling, you can grab this from the store or make your own using 2 cups of fresh blueberries. Simply cook with sugar and a little cornstarch for thickening!
-
Milk: You’ll use this to brush the crust before baking, giving you that beautiful golden finish. Almond or oat milk are excellent dairy-free options.
Step-by-Step Instructions
Now let’s get cooking! Here’s how to assemble your Cherry and Blueberry Pie step-by-step:
-
Preheat Your Oven: Set your oven to 425°F (220°C). This is essential for that perfect golden crust. A hot oven makes all the difference!
-
Prepare Your Crust: Roll out your refrigerated pie crust (if using) on a lightly floured surface until it’s about 12 inches in diameter. Don’t worry if it’s not perfect; rustic is charming!
-
Transfer to Pie Dish: Carefully place the crust in your 9-inch pie dish, pressing it gently into the edges. If you have excess dough hanging over the edge, you can trim it, but leave some for a beautiful crimped edge later!
-
Mix the Fruit Filling: In a medium bowl, combine the cherry and blueberry fillings, sugar, and 2 egg yolks. Stir until thoroughly mixed. Remember, tasting is key—adjust the sweetness to your liking!
-
Add the Sour Cream: Gently fold in the Daisy Sour Cream. This is what makes the filling so creamy and delicious. It will help to mellow the sugars and enhance the fruit flavor!
-
Fill the Pie: Spoon the fruit mixture into the prepared crust, spreading it evenly. Make sure it’s heaped nicely—this pie is all about those juicy fruit fillings!
-
Cover the Pie: If you have a second pie crust, roll it out and drape it over the filling. You can create a lattice top for a bit of flair, or simply cut slits for steam vents. Crimp the edges to seal the pie and prevent any juices from escaping.
-
Brush with Egg and Milk: Combine the remaining egg yolk with a splash of milk, and brush this mixture over the crust. This will give you that mouthwatering golden finish!
-
Bake the Pie: Place your pie on a baking sheet (to catch any drips) and bake for 25-30 minutes or until the crust is golden and the filling is bubbling. Make your kitchen smell heavenly!
-
Cool Down: Let it cool for at least an hour. I know it’s tough to wait, but this helps the filling set up beautifully.
Serving Suggestions
When it’s finally time to dig in, serve your Cherry and Blueberry Pie with a scoop of vanilla ice cream or a dollop of freshly whipped cream on top for an indulgent treat. Leftovers (if there are any!) can be enjoyed for breakfast—because why not?
Recipe Variations
Feel like mixing things up? Try one of these variations:
- Mixed Berry Delight: Swap in raspberries or blackberries for a berry medley pie.
- Peach Fusion: Add in diced peaches for a summery twist!
- Nutty Crust: Add crushed nuts to your pie crust for added texture and flavor.
- Vegan Version: Use a vegan pie crust and substitute the egg with flaxseed and the sour cream with cashew cream.
Chef’s Notes
I can’t tell you how many times this pie has been my go-to for potlucks and family gatherings. It’s a crowd-pleaser, and people always ask for the recipe (which of course, I happily share!). One time, I attempted to speed up the cooling process by placing my pie in the fridge—we ended up with a very experimental, chilly pie that didn’t quite make the cut! So learn from my mistake and let it cool at room temperature.
FAQs and Troubleshooting
Q: My pie filling is too runny. What can I do?
A: If your filling ends up too juicy, make sure you’re using enough thickening agent when making your filling. You can also try simmering it a bit on the stove with some cornstarch.
Q: How do I prevent my crust from burning?
A: If the edges of your crust are browning too fast, simply cover them with foil or use a pie shield during baking until the pie is done.
Q: Can I freeze leftover pie?
A: Absolutely! Wrap it tightly and store in the freezer for up to three months. Just remember to let it cool completely before freezing.
Q: How do I keep my crust flaky?
A: Make sure your butter or shortening is cold, and don’t overwork the dough!
Nutritional Info
While the nutritional content will vary depending on the exact ingredients you use, a single slice of Cherry and Blueberry Pie typically contains approximately:
- Calories: 320
- Fat: 16g
- Carbohydrates: 43g
- Protein: 3g
Wrapping It Up
There you have it! A delightful Cherry and Blueberry Pie that’s sure to impress family and friends while embodying the spirit of nostalgia and love. Remember, pie-making is an art, and like any art form, it’s something to enjoy and evolve over time. I can’t wait to hear your stories and see your own pie adventures. Let’s keep it fresh, simple, and seriously delicious! Happy baking!
PrintCherry and Blueberry Pie

A delicious combination of sweet cherries and luscious blueberries in a buttery, flaky crust.
- Prep Time: 15 minutes
- Cook Time: 30 minutes
- Total Time: 45 minutes
- Yield: 8 servings 1x
- Category: Dessert
- Method: Baking
- Cuisine: American
- Diet: Vegetarian
Ingredients
- 1 refrigerated pie crust
- 1 cup Daisy sour cream
- 2 egg yolks (divided)
- 3/4 cup sugar
- 2 cups cherry pie filling
- 2 cups blueberry pie filling
- 2 tablespoons milk
Instructions
- Preheat your oven to 425°F (220°C).
- Prepare your crust by rolling out the refrigerated pie crust on a lightly floured surface until about 12 inches in diameter.
- Transfer the crust into a 9-inch pie dish, pressing gently into the edges.
- Mix the cherry and blueberry fillings, sugar, and 2 egg yolks in a medium bowl until thoroughly combined.
- Add the Daisy sour cream and fold gently.
- Fill the prepared crust with the fruit mixture, spreading it evenly.
- Cover the pie with a second pie crust or create a lattice top.
- Brush the crust with the mixture of the remaining egg yolk and milk.
- Bake for 25-30 minutes or until the crust is golden and filling is bubbling.
- Cool for at least an hour before serving.
Notes
Serve with vanilla ice cream or whipped cream. Leftovers can be enjoyed for breakfast.
Nutrition
- Serving Size: 1 slice
- Calories: 320
- Sugar: 18g
- Sodium: 150mg
- Fat: 16g
- Saturated Fat: 9g
- Unsaturated Fat: 5g
- Trans Fat: 0g
- Carbohydrates: 43g
- Fiber: 2g
- Protein: 3g
- Cholesterol: 85mg
Keywords: cherry pie, blueberry pie, dessert pie, summer dessert, family recipe
Creamy Raspberry Buttercream Frosting in 30 Minutes
The Sweet Symphony of Raspberry Buttercream Frosting
Welcome to another delicious adventure at Clean Plate Cravings! Today, we’re diving into the world of baking with a recipe that will elevate your desserts and make any occasion feel special: Raspberry Buttercream Frosting. There’s something almost magical about a velvety frosting that sweetens the deal and adds that burst of flavor we all crave. And if you’re like me, you know that frosting can make or break your cake, cupcakes, or even brownies.
Picture this: it’s a warm summer afternoon, and you’re gathered in the kitchen with your family. You can hear laughter filling the air and the sweet scent of baked goods wafting through the open windows. You’re preparing something special for a birthday, family gathering, or just because it’s Tuesday! The cakes are frosted, and you can’t help but steal a lick of the bowl. That rich, creamy buttercream mingled with the bright taste of raspberries—it’s downright intoxicating.
That’s the moment I want to recreate for you all with this Raspberry Buttercream Frosting recipe. It’s not just about slathering frosting on your baked goods; it’s about creating memories, sharing sweetness, and enjoying each bite of life’s delicious moments. With every dollop, you’re adding a splash of color and a dollop of love that makes the everyday extraordinary!
So, grab your whisk, slide on your apron, and let’s transform a simple cake into a vibrant masterpiece with this luscious raspberry buttercream. It’s creamy, dreamy, and full of personality. Ready? Let’s get started!
A Sprinkle of Nostalgia
As a child, I always looked forward to baking days with my mom. We’d gather in our cozy kitchen, flour dusting the countertops and the sweet melodies of our favorite tunes playing softly in the background. I can still picture the bright pink frosting that adorned my birthday cake each year. It was my absolute favorite, made with raspberries we picked from the backyard, bursting with flavor and memories.
One summer, we decided to throw a little garden party, inviting friends and family to join us under the twinkling lights. The star of the show was a grand layered cake topped with that glorious raspberry buttercream. I remember standing on a chair to reach the table, eagerly waiting for everyone to take a slice. The smiles that lit up their faces when they tasted that rich, fruity frosting instantly gave me a warm glow.
Those moments sparked a love for baking that still fuels my passion today. Now, I’m so excited to share this raspberry buttercream frosting recipe with you—perfect for any occasion and guaranteed to make your desserts shine with an unforgettable touch.
Ingredients
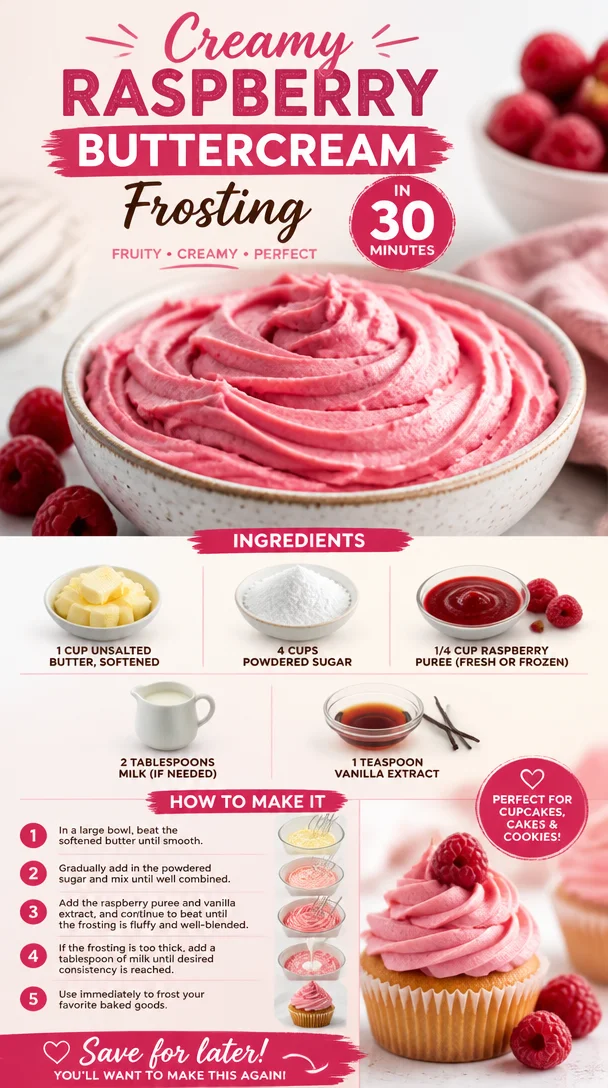
To whip up this delightful Raspberry Buttercream Frosting, gather the following ingredients:
-
1 cup unsalted butter, softened
This is the base of your frosting, creating that creamy texture. Make sure it’s softened to room temperature for easy whipping. If you’re looking for a dairy-free option, you can substitute this with coconut oil or plant-based butter. -
4 cups powdered sugar
This sweet ingredient provides the structure and sweetness. If you’re in a pinch, you can make your own by blending granulated sugar until it’s fine. -
1/4 cup raspberry puree (fresh or frozen)
This brings the fruity flavor to life! Feel free to use store-bought puree, or make your own by blending fresh or thawed frozen raspberries. Just pass it through a sieve to remove the seeds for a smooth finish. -
2 tablespoons milk (if needed)
Use this to lighten the consistency if your frosting is too thick. Non-dairy milk works too, like almond or oat milk. -
1 teaspoon vanilla extract
This adds depth and enhances the overall flavor. You can swap it with almond extract if you’re feeling adventurous!
Step-by-Step Instructions
Let’s get to the fun part—the actual frosting-making! Here’s how to create this delicious raspberry buttercream frosting, step by step:
-
Prepare your ingredients
Before you turn on that mixer, gather all your ingredients. Having everything ready will make the process smoother and more enjoyable. Pro tip: Make sure your butter is soft; if it’s too cold, you’ll end up with lumps in your frosting! -
Cream the butter
In a large bowl, add your softened unsalted butter. Use a hand mixer or stand mixer fitted with a paddle attachment. Beat it on medium speed for about 2-3 minutes until it’s light and fluffy. This step is crucial—it incorporates air into the butter, giving your frosting a light texture. -
Add the powdered sugar
Gradually add the powdered sugar, one cup at a time, while mixing on low speed to avoid a sugary cloud. Once you’ve added all the sugar, increase the speed to medium and beat until combined. You should see a soft, thick mixture forming. -
Incorporate raspberry puree
Now for the fun part—add that gorgeous raspberry puree! Mix on medium speed until the color is evenly distributed and the frosting becomes a beautiful pink hue. If the frosting seems too thick, this is when you can add a tablespoon of milk to achieve your desired consistency. -
Flavor it up
Pour in the vanilla extract for that touch of warmth. Mix it lightly to ensure it’s fully incorporated. Taste your frosting. If you want more raspberry flavor, feel free to add a bit more puree, adjusting sugar as needed. -
Final touch-up
Once you’re happy with the flavor and texture, give it one last whip for about 30 seconds on high speed. This will ensure everything is well combined and airy. Now it’s ready for action!
Serving Suggestions
When it comes to serving your raspberry buttercream frosting, the sky’s the limit! Use it generously to frost cakes, dollop it on cupcakes, or spread it between layers of fresh cookies. Not only does it taste amazing, but the vibrant pink color is a showstopper and can turn any dessert into a masterpiece. For an extra touch, you might add fresh raspberries or edible flowers on top for a delightful decoration.
Recipe Variations
Ready to put a twist on your frosting? Here are a few fun variations to keep things exciting:
-
Lemon Raspberry Twist: Add some lemon zest to your buttercream for a zesty contrast to the raspberry sweetness.
-
Chocolate Raspberry: Mix in some cocoa powder to create a rich chocolate raspberry frosting that’s perfect for chocolate cakes or cupcakes.
-
Minty Fresh: Add a drop of peppermint extract along with the vanilla for a refreshing mint raspberry flavor.
-
Berry Bliss: Swap the raspberry puree for other berry purees, like strawberry or blueberry, to create new flavors.
Chef’s Notes
This raspberry buttercream frosting has been a staple in my kitchen for years. Initially, I played around a lot with the ratios and ingredients until I found the perfect balance that produced a fluffy yet stable frosting. I’ve used it for everything from birthday cakes to casual weeknight desserts, and it’s never disappointed!
One funny memory I have is from a baking competition I participated in years ago, where I was up against some seasoned pros. I decided to use this frosting as my secret weapon! Their eyes widened when they tasted it, and I proudly walked away with first place. A berry-based frosting can charm anyone with its sweetness, but the best part is still seeing the joy on people’s faces when they take that first bite.
FAQs and Troubleshooting
-
Why is my frosting too thin?
If your frosting is runny, you likely added too much raspberry puree. Just add a little more powdered sugar until you reach your desired consistency. -
Can I make this frosting ahead of time?
Absolutely! You can prepare the frosting a day in advance. Just store it in an airtight container in the fridge. When you’re ready to use it, simply re-whip it to bring it back to that fluffy texture. -
What if my frosting is too thick?
If your frosting turns out too thick, add milk one tablespoon at a time until you achieve the desired consistency. Avoid adding too much liquid at once! -
How do I store leftover frosting?
Store any leftover frosting in an airtight container in the fridge for up to a week. Alternatively, you can freeze it for up to three months. Just make sure to let it thaw in the fridge and re-whip before using!
Nutritional Info
While I advise enjoying frosting in moderation, here’s a quick nutritional breakdown per serving (about 2 tablespoons):
- Calories: 120
- Total Fat: 7g
- Saturated Fat: 4g
- Carbohydrates: 14g
- Sugars: 12g
- Protein: 0g
Now that you’re armed with this luscious Raspberry Buttercream Frosting recipe, I hope you’re inspired to whip up something wonderful in your kitchen. Remember, cooking is all about experimentation and joy, so don’t hesitate to make this frosting your own! Let’s make every treat a celebration, one dollop at a time. Happy baking!
PrintRaspberry Buttercream Frosting
A luscious and vibrant raspberry buttercream frosting that brings sweetness and flavor to any dessert.
- Prep Time: 15 minutes
- Cook Time: 0 minutes
- Total Time: 15 minutes
- Yield: 2 cups 1x
- Category: Dessert
- Method: Mixing
- Cuisine: American
- Diet: Vegetarian
Ingredients
- 1 cup unsalted butter, softened
- 4 cups powdered sugar
- 1/4 cup raspberry puree (fresh or frozen)
- 2 tablespoons milk (if needed)
- 1 teaspoon vanilla extract
Instructions
- Prepare your ingredients
- Cream the butter until light and fluffy
- Add the powdered sugar gradually while mixing
- Incorporate raspberry puree for flavor
- Flavor it up with vanilla extract
- Final touch-up with a last whip
Notes
This frosting is perfect for cakes and cupcakes. For a fun twist, try adding lemon zest or cocoa powder.
Nutrition
- Serving Size: 2 tablespoons
- Calories: 120
- Sugar: 12g
- Sodium: 10mg
- Fat: 7g
- Saturated Fat: 4g
- Unsaturated Fat: 3g
- Trans Fat: 0g
- Carbohydrates: 14g
- Fiber: 0g
- Protein: 0g
- Cholesterol: 30mg
Keywords: frosting, raspberry, buttercream, dessert, baking, sweet
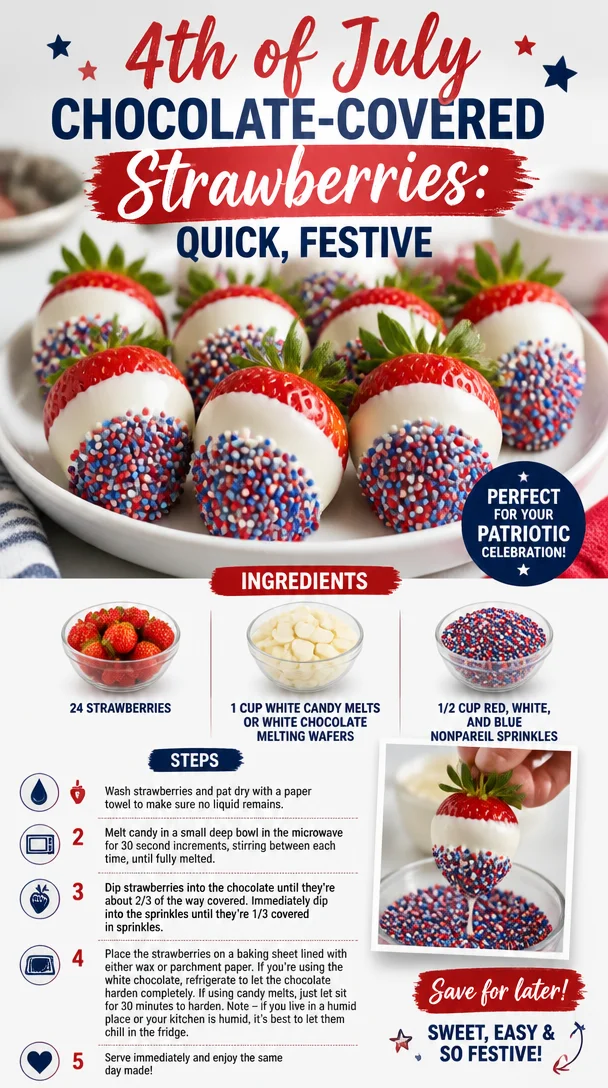
4th of July Chocolate-Covered Strawberries: Quick, Festive
Celebrate Independence Day with Festive Chocolate Covered Strawberries
Fourth of July celebrations are all about bringing people together, and what better way to do that than with a sweet treat that embodies the essence of summer, fun, and patriotism? Today, I’m excited to share my recipe for vibrant Chocolate Covered Strawberries adorned with red, white, and blue sprinkles, perfect for your holiday festivities. These delightful desserts are not only visually stunning but also incredibly easy to make, ensuring you can spend more time celebrating with friends and family, and less time stressing in the kitchen.
Picture this: It’s a warm July afternoon, and the smell of barbecue wafts through the air while kids are giggling in the backyard. You’ve got the grill going and the patriotic decor in full swing, but you know that dessert is where the magic happens. That’s where these chocolate strawberries come in! They’re not just a treat but a memory-maker.
A Sweet Memory from My Kitchen
I’ll never forget my very first Fourth of July celebration where I took my first step into the world of chocolate-covered delights. I was in my grandma’s kitchen, the sun streaming through the windows, and the scent of fresh strawberries mingling with melted chocolate filled the air. She handed me a bowl of melted chocolate, and my eyes lit up—the idea of dipping strawberries felt like magic!
As we dipped those luscious fruits, we laughed and shared stories of family traditions, tales of fireworks, and summer fun. That day, I learned how simple ingredients can be transformed into something extraordinary just with a little love and creativity. So fast forward to today, and I’m here to reignite that nostalgic joy in my own kitchen and yours with a fun twist on those classic chocolate-covered goodies—perfectly themed for Independence Day!
Ingredients
Here’s what you’ll need to create these festive strawberries:
-
24 Strawberries
These juicy gems are the star of the show. Look for bright, ripe ones with their green tops still attached. If strawberries aren’t in season, try replacing them with blueberries for a tangy taste or even bananas cut into stars for a fun shape! -
1 Cup White Candy Melts or White Chocolate Melting Wafers
This is your canvas! White candy melts are ideal because they melt smoothly and set nicely. If you prefer chocolate, semi-sweet chocolate chips work too; just remember to add a touch of coconut oil to help them set! -
1/2 Cup Red, White, and Blue Nonpareil Sprinkles
These little guys are what make your strawberries pop! If you can’t find patriotic sprinkles, you can mix regular sprinkles with some edible glitter for an extra sparkle or use a combination of crushed nuts for a different crunch.
Step-by-Step Instructions
Let’s get to this deliciousness! Follow these steps, and before you know it, you’ll have a platter of patriotic chocolate-covered strawberries ready to impress.
-
Prep Your Strawberries
Rinse the strawberries under cold water and gently pat them dry with a paper towel. It’s essential to make sure they’re completely dry because any moisture can cause the chocolate to seize up. -
Melt the Chocolate
In a microwave-safe bowl, combine the white candy melts. Heat them in 30-second intervals, stirring in between until melted and smooth. Chef Tip: To avoid burning, ensure you heat the chocolate gradually. -
Dip the Strawberries
Hold a strawberry by the green stem and dip it into the melted chocolate, swirling it slightly to coat. Lift it out and let the excess chocolate drip back into the bowl. Quick Hack: If you’re feeling adventurous, you can create a marbled effect by swirling in some melted dark chocolate with the white. -
Add Sprinkles
Immediately after dipping, sprinkle your festive nonpareils over the chocolate-coated strawberries while the chocolate is still wet. This step is vital, as the chocolate hardens quickly. Tip: Tilt the strawberry slightly to get a nice even coverage on one side if you want a half-dipped effect. -
Let Them Set
Place the dipped strawberries on a parchment-lined baking sheet. This helps prevent them from sticking. If you’re in a hurry, pop the tray into the refrigerator for about 15-20 minutes until the chocolate is fully set. -
Serve and Enjoy!
Once the chocolate is firm, they’re ready to be served! Arrange your strawberries on a festive platter for that extra ‘wow’ factor.
Serving Suggestions
To really capture that holiday spirit, arrange your strawberries in a circular pattern to resemble a patriotic flag or create a colorful centerpiece. You can even add small little flags in each strawberry or around the platter for a cute touch. These little pops of delight will brighten up any picnic table or dessert bar!
Recipe Variations
Want to get a bit creative? Here are a few variations to make the recipe your own:
-
Chocolate Drizzle
After the white chocolate sets, drizzle some dark or milk chocolate on top for a beautiful contrast. -
Different Sprinkle Themes
Change up the celebration theme by using different colored sprinkles for birthdays, anniversaries, or any festive occasion! -
Stuffed Strawberries
For a fun twist, hollow out the strawberries and fill them with whipped cream or flavored cream cheese before dipping them. -
Flavored Chocolate
Infuse your melting chocolate with flavors like vanilla extract, peppermint, or even some espresso powder for an extra kick. -
Fruit Arrangements
Swap some strawberries for raspberries or blueberries for a berry medley that still keeps that festive spirit alive.
Chef’s Notes
Over the years, my chocolate-covered strawberries have taken on a life of their own! They started as a simple treat but have evolved into a fun project I often do with friends and family. There’s just something magical about the process—seeing everyone’s unique designs brings a smile. Plus, every time I think back to that cheerful day in my grandma’s kitchen, I can’t help but love how truly special these treats are, not only for taste but for the memories they create.
FAQs and Troubleshooting
Here are some common questions you might have while making these delightful strawberries:
-
Why did my chocolate seize?
Chocolate seizes when it comes into contact with moisture. Always ensure your strawberries are dry before dipping, and melt your chocolate gently! -
How can I store them?
Store your chocolate-covered strawberries in the refrigerator in an airtight container for up to two days. Keep them away from moisture! -
Can I use regular chocolate instead of candy melts?
Absolutely! Just use a bit of coconut oil to help the chocolate remain smooth and shiny. -
What if my chocolate isn’t melting smoothly?
This could be due to overheating. Make sure you’re melting your chocolate in short bursts and stirring thoroughly to even out the temperature.
Nutritional Info
While I believe in enjoying treats without restriction, you may be curious about the nutritional profile. Here’s a rough estimate for each strawberry with a white chocolate coating:
- Calories: ~50 calories
- Fat: 2.5g
- Carbohydrates: 8g
- Protein: 0.5g
Feel free to adjust the toppings to make them even more your style!
And there you have it—your very own Fourth of July Chocolate Covered Strawberries! Ready to make a memorable impact on your celebrations while delighting your taste buds. Let them be a reminder of the joy food can bring, creating gatherings filled with laughter and love. Enjoy every bite and don’t forget to make those sweet memories along the way! Happy Fourth! 🎆🍓
PrintFestive Chocolate Covered Strawberries
Celebrate Independence Day with vibrant Chocolate Covered Strawberries adorned with red, white, and blue sprinkles, perfect for your holiday festivities.
- Prep Time: 10 minutes
- Cook Time: 5 minutes
- Total Time: 15 minutes
- Yield: 12 servings 1x
- Category: Dessert
- Method: Dipping
- Cuisine: American
- Diet: Vegetarian
Ingredients
- 24 Strawberries
- 1 Cup White Candy Melts or White Chocolate Melting Wafers
- 1/2 Cup Red, White, and Blue Nonpareil Sprinkles
Instructions
- Rinse the strawberries under cold water and gently pat them dry with a paper towel.
- Combine the white candy melts in a microwave-safe bowl. Heat in 30-second intervals, stirring until melted and smooth.
- Hold a strawberry by the green stem and dip it into the melted chocolate, swirling to coat.
- Immediately sprinkle your festive nonpareils over the chocolate-coated strawberries.
- Place the dipped strawberries on a parchment-lined baking sheet.
- Pop the tray into the refrigerator for 15-20 minutes until the chocolate is fully set.
- Arrange the strawberries on a festive platter and enjoy!
Notes
Store chocolate-covered strawberries in the refrigerator in an airtight container for up to two days.
Nutrition
- Serving Size: 1 strawberry
- Calories: 50
- Sugar: 4g
- Sodium: 10mg
- Fat: 2.5g
- Saturated Fat: 1.5g
- Unsaturated Fat: 1g
- Trans Fat: 0g
- Carbohydrates: 8g
- Fiber: 0g
- Protein: 0.5g
- Cholesterol: 0mg
Keywords: chocolate covered strawberries, Fourth of July, summer dessert, patriotic treats, easy dessert
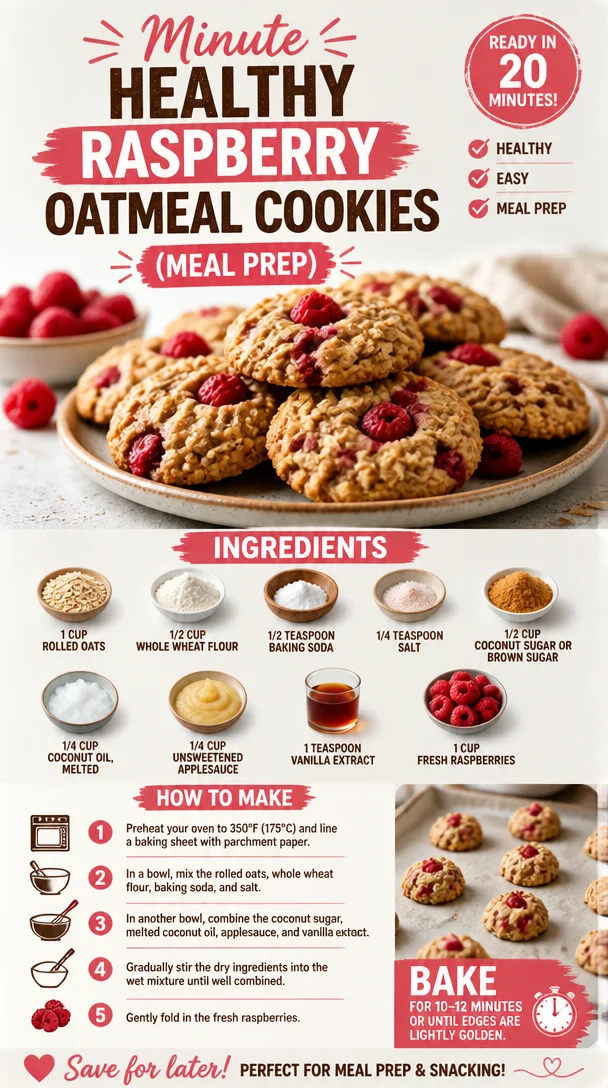
Minute Healthy Raspberry Oatmeal Cookies (Meal Prep)
Healthy Raspberry Oatmeal Cookies: A Feel-Good Delight
Hey there, foodie friends! Today I’m super excited to share a recipe that’s truly close to my heart—Healthy Raspberry Oatmeal Cookies. If you’re anything like me, you cherish those moments when you can indulge without the guilt. And trust me, these cookies bring all the deliciousness while keeping it wholesome. Let’s dive into the world of vibrant flavors, good-for-you ingredients, and a sprinkle of nostalgia!
Introduction
As someone who believes that healthy eating can be a true delight, I’m always on the lookout for recipes that are both nourishing and scrumptious. Cookies might typically be seen as a guilty pleasure, but today, we’re flipping the script! These Healthy Raspberry Oatmeal Cookies are not only packed with wholesome ingredients, but they also deliver that sweet satisfaction we all crave.
Picture this: You walk into your kitchen, and the tangy aroma of fresh raspberries fills the air. The sun is shining, birds are chirping outside, and you’ve got your favorite tunes playing. You pull these cookies out of the oven, and they are warm, chewy, and just a little crispy on the edges. Yes, my friends, this is what life is all about!
I created this recipe with the idea that healthful eating should be accessible and enjoyable. With just a handful of simple ingredients, you can whip up a batch that’s perfect for breakfast, an afternoon snack, or even a guilt-free dessert. They’re bursting with juicy raspberries, bringing you not just flavor but also a boost of antioxidants. And the best part? You can feel good about every single bite!
So, grab your apron, and let’s get baking! You’ll want to make a double batch because these cookies won’t last long.
Personal Story
This recipe reminds me of carefree afternoons spent in my grandmother’s kitchen. She was the queen of baking, whipping up a storm with whatever she had on hand. I can still hear her laughter as we baked together, flour dusting our hair and the joyful chaos of mixing bowls and spoons filling the air. One day, I remember her pulling out a colorful basket of freshly picked raspberries from her garden. “We’re making cookies!” she exclaimed, her eyes twinkling with excitement.
We mashed those sweet little berries into a simple dough, and within an hour, the house was filled with the most heavenly aroma. It was the first time I learned that you could create magic with just a few staple ingredients and a lot of love. Ever since then, I’ve treasured the idea of incorporating fresh fruits into baked goods—something that’s easy, delicious, and beautifully nostalgic. This recipe is a tribute to those memories, sharing the love and joy of baking with raspberries in every bite!
Ingredients
Let’s gather our ingredients and get cooking! Here’s what you’ll need:
-
1 cup rolled oats: The heart of our cookies! Rolled oats provide a chewy texture and significant health benefits. They’re packed with fiber, keeping you full and satisfied. If you need a gluten-free option, you can easily find gluten-free rolled oats.
-
1/2 cup whole wheat flour: This adds a nutty flavor and extra nutrients compared to all-purpose flour. You can swap for almond flour or oat flour for a gluten-free twist!
-
1/2 teaspoon baking soda: This will help our cookies rise and give them the perfect texture. Remember, fresh baking soda is key—check that expiration date!
-
1/4 teaspoon salt: A pinch of salt enhances the flavors in our sweet cookies. If you prefer a sweet-savory combo, a sprinkle of sea salt on top after baking is divine.
-
1/2 cup coconut sugar or brown sugar: Either option adds a lovely caramel flavor. Coconut sugar is lower on the glycemic index, making it a great alternative.
-
1/4 cup coconut oil, melted: This brings richness and moisture to our cookies. If you prefer, you could also use unsalted butter or even nut butter for a different taste.
-
1/4 cup unsweetened applesauce: This is our secret ingredient! It keeps the cookies soft and moist while adding natural sweetness. You can make your own if you’re feeling adventurous!
-
1 teaspoon vanilla extract: Always a must for bakery vibes! Use pure vanilla extract for the best flavor.
-
1 cup fresh raspberries: The stars of the show! They burst with juicy flavor and provide antioxidants. Frozen raspberries work in a pinch, just remember to thaw and drain them first.
Step-by-Step Instructions
Now that we have our ingredients lined up, let’s jump into the making of these delightful cookies—follow these steps, and you’ll be a cookie champion in no time!
-
Preheat your oven: Set your oven to 350°F (175°C) and line a baking sheet with parchment paper. This will ensure our cookies don’t stick and have a lovely golden color.
-
Mix the dry ingredients: In a large mixing bowl, combine the rolled oats, whole wheat flour, baking soda, and salt. Give them a good stir with a whisk—it’s like a warm-up for our cookie dough!
-
Combine the wet ingredients: In another bowl, whisk together the melted coconut oil, coconut sugar (or brown sugar), applesauce, and vanilla extract until smooth. It should be a lovely, creamy texture!
-
Combine the mixtures: Gradually add the wet ingredients to the dry mixture, stirring until well combined. This is where the magic starts to happen—watch as it transforms into a cohesive dough.
-
Fold in the raspberries: Gently fold in the fresh raspberries, careful not to break them too much. You want those juicy pockets of goodness throughout each cookie!
-
Scoop the dough: Using a cookie scoop or two tablespoons, drop rounds of cookie dough onto the prepared baking sheet, spacing them about 2 inches apart. Remember, they’ll spread a little bit, so give them room to breathe!
-
Bake and cool: Pop them in the oven for about 12-15 minutes, until the edges are golden and the centers look set. Let them cool on the baking sheet for a few minutes before transferring them to a wire rack to cool completely.
-
Enjoy!: Now comes the best part—sink your teeth into these warm, chewy delights. You might want to hide some away for later, but no judgment if you can’t resist!
Serving Suggestions
These cookies are delightful on their own but can also be plated in fun ways! Serve them warm with a dollop of Greek yogurt or a drizzle of honey for extra deliciousness. They’re perfect for breakfast alongside your morning coffee or as a satisfying midday snack. Feel free to stack them on a beautiful plate to impress your friends or family—they’ll think you’re a professional baker!
Recipe Variations
Want to switch things up? Here are some fun variations you can try out!
-
Chocolate Chip Raspberry: Mix in a handful of dark chocolate chips for a delightful chocolate-raspberry combo. Who doesn’t love chocolate, right?
-
Nutty Delight: Add 1/2 cup of chopped nuts like walnuts or almonds for added crunch and nutrition.
-
Coconut Bliss: Fold in some unsweetened shredded coconut for an extra tropical flavor.
-
Spiced Up: Add a pinch of cinnamon or nutmeg to the dry ingredients for a warm, cozy flavor.
-
Zesty Lemon: Add a teaspoon of lemon zest to brighten up the flavors and create a refreshing twist!
Chef’s Notes
As a chef, I love experimenting in the kitchen, and this recipe has come a long way since my early days of baking. I remember my first batch being a bit crumbly—too much flour and not enough moisture! Through trial and error, I’ve perfected this mix to achieve the ideal chewy and tender cookie. You can play around with the sweetness, too. If you prefer a less sugary option, reduce the sugar and add a touch more applesauce.
Oh, and here’s a funny tidbit—I once swapped the coconut sugar for regular white sugar without realizing it, and they turned out so much sweeter! My taste testers loved it, but I learned to stick to my trusty coconut sugar for that perfect balance.
FAQs and Troubleshooting
1. Can I use frozen raspberries?
Absolutely! Just make sure to thaw and drain them thoroughly to avoid excessive moisture in your cookies.
2. How do I store these cookies?
Store them in an airtight container at room temperature for about a week. They also freeze well—just layer them with parchment paper and pop them in a freezer bag for up to three months!
3. Can I make these vegan?
Yes! Substitute the coconut oil with a plant-based butter alternative and ensure your sugar is vegan-friendly.
4. Why are my cookies falling apart?
This might happen if you’ve added too much flour or not enough moisture. Next time, try measuring your flour properly or adding a tad more applesauce until you get the right consistency.
Nutritional Info (Optional)
(This section may be omitted if not applicable)
Each cookie has roughly:
- Calories: 120
- Protein: 2g
- Fats: 5g
- Carbohydrates: 18g
- Fiber: 2g
- Sugar: 6g
There you have it, my foodie friends! A delightful recipe for Healthy Raspberry Oatmeal Cookies that’s sure to bring a little joy to your day. These cookies are not just delicious; they encapsulate the spirit of home baking and the joy of nourishing our bodies. So, roll up those sleeves, gather your ingredients, and bake away! Happy baking!
PrintHealthy Raspberry Oatmeal Cookies
Wholesome and delicious cookies packed with juicy raspberries and rolled oats. Perfect for breakfast or a guilt-free snack.
- Prep Time: 15
- Cook Time: 15
- Total Time: 30
- Yield: 12 cookies 1x
- Category: Dessert
- Method: Baking
- Cuisine: American
- Diet: Vegetarian
Ingredients
- 1 cup rolled oats
- 1/2 cup whole wheat flour
- 1/2 teaspoon baking soda
- 1/4 teaspoon salt
- 1/2 cup coconut sugar or brown sugar
- 1/4 cup coconut oil, melted
- 1/4 cup unsweetened applesauce
- 1 teaspoon vanilla extract
- 1 cup fresh raspberries
Instructions
- Preheat your oven: Set your oven to 350°F (175°C) and line a baking sheet with parchment paper.
- Mix the dry ingredients: In a large mixing bowl, combine the rolled oats, whole wheat flour, baking soda, and salt.
- Combine the wet ingredients: In another bowl, whisk together the melted coconut oil, coconut sugar, applesauce, and vanilla extract until smooth.
- Combine the mixtures: Gradually add the wet ingredients to the dry mixture, stirring until well combined.
- Fold in the raspberries: Gently fold in the fresh raspberries.
- Scoop the dough: Drop rounds of cookie dough onto the prepared baking sheet, spacing them about 2 inches apart.
- Bake and cool: Bake for about 12-15 minutes, until the edges are golden and the centers look set.
- Enjoy: Sink your teeth into these warm, chewy delights.
Notes
Store cookies in an airtight container at room temperature for about a week. They also freeze well for up to three months.
Nutrition
- Serving Size: 1 cookie
- Calories: 120
- Sugar: 6g
- Sodium: 120mg
- Fat: 5g
- Saturated Fat: 4g
- Unsaturated Fat: 1g
- Trans Fat: 0g
- Carbohydrates: 18g
- Fiber: 2g
- Protein: 2g
- Cholesterol: 0mg
Keywords: raspberry, oatmeal, cookies, healthy, dessert