Grilled Pineapple with Ice Cream: Summer Dessert in Minutes
The Sweet Simplicity of Grilled Pineapple with Ice Cream
Welcome back, food lovers! Today, we’re going to embark on a delightful culinary adventure that marries sweet and savory—think backyard barbecues and warm, sun-drenched days. I’m talking about Grilled Pineapple with Ice Cream! If you’ve never tried this indulgent treat, you are in for a real surprise. Whether you’re throwing a summer bash or just craving a sweet bite after dinner, this dish is about to become your new best friend.
Picture this: It’s a sunny Saturday afternoon, and the grill is sizzling with a mix of aromas—burgers, veggies, and of course, pineapple. As the fragrant, caramelized fruit comes off the grill, it’s drizzled with honey and topped with a perfect scoop of creamy ice cream. Ah, bliss! It’s a dessert that feels incredibly easy yet impressively gourmet. Plus, it’s gluten-free and can be made vegan, too! Let’s dive into the juicy details of crafting this refreshing dish.
A Family Tradition
Growing up, summer always meant family BBQs. My parents made a killer spread that could please any palate, but it was my grandma’s grilled pineapple that stole the show. I still remember helping her in the kitchen, excitedly peeling and cutting the pineapple as she regaled me with stories about her childhood in Hawaii, where fresh fruit was always in abundance. She introduced me to the magic of caramelizing pineapple over the grill—how the heat transforms it from ordinary to extraordinary, enhancing its sweetness and adding a smoky depth.
One afternoon, in the haze of laughter and sizzling food, Grandma surprised us by serving the grilled pineapple alongside a scoop of creamy vanilla ice cream. The contrast of temperatures and flavors was heavenly! That moment stuck with me and became a cherished memory—a simple, joyful celebration of summer and family. Fast forward to today, where I find myself recreating this beloved dessert, and I can’t wait to share it with you!
Ingredients
To whip up this delightful dessert, you’ll need just a few simple ingredients. Here’s what you’ll need:
-
1 ripe pineapple
Choose a pineapple that’s slightly soft to the touch and gives off a sweet aroma. This ensures maximum ripeness and sweetness! -
1 tablespoon brown sugar
This adds a wonderful caramel flavor! You can substitute with coconut sugar for a more health-conscious option. -
1 tablespoon honey
Honey enhances the sweetness and helps create a gorgeous glaze. If you prefer, maple syrup works well too for a vegan-friendly swap. -
1 teaspoon cinnamon
Cinnamon brings warmth and a touch of spice to the dish. Feel free to swap it with nutmeg for a more exotic flavor. -
Ice cream (any flavor)
The traditional choice is vanilla, but feel free to go wild! Coconut, mango, or even a rich chocolate will elevate this dish.
Step-by-Step Instructions
Ready to get grilling? Let’s break down the steps to create this fruit-forward delight.
-
Prepare Your Pineapple
Begin by slicing off the top and bottom of the pineapple, creating flat surfaces. This will help stabilize it while you cut. Stand it upright and slice it vertically into quarters, then remove the core. Cut each quarter into thick slices (about an inch)—think of them like steak cuts for grilling! The thicker, the better for those lovely grill marks! -
Make the Glaze
In a small bowl, mix together your brown sugar, honey, and cinnamon. This mixture will be the star of the show! It adds both a sweet glaze and a deep, smoky flavor when grilled. Make sure to mix until it’s smooth and the sugar begins to dissolve slightly. -
Preheat the Grill
Fire up your grill! You want it to be nice and hot. A charcoal grill can provide that smoky flavor, but a gas grill works fine too. Preheat to medium-high heat (around 400°F) for the best results. If you’re indoors, a stovetop grill pan will also do the trick! -
Brush and Grill
Now it’s time to get those pineapples sizzling! Brush one side of the pineapple slices generously with the sugar-honey glaze. Place them on the grill, cut side down. Let them cook for about 3-4 minutes until you see those beautiful grill marks developing—not to mention that fantastic smell! -
Flip and Glaze Again
After 3-4 minutes, flip the pineapple slices and brush the other side with more glaze. This step is crucial; the caramelization will enhance the flavors! Grill for another 3-4 minutes until the pineapple is tender and golden. You should have a nice char without burning it—just a little patience pays off here! -
Serve with Ice Cream
Once perfectly grilled, take your pineapple off the grill and let it cool for a minute (though it’s hard to wait!). Scoop your desired flavor of ice cream and place it right on top. Allow it to melt slightly over the warm pineapple for that beautiful contrast—a divine experience!
Serving Suggestions
To serve, arrange your grilled pineapple slices on a quaint plate, drizzle with a little extra honey if desired, and add that scoop of ice cream right in the middle. Garnish with fresh mint leaves for a pop of color. This isn’t just a dessert; it’s a feast for the eyes! Whether it’s after dinner or as a special treat at a summer gathering, your guests will be tantalized.
Recipe Variations
This dish is beautifully versatile! Here are a few fun twists to consider:
-
Tropical Twist: Add a layer of toasted coconut on top of your ice cream for more crunch and flavor.
-
Spicy Kick: Sprinkle some chili powder or cayenne pepper over the glaze for a sweet-heat combo that pops!
-
Nutty Delight: Top your ice cream with crushed nuts, such as pecans or almonds, for added crunch and protein.
-
Ice Cream Sandwich: Sandwich the grilled pineapple between two cookies or brownies for a messy, but incredibly delicious dessert!
-
Alcohol Infusion: Drizzle with a touch of dark rum or coconut rum over the pineapple before grilling, adding an adult twist!
Chef’s Notes
Over the years, this recipe has taken on many forms, evolving alongside my culinary journey. Sometimes I’ve added spices like cardamom or vanilla for depth and variety. And let’s not forget the countless times I’ve accidentally burnt a piece or two, but hey, that’s the beauty of cooking—learning from those crispy mistakes! You never know what flavor magic can happen! This dish is about living, laughing, and loving food—all while making our taste buds dance!
FAQs and Troubleshooting
Q1: My pineapple turned out too mushy; what did I do wrong?
A: It’s likely that the pineapple was overripe. Look for pineapples that feel just slightly soft and smell sweet.
Q2: Can I make this ahead of time?
A: While grilled pineapple is best fresh, you can prep your pineapple slices and glaze in advance. Grill them right before serving!
Q3: I don’t have a grill. Can I use the oven?
A: Absolutely! You can broil the pineapple slices in the oven on high for about 5-7 minutes, flipping halfway. Just keep an eye on it!
Q4: Can I use canned pineapple?
A: While fresh pineapple is best, you can use canned. Just make sure to drain and pat them dry to avoid too much liquid while grilling.
Nutritional Info
For a serving of Grilled Pineapple with Vanilla Ice Cream, you’re looking at:
- Calories: Approx. 300 per serving
- Protein: 3g
- Carbohydrates: 50g
- Fat: 10g (varies based on ice cream choice)
- Fiber: 2g
Enjoy this light and refreshing treat guilt-free and embrace the sweetness of the moment!
Grilled Pineapple with Ice Cream isn’t just a recipe; it’s an experience, a taste of nostalgia, and the perfect ending to any meal or summer evening. Whether it’s the accent of cinnamon, the sweetness of the honey, or the warmth of the grill, allow this dessert to transport you to a sun-kissed, carefree day. So fire up that grill, and let’s savor every bite together! Happy grilling! 🍍✨
PrintGrilled Pineapple with Ice Cream
A delightful dessert featuring caramelized grilled pineapple topped with creamy ice cream, perfect for summer gatherings.
- Prep Time: 10 minutes
- Cook Time: 8 minutes
- Total Time: 18 minutes
- Yield: 4 servings 1x
- Category: Dessert
- Method: Grilling
- Cuisine: American
- Diet: Vegetarian
Ingredients
- 1 ripe pineapple
- 1 tablespoon brown sugar
- 1 tablespoon honey
- 1 teaspoon cinnamon
- Ice cream (any flavor)
Instructions
- Prepare your pineapple by slicing off the top and bottom, then cutting it into thick slices.
- Make the glaze by mixing brown sugar, honey, and cinnamon in a small bowl.
- Preheat your grill to medium-high heat (around 400°F).
- Brush one side of the pineapple slices with the glaze and place them on the grill.
- Flip the pineapple after 3-4 minutes and glaze the other side.
- Serve your grilled pineapple warm with a scoop of ice cream on top.
Notes
Drizzle with extra honey and garnish with mint for serving.
Nutrition
- Serving Size: 1 serving
- Calories: 300
- Sugar: 25g
- Sodium: 10mg
- Fat: 10g
- Saturated Fat: 5g
- Unsaturated Fat: 5g
- Trans Fat: 0g
- Carbohydrates: 50g
- Fiber: 2g
- Protein: 3g
- Cholesterol: 30mg
Keywords: grilled pineapple, dessert, summer recipe, ice cream, barbecue, easy dessert, nostalgic recipe
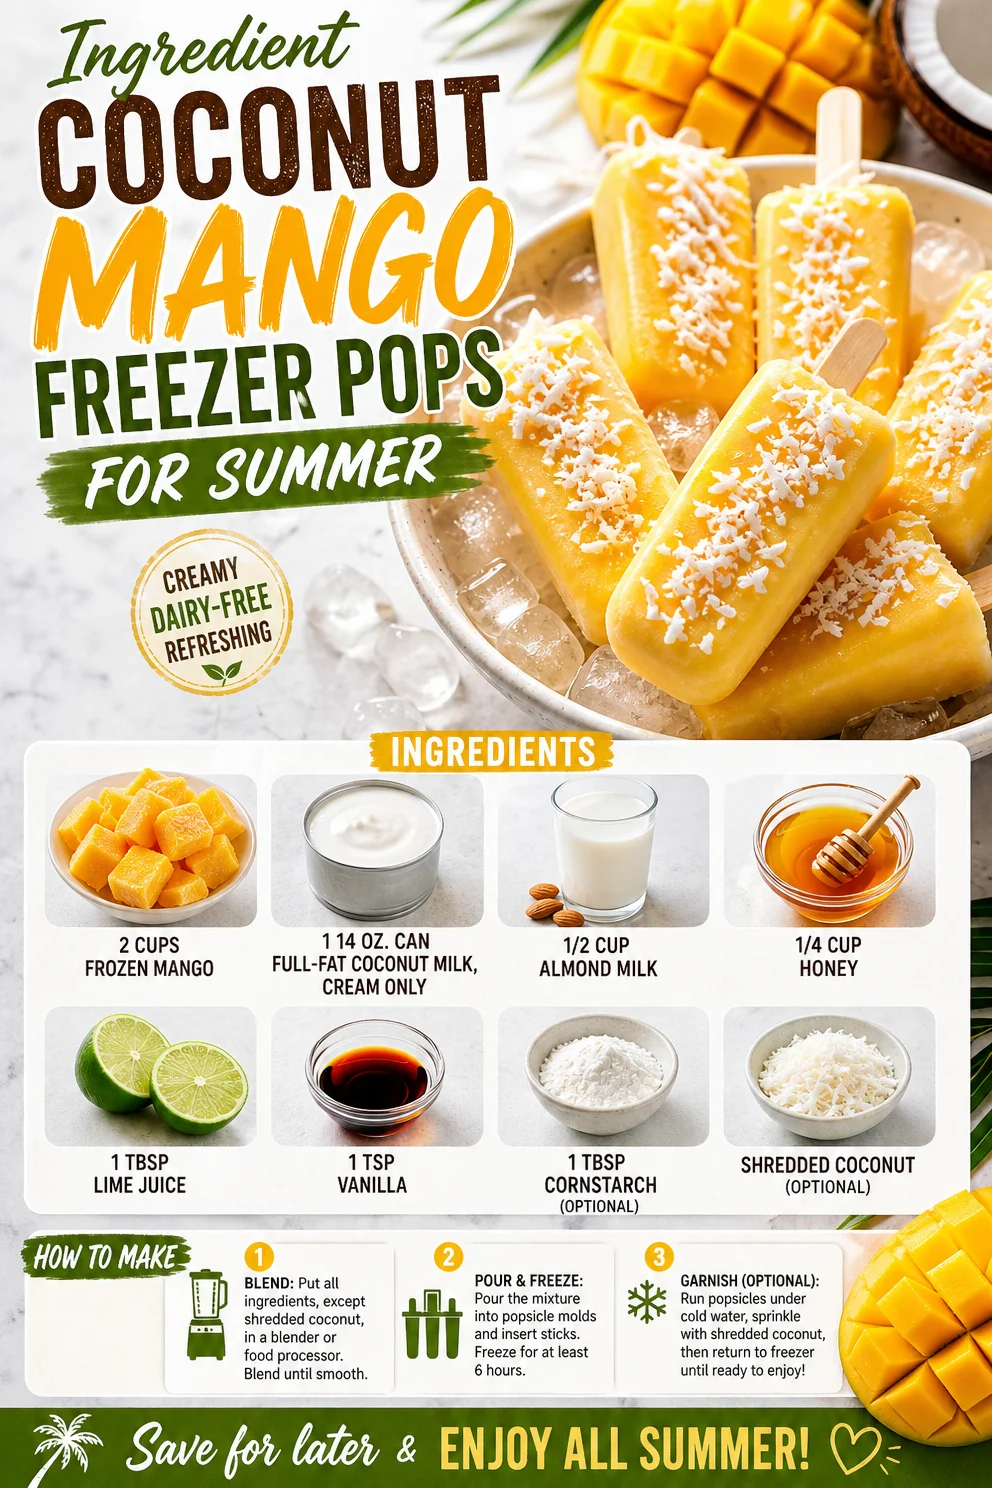
Ingredient Coconut Mango Freezer Pops for Summer
Cool Down with Tropical Bliss: Coconut Mango Popsicles
Welcome to the sweet escape of summer! If you’re anything like me, there’s nothing quite as refreshing as a delicious homemade popsicle on a hot day. As the sun blazes down and the days stretch long, it’s time to embrace the magic of fruity treats that are both satisfying and healthy. Today, I’m excited to share my beloved Coconut Mango Popsicles—a recipe that’s more than just a dessert; it’s a little piece of sunshine!
Picture this: You’re lounging in a hammock, the gentle breeze tousling your hair, and you reach into your cooler to pull out a blissful popsicle. You take your first bite, and suddenly, you’re whisked away to a tropical paradise, the flavors of sweet mango and creamy coconut dancing on your taste buds. Trust me, these popsicles are like a mini-vacation on a stick!
One of the reasons I adore this recipe is its simplicity and vibrant flavor. We’re not talking complicated techniques or obscure ingredients here—just real, wholesome goodness! This is all about enjoying feel-good ingredients that make you smile. Plus, they’re perfect for a family-friendly treat or a healthy snack when those sweet cravings hit.
So, grab your blender, some popsicle molds, and let’s dive into the world of coconut and mango bliss!
A Taste of Home: My Popsicle Memory
Let me take you back to a balmy summer evening from my childhood. I was visiting my grandparents in Florida, where the air was thick with warmth and the laughter of my cousins filled the backyard. Those lazy afternoons were always spent chasing each other around the pool, splashing and squealing like kids do.
My grandma, the magical kitchen sorceress, would come out every once in a while with a tray of colorful popsicles, each bright hue sparking joy more than the last. Every bite was a joyous explosion of fruitiness, but the ones laced with coconut were my absolute favorite. They were like the summer sun made edible.
I came to realize my love for those nostalgic popsicles wasn’t just about the flavors—they were a symbol of summer, of family togetherness, and of all things delightful. Decades later, I can still see my grandma’s smile as we raced for the final popsicle, and I can feel the sunshine on my skin.
Now, every time I whip up these Coconut Mango Popsicles, I picture those carefree summer days and all the love that went into each fruity bite. And best of all, I get to share this wholesome, feel-good treat with you!
Ingredients You’ll Need
Let’s gather our ingredients! Here’s what you’ll need to bring the tropical vibes into your kitchen:
- 2 cups frozen mango: Frozen mango is not only convenient, but it also offers that sweet, tangy flavor year-round. If you can’t find frozen mango, feel free to use fresh mango—just peel, chop, and freeze until firm.
- 1 (14 oz) can full-fat coconut milk, cream only: The creamy richness of this milk will give us that dreamy texture. Always shake the can before opening, and if you prefer a lighter version, try using light coconut milk for fewer calories!
- 1/2 cup almond milk: This helps to balance out the consistency and gives a nutty undertone. Unsweetened almond milk is best, or you can swap it for any nut or dairy milk you prefer.
- 1/4 cup honey: For sweetness! Honey pairs beautifully with mango and coconut. If you want a vegan option, agave syrup or maple syrup works wonderfully as substitutes.
- 1 Tbsp lime juice: A splash of acid enhances the flavors and provides a refreshing zing. You can also use lemon juice if you prefer.
- 1 tsp vanilla: Adds a depth of flavor—I always recommend using pure vanilla extract for the best taste.
- 1 Tbsp cornstarch (optional): If you desire a popsicle that’s extra creamy and less icy, whisk a bit of cornstarch into your mixture (mixed with almond milk) before blending.
- Shredded coconut (optional): For garnishing, this adds a slight crunch and an extra coconut flavor. Go for unsweetened shredded coconut if you’d like it less sugary!
Step-by-Step Instructions
Ready to get your popsicle game on? Let’s blend this tropical delight step-by-step!
-
Prep Your Ingredients: Start by gathering all your ingredients on your kitchen counter. This helps the cooking process flow smoothly (and it keeps your stress levels down!). I like to have everything pre-measured in little bowls, so it’s just a matter of blending, pouring, and freezing.
-
Blend the Base: In a blender, combine the frozen mango, coconut milk (just the creamy part!), almond milk, honey, lime juice, and vanilla extract. If you decided to use cornstarch for that creamy texture, whisk it with the almond milk first before adding it to the blender. Blend on high until everything is smooth and silky—about 30 seconds should do it. If the mixture is too thick, you can add a bit more almond milk, a tablespoon at a time.
-
Taste the Mix: Here’s my favorite step! Give your mixture a taste. This is where you can customize it a bit more—want it sweeter? Add a tad more honey. Looking for more zing? Throw in a bit more lime juice.
-
Pour into Molds: Carefully pour your blended mixture into popsicle molds, filling each mold about 3/4 full to leave room for expansion as they freeze. If you want to add that shredded coconut, sprinkle a layer into each mold before pouring in the mixture. Just a little, so you don’t overwhelm the flavor!
-
Insert Sticks: If your popsicle molds come with sticks, insert them now. If not, don’t worry! Just cover the molds with aluminum foil and poke wooden sticks through the foil in the center of each mold.
-
Freeze: Place your molds in the freezer for at least 4-6 hours, or until completely frozen. If you’re like me and can’t handle the wait, try to resist peeking too often!
-
Unmolding Time: Once frozen, to enjoy, run warm water over the outside of the mold for a few seconds to help loosen the popsicles. Gently pull on the sticks to release them, and voilà! You have a stunning tropical treat ready to be devoured!
Serving Suggestions
Serving these Coconut Mango Popsicles is as easy as 1-2-3! Present them on a colorful platter, perhaps with a few sprigs of fresh mint for a pop of color. You can even drizzle a bit of honey over the top for added sweetness and a touch of elegance. Kids will love these as playful snacks, and so will the adults! Pair them with a fresh fruit salad or a tropical smoothie for a full-on fruity feast.
Recipe Variations
Feeling adventurous? Here are a few fun ways to shake things up:
- Berry Bliss: Add in a cup of frozen strawberries or blueberries for a swirled effect and a lovely color contrast.
- Spicy Twist: Add a pinch of cayenne pepper or some finely chopped jalapeño to the mixture to give your popsicles a fun kick!
- Creamy Delight: Mix in some Greek yogurt before blending for a protein boost and creamier texture.
- Tropical Sensation: Substitute the lime with fresh orange juice and add a few chopped pineapple pieces for a more tropical punch.
- Nutty Fun: Incorporate a tablespoon of almond butter into the mixture for an extra nutty flavor that pairs beautifully with coconut.
Chef’s Notes
Every recipe I create has its own little story, and these popsicles are no exception! I remember whipping these up for my friend’s summer BBQ, and I found myself standing by the freezer, pulling them out with each guest’s arrival. I felt like a mixologist, only instead of cocktails, I was serving sweet, frozen magic! The joy on everyone’s faces was priceless as they devoured them, nostalgic and happy.
Over the years, I’ve adjusted and adapted this recipe based on feedback, but my favorite part is always the first taste. The fresh mango flavor is simply unparalleled. It’s like a crunchy, fruity party in your mouth!
FAQs and Troubleshooting
Q: Why are my popsicles icy instead of creamy?
A: If your popsicles are icy, it’s likely due to not enough fat! Make sure to use full-fat coconut milk, and consider adding a bit of Greek yogurt or using cornstarch to enhance creaminess.
Q: How do I store leftovers?
A: If you have extra popsicles, wrap them in parchment paper and store them in a zip-top bag in the freezer. This prevents freezer burn and keeps them fresh!
Q: Can I use other fruits instead of mango?
A: Absolutely! This recipe is versatile. You can use ripe peaches, pineapple, or even mixed berries—just blend until smooth.
Q: How long do they take to freeze completely?
A: Popsicles typically need at least 4-6 hours to freeze. If you can, leave them overnight to ensure they’re solid!
Nutritional Info
While I encourage enjoying treats in moderation, here’s a quick rundown of what you’ll be sipping on in each popsicle (the values may vary based on ingredient choices):
- Calories: Approximately 120 calories per popsicle
- Fat: 8g (mostly from coconut milk)
- Carbohydrates: 16g
- Sugar: 9g (natural sugars from mango and honey)
- Protein: 1.5g
And there you have it, my friends! Coconut Mango Popsicles are waiting for you to enjoy. This recipe is not just a way to cool down; it’s a way to bring sunny smiles to your kitchen! So, go ahead and join me in this tropical adventure. Happy blending!
PrintCoconut Mango Popsicles

Delicious homemade popsicles made with creamy coconut milk and sweet mango, perfect for cooling down on a hot day.
- Prep Time: 10 minutes
- Cook Time: 0 minutes
- Total Time: 360 minutes
- Yield: 6 servings 1x
- Category: Dessert
- Method: Freezing
- Cuisine: Tropical
- Diet: Vegan
Ingredients
- 2 cups frozen mango
- 1 (14 oz) can full-fat coconut milk, cream only
- 1/2 cup almond milk
- 1/4 cup honey
- 1 Tbsp lime juice
- 1 tsp vanilla
- 1 Tbsp cornstarch (optional)
- Shredded coconut (optional)
Instructions
- Prep Your Ingredients: Gather all your ingredients on your kitchen counter.
- Blend the Base: Combine the frozen mango, coconut milk, almond milk, honey, lime juice, and vanilla extract in a blender. Blend until smooth.
- Taste the Mix: Taste your mixture and adjust sweetness or acidity if desired.
- Pour into Molds: Pour the mixture into popsicle molds, filling them about 3/4 full.
- Insert Sticks: Insert sticks into the molds or cover with foil and poke sticks through the foil.
- Freeze: Freeze for at least 4-6 hours until solid.
- Unmolding Time: Run warm water over the outside of the mold to loosen the popsicles, then gently pull on the sticks.
Notes
Add optional garnishes like shredded coconut for extra flavor and texture.
Nutrition
- Serving Size: 1 popsicle
- Calories: 120
- Sugar: 9g
- Sodium: 5mg
- Fat: 8g
- Saturated Fat: 7g
- Unsaturated Fat: 1g
- Trans Fat: 0g
- Carbohydrates: 16g
- Fiber: 1g
- Protein: 1.5g
- Cholesterol: 0mg
Keywords: popsicles, coconut, mango, summer, dessert
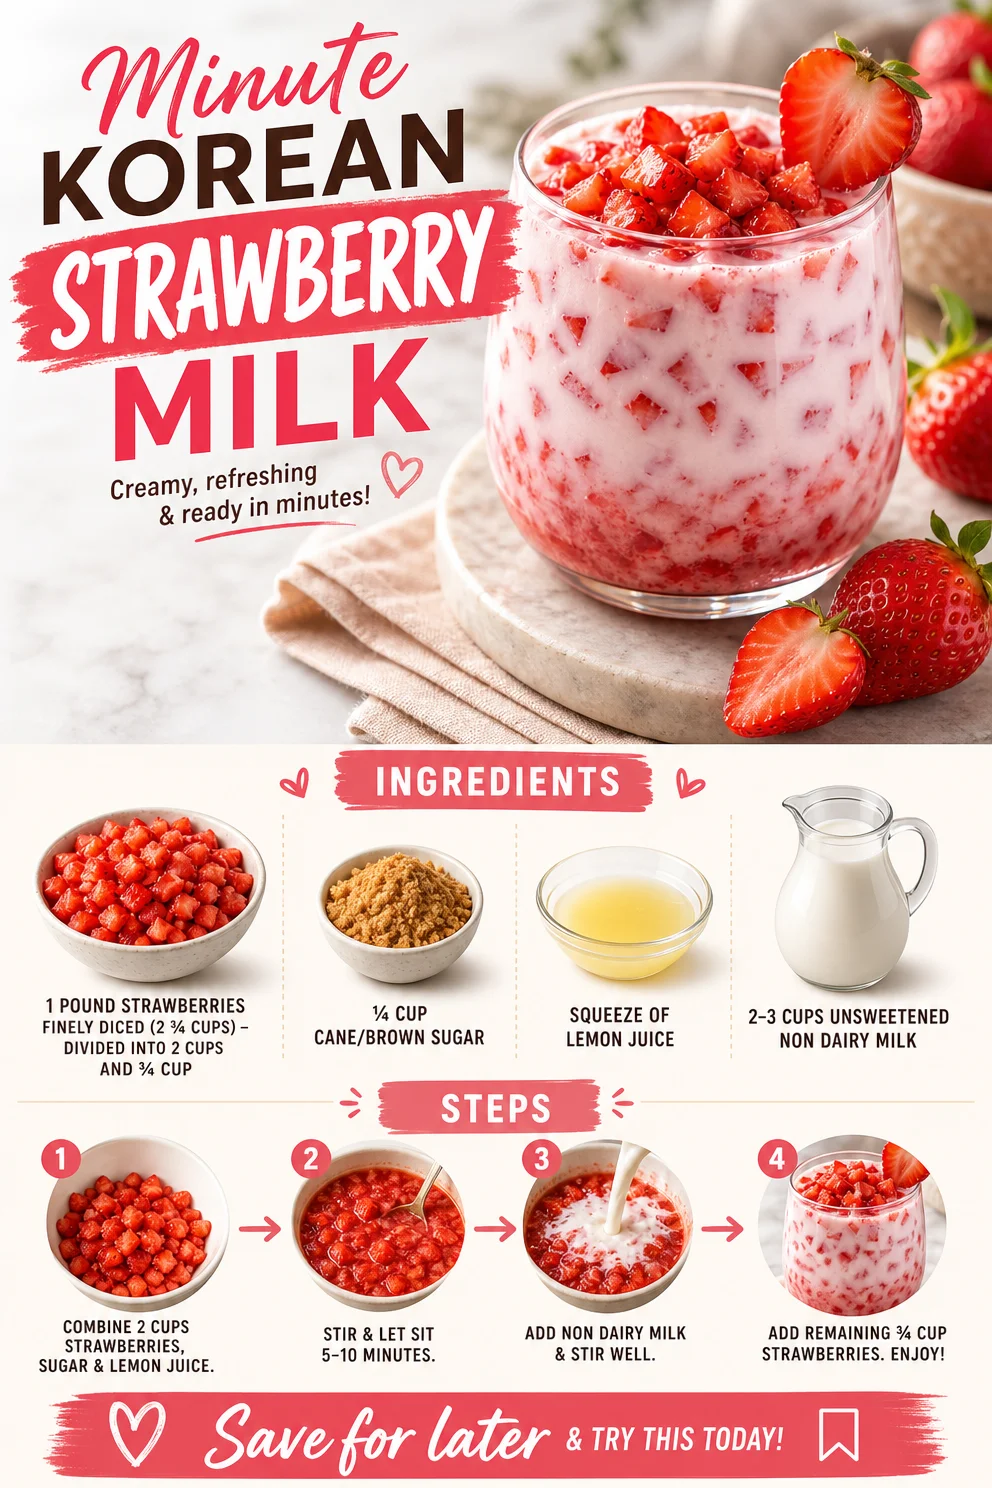
Minute Korean Strawberry Milk: Creamy, Easy Recipe
Sweet Serenity in a Glass: Mastering Korean Strawberry Milk
Welcome, fellow food lovers! Today, we’re diving headfirst into a refreshing drink that will bring a smile to your face and a burst of joy to your taste buds: Korean Strawberry Milk. Yes, you heard it right! This vibrant fusion of fresh strawberries and creamy, dreamy non-dairy milk is not just a thirst-quencher; it’s a sip of happiness.
Imagine this—bright red strawberries, perfectly ripe and sweet, mingling with velvety milk to create a delightful concoction that’s perfect for any time of the day. Whether you want to gulp it down with your breakfast, sip it during a lazy afternoon, or serve it up as a fun dessert after dinner, Korean Strawberry Milk is a stellar choice. And here’s the best part: it’s incredibly simple to make!
With just a handful of ingredients and a dash of creativity, you can whip up this delicious drink in no time. It’s fresh, it’s vibrant, and oh my goodness, it’s seriously delicious! So, grab your apron and let’s jump into this culinary adventure. Trust me; your taste buds will thank you!
A Sweet Childhood Memory
Growing up, summer meant two things for me: ripe strawberries and endless afternoons spent playing outside. I can still picture the day my grandma would take me to the local farmers’ market, her apron gently swaying as we walked under the warm sun, hand in hand. The stalls were overflowing with fresh produce, but the strawberries always caught my eye—bright red, glistening with a natural sheen and calling out to me.
Those strawberries would end up not just in our breakfast bowls but also in her special strawberry milk. She would muddle the fruit with sugar and a splash of milk, blending it all together into a sweet treat. The way we’d share that drink, sitting on the porch, laughing and enjoying the simple moment—that’s a memory I cherish. This drink has such a nostalgic place in my heart, reminding me of warm days and the comfort of family. Today, I’m thrilled to share my take on this classic drink, so you can create your own delicious memories!
Ingredients
Let’s gather our ingredients. You’ll need the following to create a luscious glass of Korean Strawberry Milk:
-
1 pound strawberries (finely diced)
- Notes: Select the ripest strawberries you can find for the sweetest flavor! If you can’t find fresh ones, frozen strawberries can work too—just thaw and drain them before use.
-
¼ cup cane or brown sugar
- Notes: This adds sweetness and a lovely caramel note. If you prefer a healthier option, feel free to substitute honey or maple syrup!
-
Squeeze of lemon juice
- Notes: A splash of lemon juice enhances the strawberry flavor and balances the sweetness. If you’re out of lemons, a dash of apple cider vinegar can do the trick.
-
2–3 cups unsweetened non-dairy milk
- Notes: Almond, oat, or soy milk are all great choices! Feel free to experiment with flavors and find your favorite blend.
With these straightforward, everyday ingredients, you’re already on your way to creating a delicious, vibrant drink that’s perfect for any occasion!
Step-by-Step Instructions
Ready to get your strawberry milk experience going? Here’s how to do it step by step:
-
Prepare Your Strawberries
- Start by washing the strawberries thoroughly under cool running water. Remove the green tops and dice them finely. Remember, the finer the dice, the sweeter the infusion! Set 2 cups aside for this initial mix, and keep the remaining ¾ cup for garnish.
-
Mix It Up
- In a medium bowl, combine the 2 cups of diced strawberries and the sugar. Use a fork or a muddler to gently mash them together. Feel free to mash more if you like a sweeter drink! You’ll want to create a lovely strawberry puree that captures all that summery goodness.
-
Add Lemon Juice
- Squeeze a bit of lemon juice into your strawberry mixture—about a teaspoon should do it. This will brighten up the flavors and enhance the overall freshness of your drink. Give it a quick stir to combine.
-
Strain (Optional)
- If you prefer a smoother drink, take a fine mesh strainer and pour the strawberry mixture through it into a separate bowl. Use a spoon or a spatula to press against the solids, extracting as much liquid as possible. But hey, if you love the texture (and I do!), just leave it as it is!
-
Blending the Milk
- Now, grab a large glass or a pitcher and pour in your non-dairy milk. The quantity depends on how strong you want the strawberry flavor to be. Start with 2 cups and add more if you like it creamier.
-
Combine and Serve
- Mix the strawberry puree into the milk, stirring gently until thoroughly combined. You can adjust the sweetness by adding a bit more sugar if desired. Though I say it’s best when the flavors meld together naturally!
-
Serve It Up
- Pour the Korean Strawberry Milk into glasses, and top each with the reserved ¾ cup of diced strawberries for that pop of flavor and beauty.
-
Pro Tip: Chill before Serving
- For an extra refreshing treat, chill your glasses beforehand or serve it over ice!
As you sip it, don’t forget to smile: this drink embodies the joys of fresh strawberries and the simple pleasure of good food!
Serving Suggestions
Here’s how to make your Korean Strawberry Milk irresistible: serve it in clear glasses to showcase the beautiful pink hue. Add a straw for that classic touch and a sprig of fresh mint on top for a pop of color. Pair it with a light breakfast like granola and yogurt or enjoy it as a refreshing afternoon snack!
Recipe Variations
Want to mix things up? Here are a few creative twists you can try on this basic recipe:
-
Berry Medley: Add in other berries—blueberries, raspberries, or blackberries—for a delicious variation.
-
Creamy Coconut Style: Use coconut milk for a tropical twist that brings in a subtle coconut flavor.
-
Minty Fresh: Infuse your strawberry puree with fresh mint leaves for a refreshing zing—great for summer!
-
Protein Boost: Mix in a scoop of your favorite protein powder to kick up the nutrition—perfect for a post-workout reward.
-
Nutty Goodness: Blend in a couple of tablespoons of almond butter for a rich, nutty flavor and added creaminess.
Feel free to get creative—after all, the kitchen is all about experimentation!
Chef’s Notes
Korean Strawberry Milk holds a special place in my heart because it’s not just a recipe; it’s a way to share joy and love through food. I remember the first time I served it at a brunch with friends; the smiles on their faces as they took a sip were priceless! It’s easy to make and can transform your day in the simplest way. Since then, I’ve tried various twists, but the classic recipe with strawberries remains closest to my heart.
It’s a reminder that food doesn’t have to be complicated to create powerful moments of happiness—it just has to come from the heart. So, gather your loved ones and sip your way to sweet moments together!
FAQs and Troubleshooting
Q1: What if my strawberries are not sweet enough?
A: If your strawberries aren’t as sweet as you’d like, don’t fret! You can always add a bit more sugar or drizzle in some honey to adjust the sweetness to your liking.
Q2: Can I make it ahead of time?
A: Absolutely! You can prepare the strawberry puree in advance and mix it with the non-dairy milk when you’re ready to serve. Just remember to stir it well before serving, as it might settle.
Q3: How do I store leftovers?
A: Store any leftovers in an airtight container in the refrigerator for up to 2 days. Just give it a good stir before enjoying it again, as the ingredients may separate over time.
Q4: Can I use dairy milk instead of non-dairy?
A: Yes! If you’re not avoiding dairy, feel free to use regular milk. The recipe will work beautifully either way!
Nutritional Info
(Note: Nutritional values will vary depending on the specific brands and quantities used.)
- Calories: Approximately 150-200 per serving
- Protein: 3-6g (depending on milk choice)
- Carbohydrates: 30-35g
- Sugars: 25-30g
- Fiber: 3g
- Fat: 3-5g
Creating Korean Strawberry Milk is not just a cooking task; it’s an experience filled with colors, flavors, and memories. It’s the taste of summer sunshine captured in a glass, making any moment special. I hope this delightful drink brings the same joy to your life as it does to mine. Happy sipping, friends!
PrintKorean Strawberry Milk
A vibrant fusion of fresh strawberries and creamy non-dairy milk, perfect for any time of the day.
- Prep Time: 10 minutes
- Cook Time: 0 minutes
- Total Time: 10 minutes
- Yield: 4 servings 1x
- Category: Beverage
- Method: Mixing
- Cuisine: Korean
- Diet: Vegan
Ingredients
- 1 pound strawberries (finely diced)
- ¼ cup cane or brown sugar
- Squeeze of lemon juice
- 2–3 cups unsweetened non-dairy milk
Instructions
- Prepare your strawberries by washing them under cool running water, removing the green tops, and dicing them finely.
- Mix the 2 cups of diced strawberries with the sugar in a medium bowl, using a fork or muddler to create a puree.
- Add a squeeze of lemon juice to the strawberry mixture.
- Strain the mixture if you prefer a smoother drink, or keep it as is for texture.
- Pour the non-dairy milk into a large glass or pitcher.
- Combine the strawberry puree with the milk, stirring gently until well mixed.
- Serve the Korean Strawberry Milk in glasses, topped with reserved diced strawberries.
Notes
Select the ripest strawberries for the sweetest flavor. This recipe can be customized with different types of non-dairy milk or by adding other berries.
Nutrition
- Serving Size: 1 serving
- Calories: 175
- Sugar: 25g
- Sodium: 30mg
- Fat: 5g
- Saturated Fat: 1g
- Unsaturated Fat: 4g
- Trans Fat: 0g
- Carbohydrates: 35g
- Fiber: 3g
- Protein: 5g
- Cholesterol: 0mg
Keywords: strawberry milk, Korean drink, non-dairy beverage, refreshing drink, summer drink
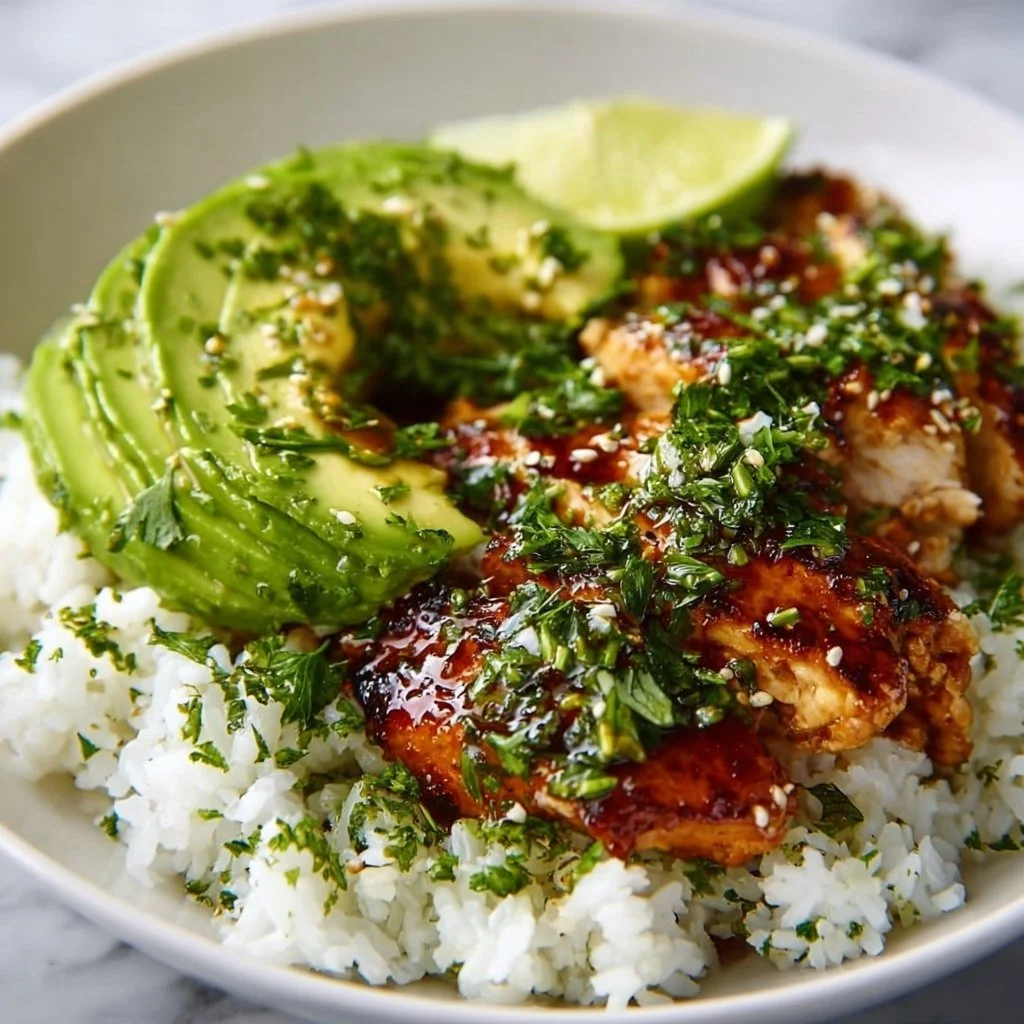
One-Pan Honey-Lime Chicken with Avocado Rice (Weeknight)
Honey Lime Chicken with Avocado Rice: A Vibrant and Satisfying Meal
Welcome, food lovers! Today, we’re whipping up something that’s not just a feast for your taste buds but a total delight for your senses. Picture this: succulent, sticky honey lime chicken drizzled with a zesty glaze, layered on a bed of creamy avocado rice—it’s like a sunny day on a plate! This dish isn’t just perfect for a weeknight meal; it invites that warm, feel-good vibe we all crave after a long day. And trust me, no complicated techniques involved here—just pure, clean goodness.
What makes this meal stand out? It’s all about balance. You have the sweetness of honey marrying beautifully with the bright acidity of lime, while the creamy avocado rice has just the right amount of richness to round it all out. It’s simple, it’s delicious, and I know you’re going to look forward to making it often. So, grab your apron and let’s get started!
A Culinary Memory
Growing up in a bustling household, dinner time was the most exciting event of the day. My parents had a knack for getting everyone involved in the kitchen, and that’s where my love for cooking was born. I distinctly remember one summer when we decided to transform our backyard into a mini taco stand for family friends. We served chicken marinated in an array of flavors, but my favorite was always the honey-lime marinade.
Everyone would gather around, chatting and laughing while we grilled the chicken to juicy perfection. The aroma of that sweet and tangy mixture wafted through the air, and nothing could make you happier than biting into a piece of grilled chicken sprinkled with fresh cilantro. These moments shaped my love for food—specifically, dishes that bring people together and create lasting memories. And now, I’m sharing that love with you through this honey lime chicken recipe, paired with creamy avocado rice to bring a bit of those summer vibes right into your kitchen.
Ingredients
For our delicious honey lime chicken with avocado rice, these vibrant ingredients will bring this dish to life. Here’s what you’ll need:
- 2 chicken breasts: Opt for skinless, boneless for ease. You can also use thighs if you prefer dark meat!
- 1/4 cup honey: This sweet nectar not only fuels your body but gives the chicken that drool-worthy glaze. Use agave syrup for a vegan alternative!
- 2 tablespoons lime juice: Fresh squeezed is always best, but bottled will do in a pinch. It adds the perfect zing to the honey!
- 2 avocados: Creamy and nutritious, they’re the star of our rice! Using ripe ones makes all the difference.
- 1 cup cooked rice: Any rice will work—brown, white, or even quinoa for a twist!
- 1 tablespoon olive oil: A heart-healthy fat that helps sauté the chicken and adds flavor.
- Salt and pepper to taste: Always essential for enhancing flavors!
- Chopped cilantro (optional, for garnish): A fresh finish that livens up the dish and adds a pop of color.
Step-by-Step Instructions
Now, let’s dive into the cooking process! It’s easier than you might think, and I’m here to guide you through every step.
-
Marinate the Chicken:
- In a bowl, combine the honey, lime juice, salt, and pepper. This is your marinade! Add the chicken breasts, ensuring they’re well-coated.
- Let them marinate for at least 30 minutes. If you’re short on time, even 10 minutes will add flavor, but letting it sit longer helps the magic happen. The chicken absorbs all that sweet and tangy goodness.
-
Cook the Rice:
- If you’re using leftover rice, simply reheat it up while you cook the chicken. If starting from scratch, cook according to the package directions, and then fluff it up with a fork when done.
- While your rice cooks, pulse up those avocados!
-
Sauté the Chicken:
- Heat the olive oil in a skillet over medium-high heat. Once the oil shimmers, add your marinated chicken.
- Cook for about 5-7 minutes on one side until golden and then flip. Here’s a little chef hack: resist the urge to poke or move the chicken around too much; let it develop a nice crust!
-
Glaze It Up:
- Once flipped, pour any remaining marinade into the pan. This will create a fabulous glaze. Continue to cook for another 5-7 minutes or until the chicken reaches an internal temperature of 165°F.
- Make sure to baste the chicken with the glaze as it cooks. This extra tenderizes the meat and enhances that sticky, delicious flavor.
-
Prepare the Avocado Rice:
- As the chicken finishes cooking, in a bowl, mash the avocados with a fork until creamy yet a little chunky for texture. Mix in the cooked rice, salt, and a squeeze of lime juice for brightness.
- I like to allow the rice to come to room temp—this makes it light and fluffy!
-
Serve Up:
- Once everything is ready, slice the chicken into strips to reveal those juicy, marinated layers. Serve over the avocado rice and garnish with fresh cilantro for that pop of green freshness.
Serving Suggestions
When plating this dish, I like using a shallow bowl for a beautiful presentation—the creamy avocado rice acts as a cushion for the juicy chicken. Make sure to drizzle extra honey-lime sauce over the top for an enticing shine. A sprinkle of cilantro adds color and fragrant freshness that’s impossible to resist. To elevate, serve it with lime wedges on the side for a little extra zing!
Recipe Variations
I love flexibility in cooking! Here are some creative ideas to play with the honey lime chicken and avocado rice:
-
Spice it Up: Add a touch of chili powder or cayenne pepper to the marinade for a kick. Alternatively, sprinkle red pepper flakes in the avocado rice for an added zing!
-
Tropical Twist: Mix in chopped pineapple or mango to the rice for a tropical version of this dish. It pairs beautifully with the honey and lime!
-
Herb it Up: Use fresh basil or parsley instead of cilantro if you’re not a fan! Fresh herbs lighten up the dish and keep it fresh.
-
Grain-Free Option: Swap the rice for cauliflower rice to keep things low-carb. Just sauté it with a bit of lime juice for flavor!
-
Veggie Power: Add grilled vegetables like bell peppers and zucchini to create a complete meal. The colorful veggies bring extra nutrients and crunch!
Chef’s Notes
Over the years, this honey lime chicken has evolved from a quick summer dish into one of my go-to meals for entertaining. I remember making it for friends and seeing their eyes light up after the first bite. It’s that reaction that keeps me experimenting! The avocados were an inspired addition one day after I had leftovers from a guacamole-making session. They perfectly balance the dish and give it that creamy texture we all love. Plus, it’s a great way to use avocados—because who doesn’t want more greens on their plate?
FAQs and Troubleshooting
-
What if my chicken isn’t cooking evenly?
- Make sure to flatten the chicken breasts a bit with a meat mallet for even cooking. If they’re uneven in thickness, they’ll cook differently—thicker parts will take longer, leading to dryness.
-
Can I use frozen chicken?
- Yes, but I recommend thawing it completely before marinating and cooking to ensure the flavors penetrate properly and for even cooking throughout.
-
What if my rice turns out mushy?
- Ensure you’re measuring water correctly based on the type of rice you’re using. For fluffy rice, rinse the grains before cooking to remove excess starch.
-
How can I prevent my avocados from browning?
- The key is to squeeze some lime juice on the mashed avocado immediately. The acidity helps slow down oxidation!
Nutritional Info
(Hypothetical serving size for readers—adjust based on your portioning)
- Calories: 480
- Protein: 30g
- Carbs: 55g
- Fat: 15g
- Fiber: 10g
Now that you’ve got the scoop on this delicious Honey Lime Chicken with Avocado Rice, there’s nothing stopping you from diving into this scrumptious creation! Remember, cooking is about having fun, experimenting, and sharing—so don’t hesitate to make it your own. I can’t wait to hear how you enjoyed this recipe and the memories you create along the way. Happy cooking, my friends!
PrintHoney Lime Chicken with Avocado Rice

A vibrant and satisfying meal with succulent honey lime chicken layered on creamy avocado rice.
- Prep Time: 10 minutes
- Cook Time: 20 minutes
- Total Time: 30 minutes
- Yield: 4 servings 1x
- Category: Main Course
- Method: Sautéing
- Cuisine: Mexican
- Diet: Paleo
Ingredients
- 2 skinless, boneless chicken breasts
- 1/4 cup honey
- 2 tablespoons lime juice
- 2 ripe avocados
- 1 cup cooked rice
- 1 tablespoon olive oil
- Salt and pepper to taste
- Chopped cilantro (optional, for garnish)
Instructions
- Marinate the chicken: In a bowl, combine the honey, lime juice, salt, and pepper. Add the chicken, ensuring they’re well-coated, and let them marinate for 30 minutes.
- Cook the rice: If using leftover rice, reheat it while cooking the chicken. If starting from scratch, cook according to package directions.
- Sauté the chicken: Heat olive oil in a skillet over medium-high heat. Add marinated chicken and cook for 5-7 minutes on one side until golden, then flip.
- Glaze the chicken: Pour remaining marinade into the pan and cook for another 5-7 minutes or until the chicken reaches an internal temperature of 165°F.
- Prepare the avocado rice: Mash the avocados, mix in the cooked rice, salt, and a squeeze of lime juice.
- Serve up: Slice the chicken and serve it over the avocado rice, garnished with fresh cilantro.
Notes
For a kick, add chili powder to the marinade or red pepper flakes to the rice.
Nutrition
- Serving Size: 1 serving
- Calories: 480
- Sugar: 12g
- Sodium: 500mg
- Fat: 15g
- Saturated Fat: 2g
- Unsaturated Fat: 10g
- Trans Fat: 0g
- Carbohydrates: 55g
- Fiber: 10g
- Protein: 30g
- Cholesterol: 70mg
Keywords: chicken, avocado, lime, honey, healthy recipe

Easy Low-Carb Chicken Spinach Mushroom Bake
Easy Low-Carb Chicken Spinach Mushroom Bake
Introduction
Hey there, food lovers! Welcome back to my cozy kitchen here at Clean Plate Cravings! Today, I’m excited to share a dish that’s not only bursting with flavor but is also low-carb and a breeze to whip up—my Easy Low-Carb Chicken Spinach Mushroom Bake. This comforting recipe is perfect for a busy weeknight but fancy enough to impress those special guests on the weekends!
Picture this: It’s a chilly evening, and after a long day filled with meetings and errands, you crave something warm and satisfying. But here’s the kicker—you also want to keep it healthy and light. That’s where this one-dish wonder comes into play! With tender shredded chicken, vibrant spinach, earthy mushrooms, and a creamy Parmesan sauce, this bake hits all the right notes without weighing you down.
And let me tell you, this dish comes with a little nostalgia. It reminds me of weekends spent cooking with my grandma in her bustling kitchen, where everything was homemade, and flavors mingled like old friends. She would often throw together a casserole filled with whatever vegetables we had on hand, and we’d savor every last bite. That’s the spirit I channel when I craft recipes today—good food, good vibes, and a lot of love.
So, roll up your sleeves, and let’s dive into this easy low-carb bake that’s sure to become a staple in your kitchen! You’ll find that it’s not only delicious but incredibly versatile, too. Let’s get cooking!
Personal Story
Growing up, my family kitchen was always filled with the aromas of delicious home-cooked meals. My grandma was a master of casseroles. She never shied away from throwing whatever was left in the fridge into a baking dish, and her motto was always, "You won’t know until you try!" One chilly autumn evening, I watched her create a creamy chicken and spinach bake that would later become one of our family favorites.
I still remember how she’d let me stir the pot, teaching me her secrets with the warmest smile. "Always taste as you go, dear," she’d say, her eyes twinkling. That day, our kitchen was alive with laughter and the tantalizing smell of garlic sautéing—an irresistible combination I’ve never forgotten.
This Easy Low-Carb Chicken Spinach Mushroom Bake is inspired by those cherished moments in my Grandma’s kitchen. It captures the essence of comfort food while keeping it light and fresh. It’s a reminder that food is not just nourishment; it’s also connection, warmth, and love shared around the table.
Ingredients
Here’s what you’ll need to create this delightful dish:
-
2 cups cooked chicken, shredded
The star of our show! Feel free to use leftover rotisserie chicken, grilled chicken, or even poach chicken breast specifically for this dish. -
2 cups fresh spinach
Spinach adds a beautiful pop of color and a ton of nutrients. Fresh is best, but you can easily substitute with frozen spinach—just make sure to thaw and squeeze out excess moisture. -
1 cup mushrooms, sliced
I love using cremini or button mushrooms for their rich umami flavor. If you’re feeling adventurous, try shiitake for an earthy twist! -
1 cup heavy cream
This creamy base is what ties everything together. For a lighter option, you can substitute with coconut cream or half-and-half, although the flavor will differ slightly. -
1 cup Parmesan cheese, grated
Parmesan brings a salty, nutty flavor to the dish. If you’re not a fan of Parmesan, any cheese that melts well, like mozzarella or goat cheese, can work in a pinch. -
2 cloves garlic, minced
Garlic is a must for adding depth and aroma. For a milder flavor, try roasted garlic. -
Salt and pepper to taste
Simple seasonings that elevate every dish. Don’t be shy—taste as you season! -
Olive oil for cooking
A splash of olive oil helps sauté the veggies and brings a lovely richness. Avocado oil is a great alternative, with a higher smoke point.
Step-by-Step Instructions
Now that we have our ingredients, let’s get to the fun part—cooking this delightful bake!
-
Preheat Your Oven
Preheat your oven to 375°F (190°C). This step is crucial for achieving that beautifully baked, golden top. -
Sauté the Aromatics
In a large skillet, heat about 2 tablespoons of olive oil over medium heat. Add the minced garlic and sauté until fragrant, about 1 minute. This sizzles up the kitchen and sends greetings to all your taste buds! -
Add the Mushrooms
Toss in your sliced mushrooms and sauté for about 3-4 minutes until they’re tender and have released their moisture. Chef’s Tip: Don’t overcrowd the pan; otherwise, the mushrooms will steam instead of sauté! -
Incorporate the Spinach
Add the fresh spinach to the skillet and cook until wilted, about 2-3 minutes. It feels like magic watching it shrink down! Season with salt and pepper to enhance the flavors. -
Combine the Chicken and Cream
Stir in the shredded chicken and pour in the heavy cream, mixing everything together. Allow it to simmer for another 2-3 minutes until everything is well coated. If you want to add a bit of zest, squeeze a little lemon juice into the mix—trust me, it elevates the flavor! -
Cheesy Goodness
Gradually fold in the Parmesan cheese until melted and creamy. Chef Hack: Save a bit of cheese for topping—this will give you a delicious, crispy layer! -
Transfer to Baking Dish
Pour the mixture into a greased 9×13 inch baking dish, spreading it evenly. Top with the remaining Parmesan cheese for a golden crust. -
Bake
Pop it into your preheated oven and bake for 25-30 minutes or until the top is bubbly and golden brown. The delightful aroma will fill your kitchen, making it hard to resist! -
Cool and Serve
Once ready, let it cool for about 5 minutes to set. Serve warm, and enjoy every bite!
Serving Suggestions
This Chicken Spinach Mushroom Bake is perfect all on its own, but if you’re looking to dress it up a bit for serving, here are a couple of ideas! Plate it in individual baking ramekins for a rustic touch. Add a sprinkle of fresh herbs, like parsley or basil, for that pop of freshness. It pairs beautifully with a simple garden salad dressed in balsamic vinaigrette.
Recipe Variations
Now, let’s get creative! Here are a few fun variations to keep this dish exciting:
-
Spicy Kick: Add a pinch of red pepper flakes to the sautéed mushrooms for a spicy version.
-
Herb Infusion: Experiment with different herbs like thyme or rosemary for a gourmet touch.
-
Cauliflower Upgrade: Add roasted cauliflower florets to the bake for an extra veggie boost and delicious texture.
-
Zucchini Noodles: Swap out half of the chicken for spiraled zucchini for a fun twist on the classic!
-
Dairy-Free Delight: Use coconut cream and nutritional yeast instead of Parmesan for a creamy, dairy-free option.
Chef’s Notes
This recipe has evolved from my grandmother’s original version, which was a bit heavier and less health-conscious. I love how we can take traditional comfort foods and make them into healthier options while preserving those beloved flavors. And honestly, I can’t help but giggle sometimes in the kitchen when I try creative combinations—some of which go wonderfully wrong but lead me to even better discoveries. Kitchen experimentation is truly where the magic happens!
FAQs and Troubleshooting
Q: Can I use leftover shredded chicken?
A: Absolutely! This dish is perfect for using up leftover chicken. Just make sure it’s seasoned to your tasting!
Q: Can I make this dish ahead of time?
A: Yes! You can prepare everything a day in advance and store it in the fridge. Just bake it right before serving.
Q: What if my bake is too dry?
A: If your bake comes out a bit dry, it might be because it was cooked for too long. Try not to overbake it, and if needed, add a splash more cream before baking.
Q: How do I store leftovers?
A: Store it in an airtight container in the fridge for up to 3 days. Reheat gently in the oven or microwave!
Nutritional Info
While I always encourage enjoying food without guilt, here’s a rough estimate of the nutritional info per serving (assuming 6 servings):
- Calories: 380
- Protein: 30g
- Fat: 27g
- Carbohydrates: 6g
- Fiber: 2g
Remember, these values can vary based on ingredient substitutions and portion sizes!
And there you have it—a cozy, easy Low-Carb Chicken Spinach Mushroom Bake that’s filled with flavor, nostalgia, and love. Grab your apron and give this recipe a try—you won’t be disappointed! Happy cooking!
PrintEasy Low-Carb Chicken Spinach Mushroom Bake

A delightful low-carb bake featuring tender shredded chicken, vibrant spinach, earthy mushrooms, and a creamy Parmesan sauce, perfect for busy weeknights or impressing guests.
- Prep Time: 15 minutes
- Cook Time: 30 minutes
- Total Time: 45 minutes
- Yield: 6 servings 1x
- Category: Main Course
- Method: Baking
- Cuisine: American
- Diet: Low-Carb, Gluten-Free
Ingredients
- 2 cups cooked chicken, shredded
- 2 cups fresh spinach
- 1 cup mushrooms, sliced
- 1 cup heavy cream
- 1 cup Parmesan cheese, grated
- 2 cloves garlic, minced
- Salt and pepper to taste
- Olive oil for cooking
Instructions
- Preheat your oven to 375°F (190°C).
- Sauté the minced garlic in olive oil over medium heat until fragrant, about 1 minute.
- Add the sliced mushrooms and sauté for about 3-4 minutes until tender.
- Incorporate the fresh spinach and cook until wilted, about 2-3 minutes; season with salt and pepper.
- Combine the shredded chicken and heavy cream, mixing well.
- Cheesy goodness: fold in the Parmesan cheese until melted and creamy.
- Transfer the mixture to a greased 9×13 inch baking dish, top with remaining Parmesan cheese.
- Bake for 25-30 minutes until bubbly and golden brown.
- Cool for 5 minutes and serve warm.
Notes
This dish is versatile; you can add red pepper flakes for spice or substitute with vegetables like cauliflower or zucchini noodles.
Nutrition
- Serving Size: 1 serving
- Calories: 380
- Sugar: 2g
- Sodium: 600mg
- Fat: 27g
- Saturated Fat: 13g
- Unsaturated Fat: 12g
- Trans Fat: 0g
- Carbohydrates: 6g
- Fiber: 2g
- Protein: 30g
- Cholesterol: 90mg
Keywords: low-carb, chicken, bake, easy recipe, comfort food, healthy