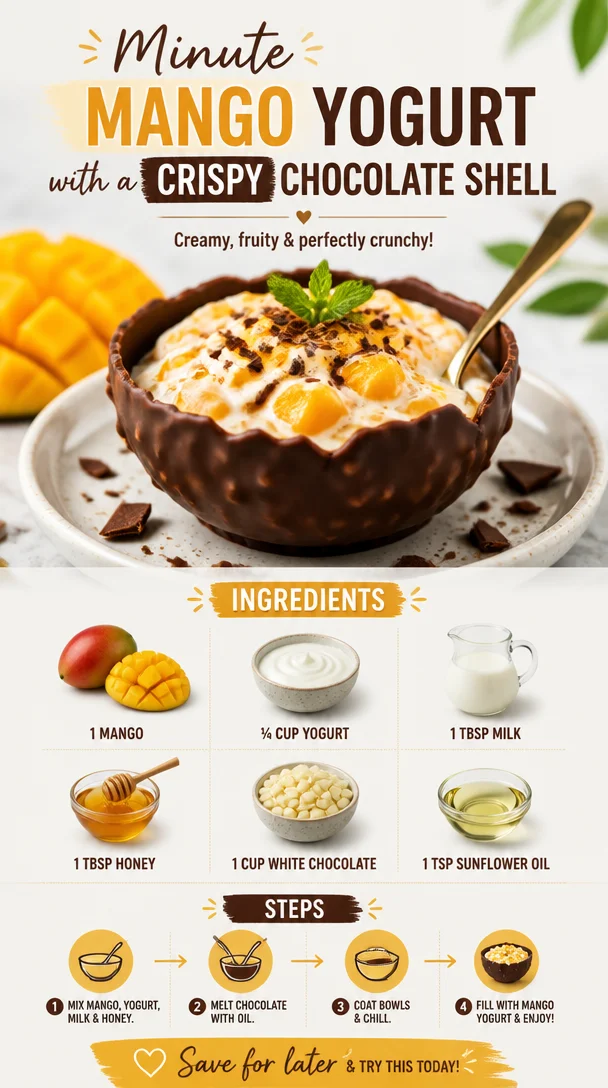
Minute Mango Yogurt with a Crispy Chocolate Shell
Indulge Your Sweet Tooth: Mango Yogurt with Chocolate Shell
Welcome to my kitchen! Today, I am thrilled to share a delightful recipe that hails from the heart of summer—a heavenly Mango Yogurt with a luscious Chocolate Shell. This dessert perfectly embodies everything I stand for at Clean Plate Cravings: vibrant flavors, simple ingredients, and a fun twist that will make your taste buds sing! If you’re looking for a refreshing treat that feels indulgent without the guilt, you’ve come to the right place.
Imagine walking through a vibrant market on a warm summer day, where the scent of ripe mangoes fills the air. Mango is truly the star of this dish—it’s sunny, sweet, and packed with flavor. Combine that with creamy yogurt and a rich, crunchy chocolate shell, and you have a dessert that’s not only easy to make but also irresistibly delicious!
But why stop there? This simple combination is about more than just flavor; it’s about the memories we create around food. I remember my mom making a similar treat on hot summer afternoons. We’d gather in the kitchen, laughter spilling over as she melted chocolate and cut fresh mango. It became a tradition: every mango season meant a chocolate-y mango treat. Now, I get to pass on that joy, sharing this dish with all of you.
Let’s dive into making your very own Mango Yogurt with Chocolate Shell! Get ready for a dessert that’s quick, satisfying, and will leave you craving more.
A Sweet Memory: The Mango Magic
As a kid, summer meant more than just long, lazy days; it meant mangoes! Living in a place where the sun shined brightly and mango trees were plentiful, these juicy fruits were the highlight of my childhood. I’ll never forget my mom’s ritual of making mango yogurt cups as a special treat for my friends and me after a long day of playing outside.
We’d gather around the kitchen island, the smell of sun-ripened mangoes filling the air. Mom would slice the mango and mix it with creamy yogurt, drizzling honey for a touch of sweetness. But the real magic happened when she’d drizzle melted chocolate over the top, watching it transform into a shiny, crunchy shell. Our eyes would light up as we dug in, the combination of flavors and textures becoming one of our favorite summer memories.
Now, as I recreate this dish for you, I can’t help but smile at those warm memories. Food is often about nourishment, but it’s also about connections and moments that stay with us forever. Let’s create a new memory together with this simple yet oh-so-delicious recipe!
Ingredients: Gather Your Goods
Here’s what you’ll need to whip up this delightful dessert, along with some tips and tricks for each ingredient:
-
1 ripe mango: Look for one that’s slightly soft to the touch; that means it’s perfectly ripe! If mangoes aren’t in season, you can use frozen mango chunks—just thaw them beforehand for this recipe.
-
¼ cup plain yogurt: Greek yogurt adds a nice creaminess and a bit of tang, but feel free to use any yogurt you love! For a dairy-free option, coconut yogurt works wonders.
-
1 tbsp milk: This helps achieve a smoother consistency. You can use any milk you prefer—almond, soy, or oat milk all work beautifully.
-
1 tbsp honey: This natural sweetener perfectly complements the tartness of yogurt. If you’re looking for a vegan option, agave syrup or maple syrup are fantastic substitutes.
-
1 cup white chocolate: The star of our chocolate shell! If you’re not a fan of white chocolate, dark chocolate could make for an equally decadent topping.
-
1 tsp sunflower oil: Added to the chocolate for a glossy finish and to help it drizzle beautifully. You can use coconut oil for a tropical twist if you prefer!
With these simple ingredients, we’ll turn ordinary elements into something extraordinary. Ready for the next step? Let’s get cooking!
Step-by-Step Instructions: Let’s Get Cooking
-
Prep the Mango:
- Start by peeling the mango and slicing it into bite-sized pieces. Mango is slippery, so use a sharp knife and exercise caution. It’s best to slice around the pit, which is large and flat. I recommend placing the mango on a non-slip cutting board to keep everything steady.
- Set the mango pieces aside—let that tropical aroma sweep you away!
-
Make the Yogurt Base:
- Grab a mixing bowl and combine the plain yogurt, milk, and honey. Whisk it together until smooth and creamy.
- Taste as you go! If you like it sweeter, feel free to add a touch more honey. This part is all about personal preference, so make it your own!
-
Assemble the Cups:
- In small serving bowls or cups, layer the yogurt mix and then top with the mango pieces. This is the fun part—get creative with the layers! Consider adding some yogurt first, a layer of mango, and then repeating until your cup is full.
- Don’t be afraid to make it colorful! The visual appeal of layers can make this dessert pop and look even more delightful!
-
Melt the Chocolate:
- Using a microwave-safe bowl, combine the white chocolate and sunflower oil. Microwave in short bursts, stirring every 15-20 seconds, until smooth and melted. Be careful not to overheat it—the chocolate can seize.
- When melted, it should have a lovely, glossy consistency that can easily drizzle.
-
Drizzle and Chill:
- Now for the magic touch! Drizzle the melted chocolate over the assembled mango yogurt cups. You can let a little chocolate cascade down the sides for that tantalizing effect.
- Once you’ve drizzled, pop the cups into the fridge for about 15 to 20 minutes to let the chocolate set. This is also a good time to clean up the kitchen—you’ll want to take a moment to admire your handiwork!
-
Serve and Enjoy:
- Once the chocolate has set, it’s time to indulge. Grab a spoon and dig in! The contrast of the cool, creamy yogurt, sweet mango, and the crunchy chocolate shell is simply irresistible.
Serving Suggestions: Plate it Up!
When it comes to serving, you can keep it casual by enjoying the yogurt cups straight from the bowl or take it up a notch by plating it with garnishes. Consider adding a sprinkle of shredded coconut, a mint leaf for a pop of color, or even a few fresh berries on the side. The presentation can elevate this simple dessert to something truly special, perfect for entertaining guests or refreshing yourself after a long day.
Recipe Variations: Get Creative!
This recipe is wonderfully flexible! Here are a few creative twists:
-
Tropical Tango: Add shredded coconut or chopped pineapple to the yogurt for a more tropical feel.
-
Berry Blast: Layer in some fresh berries like strawberries or blueberries for an additional burst of flavor and color.
-
Nutty Delights: Sprinkle some crushed nuts, like almonds or pistachios, on top for added crunch and nutritional value.
-
Chocolate Overload: Instead of white chocolate, go for dark or milk chocolate for a rich twist.
-
Herbal Infusion: Add a hint of fresh mint or basil to the yogurt for an aromatic touch that contrasts beautifully with the sweet mango.
Feel free to mix and match according to your taste and what you have on hand!
Chef’s Notes: Memories and Evolution
Whenever I whip up this Mango Yogurt with a crunchy chocolate shell, I can’t help but reminisce about those sun-drenched summers from childhood. This recipe reminds me that food is not just something we eat—it’s something that brings us together, sparking joy and connection in every bite.
Over the years, I’ve experimented with different toppings and flavors, often reminiscing about my mom’s original recipe. What started as a simple summer treat in our family home has evolved into a beloved dish that I can share with all of you. It’s proof that recipes can change and adapt, celebrating our unique tastes and moments.
FAQs and Troubleshooting
1. My chocolate shell didn’t set properly. What went wrong?
If the chocolate didn’t harden, it could be due to too much moisture or if it was improperly melted. Ensure you’re using a dry bowl and that the chocolate is fully cooled after drizzling.
2. How can I make this dairy-free?
You can absolutely swap out the yogurt for a dairy-free alternative like coconut yogurt, and use almond milk or any plant-based milk instead.
3. Can I make this in advance?
Yes! Prepare the components ahead of time, but assemble them shortly before serving to keep that delightful chocolate shell crisp.
4. What can I do with leftover mango?
If you have leftover mango, toss it into smoothies, salads, or even salsas! It’s a versatile fruit that shines in many dishes.
Nutritional Info (Optional)
This Mango Yogurt with Chocolate Shell is more than just a treat; it offers a tasty source of vitamins A and C, probiotics from the yogurt, and antioxidants from the chocolate! Feel free to enjoy it as a wholesome dessert, snack, or even breakfast option!
So there you have it, an energizing and refreshing Mango Yogurt with Chocolate Shell that’s quick to make and oh-so-delicious to enjoy! I hope you feel inspired to create your own memories in the kitchen, just like I did with my family. Happy cooking, and don’t forget to share your creations with me—I’d love to see how you enjoy this delightful dish!
PrintMango Yogurt with Chocolate Shell

A refreshing summer dessert featuring creamy mango yogurt topped with a crunchy chocolate shell.
- Prep Time: 10 minutes
- Cook Time: 5 minutes
- Total Time: 15 minutes
- Yield: 4 servings 1x
- Category: Dessert
- Method: Chilling
- Cuisine: American
- Diet: Vegetarian
Ingredients
- 1 ripe mango
- ¼ cup plain yogurt
- 1 tbsp milk
- 1 tbsp honey
- 1 cup white chocolate
- 1 tsp sunflower oil
Instructions
- Prep the mango by peeling and slicing it into bite-sized pieces.
- Make the yogurt base by mixing the yogurt, milk, and honey until smooth.
- Assemble the cups by layering the yogurt mix and mango pieces in small bowls.
- Melt the chocolate and sunflower oil in a microwave-safe bowl until smooth.
- Drizzle the melted chocolate over the assembled cups and chill for 15-20 minutes.
- Serve and enjoy the delicious contrast of flavors and textures.
Notes
Feel free to customize with your favorite fruits, nuts, or different types of chocolate.
Nutrition
- Serving Size: 1 serving
- Calories: 250
- Sugar: 18g
- Sodium: 50mg
- Fat: 10g
- Saturated Fat: 6g
- Unsaturated Fat: 4g
- Trans Fat: 0g
- Carbohydrates: 32g
- Fiber: 2g
- Protein: 4g
- Cholesterol: 5mg
Keywords: mango dessert, yogurt, chocolate shell, summer treat, easy dessert
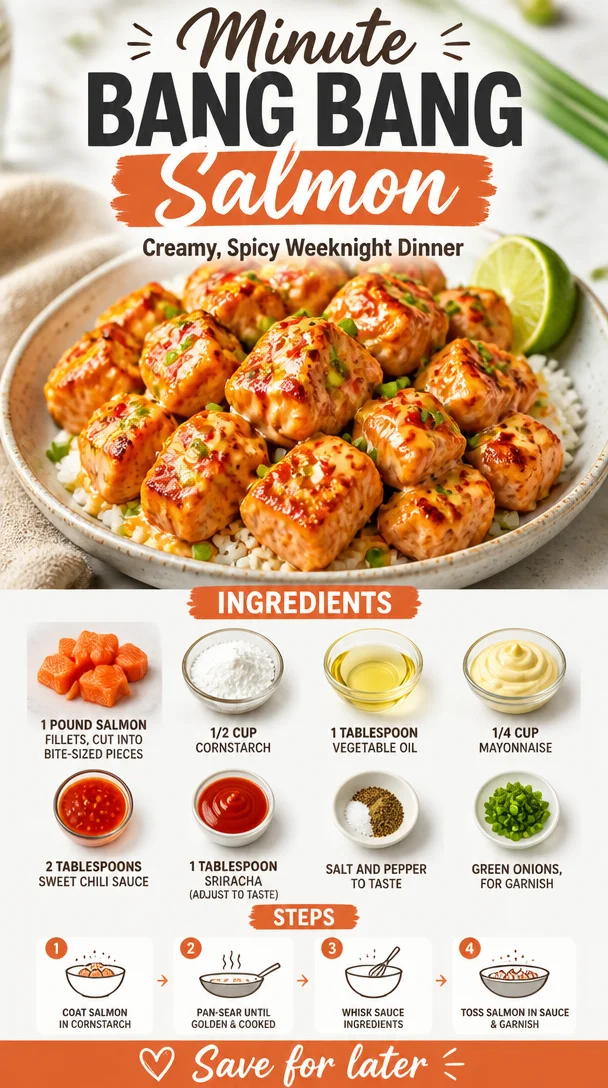
Minute Bang Bang Salmon: Creamy, Spicy Weeknight Dinner
Bang Bang Salmon: A Flavor Explosion on Your Plate
Welcome, food lovers! Today, we’re diving into the delicious, mouthwatering world of Bang Bang Salmon—a dish that not only excites the taste buds but also fills your kitchen with a delightful aroma that will make your stomach rumble in anticipation! If you’re a fan of seafood paired with just the right amount of crunch and a sweet-and-spicy kick, you’re in for a treat. So grab your apron, and let’s get cooking!
A Little Nostalgia: My Culinary Journey with Bang Bang Salmon
I still remember the first time I tasted Bang Bang Shrimp at a trendy little restaurant where I spent my early 20s. I was enthralled by how something so simple could burst with so much flavor! There was something magical about that sweet, spicy sauce enveloping the crispy bites of shrimp, making each morsel utterly addictive. It sparked my imagination and ignited a fire in my culinary heart. Fast forward to today, and the thought struck me: why not recreate this fantastic dish using salmon?
Salmon is a beautifully rich fish that can stand up to bold flavors like no other. It got me thinking about making my own version—Bang Bang Salmon! Not only is salmon packed with health benefits, but it’s also a canvas for incredible flavors. I often find myself in my kitchen reminiscing about that first taste, tweaking the recipe to fit my style while keeping it true to its roots. Now, I’m excited to share this vibrant dish with you!
Ingredients for Bang Bang Salmon
Here’s what you’ll need to whip up this sensational dish:
-
1 pound salmon fillets, cut into bite-sized pieces
Salmon is rich in omega-3 fatty acids, making it a super healthy protein choice. If you’re looking for a substitution, try using shrimp or chicken! -
1/2 cup cornstarch
This will give your salmon that satisfying crunch. If you’re looking for a gluten-free option, cornstarch is perfect. You can also use rice flour for a similar effect. -
1 tablespoon vegetable oil
Use this to get a nice sear on your salmon. Don’t have vegetable oil? Olive oil or avocado oil will work well too! -
1/4 cup mayonnaise
This adds creaminess to your sauce. For a lighter option, you can swap it out for Greek yogurt. -
2 tablespoons sweet chili sauce
Sweet chili sauce is where the magic happens—sweet with a hint of heat! Hot sauce lovers can zest it up by using spicy chili sauce instead. -
1 tablespoon sriracha
This provides that welcomed kick! Adjust the amount based on your spice tolerance—less for mild, more for a fiery punch. -
Salt and pepper to taste
Essential seasonings to enhance all those vibrant flavors! -
Green onions, for garnish
An excellent finishing touch that adds crunch and freshness to the dish.
Step-by-Step Instructions to Create Bang Bang Salmon
Ready to bring your kitchen to life? Let’s get started with these easy-to-follow steps!
-
Prepare the Salmon
Start by cutting your salmon fillets into bite-sized pieces. This makes them easy to cook and perfect for sharing—if you’re feeling generous! Ensure they’re uniform to ensure even frying. -
Coat with Cornstarch
In a mixing bowl, toss the salmon pieces with cornstarch until evenly coated. This might seem simple, but trust me, this coating is key to achieving that delightful crunch. And don’t be shy—make sure every little piece is covered! -
Heat the Oil
In a large skillet, heat the vegetable oil over medium-high heat. You want it hot enough to create a lovely sear on the salmon, but not so hot that it smokes! A drop of water should sizzle if it’s ready. -
Fry the Salmon
Carefully add the coated salmon pieces to the skillet in a single layer. Fry for about 3-4 minutes per side, flipping gently until golden brown and crispy. If you have to do this in batches, that’s okay—take your time; good things come to those who wait! -
Make the Sauce
While your salmon is cooking, let’s whip up that Bang Bang sauce! In a small bowl, combine mayonnaise, sweet chili sauce, and sriracha. Give it a good mix until smooth. You can adjust the sriracha based on how spicy you want it! -
Toss the Salmon
Once your salmon is perfectly crispy and cooked through, remove it from the heat and place it in a clean bowl. Drizzle your Bang Bang sauce over the salmon and gently toss until every piece is coated in that luscious goodness. -
Garnish and Serve
Sprinkle chopped green onions on top for a fresh touch that brightens up the dish. You want that pop of color—it’s all about making your dish look as good as it tastes!
Serving Suggestions
Now that your Bang Bang Salmon is ready, let’s talk presentation! For a feast that looks as amazing as it tastes, serve it over a bed of fluffy jasmine rice or quinoa. A side of lightly steamed veggies or a fresh salad can complement the dish nicely, adding color and freshness. Don’t forget to drizzle a little extra sauce over the top for that eye-catching finish!
Recipe Variations to Try
Get creative! Here are some fun twists on the classic Bang Bang Salmon:
-
Spicy Mango Bang Bang: Add diced ripe mango to the sauce for a tropical flair with a hint of sweetness.
-
Bang Bang Salmon Tacos: Serve the salmon in warm tortillas topped with fresh cabbage slaw for a taco night twist.
-
Pineapple Bliss: Mix in some crushed pineapple into the sauce for a tangy-sweet delight that brightens up your plate.
-
Herb-Infused: Add a sprinkle of chopped fresh herbs like cilantro or parsley for an earthy note.
Chef’s Notes
Oh man, where do I start? This Bang Bang Salmon recipe has definitely evolved over the years. I remember the first time I tried making it—it was a glorious, messy experience, and I may have accidentally spilled sriracha everywhere! But that chaos led to a glorious flavor discovery. Now, I find joy in experimenting with textures and tastes, and this dish is my canvas. Every time I make it, I think of those fun nights dining out with friends, and now all those flavors come together right in my kitchen. It’s about creating memories and sharing laughter around the dinner table—food brings us all together!
FAQs and Troubleshooting
1. My salmon is sticking to the pan! What can I do?
Make sure your pan is hot enough before adding the salmon. If it’s sticking, it might not have developed that crispy coating properly. A well-preheated pan is essential!
2. Can I use frozen salmon for this recipe?
Absolutely! Just make sure to thaw it completely and pat it dry before coating it with cornstarch to ensure a perfect texture.
3. What can I serve with Bang Bang Salmon?
This dish is incredibly versatile! Pair it with rice, stir-fried vegetables, or a refreshing salad to balance those rich flavors.
4. How do I store leftovers?
Leftover salmon can be stored in an airtight container in the fridge for up to 2 days. Just reheating it in the oven for that crispy texture is a great idea!
Nutritional Info
While I don’t have precise numbers for each component here, one serving of this Bang Bang Salmon is packed with protein from the salmon, healthy fats from the mayonnaise, and a hint of carbohydrates from the cornstarch. Feel free to reach out for specific dietary needs or adjustments!
There you have it! Bang Bang Salmon is not just a dish; it’s an experience filled with flavor, fun, and a touch of nostalgia. So, gather your ingredients, get into the kitchen, and enjoy every moment of creating and savoring this delightful meal. Happy cooking!
PrintBang Bang Salmon

A mouthwatering salmon dish with a sweet and spicy bang bang sauce, perfect for seafood lovers.
- Prep Time: 10 minutes
- Cook Time: 10 minutes
- Total Time: 20 minutes
- Yield: 4 servings 1x
- Category: Main Course
- Method: Frying
- Cuisine: Asian
- Diet: Pescatarian
Ingredients
- 1 pound salmon fillets, cut into bite-sized pieces
- 1/2 cup cornstarch
- 1 tablespoon vegetable oil
- 1/4 cup mayonnaise
- 2 tablespoons sweet chili sauce
- 1 tablespoon sriracha
- Salt and pepper to taste
- Green onions, for garnish
Instructions
- Prepare the salmon by cutting it into bite-sized pieces.
- Coat the salmon pieces with cornstarch in a mixing bowl.
- Heat the vegetable oil in a large skillet over medium-high heat.
- Fry the salmon pieces for about 3-4 minutes per side until golden brown and crispy.
- Make the Bang Bang sauce by combining mayonnaise, sweet chili sauce, and sriracha in a small bowl.
- Toss the cooked salmon with the Bang Bang sauce until evenly coated.
- Garnish with chopped green onions before serving.
Notes
For a gluten-free option, use rice flour instead of cornstarch. Adjust sriracha according to your spice preference.
Nutrition
- Serving Size: 1 serving
- Calories: 400
- Sugar: 8g
- Sodium: 500mg
- Fat: 18g
- Saturated Fat: 3g
- Unsaturated Fat: 12g
- Trans Fat: 0g
- Carbohydrates: 30g
- Fiber: 0g
- Protein: 28g
- Cholesterol: 60mg
Keywords: bang bang salmon, seafood recipe, easy salmon dish, Asian cuisine
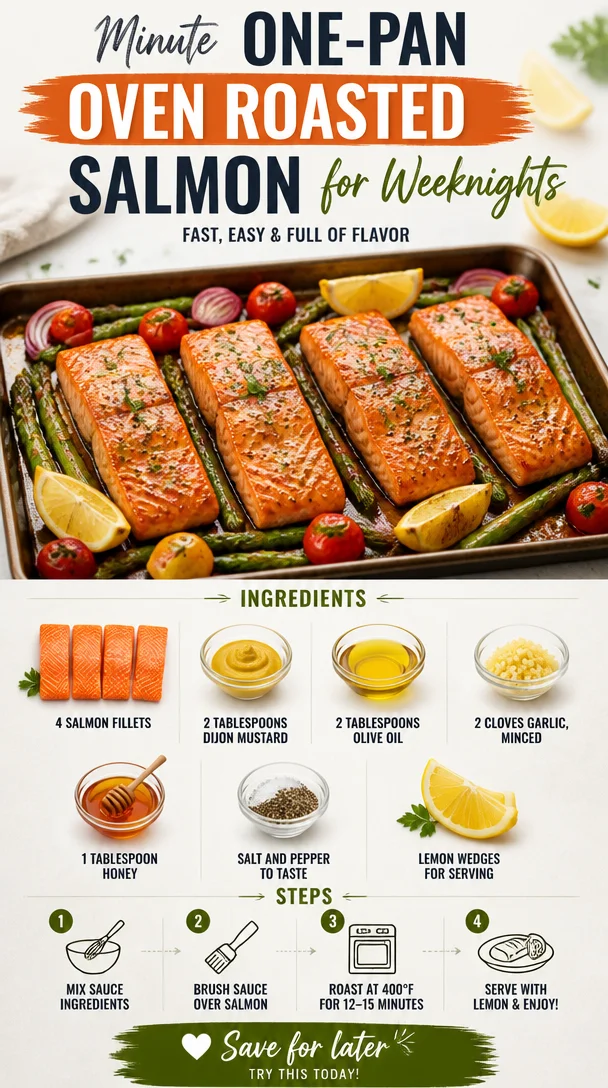
Minute One-Pan Oven Roasted Salmon for Weeknights
Oven Roasted Salmon: A Delicious Way to Enjoy a Healthy Meal
Welcome back to Clean Plate Cravings! Today, I’m excited to share a recipe that perfectly marries health and flavor—Oven Roasted Salmon. This dish is not only quick to whip up but also gives you that restaurant-quality taste right in your own kitchen. If you’re looking to impress guests, meal prep for the week, or simply enjoy a fantastic dinner with minimal fuss, this is the recipe for you!
Eating well doesn’t mean sacrificing flavor, and with salmon, we can harness both nutrition and deliciousness. I remember the first time I roasted salmon in the oven; it was a game-changer! I was visiting my friend in Seattle, a city famous for its seafood. One evening, we decided to cook together, and she pulled out a beautiful piece of salmon. As it roasted, the kitchen filled with a mouthwatering aroma that was irresistible. That night wasn’t just about the delicious meal; it was also about the laughter, chatting, and memories created. We paired that salmon with roasted vegetables and sat on the patio, enjoying the cool Seattle breeze. Since then, I’ve prized salmon in my kitchen, and I can’t wait to share my simple yet flavorful take on it with you.
Now, let’s dive into this scrumptious Oven Roasted Salmon recipe that promises to bring a burst of flavor to your table!
Ingredients
-
4 salmon fillets: Fresh salmon is key for this dish. Look for skin-on fillets for extra flavor and moisture. If you’re not a fan of salmon, feel free to swap it out with trout or even chicken breast.
-
2 tablespoons Dijon mustard: This tangy mustard adds a delightful zing that enhances the flavor of the salmon. If you want a milder flavor, try using whole grain mustard or even honey mustard for a sweeter twist.
-
2 tablespoons olive oil: A good quality virgin olive oil brings richness and depth to the dish. Can’t find olive oil? Avocado oil works brilliantly here too, with its light flavor profile.
-
2 cloves garlic, minced: Garlic is a flavor powerhouse; it complements the salmon perfectly. For a softer flavor, try roasting whole cloves instead and mashing them into a paste.
-
1 tablespoon honey: A touch of sweetness from honey balances the savory notes of the salmon and mustard. Maple syrup is a great alternative if you’re avoiding honey.
-
Salt and pepper to taste: Essential for seasoning, but feel free to get creative! Add a sprinkle of smoked paprika or dill for additional flavor notes.
-
Lemon wedges for serving: A squeeze of fresh lemon juice enhances the flavors and adds brightness to the dish. If you love citrus, try using fresh lime or oranges as well!
Step-by-Step Instructions
1. Preheat Your Oven
Start by preheating your oven to 400°F (200°C). This temperature is perfect for roasting, allowing the salmon to cook evenly while developing that lovely crispy exterior.
Chef Tip: Use a convection setting if available—this circulating air will help achieve an extra-crisp skin!
2. Prepare the Marinade
In a small bowl, whisk together the Dijon mustard, olive oil, minced garlic, and honey until well combined. This marinade will not only flavor the fish but also create a beautiful glaze as it bakes.
Chef Note: If you loved soy sauce, you could sub a tablespoon for a savory kick!
3. Season the Salmon
Place the salmon fillets skin-side down on a greased baking sheet or lined with parchment paper. Brush the marinade generously over the top of each fillet, ensuring every inch is coated. Sprinkle salt and pepper to taste.
Chef Hack: For extra crispy skin, pat the fillets dry with paper towels before applying the marinade!
4. Bake the Salmon
Slide your baking sheet into the preheated oven and roast for 12-15 minutes, depending on the thickness of your fillets. You want the salmon to be just cooked through and flake easily with a fork. A good rule of thumb is to cook it for about 4-6 minutes per half-inch of thickness.
Watch out: Salmon is best served slightly undercooked, as it will continue to cook from residual heat once out of the oven!
5. Serve with a Splash of Citrus
Remove the salmon from the oven and let it rest for a couple of minutes. Plate the fillets, squeezing fresh lemon on top for that delectable citrus finish. Enjoy it alongside your favorite side dishes like steamed veggies, rice, or a colorful salad!
Bonus Tip: Garnish with fresh herbs like parsley or dill for a beautiful presentation.
Serving Suggestions
To plate your oven roasted salmon, lay a salmon fillet slightly off-center on the plate. Serve with a generous scoop of your favorite grain on the other side—think quinoa, farro, or a light couscous salad. Add a vibrant side of roasted vegetables, like asparagus or broccoli, for that perfect pop of color. A lemon wedge on the side not only brightens the dish but invites guests to enjoy that final burst of flavor!
Recipe Variations
-
Mediterranean Style: Add chopped olives, sun-dried tomatoes, and a sprinkle of feta cheese before roasting for a delightful Mediterranean twist.
-
Herb-Crusted: Coat the fillets in fresh herbs like dill, parsley, or thyme before roasting—a fresh burst of flavor!
-
Spicy Kick: Mix in a pinch of red pepper flakes with the marinade for those who love a little heat.
-
Ginger Citrus: Add freshly grated ginger to the marinade for a refreshing zing that complements the salmon beautifully.
Chef’s Notes
Cooking salmon has become a staple in my home! I’ve gone from throwing it in the oven as-is to experimenting with all kinds of marinades and flavors over the years. One memorable attempt, I threw in a splash of orange juice and a handful of cilantro, creating a flavor combination that I never would have thought to pair! From that moment on, the kitchen became my laboratory, leading to an array of delicious discoveries. Salmon is forgiving and versatile—a true kitchen superstar!
FAQs and Troubleshooting
-
How do I know when my salmon is done cooking?
When salmon is perfectly cooked, it should appear opaque and flake easily with a fork. If you have a thermometer handy, aim for an internal temperature of about 145°F (63°C). -
Why did my salmon turn out dry?
Overcooking is the usual culprit. Keep an eye on the cooking time and check for doneness a few minutes early, especially if your fillets are thinner. -
Can I use frozen salmon?
Absolutely! Just make sure you thaw it completely before cooking for the most even results. -
What sides pair well with oven roasted salmon?
Roasted vegetables, garlic mashed potatoes, quinoa salad, or a simple green salad dress up this salmon beautifully!
Nutritional Info (Optional)
Eating salmon is one of the best dietary choices you can make! Salmon is packed with omega-3 fatty acids, which are fantastic for heart health. A typical 6 oz. serving of salmon provides approximately:
- Calories: 367
- Protein: 39g
- Fat: 23g (mostly healthy fats!)
- Carbohydrates: 0g
This menu is not only nutritious but also fills your kitchen with delightful aromas and flavors.
Now that you’ve got my Oven Roasted Salmon recipe in your back pocket, I’m excited for you to give it a try! Enjoy it with friends, loved ones, or just treat yourself to a well-deserved meal. Happy cooking, and as always, keep those plates clean but full of joy and flavor!
PrintOven Roasted Salmon

A quick and flavorful recipe for oven roasted salmon that’s perfect for impressing guests or enjoying a healthy meal at home.
- Prep Time: 10 minutes
- Cook Time: 15 minutes
- Total Time: 25 minutes
- Yield: 4 servings 1x
- Category: Main Course
- Method: Baking
- Cuisine: American
- Diet: Gluten-Free
Ingredients
- 4 salmon fillets
- 2 tablespoons Dijon mustard
- 2 tablespoons olive oil
- 2 cloves garlic, minced
- 1 tablespoon honey
- Salt and pepper to taste
- Lemon wedges for serving
Instructions
- Preheat your oven to 400°F (200°C).
- Whisk together the Dijon mustard, olive oil, minced garlic, and honey in a small bowl.
- Place the salmon fillets skin-side down on a greased baking sheet and brush with the marinade.
- Sprinkle salt and pepper to taste.
- Bake for 12-15 minutes, until just cooked through.
- Remove from the oven and let it rest for a couple of minutes. Squeeze fresh lemon on top before serving.
Notes
For extra crispy skin, pat the fillets dry before applying the marinade. Experiment with different marinades for varied flavors.
Nutrition
- Serving Size: 1 fillet
- Calories: 367
- Sugar: 5g
- Sodium: 300mg
- Fat: 23g
- Saturated Fat: 3g
- Unsaturated Fat: 15g
- Trans Fat: 0g
- Carbohydrates: 0g
- Fiber: 0g
- Protein: 39g
- Cholesterol: 70mg
Keywords: salmon, oven roasted, healthy dinner, seafood recipe, easy meal
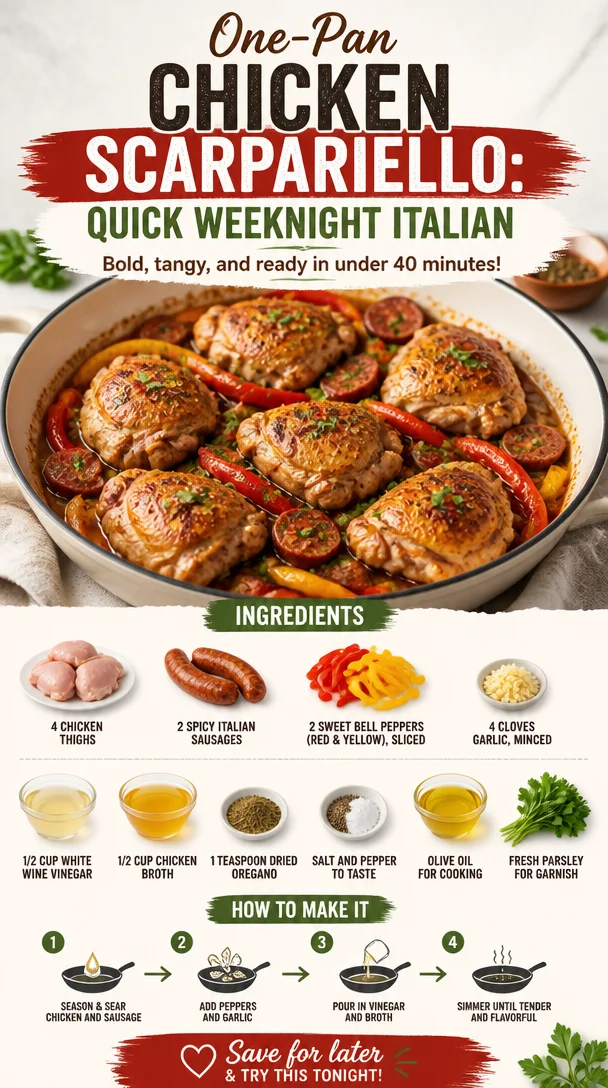
One-Pan Chicken Scarpariello: Quick Weeknight Italian
Chicken Scarpariello: A Flavorful Adventure in Every Bite
Hello, fellow food lovers! Today, I’m bubbling with excitement to share with you a dish that brings a smile to my face and warmth to my heart: Chicken Scarpariello. If you’re looking for a recipe that combines juicy chicken thighs, zesty sausages, vibrant bell peppers, and a delightful white wine vinegar sauce, you’ve landed in the right kitchen! 🥳
This dish is not only packed with flavor; it also holds a special place in my culinary journey. Growing up, I spent countless evenings in the kitchen with my grandmother, a skilled cook from the Old Country. She had this incredible knack for taking humble ingredients and turning them into something magical. One evening, while we were rummaging through her pantry, she whipped up her version of Chicken Scarpariello, and I’ll never forget the intoxicating aroma that filled the air. Every bite was a celebration of flavors and memories. The spicy sausages danced beautifully with the sweet bell peppers and garlic, creating a melody that still plays in my mind.
Today, as I share my rendition of Chicken Scarpariello with you, I hope to instill a sense of nostalgia, joy, and the excitement of cooking right in your own kitchen. So, buckle up your apron and let’s get started on this flavor-packed culinary adventure!
Ingredients
Gather these fantastic ingredients for our Chicken Scarpariello:
-
4 chicken thighs: I love using bone-in, skin-on chicken thighs for their rich flavor and juicy texture. If you prefer, boneless thighs can work too!
-
2 spicy Italian sausages: The seasoning in these sausages adds a delightful kick. If you’re not into heat, feel free to swap them out for sweet Italian sausages instead.
-
2 sweet bell peppers (red and yellow), sliced: They not only add color but also a crunch and sweetness that balances the dish beautifully. Any bell pepper works, so mix it up if you’d like!
-
4 cloves garlic, minced: Garlic is a flavor powerhouse here. Use fresh, but if you’re in a pinch, pre-minced garlic from a jar can save time.
-
1/2 cup white wine vinegar: This ingredient brings acidity and brightness to the dish. If you’re out of white wine vinegar, you can use apple cider vinegar as a substitute.
-
1/2 cup chicken broth: Homemade is best, but store-bought works too. Just make sure it’s low-sodium to control the salt content in your recipe.
-
1 teaspoon dried oregano: This herb adds a lovely earthy flavor to complement the other ingredients. Fresh oregano can elevate the dish even further if you have it on hand.
-
Salt and pepper to taste: A simple seasoning, but don’t skip them; they build the flavor up beautifully.
-
Olive oil for cooking: A splash of good-quality olive oil will make all the difference in sautéing your chicken and veggies to perfection.
-
Fresh parsley for garnish: Nothing brightens up a dish like a sprinkle of fresh herbs. Plus, they add a lovely pop of color!
Step-by-Step Instructions
-
Prep Your Ingredients: Start by gathering all your ingredients and chopping the bell peppers, mincing the garlic, and slicing the sausages. This makes cooking much smoother. Trust me; your future self will thank you!
-
Sear the Chicken: In a large skillet or Dutch oven, heat 2 tablespoons of olive oil over medium-high heat. Season the chicken thighs generously with salt and pepper. Place them skin-side down in the hot pan. Let them cook without moving for about 6-7 minutes, until the skin is golden and crispy. This is where the magic begins—listen for that sizzle!
-
Add the Sausages: Once the chicken is beautifully browned, remove it from the pan and set it aside. In the same skillet, add the sliced spicy Italian sausages and sauté for about 3-4 minutes until they start to brown. This step adds depth to the flavor base.
-
Introduce the Garlic and Peppers: Add minced garlic to the pan with the sausages and stir for about 30 seconds until fragrant. Then, toss in the sliced bell peppers. They should sizzle upon contact! Stir everything together and cook for another 5-6 minutes until the peppers are tender yet still vibrant.
-
Deglaze with Vinegar: It’s time to bring out those flavors! Pour in the white wine vinegar, scraping up any browned bits from the bottom of the pan. These little bits are flavor gold! Allow the vinegar to cook down for about 2 minutes, letting the acidity work its magic.
-
Add Broth and Oregano: Pour in the chicken broth and stir in the dried oregano. Bring the mixture to a gentle simmer. This is where the sauce starts to come together. The aroma fills the kitchen—you can practically taste it!
-
Return Chicken to the Pan: Nestle the chicken thighs back into the skillet, skin-side up. Cover the pan with a lid, reduce the heat to medium-low, and let it simmer for about 30 minutes. This slow cooking allows the flavors to meld. Pro tip: If you want even more flavor, flip the thighs halfway through cooking!
-
Final Seasoning: After 30 minutes, check the chicken for doneness (it should reach an internal temperature of 165°F). Add salt and pepper to taste. The smell should be absolutely irresistible at this point!
-
Garnish and Serve: Remove the pan from heat and sprinkle with freshly chopped parsley. This adds that gorgeous pop of green and freshness.
Serving Suggestions
When it comes to serving Chicken Scarpariello, presentation is key! I recommend serving it family-style right in the pan for a rustic touch, or you can plate it up by resembling an artful splash of sauce under the chicken for a gourmet feel. Pair it with a simple green salad, crusty bread, or over a bed of fluffy rice or polenta to soak up that savory sauce. Your guests will be begging for seconds!
Recipe Variations
Let’s shake things up! Here are a few creative twists you can try with this classic Chicken Scarpariello:
-
Herb Explosion: Add fresh thyme and rosemary to elevate the flavor profile. Just toss them in while the chicken simmers.
-
Veggie Boost: Sneak in more veggies! Carrots, zucchini, or mushrooms would be fantastic additions.
-
Heat it Up: If you want to spice things up even more, add a pinch of red pepper flakes for an additional kick.
-
Citrusy Twist: Drizzle some fresh lemon juice right before serving for a bright, zesty finish.
-
Sweet & Savory Combo: Adding a tablespoon of honey can create a delightful contrast to the vinegar, giving it a unique flavor profile.
Chef’s Notes
Oh, where do I begin? Chicken Scarpariello has evolved quite a bit since my grandmother first introduced me to the concept. I remember her saying, “Food is about love, and love should never be boring.” That mantra stuck with me and inspired the way I cook. Over the years, I’ve played with the ingredients, adding my own twists here and there. It’s amazing how versatile this dish is! You can easily turn it into a one-pan dinner or a cozy weekday meal that feels special. And hey, whenever I make this dish, I’m instantly transported back to those joyful kitchen moments with her. Food truly has a funny way of connecting us to our roots.
FAQs and Troubleshooting
-
Can I use chicken breasts instead of thighs?
Absolutely! Just keep in mind that chicken breasts may dry out more easily, so adjust the cooking time accordingly. They’ll need about 20 minutes if boneless. -
What if I don’t have white wine vinegar?
No problem! Apple cider vinegar or even lemon juice can serve as great substitutes. Just adjust the amount to taste, as they vary in acidity. -
How do I know if my chicken is cooked through?
Use a meat thermometer to check; the internal temperature should read 165°F. Also, the juices should run clear when you cut into it. -
What can I serve this with?
Chicken Scarpariello goes great with rice, polenta, or crusty bread. You could also serve it with a side of roasted vegetables for a well-rounded meal!
In conclusion, I’m thrilled you joined me on this culinary journey through the flavors of Chicken Scarpariello. This dish is more than just a recipe; it’s about traditions, memories, and connection. So get those ingredients ready, invite loved ones into your kitchen, and create your own delicious memories. Happy cooking, friends! 🍽️
PrintChicken Scarpariello

A flavor-packed dish combining juicy chicken thighs, zesty sausages, and vibrant bell peppers in a delightful white wine vinegar sauce.
- Prep Time: 15 minutes
- Cook Time: 40 minutes
- Total Time: 55 minutes
- Yield: 4 servings 1x
- Category: Main Course
- Method: Sautéing
- Cuisine: Italian
- Diet: Omnivore
Ingredients
- 4 chicken thighs, bone-in, skin-on
- 2 spicy Italian sausages, sliced
- 2 sweet bell peppers (red and yellow), sliced
- 4 cloves garlic, minced
- 1/2 cup white wine vinegar
- 1/2 cup chicken broth
- 1 teaspoon dried oregano
- Salt and pepper to taste
- Olive oil for cooking
- Fresh parsley for garnish
Instructions
- Prep your ingredients: Start by gathering and chopping the bell peppers, mincing the garlic, and slicing the sausages.
- Sear the chicken: In a large skillet, heat olive oil over medium-high heat, season chicken with salt and pepper, and cook skin-side down for 6-7 minutes until golden.
- Add the sausages: Remove chicken, add sliced sausages to the skillet, and sauté for 3-4 minutes until browned.
- Introduce the garlic and peppers: Add minced garlic and sauté for 30 seconds, then add bell peppers and cook for another 5-6 minutes.
- Deglaze with vinegar: Pour in white wine vinegar, scraping up browned bits, and cook for about 2 minutes.
- Add broth and oregano: Pour in chicken broth, stir in oregano, and bring to a gentle simmer.
- Return chicken to the pan: Nestle chicken thighs back into the skillet, cover, and simmer for about 30 minutes.
- Final seasoning: Check chicken doneness at 165°F and adjust salt and pepper to taste.
- Garnish and serve: Remove from heat, sprinkle with parsley, and serve your Chicken Scarpariello!
Notes
For extra flavor, flip the chicken halfway through cooking. Serve family-style or plate with sauce underneath the chicken.
Nutrition
- Serving Size: 1 serving
- Calories: 450
- Sugar: 5g
- Sodium: 700mg
- Fat: 20g
- Saturated Fat: 6g
- Unsaturated Fat: 12g
- Trans Fat: 0g
- Carbohydrates: 40g
- Fiber: 4g
- Protein: 30g
- Cholesterol: 100mg
Keywords: Chicken Scarpariello, Italian cuisine, comfort food, easy dinner, family meal
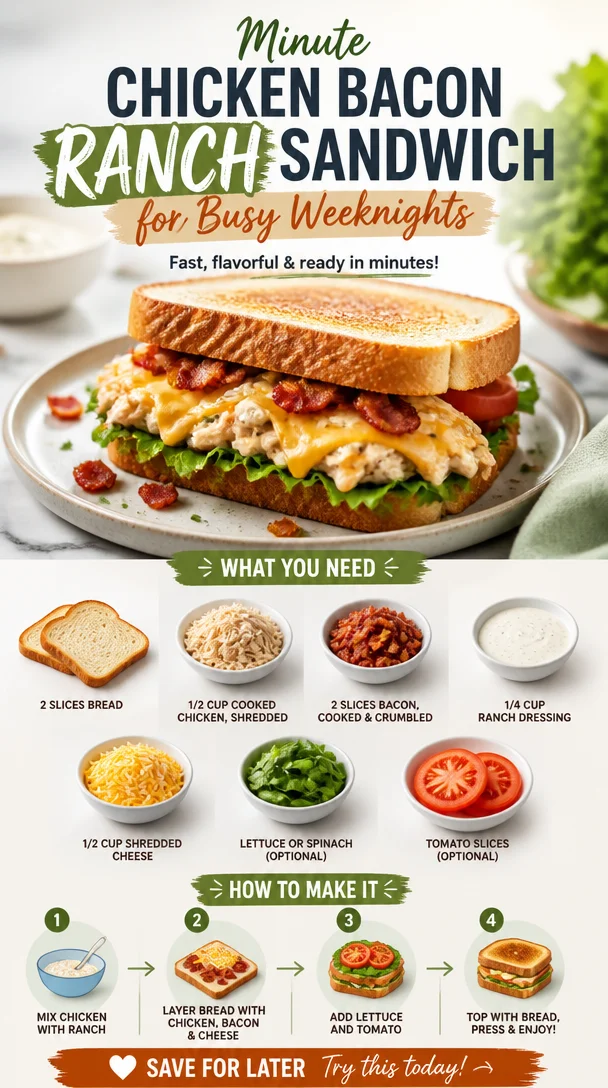
Minute Chicken Bacon Ranch Sandwich for Busy Weeknights
Chicken Bacon Ranch Sandwich: A Flavorful Feast
Welcome to my kitchen, fellow food lovers! Today, we’re diving into a classic favorite that hits all the right notes: the Chicken Bacon Ranch Sandwich. This delightful creation is not just a meal; it’s a celebration of flavors that marries juicy chicken, crispy bacon, and that creamy ranch dressing we all crave. Whether you’re preparing it for a weekday lunch or a relaxed weekend dinner, this sandwich brings a smile to your face and comfort to your belly.
When I think of a Chicken Bacon Ranch Sandwich, I’m transported back to my college days, where late-night cravings often led me to the kitchen rummaging through the fridge. One night, my friends and I were struck with the genius idea to whip up something delicious using whatever we could find. Chicken leftovers from a previous dinner, some ranch dressing that was practically begging to be used, and bacon? Well, let’s just say that it was a no-brainer. As we sat around the table, we shared laughter, stories, and bites of that delectable creation that would go on to become the ultimate crowd-pleaser.
Since then, I’ve perfected this recipe to share with all of you! It’s simple, approachable, and all about making the most out of ingredients you already have on hand. So whether you’re entertaining friends, feeding the family, or just indulging in some self-care, this Chicken Bacon Ranch Sandwich deserves a spot in your recipe book. Let’s get started!
The Ingredients You’ll Need
-
2 slices of bread
You can go classic with white or whole grain, or get adventurous with sourdough or a crusty baguette. Feel free to toast them for an extra crunch! -
1/2 cup cooked chicken, shredded
Almost any cooked chicken will do! You can use rotisserie chicken (my go-to!), grilled chicken, or even leftover baked chicken. Need a faster option? Deli-style chicken works perfectly. -
2 slices of bacon, cooked and crumbled
Crispy bacon adds the perfect crunch! Try turkey bacon for a lighter version or bacon alternatives if you’re vegetarian. -
1/4 cup ranch dressing
The star of our show! But don’t limit yourself to store-bought; a homemade ranch can elevate this sandwich. Mix yogurt, herbs, garlic, and lemon juice for a lighter option. -
1/2 cup shredded cheese (cheddar or mozzarella)
Cheddar brings a sharp flair while mozzarella melts beautifully. Go ahead and mix the two if you can’t decide! -
Lettuce or spinach (optional)
A bit of greens adds freshness! Swap it out for arugula if you prefer a peppery kick or omit it for a more indulgent treat. -
Tomato slices (optional)
Juicy tomatoes give a fresh burst. Heirloom tomatoes can really elevate this sandwich if they’re in season, but standard ones will do just fine.
Step-by-Step Instructions
-
Prepare Your Ingredients
Gather all your ingredients and ensure your chicken is shredded, bacon is crispy, and cheese is finely grated. Trust me, having everything prepped makes cooking much smoother! -
Toast the Bread
In a skillet or toaster, lightly toast your bread slices until they’re golden brown. This adds that satisfying crunch and helps keep the sandwich from getting soggy from the dressing. -
Cook the Bacon
If you’re not already using pre-cooked bacon, cook your strips in a frying pan over medium heat until they are crispy. Don’t forget to drain on a paper towel to absorb that excess oil. Pro tip: reserve a little bacon fat for cooking chicken if you want to add that extra flavor bomb! -
Mix the Filling
In a bowl, combine the shredded chicken, crumbled bacon, and ranch dressing. Mix everything until the chicken is well-coated. You can taste and adjust the dressing based on your preference for creaminess. -
Layer it Up
Place one slice of toasted bread on a plate. Spoon a generous portion of the chicken mixture onto it, spreading it out evenly. Sprinkle a layer of shredded cheese on top for that melty goodness. -
Add Fresh Ingredients
If you’re including lettuce and tomato, now’s the time to layer them on. The crunch of the lettuce and the juiciness of the tomato will elevate your sandwich’s texture. -
Top It Off
Place the second slice of bread on top. You can either leave it as is or grill the whole sandwich in the pan over medium heat for a few minutes to melt the cheese and create a crispy exterior. Flip carefully so it doesn’t fall apart! -
Slice and Serve
Use a sharp knife to slice your sandwich in half. Not only does it make it Instagram-worthy, but it also makes it easier to eat!
Serving Suggestions
For serving your Chicken Bacon Ranch Sandwich, consider pairing it with a side of crispy baked sweet potato fries or a refreshing mixed greens salad. Keep it light and breezy with a hint of lemon juice or balsamic vinegar for extra zing. If you’re really feeling indulgent, a side of potato chips or even nachos can take this meal over the top!
Recipe Variations
-
Buffalo Chicken Twist
Swap out the ranch dressing for buffalo sauce for a spicy kick, and add blue cheese crumbles for that classic buffalo flavor. -
Mediterranean Delight
Use Greek yogurt mixed with herbs instead of ranch, and add some olives, feta cheese, and cucumber slices for a fresh take. -
BBQ Chicken Ranch
Combine ranch dressing with your favorite BBQ sauce for a smoky, tangy taste, and top it with pickled jalapeños for some heat. -
Veggie Lover’s Twist
Substitute shredded chicken with roasted vegetables or a chickpea salad for a delightful vegetarian option. -
Breakfast Sandwich
Add a fried egg on top for a breakfast version that’s packed with protein and flavor.
Chef’s Notes
This Chicken Bacon Ranch Sandwich has been a beloved staple in my kitchen over the years. It’s versatile, quick to whip up, and always a crowd-pleaser. I remember experimenting with different sauces and flavors, but ranch always comes out on top. Sometimes I even mix in some hot sauce for that little kick. Cooking should always be about having fun and being creative!
FAQs and Troubleshooting
Q: Can I make this sandwich ahead of time?
Absolutely! You can prepare the chicken mixture in advance and store it in the refrigerator for up to three days. Just assemble the sandwich when you’re ready to eat!
Q: How do I prevent my sandwich from getting soggy?
Be sure to toast your bread and use less dressing if you prefer a drier sandwich. You can also layer the lettuce directly against the bread to create a barrier.
Q: What if I don’t like ranch dressing?
No worries! Feel free to customize with your favorite dressing or sauce. BBQ, honey mustard, or even a creamy garlic dressing can work wonders.
Q: How can I make this sandwich healthier?
Opt for whole grain bread, lean chicken, and Greek yogurt-based ranch dressing to cut down on calories while still enjoying an amazing flavor.
Nutritional Info
While I love indulging in hearty meals, it’s fun to know a bit about what we’re munching on! Keep in mind that the nutritional info can vary depending on your choice of ingredients and portion sizes, but here’s a rough idea for one Chicken Bacon Ranch Sandwich made with the specified ingredients:
- Calories: ~550-600
- Protein: ~35g
- Carbohydrates: ~40g
- Fats: ~30g
Enjoy the delicious journey of creating your Chicken Bacon Ranch Sandwich! Each bite is a testament to flavorful simplicity that nourishes not just the body, but the heart and soul. So, grab your apron and let’s get cooking!
PrintChicken Bacon Ranch Sandwich

A flavorful feast of juicy chicken, crispy bacon, and creamy ranch dressing in a delightful sandwich.
- Prep Time: 15 minutes
- Cook Time: 15 minutes
- Total Time: 30 minutes
- Yield: 1 serving 1x
- Category: Main Course
- Method: Grilling
- Cuisine: American
- Diet: Non-Vegetarian
Ingredients
- 2 slices of bread (white, whole grain, sourdough, or a crusty baguette)
- 1/2 cup cooked chicken, shredded
- 2 slices of bacon, cooked and crumbled
- 1/4 cup ranch dressing
- 1/2 cup shredded cheese (cheddar or mozzarella)
- Lettuce or spinach (optional)
- Tomato slices (optional)
Instructions
- Prepare your ingredients by shredding chicken, crisping bacon, and grating cheese.
- Toast the bread slices in a skillet or toaster until golden brown.
- Cook the bacon in a frying pan over medium heat until crispy.
- Mix the shredded chicken, crumbled bacon, and ranch dressing until well combined.
- Layer one slice of bread on a plate and spoon the chicken mixture on top.
- Add fresh ingredients like lettuce and tomato if desired.
- Top with the second slice of bread and optionally grill the sandwich.
- Slice in half and serve with your favorite sides.
Notes
This sandwich can be customized with different dressings and toppings for variety.
Nutrition
- Serving Size: 1 sandwich
- Calories: 550
- Sugar: 4g
- Sodium: 800mg
- Fat: 30g
- Saturated Fat: 10g
- Unsaturated Fat: 15g
- Trans Fat: 0g
- Carbohydrates: 40g
- Fiber: 2g
- Protein: 35g
- Cholesterol: 60mg
Keywords: Chicken Sandwich, Bacon Ranch, Easy Recipe, Comfort Food

4th of July Monster Cookies: 30-Minute Patriotic Treats
4th of July Monster Cookies: A Sweet Celebration!
Happy 4th of July! It’s that time of year again when we gather with friends and family, fire up the grill, and celebrate our freedom under a sky filled with fireworks. While the hot dogs and burgers might be at the forefront of your July 4th menu, what about dessert? You can’t go wrong with a cookie that packs a punch, not just in flavor but in joy! Today, I’m thrilled to share my recipe for 4th of July Monster Cookies—the perfect sweet treat for your summer festivities.
These cookies are a delightful blend of gooey chocolate chips, vibrant M&M’s, and a hint of nostalgia that will bring you back to childhood days of baking with your parents or grandparents. With each bite, you’ll experience not only the flavors but also the chuckles and sweet memories of past celebrations. They’re easy to make, fun to eat, and visually striking—everything you need for a festive gathering.
Picture this: You and your loved ones lounging outside, the sun setting, laughter ringing through the air, and the aroma of freshly baked cookies wafting from the kitchen. Nothing beats that, right? So, roll up those sleeves, and let’s whip up a batch of these deliciously colorful Monster Cookies that will brighten your holiday and leave everyone asking for seconds.
A Whimsical Cookie Memory
When I think of cookies from my childhood, I am instantly transported to my grandma’s kitchen. Her small, cozy space was filled with the sweet aroma of baked goods, and her kitchen became a haven for creativity. One summer afternoon, I remember her introducing me to the magical world of cookies. Armed with a colorful bowl of sprinkles and a variety of tasty ingredients, we created a cookie explosion that looked like a party itself!
It was on that day—while I illegally snuck handfuls of chocolate chips and M&Ms—that the idea of Monster Cookies was born. Inspired by that spirit of joy, laughter, and indulgence, I developed this recipe that encapsulates all those feelings in one bite. Every time I take a warm cookie out of the oven, I’m flooded with memories of summer fun spent baking and enjoying the company of loved ones. And today, I want to pass that magic along to you!
Ingredients You’ll Need
Here’s what you’ll need to make these hearty, delightful Monster Cookies:
-
1 cup browned butter
- Browning the butter gives a nutty flavor that elevates these cookies. You can substitute with regular unsalted butter, but don’t miss out on that toasty goodness if you can help it!
-
1 cup brown sugar
- This helps create a chewy texture. You can replace it with coconut sugar for a lighter option, but the flavor will vary slightly.
-
1/2 cup granulated sugar
- Adds sweetness and contributes to the crunchy exterior. If you’re looking to cut down on sugar, feel free to reduce the amount but it might affect that crispy edge!
-
1 cup peanut butter
- Creamy or crunchy, it adds richness and flavor. Almond or sun butter can be used for a different taste.
-
2 large eggs
- They bind everything together and provide moisture. You can swap these with a flaxseed mixture if you want to go egg-free.
-
2 teaspoons vanilla extract
- This adds a warm, comforting aroma. Always opt for pure vanilla extract if possible for an authentic flavor.
-
3 cups all-purpose flour
- This forms the base of your cookies. Whole wheat flour can be used for a healthier twist but may affect the consistency a bit.
-
1 teaspoon baking soda
- A crucial ingredient for that pillowy texture. Make sure it’s fresh to achieve the best rise.
-
1/2 teaspoon salt
- Just a pinch balances all the sweetness. Feel free to use sea salt for extra flavor!
-
1 cup chocolate chips
- Semi-sweet or dark, they add a melty chocolatey goodness. Swap with white chocolate or butterscotch chips for a fun variation.
-
1 cup M&Ms
- These colorful candies bring the festive spirit for the 4th of July! To make them healthier, you can use dark chocolate or yogurt-covered variants.
-
1/2 cup oats
- Oats provide texture and a bit of heartiness. You can use quick oats or rolled oats, depending on what you have on hand.
Step-by-Step Instructions
Now let’s roll up our sleeves and get started! Follow these steps to create your own Monster Cookies.
-
Brown the Butter:
- In a saucepan over medium heat, melt the butter. Stir it frequently until it turns golden brown and you can smell that delicious nutty aroma. This will take about 5-7 minutes. Once browned, remove it from the heat and allow it to cool slightly. A little tip: don’t walk away from the stove, or your butter may burn!
-
Mix the Sugars:
- In a large mixing bowl, combine the browned butter, brown sugar, and granulated sugar. Use a mixer or a whisk and blend until it’s well combined and creamy. The mix should be a pale tan color; this is a good sign!
-
Add Peanut Butter & Eggs:
- Stir in the peanut butter until smooth, then add the eggs one at a time. Incorporate the vanilla extract until everything is mixed uniformly. A tip for easier mixing: make sure the peanut butter is at room temperature; it will blend in more easily.
-
Dry Ingredients:
- In a separate bowl, whisk together the flour, baking soda, and salt. Gradually add this mixture to your wet ingredients. Mix until just combined—over-mixing can lead to tough cookies, and we want them soft and chewy!
-
Add the Goodies:
- Fold in the chocolate chips, M&Ms, and oats gently. I love using a spatula for this step because it makes sure everything is evenly distributed without over-mixing. Trust me; every bite should have a bit of everything!
-
Chill the Dough:
- This step is optional but highly recommended! Place your dough in the fridge for at least 30 minutes. This helps the flavors meld together and results in thicker cookies.
-
Preheat the Oven:
- Preheat your oven to 350°F (175°C). Line a baking sheet with parchment paper—this will prevent sticking and make clean-up a breeze.
-
Scoop & Bake:
- Use a large cookie scoop (or a tablespoon) to portion out the dough onto the prepared baking sheet. Leave space between them as they will spread slightly. Bake for 10-12 minutes or until the edges are golden brown but the centers are still soft.
-
Cool & Enjoy:
- Remove from the oven, and let them cool for a few minutes on the baking sheet before transferring them to a wire rack. This allows them to firm up a bit, and you’ll get that perfect texture!
Serving Suggestions
When it comes to serving these Monster Cookies, let your creativity shine! You can stack them high on a decorative platter and place them front and center at your BBQ or picnic. Add in some fresh berries for a pop of color and a little freshness. You can also wrap them in clear cellophane for beautiful party favors that everyone will cherish. Pro tip: Serve them warm with a scoop of vanilla ice cream on top for the ultimate indulgence—think ice cream sandwich meets cookie heaven!
Recipe Variations
Get creative with these Monster Cookies! Here are some fun options:
- Nut Variations: Swap the peanut butter for almond or cashew butter for a unique twist.
- Flavor Additions: Add in some cinnamon or nutmeg for a warm, spiced flavor that contrasts beautifully with the chocolate.
- Dairy-Free Delight: Use dairy-free chocolate chips and nut butter for a tasty vegan option.
- Fruit Zests: Mix in some dried cranberries or chopped nuts to provide a different texture and flavor.
Chef’s Notes
Since I started baking Monster Cookies, they’ve evolved from simply being for the 4th of July to a year-round favorite at parties, picnics, and family gatherings. I’ve played with different flavor profiles, and each time I whip up a batch, it churns out new memories and laughter around the kitchen. Just the other day, my niece took it upon herself to add sprinkles to the cookie dough, turning these cookies into a rainbow celebration! It’s a reminder that baking is not just about the end product but also about the joy and memories we create along the way.
FAQs and Troubleshooting
Why are my cookies flat?
If your cookies spread too much, consider chilling your dough a bit longer or checking that the butter wasn’t too hot when combined with sugars.
Can I freeze these cookies?
Absolutely! You can freeze the cookies after baking. Make sure they’re completely cooled, then place them in an airtight container. They’ll last for up to three months.
How do I know when my cookies are done?
Look for a slightly golden edge but a soft center. Remember, they’ll continue to bake as they cool!
My dough seems too dry. What should I do?
If you find your dough is too dry, add a splash of milk or another egg to bring it together.
Nutritional Info
If you’re watching your calories, keep in mind that these cookies are rich and loaded with goodness! Each cookie (based on the recipe yielding about 24 cookies) contains roughly:
- Calories: 210
- Fat: 10g
- Carbohydrates: 30g
- Protein: 4g
Remember, these are indulgent treats meant to be enjoyed, so savor every bite!
Final Thoughts
I hope you’re as excited as I am to whip up a batch of these 4th of July Monster Cookies and create lasting memories with your loved ones. Baking is a beautiful way to share joy, and there’s nothing quite like that first bite of a warm, gooey cookie fresh from the oven. Whether you’re dressing them up for the holiday or enjoying them any old day, these cookies are sure to please. Happy baking, and remember, every day is worth celebrating—so let’s keep it fresh, simple, and seriously delicious!
Print4th of July Monster Cookies

Delightful cookies packed with chocolate chips and M&Ms, perfect for summer celebrations.
- Prep Time: 15 minutes
- Cook Time: 12 minutes
- Total Time: 45 minutes
- Yield: 24 cookies 1x
- Category: Dessert
- Method: Baking
- Cuisine: American
- Diet: Vegetarian
Ingredients
- 1 cup browned butter
- 1 cup brown sugar
- 1/2 cup granulated sugar
- 1 cup peanut butter
- 2 large eggs
- 2 teaspoons vanilla extract
- 3 cups all-purpose flour
- 1 teaspoon baking soda
- 1/2 teaspoon salt
- 1 cup chocolate chips
- 1 cup M&Ms
- 1/2 cup oats
Instructions
- Brown the butter: In a saucepan over medium heat, melt the butter. Stir it frequently until it turns golden brown and you can smell that delicious nutty aroma. This will take about 5-7 minutes. Once browned, remove it from the heat and allow it to cool slightly.
- Mix the sugars: In a large mixing bowl, combine the browned butter, brown sugar, and granulated sugar. Use a mixer or a whisk and blend until it’s well combined and creamy.
- Add peanut butter & eggs: Stir in the peanut butter until smooth, then add the eggs one at a time. Incorporate the vanilla extract until everything is mixed uniformly.
- Mix dry ingredients: In a separate bowl, whisk together the flour, baking soda, and salt. Gradually add this mixture to your wet ingredients. Mix until just combined.
- Add the goodies: Fold in the chocolate chips, M&Ms, and oats gently.
- Chill the dough: Place your dough in the fridge for at least 30 minutes.
- Preheat the oven: Preheat your oven to 350°F (175°C). Line a baking sheet with parchment paper.
- Scoop & bake: Use a large cookie scoop (or a tablespoon) to portion out the dough onto the prepared baking sheet. Bake for 10-12 minutes or until the edges are golden brown.
- Cool: Remove from the oven, and let them cool for a few minutes on the baking sheet before transferring them to a wire rack.
Notes
Serve with ice cream for an indulgent treat!
Nutrition
- Serving Size: 1 cookie
- Calories: 210
- Sugar: 14g
- Sodium: 150mg
- Fat: 10g
- Saturated Fat: 4g
- Unsaturated Fat: 6g
- Trans Fat: 0g
- Carbohydrates: 30g
- Fiber: 1g
- Protein: 4g
- Cholesterol: 30mg
Keywords: Monster Cookies, 4th of July, Cookies, Dessert, Summer Treat
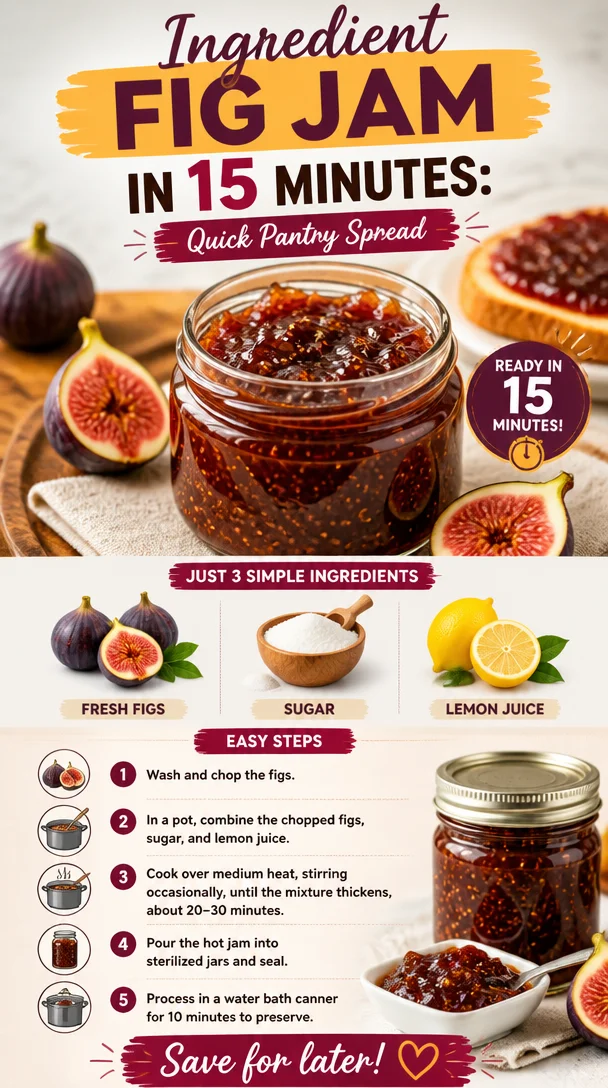
Ingredient Fig Jam in 15 Minutes: Quick Pantry Spread
3-Ingredient Fig Jam: A Sweet Adventure in Simplicity
Welcome, flavor enthusiasts and curious cooks! Today, we’re diving into a delightful recipe that captures the essence of simplicity while delivering a burst of sweetness and nostalgia—3-Ingredient Fig Jam. If you’re ready to elevate your snacking, topping, or breakfast game, you’re in the right place! Fig jam is not just a treat; it’s a celebration of fresh ingredients that come together to bring a little luxurious sweetness to your everyday meals.
Introduction
When I think about figs, I can’t help but smile. These little gems conjure up memories of sunny afternoons spent in orchards, the trees heavy with ripe fruit, their sweet aroma filling the air. If you’ve ever bitten into a ripe fig, you know the joy that comes from its tender flesh and delightful burst of flavor. And let’s be honest—figs are the ultimate gourmet ingredient that can elevate any dish without breaking a sweat!
Now, making fig jam might sound like a tedious process reserved for the culinary elite, but I’m here to tell you that it’s as easy as can be! With just three simple ingredients—fresh figs, sugar, and lemon juice—you’ll whip up a jar of jam that’s ready to spread, spoon, or savor on whatever your heart desires. This recipe is not just perfect for enhancing your breakfast, but it’s also a wonderful gift for friends and family, bringing a taste of homemade love. So, grab your apron, and let’s embark on this sweet adventure together!
Personal Story
Growing up, my grandmother always had a knack for transforming simple ingredients into something special. I remember summers at her cozy kitchen, filled with the sounds of simmering pots and the sweet scent of fruits bubbling on the stove. One of my fondest memories was the day she taught me how to make fig jam. The figs were plucked fresh from the tree in her backyard—you could almost hear the fruit laughing as you picked them!
As we stood over the stove, I eagerly watched the figs transform into a luscious, thick jam, their vibrant color deepening with every stir. The jam brought us together around the table, slathered on warm homemade bread or spooned atop creamy yogurt. It was those moments of connection and joy that inspired me to create Clean Plate Cravings, a place where I could share those very experiences and help others cultivate their own kitchen memories. So let’s continue this tradition today with a fig jam that is as bright and cheerful as those afternoons with Grandma!
Ingredients
-
Fresh Figs: The star of our show! Fresh figs are naturally sweet and juicy, making them perfect for jam. Look for plump, unblemished figs in varying shades of purple or green. If you can’t find fresh figs, you can use dried figs; just soak them in warm water for a few hours to plump them up before use.
-
Sugar: This ingredient helps to thicken and sweeten our jam. You can use regular granulated sugar, but feel free to switch it up with brown sugar for a deeper caramel flavor or coconut sugar for a healthier twist. Keep in mind that different sugars may affect sweetness levels, so taste as you go!
-
Lemon Juice: A splash of lemon juice brightens the jam and adds balance by cutting through the sweetness. Freshly squeezed is best, but bottled lemon juice can work in a pinch. If you’re feeling adventurous, you could also try other citrus juices, like orange or grapefruit, for a unique flavor profile.
Step-by-Step Instructions
-
Prepare the Figs: Start by giving your figs a good rinse under cold water. Pat them dry with a clean kitchen towel. Remove the stems and cut the figs in half or quarters, depending on their size. This makes it easier for them to break down during cooking. The exciting part? You can snack on a few while you prep!
-
Combine Ingredients: In a medium-sized pot, combine your chopped figs, sugar, and lemon juice. Make sure the figs are evenly coated with the sugar; this will help extract their natural juices during cooking.
-
Cook the Mixture: Place your pot on the stove over medium heat. Stir occasionally until the mixture begins to break down, which should take about 5-10 minutes. As you stir, you can mash the figs with the back of your spoon for a smoother consistency, or leave them chunkier if you prefer.
-
Simmer: Once your mixture comes to a gentle bubble, reduce the heat to low and let it simmer for about 20-30 minutes. Keep stirring occasionally to prevent sticking. You’ll notice the mixture will thicken and darken in color. Tip: If you want your jam to be a bit thicker, test it by placing a spoonful on a plate and seeing if it sets up to your liking.
-
Cool and Store: Once cooked, remove your pot from the heat and allow the jam to cool slightly. Then pour it into a clean jar with a tight-fitting lid. If you’re planning to store it long-term, make sure to do this while the jam is still hot to create a vacuum seal. Let it cool completely before refrigerating.
-
Enjoy: Your fig jam is now ready to be enjoyed! Spread it on toast, dollop it onto cheese plates, or stir it into your morning oats. The possibilities are endless!
Serving Suggestions
When it comes to serving this fig jam, it’s all about presentation and pairing. For an elegant touch, spoon it into a charming jar and tie a pretty ribbon around it for gifting. If you’re enjoying it at home, try serving it on a beautifully arranged charcuterie board alongside some creamy goat cheese, crunchy nuts, and sliced baguette. For breakfast, spread it on warm buttered toast or swirl it into yogurt for a delightful treat.
Recipe Variations
Now, let’s get creative with some variations on this classic fig jam:
-
Spiced Fig Jam: Add a pinch of cinnamon or a dash of vanilla extract to your fig mixture for a warm, cozy flavor.
-
Herb-Infused: Toss in a few sprigs of rosemary or thyme while it simmers for a unique herbal twist. Just remember to remove them before storing!
-
Nutty Addition: Stir in some chopped almonds or walnuts to add a lovely crunch and enhance the texture of the jam.
-
Citrus Zest: Add lemon or orange zest alongside the juice for an extra zing of freshness that brightens the whole dish.
-
Chili Flake Kick: Spice things up by adding a pinch of red chili flakes for a surprising kick in your spread.
Chef’s Notes
One of the things I love most about this recipe is its incredible versatility. It’s evolved over the years as I experimented with different fruits from my local farmer’s market. I’ve had days when the figs were in short supply, and I’ve mixed in some ripe peaches or apples to bulk up the jam, and it turned out amazing! Each jar feels like a little bit of magic and tradition, connecting me back to those sunny summer afternoons in my grandmother’s kitchen.
Another funny kitchen story: I once stored my fig jam in a very cute but very small jar, and it wasn’t long before I found myself wrestling with a sticky mess when trying to scoop some out. Pro tip: always use a clean spoon, and don’t be afraid to go big with your jar!
FAQs and Troubleshooting
-
How do I know if my jam is thick enough? A great test is to place a spoonful on a plate and run your finger through it. If it holds its shape, you’re good to go! If it’s still too runny, continue simmering for a few more minutes.
-
Can I can this jam for long-term storage? Absolutely! Make sure to sterilize your jars, pour in hot jam, seal tightly, and process in a boiling water bath for about 10 minutes to seal them properly.
-
What if I don’t have fresh figs? No worries! Dried figs work in a pinch. Just soak them in warm water first until soft, then chop and follow the same steps in the recipe.
-
Can I reduce the sugar? While sugar helps with preservation and thickness, you can experiment with natural sweeteners like honey or maple syrup—but keep in mind that these may alter the flavor and texture a bit.
Nutritional Info
While the nutritional content can vary based on ingredient brands and the number of servings, here’s a rough estimate per tablespoon serving:
- Calories: 35
- Fat: 0g
- Carbohydrates: 9g
- Sugar: 8g
- Fiber: 0.5g
So there you have it—a bright, delicious, and super easy recipe for homemade 3-Ingredient Fig Jam! This jam is not just a spread; it’s a celebration of fresh ingredients and sweet memories waiting to be made. Dive in, enjoy every jar, and remember that the kitchen is the best place to create your own flavor stories. Happy cooking!
Print3-Ingredient Fig Jam
A simple and delightful recipe for homemade fig jam using just three ingredients: fresh figs, sugar, and lemon juice.
- Prep Time: 10 minutes
- Cook Time: 30 minutes
- Total Time: 40 minutes
- Yield: 2 cups 1x
- Category: Condiment
- Method: Cooking
- Cuisine: American
- Diet: Vegan
Ingredients
- 2 cups fresh figs, stemmed and chopped
- 1 cup granulated sugar
- 2 tablespoons lemon juice
Instructions
- Prepare the figs: Rinse under cold water, pat dry, remove stems, and chop.
- Combine ingredients: In a pot, mix chopped figs, sugar, and lemon juice.
- Cook the mixture: Over medium heat, stir until figs break down (5-10 minutes).
- Simmer: Reduce heat to low and simmer for 20-30 minutes, stirring occasionally.
- Cool and store: Allow the jam to cool before transferring to a jar.
- Enjoy: Spread on toast or use as a topping for desserts.
Notes
Try variations by adding spices like cinnamon or herbs like rosemary for unique flavors.
Nutrition
- Serving Size: 1 tablespoon
- Calories: 35
- Sugar: 8g
- Sodium: 0mg
- Fat: 0g
- Saturated Fat: 0g
- Unsaturated Fat: 0g
- Trans Fat: 0g
- Carbohydrates: 9g
- Fiber: 0.5g
- Protein: 0g
- Cholesterol: 0mg
Keywords: fig jam, homemade jam, easy recipe, condiment, vegan recipe
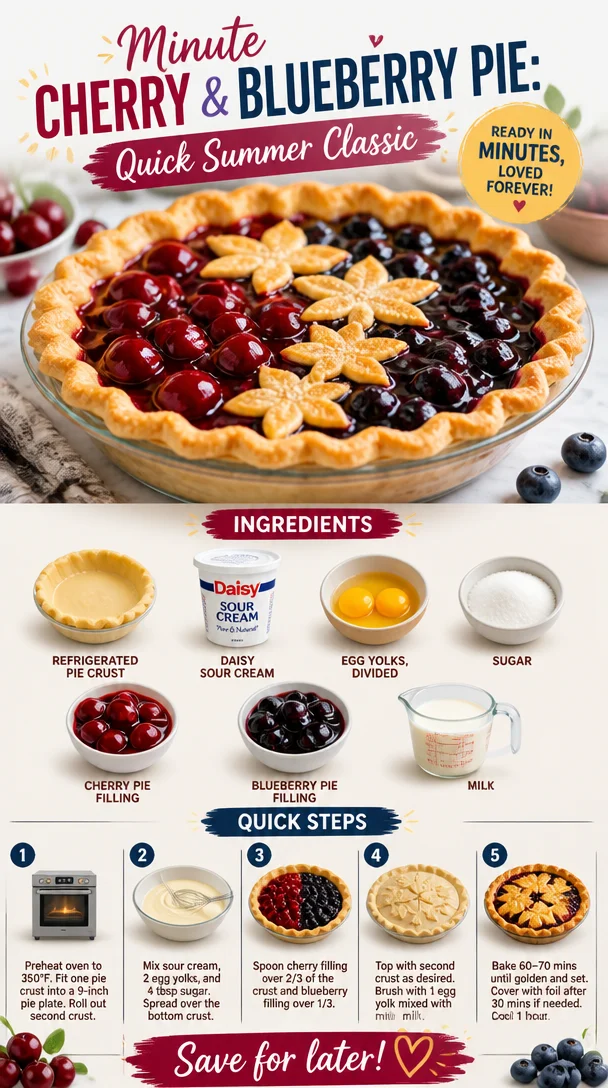
Minute Cherry & Blueberry Pie: Quick Summer Classic
Cherry and Blueberry Pie: A Wholesome Family Classic
Welcome, foodies! Today we’re diving into a beloved staple that tantalizes taste buds and warms hearts: Cherry and Blueberry Pie. This delicious dessert is a beautiful marriage of sweet cherries and luscious blueberries, all encased in a buttery, flaky crust that’s simply irresistible.
To me, pies are the ultimate symbol of comfort food. They bring back memories of family gatherings, sunny picnics, and cozy nights on the porch, watching the stars after dinner. The aroma of pie baking in the oven stirs nostalgia in the air, instantly whisking me back to my childhood and the wonderful kitchen moments shared with my grandma.
Personal Story
I vividly remember the summer my grandma decided to teach me the art of pie-making. I was about eight years old, standing on a stool so I could reach the counter. She had a way of making everything feel like a big adventure. Armed with a basket of fresh cherries and blueberries from the local farmer’s market, we set out to create the perfect pie.
With her flour-dusted apron and that twinkle in her eye, she showed me how to mix the fruits with just the right amount of sugar and lemon juice. The joy was in the journey as much as in the finished product. I learned not just how to make a pie but how love and care transform simple ingredients into something magical.
We spent the afternoon chatting, laughing, and, of course, tasting the filling as we went. The final product was a pie so delicious that I remember wanting to keep it all to myself. Sure enough, it became a family favorite, feeding not just our bellies but our souls. And every time I make this Cherry and Blueberry Pie, I’m reminded of those sunny days spent laughing in the kitchen.
Let’s create some beautiful pie memories together, shall we?
Ingredients
Here’s what you’ll need for this scrumptious Cherry and Blueberry Pie:
-
Refrigerated Pie Crust: A classic shortcut! You can make your own if you’re up for it, but don’t be afraid to grab a store-bought crust for convenience. It’ll save you time and still yield a delicious pie.
-
Daisy Sour Cream: This isn’t just for dipping! Sour cream adds an amazing creaminess and tang to your filling, balancing the sweetness of the fruits perfectly. If you’re feeling adventurous, try Greek yogurt as a substitute for a healthier twist.
-
Egg Yolks (divided): These will help bind your filling for a rich, luscious texture. Save the egg whites for breakfast or a meringue!
-
Sugar: This is your sweetener. Ground sugar (like superfine sugar) dissolves quicker, while brown sugar adds a lovely depth of flavor.
-
Cherry Pie Filling: Store-bought is fine, but if you’re using fresh cherries, you’ll need about 2 cups, pitted and halved. Just add your sugar and lemon juice!
-
Blueberry Pie Filling: Just like the cherry filling, you can grab this from the store or make your own using 2 cups of fresh blueberries. Simply cook with sugar and a little cornstarch for thickening!
-
Milk: You’ll use this to brush the crust before baking, giving you that beautiful golden finish. Almond or oat milk are excellent dairy-free options.
Step-by-Step Instructions
Now let’s get cooking! Here’s how to assemble your Cherry and Blueberry Pie step-by-step:
-
Preheat Your Oven: Set your oven to 425°F (220°C). This is essential for that perfect golden crust. A hot oven makes all the difference!
-
Prepare Your Crust: Roll out your refrigerated pie crust (if using) on a lightly floured surface until it’s about 12 inches in diameter. Don’t worry if it’s not perfect; rustic is charming!
-
Transfer to Pie Dish: Carefully place the crust in your 9-inch pie dish, pressing it gently into the edges. If you have excess dough hanging over the edge, you can trim it, but leave some for a beautiful crimped edge later!
-
Mix the Fruit Filling: In a medium bowl, combine the cherry and blueberry fillings, sugar, and 2 egg yolks. Stir until thoroughly mixed. Remember, tasting is key—adjust the sweetness to your liking!
-
Add the Sour Cream: Gently fold in the Daisy Sour Cream. This is what makes the filling so creamy and delicious. It will help to mellow the sugars and enhance the fruit flavor!
-
Fill the Pie: Spoon the fruit mixture into the prepared crust, spreading it evenly. Make sure it’s heaped nicely—this pie is all about those juicy fruit fillings!
-
Cover the Pie: If you have a second pie crust, roll it out and drape it over the filling. You can create a lattice top for a bit of flair, or simply cut slits for steam vents. Crimp the edges to seal the pie and prevent any juices from escaping.
-
Brush with Egg and Milk: Combine the remaining egg yolk with a splash of milk, and brush this mixture over the crust. This will give you that mouthwatering golden finish!
-
Bake the Pie: Place your pie on a baking sheet (to catch any drips) and bake for 25-30 minutes or until the crust is golden and the filling is bubbling. Make your kitchen smell heavenly!
-
Cool Down: Let it cool for at least an hour. I know it’s tough to wait, but this helps the filling set up beautifully.
Serving Suggestions
When it’s finally time to dig in, serve your Cherry and Blueberry Pie with a scoop of vanilla ice cream or a dollop of freshly whipped cream on top for an indulgent treat. Leftovers (if there are any!) can be enjoyed for breakfast—because why not?
Recipe Variations
Feel like mixing things up? Try one of these variations:
- Mixed Berry Delight: Swap in raspberries or blackberries for a berry medley pie.
- Peach Fusion: Add in diced peaches for a summery twist!
- Nutty Crust: Add crushed nuts to your pie crust for added texture and flavor.
- Vegan Version: Use a vegan pie crust and substitute the egg with flaxseed and the sour cream with cashew cream.
Chef’s Notes
I can’t tell you how many times this pie has been my go-to for potlucks and family gatherings. It’s a crowd-pleaser, and people always ask for the recipe (which of course, I happily share!). One time, I attempted to speed up the cooling process by placing my pie in the fridge—we ended up with a very experimental, chilly pie that didn’t quite make the cut! So learn from my mistake and let it cool at room temperature.
FAQs and Troubleshooting
Q: My pie filling is too runny. What can I do?
A: If your filling ends up too juicy, make sure you’re using enough thickening agent when making your filling. You can also try simmering it a bit on the stove with some cornstarch.
Q: How do I prevent my crust from burning?
A: If the edges of your crust are browning too fast, simply cover them with foil or use a pie shield during baking until the pie is done.
Q: Can I freeze leftover pie?
A: Absolutely! Wrap it tightly and store in the freezer for up to three months. Just remember to let it cool completely before freezing.
Q: How do I keep my crust flaky?
A: Make sure your butter or shortening is cold, and don’t overwork the dough!
Nutritional Info
While the nutritional content will vary depending on the exact ingredients you use, a single slice of Cherry and Blueberry Pie typically contains approximately:
- Calories: 320
- Fat: 16g
- Carbohydrates: 43g
- Protein: 3g
Wrapping It Up
There you have it! A delightful Cherry and Blueberry Pie that’s sure to impress family and friends while embodying the spirit of nostalgia and love. Remember, pie-making is an art, and like any art form, it’s something to enjoy and evolve over time. I can’t wait to hear your stories and see your own pie adventures. Let’s keep it fresh, simple, and seriously delicious! Happy baking!
PrintCherry and Blueberry Pie
A delicious combination of sweet cherries and luscious blueberries in a buttery, flaky crust.
- Prep Time: 15 minutes
- Cook Time: 30 minutes
- Total Time: 45 minutes
- Yield: 8 servings 1x
- Category: Dessert
- Method: Baking
- Cuisine: American
- Diet: Vegetarian
Ingredients
- 1 refrigerated pie crust
- 1 cup Daisy sour cream
- 2 egg yolks (divided)
- 3/4 cup sugar
- 2 cups cherry pie filling
- 2 cups blueberry pie filling
- 2 tablespoons milk
Instructions
- Preheat your oven to 425°F (220°C).
- Prepare your crust by rolling out the refrigerated pie crust on a lightly floured surface until about 12 inches in diameter.
- Transfer the crust into a 9-inch pie dish, pressing gently into the edges.
- Mix the cherry and blueberry fillings, sugar, and 2 egg yolks in a medium bowl until thoroughly combined.
- Add the Daisy sour cream and fold gently.
- Fill the prepared crust with the fruit mixture, spreading it evenly.
- Cover the pie with a second pie crust or create a lattice top.
- Brush the crust with the mixture of the remaining egg yolk and milk.
- Bake for 25-30 minutes or until the crust is golden and filling is bubbling.
- Cool for at least an hour before serving.
Notes
Serve with vanilla ice cream or whipped cream. Leftovers can be enjoyed for breakfast.
Nutrition
- Serving Size: 1 slice
- Calories: 320
- Sugar: 18g
- Sodium: 150mg
- Fat: 16g
- Saturated Fat: 9g
- Unsaturated Fat: 5g
- Trans Fat: 0g
- Carbohydrates: 43g
- Fiber: 2g
- Protein: 3g
- Cholesterol: 85mg
Keywords: cherry pie, blueberry pie, dessert pie, summer dessert, family recipe
Pineapple Mojito in 5 Minutes: A Bright Summer Cocktail
Sip Into Summer: The Ultimate Pineapple Mojito Recipe
Welcome, fellow food lovers! Pull up a chair, grab a glass, and let’s dive into a refreshing recipe that will transport you straight to a sun-soaked beach: the Pineapple Mojito! Not only is this drink bursting with tropical flavors, but it also has a way of making every gathering feel like a mini vacation. Whether you’re hosting friends on the patio or simply unwinding after a long day, this mojito offers the perfect blend of sweetness and zest, all while being super easy to whip up.
But first, let’s chat about why I love this drink so darn much. The vibrant combination of succulent pineapple, zesty lime, and aromatic mint just screams summer, doesn’t it? Each sip is like a hug from the sunshine. As the days get longer and warmer, there’s nothing more inviting than treating yourself to a refreshing beverage that feels like pure bliss. The beauty of the Pineapple Mojito is that it feels festive, light, and delightful—perfect for relaxing and unwinding or turning any casual get-together into a tropical soiree. Trust me; your taste buds will thank you!
A Toast to Nostalgia
Let’s rewind the tape to a delightful summer I spent with my family on a tiny island where the air smelled of salt and the sun set in a spectacular burst of crimson and gold hues. I remember our evenings being filled with laughter as we gathered around the outdoor table, where my uncle would play bartender. The drink of choice? You guessed it—mojitos!
But one evening, my aunt decided to shake things up, literally, bringing in fresh pineapple and an adventure in mixology. Watching her crush mint leaves with sugar and mix it with bright green lime juice and golden pineapple was nothing short of culinary magic. The first sip had me dreaming of summer sunsets and sandy beaches. That memory became a part of my culinary journey, inspiring not only this recipe but a lifelong love affair with crafting cocktails.
Creating this Pineapple Mojito reminds me of those carefree days, and I can’t wait for you to experience that same joy!
Ingredients
Here’s what you’ll need to create your very own Pineapple Mojito:
-
2 oz white rum: The base of our cocktail, white rum provides a smooth and slightly sweet flavor that pairs perfectly with tropical fruits. Feel free to swap it out for coconut rum if you’re feeling adventurous!
-
1 oz pineapple juice: Fresh is best, but store-bought works too. If you can’t find pineapple juice, you can substitute it with another tropical fruit juice, like passion fruit or orange juice.
-
1 oz fresh lime juice: Nothing beats the bright acidity of freshly squeezed lime. Bottled lime juice can do in a pinch, but the fresh stuff elevates the drink.
-
6-8 fresh mint leaves: Mint brings that gorgeous herbal aroma and flavor. If you’re out of mint, a little bit of basil can offer a unique twist.
-
1 tsp sugar (or simple syrup): Sweetness balances the tartness. If you’re watching your sugar intake, consider a natural sweetener like agave nectar or honey.
-
Club soda: For that bubbly finish! You can replace it with sparkling water or lemon-lime soda for added sweetness.
-
Ice: Essential for that refreshing chill. Crushed ice works nicely for a mojito with a fun texture.
-
Pineapple wedges and mint for garnish: Always garnish for a touch of flair! These create visual appeal and hint at the flavors within.
Step-by-Step Instructions
Alright, let’s roll up our sleeves and get mixing! Follow these steps to create your Pineapple Mojito:
-
Muddle the Mint: In a sturdy glass or cocktail shaker, add the fresh mint leaves and sugar (or simple syrup). Using a muddler or the back of a spoon, gently press the mint leaves to release their essential oils. Tip: Be careful not to shred the mint; just a gentle press will do the trick!
-
Add the Juices: Pour in the fresh lime juice and pineapple juice over the muddled mint. Chef Hack: If you want an extra pop of flavor, consider adding a splash of coconut water to amplify that tropical vibe.
-
Mix with Rum: Measure out your white rum and add it to the mixture. Using a cocktail shaker, add some ice and shake it like you mean it! You want to mix those flavors without losing all those precious mint oils. Shaking also chills the drink wonderfully.
-
Strain Into a Glass: If you used a shaker, strain the mixture into a glass filled with ice. If you’re using a muddling glass, simply add ice and pour straight in. Note: For a smoother drink, consider fine-straining your mixture to remove mint bits, but a little texture can be fun!
-
Top with Club Soda: Carefully pour club soda over your mixture, giving it that refreshing fizz. Use a spoon to stir gently and mix it up. Extra Tip: You can adjust the amount of soda based on how strong you like your drink!
-
Garnish and Serve: Finish off your mojito with a colorful pineapple wedge and a sprig of fresh mint for garnishing. Not only will this make it look stunning, but guests will also know exactly what flavors to expect!
Serving Suggestions
To really impress your guests (or yourself!), serve your Pineapple Mojito in a chilled glass with a decorative straw. Setting the glass on a colorful napkin alongside some sliced fruits can elevate the presentation. If you’re feeling fancy, you could even put your mojitos in a punch bowl for a crowd-pleasing centerpiece at your next gathering!
Recipe Variations
Feeling adventurous? Here are a few creative twists you can try:
-
Mango Mojito: Substitute pineapple juice with fresh mango puree for a unique twist!
-
Spicy Pineapple Mojito: Add a slice of jalapeño when muddling the mint for a spicy kick!
-
Coconut Pineapple Mojito: Mix in some coconut cream along with the juices for a creamy, tropical version of this cocktail.
-
Herb Fusion: Experiment with different herbs like rosemary or sage instead of mint for a more fragrant alternative.
Chef’s Notes
This Pineapple Mojito has evolved beautifully over time in my kitchen. Initially, I couldn’t get the ratios quite right, but after lots of experimentation (and plenty of tasting!), I found the perfect balance that brings out the best in every ingredient. Even my friends start to look for my version when summer rolls around! The great thing about cocktails is they’re so forgiving; you can tweak them based on what you have or what you’re craving. Plus, each time you make a batch, you’re creating new memories—the heart of great food!
FAQs and Troubleshooting
-
Can I use frozen fruit instead of fresh?
Absolutely! Frozen pineapple can provide great flavor, especially if you blend it before adding it to your mojito. Just be mindful of the water content; adjust the ice accordingly. -
What if I don’t have fresh mint?
You can use dried mint in a pinch, but fresh mint really gives that bright flavor. If using dried, reduce the amount as it’s more concentrated. -
My mojito tastes too sour. What do I do?
Add a little extra sugar or simple syrup to balance it out. Also, ensure you’re using quality ingredients, especially with your juicing. -
Can I make a non-alcoholic version?
Absolutely! Just replace the rum with extra pineapple juice and add a little more soda to keep that refreshing fizz. You’ll still have a delicious mocktail.
Nutritional Info
While the Pineapple Mojito is more about enjoyment than nutrition, here’s a rough estimate per serving if you’re curious:
- Calories: 200
- Carbohydrates: 20g
- Sugars: 14g
- Alcohol Content: 14% ABV (based on proper measure)
Now that you have the recipe down, gather your ingredients, put on some summer tunes, and let your kitchen transform into a tropical paradise. Cheers to refreshing sips, fun memories, and all around good vibes! Enjoy your Pineapple Mojito—it’s going to be a hit!
PrintPineapple Mojito

A refreshing Pineapple Mojito that combines succulent pineapple, zesty lime, and aromatic mint for a taste of summer bliss.
- Prep Time: 10 minutes
- Cook Time: 0 minutes
- Total Time: 10 minutes
- Yield: 1 serving 1x
- Category: Cocktail
- Method: Mixing
- Cuisine: Tropical
- Diet: Vegetarian
Ingredients
- 2 oz white rum
- 1 oz pineapple juice
- 1 oz fresh lime juice
- 6–8 fresh mint leaves
- 1 tsp sugar (or simple syrup)
- Club soda
- Ice
- Pineapple wedges and mint for garnish
Instructions
- Muddle the mint: In a sturdy glass or cocktail shaker, add the fresh mint leaves and sugar (or simple syrup). Using a muddler or the back of a spoon, gently press the mint leaves to release their essential oils.
- Add the juices: Pour in the fresh lime juice and pineapple juice over the muddled mint.
- Mix with rum: Measure out your white rum and add it to the mixture. Using a cocktail shaker, add some ice and shake it well.
- Strain into a glass: If you used a shaker, strain the mixture into a glass filled with ice.
- Top with club soda: Carefully pour club soda over your mixture, giving it that refreshing fizz.
- Garnish and serve: Finish off your mojito with a colorful pineapple wedge and a sprig of fresh mint for garnishing.
Notes
For variation, try mango puree or a spicy kick with jalapeño. You can also make a non-alcoholic version by replacing rum with extra pineapple juice.
Nutrition
- Serving Size: 1 serving
- Calories: 200
- Sugar: 14g
- Sodium: 10mg
- Fat: 0g
- Saturated Fat: 0g
- Unsaturated Fat: 0g
- Trans Fat: 0g
- Carbohydrates: 20g
- Fiber: 0g
- Protein: 0g
- Cholesterol: 0mg
Keywords: mojito, cocktail, pineapple
Minute Cowboy Caviar Recipe for Quick Weeknight Dinners
Cowboy Caviar: A Flavorful Fiesta in a Bowl
Welcome to the wild and wonderful world of Cowboy Caviar—where vibrant colors and bold flavors meet! If you’re looking for a dish that will not only tantalize your taste buds but also ignite your culinary creativity, you’re in the right spot. This zesty appetizer (or main dish, if you’re feeling adventurous) is the answer to all your snacking prayers. Picture a hearty blend of black beans, corn, fresh veggies, and a zesty dressing that’ll make your mouth water. It’s like a summer fiesta in your mouth, and trust me, you’ll want to dive right in!
So, what’s the story behind this drool-worthy dish? Cowboy Caviar is a classic appetizer with Tex-Mex roots, often served during gatherings, family cookouts, or at your neighbor’s BBQ. Each ingredient packs a punch, providing not just flavor, but plenty of nutrients to keep you feeling your best. And the best part? It’s incredibly versatile—great as a dip, a side salad, or even a topping for grilled meats or tacos. Let’s face it: once you make this dish, you’ll be the star of every potluck!
Now, roll up your sleeves, and let’s get cooking! Grab your ingredients, and get ready to whip up some Cowboy Caviar that even the cowboys would be proud of!
A Personal Story: The Perfect Summer Memory
Let me take you back to my childhood summers spent at my grandparents’ ranch in Texas. Nothing felt more liberating than spending long sunny days outside with family and friends, all while the smell of BBQ wafted through the air. In the center of it all? A giant bowl of Cowboy Caviar that my grandmother would make featuring fresh produce from her garden.
As kids, we would gather around, dipping crunchy tortilla chips into this rainbow of deliciousness while laughing and sharing stories. The freshness of every ingredient popped in our mouths—crunchy bell peppers, creamy black beans, and zesty jalapeños. It was a fiesta of flavors that always sparked joy. What I love most about Cowboy Caviar is that it reminds me of those carefree summer days, where we all connected over good food and laughter. Today, I still make this dish (with my own flair, of course), and every bite takes me right back to my grandmother’s kitchen.
Ingredients: Let’s Gather the Good Stuff
Here’s all you need to create your very own Cowboy Caviar masterpiece:
- 2 cups black beans (canned or cooked): A fabulous source of plant-based protein and fiber. For a twist, you can swap in pinto beans or kidney beans for a different flavor profile.
- 1 cup corn kernels: Fresh or frozen works great! You can also use canned corn; just be sure to rinse it well. Grilled corn adds a smoky flavor that’s to die for!
- 1 large tomato: Juicy and ripe, tomatoes are the star of the show. For a heartier version, you might try cherry tomatoes or even diced avocados for creaminess.
- 1/2 red onion: This onion adds a crunch and subtle sweetness. If red onion’s a bit too strong for you, use green onions or shallots as substitutes.
- 1 bell pepper (red or green): Use whichever you prefer! Red peppers give a sweeter taste, while green adds a nice bite. Feeling adventurous? Try a poblano pepper for a smoky flavor!
- 1/4 cup fresh cilantro: Bright and herbaceous, cilantro elevates the flavor. If you’re not a cilantro fan, parsley or even mint can work just as well.
- 1/2 cup green onions: These provide a delightful punch! Scallions can also be used here—just slice them thinly for a little zing!
- 1 jalapeño pepper: For heat! Adjust the amount depending on your spice tolerance. If you want it milder, remove the seeds and membranes.
- 3 tbsp olive oil: This is the base for your dressing, giving it a silky texture. Avocado oil works well too and provides a unique flavor.
- 2 tbsp lime juice: Freshly squeezed is best! It adds brightness. If you’re out of lime, lemon juice is a great substitute.
- 1 tsp salt: Season to your taste, but this enhances all the flavors.
- 1/2 tsp black pepper: A classic seasoning to round out the flavors.
- 1 clove garlic: Fresh garlic adds depth. Use garlic powder in a pinch, about 1/4 tsp.
- 1 tbsp apple cider vinegar: A splash of acidity that brightens everything up! Feel free to use red wine vinegar or even balsamic for a different twist.
Step-by-Step Instructions: Let’s Get Cooking!
-
Prepare Your Ingredients: Start by rinsing your black beans thoroughly if using canned ones. Drain the corn as well. Freshness is key, so if you’ve got time, you can cook your own beans and corn!
-
Chop, Chop!: Dice your tomatoes, red onion, and bell pepper into bite-sized pieces—it doesn’t have to be perfect. I love a rustic chop for that homemade feel! Gather your cilantro and green onions; both should be finely chopped for maximum flavor.
-
Handle the Heat: Time to tackle that jalapeño! Wearing gloves (trust me!), slice it in half, remove the seeds for less heat if desired, and finely chop. Here’s a chef hack: the seeds carry most of the spice, so adjust to your taste!
-
Mix It All Together: In a large mixing bowl, combine the black beans, corn, diced tomatoes, bell pepper, red onion, cilantro, green onions, and jalapeño. Feel free to get your hands in there and mix—it’s a labor of love!
-
Make the Dressing: In a smaller bowl, whisk together the olive oil, lime juice, apple cider vinegar, salt, black pepper, and minced garlic. Don’t skip the whisking—it helps emulsify everything into a glorious dressing!
-
Combine and Taste: Pour the dressing over your veggie mixture and stir gently to coat everything evenly. Here’s a pro tip: let the Cowboy Caviar sit for at least 30 minutes before serving to allow the flavors to meld together for a more harmonious taste.
-
Adjust and Enjoy: After chilling, taste it! You might need a pinch more salt or lime juice depending on your preference. It’s all about personalizing this dish to make it your own!
Serving Suggestions: How to Make It Shine
Presentation is key! Serve your Cowboy Caviar in a vibrant bowl, and garnish with extra cilantro for a pop of freshness. Pair it with crispy tortilla chips for dipping or even over a bed of greens for a light salad. Want to kick it up a notch? Serve it alongside grilled fish or chicken for a complete meal. It’s visually stunning and utterly scrumptious—perfect for impressing your guests!
Recipe Variations: Get Creative!
- Tropical Twist: Add diced mango or pineapple for a sweet and tangy flair that pairs beautifully with the spice.
- Mediterranean Style: Swap the black beans for chickpeas and add feta cheese, olives, and herbs like oregano.
- Superfood Boost: Toss in some quinoa or farro for added texture and nutrition—this transforms the Cowboy Caviar into a hearty main dish.
- Dairy-Free Creaminess: Add diced avocado right before serving for a rich, creamy finish that balances the heat.
- Spicy Sriracha Option: Drizzle a little Sriracha over the top if you want a real kick! The spice will dance with the freshness you’ve created.
Chef’s Notes: A Dash of History
My Cowboy Caviar recipe has evolved over the years as I’ve experimented with different ingredients. Growing up, I was simply a ‘don’t mess with a classic’ kind of chef. Over time, though, I’ve discovered that adding a touch of something unexpected (like that tropical mango surprise) keeps this dish fresh and exciting. Just like me, it has matured! And who doesn’t love a recipe that grows with you?
Have a little fun with it! Cooking is all about improvisation and creating memories. Whether it’s a family gathering or a cozy night in, I believe there’s magic in every bite.
FAQs and Troubleshooting: Let’s Clear It Up
1. Can I make Cowboy Caviar ahead of time?
Absolutely! In fact, I recommend letting it sit in the fridge for a few hours or overnight. This allows the flavors to meld beautifully. Just be sure to give it a stir before serving!
2. What do I do if it’s too spicy?
If you find your Cowboy Caviar has too much heat, try balancing it out with a little extra lime juice or even some diced avocado. Both will help tone things down!
3. Can I freeze Cowboy Caviar?
While you can freeze it, the texture of the veggies won’t hold up well when thawed. It’s best enjoyed fresh, but leftovers can be stored in an airtight container for about 3 days in the fridge.
4. I don’t like black beans—what can I use instead?
No problem! You can substitute any type of beans you prefer, like chickpeas or white beans. Just adjust the flavor to your liking—you’ll still have a delicious dish!
Nutritional Info (Optional)
For those counting nutrients, here’s a quick breakdown per serving (assuming about 1/2 cup):
- Calories: 120
- Protein: 4g
- Carbs: 20g
- Fiber: 6g
- Fat: 3g
Now you’re armed with everything you need to make the ultimate Cowboy Caviar! It’s fresh, flavorful, and fun to make. I can’t wait for you to take this recipe to your kitchen, so let’s whip up a bowl of joy, shall we? Happy cooking, foodies!
PrintCowboy Caviar
A vibrant and flavorful Tex-Mex appetizer made with black beans, corn, and fresh veggies, perfect for snacking or as a side dish.
- Prep Time: 15 minutes
- Cook Time: 0 minutes
- Total Time: 15 minutes
- Yield: 4 servings 1x
- Category: Appetizer
- Method: Mixing
- Cuisine: Tex-Mex
- Diet: Vegetarian
Ingredients
- 2 cups black beans (canned or cooked)
- 1 cup corn kernels (fresh or frozen)
- 1 large tomato, diced
- 1/2 red onion, chopped
- 1 bell pepper (red or green), chopped
- 1/4 cup fresh cilantro, chopped
- 1/2 cup green onions, chopped
- 1 jalapeño pepper, finely chopped
- 3 tbsp olive oil
- 2 tbsp lime juice
- 1 tsp salt
- 1/2 tsp black pepper
- 1 clove garlic, minced
- 1 tbsp apple cider vinegar
Instructions
- Prepare your ingredients by rinsing black beans and draining corn.
- Chop tomatoes, red onion, and bell pepper into bite-sized pieces.
- Handle the jalapeño, removing seeds if desired.
- Mix black beans, corn, tomatoes, bell pepper, red onion, cilantro, green onions, and jalapeño in a large bowl.
- Make the dressing by whisking together olive oil, lime juice, apple cider vinegar, salt, black pepper, and minced garlic.
- Combine the dressing with the veggie mixture and stir gently.
- Adjust seasoning as needed and let sit for 30 minutes before serving.
Notes
Great as a dip with tortilla chips or as a topping for grilled meats.
Nutrition
- Serving Size: 1/2 cup
- Calories: 120
- Sugar: 3g
- Sodium: 300mg
- Fat: 3g
- Saturated Fat: 0.5g
- Unsaturated Fat: 2.5g
- Trans Fat: 0g
- Carbohydrates: 20g
- Fiber: 6g
- Protein: 4g
- Cholesterol: 0mg
Keywords: Cowboy Caviar, Tex-Mex, appetizer, dip, salad, black beans, corn, fresh veggies