Mango Mousse
Indulge in Lightness: The Delightful Mango Mousse Recipe
Welcome back to Clean Plate Cravings! You know, there are few things in life that evoke pure happiness quite like a delicious dessert, particularly when that dessert has the refreshing flavor of mango. Today, I’m thrilled to share with you my Oh-So-Luscious Mango Mousse recipe! Trust me, this light, creamy treat is as vibrant as it is delicious. Each dollop is like a little kiss from the tropics, and it’s perfect for any occasion—or just because you deserve it!
Why Mango Mousse?
Mango mousse dances at the intersection of decadence and simplicity. It’s a fabulous dessert that’s airy, subtly sweet, and bursting with the juicy flavor of ripe mangoes. The best part? You won’t find a single ounce of heaviness here. This dessert relies on the magic of fresh ingredients and a technique that allows the natural sweetness of mango to shine through. So grab a spoon, and let’s dive into a delightful creation you’ll be proud to whip up for family and friends!
A Personal Touch: The Joy of Mangoes
Let me take you back to a sunny summer day a few years ago. I was visiting my grandmother’s house when I first discovered my love for mangoes. It was the peak of the season, and those golden fruits were literally falling off the trees in her backyard. She would often slice one open, hand me half, and insist I enjoy it right there, standing in the sun. The sweet juice would dribble down my arms—what a glorious sticky mess!
Fast forward to today, and that love for mangoes has blossomed into numerous recipes, but this mango mousse is particularly special to me. It reminds me of those carefree days, flavored with nostalgia and sunny smiles. It’s not just a recipe; it’s a tribute to cherished memories and the beauty of simple things. So, let’s create our own sweet moments in the kitchen!
Ingredients That Shine
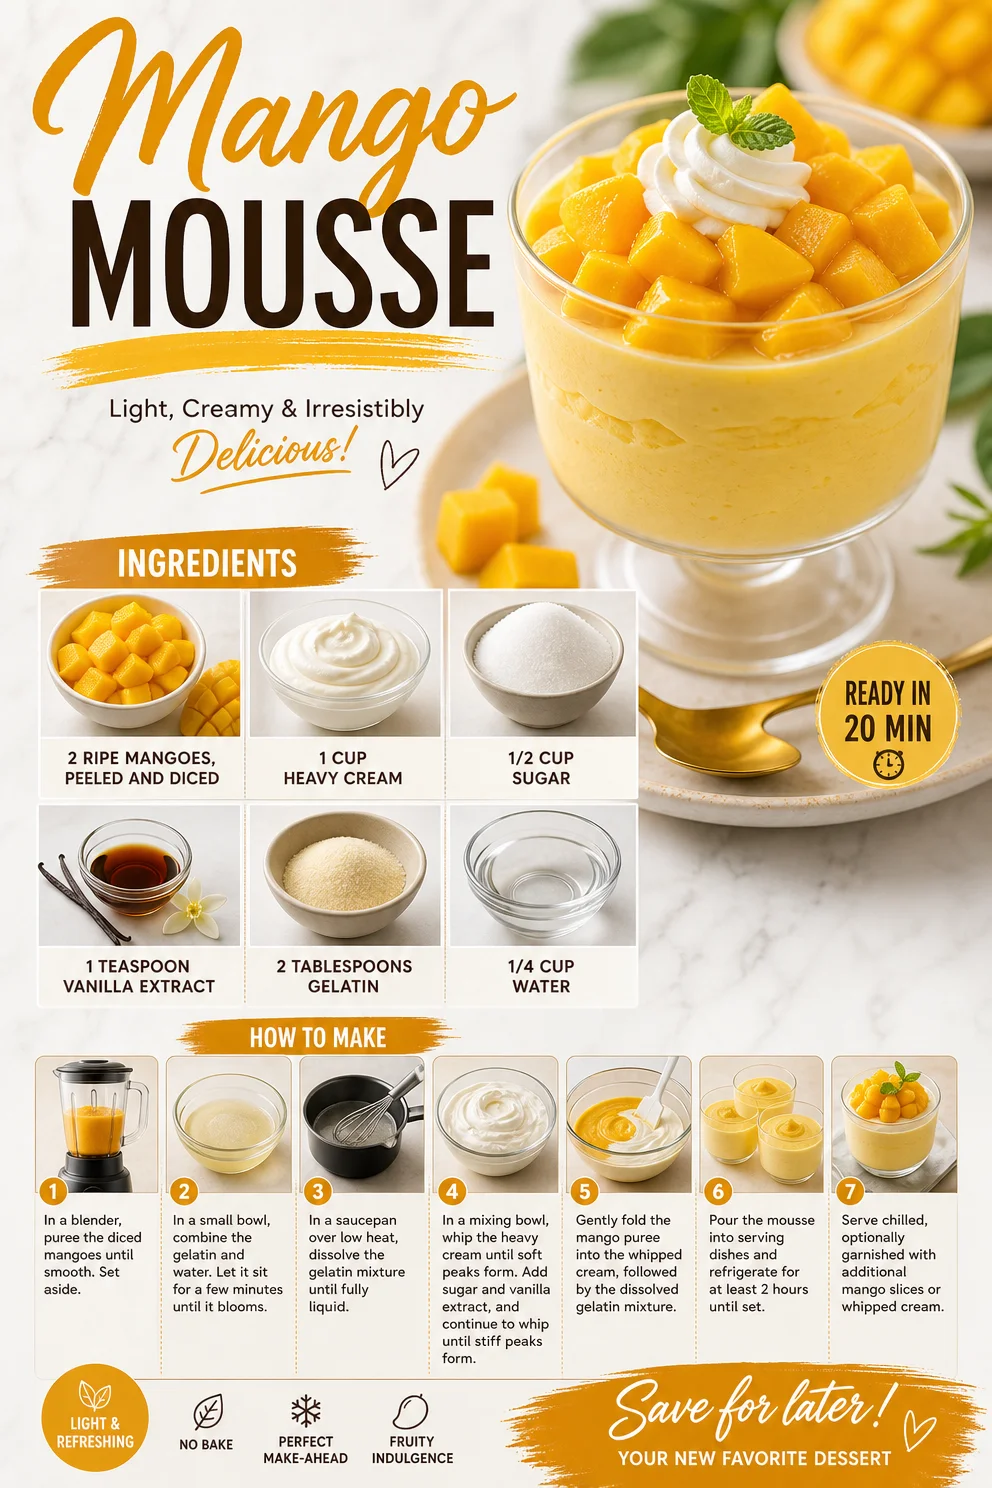
Here’s what you’ll need to make this luscious mango mousse:
-
2 ripe mangoes, peeled and diced
Mangoes are the star of this dish, providing natural sweetness and a vibrant color. Look for mangoes that yield slightly to pressure for the best flavor. -
1 cup heavy cream
To achieve that airy mousse texture, heavy cream is your go-to. If you prefer a lighter version, you can substitute it with coconut cream for a tropical twist! -
1/2 cup sugar
Sugar is essential for balancing the natural acidity of the mangoes. For a healthier option, you can use honey or maple syrup to sweeten this treat. -
1 teaspoon vanilla extract
Vanilla adds warmth and depth to the flavors. Always opt for pure vanilla extract instead of synthetic vanilla for the best results. -
2 tablespoons gelatin
Gelatin helps stabilize the mousse, giving it that perfect, creamy consistency. If you’re looking for a vegetarian alternative, agar-agar works just as well. -
1/4 cup water
This combines with the gelatin to bloom it for that soft, mousse-like texture.
Step-by-Step Instructions
-
Prepare the Gelatin
First things first! In a small bowl, mix the 2 tablespoons of gelatin with 1/4 cup of water. Let it sit for about 5-10 minutes until it swells. This process is called blooming, and it’s crucial for achieving the perfect texture in your mousse. -
Blend the Mangoes
While the gelatin is blooming, grab your diced mangoes and toss them into a blender. Blend until smooth and creamy. You can taste it! If you feel it needs a touch more sweetness, now’s the time to add a bit of sugar. Just remember, this dessert should taste like sunshine! -
Prepare Whipped Cream
In a mixing bowl, whip the heavy cream with an electric mixer until soft peaks form—think lightly whipped cream clouds! You want it airy, but not too stiff. If you’re using coconut cream, refrigerate it before whipping to make it light and fluffy. -
Dissolve the Gelatin
Now that your gelatin has bloomed, it’s time to melt it. Place it in a microwave for about 15 seconds or on low heat on the stove until it’s fully dissolved. Be careful not to overheat! It should be liquid but not hot. -
Combine Everything
In a large bowl, combine the mango puree, dissolved gelatin, sugar, and vanilla extract. Mix thoroughly to ensure the sweet and fruity flavors meld together beautifully. -
Fold in the Whipped Cream
Finally, fold in the whipped cream gently into the mango mixture. This is where the mousse gets its light and airy texture—go easy here to avoid deflating the cream! Use a spatula, and make sweeping motions from the bottom of the bowl to the top. -
Chill
Pour the mousse into serving dishes or a large bowl and chill for at least 2 hours. This allows it to set beautifully, creating that luscious texture that’s oh-so satisfying! -
Serve and Enjoy
When ready to serve, you can top your mango mousse with a sprinkle of fresh mango chunks, whipped cream, or even mint leaves for added color and flavor.
Serving Suggestions
Plating your Mango Mousse can be as fun as making it! For a classy touch, serve it in elegant glass cups to showcase that beautiful color. Spoon a dollop of whipped cream on top and garnish it with a slice of fresh mango or a mint leaf. If you’re feeling adventurous, you can even pour a little passion fruit puree on top for a tropical vibe. Your guests will be wowed by both the presentation and the taste!
Recipe Variations
Feeling creative? Here are some easy variations to give your mango mousse a fun twist:
-
Coconut Mango Mousse: Substituting half of the heavy cream with coconut cream gives it a creamy tropical flair.
-
Spicy Ginger Kick: Add a teaspoon of grated fresh ginger to the cream mixture for a zingy update!
-
Berry Swirl: Fold in some raspberry or blueberry puree right before serving for a gorgeous contrast and added tartness.
-
Dairy-Free Delight: Use almond milk or cashew cream in place of heavy cream for a lighter, dairy-free option.
Chef’s Notes
I remember the first time I made this mango mousse for my family—everyone devoured it in seconds! It’s one of those recipes that evolves as we try new things. I’ve added so many twists over the years, like incorporating fresh lime zest or swapping mango for other fruits like passionfruit and peach. Each time, I learn something new about flavor combinations and textures. It’s a testament to the beauty of keeping cooking fun and adventurous!
FAQs and Troubleshooting
1. My mousse didn’t set properly; what went wrong?
This can happen if the gelatin isn’t fully dissolved or if it wasn’t allowed to cool properly before combining with other ingredients. Make sure the mixture cools slightly before folding in the whipped cream!
2. Can I use frozen mangoes?
Absolutely! Just be sure to thaw them completely and drain any excess liquid before blending!
3. Is the mousse safe for kids or pregnant women?
If using gelatin, ensure it’s dissolved properly. For pregnant women, consulting with a healthcare provider about consuming gelatin is always a good idea.
4. How long can I store the mousse?
You can store it in the fridge for up to three days, though the texture is best within the first 1-2 days!
Nutritional Info
While I typically focus on the joy of eating rather than strict nutritional guidelines, here’s a simple overview per serving (based on 4 servings):
- Calories: 250
- Protein: 2g
- Carbohydrates: 30g
- Fat: 15g
- Sugar: 20g
Now that you’re armed with this incredible Mango Mousse recipe, it’s time to make some sweet memories and share that goodness with your loved ones! Savor every bite, and let the tropical flavors work their magic. I can’t wait to hear how yours turns out! Happy cooking, foodies!
PrintLuscious Mango Mousse

A light and creamy mango mousse that is perfect for any occasion, bursting with the refreshing flavor of ripe mangoes.
- Prep Time: 15 minutes
- Cook Time: 0 minutes
- Total Time: 135 minutes
- Yield: 4 servings 1x
- Category: Dessert
- Method: Chilling
- Cuisine: Tropical
- Diet: Vegetarian
Ingredients
- 2 ripe mangoes, peeled and diced
- 1 cup heavy cream
- 1/2 cup sugar
- 1 teaspoon vanilla extract
- 2 tablespoons gelatin
- 1/4 cup water
Instructions
- Prepare the gelatin: In a small bowl, mix the 2 tablespoons of gelatin with 1/4 cup of water. Let it sit for about 5-10 minutes until it swells.
- Blend the mangoes: Toss the diced mangoes into a blender and blend until smooth and creamy. Adjust sweetness with sugar if desired.
- Prepare whipped cream: Whip the heavy cream with an electric mixer until soft peaks form.
- Dissolve the gelatin: Melt the bloomed gelatin in the microwave for about 15 seconds or on low heat until fully dissolved.
- Combine everything: In a large bowl, combine mango puree, dissolved gelatin, sugar, and vanilla extract. Mix thoroughly.
- Fold in the whipped cream gently into the mango mixture to maintain the airy texture.
- Chill: Pour the mousse into serving dishes and chill for at least 2 hours to set.
- Serve and enjoy: Top with fresh mango chunks, whipped cream, or mint leaves before serving.
Notes
For a tropical twist, substitute half of the heavy cream with coconut cream. You can also add a teaspoon of grated fresh ginger for a spicy kick.
Nutrition
- Serving Size: 1 serving
- Calories: 250
- Sugar: 20g
- Sodium: 50mg
- Fat: 15g
- Saturated Fat: 10g
- Unsaturated Fat: 4g
- Trans Fat: 0g
- Carbohydrates: 30g
- Fiber: 2g
- Protein: 2g
- Cholesterol: 30mg
Keywords: mango mousse, tropical dessert, light dessert, easy recipes, summer recipes
Ingredient Pineapple Coconut Mockarita: Easy Summer Sipper
Pineapple Coconut Mockarita: A Tropical Twist on Mocktails
Welcome to Clean Plate Cravings! If you’re like me and have a penchant for refreshing beverages that brighten your day, then you’re going to love this Pineapple Coconut Mockarita recipe. I’m convinced that nothing says summer like a vibrant, fruity drink in hand, whether you’re lounging by the pool or enjoying a sunny picnic in the park. The best part? This is a mocktail, meaning it’s alcohol-free, so everyone can enjoy it!
A Toast to Tropical Memories
Let me take you back to my childhood for a moment. My family had this lovely tradition of running to the beach each summer, where the scent of salty air mixed with the sweet fragrance of tropical fruits. I remember weaving through the vibrant stalls at the local markets, where juicy pineapples and creamy coconuts were piled high. It was here that I discovered the joy of drinking fresh coconut water straight from the fruit and indulging in pineapple treats that made my taste buds dance.
One summer, my cousin and I decided to blend these tropical delights into something special, so we concocted a drink using whatever we could get our hands on—a rind of pineapple, a can of coconut milk, and a whole lot of imagination. Although it was a wild mix, the taste was refreshing and made us giggle uncontrollably. It wasn’t perfected, but it sparked my love for combining flavors! Fast forward to today, and I’ve elevated that childhood experiment into a sophisticated yet simple mocktail: the Pineapple Coconut Mockarita. It’s a drink that’s sure to bring a party to your taste buds!
Ingredients
-
Fresh Pineapple Juice: The star of the show! Freshly squeezed pineapple juice ensures that your mockarita is sweet, tangy, and vibrant. If you can’t find fresh pineapples, bottled juice works, but opt for 100% juice with no added sugar.
-
Coconut Milk: This thick, creamy goodness adds a silky texture and a rich coconut flavor. If you prefer a lighter option, you can substitute it with low-fat coconut milk or even almond milk for a different twist.
-
Coconut Water: It’s hydrating and refreshing, bringing a subtle sweetness to balance out the tang of the pineapple. Feel free to replace it with plain water or sparkling water for bubbles!
-
Fresh Lime Juice: A splash of lime juice adds an irresistible zing and brightens the whole drink. When fresh limes are out of season, bottled lime juice is fine in a pinch (but fresh is always best!).
-
Sea Salt: A sprinkle of sea salt on the rim not only elevates flavors but enhances the sweetness of the fruits. If you’re watching sodium, feel free to omit it or use a salt substitute.
-
Toasted Coconut: Used for garnishing the rim of the glass, it adds texture and crunch. You can skip the toasting for a softer texture or even use graham cracker crumbs for a unique touch.
Step-by-Step Instructions
-
Prepare the Glass Rim: Begin by toasting your coconut. Spread shredded coconut on a baking sheet and toast it in a preheated oven at 350°F for about 5-7 minutes, stirring occasionally until golden brown. Meanwhile, prepare your glasses by running a lime wedge around the rim, then dipping it into a plate with sea salt and the toasted coconut. This adds flair and flavor!
-
Juicing the Pineapple: If you’re using fresh pineapple, cut it into chunks. Blend the pineapple pieces in a blender until it’s pureed. Strain it through a fine-mesh sieve to extract about 1 cup of fresh pineapple juice. If you use pre-packaged juice, skip this step to save time.
-
Mixing Your Mockarita: In a cocktail shaker, combine the fresh pineapple juice, 1/2 cup of coconut milk, 1/4 cup coconut water, and a generous squeeze of fresh lime juice. Fill the shaker with ice, and shake well—channel your inner bartender! This step not only cools the mixture down but also aerates it for a delightful texture.
-
Taste Test: Before serving, give your mockarita a taste. If you want it sweeter, consider adding a drizzle of honey or agave syrup. If it’s too sweet, another squeeze of lime can balance it out beautifully.
-
Pour and Serve: Strain the mixture into your prepared glasses filled with ice, and don’t skimp on the pouring—let that tropical goodness flow!
Serving Suggestions
To serve your Pineapple Coconut Mockarita, place a small slice of fresh pineapple or a lime wheel on the rim of the glass for an added tropical vibe. You can also garnish with a sprig of mint for a pop of color and freshness. This drink pairs wonderfully with light appetizers such as guacamole, shrimp cocktails, or even just a bowl of fresh-cut fruit.
Recipe Variations
-
Mango Coconut Mockarita: Swap out the pineapple juice for fresh mango juice for a sweeter, subtler flavor.
-
Berry Blast: Mix in some muddled strawberries or raspberries to add a tart contrast to the sweetness of the coconut and pineapple.
-
Spicy Kick: Add a pinch of cayenne pepper or a slice of jalapeño in the shaker for those who enjoy a bit of spice.
-
Non-Dairy Option: For a completely dairy-free option, use almond or oat milk in place of coconut milk.
-
Mocktail Slush: Blend all ingredients with ice for a refreshing slushie version that’s perfect for hot days!
Chef’s Notes
This recipe has become a refreshing staple in my summer repertoire, and I love experimenting with ingredients based on what’s in season. I once added a splash of passion fruit, and it took my mockarita to a whole new level! It’s funny how a simple twist can bring back memories from my childhood—those sunny days by the beach, drink in hand, laughter all around.
While I love a good, well-crafted cocktail, I cherish the art of crafting mocktails that everyone can indulge in. It’s not just about the flavors; it’s about creating moments that can be shared with friends and family!
FAQs and Troubleshooting
1. Can I prepare this mocktail in advance?
Yes, you can prepare the juice mixture ahead of time and store it in the fridge. However, wait to add ice until you’re ready to serve to maintain the vibrant flavor and freshness.
2. What can I do if my drink is too sweet?
If your mockarita turns out too sweet, add a splash more lime juice or even a little soda water to balance it out.
3. How can I make it fizzy?
To add some sparkle, incorporate club soda or sparkling water right before serving! This adds a lovely effervescence.
4. How do I store leftovers?
Store any leftover mockarita mix in an airtight container in the fridge for up to two days. Just shake it again before serving!
Nutritional Info
While I don’t typically dwell too much on numbers, it’s nice to know that a serving of this Pineapple Coconut Mockarita can offer a healthy dose of vitamin C and hydration. This is a delicious way to treat yourself while keeping things light and refreshing!
Cheers to fresh flavors and joyful gatherings! I hope you enjoy making this Pineapple Coconut Mockarita as much as I loved sharing it with you. Let’s keep it fresh, simple, and seriously delicious! 🥂🍹
PrintPineapple Coconut Mockarita
A refreshing, tropical mocktail featuring a delightful blend of fresh pineapple juice, coconut milk, and lime juice. Perfect for summer gatherings!
- Prep Time: 10 minutes
- Cook Time: 5 minutes
- Total Time: 15 minutes
- Yield: 2 servings 1x
- Category: Beverage
- Method: Mixing
- Cuisine: Tropical
- Diet: Non-Alcoholic
Ingredients
- 1 cup Fresh pineapple juice
- 1/2 cup Coconut milk
- 1/4 cup Coconut water
- 1/4 cup Fresh lime juice
- Sea salt for rimming glasses
- Toasted coconut for garnishing
Instructions
- Prepare the glass rim by toasting shredded coconut and rimming the glasses with lime and sea salt.
- Juicing the pineapple: Blend and strain fresh pineapple for juice.
- Mixing your mockarita: Combine pineapple juice, coconut milk, coconut water, and lime juice in a shaker.
- Taste the mixture and adjust sweetness with honey or lime.
- Pour the mixture into prepared glasses filled with ice.
Notes
Add a slice of fresh pineapple or lime wheel for garnish. Pairs well with light appetizers.
Nutrition
- Serving Size: 1 serving
- Calories: 150
- Sugar: 20g
- Sodium: 200mg
- Fat: 8g
- Saturated Fat: 7g
- Unsaturated Fat: 1g
- Trans Fat: 0g
- Carbohydrates: 20g
- Fiber: 2g
- Protein: 2g
- Cholesterol: 0mg
Keywords: mocktail, pineapple, coconut, refreshing drinks, summer beverage
Grilled Pineapple with Ice Cream: Summer Dessert in Minutes
The Sweet Simplicity of Grilled Pineapple with Ice Cream
Welcome back, food lovers! Today, we’re going to embark on a delightful culinary adventure that marries sweet and savory—think backyard barbecues and warm, sun-drenched days. I’m talking about Grilled Pineapple with Ice Cream! If you’ve never tried this indulgent treat, you are in for a real surprise. Whether you’re throwing a summer bash or just craving a sweet bite after dinner, this dish is about to become your new best friend.
Picture this: It’s a sunny Saturday afternoon, and the grill is sizzling with a mix of aromas—burgers, veggies, and of course, pineapple. As the fragrant, caramelized fruit comes off the grill, it’s drizzled with honey and topped with a perfect scoop of creamy ice cream. Ah, bliss! It’s a dessert that feels incredibly easy yet impressively gourmet. Plus, it’s gluten-free and can be made vegan, too! Let’s dive into the juicy details of crafting this refreshing dish.
A Family Tradition
Growing up, summer always meant family BBQs. My parents made a killer spread that could please any palate, but it was my grandma’s grilled pineapple that stole the show. I still remember helping her in the kitchen, excitedly peeling and cutting the pineapple as she regaled me with stories about her childhood in Hawaii, where fresh fruit was always in abundance. She introduced me to the magic of caramelizing pineapple over the grill—how the heat transforms it from ordinary to extraordinary, enhancing its sweetness and adding a smoky depth.
One afternoon, in the haze of laughter and sizzling food, Grandma surprised us by serving the grilled pineapple alongside a scoop of creamy vanilla ice cream. The contrast of temperatures and flavors was heavenly! That moment stuck with me and became a cherished memory—a simple, joyful celebration of summer and family. Fast forward to today, where I find myself recreating this beloved dessert, and I can’t wait to share it with you!
Ingredients
To whip up this delightful dessert, you’ll need just a few simple ingredients. Here’s what you’ll need:
-
1 ripe pineapple
Choose a pineapple that’s slightly soft to the touch and gives off a sweet aroma. This ensures maximum ripeness and sweetness! -
1 tablespoon brown sugar
This adds a wonderful caramel flavor! You can substitute with coconut sugar for a more health-conscious option. -
1 tablespoon honey
Honey enhances the sweetness and helps create a gorgeous glaze. If you prefer, maple syrup works well too for a vegan-friendly swap. -
1 teaspoon cinnamon
Cinnamon brings warmth and a touch of spice to the dish. Feel free to swap it with nutmeg for a more exotic flavor. -
Ice cream (any flavor)
The traditional choice is vanilla, but feel free to go wild! Coconut, mango, or even a rich chocolate will elevate this dish.
Step-by-Step Instructions
Ready to get grilling? Let’s break down the steps to create this fruit-forward delight.
-
Prepare Your Pineapple
Begin by slicing off the top and bottom of the pineapple, creating flat surfaces. This will help stabilize it while you cut. Stand it upright and slice it vertically into quarters, then remove the core. Cut each quarter into thick slices (about an inch)—think of them like steak cuts for grilling! The thicker, the better for those lovely grill marks! -
Make the Glaze
In a small bowl, mix together your brown sugar, honey, and cinnamon. This mixture will be the star of the show! It adds both a sweet glaze and a deep, smoky flavor when grilled. Make sure to mix until it’s smooth and the sugar begins to dissolve slightly. -
Preheat the Grill
Fire up your grill! You want it to be nice and hot. A charcoal grill can provide that smoky flavor, but a gas grill works fine too. Preheat to medium-high heat (around 400°F) for the best results. If you’re indoors, a stovetop grill pan will also do the trick! -
Brush and Grill
Now it’s time to get those pineapples sizzling! Brush one side of the pineapple slices generously with the sugar-honey glaze. Place them on the grill, cut side down. Let them cook for about 3-4 minutes until you see those beautiful grill marks developing—not to mention that fantastic smell! -
Flip and Glaze Again
After 3-4 minutes, flip the pineapple slices and brush the other side with more glaze. This step is crucial; the caramelization will enhance the flavors! Grill for another 3-4 minutes until the pineapple is tender and golden. You should have a nice char without burning it—just a little patience pays off here! -
Serve with Ice Cream
Once perfectly grilled, take your pineapple off the grill and let it cool for a minute (though it’s hard to wait!). Scoop your desired flavor of ice cream and place it right on top. Allow it to melt slightly over the warm pineapple for that beautiful contrast—a divine experience!
Serving Suggestions
To serve, arrange your grilled pineapple slices on a quaint plate, drizzle with a little extra honey if desired, and add that scoop of ice cream right in the middle. Garnish with fresh mint leaves for a pop of color. This isn’t just a dessert; it’s a feast for the eyes! Whether it’s after dinner or as a special treat at a summer gathering, your guests will be tantalized.
Recipe Variations
This dish is beautifully versatile! Here are a few fun twists to consider:
-
Tropical Twist: Add a layer of toasted coconut on top of your ice cream for more crunch and flavor.
-
Spicy Kick: Sprinkle some chili powder or cayenne pepper over the glaze for a sweet-heat combo that pops!
-
Nutty Delight: Top your ice cream with crushed nuts, such as pecans or almonds, for added crunch and protein.
-
Ice Cream Sandwich: Sandwich the grilled pineapple between two cookies or brownies for a messy, but incredibly delicious dessert!
-
Alcohol Infusion: Drizzle with a touch of dark rum or coconut rum over the pineapple before grilling, adding an adult twist!
Chef’s Notes
Over the years, this recipe has taken on many forms, evolving alongside my culinary journey. Sometimes I’ve added spices like cardamom or vanilla for depth and variety. And let’s not forget the countless times I’ve accidentally burnt a piece or two, but hey, that’s the beauty of cooking—learning from those crispy mistakes! You never know what flavor magic can happen! This dish is about living, laughing, and loving food—all while making our taste buds dance!
FAQs and Troubleshooting
Q1: My pineapple turned out too mushy; what did I do wrong?
A: It’s likely that the pineapple was overripe. Look for pineapples that feel just slightly soft and smell sweet.
Q2: Can I make this ahead of time?
A: While grilled pineapple is best fresh, you can prep your pineapple slices and glaze in advance. Grill them right before serving!
Q3: I don’t have a grill. Can I use the oven?
A: Absolutely! You can broil the pineapple slices in the oven on high for about 5-7 minutes, flipping halfway. Just keep an eye on it!
Q4: Can I use canned pineapple?
A: While fresh pineapple is best, you can use canned. Just make sure to drain and pat them dry to avoid too much liquid while grilling.
Nutritional Info
For a serving of Grilled Pineapple with Vanilla Ice Cream, you’re looking at:
- Calories: Approx. 300 per serving
- Protein: 3g
- Carbohydrates: 50g
- Fat: 10g (varies based on ice cream choice)
- Fiber: 2g
Enjoy this light and refreshing treat guilt-free and embrace the sweetness of the moment!
Grilled Pineapple with Ice Cream isn’t just a recipe; it’s an experience, a taste of nostalgia, and the perfect ending to any meal or summer evening. Whether it’s the accent of cinnamon, the sweetness of the honey, or the warmth of the grill, allow this dessert to transport you to a sun-kissed, carefree day. So fire up that grill, and let’s savor every bite together! Happy grilling! 🍍✨
PrintGrilled Pineapple with Ice Cream
A delightful dessert featuring caramelized grilled pineapple topped with creamy ice cream, perfect for summer gatherings.
- Prep Time: 10 minutes
- Cook Time: 8 minutes
- Total Time: 18 minutes
- Yield: 4 servings 1x
- Category: Dessert
- Method: Grilling
- Cuisine: American
- Diet: Vegetarian
Ingredients
- 1 ripe pineapple
- 1 tablespoon brown sugar
- 1 tablespoon honey
- 1 teaspoon cinnamon
- Ice cream (any flavor)
Instructions
- Prepare your pineapple by slicing off the top and bottom, then cutting it into thick slices.
- Make the glaze by mixing brown sugar, honey, and cinnamon in a small bowl.
- Preheat your grill to medium-high heat (around 400°F).
- Brush one side of the pineapple slices with the glaze and place them on the grill.
- Flip the pineapple after 3-4 minutes and glaze the other side.
- Serve your grilled pineapple warm with a scoop of ice cream on top.
Notes
Drizzle with extra honey and garnish with mint for serving.
Nutrition
- Serving Size: 1 serving
- Calories: 300
- Sugar: 25g
- Sodium: 10mg
- Fat: 10g
- Saturated Fat: 5g
- Unsaturated Fat: 5g
- Trans Fat: 0g
- Carbohydrates: 50g
- Fiber: 2g
- Protein: 3g
- Cholesterol: 30mg
Keywords: grilled pineapple, dessert, summer recipe, ice cream, barbecue, easy dessert, nostalgic recipe
Protein-Packed Quinoa & Chickpea Salad (Meal Prep)
Quinoa and Chickpea Salad: A Delightful Blend of Wholesome Goodness
Welcome back to Clean Plate Cravings, food lovers! Today, we’re diving into a vibrant dish that’s not just a feast for your taste buds but also a powerhouse of nutrition. Yes, you guessed it—it’s the Quinoa and Chickpea Salad! This dish is perfect for quick lunches, potluck gatherings, or even as a refreshing side during your weekend barbecues. Let’s get cooking!
A Memory to Cherish
Ah, quinoa! Just saying the word evokes a wave of nostalgia for me. I remember the first time I tried it way back in college. I was in my tiny dorm kitchen, experimenting with different grains because, let’s be real, that’s what you do when you’re a food nerd in the making. A friend had introduced me to this “superfood,” and I was immediately hooked! After perfectly fluffing my first batch, I tossed it together with some canned chickpeas (because who has time to cook legumes from scratch, right?), fresh veggies, and a drizzle of lemon. The colors on my plate danced around, and as I took that first bite, it was like a burst of flavors and textures hitting my mouth. I felt energized, light, and surprisingly proud of my culinary creation. Ever since that day, quinoa and chickpeas have held a special place in my heart, and I can’t wait to share this delicious recipe with you!
Ingredients You’ll Need
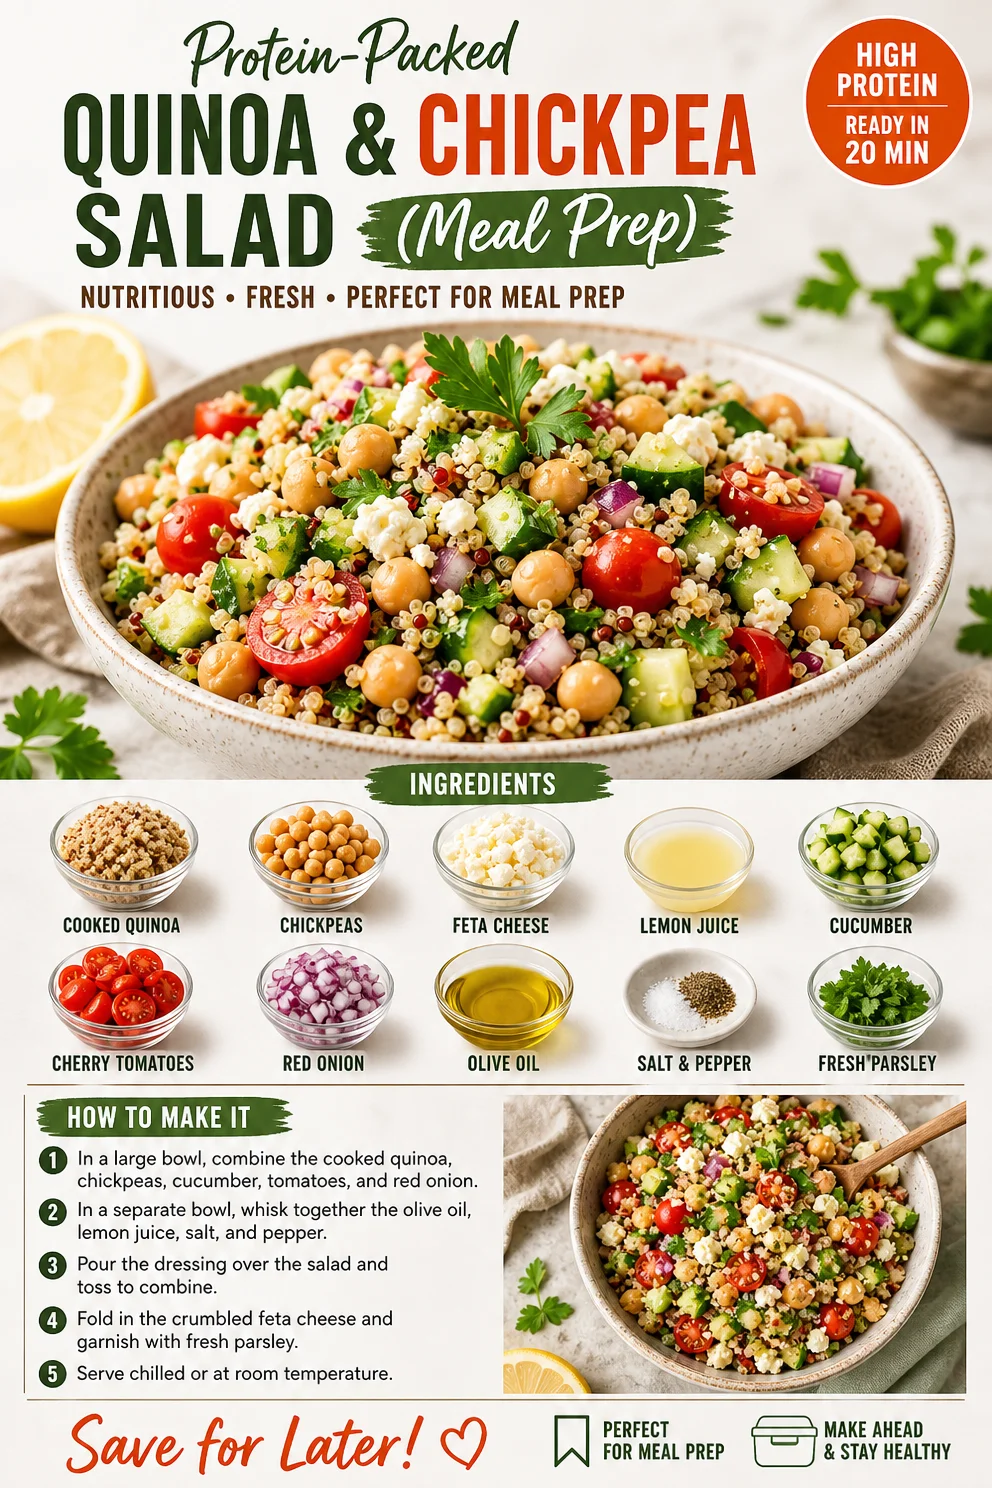
Let’s gather our ingredients! Here’s what you’ll need to whip up this delightful salad:
-
1 cup cooked quinoa: Quinoa is a fantastic grain packed with protein, fiber, and various vitamins. You can easily substitute it with farro or brown rice if quinoa isn’t your thing.
-
1 can (15 oz) chickpeas, drained and rinsed: These little legumes are rich in protein and add a lovely creaminess to the salad. Feel free to swap them out for black beans or white beans for a different flavor.
-
1/4 cup crumbled feta cheese: The salty, tangy flavor of feta adds depth to the salad. If you’re vegan or lactose intolerant, try a dairy-free cheese or skip it altogether!
-
1 tbsp fresh lemon juice: Freshly squeezed lemon juice brightens up the dish. A splash of apple cider vinegar can work as a substitute if you don’t have lemon.
-
1/4 cup diced cucumber: Cucumbers provide a delightful crunch and hydration. If you’re looking for something a little more robust, diced bell peppers would be a great alternative!
-
1/4 cup halved cherry tomatoes: These juicy little gems add sweetness and color to your salad. Any type of diced tomato will work in a pinch.
-
1/4 cup chopped red onion: A little red onion adds a zesty kick. If you find raw onion too strong, green onion or chives are milder options.
-
2 tbsp olive oil: A drizzle of good-quality olive oil not only enhances flavor but is also packed with healthy fats. Avocado oil can substitute nicely here too.
-
Salt and pepper to taste: A must for seasoning! Don’t shy away from experimenting with spices—cumin or smoked paprika can take it to the next level!
-
Fresh parsley for garnish: This not only looks great but adds a fresh, herbal note. Feel free to swap parsley for fresh mint for an extra burst of flavor!
Step-by-Step Instructions
Alright, let’s get down to business! Here’s how to make this brightly colorful Quinoa and Chickpea Salad:
-
Cook the Quinoa: Start by rinsing 1/2 cup of dry quinoa under cold water, which helps remove its natural coating called saponin (this is where the slight bitterness can come from!). Combine it with 1 cup of water or vegetable broth in a small saucepan, bringing it to a boil. Once boiling, reduce the heat to low, cover, and simmer for about 15 minutes until the grains are fluffy and the water is absorbed. A little chef hack? Let it sit covered for 5 extra minutes off the heat to steam for perfect texture!
-
Prep Your Veggies: While your quinoa is cooking, grab your cucumber, cherry tomatoes, red onion, and parsley. Dice the cucumber, halve the cherry tomatoes, chop the red onion, and roughly chop the parsley. Aim for uniform sizes for a visually appealing salad. Oh, and don’t forget to keep some cucumber seeds aside for snacking—so fresh and crunchy!
-
Rinse the Chickpeas: In a colander, drain and rinse your can of chickpeas under cool running water. This helps to reduce sodium content and improves their taste. Plus, it’s great to handle—much more civilized than going straight from the can to the bowl!
-
Combine Everything: Once your quinoa is ready, let it cool for a few minutes. In a large mixing bowl, combine the cooked quinoa, drained chickpeas, diced cucumber, halved cherry tomatoes, chopped red onion, and crumbled feta cheese. The colors should start singing at this point!
-
Dress It Up: Drizzle the salad with olive oil and freshly squeezed lemon juice. Season with salt and pepper to taste. Give everything a gentle toss to marry the flavors together. This is the point where you can add in some other spices or herbs if you’re feeling adventurous. Taste it and tweak to your liking!
-
Chill and Serve: If time allows, let the salad chill in the fridge for at least 30 minutes before serving. This lets the flavors meld beautifully. When you’re ready to serve, sprinkle with fresh parsley as the final touch!
Serving Suggestions
To plate this delightful Quinoa and Chickpea Salad, try using a large platter for a family-style serve or individual bowls for a more refined presentation. A sprinkle of extra feta and a slice of lemon on the side always elevate the experience. For an additional crunch, serve with baked pita chips or alongside a fresh slice of crusty bread. Your family and friends are going to love it!
Recipe Variations
Now that you have the basics down, here are some creative twists to make this salad your own:
-
Mediterranean Kick: Add olives and sun-dried tomatoes for that quintessential Mediterranean vibe.
-
Spicy Version: Toss in some diced jalapeños or a dash of chili flakes for heat.
-
Herbed Delight: Swap in fresh mint or cilantro instead of parsley for a different herbal note.
-
Nutty Texture: Toss in a handful of toasted pine nuts or slivered almonds for extra texture.
-
Fruit Fusion: Add diced avocados or seasonal fruits like berries or pomegranate seeds for a sweet touch.
Chef’s Notes
This dish will always remind me of those carefree college days, experimenting with flavors and textures. It’s grown with me over the years, evolving as my tastes have changed and my cooking style has developed. I still find myself returning to quinoa and chickpeas whenever I need a comfort meal that’s both hearty and nourishing. Plus, it keeps beautifully in the fridge for a few days! It can even be a stellar base for meal prep, allowing me to eat healthily without putting in hours in the kitchen. And let’s be honest—who doesn’t want to whip up something so tasty in no time?
FAQs and Troubleshooting
-
Can I make this salad ahead of time?
Absolutely! This salad keeps well for up to 3 days in the fridge. Just be aware that the tomatoes and cucumbers will release some moisture, so if you prefer a crunchier texture, add those right before serving. -
What if I don’t have quinoa?
No problem! You can substitute it with other grains like bulgur or farro, or even try a gluten-free version with brown rice or millet. -
My salad is too dry. What should I do?
If you find your salad lacks moisture, simply drizzle on a bit more olive oil or lemon juice and toss everything again until it achieves your desired consistency. -
How can I prepare chickpeas from scratch?
If you want to use dried chickpeas, soak them overnight in water and then cook in a pot of boiling water for about 1-2 hours until tender. You’ll want about 1.5 cups of cooked chickpeas for this recipe.
Nutritional Information
While I don’t usually dive deep into the nitty-gritty of nutrition—because I believe in enjoying food first—here’s a quick snapshot of what you’re getting with this Quinoa and Chickpea Salad:
- Calories: Approximately 350 per serving
- Protein: ~15g
- Fiber: ~10g
- Healthy Fats: From the olive oil and feta cheese
And there you have it—your ultimate guide to creating a Quinoa and Chickpea Salad that’s not only easy to prepare but also brimming with flavor and heartiness. I can’t wait for you to try it and make it your own. Remember, cooking is all about creativity, so experiment and have fun in the kitchen! Happy cooking, friends!
Minute Peach Berry Summer Salad for Quick Weeknight Meals
Peach Berry Summer Salad: A Fresh Take on Seasonal Flavors
Ah, summer—a time for sunshine, warmth, and, of course, the juiciest fruits of the season! Nothing quite compares to biting into a perfectly ripe peach or plucking sweet blueberries fresh from the vine. At Clean Plate Cravings, we’re all about celebrating these delightful ingredients in a way that’s both delicious and nutritious. Today, we’re whipping up a vibrant Peach Berry Summer Salad that’s not only a feast for the senses but also a meal that’s uncomplicated and bursting with flavor.
Imagine bringing together the juicy sweetness of sun-kissed peaches with the tartness of blueberries, all complemented by crunchy cucumbers, creamy feta, and toasted pecans. I mean, talk about summer on a plate! This salad is perfect for those casual backyard barbecues, a light lunch, or a fresh side dish at your next gathering. Let’s dive into this recipe and transform your kitchen into a summer oasis where every bite is a celebration!
A Taste of Nostalgia: My Peachy Summer Memories
When I think of peaches, I’m immediately transported to my childhood summers spent at my grandmother’s house. She had the most magical garden you could imagine, bursting with color and life. The peach tree stood like the monarch of her backyard, heavy with fruit that begged to be picked. Every July, my siblings and I would race each other to see who could reach the juiciest peach first. We’d devour them right there, juice dribbling down our chins, leaving us giggling and sticky.
It was in her kitchen that I first learned the value of fresh ingredients. Grandma would toss together vibrant salads using whatever she had on hand, often inspired by her garden’s bounty. That spirit of joy and simplicity has stuck with me through the years and inspired this Peach Berry Summer Salad. It’s all about using the freshest flavors to create something that tastes like sunshine—and, trust me, you’ll want to share it with everyone, just like I did back then!
Ingredients
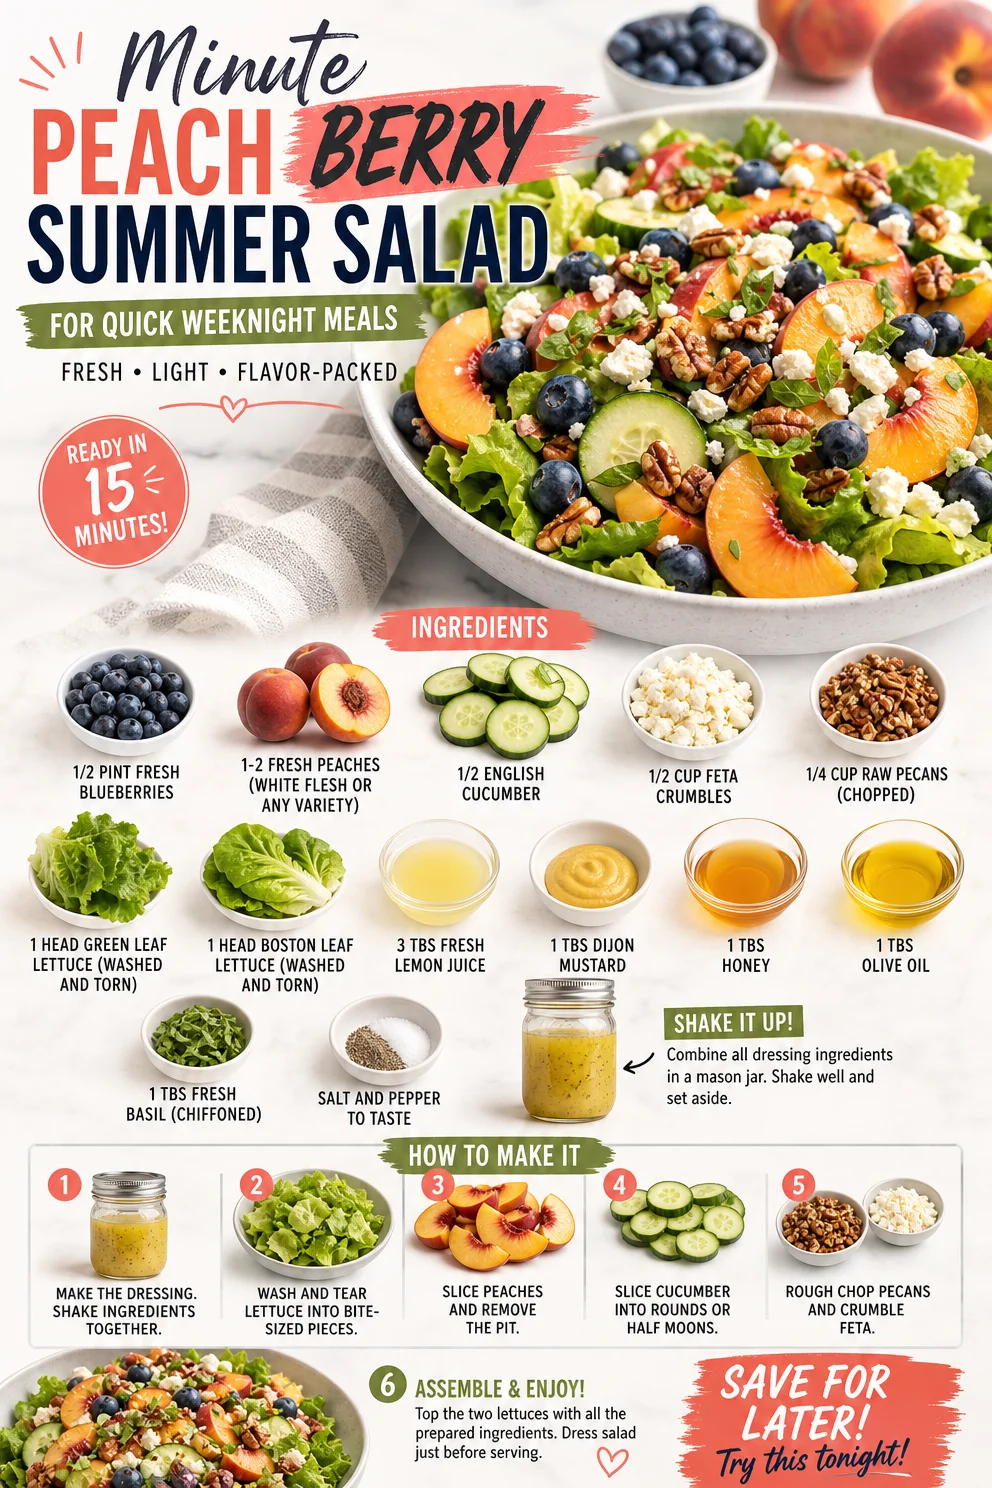
Let’s gather the vibrant, fresh ingredients for our salad! Here’s what you’ll need:
-
1/2 pint fresh blueberries
These little gems are not just delicious; they’re packed with antioxidants. If you can’t find blueberries, feel free to substitute with raspberries or sliced strawberries for that sweet-tart flavor. -
1-2 fresh peaches (white flesh or any variety)
I love white peaches for their sweetness, but any ripe peach will do. Look for peaches that are slightly soft to the touch; that’s a sign they’re perfect for eating! -
1/2 cucumber (English cucumber preferred)
A crunchy cucumber adds a refreshing crispness to the salad. If you only have regular cucumbers, just peel the skin to avoid bitterness. -
1/2 cup feta crumbles
Soft, creamy feta is a match made in heaven with sweet fruit. If you’re not a fan of feta, goat cheese works wonderfully too. -
1/4 cup raw pecans (chopped)
The toasty crunch of pecans brings a lovely texture. If you’re nut-free, sunflower seeds are a fantastic alternative. -
1 head green leaf lettuce (washed and torn)
This lettuce adds a tender base for our salad. You could also use arugula for a peppery spin! -
1 head Boston leaf lettuce (washed and torn)
Boston lettuce is mild and buttery, but any leafy green will work. Think spinach or mixed greens if that’s what you have on hand. -
3 Tbs fresh lemon juice
Bright and zesty, lemon juice elevates all the flavors. Lime juice can be a fantastic substitution if you’re looking for a twist! -
1 Tbs Dijon mustard
This provides a creamy, tangy backdrop that binds the salad together. If you don’t have Dijon, yellow mustard will do in a pinch. -
1 Tbs honey
Adding just a touch of sweetness, honey balances the tang of the mustard. Maple syrup is a great vegan alternative. -
1 Tbs olive oil
A drizzle of good-quality olive oil brings everything together beautifully. Feel free to swap this out for avocado oil if you enjoy its mild flavor. -
1 Tbs fresh basil (chiffonade)
Fresh basil adds an aromatic note. Don’t have any? Mint or cilantro can add an intriguing twist. -
Salt and pepper to taste
Essential for bringing all the flavors to life. Always taste as you go!
Step-by-Step Instructions
Ready to create this stunning salad? Follow these simple steps to master the Peach Berry Summer Salad:
-
Prep Your Produce
Begin by washing all your fresh veggies and fruits thoroughly. I like to soak my berries in a bowl of water with a splash of vinegar for a few minutes to make sure they’re super clean. This little hack ensures that any pesky pesticides or residues are washed away! -
Slice Those Peaches
Whether you’re using one or two, slice your peaches into wedges or cubes—whichever you prefer! Don’t you love the way fresh peaches smell? It’s a reminder that summertime is truly the best time for fresh fruit. -
Chop the Cucumber
Slice your English cucumber in half lengthwise and then cut it into thin crescent shapes. The cucumber adds such a satisfying crunch. You can peel it if you’d like, but I usually leave the skin on for that bright color and nutrients! -
Mix the Greens
In a large salad bowl, toss together your washed and torn green leaf and Boston lettuce. This leafy foundation is where all the magic happens! -
Add the Berries and Peaches
Gently fold the sliced peaches and fresh blueberries into the greens. Look at those colors; it’s like a celebration right in your bowl! -
Sprinkle on the Feta and Pecans
Add your feta crumbles and chopped pecans, distributing them evenly over the salad. I love to toast my pecans in a dry skillet for a few minutes to enhance their natural flavors. Just be sure to keep a close eye on them—burnt nuts are a kitchen tragedy! -
Create the Dressing
In a small bowl, whisk together the fresh lemon juice, Dijon mustard, honey, and olive oil until combined. This simple dressing ties all the ingredients together beautifully. Taste it—it should be bright, tangy, and just a little sweet. Adjust with extra honey or lemon juice as desired! -
Dress the Salad
Drizzle your dressing generously over the salad, and season with salt and pepper to taste. Toss gently to combine, ensuring that every ingredient is coated in that yummy dressing. Remember, gentle is key; we want to preserve the integrity of those beautiful berries and peaches! -
Give it a Moment
Allow the salad to rest for a few minutes to let the flavors meld. This step is especially important if you’ve added salt, as it helps draw out some of the juices from the veggies and fruits for extra flavor! -
Serve and Enjoy!
Serve this gorgeous salad immediately for the freshest experience, or refrigerate it for up to an hour if you’re planning to serve it at a gathering. But honestly, I find it’s best enjoyed right after you make it!
Serving Suggestions
To plate the Peach Berry Summer Salad, use a large, shallow bowl to showcase the colorful layers. You can even arrange the salad in a winding design for a more artistic touch. A slice of crusty bread or grilled chicken on the side fully rounds off the experience! For an extra indulgent moment, consider drizzling a little extra honey or a sprinkle of fresh herbs on top just before serving.
Recipe Variations
Feeling adventurous? Here are a few variations to keep things fresh and exciting:
-
Grilled Peach Twist: Get that smoky flavor by grilling the peach slices for a few minutes. This adds a lovely char and enhances sweetness.
-
Dairy-Free Delight: Swap feta for a scoop of creamy avocado for that buttery texture without the dairy!
-
Add Ins: Toss in some grilled chicken or shrimp for a protein-packed twist that makes this salad a complete meal.
-
Dress it Up: Enhance the dressing with a splash of balsamic vinegar for a richer flavor profile.
-
Tropical Flair: Trade peaches for mango or add some sliced strawberries for a fun, tropical vibe!
Chef’s Notes
This salad has evolved throughout the years in my kitchen and has become a staple in my summer repertoire—perfect for potlucks and family gatherings. I can’t count the number of compliments I’ve received, often accompanied by requests for the recipe! Sometimes, I even challenge myself to change it up and incorporate whatever is fresh at the farmers’ market. It’s always a delight to see how versatile a simple salad can be.
Remember, cooking is all about experimentation and joy. So, feel free to switch in your favorite fruits or nuts, and don’t hesitate to make this salad your own!
FAQs and Troubleshooting
1. Can I make this salad ahead of time?
While I recommend serving it fresh, you can prepare all the ingredients and store them separately in the fridge for a day. Just mix them together before serving, and drizzle the dressing at the last minute to prevent sogginess!
2. What can I use instead of honey?
You can substitute honey with agave syrup, maple syrup, or a few drops of stevia for a sugar-free option.
3. Why is my feta crumbly?
If your feta is too crumbly, it may be an indication that it’s been over-processed or too old. Opt for a fresher block of feta and crumble it yourself for a creamier texture.
4. How can I keep the salad fresh longer?
If preparing in advance, keep the dressing in a separate container until you’re ready to serve. This way, the salad remains crisp and vibrant!
Nutritional Info
While I didn’t provide exact nutritional stats for this salad, it’s a wholesome dish packed with vitamins and minerals. Each serving is loaded with antioxidants from the berries, healthy fats from the pecans, and a delicious source of protein from the feta cheese.
There you have it! A vibrant and luscious Peach Berry Summer Salad that embodies everything we love about summer. What are you waiting for? Let’s get chopping and enjoy the season’s best produce together! Happy cooking, friends!
Ingredient Avocado Mango Salad for 15-Minute Lunches
Avocado Mango Healthy Salad: A Fresh Spin on Flavor
Welcome back, food lovers! Today, we’re diving into a recipe that’s as vibrant as it is nutritious—the Avocado Mango Healthy Salad. This dish is much more than just a salad; it’s a celebration of fresh, wholesome ingredients coming together to create magic on your plate. If you’re looking for a dish that’s bursting with flavor and will make your taste buds dance, you’re in the right place.
If there’s anything I love as much as cooking, it’s crafting meals that spark joy and togetherness. Imagine sitting outdoors on a sunny afternoon, perhaps under the shade of a tree, with a plate of this incredible salad in front of you. The juicy sweetness of ripe mango and the creamy goodness of avocado create a flavor combination that’s simply out of this world. Add in the peppery bite of arugula and the crunch of toasted pine nuts, and you’ve got an experience that’s truly delightful.
What makes this salad even better is how quick and easy it is to whip up. Whether you’re prepping a refreshing lunch, a light dinner, or a side dish for a barbecue, this Avocado Mango Healthy Salad is perfect. Plus, it’s packed with healthy fats, vitamins, and minerals, so you’ll feel great enjoying it. No more boring green salads—this dish will make you actually crave wholesome food!
So grab your cutting board and your favorite knife, and let’s create a colorful masterpiece that’s as good for your body as it is for your soul. You’re going to love it!
Personal Story
Growing up, our family gatherings always centered around food, and no dish was ever as highly anticipated as my mom’s summer salads. Every May, she’d hit the farmers’ market and come home with bags brimming with the freshest summer produce. I distinctly remember that one year when we had an abundant supply of avocados and ripe mangoes. My mom, ever experimental, decided to combine these two gems into a salad for a family BBQ.
As she sliced the avocados and cubed the mangoes, the sweet, fruity aroma filled the kitchen, and my excitement built. I can still see our entire family sitting around the picnic table, laughter echoing through the air as we tossed the salad together. That day, I learned that food is more than just sustenance; it’s a canvas for memories, laughter, and connection. Those vibrant flavors and colorful ingredients danced in our mouths as the sun set, marking that summer day as one of my favorites.
This Avocado Mango Healthy Salad is my homage to that sweet summer nostalgia. It reminds me of the simple joy of good food, shared company, and carefree afternoons. Each bite transports me back to those beautiful moments, and I can’t wait for you to experience it too!
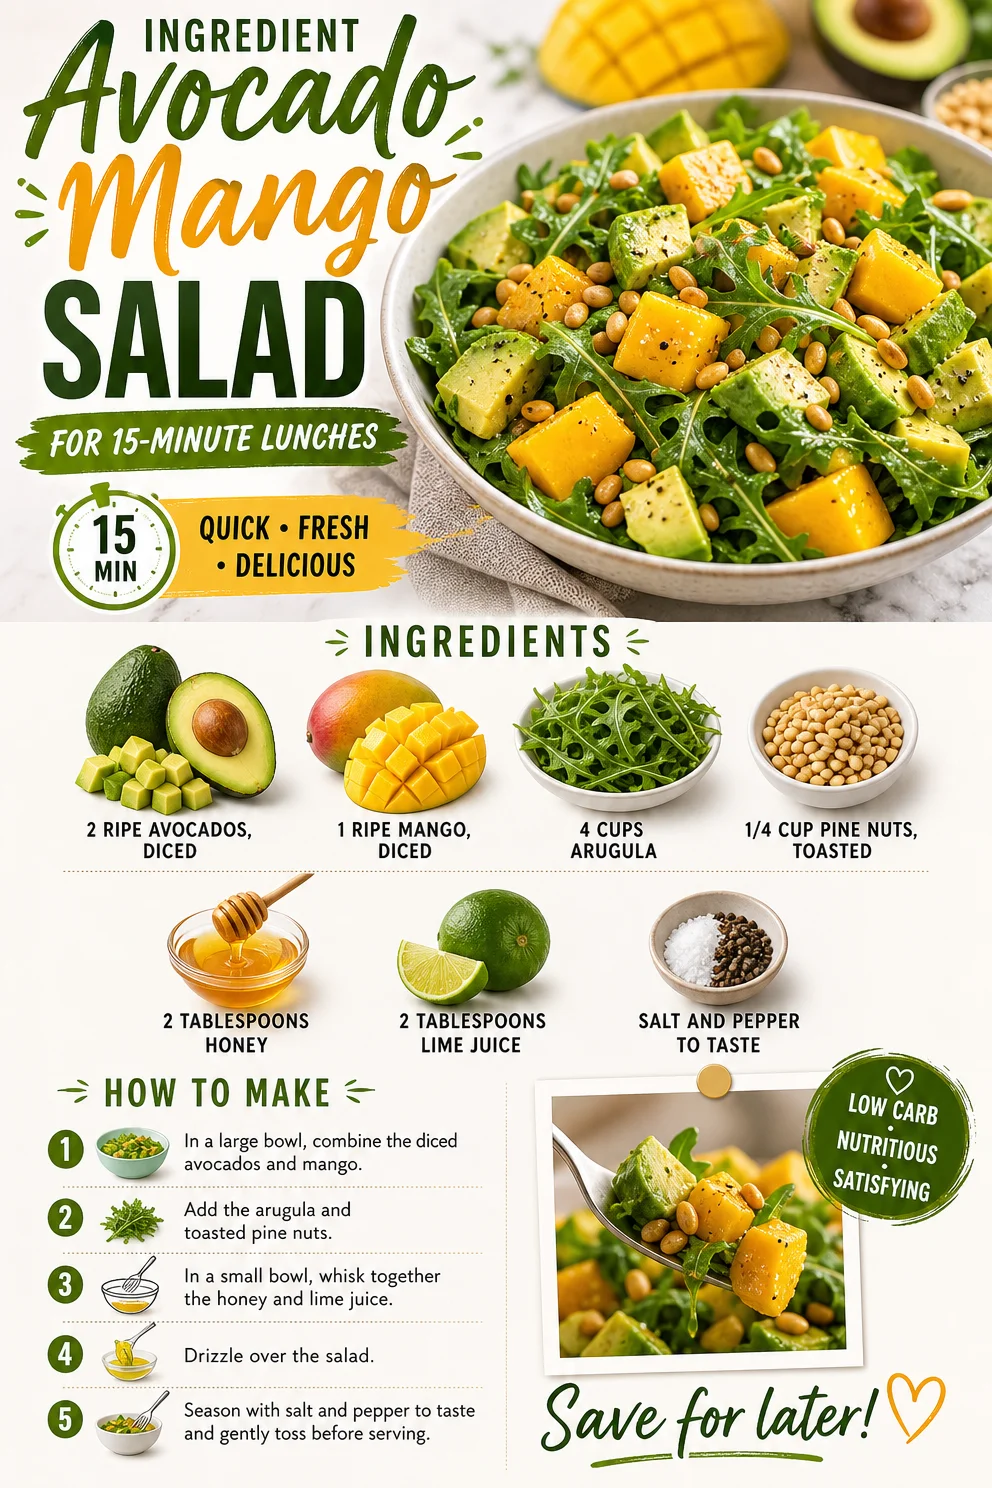
Ingredients
-
2 ripe avocados, diced
Avocados are rich in healthy fats and provide a creamy texture that makes any salad feel luxurious. When selecting avocados, look for ones that yield slightly to pressure—this indicates ripeness. If you can’t find ripe avocados, you can speed up the ripening process at home by placing them in a brown paper bag with a banana! -
1 ripe mango, diced
Mangoes are not only delicious but also packed with vitamins A and C. Make sure to choose a mango that’s slightly soft when you press it. If you can’t find a ripe mango, consider using peaches or ripe nectarines for a similar sweetness. -
4 cups arugula
This peppery green adds a lovely bite to the salad, complementing the creaminess of the avocado. If arugula isn’t your thing, swap it out for spinach or mixed greens instead! -
1/4 cup pine nuts, toasted
Toasting the pine nuts brings out their rich flavor and adds a satisfying crunch. If you’re not a fan of pine nuts, try substituting walnuts or sunflower seeds for a different texture and taste. -
2 tablespoons honey
Honey adds a natural sweetness that balances the flavors of the salad beautifully. For a vegan alternative, feel free to use agave nectar or maple syrup. -
2 tablespoons lime juice
A squeeze of lime juice brightens up the salad, enhancing all the flavors. Freshly squeezed lime juice is always best, but bottled juice will do in a pinch. -
Salt and pepper to taste
Simple seasonings can make a huge impact. Always taste as you go to ensure you’ve reached that delicious balance!
Step-by-Step Instructions
-
Prepare Your Ingredients
Start by gathering all your ingredients and washing them thoroughly. Dice the avocados and mango into bite-sized pieces. A sharp knife will make this task easier, especially when it comes to the mango’s slippery skin! -
Toast the Pine Nuts
In a dry skillet over medium heat, add the pine nuts. Toast them for about 3-5 minutes until they’re golden and fragrant, stirring frequently to prevent burning. This step is simply magical—those little nuts will transform with a warm, nutty flavor! -
Combine the Greens
In a large mixing bowl, add the arugula. If you love a well-dressed salad, a bowl with a wide opening will allow for easier tossing. -
Mix the Avocado and Mango
Gently add the diced avocado and mango to the arugula. Be careful not to stir too aggressively, as the avocados can break apart easily. Instead, use a big spoon and fold the ingredients together. -
Add Honey and Lime Juice
In a small bowl, whisk together the honey and lime juice until smooth. Pour this delightful mixture over your salad. It’s where the magic happens—this dressing is going to bring everything together beautifully. -
Season
Season your salad with salt and pepper to taste. I always recommend starting with a pinch and adding more as you go. The right seasoning can elevate the flavors immensely. -
Fold It All Together
Gently toss everything together, ensuring every leaf is coated in that vibrant dressing and the ingredients mingle beautifully. You want to maintain the integrity of the avocados, so be gentle here! -
Serve Immediately
This salad is best when served right away, so plate it up while the flavors are fresh. Presentation can elevate any meal—consider serving it in a large bowl in the center of the table and let everyone dig in!
Serving Suggestions
When it comes to serving this gorgeous salad, feel free to get a little creative! You can serve it family-style in a large bowl or individually plated for a more refined touch. Drizzle a little extra lime juice over each serving for a zesty finish and scatter the toasted pine nuts on top for that added crunch and visual allure. Pair it with a refreshing beverage like sparkling water infused with lime or a light white wine for an elevated dining experience.
Recipe Variations
-
Grilled Chicken Avocado Mango Salad
For a heartier option, toss in some sliced, grilled chicken. The smokiness of the grilled meat pairs beautifully with the fresh ingredients. -
Quinoa Base
Want to add some whole grains? Serve the salad over a bed of cooked quinoa. It brings a nice chewiness and turns this light salad into a filling meal. -
Replace Pine Nuts with Feta Cheese
If you’re in the mood for a savory twist, crumble some feta cheese over the top before serving. The salty bite complements the sweetness of the mango perfectly. -
Add Some Heat
Spice things up! Toss in some chopped fresh jalapeños or a sprinkle of red pepper flakes for a pop of heat that will wake up your palate. -
Herb Infusion
Incorporate fresh herbs like cilantro or mint to add a fresh layer of flavor and aroma. They make the salad feel even more vibrant and alive!
Chef’s Notes
Cooking is such a beautiful and fluid art form! While my mom inspired my love for this salad, I’ve continued to evolve it over the years. Sometimes, I’ll switch up the fruits based on the seasons or even add more nuts for crunch. The variations are endless, and that’s what makes it so fun.
I remember one time I invited friends over for a picnic, and we ended up having an impromptu salad bar, where everyone could customize their plate with different toppings. We ended up with the most colorful spread, and it turned out to be such a hit! This salad became a staple in our get-togethers, reminding me that food is meant to be shared and enjoyed—while also sparking imagination in the kitchen!
FAQs and Troubleshooting
-
Can I prepare this salad ahead of time?
While it’s best enjoyed fresh, you can prep the ingredients a few hours in advance and keep them separately in the refrigerator. Just wait until serving time to assemble and dress the salad—this keeps the arugula crisp! -
What if my avocados aren’t ripe?
If you find yourself with unripe avocados, don’t fret! You can either let them ripen at room temperature or use them in a different dish where they’ll be blended or cooked, such as in smoothies or guacamole. -
How do I toast pine nuts without burning them?
It’s all about keeping an eye on them! Stir them frequently, and as soon as you start smelling their nutty aroma and they turn golden, remove them from the heat immediately. They can go from perfect to burnt in seconds! -
Can I use frozen mango?
Absolutely! Frozen mango is a great alternative; just make sure it’s thawed and drained before adding it to your salad. It might be a bit softer than fresh, but the flavor remains delicious!
This Avocado Mango Healthy Salad is not just a dish; it’s an experience. It’s the perfect blend of fresh ingredients, crunchy textures, and sweet flavors that dance together on the plate. I hope this recipe brings you as much joy as it has brought me and my loved ones. Enjoy each bite, the memories made around the table, and remember—you’re doing great just by nourishing your body and soul. Happy cooking!
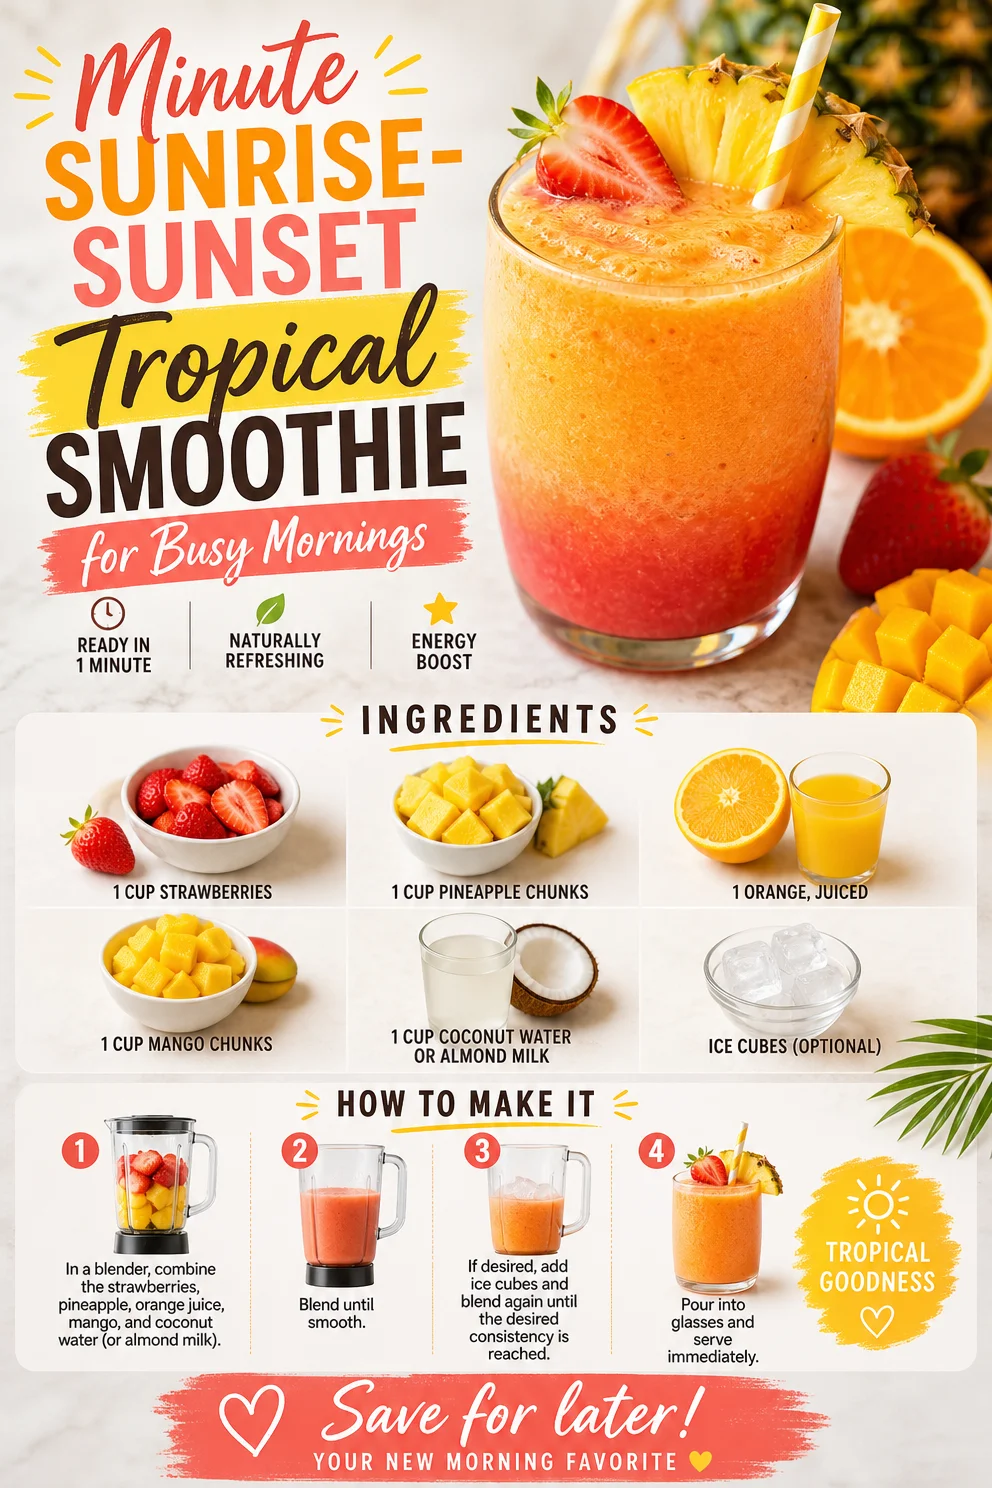
Minute Sunrise-Sunset Tropical Smoothie for Busy Mornings
Sunrise Sunset Tropical Smoothie: Your Perfect Morning Boost
Let’s talk about mornings! You know, that magical time of day when you wake up, and the sun is just beginning to spill golden light across the horizon. There’s something about that morning glow that makes everything feel fresh and full of potential. Whether you’re a busy bee rushing to work or someone who loves to linger over breakfast, there’s one thing we can all agree on: a bright and cheerful morning smoothie can set the tone for a wonderful day ahead. Say hello to the Sunrise Sunset Tropical Smoothie—your new breakfast buddy!
This smoothie is a delightful whirlpool of sweetness and a burst of flavor that’ll transport you straight to a tropical island, no passport required! Packed with vibrant strawberries, luscious pineapple, zesty orange, and creamy mango, it’s like taking a mini-vacation right in your kitchen. Not only is it a feast for your taste buds, but it’s also a nutritional powerhouse, giving you the energy boost you need to tackle whatever lies ahead in your day.
But wait! Let me share a little story that makes this smoothie even more special for me. Picture this: it’s a warm summer morning, and I’m at my favorite beachside café in Bali. The aroma of fresh fruits fills the air, and the gentle sound of waves crashing on the shore sets a soothing backdrop. I remember ordering a tropical smoothie that was so bright and flavorful; it was like a hug in a glass. That experience inspired my version of the Sunrise Sunset Tropical Smoothie, perfect for those moments when you want to capture that vacation vibe at home. Whether you sip it on your porch or prep it for a quick breakfast, this smoothie will bring that same sunny joy to your day.
Ingredients
Here’s what you’ll need to whip up this tropical delight:
-
1 cup strawberries, hulled and sliced
Fresh strawberries are the star of this smoothie. They add a lovely sweetness and vibrant color. If strawberries are out of season, you can swap them for frozen strawberries to keep the texture perfect! -
1 cup pineapple chunks
Pineapple brings a juicy, tropical flavor that brightens every sip. Don’t have fresh pineapple? Canned pineapple works too—just make sure it’s packed in juice or water, not syrup. -
1 orange, juiced
Freshly squeezed orange juice adds a zesty kick and a dose of vitamin C that’ll have you feeling refreshed. If oranges aren’t handy, you can use store-bought orange juice—just go for the no-sugar-added kind! -
1 cup mango chunks
Ah, mango! The creamy superstar of tropical fruits. It elevates your smoothie with its sweetness and velvety texture. Frozen mango is a fantastic substitute and gives the smoothie that refreshing chill! -
1 cup coconut water or almond milk
Coconut water is wonderful for hydration and adds a light tropical flavor. If you prefer almond milk for creaminess, it’s a great alternative. You can also use any plant-based milk you love! -
Ice cubes (optional)
If you want your smoothie to have a frosty texture, add a handful of ice cubes. I personally love it chilled!
Step-By-Step Instructions
Now, let’s get blending! Here’s a simple breakdown of how to make this Sunrise Sunset Tropical Smoothie:
-
Prep Your Ingredients
Start by hulking (removing the green tops) and slicing your strawberries. It’s so satisfying to see fresh fruit ready to go! Make sure you have everything within arm’s reach so you won’t have to pause mid-blend. -
Juice the Orange
Cut the orange in half and juice it right into your blender. If you don’t have a juicer, simply squeeze it with your hands. Just keep an eye out for those pesky seeds—nobody wants a surprise crunch! -
Add the Fruits
Toss in the strawberries, pineapple chunks, and mango. I like to add the soft fruits like mango and strawberries first so that they blend up nicely without clumping together. -
Pour in the Coconut Water or Almond Milk
Now pour in your coconut water or almond milk for that smooth texture. If you’re using ice, you can add that at the same time or delay it until later for a thicker consistency. -
Blend Until Smooth
Put the lid on your blender and blend on high until everything is completely smooth—usually, about 30 seconds to a minute should do the trick. If you notice it’s too thick, add a little more coconut water or almond milk until you reach your desired consistency. -
Taste and Adjust
Give your smoothie a quick taste! If you’d like it sweeter, feel free to add a bit of honey or agave syrup. Or if it needs a bit more zest, a squeeze of lime can brighten it up even more! -
Pour and Enjoy
Pour your vibrant smoothie into a glass or bowl, and take a moment to admire that stunning sunset-like color! Serve it immediately for the best taste and texture.
Serving Suggestions
For an extra flair, garnish your smoothie with a few slices of fresh fruit or a sprinkle of shredded coconut on top. A cute straw doesn’t hurt either! If you’re feeling fancy, you can even top it off with some granola for a bit of crunch. Serve it with your favorite whole-grain toast or a handful of nuts for a well-rounded breakfast.
Recipe Variations
If you’re ready to get creative, here are a few easy twists you can try with this Sunrise Sunset Tropical Smoothie:
-
Tropical Green Boost: Add a handful of spinach or kale for a nutritional punch without sacrificing flavor!
-
Chia Seed Power-Up: Toss in a tablespoon of chia seeds for a boost of omega-3s and added texture.
-
Creamy Avocado Delight: Swap out 1/2 cup of mango for half an avocado. It gives a rich creaminess and sneaks in healthy fats.
-
Berry Medley: Exchange the strawberries and pineapple for a mix of blueberries, raspberries, or blackberries for a delightful twist.
-
Coconut Milk Creaminess: Switch the coconut water for full-fat coconut milk for an indulgent treat that’s really rich and creamy.
Chef’s Notes
Years ago, I first experimented with tropical smoothies while dreaming of sandy beaches and sunshine during a chilly winter day. It’s funny how that one sunny morning inspired such a bright recipe! Over the years, I’ve adapted this particular blend many times, letting seasonal fruits dictate my choices. Sometimes I even sneak in a bit of Greek yogurt for a protein boost. No matter how I change it up, this smoothie never fails to lift my spirits and remind me of warmer days!
FAQs and Troubleshooting
-
Can I make this smoothie ahead of time?
Absolutely! Just blend your smoothie and store it in an airtight container in the fridge. It’s best consumed within 24 hours for optimal freshness. -
Why is my smoothie too thick?
If you find your smoothie is too thick, simply add more coconut water, almond milk, or even a bit of juice until you reach the desired consistency. You can also blend in a few more ice cubes for a lighter texture. -
Can I replace the fruit with frozen versions?
Yes, using frozen fruit is a great way to achieve that frosty texture! It can also help you keep your smoothie colder for longer. -
How can I make it sweeter?
If you prefer a sweeter smoothie, consider adding a bit of honey, agave nectar, or even a few medjool dates. Remember to blend those right in!
Nutritional Info (Optional)
While I won’t dive too deep into numbers, here’s a quick heads-up—this smoothie is loaded with vitamin C, antioxidants, and hydration thanks to the fruits and coconut water. It’s a fantastic option that helps kickstart your metabolism while keeping your energy levels high throughout the day.
So there you have it—a delicious, energizing Sunrise Sunset Tropical Smoothie that’s just waiting to brighten up your mornings. Whatever your day may hold, this little glass of sunshine might be just what you need. Cheers to fresh, feel-good food that empowers you and keeps you craving more! Enjoy your tasty journey in the kitchen! 🌞🍹
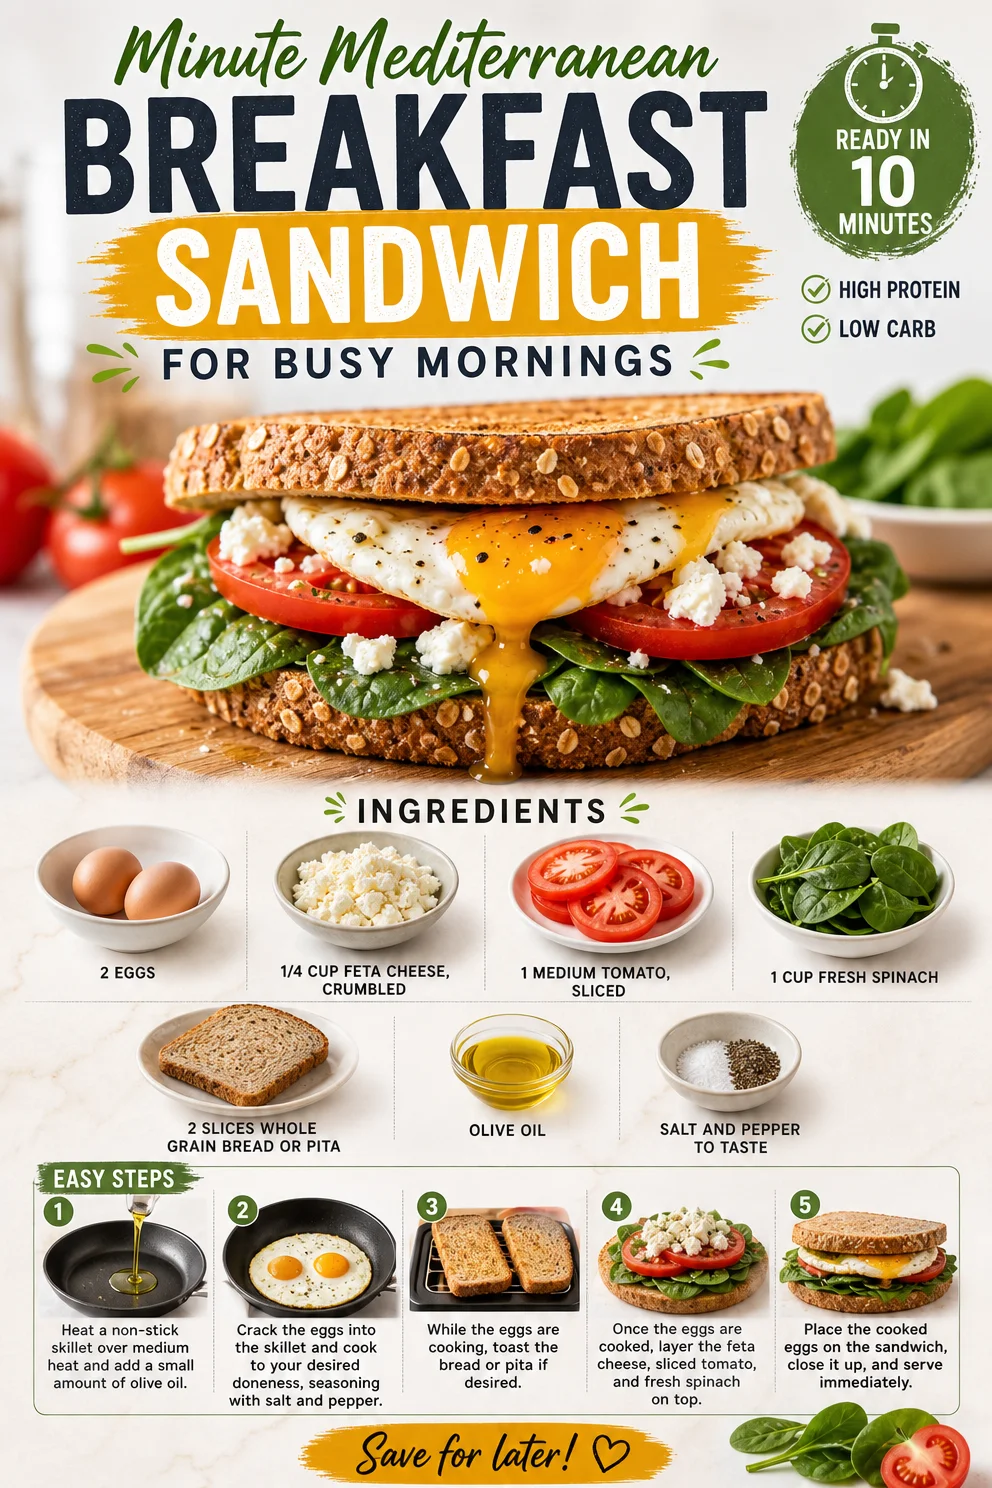
Minute Mediterranean Breakfast Sandwich for Busy Mornings
Rise and Shine with a Mediterranean Breakfast Sandwich
Welcome, food lovers! If you’re all about simple, tasty meals that make breakfast feel like a mini-vacation, you’re in the right spot. Today, we’re diving into the delicious world of Mediterranean flavors with a breakfast sandwich that’s not just easy to whip up but also packed with vibrant ingredients that’ll fuel your day. Trust me, once you take a bite, you’ll never think of breakfast the same way again.
Now, let’s set the stage: picture a bright morning, with sunlight streaming through your kitchen window. You’re craving something more than a plain ol’ bowl of cereal. It’s time to get creative! With just a few fresh ingredients—think eggs, feta, and bright veggies—you can create a breakfast masterpiece. This Mediterranean Breakfast Sandwich is all about that quick culinary getaway, where every bite takes you to sun-drenched shores and delightful brunch spots.
A Toast to Nostalgia
Before we dive into the recipe, let me share a little story. Growing up, my mom had this way of turning breakfast into an experience. Saturdays were reserved for slow mornings where we’d gather around the kitchen table, and she’d whip up all sorts of delightful dishes. One of the standouts was her version of the Mediterranean sandwich. I remember the smell of eggs sizzling in olive oil, the way the feta crumbled and melded with fresh tomatoes, and the vibrant green of spinach all coming together in a soft pita or toasted bread.
One particular Saturday, I was feeling adventurous, and I decided to experiment with her recipe. Armed with piggy banks worth of pocket money, I headed to the local market to pick out the freshest ingredients. By the time I returned with my haul, I was a whirlwind of energy and excitement. Little did I know that day would spark a lifelong love for Mediterranean flavors. That first bite of my version was magical—it was everything breakfast should be: comforting, invigorating, and oh-so-delicious. Now, every time I make this sandwich, it takes me back to those cherished mornings spent in the kitchen with my mom, and I’m excited to pass along that joy to you!
Ingredients to Gather
Let’s talk about what you’ll need for this Mediterranean Breakfast Sandwich—each ingredient plays a crucial role:
-
2 Eggs
Eggs are the star of the show! Packed with protein and healthy fats, they’re essential for a satisfying breakfast. For a lighter option, you can replace one egg with egg whites or a plant-based egg substitute. -
1/4 cup Feta Cheese, Crumbled
Feta adds a wonderful tangy flavor that complements the other ingredients beautifully. If you can’t find feta or want a vegan option, try using crumbled tofu or a dairy-free feta. -
1 Medium Tomato, Sliced
Fresh tomatoes bring juiciness and acidity to the table! If tomatoes aren’t in season, roasted red peppers are a fantastic alternative, providing a sweet and rich flavor. -
1 cup Fresh Spinach
Spinach is loaded with nutrients, adding both color and a nutrient boost to your sandwich. You can also swap it out for arugula or kale for a slightly peppery twist. -
2 Slices Whole Grain Bread or Pita
Whole grain bread offers fiber and texture. If you’re gluten-free, use gluten-free bread or any grain-free wraps! -
Olive Oil
The Mediterranean staple! Use extra-virgin olive oil for cooking the eggs for that rich flavor. If you want to mix it up, try avocado oil for a mild taste. -
Salt and Pepper to Taste
The essential finishing touch! Feel free to experiment with spices like paprika or Italian herbs if you want to take it up a notch.
Step-by-Step Instructions
Now, let’s get to the good stuff—cooking! Grab your apron and let’s make your kitchen smell heavenly.
-
Prep Your Ingredients
Start by slicing your tomato and crumbling your feta cheese. Wash your spinach if you haven’t already. Setting everything up beforehand makes the cooking process smoother and quicker! -
Heat the Olive Oil
In a non-stick skillet, add a drizzle of olive oil—about 1 tablespoon should do. Heat it up over medium heat. You want to feel that gentle sizzle when you add the eggs, so don’t rush this step. -
Cook the Eggs
Crack those eggs right into the hot skillet. Let them sit for a minute to cook on the bottom, and then gently stir with a spatula. For a perfectly soft scramble, keep them moving, but for that gorgeous runny yolk, leave them almost undisturbed! -
Season
Sprinkle in a pinch of salt and a dash of pepper while they cook. Feel free to add a sprinkle of your favorite herbs for extra flair! Oregano or basil can really lift the flavors. -
Add Spinach and Feta
Once the eggs are nearly done but still a bit runny, toss in the fresh spinach and crumble in the feta cheese. The residual heat will wilt the spinach and warm the feta nicely. Stir just until combined—yummy! -
Toast Your Bread
While your eggs are cooking, pop your whole grain bread slices or pita into a toaster until golden brown. If you prefer, you can also toast them in the skillet for a couple of minutes. -
Assemble Your Sandwich
Top your toasted bread with the heavenly egg, spinach, and feta mixture. Add the tomato slices on top and sprinkle a bit more salt and pepper, if desired. -
Finish with a Drizzle of Olive Oil
For an extra touch of Mediterranean flair, drizzle a bit more olive oil over the top before placing the second slice of bread or folding the pita. Yum! -
Serve and Enjoy!
This sandwich is best served warm, right after you make it. Grab a plate, take a moment to admire your creation, and dig in!
Serving Suggestions
Serving up this Mediterranean Breakfast Sandwich is a treat for the eyes, too! Plate it on a colorful dish and add a handful of fresh herbs—like parsley or basil—on the side for a pop of color. You can also pair it with a refreshing fruit salad or a dollop of Greek yogurt sprinkled with honey for a complete breakfast experience.
Recipe Variations
Want to switch things up? Here are some fun ideas to customize your sandwich:
-
Avocado Twist: Mash some ripe avocado and spread it on your bread before layering the egg mixture. Creamy deliciousness!
-
Spicy Kick: Add sliced jalapeños or a dash of hot sauce for a spicy breakfast that’ll wake up your taste buds!
-
Herbed Delight: Swap out basil and use fresh dill or mint for a fresh burst of flavor that takes you straight to the Mediterranean coast.
-
Veggie-Packed: Add sautéed bell peppers, mushrooms, or zucchini to amp up the nutrition and color!
-
Protein Boost: For extra protein, add slices of smoked salmon or turkey on top—it elevates the sandwich from breakfast to brunch!
Chef’s Notes
This Mediterranean Breakfast Sandwich has been my go-to for busy mornings and lazy weekends alike. I love how versatile it is, and it’s one of those recipes that evolves as you discover new ingredients. I once threw in some olives I had left over from a dinner party, and oh boy, was that a game-changer! Now, I keep olives on hand just in case I want that briny flavor.
I also love making this for friends; it’s a delightful way to start off brunch gatherings. Whenever I serve it, I have to remind myself to make a double batch because everyone asks for seconds!
FAQs and Troubleshooting
Q: Why are my eggs rubbery?
A: Overcooking eggs is the main culprit of rubbery textures. Take them off the heat while they’re still slightly undercooked to allow residual heat to finish the cooking!
Q: Can I make this sandwich ahead of time?
A: For the freshest results, I recommend cooking the eggs and assembling the sandwich right before serving. However, you can prep the ingredients ahead and store them separately.
Q: What if I don’t have spinach?
A: No problem! Any leafy green will work. Swiss chard, kale, or even arugula are great substitutes.
Q: How do I keep my bread from getting soggy?
A: Toast your bread until it’s nice and crispy, and try to assemble the sandwich right before eating. You can also let the egg mixture cool for a minute before layering to avoid sogginess.
Nutritional Info
(Feel free to adjust this section based on your preferred format.)
- Calories: ~350 kcal
- Protein: ~22g
- Fat: ~18g
- Carbs: ~30g
- Fiber: ~6g
So go ahead, give this Mediterranean Breakfast Sandwich a try! Your mornings deserve to be bright, delicious, and full of flavor. Enjoy every bite and let the flavors transport you to the sun-drenched Mediterranean coast! Happy cooking, foodies!
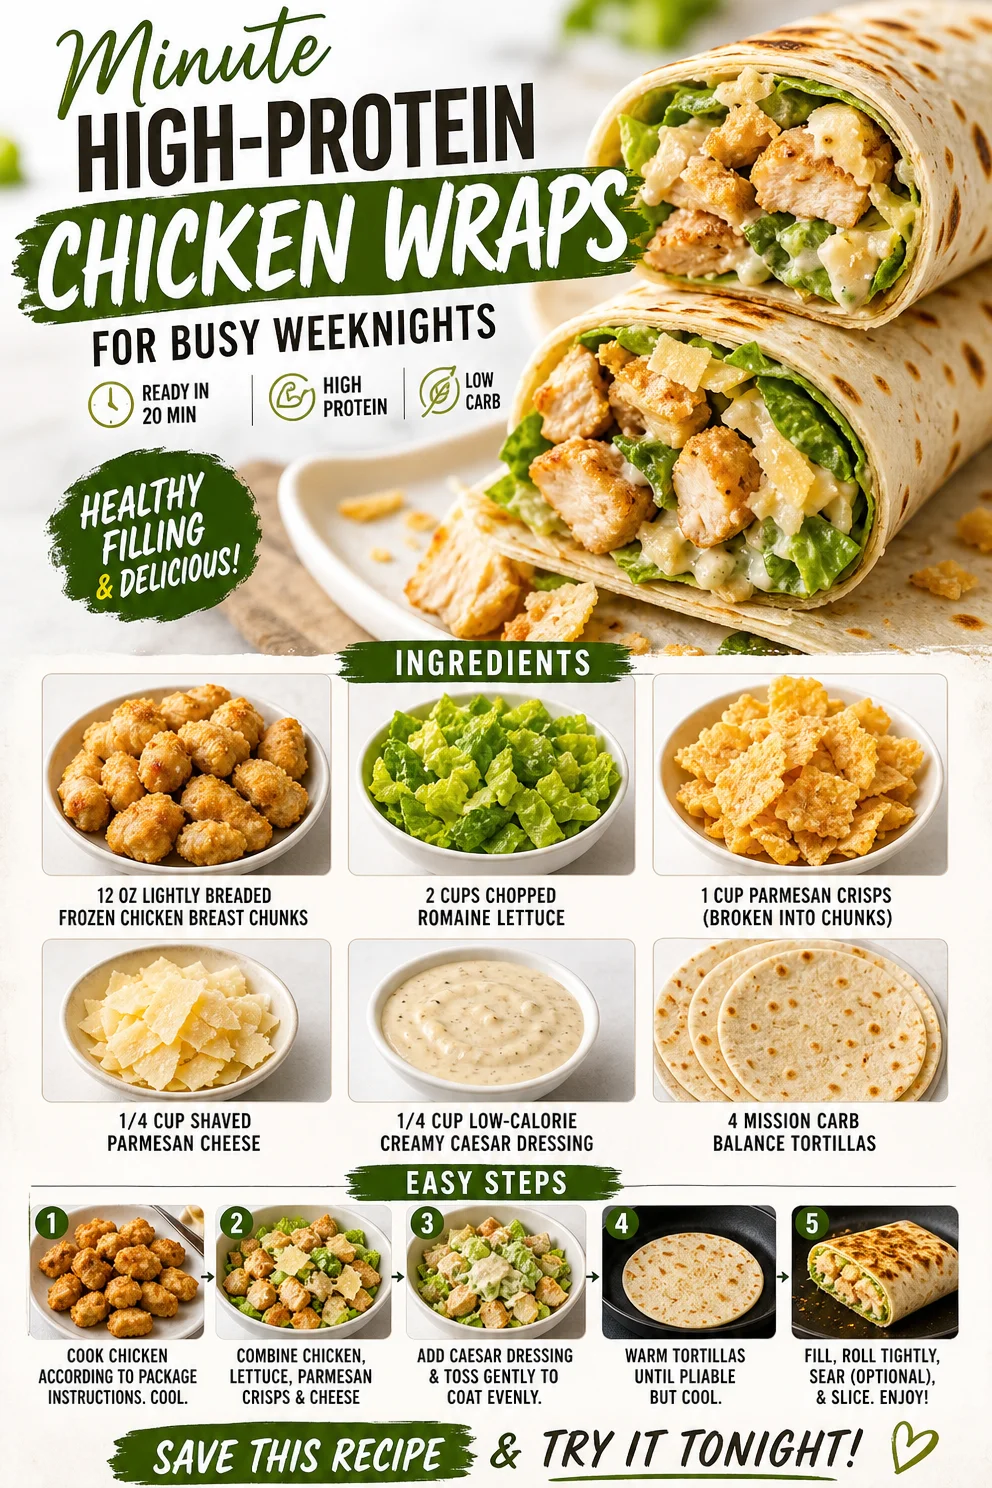
Minute High-Protein Chicken Wraps for Busy Weeknights
High Protein Chicken Wraps: Your Go-To for Flavorful Fuel
Hey there, food lovers! Welcome back to Clean Plate Cravings, where we embrace vibrant, delicious meals that keep our energy levels high without driving us to the brink of madness in the kitchen. Today, I’m thrilled to share a recipe for high protein chicken wraps that are not just delightful to the taste buds but also super simple to whip up, making them perfect for busy days and hungry bellies.
Imagine biting into a wrap filled with crispy chicken, crunchy romaine, savory Parmesan, and a creamy Caesar dressing that dances across your palate. Sounds divine, right? Well, that’s exactly what we’re creating today. Whether you’re meal prepping for the week, looking for a quick lunch, or just want to impress a friend with your culinary skills (we won’t tell anyone how easy this is!), these wraps have got your back!
Let’s get into why high protein chicken wraps should be your new favorite go-to meal. First of all, they’re a fantastic way to pack in nutrients—specifically, protein! Chicken is not only filling but also supports muscle health and keeps you feeling satisfied for longer. Plus, these wraps are loaded with fresh veggies and a punch of flavor that will make you want to rave about them to all your friends.
So, roll up those sleeves, grab your apron, and let’s create some magic in the kitchen!
A Bite of Nostalgia
Growing up, I have vivid memories of Sundays spent gathering around the kitchen table with my family. While my mom busied herself with her famous lemon rosemary chicken, my dad would be wrapping up leftovers for lunch the next day. It was a delightful chaos of flavors, laughter, and the comforting aroma of homemade meals wafting through our home.
One day, in the rush of Sunday dinner, I decided to take matters into my own hands. I found some leftover chicken breast from the night before (one of my mom’s ingenious tricks to save time) and, inspired by my parents, I decided to make my own wraps. Using whatever I could find in the fridge—romaine, some cheese, and that glorious Caesar dressing—we had an impromptu high-protein meal that we all enjoyed. It was quick, delicious, and the perfect way to use up leftovers! Fast forward to today, and I still channel that inspiration for my chicken wraps. They’re now a staple in my meal plan, reminding me of those beautiful family moments while also fueling the busy lifestyle I lead as a food enthusiast.
Ingredients
To create these amazing high protein chicken wraps, you’ll need the following ingredients:
-
12 oz lite breaded frozen chicken breast chunks
A convenient option that you can toss in the oven or air fryer. If you’re looking for a healthier version, opt for grilled chicken breast cut into chunks as a great substitute. -
2 cups chopped romaine lettuce
Fresh and crunchy, romaine adds a refreshing element to each bite. If you want to switch it up, try spinach or kale for an extra nutrient boost! -
1 cup parmesan crisps (broken into chunks)
These savory bites are the perfect crunch! For a low-carb option, you could substitute with crushed nuts or seeds. -
1/4 cup shaved Parmesan cheese
A little more cheesy goodness never hurt anyone! If you’re dairy-free, nutritional yeast can offer a cheesy flavor without the milk. -
1/4 cup low-calorie creamy Caesar dressing
This dressing ties all the flavors together. For a homemade touch, try a yogurt-based dressing or a drizzle of olive oil and lemon juice for a lighter option. -
4 Mission Carb Balance tortillas
These low-carb tortillas are flexible and delicious. Feel free to use whole-grain wraps or even lettuce leaves for a lighter, grain-free option.
Step-by-Step Instructions
Let’s dive into the how-to! Get ready to turn your kitchen into a flavor factory with these delightful chicken wraps.
Step 1: Preheat and Prepare
Start by preheating your oven according to the package instructions for the frozen chicken breast chunks. Typically, this will be around 400°F (200°C) and takes about 20-25 minutes to ensure they’re perfectly crispy.
Chef’s Tip: While that’s heating up, you can multitask—set the table or chop your romaine!
Step 2: Bake Those Chicken Chunks
Once your oven is hot and ready to go, spread your frozen chicken chunks evenly on a baking sheet. Pop them in the oven and let them bake until golden brown and crispy. Remember, you want them to have that delightful crunch!
Chef’s Insight: If you have an air fryer, feel free to use that for an even quicker prep time and an ultra-crispy finish!
Step 3: Chop the Romaine
While the chicken is baking, grab your chopping board and toss the romaine lettuce into a large bowl. Make sure to chop to your desired size—some like it big and crunchy while others prefer smaller bites.
Fun Fact: Did you know that romaine is packed with vitamins A and K? It not only adds crunch but also a nutritional punch!
Step 4: Prepare the Extras
While your chicken cooks and your romaine is cut, break up the parmesan crisps into chunks. Add those to your bowl along with the shaved Parmesan cheese for some gourmet flair.
Little Chef Hack: If you’re a cheese lover (who isn’t?), go ahead and add a sprinkle of your favorite cheese for an added creaminess!
Step 5: Combine Ingredients
Once your chicken is done and has had a minute to cool (you don’t want any major heat accidents!), toss those crispy chunks into the bowl with the romaine and cheeses. Pour in the Caesar dressing and mix it all up until everything is coated and happy!
Quick Tip: Don’t overmix! Just enough to coat evenly is perfect.
Step 6: Wrap It Up
Now for the fun part! Grab one of your tortillas and lay it flat. Spoon a generous amount of your chicken and salad mixture into the center of the wrap, leaving enough space to fold over the edges and roll it up neatly.
Chef’s Note: If you want the wrap to hold better, heat the tortillas for about 10 seconds in the microwave. This will soften them up!
Step 7: Serve and Enjoy
After you’ve successfully rolled your wraps, slice them in half if you’d like. Arrange them on a plate, and voilà, you have a beautiful meal that’s as eye-catching as it is tasty!
Serving Suggestions
For a fun and inviting presentation, serve your chicken wraps on a colorful platter with a small bowl of extra Caesar dressing for dipping. You can add a side of veggie sticks or baked sweet potato fries for a complete meal that’s nothing short of amazing!
Recipe Variations
Feeling inspired? Here are a few ways to jazz up your chicken wraps:
- Buffalo Chicken Twist: Add some buffalo sauce to the chicken before combining it with the other ingredients for a spicy kick.
- Mediterranean Style: Swap the dressing for tzatziki, add diced cucumbers, and feta cheese for a Mediterranean feast.
- Vegan Delight: Replace the chicken with chickpeas or marinated tofu and use a vegan dressing.
- Southwest Flair: Toss in black beans and corn, and switch the cheese for pepper jack for some heat.
- Breakfast Wrap: Enjoy this recipe as a breakfast option by including scrambled eggs and avocado for a protein-packed start to your day.
Chef’s Notes
This recipe has evolved over the years—from a simple family dinner to a versatile staple in my kitchen. I love how it encourages creativity! Last week, I found myself combining leftover veggies and chicken, and that’s when it hit me: these wraps are perfect for cleaning out the fridge! Additionally, they make for great meals on the go, whether that be a road trip or a busy workday.
And honestly, every time I take a bite, I’m transported back to those Sunday dinners with my family. It warms my heart knowing that those memories continue to inspire my love for cooking!
FAQs and Troubleshooting
-
What if my chicken isn’t crispy?
- If your chicken chunks aren’t crispy, try increasing the oven temperature slightly and give them a few more minutes. An air fryer also works wonders for achieving the perfect crunch!
-
What’s the best way to store leftovers?
- Store your wraps in an airtight container in the fridge for up to two days. I recommend keeping the dressing separate until you’re ready to enjoy!
-
Can I use different sauces?
- Absolutely! Any dressing you love will work. A ranch or a creamy garlic sauce could add a delightful touch as well.
-
What can I substitute for the tortillas?
- Try lettuce leaves or collard greens for a low-carb option, or use whole grain tortillas for more fiber.
Nutritional Info (Optional)
If you’re tracking your macros, one wrap (including the chicken, dressing, and toppings) typically contains around 450 calories, with approximately 30 grams of protein, making it a filling meal option!
So there you have it, foodies! High protein chicken wraps that are as flavorful as they are filling, perfect for any day of the week. Get creative, have fun, and remember, the kitchen is your playground! Happy cooking!
PrintHigh Protein Chicken Wraps

Delicious and easy high protein chicken wraps made with crispy chicken, fresh romaine, cheeses, and creamy Caesar dressing, perfect for busy days.
- Prep Time: 15 minutes
- Cook Time: 25 minutes
- Total Time: 40 minutes
- Yield: 4 servings 1x
- Category: Main Course
- Method: Baking
- Cuisine: American
- Diet: High Protein
Ingredients
- 12 oz lite breaded frozen chicken breast chunks
- 2 cups chopped romaine lettuce
- 1 cup parmesan crisps (broken into chunks)
- 1/4 cup shaved Parmesan cheese
- 1/4 cup low-calorie creamy Caesar dressing
- 4 Mission Carb Balance tortillas
Instructions
- Preheat your oven according to the package instructions for the frozen chicken breast chunks.
- Bake the chicken chunks on a baking sheet until golden brown and crispy.
- Chop the romaine lettuce into a large bowl.
- Prepare the parmesan crisps and shaved Parmesan cheese, adding them to the bowl.
- Combine the baked chicken, romaine, and cheeses with the Caesar dressing.
- Wrap a generous amount of the mixture in a tortilla.
- Serve and enjoy your delicious wraps!
Notes
Store leftovers in an airtight container in the fridge for up to two days. Keep the dressing separate until ready to eat.
Nutrition
- Serving Size: 1 wrap
- Calories: 450
- Sugar: 3g
- Sodium: 600mg
- Fat: 20g
- Saturated Fat: 6g
- Unsaturated Fat: 10g
- Trans Fat: 0g
- Carbohydrates: 35g
- Fiber: 5g
- Protein: 30g
- Cholesterol: 60mg
Keywords: chicken wraps, high protein, lunch, easy recipes, meal prep
Meal-Prep Vietnamese Chicken Summer Rolls: Fresh & Quick
Fresh and Fabulous Vietnamese Summer Rolls with Chicken
Welcome to my kitchen! I’m Ava Carter, and today, we’re diving into the vibrant world of Vietnamese cuisine with a dish that’s not only easy and fun to make but also as beautiful as it is delicious: Vietnamese Summer Rolls with Chicken. If you’re on the quest for a meal that’s light, refreshing, and bursting with flavor, then you’re going to love these little bundles of joy.
Introduction
Imagine sinking your teeth into a harmonious wrap filled with crunchy veggies, succulent chicken, and aromatic herbs, all dipped in a luscious peanut sauce. Sounds pretty fantastic, right? Summer rolls have a unique charm—they’re not just food; they’re a culinary experience! Having these colorful rolls at a dinner party or as a light lunch brings an element of fun and freshness that’s hard to beat. Plus, they’re remarkably versatile, allowing you to get creative with whatever ingredients you have on hand.
These rolls are perfect for those warm days when you want something that doesn’t weigh you down. And let’s be honest, they look fabulous on any table! As a chef who believes in sharing recipes that spark joy and encourage quick cooking, I am excited to share this recipe with you. Let’s roll up our sleeves and get started!
Personal Story
I was introduced to summer rolls during a visit to Vietnam a few years ago. I remember wandering through the bustling streets of Ho Chi Minh City, the scents of fresh herbs and sizzling meats wafting in the air. It was there that I stumbled upon a small street vendor proudly crafting these rolls with a burst of color and flavor. I was captivated!
Sitting on a tiny stool, I watched as he expertly dipped the rice paper into warm water, then layered on the shredded chicken, vibrant vegetables, and fragrant herbs. Watching those rolls come together was mesmerizing, and the moment I took my first bite, I understood why they were so adored. The balance of textures and flavors was sheer perfection. Since that day, I’ve carried a piece of that experience into my kitchen and now share it with you.
Ingredients
Here’s what you’ll need for your delicious Vietnamese Summer Rolls with Chicken:
-
Rice paper wrappers: These are the stars of the show! They’re thin, gluten-free, and provide a chewy texture that pairs perfectly with the fillings. If you can’t find rice paper, you can use lettuce leaves as a wrap for a low-carb option.
-
Cooked chicken breast, shredded: Opt for rotisserie chicken for a quick shortcut. You could also use tofu or shrimp if you prefer a meatless or seafood version.
-
Lettuce leaves: Romaine or butter lettuce works best. They add a nice crunch and make rolling easier. If you’re looking for a fun twist, try using kale or collard greens.
-
Carrots, julienned: These not only add sweetness but also a pop of color! If you’re short on time, grab a bag of pre-cut carrots or use a peeler to create ribbons.
-
Cucumbers, julienned: Fresh and crisp, cucumbers balance the density of the other ingredients. Substitute zucchini for a unique, but tasty twist.
-
Fresh herbs (such as mint and cilantro): Featuring aromatic herbs is essential! They bring brightness and complexity to the rolls. Basil or chives also work beautifully.
-
Rice vermicelli noodles (optional): Adding these noodles makes the rolls even more filling! Look for them in the Asian aisle at the grocery store; they cook in just a couple of minutes!
-
Peanut dipping sauce or hoisin sauce: A rich, creamy sauce takes these rolls to the next level. You can make your own with peanut butter, soy sauce, and a little sugar or pick up your favorite pre-made version at the store.
Step-by-Step Instructions
Step 1: Prepare Your Ingredients
Start by gathering all your ingredients. Clean and julienne the carrots and cucumbers, shred the chicken, and wash the lettuce and herbs thoroughly. This assembly line approach will make rolling your summer rolls so much easier and more fun!
Step 2: Soften the Rice Paper Wrappers
Fill a large bowl with warm water. Submerge one rice paper wrapper for about 10-15 seconds, or until it softens but is still slightly firm (it will continue to soften while you work). Lay it flat on a damp cutting board or clean surface—this prevents sticking!
Step 3: Layer Your Fillings
In the center of the softened rice paper, place a lettuce leaf (this provides a stable base). Follow it with your shredded chicken (or meat alternative), a small handful of julienned carrots, cucumbers, and a few fresh herbs. If you’re using rice vermicelli noodles, add a small portion on top. Remember not to overfill; you’ll need enough space to roll!
Step 4: Roll It Up
Here’s the fun part! Fold the sides of the rice paper over the filling, then start rolling from the bottom, tucking in the filling as you go. Keep it tight, but gentle—rice paper is delicate. The final product should look like a jewel, just waiting to be dipped into sauce!
Step 5: Make the Peanut Dipping Sauce
If you’re making the peanut dipping sauce, simply whisk together 1/4 cup of peanut butter, a splash of soy sauce, a bit of honey for sweetness, and water until you reach your desired consistency. Taste and adjust as necessary!
Step 6: Serve and Enjoy
Once all your rolls are assembled, serve them alongside your peanut dipping sauce or hoisin sauce in a lovely dish. Enjoy with friends or family while marveling at your creation!
Serving Suggestions
These summer rolls are best served fresh! Lay out your rolls on a large platter, and garnish with extra fresh herbs or sesame seeds for flair. Consider adding lime wedges to squeeze over the rolls for an extra zing. Enjoy them as a light meal, appetizer, or snack that invites dipping and sharing!
Recipe Variations
-
Shrimp Summer Rolls: Swap out the chicken for cooked shrimp for a delectable seafood option.
-
Veggie-Only Rolls: Omit the meat and load up on extra veggies like bell peppers, bean sprouts, and avocado for a satisfying vegetarian option!
-
Spicy Touch: Add slices of jalapeño or a drizzle of sriracha into your rolls for a kick!
-
Fruity Twist: Try adding thin slices of mango or pineapple for a sweet and tropical flavor.
-
Herbed Up: Experiment with different herbs like Thai basil or dill to give your rolls a fresh burst of flavor.
Chef’s Notes
I can’t tell you how many times I’ve experimented with summer roll ingredients based on what I had on hand. I’ve tried funky combinations like smoked salmon and cream cheese (which turned out surprisingly well!). The beauty of cooking is diving into your creativity and not holding back. I also love hosting ‘summer roll nights’ with friends where we each bring our favorite fillings and sauces. It’s not just about the food; it’s the laughs, stories, and memories that make it special!
FAQs and Troubleshooting
Q: What if my rice paper tears while rolling?
A: It’s all part of the learning process! If it tears, simply overlap the pieces a bit or use another wrapper. No one will be able to tell once it’s all rolled up!
Q: Can I make these ahead of time?
A: Summer rolls are best enjoyed fresh, but you can prepare all your ingredients and roll them up in advance. Just keep them covered with a damp cloth until serving so they stay moist.
Q: How do I store leftover rolls?
A: If you have any leftovers, place them in an airtight container with a damp paper towel to avoid drying out. Consume within a day for optimal freshness!
Q: Can I customize the sauce?
A: Absolutely! Feel free to swap the peanut sauce for a soy-vinegar mix or even a spicy hoisin sauce if you’re feeling adventurous.
Nutritional Info (Optional)
These summer rolls are not just tasty but also health-conscious. Per roll (without sauce), you can expect approximately:
- Calories: 70
- Protein: 7g
- Carbohydrates: 10g
- Fat: 2g (mainly from the sauce)
- Fiber: 2g
Embrace the deliciousness of these Vietnamese summer rolls with chicken! They bring a fresh and inviting element to any meal, and you’ll be surprised at how much flavor you can pack into these little parcels. Get creative, enjoy the process, and let your taste buds dance with delight! Happy rolling!
PrintFresh and Fabulous Vietnamese Summer Rolls with Chicken

Light and refreshing Vietnamese summer rolls filled with crunchy veggies, succulent chicken, and aromatic herbs, served with a delicious peanut sauce.
- Prep Time: 15 minutes
- Cook Time: 10 minutes
- Total Time: 25 minutes
- Yield: 4 servings
- Category: Appetizer
- Method: Rolling
- Cuisine: Vietnamese
- Diet: Gluten-Free, Dairy-Free
Ingredients
- Rice paper wrappers
- Cooked chicken breast, shredded
- Lettuce leaves (romaine or butter lettuce)
- Carrots, julienned
- Cucumbers, julienned
- Fresh herbs (mint and cilantro)
- Rice vermicelli noodles (optional)
- Peanut dipping sauce or hoisin sauce
Instructions
- Prepare Your Ingredients: Gather and clean all ingredients; julienne the carrots and cucumbers, shred the chicken, and wash the lettuce and herbs.
- Soften the Rice Paper Wrappers: Submerge a rice paper wrapper in warm water for 10-15 seconds until softened.
- Layer Your Fillings: Place a lettuce leaf, shredded chicken, julienned carrots, cucumbers, and fresh herbs in the center of the wrapper.
- Roll It Up: Fold the sides over the filling and roll tightly from the bottom, tucking in the filling as you go.
- Make the Peanut Dipping Sauce: Whisk together peanut butter, soy sauce, honey, and water to desired consistency.
- Serve and Enjoy: Serve the rolls with your peanut sauce or hoisin sauce and share with friends!
Notes
Experiment with different fillings and sauces for a fun and creative experience!
Nutrition
- Serving Size: 1 roll
- Calories: 70
- Sugar: 3g
- Sodium: 200mg
- Fat: 2g
- Saturated Fat: 0g
- Unsaturated Fat: 1g
- Trans Fat: 0g
- Carbohydrates: 10g
- Fiber: 2g
- Protein: 7g
- Cholesterol: 25mg
Keywords: summer rolls, Vietnamese cuisine, healthy appetizer, fresh sauce, easy recipe