
Minute Apple Cobbler: Quick, Cozy Weeknight Dessert
Easy Apple Cobbler: A Cozy Deliciousness
Welcome to the delightful world of Easy Apple Cobbler! If you think about comfort food, the image of warm, fragrant apples enveloped in a buttery, flaky topping often comes to mind. The ability to whip this up in no time is just one of the reasons I find apple cobbler to be pure magic! Whether it’s for a dinner party, family gathering, or just a cozy night on the couch, this dish checks all the boxes. With a handful of simple ingredients, you can create a sweet, satisfying dessert that’ll have everyone begging for seconds.
I can remember the first time I had apple cobbler — it was a chilly autumn afternoon, and the scent wafting from the kitchen was nothing short of enchanting. I was visiting my grandma, who had a talent for turning simple ingredients into something extraordinary. We spent the day picking fresh apples from her backyard—a mix of Granny Smith and Honeycrisp—her favorites. As we peeled and sliced, she shared stories of her childhood and how apple cobbler was a staple in her home. It wasn’t just a recipe; it was a connection, a celebration of all things cozy and heartwarming. That day, we laughed, we reminisced, and most importantly, we baked. When it finally emerged from the oven, crust bubbling and golden-brown, I knew we had created something special. Now, I carry that cherished memory with me every time I make this apple cobbler.
Let’s dive into this easy recipe that’ll soon become a beloved staple in your kitchen!
Ingredients
-
1 can of sweet rolls: These doughy nuggets provide the perfect base for the cobbler topping. You can substitute them with homemade biscuit dough or crescent rolls if you’re feeling adventurous!
-
2 cups of sliced apples: Fresh apples are the star of the show! I love using a mix of tart and sweet apples for a layer of complexity. Feel free to swap out with pears or peaches for a fruity twist.
-
1 teaspoon of cinnamon: This fragrant spice adds warmth and earthy notes to your cobbler. If you want a bolder flavor, consider using apple pie spice or even a dash of nutmeg.
-
Frosting for drizzling (optional): A simple drizzle can elevate your cobbler to a whole new level of indulgence. Store-bought chocolate or vanilla frosting works perfectly, but you can also whip up a quick glaze with powdered sugar, milk, and a splash of vanilla if you’re feeling crafty.
Step-by-Step Instructions
-
Preheat the oven: Start by preheating your oven to 350°F (175°C). A well-preheated oven will help your cobbler bake evenly and achieve that golden crust.
-
Prepare the apples: While the oven is warming, wash, peel, and slice your apples. Aim for thin slices so they cook evenly. If you’re using a mix of apple varieties, slice them all at once and toss with a sprinkle of lemon juice to avoid browning.
-
Toss with cinnamon: In a large bowl, add your sliced apples and the cinnamon. Give it a good toss! You want each apple slice to be coated in that fragrant spice. If you’re feeling extra adventurous, add a tablespoon of brown sugar for some extra caramelization.
-
Open the sweet rolls: Carefully pop open the can of sweet rolls. The dough is usually sectioned, which gives you that rustic cobbler topping. Set it aside for a moment as we prepare the apples.
-
Assemble the cobbler: Grease a baking dish (an 8×8 or 9×9 inch works great). Pour the seasoned apples evenly into the dish, then take the sweet roll dough and tear each piece into smaller pieces or leave them whole if you prefer. Layer them over the apples, covering as much surface area as possible.
-
Bake: Pop the baking dish in the oven and let it work its magic for about 25-30 minutes. You’re looking for a nice, golden brown color on the dough and bubbly apples underneath.
-
Drizzle the frosting: While the cobbler is baking, prepare your frosting if you’re using it! You can either melt the store-bought frosting in the microwave for about 15 seconds for a drizzly consistency or mix up your homemade glaze. Once the cobbler is out and slightly cooled, drizzle it generously over the top for a sweet finishing touch.
-
Serve and enjoy: Let it cool for a few minutes, then scoop it into bowls. It’s delicious on its own or with a scoop of vanilla ice cream. Trust me, it’s heavenly!
Serving Suggestions
To make your apple cobbler a visual treat, consider serving it in wide, shallow bowls or ramekins. A scoop of vanilla ice cream melting on top of the warm cobbler is not only delicious but also creates a lovely contrast in temperature. Garnish with a sprinkle of cinnamon or a few fresh mint leaves for added color.
Recipe Variations
-
Mix it up with nuts: Add a handful of chopped walnuts or pecans to your apple filling for an added crunch and nutty flavor.
-
Cranberry apple cobbler: Toss in some fresh or dried cranberries for a tangy contrast to the sweet apples.
-
Spiced-up version: Add a teaspoon of allspice or cardamom to your apple mixture for an aromatic twist.
-
Caramel apple cobbler: Drizzle some caramel sauce over the apples before adding the sweet rolls for an indulgent dessert.
-
Gluten-free option: Use gluten-free biscuit dough in place of sweet rolls for a fabulous gluten-free treat.
Chef’s Notes
Every time I make this Easy Apple Cobbler, I can’t help but chuckle at how many essay drafts I’ve written in pursuit of the perfect recipe. Some versions missed the mark, but this one—the sweet rolls—always brings the nostalgic feel of cooking with my grandma. I can still hear her laughter and see her smiling face as we shared our love for good food, and I think that’s what makes this dish special. It’s filled with love, joy, and some seriously flavorful apples!
FAQs and Troubleshooting
1. My dough didn’t cook through! What happened?
Don’t worry; this happens sometimes! Make sure your oven is fully preheated, and if your sweet rolls look too brown on top but are undercooked inside, you can cover them loosely with foil and let them bake for a few more minutes.
2. Can I use frozen apples?
Absolutely! Just remember to thaw them fully and drain excess moisture before mixing with your cinnamon.
3. What’s the best way to store leftovers?
Allow your cobbler to cool completely, then store it in an airtight container in the fridge for up to three days. Reheat slices in the microwave, and they’ll be just as delightful!
4. Can I make this ahead of time?
Certainly! You can prepare the apple filling the day before and assemble it right before baking. Just remember that the baking time may need slight adjustments if your ingredients are cold from the fridge.
Nutritional Info
While exact nutritional content can vary based on ingredients and portions, this Easy Apple Cobbler can generally provide:
- Calories: Approximately 270 per serving (based on 8 servings)
- Protein: 3g
- Carbohydrates: 35g
- Fat: 12g
- Fiber: 2g
I hope you enjoy making this Easy Apple Cobbler as much as I do! Remember, the kitchen is all about exploration, laughter, and sharing with loved ones. So what are you waiting for? Grab those apples and let’s get cooking! Your own cozy kitchen story awaits!
PrintEasy Apple Cobbler

A cozy apple cobbler featuring warm, fragrant apples enveloped in a buttery, flaky topping. Perfect for any occasion!
- Prep Time: 15 minutes
- Cook Time: 30 minutes
- Total Time: 45 minutes
- Yield: 8 servings 1x
- Category: Dessert
- Method: Baking
- Cuisine: American
- Diet: Vegetarian
Ingredients
- 1 can of sweet rolls
- 2 cups of sliced apples
- 1 teaspoon of cinnamon
- Frosting for drizzling (optional)
Instructions
- Preheat the oven to 350°F (175°C).
- Prepare the apples by washing, peeling, and slicing them thinly.
- Toss the sliced apples with cinnamon in a large bowl.
- Open the can of sweet rolls and set it aside.
- Assemble the cobbler by greasing a baking dish, pouring in the seasoned apples, and layering the sweet roll dough on top.
- Bake for 25-30 minutes until golden brown and bubbly.
- Drizzle the frosting over the cobbler once baked and slightly cooled.
- Serve warm in bowls, optionally with vanilla ice cream.
Notes
Feel free to mix in nuts or swap apples for pears or peaches. Serve with a scoop of ice cream for an indulgent treat!
Nutrition
- Serving Size: 1 serving
- Calories: 270
- Sugar: 15g
- Sodium: 500mg
- Fat: 12g
- Saturated Fat: 4g
- Unsaturated Fat: 6g
- Trans Fat: 0g
- Carbohydrates: 35g
- Fiber: 2g
- Protein: 3g
- Cholesterol: 30mg
Keywords: apple cobbler, dessert, quick dessert, baking, easy recipe, cozy recipe
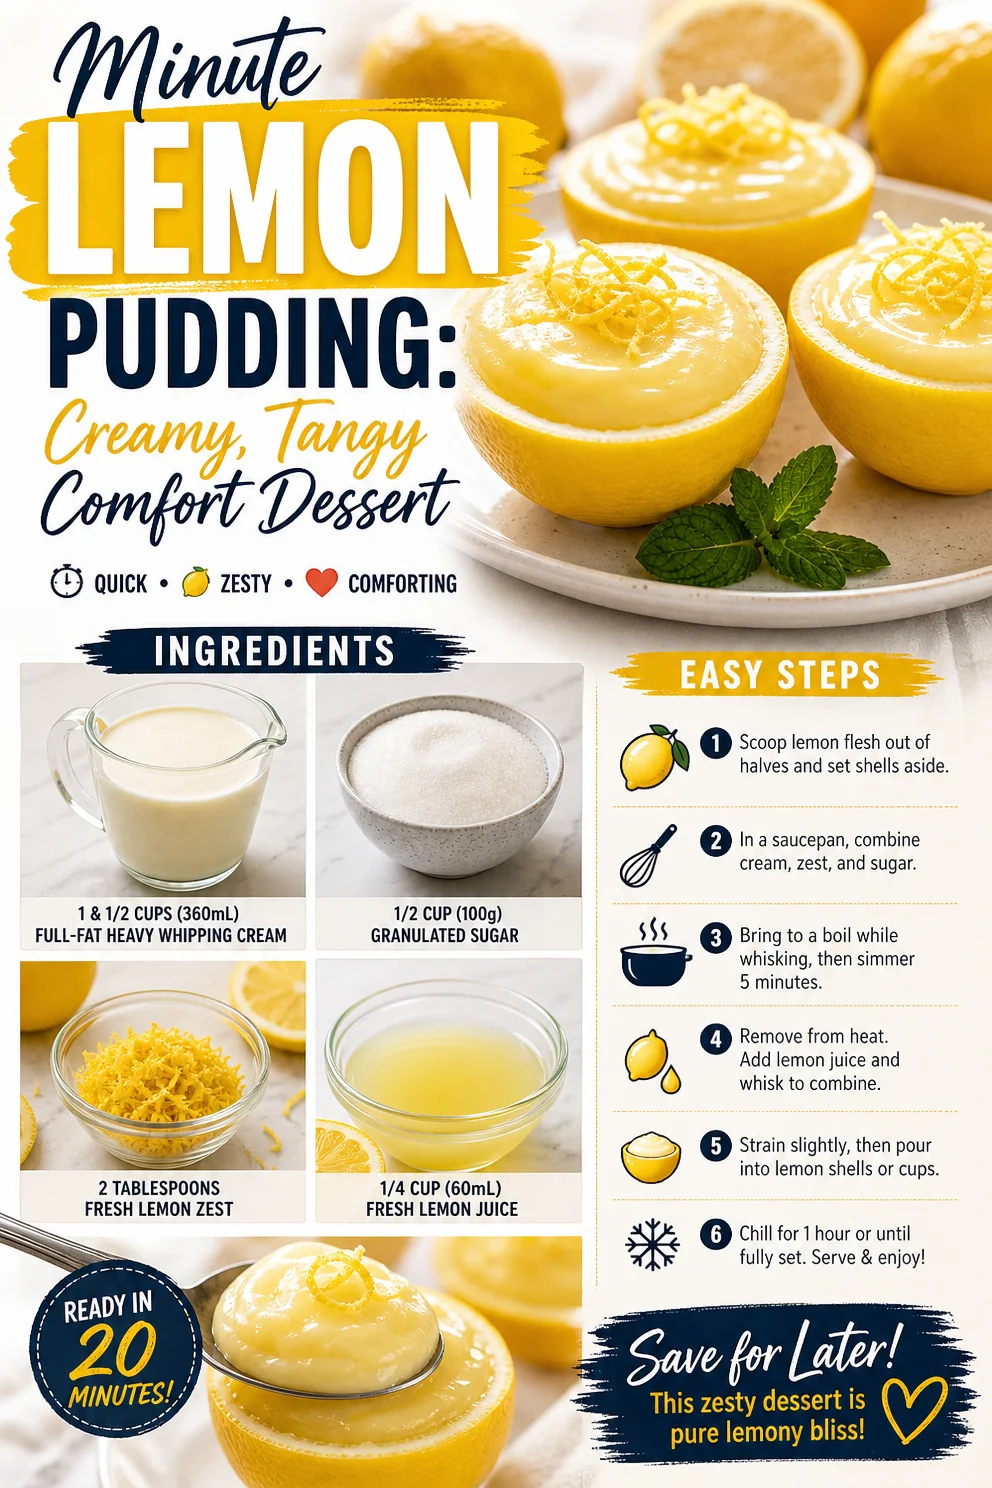
Minute Lemon Pudding: Creamy, Tangy Comfort Dessert
Easy Lemon Pudding: A Bright Delight for Every Occasion
Welcome to the sweet side of clean eating! Today, we’re diving into a dish that perfectly balances simplicity with flavor—Easy Lemon Pudding. This delightful dessert is not only a treat for your taste buds but also a comforting reminder of sunny days and special moments. So, let’s make a fresh batch that will brighten up any gathering or simply elevate your weeknight dinner!
When it comes to desserts, I’ve always been a fan of those that feel indulgent but can also fit into a more wholesome lifestyle. I remember the first time I tasted homemade lemon pudding; it was at my grandmother’s summer barbecue, where laughter filled the air and the sun kissed our cheeks. There was something magical about that cool, creamy pudding topped with a dusting of fresh zest that danced on the palate. It was one of those dishes that seemed to embody joy and warmth, and I’ve carried that memory with me ever since.
This recipe is my take on that nostalgic treat, infused with all the bright flavors of fresh lemons. I promise you that each spoonful will not only transport you back to carefree summer days but also leave you feeling satisfied, not deprived. Now, let’s get cooking!
Personal Story
Lemon pudding takes me back to my childhood—specifically, to afternoons spent in my grandmother’s sunlit kitchen. She was a master of simple yet delightful desserts, and lemon pudding was one of her best creations. I still remember clutching the edges of the wooden table, waiting for that first taste as she poured the silky mixture into bowls. The tangy brightness was like sunshine in my mouth, making every scoop feel like a treat. My grandma always said that food is best when shared, and this lemon pudding became a family favorite, often requested for gatherings and celebrations. Now, I love recreating that joy in my kitchen, passing down the tradition of sharing love through food. Every time I whip up this pudding, I channel those fond memories of my grandma, and I hope you get a bit of that warmth in your own kitchen too!
Ingredients
Here’s what you’ll need to whip up your very own Easy Lemon Pudding. Think of each ingredient as a building block of flavor.
-
1 & 1/2 cups (360mL) full-fat heavy whipping cream: This gives the pudding its rich, creamy texture. You can substitute it with coconut cream for a dairy-free version, or use half and half for a lighter option.
-
1/2 cup (100g) granulated sugar: The sweetness balances the tartness of lemon. If you prefer a healthier choice, you can replace it with honey or maple syrup, but adjust to taste as they can vary in sweetness.
-
2 tablespoons fresh lemon zest: Freshly grated zest adds a fragrant citrus note that elevates the pudding. If you’re in a pinch, you can use bottled lemon zest but fresh is always better for flavor.
-
1/4 cup (60mL) fresh lemon juice: Lemon juice provides the zing and acidity that makes this pudding bright. Bottled lemon juice works in a hurry, but squeezing fresh lemons gives you way more flavor!
Step-by-Step Instructions
Alright, let’s bring this delicious pudding to life! Follow along with these simple steps:
-
Prep Your Ingredients: Before we start cooking, gather all your ingredients and have them at your fingertips. It makes the process smoother and more enjoyable—plus, it keeps you from scrambling around looking for the sugar mid-recipe!
-
Whip the Cream: In a medium mixing bowl, pour in that luscious heavy cream. Using a hand mixer or a whisk, whip the cream until soft peaks form. You want it to be thick yet still smooth—be careful not to over-whip or you’ll end up with butter! (Trust me, I’ve made that mistake before!)
-
Mix the Sugar and Lemon: In another mixing bowl, combine the granulated sugar, lemon zest, and fresh lemon juice. Stir them together until the sugar begins to dissolve. This step is crucial because it allows those zesty flavors to bloom.
-
Combine Everything: Gently fold the whipped cream into the lemon mixture. Use a spatula to lift and fold rather than stir too vigorously. This keeps the cream airy and light, giving your pudding that delightful texture.
-
Chill: Once everything is well combined, transfer the pudding into your serving dishes (think cute ramekins or small glasses for a more refined presentation). Cover with plastic wrap and pop them in the fridge for at least 2 hours—or overnight for the best flavor infusion!
-
Serve and Enjoy: When you’re ready to serve your lemon pudding, remove it from the fridge and remove the wrap. For an extra touch, you can top it with additional lemon zest or a dollop of whipped cream.
Serving Suggestions
Presentation can elevate any dish, and your Easy Lemon Pudding is no exception! Serve it in individual ramekins, topped with fresh berries or a sprinkle of mint for a pop of color. You could also drizzle a little honey over the top for added sweetness and visual flair. If you’re feeling stylish, use glass cups to showcase the beautiful layers, making it even more tempting for everyone at the table.
Recipe Variations
Want to switch things up a bit? Here are some fun variations to consider:
-
Berry Bliss: Fold in some pureed strawberries or blueberries into the pudding for a fruity twist.
-
Coconut Cream Dream: Replace the heavy cream with coconut cream for a tropical version.
-
Spiced Surprise: Add a pinch of ground ginger or cinnamon to the lemon mixture for a subtle kick.
-
Lemon-Lavender: Incorporate a teaspoon of culinary lavender for a floral hint.
-
Vegan Option: Substitute the cream with coconut whipped cream and replace sugar with agave syrup for a plant-based treat.
Chef’s Notes
You know, this lemon pudding recipe has evolved quite a bit since I first started making it! I initially followed a rather complicated recipe with cornstarch and eggs, but I learned to simplify it over the years. The magic of this version is how easy and quick it is to prepare—it’s almost foolproof! Plus, I can now whip up a batch much faster; the hardest part is waiting for it to chill before indulging! Remember, the cleaner your ingredients, the better the flavors will shine through, so always use fresh lemons if you can. Enjoy each moment spent in the kitchen, and don’t forget to share your creations with loved ones—they’ll appreciate the effort and love that went into it!
FAQs and Troubleshooting
-
Q: Can I use bottled lemon juice instead of fresh?
A: While bottled lemon juice works in a pinch, fresh lemon juice gives you a much brighter and more vibrant flavor. If you get the chance, opt for fresh lemons! -
Q: What if my pudding is too runny?
A: If your pudding doesn’t set properly, it might be due to insufficient chilling time, or the cream wasn’t whipped enough. Make sure to whip until soft peaks form and give the pudding enough time in the fridge. -
Q: How can I make this recipe keto-friendly?
A: Simply substitute the granulated sugar with a keto-friendly sweetener like erythritol or monk fruit. The result will still be delicious and guilt-free! -
Q: Can I make this pudding ahead of time?
A: Absolutely! In fact, it’s best when made a day in advance. Just store it in the fridge until you’re ready to serve. It’ll be a refreshing treat that you can enjoy at any time!
Nutritional Info
(Optional, but here’s a sample layout if you want it included.)
- Calories: Approximately 250 per serving
- Fat: 22g
- Carbohydrates: 16g
- Protein: 2g
- Sugar: 10g (if using granulated sugar)
Now that you have all the tools and stories to create this joyful Easy Lemon Pudding, it’s your turn to bring a bit of sunshine into your kitchen! Dive in, enjoy the process, and share the love with those you care about. Happy cooking!
PrintEasy Lemon Pudding

A delightful and creamy lemon pudding that captures the essence of sunshine in every spoonful.
- Prep Time: 15 minutes
- Cook Time: 0 minutes
- Total Time: 120 minutes
- Yield: 4 servings 1x
- Category: Dessert
- Method: Chilling
- Cuisine: American
- Diet: Vegetarian
Ingredients
- 1 & 1/2 cups (360mL) full-fat heavy whipping cream
- 1/2 cup (100g) granulated sugar
- 2 tablespoons fresh lemon zest
- 1/4 cup (60mL) fresh lemon juice
Instructions
- Prep your ingredients: Gather all your ingredients for a smoother cooking process.
- Whip the cream: Pour the heavy cream into a mixing bowl and whip until soft peaks form.
- Mix the sugar and lemon: In another bowl, combine sugar, lemon zest, and lemon juice until the sugar begins to dissolve.
- Combine everything: Gently fold the whipped cream into the lemon mixture until well incorporated.
- Chill: Transfer the pudding into serving dishes, cover, and chill in the fridge for at least 2 hours.
- Serve and enjoy: Remove from the fridge and top with extra lemon zest or whipped cream if desired.
Notes
For variations, consider folding in pureed berries, using coconut cream, or adding spices such as ginger or cinnamon.
Nutrition
- Serving Size: 1 serving
- Calories: 250
- Sugar: 10g
- Sodium: 50mg
- Fat: 22g
- Saturated Fat: 14g
- Unsaturated Fat: 6g
- Trans Fat: 0g
- Carbohydrates: 16g
- Fiber: 0g
- Protein: 2g
- Cholesterol: 70mg
Keywords: lemon pudding, dessert, easy recipe, summer dessert, creamy pudding
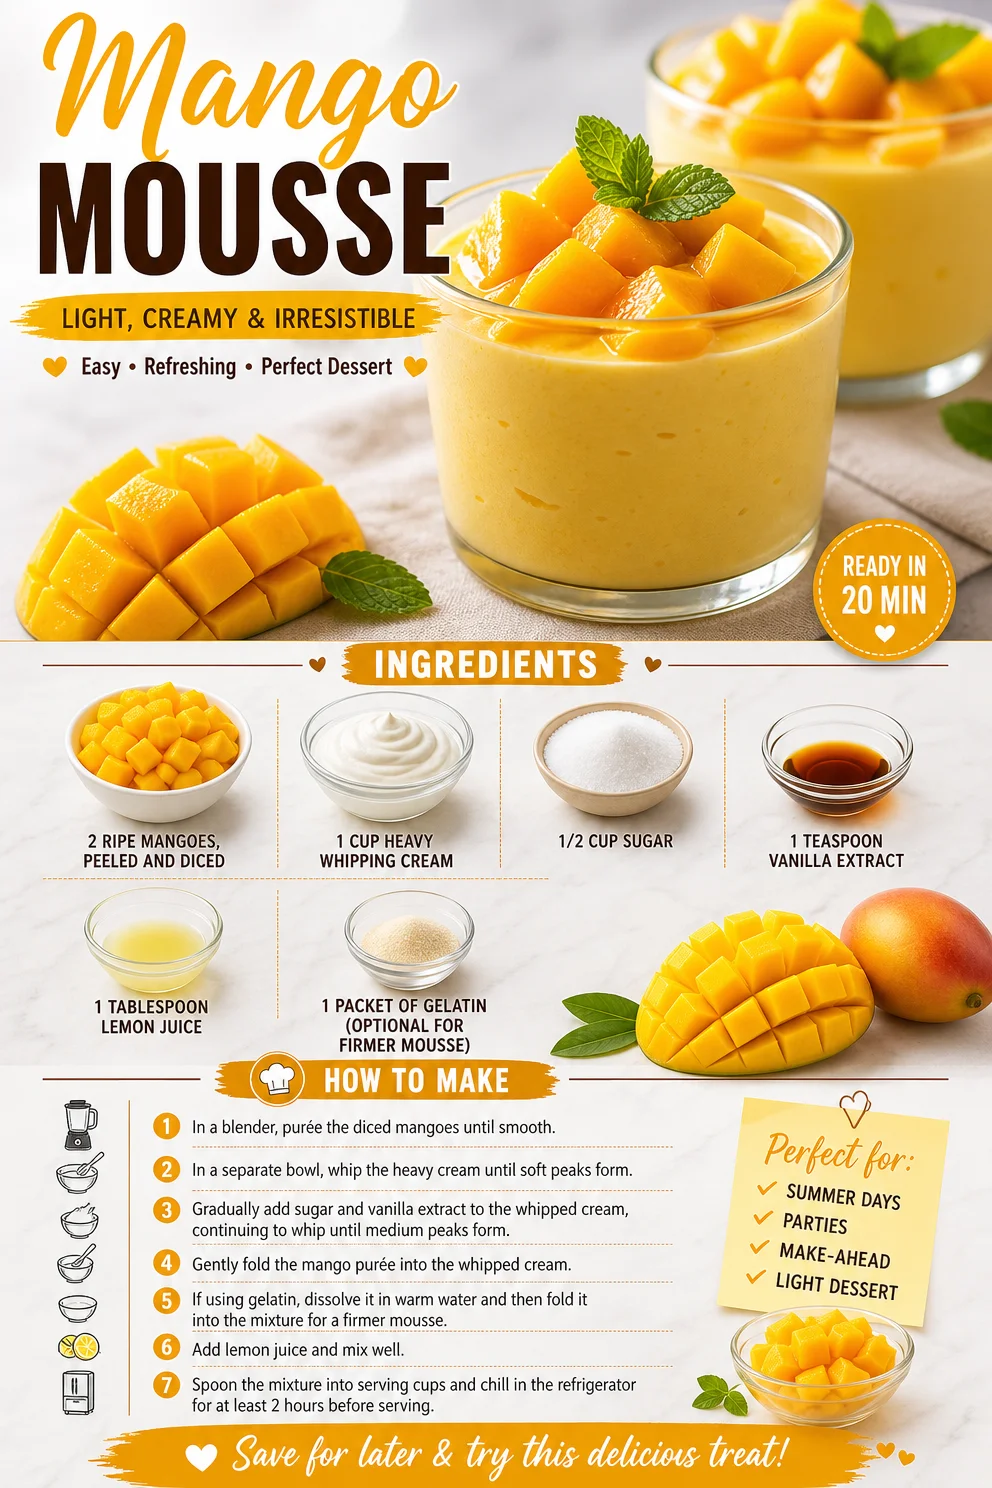
Mango Mousse
Whip Up Some Sunshine: The Magic of Mango Mousse
Ah, mango mousse—the dessert that whispers sweet nothings to your taste buds while wrapping you in a warm, tropical embrace. If you’ve ever dove into that first spoonful, experiencing the creamy yet fruity delight dancing on your palate, you’ll know exactly what I mean. It’s like summer vacation captured in a bite!
Today, I want to share a family-favorite recipe for mango mousse that not only brings the flavors of tropical goodness to your kitchen but also carries with it a cherished memory I hold dear. You see, cooking isn’t just about the ingredients or the fancy techniques; it’s about connection, creativity, and sharing love through food—something I’m excited to explore with you.
So, pull up a chair, grab your cooking utensils, and let’s dive into the world of mango mousse. It captures the essence of summer days spent with friends and family, where laughter mingles with the sweet aroma of mango and a hint of cream. Trust me; you’ll want to make this a regular in your dessert rotation!
A Bite of Nostalgia
Let me take you back to the sun-soaked afternoons of my childhood when my grandmother would whip up her famous mango mousse. Each summer, my cousins and I would gather at her house, our faces covered in sticky popsicle remnants from the fruit stands nearby. The air would be filled with the scents of ripe fruits, and laughter would echo in the kitchen as Grandma played the role of the mad scientist in her culinary lab.
The best part? We were her sous chefs! I can still picture it—mangoes piled high, a shiny silver bowl filled with whipped cream, and Grandma’s warm smile lighting up the room. She would tell us stories about her favorite mangoes as she diced them with the precision of a seasoned chef, and we’d eagerly await our turn to whip the cream. The anticipation grew as we churned our ingredients, knowing dessert was just a few whisking moments away.
When that fluffy, golden mousse hit the table, we were all in bliss. It felt like indulging in summer itself, vibrant and light. This recipe is my homage to those joyful summer days, bringing a touch of nostalgia and a whole lot of flavor to your kitchen.
Ingredients
To create this delightful mango mousse, you’ll need the following:
-
2 ripe mangoes, peeled and diced
Look for mangoes that yield slightly when pressed; that means they’re ready for the sweet dive into dessert! If mangos aren’t in season, you can substitute with frozen mango, just be sure to thaw and drain excess moisture. -
1 cup heavy whipping cream
This is the secret to a rich, velvety mousse. For a lighter version, you can swap in coconut cream or a plant-based alternative, though the texture will be slightly different. -
1/2 cup sugar
Adjust the sweetness to your taste! If you prefer a healthier option, you can use agave syrup or honey; keep in mind that liquid sweeteners may alter the mousse’s consistency slightly. -
1 teaspoon vanilla extract
Always opt for pure vanilla extract over imitation for an authentic flavor boost. The depth of the vanilla harmonizes beautifully with mango. -
1 tablespoon lemon juice
This not only enhances the mango flavor but also helps to keep the mousse from browning. Fresh lemon will give you the brightest taste, but bottled lemon juice works in a pinch. -
1 packet of gelatin (optional for firmer mousse)
If you want a more stable mousse perfect for beautiful plating, use this. For a plant-based option, try agar-agar but remember to adjust the cooking time according to the package instructions.
Step-by-Step Instructions
Now, let’s get our hands a little sticky and create that luscious mango mousse:
-
Prep the Mangoes
Start by peeling and dicing your fresh mangoes, which is arguably the most vital step! The riper, the better! Cut around the pit and chop the sweet flesh into cubes. If you’ve chosen frozen mango, just make sure it’s thoroughly thawed before proceeding. Place these glorious chunks into a blender. -
Blend Until Smooth
Blend the diced mangoes until the texture is silky—no lumps allowed! This should take about 30 seconds. If you’re feeling adventurous, toss in a sprinkle of cinnamon for an extra layer of flavor! -
Whip the Cream
In a separate bowl, use an electric mixer to whip the heavy cream until it forms soft peaks. Trust me, there’s something joyfully therapeutic about watching that cream transform before your eyes. Whip until it’s light and fluffy—don’t overdo it, or you’ll end up with buttery clumps. -
Combine with Sugar and Vanilla
Gradually add in the sugar and vanilla extract as you continue to whip the cream. The sweetness should complement the mango without overpowering it; it’s a delicate dance of flavors! -
Add the Lemon Juice
Once your cream is nice and whipped, add the lemon juice and proceed to gently fold in the mango puree. This step is key—use a spatula and fold the mixture rather than stirring. We want to keep that light, airy texture! -
Incorporate Gelatin (if using)
If you’re opting for that extra firmness with gelatin, dissolve a packet in a small amount of warm water according to the package instructions. Allow it to cool slightly before gently folding it into your mousse mixture. -
Chill the Mousse
Spoon your delightful mixture into serving glasses or a large bowl and let it chill in the refrigerator for at least 2–3 hours—this allows the flavors to meld beautifully while setting the texture. I find that the longer it chills, the better it gets! -
Serve and Enjoy
Once it’s set and chilled, take a moment to admire your masterpiece before serving. A little mango wedge or a sprig of mint on top gives it that chef-level finish!
Serving Suggestions
When it comes to plating, keep it simple and elegant. Present the mango mousse in clear glasses or bowls to showcase its beautiful, vibrant color. You can garnish with additional diced mango, a drizzle of honey, or even some crushed pistachios for that delicious crunch. If you’re feeling extra festive, a dollop of whipped cream on top with a sprinkle of lime zest can elevate your presentation and flavor profile even further.
Recipe Variations
Now let’s get a little creative! Here are a few fun twists to try with your mango mousse:
-
Coconut Mango Mousse: Swap half of the heavy cream with coconut cream for a tropical coconut flavor that pairs beautifully with mango.
-
Spicy Mango Mousse: Add a touch of cayenne pepper or finely chopped jalapeños for a sweet and spicy kick that tantalizes the senses.
-
Berry Fusion: Incorporate other fruits such as chopped strawberries or blueberries into the mousse for a mixed-berry delight that bursts in flavor.
-
Chocolate Drizzle: Top the mousse with melted dark chocolate for an indulgent dessert experience! It adds a rich contrast to the fruity flavors.
-
Tropical Twist: Mix in a bit of pineapple or passion fruit puree for an even fruitier flair that keeps the tropical vibes going strong!
Chef’s Notes
This mango mousse has been a staple on my dessert table for years, evolving as I explored different flavor profiles and techniques. I remember a time I accidentally whipped the cream too much, and instead of throwing it away, I folded some of it back into the mango puree, and voila! It was a happier accident that made me appreciate the beauty in imperfection in the kitchen.
Mangoes are versatile delights! I try to use the freshest ones at their peak ripeness, but even a can of good-quality mango puree can save the day now and then. Cooking is a journey of flavors, and I invite you to take the reins and make this mango mousse your own.
FAQs and Troubleshooting
1. My mousse didn’t set. What happened?
No worries! The most common culprits are under-whipping the cream or not letting the mousse chill long enough. If you used gelatin, ensure it was properly dissolved and incorporated.
2. Can I make this ahead of time?
Absolutely! This dessert is perfect for prepping a day in advance. Just cover it well and keep it in the fridge until you’re ready to serve.
3. How can I make this dairy-free?
Great question! You can swap the heavy cream for coconut cream or a dairy-free whipping cream. Just make sure the texture and flavor balance works for you.
4. What should I do if it’s too sweet?
If you find the mousse overly sweet, add a little more lemon juice to balance the sweetness. A touch of sea salt can also help bring all the flavors together!
Nutritional Info
(Optional based on preference and can be modified depending on specific nutritional needs.)
- Serving Size: 1 portion
- Calories: Approximately 150
- Fat: 10g
- Carbohydrates: 15g
- Protein: 2g
So there you have it, friends! A sunny, cheerful mango mousse recipe that brings back the essence of summer right into your home. I hope you feel inspired to whip this up for your next gathering or simply treat yourself to a taste of sunshine. Happy cooking!
PrintMango Mousse

A delightful mango mousse that captures the essence of summer with its creamy, tropical flavor.
- Prep Time: 15 minutes
- Cook Time: 0 minutes
- Total Time: 180 minutes
- Yield: 4 servings 1x
- Category: Dessert
- Method: No-Cook
- Cuisine: Tropical
- Diet: Vegetarian
Ingredients
- 2 ripe mangoes, peeled and diced
- 1 cup heavy whipping cream
- 1/2 cup sugar
- 1 teaspoon vanilla extract
- 1 tablespoon lemon juice
- 1 packet of gelatin (optional for firmer mousse)
Instructions
- Prep the mangoes by peeling and dicing them, then place them in a blender.
- Blend until smooth—about 30 seconds.
- Whip the cream in a separate bowl until soft peaks form.
- Combine the sugar and vanilla into the whipped cream.
- Add the lemon juice and gently fold in the mango puree.
- Incorporate gelatin if you’re using it, following package instructions.
- Chill the mousse in the refrigerator for at least 2–3 hours.
- Serve and enjoy with garnishes like mango wedges or mint.
Notes
Feel free to customize your mousse with toppings or mix-ins like coconut, berries, or chocolate.
Nutrition
- Serving Size: 1 serving
- Calories: 150
- Sugar: 15g
- Sodium: 30mg
- Fat: 10g
- Saturated Fat: 6g
- Unsaturated Fat: 4g
- Trans Fat: 0g
- Carbohydrates: 15g
- Fiber: 1g
- Protein: 2g
- Cholesterol: 30mg
Keywords: mango mousse, dessert, tropical dessert, summer recipe, easy dessert
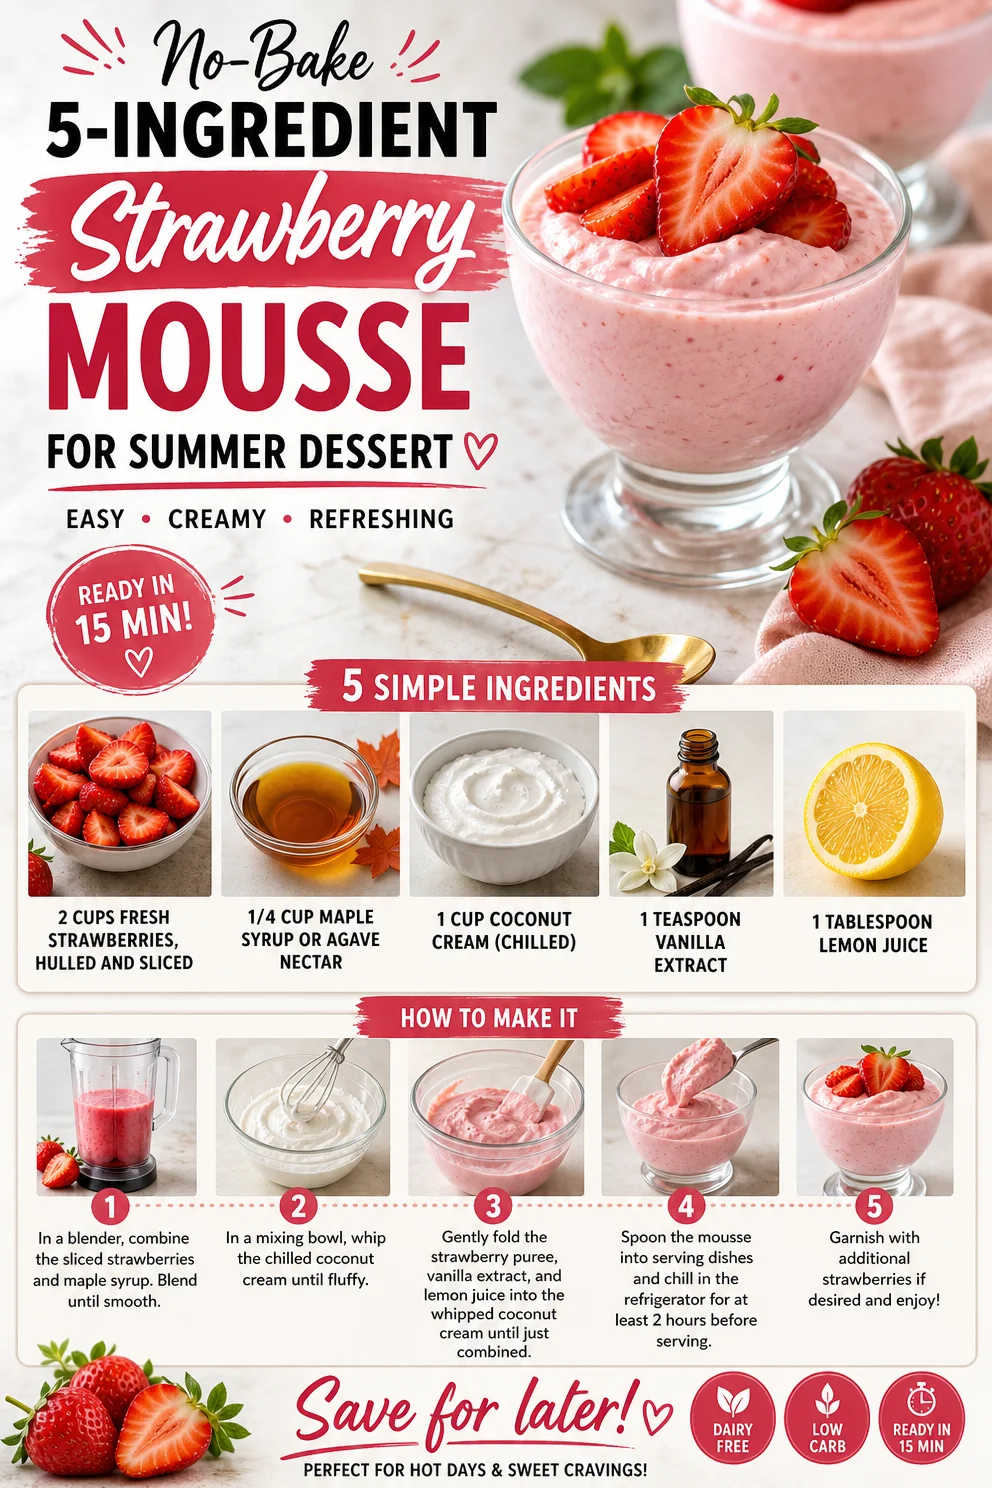
No-Bake 5-Ingredient Strawberry Mousse for Summer Dessert
Indulge in Freshness: A Delightful Strawberry Mousse
Welcome, fellow food lovers! Today, I’m shimmying into your kitchen to share one of my all-time favorite recipes—Strawberry Mousse. This light and fluffy dessert is as vibrant as a summer day and will have your taste buds dancing with delight. I mean, who doesn’t love the combination of creamy, dreamy textures mingling with the sweet-tartness of fresh strawberries? Trust me; this is a dessert that will make you feel like a culinary rockstar, even if you’re just starting out in the kitchen.
The beauty of Strawberry Mousse lies in its simplicity. With just a few wholesome ingredients, we can create a dish that feels indulgent yet remains guilt-free. Plus, it’s versatile enough to suit any occasion—from casual family dinners to fancy gatherings. It’s time to roll up those sleeves, grab your favorite apron, and let’s create a dessert that will be the star of the show.
A Sweet Childhood Memory
Before we dive into the how-to, let me whisk you away to my childhood for a moment. I grew up in a household that absolutely celebrated food. Some of my fondest memories revolve around summer afternoons spent in my grandmother’s sun-kissed garden, where strawberries grew in abundance. We’d pluck those ruby-red jewels right off the vine, their sweetness bursting in our mouths.
One day, my grandmother introduced me to her secret recipe for Strawberry Mousse. As we whipped the creamy mixture together, she shared stories from her childhood, her laughter mixing with the sounds of the mixer whirring. We indulged in cherry-red bowls of mousse on the porch, while the sun set behind us, painting the sky with hues of orange and pink.
Those moments instilled in me a love for cooking and sharing food. This Strawberry Mousse is my way of honoring those sun-drenched days filled with sweetness, laughter, and love. So, grab your strawberries, and let’s whip up some delicious memories of our own!
Ingredients
Here’s what you’ll need to create this delightful Strawberry Mousse:
-
2 cups fresh strawberries, hulled and sliced
The star ingredient! Choose ripe strawberries for the best flavor. If strawberries aren’t in season, feel free to substitute with frozen berries—just ensure they’re thawed and well-drained. -
1/4 cup maple syrup or agave nectar
A natural sweetener that adds richness! If you want to cut down on sweetness, feel free to adjust the amount. Honey can be used here too, just remember that it may change the flavor slightly. -
1 cup coconut cream (chilled)
This gives our mousse its luxurious, creamy texture. Chill your coconut cream overnight for the best results. Want a nut-free option? Try Greek yogurt instead. -
1 teaspoon vanilla extract
A splash of vanilla adds depth! Go for pure vanilla extract if you can; it makes all the difference in flavor. -
1 tablespoon lemon juice
Lemon juice brightens the flavors and balances the sweetness. If you don’t have fresh lemons, bottled lemon juice can work in a pinch.
Step-by-Step Instructions
Now that our ingredients are ready, let’s get into the nitty-gritty of creating this mousse! Follow these steps to ensure success:
-
Prepare Your Strawberries
Start by hulling and slicing your strawberries. A quick tip: use the tip of a paring knife to remove the green tops efficiently. Set aside a few lovely slices for garnishing later! -
Blend the Strawberries
Toss your sliced strawberries into a blender or food processor. Blend until smooth. You want it velvety! If you prefer textured mousse, pulse a few times to leave some tiny chunks. -
Sweeten It Up
Add the maple syrup (or your chosen sweetener) to the strawberry puree. Blend again until combined. Taste at this stage; adjust sweetness as needed! You can even add a tiny pinch of salt to enhance those sweet notes. -
Whip the Coconut Cream
In a separate bowl, beat your chilled coconut cream. Use an electric mixer on medium speed; you want it fluffy and light. It should take about 3-4 minutes. If it’s too stiff, you can add a splash of non-dairy milk to help it along. -
Combine the Mixtures
Gently fold the strawberry puree into the whipped coconut cream until well combined. Be careful not to deflate the cream too much; we want that airy texture to remain! This is where the magic happens. -
Add Vanilla and Lemon Juice
Now, add your teaspoon of vanilla extract and tablespoon of lemon juice. Fold it gently until everything is mixed in. The mousse should look pretty and light, with a beautiful pink color. -
Chill to Perfection
Spoon the mousse into your favorite serving dishes or glasses. Cover them with plastic wrap or a lid and chill in the fridge for at least an hour. This step is crucial to help the flavors meld and ensure it’s cool when served.
Serving Suggestions
Once your mousse has chilled, it’s time to serve! You can ladle it into elegant glasses for a fancy dinner party or into simple bowls for a cozy night-in. Garnish with those reserved strawberry slices, a dollop of coconut cream, or even a sprig of fresh mint for an extra pop of freshness. If you’re feeling adventurous, drizzle a little chocolate sauce over the top—this mousse is all about creative expression, after all!
Recipe Variations
Now, let’s jazz up this recipe with some fun twists, shall we? Here are a few ideas to keep things exciting:
-
Berry Medley Mousse: Blend in a mix of berries—think blueberries, raspberries, or blackberries. The colors and flavors will make your mousse appealing and delicious!
-
Chocolate-Covered Strawberry Mousse: Add 2 tablespoons of cocoa powder to the strawberry mixture for a decadent chocolate flavor that pairs beautifully with strawberries.
-
Citrus Burst: Replace lemon juice with lime or orange juice for a zesty twist on this classic dessert.
-
Herb-Infused: Add fresh mint or basil to the blender with the strawberries for a refreshing herbal note.
-
Nutty Mousse: Incorporate a tablespoon of almond extract along with the vanilla for a subtle nuttiness that complements the strawberries.
Chef’s Notes
This Strawberry Mousse is a canvas for creativity! I often swap ingredients based on what’s in my fridge or pantry—there’s no right or wrong way here. And if you happen to over-whip your coconut cream (guilty!), fear not! Simply add a tad more coconut cream to soften it back up.
I also learned in my kitchen adventures that a bit of patience goes a long way. Letting the mousse chill for a bit helps solidify the lovely fluffy texture. Plus, it allows the flavors to sing in harmony. So don’t rush it; good things take time—especially sweet, creamy things!
FAQs and Troubleshooting
-
Why is my mousse not thickening?
If your mousse isn’t thickening, ensure that your coconut cream is chilled properly before whipping. If you used regular cream, it may require more whipping. -
Can I make this ahead of time?
Absolutely! Strawberry Mousse can be made a day ahead, just keep it stored in the refrigerator. It’s a great make-ahead dessert. -
How long will the mousse last?
Stored in an airtight container in the refrigerator, this mousse will stay fresh for about 2-3 days. -
What if I want to make this recipe vegan?
The recipe is already vegan-friendly, thanks to the coconut cream and maple syrup. Just double-check that all your ingredients align with vegan diets.
Nutritional Info
Each serving of Strawberry Mousse contains approximately:
- Calories: 180
- Fat: 11g
- Carbohydrates: 20g
- Protein: 2g
- Fiber: 2g
And there you have it! A delightful Strawberry Mousse that’s fresh, delicious, and sure to impress. This dessert not only brings back beautiful memories but also creates new ones with every spoonful! Remember, the kitchen is your playground; experiment, enjoy, and most importantly, savor every bite. Happy cooking!
PrintStrawberry Mousse

A light and fluffy strawberry mousse that combines creamy textures with the sweet-tartness of fresh strawberries.
- Prep Time: 15 minutes
- Cook Time: 0 minutes
- Total Time: 60 minutes
- Yield: 4 servings 1x
- Category: Dessert
- Method: No-Cook
- Cuisine: International
- Diet: Vegan
Ingredients
- 2 cups fresh strawberries, hulled and sliced
- 1/4 cup maple syrup or agave nectar
- 1 cup coconut cream (chilled)
- 1 teaspoon vanilla extract
- 1 tablespoon lemon juice
Instructions
- Prepare your strawberries by hulling and slicing them. Set aside a few slices for garnishing later.
- Blend the sliced strawberries in a blender until smooth.
- Sweeten the strawberry puree by adding maple syrup and blending again. Adjust sweetness as needed.
- Whip the chilled coconut cream in a separate bowl until fluffy, about 3-4 minutes.
- Combine the strawberry puree with the whipped coconut cream, folding gently.
- Add the vanilla extract and lemon juice, folding until well mixed.
- Chill the mousse in serving dishes for at least an hour before serving.
Notes
You can garnish with additional strawberry slices or a dollop of coconut cream. This mousse can be made ahead of time and stored in the fridge for 2-3 days.
Nutrition
- Serving Size: 1 serving
- Calories: 180
- Sugar: 14g
- Sodium: 5mg
- Fat: 11g
- Saturated Fat: 10g
- Unsaturated Fat: 1g
- Trans Fat: 0g
- Carbohydrates: 20g
- Fiber: 2g
- Protein: 2g
- Cholesterol: 0mg
Keywords: strawberry mousse, dessert, vegan dessert, easy dessert, summer recipes
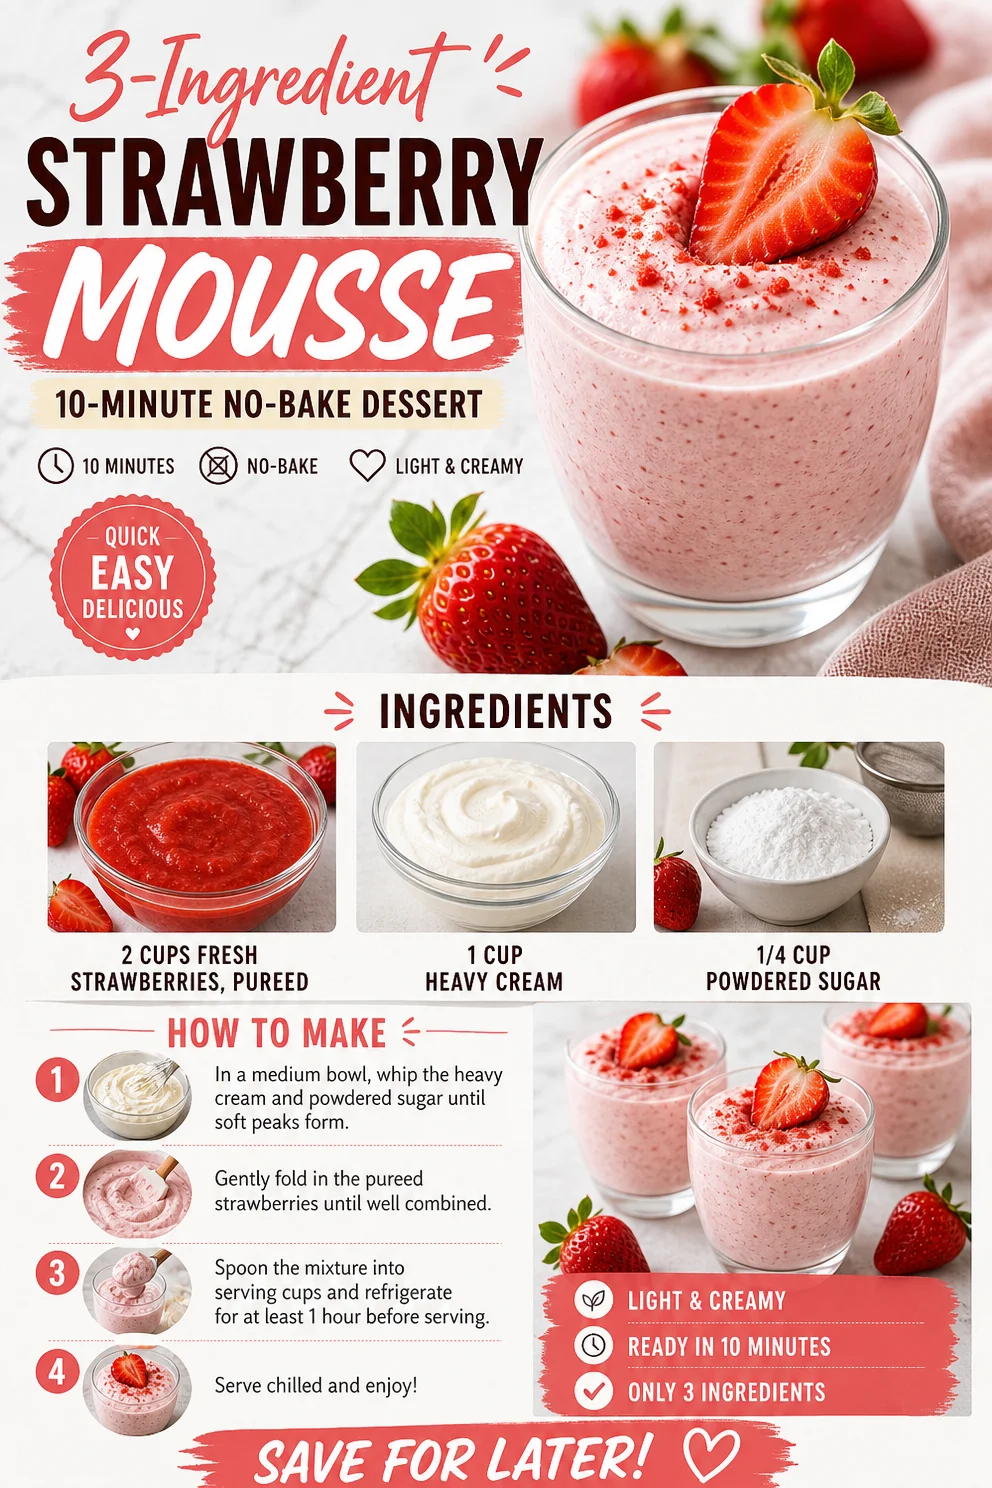
Ingredient Strawberry Mousse: 10-Minute No-Bake Dessert
The Ultimate 3-Ingredient Strawberry Mousse: Your New Favorite Dessert!
Welcome to Clean Plate Cravings! If you have a sweet tooth and a love for fresh ingredients, buckle up—you’re about to dive into the world of glorious, creamy strawberry mousse. Trust me, this isn’t just any old dessert. This is a silky, dreamy, and oh-so-simple treat crafted with just three ingredients that will have your taste buds dancing in delight. And here’s the best part: it’s as easy to whip up as it is delicious!
A Love Affair with Strawberries
Let’s take a moment to chat about strawberries. There’s something magical about them, isn’t there? I still remember the first time I plucked a ripe strawberry straight from the vine on my grandmother’s farm. I was probably eight years old, and that burst of sweetness lingered in my mind long after the sun set. My grandma would toss those fresh berries into delectable desserts, but my favorite was her strawberry mousse—made with just a few simple ingredients, of course, still using that secret that I recently rediscovered: simplicity is key.
Now, every time I make this mousse, it reminds me of those sunny afternoons spent picking strawberries and blending flavors in a way that’s both fun and nourishing. This dessert celebrates that nostalgic joy while also fitting seamlessly into our modern lives. No need to fuss over complicated techniques or hard-to-find ingredients; with just two cups of fresh strawberries, one cup of heavy cream, and a bit of powdered sugar, you’ll have a show-stopping dessert ready in no time!
Ingredients
Let’s get down to business! Here’s what you’ll need for this blissful three-ingredient strawberry mousse:
-
2 cups fresh strawberries, pureed
Fresh strawberries are the star of our show! Choose ripe, sweet berries for the best flavor. If strawberries aren’t in season, you can use frozen strawberries—just thaw and drain them before pureeing. -
1 cup heavy cream
This is what’s going to give our mousse that rich, creamy texture. Want to lighten it up? You can substitute half of the heavy cream with Greek yogurt for a slightly tangy flavor and fewer calories. -
1/4 cup powdered sugar
Sugar is essential to sweeten up that luscious cream and balanced flavors. If you’re avoiding sugar, feel free to use a sugar substitute like monk fruit or erythritol to keep things sweet without the guilt.
Step-by-Step Instructions
Ready to create some magic in your kitchen? Let’s get to it! Follow these easy steps for a delightful dessert that will have you reminiscing about those farm days.
-
Prep Your Strawberries
Rinse your strawberries thoroughly under cold water to remove any dirt. Remove the green tops and hull the strawberries. Now, slice them in half to make them easier to puree. This little extra step helps to get a smoother blend! -
Puree the Strawberries
Transfer those beautifully hulled berries into a blender or food processor. Blend until smooth! You want a luscious puree that’s bright red and slightly chunky. If you prefer a more refined texture, you can strain the puree through a fine mesh sieve to remove any seeds, but that’s totally up to you! -
Whip the Heavy Cream
In a mixing bowl, pour in your heavy cream. Using an electric mixer or whisk (a little muscle never hurt!), whip the cream until soft peaks form. This step is crucial—it creates that airy texture that makes mousse so dreamily light! Just be careful not to over-whip, or you’ll end up with butter instead of a smooth cream. -
Add Powdered Sugar and Strawberry Puree
Sprinkle the powdered sugar into the whipped cream and gently fold it in using a spatula. This helps sweeten the cream without losing its fluffiness. Once incorporated, add in your strawberry puree. Fold it gently until just combined; you want to maintain that airy texture while combining flavors. -
Chill and Set
Transfer your mousse into serving dishes or a large bowl and cover with plastic wrap. Pop it in the refrigerator for at least 1-2 hours. This chill time allows the flavors to meld together beautifully and for the mousse to set.
Voilà! Your 3-ingredient strawberry mousse is all set. Now, this is where the waiting game begins, and I know it’s hard to resist digging in right away! But trust me, the time spent chilling is worth it for that decadent taste.
Serving Suggestions
Serving this mousse is as delightful as eating it! For that extra special touch, use a piping bag to dollop the mousse into your favorite dessert cups or glasses. A sprinkle of fresh strawberry slices on top and a mint leaf or two will elevate the presentation. Want to go all out? Add a drizzle of dark chocolate sauce or a sprinkle of graham cracker crumbs for contrast—your guests will be impressed!
Recipe Variations
Now that you’ve mastered the classic strawberry mousse, let me share some fun ways to switch it up:
-
Chocolate Strawberry Mousse: Add two tablespoons of cocoa powder to the whipped cream before folding in the strawberry puree. It’s a decadent twist that chocolate lovers will adore!
-
Coconut Strawberry Mousse: Replace the heavy cream with coconut cream for a tropical vibe. You’ll be transported to a beach paradise with every bite!
-
Berry Medley Mousse: Swap some of the strawberries for other berries like raspberries or blueberries. It’s a refreshing burst of flavors—feel free to mix and match!
-
Lemon Zest Surprise: Add a teaspoon of lemon zest to the strawberry puree for a zesty twist that will brighten up the flavors.
Chef’s Notes
This recipe holds a special place in my heart not only because of the flavors but because of the ease it offers! I remember once bringing this mousse to a friend’s picnic, and everyone was in disbelief when I revealed how simple it was to make. It’s amazing how a few ingredients can create something so luxurious.
Over the years, I’ve adjusted this recipe to fit my pantry needs—like substituting Greek yogurt for heavy cream when I’m feeling extra health-conscious. It’s been a life-saver for those last-minute dessert craves when I want to impress guests but don’t have hours to spend in the kitchen.
FAQs and Troubleshooting
1. Can I use frozen strawberries?
Absolutely! Just remember to thaw and drain them well before pureeing to keep the mousse from getting too watery.
2. Can I make this ahead of time?
Yes, you can! This mousse stores beautifully in the refrigerator for up to 3 days. Just keep it covered to maintain freshness.
3. What if my mousse isn’t thick enough?
Make sure you’re whipping the cream to soft peaks before incorporating it with the puree. If it doesn’t look thick enough after chilling, gently fold in some more whipped cream to lighten it up.
4. How can I make this dairy-free?
Substituting heavy cream with coconut cream works wonders! Just chill a can of coconut milk overnight and scoop out the solid cream for this recipe.
Nutritional Info
While exact nutritional values can vary based on your ingredient choices, here’s a quick overview of what you can expect per serving (based on 8 servings):
- Calories: 140
- Carbohydrates: 15g
- Protein: 2g
- Fat: 8g
Feel free to adjust and tweak as needed to suit your dietary preferences.
And there you have it! A simple, yet utterly delightful 3-ingredient strawberry mousse that brings both joy and sweetness into your kitchen. Whether you’re treating yourself after a long day, hosting friends, or looking to impress during a special occasion, this dessert is sure to make any gathering a success. So grab those strawberries, and let’s create something delicious together! Happy cooking!
PrintUltimate 3-Ingredient Strawberry Mousse
A silky, dreamy dessert made with just three ingredients: fresh strawberries, heavy cream, and powdered sugar.
- Prep Time: 15 minutes
- Cook Time: 0 minutes
- Total Time: 120 minutes
- Yield: 8 servings 1x
- Category: Dessert
- Method: No Bake
- Cuisine: American
- Diet: Vegetarian
Ingredients
- 2 cups fresh strawberries, pureed
- 1 cup heavy cream
- 1/4 cup powdered sugar
Instructions
- Prep your strawberries by rinsing and hulling them.
- Puree the strawberries in a blender until smooth.
- Whip the heavy cream until soft peaks form.
- Add powdered sugar to the whipped cream and fold in.
- Chill the mousse in the refrigerator for at least 1-2 hours.
Notes
For a lighter version, substitute half the heavy cream with Greek yogurt. This mousse can also be made ahead of time and stored in the refrigerator for up to 3 days.
Nutrition
- Serving Size: 1 serving
- Calories: 140
- Sugar: 10g
- Sodium: 50mg
- Fat: 8g
- Saturated Fat: 5g
- Unsaturated Fat: 3g
- Trans Fat: 0g
- Carbohydrates: 15g
- Fiber: 1g
- Protein: 2g
- Cholesterol: 30mg
Keywords: strawberry mousse, easy dessert, 3-ingredient dessert
No-Bake Coconut Mango Bliss Balls: Quick, Healthy Treats
Coconut Mango Bliss Balls: A Sweet Escape to Paradise
Welcome to the sunny side of life! If you’re someone who has ever dreamt of being whisked away to a tropical paradise, you’re in for a delightful treat. Today, we’re diving into a recipe that brings the beach to your kitchen: Coconut Mango Bliss Balls. These little bites of joy are not only a beautiful combination of flavors but also carry a touch of nostalgia that makes cooking all the more exciting.
Introduction
I can still remember standing in my grandmother’s kitchen when I was a kid, the warm sun spilling through the windows as she whipped up one of her famous treats. There was something magical about how a few simple ingredients could transform into something so delicious. One particular recipe that always stood out was her tropical coconut and mango concoction. She would often make these blissful little bites during family gatherings, and I’d watch her create these mouthwatering goodies, a twinkle of joy in her eyes.
Now, fast-forward to today, and I’m thrilled to share an evolved version of those cherished treats with you! Coconut Mango Bliss Balls are not just your average snack; they embody everything I love about food: bright flavors, ease of preparation, and the power to transport you to a blissful place with one delightful bite.
These bliss balls are perfect for an afternoon snack, a healthy dessert, or even as a fun addition to your meal prep routine. Plus, they’re super customizable—healthy eating should bring joy, not restrictions! So, puff out your chest, grab that apron, and let’s turn your kitchen into a tropical retreat!
Personal Story
Every time I roll these Coconut Mango Bliss Balls, I’m greeted by a wave of nostalgia. It reminds me of my first trip to the beach with my family. As kids, my siblings and I raced across the warm, golden sand, chasing after the crashing waves while our parents lounged nearby, sipping on tropical drinks. My grandmother had prepared a cooler packed with snacks, including her famous coconut and mango goodies.
There’s a vivid memory of biting into those bliss balls as I sat on the sand, the salty breeze brushing against my face, while the sheer sweetness of the coconut and mango danced on my tongue. It felt like encapsulating summer in one delicious bite! It’s not just about the taste but the memories and the experiences we share around food. That’s why I adore creating and sharing recipes—because every meal has the potential to create a fond memory.
Ingredients
Let’s gather our ingredients and start this delicious journey! Here’s what you’ll need:
-
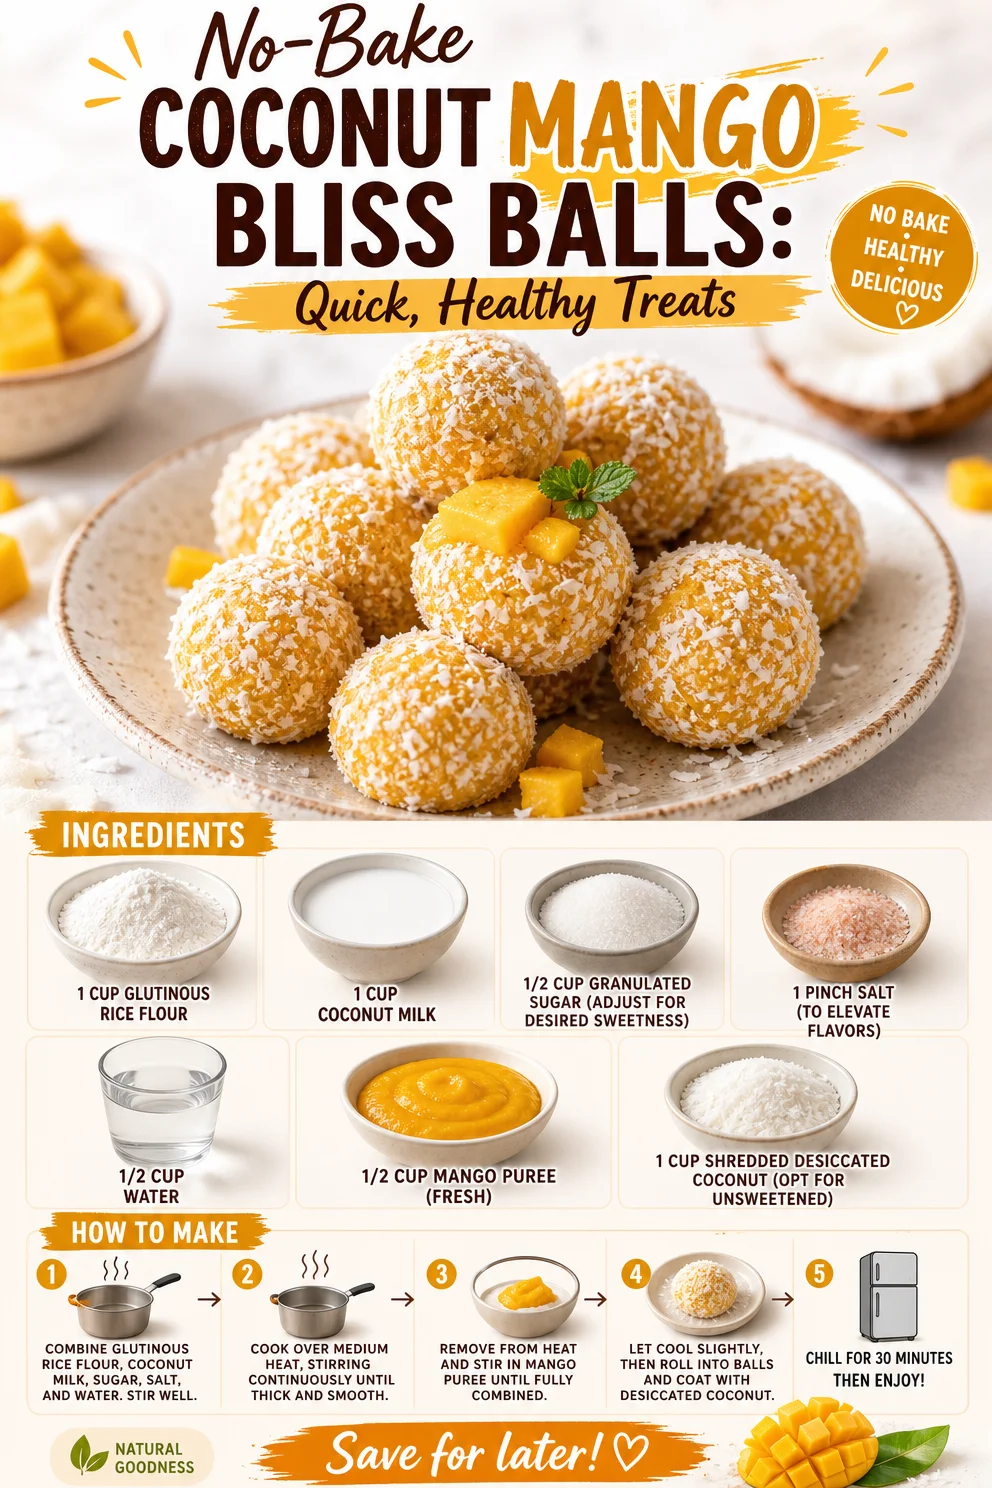
1 cup glutinous rice flour
This flour gives our bliss balls a chewy texture. If you can’t find glutinous rice flour, feel free to use regular rice flour, but the texture might be slightly different. -
1 cup coconut milk
Creamy and rich, coconut milk lends a lusciousness to our mixture. For a lighter option, you can substitute with coconut almond milk or even oat milk. -
1/2 cup granulated sugar
Adjust the sweetness to your liking! You may want to swap it for coconut sugar or even a natural sweetener like maple syrup for a less refined option. -
1 pinch salt
Just a sprinkle to enhance all those fabulous flavors; trust me, you won’t regret it! -
1/2 cup water
This helps bring the mixture together and dissolve the sugar. It’s your liquid magic. -
1/2 cup mango puree (fresh)
Use ripe, juicy mangoes for the best flavor! If fresh mango isn’t available, consider using thawed frozen mango, or even store-bought puree. -
1 cup shredded desiccated coconut (unsweetened)
This adds texture and a delightful coconutty flavor to our bliss balls. Unsweetened coconut is preferred to keep things healthy without adding refined sugars.
Step-by-Step Instructions
Alright, let’s get cooking! These bliss balls are not only simple to make but ridiculously fun to prepare. Here’s how to whip them up:
-
Combine Dry Ingredients
In a large mixing bowl, combine the glutinous rice flour and salt. Give it a gentle whisk to mix them well; think of it as giving your rice flour a spa day! -
Mix Wet Ingredients
In a separate bowl, whisk together the coconut milk, water, and granulated sugar. Stir until the sugar is dissolved. This is where the magic begins! -
Combine and Form the Dough
Gradually add the wet mixture to the dry ingredients. Use a spatula or your hands to combine everything until you form a cohesive dough. It should be slightly sticky but manageable. Don’t be afraid to get your hands dirty! -
Add Mango Puree
Gently fold in the mango puree. This is where the flavor explosion occurs! The aroma of ripe mango will whisk you away to a tropical paradise even before you take a bite. -
Shape the Bliss Balls
Use your hands to form small balls, about the size of a tablespoon. Roll them between your palms until they’re nice and smooth. If you need a little extra coconut coating on the outside, feel free to roll them in shredded desiccated coconut for an extra touch of tropical bliss! -
Chill and Set
Place your bliss balls on a plate lined with parchment paper and refrigerate for about 30 minutes. This will help them firm up. While they chill, you can clean up the kitchen (or sneak a taste of the leftover dough—no judgment here!).
Serving Suggestions
These Coconut Mango Bliss Balls delight the senses, not just in taste but also in presentation. Serve them on a vibrant platter, perhaps surrounded by fresh mango slices or sprinkled with extra shredded coconut for a fun, tropical vibe! Add a sprig of mint for a pop of color, and you’ve got yourself a stunning treat that’s just as pleasing to the eyes as it is to the taste buds.
Recipe Variations
Let’s get creative! Here are a few ideas to switch things up:
-
Chocolate Coconut Bliss Balls: Add 1-2 tablespoons of cocoa powder to the dry ingredients for a chocolatey twist. You can also drizzle melted dark chocolate over the finished balls for a decadent treat.
-
Protein-Packed Version: Incorporate a scoop of your favorite protein powder to boost nutrition!
-
Tropical Fruit Fusion: Mix in diced pineapple or a splash of lime juice for an extra zing!
-
Nutty Addition: Fold in some crushed cashews or almonds into the mixture for added crunch.
-
Vegan Swaps: Ensure all ingredients are labeled vegan, swapping granulated sugar for coconut sugar or maple syrup to keep it plant-based.
Chef’s Notes
As with any recipe, feel free to adapt it to your taste. When I first started making these bliss balls, I accidentally added too much coconut milk and turned them into a delectable coconut-mango pudding instead! Not everything has to come out perfectly—to me, that’s the essence of home cooking. So if you find yourself in a sticky situation (pun intended!), don’t be afraid to play around.
These bliss balls have also evolved beyond just a sweet treat; they’re now a staple in my meal prep rotation, enjoyed on busy days when I need a quick fuel-up. They quickly went from being a summer treat to a year-round favorite, embodying the goal of Clean Plate Cravings: keeping food exciting and adaptable!
FAQs and Troubleshooting
How do I store Coconut Mango Bliss Balls?
Keep them in an airtight container in the fridge for up to a week. You can also freeze them for up to a month; just thaw when you’re ready to enjoy!
The dough is too sticky; what should I do?
If your dough feels overly sticky, simply sprinkle in a bit more glutinous rice flour, a tablespoon at a time, until you can easily roll them into balls.
Can I use fresh mango instead of puree?
You can! Just blend fresh mango until smooth, or finely chop it and fold it into the mixture for a chunkier texture.
What if I want a sweeter bite?
Feel free to increase the sugar to 3/4 cup or replace it with a sweeter fruit puree, like banana or apple sauce for added flavor without the extra sugar!
Nutritional Info (Optional)
These bliss balls are not just delectable—they also pack a nutritional punch! Each serving contains healthy fats from the coconut, natural sugars from mango, and fiber from the rice flour. With mindful portioning, they make for an energizing snack that keeps you feeling fulfilled.
There you have it! Your sweet escape to paradise in the form of Coconut Mango Bliss Balls. I hope you enjoy making them as much as I love sharing this recipe with you. Remember, the kitchen is a place for joy, creativity, and delicious experimentation. Happy cooking!
PrintCoconut Mango Bliss Balls

Delightful tropical treats made with coconut and mango, perfect for snacking or as a healthy dessert.
- Prep Time: 15 minutes
- Cook Time: 0 minutes
- Total Time: 45 minutes
- Yield: 20 servings 1x
- Category: Snack
- Method: No-Cook
- Cuisine: Tropical
- Diet: Vegan
Ingredients
- 1 cup glutinous rice flour
- 1 cup coconut milk
- 1/2 cup granulated sugar
- 1 pinch salt
- 1/2 cup water
- 1/2 cup mango puree (fresh)
- 1 cup shredded desiccated coconut (unsweetened)
Instructions
- Combine Dry Ingredients: In a large mixing bowl, combine the glutinous rice flour and salt. Give it a gentle whisk to mix them well.
- Mix Wet Ingredients: In a separate bowl, whisk together the coconut milk, water, and granulated sugar until the sugar is dissolved.
- Combine and Form the Dough: Gradually add the wet mixture to the dry ingredients, mixing with a spatula or your hands to form a cohesive dough.
- Add Mango Puree: Gently fold in the mango puree until well incorporated.
- Shape the Bliss Balls: Use your hands to form small balls, about the size of a tablespoon.
- Chill and Set: Place the bliss balls on a plate lined with parchment paper and refrigerate for about 30 minutes.
Notes
Feel free to customize with chocolate, nuts, or additional fruits for a variety of flavors.
Nutrition
- Serving Size: 1 ball
- Calories: 120
- Sugar: 6g
- Sodium: 5mg
- Fat: 6g
- Saturated Fat: 5g
- Unsaturated Fat: 1g
- Trans Fat: 0g
- Carbohydrates: 15g
- Fiber: 1g
- Protein: 2g
- Cholesterol: 0mg
Keywords: Coconut, Mango, Bliss Balls, Healthy Snacks, Vegan Dessert
Beginner-Friendly Strawberry Chocolate Shell Cake to Impress
Indulgent Strawberry Chocolate Shell Cake That Wows Every Time
Introduction
Hey there, fellow foodies! Today, I am super excited to share a recipe that is not only a feast for the eyes but also a taste sensation that will make your heart skip a beat—my Indulgent Strawberry Chocolate Shell Cake! If you’re anything like me, you know that certain desserts take you back to sweet memories and sun-soaked moments. This cake, with its rich chocolate layers and a glossy strawberry chocolate shell, is nothing short of a celebration on a plate.
Picture this: it’s a sunny afternoon, and I’m in my grandma’s kitchen, surrounded by the warm aroma of baking cakes and hearty laughter. Grandma is mixing that velvety chocolate cake batter while I’m sneaking glances at the delicious strawberries she’s washed, ready to create something magical. That fond memory has inspired this very recipe, a little nod to my childhood and a reminder that food is not just about sustenance—it’s intertwined with love, nostalgia, and the joy of sharing.
This cake is perfect for birthdays, anniversaries, or simply when you want to indulge in something that feels fancy yet approachable. Trust me when I say, your friends and family will be wowed just by the presentation! Not only is it gorgeous, but it’s also surprisingly easy to whip up. So let’s roll up our sleeves and get cooking!
Personal Story
I remember the first time I attempted to make this cake; I was maybe around 12 years old, and there was an epic family gathering on the horizon. I wanted to create something that would impress everyone—and to be honest, I just wanted an excuse to eat all the chocolate and strawberries in the house! With my grandma’s guidance by my side, we transformed a simple recipe into a masterpiece that had everyone raving about my baking skills.
As we pulled the cake from the oven, the warm, chocolatey aroma enveloped the kitchen, and the little kid in me couldn’t wait to dive in. We layered it high, topped it with fresh strawberries, and finished off with that glorious glossy strawberry chocolate shell. The smiles on my family’s faces as they took their first bites were worth all the flour dust and the moments of chaos! That day, I learned that cooking is about connection—sharing recipes and memories simultaneously—an experience I cherish to this day.
Ingredients
Here’s what you’ll need to create this irresistible cake:
-
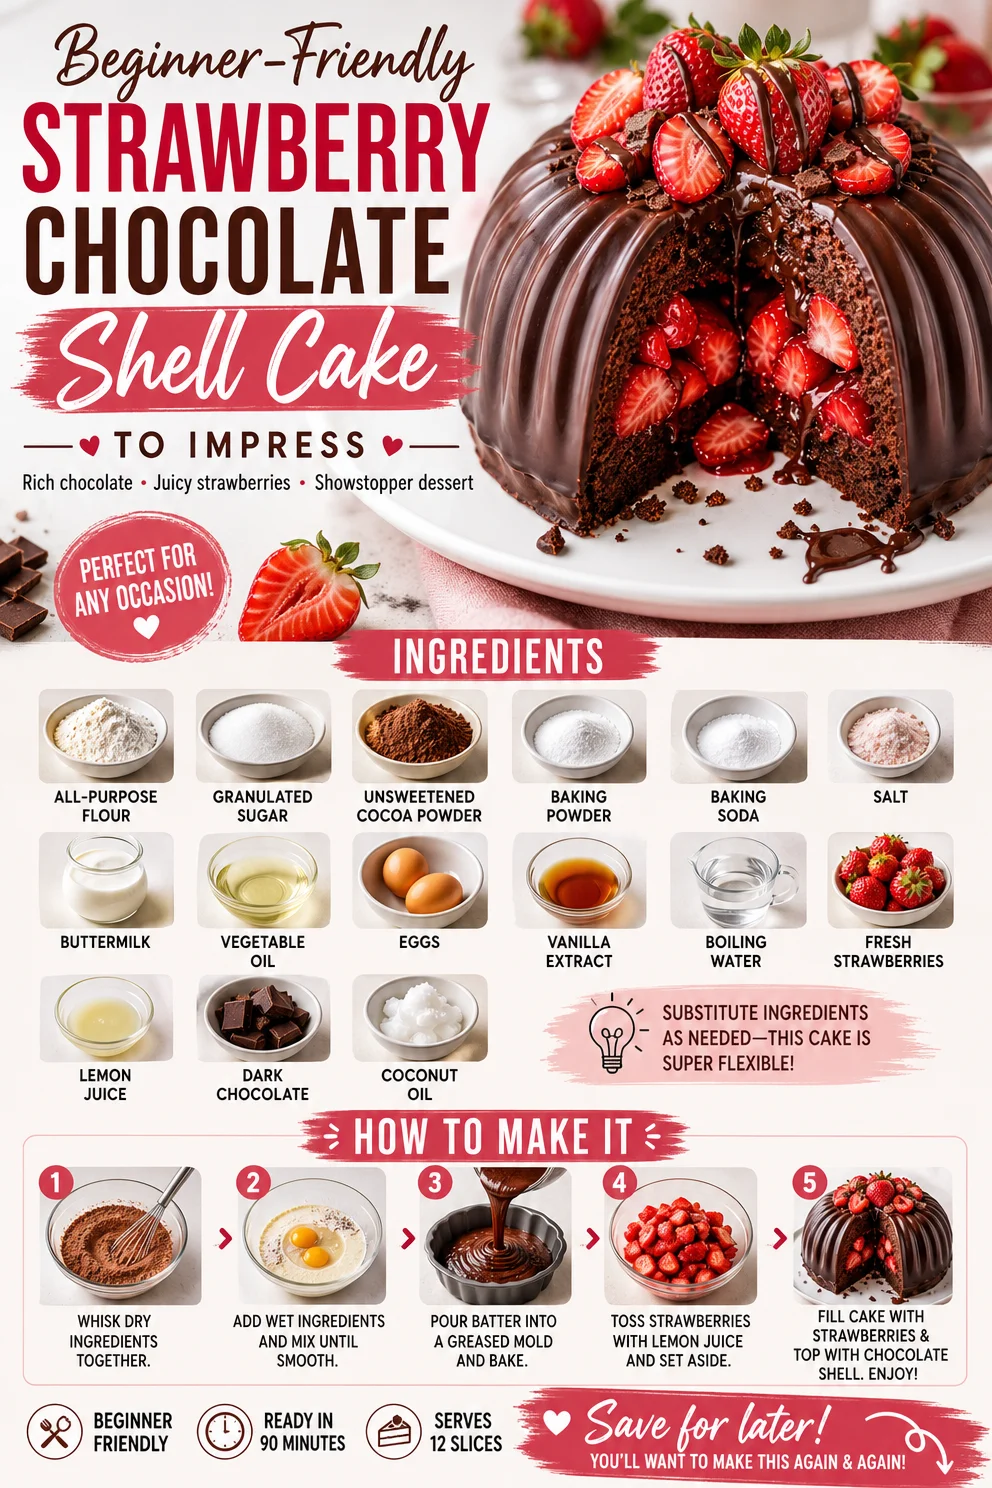
2 cups All-Purpose Flour
Perfectly versatile! If you’re looking for a gluten-free option, you can substitute it with a gluten-free flour blend. -
2 cups Granulated Sugar
This brings sweetness to the cake. You can also use brown sugar for added flavor and a slight molasses kick! -
3/4 cup Unsweetened Cocoa Powder
Choose Dutch-process cocoa for a smoother, richer chocolate flavor. -
1 tablespoon Baking Powder
Always check that it’s fresh! Leavening agents can lose potency over time. -
1 teaspoon Baking Soda
Omit this if you’re using self-rising flour, which already has it included. -
1 teaspoon Salt
Sea salt is an excellent alternative—just a pinch brings out all the flavors beautifully! -
1 cup Buttermilk
Adds moisture and richness; if you don’t have any, use yogurt or milk mixed with a little vinegar. -
1/2 cup Vegetable Oil
This keeps the cake moist. You can switch it out for melted coconut oil for a tropical kick! -
2 large Eggs
Eggs help bind the ingredients; for a vegan alternative, a flaxseed meal mixed with water works wonders. -
2 teaspoons Vanilla Extract
A classic flavor booster! Swap it for almond extract if you want a new twist. -
1 cup Boiling Water
This ingredient is vital for creating a tender crumb—there’s no substitute! -
2 cups Fresh Strawberries
These add natural sweetness and a fresh pop! Feel free to use any berries you fancy. -
1 tablespoon Lemon Juice
A little acidity enhances the strawberry flavor; lime juice can work just as well. -
8 ounces Dark Chocolate
Use semi-sweet chocolate if you prefer a sweeter profile. -
2 tablespoons Coconut Oil
This will help the dark chocolate melt beautifully; vegetable oil can be an option too, but it may change the texture slightly.
Step-by-Step Instructions
Now that we have all our ingredients gathered, let’s get started on making your new favorite cake!
-
Preheat Your Oven: Start by preheating your oven to 350°F (175°C). This ensures a perfectly baked cake from the get-go!
-
Mix Dry Ingredients: In a large mixing bowl, whisk together your all-purpose flour, granulated sugar, cocoa powder, baking powder, baking soda, and salt. This helps to ensure even distribution of the leavening agents and cocoa, which is key for a fluffy cake.
-
Combine Wet Ingredients: In another bowl, mix together the buttermilk, vegetable oil, eggs, and vanilla extract. I usually whisk this until it’s nice and smooth, breaking up the eggs fully. This mixture will infuse moisture into your batter!
-
Combine Both Mixtures: Gradually add the wet mixture into the dry ingredients. Stir with a spatula or wooden spoon until just combined—be careful not to overmix; a few lumps are perfectly fine!
-
Add Boiling Water: Here’s the magic touch! Slowly pour in the boiling water, mixing gently as you go. The batter will be quite thin, which is exactly what you’re aiming for. This step helps make your cake moist and tender.
-
Bake: Grease your cake pans (two 9-inch round pans will do beautifully!) with butter or cooking spray, pour in your batter, and pop them into the oven for about 30-35 minutes. Keep an eye on them; you want a toothpick inserted into the center to come out clean.
-
Cool: Once baked, remove the cakes from the oven and allow them to cool in the pans for 10 minutes before transferring them to wire racks to cool completely. This prevents sogginess—nobody wants that!
-
Prepare the Strawberry Filling: While your cake is cooling, chop those beautiful strawberries and toss them in a bowl with lemon juice. This brightens their flavor and draws out the juices, making a delicious filling!
-
Create the Chocolate Shell: Melt the dark chocolate with coconut oil in a microwave-safe bowl or over a double boiler. Stir until smooth, and let it cool slightly before pouring.
-
Assemble Your Cake: On a serving plate, place the first layer of your cooled cake. Spread a generous layer of the sweetened strawberries over the top, then place the second layer on top.
-
Pour the Chocolate Shell: Finally, pour that delicious chocolate shell over the cake. Allow it to drip down the sides. The sight alone is enough to make anyone swoon!
Serving Suggestions
When it’s time to serve, slice up generous pieces of this stunning cake and plate it with fresh strawberries or a dollop of whipped cream for an extra touch of flair. A sprinkle of cocoa powder or chocolate shavings can elevate it even further. Lighting a few candles and serving it with a smile? Pure bliss.
Recipe Variations
Here are some creative twists you can try with this indulgent cake:
-
Add Mint: Infuse your chocolate shell with a few drops of mint extract for a refreshing mint chocolate vibe.
-
Layered Flavors: For an added dimension, layer in some raspberry jam or a different berry between the cake layers.
-
Nutty Crunch: Incorporate chopped walnuts or almonds into the batter for a delightful texture contrast.
-
Vegan Delight: Go fully plant-based by using flax eggs and a dairy-free chocolate for the shell.
-
Tropical Retreat: Swap out the strawberries for fresh pineapple for a fun tropical twist!
Chef’s Notes
This recipe holds a special place in my heart, as it has evolved over the years. From that fun day in Grandma’s kitchen to impressing friends at dinner parties, it truly is a crowd-pleaser. I once attempted to make a version with raspberry, and while it was delicious, it was a bit too runny for the shell to set properly. But hey, the best part of cooking is learning through trial and error!
This cake is perfect for sharing, and honestly, there’s something magical about gathering around a beautifully decorated dessert. So don’t be shy—slice it up and gather your loved ones to enjoy!
FAQs and Troubleshooting
-
My cake sunk in the middle! What went wrong?
This can happen for a few reasons; the oven temperature might have been too low or the cake was underbaked. Always ensure your oven is properly preheated and check for doneness before removing. -
How can I make the cake more chocolatey?
For extra rich flavor, try adding a bit more cocoa powder, or using a mix of dark chocolate and milk chocolate for the ganache. -
My chocolate shell isn’t setting! What did I do wrong?
Make sure to let your melted chocolate cool slightly before pouring it over the cake. If it’s too hot, it won’t set properly! -
Can I make this cake in advance?
Absolutely! You can bake the cake a day ahead. Just store it wrapped in plastic wrap in the refrigerator. The flavors will actually deepen overnight.
Nutritional Info
While indulgent, remember that this cake is meant for special occasions! Here’s a rough breakdown per slice (based on 12 servings):
- Calories: 350
- Protein: 4g
- Carbs: 58g
- Fats: 12g
- Fiber: 3g
Life is all about balance, right? So go ahead and indulge!
And there you have it! An indulgent Strawberry Chocolate Shell Cake that will leave everyone wanting more. Remember, cooking is all about having fun and sharing joy—so don’t forget to enjoy yourselves in the kitchen! Until next time, happy baking!
PrintIndulgent Strawberry Chocolate Shell Cake

A beautiful cake with rich chocolate layers and a glossy strawberry chocolate shell, perfect for celebrations.
- Prep Time: 20 minutes
- Cook Time: 35 minutes
- Total Time: 55 minutes
- Yield: 12 servings 1x
- Category: Dessert
- Method: Baking
- Cuisine: American
- Diet: Vegetarian
Ingredients
- 2 cups All-Purpose Flour
- 2 cups Granulated Sugar
- 3/4 cup Unsweetened Cocoa Powder
- 1 tablespoon Baking Powder
- 1 teaspoon Baking Soda
- 1 teaspoon Salt
- 1 cup Buttermilk
- 1/2 cup Vegetable Oil
- 2 large Eggs
- 2 teaspoons Vanilla Extract
- 1 cup Boiling Water
- 2 cups Fresh Strawberries
- 1 tablespoon Lemon Juice
- 8 ounces Dark Chocolate
- 2 tablespoons Coconut Oil
Instructions
- Preheat your oven to 350°F (175°C).
- Mix together your dry ingredients in a large mixing bowl.
- Combine the wet ingredients in another bowl.
- Gradually add the wet mixture into the dry ingredients.
- Add the boiling water slowly to the batter.
- Bake the cake in greased pans for 30-35 minutes.
- Cool the cakes for 10 minutes before transferring them to wire racks.
- Prepare the strawberry filling by tossing chopped strawberries with lemon juice.
- Create the chocolate shell by melting dark chocolate and coconut oil.
- Assemble your cake by layering and pouring the chocolate shell over.
Notes
Serve with fresh strawberries or whipped cream for an extra touch.
Nutrition
- Serving Size: 1 slice
- Calories: 350
- Sugar: 30g
- Sodium: 400mg
- Fat: 12g
- Saturated Fat: 6g
- Unsaturated Fat: 4g
- Trans Fat: 0g
- Carbohydrates: 58g
- Fiber: 3g
- Protein: 4g
- Cholesterol: 30mg
Keywords: cake, dessert, chocolate, strawberries, celebration, baking
Ingredient Strawberry Mousse: Quick 10-Min No-Bake Dessert
4-Ingredient Strawberry Mousse – So Light, So Dreamy!
Welcome, food lovers! 🌟 Today, we’re diving into a dessert that’s as light and airy as a cloud, yet rich with flavor—Strawberry Mousse! If you’ve ever craved something romantic and delicious without the fuss, you’re in the right place. Picture this: a velvety, smooth mousse that’s perfect for impressing guests, celebrating special occasions, or simply treating yourself after a long day. You might be wondering, "Is that even possible with just four ingredients?" Yes, yes it is! And trust me, you’ll be licking the bowl clean.
I’m Ava Carter, and I firmly believe that cooking should be a joyful and liberating experience, not something that adds stress to your day. This Strawberry Mousse recipe is not just easy; it offers a delicious way to connect with wholesome ingredients without any complicated techniques or hidden nasties. So, let’s roll up our sleeves, gather these fantastic ingredients, and whip up some magic in the kitchen!
A Sweet Memory in Every Bite
Let me take you back in time. I remember sitting at my grandmother’s kitchen table during those lazy summer weekends. The air was rich with the scent of fresh strawberries, and the garden was bursting with ripe fruits, evoking memories of a blissful childhood. Each time my grandmother made her famous Strawberry Mousse, it became an occasion. We would gather around the table, sharing stories and laughter as she dolloped fluffy clouds of mousse into ice-cold bowls.
The mesmerizing pink color, the delicate tang of strawberries, and the lightness of the mousse were always met with squeals of delight. Those moments created more than just sweet treats; they crafted lasting bonds and treasured memories. Today, I want to share that nostalgia with all of you. Let’s create your very own Strawberry Mousse memory! 🌸💕
Ingredients
Here’s how simple this dessert is:
-
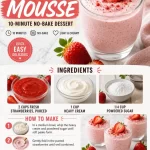
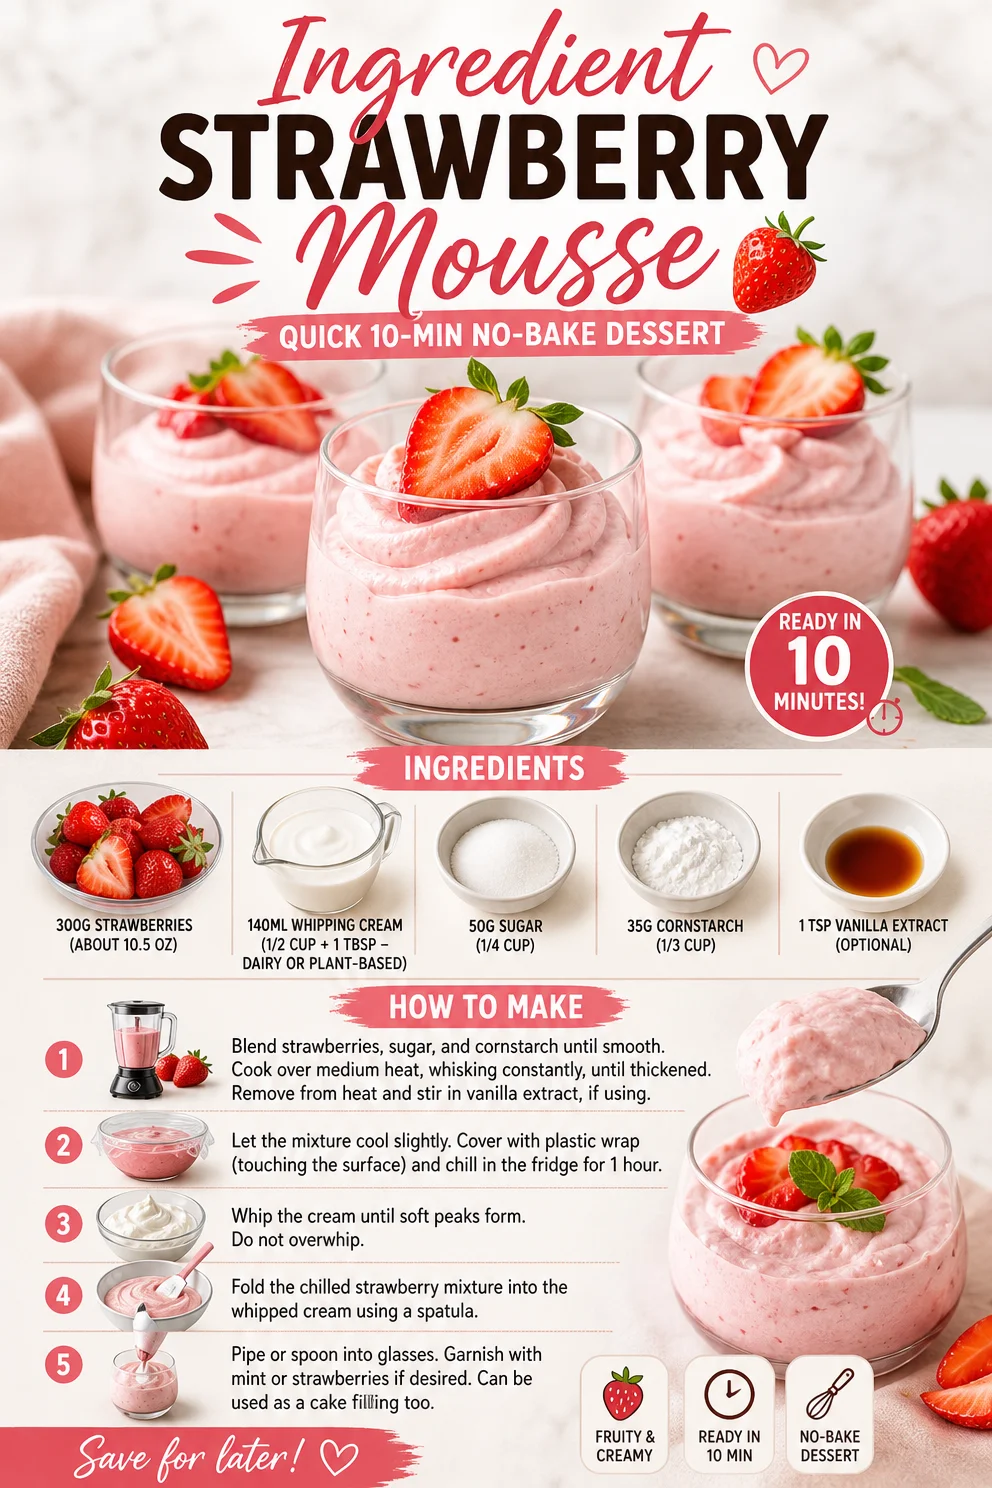
300g Strawberries (about 10.5 oz)
Juicy, sweet strawberries are the star of our show. Choose fresh, ripe berries for the best flavor. If strawberries are out of season, you could substitute with raspberries or even mango for a different twist! -
140ml Whipping Cream (1/2 cup + 1 tbsp)
This creamy base gives the mousse its indulgent texture. Feel free to swap for a dairy-free version with coconut cream or almond whipped cream. Just ensure it’s thick enough to whip! -
50g Sugar (1/4 cup)
We’ll sweeten the deal! You can adjust this based on the natural sweetness of your strawberries; if they’re super sweet, you may want less sugar. Alternatively, honey or maple syrup works too. -
35g Cornstarch (1/3 cup)
This acts as our stabilizer, giving the mousse structure without weighing it down. If you’re looking for a gluten-free option, cornstarch is perfect. You could also use arrowroot starch. -
1 tsp Vanilla Extract (optional)
This is where you can add a warm, aromatic twist. Most recipes benefit from this classic addition, but feel free to omit if you’re keeping it pure and simple.
Step-by-Step Instructions
Now that we’ve gathered our star players, let’s get to the fun part—the actual making! 🎉
-
Prep Your Strawberries
Start by washing your strawberries thoroughly under cool water. Remove the green tops and slice them in half for quicker blending. The more surface area, the easier they will blend into a luscious puree! -
Blend the Strawberries
In a blender or food processor, add the sliced strawberries. Blend until smooth—about 30 seconds should do the trick! If you prefer a chunky mousse, pulse a few times to leave some strawberry bits. Yum! -
Strain if Desired
For an extra silky mousse, you can strain the strawberry puree through a fine mesh sieve. This step is optional, but it guarantees a smooth texture. Use a spatula to push through as much liquid as possible. -
Whip Your Cream
In a mixing bowl, pour in the whipping cream. With an electric mixer, whip until it forms soft peaks. Watch closely! Once it holds its shape but is still silky, stop! Overwhipped cream can become grainy. -
Combine with Strawberries
Gently fold the strawberry puree into the whipped cream. Use a spatula and mix carefully to keep that airy texture—grace, my friend! Add in your sugar and optional vanilla extract during this step for sweetness. -
Thicken with Cornstarch
In a small bowl, mix the cornstarch with a tablespoon of cold water to create a slurry. Heat it in a microwave or stovetop for about 30 seconds until it thickens slightly. This step is key to helping your mousse hold its shape. Once thickened, fold it into the strawberry mixture. -
Chill
Transfer your mousse into dessert cups or a large bowl. Chill in the refrigerator for at least two hours, or until set. This is the hardest part—waiting! -
Serve & Enjoy!
Once chilled and set, it’s time for a taste test! Grab your favorite spoons, heap on some more chopped strawberries or mint for garnish, and dig in!
Serving Suggestions
When you’re ready to serve, think about presentation! Layer your mousse in elegant glass jars or bowls for that wow factor. Garnish with a sprinkle of fresh strawberries on top, maybe even a sprig of mint for that classic touch. Not only does it look beautiful, but it also adds a fresh, aromatic pop that makes every bite more delightful.
Recipe Variations
Feeling adventurous? Here are a few creative twists to give your mousse a personal touch:
- Chocolate Strawberry Mousse: Add 2 tablespoons of melted dark chocolate into the strawberry mixture for a decadent twist.
- Citrus Burst: Add a teaspoon of lemon or lime juice to the strawberries for a zesty spin!
- Nutty Delight: Fold in crushed nuts like almonds or hazelnuts for texture and flavor.
- Berry Medley: Instead of just strawberries, mix in blueberries or blackberries for a tangy blend.
- Coconut Cream: Substitute the whipping cream with coconut cream for a tropical flair!
Chef’s Notes
This recipe has traveled with me through many kitchens, evolving each time I make it. I find it fascinating how the simplest recipes can bring comfort and joy. One time, I made it for a friend’s birthday, and it vanished almost instantly! Not only was it a hit, but it also sparked a cooking session where we experimented together. This certainly reminded me that cooking connects us, and each dish holds a story.
FAQs and Troubleshooting
1. Why is my mousse not setting?
If your mousse isn’t thickening, ensure that your cornstarch slurry was cooked until it thickened before folding it in. If you skipped that step, the mousse might remain runny.
2. Can I use frozen strawberries?
Absolutely! You just need to thaw them first and make sure to drain excess liquid. This might slightly alter the texture but will still be delicious.
3. My cream didn’t whip properly; what did I do wrong?
Ensure your bowl and whisk are clean and dry. Any fat residue can prevent the cream from whipping. Also, using cold cream right out of the fridge is essential.
4. Can I make this recipe ahead of time?
Yes! You can prepare it a day in advance and just store it in the fridge until you’re ready to serve. This can actually enhance the flavors!
Nutritional Information
(Assuming serving size 1/2 cup)
- Calories: 150
- Protein: 2g
- Carbs: 24g
- Sugars: 16g
- Fat: 7g
- Fiber: 2g
And there you have it! A dreamy, fluffy, and delectable 4-Ingredient Strawberry Mousse ready to be enjoyed! Cooking should be about simplicity and joy, so I hope this recipe sparks memories or creates new ones for you.
Remember, the kitchen is a place to nurture creativity and make a little magic happen—so get in there and start whisking. Happy cooking! 🍓✨
Print4-Ingredient Strawberry Mousse
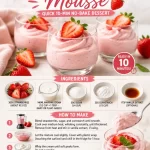
A light and airy strawberry mousse made with just four simple ingredients, perfect for any occasion.
- Prep Time: 15 minutes
- Cook Time: 0 minutes
- Total Time: 120 minutes
- Yield: 4 servings 1x
- Category: Dessert
- Method: Chilling
- Cuisine: French
- Diet: Vegetarian
Ingredients
- 300g Strawberries (about 10.5 oz)
- 140ml Whipping Cream (1/2 cup + 1 tbsp)
- 50g Sugar (1/4 cup)
- 35g Cornstarch (1/3 cup)
- 1 tsp Vanilla Extract (optional)
Instructions
- Prep your strawberries by washing them and slicing in half.
- Blend the strawberries until smooth, about 30 seconds.
- Strain the puree for a silky texture, if desired.
- Whip the cream until soft peaks form, being careful not to overwhip.
- Combine the strawberry puree with the whipped cream, folding gently.
- Thicken the mixture by adding the cornstarch slurry after heating it slightly.
- Chill the mousse in the refrigerator for at least two hours, until set.
- Serve with additional strawberries or mint for garnish.
Notes
Try adding chocolate or citrus for a different twist on flavor. This mousse can be prepared a day in advance for enhanced flavor.
Nutrition
- Serving Size: 1 serving
- Calories: 150
- Sugar: 16g
- Sodium: 5mg
- Fat: 7g
- Saturated Fat: 4g
- Unsaturated Fat: 2g
- Trans Fat: 0g
- Carbohydrates: 24g
- Fiber: 2g
- Protein: 2g
- Cholesterol: 30mg
Keywords: strawberry mousse, dessert, easy dessert, summer dessert

Spring Strawberry Upside-Down Cake: Easy, Fresh & Fluffy
Strawberry Upside Down Cake: A Sweet Slice of Nostalgia
Hey there, fellow food lovers! Today, I’m thrilled to share one of my all-time favorite desserts—Strawberry Upside Down Cake. If you’ve ever had the pleasure of baking something that fills your kitchen with warmth and sweet aromas, then you know the joy it brings. There’s something so delightful about turning a simple cake upside down to reveal a beautiful, caramelized layer of fresh strawberries. It’s not just about the taste; it’s an experience that tugs at the heartstrings and makes memories.
Imagine walking into a cozy kitchen on a summer afternoon, the sunlight streaming through the windows, casting a warm glow on a colorful fruit display. That setting is where my love affair with upside-down cakes began. My mom used to whip up a peach version with fruit fresh off our backyard trees. We’d dig into it as a family, sharing stories over slices that were as sweet as the laughter bouncing off the walls. Those moments taught me that food has the power to connect us, celebrate occasions, and create cherished memories. Now, I’m excited to pass this love for dessert on to you with this easy and scrumptiously satisfying Strawberry Upside Down Cake!
Let’s jump in and whip up this vibrant berry delight together.
Ingredients
Here’s what you’ll need to create this delicious Strawberry Upside Down Cake, along with some handy tips for each ingredient:
-
2 cups fresh strawberries, sliced
Fresh strawberries are the star of the show! Look for plump, red ones with a sweet aroma. In a pinch, you can use frozen strawberries, but make sure to thaw and drain them well to avoid excess moisture. -
1/2 cup sugar
This sugar is used to sweeten the strawberry layer and the cake batter. If you want a healthier alternative, try coconut sugar or a sugar substitute that measures like sugar. -
1/4 cup butter
Butter adds richness and depth to your cake. Unsalted butter is ideal because you control the amount of salt. If you’re looking for a dairy-free option, coconut oil works beautifully as a substitute! -
1 cup all-purpose flour
The foundation for your cake! Use a gluten-free flour blend if you need to make it gluten-free. Just ensure it has a binding agent like xanthan gum to help with texture. -
1/2 cup milk
Whole milk gives the cake a lovely moisture level. If you’re lactose intolerant, almond milk or oat milk are great alternatives that will not skimp on flavor. -
1/2 cup vegetable oil
Vegetable oil keeps the cake tender and fluffy. You can swap it out for melted coconut oil for a tropical twist, or use unsweetened applesauce to reduce the fat content. -
2 eggs
Eggs help bind everything together while adding moisture. For a vegan version, flax eggs (1 tablespoon ground flaxseed mixed with 2.5 tablespoons water per egg) can work wonders. -
1 teaspoon vanilla extract
This little bottle of magic elevates the flavor of your cake. Always opt for pure vanilla extract if you can! It really makes a difference. -
1 1/2 teaspoons baking powder
The rising agent! Make sure it’s fresh for the best results; old baking powder can lead to a flat cake. -
1/2 teaspoon salt
A pinch of salt accentuates all the other flavors in your cake. Don’t skip it, as it balances the sweetness perfectly!
Step-by-Step Instructions
Ready to create some kitchen magic? Let’s get baking! Follow these steps carefully, and you’ll have a showstopper dessert in no time.
-
Preheat Your Oven and Prepare the Pan
Preheat your oven to 350°F (175°C). While that’s heating up, grab a 9-inch round cake pan. In a small bowl, melt your 1/4 cup of butter and pour it into the bottom of the pan. Sprinkle 1/2 cup of sugar evenly over the butter, creating a lovely base for the strawberries.Tip: This step ensures that when you flip the cake, the strawberries will have that gorgeous caramelized look. It’s all about that presentation!
-
Layer the Strawberries
Arrange the sliced strawberries in a single layer over the sugar and butter mixture. You can get creative here—overlap them beautifully or create a pattern. This is your moment to make it visually appealing!Chef’s note: The natural shape of the strawberries will give your cake a whimsical design. Plus, you get to enjoy the fruit’s sweet juices melding with the sugar as it bakes.
-
Mix the Batter
In a large bowl, whisk together the 1 cup of flour, 1/2 cup sugar, 1 1/2 teaspoons baking powder, and 1/2 teaspoon salt. In another bowl, beat the 2 eggs, then add in the milk, vegetable oil, and 1 teaspoon vanilla extract. Mix these wet ingredients until they’re well combined.Pro tip: For an extra lift in your cake, beat the eggs until they’re frothy before adding other ingredients.
-
Combine Wet and Dry Ingredients
Pour the wet mixture into the dry ingredients and stir gently until just combined. Be careful not to over-mix, as this can lead to a dense cake. We want it light and fluffy!Mini chef hack: Using a spatula keeps everything airy and helps prevent overmixing. Aim for a few flour streaks in the batter. That’s perfect!
-
Pour the Batter Over the Strawberries
Carefully spoon the batter over the arranged strawberries, spreading it evenly. Tap the pan gently on the counter to remove any air bubbles.Side note: Make sure to cover all the strawberries with batter to ensure they get all cozy during the baking process.
-
Bake to Perfection
Place the cake in the oven and let it bake for about 30–35 minutes, or until the top is golden and a toothpick inserted into the center comes out clean. Keep an eye on it towards the end to avoid over-baking—no one wants a dry cake!Chef’s tip: If the top is browning too quickly, tent it with foil halfway through.
-
Cool and Invert
Once baked, let the cake cool in the pan for about 10 minutes. Then, take a large plate and carefully flip the cake over onto it. Give the pan a gentle shake to help release it.Remember to stand back—the strawberries might be a little saucy and could escape!
-
Serve and Enjoy!
Slice yourself a generous piece and watch the beautiful strawberry layer glisten. Serve it warm, at room temperature, or chilled—whatever floats your boat.
Serving Suggestions
For an extra special touch, serve your Strawberry Upside Down Cake with a dollop of freshly whipped cream or a scoop of vanilla ice cream. Trust me, the creaminess brilliantly complements the tartness of the strawberries. A sprinkle of mint leaves on top will add a beautiful pop of color!
Recipe Variations
Feel like experimenting? Here are a few creative ideas to switch things up:
- Berry Medley: Swap out the strawberries for a mix of blueberries and raspberries for a vibrant berry blend.
- Citrus Infusion: Add the zest of one lemon or orange to the batter for a refreshing citrus flavor.
- Nutty Crunch: Sprinkle a handful of chopped nuts (like walnuts or pecans) over the strawberries before adding the cake batter for added texture.
- Spiced Delight: Incorporate a dash of cinnamon or nutmeg into the batter for a warm, spiced flavor profile.
Chef’s Notes
This Strawberry Upside Down Cake is one of those recipes that has evolved over time. I initially stumbled upon it during a baking class a decade ago, and it instantly became a family favorite. What started as a simple recipe transformed into a weekend ritual. I’d whip it up for gatherings, birthdays, and "just because" moments.
Every time I make it, I’m reminded of those summer afternoons spent with family, and I can’t help but chuckle at the inevitable tiny strawberry fights that would break out. Those little morsels were just too good to resist!
FAQs and Troubleshooting
1. What if my cake is gummy in the middle?
A gummy texture usually means it wasn’t baked long enough. Be sure to check for doneness with a toothpick—if it comes out with batter, give it more time and test again every few minutes.
2. Can I make this cake ahead of time?
Absolutely! You can bake it a day in advance and store it covered at room temperature. For the freshest taste, I recommend adding any whipped cream or ice cream just before serving.
3. My strawberries sank to the bottom; what happened?
This can happen if your batter is too thin. To prevent this, ensure the batter is thick enough before pouring it over the strawberries or consider tossing the sliced strawberries in a bit of flour to help suspend them in the batter.
4. Can I freeze this cake?
Yes! Once cooled, wrap it tightly in plastic wrap and place it in a freezer-safe bag. Thaw in the fridge overnight before serving.
Nutritional Info (Optional)
Although I won’t get too bogged down in the numbers, a slice of this delightful cake roughly has about 250 calories, depending on portion size and ingredients used. It’s perfect for an occasional treat!
And there you have it! A scrumptious Strawberry Upside Down Cake that’s sure to bring smiles and sweet memories. I can’t wait for you to try this recipe out. It’s easy, fun, and oh-so-delicious. So, roll up those sleeves, get baking, and let’s make some sweet memories together! Happy baking!
PrintStrawberry Upside Down Cake

A nostalgic and delightful dessert featuring a beautiful layer of caramelized strawberries on top of a moist and fluffy cake.
- Prep Time: 15 minutes
- Cook Time: 30 minutes
- Total Time: 45 minutes
- Yield: 8 servings 1x
- Category: Dessert
- Method: Baking
- Cuisine: American
- Diet: Vegetarian
Ingredients
- 2 cups fresh strawberries, sliced
- 1/2 cup sugar
- 1/4 cup butter
- 1 cup all-purpose flour
- 1/2 cup milk
- 1/2 cup vegetable oil
- 2 eggs
- 1 teaspoon vanilla extract
- 1 1/2 teaspoons baking powder
- 1/2 teaspoon salt
Instructions
- Preheat your oven to 350°F (175°C). Melt 1/4 cup of butter in a bowl and pour it into a 9-inch round cake pan. Sprinkle 1/2 cup of sugar over the melted butter.
- Arrange the sliced strawberries in a single layer over the sugar and butter mixture.
- Whisk together the flour, 1/2 cup sugar, baking powder, and salt in a large bowl. In another bowl, beat the eggs and add milk, oil, and vanilla extract.
- Combine the wet mixture with the dry ingredients and stir gently until just combined.
- Spoon the batter over the arranged strawberries and spread it evenly.
- Bake for 30–35 minutes, or until the top is golden and a toothpick inserted into the center comes out clean.
- Cool the cake in the pan for 10 minutes, then flip it onto a plate.
- Slice and serve warm, at room temperature, or chilled.
Notes
For an extra special touch, serve with whipped cream or vanilla ice cream. This cake can also be made ahead and stored covered at room temperature.
Nutrition
- Serving Size: 1 slice
- Calories: 250
- Sugar: 12g
- Sodium: 200mg
- Fat: 10g
- Saturated Fat: 5g
- Unsaturated Fat: 5g
- Trans Fat: 0g
- Carbohydrates: 30g
- Fiber: 1g
- Protein: 4g
- Cholesterol: 50mg
Keywords: strawberry, cake, dessert, upside down, summer, family recipe
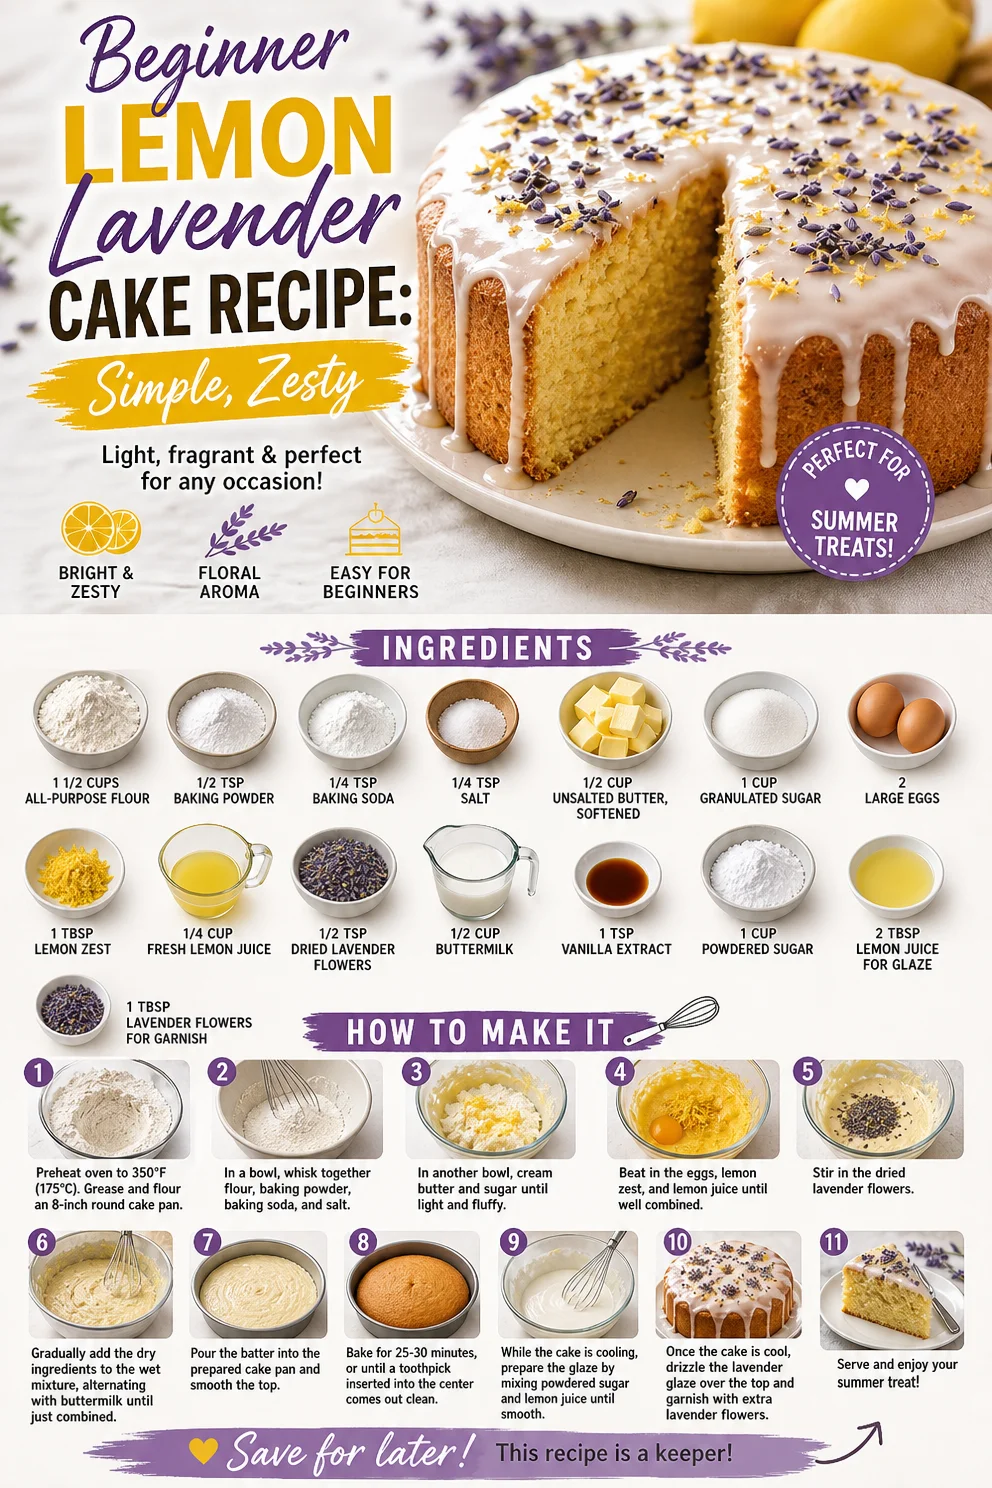
Beginner Lemon Lavender Cake Recipe: Simple, Zesty
Indulging in Nostalgia: The Delight of Lemon Lavender Cake
Welcome, food lovers! Today, I’m thrilled to share with you one of my favorite recipes that beautifully combines the invigorating zest of lemons with the delicate floral notes of lavender. That’s right, we’re diving into the world of Lemon Lavender Cake—a dessert that not only tantalizes your taste buds but also transports you to sunlit gardens with every bite. Picture this: a slice of moist cake topped with a silky glaze, bursting with citrusy brightness and floral undertones. It doesn’t just taste delicious; it feels like a hug in cake form!
Now, some of you might be thinking, “Lavender in a cake? Really?” And I’m here to say, “Absolutely!” Don’t let the idea intimidate you. When used correctly, lavender can elevate your baking game. It adds an unexpected twist that’s surprisingly comforting. Even if you think you’re not a lavender person, I urge you to give it a shot. You might just discover a new flavor obsession!
Let’s transport ourselves to my kitchen for a moment. The air is fragrant with citrus, and I can hear the gentle clinks of my baking tools against the counter, mixing in rhythm with some soft music. Baking has always been a joyful ritual for me—a way to express love and creativity. And when I pull this cake out of the oven, the first thing I do is give it a little sniff. The combination of lemon and lavender is nothing short of intoxicating. If baking is an art, then this recipe makes you a brilliant artist. So, let’s get those aprons on and start creating something delicious!
A Sweet Memory
The inspiration behind this Lemon Lavender Cake comes from many summer afternoons spent at my grandmother’s cottage. She had a small garden filled with vibrant flowers, but what stood out most were her lavender plants. I still remember walking through her garden, the sun gently warming my back, inhaling the floral aroma that seemed to dance through the air. One afternoon, she invited me into her cozy kitchen, where we whipped up a cake that would forever hold a special place in my heart.
As we mixed the batter, I giggled at the way she cautioned me to be careful with the lavender. “A little goes a long way,” she said with a wink. I’ve carried that advice with me through the years, and it’s one of those beautifully simple lessons that stuck. The cake we baked together was simple yet elegant, and the zesty lemon contrasted perfectly with the aromatic lavender. Each slice reminded me of those sunny afternoons, laughter floating around us like the sweet scent intertwined with the breeze. That nostalgia is what drives me to recreate this cake, with each bite as comforting as a cherished memory.
Ingredients
Here’s what you’ll need to create this delightful Lemon Lavender Cake:
-
1 1/2 cups all-purpose flour
- The backbone of any cake! For a lighter version, you could substitute half with almond flour for a nutty flavor.
-
1/2 teaspoon baking powder
- This helps the cake rise. Be sure it’s fresh for the best results!
-
1/4 teaspoon baking soda
- Balances the acidity of the lemon. Another crucial leavening agent to make your cake fluffy.
-
1/4 teaspoon salt
- Balances flavors and enhances sweetness. It’s a baker’s secret weapon!
-
1/2 cup unsalted butter, softened
- Butter creates the cake’s rich, moist texture. Don’t skip the softening step; it should be room temperature!
-
1 cup granulated sugar
- Adds sweetness and helps the cake brown properly. You can swap this for coconut sugar for a healthier twist.
-
2 large eggs
- Eggs bind the ingredients and add moisture. Ensure they’re at room temperature for an even mix.
-
1 tablespoon lemon zest
- This is where the magic begins—fresh zest gives an intense lemon flavor. Always use organic lemons when you can!
-
1/4 cup fresh lemon juice
- The star of the show! Freshly squeezed is best, as bottled lemon juice just doesn’t compare in flavor.
-
1/2 teaspoon dried lavender flowers
- Use culinary-grade lavender. You can find this in specialty stores or online—it’s worth it!
-
1/2 cup buttermilk
- Adds moisture and gives the cake a tender crumb. You can make your own with milk and a splash of vinegar!
-
1 teaspoon vanilla extract
- A must for depth of flavor. Try using homemade vanilla extract for an extra touch!
-
1 cup powdered sugar
- Perfect for that sweet, glossy glaze that brings the whole cake together.
-
2 tablespoons lemon juice for glaze
- Intensifies the lemony flavor and adds a lovely tang to the glaze.
-
1 tablespoon lavender flowers for garnish
- For a final touch of elegance, sprinkle these on top!
Step-by-Step Instructions
Let’s put on our chef hats and get baking! Here’s how to masterfully whip up your Lemon Lavender Cake in no time:
-
Preheat your oven to 350°F (175°C).
- Prepping your oven ensures an even bake. You want to be ready to go as soon as the batter is mixed!
-
Grease and flour a 9-inch round cake pan.
- This is so your cake doesn’t stick. You can also line the bottom with parchment paper for easier removal.
-
In a mixing bowl, whisk together the all-purpose flour, baking powder, baking soda, and salt.
- This is creating your dry mix. Whisking aerates the flour, ensuring your cake rises nicely.
-
In another bowl, beat the softened butter and granulated sugar together until light and fluffy.
- This step can take about 3-5 minutes. The air you incorporate is key for a light texture!
-
Add the eggs, lemon zest, and lemon juice to the butter mixture. Mix until well combined.
- This fruity combo is where you start to see the magic happen!
-
Gradually add the dry ingredients to the wet mixture, alternating with buttermilk. Begin and end with the flour mixture.
- Mix until just combined—overmixing can lead to a dense cake. We want light and fluffy!
-
Gently fold in the dried lavender flowers.
- Use a spatula to fold—it preserves the tenderness of the batter!
-
Pour the batter into the prepared cake pan and level off the top.
- Give the pan a little shake to smooth the batter.
-
Bake in the preheated oven for 25-30 minutes, or until a toothpick inserted into the center comes out clean.
- Every oven is a little different, so keep an eye on it, especially the first time you make this!
-
Allow the cake to cool in the pan for 10 minutes, then transfer to a wire rack to cool completely.
- Patience is key! Letting it cool all the way will allow for a better texture when you glaze.
-
While the cake cools, prepare the glaze by whisking together powdered sugar and lemon juice until smooth.
- If it’s too thick, add more lemon juice. Too runny? Just add a bit more powdered sugar!
- Once the cake is cool, pour the glaze over the top and let it drip down the sides. Garnish with lavender flowers.
- The presentation matters! Use a spoon to help guide the glaze if you want a bit more control.
Voilà! You’ve just mastered a beautiful Lemon Lavender Cake!
Serving Suggestions
When it comes to serving this beauty, keep it simple yet elegant. A slice on a beautifully patterned plate with a sprig of fresh lavender on the side gives a lovely presentation. Pair it with a dollop of whipped cream or a scoop of vanilla ice cream for an extra treat. This cake is fantastic for brunch gatherings, afternoon tea, or just a sweet way to treat yourself!
Recipe Variations
Here are a few creative twists you can consider to make this recipe your own:
-
Lemon Elderflower Cake: Replace the lavender with elderflower cordial for a flowery flavor that beautifully complements the lemon.
-
Lavender Vanilla Bean Cake: Add vanilla bean paste to the batter for a rich, aromatic depth that pairs wonderfully with the floral notes.
-
Gluten-Free Lavender Cake: Substitute the all-purpose flour with a gluten-free baking mix to make this cake suitable for gluten-sensitive guests.
-
Vegan Lemon Lavender Cake: Replace eggs with flax eggs (1 tablespoon of ground flaxseed mixed with 2.5 tablespoons of water) and use a plant-based butter alternative or coconut oil.
Chef’s Notes
I can’t tell you how many times I’ve made this cake, each time adding a little twist or realizing I forgot an ingredient! One time, I made it with coconut sugar, giving it a subtle caramel note beneath the lemon. And oh, darling, on another occasion, my neighbor brought me fresh mint from her garden. A little mint syrup drizzled on top was a game changer!
Every bake is an adventure, and I encourage you to make this recipe your own. Don’t be afraid to tinker around! Trust me, the result is always worth it, whether it’s beautifully imperfect or perfectly flawed.
FAQs and Troubleshooting
Q1: Why did my cake sink in the middle?
- This typically happens due to overmixing or not baking it long enough. Make sure to mix until just combined and test for doneness with a toothpick!
Q2: Can I use dried lavender if I can’t find fresh?
- Absolutely! Just ensure it’s labeled as culinary-grade. Fresh flowers can be too potent!
Q3: How should I store leftover cake?
- Keep it in an airtight container at room temperature for up to three days, or in the fridge if you prefer a chilled treat.
Q4: Can I make this as cupcakes?
- Yes! Pour the batter into a lined muffin tin and bake for about 18-20 minutes.
By keeping these tips in mind, you’ll be well on your way to baking a delightful Lemon Lavender Cake that’ll leave everyone asking for your secret recipe!
Nutritional Info
While baking is all about joy and flavor, being mindful of nutritional aspects can be beneficial. Please note the following estimates per slice (assuming 12 servings):
- Calories: ~210
- Protein: 2g
- Fat: 9g
- Carbohydrates: 31g
- Sugar: 15g
And there you have it, beautiful bakers! A delightful journey through the delightful realm of Lemon Lavender Cake. Remember, the best ingredient in your kitchen is love—so bake with joy, share with friends, and savor every slice! Happy baking! 🍰🌼
PrintLemon Lavender Cake
A delightful dessert that combines the invigorating zest of lemons with delicate floral notes of lavender, topped with a silky glaze.
- Prep Time: 15 minutes
- Cook Time: 30 minutes
- Total Time: 45 minutes
- Yield: 12 servings 1x
- Category: Dessert
- Method: Baking
- Cuisine: American
- Diet: Vegetarian
Ingredients
- 1 1/2 cups all-purpose flour
- 1/2 teaspoon baking powder
- 1/4 teaspoon baking soda
- 1/4 teaspoon salt
- 1/2 cup unsalted butter, softened
- 1 cup granulated sugar
- 2 large eggs
- 1 tablespoon lemon zest
- 1/4 cup fresh lemon juice
- 1/2 teaspoon dried lavender flowers
- 1/2 cup buttermilk
- 1 teaspoon vanilla extract
- 1 cup powdered sugar
- 2 tablespoons lemon juice for glaze
- 1 tablespoon lavender flowers for garnish
Instructions
- Preheat your oven to 350°F (175°C).
- Grease and flour a 9-inch round cake pan.
- In a mixing bowl, whisk together the all-purpose flour, baking powder, baking soda, and salt.
- In another bowl, beat the softened butter and granulated sugar together until light and fluffy.
- Add the eggs, lemon zest, and lemon juice to the butter mixture. Mix until well combined.
- Gradually add the dry ingredients to the wet mixture, alternating with buttermilk. Begin and end with the flour mixture.
- Gently fold in the dried lavender flowers.
- Pour the batter into the prepared cake pan and level off the top.
- Bake in the preheated oven for 25-30 minutes, or until a toothpick inserted into the center comes out clean.
- Allow the cake to cool in the pan for 10 minutes, then transfer to a wire rack to cool completely.
- While the cake cools, prepare the glaze by whisking together powdered sugar and lemon juice until smooth.
- Once the cake is cool, pour the glaze over the top and let it drip down the sides. Garnish with lavender flowers.
Notes
Serve with a sprig of fresh lavender or a dollop of whipped cream for an elegant touch.
Nutrition
- Serving Size: 1 slice
- Calories: 210
- Sugar: 15g
- Sodium: 200mg
- Fat: 9g
- Saturated Fat: 5g
- Unsaturated Fat: 3g
- Trans Fat: 0g
- Carbohydrates: 31g
- Fiber: 1g
- Protein: 2g
- Cholesterol: 30mg
Keywords: cake, lemon, lavender, dessert, baking