
Quick Strawberry Cream Cheese Danish with Flaky Puff Pastry
Flaky Strawberry Cream Cheese Danish: A Sweet Treat for Any Day
Welcome back to Clean Plate Cravings, where we whip up deliciously fresh meals that spark joy—and today, I’m thrilled to share a staple that’s both indulgent and surprisingly light! We’re diving into the world of pastries with a recipe that has nostalgia written all over it: the Strawberry Cream Cheese Danish. This delightful treat combines the buttery, flaky goodness of puff pastry with a creamy filling and sweet, juicy strawberries. Perfect for breakfast, brunch, or a delightful afternoon snack, this Danish is sure to impress your family and friends. So, roll up those sleeves and let’s get started—we’re about to create some magic in the kitchen!
A Trip Down Memory Lane
As I sit here reminiscing, I can’t help but think of my grandmother’s kitchen, where the sweet smell of pastries wafted through the air every Sunday morning. I remember walking in, the sun shining through the window, and seeing her bustling around, arm deep in flour. She would always have a batch of Danish pastries on the table, each neatly arranged and bursting with flavor. Her secret? A touch of love and a whole lot of butter!
The highlight was always the strawberry version—bright ruby-red jewels peeking out from a golden swirl of dough. She’d invite us to gather around the table, and we’d share stories of our week over warm, flaky pastries and steaming cups of coffee. Those moments are precious to me, and now, I strive to recreate that same warmth and comfort in my own kitchen. This Strawberry Cream Cheese Danish is my way of honoring those memories while keeping things fresh and modern. I promise this recipe will fill your home with the same warmth and love my grandmother’s kitchen did when I was a child!
Ingredients
For this scrumptious Danish, you’ll need the following ingredients:
-
1 sheet thawed puff pastry: The star of the show! Puff pastry gives the Danish its flaky texture. If you don’t have puff pastry, you can use crescent roll dough for a slightly different, but still delicious, result.
-
4 ounces cream cheese, softened: This creates that rich, creamy filling! You could use mascarpone or ricotta as a substitute if you want to experiment with different flavors.
-
2 tablespoons granulated sugar: A little sweetness goes a long way in balancing flavors. If you’re looking to cut down on sugar, coconut sugar or a sugar substitute works great, too.
-
1/2 teaspoon vanilla extract: For a touch of warmth and depth. Feel free to infuse with almond extract for a nutty twist.
-
1 egg: Used to create a simple egg wash that gives the pastry a beautiful golden finish. If you need a vegan option, a tablespoon of non-dairy milk mixed with a bit of cornstarch works wonders!
-
1 tablespoon milk: This adds richness to the egg wash. Use an alternative milk, like almond or oat, for a dairy-free version.
-
8 ounces strawberries, hulled and sliced: The star of our topping! Fresh strawberries brighten up the pastry. No fresh strawberries? Frozen will do—just thaw and drain excess liquid before using.
-
2 tablespoons granulated sugar: This will sweeten the strawberries and complement their natural tartness. You can reduce the amount if your strawberries are super sweet!
-
1 teaspoon lemon juice: Adds bright acidity and enhances the strawberry flavor. Swap it out for lime juice if you’re feeling adventurous!
-
1 tablespoon cornstarch: This thickens the strawberry mixture and prevents it from becoming too watery.
-
1/2 cup powdered sugar: For our delightful glaze that brings everything together!
-
1 tablespoon milk: Adds creaminess to the glaze. Again, feel free to choose your favorite plant-based milk.
-
1/4 teaspoon vanilla extract: A hint of flavor for the glaze. It’s optional but highly encouraged for an extra kick!
Step-by-Step Instructions
Let’s get to the good stuff—time to assemble and bake our Danish!
1. Preheat and Prepare
Start by preheating your oven to 400°F (200°C). While that heats up, let’s get our workspace ready. Line a baking sheet with parchment paper—this will help our pastries bake evenly and prevent sticking.
2. Roll Out the Puff Pastry
Once your puff pastry is thawed, place it on a lightly floured surface. Gently roll it out to smooth any creases and increase its size slightly. I like to roll it into a rectangle, about 12 by 10 inches, but you can adapt based on your style!
3. Make the Cream Cheese Filling
In a bowl, mix the softened cream cheese, granulated sugar, and half a teaspoon of vanilla extract until smooth and creamy. Use a spatula for the best mixing results! This filling is so dreamy, I sometimes catch myself eating it straight from the bowl—so good!
4. Assemble the Danish
Carefully cut your rolled-out puff pastry into squares (about 3-4 inches each). For each square, make a small cut from each corner towards the center, but don’t cut all the way through. Spoon some of the cream cheese filling in the middle of each square. Fold the corners of each pastry square towards the center over the filling—this is where the magic happens! Pinch to seal. These little pockets of delight will puff up beautifully, giving you that characteristic Danish shape.
5. Prepare the Strawberry Topping
In a separate bowl, combine the sliced strawberries, granulated sugar, lemon juice, and cornstarch. Gently fold to mix. This step enhances the flavor of the strawberries while also keeping them juicy! Spoon this mixture over the cream cheese filling in each Danish, letting the strawberries nest comfortably amongst the folds.
6. Make the Egg Wash
Beat the egg with a tablespoon of milk in a small bowl. Lightly brush the egg wash over the pastry edges for a golden, glossy finish. This step might seem small, but trust me—your Danish will look like a million bucks!
7. Bake
Place your assembled Danishes on the prepared baking sheet and pop them in the oven. Bake for about 15-20 minutes or until the pastry is golden brown and puffed. The smell in your kitchen will be heavenly, trust me!
8. Prepare the Glaze
While the pastries are baking, whisk together powdered sugar, milk, and the remaining vanilla extract in a small bowl until smooth. You want a drizzle-able consistency, so adjust the amount of milk as needed.
9. Glaze and Serve
Once your Danish are out of the oven and cooled slightly, drizzle the glaze over the top with a spoon or a piping bag for that professional look. And voila! You’re ready to serve an Instagram-worthy treat that tastes as good as it looks.
Serving Suggestions
These Strawberry Cream Cheese Danishes are delightful on their own, but you could also serve them with whipped cream, a sprinkle of crushed nuts, or a side of yogurt for a breakfast treat. Pair them with a cup of freshly brewed coffee or tea for the perfect pick-me-up!
Recipe Variations
-
Berry Medley: Swap out strawberries for a mix of blueberries, raspberries, and blackberries for a colorful twist!
-
Chocolate Drizzle: Post-baking, add a rich chocolate drizzle over the top of your Danishes for an indulgent option.
-
Peachy Keen: Replace strawberries with sliced peaches and add a pinch of nutmeg for a summertime favorite.
-
Nutty Surprise: Mix in ground almonds or walnuts into your cream cheese filling for added crunch and flavor.
-
Vegan Version: Substitute cream cheese with a dairy-free option, use flax eggs instead of the real egg, and your favorite plant-based milk.
Chef’s Notes
This recipe has evolved over the years; I initially began baking Danishes for my family with store-bought pastry, but as I gained confidence, I started experimenting with homemade dough. Puff pastry is truly my go-to these days for its ease and flakiness. There’s something so satisfying about biting into that crispy texture combined with the creamy filling and fresh fruit. And don’t worry if you’ve got a few imperfect shapes—each one tells a story of love and effort!
FAQs and Troubleshooting
1. My puff pastry didn’t puff! What went wrong?
This could be due to a few reasons—make sure your pastry is kept cold before baking for the best rise. Also, ensure your oven is fully preheated before putting your pastries inside, as a good blast of heat is essential for puffing.
2. How do I prevent soggy bottoms?
Bake your Danishes on a preheated baking sheet for an extra crispy base. Using parchment paper also helps prevent sogginess.
3. Can I make these ahead of time?
Absolutely! You can assemble the Danishes in advance and either freeze them before baking or refrigerate them for a few hours before baking. Just add a few extra minutes to the baking time if they are chilled.
4. What if I don’t have cornstarch?
You can substitute cornstarch with flour, but be aware that the filling may be a bit runnier. Alternatively, tapioca starch or arrowroot powder works well too!
Nutritional Info
While enjoying these treats, it’s good to be aware of the nutritional aspects. Each Danish roughly contains:
- Calories: 230
- Protein: 4g
- Fats: 12g
- Carbohydrates: 28g
- Fiber: 1g
- Sugars: 10g
Again, feel free to adjust ingredients to suit your dietary needs!
There you have it—your Strawberry Cream Cheese Danish is ready to be devoured! I sincerely hope this recipe sparks joy and brings a slice of sweetness to your table, just like my grandmother’s did for me. Happy baking, and remember: cooking is all about enjoying the journey. Let me know how your Danishes turn out—I can’t wait to hear your kitchen stories! 🥐💕
PrintFlaky Strawberry Cream Cheese Danish
Indulgent yet light strawberry cream cheese danish, perfect for breakfast or a snack.
- Prep Time: 20 minutes
- Cook Time: 20 minutes
- Total Time: 40 minutes
- Yield: 4 servings 1x
- Category: Dessert
- Method: Baking
- Cuisine: American
- Diet: Vegetarian
Ingredients
- 1 sheet thawed puff pastry
- 4 ounces cream cheese, softened
- 2 tablespoons granulated sugar
- 1/2 teaspoon vanilla extract
- 1 egg
- 1 tablespoon milk
- 8 ounces strawberries, hulled and sliced
- 2 tablespoons granulated sugar
- 1 teaspoon lemon juice
- 1 tablespoon cornstarch
- 1/2 cup powdered sugar
- 1 tablespoon milk
- 1/4 teaspoon vanilla extract
Instructions
- Preheat your oven to 400°F (200°C) and line a baking sheet with parchment paper.
- Roll out the puff pastry on a floured surface to a rectangle, about 12 by 10 inches.
- Mix the cream cheese, granulated sugar, and vanilla extract until smooth.
- Cut the rolled-out pastry into squares and make small cuts from each corner towards the center.
- Spoon the cream cheese filling into the center of each square and fold the corners towards the center.
- Combine the strawberries, granulated sugar, lemon juice, and cornstarch in a bowl and mix.
- Beat the egg with milk to create an egg wash and brush it over the pastry edges.
- Bake for about 15-20 minutes until golden brown.
- Whisk together powdered sugar, milk, and vanilla for the glaze.
- Drizzle the glaze over the cooled Danishes and serve.
Notes
Feel free to mix up the fruit toppings or add chocolate drizzle for variation.
Nutrition
- Serving Size: 1 Danish
- Calories: 230
- Sugar: 10g
- Sodium: 250mg
- Fat: 12g
- Saturated Fat: 6g
- Unsaturated Fat: 4g
- Trans Fat: 0g
- Carbohydrates: 28g
- Fiber: 1g
- Protein: 4g
- Cholesterol: 70mg
Keywords: Danish, pastry, strawberry, cream cheese, dessert
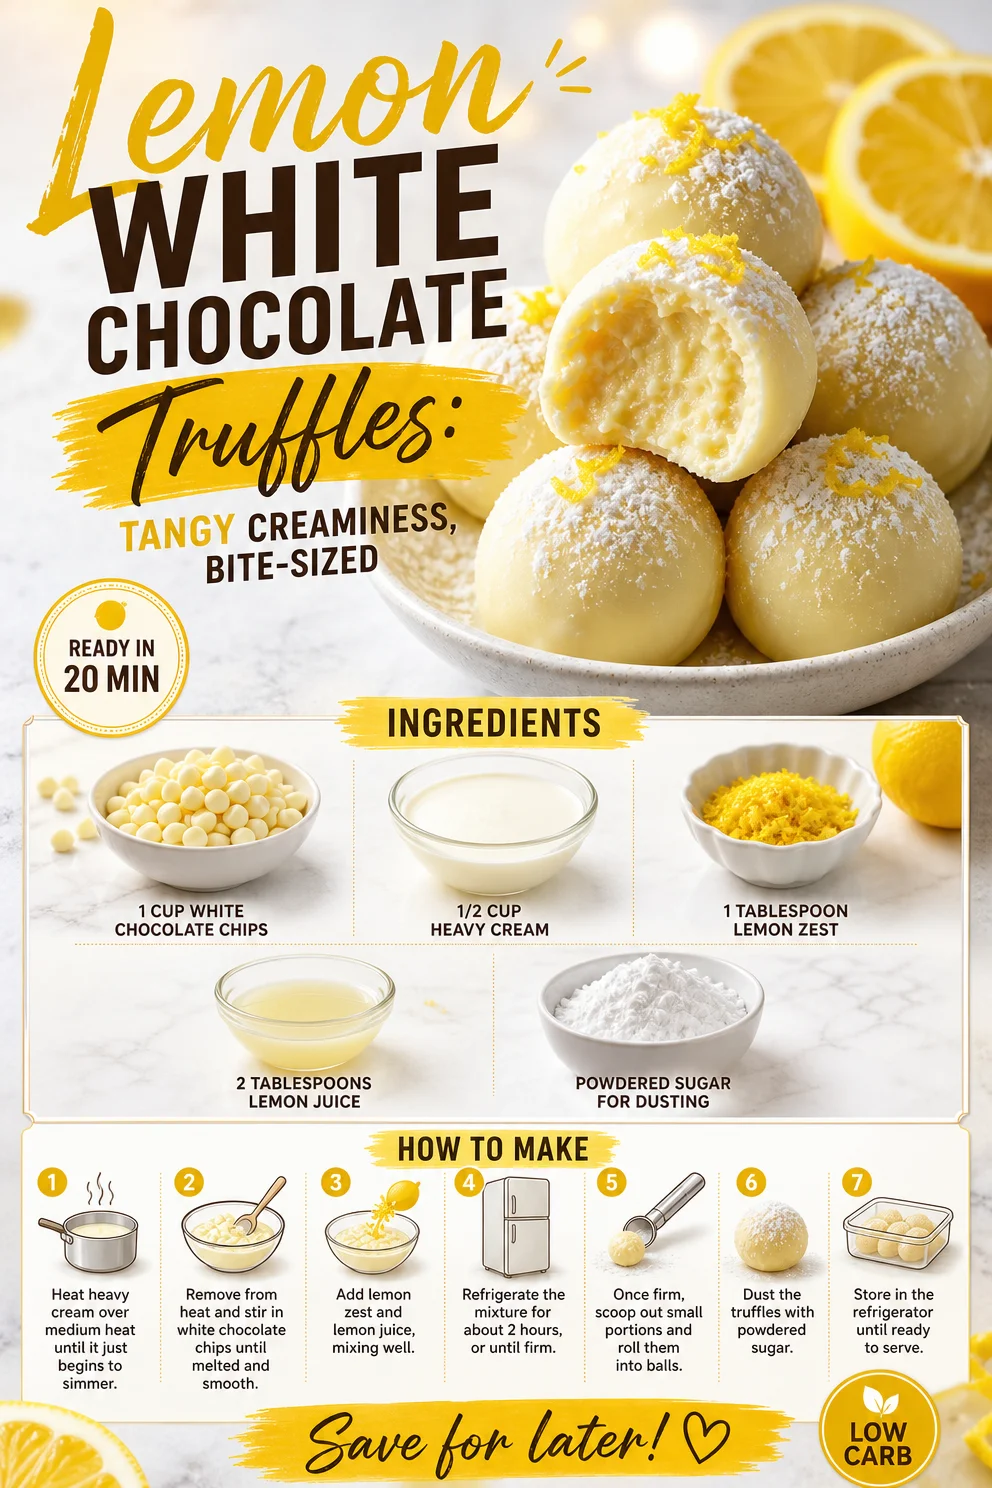
Lemon White Chocolate Truffles: Tangy Creaminess, Bite-Sized
A Zesty Delight: Lemon White Chocolate Truffles
Welcome back, food lovers! Today, I’m excited to share one of my all-time favorite treats: Lemon White Chocolate Truffles. If there’s a combination that hits the sweet spot between refreshingly tart and decadently rich, it’s definitely this. When I think of these truffles, I’m transported to sun-drenched afternoons filled with laughter, sweet conversations, and, of course, the delightful aroma of citrus wafting through the kitchen. Trust me, this recipe is a true gem that will make your taste buds dance and your heart sing!
Lemon White Chocolate Truffles are the perfect bite-sized indulgence. They’re not just a dessert; they’re a little burst of sunshine that can brighten any day. Whether you’re planning a special occasion or just want to satisfy your sweet cravings, these truffles fit the bill. Plus, they’re simple to whip up, making it easy to impress your friends and family without spending all day in the kitchen. Are you ready to elevate your dessert experience? Let’s dive in!
A Nostalgic Bite
Let me take you back to one of my favorite childhood memories—baking with my grandmother on warm summer afternoons. The sun would pour into her kitchen, and the scent of fresh lemons would fill the air as we prepared our favorite treats together. We would chat, laugh, and of course, sneak bites of the white chocolate we were supposed to be saving for our lemony delights.
The highlight was always when we’d roll the truffles in powdered sugar, making them look as though they were dusted with fresh snow. Each truffle we created had its own personality, and somehow, making them felt like a delightful dance between sweet and tart. It became a cherished tradition, one I now carry on by making these Lemon White Chocolate Truffles for gatherings with friends and family. There’s something magical about sharing good food and sweet memories, and these truffles create just that!
Ingredients
Here’s what you’ll need to whip up these luscious truffles:
-
1 cup white chocolate chips
- Tip: Use good-quality chocolate for the best flavor. If you’re not a fan of white chocolate, try starting with milk chocolate instead.
-
1/2 cup heavy cream
- Insight: Heavy cream gives these truffles their luscious texture, making them rich and creamy. You can substitute with canned coconut milk for a dairy-free version!
-
1 tablespoon lemon zest
- Tip: Use a microplane for the finest zest. This will maximize the flavor without the bitter white pith.
-
2 tablespoons lemon juice
- Insight: Freshly squeezed lemon juice adds bright acidity. Store-bought lemon juice can work in a pinch, but fresh is always best!
-
Powdered sugar for dusting
- Tip: Dust right before serving for a beautiful presentation. You can also use cocoa powder or crushed nuts for a different twist!
Step-by-Step Instructions
Now let’s get cooking! Follow these steps, and you’ll have a delightful batch of Lemon White Chocolate Truffles in no time.
-
Prepare Your Ingredients: Start by gathering all your ingredients and equipment. You’ll need a heat-proof bowl, a whisk, a spatula, and a baking sheet lined with parchment paper. Prepping everything beforehand will make your process smoother and more enjoyable!
-
Melt the White Chocolate: In your heat-proof bowl, combine the white chocolate chips with the heavy cream. Place the bowl over a pot of simmering water (this is called a double boiler!). Stir occasionally until the mixture is completely smooth and glossy. Be patient here; the slow melting is key to avoiding burnt chocolate!
-
Add Lemon Zest and Juice: Once the chocolate is melted, remove it from the heat and immediately stir in the lemon zest and juice. This is where the magic happens! The zesty aroma will fill your kitchen, and you’ll feel like a professional chocolatier.
-
Chill the Mixture: Allow the mixture to cool to room temperature, then cover it and pop it in the fridge for about 2 hours. You want it to firm up enough that you can scoop it easily, but not so hard that it’s impossible to work with.
-
Form the Truffles: Once the chocolate mixture is set, use a small cookie scoop or spoon to portion out the truffles. Quickly roll the portions into balls with your palms. Don’t worry if they’re not perfect; uniqueness in shape adds character!
-
Dust with Powdered Sugar: Finally, roll the truffles in powdered sugar and place them on the lined baking sheet. This final touch not only keeps them from sticking together but gives them that gorgeous snow-dusted look!
Serving Suggestions
Presentation goes a long way when it comes to dessert. For an elegant touch, you can serve these truffles on a beautiful platter or in a small glass jar tied with a ribbon. Pair them with a cup of delicate tea or a glass of bubbly prosecco for a refreshing balance. A few sprigs of mint on the side will also enhance the visual appeal of your lovely truffles. Trust me; your guests will be wowed!
Recipe Variations
Feeling adventurous? Here are a few creative twists to customize your Lemon White Chocolate Truffles:
- Coconut Lemon Truffles: Add shredded coconut to the chocolate mixture before chilling.
- Minty Lemon Delight: Mix in a few drops of peppermint extract for a refreshing twist.
- Nutty Lemon Crunch: Roll the truffles in crushed almonds or walnuts instead of powdered sugar.
- Berry Burst: Incorporate dried cranberries or raspberries into the chocolate mix for a fruity kick.
- Spiced Perfection: Try adding a pinch of cardamom or ginger for a warm spice note.
Chef’s Notes
Many years ago, my attempts at making truffles were a hilarious disaster! I remember one particular evening where I accidentally melted my chocolate too quickly. The results were a grainy mess that resembled something resembling chocolate cement—a complete chef flop! But, like any good cook will tell you, every failure in the kitchen is simply an opportunity to learn. It took a few tries, but I eventually nailed it, and I promise anyone can create these truffles, with a little patience and practice. Now, every time I make them, it’s a sweet reminder that practice makes perfect!
FAQs and Troubleshooting
1. Why are my truffles not setting?
If your truffle mixture is too soft, it likely needs more chill time in the fridge. Make sure to give it at least 2 hours to firm up.
2. Can I make these ahead of time?
Absolutely! These truffles keep well in the fridge for up to a week. Just store them in an airtight container!
3. What if I don’t like lemon?
No problem! Feel free to substitute the lemon with your favorite flavors like orange, raspberry, or even matcha for a different twist.
4. How do I keep my truffles from sticking together?
Rolling them in powdered sugar right before serving is a fantastic way to keep them separate. You can also store them in a single layer in an airtight container.
Nutritional Info
These Lemon White Chocolate Truffles are a delightful treat, with each truffle containing approximately 100 calories, mostly from the fats in the chocolate and cream. They are also a source of quick energy, thanks to the sugar from the chocolate and lemon. Enjoy in moderation as an indulgent treat to brighten your day!
And there you have it—a delightful, zesty treat that’s perfect for any occasion. Whether you’re making them to share or keeping them all to yourself (no judgment here!), these Lemon White Chocolate Truffles are sure to be a hit. So grab your whisk and let the fun begin! Happy cooking!
PrintLemon White Chocolate Truffles

Indulge in these delightful Lemon White Chocolate Truffles that combine zesty lemon and rich white chocolate for a perfect bite-sized treat.
- Prep Time: 15 minutes
- Cook Time: 10 minutes
- Total Time: 125 minutes
- Yield: 20 truffles 1x
- Category: Dessert
- Method: Chilling
- Cuisine: American
- Diet: Vegetarian
Ingredients
- 1 cup white chocolate chips
- 1/2 cup heavy cream
- 1 tablespoon lemon zest
- 2 tablespoons lemon juice
- Powdered sugar for dusting
Instructions
- Prepare your ingredients: Start by gathering all your ingredients and equipment.
- Melt the white chocolate: Combine white chocolate chips with heavy cream in a heat-proof bowl over simmering water.
- Add lemon zest and juice: Stir in the lemon zest and juice once the chocolate is melted.
- Chill the mixture: Cool to room temperature, cover, and refrigerate for about 2 hours.
- Form the truffles: Use a small cookie scoop to portion the mixture and roll into balls.
- Dust with powdered sugar: Roll the truffles in powdered sugar before serving.
Notes
Adjust the chilling time if your mixture is too soft. These truffles can be made in advance and stored in an airtight container.
Nutrition
- Serving Size: 1 truffle
- Calories: 100
- Sugar: 8g
- Sodium: 15mg
- Fat: 6g
- Saturated Fat: 4g
- Unsaturated Fat: 2g
- Trans Fat: 0g
- Carbohydrates: 12g
- Fiber: 0g
- Protein: 1g
- Cholesterol: 20mg
Keywords: truffles, lemon, dessert, chocolate, sweet treats
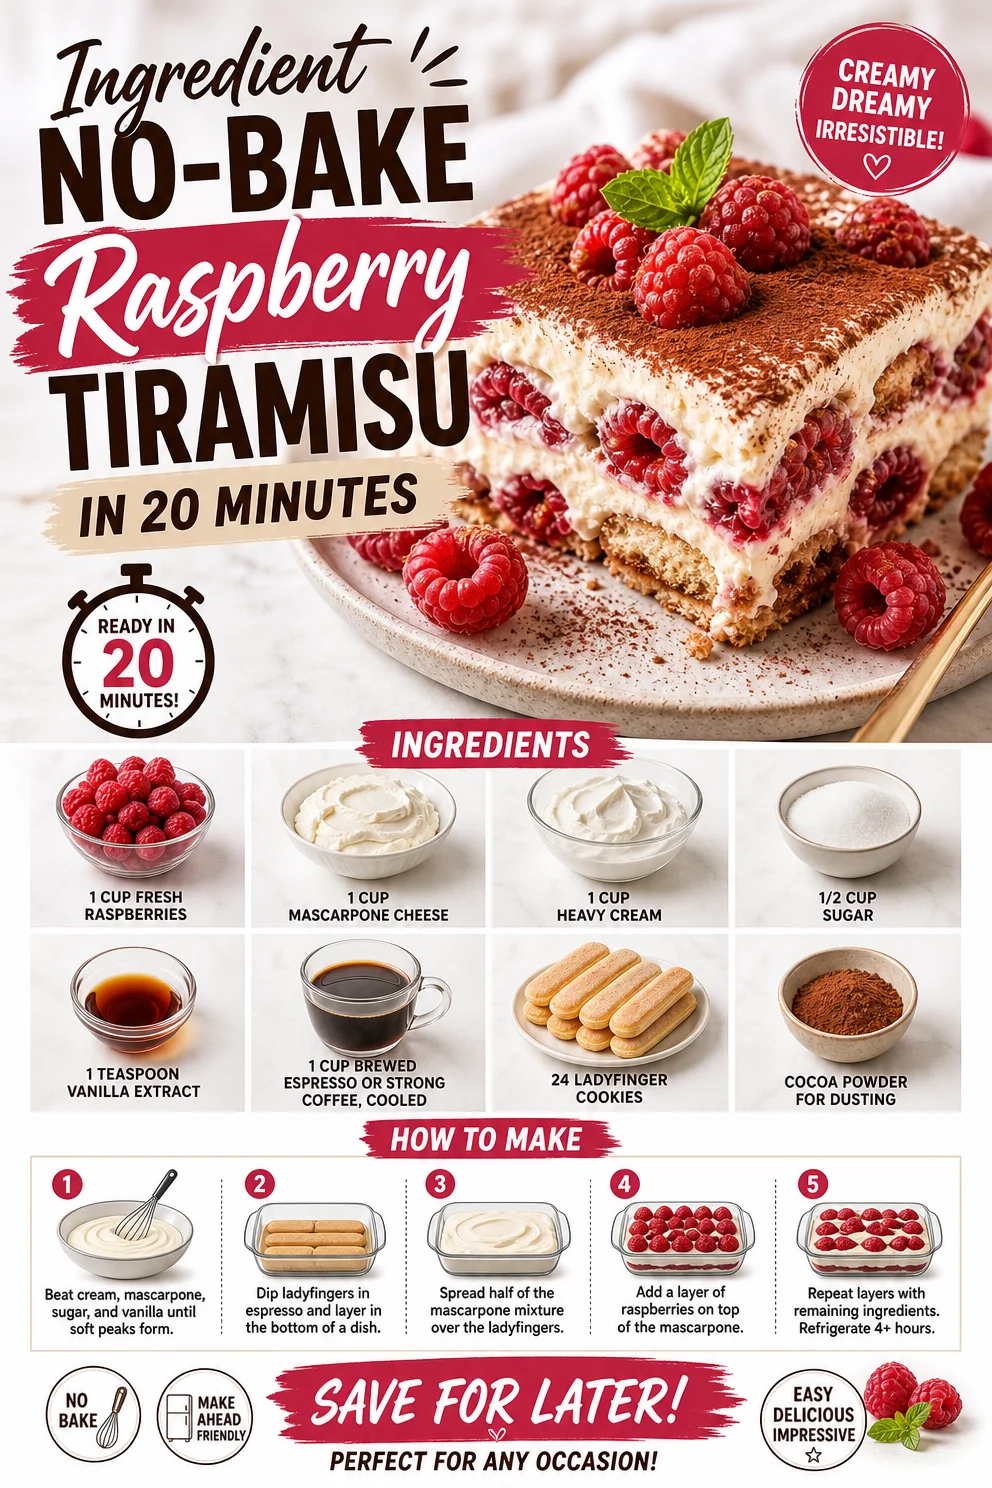
Ingredient No-Bake Raspberry Tiramisu in 20 Minutes
Raspberry Tiramisu: A Delightful Twist on a Classic
Hey there, food lovers! Ava here, ready to dive into one of the most delicious desserts you’ll ever make—Raspberry Tiramisu! If you’re like me and believe that indulgence can be both light and refreshing, then you’re in for a treat. This unique dessert takes the classic Italian Tiramisu and gives it a vibrant twist with fresh, juicy raspberries. Perfect for gatherings or simply treating yourself after a long day, this dessert is bound to impress your friends and satisfy your cravings.
So let’s take a stroll down memory lane, shall we? My first encounter with Tiramisu was at a little Italian café tucked in the heart of my hometown. The moment I took a bite, I was transported to a world of creamy mascarpone, rich espresso, and that glorious cocoa dusting on top. But let’s be real, I’ve always been a fan of fruits in desserts—it balances sweetness and adds a refreshing zing. That’s when I thought, “Why not infuse this classic with the tartness of raspberries?” And just like that, my Raspberry Tiramisu was born.
Picture this: a generous layer of creamy mascarpone laced with whipped cream and raspberries, delicately sandwiched between ladyfingers soaked in aromatic espresso. Can you taste it? Let’s get into the details so you can whip up this masterpiece in your kitchen!
A Sweet Memory in Every Bite
Growing up, my grandmother had a special place in her heart for Italian cuisine. Each Sunday, our family would gather at her cozy kitchen, where the aroma of freshly baked pastries filled the air. One day she surprised us all with Tiramisu, her version, of course, which was a labor of love involving layers upon layers of espresso-soaked goodness. As we dug in, my cousin and I decided to sneak in some fresh berries we had picked from the garden. The resulting combination was magic!
The tartness of the berries danced beautifully against the creamy layers, creating a flavor explosion that left us grinning from ear to ear. Although traditionalists may frown upon fruit in Tiramisu, I believe in breaking the rules when it comes to flavor! My Raspberry Tiramisu is a nod to that playful spirit and a reminder that cooking is all about experimenting and having fun.
Ingredients
Let’s gather our ingredients! Here’s what you’ll need:
-
1 cup fresh raspberries
Sweet and slightly tart, raspberries bring a burst of freshness to the dish. Feel free to use mixed berries if you want to switch things up! -
1 cup mascarpone cheese
This creamy Italian cheese is the heart of Tiramisu. If you can’t find mascarpone, you can substitute it with cream cheese mixed with a bit of sour cream for a similar texture. -
1 cup heavy cream
Whipped to perfection, heavy cream adds volume and richness. If you prefer a lighter version, you can use half-and-half, but the texture won’t be quite the same. -
1/2 cup sugar
Sweeten to taste! You can use coconut sugar or a sugar alternative like stevia if you’re looking to cut calories. -
1 teaspoon vanilla extract
This enhances the flavors beautifully. For a twist, try almond extract instead! -
1 cup brewed espresso or strong coffee, cooled
This gives Tiramisu its characteristic flavor. Make sure it’s strong so it doesn’t get overpowered by the other ingredients! -
24 ladyfinger cookies
These delightful sponge cookies soak up the coffee like nobodies’ business. If you’re gluten-free, look for gluten-free ladyfingers or make your own. -
Cocoa powder for dusting
A classic finishing touch that adds a nice bitter contrast to the sweetness.
Step-by-Step Instructions
Alright, let’s get cooking! Here’s how to assemble your Raspberry Tiramisu step-by-step.
-
Prepare Your Espresso
Brew a strong cup of espresso or coffee. Once it’s ready, set it aside to cool while you prep the cream. This helps retain the ladyfingers’ texture when they’re dipped. -
Whip the Cream
In a large mixing bowl, add the heavy cream and sugar. Using an electric mixer, whip until stiff peaks form. This will add air and create a delightful lightness that’s essential for Tiramisu. Make sure not to over-whip it; you don’t want butter! -
Mix in the Mascarpone
Gently fold in the mascarpone cheese and vanilla extract into your whipped cream. Use a rubber spatula and be careful not to deflate the whipped cream—this step is all about keeping that airy texture! -
Incorporate Fresh Raspberries
Now for the fun part! Stir in about 3/4 of your fresh raspberries gently into the mascarpone mixture. Reserve the rest for garnishing later. The vibrant color and tanginess will bring the whole dessert to life! -
Dip Ladyfingers in Coffee
Quickly dip each ladyfinger into the cooled espresso, ensuring they’re soaked but not soggy. Lay them side by side in a 9×13 inch dish, covering the bottom completely. Feel free to get a little creative with your layering! -
Layer the Cream Mixture
Once the ladyfingers are ready, spread half of the mascarpone-raspberry cream over the top. Use an offset spatula for a smooth finish—it’s all in the presentation! -
Repeat the Process
Layer another set of dipped ladyfingers on top of the cream, followed by the remaining raspberry cream mixture. Smooth it out nicely for a beautiful appearance. -
Chill, Chill, Chill!
Cover the dish with plastic wrap and let it chill in the refrigerator for at least 4-6 hours, or ideally overnight. This allows the flavors to meld together and the cream to firm up. -
Dust with Cocoa Powder
Just before serving, dust the top with cocoa powder. This step adds a bit of elegance and an inviting look that will have everyone excited to dive in! -
Garnish and Serve
Top with the remaining fresh raspberries for a pop of color and a delightful touch.
Serving Suggestions
To serve the Raspberry Tiramisu, cut into squares and plate on dessert plates. Add a few extra raspberries to the side for a beautiful pop of color and a sprig of mint for that extra touch of finesse. You might want to keep a dusting of cocoa powder on the table for guests to sprinkle on their servings!
Recipe Variations
Here are a few fun twists you can try:
-
Chocolate Raspberry Tiramisu: Add a layer of chocolate ganache between the cream layers for a rich, indulgent version.
-
Vegan Version: Substitute mascarpone with a mixture of soaked cashews blended with coconut cream. Use homemade vegan ladyfingers or sponge cake!
-
Citrus Twist: Add a tablespoon of lemon zest to the mascarpone mixture for a bright, zesty flavor.
-
Nutty Delight: Sprinkle crushed nuts, such as hazelnuts or almonds, between layers for added texture and flavor.
-
Berry Medley: Swap out raspberries for your fave berries or a mix; strawberries, blueberries, and blackberries all work wonderfully!
Chef’s Notes
As with all my favorite recipes, this Raspberry Tiramisu has evolved. In my early attempts, I was overly cautious about using fruit, but then I realized how complementary it can be. I’ve had friends tell me they prefer this fruity version to the classic! Just goes to show, there’s beauty in bending the rules.
And here’s a little tip: if you have any leftover mascarpone mixture, it makes an incredible fruit dip! Just store it in an airtight container in the fridge.
FAQs and Troubleshooting
Q: Can I make this Tiramisu in advance?
Absolutely! It’s best when made ahead of time, letting it develop all those wonderful flavors. Just keep it covered in the fridge.
Q: My ladyfingers fell apart?
If your ladyfingers are too soggy, try a quicker dip in the espresso next time. They should absorb the liquid but retain enough structure to hold layers.
Q: Can I use decaf coffee?
Of course! Decaf coffee works perfectly for a caffeine-free dessert without sacrificing flavor.
Q: How long can I store leftovers?
You can store leftovers in the fridge for up to 3 days. Just make sure to cover them well to keep the moisture in!
Nutritional Info
This delightful treat might just earn a place in your heart! Here’s the approximate nutritional info per serving (based on 8 servings):
- Calories: 350
- Protein: 5g
- Fat: 22g
- Carbohydrates: 30g
- Sugar: 20g
Remember, it’s all about balance. Enjoy in moderation, and savor every layer of this Raspberry Tiramisu!
So there you have it! A fresh, vibrant twist on Tiramisu that’s perfect for any occasion. This dessert is not just about the taste; it’s about sharing moments with loved ones. Get ready to wow your guests with this deliciously simple yet elegant dish—happy baking!
PrintRaspberry Tiramisu

A delightful twist on the classic Italian dessert, featuring fresh raspberries and creamy mascarpone layered with espresso-soaked ladyfingers.
- Prep Time: 30 minutes
- Cook Time: 10 minutes
- Total Time: 540 minutes
- Yield: 8 servings 1x
- Category: Dessert
- Method: No-Cook
- Cuisine: Italian
- Diet: Vegetarian
Ingredients
- 1 cup fresh raspberries
- 1 cup mascarpone cheese
- 1 cup heavy cream
- 1/2 cup sugar
- 1 teaspoon vanilla extract
- 1 cup brewed espresso or strong coffee, cooled
- 24 ladyfinger cookies
- Cocoa powder for dusting
Instructions
- Prepare your espresso. Brew a strong cup of espresso or coffee and set aside to cool.
- Whip the cream. In a bowl, add the heavy cream and sugar, and whip until stiff peaks form.
- Mix in the mascarpone. Gently fold in the mascarpone cheese and vanilla extract into your whipped cream.
- Incorporate fresh raspberries. Stir in 3/4 of the fresh raspberries into the mascarpone mixture.
- Dip ladyfingers in coffee. Quickly dip each ladyfinger into the cooled espresso and lay them side by side in a 9×13 inch dish.
- Layer the cream mixture. Spread half of the mascarpone-raspberry cream over the ladyfingers.
- Repeat the process. Layer another set of dipped ladyfingers followed by the remaining raspberry cream mixture.
- Chill in the refrigerator for at least 4-6 hours or ideally overnight.
- Dust with cocoa powder just before serving.
- Garnish with remaining fresh raspberries.
Notes
For a lighter version, you can use half-and-half instead of heavy cream. Experiment with different fruits for a unique flavor.
Nutrition
- Serving Size: 1 serving
- Calories: 350
- Sugar: 20g
- Sodium: 100mg
- Fat: 22g
- Saturated Fat: 13g
- Unsaturated Fat: 5g
- Trans Fat: 0g
- Carbohydrates: 30g
- Fiber: 2g
- Protein: 5g
- Cholesterol: 60mg
Keywords: tiramisu, raspberry dessert, Italian dessert, easy dessert, creamy dessert
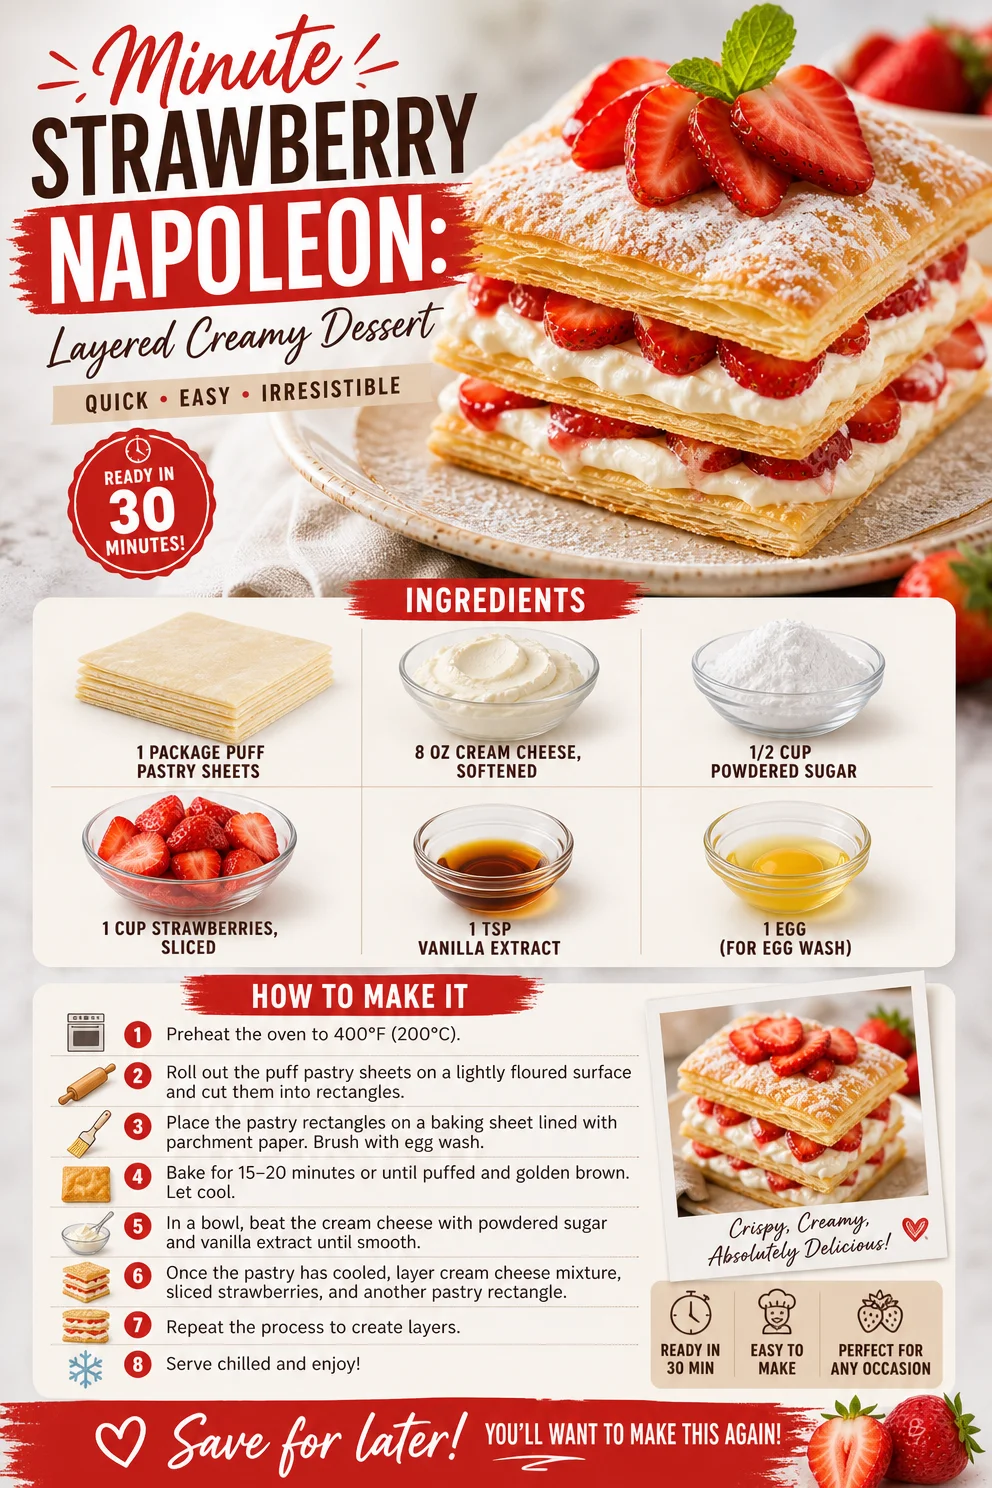
Minute Strawberry Napoleon: Layered Creamy Dessert
Whip Up Some Magic with Easy Strawberry Napoleon!
Hey there, food lovers! Welcome back to Clean Plate Cravings, where we celebrate fresh, feel-good meals that tickle the taste buds without complicating your life. Today, I’m extra excited to share a crowd-pleaser that’s not only visually stunning but also ridiculously simple to make—Easy Strawberry Napoleon! This dessert pays homage to my love for fresh strawberries and flaky pastry and brings a little nostalgia with every bite.
Imagine layers of crisp, buttery puff pastry cradling clouds of sweetened cream cheese and bright, juicy strawberries. Can you picture it? It’s like a trip down memory lane, where every bite is a delightful reminder of summers spent picking sun-ripened strawberries and inhaling their sweet fragrance. You don’t need to be a pastry chef to whip up this elegant dessert, and trust me, everyone will think you are one after they take their first bite!
This dessert is perfect for any occasion, whether it’s a summer picnic, a dinner party with friends, or just a sweet treat at the end of a long day. So, roll up those sleeves, and let’s get to creating this deliciously simple Strawberry Napoleon that’s sure to impress!
A Sweet Slice of Nostalgia
Growing up, summers in my house were filled with the heavenly scent of strawberries ripening in the garden. My mom would often gather us kids to help her make fresh strawberry shortcakes, but my all-time favorite memory stems from a special visit to a quaint little bakery on the corner of our street. They had the most beautiful Strawberry Napoleons I had ever seen.
The first time I tasted it, I was captivated. The lightness of the pastry combined with the rich creaminess of the filling and the fresh, tart strawberries danced in my mouth. I remember holding that delicate dessert, taking the first bite, and being blown away by how something so simple could bring such joy. Those moments of savoring every layer sparked my passion for baking and creating delightful dishes, and today, I want to share that magic with you!
Ingredients
Here’s what you’ll need to create this delightful treat. Don’t worry; these ingredients are easily accessible and allow for some fun substitutes!
-
1 package puff pastry sheets
Flaky, buttery goodness is the base of our Napoleon! If you’re short on time, consider using pre-rolled pastry dough readily available at your local grocery store. -
8 oz cream cheese, softened
Creamy and luscious, this is the heart of our dessert. If you want a lower-fat option, you can swap it out for reduced-fat cream cheese or even Greek yogurt for a tangy kick! -
1/2 cup powdered sugar
This will sweeten our cream cheese filling. If you prefer a healthier alternative, try using coconut sugar or a sugar substitute like erythritol. -
1 cup strawberries, sliced
Fresh strawberries add that juicy, sweet component. If strawberries aren’t in season, feel free to substitute with raspberries or blueberries for a different flavor profile. -
1 tsp vanilla extract
This adds a lovely depth of flavor to our cream mixture. Make sure to use pure vanilla extract for the best taste; it makes all the difference! -
1 egg (for egg wash)
This gives our pastry a beautiful golden finish. If you want a vegan option, just brush the pastry with a little almond milk instead.
Step-by-Step Instructions
Alright, let’s dive into the fun part! Here’s how to assemble your Easy Strawberry Napoleon.
-
Preheat the Oven
First things first, preheat your oven to 400°F (200°C). This will ensure that your pastry gets nice and puffed up while baking. -
Prepare the Puff Pastry
Roll out your puff pastry sheets on a lightly floured surface. If it’s already rolled, just cut it into equal-sized rectangles—about 3 inches by 5 inches works beautifully. Don’t stress about making them perfect; a little mess adds character! -
Egg Wash Time
Beat the egg in a small bowl and brush it lightly over each pastry rectangle. This will give them that shiny, golden color we all love. Quick tip: If you want a lighter version, you can skip this step, but trust me, it’s worth it! -
Bake the Pastry
Place your pastry on a lined baking sheet and pop them in the oven. Bake for about 15-20 minutes, or until they are puffy and golden. Keep an eye on them, as oven temperatures can vary! -
Cool Down
Once baked, take them out and let them cool completely on a wire rack. This is crucial because we don’t want to melt the cream cheese filling when we assemble! -
Make the Cream Cheese Mixture
While the pastry cools, in a mixing bowl, combine the softened cream cheese, powdered sugar, and vanilla extract. Use a hand mixer or whisk to blend until smooth and fluffy. A tip here: If you want it sweeter, don’t hesitate to taste and adjust the sugar! -
Slice the Strawberries
Grab those beautiful strawberries and slice them up. You want them thin enough to layer beautifully but thick enough to hold their shape—think about a quarter-inch thickness for this. -
Assemble the Napoleons
Now, it’s assembly time! Take one pastry rectangle, spread a generous layer of the cream cheese mixture on top, and add a layer of sliced strawberries. Repeat this with another pastry layer on top. For extra flair, dust the top layer with some powdered sugar! -
Chill Before Serving
If possible, let the assembled Napoleons chill in the fridge for about 30 minutes. This allows the flavors to meld and makes for a refreshing treat! -
Enjoy!
Make sure to serve them on a pretty plate and get ready for compliments. Trust me; this dessert will disappear faster than you can say “Napoleon!”
Serving Suggestions
When it comes to serving your Easy Strawberry Napoleon, presentation is key! Stack your assembled pastry layers on a sleek white plate for a clean look. Drizzle a bit of chocolate or raspberry sauce for a pop of color and extra flavor, and don’t forget to add a sprig of fresh mint on top for that final touch! Your guests will think they’ve stepped into a gourmet restaurant—just don’t tell them how easy it was to make!
Recipe Variations
Once you’ve mastered the classic, here are some fun twists you can try:
-
Mixed Berry Delight: Swap out strawberries for a mix of your favorite berries—think raspberries, blueberries, or even blackberries!
-
Chocolate Hazelnut Twist: Spread a thin layer of chocolate hazelnut spread before adding the cream cheese mixture. Decadent and delightful!
-
Lemon Zing: Mix some lemon juice and zest into the cream cheese for a refreshing citrusy flavor.
-
Minty Fresh: Add finely chopped fresh mint leaves to your cream mixture for a refreshing twist.
-
Vegan Version: Use dairy-free cream cheese and plant-based milk for the egg wash to make this dessert vegan-friendly!
Chef’s Notes
This Easy Strawberry Napoleon recipe holds a special place in my heart and kitchen. Over the years, I’ve played around with different fillings and toppings—I’ve even tried adding a splash of orange liqueur to the cream mixture for a little adult fun! The beauty of this dessert is its simplicity; it allows for creativity. So don’t be afraid to add your personal touch and make it your own!
One of my most memorable kitchen disasters involving this dessert was trying to rush the pastry while multitasking. Let’s just say, a melted mess isn’t quite as appetizing as I had envisioned. But that’s the joy of cooking—sometimes the flops lead to the best learning experiences!
FAQs and Troubleshooting
-
Why did my puff pastry not puff up?
If your puff pastry didn’t puff like it should, it could be due to two things: either it was too warm before baking or the oven temperature wasn’t high enough. Make sure your pastry is cold before baking and check that your oven is properly preheated! -
Can I make this ahead of time?
Absolutely! You can prepare the puff pastry and cream filling a day in advance. Just assemble the Napoleon just before serving to maintain that fresh, crispy texture! -
How can I store leftovers?
While this dessert is best enjoyed fresh, if you have leftovers, store them in the fridge in an airtight container for up to two days. However, the pastry may become soggy over time, so eat them while they’re fresh! -
What can I use if I can’t find puff pastry?
In a pinch, you can use phyllo dough layered several times and brushed with butter. Though not a perfect substitute, it’ll still be delicious, although with a different texture.
Nutritional Info
While this dish is a sweet treat, it’s always good to be mindful of our servings! Each Napoleon roughly contains:
- Calories: 250
- Protein: 5g
- Carbohydrates: 28g
- Sugars: 10g
- Fats: 15g
As always, these numbers can vary based on the exact ingredients you use.
Now, aren’t you excited to dive into this confection of crispy pastry and luscious filling? I hope you enjoy making this Easy Strawberry Napoleon as much as I love sharing it with you. Let’s keep things fresh, simple, and, of course, seriously delicious! Happy baking, friends! 🍓🍰
PrintEasy Strawberry Napoleon
A visually stunning and simple dessert featuring layers of flaky puff pastry, sweetened cream cheese, and fresh strawberries.
- Prep Time: 20 minutes
- Cook Time: 20 minutes
- Total Time: 40 minutes
- Yield: 4 servings 1x
- Category: Dessert
- Method: Baking
- Cuisine: French
- Diet: Vegetarian
Ingredients
- 1 package puff pastry sheets
- 8 oz cream cheese, softened
- 1/2 cup powdered sugar
- 1 cup strawberries, sliced
- 1 tsp vanilla extract
- 1 egg (for egg wash)
Instructions
- Preheat the oven to 400°F (200°C).
- Roll out your puff pastry sheets on a lightly floured surface and cut into rectangles.
- Beat the egg in a small bowl and brush over each pastry rectangle.
- Bake the pastry on a lined baking sheet for 15-20 minutes, until golden.
- Cool the baked pastry on a wire rack completely.
- Combine cream cheese, powdered sugar, and vanilla extract in a bowl until smooth.
- Slice the strawberries into thin pieces.
- Assemble the layers with cream cheese mixture and strawberries between the pastry rectangles.
- Chill the assembled Napoleons in the fridge for 30 minutes.
- Serve on a plate, optionally drizzled with chocolate or raspberry sauce.
Notes
For serving, add fresh mint as garnish. You can modify the filling with different berries or flavors according to your taste.
Nutrition
- Serving Size: 1 Napoleon
- Calories: 250
- Sugar: 10g
- Sodium: 150mg
- Fat: 15g
- Saturated Fat: 8g
- Unsaturated Fat: 5g
- Trans Fat: 0g
- Carbohydrates: 28g
- Fiber: 2g
- Protein: 5g
- Cholesterol: 30mg
Keywords: Easy Dessert, Strawberry Napoleon, Puff Pastry, Summer Treat, Cream Cheese Dessert
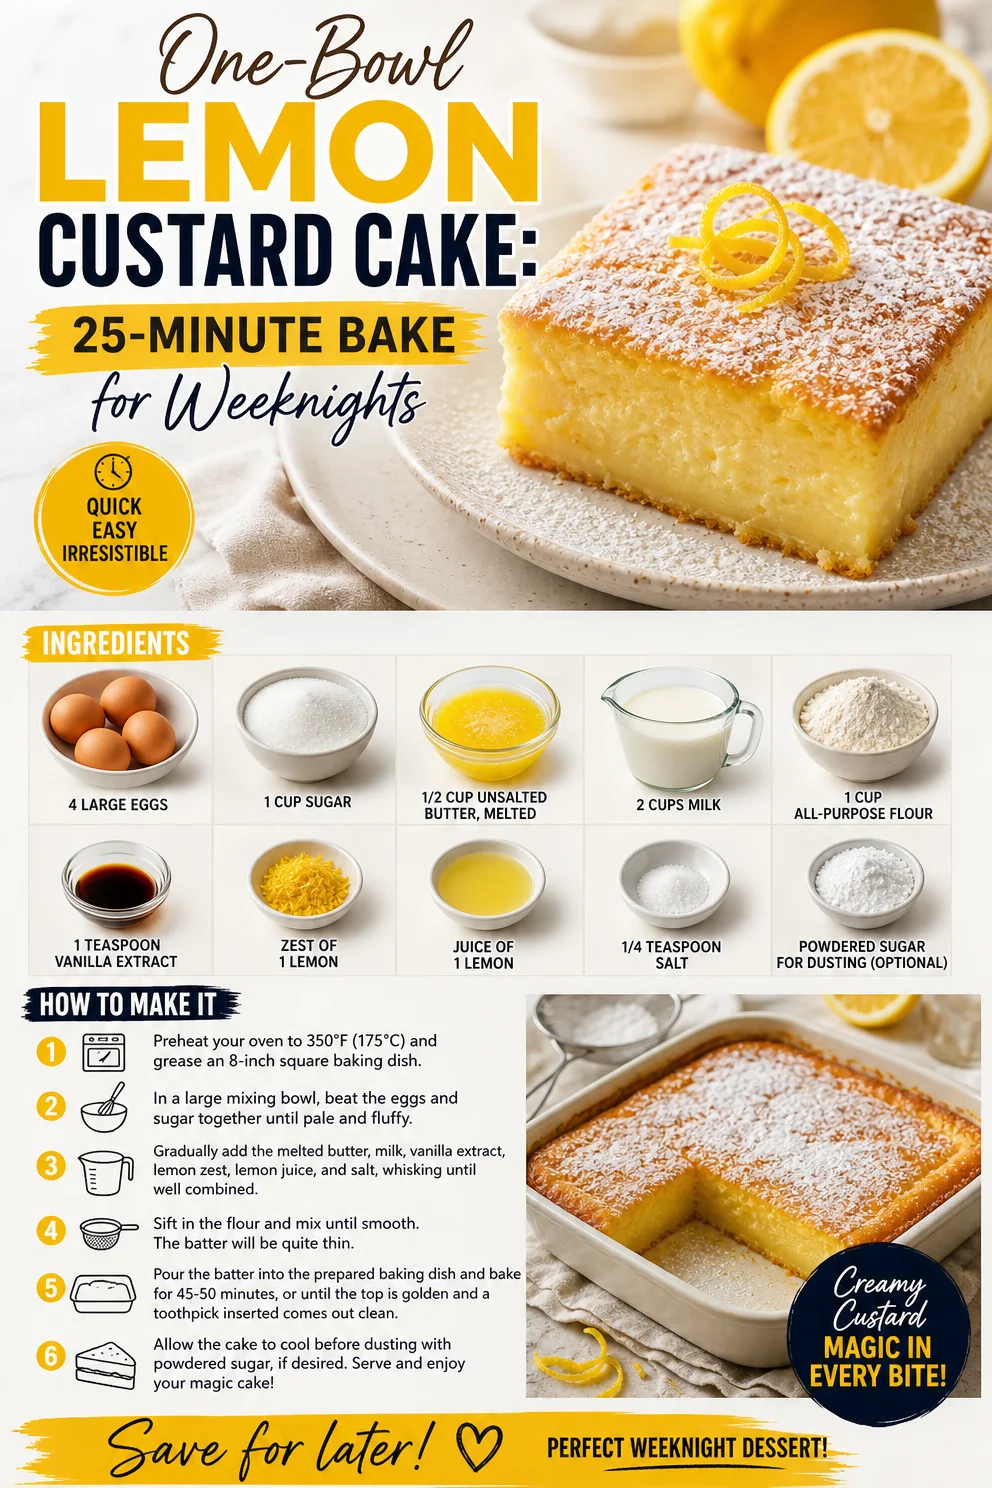
One-Bowl Lemon Custard Cake: 25-Minute Bake for Weeknights
Discover the Magic of Lemon Custard Cake
Hello, fellow food lovers! Today, I’m thrilled to share a little slice of sunshine with you—my beloved Magic Lemon Custard Cake. This isn’t just any dessert; it’s a delightful fusion of tangy lemon flavors and creamy custard that magically transforms as it bakes. If you’re looking for that perfect balance of sweet and tart, this cake is your ticket to flavor town!
Picture this: it’s a lazy Sunday afternoon, and the light filtering through the kitchen window illuminates a gathering of friends around the table. Each person is eagerly discussing everything from weekend plans to travel escapades while the scent of something fresh and lemony wafts through the air. That magical moment when cake comes out of the oven and the anticipation builds—it’s this experience that inspired me to craft this recipe. Cooking is more than just nutrition; it’s about creating memories and enjoying the vibrant tapestry of life through food.
As the custard cake cools, something incredible happens. The top layer becomes light and airy, while the bottom sinks into a rich, creamy custard. It’s a delicious surprise in every bite, and I just know you and your loved ones will savor every moment together with this delightful dish!
A Slice of Nostalgia
You know, food has this amazing ability to take you back to special moments in the past. For me, that moment happened in my grandmother’s cozy kitchen every summer. She would whip up her famous lemon meringue pie, and the family would gather around her as she squeezed fresh lemons and whisked egg whites into pristine peaks. The smell of citrus would dance through the air, and we’d talk about everything from her childhood stories to the best ways to slice a lemon.
One summer, after a particularly sticky day, my grandmother decided to try something a little different—a lemon custard cake. As she explained her recipe, I could see the joy in her eyes. “It’s all about balancing sour and sweet,” she told me. That idea stuck with me all these years, and I promise, this Magic Lemon Custard Cake is an homage to those cherished moments and flavors. Let’s create some magic in your kitchen!
Ingredients
Here’s what you’ll need to bring this enchanting dessert to life:
-
4 large eggs: These help create a fluffy, airy texture for the cake. If you’re looking for a vegan version, you can use flax eggs (1 tablespoon flaxseed meal + 3 tablespoons water = 1 egg).
-
1 cup sugar: Sweetness is key! You can substitute with coconut sugar or use a sugar alternative like stevia; just adjust according to the product’s sweetness level.
-
1/2 cup unsalted butter, melted: This adds richness, but if you’re avoiding dairy, try using coconut oil or a vegan butter spread.
-
2 cups milk: Whole milk gives the best texture, but feel free to use almond milk or oat milk for a non-dairy option.
-
1 cup all-purpose flour: This is vital for structure. Gluten-free all-purpose flour can be used for a gluten-free version.
-
1 teaspoon vanilla extract: This enhances the flavors. Consider using almond extract for a twist!
-
Zest of 1 lemon: A zingy addition! Use a microplane for fine zest, but if you’re in a bind, lemon peel can work too.
-
Juice of 1 lemon: Fresh is best! Bottled lemon juice lacks the same vibrancy, so opt for freshly squeezed.
-
1/4 teaspoon salt: This is essential to balance the sweetness and highlight the lemon flavor.
-
Powdered sugar for dusting (optional): Just a light sprinkle elevates the cake visually and adds a touch of sweetness!
Step-by-Step Instructions
Ready to dive in? Let’s get baking!
-
Preheat the Oven: Preheat your oven to 350°F (175°C). This is crucial for achieving that magical bake.
-
Prepare the Baking Dish: Grease an 8-inch square baking dish or a similar size with butter or any cooking spray. This will prevent sticking and ensure easy removal.
-
Whisk the Eggs: In a large mixing bowl, crack 4 large eggs. Whisk vigorously until they turn pale and frothy—this will add air to your batter, which creates fluffiness!
-
Mix in Sugar and Butter: Slowly add 1 cup of sugar to the frothy eggs while continuing to whisk. Once combined, pour in the 1/2 cup of melted butter and mix until smooth.
-
Incorporate Milk and Vanilla: Gently stir in 2 cups of milk and 1 teaspoon of vanilla extract. This is where the magic begins! The mixture may appear a bit thin—that’s perfect!
-
Add Flour and Lemon: Next, sift in 1 cup of all-purpose flour, zest of 1 lemon, juice of 1 lemon, and 1/4 teaspoon salt. Use a spatula to fold everything together until just combined. Be careful not to overmix; we want to keep it light!
-
Pour and Bake: Pour the batter into the prepared baking dish. Place it in the preheated oven and bake for about 35-40 minutes, or until the top is golden and a toothpick inserted in the center comes out clean. Keep an eye on it towards the end; all ovens vary!
-
Cool and Dust: Let the cake cool in the pan for about 10-15 minutes before transferring it to a wire rack. Once completely cool, dust the top with powdered sugar for that perfect finishing touch!
Serving Suggestions
To plate this delightful Lemon Custard Cake, slice it into squares, and serve each piece on individual plates. If you want to elevate the presentation, add a dollop of whipped cream or a scoop of vanilla ice cream on the side. Garnish with fresh mint or additional lemon zest for that extra pop of color. Trust me, it’ll make your dessert not just delicious but visually appealing too!
Recipe Variations
Feel like getting creative? Here are some scrumptious twists to this classic recipe:
-
Berry Bliss: Add 1 cup of fresh blueberries or raspberries to the batter for a burst of color and flavor.
-
Coconut Dream: Substitute half the milk for coconut milk and add shredded coconut for a tropical flair.
-
Spiced Lemon: Incorporate 1/2 teaspoon of ground ginger or a pinch of cinnamon for a warm, cozy twist.
-
Chocolate Chip Delight: Mix in some mini chocolate chips for an indulgent contrast to the tangy lemon.
-
Herb-Infused: Add a sprinkle of finely chopped rosemary or thyme to the batter for an herbal twist that will surprise your taste buds.
Chef’s Notes
I must confess—my journey with this recipe hasn’t always been smooth sailing. I once made it for a dinner party and forgot the flour (yikes!). My friends still devoured it, claiming it tasted like a lemon soup! It was a funny mishap that turned into a cherished memory. Over time, I’ve perfected it, and now it’s a crowd-pleaser at any gathering. Remember, every misstep in the kitchen is just a new adventure waiting to unfold, so don’t stress—enjoy the process!
FAQs and Troubleshooting
Here are some common questions and potential missteps you might encounter while making your Magic Lemon Custard Cake:
-
Why did my cake not set?
- If your cake came out runny, it may need more cooking time. Make sure to check it towards the end of the baking time. Every oven is different!
-
Can I make this ahead of time?
- Absolutely! This cake stores well. Just keep it in an airtight container in the fridge for up to 3 days. Make sure to dust with powdered sugar just before serving for the best look.
-
Why does my cake have a weird texture?
- Overmixing can lead to a dense texture, so gently fold in the ingredients. Another tip is to avoid opening the oven too soon, as this can cause it to deflate.
-
Can I substitute the lemon?
- Yes! You can use lime juice or even orange for a different flavor profile, but adjust the sugar content slightly since limes tend to be tart.
Nutritional Info
While the nutrition can vary depending on the specific ingredients used, here’s a rough estimate per slice (assuming you cut the cake into 12 pieces):
- Calories: 210
- Protein: 4g
- Fat: 7g
- Carbohydrates: 33g
- Fiber: 1g
- Sugar: 12g
Conclusion
And there you have it—a journey through the delightful world of Magic Lemon Custard Cake! I hope you find as much joy in making and sharing this cake as I do. So roll up your sleeves, savor the process, and enjoy every unforgettable slice alongside the loved ones in your life. Remember, the best part of cooking isn’t just the final dish; it’s the memories we create along the way. Happy baking!
PrintMagic Lemon Custard Cake
A delightful fusion of tangy lemon flavors and creamy custard that creates a magical treat for any occasion.
- Prep Time: 15 minutes
- Cook Time: 40 minutes
- Total Time: 55 minutes
- Yield: 12 servings 1x
- Category: Dessert
- Method: Baking
- Cuisine: American
- Diet: Vegetarian
Ingredients
- 4 large eggs
- 1 cup sugar
- 1/2 cup unsalted butter, melted
- 2 cups milk
- 1 cup all-purpose flour
- 1 teaspoon vanilla extract
- Zest of 1 lemon
- Juice of 1 lemon
- 1/4 teaspoon salt
- Powdered sugar for dusting (optional)
Instructions
- Preheat your oven to 350°F (175°C).
- Grease an 8-inch square baking dish with butter or cooking spray.
- Whisk the eggs in a large mixing bowl until pale and frothy.
- Mix in the sugar and melted butter until smooth.
- Incorporate the milk and vanilla extract gently into the mixture.
- Add the flour, lemon zest, lemon juice, and salt, and fold until just combined.
- Pour the batter into the prepared baking dish.
- Bake for about 35-40 minutes, or until golden and a toothpick comes out clean.
- Cool the cake in the pan for 10-15 minutes before transferring to a wire rack.
- Dust with powdered sugar before serving.
Notes
This cake can be stored in an airtight container in the fridge for up to 3 days. Dust with powdered sugar just before serving.
Nutrition
- Serving Size: 1 slice
- Calories: 210
- Sugar: 12g
- Sodium: 150mg
- Fat: 7g
- Saturated Fat: 4g
- Unsaturated Fat: 2g
- Trans Fat: 0g
- Carbohydrates: 33g
- Fiber: 1g
- Protein: 4g
- Cholesterol: 100mg
Keywords: lemon cake, custard cake, dessert, baking, easy recipe
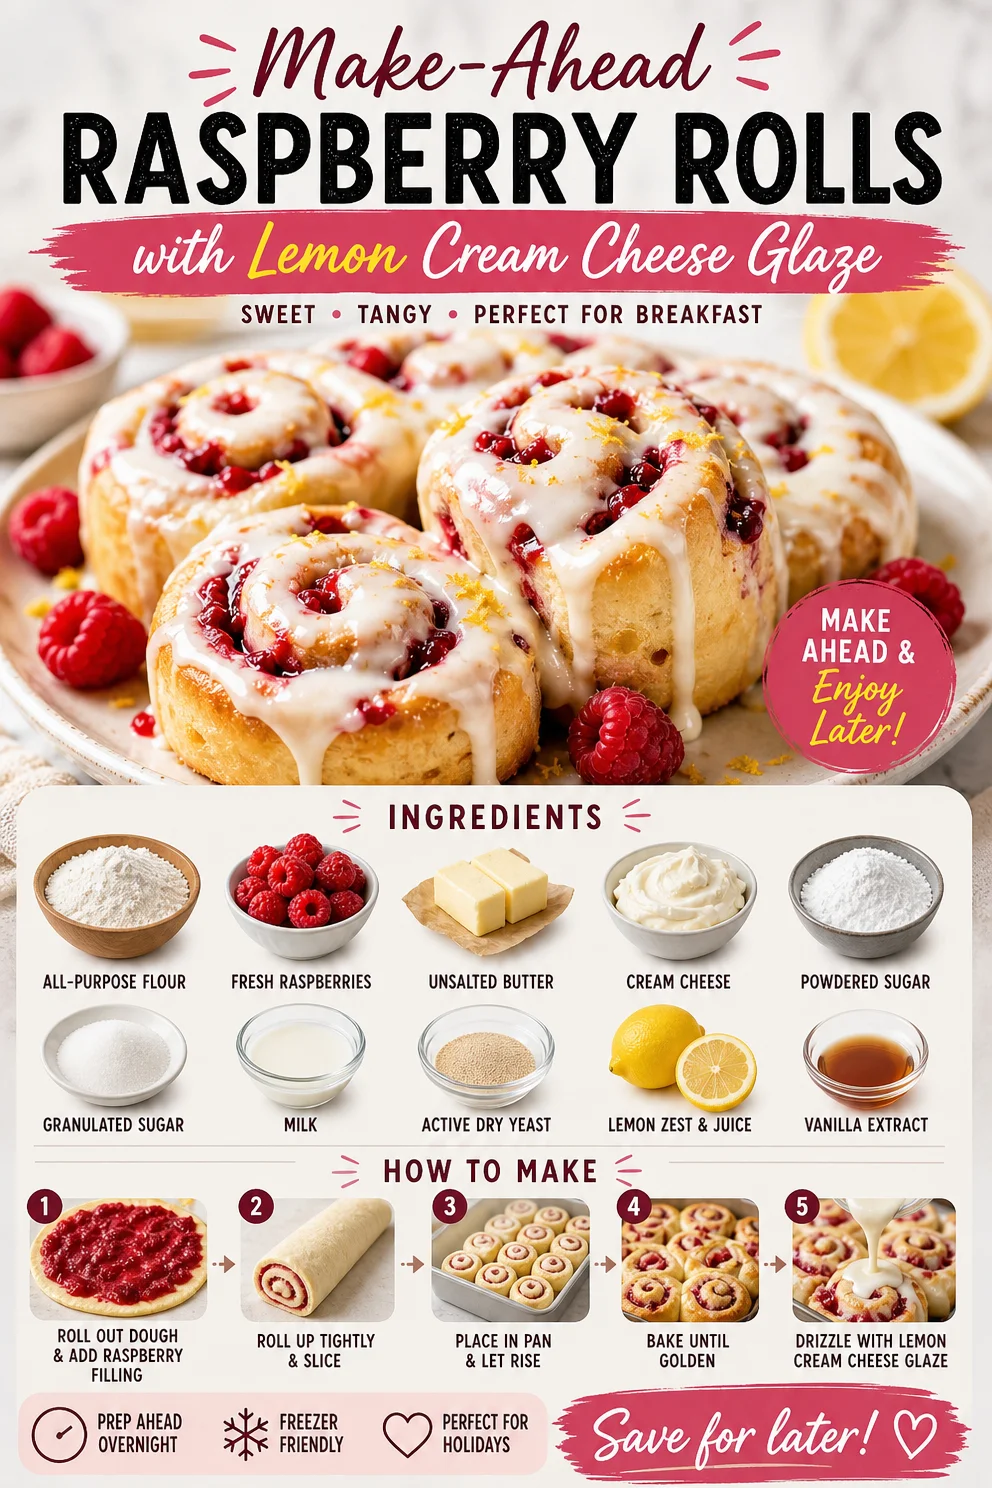
Make-Ahead Raspberry Rolls with Lemon Cream Cheese Glaze
Overnight Raspberry Sweet Rolls with Lemon Cream Cheese Glaze
Welcome to Clean Plate Cravings, my dear food enthusiasts! Today, we’re diving into a delightful recipe that’s bound to become a cherished favorite in your kitchen: Overnight Raspberry Sweet Rolls with a zesty Lemon Cream Cheese Glaze. Just imagine waking up to the sweet aroma of freshly baked rolls infused with tangy raspberries, drizzled in a luscious lemon glaze! It’s not just breakfast; it’s an experience.
A Sweet Morning Memory
Let me take you back to a sunny Sunday morning, years ago when I was just a young home cook trying to impress my family. It was one of those rare mornings when everyone was home, and I wanted to create something special. I decided to try my hand at baking sweet rolls, inspired by my grandmother’s old recipe box that was filled with hand-written notes.
As I bustled around the kitchen, flour danced in the air, and my little brother, with his chocolate-stained face, kept sneaking bites of the dough. I managed to create a bit of chaos, but the joy on my family’s faces when they sunk their teeth into those sweet rolls made it all worthwhile. The rolls weren’t perfect, but the laughter, the mess, and the taste blended into one beautiful memory that I’ll cherish forever. That love for baking, combined with fresh ingredients and a bit of creativity, turned those rolls into something magical.
Now, I’m excited to share my updated version with you! These Overnight Raspberry Sweet Rolls are not only simple but also infused with wholesome flavor. You’ll love how effortless and incredibly delicious they are!
Ingredients
Here’s what you’ll need to create these drool-worthy rolls:
-
1 cup whole milk: Essential for a soft dough, warm the milk to about 110°F to activate the yeast. You can substitute with almond or oat milk for a dairy-free version.
-
1/4 cup granulated sugar: Sweetens the dough and helps activate the yeast. You can use coconut sugar for a healthier alternative, but the sweetness and color might slightly differ.
-
1 package (2 1/4 tsp) active dry yeast: This is the key to fluffy rolls! If you have instant yeast, feel free to use that as well; just skip the proofing step.
-
1/4 cup unsalted butter, melted: Adds richness and flavor. You could also use coconut oil for a dairy-free option!
-
1 large egg: Helps bind the dough and adds moisture. If you’re vegan, replace it with a flax egg (1 tablespoon ground flaxseed + 2.5 tablespoons water).
-
3 cups all-purpose flour: Provides the structure. For a healthier twist, you can swap in whole wheat flour or use a gluten-free blend.
-
1 cup fresh raspberries: These juicy gems give a tart contrast to the sweet rolls. Frozen raspberries work too, but be mindful of the extra moisture.
-
1/2 teaspoon salt: Balances the flavors – don’t skip it!
-
For the lemon cream cheese glaze:
- 4 oz cream cheese, softened: Creamy base for the glaze. Vegan cream cheese can replace this for a plant-based option.
- 1 cup powdered sugar: Sweetness is key here; feel free to adjust according to your taste.
- Zest of 1 lemon: Adds a fragrant and bright flavor.
- 2-3 tablespoons lemon juice: Adjust the acidity to your preference here.
Step-by-Step Instructions
Let’s roll up our sleeves and get started!
-
Activate the yeast: In a small bowl, combine the warm milk and granulated sugar, then sprinkle in the yeast. Stir gently and let it sit for about 5-10 minutes until it’s frothy. This means your yeast is happy and alive!
-
Mix the dough: In a large mixing bowl, combine the melted butter, egg, and salt. Once the yeast mixture is bubbly, pour it into the bowl with the other ingredients. Gradually add in the flour, one cup at a time, mixing with a wooden spoon until a soft dough forms.
-
Knead the dough: Lightly flour a clean surface and turn out the dough. Knead for about 8-10 minutes until it’s smooth and elastic. If the dough is sticky, sprinkle in a bit more flour as needed. Here’s a chef hack: you can also use a stand mixer with a dough hook attachment for this step—it’ll save you time and energy!
-
Let it rise: Place the dough in a lightly greased bowl, cover with a kitchen towel, and let it rise in a warm spot for 1-2 hours, or until doubled in size. I like to preheat my oven for a minute, turn it off, and place my dough inside for the perfect cozy environment!
-
Prepare the filling: Once the dough has risen, roll it out on a floured surface into a rectangle (about 15×10 inches). Gently spread butter over the dough, then sprinkle the fresh raspberries evenly.
-
Roll it up: Starting from one long edge, tightly roll the dough into a log. Pinch the seam to seal and cut it into 12 even pieces. Place these rolls in a greased 9×13-inch baking dish, cut side up, and cover again with a towel.
-
Second rise: Let the rolls rise for another 30-60 minutes in a warm spot, or until they look fluffy. Don’t rush this step; the longer they rise, the lighter your rolls will be!
-
Preheat and bake: Preheat your oven to 375°F (190°C). Once the rolls have puffed up, bake them in the oven for 25-30 minutes, or until golden brown. Your kitchen will start to smell heavenly!
-
Make the glaze: While the rolls are baking, prepare the lemon cream cheese glaze. In a bowl, beat the softened cream cheese until smooth, then add the powdered sugar, lemon zest, and lemon juice. Mix until you achieve a silky consistency!
-
Glaze and enjoy: Once the rolls are out of the oven, drizzle that zesty glaze generously over the warm rolls and serve them while they’re still warm!
Serving Suggestions
To serve these Overnight Raspberry Sweet Rolls, arrange them on a rustic wooden platter or a simple white dish. Drizzle extra glaze on top for that elegant touch, and garnish with a few lemon slices or fresh mint leaves for a pop of color. Pair them with a steaming cup of coffee or tea for a cozy breakfast spread!
Recipe Variations
- Berry medley: Swap out raspberries for a mix of blueberries and blackberries for a delightful stunning blend.
- Chocolate twist: Drizzle some melted dark chocolate on top for an indulgent variation!
- Nutty addition: Add chopped nuts like pecans or walnuts to the filling for added crunch and nutrition.
- Cinnamon sugar: Sprinkle a mixture of cinnamon and sugar on the dough before rolling for a warm and comforting flavor!
- Lemon poppy seed: Mix poppy seeds into the glaze for a lovely twist that complements the lemon perfectly.
Chef’s Notes
These Overnight Raspberry Sweet Rolls have come a long way since that first attempt in my family kitchen. Over time, I learned the magic of fresh ingredients, a hint of creativity, and the importance of patience. There’s something so fulfilling about waking up to fresh baked goodies, and I can’t wait for you to create your own morning memories with this recipe!
Don’t be afraid to play around with flavors and fillings. It’s all about finding what makes your taste buds dance with joy, and trust me, these sweet rolls are so versatile.
FAQs and Troubleshooting
-
Why did my sweet rolls not rise?
If your rolls didn’t rise well, your yeast might have been expired. Always check the expiration date before use. Additionally, make sure you’re working with warm—not hot—milk during activation! -
How can I store leftovers?
Once cooled, these rolls can be stored in an airtight container at room temperature for up to two days. For longer storage, wrap them tightly and freeze for up to a month! -
What can I do if my filling leaked out during baking?
Sometimes, the juicy raspberries may release some liquid. To avoid this, consider blotting them gently with a paper towel before adding to the dough. If some filling spills out, no worries—it’ll still taste amazing! -
Can I make this recipe dairy-free?
Absolutely! Use plant-based milk, vegan cream cheese for the glaze, and coconut oil in place of butter to keep it dairy-free without sacrificing flavor.
Nutritional Info
While I typically focus on enjoyment over strict nutritional info, if you’re curious, a single roll (without glaze) comes in at around 180 calories, 5g protein, and 8g fat. However, remember that these numbers can vary based on substitutions and portion sizes!
I hope you’ve enjoyed this delightful journey of making Overnight Raspberry Sweet Rolls with Lemon Cream Cheese Glaze! May your mornings be as joyful and vibrant as these sweet rolls. Happy baking, and don’t forget to share your kitchen adventures with me!
PrintOvernight Raspberry Sweet Rolls with Lemon Cream Cheese Glaze

Delightful overnight raspberry sweet rolls topped with a tangy lemon cream cheese glaze, perfect for a cozy breakfast experience.
- Prep Time: 60 minutes
- Cook Time: 30 minutes
- Total Time: 90 minutes
- Yield: 12 servings 1x
- Category: Breakfast
- Method: Baking
- Cuisine: American
- Diet: Vegetarian
Ingredients
- 1 cup whole milk
- 1/4 cup granulated sugar
- 1 package (2 1/4 tsp) active dry yeast
- 1/4 cup unsalted butter, melted
- 1 large egg
- 3 cups all-purpose flour
- 1 cup fresh raspberries
- 1/2 teaspoon salt
- For the lemon cream cheese glaze:
- 4 oz cream cheese, softened
- 1 cup powdered sugar
- Zest of 1 lemon
- 2–3 tablespoons lemon juice
Instructions
- Activate the yeast: In a small bowl, combine the warm milk and granulated sugar, then sprinkle in the yeast. Stir gently and let it sit for about 5-10 minutes until it’s frothy.
- Mix the dough: In a large mixing bowl, combine the melted butter, egg, and salt. Once the yeast mixture is bubbly, pour it into the bowl with the other ingredients. Gradually add in the flour, one cup at a time, mixing with a wooden spoon until a soft dough forms.
- Knead the dough: Lightly flour a clean surface and turn out the dough. Knead for about 8-10 minutes until it’s smooth and elastic.
- Let it rise: Place the dough in a lightly greased bowl, cover with a kitchen towel, and let it rise in a warm spot for 1-2 hours, or until doubled in size.
- Prepare the filling: Once the dough has risen, roll it out on a floured surface into a rectangle (about 15×10 inches). Gently spread butter over the dough, then sprinkle the fresh raspberries evenly.
- Roll it up: Starting from one long edge, tightly roll the dough into a log. Pinch the seam to seal and cut it into 12 even pieces.
- Second rise: Let the rolls rise for another 30-60 minutes in a warm spot, or until they look fluffy.
- Preheat and bake: Preheat your oven to 375°F (190°C). Once the rolls have puffed up, bake them in the oven for 25-30 minutes, or until golden brown.
- Make the glaze: While the rolls are baking, prepare the lemon cream cheese glaze by mixing the softened cream cheese, powdered sugar, lemon zest, and lemon juice until smooth.
- Glaze and enjoy: Once the rolls are out of the oven, drizzle the glaze generously over the warm rolls and serve them immediately.
Notes
For an alternative, you can use coconut oil instead of butter and adjust the glaze for sweetness to your liking.
Nutrition
- Serving Size: 1 sweet roll
- Calories: 180
- Sugar: 8g
- Sodium: 150mg
- Fat: 8g
- Saturated Fat: 4g
- Unsaturated Fat: 3g
- Trans Fat: 0g
- Carbohydrates: 23g
- Fiber: 1g
- Protein: 5g
- Cholesterol: 25mg
Keywords: breakfast, sweet rolls, raspberry, lemon glaze, brunch recipe
Min No-Bake Key Lime Cheesecake Jars for Meal Prep
No-Bake Key Lime Cheesecake Jars: A Slice of Sunshine in Every Bite!
Hey there, fellow foodies! I’m so excited to share one of my absolute favorite desserts with you today: No-Bake Key Lime Cheesecake Jars! Picture this: a creamy, tart filling layered with sweet, buttery graham cracker crumbs, all served in adorable little jars. It’s like capturing the essence of summer in a deliciously dreamy dessert. Whether it’s a summer gathering, a relaxing weekend with friends, or just a little self-care after a long week, these jars of joy will make every moment feel special.
Imagine walking into your kitchen, the sun shining through the windows, and that warm breeze beckoning you to create something refreshing. This no-bake treat is super easy to whip up, allowing you to spend more time enjoying your creation rather than slaving over the stove. Perfect for those hot summer days when you want something scrumptious but don’t want to turn on the oven!
So grab your whisk and your favorite jars, and let’s dive into how to make this delightful dessert that will have everyone asking for seconds. Trust me, once you make this, you’ll find all the excuses to whip it out of your fridge!
A Sweet Memory to Cherish
Ah, key lime cheesecake – this dessert brings back so many lovely memories of summer beach trips with my family. I remember how we would drive down to the Florida coast with the windows down, the salty air blowing through the car, and a playlist of our favorite tunes blasting from the speakers. Our first stop would always be at this charming little cafe right by the shore, known for its homemade key lime pie.
I vividly remember the first time I took a bite of their cheesecake version. The tangy lime flavor hit my palate like the ocean waves crashing against the shore, and I was hooked! There was something so nostalgic about that creamy filling combined with the crunch of the graham cracker crust. Fast forward to today, and I’ve transformed that love for key lime cheesecake into these fun little jars. They embody that same luscious flavor, and they stir up wonderful memories with every bite.
Ingredients
Let’s gather our ingredients, shall we? This is a super simple list:
-
8 oz cream cheese, softened: This is the star of your cheesecake! Make sure to let it soften at room temperature, so it’s easy to mix and results in a smooth texture. If you’re in a pinch, you can use mascarpone cheese for a different flavor profile.
-
1/2 cup sugar: This will sweeten your filling perfectly! You can substitute it with honey or maple syrup for a more natural sweetness. Just keep in mind that the texture may vary a bit.
-
1 cup heavy cream: For that dreamy whipped topping on your cheesecake! You can swap it with coconut cream for a dairy-free option.
-
1/2 cup key lime juice: This gives the recipe its zesty kick! Freshly squeezed key limes are ideal, but if you can’t find them, bottled key lime juice works well too. Just check the ingredients for all-natural options.
-
1 tsp vanilla extract: A hint of vanilla enhances the flavor and makes everything more delightful.
-
Graham cracker crumbs: These create the crust! You can crush your own graham crackers or use store-bought crumbs. For a gluten-free version, try using almond flour or gluten-free graham crackers.
-
Lime zest for garnish: This is the cherry on top! Not only does it make your dessert pretty, but it also adds an extra layer of lime flavor.
Step-by-Step Instructions
Now that we have everything ready, let’s get cooking!
-
Mixing the Base: In a large bowl, combine the softened cream cheese and sugar. Use an electric mixer on medium speed to beat it together until it is smooth and creamy. This usually takes about 2-3 minutes. Chef’s tip: Make sure your cream cheese is at room temperature; cold cream cheese can leave lumps in your filling.
-
Whipping the Cream: In a separate bowl, whip the heavy cream until it forms stiff peaks. This might take about 3-5 minutes. You’ll know it’s ready when it holds its shape and doesn’t slosh around. A simple whisk will do if you’re feeling adventurous! This step adds lightness to your cheesecake.
-
Adding the Zesty Kick: Gently fold the whipped cream into the cream cheese mixture. Use a spatula and fold it in slowly to maintain the fluffiness of the whipped cream. Once combined, pour in the key lime juice and vanilla extract, and fold again until everything is well mixed. Your filling should be creamy and light!
-
Layering Time: Now for the fun part! In a jar or a glass, add a spoonful of graham cracker crumbs at the bottom. Then, layer on a generous scoop of your cream cheese mixture. You can use a piping bag for a fancy touch, but a regular spoon does just fine too! Repeat the layers until you reach the top of the jar, ending with a final layer of the cheesecake filling.
-
Chill and Set: Once your jars are assembled, pop them in the fridge for at least 2 hours (or overnight if you can wait!). This will help the cheesecake firm up and allow all those flavors to meld beautifully.
-
Garnish and Serve: Right before serving, sprinkle some extra graham cracker crumbs on top for garnish and finish it off with a sprinkle of lime zest. Serve chilled and watch your friends and family rave about how delicious it is!
Serving Suggestions
When it comes to serving these jars, presentation is key! I love to layer them up in clear glass jars, showcasing all those beautiful layers of creaminess and crunch. You can also use pretty dessert cups or small mason jars for a rustic touch. Pair them with fresh fruit like blueberries or strawberries on the side, or even a sprig of mint for a pop of color. These jars are not just a treat for the taste buds, but for the eyes too!
Recipe Variations
Now, let’s spice things up a bit! Here are a few creative spins on this recipe:
-
Chocolate Key Lime Cheesecake Jars: Add some melted chocolate to the cream cheese mixture, or use chocolate graham crackers to create a delicious chocolate crust for a rich twist.
-
Berry Swirl: Fold in some berry puree (like raspberry or strawberry) into the cream cheese mixture for a fruity surprise!
-
Tequila Key Lime Cheesecake: For the adults, add a splash of tequila to the cream cheese mixture to turn this dessert into a fun, boozy treat.
-
Coconut Cream Variation: Incorporate shredded coconut into the crust and the filling for a tropical coconut key lime experience.
-
Non-Dairy Version: Substitute cream cheese with cashew cream or silken tofu blended until smooth, and the heavy cream with coconut cream for a vegan-friendly option.
Chef’s Notes
I absolutely adore how this recipe has evolved over the years! My very first attempt was a full cheesecake, but it took forever to bake, cool, and slice perfectly. I decided to ditch the oven and embrace the joy of no-bake desserts, which is definitely more my style (and allows for more creativity!). Plus, no one can resist grabbing their own little jar of happiness! Feel free to be experimental with the layers—sometimes, I throw in some crushed candies or rotate the flavors. Get creative; the kitchen is your playground!
FAQs and Troubleshooting
-
What if my cream cheese is lumpy?
- If your cream cheese isn’t soft enough, you might end up with a few lumps. Just keep mixing until it’s smooth, or put it in the microwave for 10-15 seconds to soften it a bit more before mixing.
-
How can I make them less sweet?
- You can reduce the sugar in the filling to taste. Keep in mind that the tartness from the key lime juice will balance it out, so adjust according to your preference!
-
Can I use regular limes instead of key limes?
- Absolutely! Regular limes will work just fine. The flavor may not be as unique, but it’ll still taste great!
-
How long do they last in the fridge?
- These jars can be stored in the fridge for about 3-4 days. Just make sure they’re covered!
Nutritional Info
This no-bake key lime cheesecake jar is not only delicious but also carries a delightful nutritional profile that fits into a balanced lifestyle. Just remember to treat it as an indulgent dessert!
So there you have it, my friends! A fun, refreshing, and super easy recipe that you can whip up any time the mood strikes. I hope you enjoy making (and devouring) these No-Bake Key Lime Cheesecake Jars as much as I do. Here’s to blissful bites and sweet memories in the kitchen! Let’s keep it fresh, simple, and seriously delicious! Happy cooking!
PrintNo-Bake Key Lime Cheesecake Jars
A creamy, tart filling layered with sweet, buttery graham cracker crumbs served in adorable jars, perfect for summer gatherings.
- Prep Time: 15 minutes
- Cook Time: 0 minutes
- Total Time: 120 minutes
- Yield: 4 servings 1x
- Category: Dessert
- Method: No-Bake
- Cuisine: American
- Diet: Vegetarian
Ingredients
- 8 oz cream cheese, softened
- 1/2 cup sugar
- 1 cup heavy cream
- 1/2 cup key lime juice
- 1 tsp vanilla extract
- Graham cracker crumbs
- Lime zest for garnish
Instructions
- Mix the softened cream cheese and sugar in a large bowl until smooth and creamy using an electric mixer.
- Whip the heavy cream in a separate bowl until it forms stiff peaks.
- Fold the whipped cream gently into the cream cheese mixture, then add the key lime juice and vanilla extract.
- Layer graham cracker crumbs and cream cheese mixture in jars until full.
- Chill in the refrigerator for at least 2 hours.
- Garnish with extra graham cracker crumbs and lime zest before serving.
Notes
Serve in clear glass jars for a beautiful presentation. You can alter the layers and add fruits for decoration.
Nutrition
- Serving Size: 1 jar
- Calories: 320
- Sugar: 18g
- Sodium: 180mg
- Fat: 25g
- Saturated Fat: 14g
- Unsaturated Fat: 8g
- Trans Fat: 0g
- Carbohydrates: 32g
- Fiber: 1g
- Protein: 4g
- Cholesterol: 80mg
Keywords: no-bake cheesecake, key lime dessert, summer dessert
Weeknight Crispy Hot Honey Pizza in 30 Minutes, Family-Ready
Hot Honey Pizza: A Slice of Flavorful Paradise
Hey there, fellow food lovers! If you’ve landed here, you’re probably on the lookout for a pizza that doesn’t just satisfy your cravings but also jazzes up your taste buds. Well, get ready, because today we’re about to whip up a spectacular Hot Honey Pizza that’s as fun to make as it is to eat!
There’s something magical about pizza, isn’t there? It’s like the universal language of comfort food. From casual Friday nights to celebratory gatherings, pizza brings people together—and when you add the breathtaking heat of hot honey, oh boy, you’ve got an irresistible masterpiece on your hands!
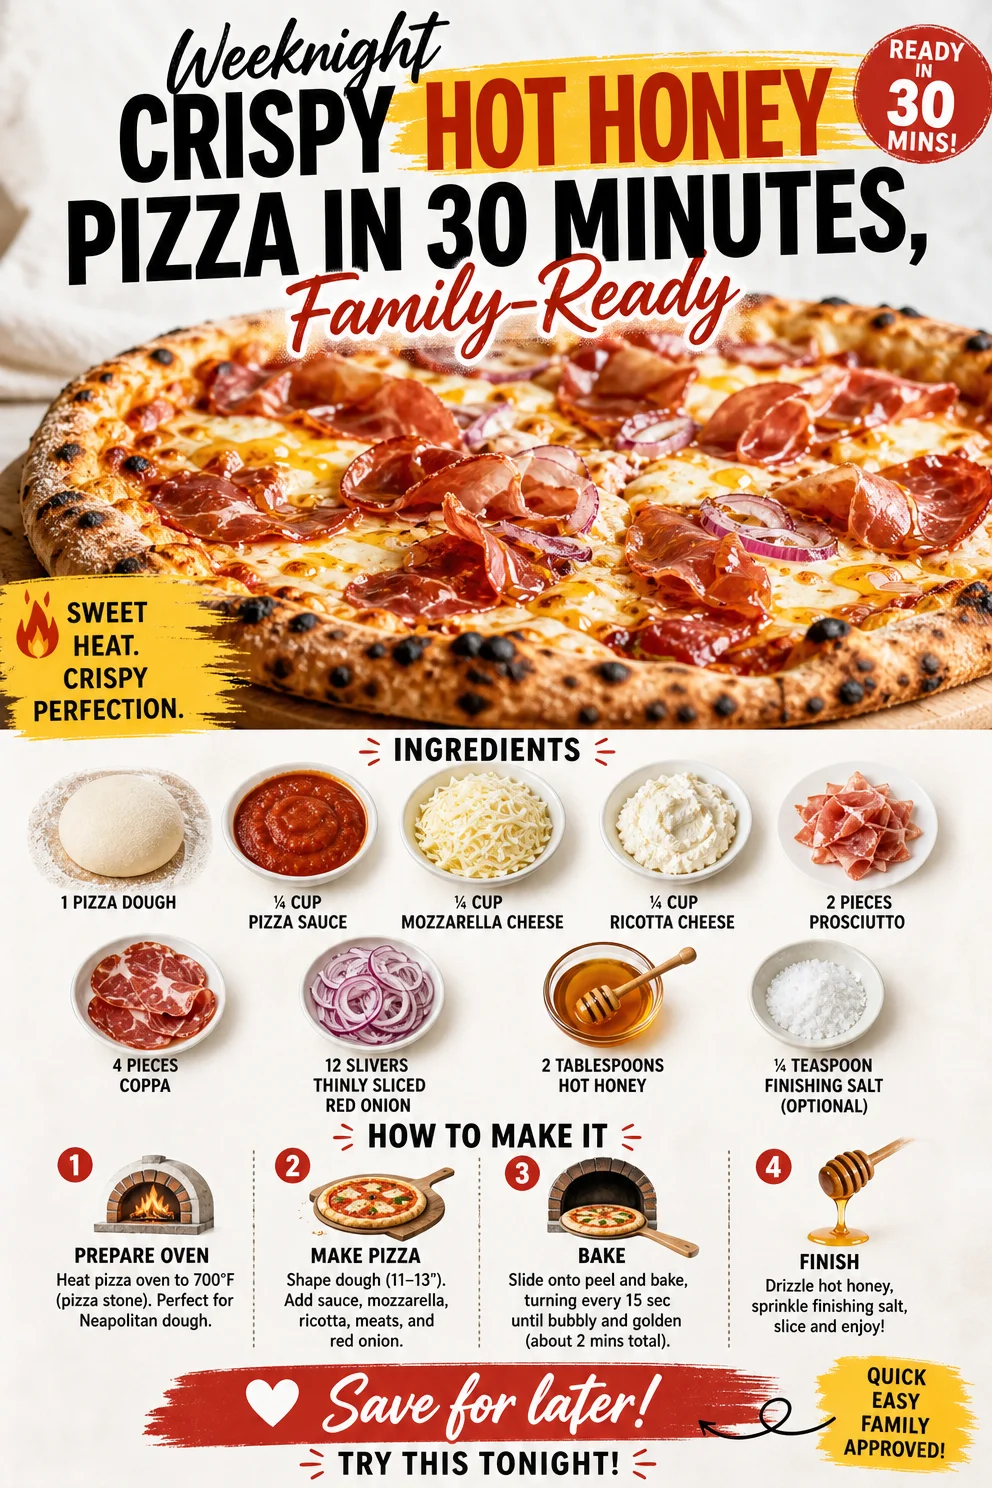
Imagine this: a hot, crispy crust bubbling with gooey mozzarella and creamy ricotta, layered with savory prosciutto and coppa, and garnished with sweet yet spicy drizzles of hot honey that tingle your senses. Sounds divine, right? And let me tell you about the first time I made it—because every great recipe comes with its own story.
A Slice of Nostalgia
Flashback to a sunny summer afternoon a few years ago. I was at a cozy little Italian restaurant, celebrating a friend’s birthday. It was one of those places that felt like home—dim lights, mellow music, and the enchanting aroma of freshly baked pizza wafting through the air. That’s when I first encountered hot honey on pizza. I was skeptical at first. Hot honey? On pizza? But bravely, I took my first bite.
The moment that sweet heat hit my taste buds, I knew I had stumbled upon something extraordinary. The contrast between the gooey cheese and the warm, spicy drizzle was unlike anything else. My friends and I couldn’t stop talking about it; we even ordered a second pizza just to experience that magic again! It inspired me to recreate this beauty at home, and that’s how my beloved Hot Honey Pizza was born, full of flavors and memories. Now I’m excited to share it with you!
Ingredients
To craft this delightfully spicy, cheesy wonder, you’ll need the following ingredients:
- 1 Pizza Dough: You can use store-bought or make your own. If you go store-bought, opt for fresh dough from the bakery section for the best flavor and texture.
- ¼ Cup Pizza Sauce: A simple tomato sauce works wonders. Check the label for low sugar content. You can also blend canned tomatoes with garlic and herbs for a homemade touch!
- ¼ Cup Mozzarella Cheese: The classic gooey cheese! If you’re feeling adventurous, try buffalo mozzarella or even vegan cheese alternatives.
- ¼ Cup Ricotta Cheese: Creamy and luscious, ricotta cheese adds a layer of richness. If you’re dairy-free, swap it with cashew cheese or another nut-based option.
- 2 Pieces Prosciutto, Shredded: This adds a lovely saltiness. If you prefer a vegetarian option, use marinated artichokes or olives instead.
- 4 Pieces Coppa: A delightful cured meat; consider swapping with salami or pepperoni based on your preference.
- 12 Slivers Thinly Sliced Red Onion: For a bit of crunch and zing! If red onions are too sharp for your liking, try caramelizing them first for a sweeter flavor.
- 2 Tablespoons Hot Honey: A sweet, spicy drizzle that takes everything up a notch! If you’re feeling adventurous, try infusing plain honey with chili flakes or sriracha.
- ¼ Teaspoon Finishing Salt (Optional): A sprinkle of flaky sea salt right before serving enhances flavors beautifully.
Step-by-Step Instructions
Now that we’ve got our ingredients lined up, let’s dive into making this homemade Hot Honey Pizza! Trust me; you’ll want to grab a slice as soon as it’s out of the oven.
1. Preheat Your Oven
Preheat your oven to the hottest setting, typically around 475°F (245°C) or higher if your oven allows. This step is crucial for that perfect crispy crust! If you’re using a pizza stone, pop it in the oven to heat up as well.
2. Roll Out the Dough
On a floured surface, take your pizza dough and roll it out into your desired shape—round, square, or rustic! Just be sure to make it about ¼ inch thick for that nice texture. If it’s too sticky, lightly flour your rolling pin. Chef’s Tip: If your dough keeps bouncing back, let it rest for a few minutes to relax the gluten.
3. Spread the Sauce
Once rolled out, carefully transfer the dough to a pizza peel or a baking sheet lined with parchment paper. Spread ¼ cup of pizza sauce evenly over the crust, leaving a little room at the edges for that golden crust. Bonus Tip: Add a sprinkle of dried oregano or basil for extra flavor!
4. Load Up on Cheese
Now, sprinkle ¼ cup of mozzarella evenly over the pizza. Then dollop ¼ cup of ricotta in strategic spots; it’ll melt beautifully in the oven! Note: For an added fun moment, you can use your fingers to fashion little ricotta ‘clouds’ on top!
5. Add the Meats and Onions
Next, layer on 2 pieces of shredded prosciutto and 4 pieces of coppa. Make sure to distribute them evenly; every bite should have that delicious meaty flavor. Top it off with those lovely 12 slivers of red onion for that crispy crunch! Chef Note: The onions will caramelize slightly in the oven, adding sweetness.
6. Bake It Up
Slide the pizza into your hot oven (on the pizza stone if you have one). Bake for about 12–15 minutes or until the crust is golden brown and the cheese is melted and bubbly. Check on it around the 10-minute mark to avoid overbaking!
7. Drizzle with Hot Honey
Once the pizza is out of the oven, let it cool for a minute. Then, drizzle 2 tablespoons of hot honey over the top. If you really love spice, don’t hold back! Chef’s Tip: A honey drizzle adds an irresistible sweetness that contrasts beautifully with the saltiness of the meats!
8. Finish with Finishing Salt
For a little flair, sprinkle ¼ teaspoon of finishing salt over the top if desired. This will just enhance all those lovely flavors and bring everything together!
Serving Suggestions
Slice your Hot Honey Pizza into wedges and transfer them to a large platter or individual plates. Serve it alongside a simple arugula salad with lemon vinaigrette for a refreshing contrast. Guests will love the unexpected warmth and crunch of the pizza paired with the zesty salad! 🍕✨
Recipe Variations
Feeling adventurous? Here are some creative twists to this Hot Honey Pizza:
- Veggie Lover’s Delight: Add bell peppers, mushrooms, and spinach for a delicious veggie version.
- Pineapple Passion: Toss on some pineapple chunks for a sweet and savory Hawaiian twist!
- BBQ Chicken: Swap out the meats for shredded BBQ chicken and drizzle with extra hot honey.
- Spicy Veggie: Add jalapeños or banana peppers for a deeper kick of heat!
- Mediterranean Flair: Use feta cheese, kalamata olives, and roasted red peppers for an exotic Mediterranean pizza.
Chef’s Notes
This Hot Honey Pizza has truly become a staple in my kitchen. Over the years, I’ve experimented with different cheeses and toppings, and I have to say, each version has its own unique charm! I still remember the first time I made this for my family; their reactions were priceless! It’s a recipe that brings everyone together, laughing and sharing stories around the table—just the way food should be.
FAQs and Troubleshooting
Q: My pizza dough keeps sticking. What can I do?
Sometimes dough can be sticky. Be sure to flour your surface generously, and if it’s too much trouble, let it rest for a bit.
Q: How can I tell when the pizza is done?
The cheese should be melted and bubbly, and the crust should be golden brown. A simple lift with a spatula will show you a nice golden bottom!
Q: Can I make the dough ahead of time?
Absolutely! You can make it a day in advance and keep it covered in the fridge. Just bring it to room temperature before rolling out.
Q: What if I don’t have hot honey?
No biggie! You can easily infuse regular honey with chili flakes or hot sauce to achieve that sweet and spicy goodness.
And there you have it—your roadmap to creating a Hot Honey Pizza that will make your taste buds dance! So grab your apron and get ready to create a masterpiece in your kitchen. Remember, food is meant to be enjoyed, so make it fun, share it with loved ones, and savor every single bite! Happy cooking, my foodie friends! 🌶️🍯🍕
PrintHot Honey Pizza

A deliciously spicy and cheesy pizza topped with prosciutto, coppa, and a sweet hot honey drizzle.
- Prep Time: 15 minutes
- Cook Time: 15 minutes
- Total Time: 30 minutes
- Yield: 4 servings 1x
- Category: Main Course
- Method: Baking
- Cuisine: Italian
- Diet: None
Ingredients
- 1 Pizza Dough
- ¼ Cup Pizza Sauce
- ¼ Cup Mozzarella Cheese
- ¼ Cup Ricotta Cheese
- 2 Pieces Prosciutto, Shredded
- 4 Pieces Coppa
- 12 Slivers Thinly Sliced Red Onion
- 2 Tablespoons Hot Honey
- ¼ Teaspoon Finishing Salt (Optional)
Instructions
- Preheat your oven to the hottest setting, typically around 475°F (245°C).
- Roll out the dough on a floured surface to about ¼ inch thickness.
- Spread ¼ cup of pizza sauce evenly over the crust.
- Load up with ¼ cup of mozzarella and dollop on ¼ cup of ricotta.
- Add 2 pieces of shredded prosciutto and 4 pieces of coppa, then top with 12 slivers of red onion.
- Bake for 12–15 minutes or until the crust is golden brown.
- Drizzle 2 tablespoons of hot honey over the top after baking.
- Finish with optional finishing salt if desired.
Notes
For a vegetarian option, substitute meats with marinated artichokes or olives. Experiment with different cheeses and toppings for variations.
Nutrition
- Serving Size: 1 slice
- Calories: 350
- Sugar: 8g
- Sodium: 600mg
- Fat: 15g
- Saturated Fat: 6g
- Unsaturated Fat: 7g
- Trans Fat: 0g
- Carbohydrates: 40g
- Fiber: 2g
- Protein: 14g
- Cholesterol: 35mg
Keywords: Hot Honey Pizza, Spicy Pizza, Italian Recipe, Comfort Food, Easy Pizza Recipe
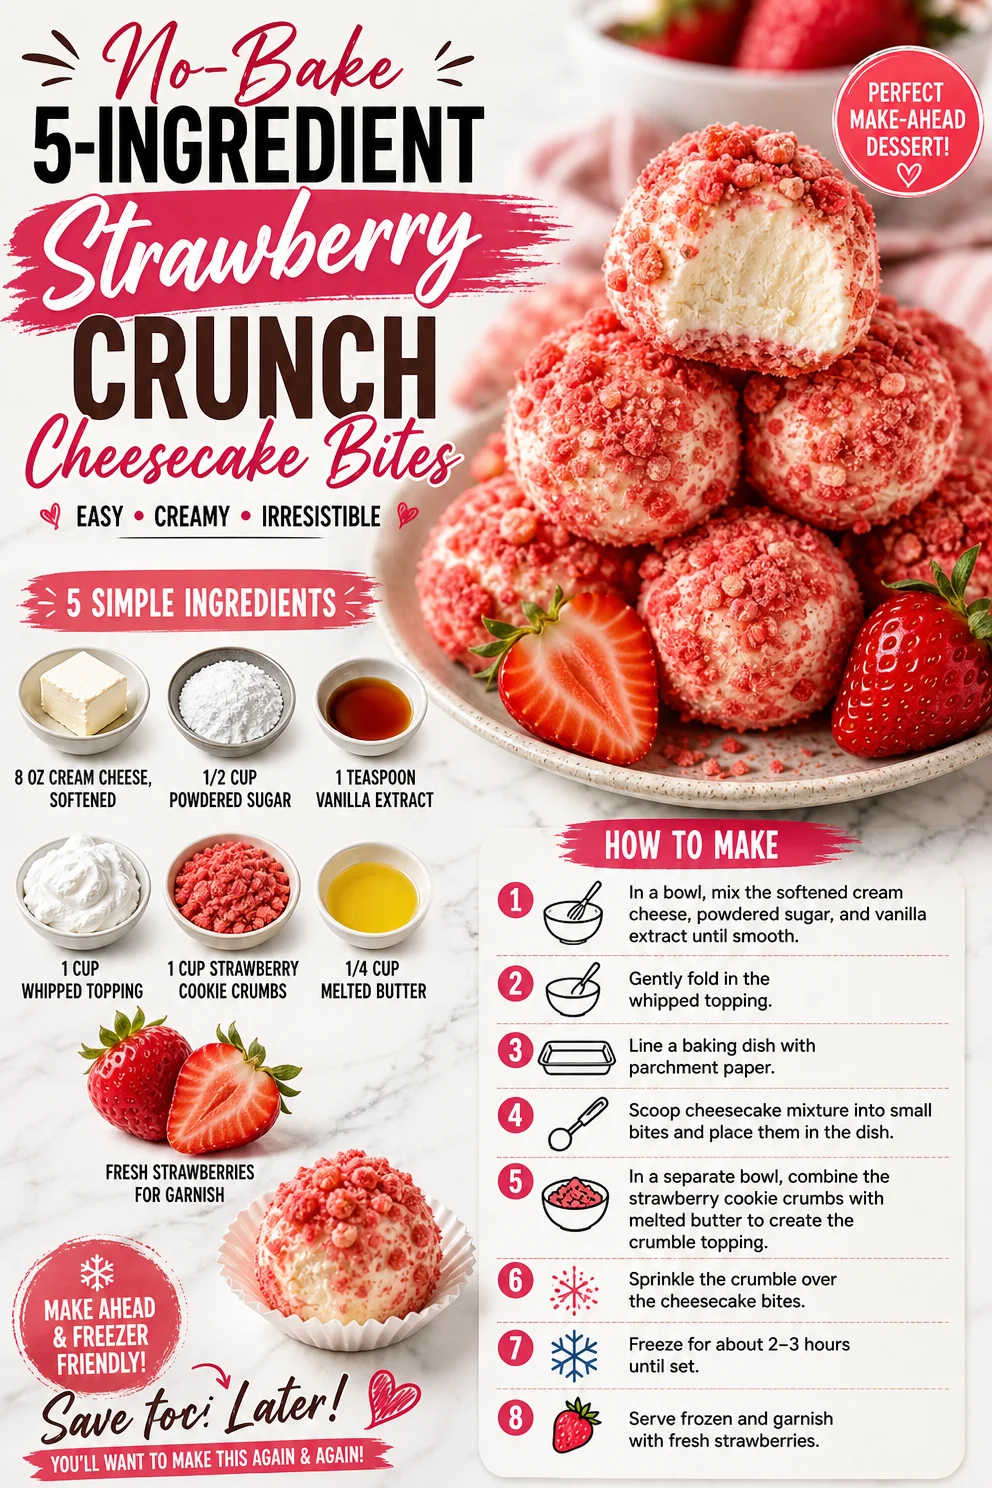
No-Bake 5-Ingredient Strawberry Crunch Cheesecake Bites
Strawberry Crunch Cheesecake Bites: A Sweet, Nostalgic Treat
Hey there, fellow food lovers! It’s your friend Ava here and today we’re diving into a sweet indulgence that combines creamy decadence with a pop of crunch and a burst of strawberry goodness. Yes, you guessed it, we’re making Strawberry Crunch Cheesecake Bites! These little morsels are not just delicious; they hold a special place in my heart, and I can’t wait to share the story behind them.
A Slice of Nostalgia
Growing up, my family had a tradition during summer barbecues—an unspoken competition of who could bring the sweetest, most delightful dessert. My grandmother always impressed us with her strawberry shortcakes, each layer of fresh berries, creamy filling, and buttery biscuit leaving us pleading for just one more slice.
One summer, as I stood precariously on a stool helping her out in the kitchen, we decided to switch things up. Combining her love for cheesecake with my craving for shortcake, we created these Strawberry Crunch Cheesecake Bites. I vividly remember the first time we took a bite; it was as if fireworks lit up our taste buds! The way the creamy cheesecake melted in our mouths while the crunchy cookie layer added a perfect texture was pure magic. Those moments spent giggling in the kitchen, surrounded by flour dust and berry stains, have shaped my cooking style today—simple yet joyful, and bursting with flavor!
I hope these bites bring you the same joy they bring to me because they are perfect for any occasion, or no occasion at all!
Ingredients
Let’s gather our ingredients for these delightful bites:
-
8 oz cream cheese, softened
Cream cheese is the star of this show. It adds that rich, smooth texture we associate with cheesecake. If you’re looking for a lighter option, try using Neufchâtel cheese, which has less fat but still gives you that creamy goodness! -
1/2 cup powdered sugar
Powdered sugar gives the cheesecake a sweet touch without being overly gritty. In a pinch? You can omit the sugar or use a sugar alternative like erythritol for a lower-calorie option. -
1 teaspoon vanilla extract
Nothing warms the heart quite like vanilla. It enhances the sweetness and adds depth to your cheesecake. Use pure vanilla extract for a better flavor, but in a pinch, imitation vanilla will work, too. -
1 cup whipped topping
This fluffy element lightens up our cheesecake mix, giving it that airy texture. You can easily swap this for homemade whipped cream if you’re feeling adventurous—just whip some heavy cream until stiff peaks form. -
1 cup strawberry cookie crumbs (or crushed strawberry shortcake bars)
This is where the magic happens! Use strawberry cookies for that perfect crunch and sweet flavor. If you can’t find them, crushed shortcake bars make a delicious alternative. Feel free to crush up some graham crackers, too! -
1/4 cup melted butter
The melted butter helps bind our cookie crumbs into a beautiful crust. Unsalted butter is best for maintaining flavor balance, but coconut oil is a fun swap if you want a dairy-free twist. -
Fresh strawberries for garnish
Fresh strawberries are the rockstars of this recipe—garnishing with them gives that appealing touch and fresh burst of flavor. This is optional, of course, but why not spring for the fresh stuff when it’s so beautifully vibrant?
Step-by-Step Instructions
Now that we’ve got our ingredients prepped, let’s get cooking!
-
Prepare the Cheesecake Mixture
In a large mixing bowl, combine the softened cream cheese, powdered sugar, and vanilla extract. Using an electric mixer, beat the mixture on medium speed until it’s smooth and creamy—about 2 minutes. A little tip here: make sure your cream cheese is softened enough (leave it at room temperature for about 30 minutes) to avoid lumps. Trust me; nobody wants a lumpy cheesecake! -
Fold in the Whipped Topping
Gently fold in the whipped topping until fully combined. This step adds airiness to the mixture, keeping that luscious cheesecake light and fluffy. Use a spatula and a gentle folding motion, kind of like you’re tucking the whipped topping into a warm blanket! -
Prepare the Crunchy Cookie Base
In another bowl, mix together the strawberry cookie crumbs and melted butter until the crumbs are evenly coated. When your mixture looks like wet sand, it’s ready! Press this mixture firmly into the bottom of your chosen mini dessert cups or a muffin tin lined with cupcake liners. Pro tip: Use the back of a tablespoon to pack it down tightly so they hold together perfectly when you bite into them! -
Fill with Cheesecake Mixture
Spoon the creamy cheesecake mixture on top of the pressed cookie base. Try to smooth out the tops for a lovely presentation—unless, of course, you love that homemade look. Don’t be afraid to use a piping bag if you want a fancier finish! -
Chill Until Set
Cover your dessert cups with plastic wrap or foil, and place them in the fridge for at least 2 hours to let them set. This is the perfect time to whip up a batch of your favorite cocktails or simply relax with a good book while dreaming of your creamy, crunchy treat! -
Garnish and Serve
Before serving, pop a fresh strawberry piece on top of each cheesecake bite. You can even drizzle a bit of chocolate sauce or strawberry puree if you’re feeling extra fancy!
Serving Suggestions
These Strawberry Crunch Cheesecake Bites are perfect for picnics, parties, or just a sweet little treat after dinner. Serve them chilled, and for a fun touch, place them on a colorful platter alongside whole fresh strawberries and mint leaves to brighten up your table. It’s like a little spring party on a plate!
Recipe Variations
Let’s get creative! Here are a few fun twists to try on this classic recipe:
-
Chocolate Lovers’ Delight: Swap the strawberry cookie crumbs for crushed chocolate cookies, and mix some melted chocolate into the cheesecake mixture for a divine chocolate strawberry cheesecake combo.
-
Caribbean Vacation: Add a splash of coconut extract to your cheesecake mixture and substitute crushed pineapple for the strawberry layer for a tropical vibe!
-
Berry Medley: Use a mix of berries—raspberries, blueberries, and strawberries—to make a berry explosion!
-
Vegan Option: Substitute cream cheese with a cashew cream or a vegan cream cheese. Ensure that your whipped topping is also dairy-free for a completely plant-based dessert.
Chef’s Notes
As with many of my recipes, this one has evolved over time. Initially, I stuck strictly to the classic strawberry flavor. However, after hearing from friends and love ones about their flavor preferences, I started experimenting with different combinations, much to my delight! The look of surprise and joy as they took their first bites inspired me to keep trying new variations. So don’t hesitate to make this recipe your own!
Oh, and I can’t forget the time I accidentally left the cheesecake bites out of the fridge for a few hours. Instead of panicking, I decided to embrace it! The bites were slightly warm and extra creamy, with the crust becoming soft but still delicious. Sometimes the magic happens in the unexpected—and that’s what you can find when you embrace your kitchen adventures!
FAQs and Troubleshooting
1. Why are my cheesecake bites not setting?
If your bites haven’t set, they likely need more chilling time. Make sure they’re covered well and give them a few more hours in the fridge.
2. Can I freeze these bites?
You absolutely can! Just be sure to wrap them tightly in plastic wrap or aluminum foil. Thaw them in the refrigerator before serving for the best texture.
3. My crust is too crumbly! What went wrong?
You might not have used enough melted butter to bind the crumbs. If this happens, simply mix in a bit more melted butter until you reach the desired consistency.
4. How can I make these bites lower in sugar?
Substituting the powdered sugar with a sugar alternative like Stevia or monk fruit is a great option! You can also reduce the sugar a bit and see how you like it. Taste as you go—cooking is all about finding what pleases your palate!
Nutritional Info (Optional, if applicable)
While indulgent, each Strawberry Crunch Cheesecake Bite is a perfect balance of flavor and satisfaction! For those counting calories, know there are options to lower sugar and calorie counts, but these little treats are meant to be enjoyed in moderation!
And there you have it! A delightful recipe that combines sweet nostalgia with homemade goodness. You’ll find that these Strawberry Crunch Cheesecake Bites are the perfect treat for anytime you want something easy, delicious, and guaranteed to impress. So get in that kitchen, make a mess, and enjoy every bite—after all, life is too short for boring food! Let’s keep things fresh and flavorful!
PrintStrawberry Crunch Cheesecake Bites
Creamy cheesecake bites with a crunchy strawberry cookie base, perfect for any occasion.
- Prep Time: 20 minutes
- Cook Time: 0 minutes
- Total Time: 120 minutes
- Yield: 12 servings 1x
- Category: Dessert
- Method: Chilling
- Cuisine: American
- Diet: Vegetarian
Ingredients
- 8 oz cream cheese, softened
- 1/2 cup powdered sugar
- 1 teaspoon vanilla extract
- 1 cup whipped topping
- 1 cup strawberry cookie crumbs (or crushed strawberry shortcake bars)
- 1/4 cup melted butter
- Fresh strawberries for garnish
Instructions
- Prepare the cheesecake mixture: In a large mixing bowl, combine the softened cream cheese, powdered sugar, and vanilla extract. Beat until smooth and creamy.
- Fold in the whipped topping until fully combined.
- Prepare the crunchy cookie base: Mix strawberry cookie crumbs and melted butter in another bowl until evenly coated. Press firmly into mini dessert cups.
- Fill with cheesecake mixture: Spoon the creamy cheesecake mixture on top of the pressed cookie base.
- Chill until set: Cover with plastic wrap or foil, and refrigerate for at least 2 hours.
- Garnish and serve: Top each cheesecake bite with a fresh strawberry piece before serving.
Notes
These bites can be frozen; wrap tightly and thaw in the refrigerator before serving. Experiment with flavors for a fun twist.
Nutrition
- Serving Size: 1 bite
- Calories: 150
- Sugar: 8g
- Sodium: 160mg
- Fat: 9g
- Saturated Fat: 4g
- Unsaturated Fat: 4g
- Trans Fat: 0g
- Carbohydrates: 15g
- Fiber: 0g
- Protein: 2g
- Cholesterol: 30mg
Keywords: strawberry cheesecake bites, dessert, summer treats, no bake cheesecake
Beginner-Friendly Cinnamon Roll Cookies: Easy, Gooey Treats
The Sweetest Twist: Cinnamon Roll Cookies Recipe
There’s something undeniably cozy about the scent of cinnamon wafting through your kitchen, isn’t there? It’s like wrapping yourself in a warm blanket and settling into a comfy chair with a good book. That’s the feeling I want to evoke in you today with my take on a classic favorite: Cinnamon Roll Cookies. Yes, you heard that right—cookies that capture all the flavors of a delicious cinnamon roll, but come together in a delightful, chewy cookie form!
These cookies are not just a dessert; they are a celebration of texture and flavor that can elevate any day, whether gloomy or sunny. A hint of vanilla, the warmth of cinnamon, and the decadent frosting hugged around every bite make these cookies the ultimate treat. They are perfect for sharing with friends, family gatherings, or, let’s be honest, hiding away for yourself (we won’t tell!).
In this blog post, I’ll take you through every step of crafting these delectable cookies. Whether you’re a seasoned baker or new to the kitchen, this recipe is approachable, so you can whip it up without feeling overwhelmed. Plus, I’ll share some fun stories, culinary tips, and a few delightful variations to keep things fresh every time you bake. So grab your apron, and let’s dive into this delightful cookie adventure together!
A Little Background on My Love for Cinnamon Rolls
Growing up, Sundays were sacred in our household. They began with the cozy ritual of Sunday brunch, where the aroma of freshly baked cinnamon rolls filled the air—the cinnamon, brown sugar, and butter swirled together with tender dough crafted by my mom’s magical hands. Each bite was a warm hug that melted my heart and fueled my day.
One Sunday, however, things took a delicious twist. My mom decided to experiment with a cookie version of our beloved cinnamon rolls. She gathered us around the kitchen, and even though our expectations were high, the moment we took a bite, we were all in agreement—these were divine! The light, chewy texture combined with the rich flavor of cinnamon was an instant hit. The best part? We could eat more than one without feeling guilty!
That memory sticks with me, and it’s why I’m so excited to share this Cinnamon Roll Cookies recipe with you. Not only are these cookies reminiscent of those cherished Sunday mornings, but they bring a modern twist to a classic favorite. Let’s keep those sweet memories alive—one cookie at a time!
Ingredients
Let’s gather our ingredients before diving into the baking process. Here’s what you’ll need:
-
2 cups All-Purpose Flour
This forms the base of your cookie—use a scoop and level method for perfect measurements! If you’re gluten-free, opt for a 1:1 gluten-free flour blend, and it should work just as beautifully. -
1 cup Butter, softened
The butter provides richness and moisture to our cookies. I recommend unsalted butter for better flavor control. In a pinch, you can swap in coconut oil for a dairy-free version—just ensure it’s softened. -
1 cup Sugar
Regular granulated sugar gives these cookies their sweetness and helps create a nice, chewy texture. Feel free to substitute with coconut sugar for a healthier twist, but cookies may be darker in color. -
1 teaspoon Vanilla Extract
Pure vanilla extract enhances the flavor profile wonderfully. If you find yourself out of vanilla, a touch of almond extract can add a unique spin. -
1 teaspoon Baking Powder
This is essential for fluffiness; it gives the cookies a lovely lift. Don’t confuse it with baking soda, as they serve different purposes! -
1/2 teaspoon Salt
Salt balances the sweetness and enhances all the flavors in the cookies. Sea salt is a great option here if you have it! -
1/2 cup Brown Sugar
Brown sugar adds that irresistible caramel flavor, and the moisture it contains helps keep the cookies soft. For a lighter flavor, use light brown sugar instead. -
2 teaspoons Cinnamon
The star of the show! Fresh ground cinnamon works best for the richest flavor; if you have a spice grinder, using whole sticks is the way to go! -
1 Egg
The egg binds everything together while also contributing to the richness. For a vegan replacement, you can use a flaxseed egg (1 tablespoon flaxseed meal mixed with 2.5 tablespoons water). -
1/2 cup Powdered Sugar (for icing)
The icing drizzled on top is the crowning glory for these cookies. If you’re avoiding refined sugars, powdered coconut sugar is a perfect alternative!
Step-by-Step Instructions
Alright, let’s channel our inner baker and get these cookies in the oven! Follow these steps for a stress-free baking experience:
-
Preheat Your Oven
Start by preheating your oven to 350°F (175°C). This ensures that your cookies bake evenly from the moment they hit the tray—no one likes doughy centers! -
Prepare Your Baking Sheet
Line a baking sheet with parchment paper. This prevents sticking and ensures even baking. Alternatively, you can grease the baking sheet but trust me, parchment is a lifesaver! -
Mix the Dry Ingredients
In a medium bowl, whisk together the all-purpose flour, baking powder, salt, and cinnamon. This step is crucial as it helps the baking powder distribute evenly throughout the flour. A well-mixed dry ingredient blend means perfectly risen cookies! -
Cream the Butter and Sugars
In a large mixing bowl, use an electric mixer to cream together the softened butter, granulated sugar, and brown sugar until it’s light and fluffy—about 2-3 minutes. This incorporates air into the batter for a lighter cookie. Pro tip: Your butter should be soft but not melting! -
Add the Egg and Vanilla
Beat in the egg and vanilla extract until well combined. Here’s where that delicious aroma starts to fill your kitchen! -
Combine Wet and Dry Ingredients
Gradually add the dry ingredient mixture to the wet mixture, stirring with a spatula until just combined. Avoid over-mixing, as this can make the cookies tough! -
Scoop & Shape
Using a cookie scoop (or a tablespoon), drop mounds of dough onto the prepared baking sheet, leaving enough space in between for spreading. You can roll them into balls for a more polished look. Want to jazz it up? Gently press down on the tops to create a little flat area for the icing to pool later. -
Bake the Cookies
Pop them in the oven and bake for 10-12 minutes, or until the edges are lightly golden and the centers are just set. Resist the urge to over-bake, as they will continue to cook on the tray after you take them out. My secret? Set a timer for 10 minutes, and start checking—every oven is a bit different! -
Cool Down
Once baked, allow the cookies to cool on the baking sheet for about 5 minutes before transferring them to a wire rack. This helps them firm up a bit without losing that soft center. -
Make the Icing
Whisk the powdered sugar with a splash of milk (about 1-2 tablespoons) until smooth. Drizzle this sweet icing over the warm cookies using a fork for that charming rustic look. If you’d like a thicker icing, simply reduce the amount of milk! -
Enjoy
Wait until the icing sets (or don’t!) and dig in! Nothing beats a warm cinnamon roll cookie fresh out of the oven.
Serving Suggestions
These Cinnamon Roll Cookies are delightful as is! However, I always encourage a little creativity. Consider serving them on a fun platter with a side of whipped cream or custard for dipping. If it’s a celebration, stack them up like a birthday cake and shower them with colorful sprinkles for a festive touch!
Recipe Variations
Your culinary journey doesn’t have to end here! Mix it up with these creative twists:
-
Nutty Boost
Add 1/2 cup of chopped pecans or walnuts for a delightful crunch that complements the soft cookies. -
Chocolate Drizzle
After icing the cookies, drizzle them with melted chocolate for an indulgent twist. You can also use dark chocolate chips instead of half the granulated sugar for a chocolaty experience. -
Apple Cinnamon Roll
Fold in 1 cup of finely chopped apples to bring a fruity note to the cookies—think fresh apple pie meets cinnamon roll! -
Spiced Up
Amp up the cinnamon to 3 teaspoons for a spicier flavor, or add a dash of nutmeg or cardamom for a unique twist! -
Vegan Delight
Replace the butter with vegan buttery sticks and use a flaxseed egg to make these delightful cookies plant-based!
Chef’s Notes
Ah, the journey of perfecting this recipe has been a delightful ride! Initially, my cinnamon roll cookies were a bit too cakey (oops!). After many experiments, I stumbled upon the right balance of ingredients that created the chewy texture you see here. I also remember the time I forgot to add sugar and ended up with a batch of bizarre flour cookies—definitely not my finest moment! But every "oops" in the kitchen leads you to those precious "aha!" moments, doesn’t it?
So don’t be shy—have fun with this recipe and put your own spin on things!
FAQs and Troubleshooting
1. Why are my cookies spreading too much?
This could be due to using melted butter instead of softened or not chilling the dough slightly before baking. If your kitchen is particularly warm, consider chilling the dough for 30 minutes before baking.
2. My cookies feel dry. How can I avoid that?
Overbaking is usually the culprit! Keep an eye on them towards the end of the bake time. They should look a little underbaked when you take them out, as they will continue to set while cooling.
3. Can I freeze the cookies?
Absolutely! You can freeze the cookie dough in advance. Just shape it into balls, chill them, and then store them in an airtight container. They’ll last about 3 months. When you’re ready to bake, just pop them into the oven straight from the freezer (add a minute or two to the baking time).
4. How can I make these gluten-free?
Swap out the all-purpose flour for a 1:1 gluten-free flour blend. Add in a teaspoon of xanthan gum if your blend doesn’t already include it—this helps bind the ingredients together for the perfect texture.
Nutritional Info (optional)
Each cookie contains approximately 180 calories, with 8g of fat, 24g of carbohydrates, 1g of protein, and 9g of sugar. For a healthier alternative, consider using natural sweeteners and almond flour; the nutritional profile will vary.
And there you have it, friends! Your journey into the delightful world of Cinnamon Roll Cookies is just a step away. Each bite is a little piece of heaven, and I can’t wait for you to experience the joy these cookies bring! Happy baking!
PrintCinnamon Roll Cookies
Delightful cookies that capture all the flavors of a delicious cinnamon roll in a chewy form.
- Prep Time: 15 minutes
- Cook Time: 12 minutes
- Total Time: 27 minutes
- Yield: 24 cookies 1x
- Category: Dessert
- Method: Baking
- Cuisine: American
- Diet: Vegetarian
Ingredients
- 2 cups All-Purpose Flour
- 1 cup Butter, softened
- 1 cup Sugar
- 1 teaspoon Vanilla Extract
- 1 teaspoon Baking Powder
- 1/2 teaspoon Salt
- 1/2 cup Brown Sugar
- 2 teaspoons Cinnamon
- 1 Egg
- 1/2 cup Powdered Sugar (for icing)
Instructions
- Preheat your oven to 350°F (175°C).
- Prepare a baking sheet lined with parchment paper.
- Mix the dry ingredients in a bowl: flour, baking powder, salt, and cinnamon.
- Cream the butter, granulated sugar, and brown sugar in a large mixing bowl until light and fluffy.
- Add the egg and vanilla extract, mixing until combined.
- Combine the wet and dry ingredients, stirring until just mixed.
- Scoop mounds of dough onto the baking sheet, leaving space between them.
- Bake for 10-12 minutes until edges are lightly golden.
- Cool on the baking sheet for 5 minutes, then transfer to a wire rack.
- Make the icing by whisking powdered sugar with a splash of milk.
- Drizzle icing over the warm cookies and enjoy!
Notes
For vegan cookies, replace butter with vegan buttery sticks and use a flaxseed egg.
Nutrition
- Serving Size: 1 cookie
- Calories: 180
- Sugar: 9g
- Sodium: 180mg
- Fat: 8g
- Saturated Fat: 5g
- Unsaturated Fat: 3g
- Trans Fat: 0g
- Carbohydrates: 24g
- Fiber: 0g
- Protein: 1g
- Cholesterol: 30mg
Keywords: cinnamon roll, cookies, dessert, baking, sweet treats