Longhorn Parmesan Chicken Copycat: Crispy Weeknight Recipe
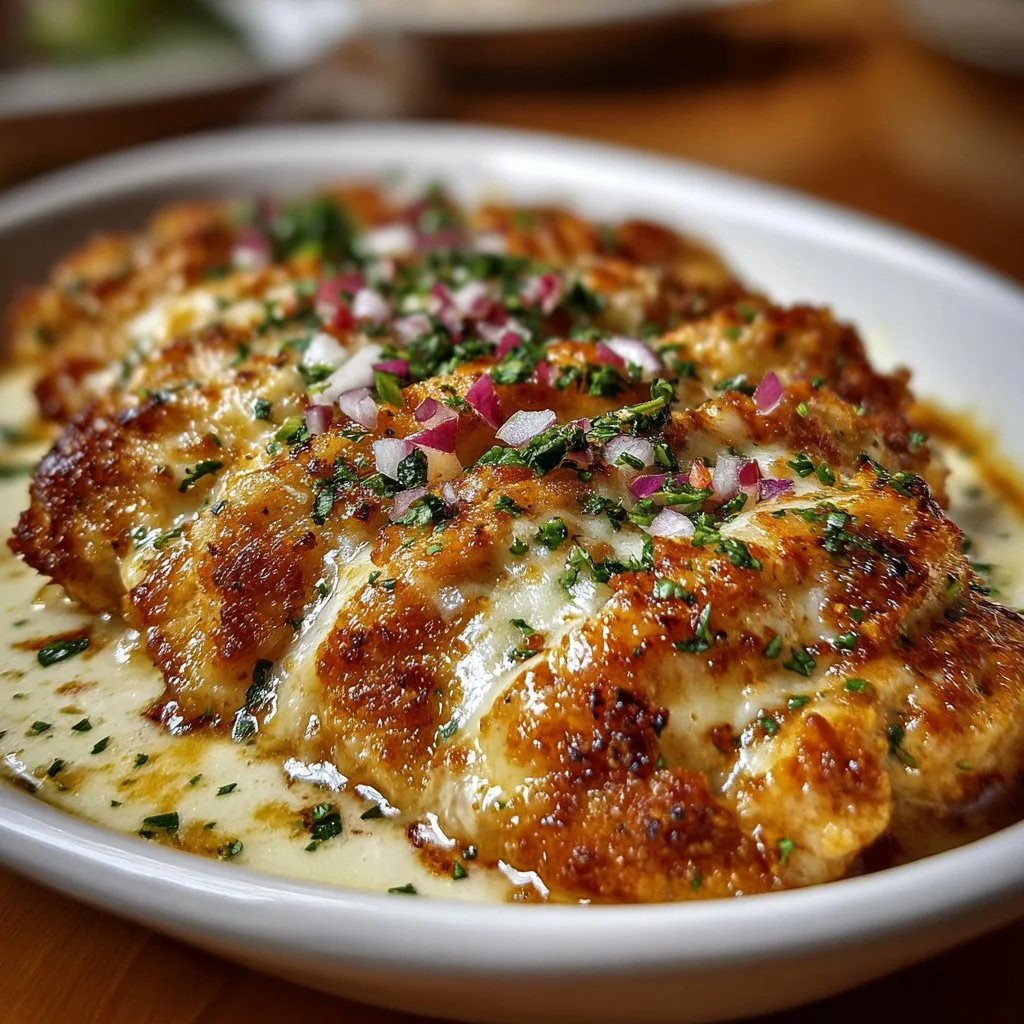
Crispy, Cheesy Longhorn Steakhouse Parmesan Chicken Recipe
Welcome to Clean Plate Cravings, where delicious meets nutritious! Today, I’m thrilled to share with you one of my absolute favorite dishes: Longhorn Steakhouse Parmesan Chicken. This recipe is not only a nod to a classic American eatery but also a way to bring restaurant-quality flavors right into your cozy kitchen. Whether you’re preparing a family dinner or hosting friends, this dish will leave everyone craving more. So, grab your apron and let’s get cooking!
Introduction
When it comes to comfort food, chicken reigns supreme—especially when it’s breaded, cheesy, and crispy! Longhorn Steakhouse’s Parmesan Chicken is a delectable treat that’s surprisingly easy to whip up at home. Imagine succulent, juicy chicken breasts encased in a golden, crunchy breadcrumb coating, topped with melted mozzarella and a sprinkle of Parmesan cheese. Yes, please!
This recipe strikes a glorious balance between being indulgent and nourishing. Picture this: after a long day, you sit down to a plate of crispy chicken served with a fresh side salad or some roasted veggies. It’s a meal that not only feels like a weekend splurge but also leaves you satisfied and happy without the heavy feeling that often comes after dining out.
I believe that eating well shouldn’t mean forfeiting flavor or fun. That’s why today, I’ve put a unique spin on the traditional Longhorn Parmesan Chicken, infusing it with healthier ingredients while retaining that crave-worthy, comforting essence. Whether you’re a foodie at heart or someone just starting to explore the culinary world, this recipe is approachable, delicious, and absolutely worth the effort!
So let’s dive into my kitchen story that inspired this recipe before we begin!
Personal Story
Growing up, dinner was a cherished time in our household. My parents worked hard, but every Sunday, we made it a point to gather around the table for a homemade feast. One of my father’s specialties was chicken—fried, baked, or grilled, it didn’t matter. He had a knack for transforming simple ingredients into something magical.
I still remember the first time I tasted a version of Parmesan chicken at a family celebration. It was crispy, cheesy, and so flavorful that I couldn’t stop eating! My father had meticulously breaded each piece and served it with a homemade marinara sauce and pasta.
That meal left a mark on me, igniting my passion for cooking and teaching me how a handful of ingredients could create something memorable. Fast-forward to today, that dish transformed into a recipe that’s lighter yet equally satisfying. Each time I make this Longhorn-inspired Parmesan Chicken, I’m reminded of those Sunday dinners filled with laughter, stories, and of course, that delicious chicken!
Ingredients
Here’s what you’ll need for this delish dish:
- 4 boneless, skinless chicken breasts (about 6 ounces each)
- These are the star of the show! Use fresh chicken for better flavor. If you can’t find boneless, skinless, feel free to use thighs or even turkey cutlets.
- 2 tablespoons olive oil
- This adds richness and helps the breadcrumbs get golden brown. Avocado oil works too if you prefer a higher smoke point!
- 1 teaspoon garlic powder
- Oodles of flavor without the hassle! In a pinch, fresh garlic can work; just sauté it lightly beforehand.
- 1 teaspoon onion powder
- Adds depth to the dish. If you’re looking for a fresh twist, caramelized onions can substitute beautifully.
- 1/2 teaspoon smoked paprika
- Smoky, sweet goodness. Regular paprika is fine if you prefer less smokiness.
- 1/2 teaspoon salt
- Essential for making flavors pop. Use sea salt or pink Himalayan salt for a fancier touch!
- 1/4 teaspoon black pepper
- A little spice goes a long way. Adjust according to your heat preference.
- 1/2 cup panko breadcrumbs
- The secret to that crispy texture! You can use gluten-free panko too if needed.
- 1/3 cup grated Parmesan cheese
- Nutty and savory, Parmesan elevates the flavors. Pecorino Romano can be an excellent substitute if you’re feeling adventurous.
- 1/3 cup shredded mozzarella cheese
- Provides that gooey, melty bountifulness. Feel free to swap with provolone if you want something different!
- 2 tablespoons unsalted butter, melted
- Richness and flavor booster. You can replace it with olive oil for a healthier option.
- 1 tablespoon mayonnaise
- Helps bind the breadcrumbs and chicken for that irresistible crunch. Greek yogurt can work wonders as a substitute too!
- 1 teaspoon dried parsley
- For a pop of color and subtle herbal flavor. Fresh parsley or even basil can amp up the freshness.
- 1/2 teaspoon garlic powder (additional)
- Double the garlic, double the love!
- Fresh parsley (for garnish)
- For that vibrant finishing touch. It’s all about those looks!
- Lemon wedges
- A squeeze of lemon brightens the flavors beautifully. Trust me on this one!
Step-by-Step Instructions
Ready to bring this recipe to life? Let’s get cooking!
- Preheat Your Oven:
- Preheat your oven to 375°F (190°C). This is crucial for achieving that lovely, crispy crust while keeping the chicken juicy inside.
- Prepare the Chicken:
- Take your chicken breasts and, if they’re thick, consider butterflying them or pounding them to an even thickness. This ensures they cook evenly. Season with a mix of salt, smoked paprika, garlic powder, and onion powder on both sides. This adds layers of flavor right from the start!
- Set Up Your Bread Crumb Mixture:
- In a mixing bowl, combine the panko breadcrumbs, grated Parmesan cheese, melted butter, and dried parsley. This lovely mixture is where all the crunch comes from! Toss everything together until the panko is evenly coated in the butter and the cheese is distributing evenly.
- Coat the Chicken:
- First, brush each chicken breast with mayonnaise on both sides (trust me, this will keep them moist and flavorful). Then, dredge each piece in the breadcrumb mixture, pressing gently to ensure the crumbs stick. You want a nice, thick layer to get that glorious crunch we’re aiming for!
- Arrange in the Baking Dish:
- Place each coated chicken breast on a baking sheet lined with parchment paper or lightly greased. Be sure to leave space between each piece! This helps them cook evenly and become beautifully crispy.
- Bake Away:
- Pop that tray into your preheated oven and let it bake for about 25-30 minutes, or until the chicken is golden brown and cooked through (the internal temperature should reach 165°F or 74°C). If you want an extra crispy coating, you can broil the chicken for the last 2-3 minutes—just keep a keen eye on it!
- Add the Cheeses:
- Once out of the oven, sprinkle your shredded mozzarella on top of the chicken and pop it back in the oven just until it melts (about 2-3 minutes). This is where your dish goes from great to WOW!
- Garnish & Serve:
- Once the cheese has melted perfectly, take out the chicken, garnish with freshly chopped parsley, and serve with lemon wedges on the side. A squeeze of fresh lemon over the crispy chicken takes it to a whole new level of deliciousness!
Serving Suggestions
For a complete meal, plate your Longhorn Parmesan Chicken alongside a crisp green salad or a serving of roasted Brussels sprouts. The acidity of the lemon and the freshness of the parsley brighten up the richness of the chicken beautifully! Consider a side of whole grain rice or quinoa for a wholesome touch.
Recipe Variations
Want to mix things up? Here are some creative twists you can try:
- Spicy Kick: Add a pinch of cayenne pepper to the seasoning mix for a spicy version of this dish.
- Herb-Infused: Use fresh herbs like thyme or basil in the breadcrumb mixture for an herbaceous flair.
- Asian-Inspired: Use sesame oil instead of olive oil and top with a sprinkle of toasted sesame seeds and scallions for a nifty twist.
- Stuffed Chicken: Add a layer of spinach and ricotta cheese inside the chicken before coating for a stuffed version.
Chef’s Notes
Cooking this delicious Longhorn-inspired Parmesan Chicken takes me back to those nostalgic family dinners. Over time, I’ve learned to add my twists, and the feedback has been overwhelmingly positive! From dinner parties to casual meals, the simplicity and straightforwardness of this recipe allow it to evolve and grow with each cook. Honestly, it’s hard to mess this one up—so don’t overthink it! And who doesn’t love a dish that leaves your kitchen smelling like heaven?
FAQs and Troubleshooting
1. My chicken isn’t crispy! What did I do wrong?
Ensure that you’re baking it at the right temperature and give them enough space on the baking sheet. Crowding the pan can lead to steaming rather than crisping.
2. Can I use chicken thighs instead of breasts?
Absolutely! Thighs are a fantastic option if you prefer richer flavors. Just keep an eye on the cooking time, as they might take a few minutes less than breasts.
3. What if I don’t have panko?
You can use regular breadcrumbs, but panko gives you that extra crunch. You’ll want to bake them slightly longer if using regular breadcrumbs.
4. How can I reheat leftovers?
For best results, reheat in the oven at 350°F (175°C) for about 10-15 minutes or until heated through. Avoid the microwave if you can, as it may turn your crispy chicken soggy.
Nutritional Info
(Per serving)
- Calories: 350
- Protein: 40g
- Carbohydrates: 16g
- Fat: 15g
- Fiber: 1g
This dish is not only satisfying, but it’s also packed with protein, making it a superb option for those looking to fuel up after a long day or a workout.
Whether you’re making this Longhorn Steakhouse Parmesan Chicken for a special occasion or just a casual weeknight dinner, it’s sure to impress. Let me know how yours turns out, and enjoy every delightful bite! Happy cooking!
PrintCrispy, Cheesy Longhorn Steakhouse Parmesan Chicken

A healthier take on Longhorn Steakhouse’s classic Parmesan Chicken, featuring crispy breaded chicken breasts topped with gooey cheese.
- Prep Time: 15 minutes
- Cook Time: 30 minutes
- Total Time: 45 minutes
- Yield: 4 servings 1x
- Category: Main Course
- Method: Baking
- Cuisine: American
- Diet: Gluten-Free
Ingredients
- 4 boneless, skinless chicken breasts (about 6 ounces each)
- 2 tablespoons olive oil
- 1 teaspoon garlic powder
- 1 teaspoon onion powder
- 1/2 teaspoon smoked paprika
- 1/2 teaspoon salt
- 1/4 teaspoon black pepper
- 1/2 cup panko breadcrumbs
- 1/3 cup grated Parmesan cheese
- 1/3 cup shredded mozzarella cheese
- 2 tablespoons unsalted butter, melted
- 1 tablespoon mayonnaise
- 1 teaspoon dried parsley
- 1/2 teaspoon garlic powder (additional)
- Fresh parsley (for garnish)
- Lemon wedges
Instructions
- Preheat your oven to 375°F (190°C).
- Prepare the chicken by butterflying or pounding to even thickness and seasoning with salt, smoked paprika, garlic powder, and onion powder.
- Set up your breadcrumb mixture by combining panko, Parmesan cheese, melted butter, and dried parsley.
- Coat each chicken breast with mayonnaise, then dredge in the breadcrumb mixture.
- Arrange the coated chicken breasts on a baking sheet lined with parchment paper.
- Bake for 25-30 minutes until golden brown and cooked through.
- Add shredded mozzarella on top and return to oven until melted (about 2-3 minutes).
- Garnish with chopped parsley and serve with lemon wedges.
Notes
For a complete meal, serve with a green salad or roasted veggies. Squeeze fresh lemon over the chicken for enhanced flavor.
Nutrition
- Serving Size: 1 serving
- Calories: 350
- Sugar: 2g
- Sodium: 800mg
- Fat: 15g
- Saturated Fat: 7g
- Unsaturated Fat: 6g
- Trans Fat: 0g
- Carbohydrates: 16g
- Fiber: 1g
- Protein: 40g
- Cholesterol: 70mg
Keywords: Parmesan Chicken, Crispy Chicken, Comfort Food, Healthy Recipe, Easy Dinner
Ingredient Baked Blueberry Cottage Cheese Breakfast Bowls
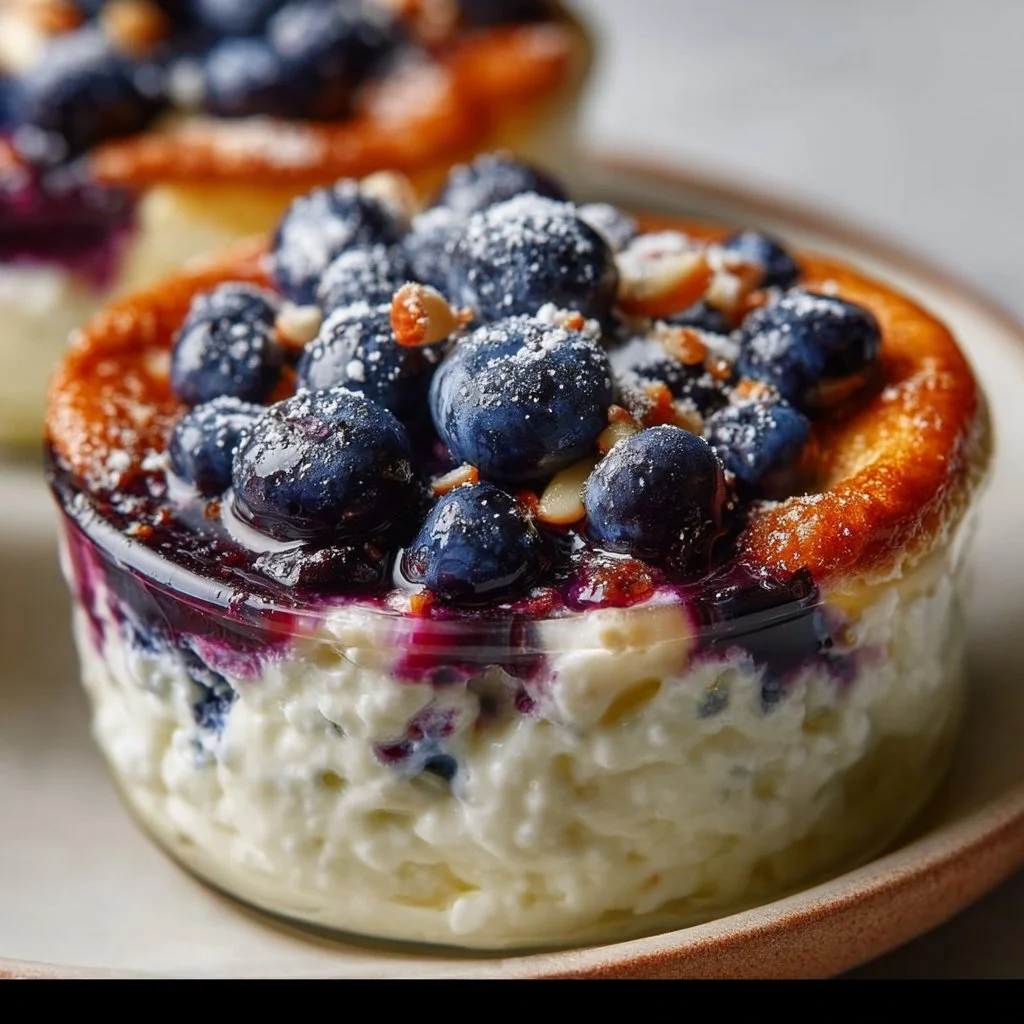
Baked Blueberry Cottage Cheese Breakfast Bowls: A Wholesome Morning Delight
Hey there, fellow foodies! Today, I’m super excited to share a recipe that’s as nourishing as it is delicious: Baked Blueberry Cottage Cheese Breakfast Bowls. If you’re looking for a way to kickstart your day with something vibrant and satisfying, you’ve hit the jackpot! These bowls are like a cozy hug in the morning, blending warm baked blueberries with the creamy goodness of cottage cheese, and they’re a breeze to whip up!
Let’s talk about why this dish holds a special place in my heart. Growing up, my mornings often began with a bowl of creamy cottage cheese topped with fresh fruits. My grandma, with her apron tied snugly around her waist, would slide a bowl across the kitchen table, her smile brighter than the summer sun. She used to say that breakfast was the most crucial meal of the day because it sets the tone for everything that follows.
But here’s the twist—sometimes, she’d bake the blueberries with a sprinkle of cinnamon, transforming our typical breakfast into something magical. The warm, bubbling blueberries bursting in flavor reminded me that simple ingredients could create a symphony of taste and comfort. I’ve taken that cherished memory and flipped it into a modern breakfast bowl that’s perfect for our busy lives while maintaining that nostalgic touch.
Ingredients
Here’s what you’ll need to bring these delightful breakfast bowls to life:
-
2 cups cottage cheese: The star of the show! Cottage cheese is a protein powerhouse that keeps you full and satisfied. If you aren’t a fan, Greek yogurt makes a fantastic substitute.
-
1 cup fresh blueberries: Sweet and juicy, these little gems are packed with antioxidants! Frozen blueberries can work, too—just be sure to thaw and drain any excess moisture before baking.
-
2 tablespoons honey or maple syrup: This adds a touch of natural sweetness. If you prefer a sugar-free option, a splash of stevia or a ripe banana can do the trick!
-
1 teaspoon vanilla extract: A splash of vanilla elevates the dish, giving it that homemade warmth. If you don’t have vanilla, almond extract can be a delightful alternative.
-
1/4 teaspoon cinnamon: This warm spice adds depth and coziness. Feel free to amp it up if you adore cinnamon as much as I do!
-
1/4 cup chopped nuts (optional): Your choice of walnuts, almonds, or pecans adds a delightful crunch and boosts the health factor. You can skip these for nut allergies or swap in seeds like pumpkin or sunflower!
-
1/4 cup oats (optional): For a bit more fiber and texture, oats can be a welcome addition. If you’re gluten-free, make sure to use certified gluten-free oats.
Step-by-Step Instructions
Let’s dive into making these fantastic Baked Blueberry Cottage Cheese Breakfast Bowls. Follow me!
-
Preheat the oven: Start by preheating your oven to 350°F (175°C). A warm oven is essential for turning those blueberries into bubbling goodness!
-
Prepare the baking dish: Take a medium-sized baking dish or individual ramekins for personal servings. Grease with a light coat of cooking spray or a drizzle of olive oil. This prevents sticking and makes cleanup a breeze!
-
Mix the cottage cheese: In a mixing bowl, combine the cottage cheese, honey (or maple syrup), vanilla extract, and cinnamon. Stir until well-blended and creamy. This is your base—imagine how delicious it’s going to be warm!
-
Layer in the blueberries: Spread half of the cottage cheese mixture into your baking dish. Next, sprinkle the fresh blueberries on top. You want those beauties to nestle in nicely, bursting with flavor as they bake.
-
Add the remaining mixture: Spread the rest of the cottage cheese mixture over the blueberries. Be gentle—no one likes a smashed berry!
-
Top with oats and nuts: If you’re using oats and nuts, sprinkle them on top for that extra texture and crunch. This is also where you can get creative—mix in some chopped dark chocolate or coconut flakes for a twist!
-
Bake: Slide the entire dish into your preheated oven and bake for about 25-30 minutes, or until the top is golden and slightly puffed. The aroma will fill your kitchen like a warm hug!
-
Cool and serve: Once baked, let it cool for about 5 minutes. Serve warm, and don’t forget to drizzle any remaining honey or maple syrup on top. The gooeyness of the blueberries and the creaminess of the cottage cheese is absolute breakfast bliss!
Serving Suggestions
These Baked Blueberry Cottage Cheese Breakfast Bowls are super versatile! Serve them warm in the baking dish for a cozy brunch or portion them into individual bowls for a lovely presentation. Top with a sprinkle of fresh mint or a dollop of extra Greek yogurt for that gourmet touch. Pair it with a refreshing cup of herbal tea or your favorite coffee for a delightful breakfast experience!
Recipe Variations
-
Berry Medley: Swap out the blueberries for your favorite berries—think strawberries, raspberries, or blackberries! Each berry brings its own unique flavor.
-
Tropical Twist: Add diced pineapple and shredded coconut for a tropical vibe. This fresh spin will transport you to a sunny beach!
-
Chocolate Lovers: Mix in a handful of dark chocolate chips for a deliciously decadent breakfast. Chocolate for breakfast? Yes, please!
-
Nutty Granola: Instead of nuts, sprinkle your favorite granola on top before serving for a delicious crunch.
-
Savory Spin: For a savory version, skip the sweeteners and toss in some sautéed spinach and feta cheese. It’s a perfect brunch option!
Chef’s Notes
This recipe has evolved over the years from my grandma’s simple breakfast to a versatile and modern twist! I love experimenting with different fruits and flavor combinations every single time I make it. And let me tell you, there have been a few breakfast mishaps along the way—like the time I accidentally swapped salt for sugar! But, hey, that’s the beauty of cooking, right? Each time is a new adventure.
Also, feel free to customize it! The great thing about these breakfast bowls is that they can be adapted to fit your cravings or what you have on hand. Your kitchen, your rules!
FAQs and Troubleshooting
-
Can I use frozen blueberries?
Absolutely! Just make sure to thaw and drain them before adding them to your mixture. Frozen berries will work beautifully in this recipe. -
Is this recipe gluten-free?
Yes! If you use gluten-free oats and skip any added breads or grains, this dish is perfect for your gluten-free diet. -
What if I don’t have cottage cheese?
Greek yogurt is an excellent substitute if you’re looking for a similar creamy texture. You might need to adjust the sweetness depending on the brand. -
Can I make this ahead of time?
Yes! You can prepare the mixture the night before and let it sit in the fridge overnight. Just pop it in the oven in the morning, and you’ll have a delightful breakfast in no time!
Enjoy whipping up these bowls and reminisce about your favorite kitchen memories while you’re at it! Here’s to starting your day with health, happiness, and deliciousness!
PrintBaked Blueberry Cottage Cheese Breakfast Bowls
A wholesome breakfast bowl featuring warm baked blueberries and creamy cottage cheese, perfect for kickstarting your day.
- Prep Time: 10 minutes
- Cook Time: 30 minutes
- Total Time: 40 minutes
- Yield: 4 servings 1x
- Category: Breakfast
- Method: Baking
- Cuisine: American
- Diet: Vegetarian
Ingredients
- 2 cups cottage cheese
- 1 cup fresh blueberries
- 2 tablespoons honey or maple syrup
- 1 teaspoon vanilla extract
- 1/4 teaspoon cinnamon
- 1/4 cup chopped nuts (optional)
- 1/4 cup oats (optional)
Instructions
- Preheat the oven to 350°F (175°C).
- Prepare the baking dish with a light coat of cooking spray or olive oil.
- Mix the cottage cheese, honey (or maple syrup), vanilla extract, and cinnamon until creamy.
- Layer half of the mixture into your baking dish and sprinkle with blueberries.
- Add the remaining cottage cheese mixture over the blueberries.
- Top with oats and nuts, if using.
- Bake for about 25-30 minutes until golden and puffed.
- Cool for 5 minutes and serve warm with extra honey or maple syrup.
Notes
Feel free to customize with different fruits or toppings! Great for brunch or a cozy breakfast.
Nutrition
- Serving Size: 1 serving
- Calories: 320
- Sugar: 10g
- Sodium: 370mg
- Fat: 10g
- Saturated Fat: 3g
- Unsaturated Fat: 7g
- Trans Fat: 0g
- Carbohydrates: 40g
- Fiber: 4g
- Protein: 20g
- Cholesterol: 15mg
Keywords: breakfast, baked blueberries, cottage cheese, healthy recipe, quick breakfast
French Strawberry Cake Recipe: Quick, Elegant Summer Treat
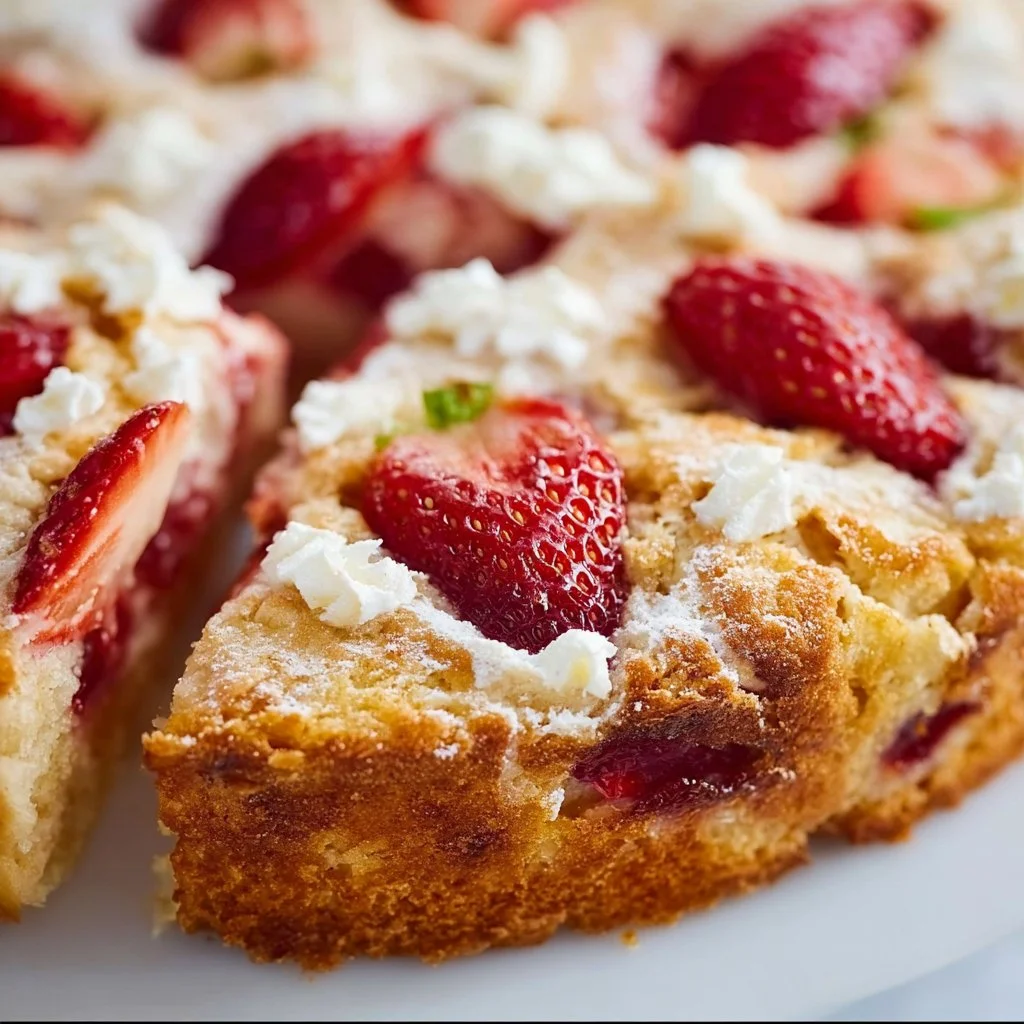
The BEST French Strawberry Cake Recipe: A Slice of Nostalgia
Welcome to Clean Plate Cravings! I’m thrilled you’re here because today, I’m sharing a recipe that holds a special place in my heart: the BEST French Strawberry Cake. Imagine a soft, buttery cake, bursting with fresh strawberries and topped with a light, airy frosting that feels like summer on a plate. This recipe isn’t just about making dessert; it’s about the memories of baking with family, the aroma of strawberries filling the kitchen, and the smiles that come with every bite. So, let’s dive in!
When I was a kid, summer meant two things: long days spent outside and my grandmother’s annual strawberry picking trip. Those trips were magical! We would roam the fields, laughter intermingled with the sweet scent of ripe strawberries. Once we got home, my grandmother would whip up her famous strawberry cake, and I would be her little sous-chef, eagerly stirring batter while sprinkling in a little sugar and a lot of love. That cake—the one that could turn any ordinary day into a celebration—sparked my love for cooking and baking. Now, as an adult, I carry those memories with me every time I bake.
This French Strawberry Cake is my take on my grandmother’s classic recipe, modernized and made with a little flair while retaining that nostalgic charm. Trust me; you’ll want to keep this one in your repertoire!
Ingredients
Here’s what you’ll need for this delightful cake. Each ingredient plays a key role, so let’s break it down:
- 1 stick unsalted butter, softened (about 1/2 cup): Butter gives the cake its rich flavor and tender texture. If you need a dairy-free option, you can substitute with a plant-based butter.
- 1 cup granulated sugar: This sweetens the cake and helps create a lovely golden crust. You can use coconut sugar for a less refined option, but it may impart a caramel flavor.
- 2 large eggs: Eggs provide structure and moisture. If you’re vegan, you can substitute with 1/2 a mashed banana or a flaxseed egg (1 tablespoon ground flaxseed mixed with 2.5 tablespoons water, let sit until gel-like).
- 1 1/2 teaspoons vanilla extract: Vanilla brightens up the flavors in the cake. For a twist, use almond extract or a splash of citrus zest.
- 1 1/2 cups all-purpose flour: Essential for that fluffy cake texture. If you need a gluten-free version, swap in a gluten-free all-purpose flour blend.
- 1 1/4 teaspoon baking powder: This leavening agent helps the cake rise. Make sure it’s fresh for the best results!
- 1/4 teaspoon salt: Salt enhances flavors and balances sweetness. Don’t skip it!
- 1/2 cup sour cream: This adds moisture and tang, making the cake super soft. Greek yogurt can be a great substitute for that creamy texture.
- 16 ounces strawberries, sliced (about 2 cups): The star of the show! Fresh strawberries bring natural sweetness and flavor. You can use other berries if strawberries aren’t in season.
- 3 Tablespoons granulated sugar (for strawberries): This macerates the strawberries and brings out their juices, making them deliciously sweet.
- 2 Tablespoons powdered sugar (optional): For dusting on top, giving your cake that beautiful bakery finish.
Step-by-Step Instructions
Now let’s get to the fun part—baking this glorious cake!
- Preheat your oven to 350°F (175°C) and grease a 9-inch round cake pan. Nothing beats the smell of a warm oven, so let’s get that going!
- Cream together the butter and sugar in a large mixing bowl until light and fluffy—this should take about 3-4 minutes. This step is crucial as it helps to incorporate air, which gives your cake that fluffy texture. Don’t rush this step; it’s worth the extra time!
- Add in the eggs one at a time, mixing until fully combined before adding the next. Ensure each egg is fully incorporated, creating a smooth batter. This helps avoid any curdling, giving you a lovely consistent mixture.
- Stir in the vanilla, and then set the bowl aside. The aroma is already divine!
- In another bowl, whisk together the flour, baking powder, and salt. This step is often overlooked but mixing the dry ingredients separately ensures an even distribution of the leavening agent.
- Gradually add the dry ingredients to the butter mixture, alternating with the sour cream. Start and end with the flour mixture (dry-wet-dry). Use a spatula to gently fold it in until just combined. Be careful not to overmix; a few lumps are okay!
- Prepare the strawberries while the batter comes together: toss the sliced strawberries with 3 tablespoons of sugar in a bowl and let them sit for about 10 minutes. This will create a juicy syrup that’s pure magic.
- Gently fold the strawberries into the cake batter, taking care not to break them up too much. This adds a beautiful texture and flavor to every bite!
- Pour the batter into your prepared cake pan and smooth the top. Give it a little tap on the counter to settle it, and pop it in the oven.
- Bake for 30-35 minutes, or until a toothpick inserted in the center comes out clean. Watch your cake closely as oven times can vary. A golden top and a small bounce back should have you reaching for the toothpick!
- Once baked, let the cake cool in the pan for about 10 minutes, then carefully transfer it onto a wire rack to cool completely. I’ll let you in on a little secret: The smell of fresh cake can be hard to resist, so try not to sneak a bite yet!
Serving Suggestions
When it’s time to serve, I love to dust the top with powdered sugar for a pretty finish. Place the cake on a lovely cake stand or a platter and slice it into generous pieces—don’t forget to scoop out some of those delicious strawberries along with each slice! A dollop of whipped cream on the side wouldn’t hurt either.
Recipe Variations
Let’s get creative! Here are a few fun twists to switch things up:
- Berry Medley: Swap out the strawberries for raspberries or blueberries, or mix them for a berry bomb delight!
- Lemon Zest: Add the zest of one lemon to the batter for a fresh citrus flavor that complements the strawberries beautifully.
- Almond Joy: Sprinkle some sliced almonds on top before baking for a crunchy texture and nutty flavor.
- Minty Fresh: A few fresh mint leaves finely chopped into the batter or as a garnish can elevate the flavors to a whole new level.
Chef’s Notes
This recipe has evolved over the years from my early attempts in the kitchen. I remember my first French Strawberry Cake; I was so eager to get it right that I forgot to adjust the oven temperature, and it came out a bit dense. But even that cake was devoured, proving that even mishaps can lead to delicious results!
Going forward, I learned the importance of textures and flavors and how they work together. Today’s version is just the right balance of airy sweetness with a touch of nostalgia.
FAQs and Troubleshooting
- What if my cake sinks in the middle? This sometimes happens due to overmixing or using old leavening agents. Avoid overmixing when combining dry and wet ingredients, and always check the freshness of your baking powder.
- Can I make this cake ahead of time? Absolutely! The cake can be made a day in advance; just keep it covered at room temperature. You can even freeze it if you want to save it for later. Just make sure to wrap it tightly!
- Why are my strawberries not juicy? If your strawberries aren’t as sweet or juicy, it might be a sign that they’re out of season. Always try to use fresh, ripe strawberries for the best flavor.
- Can I use frozen strawberries? Yes, but make sure to thaw and drain them first to avoid extra moisture in your batter. I recommend fresh fruit for the best flavor and texture, though!
Nutritional Info
(For a standard slice assuming 12 slices in total)
- Calories: 250
- Protein: 4g
- Carbohydrates: 36g
- Fat: 10g
- Fiber: 1g
- Sugar: 15g
There you have it—the BEST French Strawberry Cake! The memories of baking this delight, the sweet fragrance filling your home, and sharing it with loved ones will be the icing on the cake. Happy baking, my fellow foodie friends!
PrintThe BEST French Strawberry Cake

A soft, buttery cake bursting with fresh strawberries and topped with a light, airy frosting, perfect for summer celebrations.
- Prep Time: 15 minutes
- Cook Time: 30 minutes
- Total Time: 45 minutes
- Yield: 12 servings 1x
- Category: Dessert
- Method: Baking
- Cuisine: French
- Diet: Vegetarian
Ingredients
- 1 stick unsalted butter, softened (about 1/2 cup)
- 1 cup granulated sugar
- 2 large eggs
- 1 1/2 teaspoons vanilla extract
- 1 1/2 cups all-purpose flour
- 1 1/4 teaspoon baking powder
- 1/4 teaspoon salt
- 1/2 cup sour cream
- 16 ounces strawberries, sliced (about 2 cups)
- 3 tablespoons granulated sugar (for strawberries)
- 2 tablespoons powdered sugar (optional)
Instructions
- Preheat your oven to 350°F (175°C) and grease a 9-inch round cake pan.
- Cream together the butter and sugar in a large mixing bowl until light and fluffy—this should take about 3-4 minutes.
- Add in the eggs one at a time, mixing until fully combined before adding the next.
- Stir in the vanilla, and then set the bowl aside.
- Whisk together the flour, baking powder, and salt in another bowl.
- Gradually add the dry ingredients to the butter mixture, alternating with the sour cream.
- Prepare the strawberries by tossing them with 3 tablespoons of sugar and letting them sit for about 10 minutes.
- Fold the strawberries gently into the cake batter.
- Pour the batter into your prepared cake pan and smooth the top.
- Bake for 30-35 minutes, or until a toothpick inserted in the center comes out clean.
- Let the cake cool in the pan for about 10 minutes before transferring it to a wire rack to cool completely.
Notes
Dust with powdered sugar before serving for a bakery finish. Pair with whipped cream for extra indulgence.
Nutrition
- Serving Size: 1 slice
- Calories: 250
- Sugar: 15g
- Sodium: 200mg
- Fat: 10g
- Saturated Fat: 6g
- Unsaturated Fat: 4g
- Trans Fat: 0g
- Carbohydrates: 36g
- Fiber: 1g
- Protein: 4g
- Cholesterol: 30mg
Keywords: French cake, strawberry dessert, summer cake, nostalgic recipe
Minute One-Pan Greek Chicken & Rice Bowl for Weeknights
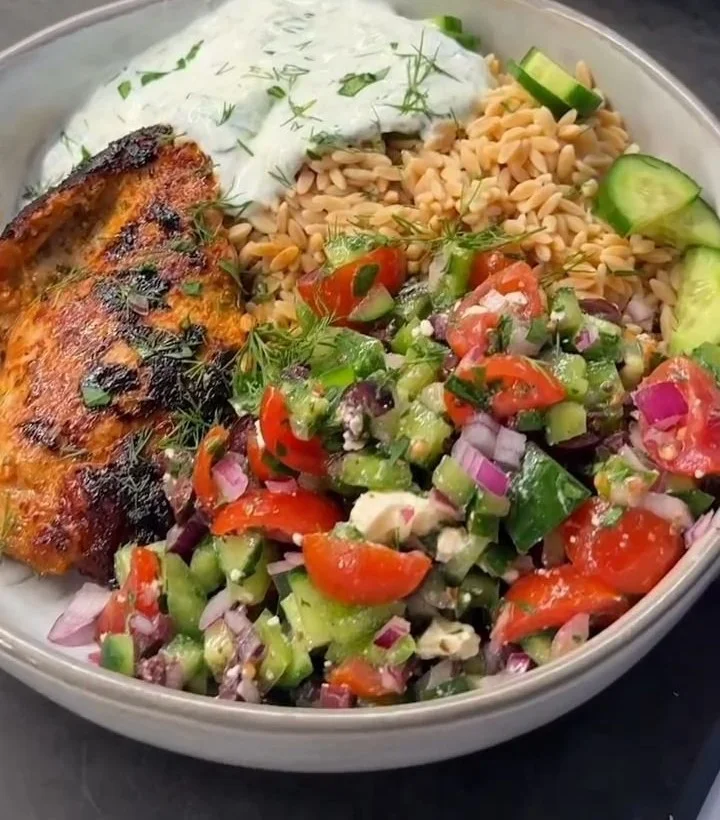
Greek Chicken & Rice Bowl: A Fresh Taste of the Mediterranean
Hello, fellow food lovers! Today, we’re diving into a dish that packs a punch of flavor—meet the Greek Chicken & Rice Bowl! 🥗 It’s vibrant, it’s fresh, and let me tell you, it’s one of those meals that will have you dreaming of sunny Mediterranean beaches. Imagine juicy chicken, creamy Greek yogurt, crunchy veggies, and aromatic herbs all nestled together in a bowl. Trust me, this isn’t just food; it’s an experience.
Personal Story: The Summer of Greek Flavors
I remember my first adventure to Greece like it was yesterday. Picture this: the sun setting over the Aegean Sea, the air filled with the aroma of grilled meats and fresh herbs, and vibrant markets bursting with colors. I was whisked away by the flavors! One evening, while exploring a quaint little tavern, I stumbled across a Greek chicken and rice dish that changed everything for me. The chicken was marinated to perfection, and fresh veggies danced with bright, zesty flavors. That meal brought back memories of my own kitchen, where I learned to mix bold ingredients with love and excitement.
As soon as I returned home, I couldn’t wait to recreate that bowl of joy! This version is a bit lighter with low-carb, high-protein rice and a hefty dollop of Greek yogurt for creaminess. It’s a nod to that unforgettable summer, and I’m excited to share it with you!
Ingredients
-
1 pound chicken breast, diced
Juicy and protein-packed, chicken breasts are a fantastic base for this dish. If you prefer, try swapping for turkey or tofu for a vegetarian option. -
1 cup low carb high protein rice
This rice is not just a nutritional win but also provides a lovely texture. Don’t have it? Quinoa or cauliflower rice works great too! -
1 cup Greek yogurt
Creamy and tangy, Greek yogurt adds a scrumptious layer of flavor. You can use plant-based yogurt as a dairy-free alternative if needed. -
1 cucumber, diced
Crisp and refreshing, cucumbers are the perfect counterbalance to the savory chicken. Try a zucchini if you want something different. -
1 cup cherry tomatoes, halved
Sweet and juicy, cherry tomatoes burst in your mouth! Any fresh tomatoes will do if you can’t find cherries—just chop them up a bit. -
1/4 red onion, finely chopped
Onions add depth and zing. For a milder flavor, you can use shallots or spring onions. -
1 teaspoon olive oil
Rich in healthy fats, this will help in browning the chicken and adding flavor. Avocado oil is a great substitute if you’re out of olive oil. -
1 teaspoon oregano
Classic Mediterranean flavor! You can add other herbs like dill or parsley for a different twist. -
Salt and pepper to taste
Don’t underestimate the magic of seasoning! Adjust it based on your personal preference.
Step-by-Step Instructions
-
Prepare Your Ingredients
Start by gathering all your ingredients. Chop your chicken breast into bite-sized pieces and dice your cucumber. Halve your cherry tomatoes and chop the red onion. This way, everything’s ready to go when you start cooking—no frantic cutting mid-sautéing! -
Marinate the Chicken
In a bowl, combine the diced chicken with olive oil, oregano, salt, and pepper. Let it sit for about 15 minutes while you prep the rest of the ingredients. This step is crucial; it allows the flavors to meld and enhances the chicken’s taste! -
Cook the Rice
Follow the package directions for your low-carb high-protein rice—easy peasy! I’m a big fan of preparing it in vegetable broth for that extra oomph. Once done, fluff it with a fork and set aside. -
Sauté the Chicken
Heat a large pan over medium-high heat. Once hot, add the marinated chicken. Sauté for about 7-10 minutes until the chicken is thoroughly cooked and golden brown. The sizzle is music to your ears—enjoy it! -
Mix the Salad
In a large bowl, combine the diced cucumber, halved cherry tomatoes, and finely chopped red onion. Drizzle with a bit of olive oil, and sprinkle with salt and pepper. This vibrant mix adds freshness and crunch to your bowl—don’t skip it! -
Assemble the Bowls
It’s time for the fun part! Start with a base of fluffy rice, add a hefty portion of sautéed chicken, and then layer on your veggie salad. Top it all off with that creamy Greek yogurt—it’s like the cherry on top of your Mediterranean masterpiece!
Serving Suggestions
Serve your Greek Chicken & Rice Bowl in large, colorful bowls that allow the beautiful ingredients to shine. Don’t be shy with the yogurt—give it a generous dollop right in the center. For a final touch, you can sprinkle extra oregano or some crumbled feta cheese (if you’re feeling indulgent) on top for added flavor.
Recipe Variations
-
Mediterranean Spice Twist
Add a pinch of cumin and coriander to the chicken marinade for a warm, aromatic flavor. -
Swap the Protein
Try shrimp or chickpeas for a different protein option. Both will change the dish in deliciously unexpected ways! -
Warm Grain Base
If you’re not into rice, try a warm quinoa base or even a bed of roasted sweet potatoes for a sweet and savory combo. -
Herby Yogurt Sauce
Mix a tablespoon of chopped dill or mint into the Greek yogurt for a fresh and herby sauce that pairs fabulously with this bowl. -
Veggie Boost
Add spinach or arugula to your salad mix for a nutrient-packed punch. This extra greenery boosts the color and health factor!
Chef’s Notes
Oh, the kitchen mishaps I’ve had over the years! I once tried to impress some friends with this bowl and accidentally grabbed the cinnamon instead of oregano. Let’s just say, we had a very “unique” dinner that night! But it reminded me that cooking is about trial and error—and those imperfections often create the best stories. With every iteration, I refined this recipe, and I’m sure you’ll make it your own, too. Cooking is magic, and more than anything, I love sharing this experience with you.
FAQs and Troubleshooting
1. Can I use chicken thighs instead of breasts?
Absolutely! Chicken thighs will add more richness due to their higher fat content. Just make sure to cook them thoroughly.
2. My chicken is sticking to the pan! What did I do wrong?
Ensure that your pan is sufficiently heated before adding the chicken. If the oil isn’t hot, the chicken will stick. A non-stick pan can be a lifesaver.
3. How do I store leftovers?
Store leftover bowls in airtight containers in the fridge. They’ll stay fresh for about 3-4 days. Just remember to keep the yogurt separate until you’re ready to serve.
4. Can I freeze this dish?
Yes! You can freeze the chicken and rice separately for up to three months. Just make sure to let it cool before freezing. Thaw in the fridge overnight before reheating.
Nutritional Info
(Note: Nutritional information will vary based on specific ingredients used and portion sizes. Here’s a basic breakdown for one serving):
- Calories: Approximately 450
- Protein: 35g
- Carbohydrates: 30g
- Fat: 15g
Now that you’ve got the inside scoop on how to create this delightful Greek Chicken & Rice Bowl, get ready to indulge in a meal that not only nourishes your body but also brings joy to your taste buds. So gather your ingredients, channel your inner chef, and let’s make some magic in the kitchen! Happy cooking! 🍽️✨
PrintGreek Chicken & Rice Bowl

A vibrant and fresh Mediterranean dish featuring juicy chicken, creamy Greek yogurt, and crunchy vegetables.
- Prep Time: 15 minutes
- Cook Time: 20 minutes
- Total Time: 35 minutes
- Yield: 4 servings 1x
- Category: Main Course
- Method: Sautéing
- Cuisine: Mediterranean
- Diet: High Protein
Ingredients
- 1 pound chicken breast, diced
- 1 cup low carb high protein rice
- 1 cup Greek yogurt
- 1 cucumber, diced
- 1 cup cherry tomatoes, halved
- 1/4 red onion, finely chopped
- 1 teaspoon olive oil
- 1 teaspoon oregano
- Salt and pepper to taste
Instructions
- Prepare Your Ingredients: Gather all your ingredients. Chop your chicken breast and dice your cucumber.
- Marinate the Chicken: Combine chicken with olive oil, oregano, salt, and pepper. Let sit for about 15 minutes.
- Cook the Rice: Follow package directions for the rice. Fluff it once done.
- Sauté the Chicken: Heat a pan over medium-high heat and cook the marinated chicken for 7-10 minutes.
- Mix the Salad: Combine cucumber, cherry tomatoes, and red onion in a bowl with olive oil, salt, and pepper.
- Assemble the Bowls: Layer rice, sautéed chicken, and salad in bowls. Top with Greek yogurt.
Notes
Feel free to add extra oregano or crumbled feta cheese on top for added flavor.
Nutrition
- Serving Size: 1 serving
- Calories: 450
- Sugar: 5g
- Sodium: 400mg
- Fat: 15g
- Saturated Fat: 5g
- Unsaturated Fat: 8g
- Trans Fat: 0g
- Carbohydrates: 30g
- Fiber: 3g
- Protein: 35g
- Cholesterol: 85mg
Keywords: Greek, Mediterranean, chicken, rice bowl, healthy eating, quick meals
One-Pan Creamy Mushroom Chicken Meatballs in 25 Minutes
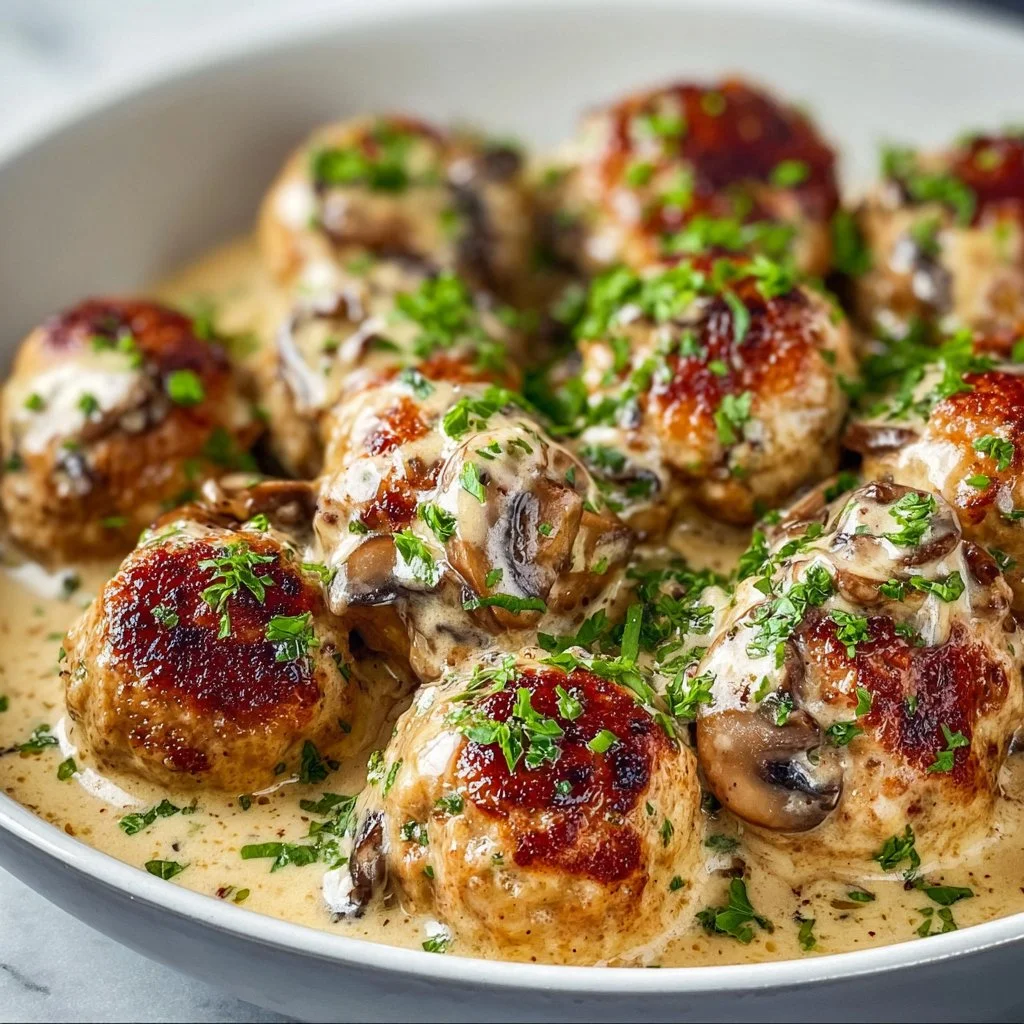
Creamy Mushroom Chicken Meatballs: A Comforting Delight
Welcome to Clean Plate Cravings! Today, I’m thrilled to share one of my all-time favorite recipes: Creamy Mushroom Chicken Meatballs. This dish is the epitome of comfort food, with a twist of sophistication that makes it perfect for weeknight dinners or special occasions. Now, who can resist tender meatballs enveloped in a luscious, creamy mushroom sauce? It’s simply divine!
When I first created this recipe, I wanted to blend the warmth of a traditional spaghetti and meatballs dish with the richness of gourmet flavors. I couldn’t wait to make it for family and friends. Picture this: a cozy afternoon, the aroma of garlic and mushrooms wafting through the kitchen, and laughter ringing out from the dining room. It’s these little moments that make cooking so magical to me.
As I stirred the sauce and formed the meatballs, I was flooded with memories of my grandmother’s kitchen. She had this incredible ability to turn simple ingredients into crowd-pleasing meals. I remember her deft hands shaping meatballs, every one perfectly rounded, as she hummed a tune while whisking together a velvety sauce. It was a dance of flavors and love, which undoubtedly inspired my culinary journey.
So, let’s dive into this flavorful recipe that’s not only delicious but also brings a slice of my childhood into your home. Whether you’re cooking for yourself, your family, or a group of friends, these Creamy Mushroom Chicken Meatballs will surely become a cherished addition to your recipe repertoire!
Ingredients
Here’s what you’ll need to whip up these flavorful meatballs:
-
1 pound ground chicken
- A lean meat option that keeps the meatballs juicy while allowing the creamy sauce to shine. If you want a richer flavor, you can substitute with ground turkey or even a mix of chicken and pork.
-
1/2 cup breadcrumbs
- These provide structure and help keep the meatballs tender. You can use regular or panko breadcrumbs. For a gluten-free option, try almond flour or gluten-free breadcrumbs.
-
1/4 cup grated Parmesan cheese
- This adds a savory depth to the meatballs. Feel free to substitute with Pecorino Romano or omit it for a dairy-free version.
-
1 egg
- The binding agent that holds everything together. If you need an egg substitute, use a flaxseed meal mixture (1 tablespoon flaxseed meal + 3 tablespoons water) per egg.
-
2 cloves garlic, minced
- Adds a delightful aroma and flavor. More garlic lovers can add an extra clove or two!
-
Salt and pepper, to taste
- Essential for enhancing the flavors of your dish. Don’t be shy—season generously!
-
2 tablespoons olive oil
- Perfect for browning the meatballs. Can be replaced with avocado oil or melted butter for a richer taste.
-
8 ounces mushrooms, sliced
- Use your favorite variety, I love cremini or button mushrooms for their texture and flavor. Portobello can also add a nice, meaty base.
-
1 cup heavy cream
- This creates the rich, creamy sauce that makes this dish indulgent. For a lighter option, you can use half-and-half or coconut cream for a dairy-free alternative.
-
1/2 cup chicken broth
- Adds depth to the sauce. If you prefer vegetarian, go for vegetable broth instead.
-
1 teaspoon thyme
- Fresh or dried, this herb pairs beautifully with the creamy sauce and mushrooms. You can substitute with rosemary or Italian seasoning if that’s what you have on hand.
Step-by-Step Instructions
Ready to get started? Grab your apron, and let’s make these creamy mushroom chicken meatballs!
-
Prepare the meatball mixture: In a mixing bowl, combine the ground chicken, breadcrumbs, grated Parmesan cheese, egg, minced garlic, salt, and pepper. Use your hands to gently mix until everything is just combined—be careful not to overwork it!
Chef’s Tip: Using your hands is the best way to ensure all ingredients blend well, but don’t forget to wash them afterward!
-
Shape the meatballs: Roll the mixture into golf ball-sized meatballs (about 1.5 inches in diameter). Place them on a plate or baking sheet as you work.
Pro Tip: For even cooking, try to make them all the same size. If you want to be extra fancy, use a small cookie scoop!
-
Brown the meatballs: In a large skillet, heat the olive oil over medium heat. Once hot, gently add the meatballs in batches, making sure not to overcrowd the pan. Brown them on all sides for about 5-7 minutes.
Chef Hack: If they stick to the pan, give them a little extra time to sear, and they should release beautifully!
-
Cook the mushrooms: Once browned, remove the meatballs from the skillet and set aside. In the same skillet, add the sliced mushrooms. Sauté them for about 5 minutes or until they’re tender and browned.
Tip: If the pan seems dry, add a splash more oil. Get those mushrooms nice and caramelized for extra flavor!
-
Make the sauce: Pour in the heavy cream and chicken broth. Stir well to combine with the mushrooms. Sprinkle in the thyme, and let it simmer for about 3-4 minutes until it thickens slightly.
Cooking Hack: If you prefer a super creamy sauce, feel free to whisk in a little more cream as you go!
-
Bring it all together: Return the browned meatballs to the skillet, gently nestling them in the creamy sauce. Cover and let simmer for an additional 10 minutes, allowing the meatballs to cook through and absorb the flavors.
Tip: You can temp the meatballs with a meat thermometer—165°F ensures they are perfectly cooked!
-
Taste and season: Give the sauce a final taste and adjust the salt and pepper as needed. If you’d like, throw in some fresh parsley or chives at this stage for an extra burst of color and flavor.
Chef Note: A squeeze of lemon at the end really brightens up the dish!
Serving Suggestions
To serve these creamy mushroom chicken meatballs, I love to plate them over a bed of buttery mashed potatoes, creamy polenta, or even whole wheat spaghetti for that classic touch! Drizzle some of the luscious sauce over the top and garnish with fresh herbs like parsley or thyme.
Pair it with a crisp, green salad dressed with a tangy vinaigrette to cut through the creaminess, or some roasted veggies for a colorful side. The options are limitless!
Recipe Variations
Feel free to play around with this recipe! Here are a few fun twists to consider:
-
Add Spinach or Kale: Stir in some fresh spinach or kale into the sauce for added nutrients and color.
-
Cheesy Version: Mix in some shredded mozzarella or fontina cheese with the sauce for a melty finish that’s irresistible.
-
Spicy Kick: Add a sprinkle of red pepper flakes or some diced jalapeños into the meatball mixture for a spicy twist.
-
Herb Variations: Try using fresh basil or oregano instead of thyme for a different flavor profile.
-
Mushroom Medley: Use a variety of mushrooms like shiitake, portobello, and oyster for an earthy, sophisticated flavor.
Chef’s Notes
Every recipe has a story, and this one is no different! I remember the countless evenings spent experimenting with different sauces and spices as I tried to recreate my grandmother’s famous meatballs. The journey of discovering what works, what doesn’t, and remembering the people you love along the way is what makes cooking magical.
I’ve evolved this recipe over the years, starting with a classic beef meatball version when I was a kid. Now, I adore how light ground chicken feels while still being flavorful and hearty. Plus, the creamy sauce makes everything feel like a warm hug!
FAQs and Troubleshooting
1. My meatballs fell apart while cooking! What did I do wrong?
It’s likely that they needed an extra binding agent. Make sure to measure your breadcrumbs and egg accurately. If they feel too loose, a little more breadcrumb or even some grated cheese can help bind them better.
2. Can I make this recipe ahead of time?
Absolutely! You can prepare the meatballs and sauce, then store them separately in the refrigerator for up to 2 days. Reheat gently before serving.
3. How do I store leftovers?
Store any leftover meatballs in an airtight container in the fridge for up to 3 days. You can also freeze them—just make sure to separate them before putting them in a freezer bag for easier thawing!
4. Can I use other meats instead of chicken?
Yes, you can substitute ground turkey, pork, or beef for a different flavor and texture experience!
Nutritional Info
While the exact nutritional content can vary based on specific ingredients used, here’s a rough estimate for one serving of Creamy Mushroom Chicken Meatballs (based on six servings):
- Calories: 360
- Protein: 25g
- Fat: 25g
- Carbohydrates: 14g
- Fiber: 1g
Note: Adjustments in ingredients may alter nutritional values, so be sure to keep track of substitutions!
And there you have it—Creamy Mushroom Chicken Meatballs that will make you feel right at home, whether you’re cooking for yourself or for a crowd. Thanks for joining me in this kitchen adventure, and happy cooking! Here’s to many delicious meals ahead!
PrintCreamy Mushroom Chicken Meatballs

Tender meatballs enveloped in a luscious, creamy mushroom sauce, blending traditional comfort food with gourmet flavors.
- Prep Time: 15 minutes
- Cook Time: 30 minutes
- Total Time: 45 minutes
- Yield: 6 servings 1x
- Category: Main Course
- Method: Baking
- Cuisine: Italian
- Diet: Gluten-Free
Ingredients
- 1 pound ground chicken
- 1/2 cup breadcrumbs
- 1/4 cup grated Parmesan cheese
- 1 egg
- 2 cloves garlic, minced
- Salt and pepper, to taste
- 2 tablespoons olive oil
- 8 ounces mushrooms, sliced
- 1 cup heavy cream
- 1/2 cup chicken broth
- 1 teaspoon thyme
Instructions
- Prepare the meatball mixture: In a mixing bowl, combine the ground chicken, breadcrumbs, grated Parmesan cheese, egg, minced garlic, salt, and pepper. Use your hands to gently mix until everything is just combined.
- Shape the meatballs: Roll the mixture into golf ball-sized meatballs (about 1.5 inches in diameter). Place them on a plate or baking sheet.
- Brown the meatballs: In a large skillet, heat the olive oil over medium heat. Once hot, gently add the meatballs in batches, browning them on all sides for about 5-7 minutes.
- Cook the mushrooms: Once browned, remove the meatballs and set them aside. In the same skillet, add the sliced mushrooms and sauté for about 5 minutes or until tender.
- Make the sauce: Pour in the heavy cream and chicken broth, stir well with the mushrooms, and sprinkle in the thyme. Let it simmer for about 3-4 minutes until it thickens slightly.
- Bring it all together: Return the meatballs to the skillet, gently nestling them in the sauce. Cover and let simmer for an additional 10 minutes.
- Taste and season: Adjust the salt and pepper as needed and add fresh parsley or chives for extra flavor.
Notes
Serve over buttery mashed potatoes, creamy polenta, or whole wheat spaghetti. Pair with a crisp salad or roasted veggies.
Nutrition
- Serving Size: 1 serving
- Calories: 360
- Sugar: 5g
- Sodium: 600mg
- Fat: 25g
- Saturated Fat: 10g
- Unsaturated Fat: 10g
- Trans Fat: 0g
- Carbohydrates: 14g
- Fiber: 1g
- Protein: 25g
- Cholesterol: 90mg
Keywords: chicken meatballs, creamy sauce, comfort food, Italian recipe, easy dinner

Minute High-Protein Honey Garlic Shrimp for Meal Prep
High-Protein Honey Garlic Shrimp: A Delicious Adventure
Introduction
Hello, fellow food lovers! Buckle up your aprons because today we’re embarking on a culinary journey that’s about to transform your weeknight dinners—High-Protein Honey Garlic Shrimp! This dish is not just tantalizingly tasty; it’s also packed with protein, making it a guilt-free pleasure you’ll want to savor again and again.
Imagine a busy weekday evening. You’ve shuffled through the chaos of meetings, errands, and the inevitable “What’s for dinner?” disaster. You walk into your kitchen, and the thought of whipping up something delicious feels miles away. But wait! With just a handful of ingredients, you can bring the vibrant flavors of a great seafood restaurant right to your table.
This dish features juicy shrimp coated in a sweet and savory honey garlic sauce that’s simply irresistible! Not only is it quick to prepare—taking about 20-30 minutes—but it’s also extraordinarily versatile, allowing you to serve it with rice, quinoa, or fresh vegetables. Plus, it’s wonderful on its own or dressed up with your favorite sides.
And let’s not forget about the nutritional side of things! Shrimp is an excellent source of protein and packed with vitamins and minerals, making this dish not only scrumptious but also wholesome. Join me as we dive headfirst into this adventure in flavor!
Personal Story
Growing up in my family, seafood wasn’t just food; it was a celebration. I fondly remember the evenings spent by the ocean, the salty breeze wrapping around us as my parents cooked up shrimp on the grill while sharing stories and laughter. One evening, my dad decided to try his hand at making garlic shrimp with a touch of honey sauce—an experiment that turned into a family favorite.
We all waited eagerly as the sweet aroma drifted from the kitchen to the dining table—a combination of smoky garlic and a hint of sweetness dancing through the air. As the first bite melted in my mouth, I realized he’d created magic! That simple dish, full of flavor and nostalgia, became a staple in our household.
Fast forward to today, and I can’t tell you how happy it makes me to recreate that same happiness in my own kitchen, pasta parties instead replaced with meal prepping shrimp for the week ahead. Trust me, once you try this High-Protein Honey Garlic Shrimp, you’ll have your own memories to cherish for years to come!
Ingredients
To make this delectable dish, gather the following ingredients:
-
1 pound shrimp, peeled and deveined
Fresh shrimp provides the best flavor and texture. If you can’t find fresh, frozen shrimp works too! Just ensure to thaw it thoroughly before cooking. -
1/4 cup honey
Honey adds a lovely sweetness to balance the garlic. Adjust the quantity if you prefer a sweeter or less sweet flavor! -
3 cloves garlic, minced
Garlic is essential for that delightful aromatic quality. Feel free to use garlic powder in a pinch—just aim for about 1 teaspoon. -
2 tablespoons soy sauce
This adds the umami kick! You can swap in low-sodium soy sauce for a lighter option, or use tamari for a gluten-free alternative. -
1 tablespoon olive oil
Olive oil adds healthy fats and helps prevent shrimp from sticking to the pan. If you’re looking for a flavor twist, try sesame oil for an extra punch! -
Salt and pepper to taste
Seasoning is vital! Remember, you can always add more, but you can’t take it out once it’s in. -
Cooked rice or vegetables for serving
Serve this dish over your choice of rice, quinoa, or steamed veggies. It’s super versatile—play around to find your favorite combination!
Step-by-Step Instructions
Step 1: Preparing the Shrimp
Start by ensuring your shrimp is thawed, cleaned, and patted dry. The drier they are, the better they’ll sear. There’s nothing worse than steaming when you want a lovely golden crust! Chef tip: If your shrimp come with tails, consider leaving them on for presentation—makes it feel a bit fancier!
Step 2: Mixing the Sauce
In a small bowl, whisk together the honey, minced garlic, and soy sauce. This sauce is where the magic happens! Pro tip: If you like a bit of kick, add a pinch of red pepper flakes to the mix for a sweet and spicy finish.
Step 3: Heating the Pan
In a large skillet, heat the olive oil over medium-high heat. You want the oil hot but not smoking; too much heat can burn the garlic and give it a bitter flavor. Keep an eye on it! If your pan starts to smoke, turn it down a notch.
Step 4: Cooking the Shrimp
Add the shrimp to the skillet in a single layer. Let them cook for about 2-3 minutes without stirring to achieve that golden sear. You’ll know they’re ready to flip when they turn pink around the edges. Chef secret: Don’t overcrowd the pan! If you’re making a double batch, do it in two rounds.
Step 5: Adding the Sauce
Once the shrimp are beautifully seared, pour the honey garlic sauce over and toss to coat. Cook for another 1-2 minutes until the shrimp are fully cooked and the sauce has thickened slightly. Tip: The shrimp will continue cooking from residual heat, so take them off the stove as soon as they’re opaque.
Step 6: Seasoning
Taste your shrimp and season with salt and pepper if needed. You may not even need it with the soy sauce already in there! A little spritz of lemon juice at the end can elevate the flavors to another level—try it out!
Serving Suggestions
To serve, pile a generous portion of cooked rice or your favorite veggies on a plate and gently lay the honey garlic shrimp on top. Drizzle any extra sauce over the shrimp and garnish with sesame seeds or finely chopped green onions for a little extra flair! This presentation not only packs a flavor punch but also makes for an eye-catching meal!
Recipe Variations
-
Spicy Honey Garlic Shrimp: Add a splash of sriracha or a diced fresh chili to the sauce for an exciting kick!
-
Citrusy Twist: Squeeze some fresh lime juice into the sauce for a refreshing zing that compliments the sweetness of the honey.
-
Zucchini Noodles Option: Serve the honey garlic shrimp over spiralized zucchini noodles for a low-carb alternative!
-
Herb Infusion: Mix in some fresh basil or cilantro when serving to elevate the dish with vibrant herb flavors.
-
Sweet and Savory: Toss in some pineapple chunks when cooking the shrimp for a tropical, sweet addition!
Chef’s Notes
This High-Protein Honey Garlic Shrimp recipe has evolved over the years. Initially, I used to cook my shrimp in plain olive oil, but after my dad introduced me to the beauty of sauce-making, I couldn’t resist adding flavor layers. The sweetness of honey and the pungent garlic opened a whole new world of possibilities!
And let me tell you, there have been funny moments, too! One time, during a dinner party, I accidentally spilled half a bottle of honey into the pan, thinking I was using a different recipe! It turned into a sticky disaster but somehow turned out to be the favorite dish of the night—so, I guess accidents in the kitchen can be a blessing, right?
FAQs and Troubleshooting
1. How do I know when the shrimp are cooked?
Look for shrimp that have turned pink and opaque all the way through. They should curl up into a "C" shape. If they curl into an "O," they may be overcooked.
2. Can I use frozen shrimp?
Absolutely! Just make sure to thaw them completely and pat them dry before cooking. This ensures they sear nicely.
3. What sides pair well with honey garlic shrimp?
This dish is super versatile! Try it over fluffy rice, sautéed greens, or even a fresh salad for a balanced meal.
4. Why is my sauce too runny?
If your sauce isn’t thickening, try increasing the heat slightly and cooking for a bit longer. Alternatively, you can add a cornstarch-water slurry (1 tsp cornstarch mixed with 1 tsp water) to thicken it up quickly.
Nutritional Info (Optional)
While I haven’t included the specifics in our conversation, you can roughly estimate this serving to contain about 200 calories, with 22 grams of protein, 8 grams of carbs, and minimal fats if you stick to olive oil.
So there you have it—your go-to High-Protein Honey Garlic Shrimp recipe! Don’t forget to share your culinary experiences with me, and let’s keep the delicious vibes flowing. Happy cooking!
PrintHigh-Protein Honey Garlic Shrimp

A quick and delicious high-protein meal featuring shrimp coated in a sweet and savory honey garlic sauce.
- Prep Time: 10 minutes
- Cook Time: 10 minutes
- Total Time: 20 minutes
- Yield: 4 servings 1x
- Category: Main Course
- Method: Sautéing
- Cuisine: Seafood
- Diet: Gluten-Free
Ingredients
- 1 pound shrimp, peeled and deveined
- 1/4 cup honey
- 3 cloves garlic, minced
- 2 tablespoons soy sauce
- 1 tablespoon olive oil
- Salt and pepper to taste
- Cooked rice or vegetables for serving
Instructions
- Start by ensuring your shrimp is thawed, cleaned, and patted dry.
- In a small bowl, whisk together the honey, minced garlic, and soy sauce.
- In a large skillet, heat the olive oil over medium-high heat.
- Add the shrimp to the skillet in a single layer; let them cook for about 2-3 minutes without stirring.
- Once the shrimp are beautifully seared, pour the honey garlic sauce over and toss to coat.
- Taste your shrimp and season with salt and pepper if needed.
Notes
For an exciting kick, consider adding sriracha or diced chili to the sauce. A squeeze of fresh lemon juice at the end can elevate the flavors.
Nutrition
- Serving Size: 1 serving
- Calories: 200
- Sugar: 21g
- Sodium: 400mg
- Fat: 7g
- Saturated Fat: 1g
- Unsaturated Fat: 5g
- Trans Fat: 0g
- Carbohydrates: 9g
- Fiber: 0g
- Protein: 22g
- Cholesterol: 200mg
Keywords: shrimp, honey garlic, seafood, quick dinner, high-protein

Minute One-Serving Cottage Cheese Pancake (High-Protein)
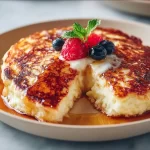
Easy Cottage Cheese Pancake for One
Welcome to Clean Plate Cravings! Today, we’re diving into something so simple yet oh-so-delicious: the Easy Cottage Cheese Pancake for One. If you’re like me and love breakfast that feels more like a hug than a chore, this dish is about to become your go-to. With just a handful of wholesome ingredients, you can whip up a fluffy pancake that’s packed with protein and flavor, satisfying both your morning cravings and your health goals. So, grab your mixing bowl and let’s get cooking!
A Fluffy Memory
I remember the first time I stumbled upon cottage cheese pancakes. I was in college, loaded with textbooks and energy drinks, trying to juggle classes and my part-time job. Cooking was often a hurried affair in my tiny kitchen, with little time for elaborate meals. One morning, rummaging through the fridge, I found a tub of cottage cheese that was about to expire. “Why not?” I thought. I mixed it up with some oats and an egg and threw it onto a hot skillet. The aroma that filled my kitchen was so enticing that I couldn’t help but take a moment to savor it. The first bite was a revelation! Fluffy, satisfying, and utterly delicious, these pancakes quickly became a staple in my breakfast rotation. They were budget-friendly, fueled my busy days, and even made me feel like a chef in my small little space. They’ve been a cherished part of my mornings ever since, and I’m thrilled to share this delight with you!
Ingredients
-
1/2 cup cottage cheese
A creamy base that adds protein and moisture to your pancakes. If you’re not a fan of cottage cheese, Greek yogurt can be a great substitute for a similar texture. -
1/2 cup oats
Rolled oats give these pancakes a hearty bite. For a gluten-free option, use certified gluten-free oats. If you’re looking for something different, you can blend the oats into oat flour for a smoother texture. -
1 egg
The egg binds everything together and adds richness. You can replace it with a flax egg (1 tablespoon ground flaxseed mixed with 2.5 tablespoons of water) for a vegan version. -
1/4 teaspoon baking powder
This little powerhouse helps your pancakes rise, making them light and fluffy. Don’t skip this step—it’s essential for the perfect pancake! -
Salt to taste
A pinch of salt enhances the flavors. Feel free to add a dash of cinnamon if you want to bring a warm spice element to your pancakes. -
Butter or oil for cooking
Whether you choose butter for that rich flavor or a bit of coconut oil for a subtle sweetness, both options work beautifully. Just make sure the skillet is hot enough so they don’t stick!
Step-by-Step Instructions
-
Mix the Batter
In a mixing bowl, combine the cottage cheese, oats, egg, baking powder, and salt. Use a fork to mash the cottage cheese slightly, blending all the ingredients together. You want everything to come together nicely, but it’s okay if the mixture isn’t completely smooth. Chef’s Tip: Don’t overmix; a few lumps are perfectly fine and will add to the texture of your pancake! -
Heat the Skillet
Place a non-stick skillet or frying pan over medium heat and add butter or oil as it heats up. Chef Hack: To test if your skillet is hot enough, sprinkle a few drops of water on the surface. If they sizzle and evaporate immediately, you’re ready to go! -
Cook the Pancake
Pour half of your batter into the skillet, using a spatula to gently spread it into a round shape. Cook for 2-3 minutes until the edges look set and you see bubbles forming on top. Chef Insight: If you find it hard to flip, let it cook a bit longer! Patience is key for the fluffiest pancake. -
Flip and Finish
Carefully flip the pancake using a spatula and cook for another 1-2 minutes on the other side until golden brown. It should feel springy to the touch! Repeat the process with the remaining batter. -
Serve
Once cooked, transfer your pancake(s) onto a plate and stack them high for an impressive presentation. Pro Tip: Top with fresh fruit, maple syrup, or a dollop of yogurt for added deliciousness!
Serving Suggestions
When it comes to serving your Easy Cottage Cheese Pancake, the sky’s the limit! I love topping mine with a mix of fresh blueberries and a drizzle of honey. You could also try a sprinkle of nuts for crunch or a dusting of powdered sugar for a sweet touch. Feel free to get creative—this pancake is a blank canvas waiting for your culinary artistry!
Recipe Variations
- Savory Twist: Add herbs and cheese (like feta or cheddar) to the batter for a savory pancake perfect for brunch.
- Sweet Surprise: Mix in a mashed banana or a splash of vanilla extract for a hint of sweetness.
- Spiced Up: Add a dash of cinnamon or nutmeg to the batter to warm up those flavors.
- Pumpkin Spice: Use canned pumpkin puree in place of some of the cottage cheese for a seasonal touch.
- Chocolate Lovers: Fold in some dark chocolate chips while cooking for a special treat.
Chef’s Notes
These cottage cheese pancakes have been a kitchen staple for years! I can’t even count how many variations I’ve tried—some were epic fails, like the time I accidentally used expired cottage cheese (yikes!). But even those mishaps taught me to embrace the kitchen adventure. What I love most about these pancakes is their versatility; they adapt beautifully to whatever ingredients you have on hand. So don’t hesitate to experiment and make this recipe your own!
FAQs and Troubleshooting
-
Why are my pancakes sticking to the pan?
Make sure your skillet is adequately greased and hot before you pour in the batter. If you’re using a cast-iron skillet, preheat it well and season it properly for the best results. -
My pancakes are too dense. What did I do wrong?
This could be due to overmixing the batter or not enough baking powder. Give it a little stir, ensuring a few lumps remain, and check your baking powder’s freshness! -
Can I make the batter ahead of time?
Yes! You can prep it the night before and store it in the fridge. Just give it a quick stir before cooking to reintegrate everything. -
How can I make these pancakes sweeter?
If you prefer a sweeter pancake, add a tablespoon of honey or maple syrup to the batter, or top with your favorite syrup or sweet spread.
Nutritional Info
This Easy Cottage Cheese Pancake is not only delicious but also packed with nutrients! Depending on specific brands and measurements, one pancake contains approximately:
- Calories: 200
- Protein: 15g
- Carbohydrates: 20g
- Fat: 7g
- Fiber: 3g
Conclusion
There you have it! A delightful, easy recipe for Cottage Cheese Pancakes that’s perfect for a quick breakfast or a leisurely brunch. With every bite, you’ll experience a blend of hearty oats and creamy cottage cheese, making your mornings that much brighter. So why wait? Gather your ingredients and treat yourself to a delicious pancake experience today. Happy cooking, and let’s keep it fresh, simple, and seriously delicious!
PrintEasy Cottage Cheese Pancake for One
A fluffy and protein-packed pancake made with cottage cheese and oats, perfect for a quick breakfast.
- Prep Time: 5 minutes
- Cook Time: 5 minutes
- Total Time: 10 minutes
- Yield: 1 serving 1x
- Category: Breakfast
- Method: Cooking
- Cuisine: American
- Diet: Vegetarian
Ingredients
- 1/2 cup cottage cheese
- 1/2 cup oats
- 1 egg
- 1/4 teaspoon baking powder
- Salt to taste
- Butter or oil for cooking
Instructions
- Mix the Batter: In a mixing bowl, combine the cottage cheese, oats, egg, baking powder, and salt. Use a fork to mash the cottage cheese slightly, blending all the ingredients together.
- Heat the Skillet: Place a non-stick skillet over medium heat and add butter or oil as it heats up.
- Cook the Pancake: Pour half of your batter into the skillet and gently spread it into a round shape. Cook for 2-3 minutes until the edges look set and bubbles form on top.
- Flip and Finish: Carefully flip the pancake and cook for another 1-2 minutes until golden brown. Repeat with the remaining batter.
- Serve: Transfer your pancake(s) onto a plate and stack them high. Top with fresh fruit, syrup, or yogurt.
Notes
Feel free to experiment with different toppings and mix-ins for a personalized pancake experience.
Nutrition
- Serving Size: 1 pancake
- Calories: 200
- Sugar: 3g
- Sodium: 200mg
- Fat: 7g
- Saturated Fat: 2g
- Unsaturated Fat: 5g
- Trans Fat: 0g
- Carbohydrates: 20g
- Fiber: 3g
- Protein: 15g
- Cholesterol: 130mg
Keywords: pancakes, cottage cheese, breakfast, easy recipe, healthy pancakes

Keto Chocolate Avocado-Chia Pudding: 5-Min No-Bake Recipe
Keto Chocolate Chia Avocado Pudding: A Guilt-Free Indulgence
Welcome, fellow foodies! Today, I’m thrilled to share a scrumptious and indulgent dessert that doesn’t compromise on flavor or nutritional value—Keto Chocolate Chia Avocado Pudding! This dessert is not only delicious, but it’s also packed with healthy fats, fiber, and antioxidants. Plus, it’s super easy to whip up, making it the perfect treat for busy days when you want something sweet without the carbs. Trust me; you’re going to love this!
As someone who believes that eating well should never feel like a chore or restriction, I love to create desserts that fit seamlessly into a healthier lifestyle while still being incredibly tasty. Every spoonful of this rich, creamy pudding will make you feel like you’re indulging in something naughty, when in fact, it’s the complete opposite! Plus, it’s keto-friendly, so if you’re on that low-carb journey or simply looking for a deliciously different dessert, keep reading!
A Sweet Memory
I remember the first time I tried avocado in a dessert. I was attending a friend’s dinner party, and there it was: an elegant chocolate mousse made with ripe avocados. At first, I was skeptical. How could something so creamy and delicious be good for me? But when my friend pressed a spoonful into my hand, I couldn’t resist. One bite, and I was captivated! The rich chocolate flavor paired with the creamy texture of avocado had me hooked.
From that moment on, I started experimenting in my own kitchen, and that’s how this Keto Chocolate Chia Avocado Pudding was born! It’s become a staple in my dessert repertoire, and every time I make it, I think back to that night and the joy of discovering that healthy desserts can actually taste amazing. Whether you’re serving it to guests or just treating yourself after a long day, this pudding is bound to impress.
Ingredients
Here’s what you’ll need for this delicious pudding:
-
1 ripe avocado: The star of the show! Ripe avocados provide the creamy base for our pudding, full of healthy fats and nutrients. If you’re out of avocados, you can substitute with silken tofu for a similar texture but with a different flavor profile.
-
1/4 cup unsweetened cocoa powder: This gives our pudding that rich chocolate flavor. Make sure you use unsweetened to keep it keto-friendly. If you prefer a sweeter taste, you can choose a high-quality dark cocoa powder.
-
1/4 cup chia seeds: These little gems are a fantastic source of fiber and help thicken the pudding. If you don’t have chia seeds on hand, ground flaxseed can be a good substitute, though it might alter the texture a bit.
-
1/4 cup almond milk (or coconut milk): This adds creaminess and helps blend everything smoothly. If you’re nut-free, opt for oat milk or another dairy-free milk of your choice.
-
2 tablespoons sweetener (like erythritol or stevia, to taste): Sweeten to your liking! If you’re not concerned about Keto or low-sugar, you could use honey or maple syrup, but keep in mind this will change the carb content.
-
1 teaspoon vanilla extract: A touch of vanilla elevates the flavors and adds a lovely aroma. If you like a hint of spice, consider adding a sprinkle of cinnamon or even a drop of peppermint extract for a refreshing twist.
-
Pinch of salt: Balancing sweet and savory is key! A little pinch enhances all the flavors without making it taste salty.
Step-by-Step Instructions
-
Prepare Your Avocado: Start by slicing your ripe avocado in half. Gently remove the pit and scoop the creamy flesh into a food processor or a mixing bowl. Make sure to choose a perfectly ripe avocado; it should be slightly soft to the touch but not overly mushy.
Chef’s Tip: To tell if an avocado is ripe, gently press on the skin. If it yields slightly, you’re good to go!
-
Blend Ingredients: Add the unsweetened cocoa powder, chia seeds, almond milk, sweetener, vanilla extract, and a pinch of salt to the avocado. If you’re using a food processor, secure the lid and blend until smooth and creamy. If you’re using a bowl, grab a whisk or hand mixer to blend it to perfection.
Chef’s Hack: Scrape down the sides of your bowl or processor to ensure all ingredients are combined evenly. You want a silky, velvety texture!
-
Taste and Adjust: Once blended, take a quick taste to see if it needs more sweetness or vanilla. Feel free to adjust the flavors as per your preference—this is your pudding after all!
-
Chill & Set: Transfer the pudding into individual serving bowls or one large dish. Cover with plastic wrap (press the wrap directly onto the surface to prevent a skin from forming). Pop it into the fridge for at least 30 minutes to allow the chia seeds to absorb the liquids and thicken the pudding.
-
Serve: After it’s chilled, give it a quick stir. If you’d like a thinner consistency, you can blend in a splash more of your almond or coconut milk.
Chef’s Note: For the ultimate chocolate experience, sprinkle additional cocoa powder on top before serving!
Serving Suggestions
When it comes to serving, the presentation can elevate this simple pudding into something extraordinary! Consider adding a dollop of whipped coconut cream or a few fresh berries on top. You could also garnish it with chocolate shavings or a sprinkle of crushed nuts for a nice crunch. The contrast of the creamy pudding with some textural elements really gives this dessert a wow factor.
Recipe Variations
Here are a few fun variations to take your Keto Chocolate Chia Avocado Pudding to the next level:
-
Peanut Butter Swirl: Add a tablespoon of natural peanut butter or almond butter into the mix before blending to create a deliciously nutty flavor.
-
Mint Chocolate: Add a few drops of peppermint extract for a refreshing twist, making it reminiscent of a thin mint cookie.
-
Caffeinated Kick: Mix in a teaspoon of instant espresso or coffee powder for a mocha delight!
-
Berry Bliss: Top with fresh raspberries or strawberries to give a fruity touch that pairs beautifully with chocolate.
Chef’s Notes
This recipe has evolved over the years as I’ve experimented with ingredients and flavors. Occasionally, I like to throw in a handful of spinach for a nutritional boost—even though you can’t taste it, you’re getting all those extra vitamins! Just keep in mind that the color will change to a light green, but it still looks and tastes amazing.
Sometimes, I’ve even swapped out the chia seeds for rolled oats for a different texture! Each time I make it, I’m reminded of that dinner party where my love for avocado desserts began—a perfect full-circle moment!
FAQs and Troubleshooting
1. What if my pudding isn’t thick enough?
If your pudding didn’t thicken up, it might need more time in the fridge. Let it chill for an additional 15-30 minutes, and the chia seeds will help thicken it up. Also, make sure you used enough chia seeds during the initial prep.
2. Can I make it ahead of time?
Absolutely! This pudding is perfect for meal prep. You can store it in the fridge for up to three days, so feel free to double the recipe for quick, healthy desserts throughout the week.
3. Can I use dairy milk instead of almond or coconut milk?
Yes, if you’re not dairy-free, whole milk or heavy cream can substitute for almond milk. Just keep in mind that this will change the nutritional content.
4. How do I store leftovers?
Keep any leftover pudding in an airtight container in the fridge for up to three days. You may notice the chia seeds may swell slightly, but it’ll still taste divine!
Nutritional Info
This Keto Chocolate Chia Avocado Pudding is rich in healthy fats, fiber, and low in carbs, making it an ideal dessert choice for any health-conscious foodie.
- Calories: Approximately 200 per serving
- Fat: 15g
- Carbohydrates: 10g (Net Carbs: 5g)
- Protein: 3g
- Fiber: 7g
With all that said, I hope you give this delicious Keto Chocolate Chia Avocado Pudding a try! It’s a fun, guilt-free indulgence that will satisfy your chocolate cravings without any of the guilt. Remember, great food doesn’t just nourish our bodies; it also brings joy to our lives. Enjoy this delightful treat and happy cooking!
PrintKeto Chocolate Chia Avocado Pudding

A scrumptious and indulgent keto-friendly dessert that combines avocado, chocolate, and chia seeds for a creamy pudding that’s low in carbs and packed with healthy fats.
- Prep Time: 10 minutes
- Cook Time: 0 minutes
- Total Time: 40 minutes
- Yield: 4 servings 1x
- Category: Dessert
- Method: Blending
- Cuisine: Keto
- Diet: Keto
Ingredients
- 1 ripe avocado
- 1/4 cup unsweetened cocoa powder
- 1/4 cup chia seeds
- 1/4 cup almond milk (or coconut milk)
- 2 tablespoons sweetener (like erythritol or stevia, to taste)
- 1 teaspoon vanilla extract
- Pinch of salt
Instructions
- Prepare your avocado: Start by slicing your ripe avocado in half and removing the pit. Scoop the flesh into a food processor or mixing bowl.
- Blend ingredients: Add cocoa powder, chia seeds, almond milk, sweetener, vanilla extract, and salt to the avocado. Blend until smooth.
- Taste and adjust: Check if it needs more sweetness or vanilla, and adjust to your liking.
- Chill & set: Transfer pudding into serving bowls, cover, and refrigerate for at least 30 minutes.
- Serve: After chilling, stir and adjust consistency with more liquid if desired.
Notes
For extra flavor, consider adding toppings like whipped coconut cream or fresh berries. You can also mix in peanut butter, mint extract, or coffee powder for variations.
Nutrition
- Serving Size: 1 serving
- Calories: 200
- Sugar: 1g
- Sodium: 5mg
- Fat: 15g
- Saturated Fat: 2g
- Unsaturated Fat: 10g
- Trans Fat: 0g
- Carbohydrates: 10g
- Fiber: 7g
- Protein: 3g
- Cholesterol: 0mg
Keywords: keto dessert, chocolate pudding, avocado pudding, low carb dessert, healthy dessert

High-Protein Cinnamon Roll Muffins for Busy Mornings
Protein-Packed Cinnamon Roll Muffins
Welcome back, food lovers! I’m thrilled you’re here with me today in the kitchen, where we’re on a mission to enjoy delicious and wholesome food that fuels us right. Let’s talk about a guilty pleasure that we’re turning into a wholesome treat: cinnamon rolls. Picture this—warm, gooey, and loaded with that irresistible cinnamon flavor. Now, let’s kick it up a notch with a protein-packed twist that makes these treats a perfect breakfast or snack option. Yes, I’m talking about Protein-Packed Cinnamon Roll Muffins!
These muffins are not only tasty, but they also pack a nutritious punch that will keep you feeling satisfied and energized throughout your day. Whether you’re heading to work, gearing up for a workout, or just need a little something sweet to make your morning shine, these muffins will check all your boxes. Plus, they’re super easy to whip up!
In this post, we’ll combine wholesome ingredients to create delicious muffins without compromising flavor. I can’t wait to share my memories, tips, and even a few sneaky kitchen secrets to help you craft the perfect batch of these delightful goodies. So grab your aprons, and let’s get baking!
A Sweet Memory
Whenever I think of cinnamon rolls, I can’t help but be transported back to my childhood kitchen, where the smell of freshly baked goods wafted through the house on cozy Sunday mornings. My mom had a unique ability to turn our kitchen into an aroma-filled wonderland of spices and sweetness. One of my fondest memories involves her recipe for cinnamon rolls, which required an absurd amount of butter and sugar—but boy, were they delicious!
I remember eagerly waiting by the oven, my mouth watering as I counted down the seconds until we could devour those fluffy rolls, slathered in a rich cream cheese frosting. As I grew older, though, I started to realize that maybe I should swap out some of that sugar and butter for healthier options—while still retaining that amazing flavor I loved so much. That’s when the inspiration for these Protein-Packed Cinnamon Roll Muffins hit me. They combine nostalgia with health in a way that feels just as good to make as it does to eat.
Now, let’s jump into the ingredients that will help us bring these muffins to life!
Ingredients
-
1 cup whole wheat flour
A fantastic source of fiber and nutrients, whole wheat flour is the backbone of this recipe. It provides that hearty base while keeping the muffins light and fluffy. If you’re in a pinch, you can substitute with all-purpose flour, but you’ll lose some of the nutritional benefits. -
1 cup rolled oats
These little gems contribute a delightful chewiness and even more fiber. They also work great as a natural thickener. If you don’t have rolled oats, quick oats can work too, though they may yield a slightly different texture. -
1/2 cup protein powder
This is where we get our protein boost! You can use your favorite protein powder—whey, plant-based, or any other kind will work. Just be mindful that flavored protein powders may alter the taste, so go for unflavored if you want to keep the cinnamon flavor front and center! -
1/4 cup coconut sugar
Coconut sugar is a natural sweetener that has a lower glycemic index than regular sugar. It’s a wonderful alternative that adds a subtle caramel note to your muffins. If you don’t have coconut sugar, you can swap it for brown sugar—just keep the sweetness in check to your liking. -
2 teaspoons baking powder
This leavening agent gives our muffins that perfect rise, making them fluffy and light. Ensure it’s fresh for the best results! -
1 teaspoon cinnamon
Because what’s a cinnamon roll without cinnamon? This spice adds warmth and sweetness. You can also experiment with adding nutmeg or cardamom for a twist! -
1/2 teaspoon salt
Trust me, this tiny ingredient is key! It enhances the flavors and balances the sweetness of the muffins. -
1 cup unsweetened almond milk
A dairy-free option that keeps these muffins moist and adds a lovely creamy texture. You can replace it with your favorite milk (dairy or non-dairy) if needed. -
1/4 cup unsweetened applesauce
Applesauce helps to keep our muffins moist and fluffy while adding a touch of natural sweetness. It’s a great egg substitute too; if you’re vegan, you can ditch the egg and use a bit more applesauce! -
1 large egg
This helps bind all our ingredients together. If you’re going for a vegan option, just replace it with an extra 1/4 cup of applesauce or a flax egg. -
1 teaspoon vanilla extract
Vanilla extract enhances the overall flavor profile and adds a cozy warmth to our muffins. Always go for pure vanilla extract if you can! -
Optional: Cream cheese frosting
For those of you who want to indulge a little more! A simple mix of cream cheese, powdered sugar, and vanilla extract makes for a dreamy topping. Substitute with Greek yogurt and honey for a lighter version, if desired.
Step-by-Step Instructions
Step 1: Preheat the Oven
Let’s kick things off by preheating your oven to 350°F (175°C). This is crucial for getting those muffins perfectly fluffy. Grab your muffin tin and line it with paper liners or spray it with a bit of non-stick cooking spray. This way, our delicious muffins won’t cling to the pan!
Step 2: Mix the Dry Ingredients
In a large mixing bowl, combine whole wheat flour, rolled oats, protein powder, baking powder, cinnamon, and salt. Whisk them together until well mixed. I always say, the key to fluffy muffins starts with blending those dry ingredients! Plus, the aromatic scent of cinnamon will fill your kitchen, and trust me, that’s a win!
Step 3: Combine the Wet Ingredients
In another bowl, mix almond milk, applesauce, egg, and vanilla extract. Whisk until well combined, and it should have a lovely creamy consistency. Here’s a little chef hack: When mixing wet ingredients, crack your egg directly into the liquid. This way, you can avoid any shell pieces making it into the bowl!
Step 4: Bring it All Together
Now, pour the wet ingredients into the bowl with the dry ingredients, and gently fold them together. Be careful not to overmix—just until everything is combined. A few lumps are totally okay! Overmixing can lead to tough muffins, and we want them to be fluffy and tender.
Step 5: Fill the Muffin Tin
Using a spoon or ice cream scoop, evenly distribute the batter into the prepared muffin tin. This should make about 12 muffins. A little tip: If you want that bakery-style dome on top, fill the cups just above the rim!
Step 6: Bake to Perfection
Pop those beauties into your preheated oven and bake for about 18-20 minutes, or until a toothpick comes out clean. Keep an eye on them towards the end—every oven is a little different! As they bake, the aroma will swirl through your home and may just lure the family into the kitchen!
Step 7: Cool and Frost
Once baked, remove the muffins from the oven and allow them to cool in the tin for about 5-10 minutes before transferring them to a wire rack. If you’re opting for that delicious cream cheese frosting, now is the time to whip it up! Just mix together the cream cheese, powdered sugar, and vanilla until smooth, and then drizzle a little on top of each muffin.
Serving Suggestions
These Protein-Packed Cinnamon Roll Muffins are delightful served warm, fresh from the oven. Pair them with a sprinkle of nuts, a dollop of yogurt, or even a fresh cup of coffee for your perfect breakfast combo. You could also prepare them in advance and simply warm them up when you’re ready to enjoy. Store them in an airtight container for up to a week, or freeze them for a quick grab-and-go snack!
Recipe Variations
-
Chocolate Chip Delight: Mix in some dark chocolate chips for a sweet twist. Who says you can’t have dessert for breakfast?
-
Nutty Banana Swirl: Fold in some mashed bananas for a banana bread twist! It adds moisture and natural sweetness.
-
Apple Cinnamon: Dice up some fresh apples and toss them into the batter for added texture and flavor.
-
Pumpkin Spice: For a seasonal treat, swap in some pumpkin puree and a pinch of nutmeg for a fall-inspired muffin.
-
Gluten-Free Option: Substitute whole wheat flour with a gluten-free all-purpose blend. Just make sure it contains xanthan gum for the right consistency!
Chef’s Notes
Cooking is all about experimenting, and this recipe is no exception! Over the years, I’ve played around with different ingredients, from various types of sweeteners to dairy alternatives. I found that sticking to wholesome, real ingredients not only made my muffins healthier but also incredibly fulfilling.
One fun story involves a baking mishap where I accidentally used baking soda instead of baking powder. Let’s just say my muffins were more like hockey pucks that day! But hey, that’s the beauty of cooking—you learn through every experience.
FAQs and Troubleshooting
Q: Why are my muffins dense?
A: Dense muffins can result from overmixing or too much flour. Make sure to fold gently and measure your ingredients accurately!
Q: Can I make these muffins ahead of time?
A: Absolutely! These muffins store well in an airtight container for up to a week. You can also freeze them for a quick treat whenever you need.
Q: How do I know when my muffins are done baking?
A: Insert a toothpick in the center—if it comes out clean or with a few crumbs, they are ready! If it comes out wet, give them a few more minutes in the oven.
Q: Can I substitute the protein powder with something else?
A: If you’re not a fan of protein powder, consider adding extra oats or flour, though it may change the texture slightly.
Nutritional Info
These muffins are a wholesome option packed with protein, fiber, and essential nutrients. Just one muffin offers a balance of macronutrients that will keep you fueled and satisfied throughout your mornings.
So, are you ready to indulge in some cinnamon goodness without the guilt? Make these Protein-Packed Cinnamon Roll Muffins today, and let them inspire your kitchen adventures! Remember, cooking is all about joy, creativity, and flavor—so have fun, and enjoy every bite! Happy baking, my friends!
PrintProtein-Packed Cinnamon Roll Muffins
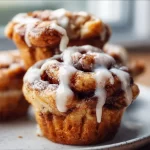
Delicious, wholesome muffins packed with protein and irresistible cinnamon flavor, perfect for breakfast or a snack.
- Prep Time: 15 minutes
- Cook Time: 20 minutes
- Total Time: 35 minutes
- Yield: 12 muffins 1x
- Category: Breakfast
- Method: Baking
- Cuisine: American
- Diet: Vegetarian
Ingredients
- 1 cup whole wheat flour
- 1 cup rolled oats
- 1/2 cup protein powder
- 1/4 cup coconut sugar
- 2 teaspoons baking powder
- 1 teaspoon cinnamon
- 1/2 teaspoon salt
- 1 cup unsweetened almond milk
- 1/4 cup unsweetened applesauce
- 1 large egg
- 1 teaspoon vanilla extract
- Optional: Cream cheese frosting
Instructions
- Preheat the oven to 350°F (175°C).
- Mix the dry ingredients in a bowl: whole wheat flour, rolled oats, protein powder, baking powder, cinnamon, and salt.
- Combine the wet ingredients in another bowl: almond milk, applesauce, egg, and vanilla extract.
- Bring the wet ingredients into the dry ingredients, folding gently until just combined.
- Fill a lined muffin tin with batter.
- Bake for 18-20 minutes or until a toothpick comes out clean.
- Cool the muffins for 5-10 minutes before transferring to a wire rack and optionally frost with cream cheese frosting.
Notes
Store muffins in an airtight container for up to a week or freeze for later.
Nutrition
- Serving Size: 1 muffin
- Calories: 180
- Sugar: 6g
- Sodium: 200mg
- Fat: 4g
- Saturated Fat: 1g
- Unsaturated Fat: 3g
- Trans Fat: 0g
- Carbohydrates: 30g
- Fiber: 5g
- Protein: 7g
- Cholesterol: 30mg
Keywords: cinnamon rolls, muffins, breakfast, healthy, protein-packed, baking

Minute Coconut Chia Pudding Recipe (Raffaello Flavor)
The Ultimate Easy Coconut Chia Pudding Recipe (Coconut Raffaello)
Welcome back, food lovers! Today, I’m thrilled to share one of my absolute favorite recipes—a creamy, dreamy Coconut Chia Pudding that’s inspired by the delightful flavors of Raffaello coconut candies. This dessert not only delights your taste buds but is also packed with nourishing ingredients that will leave you feeling energized and satisfied. Let’s dig in!
Introduction
Now, who doesn’t love a simple, satisfying dessert that tastes like a tropical vacation? There’s something about the sweet, nutty flavor of coconut combined with the simplistic charm of chia pudding that strikes a nostalgic chord for many of us.
Growing up, I remember my family indulging in coconut treats during the summer, each bite reminiscent of sunny beach days and carefree laughter. Coconut Chia Pudding brings me back to those moments, with the added bonus of being a healthy alternative to traditional desserts. It’s made with real, wholesome ingredients that are easy to find and even easier to prepare.
I know many of you are navigating a busy life and might feel challenged when it comes to preparing healthier meals. That’s where this recipe comes in! This Coconut Raffaello Chia Pudding is not only a guilt-free treat but also an incredibly adaptable one. Whether you prefer it for breakfast, as a snack, or even a dessert, you’ll find that it fits perfectly in your day-to-day routine.
With just a handful of ingredients and minimal prep time, this recipe is designed to reduce your stress in the kitchen while delivering maximum flavor. Are you ready to impress your friends and family with this delightful dish that’s sure to bring smiles and satisfaction all around? Let’s get cooking!
Personal Story
Let me share a little background story that embodies my love for coconut desserts. A few summers ago, I packed my bags for a tropical getaway with friends. One afternoon, we found ourselves in a charming little café on the beach, where I first tasted a homemade coconut dessert that would make me swoon. Picture this: a bowl of creamy coconut pudding topped with fresh mango slices and a sprinkle of toasted coconut!
I was instantly hooked. It was light, refreshing, and perfectly sweet—the ideal treat after a day soaking up the sun. As I savored each bite, I knew I had to recreate this experience in my own kitchen. Thus began my journey to perfect homemade coconut desserts.
Fast forward to today, and here we are with this Coconut Chia Pudding recipe. It’s quick and easy to make, allowing you to recreate that beachy bliss any time you please!
Ingredients
Let’s break down the ingredients needed for this delightful Coconut Chia Pudding:
-
3 tbsp oats
Oats add heartiness and fiber to your pudding. If you need a gluten-free option, replace them with gluten-free oats or skip them entirely for a smoother texture! -
4 tbsp shredded coconut
Choose unsweetened shredded coconut for a more authentic taste. Feel free to toast it lightly in a pan for added flavor! -
1 tbsp chia seeds
Chia seeds are little powerhouses of nutrition, packed with omega-3 fatty acids. If you’re not a fan, try flaxseeds as a substitute! -
2 tbsp honey
Honey adds a touch of natural sweetness. If you prefer, agave syrup or maple syrup work wonderfully too! -
2 tbsp Greek yogurt
Greek yogurt brings a creamy texture and a protein boost. You can replace it with a non-dairy yogurt if you’re going plant-based. -
1 tsp vanilla extract
Vanilla extract enhances the overall flavor of the pudding. For a little twist, try almond extract or coconut extract instead! -
1 cup milk
Use any milk of your choice—almond, coconut, or dairy! The milk offers a creamy base for the pudding; opt for full-fat for extra richness or a lower-fat version if you’d like.
Step-by-Step Instructions
Alright, let’s get our cook on! Here’s how to whip up this Coconut Chia Pudding in no time:
-
Gather Your Ingredients: Make sure you’ve got everything out and ready. This will make the process much smoother.
-
Mix the Dry Ingredients: In a medium-sized bowl, combine the oats, shredded coconut, and chia seeds. Give them a good stir to mix everything together. This is where the magic begins!
-
Create the Wet Mixture: In a separate bowl, whisk together the honey, Greek yogurt, vanilla extract, and milk until smooth. Watch as the creamy yogurt blends harmoniously with the milk, creating a dreamy base.
-
Combine: Pour the wet mixture into the dry ingredients. Stir well until everything is well combined. The chia seeds will start to absorb liquid, thickening the mixture as you let it sit.
-
Chill Time: Transfer your mixture to a jar or individual serving cups, cover, and refrigerate for at least two hours or overnight if you can wait! This is when the chia seeds do their magic and turn your mixture into a luscious pudding.
-
Enjoy the Transformation: Once it’s set, give it a good stir, and you’ll see it gains a delightful pudding-like consistency. Dive in with a spoon, and you’re all set!
Serving Suggestions
To serve this delightful Coconut Chia Pudding, you can layer it in cute glasses for an elegant touch. Top with additional shredded coconut, a sprinkle of cocoa nibs, or fresh fruit like berries or mango slices for a gorgeous finish. It’s not just about taste but also presentation—because we eat with our eyes first!
Recipe Variations
Here are a few fun ways to switch it up and keep things exciting:
-
Chocolate Coconut Chia Pudding: Add a tablespoon of cocoa powder to the wet mixture for a chocolate twist. You can even add a few chocolate chips on top!
-
Tropical Fruit Medley: Layer with chopped tropical fruits like pineapple, papaya, or kiwi for that ultimate beach vibe.
-
Nutty Delight: Stir in a tablespoon of almond or peanut butter before letting the pudding set for a nutty flavor.
-
Spiced Option: Add a pinch of cinnamon or nutmeg to the mixture for a warm, cozy feel.
-
Alternative Sweeteners: Try using date syrup or stevia for sweetness if you’re on a low-sugar kick.
Chef’s Notes
I’ve come a long way in my culinary journey, and this Coconut Chia Pudding is a testament to my philosophy of simplicity and flavor. One funny story I have relates to my earlier attempts at making chia pudding. I eagerly made a large batch, thinking a day of soaking would do the trick. But I got busy and ended up leaving it for two days. Let me tell you, the consistency was nothing short of a science experiment! I couldn’t have imagined that the little seeds would absorb so much liquid!
But with each experiment, I learned: patience is key, and perfection comes with practice. Now, I have my foolproof method that never fails. And honestly, it still astonishes me how something so simple can be so delicious!
FAQs and Troubleshooting
1. My chia pudding isn’t thickening as expected! What went wrong?
Chia seeds need enough liquid and time to fully absorb it. Make sure you’re using a good ratio of chia seeds to liquid and refrigerate long enough. If it’s taking too long, try adding a bit more chia seeds and let it sit longer.
2. Can I make this vegan?
Absolutely! Simply swap Greek yogurt with a plant-based yogurt, and use maple syrup or agave as your sweetener. Use almond milk or coconut milk for a truly decadent vegan treat.
3. How long can I store leftovers?
Your Coconut Chia Pudding will last up to 5 days in the fridge, making it a perfect meal prep option for busy weekdays!
4. Can I eat chia pudding daily? Is it healthy?
Yes! Chia seeds are packed with fiber, omega-3s, and antioxidants. Just be mindful of the added sweeteners and toppings to keep it balanced.
Nutritional Info
For those curious about the nutritional aspect, each serving of this delightful Coconut Chia Pudding gives you a hearty dose of fiber, healthy fats, and protein. Perfect for keeping you fueled throughout the day!
There you have it! An easy, delicious Coconut Chia Pudding that’s not just a treat but a celebration of simple ingredients and joyful cooking. So, gather your ingredients, make a batch, and enjoy that flavorful tropical bliss right at home. Happy cooking, my friends!
PrintUltimate Easy Coconut Chia Pudding
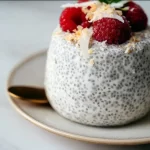
A creamy, dreamy Coconut Chia Pudding inspired by Raffaello coconut candies, perfect for any time of the day.
- Prep Time: 10 minutes
- Cook Time: 0 minutes
- Total Time: 120 minutes
- Yield: 2 servings 1x
- Category: Dessert
- Method: Chilling
- Cuisine: Tropical
- Diet: Vegan
Ingredients
- 3 tbsp oats
- 4 tbsp shredded coconut
- 1 tbsp chia seeds
- 2 tbsp honey
- 2 tbsp Greek yogurt
- 1 tsp vanilla extract
- 1 cup milk
Instructions
- Gather your ingredients: Make sure you’ve got everything out and ready.
- Mix the dry ingredients: In a medium-sized bowl, combine the oats, shredded coconut, and chia seeds.
- Create the wet mixture: In a separate bowl, whisk together the honey, Greek yogurt, vanilla extract, and milk until smooth.
- Combine: Pour the wet mixture into the dry ingredients and stir well.
- Chill Time: Transfer your mixture to a jar, cover, and refrigerate for at least two hours or overnight.
- Enjoy the transformation: Once set, give it a good stir, and dive in with a spoon!
Notes
Serve layered in glasses with additional toppings like fruit or cocoa nibs for added elegance.
Nutrition
- Serving Size: 1 serving
- Calories: 250
- Sugar: 10g
- Sodium: 50mg
- Fat: 10g
- Saturated Fat: 5g
- Unsaturated Fat: 4g
- Trans Fat: 0g
- Carbohydrates: 30g
- Fiber: 8g
- Protein: 6g
- Cholesterol: 5mg
Keywords: coconut, chia pudding, healthy dessert, tropical treat, vegan dessert